Agility Blues Help · Agility Blues is a program that helps you design agility courses. The program...
70
Agility Blues is a program that helps you design agility courses. The program has many useful functions for quick and easy course design. Possibilities include: Design: • Design in colour for clarity • Adjustable obstacle dimensions • Moving and rotating obstacles using mouse or keyboard, individually or as a group • Adjustable, smooth route lines, showing distances between obstacles • Obstacles can be grouped into combinations • Buttons at the ends of the obstacles to help position the obstacles • Tunnels can be shaped freely • More than one set of obstacles can be defined, for example to meet different regulations, different obstacle sets, etc. • Exact positioning of obstacles, the coordinates can be entered by hand • Opening and altering more than one course at the same time Printing • Prints more than one course per page, divided into a variable number of rows and or columns • Prints courses portrait or landscape • Various colour schemes for printing in black/white, grey tones or colour Management • Creating course templates. The templates consist of fixed course elements and form the basis for every new course. • Importing from AGL-files • The possibility to fill in a course description improves the clarity of an extensive course library • Course previews to select courses.
Transcript of Agility Blues Help · Agility Blues is a program that helps you design agility courses. The program...

Agility Blues is a program that helps you design agility courses. The program has many useful functions for quick and easy course design. Possibilities include: Design:
• Design in colour for clarity • Adjustable obstacle dimensions • Moving and rotating obstacles using mouse or keyboard, individually or as a group • Adjustable, smooth route lines, showing distances between obstacles • Obstacles can be grouped into combinations • Buttons at the ends of the obstacles to help position the obstacles • Tunnels can be shaped freely • More than one set of obstacles can be defined, for example to meet different regulations,
different obstacle sets, etc. • Exact positioning of obstacles, the coordinates can be entered by hand • Opening and altering more than one course at the same time
Printing
• Prints more than one course per page, divided into a variable number of rows and or columns • Prints courses portrait or landscape • Various colour schemes for printing in black/white, grey tones or colour
Management
• Creating course templates. The templates consist of fixed course elements and form the basis for every new course.
• Importing from AGL-files • The possibility to fill in a course description improves the clarity of an extensive course library • Course previews to select courses.

Program window
Screen elements top down Menu bar
1. Button bar. The button bar has two parts: standard tool buttons and obstacle buttons. The tool buttons are for commands such as ‘Save’, ‘Print’, etc. The obstacle buttons are used to place obstacles in the course.
2. Course window. This window contains the course. Several course windows can be opened simultaneously. The menu and button bar functions apply to the active course window.
3. Course buttons. This buttons on this bar on the right side of the screen have various functions applying to the obstacles in the active course
4. Status bar This bar gives information about the active course. For example here you will find the location of the mouse pointer on the course, the name of the obstacle under the mouse pointer, the function of the button under the mouse pointer, the position of the obstacle, etc.
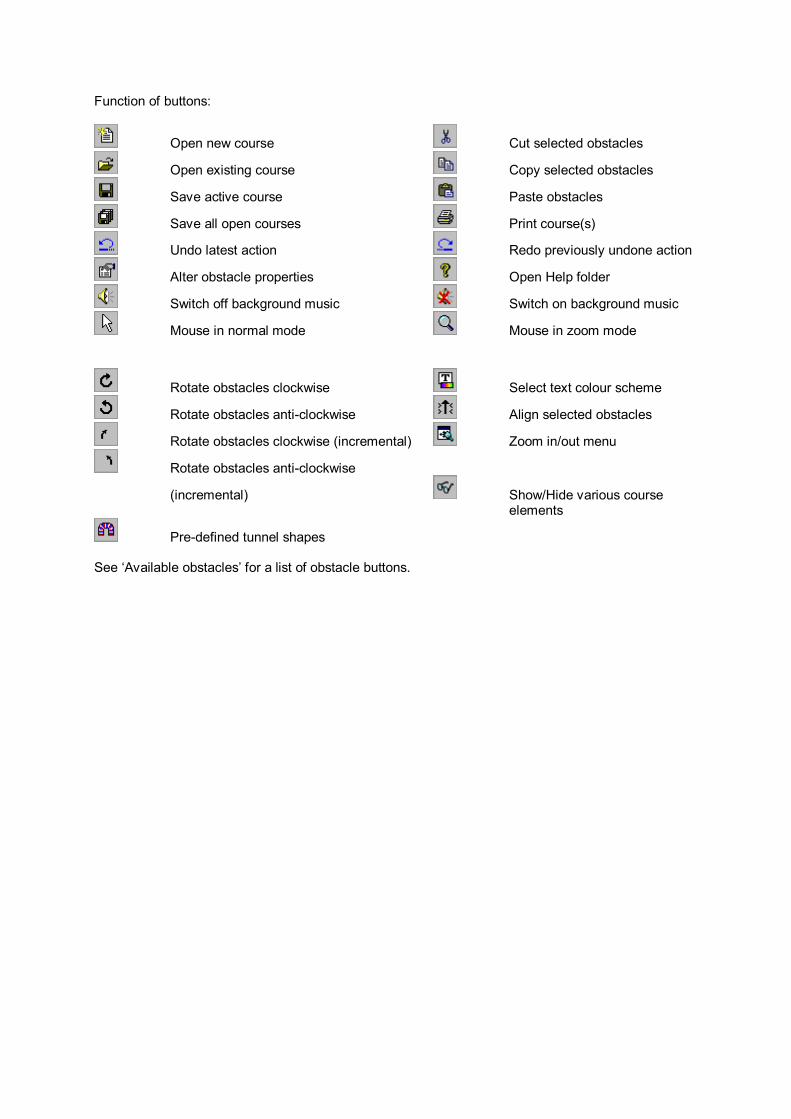
Function of buttons:
Open new course Cut selected obstacles
Open existing course Copy selected obstacles
Save active course Paste obstacles
Save all open courses Print course(s)
Undo latest action Redo previously undone action
Alter obstacle properties Open Help folder
Switch off background music Switch on background music
Mouse in normal mode Mouse in zoom mode
Rotate obstacles clockwise Select text colour scheme
Rotate obstacles anti-clockwise Align selected obstacles
Rotate obstacles clockwise (incremental) Zoom in/out menu
Rotate obstacles anti-clockwise
(incremental) Show/Hide various course elements
Pre-defined tunnel shapes See ‘Available obstacles’ for a list of obstacle buttons.
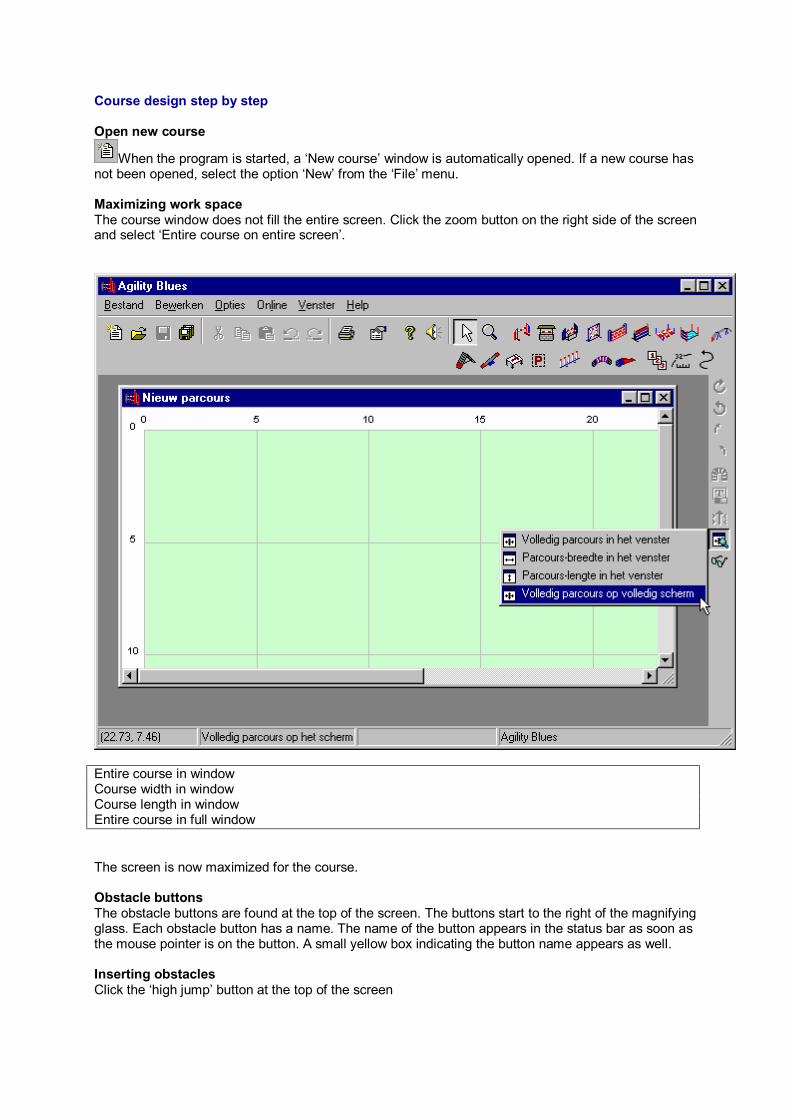
Course design step by step Open new course
When the program is started, a ‘New course’ window is automatically opened. If a new course has not been opened, select the option ‘New’ from the ‘File’ menu. Maximizing work space The course window does not fill the entire screen. Click the zoom button on the right side of the screen and select ‘Entire course on entire screen’.
Entire course in window Course width in window Course length in window Entire course in full window The screen is now maximized for the course. Obstacle buttons The obstacle buttons are found at the top of the screen. The buttons start to the right of the magnifying glass. Each obstacle button has a name. The name of the button appears in the status bar as soon as the mouse pointer is on the button. A small yellow box indicating the button name appears as well. Inserting obstacles Click the ‘high jump’ button at the top of the screen

The button appears ‘pressed in’. Place the mouse pointer on the desired position in the course and click. A high jump appears.
The obstacle is set in a red/white frame. The frame indicates that the obstacle has been ‘selected’. Rotating and moving obstacle A selected obstacle has two purple rotation buttons. You can ‘drag’ these buttons and thus rotate the obstacle. Place the mouse on one of the two purple buttons. The mouse pointer changes shape. Press and hold down the left mouse button. Drag the purple button to the desired position. Release the mouse button when the obstacle is in the correct position.
If you put the mouse pointer on the obstacle (within the red/white selection frame) but not on one of the purple buttons, you can move the entire obstacle.

Inserting another obstacle Click on the desired obstacle button at the top of the screen. Insert the new obstacle as described above. Inserting more than one of the same obstacle If you want to insert several high jumps after each other, it is not necessary to click the high jump button every time. Place the first of the series of obstacles as described above. Press down the shift key (the mouse pointer changes shape), click, and the same obstacle will appear again. Reshaping tunnels
The tunnel is inserted in the same way as the other obstacles. However, the tunnel has five instead of two purple buttons. The buttons are not used to rotate the tunnel but to change its shape. The tunnel can be given any shape, like a real tunnel can.

The program also has a number of standard tunnel shapes. Click the 'Tunnel shape’ button on the right side of the screen and select a shape. If you want to rotate the tunnel use one of the four rotation buttons on the right side of the screen. Straight tunnel Tunnel 45 degrees...90 Tunnel in S-bend Creating route lines The route line is a smooth curve running through a number of set points. Set the route points by clicking the route line button and then clicking on the course. Position the beginning of the line as follows:
Click the route line button. Place the mouse pointer on the starting point of the route in the course. Press and hold down the mouse button. Drag the mouse pointer to the second point of the route and release.
Place the mouse pointer on the next point of the line. Press the shift key and click. The third route point will appear. The route line is smooth.

Route lines may have three different 'control buttons’: Blue buttons, (smaller) yellow buttons and red buttons. The blue buttons are the precise points through which the route line will run. The yellow buttons determine the smoothness of the curve. The red buttons are the same as the blue ones, only they are linked to an obstacle. The buttons on the route can be dragged in the same way as the purple buttons on obstacles. Route lines give you several possibilities. You can change the shape of the route. You can link the route to obstacles. You can show the distance between two obstacles. You can alter the type of line (normal, dashes or dots) and you can choose whether the program should draw arrows in the line. See “Route lines” for more information about the possibilities. Inserting obstacle numbers and other text
Obstacle numbers and text boxes are both inserted with the same obstacle button ‘Text’. Click the obstacle button, then click on the desired position in the course and a text box will appear. The text box will attach a number to the obstacle. The program automatically raises the numbers. If you want different text in the box, right-click the mouse on the text box. The pop-up menu gives the option ‘Çhange text’. Select this option to change the text in the box. Text boxes can consist of more than one line. Removing obstacles from the course First select the object to be deleted by clicking on it with the mouse. A selected object can be recognised by the red/white selection frame around it. A selected route is not framed but becomes red/white itself. When the obstacle has been selected, select ‘Delete’ from the ‘Edit’ menu or press the delete button. Rotating or moving a group of obstacles Several obstacles can be selected together, and can then be rotated, moved or deleted all together. There are three possibilities to select a group of obstacles together:
1. Drag a selection frame with the mouse. All obstacles within the frame are selected. Make sure that the mouse arrow is in ‘normal mode’ (click the mouse arrow button at the top of the screen). Place the mouse pointer on an empty space in the course, that is, not on an obstacle. If correct, the mouse pointer is a normal arrow without additional symbols. Hold down the left mouse button. Drag the arrow across the course. A frame will appear. All obstacles within the frame are selected.
2. Hold the 'Ctrl'-key down while you click on an obstacle. The obstacle will be added to the current selection.
3. Choose the option ‘Select all’ from the ‘Edit’ menu. Every obstacle in the course will automatically be selected.

three of the four jumps lie within the selection frame and have been selected If more than one obstacle has been selected, the purple buttons you normally use to rotate them disappear. Instead there is a ‘rotation line’, which contains a purple rotation button and a green rotation centre. Use the purple button to rotate the selected group. The green button can be moved and is the centre of rotation. One of the selected obstacles has a red/white frame; the others have black/white frames. When you move one of the selected obstacles the others automatically move as well. Undoing actions
You can undo any action. Select the option ‘Undo’ from the ‘Edit’ menu or click the button on the top bar. The program remembers as many actions as possible. Depending on the number of obstacles in the course you can undo several tens of actions.
You can redo undone actions. Select the option from the ‘Edit’ menu or click the button on the top bar. Note: If you undo several actions and subsequently change something in the course you can no longer redo the undone actions. Operation The program is operated using the mouse and keyboard. The various functions of the program are activated by means of a menu option, a button on the buttons bar or with the keyboard. The program cannot be run without a mouse or similar pointing device. Click and double clicks The help text often mentions ‘clicks’. This means pressing and releasing the left mouse button. Sometimes a ‘double click’ is required. This means quickly pressing and releasing the left mouse button twice. Dragging If the text states ‘drag’, it means: press the left mouse button in and hold down. Subsequently move (drag) the mouse pointer with left button pressed in. Finally release the button. Active course Several courses can be open simultaneously. However, almost all functions in the program apply to one course only, namely the 'active course'. The active course can be recognised by the different colour of the window title bar. Button bar The command buttons on the toolbar (e.g. ‘Open’, ‘Save’, ‘Rotate’) are normal buttons that are always

restored after you have clicked on them. The obstacle buttons remain ’pressed in’ when you click them. To close the button, click again. Obstacle buttons are automatically deactivated once the obstacle has been inserted. Some buttons on the right side of the screen open a menu. Close the menu by selecting one of the options or clicking on an empty spot on the screen. Menus can also be closed by pressing the ‘Esc’ key. Buttons are not always active. If a button has a function that you cannot use at the time, it will be shown grey. That button can then not be clicked. For example, the rotation buttons on the right side of the screen can only be used if one or more obstacles have been selected. If no obstacles have been selected, the program cannot recognise which obstacle should be rotated. Therefore, the buttons are deactivated. Mouse pointer The shape of the mouse pointer indicates what will happen when you click the left mouse button. The mouse pointer may have one of the following shapes:
Normal mode. No special functions are active
Add. When you click an obstacle is inserted. You can see which obstacle will be inserted on the button bar.
Move. The mouse pointer is on an obstacle. The obstacle can be moved.
Rotate. The mouse pointer is on a purple rotation button. The obstacle can be rotated.
Set new route. The first segment of a new route can be drawn.
Add route point. When you click a new route point is added to the selected route.
Zoom mode. You can zoom in or out on the course. The left mouse button zooms in, the right one zooms out.
The right mouse button When you click on the right mouse button somewhere in the course, a pop-up menu will appear that applies to that point. The options depend on the position of the mouse and any obstacles selected. Selecting / unselecting Before you can apply certain functions to an obstacle (e.g. rotate) you must select it first. To select an obstacle simply click on that obstacle. A red/white selection frame will appear around the obstacle. You can unselect the obstacle by clicking on an empty spot on the course outside all selection frames. More than one obstacle can be selected. There are three possibilities:
1. Drag a selection frame with the mouse. All obstacles fitting in the frame are selected.
Make sure the mouse pointer is in 'normal mode’ (click the 'mouse pointer’ button at the top of the screen). Place the mouse pointer on an empty spot in the course, i.e. not on an obstacle. The mouse pointer should be a normal arrow without additional symbols. Press and hold down the left mouse button. Drag the pointer through the course. A frame will appear. All obstacles within the frame are selected. (See also select and unselect)
2. Hold down the 'Ctrl'-key while you click on an obstacle. The obstacle will be added to the current selection. If you click on an obstacle that was already selected, it will be unselected, that is removed from the current selection.
3. Choose ‘Select all’ from the ‘Edit’ menu. All obstacles in the course will automatically be selected.

When several obstacles have been selected the purple rotation buttons (and the blue, red and yellow buttons on routes) will disappear. One of the obstacles will have a red/white selection frame. The others will have black/white frames. The obstacle with the red/white frame is the first obstacle in the selection, which is used to align the obstacles. When several obstacles have been selected every function used will be applied to all obstacles in the selection. For example, if you move one of the selected obstacles all the other obstacles in the selection will automatically be moved with it. Mouse clicks in combination with the keyboard Certain special keys modify the function of the mouse: Shift When you hold down the Shift key and click somewhere in the course, the program will
insert the last obstacle it inserted again. Ctrl When you hold down the Ctrl key, the obstacle you click on will be added to the current
selection, or, if the obstacle has already been selected, it will be removed from the current selection
Space bar When you have selected several obstacles you can only move or rotate the entire group. But if you hold down the space bar you can move or rotate obstacles independently of the rest.
Zoom in / out There are several ways to zoom in on a part of the course, or zoom out to see the entire course on the screen.
1. Use the 'Zoom' button at the top of the screen. The mouse pointer changes into a magnifying glass. If you click somewhere on the course with the right mouse button that part of the course will be magnified. If you right-click in the course again it will be reduced.
If the mouse pointer is in 'zoom-mode' you can also drag a 'zoom-frame’. Hold down the left mouse button and move the mouse pointer. A square frame will appear. As soon as you release the mouse button that part of the course will fill the screen.
2. You can use the zoom button on the right side of the screen. A menu will pop up with several zoom options to make the entire course appear again.

Keyboard functions Some of the program’s functions can be selected by pressing a key:
Enter Opens the standard window of a selected obstacle. The standard window depends on the selected obstacle. For example if you select a high jump the Enter key opens the 'Position window’. When you click the right mouse button on a selected obstacle a menu with a number of options pops up. One of the options is displayed bold. This is the standard option that is activated by the Enter key.
Escape When one of the obstacle buttons is pressed in you can deactivate it by pressing the Escape key. The key has the same effect as pressing on the 'Normal mode' button on the button bar (mouse pointer).
[ Rotates the selected obstacles anti-clockwise in large steps. ] Rotates the selected obstacles clockwise in large steps. { Rotates the selected obstacles anti-clockwise in small steps. } Rotates the selected obstacles clockwise in small steps. Cursor keys (arrow pointing up/down/left/right) move the selected obstacles. Tab Select the next obstacle. Shift Tab Select the previous obstacle. Ctrl Z Undo last action. Ctrl R Redo last undone action. Ctrl C Copy; copy the selected obstacles to the clipboard. Ctrl X Cut Ctrl V Paste Ctrl N Open new course Ctrl O Open existing course file Ctrl S Save active course with present name F12 Save active course with new name Ctrl P Print

F9 Redraw screen
Double clicks When you double click on an obstacle, the standard settings window for that obstacle opens. For most obstacles this is the ‘Position’ window. Double clicking has the same function as using the Enter-key.

Save and open The 'File’ menu contains all the commands required to save and open courses.
Open course Select the option ‘Open’ from the ‘File’ menu. A standard dialog box appears with which you can select the file to be opened. The program can read two types of files: Its own format files, made by the program (AAP-files) AGL-files, made with CleanRun® CourseDesigner(TM)
The selected course will be opened in a new course window. Extended 'Open' window

The extended window gives 'previews' and summaries of the courses on the hard disk. Summaries can be useful to find a particular course. The size of the window can be adjusted. Place the mouse pointer in the right bottom corner of the window, click and drag the corner. You can also move the vertical bar between the folders and file names to create more space for the file names. Finally you can move the horizontal bar between the file names and the preview. You can activate the extended window by selecting ‘General settings’ from the ‘Options’ menu. Select the tab ‘Files’ and check the option ‘Extended window’. See also ‘Extended “Open” window’.
Saving courses A course can be saved in the program’s own format (AAP-file) or as a bitmap. The latter possibility can be used among others to publish courses on internet. The 'File’ menu has four options to save an active course: Save Saves the course as AAP-file under its current name. If the course does not have a
name yet the program will prompt for one. Save as... This option allows you to save the course under a different name.
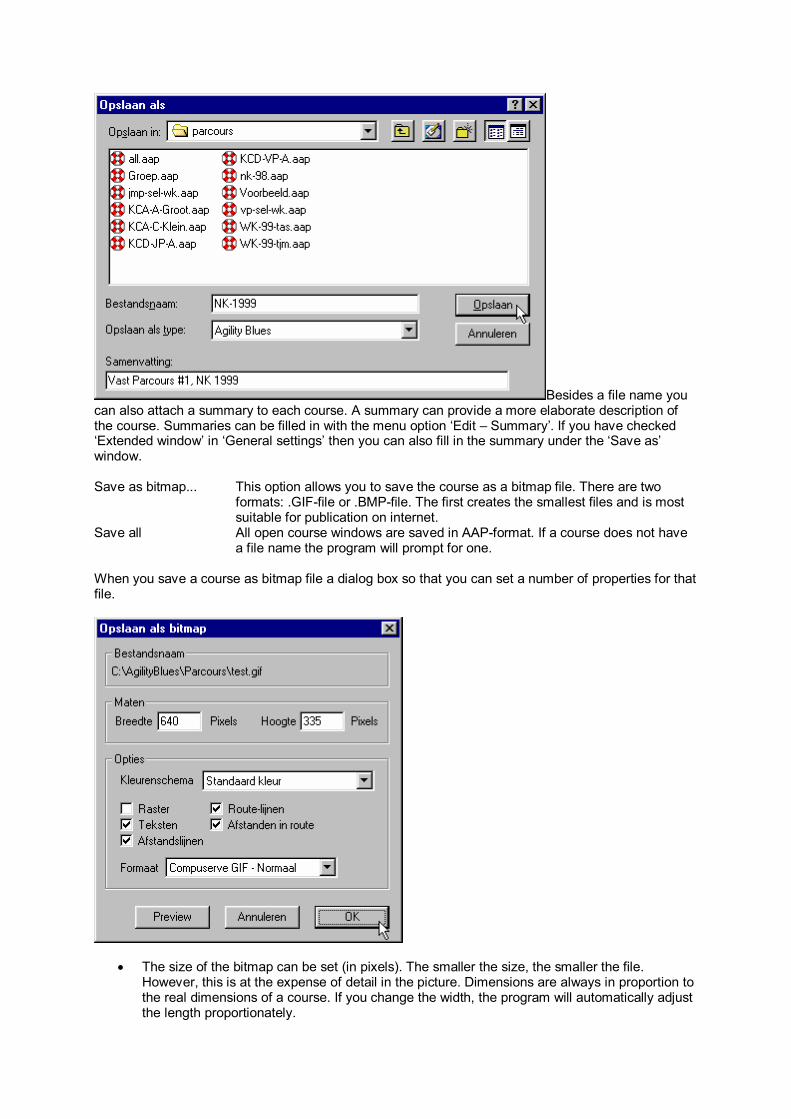
Besides a file name you can also attach a summary to each course. A summary can provide a more elaborate description of the course. Summaries can be filled in with the menu option ‘Edit – Summary’. If you have checked ‘Extended window’ in ‘General settings’ then you can also fill in the summary under the ‘Save as’ window. Save as bitmap... This option allows you to save the course as a bitmap file. There are two
formats: .GIF-file or .BMP-file. The first creates the smallest files and is most suitable for publication on internet.
Save all All open course windows are saved in AAP-format. If a course does not have a file name the program will prompt for one.
When you save a course as bitmap file a dialog box so that you can set a number of properties for that file.
• The size of the bitmap can be set (in pixels). The smaller the size, the smaller the file. However, this is at the expense of detail in the picture. Dimensions are always in proportion to the real dimensions of a course. If you change the width, the program will automatically adjust the length proportionately.
• You can set the colours for the bitmap. You can choose from one of the given colour schemes.
• You can select which course elements are to be displayed in the bitmap. • You can select the sub-format of the bitmap file. In the case of GIF-bitmaps you can, e.g.,
choose between 'Normal' and 'Interlaced'. The 'Preview' button shows the result of your screen settings. A dialog box appears in which you can check the bitmap. For example you can see whether the dimensions of the bitmap are not too small (making course details indistinct). Finally click OK to actually save the file. Recent courses The option 'Recent' in the ‘File’ menu gives a list of the last nine courses worked on. You can choose this option to easily and quickly view your most recent courses.

Printing One or more courses can be printed on a page. To this end select ‘Print’ from the 'File’ menu.
The left side of the dialog box has options you can set yourself. The right side gives a print preview in which you can see how the printed courses will look. Printer In the first box you can indicate which printer the course is to be printed by. Click the 'Printer...' button to select another printer. You can also choose whether the page is to be printed portrait or landscape. If the course width is greater than its length a landscape print will fill the page better. Options In the second box you can set various print options.
• You can set the colour scheme for each print. For a black/white printers it is best to choose black/white or grey schemes.
• You can set which course elements are to be printed. • You can set whether the course is to be centred horizontally or vertically within the available
space. • You can set the number of copies the program should print.
Course to be printed In the third panel you can select which courses are to be printed.
1. Print current course only. If you click this option only the active course will be printed. The list of courses and the rows/columns settings are not applicable
2. Print several courses. If you click this option, you can select more than one course for printing. You can choose from the courses that are currently open. You will see a list of all open course windows. Click on the courses to be printed. You can set how many courses are to be printed per page by adjusting the number of rows and columns. If more courses have been selected than fit the page, the program will print several pages.

In this example three out of five courses have been selected for printing. The rows and columns have been set so that the three courses are printed under each other. The print preview shows how the page will look. One of the courses has a star (*) behind its name (in the window above you see a star behind 'Voorbeeld.aap *'). This is the active course. If you select ‘Current course’ this course will be printed. You can alter the order of the courses in the list and thus the print sequence. You can drag courses in the list. While you drag the mouse pointer will change into a small double arrow. The program uses the available space for a course to the maximum. A course will be printed as large as will just fit into the available space.

Cut and paste Selected obstacles can be cut or copied to the clipboard and subsequently be pasted in the course again. The cut and paste function is the same as in most other Windows programs. Copy Select one or more obstacles and choose the option ‘Copy’ from the ‘Edit’ menu. Cut Select one or more obstacles and choose the option ‘Cut’ from the ‘Edit’ menu. The obstacles will disappear from the course (they are moved to the clipboard). Paste Select the option ‘Paste’ from the ‘Edit’ menu. A copy of the obstacles on the clipboard will appear on the course (paste can be repeated if required). These commands can also be activated with the keyboard: Ctrl C Copy Ctrl X Cut Ctrl V Paste. The pasted obstacles appear approximately on the mouse pointer.

Menus
Main menu File New Opens a new course window Open Opens an existing course Close Closes the active course window Save Saves the active course under current name Save as... Saves the active course under a different name Save all Saves all open courses Save as bitmap... Saves active course as bitmap file Print Prints open courses Recent Opens a list with the last nine courses opened Close Ends program Edit Undo Undoes last action Redo Redoes the last undone action Properties Changes the properties of the selected obstacle Position Opens the position window in which you can indicate the exact
position of the selected obstacle Summary Opens a dialog box where you can fill in a description of the active
course Select all Selects all obstacles in the active course Copy Copies selected obstacles to the clipboard Paste Inserts obstacles from the clipboard to the active course Cut Moves selected obstacles from the active course to the clipboard Delete Deletes selected obstacles Group selection Combines several selected obstacles into a group of obstacles Options Standard obstacle properties Opens a dialog box where you can change the properties Colour schemes Opens a dialog box where you can change the colour schemes General settings Opens a dialog box where you change all sorts of default
program settings Online This menu has links to various Agility Blues internet pages.

Window Close Closes active course window Close all Closes all open course windows Minimise all Options to resize open windows Arrange windows - Adjacent - Arrange pictograms - Help Help subjects Displays the help text Info Displays information on the program version and user data Activate Starts the activation program. Before you can fully use the program
you need to activate once first. Right mouse button menu When you click on an obstacle with the right mouse button a pop-up menu appears. The content of the menu varies. You may come across the following: Obstacle name with check When one of the obstacle buttons is pressed in the name of that
obstacle appears at the top of the menu with a check. You can deactivate this obstacle button with this option.
Obstacle name Has no function but only shows which obstacle has been clicked on.
Position Opens the dialog box where you can set the exact position of that obstacle
Properties Opens the dialog box where you can change the properties of the obstacle
Copy Clipboard functions Cut - Paste - Delete Deletes the obstacle Group selection Combine several selected obstacles into a group of obstacles Ungroup selection If you have selected a group of obstacles Delete obstacle from group Removes the obstacle from the group Acute angle If you click on a route point you can indicate whether the route
should take a sharp turn around this point. Insert route point If you select a route you can insert a route point here. Delete route point Removes the route point you have clicked on. Course length If you click on a route you can set whether the course length
should be displayed. Delete obstacle number Deletes the obstacle number and automatically adjusts remaining
numbers. Insert obstacle number Opens a dialog box where you can fill in the number to be
inserted. The other numbers are automatically adjusted. Right mouse button on top toolbar

If you click on the top toolbar with the right mouse button a menu appears with which you can activate or deactivate the obstacle buttons on the button bar. Obstacles that are not available in a set of obstacles can easily be removed from the bar. Changes to the visible buttons on the bar only apply to the current ‘properties scheme’. The menu above shows the active scheme. See also ‘Properties schemes’.

Background music
Agility Blues plays background music while you work. The program plays MIDI files, which it obtains from the ‘Midi folder’, which is in the Agility Blues folder. You can add other MIDI files to this folder. The program will automatically play the available MIDIs one by one.
Click on the loudspeaker in the top toolbar to switch the music on or off.

Available obstacles The program includes the following obstacles:
Single bar jump Table
Well Pause table
Double bar jump (oxers) Weave poles
Tire jump Tunnel
Wall Collapsed tunnel
Brush jump Text boxes
Long jump Distance lines
Catwalk Route lines
A-frame Planes
Seesaw The single bar jumps are used for jumps with and without wings. The width of the wings can be adjusted to 0 for hurdles without wings. The double bar jump is used for spread bar jumps with 2, 3 or 4 bars behind each other. The text boxes are used for obstacle numbers and other text. The program always inserts the next obstacle number in a new text box. Routes can be used for all sorts of things. They can show the route of the dog, handler or judge or, for example, the start/finish line Distance lines can be used to quickly measure a certain distance in the course. Planes can be used for all sorts of things. For example, you can show that certain parts of the course cannot be used, e.g. because of tree. Every obstacle has several properties that can be changed. For example, you can change the size of an obstacle or the number of poles for the weave.

Select and unselect Before you can apply a command to an obstacle (e.g. rotation) you need to select the obstacle. To select an obstacle, simply click on it. A red/white frame will appear around the obstacle. You can unselect an obstacle by clicking on an empty space on the course, outside all selection frames. Obstacles can be selected with the keyboard. Press the Tab key. The next obstacle will be selected. Press the Tab key again to select the following obstacle. Press Shift-Tab to select the previous obstacle.
not selected selected, there is a selection frame around the obstacle with
two purple rotation buttons More than one obstacle can be selected. There are three possibilities:
4. Drag a selection frame with the mouse. All obstacles fitting in the frame are selected.
Make sure the mouse pointer is in 'normal mode’ (click the 'mouse pointer’ button at the top of the screen). Place the mouse pointer on an empty spot in the course, i.e. not on an obstacle. The mouse pointer should be a normal arrow without additional symbols. Hold down the left mouse button. Drag the pointer through the course. A frame will appear. All obstacles within the frame are selected. (See also ‘Select and unselect’)
5. Hold the 'Ctrl'-key down while you click on an obstacle. The obstacle will be added to the current selection. If you click on an obstacle that was already selected, it will be unselected, that is removed from the current selection.
6. Choose ‘Select all’ from the ‘Edit’ menu. All obstacles in the course will automatically be selected.
When several obstacles have been selected the purple rotation buttons (and the blue, red and yellow buttons on routes) will disappear. One of the obstacles will have a red/white selection frame. The others will have black/white frames. The obstacle with the red/white frame is the first obstacle in the selection, which is used to align the obstacles. When several obstacles have been selected every function used will be applied to all obstacles in the selection. For example, if you move one of the selected obstacles all the other obstacles in the selection will automatically be moved with it.

selecting by dragging a selection frame. More than one obstacle has been selected so there are no purple rotation buttons on the obstacles, but a rotation line instead. When several obstacles have been selected the purple rotation buttons (and the blue, red and yellow buttons on routes) will disappear. Instead a rotation line will appear. Use the line to rotate the entire selection. One of the obstacles will have a red/white selection frame. The others will have black/white frames. The obstacle with the red/white frame is the first obstacle selected, and is used to align the other obstacles. If several obstacles have been selected every function used will be applied to all obstacles in the selection. For example, if you move one of the selected obstacles all the other obstacles in the selection will automatically be moved with it. Special selection commands The program has the following selection commands:
Ctrl 1 Selects all obstacles without text boxes, route lines, planes, etc. Ctrl 2 Selects all obstacle numbers Ctrl 3 Selects all text boxes except obstacle numbers Ctrl 4 Selects all text boxes (text and obstacle numbers) Ctrl 5 Selects all route lines Ctrl 9 Reverses the current selection (all elements that were selected are unselected, all
elements that were not selected are selected).
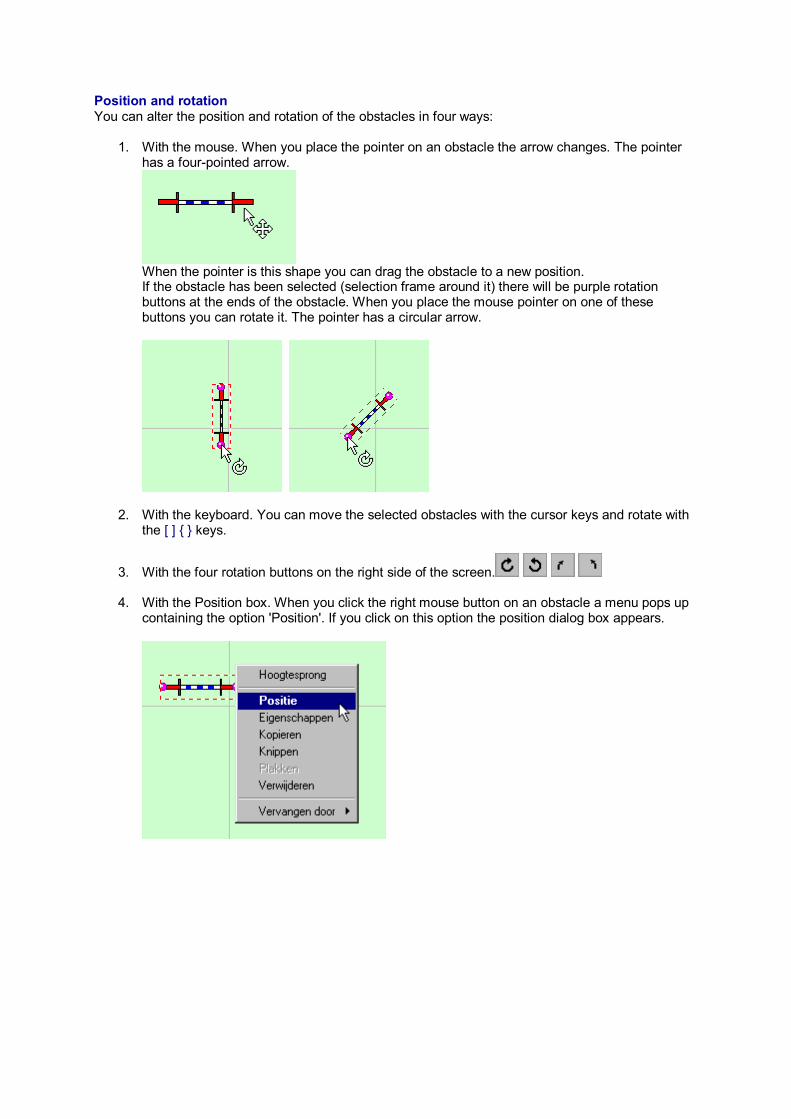
Position and rotation You can alter the position and rotation of the obstacles in four ways:
1. With the mouse. When you place the pointer on an obstacle the arrow changes. The pointer has a four-pointed arrow.
When the pointer is this shape you can drag the obstacle to a new position. If the obstacle has been selected (selection frame around it) there will be purple rotation buttons at the ends of the obstacle. When you place the mouse pointer on one of these buttons you can rotate it. The pointer has a circular arrow.
2. With the keyboard. You can move the selected obstacles with the cursor keys and rotate with the [ ] { } keys.
3. With the four rotation buttons on the right side of the screen.
4. With the Position box. When you click the right mouse button on an obstacle a menu pops up containing the option 'Position'. If you click on this option the position dialog box appears.

The position box allows you to set the precise position and rotation of an obstacle. For obstacles with a shared entrance and exit (e.g. high jumps) you can set the position of its centre. For obstacles with different entrances and exits (e.g. catwalk or tunnel) you can set the precise position of entrance and exit. If you change the entrance, the exit will automatically move along, and vice versa. Rotation is given in degrees. Fill in a number between 0 and 360 degrees, whereby 0 degrees points right, 90 upwards, 180 left, and 270 degrees points down. The small circle in the rotation panel shows the direction of the obstacles with a help line. Click in the circle to change the rotation.
If more than one obstacle has been selected, they will all be rotated and moved together. In this case there are no purple rotation buttons. Instead you will see a rotation line with a purple and a green button. The purple button is used to rotate the selection, the green button is the centre of rotation.

Rotate the selection with the purple button. The selection will rotate around the green button.
Drag the green button to move the centre of rotation. Obstacles within a selection can be moved or rotated separately. Press the space bar. The purple rotation buttons will reappear on the obstacles. Hold the space bar down to move the obstacles individually. You can also move the rotation line without rotating the obstacles as well in this way. This

is useful to align the selected obstacles along the rotation line.
When the space bar is held down, the obstacles can be rotated or moved individually. Tunnels and route lines cannot be rotated with the purple (blue or red) rotation buttons. These buttons alter the shape of the obstacle. Use the position dialog box, keyboard or the rotation buttons on the right side of the screen to rotate these obstacles.

Obstacle properties The properties of every obstacle can be altered. For example, high jumps have ‘bar width’ and ‘wing width’ as properties. Properties can be changed in several ways.
1. Click on an obstacle with the right mouse button. Select ‘Properties’ and a menu pops up. 2. Select an obstacle and choose the option ‘Properties’ from the ‘Edit’ menu
3. Select an obstacle and click the ‘Properties’ button on the toolbar
A properties dialog box appears.
There are four boxes. Name scheme Contains the name of the current ‘properties scheme’.

Obstacles This box lists all selected obstacles as well as the ring. In this example only high jumps have been selected. Properties This box shows all the properties of the obstacles that have been selected in the list. In this example a high jump has been selected. The width of the bar and of the wings can be set. Sizes are usually given in metres. However, you can also use centimetres by typing ‘cm’ behind size. In reverse, you can change a size in centimetres to meters by typing ‘m’. Example Below different properties for the same obstacle are shown; here you can see the effect of changes on the obstacle. If you change the properties of an obstacle, only the selected obstacle or obstacles are effected. The same kind of obstacle that has not been selected will not change. In this way you can place various sized obstacles in a course.
four jumps with various bar and wing widths If more than one obstacle of the same type have been selected the property changes apply to all these selected obstacles. The program examines which properties are changed, and which not. Only those changes that have been set will actually be applied. For example, if you select four high jumps with four different bar widths and four different wing widths and you only change the wing width, then all wing widths will be changed to the dimensions you set. The bar widths remain as they were. For most obstacles only the size (length and width) can be changed. Some obstacles have specific properties:

Ring
The length and width of the ring can be set. The default ring length is 20 m by 40 m. You can set over how many metres the program should draw a raster. Rasters are helpful for situating obstacles and can be useful to help ringmasters set up a course. You can set at where the program should give the ring dimensions. You can set the raster orientation. The standard is ‘left top’. This means that the coordinates of the ring start in the top let corner. The width of the ring is numbered from left to right, the length from top to bottom. Orientation can be set from any of the other three corners as well. If you choose left bottom, ring width will be numbered from left to right and length from bottom to top.

Double jump
For double bar jumps, you can set how many bars the jump should have, and besides the normal measures, (double, triple, 4 bars) the distance between bars.

Weave poles
You can set how many poles are to be used for the weave (minimum 1, maximum ...) and the distance between the poles. Furthermore, the program can draw in channel wires (e.g. for training courses).

Tunnel
There is a minimum and maximum length for the tunnel, so that it can be pushed in or stretched out like a real tunnel.

Long jump
You can set how many elements are to be used for the long jump. You can also set the width of the elements and the space between them.

Text boxes
You can adjust the height of the figures in the text boxes; this is done in course-centimetres. You can also change the colours. You can choose between several colour schemes. Different schemes can be used, for example to use two sets of obstacle numbers in a course, one black text in a white box, and the other white text in a black box. Alignment only applies to text boxes with more than one line of text. You can set whether you want text aligned left, centre or right. Normally text has a border. However, you can hide the border to place text directly in the course. Finally you can select ‘fixed figure width’. When you check this option the program chooses a letter type with equally wide letters. This can be useful for making tables.

Route lines
You can choose whether the program should insert arrowheads at the end of a route line, whether distances in the route should be given, and what kind of line is to be used. The latter can be ‘normal’, ’dashes’, or ‘dots’.

Planes
You can set the dimensions of the planes, that is length and width. You can set the shape of the plane, rectangular or circular. You can set a fill colour for the plane; you can choose between four colours and transparant. You can set the thickness of the lines.

Text and numbers
Text boxes and obstacle numbers are filled in with the ‘Text’ obstacle button. As standard text boxes are used for obstacle numbers. If you insert a text box the program automatically fills in a number. However, you can change the contents of a text box and insert any text you like, even adding several lines of text.
When you click the right mouse button on a text box, a menu pops up with the option ‘Change text’. When you select that option the following dialog box appears.
In this box you can first of all change the text. Furthermore, you can set a number of properties for the text box: Height The height of the letters in course-centimetres. Colour You can choose from 12 colour combinations for the text. Alignment If there is more than one line of text, you can align left, centre or right. Border Text normally appears in a box. However you can hide the border and the text
will appear directly on the course Fixed figure width A letter type will be used with equally wide figures. This can be useful for making
tables.
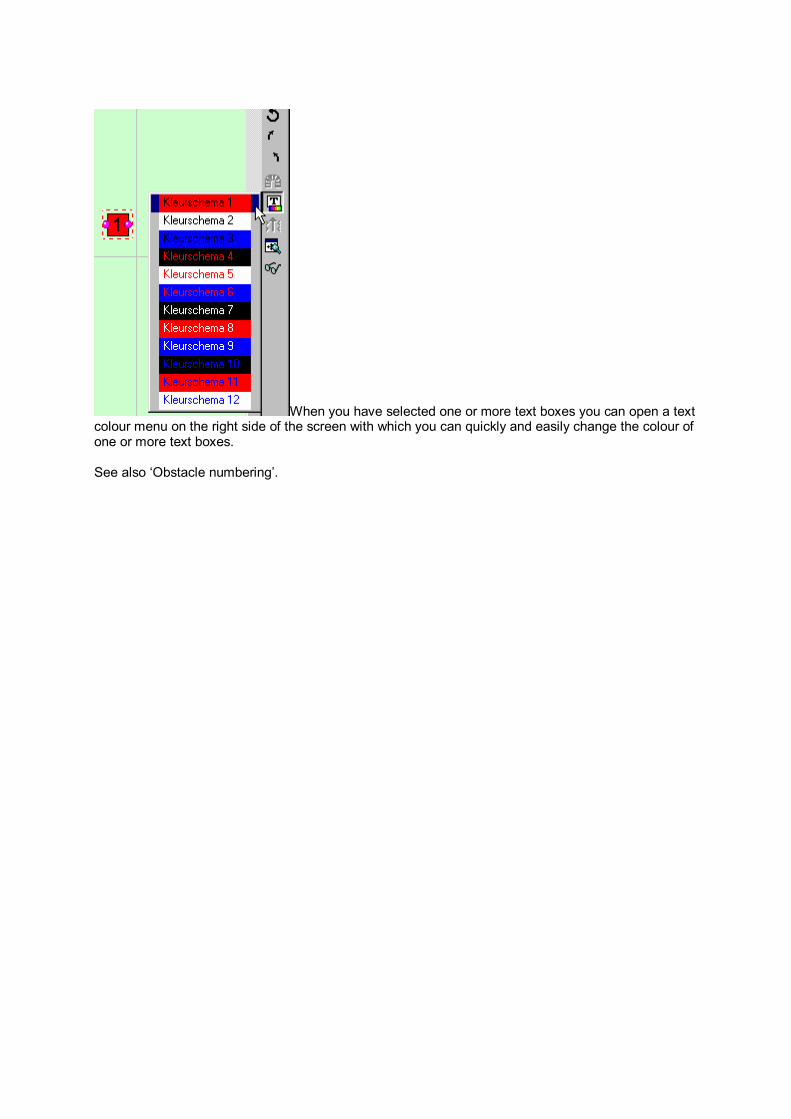
When you have selected one or more text boxes you can open a text colour menu on the right side of the screen with which you can quickly and easily change the colour of one or more text boxes. See also ‘Obstacle numbering’.

Route lines The route lines in the program have the following functions:
• The program calculates and displays the length of the route in the status bar. • The distance between two obstacles along the route can be displayed. • Route lines can be linked to obstacles. If the obstacle is moved or rotated the route
automatically shifts with it. • Route lines curve smoothly through a number of set points. These points and the curve can be
adjusted at all times. • The route lines can be displayed as a normal line, dashed or dotted. • If desired, the program draws in arrowheads to point the direction of the route.
See ‘quick route lines’ for the easiest way to insert a route line in a complete course. Inserting a route in a course
The route runs through a number of fixed points. which you can set with the mouse. First click on the route-line button. Place the mouse pointer on the starting point of the route: click and hold down the left mouse button. Drag the mouse to the second point of the route. A control line will appear between the first and second point. Release the mouse button when the second point is in the correct position.
Place the mouse pointer on the position of the third point; press the shift key and the left mouse button. A control line will appear between point 2 and point 3. If necessary, drag the mouse to the correct position and release the button again. The route now has three points with a smooth curve running through them.
Repeat the above steps until the route is complete. The route line has three different 'control points':
• The blue points are buttons through which the route must run exactly • The smaller yellow buttons determine the curve of the line. There are black help-lines between

the yellow points and route line itself. They indicate which part of the route is influenced by the yellow point.
• The red points are similar to the blue ones but indicate that the route has been linked to an obstacle. If that obstacle is moved or rotated, the route automatically shifts with it.
All control points can be dragged to alter the shape of the curve. A route line that has been selected does not have a selection frame like other obstacles. The line itself is displayed red/white when it has been selected. When a route has been selected its total length appears in the status bar at the bottom of the screen. Mouse pointer The shape of the mouse pointer indicates what happens when you click:
Starts a new route line
Inserts a point to the selected route line
Drags the control point under the mouse pointer.
Moves the entire route Adding new route points Route points can be added to an existing route. Select the route line and click on the route line button at the top of the screen. Check the shape of the mouse pointer! The plus sign indicates that a point will be added at the end of an existing line. Inserting route points between others Points can be inserted between others in an existing route. First select the desired route. Click with the right mouse button on the position where the point is to be added. Select ‘Insert point’ from the menu.

The point is added next to the mouse pointer Moving the entire route Put the mouse pointer somewhere on the line, but not on one of the control points. Drag the route to the desired position. Rotating the route The route cannot be rotated as a whole with the mouse. Use the rotation buttons on the right side of the screen or the keyboard. Removing route points Click with the right mouse button on the point to be removed. Select ‘Delete point’ from the menu. You can only delete blue or red points. Sharp bends / smooth curves Normally the program draws a smooth curve through the route points. You may want to make a sharp bend. Click with the right mouse button on the route point and select ‘Sharp bend’.
The route line can also be made with sharp bends. Linking the route to obstacles If you insert a route point in the vicinity of an obstacle, the program will automatically position it on the entrance or exit of that obstacle. When you release the mouse button, the point will be exactly on the obstacle. The new point will be red.

the red control point is linked to the high jump Linked route points always remain in their position on the obstacle, even when the obstacle is moved. The distances shown on the route are the distances between the red linking points. If the route is linked to every obstacle in the course, the figures show the exact distance between the obstacles measured along a smooth curve. If you move the linked obstacles, the distance between them will automatically be adjusted. This is useful to check whether the distance between obstacles meets the applicable regulations, and if necessary to move obstacles to meet the requirements. Unlinking linked points You can unlink a (red) linked point from an obstacle by dragging it away. Once the point exceeds a given value to the obstacle (50 cm) it is automatically unlinked. Thus you can ‘tear’ the point loose. Linking existing points You can link existing blue points to an obstacle by dragging the point to an obstacle. If the distance between the point and the obstacle lies within a given value, the point will automatically be linked. A few remarks about linked routes If the route as a whole is moved, all linked obstacles will automatically be moved with it. If the route is rotated, the linked obstacles will unlink themselves. When a route is dragged through a course, the program will attempt to adjust the curve as naturally as possible. However, in some cases, e.g. certain “ U-turns” the program may miscalculate the intended direction of the obstacle, in which case the route will appear as follows:
the program has miscalculated the direction over jump 2 In such cases drag the yellow control points near jump 2 to make the route curve in the correct

direction.
the direction of the curve over jump 2 has been adjusted by hand Routes may bend too sharply around obstacles. In that case drag the yellow control point concerned to make a wider bend.
the yellow control points have been dragged further from the obstacles, the route makes a wider bend The total length of a route is displayed in the status bar at the bottom of the screen if it is the only route that has been selected, or if the mouse pointer is on a route line.

Option course length in right mouse button menu When you right-click on a route, the menu gives the option 'Course length'. This option shows whether the course length is displayed on the route. If you have made more than one route line in a course, you can select which line gives the dog’s route, and thus course length. You can use ‘route-line course-length’ as text variable.

Grouping obstacles The program can group a number of obstacles. Obstacle groups are considered an entity by the program. The group is always moved and rotated as a whole. Groups of obstacles can be used to build courses from a number of separate obstacle combinations. Grouping Select the obstacles that are to be grouped together. Choose the option ‘Group selection’ from the ‘Edit’ menu. The obstacles are now a group. If one of the obstacles in the group is selected, the others will automatically be selected with it.
two ostacle groups, the group numbers are shown Show group numbers

Group numbers may not be visible. Click on the ‘Show/hide elements’ button on the right side of the screen. In the menu there is an option ‘Obstacle group’. Click this option. Ungrouping obstacles
The group function can also be undone. Select the group to be ungrouped, click on the group with the right mouse button and choose ‘Ungroup selection’ from the menu. Removing obstacles from a group It is possible to remove an obstacle from a group (i.e. to unlink it from the group). Click with the right mouse button on the obstacle concerned and choose the option ‘Remove obstacle from group’ from the menu. Adding obstacles to an existing group First select the group to which the obstacle is to be added. Subsequently add the obstacle to the selection (hold down the Ctrl key and click on the obstacle). Then choose ‘Group selection’ again. Changing the position of an obstacle in a group Normally you can only move or rotate a group of obstacles as a whole. However, if you hold down the space bar you can move or rotate individual obstacles within the group.

Numbering obstacles Obstacle numbers are text boxes. The program automatically fills in the next consecutive number in the box. To set obstacle numbers in a course quickly, proceed as follows:
Click the ‘Text’ button on the top button bar. Click on the position of the first obstacle in the course. Hold down the shift key and subsequently click on position numbers 2, 3, 4, etc. Inserting more than one set of obstacle numbers If more than one sequence is to be used in a course, you can insert several sets of numbers. Make the first set as described above. Subsequently add a new number on the position of the first obstacle in the second sequence. The number will initially have the next number in the previous sequence. Now change the text of the last number into number 1 (e.g. click with right mouse button on the number and select ‘Change text’). Then continue to add the remaining numbers of the second set (the program determines the sequence of numbers on the basis of the last number inserted) Number sequences in different colours
Every new number inserted has the same colour as the previous one. When you have inserted the first number of a new sequence you can change the colour of the new number. Select the number to be changed and click on the ‘Text colour’ button on the right side of the screen. A menu appears with options for colour combinations for the obstacle number. Select a combination. Subsequently insert the remaining numbers in the set. Removing obstacle numbers Of course a number can be selected and deleted in the usual way. However, the remaining numbers will not automatically be adjusted. Therefore, click on the number to be deleted with the right mouse button and select ‘Delete obstacle number’. The number is deleted and the remaining numbers in the sequence are automatically adjusted. The program recognises a sequence by its colours. If there is more than one set of numbers in a course then only the numbers in the same colours as the deleted number are changed. Adding intermediate obstacle numbers A number can also be added to an existing sequence. Click on the ‘Text’ button at the top of the screen. Then click with the right mouse button on the position of the new number. The menu will give the option ‘Add obstacle number’. Choose this option. Type the number to be added in the dialog box. The program will automatically change the other numbers in the sequence. If the last obstacle you placed was a number, you need not use the ‘Text’ button. Hold down the Shift key and click on the right mouse button.

Show/hide numbers
In the 'Show/hide elements’ menu, which is activated by the button on the right side of the screen, you can set whether you want to show or hide numbers on the screen. Click the option ‘Texts/numbers’.

Aligning obstacles
The ‘Align obstacles’ button on the right side of the screen contains several options to position a number of obstacles in an exact line. Before obstacles can be aligned, they must be selected. This makes clear why only one obstacle in a selection has a red/white frame and the others black/white ones. The red/white-framed obstacle is namely used as base obstacle for the alignment. The others are aligned to the first one. The obstacle that is selected first will have a red/white frame. Make sure that you select the correct obstacle first. If necessary use the selection method Ctrl key / mouse click. There are six different alignments:
1. Behind each other Obstacles are moved into a straight line behind the first obstacle. The other obstacles will face the same direction as the first one.
2. Horizontal Obstacles are aligned horizontally: they have the same latitude position (or X-coördinate) as the first obstacle.
3. Vertical Obstacles are aligned vertically: they have the same longitudinal position (or Y-coördinate) as the first obstacle.
4. Same direction Obstacles face the same direction as the first obstacle. Their position is not changed.
5. Along rotation line Obstacles are placed on the rotation line. Hold down the space bar to move the rotation line without moving the obstacles as well.
6. Along the route line If you select a number of obstacles and one route line, you can choose to position the obstacles on the route. The obstacles will be placed on the nearest point on the route and their direction will be adjusted so that they follow the route nicely. This option can be used for example, to position a number of jumps along a smooth line. The route line you use must be a temporary one. After the obstacles are in the correct place delete the route line.
the far left obstacle has the red/white selection frame and is the base for the alignment

the second and third obstacles are aligned to the first
Aligning along the rotation line. The obstacles are placed on the rotation line.
Aligning along a route line. Select the jumps to be aligned and one (!) route line

The obstacles are placed on the route and their direction is adjusted to the line

Properties schemes The default properties (such as length and width) of the obstacles are set in the “properties schemes”. You can customise various property schemes, for example to: Define one of the available obstacles in a given set. You can remove unavailable obstacles
from the button bar. Define the regulatory dimensions of the obstacles for a given course. For example, you can
make separate schemes for large and small dogs, whereby the dimensions of the obstacles are adapted to the specific regulations
Define the dimensions of a given set of obstacles. For example, you can apply the exact dimensions of your training obstacles in a scheme. When you design a training course you can be sure that the sizes on the screen and paper are proportionate to the real dimensions of the available obstacles.
Define the correct dimensions according to the regulations of various agility organizations. Modifying the properties scheme Select the option ‘Standard obstacle properties’ from the ‘Options’ menu. A list of all properties schemes drops down.
First select the scheme to be changed. Click the button ‘Change’. A second dialog box appears in which the properties of all the obstacles can be changed.

In the first box you can change the name of the scheme. The list includes all the available obstacles. Select the obstacle to be changed from the list and change its properties. When all required obstacle properties have been changed, click OK. Deleting obstacles from the button bar You can set whether you want a particular obstacle on the top button bar. Obstacles that do not occur in a given set will then not use up space. This improves clarity and prevents you accidentally inserting the wrong obstacle in a course.

deleting the well from the button bar Making a new properties scheme Instead of the ‘Change’ button select ‘New scheme’. Give the new scheme in the window that dialog box the correct name and fill in the properties desired. Selecting the active scheme When you insert a given obstacle it has certain properties. The high jumps for example have a bar width of 130 cm and wing width of 70 cm. The program takes these sizes from the active properties scheme. Select the desired scheme from the list and click on one of the following buttons:
Apply to new obstacles only The properties in the scheme are only applied to obstacles yet to be inserted.
Apply to obstacles in present course The properties in the scheme are applied to the
obstacles in the present course.
In reality the program does not always determine the properties of a new obstacle according to the properties scheme. If you insert several of the same kind of obstacle successively, the program takes the properties of the second, third, etc. obstacle from the first. For example: Insert a high jump and change its properties. Subsequently insert another high jump. The second will have the same properties as the first instead of those in the active properties scheme. However, when you insert a different obstacle and then another high jump the new jump will have the properties defined in the active scheme.

Colour schemes Like the properties schemes define the sizes of the obstacles, the colour schemes define the colours of the obstacles. Obstacle colours always apply to all obstacles in the program. You cannot have two high jumps with different colours in one course. Various colour schemes can be used, for example, for: Different colours for the screen, printer, and bitmap files. Colours to match the colour of the actual obstacle set used. Select the option ‘Colour schemes’ from the 'Options' menu. A dialog box with the current colour scheme appears.
The program has three standard schemes. ‘Grey’ and ‘black/white’ are meant for black/white printers. Making or modifying colour schemes You can make a new scheme or modify an existing one. After clicking the buttons concerned the following dialog box appears:

In the first box you can change the name of the scheme if wished. The list contains all available obstacles. Use the box ‘Colours’ to change the colours of an obstacle. First select the obstacle whose colour you want to change from the list. Every obstacle has at most four colours. One of the colours is used for the lines in the obstacle; the other three colours can be used for the different areas drawn in the obstacle. To change one of he four colours first click on the colour button. The colour buttons are under the texts ‘Lines Colour 1 Colour 2 Colour 3’. The buttons show the current colours set. One of the colours has a blue frame; this is the active button of which you can change the colour. Under the four colour buttons there are three sliding bars. By shifting these bars you can change the colour of the active button, and with it that part of the selected obstacle. Next to the three sliding bars you can see colour values expressed in Red, Green and Blue. You can type in a value. Values range from 0 to 255 If you click the box ‘Grey’ the program will only accept grey tones. This can be useful if for example you are making a scheme for a black/white printer. Finally you can also click on the button ‘Select colour’. A standard colour choice will appear in the window, which you may know from other programs. Choosing the active colour scheme The active colour scheme determines the colour of the obstacles on the screen. Simply select one of the schemes and click on OK. Printing and saving as bitmap When you print your course, one of the print options will be to select a colour scheme. The same applies to ‘save as bitmap’.

Why grey and black/white schemes For clarity on the screen it is useful for obstacles and the ring to have different colours. However, if you print the course on a black/white printer, the colours are no longer so useful. For example, the contact zones, clearly visible on screen, may not be easy to distinguish from the rest of the obstacle once printed. Another significant disadvantage of colour printing is that while on the screen the ring is pale green, it will be printed as a large grey plane. This is not very clear and uses up a lot of ink/toner. Even if you have a colour printer, you can save a lot of ink if you decide to leave the ring plain white on paper. The size of bitmap files is better if you save the course in a black/white scheme. The size of the file may be important if, for example, you want to publish it on internet.

General settings The ‘General settings’ option on the 'Options’ menu opens a dialog in which you can change all sorts of program settings. At the top of the dialog box you can select various tabs. Each tab contains a number of program settings. Button bar
In this dialog box you can change the behaviour of the button bar. You can choose whether the obstacle buttons on the bar should automatically be restored as soon as you have inserted an obstacle.

Windows
In this dialog box you can change the standard display of the program window and the course windows. Display main window Defines how the program window should appear
when you start the program.
Open automatically Defines if and what the program should open automatically after you start it.
Display new course window Defines the form of a new course window. You can set the size of the window as well as the 'zoom-factor' of the course within the window. The second setting defines what should happen if the program is started when it was already started. You can choose between activating the existing program and starting a second program. This setting applies if, e.g. you open an AAP-course from Windows Explorer.
Automatic zoom to enlarge window If you enlarge a course window and the course does not fill the entire window, the program will automatically zoom in on the course until it does fill the window. However, if you minimise the window, it does not automatically zoom out.
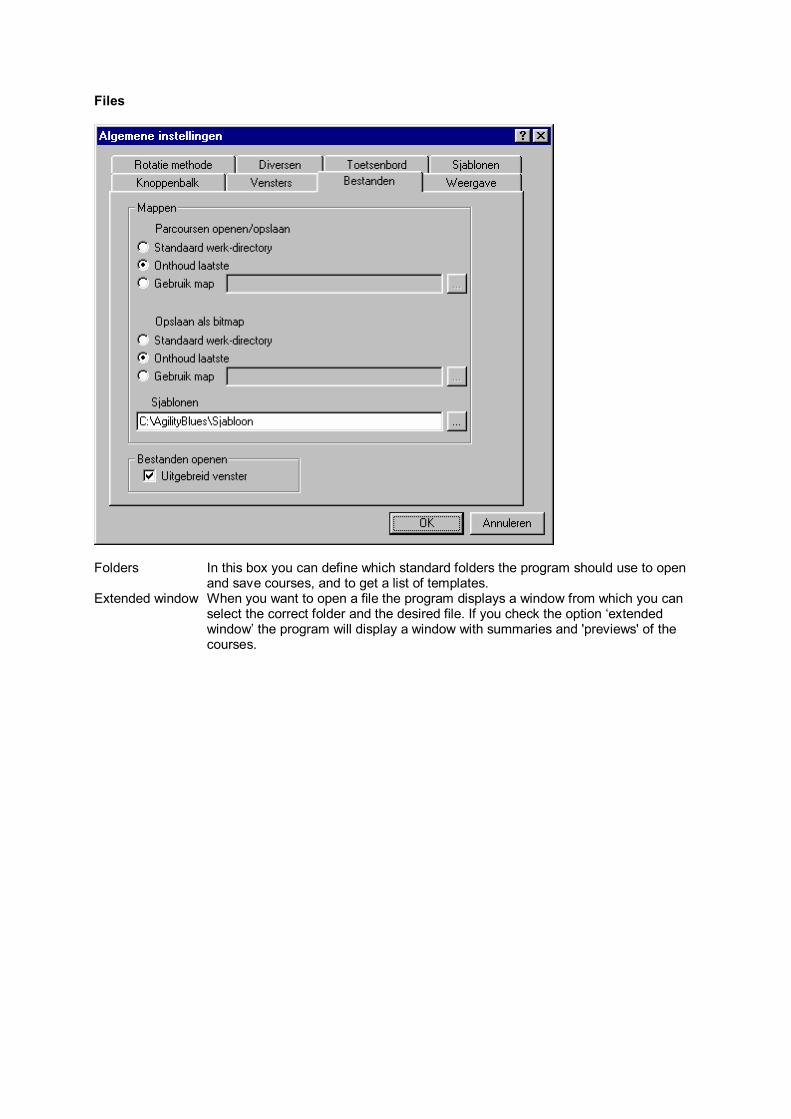
Files
Folders In this box you can define which standard folders the program should use to open
and save courses, and to get a list of templates. Extended window When you want to open a file the program displays a window from which you can
select the correct folder and the desired file. If you check the option ‘extended window’ the program will display a window with summaries and 'previews' of the courses.
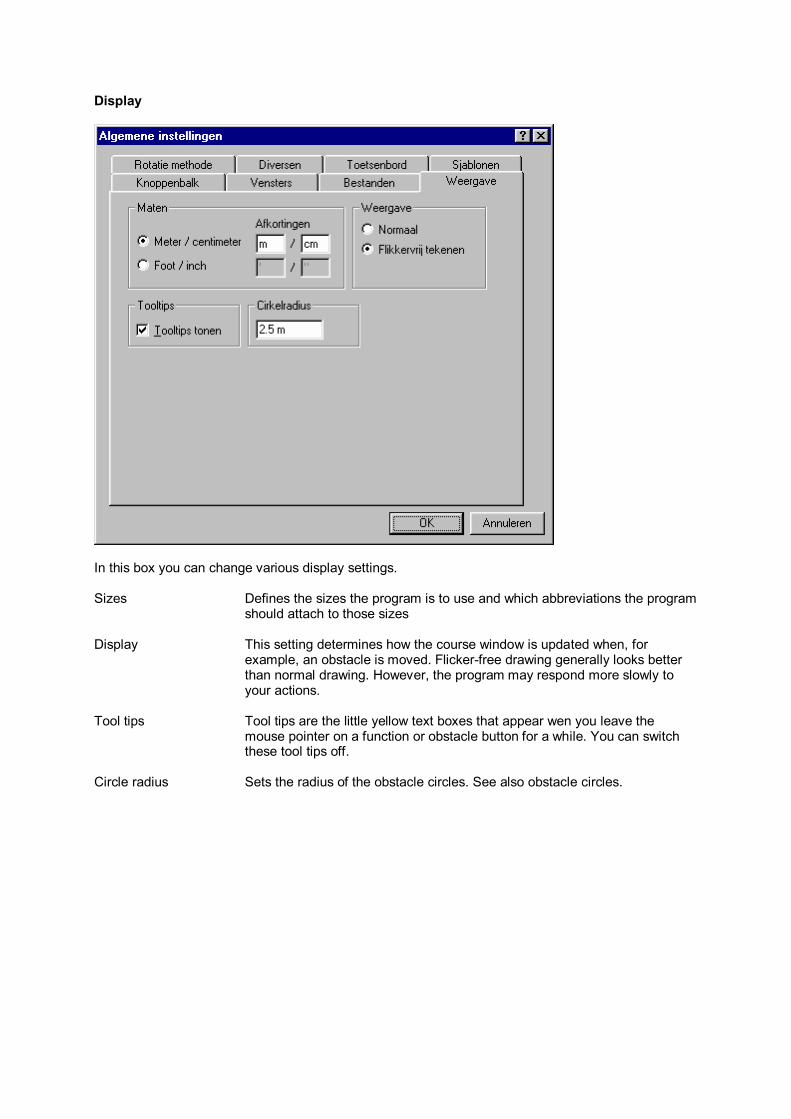
Display
In this box you can change various display settings. Sizes Defines the sizes the program is to use and which abbreviations the program
should attach to those sizes Display This setting determines how the course window is updated when, for
example, an obstacle is moved. Flicker-free drawing generally looks better than normal drawing. However, the program may respond more slowly to your actions.
Tool tips Tool tips are the little yellow text boxes that appear wen you leave the
mouse pointer on a function or obstacle button for a while. You can switch these tool tips off.
Circle radius Sets the radius of the obstacle circles. See also obstacle circles.

Rotation method
In this box you can set whether rotation should be set from the centre or around the ends of an obstacle. Obstacles such as the catwalk and the seesaw can generally best be rotated around the ends, while high jumps can best be rotated around the centre of the jump. The rotation method only applies to rotation with the purple rotation buttons.

Miscellaneous
Undo Sets how much memory the program should reserve to remember the latest actions. The more memory the program reserves, the more actions you can undo. If you set the memory at 0 the undo function is switched off. Normally it is not necessary to change this setting. Double clicks Here you can set whether the program should react to double-clicking on an obstacle. If you check this option then a double click on the obstacle will automatically open the standard window. For most obstacles this is the position window. For some obstacles this is the properties window. For text boxes it is the change text window.

Keyboard
In this box you can change the function of the Shift key, the Ctrl key and the space bar. The default setting uses the Shift key to place the same obstacle as the previous one again, and the Ctrl key to select several obstacles. You can reverse these functions in this tab box.

Templates
This tab box defines all course template settings. First of all, set whether the program should use a template when you start up. Subsequently, set whether the program should use a template when you select ‘File – new’ from the menu. The 'Templates folder’ is the folder from which the program takes the templates shown in a list. Save templates in this folder. The 'standard-template’ is the template the program should automatically start with. This is the file that is used when you select the option ‘Always use standard template’.