Agilent N2X N2X Traffic Generation and Analysis - N2X...
18
N2X Traffic Generation and Analysis - N2X Fast Find Application Note Agilent N2X N2X Fast Find enhancements accelerate time to insight by providing sorting and filtering mechanisms for large quantities of post-test results.
Transcript of Agilent N2X N2X Traffic Generation and Analysis - N2X...

N2X Traffic Generation and Analysis - N2X Fast Find
Application Note
Agilent N2X
N2X Fast Find enhancements accelerate time to insight by providing sorting and filtering mechanisms for large quantities of post-test results.
2
N2X Traffic Generation and Analysis - N2X Fast Find
IntroductionFast Find - Accelerate time to insight
N2X Fast Find provides measurement sorting and filtering mechanisms on 10s of millions of results, helping users find the "worst offending" streams with a single click.
Test ObjectiveThe objective of this application note is to show how the N2X FastFind Capability can accelerate traffic testing and analysis by finding key results quickly and easily.
Example:
An N2X user is running tests that involve tens of thousands of streams per port in any configuration.
Target UserThe target user is any Test engineer running tests with many (>100) streams, up to 1 million streams in total (across many ports).
Example:
A test engineer is running a basic traffic QoS test for a layer 2 aggregation switch, or a L3 edge router. The engineer has set up traffic in a partial mesh, with hundreds of streams from every port to every port.
Key FeaturesBasic sorting and filteringComplex filtering through the filter builderExporting filtered results to CSV files
Equipment RequiredN2X Equipment
One N2X controller
N2X SoftwareN2X release 6.10 (or later)E7880B “Packets and Protocols” license OR E7881B “Packets” license
Device Under Test (DUT)To simplify this application note, no DUT will be required and N2X dummy modules will be used in the examples shown.
•••
•
••

3
N2X Traffic Generation and Analysis - N2X Fast Find
Instructions
Test Example:
Port Setup
► Step 1
Add one module to your N2X configuration; for this example we use a dummy module:
► Step 2
Open a new N2X test session and add 2 dummy Ethernet ports. Ports numbered 64xx and lower are real ports. Ports numbered 65xx and higher are dummy ports.
We will refer to the first port as port 1 and second port as port 2 in this application note.
► Step 3
There is no need to configure the Physical or Link Layer since we are using dummy ports for demonstration purpose only.

4
N2X Traffic Generation and Analysis - N2X Fast Find
Setup Traffic Streams and Generate Statistics Data
► Step 4
Click on "Traffic" in the main window, select port 1, and add 4 stream groups, each with 8,000 streams by incrementing the Destination IP addresses. You can do that by double-clicking on the stream group. Then right-click on "Destination Address", set the Count to 8,000, make sure that the Stream ID is set to Yes and click "OK". Configure the streams as per your test needs; specific details are not important for this example.
► Step 5
Start traffic, wait for a few seconds, then stop traffic.
Viewing Statistics Data in Fast Find
► Step 6
Click on "N2X Fast Find" on the left hand side of the main dialog to open the Fast Find pane.

5
N2X Traffic Generation and Analysis - N2X Fast Find
► Step 7
Click on "Retrieve Data" in the Fast Find pane and open the tab "Session: STREAM" to load up all 32,000 statistics records on one single view.
Retrieve all end-of-test statistics data in one mouse click! There is no need to use scripting or paging just to view all the statistics data.
► Step 8
Click on the Fast Find views - Port, Stream and Field views - respectively to browse the statistics data. You will see 32,000 statistics records on the Stream view, all on one page. You can go through all statistics data by using the scroll bar on the right hand side.
All the statistics data (port, stream and field) you are currently viewing is the session data set, i.e. all the measurement data from the last test run. This data is persistent until you run another test. Each row is a record.
NOTE:There will be no data in the Field view since we have not configured any field values.
Observe that the statistics types are the default selections from the Realtime statistics dialog.
► Step 9
Also observe the status bar, and the number of records at the bottom of the pane.

6
N2X Traffic Generation and Analysis - N2X Fast Find
Fast Find Filtering and Sorting
Filtering and sorting on all data takes only seconds.
► Step 10
Click on the Stream view. Do a quick filter by right-clicking on a data cell and select one of the “=”, “>” or “<” options in the context menu. Observe that data has been filtered and the number of filtered records is as displayed in the bottom-right corner.

7
N2X Traffic Generation and Analysis - N2X Fast Find
► Step 11
Try another quick way to filter, by selecting a value from the column drop-down selection.

8
N2X Traffic Generation and Analysis - N2X Fast Find
► Step 12
You can perform more complex filtering using the filter builder. Click on "Filter" on top of the Fast Find pane to open the Edit Filter dialog. You can also go to this dialog by clicking on the "Edit Filter" button at the bottom-right corner of the pane.
► Step 13
Create a filter by specifying the columns to filter on, the value for filtering, and a conditional operator. Also choose a compound operator if you are filtering on multiple columns. Click "OK" and look at the result.

9
N2X Traffic Generation and Analysis - N2X Fast Find
► Step 14
Clear the filter by clicking on the "Clear Filter" button on top of the pane or the “x” at the bottom-left corner.
► Step 15
To re-apply the previously defined filter, select one from the drop-down list at the bottom-left of the Fast Find pane.
► Step 16 To sort the data, simply click on the header of the column on which you would like to sort. Click one more time to switch between ascending and descending sort alternatives.
10
N2X Traffic Generation and Analysis - N2X Fast Find
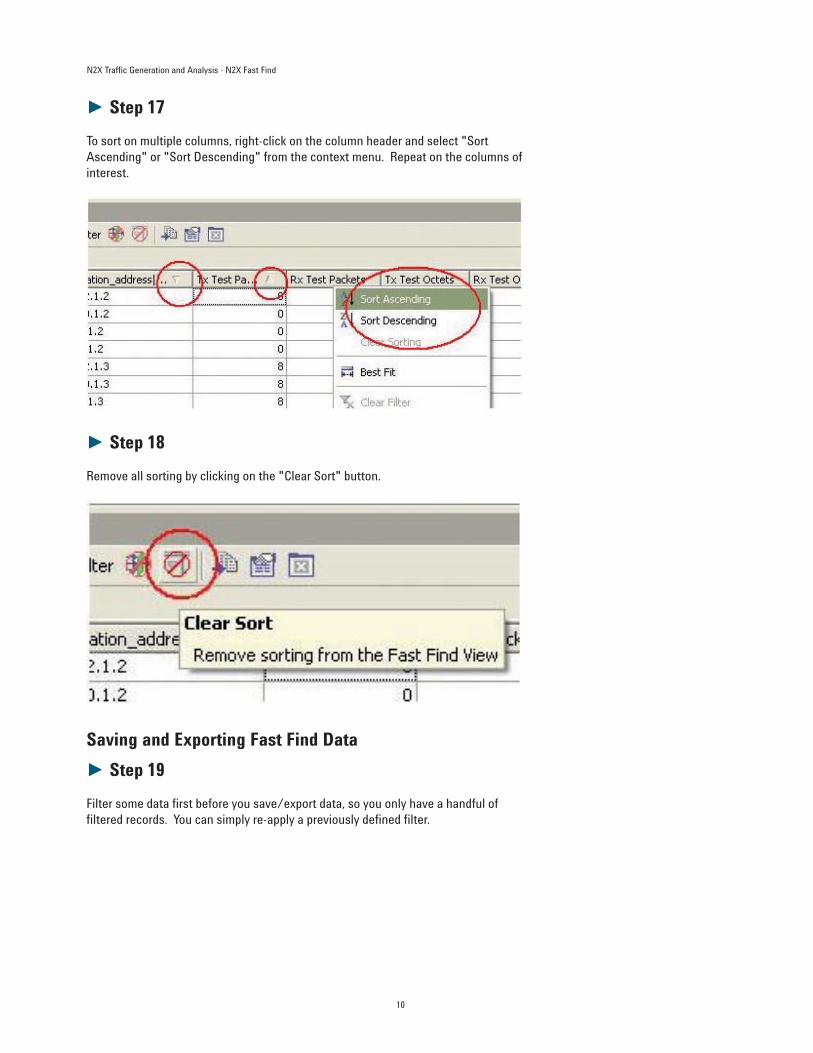
► Step 17
To sort on multiple columns, right-click on the column header and select "Sort Ascending" or "Sort Descending" from the context menu. Repeat on the columns of interest.
► Step 18
Remove all sorting by clicking on the "Clear Sort" button.
Saving and Exporting Fast Find Data
► Step 19
Filter some data first before you save/export data, so you only have a handful of filtered records. You can simply re-apply a previously defined filter.

11
N2X Traffic Generation and Analysis - N2X Fast Find
► Step 20
Save current Fast Find statistics data into a data set file (.set). Click on the "Save Session Data Set" button to open the Save dialog. Select a directory and provide a file name, then click "OK".
► Step 21
Export the filtered data to a .csv file. Click on the "Export View" button to open the Export dialog. Select a directory and provide a file name, then click "OK".
NOTE:As opposed to saving the data set, exporting data will only export the filtered result.
► Step 22
Open the saved .csv file in a spreadsheet program such as Microsoft Excel. Observe that only the filtered records are present.

12
N2X Traffic Generation and Analysis - N2X Fast Find
► Step 23
Re-configure the traffic as shown in step 4 and run another test before you open your saved data set file. First, remove all except the first stream group on port 1. On port 2, create a stream group by varying VLAN ID.
► Step 24 Set up the field statistics collection on port 1. Click on "Realtime" to open the Result – Realtime pane. Double-click on port 1 to open the Port Measurement Properties dialog.
Select Field Values, then select “vlan_id1” as the Field.

13
N2X Traffic Generation and Analysis - N2X Fast Find
► Step 25
Start traffic, wait a few seconds, and then stop the test. Click on "N2X Fast Find" again to open the Fast Find pane. Click "Retrieve Data".
Observe that the session data set has been updated. You will see now that you have 4,000 field statistics records, and 8,000 stream statistics records.

14
N2X Traffic Generation and Analysis - N2X Fast Find
► Step 26 Open the previously saved data set.
Click on "New View" to open the New N2X Fast Find View dialog.
Select the Data Set by clicking on the "Open..." button, and select the data set file saved from the previous traffic run. Select "STREAM" as the Measurement Type. Click "OK".
► Step 27
Observe that the new Fast Find view is displaying the data from the previous run and that there are 32,000 stream statistics records.

15
N2X Traffic Generation and Analysis - N2X Fast Find
► Step 28
Select a different measurement type for viewing. Click on "View Properties" to open the Fast Find Properties dialog. Select "FIELD" for Measurement Type. You will see an empty table because we did not have field statistics collection in the previous test run.
► Step 29 You can create additional Fast Find views to look at the saved data sets from multiple test runs. Save the session data set. Open another new Fast Find view and select the newly saved data set file.
► Step 30
Remove a view by clicking the "Remove View" button.

16
N2X Traffic Generation and Analysis - N2X Fast Find
Other Fast Find Configurations
► Step 31
To change the collected statistics in Fast Find, change the selection in the N2X statistics subsystem. This is because Fast Find is only reflecting the data as collected by the statistics subsystem. Click on the "Realtime to Result – Realtime" pane again. Click on "Setup" to open the Setup Measurement dialog. Go to the "Measurement" tab. Now, add and remove a few measurements.
► Step 32
Start traffic, wait for a few seconds, then stop traffic.
► Step 33
Click on "N2X Fast Find" to open the Fast Find pane. Click "Retrieve Data". Observe that collected statistics have changed, as indicated by the columns in the Fast Find views.
► Step 34
Among the statistics data collected, you can select or deselect the statistics, i.e. the columns, to view within Fast Find views.
To remove a column, drag and drop the column header.
To add or remove columns, right-click on any column header and select "Choose Columns..." to open the Choose Columns dialog. Check and uncheck the columns as you like and click "OK".

17
N2X Traffic Generation and Analysis - N2X Fast Find
► Step 35 You can choose to have data retrieved automatically after each test run. Click on the "Property" button to open the Retrieve Data Properties dialog. Enable Auto-Retrieve and click "OK".
Start traffic, wait for a few seconds, and stop traffic.
Observe that in Fast Find views, the session data set has been automatically retrieved for this test run.
► Step 36
In case you would like to interrupt data retrieval, e.g. if data retrieval is taking longer than you expected, you can do so by clicking on the "Cancel Retrieve Data" button.
For large-scale configuration, you might choose to collect data only on specified ports. This is supported only in the Tcl API command.
Sales, Service and SupportUnited States: Agilent Technologies Test and Measurement Call CenterP.O. Box 4026Englewood, CO 80155-4026 1-800-452-4844
Canada:Agilent Technologies Canada Inc.2660 Matheson Blvd. EMississauga, OntarioL4W 5M21-877-894-4414
Europe:Agilent TechnologiesEuropean Marketing OrganisationP.O. Box 9991180 AZ AmstelveenThe Netherlands(31 20) 547-2323
United Kingdom07004 666666
Japan:Agilent Technologies Japan Ltd.Measurement Assistance Center9-1, Takakura-Cho, Hachioji-Shi,Tokyo 192-8510, JapanTel: (81) 426-56-7832Fax: (81) 426-56-7840
Latin America:Agilent TechnologiesLatin American Region Headquarters5200 Blue Lagoon Drive, Suite #950Miami, Florida 33126U.S.A.Tel: (305) 269-7500Fax: (305) 267-4286
Asia Pacific:Agilent Technologies19/F, Cityplaza One, 1111 King’s Road,Taikoo Shing, Hong Kong, SARTel: (852) 3197-7777Fax: (852) 2506-9233
Australia/New Zealand:Agilent Technologies Australia Pty Ltd 347 Burwood HighwayForest Hill, Victoria 3131Tel: 1-800-629-485 (Australia)Fax: (61-3) 9272-0749Tel: 0-800-738-378 (New Zealand)Fax: (64-4) 802-6881
Agilent N2XAgilent’s N2X multi-service tester combines leading-
edge services with carrier grade infrastructure testing
and emulation. The N2X solution set allows network
equipment manufacturers and service providers to
more comprehensively test new services end-to-end,
resulting in higher quality of service and lower network
operating costs.
Warranty and SupportHardware Warranty
All N2X hardware is warranted against defects in
materials and workmanship for a period of 1 year from
the date of shipment.
Software Warranty
All N2X software is warranted for a period of 90 days.
The applications are warranted to execute and install
properly from the media provided.
This warranty only covers physical defects in the
media, whereby the media is replaced at no charge
during the warranty period.
Software UpdatesWith the purchase of any new system controller
Agilent will provide 1 year of complimentary software
updates. At the end of the first year you can enroll into
the Software and Suport Agreement (SSA) contract for
continuing software product enhancements.
SupportTechnical support is available throughout the support
life of the product. Support is available to verify
that the equipment works properly, to help with
product operation, and to provide basic measurement
assistance for the use of the specified capabilities, at
no extra cost, upon request.
Ordering InformationTo order and configure the test system consult your
local Agilent field engineer.
www.agilent.com/find/n2x
This information is subject to change without notice.Printed on recycled paper© Agilent Technologies, Inc. 2008Printed in USA September 10, 20085989-9724EN