Agile Product Lifecycle Management...MCAD Install Guide 3.3.0.0 6 Agile Product Lifecycle Management...
40
Agile Product Lifecycle Management MCAD Connectors for Agile Engineering Collaboration Installation Guide December 2013 V3.3.0.0 Oracle Part Number – E50823-01
Transcript of Agile Product Lifecycle Management...MCAD Install Guide 3.3.0.0 6 Agile Product Lifecycle Management...

Agile Product Lifecycle Management
MCAD Connectors for Agile Engineering
Collaboration Installation Guide
December 2013
V3.3.0.0
Oracle Part Number – E50823-01

Copyrights and Trademarks
IMPORTANT NOTICE
This document contains information protected by copyright.
All rights are reserved, including the translation. No part of this documentation may be reproduced in
any way (print, photocopy, microfilm or any other form) or processed, duplicated or distributed by use of
electronic system without written permission of the company. The information contained in this
documentation does not constitute any obligation on the part of the seller. The software described in
this documentation is delivered under licensing contract which governs its use.
xPLM Solution is not liable for errors in this documentation.
All trademarks are the property of their respective owners.
Contact Address (for Support Services see Preface chapter):
xPLM Solution GmbH xPLM Solution Inc.
Devrientstr. 5 250 Commercial Street, Suite 520
D - 01067 Dresden, Germany Worcester, MA 01608 USA
www.xplm.com
3
CONTENTS
Prerequisites ....................................................................................................................................6
Validating the Engineering Collaboration Services on the Agile PLM Server ...................... 6
Installing and Configuring Pro/ENGINEER Connector .....................................................8
Extracting Files for Pro/ENGINEER Connector ................................................................................ 9
Setting Java Version ................................................................................................................................. 9
Editing the Configuration File ............................................................................................................. 10
Creating a Shortcut to the Startup File ........................................................................................... 10
Creating the Agile Toolbar in Pro/E .................................................................................................. 11
Installing MCAD for Pro/Engineer or Creo on Additional Computers ................................... 13
Installing and Configuring the SolidWorks Connector .................................................. 14
Extracting Files for the SolidWorks Connector ............................................................................. 15
Setup the SolidWorks Connector using the Installer ................................................................. 16
Microsoft .NET environment on older Windows operating systems ..................................... 20
Setting the Workspace Root ................................................................................................................ 20
Creating the Agile Menu in SolidWorks ........................................................................................... 20
Installing and Configuring Solid Edge Connector ........................................................... 23
Extracting Files for Solid Edge Connector ...................................................................................... 24
Setup the Solid Edge Connector using the Installer .................................................................. 25
Setting the Java Version ....................................................................................................................... 28
Microsoft .NET environment on older Windows operating systems ..................................... 28
Setting the Workspace Root ................................................................................................................ 28
Installing on Additional Computers .................................................................................................. 30
How to setup Solid Edge and SolidWorks Connector in parallel on one machine31
Extracting Files for the combined CAD Connector ...................................................................... 32
Setup the Combined Connector using the Installer ................................................................... 33
Microsoft .NET environment on older Windows operating systems ..................................... 36
Setting the Workspace Root ................................................................................................................ 36
How to Uninstall, Add or Change CAD System Versions .......................................................... 37
Installing the Web Components ............................................................................................ 38

MCAD Install Guide 3.3.0.0
4 Agile Product Lifecycle Management
Extracting Files for Web Components for CATIA, Pro/E, NX ................................................... 38
Extracting Files for Web Components for SolidWorks and Solid Edge ................................ 38
Running the Load Callback Installer................................................................................................. 39
Regenerating Attributes.xml .................................................................................................. 40
MCAD Install Guide 3.3.0.0
5
Preface
Contacting Oracle Support Services
For Oracle Agile Engineering Collaboration support contact the Oracle Global Customer Support
(GCS) via www.oracle.com/support or My Oracle Support via https://support.oracle.com.
Accessibility of Code Examples in Documentation
Screen readers may not always correctly read the code examples in this document. The
conventions for writing code require that closing braces should appear on an otherwise empty
line; however, some screen readers may not always read a line of text that consists solely of a
bracket or brace.
This documentation may contain links to web sites of other companies or organizations that xPLM
Solution does not own or control. xPLM Solution neither evaluates nor makes any representations
regarding the accessibility of these web sites.
MCAD Install Guide 3.3.0.0
6 Agile Product Lifecycle Management
Prerequisites
Prior to the installation of the CAD Connectors and the MCAD Web Components on a local system,
you must verify the following items:
Database is operational and running.
Agile PLM (see Introduction for supported versions) is installed and the server is accessible.
(The prerequisites for the Java Runtime Environment are the same as for Agile PLM server.)
Important If you are not working with a member of Oracle Consulting Services, you are strongly encouraged to refer to Agile Product Lifecycle Management Documentation for installation procedures.
Agile File Management Server is usable and accessible.
The Engineering Collaboration Web Services might need to be updated on your Agile PLM
server to be compatible with this release of PLM MCAD. Please check the chapter “Updating
the Engineering Collaboration Services on the Agile PLM server” for details.
A test environment is prepared.
A CAD system is installed on the end-user’s workstation. In addition, the end user has been
granted any necessary privileges to use the CAD system.
Login name and password of the Agile PLM test user are known in Agile PLM.
The test user can launch an Agile PLM client session.
Note that starting with release 3.0 of the Engineering Collaboration MCAD Connectors, only the
Design data model is supported for storing CAD data in PLM. If you are currently using the
DocuBOM data model for MCAD it is necessary to migrate the data accordingly. Please contact
Oracle Consulting Services for assistance.
Validating the Engineering Collaboration Services on the
Agile PLM Server
The Connectors communicate with the Agile PLM server through the Engineering Collaboration
Web Services (EC Services). The required web services are provided by Oracle as part of the
standard Agile PLM installation, but might require an update through a hotfix.
Please check the “Oracle Agile Product Lifecycle Management - MCAD Connector Quick Install
Guide” on the Oracle Software Delivery Cloud ( http://edelivery.oracle.com/ ) if a hotfix is needed
for your version of Oracle Agile PLM and follow the installation instructions of the required PLM

MCAD Install Guide 3.3.0.0
7
hotfix.

MCAD Install Guide 3.3.0.0
8 Agile Product Lifecycle Management
Installing and Configuring Pro/ENGINEER
Connector
This section describes setting up the connection between your Pro/ENGINEER CAD application and
Agile Engineering Collaboration.
The main steps are:
Extract files from Pro/ENGINEER Connector zip file.
Install the Engineering Collaboration Web Components
Edit some parameters in the configuration file.
Edit some parameters in the mapping file.
Create shortcut to new startup file.
Create toolbar in Pro/E (optional).
The installation requires the following files:
Main Pro/E CAD Connector installation package.
Main Web Connector installation package.
Performing the installation steps described here will enable the Agile menu to appear within
Pro/E. In order to have a completely functional integration, you must also:
Perform the core Agile configuration, as described in the chapter Agile PLM Server Class
Administration of the MCAD Connectors for Agile Engineering Collaboration Administration
Guide.
Configure desired Pro/E Connector parameters as described in the Administration Guide.
MCAD Install Guide 3.3.0.0
9
Extracting Files for Pro/ENGINEER Connector
Extract the Pro/E Connector installation file in new and empty folder location <Installation Directory>.
When unzipping, make sure to retain the folder paths from the zip file. When the files are
unzipped you should see a folder named xacp, which contains the connector installation.
Extract the Web Components installation file into the xacp folder in the <Installation Directory>.
When unzipping, make sure to retain the directory structure contained within the zip file. If you
are prompted for overwriting existing files during unzipping, always accept.
Now follow the common installation instructions in Installing the Web Components and run the
Load Callback Installer if needed.
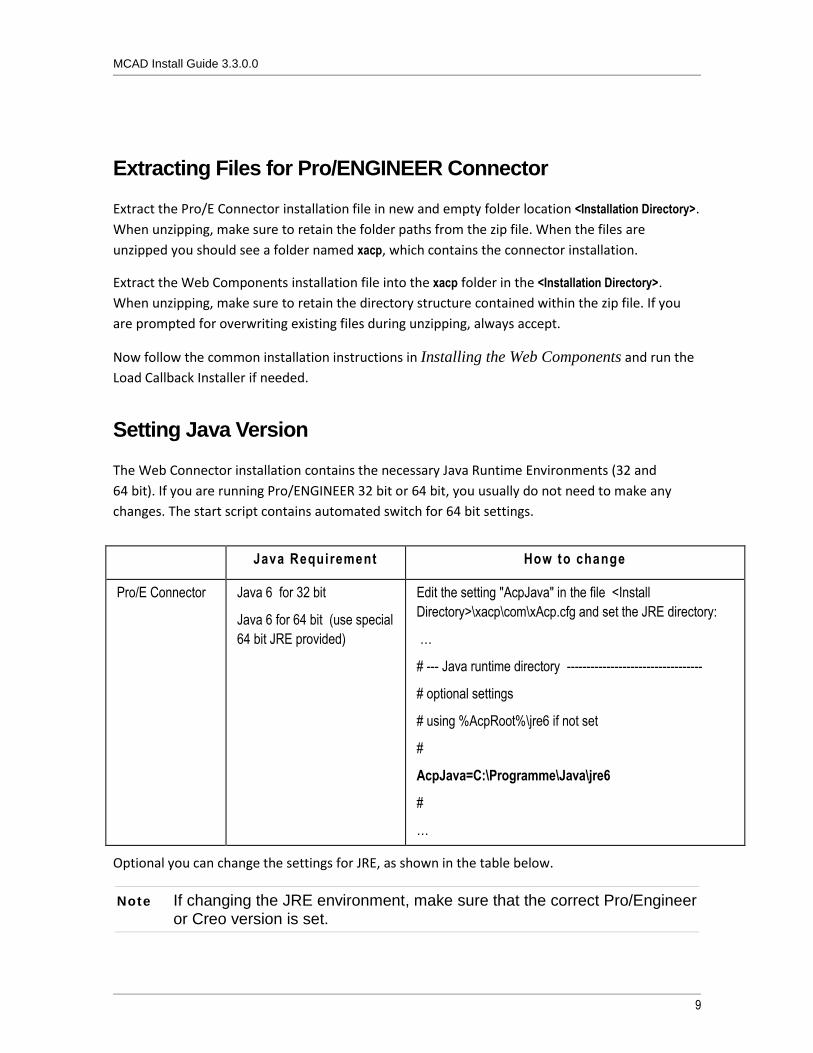
Setting Java Version
The Web Connector installation contains the necessary Java Runtime Environments (32 and
64 bit). If you are running Pro/ENGINEER 32 bit or 64 bit, you usually do not need to make any
changes. The start script contains automated switch for 64 bit settings.
Optional you can change the settings for JRE, as shown in the table below.
Note If changing the JRE environment, make sure that the correct Pro/Engineer or Creo version is set.
Java Requirement How to change
Pro/E Connector Java 6 for 32 bit
Java 6 for 64 bit (use special
64 bit JRE provided)
Edit the setting "AcpJava" in the file <Install
Directory>\xacp\com\xAcp.cfg and set the JRE directory:
…
# --- Java runtime directory ----------------------------------
# optional settings
# using %AcpRoot%\jre6 if not set
#
AcpJava=C:\Programme\Java\jre6
#
…
MCAD Install Guide 3.3.0.0
10 Agile Product Lifecycle Management
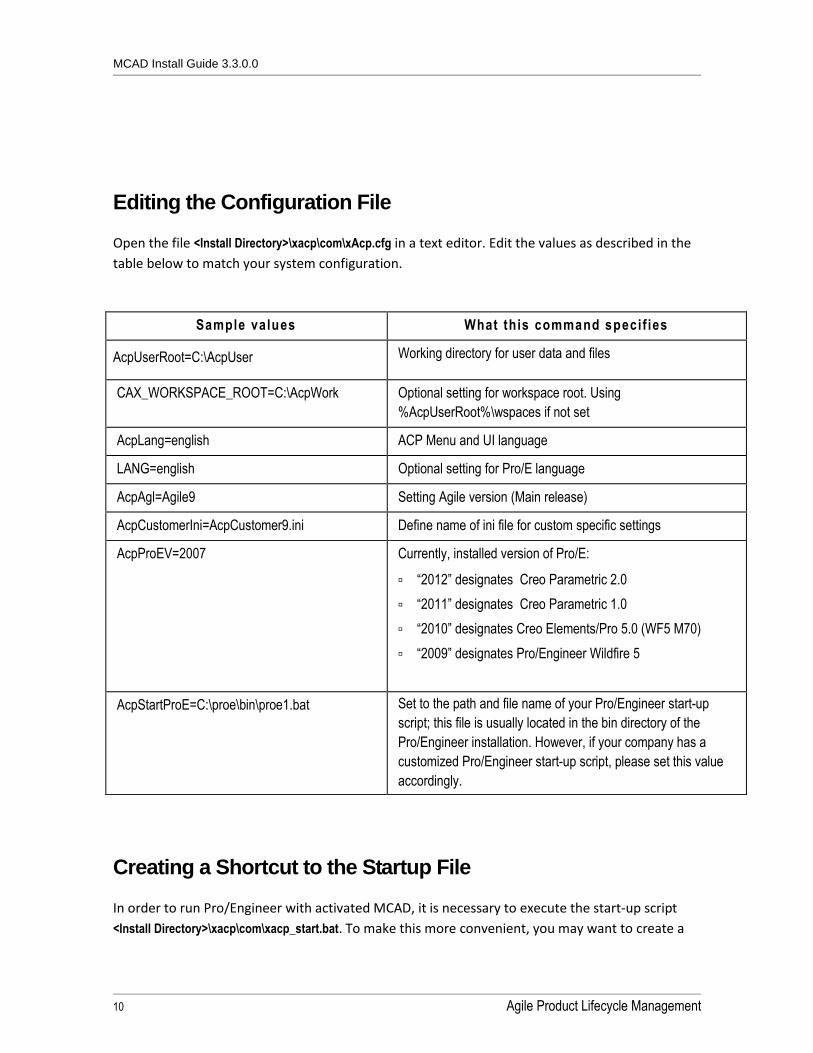
Editing the Configuration File
Open the file <Install Directory>\xacp\com\xAcp.cfg in a text editor. Edit the values as described in the
table below to match your system configuration.
Sample values What this command specif ies
AcpUserRoot=C:\AcpUser Working directory for user data and files
CAX_WORKSPACE_ROOT=C:\AcpWork Optional setting for workspace root. Using
%AcpUserRoot%\wspaces if not set
AcpLang=english ACP Menu and UI language
LANG=english Optional setting for Pro/E language
AcpAgl=Agile9 Setting Agile version (Main release)
AcpCustomerIni=AcpCustomer9.ini Define name of ini file for custom specific settings
AcpProEV=2007 Currently, installed version of Pro/E:
“2012” designates Creo Parametric 2.0
“2011” designates Creo Parametric 1.0
“2010” designates Creo Elements/Pro 5.0 (WF5 M70)
“2009” designates Pro/Engineer Wildfire 5
AcpStartProE=C:\proe\bin\proe1.bat Set to the path and file name of your Pro/Engineer start-up
script; this file is usually located in the bin directory of the
Pro/Engineer installation. However, if your company has a
customized Pro/Engineer start-up script, please set this value
accordingly.
Creating a Shortcut to the Startup File
In order to run Pro/Engineer with activated MCAD, it is necessary to execute the start-up script
<Install Directory>\xacp\com\xacp_start.bat. To make this more convenient, you may want to create a

MCAD Install Guide 3.3.0.0
11
shortcut to this file on your Desktop and/or in your Quick Launch bar.
Verify that the MCAD is working by double-clicking on your start-up script (or the appropriate
shortcut). You should see a menu labelled Agile in Pro/Engineer’s or Creo’s main menu bar
respectively ribbon.
Creating the Agile Toolbar in Pro/E
This step is optional; it will create a toolbar that you can use to run the Agile commands, in
addition to the Agile menu.
To create the toolbar icon on the Pro/E toolbar:
1. Choose Tools → Customize Screen and select the Toolbars tab.
2. When you enable the Toolbar 1 field by clicking the checkbox, a new blank toolbar appears on
the main toolbar.
Figure: Enabling the Toolbar
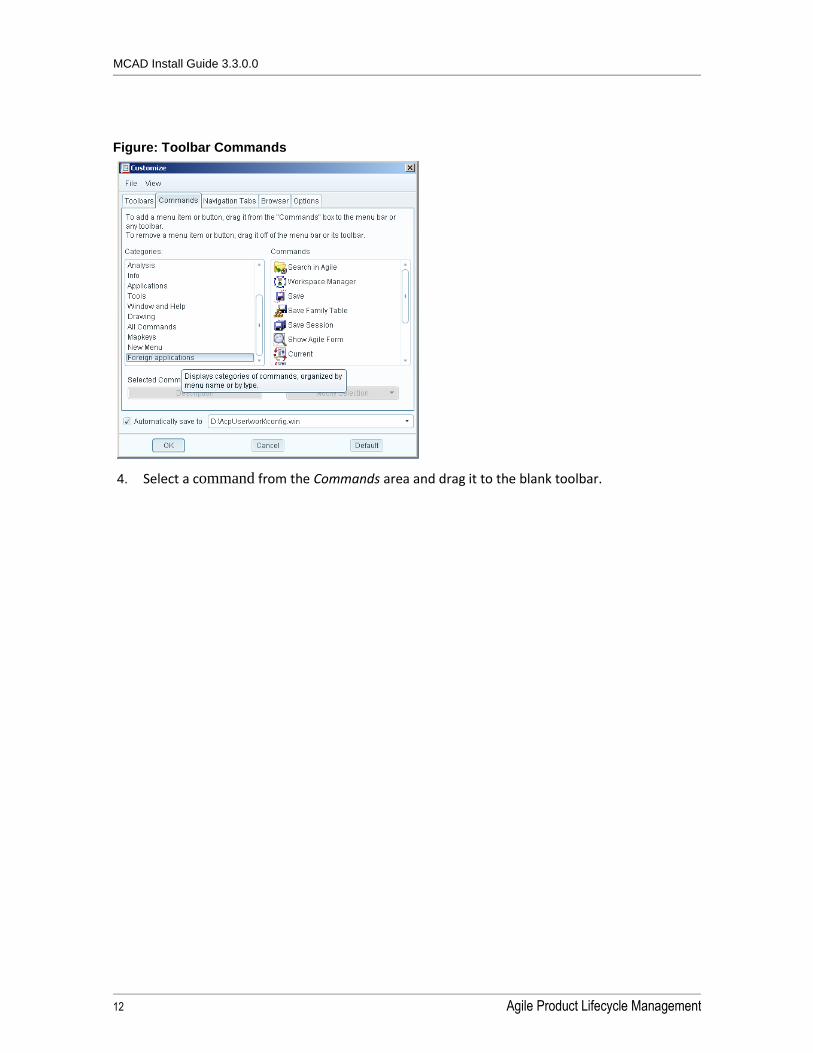
3. Select the Commands tab. Scroll down and select Foreign applications. The icons of the Agile
menu appear in the Commands area.
MCAD Install Guide 3.3.0.0
12 Agile Product Lifecycle Management
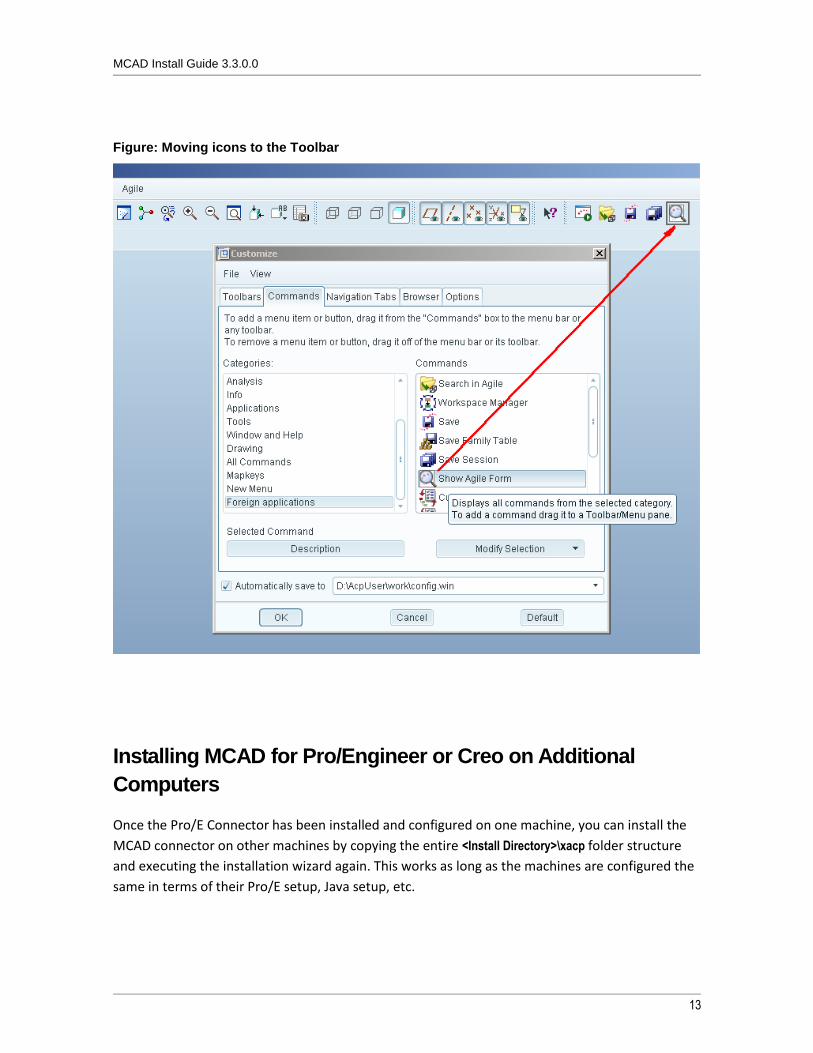
Figure: Toolbar Commands
4. Select a command from the Commands area and drag it to the blank toolbar.
MCAD Install Guide 3.3.0.0
13
Figure: Moving icons to the Toolbar
Installing MCAD for Pro/Engineer or Creo on Additional
Computers
Once the Pro/E Connector has been installed and configured on one machine, you can install the
MCAD connector on other machines by copying the entire <Install Directory>\xacp folder structure
and executing the installation wizard again. This works as long as the machines are configured the
same in terms of their Pro/E setup, Java setup, etc.
MCAD Install Guide 3.3.0.0
14 Agile Product Lifecycle Management
Installing and Configuring the SolidWorks
Connector
This section describes setting up the connection between your SolidWorks CAD application and
Agile Engineering Collaboration.
The main steps are:
Extract files from SolidWorks Connector zip file.
Install the Engineering Collaboration Web Components
Run the Installer for registration
If necessary, activate the MCAD’s add-in menu in SolidWorks.
The installation requires the following files:
Main SolidWorks CAD Connector installation package.
Main Web Connector installation package.
Having performed the installation, the following configuration tasks need to be performed:
Perform the core Agile configuration, as described in the chapter Agile PLM Server Class
Administration of the MCAD Connectors for Agile Engineering Collaboration Administration
Guide.
Configure desired SolidWorks connector parameters as described in the Administration Guide.

MCAD Install Guide 3.3.0.0
15
Extracting Files for the SolidWorks Connector
Create a new folder for the combined Solid Edge and SolidWorks connector, such as C:\AgileEC\xacw
called your <Installation Directory>.
ATTENTION: The required components are registered from the current location. You must not
install xacw on a network location. The SolidWorks connector will not work properly if installed
on network drives.
Extract the SolidWorks Connector installation file in new and empty folder location <Installation
Directory>. When you unzip, make sure that you retain the folder paths from the zip file. When the
files are unzipped, you should see a folder named components, which contains the connector
installation.
Extract the Web Components installation file into the components subfolder in the <Installation
Directory>. When you unzip, make sure that you retain the folder paths from the zip file. If you are
prompted for overwriting existing files always accept.
Run the setup as described in the next chapter.
Now follow the common installation instructions in Installing the Web Components.
MCAD Install Guide 3.3.0.0
16 Agile Product Lifecycle Management
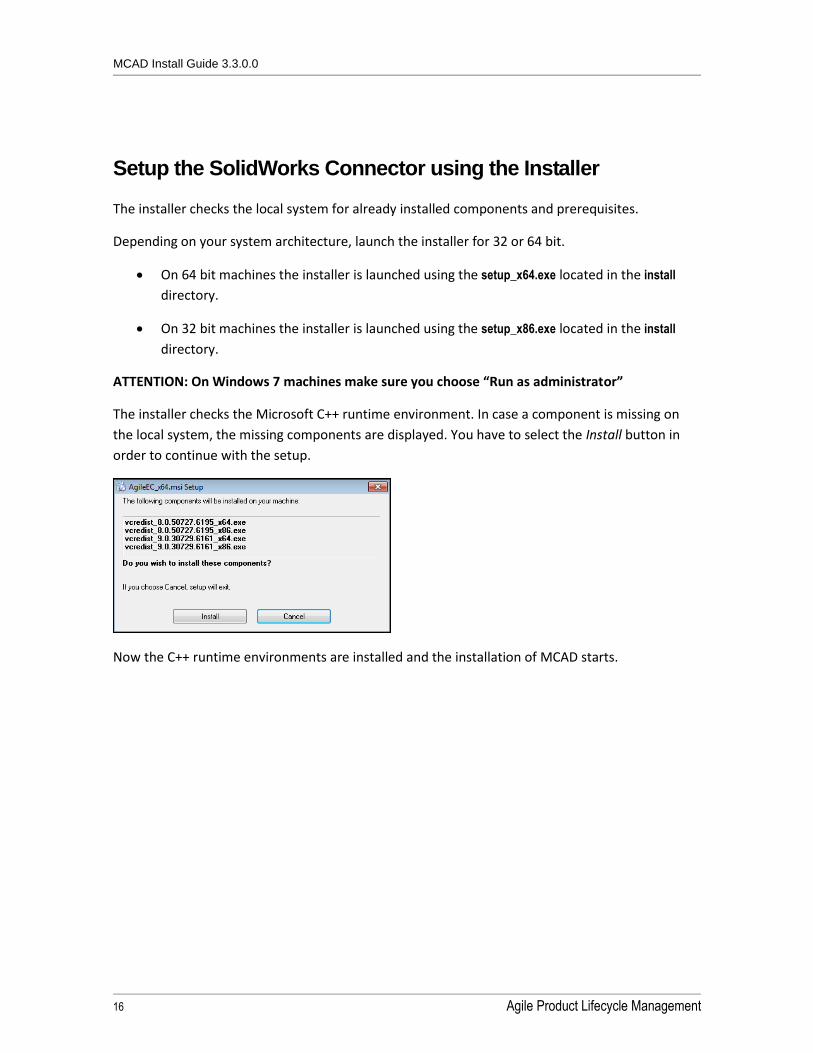
Setup the SolidWorks Connector using the Installer
The installer checks the local system for already installed components and prerequisites.
Depending on your system architecture, launch the installer for 32 or 64 bit.
On 64 bit machines the installer is launched using the setup_x64.exe located in the install
directory.
On 32 bit machines the installer is launched using the setup_x86.exe located in the install
directory.
ATTENTION: On Windows 7 machines make sure you choose “Run as administrator”
The installer checks the Microsoft C++ runtime environment. In case a component is missing on
the local system, the missing components are displayed. You have to select the Install button in
order to continue with the setup.
Now the C++ runtime environments are installed and the installation of MCAD starts.
MCAD Install Guide 3.3.0.0
17
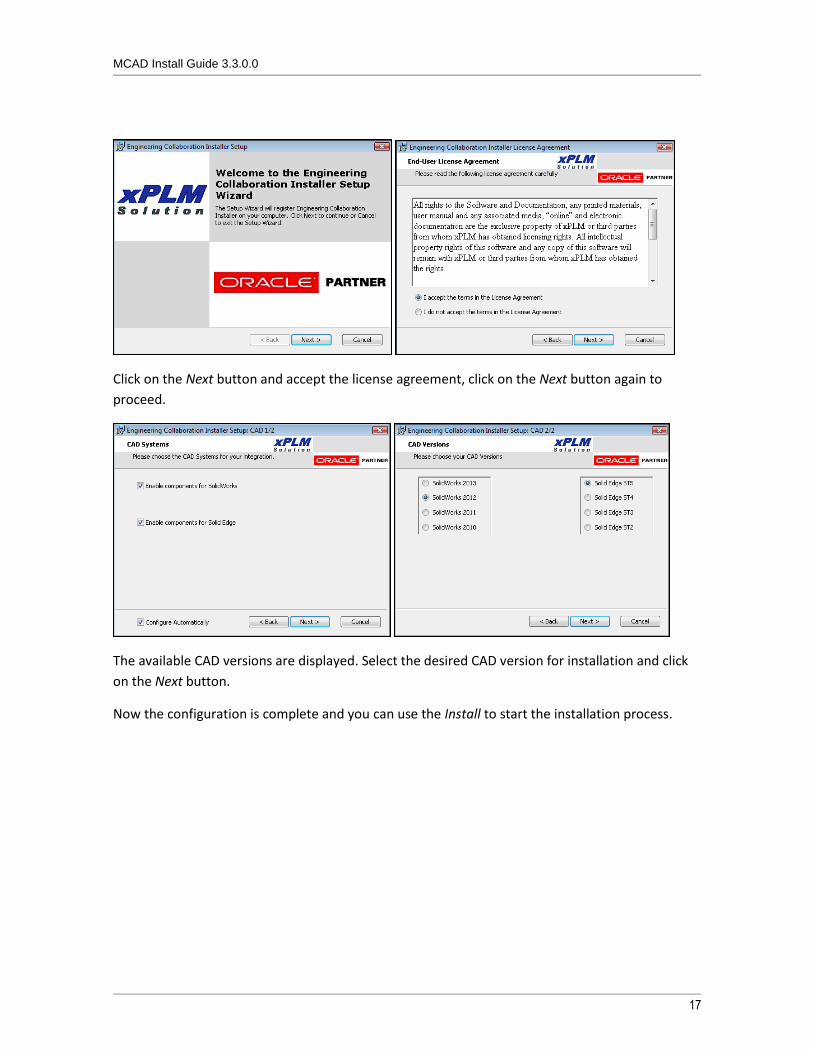
Click on the Next button and accept the license agreement, click on the Next button again to
proceed.
The available CAD versions are displayed. Select the desired CAD version for installation and click
on the Next button.
Now the configuration is complete and you can use the Install to start the installation process.
MCAD Install Guide 3.3.0.0
18 Agile Product Lifecycle Management
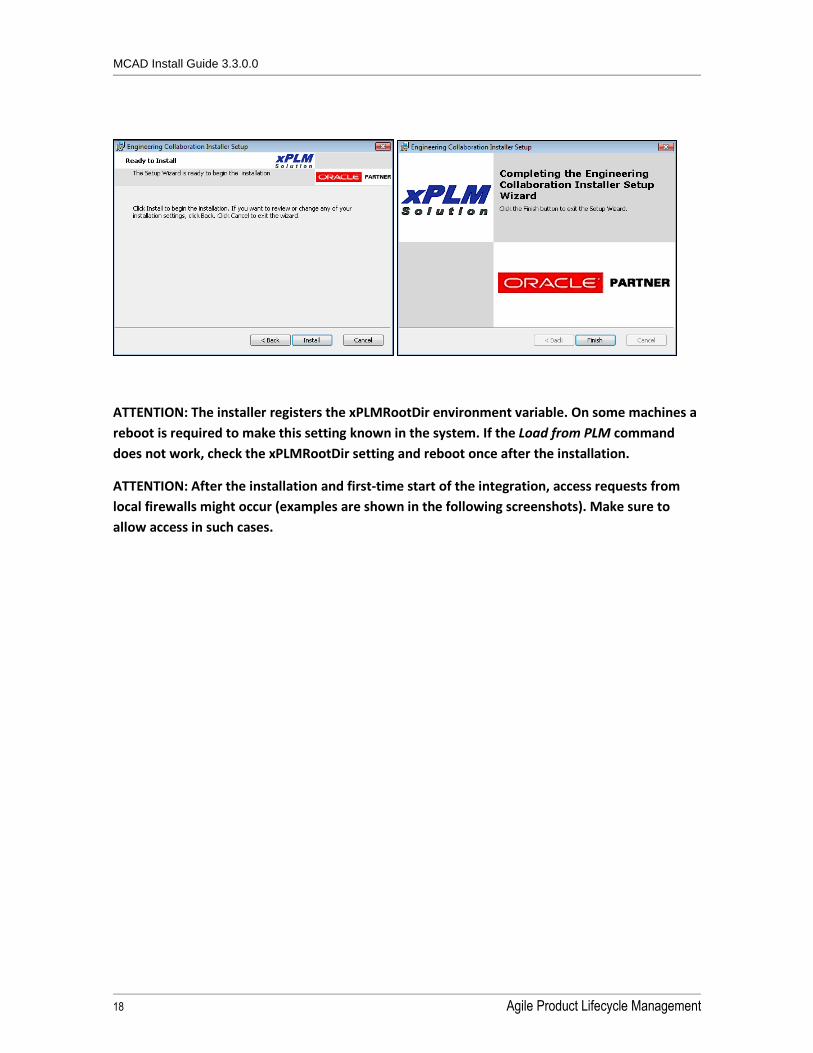
ATTENTION: The installer registers the xPLMRootDir environment variable. On some machines a
reboot is required to make this setting known in the system. If the Load from PLM command
does not work, check the xPLMRootDir setting and reboot once after the installation.
ATTENTION: After the installation and first-time start of the integration, access requests from
local firewalls might occur (examples are shown in the following screenshots). Make sure to
allow access in such cases.

MCAD Install Guide 3.3.0.0
19
MCAD Install Guide 3.3.0.0
20 Agile Product Lifecycle Management
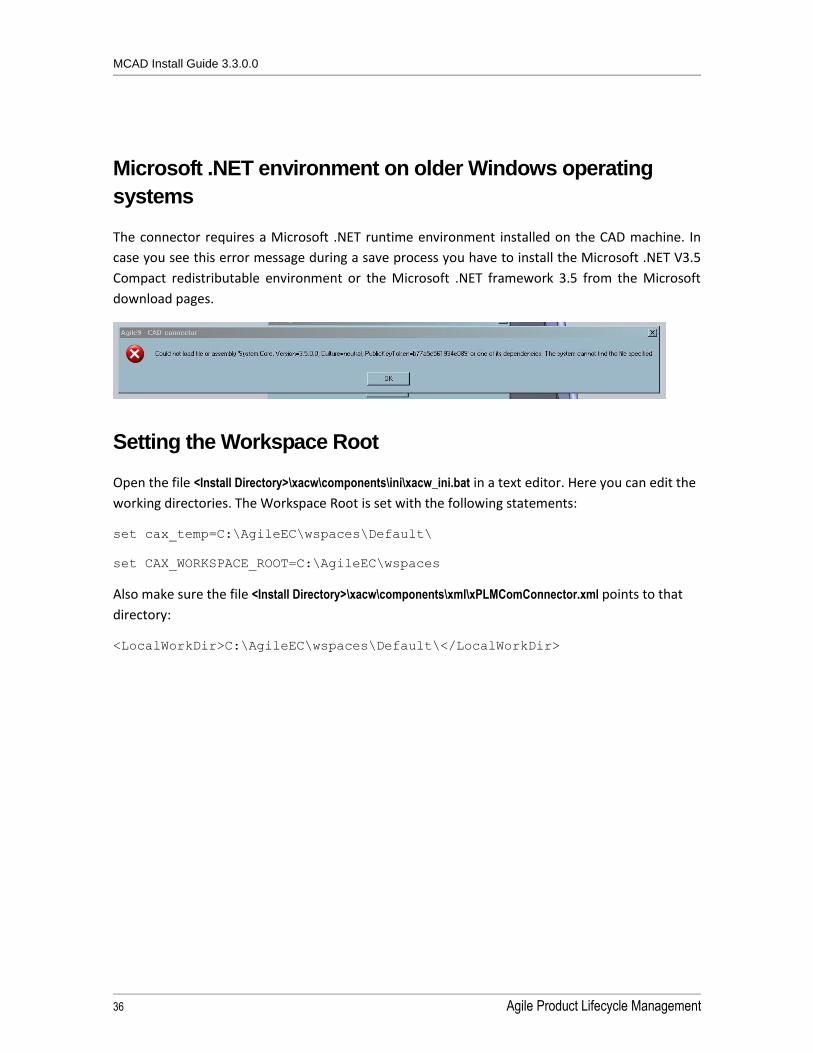
Microsoft .NET environment on older Windows operating
systems
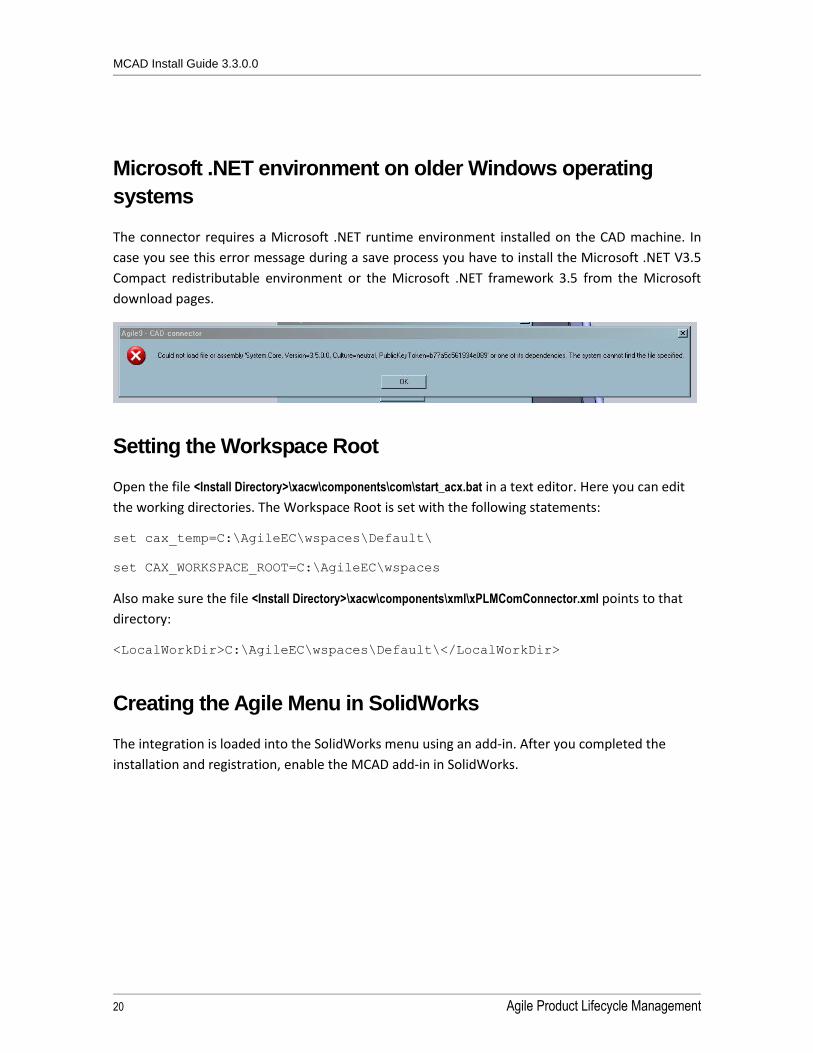
The connector requires a Microsoft .NET runtime environment installed on the CAD machine. In
case you see this error message during a save process you have to install the Microsoft .NET V3.5
Compact redistributable environment or the Microsoft .NET framework 3.5 from the Microsoft
download pages.
Setting the Workspace Root
Open the file <Install Directory>\xacw\components\com\start_acx.bat in a text editor. Here you can edit
the working directories. The Workspace Root is set with the following statements:
set cax_temp=C:\AgileEC\wspaces\Default\
set CAX_WORKSPACE_ROOT=C:\AgileEC\wspaces
Also make sure the file <Install Directory>\xacw\components\xml\xPLMComConnector.xml points to that
directory:
<LocalWorkDir>C:\AgileEC\wspaces\Default\</LocalWorkDir>
Creating the Agile Menu in SolidWorks
The integration is loaded into the SolidWorks menu using an add-in. After you completed the
installation and registration, enable the MCAD add-in in SolidWorks.
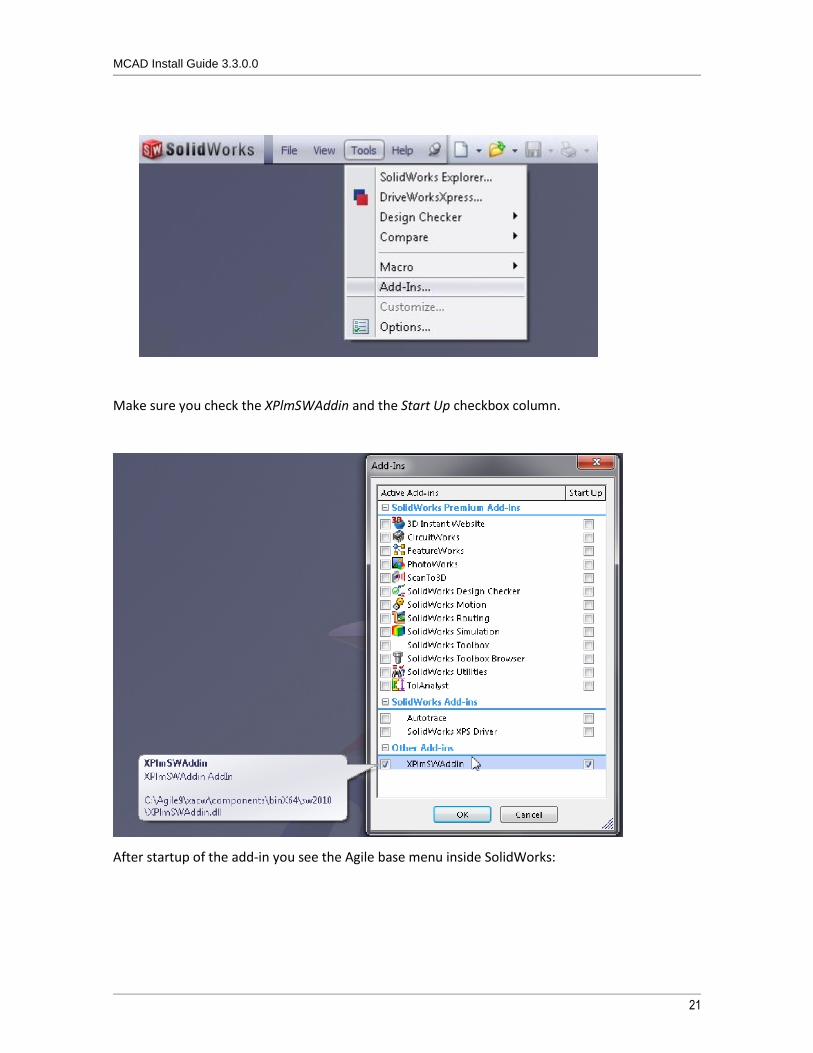
MCAD Install Guide 3.3.0.0
21
Make sure you check the XPlmSWAddin and the Start Up checkbox column.
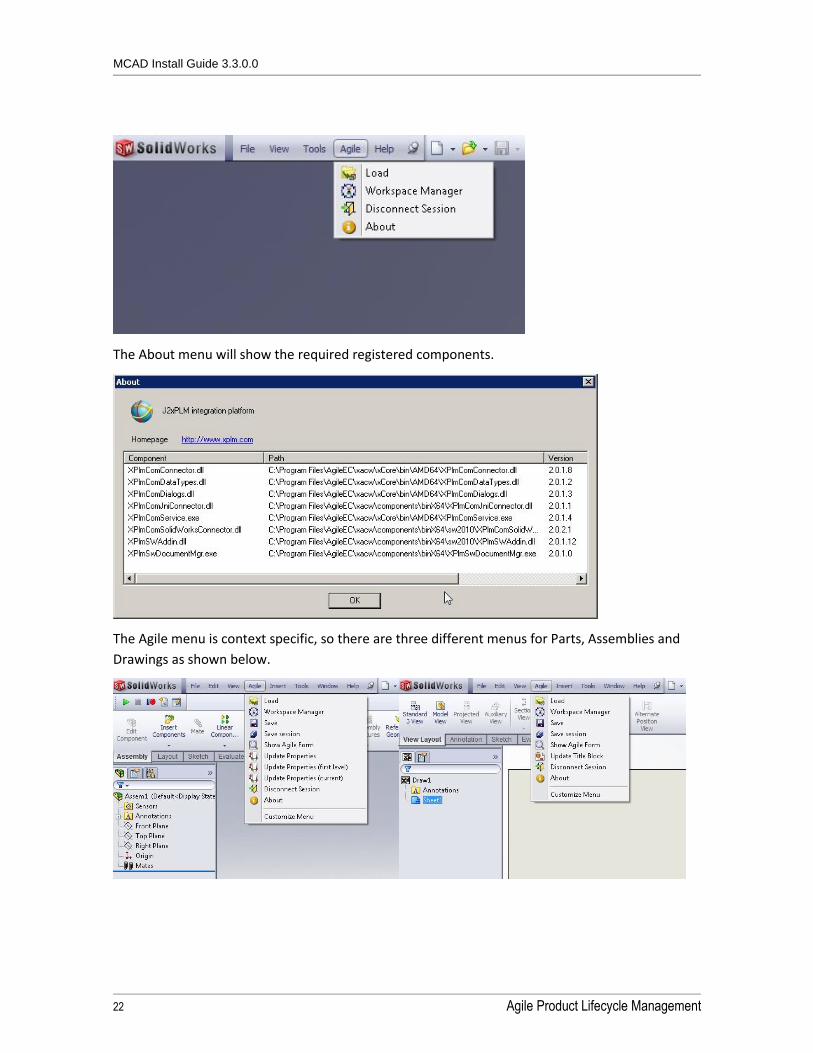
After startup of the add-in you see the Agile base menu inside SolidWorks:
MCAD Install Guide 3.3.0.0
22 Agile Product Lifecycle Management
The About menu will show the required registered components.
The Agile menu is context specific, so there are three different menus for Parts, Assemblies and
Drawings as shown below.

MCAD Install Guide 3.3.0.0
23
Installing and Configuring Solid Edge Connector
This section describes setting up the connection between your Solid Edge CAD application and
Agile Engineering Collaboration.
The main steps are:
Extract files from Solid Edge connector zip file.
Install the Engineering Collaboration Web Components
Run the installation wizard for registration
The installation requires the following files:
Main Solid Edge CAD Connector installation package.
Main Web Connector installation package.
Having performed the installation, the following configuration tasks need to be performed:
Perform the core Agile configuration, as described in the chapter Agile PLM Server Class
Administration of the MCAD Connectors for Agile Engineering Collaboration Administration
Guide.
Configure desired Solid Edge Connector parameters as described in the Administration Guide.
MCAD Install Guide 3.3.0.0
24 Agile Product Lifecycle Management
Extracting Files for Solid Edge Connector
Create a new folder for Solid Edge connector, such as C:\AgileEC\xace called your
<Installation Directory>.
ATTENTION: The required components are registered from the current location. You must not
install xace on a network location. The Solid Edge connector will not work properly if installed
on network drives.
Extract the Solid Edge Connector installation file in new and empty folder location
<Installation Directory>. When you unzip, make sure that you retain the folder paths from the zip file.
When the files are unzipped, you should see a folder named components, which contains the
connector installation.
Extract the Web Components installation file into the components subfolder in the
<Installation Directory>. When you unzip, make sure that you retain the folder paths from the zip file.
If you are prompted for overwriting existing files always accept.
Run the setup as described in the next chapter.
Now follow the common installation instructions in Installing the Web Components.
MCAD Install Guide 3.3.0.0
25
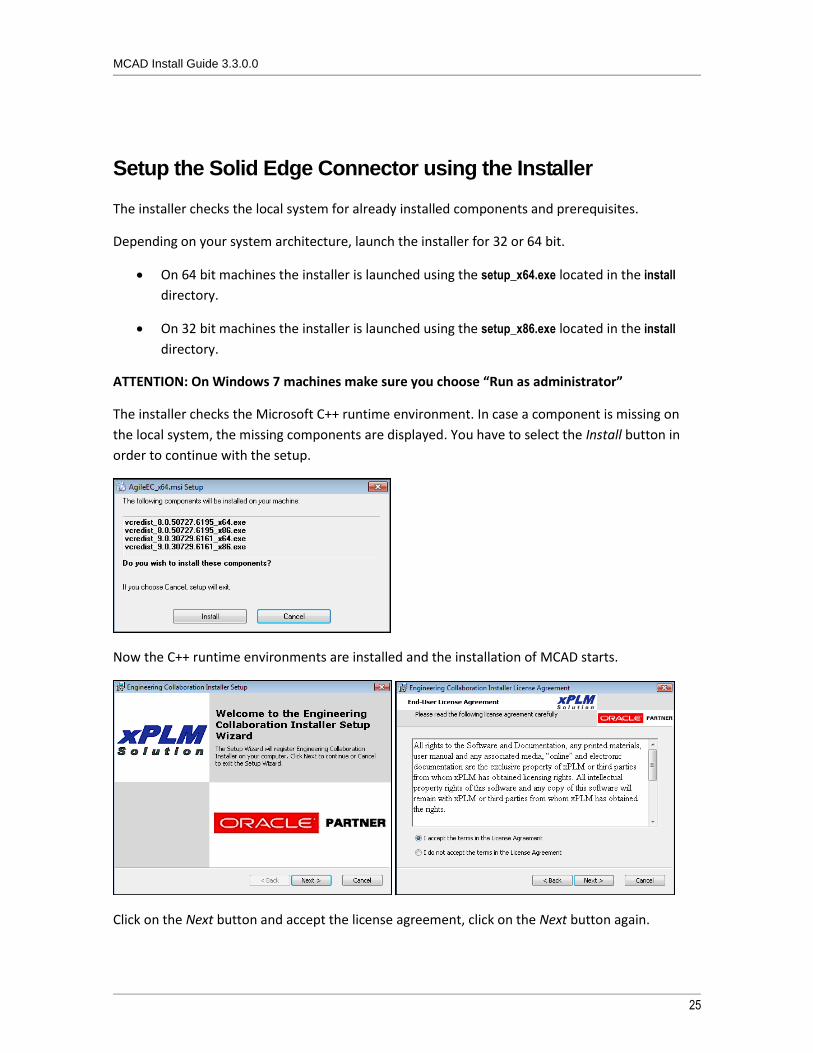
Setup the Solid Edge Connector using the Installer
The installer checks the local system for already installed components and prerequisites.
Depending on your system architecture, launch the installer for 32 or 64 bit.
On 64 bit machines the installer is launched using the setup_x64.exe located in the install
directory.
On 32 bit machines the installer is launched using the setup_x86.exe located in the install
directory.
ATTENTION: On Windows 7 machines make sure you choose “Run as administrator”
The installer checks the Microsoft C++ runtime environment. In case a component is missing on
the local system, the missing components are displayed. You have to select the Install button in
order to continue with the setup.
Now the C++ runtime environments are installed and the installation of MCAD starts.
Click on the Next button and accept the license agreement, click on the Next button again.
MCAD Install Guide 3.3.0.0
26 Agile Product Lifecycle Management
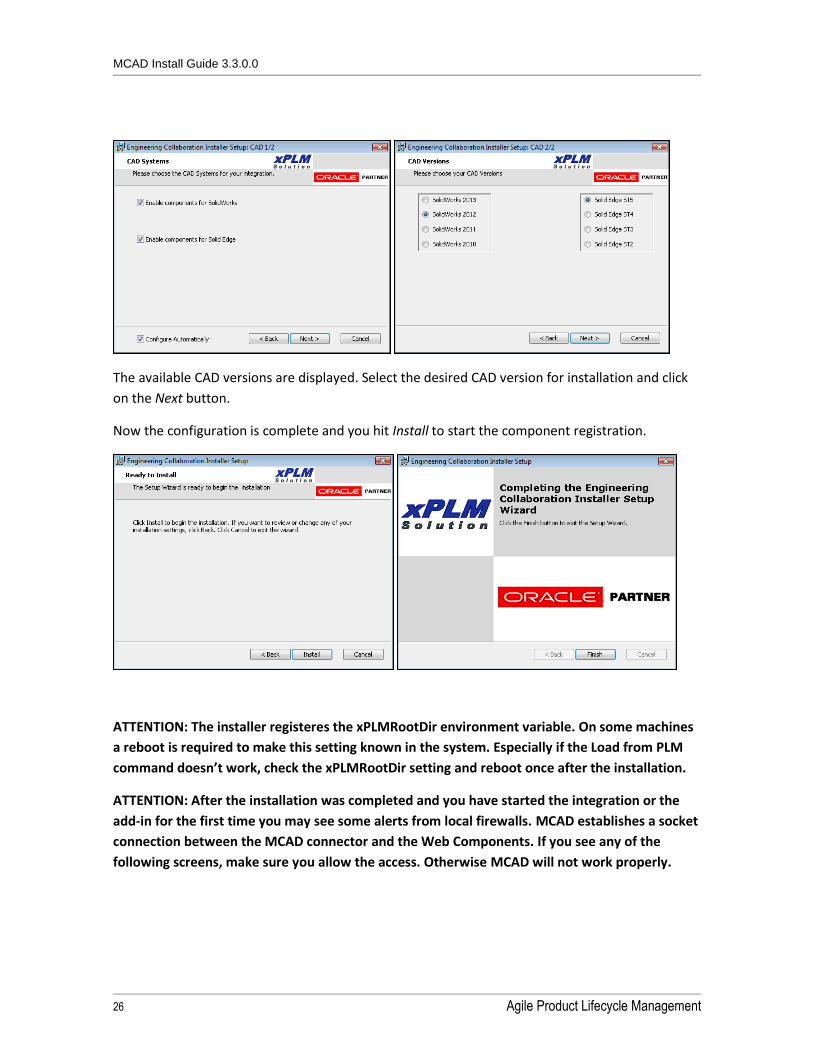
The available CAD versions are displayed. Select the desired CAD version for installation and click
on the Next button.
Now the configuration is complete and you hit Install to start the component registration.
ATTENTION: The installer registeres the xPLMRootDir environment variable. On some machines
a reboot is required to make this setting known in the system. Especially if the Load from PLM
command doesn’t work, check the xPLMRootDir setting and reboot once after the installation.
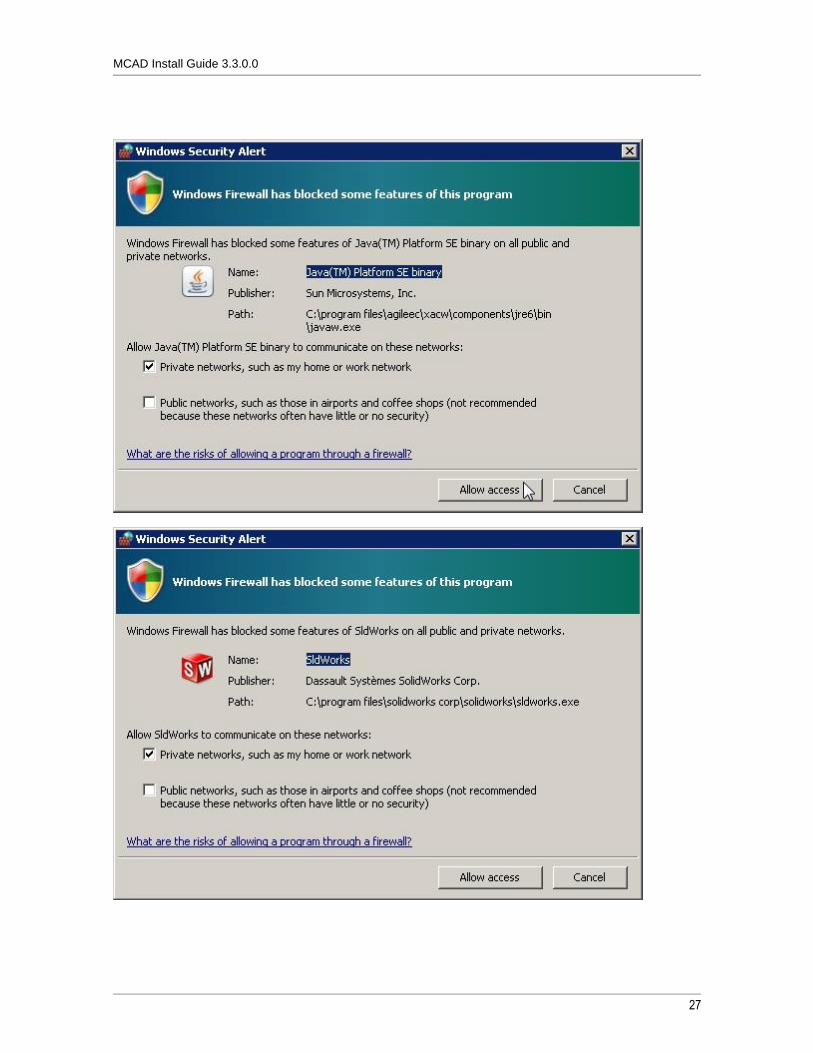
ATTENTION: After the installation was completed and you have started the integration or the
add-in for the first time you may see some alerts from local firewalls. MCAD establishes a socket
connection between the MCAD connector and the Web Components. If you see any of the
following screens, make sure you allow the access. Otherwise MCAD will not work properly.
MCAD Install Guide 3.3.0.0
27
MCAD Install Guide 3.3.0.0
28 Agile Product Lifecycle Management
Setting the Java Version
This chapter describes the settings that should be created after you ran the installer.
The Web Connector installation contains the necessary JRE (32 bit and 64 bit). If you are running
Solid Edge 32 bit or 64 bit you have to check the PATH setting to include the required jvm.dll of the
right JRE.
For a 32 bit Solid Edge application you have to set the 32 bit JRE environment into your system
path like this:
set PATH=[inst]\components\jre6\bin\client;[inst]\components\jre6\bin;%PA
TH%
For a 64 bit Solid Edge application you have to set the 64 bit JRE environment and 32 bit JRE
environment into your system path like this:
set PATH=[inst]\components\jre6_64\bin\server;[inst]\components\jre6_64\b
in;[inst]\components\jre6\bin\client;[inst]\components\jre6\bin;%PATH%
Microsoft .NET environment on older Windows operating
systems
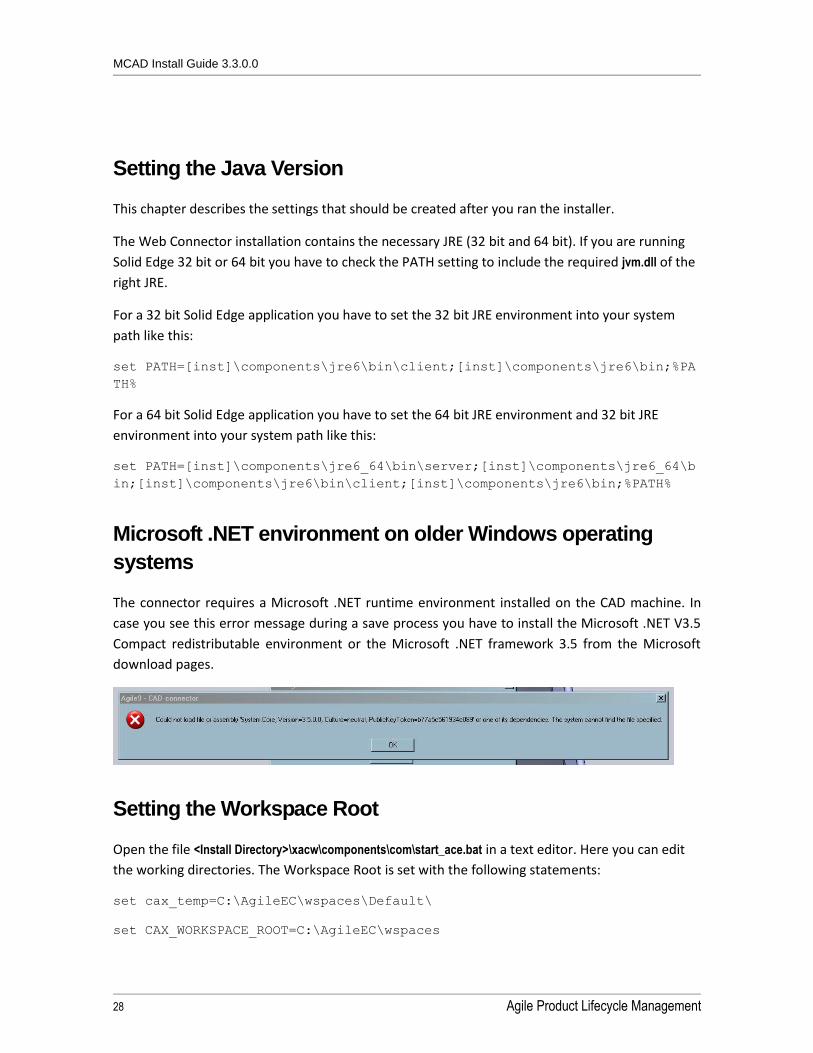
The connector requires a Microsoft .NET runtime environment installed on the CAD machine. In
case you see this error message during a save process you have to install the Microsoft .NET V3.5
Compact redistributable environment or the Microsoft .NET framework 3.5 from the Microsoft
download pages.
Setting the Workspace Root
Open the file <Install Directory>\xacw\components\com\start_ace.bat in a text editor. Here you can edit
the working directories. The Workspace Root is set with the following statements:
set cax_temp=C:\AgileEC\wspaces\Default\
set CAX_WORKSPACE_ROOT=C:\AgileEC\wspaces

MCAD Install Guide 3.3.0.0
29
Also make sure the file <Install Directory>\xacw\components\xml\xPLMConnector.xml points to that
directory:
<LocalWorkDir>C:\AgileEC\wspaces\Default\</LocalWorkDir>

MCAD Install Guide 3.3.0.0
30 Agile Product Lifecycle Management
Installing on Additional Computers
Once the Solid Edge Connector has been installed and configured on one machine, you can install
on other machines simply by copying the entire <Install Directory>\xace folder structure. You have to
rerun the registration using the installer as described above. This works as long as the machines
are configured the same in terms of their Solid Edge setup, Java setup, etc.

MCAD Install Guide 3.3.0.0
31
How to setup Solid Edge and SolidWorks
Connector in parallel on one machine
This section describes setting up the connection between your CAD applications and Agile
Engineering Collaboration, if you want to use more than one CAD system on the same machine.
The main steps are:
Extract files from Solid Edge Connector zip file.
Extract files from SolidWorks Connector zip file.
Install the Engineering Collaboration Web Components
Run the installer.
The installation requires the following files:
Main Solid Edge CAD Connector installation package.
Main SolidWorks Connector installation package.
Main Web Connector installation package.
Performing the installation steps described here will enable the Agile menu to appear within Solid
Edge and SolidWorks. In order to have a completely functional integration, you must also:
Perform the core Agile configuration, as described in the chapter Agile PLM Server Class
Administration of the MCAD Connectors for Agile Engineering Collaboration Administration
Guide.
Configure desired Solid Edge Connector parameters as described in the Administration Guide.
Configure desired SolidWorks Connector parameters as described in the Administration Guide.
MCAD Install Guide 3.3.0.0
32 Agile Product Lifecycle Management
Extracting Files for the combined CAD Connector
Create a new folder for the combined Solid Edge and SolidWorks connector, such as C:\AgileEC\acx
called your <Installation Directory>.
ATTENTION: The required components are registered from the current location. You must not
install xace on a network location. The Solid Edge connector will not work properly if installed
on network drives.
Extract the Solid Edge installation file into the <Installation Directory>. When you unzip, make sure
that you retain the folder paths from the zip file. When the files are unzipped, you should see a
folder named components, which contains the Solid Edge Connector installation.
Extract the SolidWorks installation file into the same <Installation Directory>. When you unzip, make
sure that you retain the folder paths from the zip file. If you are prompted for overwriting existing
files always accept. When the files are unzipped, you should still see a folder named components,
which contains the SolidWorks Connector installation.
Extract the Web Components installation file into the components subfolder in the <Installation
Directory>. When you unzip, make sure that you retain the folder paths from the zip file. If you are
prompted for overwriting existing files always accept.
Run the setup as described in the next chapter.
Now follow the common installation instructions in Installing the Web Components.
MCAD Install Guide 3.3.0.0
33
Setup the Combined Connector using the Installer
The installer checks the local system for already installed components and prerequisites.
Depending on your system architecture launch the installer for 32 or 64 bit.
On 64 bit machines the installer is launched using the setup_x64.exe located in the install directory.
On 32 bit machines the installer is launched using the setup_x86.exe located in the install directory.
ATTENTION: On Windows 7 machines make sure you choose “Run as administrator”
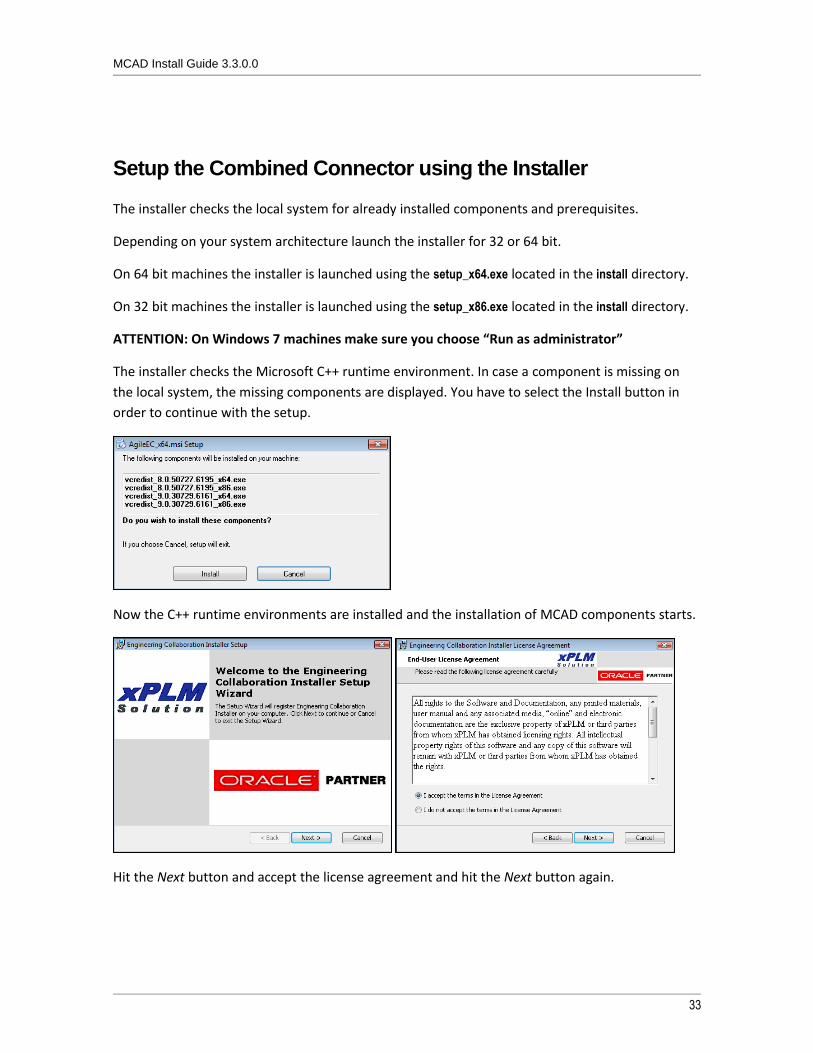
The installer checks the Microsoft C++ runtime environment. In case a component is missing on
the local system, the missing components are displayed. You have to select the Install button in
order to continue with the setup.
Now the C++ runtime environments are installed and the installation of MCAD components starts.
Hit the Next button and accept the license agreement and hit the Next button again.
MCAD Install Guide 3.3.0.0
34 Agile Product Lifecycle Management
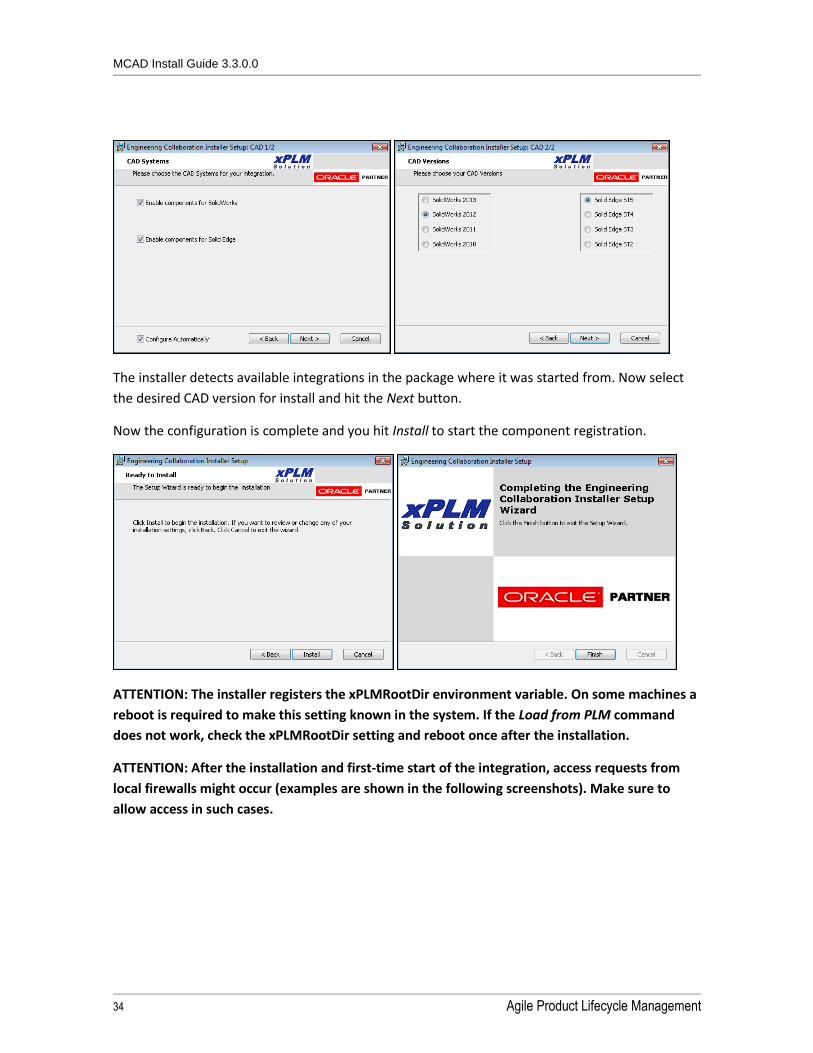
The installer detects available integrations in the package where it was started from. Now select
the desired CAD version for install and hit the Next button.
Now the configuration is complete and you hit Install to start the component registration.
ATTENTION: The installer registers the xPLMRootDir environment variable. On some machines a
reboot is required to make this setting known in the system. If the Load from PLM command
does not work, check the xPLMRootDir setting and reboot once after the installation.
ATTENTION: After the installation and first-time start of the integration, access requests from
local firewalls might occur (examples are shown in the following screenshots). Make sure to
allow access in such cases.

MCAD Install Guide 3.3.0.0
35
MCAD Install Guide 3.3.0.0
36 Agile Product Lifecycle Management
Microsoft .NET environment on older Windows operating
systems
The connector requires a Microsoft .NET runtime environment installed on the CAD machine. In
case you see this error message during a save process you have to install the Microsoft .NET V3.5
Compact redistributable environment or the Microsoft .NET framework 3.5 from the Microsoft
download pages.
Setting the Workspace Root
Open the file <Install Directory>\xacw\components\ini\xacw_ini.bat in a text editor. Here you can edit the
working directories. The Workspace Root is set with the following statements:
set cax_temp=C:\AgileEC\wspaces\Default\
set CAX_WORKSPACE_ROOT=C:\AgileEC\wspaces
Also make sure the file <Install Directory>\xacw\components\xml\xPLMComConnector.xml points to that
directory:
<LocalWorkDir>C:\AgileEC\wspaces\Default\</LocalWorkDir>
MCAD Install Guide 3.3.0.0
37
How to Uninstall, Add or Change CAD System Versions
You can run the installer a second time, which will let you uninstall the registration.
Depending on your system architecture you launch the installer for 32 or 64 bit.
On 64 bit machines the installer is launched using the setup_x64.exe located in the install directory.
On 32 bit machines the installer is launched using the setup_x86.exe located in the install directory.
ATTENTION: On Windows 7 machines make sure you choose “Run as administrator”
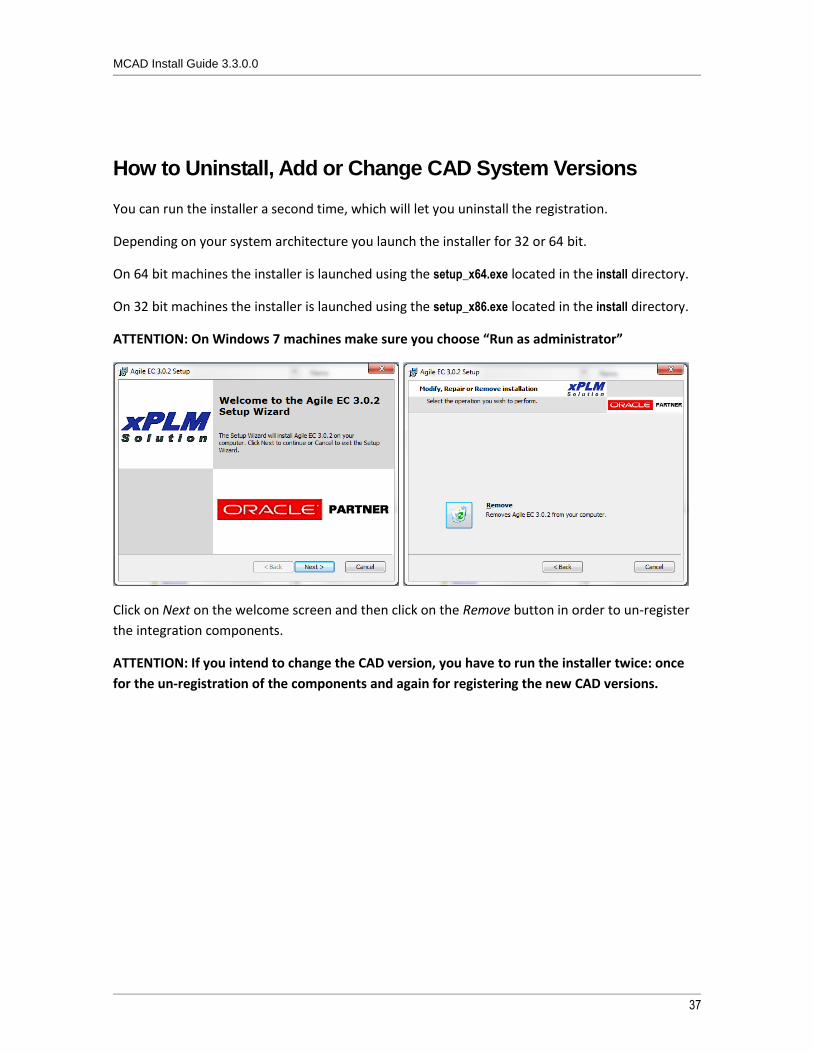
Click on Next on the welcome screen and then click on the Remove button in order to un-register
the integration components.
ATTENTION: If you intend to change the CAD version, you have to run the installer twice: once
for the un-registration of the components and again for registering the new CAD versions.
MCAD Install Guide 3.3.0.0
38 Agile Product Lifecycle Management
Installing the Web Components
This section describes the common setup procedures for the CAD connectors. This section
describes setting up the common connection between your CAD integration and Agile Engineering
Collaboration.
The main steps are:
Extract files from Web Connector Client zip file.
Running the Load Callback Installer.
Install the PLM Server Components.
The installation requires the following file:
Main Web Connector Client installation package.
Performing the installation steps described here will enable the CAD connector communication to
PLM.
Extracting Files for Web Components for CATIA, Pro/E, NX
Extract the installation file to the folder of the CAD Connector location, e.g. <Install Directory>\xacp.
When you unzip, make sure that you retain the folder paths from the zip file and the archive will
be extracted into the CAD connector directory. When the files are unzipped, you should see
additional folders like jre6 within xacp or xacc directory.
Extracting Files for Web Components for SolidWorks and
Solid Edge
Extract the installation file to the folder components of the CAD Connector location, e.g.
<Install Directory>\AgileEC\components. When you unzip, make sure that you retain the folder paths
from the zip file and the archive will be extracted into the CAD connector directory. When the files
are unzipped, you should see additional folders like jre6 within AgileEC\components. directory.

MCAD Install Guide 3.3.0.0
39
Running the Load Callback Installer
This registration step is NOT required for SolidWorks, Solid Edge and Office. The installer of the
systems includes the Load Callback registration.
This registration step is NOT required for the MCAD Web Component Only Update.
This registration step is NOT required if you want to use SolidWorks or Solid Edge connector
together with the Pro/E or CATIA connector on the same machine! The installer for SolidWorks,
Solid Edge and Office must be executed instead, because it includes the Load Callback
registration.
The Load Callback setup installs all required Visual C++ Runtime environments and registers the
required Windows components. You need administrator privileges on the local machine.
ATTENTION: On Windows 7 machines make sure you choose “Run as administrator”
Setup on a 32 bit Windows System
Go to the install subdirectory folder inside the connector folder. Follow the steps:
Run setup_x86.exe – Installer for Windows 32 bit machines.
Follow the instructions and confirm the installation of the required Microsoft runtime
environments.
Confirm the copyrights and continue using the Next button until the setup is finished.
Setup on a 64 bit Windows System
Go to the install subdirectory folder inside the connector folder. Follow the steps:
Run setup_x64.exe – Installer for Windows 64 bit machines.
Follow the instructions and confirm the installation of the required Microsoft runtime
environments.
Confirm the copyrights and continue using the Next button until the setup is finished.

MCAD Install Guide 3.3.0.0
40 Agile Product Lifecycle Management
Regenerating Attributes.xml
The metadata extraction is optimized in this release. The performance is increased and the Agile
List values are now read from the server during runtime. In order to recreate a valid Attributes.xml
follow the steps below.
The main steps are:
Go to the MCAD-CONFIG filefolder in PLM.
Check out the folder.
Remove the existing Attributes.xml file from the files tab.
Check in the MCAD-CONFIG folder (the file tab must be empty).
Go to the local AgileCache directory in users home.
Delete all Attributes.* files in the AgileCache directory.
Start the integration xacc or xacp, the system will regenerate a valid Attributes.xml during next
login.


![Agile Product Lifecycle Management ACP User Guide · [1]Agile Product Lifecycle Management Agile Configuration Propagation Guide Release 9.3.6 E71151-01 February 2017](https://static.fdocuments.in/doc/165x107/5f43153251a0f1611b398b0d/agile-product-lifecycle-management-acp-user-guide-1agile-product-lifecycle-management.jpg)