Agile PLM DataMart Setup Guide - Oracle Documentation
68
Agile Product Lifecycle Management Data Mart Setup Guide May 2012 v3.2.0.2 Part Number: E26533_03
Transcript of Agile PLM DataMart Setup Guide - Oracle Documentation
Agile Product Lifecycle Management
Data Mart Setup Guide
May 2012
v3.2.0.2
Part Number: E26533_03
Data Mart Setup Guide
ii Agile Product Lifecycle Management
Oracle Copyright
Copyright © 1995, 2012, Oracle and/or its affiliates. All rights reserved.
This software and related documentation are provided under a license agreement containing restrictions on use and disclosure and are protected by intellectual property laws. Except as expressly permitted in your license agreement or allowed by law, you may not use, copy, reproduce, translate, broadcast, modify, license, transmit, distribute, exhibit, perform, publish or display any part, in any form, or by any means. Reverse engineering, disassembly, or decompilation of this software, unless required by law for interoperability, is prohibited.
The information contained herein is subject to change without notice and is not warranted to be error-free. If you find any errors, please report them to us in writing.
If this software or related documentation is delivered to the U.S. Government or anyone licensing it on behalf of the U.S. Government, the following notice is applicable:
U.S. GOVERNMENT RIGHTS Programs, software, databases, and related documentation and technical data delivered to U.S. Government customers are "commercial computer software" or "commercial technical data" pursuant to the applicable Federal Acquisition Regulation and agency-specific supplemental regulations. As such, the use, duplication, disclosure, modification, and adaptation shall be subject to the restrictions and license terms set forth in the applicable Government contract, and, to the extent applicable by the terms of the Government contract, the additional rights set forth in FAR 52.227-19, Commercial Computer Software License (December 2007). Oracle USA, Inc., 500 Oracle Parkway, Redwood City, CA 94065.
This software is developed for general use in a variety of information management applications. It is not developed or intended for use in any inherently dangerous applications, including applications which may create a risk of personal injury. If you use this software in dangerous applications, then you shall be responsible to take all appropriate fail-safe, backup, redundancy and other measures to ensure the safe use of this software. Oracle Corporation and its affiliates disclaim any liability for any damages caused by use of this software in dangerous applications.
Oracle and Java are registered trademarks of Oracle Corporation and/or its affiliates. Other names may be trademarks of their respective owners.
This software and documentation may provide access to or information on content, products and services from third parties. Oracle Corporation and its affiliates are not responsible for and expressly disclaim all warranties of any kind with respect to third party content, products and services. Oracle Corporation and its affiliates will not be responsible for any loss, costs, or damages incurred due to your access to or use of third party content, products or services. The RMW product includes software developed by the Visigoth Software Society.
v3.2.0.2 iii
CONTENTS
Oracle Copyright ............................................................................................................................... ii
Chapter 1 ......................................................................................................................... 1
Overview of Agile PLM Data Mart Installation ......................................................... 1
Downloading Agile PLM Data Mart Software ............................................................................... 1
Obtaining Software ................................................................................................................................................. 1
Chapter 2 ......................................................................................................................... 3
Agile PLM Data Mart Overview .................................................................................... 3
Introduction ....................................................................................................................................... 3
Agile PLM Data Mart Features ........................................................................................................ 3
Architectural Components ............................................................................................................... 4
Deployment Architecture ................................................................................................................ 6
Chapter 3 ......................................................................................................................... 7
System Requirements ................................................................................................... 7
Software Requirements ................................................................................................................... 7
Hardware Requirements .................................................................................................................. 8
Installation Requirements ............................................................................................................... 8
Chapter 4 ......................................................................................................................... 9
Installing Agile PLM Data Mart ................................................................................... 9
Data Mart Installer ........................................................................................................................... 9
Prerequisite Installations ................................................................................................................. 9
Oracle Database Server ..................................................................................................................................... 10
Agile PLM Database .............................................................................................................................................. 10
Oracle Data Integrator........................................................................................................................................ 11
Pre-installation Checks .................................................................................................................. 11
Installing Agile PLM Data Mart on Windows .............................................................................. 12
Installing Agile PLM Data Mart on Solaris and HP-UX ............................................................. 12
Installing Agile PLM Data Mart on Linux .................................................................................... 14
Installing Agile PLM Data Mart on AIX ....................................................................................... 15
Adding Database Services to the Listener ................................................................................. 15
Manual Installation Steps for DB Schema ................................................................................. 16
Setting Database Privileges ............................................................................................................................. 17
Data Mart Setup Guide
iv Agile Product Lifecycle Management
Validating the Agile PLM Data Mart Installation ....................................................................... 18
Install Directory Structure ................................................................................................................................ 19
Database Schemas ............................................................................................................................................... 19
Before you Upgrade ....................................................................................................................... 22
Upgrading from Agile PLM Data Mart 3.2 .................................................................................. 22
Upgrading from Agile PLM Data Mart 3.1.2 or Earlier ............................................................ 23
Chapter 5 ....................................................................................................................... 25
Configuring Agile PLM Data Mart .............................................................................. 25
List Dimension Configurator ......................................................................................................... 25
Changing List Names in Dimension Table ................................................................................. 27
Validating Dimension Tables ........................................................................................................ 27
Enabling and Disabling ETL for PLM Modules ........................................................................... 27
Changing the Agile PLM Data Mart Passwords ......................................................................... 28
Chapter 6 ....................................................................................................................... 31
Executing ETL ............................................................................................................... 31
Setting up ODI Users ..................................................................................................................... 31
Executing ETL from ODI ................................................................................................................ 33
Executing ETL from Command Prompt ...................................................................................... 34
Chapter 7 ....................................................................................................................... 35
Installing on Real Application Cluster ..................................................................... 35
Prerequisites .................................................................................................................................... 35
Installing Agile PLM Data Mart Patch 3.2.0.2 on Real Application Cluster ......................... 35
Post Installation Steps ................................................................................................................... 35
Appendix A .................................................................................................................... 37
Troubleshooting ........................................................................................................... 37
Installation Issues .......................................................................................................................... 37
ETL Runtime Issues ........................................................................................................................ 39
PL/SQL Logs ..................................................................................................................................... 42
Database Issues .............................................................................................................................. 42
Detecting Errors in ODI coming from Oracle ............................................................................ 43
Contents
v3.2.0.2 v
Appendix B .................................................................................................................... 47
Best Practices ............................................................................................................... 47
Purging Logs .................................................................................................................................... 47
Archiving ........................................................................................................................................... 47
Changing the Database Password ............................................................................................... 47
Improving ETL Performance ......................................................................................................... 48
Deployment ...................................................................................................................................... 48
Appendix C .................................................................................................................... 49
Configuring Multiple Work Environments ............................................................... 49
Pre-installation Notes ..................................................................................................................... 49
Creating Schema and Work Repositories .................................................................................. 49
Installing ETL Components ........................................................................................................... 50
Extract the Data Mart files ............................................................................................................ 50
Copy the JDK files ........................................................................................................................... 50
Configure property files or batch files ........................................................................................ 51
Execute Batch or Shell file ............................................................................................................ 55
Configure Physical Connection in the Topology Manager ...................................................... 55
Export the Work Repository and Import into the QA or Production environment ............ 56
Appendix D .................................................................................................................... 57
Manually Installing Agile PLM Data Mart ETL ......................................................... 57
Pre-Installation Notes .................................................................................................................... 57
Creating Schemas ........................................................................................................................... 57
Installing ETL ................................................................................................................................... 58

vi Agile Product Lifecycle Management
Preface Oracle's Agile PLM documentation set includes Adobe® Acrobat PDF files. The Oracle Technology
Network (OTN) Web site http://www.oracle.com/technetwork/documentation/agile-085940.html contains the latest versions of the Agile PLM PDF files. You can view or download these manuals from the Web site, or you can ask your Agile administrator if there is an Agile PLM Documentation folder available on your network from which you can access the Agile PLM documentation (PDF) files.
Note To read the PDF files, you must use the free Adobe Acrobat Reader version 9.0 or later. This program can be downloaded from the Adobe Web site http://www.adobe.com.
The Oracle Technology Network (OTN) Web site http://www.oracle.com/technetwork/documentation/agile-085940.html can be accessed through Help > Manuals in both Agile Web Client and Agile Java Client. If you need additional assistance or information, please contact My Oracle Support (https://support.oracle.com) for assistance.
Note Before calling Oracle Support about a problem with an Agile PLM manual, please have the full part number, which is located on the title page.
TTY Access to Oracle Support Services
Oracle provides dedicated Text Telephone (TTY) access to Oracle Support Services within the United States of America 24 hours a day, 7 days a week. For TTY support, call 800.446.2398. Outside the United States, call +1.407.458.2479.
Readme
Any last-minute information about Agile PLM can be found in the Readme file on the Oracle
Technology Network (OTN) Web site http://www.oracle.com/technetwork/documentation/agile-085940.html.
Agile Training Aids
Go to the Oracle University Web page http://www.oracle.com/education/chooser/selectcountry_new.html for more information on Agile Training offerings.
Accessibility of Code Examples in Documentation
Screen readers may not always correctly read the code examples in this document. The conventions for writing code require that closing braces should appear on an otherwise empty line; however, some screen readers may not always read a line of text that consists solely of a bracket or brace.
This documentation may contain links to Web sites of other companies or organizations that Oracle does not own or control. Oracle neither evaluates nor makes any representations regarding the accessibility of these Web sites.
v3.2.0.2 1
Chapter 1
Overview of Agile PLM Data Mart Installation
This chapter includes the following:
Downloading Agile PLM Data Mart Software ....................................................................................................... 1
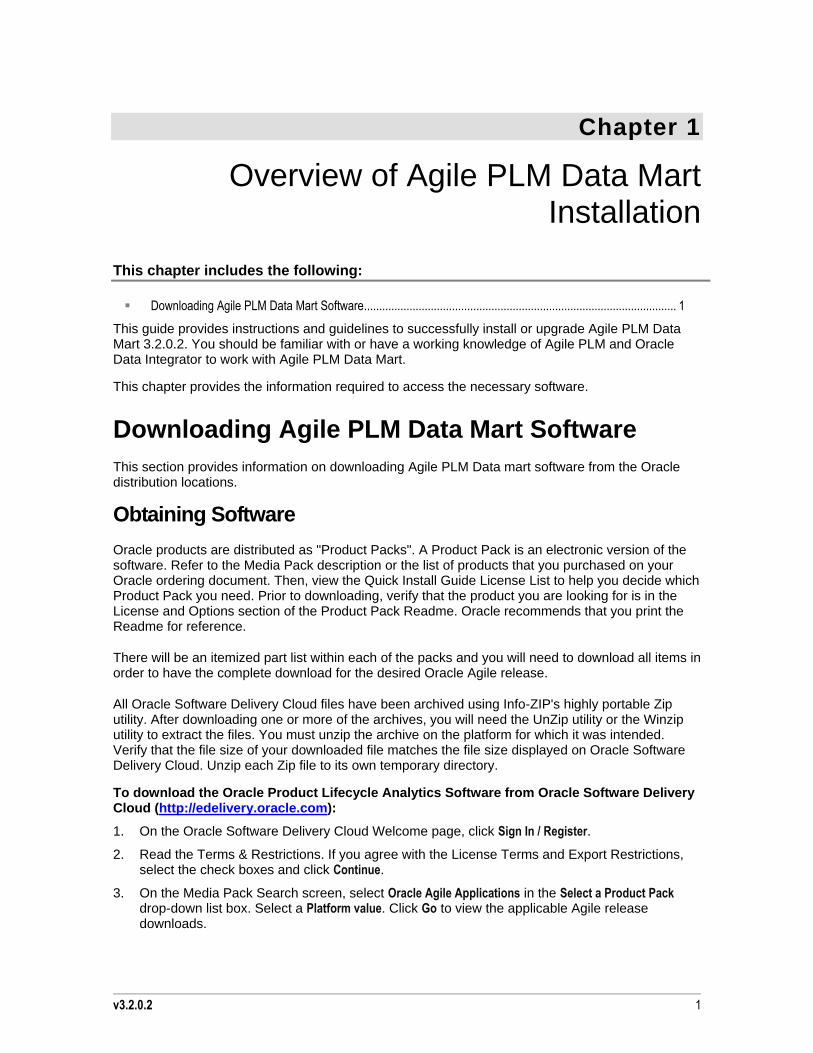
This guide provides instructions and guidelines to successfully install or upgrade Agile PLM Data Mart 3.2.0.2. You should be familiar with or have a working knowledge of Agile PLM and Oracle Data Integrator to work with Agile PLM Data Mart.
This chapter provides the information required to access the necessary software.
Downloading Agile PLM Data Mart Software
This section provides information on downloading Agile PLM Data mart software from the Oracle distribution locations.
Obtaining Software
Oracle products are distributed as "Product Packs". A Product Pack is an electronic version of the software. Refer to the Media Pack description or the list of products that you purchased on your Oracle ordering document. Then, view the Quick Install Guide License List to help you decide which Product Pack you need. Prior to downloading, verify that the product you are looking for is in the License and Options section of the Product Pack Readme. Oracle recommends that you print the Readme for reference.
There will be an itemized part list within each of the packs and you will need to download all items in order to have the complete download for the desired Oracle Agile release.
All Oracle Software Delivery Cloud files have been archived using Info-ZIP's highly portable Zip utility. After downloading one or more of the archives, you will need the UnZip utility or the Winzip utility to extract the files. You must unzip the archive on the platform for which it was intended. Verify that the file size of your downloaded file matches the file size displayed on Oracle Software Delivery Cloud. Unzip each Zip file to its own temporary directory.
To download the Oracle Product Lifecycle Analytics Software from Oracle Software Delivery Cloud (http://edelivery.oracle.com):
1. On the Oracle Software Delivery Cloud Welcome page, click Sign In / Register.
2. Read the Terms & Restrictions. If you agree with the License Terms and Export Restrictions, select the check boxes and click Continue.
3. On the Media Pack Search screen, select Oracle Agile Applications in the Select a Product Pack drop-down list box. Select a Platform value. Click Go to view the applicable Agile release downloads.
Data Mart Setup Guide
2 Agile Product Lifecycle Management
4. Select the appropriate link. Click Continue.
5. The Download page displays downloadable release parts, including customer guides. Click Download for the appropriate media pack.
6. Extract the contents of the media pack, unzip the contents, and navigate to the product folder. The installers for all platforms are available within the product folder, regardless of the operating system on which you have chosen to install the software.

v3.2.0.2 3
Chapter 2
Agile PLM Data Mart Overview
This chapter includes the following:
Introduction .......................................................................................................................................................... 3 Agile PLM Data Mart Features ............................................................................................................................ 3 Architectural Components ................................................................................................................................... 4 Deployment Architecture ..................................................................................................................................... 6
Introduction
Agile PLM Data Mart is an operational data store for Agile PLM data integrated with ETL technology that provides the data foundation for your Enterprise Data Warehouse & Analytics solutions. The Agile PLM Data Mart stores all relevant data available in the PPM, PC, PCM, PG&C, and PQM Modules of Agile PLM. The data model for the Agile PLM Data Mart is structured to facilitate querying and analysis.
The Agile PLM Data Mart operational data store facilitates the following use cases:
1. To integrate Agile Data with your Corporate Data Warehouse using corporate ETLs
2. To build and deploy your corporate Business Reporting & Intelligence applications
3. To deploy pre-packaged Agile PLM Business Intelligence (BI) Solutions
For use case #2, we recommend that you design a Multi-dimensional schema (MDS) layer with the Agile PLM Data Mart as the staging schema. MDS consists of Facts and Dimension tables and its design is driven by reporting and business intelligence requirements.
Agile PLM Data Mart Features
Agile PLM Data Mart delivers a normalized schema database that captures the business object data of Common, PC, PCM, PG&C, PPM, and PQM objects and their related data. In addition, it captures selected data and last modification timestamps which help to further extract data into any down-stream database system.
Agile PLM Data Mart packages pre-built ETL that leverages Oracle Data Integrator (ODI) Technology. Using the ODI operator, you can extract, load, and transform the Agile PLM transactional data into the Agile PLM Data Mart.
Agile PLM Data Mart can be set to extract data from one or more supported Agile PLM modules.
Agile PLM Data Mart supports incremental extraction for business object data.
Agile PLM Data Mart can be set to run a full or Incremental load.
Data Mart Setup Guide
4 Agile Product Lifecycle Management
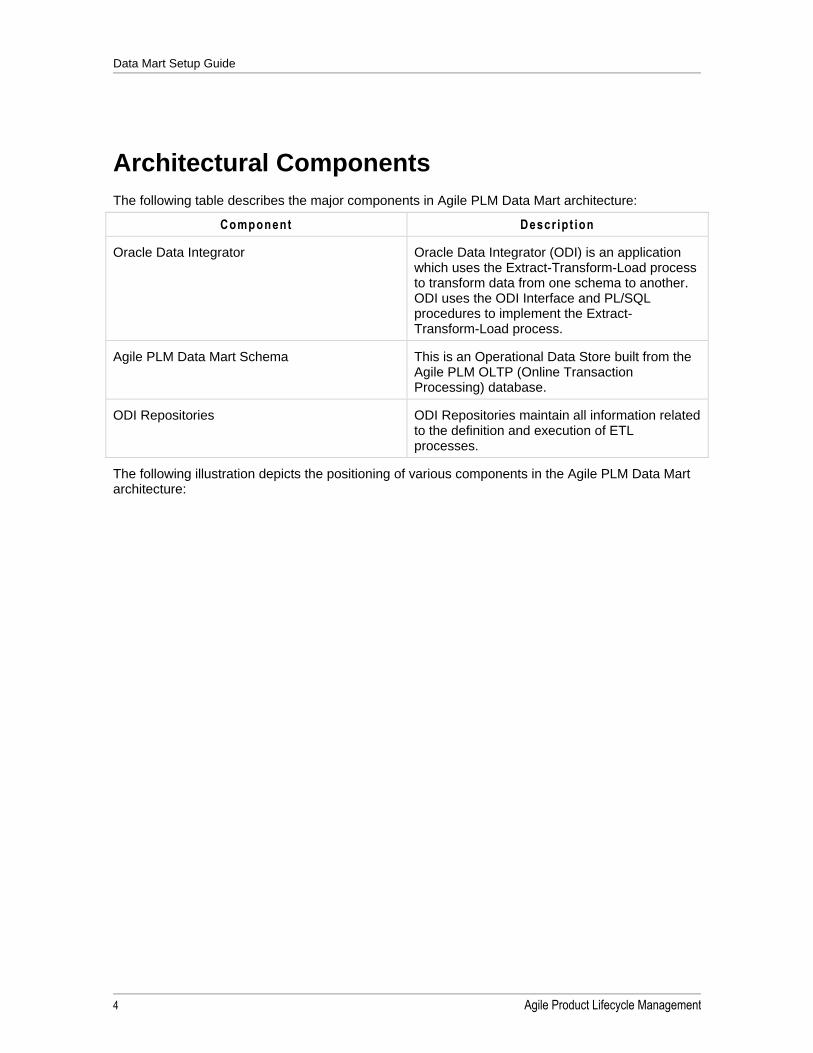
Architectural Components
The following table describes the major components in Agile PLM Data Mart architecture:
Component Descr ipt ion
Oracle Data Integrator Oracle Data Integrator (ODI) is an application which uses the Extract-Transform-Load process to transform data from one schema to another. ODI uses the ODI Interface and PL/SQL procedures to implement the Extract- Transform-Load process.
Agile PLM Data Mart Schema This is an Operational Data Store built from the Agile PLM OLTP (Online Transaction Processing) database.
ODI Repositories ODI Repositories maintain all information related to the definition and execution of ETL processes.
The following illustration depicts the positioning of various components in the Agile PLM Data Mart architecture:
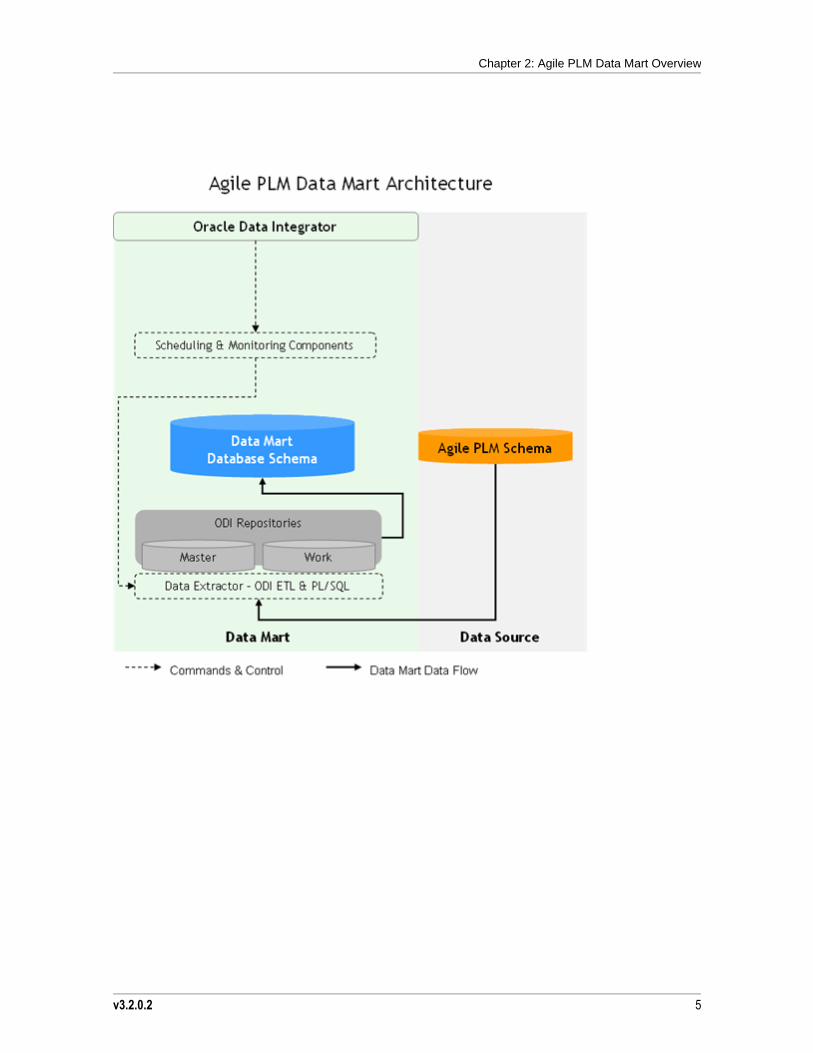
Chapter 2: Agile PLM Data Mart Overview
v3.2.0.2 5
Data Mart Setup Guide
6 Agile Product Lifecycle Management
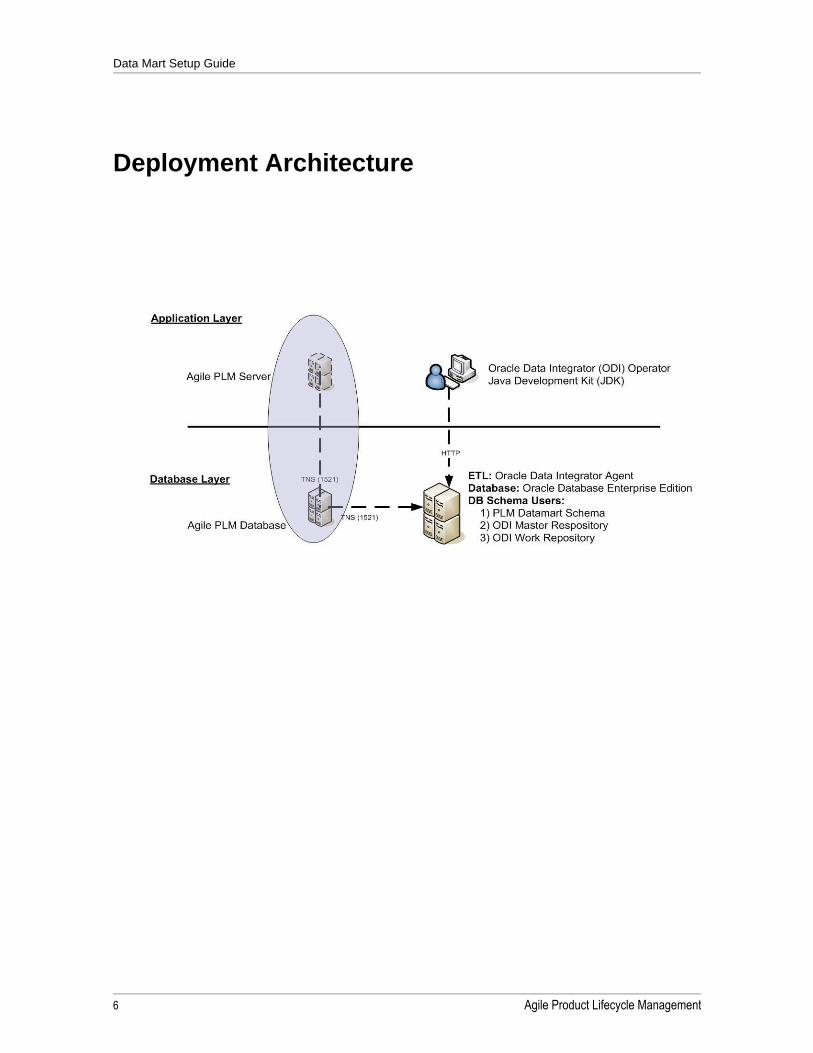
Deployment Architecture
v3.2.0.2 7
Chapter 3
System Requirements
This chapter includes the following:
Software Requirements ....................................................................................................................................... 7 Hardware Requirements ...................................................................................................................................... 8 Installation Requirements .................................................................................................................................... 8
Agile PLM Data Mart can be deployed in different configurations. The amount of time required to complete an installation depends on the complexity of your deployment.
This chapter describes the minimum software and hardware requirements for an Agile PLM Data Mart installation.
Software Requirements
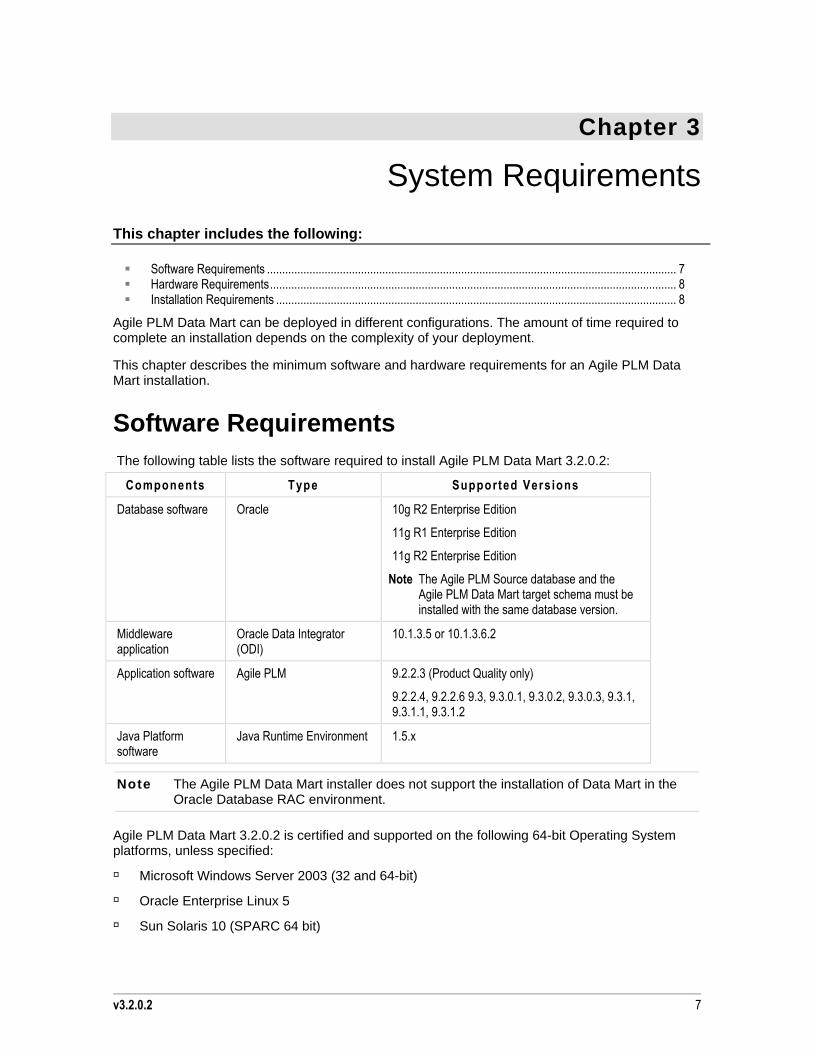
The following table lists the software required to install Agile PLM Data Mart 3.2.0.2:
Components Type Supported Vers ions
Database software Oracle 10g R2 Enterprise Edition
11g R1 Enterprise Edition
11g R2 Enterprise Edition
Note The Agile PLM Source database and the Agile PLM Data Mart target schema must be installed with the same database version.
Middleware application
Oracle Data Integrator (ODI)
10.1.3.5 or 10.1.3.6.2
Application software Agile PLM 9.2.2.3 (Product Quality only)
9.2.2.4, 9.2.2.6 9.3, 9.3.0.1, 9.3.0.2, 9.3.0.3, 9.3.1, 9.3.1.1, 9.3.1.2
Java Platform software
Java Runtime Environment 1.5.x
Note The Agile PLM Data Mart installer does not support the installation of Data Mart in the Oracle Database RAC environment.
Agile PLM Data Mart 3.2.0.2 is certified and supported on the following 64-bit Operating System platforms, unless specified:
Microsoft Windows Server 2003 (32 and 64-bit)
Oracle Enterprise Linux 5
Sun Solaris 10 (SPARC 64 bit)
Data Mart Setup Guide
8 Agile Product Lifecycle Management
IBM AIX 5.3 or 6
HP-UX 11.31
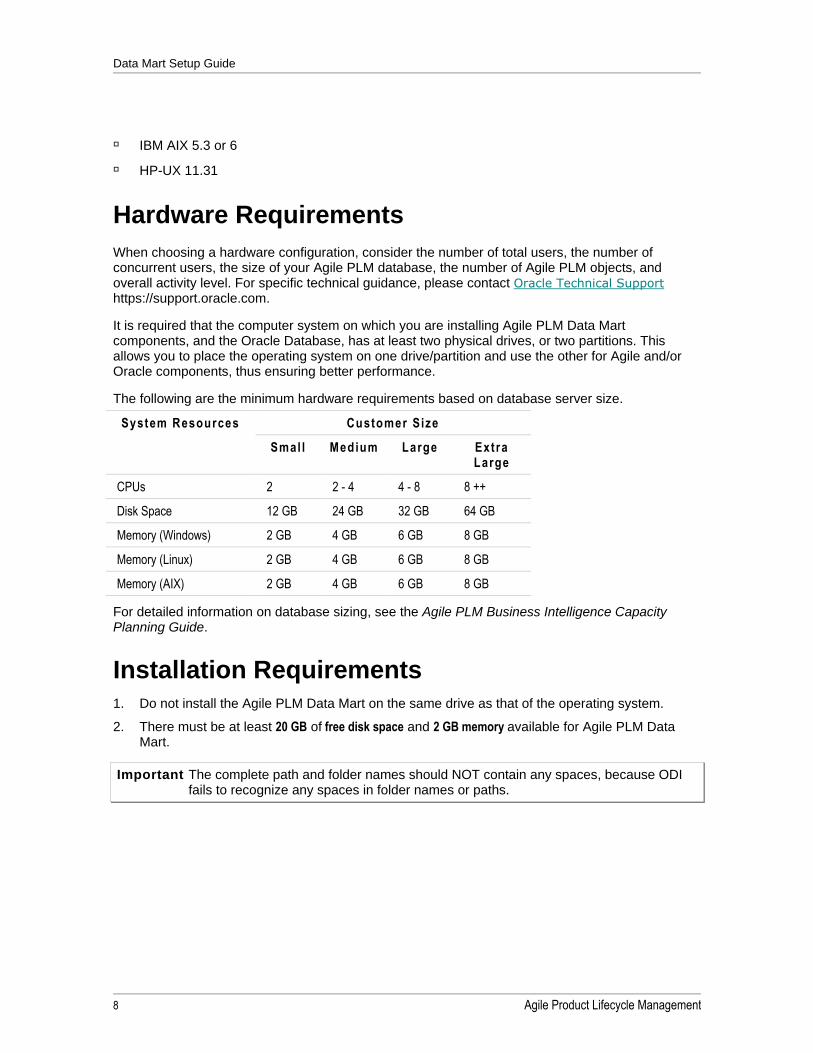
Hardware Requirements
When choosing a hardware configuration, consider the number of total users, the number of concurrent users, the size of your Agile PLM database, the number of Agile PLM objects, and overall activity level. For specific technical guidance, please contact Oracle Technical Support https://support.oracle.com.
It is required that the computer system on which you are installing Agile PLM Data Mart components, and the Oracle Database, has at least two physical drives, or two partitions. This allows you to place the operating system on one drive/partition and use the other for Agile and/or Oracle components, thus ensuring better performance.
The following are the minimum hardware requirements based on database server size.
System Resources
Customer Size
Smal l Medium Large Extra Large
CPUs 2 2 - 4 4 - 8 8 ++
Disk Space 12 GB 24 GB 32 GB 64 GB
Memory (Windows) 2 GB 4 GB 6 GB 8 GB
Memory (Linux) 2 GB 4 GB 6 GB 8 GB
Memory (AIX) 2 GB 4 GB 6 GB 8 GB
For detailed information on database sizing, see the Agile PLM Business Intelligence Capacity Planning Guide.
Installation Requirements 1. Do not install the Agile PLM Data Mart on the same drive as that of the operating system.
2. There must be at least 20 GB of free disk space and 2 GB memory available for Agile PLM Data Mart.
Important The complete path and folder names should NOT contain any spaces, because ODI fails to recognize any spaces in folder names or paths.
v3.2.0.2 9
Chapter 4
Installing Agile PLM Data Mart
This chapter includes the following:
Data Mart Installer ............................................................................................................................................... 9 Prerequisite Installations ...................................................................................................................................... 9 Pre-installation Checks ........................................................................................................................................ 11 Installing Agile PLM Data Mart on Windows ........................................................................................................ 12 Installing Agile PLM Data Mart on Solaris and HP-UX ........................................................................................ 12 Installing Agile PLM Data Mart on Linux .............................................................................................................. 13 Installing Agile PLM Data Mart on AIX ................................................................................................................. 15 Adding Database Services to the Listener ........................................................................................................... 15 Manual Installation Steps for DB Schema ........................................................................................................... 16 Validating the Agile PLM Data Mart Installation ................................................................................................... 18 Before you Upgrade ............................................................................................................................................. 22 Upgrading from Agile PLM Data Mart 3.2 ............................................................................................................ 22 Upgrading from Agile PLM Data Mart 3.1.2 or Earlier ......................................................................................... 23
Important It is recommended that the Data Mart Database installation is performed under the guidance of a DBA.
Important The ETL installation can be performed by anyone who has administrative privileges for the machine.
Data Mart Installer
The Agile PLM Data Mart Installer is a program that helps in installation of the Agile PLM Data Mart DB and its components. The installer seeks required inputs about the Source Database, Target Database and ODI from the user, configures the corresponding properties, and installs all the components required for Agile PLM Data Mart to perform its functions.
Each installation panel has online help. At any time during installation, you can click Help for more information about the panel's options.
The Installer deploys the following:
Apache Ant
Agile PLM Data Mart components
Agile PLM Data Mart Database
Prerequisite Installations
The following products should be installed and configured before you begin installing the Agile PLM

Data Mart Setup Guide
10 Agile Product Lifecycle Management
Data Mart:
Oracle Database Server
Agile PLM Database
Oracle Data Integrator
Java Runtime Environment
If any of these is missing or improperly configured, the Data Mart installation process will fail.
For information on the required versions of the prerequisite products, see Software Requirements on page 7. For information on how to install and configure these products, go to the Oracle
Technology Network (OTN) Web site http://www.oracle.com/technology/documentation for their respective documentation libraries.
Note During the ODI installation, you need to install only the Oracle Data Integrator component from the installation component checklist.
Oracle Database Server
The Agile PLM Data Mart Installer seeks the paths of the Database Datafile Directory (Destination Base) and Oracle Home Directory (Destination Home). Therefore, the system where you wish to install the Data Mart Database, the Target Database, should already have Oracle Database Server installed.
You are not required to create any DB Schema Users - the installer creates them.
For Data Mart Database creation, make sure that SQLNET.AUTHENTICATION_SERVICES in the Network Configuration File, sqlnet.ora, is set to (NONE). The sqlnet.ora file is located in the oracle_home\Network\Admin directory.
For complete information about the Oracle Database and its installation procedures, refer to the Oracle DB Installation Guide on the Oracle Technology Network (OTN) Web site http://www.oracle.com/technology/documentation.
Agile PLM Database
The Agile PLM Data Mart extracts, loads and transforms data from the Agile PLM Database, the Source Database. The Agile PLM Database can be located anywhere in your enterprise, connected through Local Area Network or Wide Area Network over TCP/IP.
The source PLM DB should already exist. The target Database, the Data Mart Database, however, can be created in an existing instance, or in a new instance, using the Agile PLM Data Mart installer.
The Agile PLM Data Mart Installer requires the following information, which should be available from your Agile PLM Administrator:
Database Host Name
Database Port Number
Chapter 4: Installing Agile PLM Data Mart
v3.2.0.2 11
Database Name
Database SID
Sys User Password
System User Password
PLM DB Username
PLM DB Password
Oracle Data Integrator
Agile PLM Data Mart operation is based on Oracle Data Integrator (ODI). The Data Mart Schema requires at least one Master Repository and one Work Repository. These repositories are used by ODI to operate on data during transformation.
The installer creates the Data Mart Schema on the Target Database Server. ODI should be installed on the same system where you plan to install Agile PLM Data Mart ETL Components.
For complete information on ODI, refer to its documentation, which is available at Oracle Technology Network (OTN) Web site.
ODI, and its patch, can be downloaded from the Oracle web site http://www.Oracle.com.
Pre-installation Checks
Make sure the following checks are completed on the machine where Agile PLM Data Mart will be installed:
Minimum hardware and software requirements are met.
Make sure that you login with a userid that has administrative privileges on the machine where Agile PLM Data Mart will be installed.
Disk compression is disabled.
PLM Source DB is available and you have passwords for SYS and SYSTEM.
Correct versions of JRE and ODI are installed.
ODI_JAVA_HOME environment variable contains the path to the installation directory of JDK 1.5.x.
JAVA_HOME environment variable contains the path to the installation directory of JDK 1.5.x and JAVA_HOME is added to the PATH environment variable.
If you are installing from a network drive on Windows, use Windows File Manager to map that drive to your computer.
The machines on which you plan to install Agile PLM Data Mart computers and databases should be dedicated to Agile and should not have any other software installed, unless otherwise specified. Do not include other database schemas or use the Agile host server as the primary domain controller (PDC) or dynamic host configuration protocol (DHCP) server.

Data Mart Setup Guide
12 Agile Product Lifecycle Management
Virus Protection should be disabled.
If virus protection is enabled, components used in the installer can be falsely identified as being infected and lockup the installation. You can turn the virus protection on after the installation is complete.
Installing Agile PLM Data Mart on Windows
Before you start the Installer, you are required to set the Environment Variables.
To set the Environment Variables:
1. On your desktop, right click on My Computer and select Properties. The System Properties panel appears.
2. Click Environment Variables in Advanced tab.
3. Define User variable for Java Home.
Example : JAVA_HOME=C:\Java\jdk1.5
4. Set PATH environment variable to include the bin directory path of the JDK installation.
Example : PATH=%JAVA_HOME%\bin
5. Click OK to complete.
To start the Agile PLM Data Mart installer on Windows:
1. Log in as a user with administrative privileges.
2. From Installer base directory in the Installer Disk, <double-click> PLMDM3.2.0.2_Win.exe file.
The Welcome screen appears.
3. Click Next for subsequent screens. Be sure to view the Installer online help for information about each panel.
4. Click Install to begin the installation.
Installing Agile PLM Data Mart on Solaris and HP-UX
For the Oracle databases to work properly, the default semaphore settings in Solaris and HP-UX must be changed. These settings should be reconfigured as follows:
To modify the system kernel parameters:
1. Change to the root user, and back up the /etc/system file:
$ su - [Enter]
# cp /etc/system /etc/system_save [Enter]
2. Verify the following /etc/system kernel parameters. If the parameters do not exist, go to the next step.
set shmsys:shminfo_shmmax = 4294967295

Chapter 4: Installing Agile PLM Data Mart
v3.2.0.2 13
set shmsys:shminfo_shmmin = 1
set shmsys:shminfo_shmmni = 100
set shmsys:shminfo_shmseg = 10
set semsys:seminfo_semmns = 1024
set semsys:seminfo_semmni = 100
set semsys:seminfo_semmsl = 500
set semsys:seminfo_semopm = 100
set semsys:seminfo_semvmx = 32767
set noexec_user_stack = 1 (Note:On Oracle 10g only)
Important If you have been running the host computer as an Oracle database server, you have to check with your system administrator before changing these parameters. For these parameter settings, you can also refer to the Oracle database documentation.
Note Restart the computer if you modify the /etc/system file.
3. Before you start the Installer program, set the profile as follows -
(Oracle 10g) ORACLE_HOME=/u01/app/oracle/product/10.2.0/db_1; export ORACLE_HOME
(Oracle 11g)ORACLE_HOME=/u01/app/oracle/product/11.1.0/db_1; export ORACLE_HOME
PATH=$PATH:$ORACLE_HOME/bin; export PATH
JAVA_HOME=/u01/oracle/software/jdk1.5.0_15; export JAVA_HOME
ODI_JAVA_HOME=$JAVA_HOME; export ODI_JAVA_HOME
ODI_HOME=/u01/oracle/software/odi/oracledi; export ODI_HOME
To start the Agile PLM Data Mart installer on Solaris or HP-UX:
1. Log on as a user with full permissions.
Important The user must have full permissions (-rwx) for all the folders of the Oracle DB and ODI or the Installation will fail.
2. Open a terminal window.
3. Change to the directory where you downloaded the installation file.
4. At the prompt, execute the PLMDM3.2.0.2_Sol.bin file for Solaris or the PLMDM3.2.0.2_hpux.bin file for HP-UX.
The Welcome screen appears.
5. Click Next for subsequent screens. Be sure to view the Installer online help for information about each panel.
6. Click Install to begin the installation.
Data Mart Setup Guide
14 Agile Product Lifecycle Management
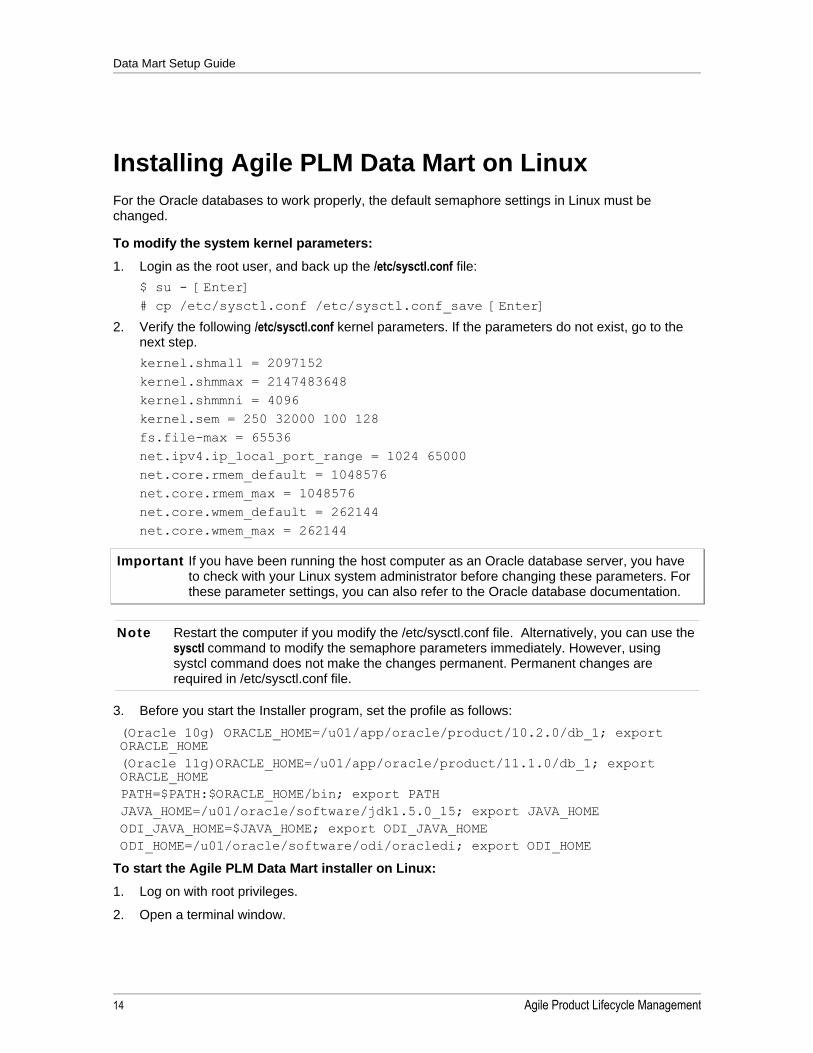
Installing Agile PLM Data Mart on Linux
For the Oracle databases to work properly, the default semaphore settings in Linux must be changed.
To modify the system kernel parameters:
1. Login as the root user, and back up the /etc/sysctl.conf file:
$ su - [Enter]
# cp /etc/sysctl.conf /etc/sysctl.conf_save [Enter]
2. Verify the following /etc/sysctl.conf kernel parameters. If the parameters do not exist, go to the next step.
kernel.shmall = 2097152
kernel.shmmax = 2147483648
kernel.shmmni = 4096
kernel.sem = 250 32000 100 128
fs.file-max = 65536
net.ipv4.ip_local_port_range = 1024 65000
net.core.rmem_default = 1048576
net.core.rmem_max = 1048576
net.core.wmem_default = 262144
net.core.wmem_max = 262144
Important If you have been running the host computer as an Oracle database server, you have to check with your Linux system administrator before changing these parameters. For these parameter settings, you can also refer to the Oracle database documentation.
Note Restart the computer if you modify the /etc/sysctl.conf file. Alternatively, you can use the sysctl command to modify the semaphore parameters immediately. However, using systcl command does not make the changes permanent. Permanent changes are required in /etc/sysctl.conf file.
3. Before you start the Installer program, set the profile as follows:
(Oracle 10g) ORACLE_HOME=/u01/app/oracle/product/10.2.0/db_1; export ORACLE_HOME
(Oracle 11g)ORACLE_HOME=/u01/app/oracle/product/11.1.0/db_1; export ORACLE_HOME
PATH=$PATH:$ORACLE_HOME/bin; export PATH
JAVA_HOME=/u01/oracle/software/jdk1.5.0_15; export JAVA_HOME
ODI_JAVA_HOME=$JAVA_HOME; export ODI_JAVA_HOME
ODI_HOME=/u01/oracle/software/odi/oracledi; export ODI_HOME
To start the Agile PLM Data Mart installer on Linux:
1. Log on with root privileges.
2. Open a terminal window.
Chapter 4: Installing Agile PLM Data Mart
v3.2.0.2 15
3. Change to the directory where you downloaded the installation file.
4. At the prompt, execute the PLMDM3.2.0.2_Lin.bin file.
The Welcome screen appears.
5. Click Next for subsequent screens. Be sure to view the Installer online help for information about each panel.
Important The user should have full permission (-rwx) for all the folders of the Oracle DB and ODI or the Installation will fail.
Installing Agile PLM Data Mart on AIX
To start the Agile PLM Data Mart installer on AIX:
1. Log on as a user with full permissions.
Important The user must have full permissions (-rwx) for all the folders of the Oracle DB and ODI or the Installation will fail.
2. Open a terminal window.
3. Change to the directory where you downloaded the installation file.
4. At the prompt, execute the PLMDM3.2.0.2_Aix.bin file.
The Welcome screen appears.
5. Click Next for subsequent screens. Be sure to view the Installer online help for information about each panel.
6. Click Install to begin the installation.
Adding Database Services to the Listener
Note This is only applicable for Agile PLM deployments creating a new Oracle PLA Data Mart database instance.
Upon completion of the Installation process, you are required to add database services to the Listener. Use the Oracle Net Manager to specify:
Global Database Name [eg, PLMDM]
Oracle Home Directory [eg, D:\ORACLE\product\10.2.0\db_1]
SID [eg, PLMDM]
Stop and restart the Listener after you have added the services.
Data Mart Setup Guide
16 Agile Product Lifecycle Management
Manual Installation Steps for DB Schema
If you selected the option Generate SQL Scripts in the Select Data Mart Schema panel during installation, the Installer generates a set of SQL files and stores them in the Schema folder under the Data Mart Home directory. You need to run them in SQL*Plus in the order given to manually create the Agile PLM Data Mart database schema.
Note The database needs to be already created before performing these steps.
The following are the different possibilities of creating the Data Mart schema using manually generated Install Scripts:
Scenario 1
Generate the scripts using installer in system A where Data Mart Schema is created and execute the scripts manually.
In SQL*Plus, connect to the Data Mart database using the Data Mart User Name and Password.
Before doing so, set the Oracle SID environment variable as follows:
IWindows set oracle_sid = <sid_name>
Solaris/Linux export ORACLE_SID = <sid_name>
1. Run TableSpaceCreation.sql to create Tablespace. If the tablespace already exists, skip this step.
2. Run UserCreation.sql to create Users.
3. Run ODM.sql to install the Operational Data Mart (ODM).
4. Run ODM_DDL_COMMENTS.sql script to add comments for the tables. This step is optional.
Note The given sequence of execution is very important or the installation will fail. If you run the scripts on a machine different from where they were generated, verify the parameters, including sys and system password.
Scenario 2
Generate the scripts using installer in system A and create the Data Mart Schema on another system using the generated scripts.
If you generate the scripts on System A and run them on System B, then you need to replace the scripts in the same location on System B, because the .sql files contain an absolute path. Or, you can change the directory path in the .sql files to any valid directory.
Example :
Generate the scripts on System A in directory F:\PLM_DataMart. Copy the scripts to System B to the location F:\PLM_DataMart. If F: drive does not exist in System B, copy the scripts to any valid directory (example : D:\PLM_DataMart) on System B and change the directory path in the following .sql files:
SingleSchemaCreation.sql (for Single Schema Option)

Chapter 4: Installing Agile PLM Data Mart
v3.2.0.2 17
UsersCreation.sql(for Default Schema Option)
TablespaceCreation.sql(optional)
Odm.sql
Note Follow the steps outlined in the Scenario 1 to manually install the Data Mart schema.The generated scripts can be run on all operating systems.
Setting Database Privileges
The following table illustrates the privileges that a database administrator can grant on a single schema installation:
Schema Database Pr iv i lege Purpose
ODM GRANT CONNECT,RESOURCE to ODM; Enable connection to the schema
GRANT CREATE DATABASE LINK TO ODM Create DB link for every full ETL run
GRANT DROP PUBLIC DATABASE LINK TO ODM
Drop DB link
GRANT CREATE SYNONYM TO ODM Create synonym for Source table in Target Schema
GRANT CREATE PUBLIC SYNONYM TO ODM
Create public synonym for Source table in Target Schema
GRANT ANALYZE ANY TO ODM Analyze the i$ table during the CDC ETL run
GRANT DROP PUBLIC SYNONYM TO ODM Drop Synonym
GRANT CREATE TABLE TO ODM Create Table
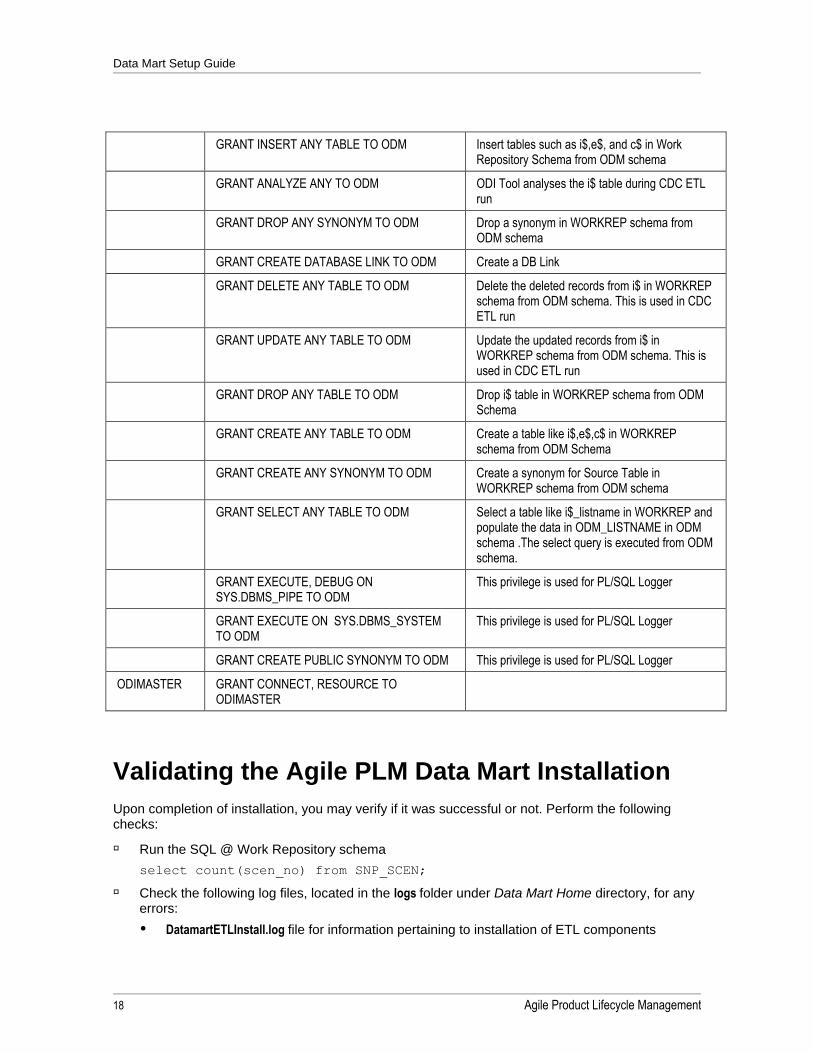
The following table illustrates the important database privileges required for multiple schema installation:
Schema Database Pr iv i lege Purpose
ODIWORK GRANT CONNECT, RESOURCE TO ODIWORK
GRANT ANALYZE ANY TO ODIWORK WITH ADMIN OPTION
ODI tool analyzes temp tables during CDC ETL run
ODM GRANT CONNECT, RESOURCE TO ODM
GRANT DROP PUBLIC DATABASE LINK TO ODM Drop DB Link for every Full ETL run
GRANT CREATE ANY INDEX TO ODM Create an index in WorkRep Schema for i$ tables from ODM Schema
Data Mart Setup Guide
18 Agile Product Lifecycle Management
GRANT INSERT ANY TABLE TO ODM Insert tables such as i$,e$, and c$ in Work Repository Schema from ODM schema
GRANT ANALYZE ANY TO ODM ODI Tool analyses the i$ table during CDC ETL run
GRANT DROP ANY SYNONYM TO ODM Drop a synonym in WORKREP schema from ODM schema
GRANT CREATE DATABASE LINK TO ODM Create a DB Link
GRANT DELETE ANY TABLE TO ODM Delete the deleted records from i$ in WORKREP schema from ODM schema. This is used in CDC ETL run
GRANT UPDATE ANY TABLE TO ODM Update the updated records from i$ in WORKREP schema from ODM schema. This is used in CDC ETL run
GRANT DROP ANY TABLE TO ODM Drop i$ table in WORKREP schema from ODM Schema
GRANT CREATE ANY TABLE TO ODM Create a table like i$,e$,c$ in WORKREP schema from ODM Schema
GRANT CREATE ANY SYNONYM TO ODM Create a synonym for Source Table in WORKREP schema from ODM schema
GRANT SELECT ANY TABLE TO ODM Select a table like i$_listname in WORKREP and populate the data in ODM_LISTNAME in ODM schema .The select query is executed from ODM schema.
GRANT EXECUTE, DEBUG ON SYS.DBMS_PIPE TO ODM
This privilege is used for PL/SQL Logger
GRANT EXECUTE ON SYS.DBMS_SYSTEM TO ODM
This privilege is used for PL/SQL Logger
GRANT CREATE PUBLIC SYNONYM TO ODM This privilege is used for PL/SQL Logger
ODIMASTER GRANT CONNECT, RESOURCE TO ODIMASTER
Validating the Agile PLM Data Mart Installation
Upon completion of installation, you may verify if it was successful or not. Perform the following checks:
Run the SQL @ Work Repository schema
select count(scen_no) from SNP_SCEN;
Check the following log files, located in the logs folder under Data Mart Home directory, for any errors:
DatamartETLInstall.log file for information pertaining to installation of ETL components
Chapter 4: Installing Agile PLM Data Mart
v3.2.0.2 19
DatamartDBInstall.log file for information on DB creation
DatamartInstall.log file
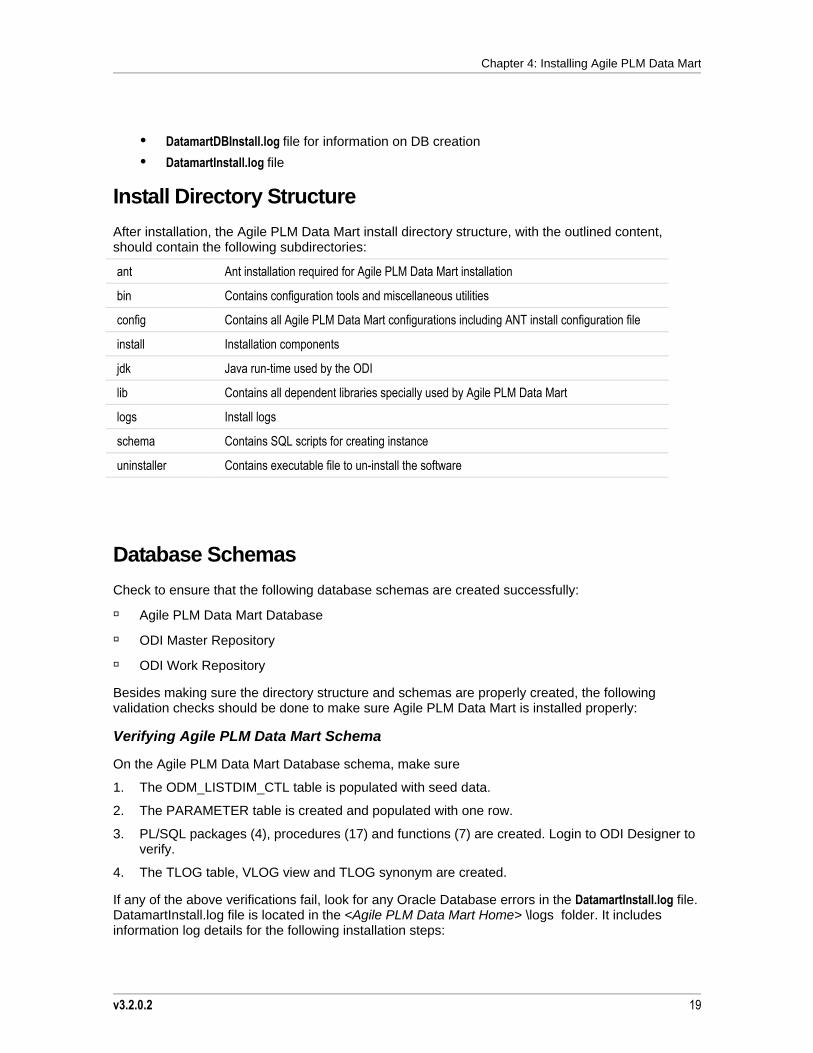
Install Directory Structure
After installation, the Agile PLM Data Mart install directory structure, with the outlined content, should contain the following subdirectories:
ant Ant installation required for Agile PLM Data Mart installation
bin Contains configuration tools and miscellaneous utilities
config Contains all Agile PLM Data Mart configurations including ANT install configuration file
install Installation components
jdk Java run-time used by the ODI
lib Contains all dependent libraries specially used by Agile PLM Data Mart
logs Install logs
schema Contains SQL scripts for creating instance
uninstaller Contains executable file to un-install the software
Database Schemas
Check to ensure that the following database schemas are created successfully:
Agile PLM Data Mart Database
ODI Master Repository
ODI Work Repository
Besides making sure the directory structure and schemas are properly created, the following validation checks should be done to make sure Agile PLM Data Mart is installed properly:
Verifying Agile PLM Data Mart Schema
On the Agile PLM Data Mart Database schema, make sure
1. The ODM_LISTDIM_CTL table is populated with seed data.
2. The PARAMETER table is created and populated with one row.
3. PL/SQL packages (4), procedures (17) and functions (7) are created. Login to ODI Designer to verify.
4. The TLOG table, VLOG view and TLOG synonym are created.
If any of the above verifications fail, look for any Oracle Database errors in the DatamartInstall.log file. DatamartInstall.log file is located in the <Agile PLM Data Mart Home> \logs folder. It includes information log details for the following installation steps:
Data Mart Setup Guide
20 Agile Product Lifecycle Management
Creation of Users (Agile PLM Data Mart Schema User, ODI Master Repository user, ODI Work Repository User)
PL/SQL logger (Analytics Log user, creation of tables TLOG)
Agile PLM Data Mart database creation
ODI Repository creation
ODI Physical connection configuration, Logical connection configuration, importing Model folder, Project folder
Verifying ODI Repositories
Log into ODI Designer to verify the following:
Chapter 4: Installing Agile PLM Data Mart
v3.2.0.2 21
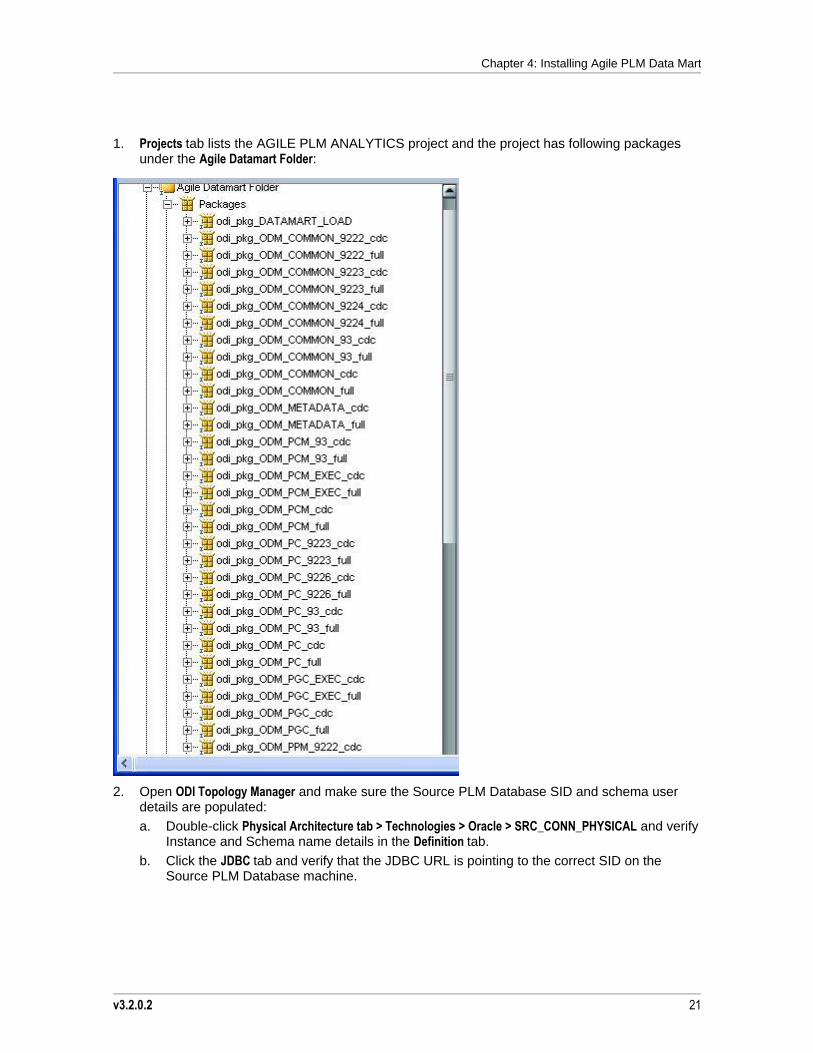
1. Projects tab lists the AGILE PLM ANALYTICS project and the project has following packages under the Agile Datamart Folder:
2. Open ODI Topology Manager and make sure the Source PLM Database SID and schema user details are populated:
a. Double-click Physical Architecture tab > Technologies > Oracle > SRC_CONN_PHYSICAL and verify Instance and Schema name details in the Definition tab.
b. Click the JDBC tab and verify that the JDBC URL is pointing to the correct SID on the Source PLM Database machine.
Data Mart Setup Guide
22 Agile Product Lifecycle Management
Before you Upgrade
Make sure one ETL load completes successfully in the current version of Agile PLM Data Mart.
Upgrading from Agile PLM Data Mart 3.2
Perform the following steps to upgrade Agile PLM Data Mart 3.2 or 3.2.0.0.1 to Agile PLM Data Mart 3.2.0.2:
1. Set the PLMDataMart_Home environment variable to point to the directory where the existing Agile PLM Data Mart 3.2 software is installed.
For example:
Windows: Set PLMDataMart_Home=D:/PLMDataMart
Linux/Solaris: export PLMDataMart_Home \home\oracle\PLMDataMart
2. Copy the DM3202_PatchInstaller.zip file into the existing PLM Data Mart install directory
3. Unzip the DM3202_PatchInstaller.zip file:
a. In the Command Prompt or terminal window, change to the directory where you saved the DM3202_PatchInstaller.zip file
b. Enter the following command to extract the contents of the file:
jar -xvf DM3202_PatchInstaller.zip
c. After you extract the files, the following folders are displayed:
bin
Patch
\etl
\schema
4. Using the Command Prompt or shell, login to the Data Mart schema and run the ODM_3202.sql script, located in the %PLMDataMart_Home%\Patch\schema directory on Windows or the $PLMDataMart_Home/Patch schema directory on Linux and Solaris:
SQL> @ODM_3202.sql
5. Replace the following tokens in the Windows batch file, %PLMDataMart_HOME%\bin\ImportODMComponents_patch.bat or the Linux/Solaris shell file $PLMDataMart_Home/bin/ImportODMComponents_Patch.sh:
a. Replace <<AA_HOME> with the Data Mart home directory path.
b. Replace <ODI_WORK> with the ODI Work Repository name (default=WORKREP).
Note <ODI_WORK> is the logical name of the work repository, but is not the ODI Work schema name.
6. Run the ImportODMComponents_patch.bat (or .sh) file:
On Windows:
Note Make sure that %ODI_HOME%\bin is present in the operating system path.
Chapter 4: Installing Agile PLM Data Mart
v3.2.0.2 23
cd %PLMDataMart_Home%\bin
ImportODMComponents_patch.bat > ..\logs\Patch.log
On Linux or Solaris:
$ cd $PLMDataMart_Home/bin
$ chmod +x *.sh
$./ImportODMComponents_patch.sh > ../logs/Patch.log
Note Make sure $ODI_HOME is present in the operating system path.
7. Using the Command Prompt or shell, login to the Data Mart schema and run the Post_Installation.sql file, located in the %PLMDataMart_Home%\Patch\schema directory on Windows or the $PLMDataMart_Home/Patch/schema on Linux and Solaris.
8. After running the Post_Installation.sql file, run the following statements to confirm successful execution:
sql> select * from dm_load_ctl;
sql> select * from odm_data_dictionary where tgt_table like '%_P4';
sql> select * from user_tables where table_name like '%_P4';
sql> select * from user_tables where table_name like '%_P4%_MAP';
sql> select * from odm_flexcols_metadata;
Note All of the statements should not return any rows.
Upgrading from Agile PLM Data Mart 3.1.2 or Earlier
The Agile PLM Data Mart 3.2.0.2 installer does not provide upgrade software or scripts to upgrade any customizations done on the Data Mart schema or ODI ETL components installed with Agile PLM Data Mart 3.1.2 or earlier versions.
If you are upgrading from a previous release of Agile PLM Data Mart, use the following steps as guidelines for upgrading your existing Agile PLM Data Mart installation:
Note These steps are applicable only if you customized any schema objects or ODI-related objects in a previous release.
1. Backup the Data Mart schema, including any views or downstream ETL developed against the Data Mart schema.
Note It is best practice to package all schema customizations into one or multiple upgrade SQL files that can be run directly after installing Agile PLM Data Mart.
2. Backup the ODI Master and Work repository schema objects and note all ODI ETL customizations developed against Agile PLM Data Mart.
3. Drop, recreate, and provide appropriate database schema user privileges for Data Mart, ODI Master and Work schemas.
Data Mart Setup Guide
24 Agile Product Lifecycle Management
Note Drop and recreate a single schema if the previous deployment used a single schema for all three schema objects.
4. Install Agile PLM Data Mart using the same schema configurations you used in the previous release.
5. Re-implement schema customizations including a refresh (or recreate) of views and downstream ETL developed on the Data Mart schema.
6. Import or re-implement any customization done on the ODI ETL.
7. Test the installation of Agile PLM Data Mart and all customizations.
v3.2.0.2 25
Chapter 5
Configuring Agile PLM Data Mart
This chapter includes the following:
List Dimension Configurator ................................................................................................................................ 25 Changing List Names in Dimension Table ........................................................................................................... 27 Validating Dimension Tables ............................................................................................................................... 27 Enabling and Disabling ETL for PLM Modules .................................................................................................... 27 Changing the Agile PLM Data Mart Passwords ................................................................................................... 28
List Dimension Configurator
The Agile PLM Data Mart Configurator is a tool bundled with the Agile PLM Data Mart software. The tool provides the flexibility for customers to change the dimension table names of any of the "out of the box" list in the Agile PLM Data Mart schema. These List Dimension tables are named according to their List Names. You may rename them in accordance with your own naming conventions.
The tool also enables customers to provide new dimension table names for the customer configured lists in Agile PLM.
During ETL execution, the Agile PLM Data Mart application creates separate database tables in the Agile PLM Data Mart schema for each list Dimension. These tables serve as the master data source of list items. The Dimension Table Names for Lists are stored in table ODM_LISTDIM_CTL in the Agile PLM Data Mart schema.
To use the List Dimension Configurator, follow these steps:
1. Execute the Configurator.bat file, located in bin folder of the Data Mart Home directory.
Data Mart Setup Guide
26 Agile Product Lifecycle Management
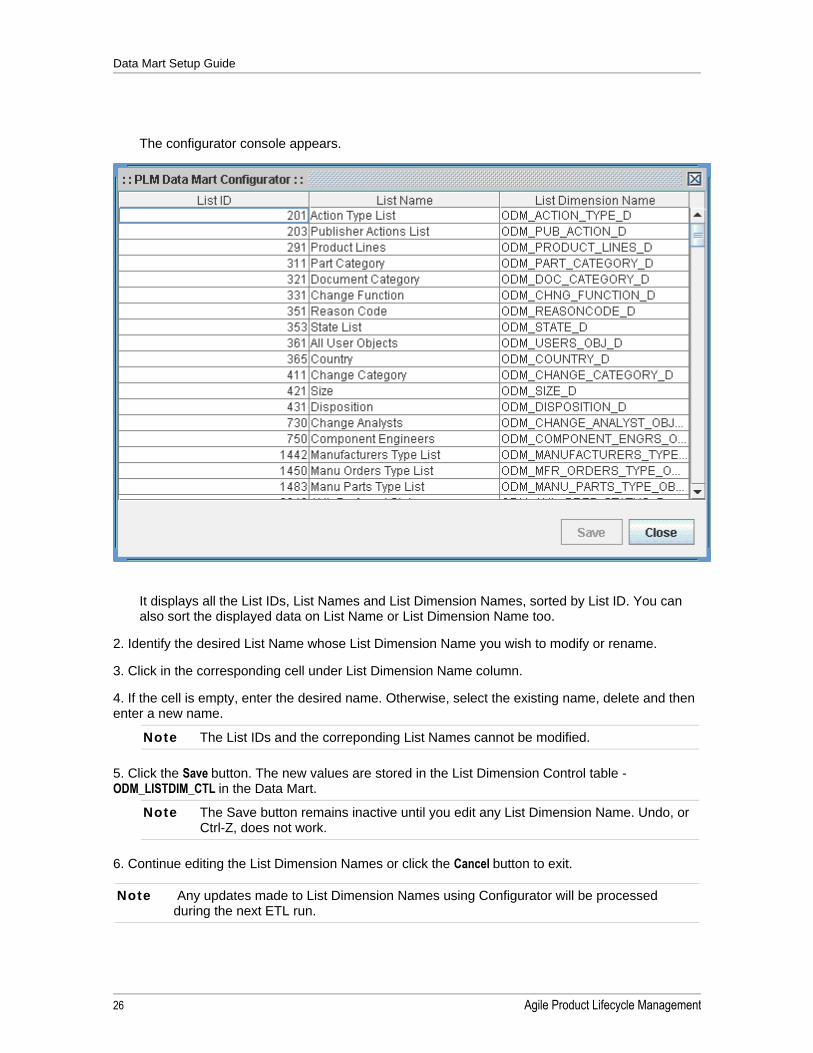
The configurator console appears.
It displays all the List IDs, List Names and List Dimension Names, sorted by List ID. You can also sort the displayed data on List Name or List Dimension Name too.
2. Identify the desired List Name whose List Dimension Name you wish to modify or rename.
3. Click in the corresponding cell under List Dimension Name column.
4. If the cell is empty, enter the desired name. Otherwise, select the existing name, delete and then enter a new name.
Note The List IDs and the correponding List Names cannot be modified.
5. Click the Save button. The new values are stored in the List Dimension Control table - ODM_LISTDIM_CTL in the Data Mart.
Note The Save button remains inactive until you edit any List Dimension Name. Undo, or Ctrl-Z, does not work.
6. Continue editing the List Dimension Names or click the Cancel button to exit.
Note Any updates made to List Dimension Names using Configurator will be processed during the next ETL run.
Chapter 5: Configuring Agile PLM Data Mart
v3.2.0.2 27
The ODM_LISTDIM_CTL table stores the latest List Dimension Names. The existing data is copied into its backup table, ODM_LISTDIM_CTL_BK, along with the timestamps of each modification before it is committed. Thus, it maintains the entire history of each and every earlier List Dimension Name, allowing you to switch back, if you want to.
Changing List Names in Dimension Table
When a new List is added in Agile PLM, the Data Mart ETL dynamically adds the appropriate dimension table name to the ODM_LISTDIM_CTL table and creates it during the next ETL run. You can change the name of this dimension table after an ETL run is completed.
To create a new List in Agile PLM and also change its dimension table in Target Data Mart:
1. Create a new List in Agile PLM Administrator.
2. Run Agile PLM Data Mart ETL.
3. Run Configurator and identify the row of the newly created List in Configurator.
4. (Optional) Delete the dimension table that was created during the previous ETL run. This step prevents schema from having orphan dimension tables.
5. Change the Dimension Table name for the newly created List.
6. Once changes are completed and saved, run Agile PLM Data Mart ETL.
Validating Dimension Tables
When you make any changes to Dimension table names using Configurator and you have not deleted previously created dimension tables from the Agile PLM Data Mart schema, anyone with Oracle Database Administration skills can take the following steps to identify and remove unused dimension tables from the Agile PLM Data Mart schema:
1. Run the following SQL query to identify all Dimension tables
SELECT LIST_DIM from ODM_LISTDIM_CTL_BKP
WHERE
LIST_DIM not in
(SELECT LIST_DIM from ODM_LISTDIM_CTL)
2. Make sure the table names returned by this query are not used by any downstream ETL application.
3. Drop every table identified as not used by Agile PLM Data Mart or the downstream ETL application from the Agile PLM Data Mart schema.
Enabling and Disabling ETL for PLM Modules
You can enable or disable ETL for the Agile PLM modules (PC, PPM, PQM, PCM, PG&C) to selectively extract their data from the PLM database server. The properties of the Enabled/Disabled modules are stored in the DataMartConfig.Properties file in the Config folder under the Agile PLM Data Mart Home Directory.
Data Mart Setup Guide
28 Agile Product Lifecycle Management
To Enable/Disable ETL for the modules:
1. Open the DataMartConfig.Properties file in a Text Editor.
2. Go to the section ###PLM Module###. The PLM modules are listed here.
PQM=Y
PPM=Y
PC=Y
PCM=Y
PGC=Y
3. Change the property values to Y or N.
The properties value Y enables the module, and N disables.
4. Run the LoadParameters script located in the bin directory under the Agile PLM Data Mart Home directory.
5. Or, change and commit the values (Y or N) in the Parameter Table.
Note The module property cannot be empty. It should be either Y or N.
Changing the Agile PLM Data Mart Passwords
Password changes are stored directly in the database. However, the changed passwords should also be stored, in encrypted form, in the DataMartConfig.properties file. This is necessary for the following reasons:
The LoadParameters.bat uses the access information (username, password) from the properties file to enable or disable the modules.
The Configurator.bat file uses the access information (username, password) from the properties file to configure the new List Dimension Names.
Therefore, any changes in any passwords in the database should also be reflected in the properties file. The encryption of passwords is required for security reasons.
Changing a password entails a two-staged action:
1. Generate an encrypted string for a character password using DMEncoder.bat in Windows, or DMEncoder.sh in Solaris/Linux/AIX.
2. Replace the existing encrypted password string in the DataMartConfig.properties file with the new encrypted string.
Note The LoadParameters.bat file uses this properties file to change the PLM modules.
To change a password:
1. Go to the bin folder in the Agile PLM Data Mart Home directory
2. Run the batch file along with a desired password, as follows:
Chapter 5: Configuring Agile PLM Data Mart
v3.2.0.2 29
dmencoder <pwd>
where <pwd> is an alpha-numeric character string password.
An encrypted string appears.
3. Select and copy the encrypted string.
4. Open the DataMartConfig.properties file, located in the config folder in the Agile PLM Data Mart Home directory, in a text editor.
5. Delete the password that you wish to change.
6. Paste the new encrypted string and save and close the file.
Note To reflect the changed password(s) in ODI, refer to the ODI Administration Guide.

v3.2.0.2 31
Chapter 6
Executing ETL
This chapter includes the following:
Setting up ODI Users ........................................................................................................................................... 31 Executing ETL from ODI ...................................................................................................................................... 33 Executing ETL from Command Prompt ............................................................................................................... 34
You can perform Extraction, Transformation and Loading (ETL) of PLM data from the source database to the Agile PLM Data Mart Database by running the ETL tasks. These tasks are installed in the Agile PLM Data Mart Home directory and can be run inside ODI or from a command prompt.
Important Agile PLM Data Mart does not guarantee data consistency in the ODM schema if there are any data changes to Agile PLM while ETL is running. It is recommended that ETL runs are scheduled when Agile PLM systems are idle.
Before running any tasks, you are required to setup ODI users.
Setting up ODI Users
Agile PLM Data Mart is based on the Oracle Data Integrator. To run ETL tasks and operate on data, you are required to use ODI.
Note ODI User setup requires the information entered during the Data Mart installation, such as, user names and passwords.
To configure a user:
1. On Windows, run the program Operator from Start > Programs > OracleODI > Operator
The Oracle Data Integrator Login screen appears.
2. Click New to create a new Work Repository Connection.

Data Mart Setup Guide
32 Agile Product Lifecycle Management
The Work Repository Connection screen appears
3. Enter Login Name, User name and password for ODI connection.
These can be of your choice. The default User Name is SUPERVISOR and the password is SUNOPSIS (case sensitive).
Note To configure additional users or change password for SUPERVISOR, refer to the ODI documentation.
4. Enter the User name and password for Master Repository DB connection that you specified during installation.
5. Select Oracle JDBC Driver from Driver List
The Driver Name field is automatically filled with oracle.jdbc.driver.OracleDriver.
6. Enter the following URL:
jdbc:oracle:thin:@<host>:<port>:<sid>
where
<host> Host name of Agile PLM Data Mart DB Server
<port> Port Number of Agile PLM Data Mart DB Server

Chapter 6: Executing ETL
v3.2.0.2 33
<sid> SID or the Instance name of Agile PLM Data Mart DB
7. Enter the Repository Name for Work Repository.
8. Click Test button to verify the connection works.
9. Click OK . You are prompted to enter the Work Repository Password.
10. Enter the Work Repository Password that was assigned during the Data Mart installation and click OK.
11. Click OK to finish.
Note For complete information on installation and usage of ODI, refer to its documentation available at the Oracle Technology Network (OTN) Web site http://www.oracle.com/technology/documentation.
Executing ETL from ODI
Note If you want to see the status of all the tasks that are under execution, increase the Operator Display Limit to 1000 (the default value is 100). In ODI Operator, go to File Menu > User parameter >Set operator Display limit and change the value.
The full or incremental load brings in all relevant data that were modified or added after the latest data load. If you want to run a FULL_LOAD, set Full_Load to Yes in PARAMETER table of the Agile PLM Data Mart schema.
To modify the parameter table:
1. Login to Agile PLM Data Mart database.
SQL> update PARAMETER set FULL_LOAD='Y';
SQL> commit;
To execute ETL from ODI, follow these steps:
1. Launch ODI Operator and select login, which is Repository Name
a. The username and password populate automatically. Click OK.
b. Go to the Scenarios tab.
2. You will see all the components listed in the Left Frame.
a. Right-click on DATAMART_LOAD Version 001 component and select Execute. The Execution window displays.
b. Click OK. The Sessions Started dialog appears.
c. Click OK. The ETL process begins.
Note The Agile PLM Data Mart load does not physically delete any data, which are either soft or hard deleted in the PLM source database. The deleted items are flagged with the delete_flag set to 1.
Data Mart Setup Guide
34 Agile Product Lifecycle Management
Executing ETL from Command Prompt
To execute ETL from a command prompt:
1. In Windows, open a Command Prompt window.
2. Change the directory to the bin folder in your Data Mart Home Directory, eg, d:\PLMdatamart\bin
3. Enter the following on the command line:
startdm DATAMART_LOAD 001 PLMDM
where
startdm is the batchfile that executes ETL tasks
DATAMART_LOAD is the ETL task
001 is the version number of ETL task
PLMDM is the ETL context
The ETL process starts.
To view the status of an ETL process:
1. Launch ODI Operator and select login, which is the Repository Name.
The username and password populate automatically.
2. Click OK.
3. Go to the Sessions List tab and select All Executions in the left frame, which shows all the running tasks.
4. Or, you can go to the Hierarchical Sessions tab and select Status or All Executions in the left frame to check overall top level progress.
v3.2.0.2 35
Chapter 7
Installing on Real Application Cluster
This chapter includes the following:
Prerequisites ........................................................................................................................................................ 35 Installing Agile PLM Data Mart Patch 3.2.0.2 on Real Application Cluster .......................................................... 35 Post Installation Steps ......................................................................................................................................... 35
This section lists the prerequisites, installation procedure, and post-installation guidelines for installing Agile PLM Data Mart Patch 3.2.0.2 on Real Application Cluster.
Prerequisites 1. Install Oracle 11gR2 clusterware. For more information, see Oracle 11gR2 documentation.
2. Install supported ODI version. For more information, see ODI Installation documentation.
Installing Agile PLM Data Mart Patch 3.2.0.2 on Real Application Cluster 1. Create TNS entries for Agile PLM source on each node in the cluster.
Note ETL will fail if the TNS entries are not created.
2. Install Agile PLM Data Mart in any of the nodes in the cluster environment by following the installation procedure provided in the Agile PLM Data Mart Setup Guide.
Post Installation Steps
After you install Agile PLM Data Mart on RAC, perform the following steps:
1. Launch the ODI Operator.
Note Agile PLM Data Mart can be installed on any of the nodes in the cluster.
2. Replace the URL in the Work Repository Connection window with the corresponding details of the two nodes. The URL is displayed in the following format: Jdbc:oracle:thin:@<host>:port:sid
Data Mart Setup Guide
36 Agile Product Lifecycle Management
To replace the URL, see the example below: Jdbc:oracle:thin:@(DESCRIPTION=(LOAD_BALANCE=on) (ADDRESS=(PROTOCOL=TCP) (HOST=<NODE # 1 HOSTNAME> (PORT=1521)) (ADDRESS=(PROTOCOL=TCP)(HOST=<NODE # 2 HOSTNAME> (PORT=1521)) (CONNECT_DATA=(SERVICE_NAME=<SID NAME>)))
Note For more information on setting up ODI Users, refer to the "Setting up ODI Users" section in the Agile PLM Data Mart Setup Guide.
3. Launch the Topology Manager and update the target JDBC database configuration for Staging. Please refer to the example provided in Step 2.
Note For more information, see ODI documentation or contact Oracle Support.
v3.2.0.2 37
Appendix A
Troubleshooting
This Appendix includes the following:
Installation Issues ................................................................................................................................................ 37 ETL Runtime Issues ............................................................................................................................................ 39 PL/SQL Logs ....................................................................................................................................................... 42 Database Issues .................................................................................................................................................. 42 Detecting Errors in ODI coming from Oracle ....................................................................................................... 43
Installation Issues
Unsupported Operating systems error
I use Windows XP operating system. I get a warning that states 'Unsupported Operating System' when I run the PLMBISetup_Win.exe file. There are options to quit or continue the installation. If I continue the installation what is the impact?
Cause:
You are running the installer on a computer that is not a Server. This warning indicates that Oracle does not support any issues that might come up after the installation of the software on a desktop at work or a Personal Computer (PC) used for software demonstrations.
Action:
There are no known adverse impacts if you continue with the installation. This warning does not appear if you install Oracle Product Lifecycle Analytics on a Server.
You can choose to quit the installation if you do not want to install the application on your work desktop or Home PC.
Installation Unsuccessful
During the installation of Oracle Product Lifecycle Analytics, I get an error message: Installation unsuccessful.
Action:
If the Database and ETL are installed together, check the Logs\DataMartInstall.log file. If the Database and ETL are installed separately, including on different machines, check the database install log at logs\DatamartDBInstall.log and the ETL install log at logs\DataMartETLInstall.log.
Repeat the installation using the latest download of the PLMBISetup file.
Unable to select the same installation directory if I install Oracle Product Lifecycle Analytics database and ETL components separately
I have installed the Product Lifecycle Analytics database. I am unable to install the Product Lifecycle
Data Mart Setup Guide
38 Agile Product Lifecycle Management
Analytics application in the same system and in the same directory where the database is installed.
Action:
If you are installing both the database and ETL on the same system, you can select both options together in the installer. If you install them separately in the same system, you will need to use two separate install folders.
Page cannot be displayed
I completed the installation successfully but when I launch the Oracle Product Lifecycle Analytics application URL, I get a 'Page cannot be displayed' screen.
Action:
Make sure to start the following services in the listed order:
1. OC4J or IIS
2. Oracle BI Java Host
3. Oracle BI Server
4. Oracle BI Presentation Server
Installer failed to create Data Mart schema, ODI Work repository and/or ODI Master repository schemas
Look for possible root causes in DatamartInstall.log, located in the logs folder of the Oracle PLA Data Mart install home directory.
Possible root causes could be:
Database version specified is different from the one installed in the system. For example, Oracle 10g option is selected during installer while the machine has Oracle 9i.
Path specified for Oracle Target DB Tablespaces could be invalid.
Oracle Database path specified is incorrect.
Database Instance exists, but the System user does not have proper privileges required to create and grant appropriate roles to schema users.
Incorrect installation of Oracle database
Database name specified when you create the database, may pre-exist. Choose another data base name to resolve the issue.
Installer failed to create ODI Work repository and ODI Master repository
Look for possible root causes under ODIRepCreation: tag in DatamartInstall.log:
Work Repository and Master Repository schemas are not created for possible root causes outlined in #1.
Tablespace specified for Work & Master repository are invalid.
JAVA_HOME and JAVA_ODI_HOME environment variables are incorrect.
Specified ODI directory is incorrect or ODI is not installed at specified path.
ODI Project "AGILE PLM ANALYTICS" does not have any packages
Besides the root causes outlined in #2, look for errors under ODI-PHY-Creation section in
Appendix A
v3.2.0.2 39
DatamartInstall.log for other issues:
OdiImportObject failed to execute for incorrect JRE specified
JDK version specified is either less than 1.5.x or 1.6 or above.
Specified Work Repository Name is already used in existing ODI
ODI already has projects that have conflicting Work and Master Repository IDs. Oracle PLA Data Mart uses following repository IDs:
Work Repository ID = 102
Master Repository ID = 103
Data Mart installation failed in Solaris.
If you are using Solaris installer for ODI, the Data Mart Installation fails. To avoid this installation error, use ODI Linux installer and manually install ODI as outlined in the ODI Installation Guide.
Installation fails with non-default Listener
If you are installing Oracle PLA Data Mart on a database with a non-default listener on a non-default port, make sure the listener is added to the listener.ora file in order to be recognized by the installer.
Installer unable to find Oracle Database Server
If you are installing Oracle PLA Data Mart on a 64-bit Windows system, an error message may display stating that the Oracle Database server was not found, even though it is installed. Ignore this message and continue with the installation.
Data Mart database instance not recognized by Oracle Database Configuration Assistant when using the Oracle Product Lifecycle Analytics Installer.
A user with Admin privileges must manually add the database as an entry to the oratab file, located in either the /etc or var/opt/oracle/ directory, based on the operating system.
Unable to update RPD and Web Catalog
The Oracle Product Lifecycle Analytics Installation is unsuccessful. I am unable to update RPD and Web Catalog.
Action:
Ensure that the OC4J server is running before you begin the installation.
ETL Runtime Issues
Connection Identifier error on ETL run with Agile PLM source (Agile PLM)
When I run ETL, the ODI_INT_CREATE_DBLINK task displays a connection identifier error message.
Cause:
The TNSNAMES.ORA file does not have the correct information that enables connection to the source database.
Data Mart Setup Guide
40 Agile Product Lifecycle Management
Action:
Add a TNSNAME entry in the target database that points to the source database before you run the ETL.
If the database SID name of the source and target database are different (Example: Source SID = AGILE9 and Target SID = PLMDM), then modify the TNS Service name to the name of the source database name in the tnsname.ora file, like AGILE9, in this example.
If the database SID name of the source and target database are the same (Example: Source SID = AGILE9 and Target SID = AGILE9), to eliminate DBLINK errors:
1. Modify the TNS entry as follows:
AGILE9_LAB1 =
(DESCRIPTION =
(ADDRESS_LIST =
(ADDRESS = (PROTOCOL = TCP)(HOST = LAB1)(PORT = 1521))
)
(CONNECT_DATA =
(SERVICE_NAME = AGILE9)
)
)
2. Start > Oracle > Oracle Data Integrator > Topology Manager
In the Topology Manager select Physical Architectures >Technologies>Oracle>SRC_CONN_PHYSICAL.
3. Replace the added TNSNAME (Example: AGILE9_LAB1) in the DB link column.
Credential retrieval failure error on ETL run (Agile PLM)
My Database server and ODI/ETL systems are in two different domains. When I run ETL, the ODI_INT_CREATE_DBLINK scenario returns the following message:
ORA-12638: Credential retrieval failed.
Cause:
The source DB and target DB are in different domains.
Action:
To eliminate the DBLINK errors:
4. Navigate to the %oracle_home%\network\admin directory.
5. Modify the SID and HOSTNAME in the TNSNAME entry to reflect the domain name.
Appendix A
v3.2.0.2 41
6. Start > Oracle > Oracle Data Integrator > Topology Manager.
7. In the Topology Manager, select
Physical Architectures >Technologies>Oracle>SRC_CONN_PHYSICAL.
8. Replace the added TNSNAME ( Example: AGILE9.ALAB01) in the DB link column.
To verify DBLINK:
Execute the scenario ODI_INT_CREATE_DBLINK from ODI operator in ODI.
If the scenario fails, the following message appears again:
Link AGILE9.ALAB01 error: ORA-12638: Credential retrieval failed
To resolve this issue:
1. Navigate to the %oracle_home%\network\admin directory
2. Modify the value of SQLNET.AUTHENTICATION_SERVICES in sqlnet.ora file as follows:
Original Entry - SQLNET.AUTHENTICATION_SERVICES= (NTS)
Modified Entry - SQLNET.AUTHENTICATION_SERVICES= (NONE)
3. Restart the database instance.
4. Re-run the scenario ODI_INT_CREATE_DBLINK from ODI operator in ODI.
Unable to run ETL after a configuration change
If there are any PLM configuration changes, such as the renaming of an attribute, it is recommended that you run a full ETL. Consult Oracle Support if you need help in resetting your ETL to full load.
Errors when using external .csv files
Do not add deleted Projects to the prj_cost.csv and prj_forecast.csv files.
If any ETL task fails during run-time the best option is to check the Execution tab of the ETL task in ODI Operator:
1. Log in to ODI Operator.
2. Select the Sessions List tab.
3. Expand All Executions in the left pane.
4. Select the task that is failing by double-clicking on it.
5. Select the Execution tab to view error details. Optionally, you can also export entire log file as an XML file thru Operator to check for multiple errors.
6. If the scenario name starts with ODI_PRO, look for PL/SQL errors logged in the VLOG table. See PL/SQL Logging section for more details on how to enable "debug mode" for detailed PL/SQL traces. Debug Mode for PL/SQL should be enabled if you need to further debug the issue.
Data Mart Setup Guide
42 Agile Product Lifecycle Management
If any ETL task hangs during run-time, check the Execution tab of the ETL task in ODI Operator:
1. Log in to ODI Operator.
2. Select the Sessions List tab.
3. Expand All Executions in the left pane.
4. Identify the task that is hanging by double-clicking on it.
5. Consult your DBA and provide the details noted in the previous step to help research and possibly identify any long-running SQL in the Data Mart schema.
6. Enable the Debug Mode for PL/SQL and look for errors in the VLOG table.
PL/SQL Logs
The log details are stored in the following table/view in the Data Mart schema
TLOG (table) This table contains information like timestamp, ID etc. This table will be appended, if the mode is ERRORMODE. This table will be purged, if the mode is DEBUGMODE
VLOG (view) This is a view created for the TLOG table and contains only the ERROR messages. The difference between ERROR_MODE and DEBUG_MODE is explained below
ERROR MODE This is the default mode. The value for this is '0' in the DEBUG_MODE column of the ETL_PARAMETER Table in the Data Mart schema and captures the error message.
DEBUG MODE This mode contains the value '1' in the DEBUG_MODE column of the ETL_PARAMETER table in the Data Mart schema and captures step-by-step information inside a PL/SQL Procedure.
Database Issues
Connectivity Errors
Agile PLM or Agile PLM for Process source database is available and accessible from the Oracle PLA Data Mart machine
Verify source database schema details
Target (Oracle PLA Data Mart) database is available
Verify Target database schema details
DB Link does not work when source and target schema are created in the same database (Agile PLM)
Create a TNS name that is different from the database name and SID. In the ODI Topology Manager, go to Physical Architecture>Technologies>Oracle>SRC_CONN_PHYSICAL. Manually update the Instance/Data Server field.

Appendix A
v3.2.0.2 43
Data Issues such as column width
Check the column in both Source and Target schema (refer to Schema documentation for table/column details).
Disk space
Check the Target database machine to ensure enough space is available for ETL to execute and add data.
Database Sessions to execute ETL
Check the database for enough sessions (>500) with which the ODI will run smoothly. To check database session and process parameters:
1. Login as sys/<PWD> as sysdba in command prompt using sqlplus.
SHOW PARAMETER SESSIONS
SHOW PARAMETER PROCESSES
2. Alter system set processes=1000 scope=spfile; OR
3. Alter system set processes=1000 scope=both;
4. After altering the Database, restart the instance.
Linux/Unix Specific only
If you receive a 'cannot execute' message, re-run the command with the following options: chmod u+x PLMBISetup*.bin
Make sure the TNS Listener is running with the ps –ef | grep tns command. If nothing shows, then it is not running.
If the TNS Listener is running, check the status with the lsnrctl status command.
Unable to view reports
When I login to the Oracle Product Lifecycle Analytics Application, I am unable to view any report. The window displays ODBC Driver errors.
Action:
If either TNSNAMES or MDS schema names or both are not default, reconfigure the TNSNAMES.ORA file, CONNECTION POOL details and MDS Schema Name in OBIEE Administrator, as appropriate.
Performance degrades on 64-bit platform with Oracle Database 10.2.0.3
Apply Oracle Patch to upgrade database to version 10.2.0.4.
Detecting Errors in ODI coming from Oracle
Errors appear often in Oracle Data Integrator in the following way:
java.sql.SQLException: ORA-01017: invalid username/password; logon denied
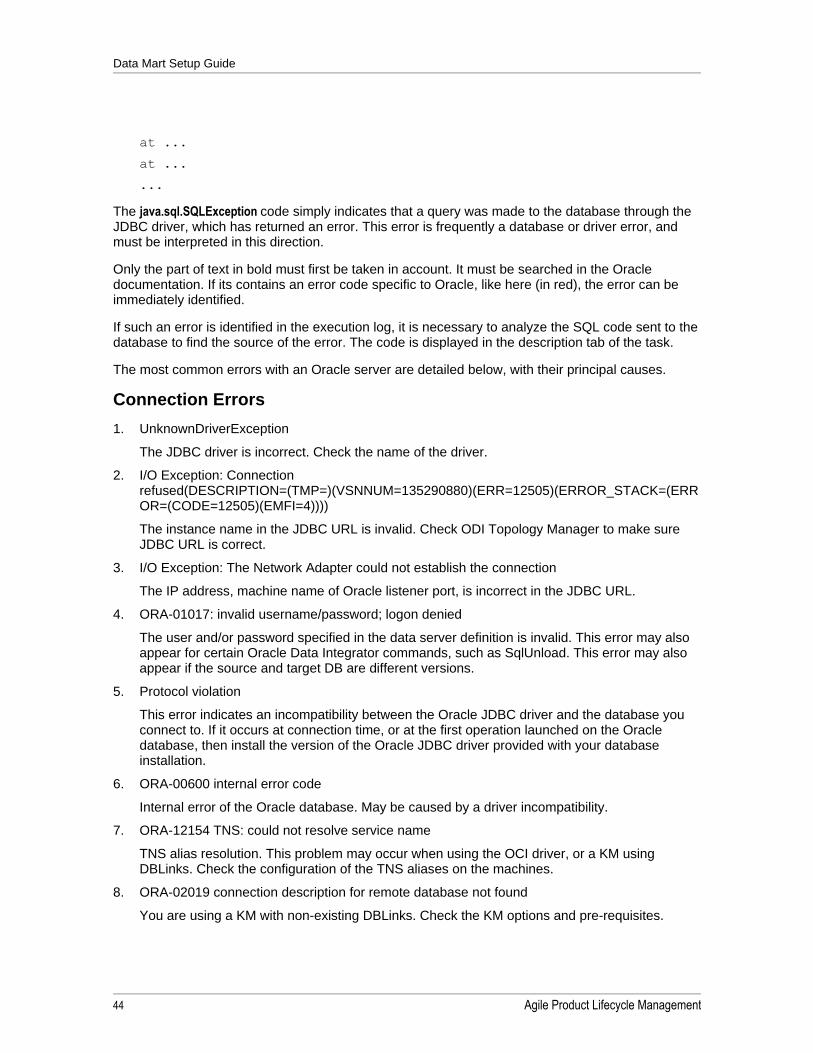
Data Mart Setup Guide
44 Agile Product Lifecycle Management
at ...
at ...
...
The java.sql.SQLException code simply indicates that a query was made to the database through the JDBC driver, which has returned an error. This error is frequently a database or driver error, and must be interpreted in this direction.
Only the part of text in bold must first be taken in account. It must be searched in the Oracle documentation. If its contains an error code specific to Oracle, like here (in red), the error can be immediately identified.
If such an error is identified in the execution log, it is necessary to analyze the SQL code sent to the database to find the source of the error. The code is displayed in the description tab of the task.
The most common errors with an Oracle server are detailed below, with their principal causes.
Connection Errors
1. UnknownDriverException
The JDBC driver is incorrect. Check the name of the driver.
2. I/O Exception: Connection refused(DESCRIPTION=(TMP=)(VSNNUM=135290880)(ERR=12505)(ERROR_STACK=(ERROR=(CODE=12505)(EMFI=4))))
The instance name in the JDBC URL is invalid. Check ODI Topology Manager to make sure JDBC URL is correct.
3. I/O Exception: The Network Adapter could not establish the connection
The IP address, machine name of Oracle listener port, is incorrect in the JDBC URL.
4. ORA-01017: invalid username/password; logon denied
The user and/or password specified in the data server definition is invalid. This error may also appear for certain Oracle Data Integrator commands, such as SqlUnload. This error may also appear if the source and target DB are different versions.
5. Protocol violation
This error indicates an incompatibility between the Oracle JDBC driver and the database you connect to. If it occurs at connection time, or at the first operation launched on the Oracle database, then install the version of the Oracle JDBC driver provided with your database installation.
6. ORA-00600 internal error code
Internal error of the Oracle database. May be caused by a driver incompatibility.
7. ORA-12154 TNS: could not resolve service name
TNS alias resolution. This problem may occur when using the OCI driver, or a KM using DBLinks. Check the configuration of the TNS aliases on the machines.
8. ORA-02019 connection description for remote database not found
You are using a KM with non-existing DBLinks. Check the KM options and pre-requisites.
Appendix A
v3.2.0.2 45
9. ORA-02085: database link string connects to string
Set GLOBAL_NAME to FALSE in the database.
Errors in Interfaces
1. ORA-00900 invalid SQL statement
ORA-00923 FROM Keyword not found where expected.
The code generated by the interface, or typed in a procedure is invalid for Oracle. This is usually related to an input error in the mapping filter of join. The typical case is a missing quote or an unclosed bracket.
A frequent cause is also the call made to a non SQL syntax, like the call to an Oracle stored procedure using the syntax EXECUTE SCHEMA.PACKAGE.PROC(PARAM1, PARAM2).
The valid SQL call for a stored procedure is:
BEGIN
SCHEMA.PACKAGE.PROC(PARAM1, PARAM2);
END;
The syntax EXECUTE SCHEMA.PACKAGE.PROC(PARAM1, PARAM2) is specific to SQL*PLUS, and does not work on the Oracle JDBC Thin driver.
2. ORA-00904 invalid column name
Keying error in a mapping/join/filter. A string which is not a column name is interpreted as a column name, or a column name is misspelled.
This error may also appear when accessing an error table associated to a datastore with a recently modified structure. It is necessary to impact in the error table the modification, or drop the error tables and let Oracle Data Integrator recreate it in the next execution.
3. ORA-00903 invalid table name
The table used (source or target) does not exist in the Oracle schema. Check the mapping logical/physical schema for the context, and check that the table physically exists on the schema accessed for this context.
4. ORA-00972 Identifier is too Long
There is a limit in the object identifier in Oracle (usually 30 characters). When going over this limit, this error appears. A table created during the execution of the interface went over this limit, and caused this error (see the execution log for more details).
Check in the topology for the oracle technology, that the maximum lengths for the object names (tables and columns) correspond to your Oracle configuration.
5. ORA-01790 expression must have same datatype as corresponding expression
You are trying to connect two different values that can not be implicitly converted (in a mapping, a join). Use the explicit conversion functions on these values.

v3.2.0.2 47
Appendix B
Best Practices
This Appendix includes the following:
Purging Logs ........................................................................................................................................................ 47 Archiving .............................................................................................................................................................. 47 Changing the Database Password ...................................................................................................................... 47 Improving ETL Performance ................................................................................................................................ 48 Deployment .......................................................................................................................................................... 48
Purging Logs
Use Purge Log feature which is available in ODI Operator:
1. Login to ODI Operator.
2. Go to File | Purge Logs option
Note Users have option to Purge Logs based on Timeline (From/To Date), Context, Agent, Status, User Name and Session name.
In purging Agile PLM Data Mart logs, it is up to you on how you want to implement it. Refer to the ODI documentation for more details.
Archiving
It is recommended to take regular backups of the following:
Data Mart Target DB schema
VLOG (Parameter table)
ODI logs (this can be done by using the "Export Logs" feature in ODI Operator).
To use Export Logs:
1. Login to ODI Operator
2. Select to "Export Logs" option from "File" drop down list
Changing the Database Password
To update the connection details for Source or Target database, update the DataMartconfig.properties file in <Agile PLM Data Mart Home directory>/config folder.

Data Mart Setup Guide
48 Agile Product Lifecycle Management
Note Before updating, encrypt the password using the dmencoder utility, located in the bin directory of the Agile PLM Data Mart install folder.
The following sections must be updated because of the password change:
PLM Source DB Details : # PLM DATABASE DETAILS ###
Target Data Mart DB Details: ####### DataMart Database Details######
Target Data Mart DB Schema Details: ###PLM Database TNSEntry Name####
ODI Database Schema Details: ## Oracle Data Integrator Repository Details##ODI Work Repository Details: # ODI Work Repository Details
Improving ETL Performance
It is recommended to increase the Heap-Size to enhance ETL performance. This can be done in the startdmparams.bat file located in <ODI Home> / bin directory
The default setting in the startdmparams.bat file is
set ODI_INIT_HEAP=32m
set ODI_MAX_HEAP=256m --- this gets mapped into -Xmx%ODI_MAX_HEAP%
Note For Linux Machines set ODI_MAX_HEAP=1024m
Deployment 1. Schema Configuration
The source PLM Database schema and Target Database schema MUST be 30 characters or less. Also, it may not contain any special characters except underscore "_"
2. Install Location Restrictions
Agile PLM PLM Data Mart should not be installed in a directory which contains operating systems files (e.g. c:\)
Agile PLM Data Mart should not be installed in any directory which has space in it (e.g. d:\program files).
The ODI home directory should not exist in a directory which has space it. If it does, the Agile PLM Data Mart installation will not proceed.
3. Table space Data Sizing
Refer to the Agile PLM Business Intelligence Capacity Planning Guide for complete information.
v3.2.0.2 49
Appendix C
Configuring Multiple Work Environments
This Appendix includes the following:
Pre-installation Notes ........................................................................................................................................... 49 Creating Schema and Work Repositories ............................................................................................................ 49 Installing ETL Components .................................................................................................................................. 50
The Implementation of the Agile PLM BI application in Development, Test and Production environments require distinct Data Mart Installations on these environments.
The Installer creates both Master and Work Repositories, by default. This installation is used in the Development environment. The Production and Test environments use separate work repositories on top of the existing Master Repository.
Pre-installation Notes
The following pre-installation guidelines require you to ensure that:
The Master Repository exists, if you want to configure work repositories in Test or Production environments.
The existing Master Repository ID is specified in the DataMartConfig.properties file.
All the required Database users such as Data Mart Schema user and Work Repository Schema user are created before you run the batch file, DMOnExistingMasterRep.
All the Logical connections related to Data Mart are present in the existing Master repository.
You use the Installer.exe file to create Master repository, Work Repository and all of the Data Mart related ETL components.
The Repository ID is within the range of 100-999. Do not use numbers such as 100,101,102,103.555,666 that are already used in the product development environment. For more information, refer to the ODI Documentation.
The DataMartConfig.properties file is configured before you run the batch file, DMOnExistingMasterRep.
The following are the steps to create a new work repository and Data Mart ETL components on an existing master repository:
1. Create schema and work repositories
2. Install ETL components
Creating Schema and Work Repositories
Generate scripts for the Work Repository and Data Mart schema using the 'Generate SQL Script' option of the Data Mart installer.
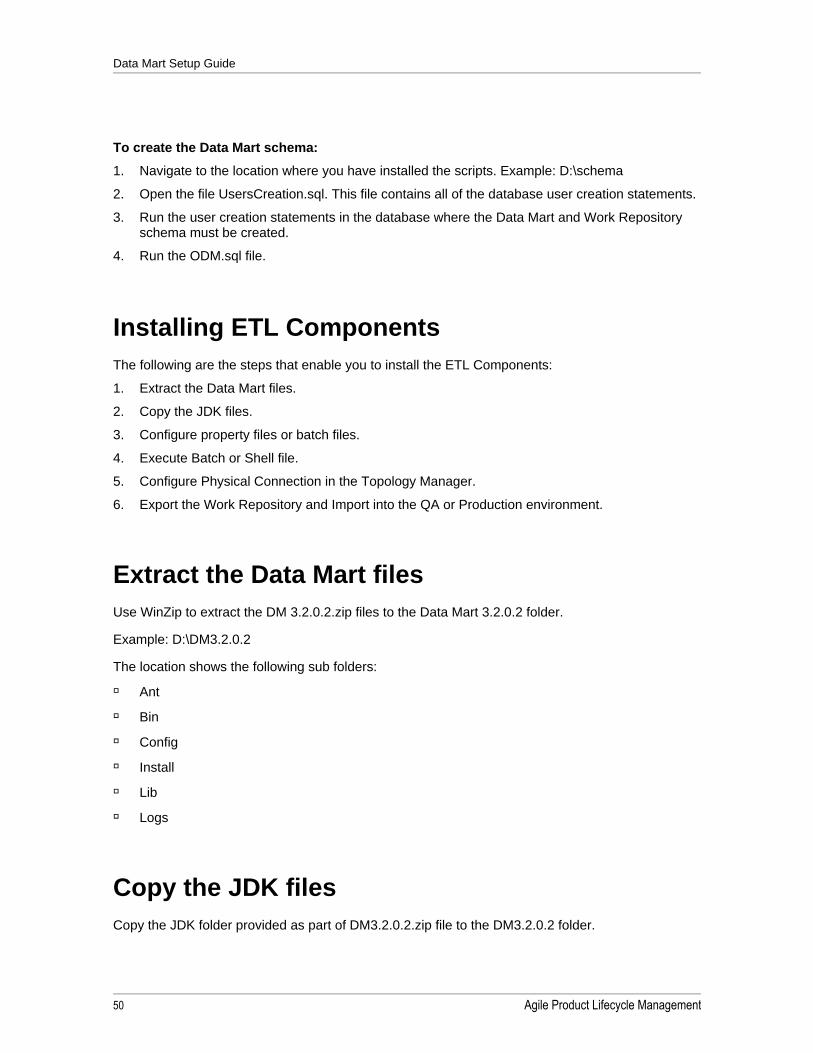
Data Mart Setup Guide
50 Agile Product Lifecycle Management
To create the Data Mart schema:
1. Navigate to the location where you have installed the scripts. Example: D:\schema
2. Open the file UsersCreation.sql. This file contains all of the database user creation statements.
3. Run the user creation statements in the database where the Data Mart and Work Repository schema must be created.
4. Run the ODM.sql file.
Installing ETL Components
The following are the steps that enable you to install the ETL Components:
1. Extract the Data Mart files.
2. Copy the JDK files.
3. Configure property files or batch files.
4. Execute Batch or Shell file.
5. Configure Physical Connection in the Topology Manager.
6. Export the Work Repository and Import into the QA or Production environment.
Extract the Data Mart files
Use WinZip to extract the DM 3.2.0.2.zip files to the Data Mart 3.2.0.2 folder.
Example: D:\DM3.2.0.2
The location shows the following sub folders:
Ant
Bin
Config
Install
Lib
Logs
Copy the JDK files
Copy the JDK folder provided as part of DM3.2.0.2.zip file to the DM3.2.0.2 folder.
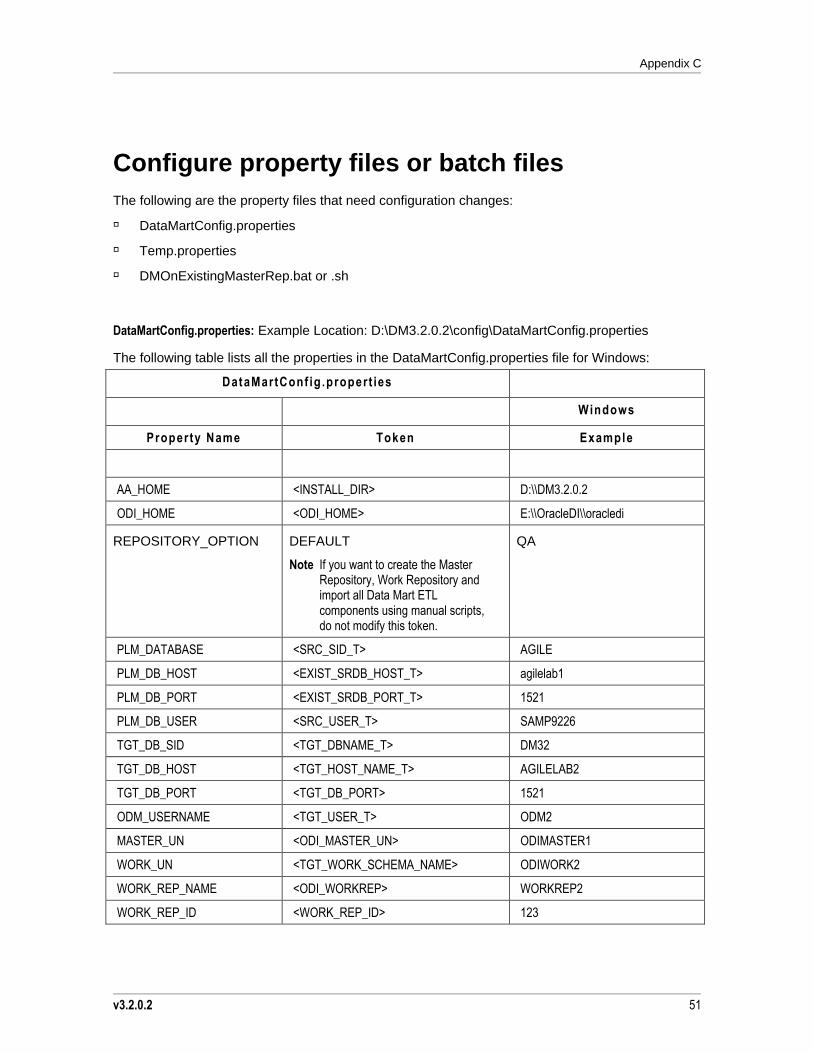
Appendix C
v3.2.0.2 51
Configure property files or batch files
The following are the property files that need configuration changes:
DataMartConfig.properties
Temp.properties
DMOnExistingMasterRep.bat or .sh
DataMartConfig.properties: Example Location: D:\DM3.2.0.2\config\DataMartConfig.properties
The following table lists all the properties in the DataMartConfig.properties file for Windows:
DataMartConf ig .propert ies
Windows
Property Name Token Example
AA_HOME <INSTALL_DIR> D:\\DM3.2.0.2
ODI_HOME <ODI_HOME> E:\\OracleDI\\oracledi
REPOSITORY_OPTION DEFAULT
Note If you want to create the Master Repository, Work Repository and import all Data Mart ETL components using manual scripts, do not modify this token.
QA
PLM_DATABASE <SRC_SID_T> AGILE
PLM_DB_HOST <EXIST_SRDB_HOST_T> agilelab1
PLM_DB_PORT <EXIST_SRDB_PORT_T> 1521
PLM_DB_USER <SRC_USER_T> SAMP9226
TGT_DB_SID <TGT_DBNAME_T> DM32
TGT_DB_HOST <TGT_HOST_NAME_T> AGILELAB2
TGT_DB_PORT <TGT_DB_PORT> 1521
ODM_USERNAME <TGT_USER_T> ODM2
MASTER_UN <ODI_MASTER_UN> ODIMASTER1
WORK_UN <TGT_WORK_SCHEMA_NAME> ODIWORK2
WORK_REP_NAME <ODI_WORKREP> WORKREP2
WORK_REP_ID <WORK_REP_ID> 123
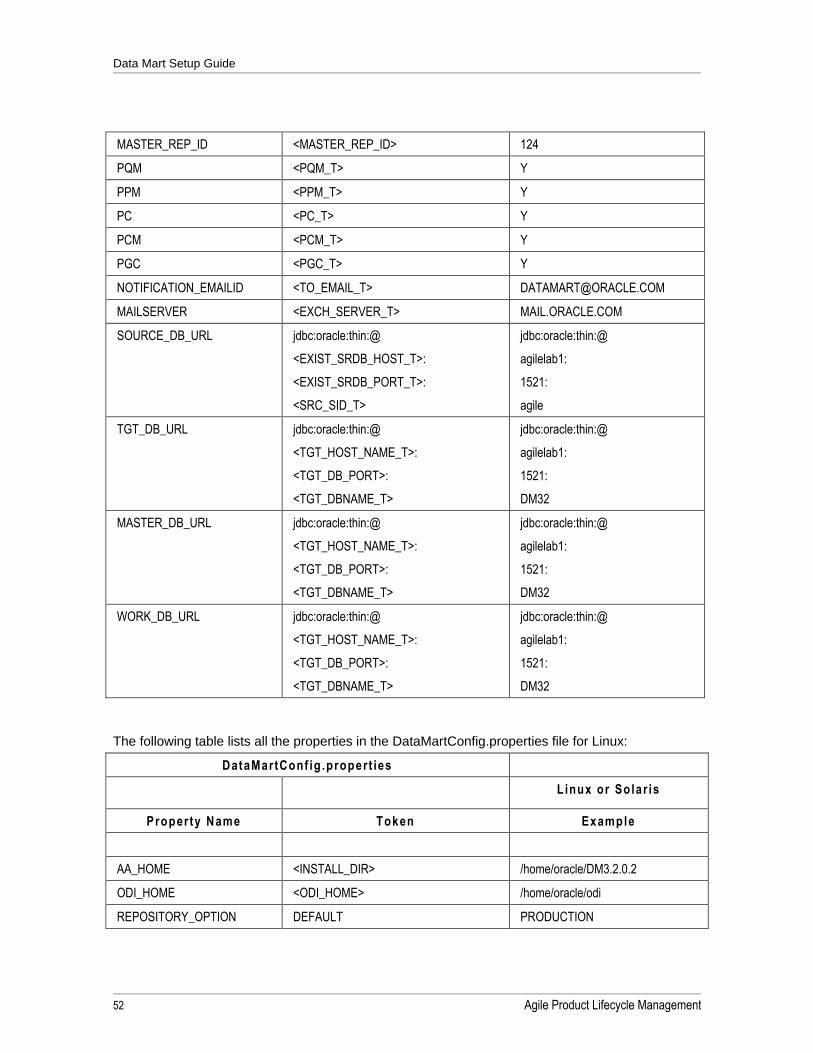
Data Mart Setup Guide
52 Agile Product Lifecycle Management
MASTER_REP_ID <MASTER_REP_ID> 124
PQM <PQM_T> Y
PPM <PPM_T> Y
PC <PC_T> Y
PCM <PCM_T> Y
PGC <PGC_T> Y
NOTIFICATION_EMAILID <TO_EMAIL_T> [email protected]
MAILSERVER <EXCH_SERVER_T> MAIL.ORACLE.COM
SOURCE_DB_URL jdbc:oracle:thin:@
<EXIST_SRDB_HOST_T>:
<EXIST_SRDB_PORT_T>:
<SRC_SID_T>
jdbc:oracle:thin:@
agilelab1:
1521:
agile
TGT_DB_URL jdbc:oracle:thin:@
<TGT_HOST_NAME_T>:
<TGT_DB_PORT>:
<TGT_DBNAME_T>
jdbc:oracle:thin:@
agilelab1:
1521:
DM32
MASTER_DB_URL jdbc:oracle:thin:@
<TGT_HOST_NAME_T>:
<TGT_DB_PORT>:
<TGT_DBNAME_T>
jdbc:oracle:thin:@
agilelab1:
1521:
DM32
WORK_DB_URL jdbc:oracle:thin:@
<TGT_HOST_NAME_T>:
<TGT_DB_PORT>:
<TGT_DBNAME_T>
jdbc:oracle:thin:@
agilelab1:
1521:
DM32
The following table lists all the properties in the DataMartConfig.properties file for Linux:
DataMartConf ig .propert ies
Linux or Solar is
Property Name Token Example
AA_HOME <INSTALL_DIR> /home/oracle/DM3.2.0.2
ODI_HOME <ODI_HOME> /home/oracle/odi
REPOSITORY_OPTION DEFAULT PRODUCTION
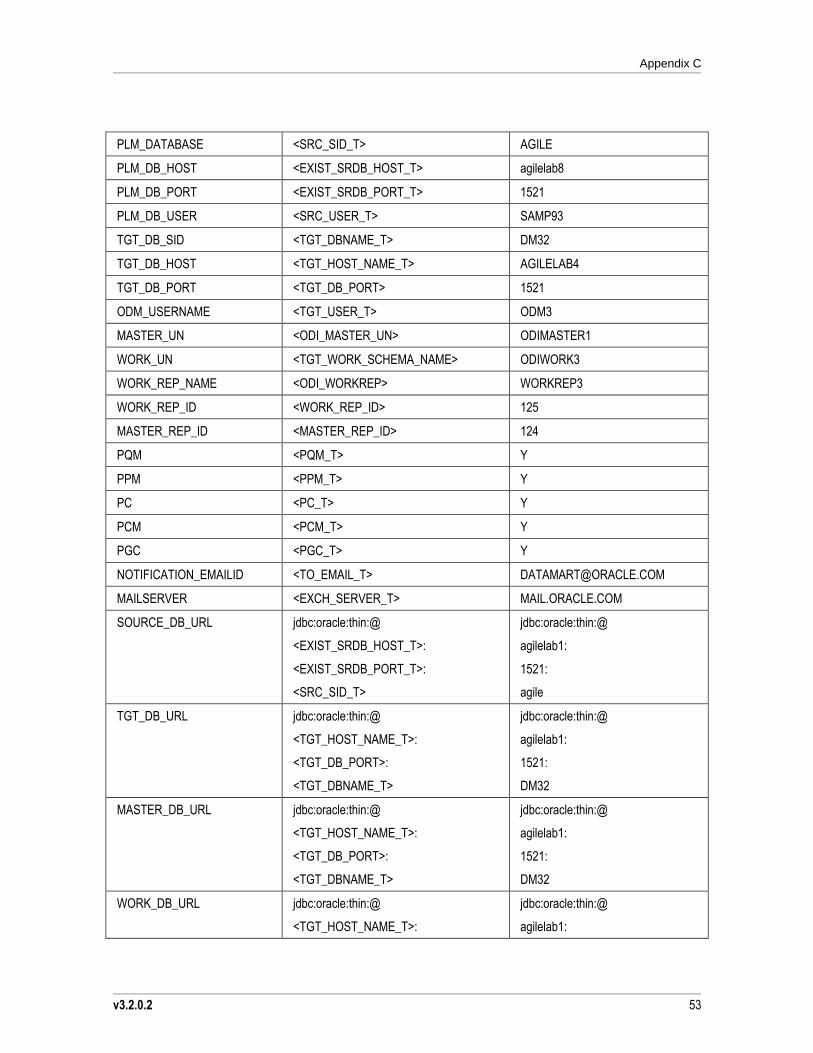
Appendix C
v3.2.0.2 53
PLM_DATABASE <SRC_SID_T> AGILE
PLM_DB_HOST <EXIST_SRDB_HOST_T> agilelab8
PLM_DB_PORT <EXIST_SRDB_PORT_T> 1521
PLM_DB_USER <SRC_USER_T> SAMP93
TGT_DB_SID <TGT_DBNAME_T> DM32
TGT_DB_HOST <TGT_HOST_NAME_T> AGILELAB4
TGT_DB_PORT <TGT_DB_PORT> 1521
ODM_USERNAME <TGT_USER_T> ODM3
MASTER_UN <ODI_MASTER_UN> ODIMASTER1
WORK_UN <TGT_WORK_SCHEMA_NAME> ODIWORK3
WORK_REP_NAME <ODI_WORKREP> WORKREP3
WORK_REP_ID <WORK_REP_ID> 125
MASTER_REP_ID <MASTER_REP_ID> 124
PQM <PQM_T> Y
PPM <PPM_T> Y
PC <PC_T> Y
PCM <PCM_T> Y
PGC <PGC_T> Y
NOTIFICATION_EMAILID <TO_EMAIL_T> [email protected]
MAILSERVER <EXCH_SERVER_T> MAIL.ORACLE.COM
SOURCE_DB_URL jdbc:oracle:thin:@
<EXIST_SRDB_HOST_T>:
<EXIST_SRDB_PORT_T>:
<SRC_SID_T>
jdbc:oracle:thin:@
agilelab1:
1521:
agile
TGT_DB_URL jdbc:oracle:thin:@
<TGT_HOST_NAME_T>:
<TGT_DB_PORT>:
<TGT_DBNAME_T>
jdbc:oracle:thin:@
agilelab1:
1521:
DM32
MASTER_DB_URL jdbc:oracle:thin:@
<TGT_HOST_NAME_T>:
<TGT_DB_PORT>:
<TGT_DBNAME_T>
jdbc:oracle:thin:@
agilelab1:
1521:
DM32
WORK_DB_URL jdbc:oracle:thin:@
<TGT_HOST_NAME_T>:
jdbc:oracle:thin:@
agilelab1:
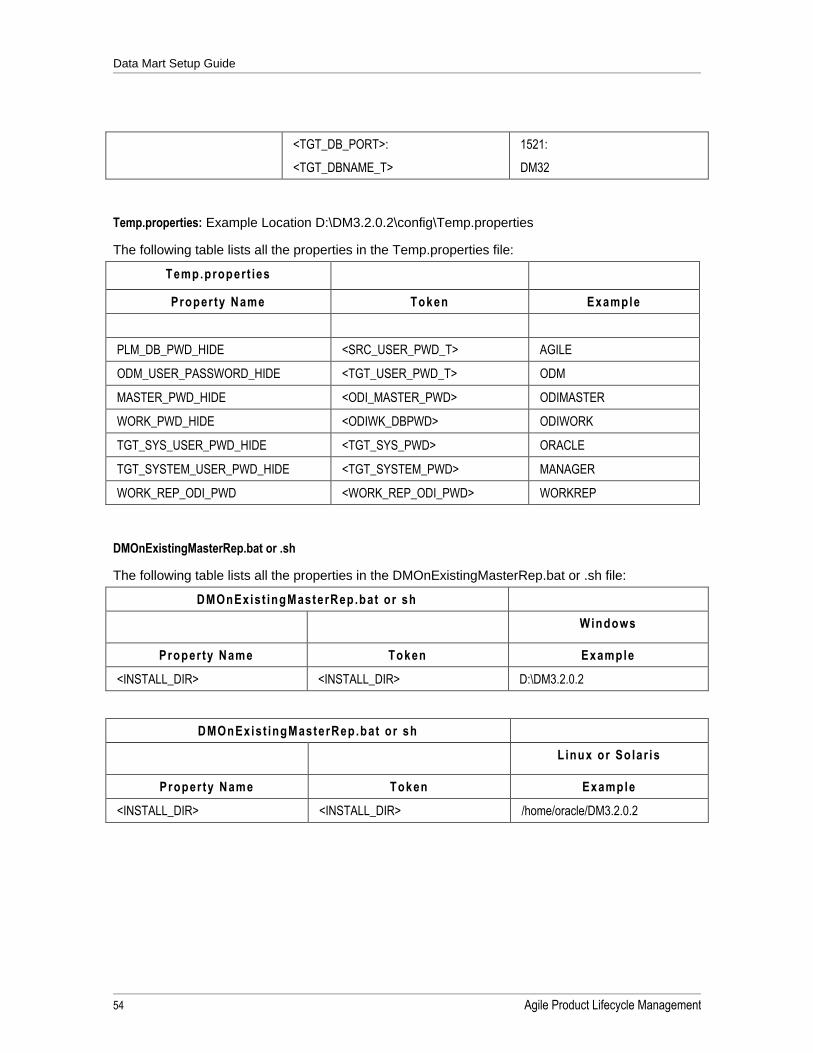
Data Mart Setup Guide
54 Agile Product Lifecycle Management
<TGT_DB_PORT>:
<TGT_DBNAME_T>
1521:
DM32
Temp.properties: Example Location D:\DM3.2.0.2\config\Temp.properties
The following table lists all the properties in the Temp.properties file:
Temp.propert ies
Property Name Token Example
PLM_DB_PWD_HIDE <SRC_USER_PWD_T> AGILE
ODM_USER_PASSWORD_HIDE <TGT_USER_PWD_T> ODM
MASTER_PWD_HIDE <ODI_MASTER_PWD> ODIMASTER
WORK_PWD_HIDE <ODIWK_DBPWD> ODIWORK
TGT_SYS_USER_PWD_HIDE <TGT_SYS_PWD> ORACLE
TGT_SYSTEM_USER_PWD_HIDE <TGT_SYSTEM_PWD> MANAGER
WORK_REP_ODI_PWD <WORK_REP_ODI_PWD> WORKREP
DMOnExistingMasterRep.bat or .sh
The following table lists all the properties in the DMOnExistingMasterRep.bat or .sh file:
DMOnExist ingMasterRep.bat or sh
Windows
Property Name Token Example
<INSTALL_DIR> <INSTALL_DIR> D:\DM3.2.0.2
DMOnExist ingMasterRep.bat or sh
Linux or Solar is
Property Name Token Example
<INSTALL_DIR> <INSTALL_DIR> /home/oracle/DM3.2.0.2
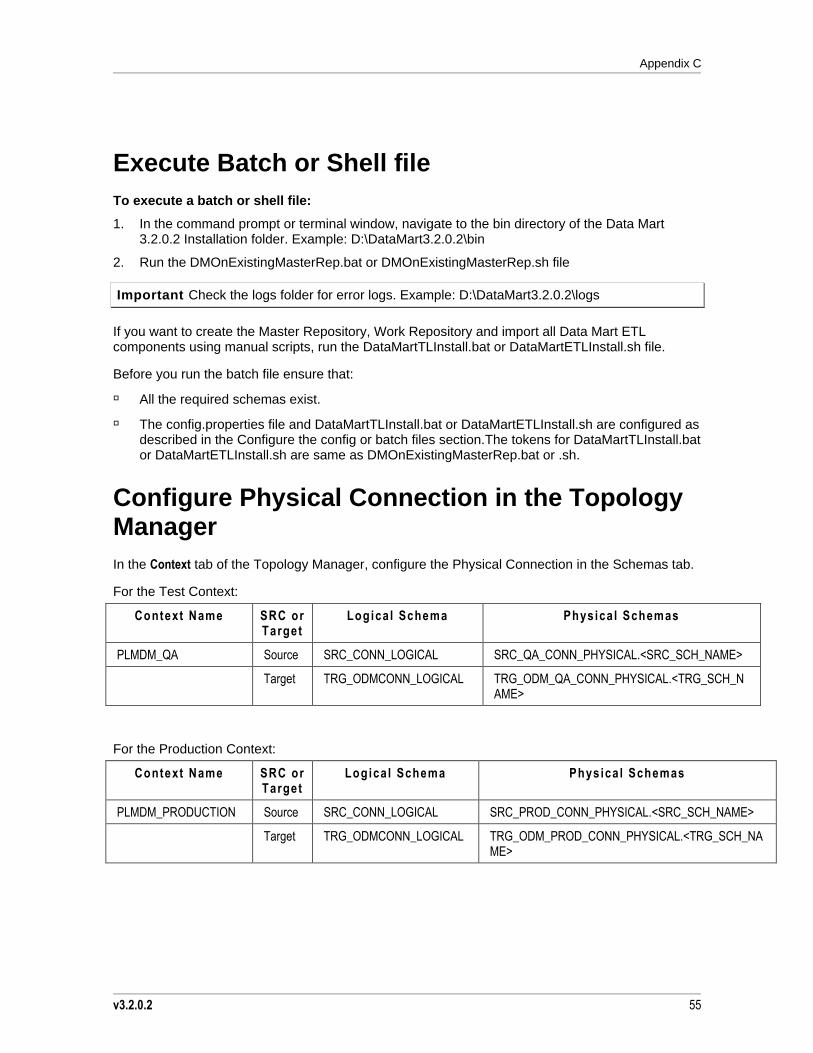
Appendix C
v3.2.0.2 55
Execute Batch or Shell file
To execute a batch or shell file:
1. In the command prompt or terminal window, navigate to the bin directory of the Data Mart 3.2.0.2 Installation folder. Example: D:\DataMart3.2.0.2\bin
2. Run the DMOnExistingMasterRep.bat or DMOnExistingMasterRep.sh file
Important Check the logs folder for error logs. Example: D:\DataMart3.2.0.2\logs
If you want to create the Master Repository, Work Repository and import all Data Mart ETL components using manual scripts, run the DataMartTLInstall.bat or DataMartETLInstall.sh file.
Before you run the batch file ensure that:
All the required schemas exist.
The config.properties file and DataMartTLInstall.bat or DataMartETLInstall.sh are configured as described in the Configure the config or batch files section.The tokens for DataMartTLInstall.bat or DataMartETLInstall.sh are same as DMOnExistingMasterRep.bat or .sh.
Configure Physical Connection in the Topology Manager
In the Context tab of the Topology Manager, configure the Physical Connection in the Schemas tab.
For the Test Context:
Context Name SRC or Target
Logica l Schema Physica l Schemas
PLMDM_QA Source SRC_CONN_LOGICAL SRC_QA_CONN_PHYSICAL.<SRC_SCH_NAME>
Target TRG_ODMCONN_LOGICAL TRG_ODM_QA_CONN_PHYSICAL.<TRG_SCH_NAME>
For the Production Context:
Context Name SRC or Target
Logica l Schema Physica l Schemas
PLMDM_PRODUCTION Source SRC_CONN_LOGICAL SRC_PROD_CONN_PHYSICAL.<SRC_SCH_NAME>
Target TRG_ODMCONN_LOGICAL TRG_ODM_PROD_CONN_PHYSICAL.<TRG_SCH_NAME>
Data Mart Setup Guide
56 Agile Product Lifecycle Management
Export the Work Repository and Import into the QA or Production environment
Export the Work repository from the Development environment and Import it into the Test or Production environment based on your configuration.
To export the Work Repository:
1. Login to ODI Designer using Development Work Repository credentials.
2. Click File > Export >Work Repository.
3. Select the Export to Zip file option.
4. Choose a directory into which you wan to export the repository.
5. Enter a name for the repository.
6. Click OK.
To import the Development Work Repository in Test or Production work repository:
1. Login to ODI Designer using Production or Test Work Repository credentials.
2. Click File > Import > Work Repository.
3. Select Synonym Mode INSERT_UPDATE from the drop down list.
4. Select the Import from a zip file option.
5. Choose the directory that has the zip file exported from the Development environment.
6. Click OK.
Note If you wish to change your PLM (source) schema details, refer to the Knowledge Base on Oracle Support for detailed instructions. You need to sign in to Oracle Support to view the content.
v3.2.0.2 57
Appendix D
Manually Installing Agile PLM Data Mart ETL
This Appendix includes the following:
Pre-Installation Notes .......................................................................................................................................... 57 Creating Schemas ............................................................................................................................................... 57 Installing ETL ....................................................................................................................................................... 58
This appendix describes the process to manually install Agile PLM Data Mart ETL.
Pre-Installation Notes
Before starting the installing, make sure the following guidelines apply:
All of the required database users, like the Data Mart schema and Work Repository users, should be created before running the install script.
The Repository ID should be within the range of 100-999.
Do not use the following numbers because they are already in use:
100-103, 555, 666
Refer to the ODI documentation found on the Oracle Technology Network (OTN) Web site http://www.oracle.com/technology/documentation for more information.
Configure the properties file before running the install script.
Creating Schemas
During the Agile PLM Data Mart installation, select the Generate SQL Scripts option to generate the scripts for the work repository and Agile PLM Data Mart schema.
Note Ignore this step if the schemas are created during the Agile PLM Data Mart installation.
To create the schemas:
1. After the scripts are generated in the installation location, open the UsersCreation.sql script in the schema directory.
2. Run the UsersCreation.sql script on the database where the Agile PLM Data Mart, Master Repository, and Work Repository schemas are to be created.
3. Run the ODM.sql script.
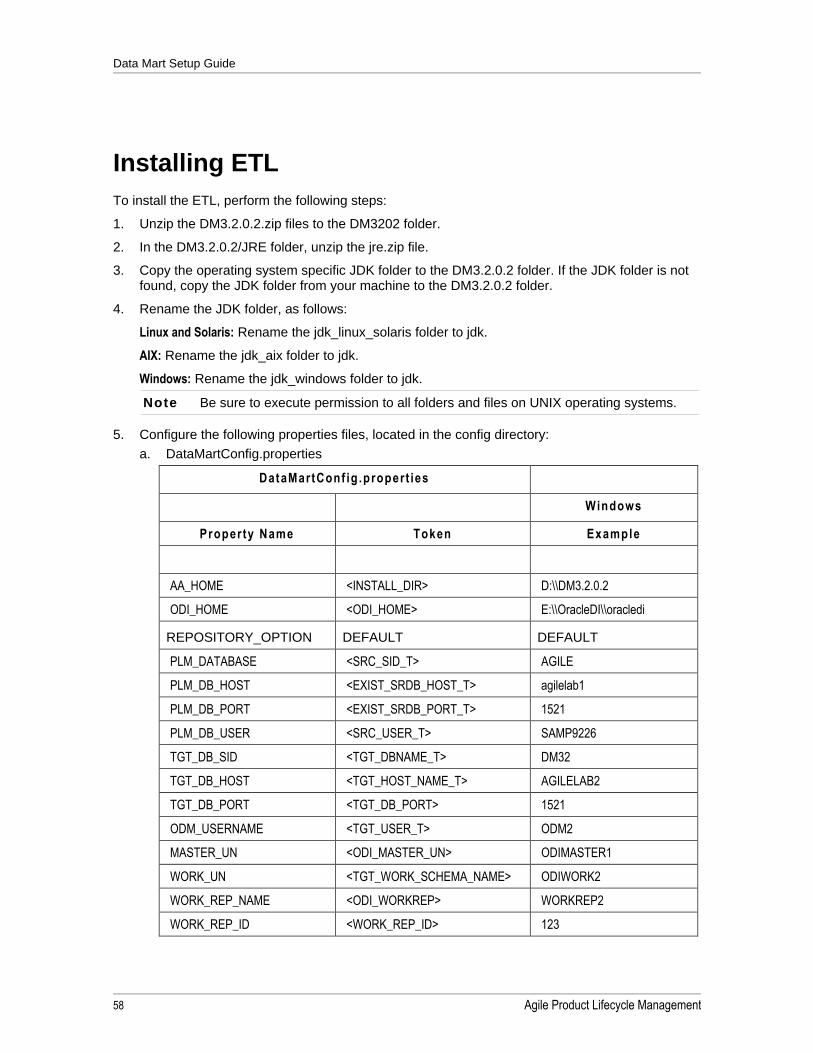
Data Mart Setup Guide
58 Agile Product Lifecycle Management
Installing ETL
To install the ETL, perform the following steps:
1. Unzip the DM3.2.0.2.zip files to the DM3202 folder.
2. In the DM3.2.0.2/JRE folder, unzip the jre.zip file.
3. Copy the operating system specific JDK folder to the DM3.2.0.2 folder. If the JDK folder is not found, copy the JDK folder from your machine to the DM3.2.0.2 folder.
4. Rename the JDK folder, as follows:
Linux and Solaris: Rename the jdk_linux_solaris folder to jdk.
AIX: Rename the jdk_aix folder to jdk.
Windows: Rename the jdk_windows folder to jdk.
Note Be sure to execute permission to all folders and files on UNIX operating systems.
5. Configure the following properties files, located in the config directory:
a. DataMartConfig.properties
DataMartConf ig .propert ies
Windows
Property Name Token Example
AA_HOME <INSTALL_DIR> D:\\DM3.2.0.2
ODI_HOME <ODI_HOME> E:\\OracleDI\\oracledi
REPOSITORY_OPTION DEFAULT DEFAULT
PLM_DATABASE <SRC_SID_T> AGILE
PLM_DB_HOST <EXIST_SRDB_HOST_T> agilelab1
PLM_DB_PORT <EXIST_SRDB_PORT_T> 1521
PLM_DB_USER <SRC_USER_T> SAMP9226
TGT_DB_SID <TGT_DBNAME_T> DM32
TGT_DB_HOST <TGT_HOST_NAME_T> AGILELAB2
TGT_DB_PORT <TGT_DB_PORT> 1521
ODM_USERNAME <TGT_USER_T> ODM2
MASTER_UN <ODI_MASTER_UN> ODIMASTER1
WORK_UN <TGT_WORK_SCHEMA_NAME> ODIWORK2
WORK_REP_NAME <ODI_WORKREP> WORKREP2
WORK_REP_ID <WORK_REP_ID> 123
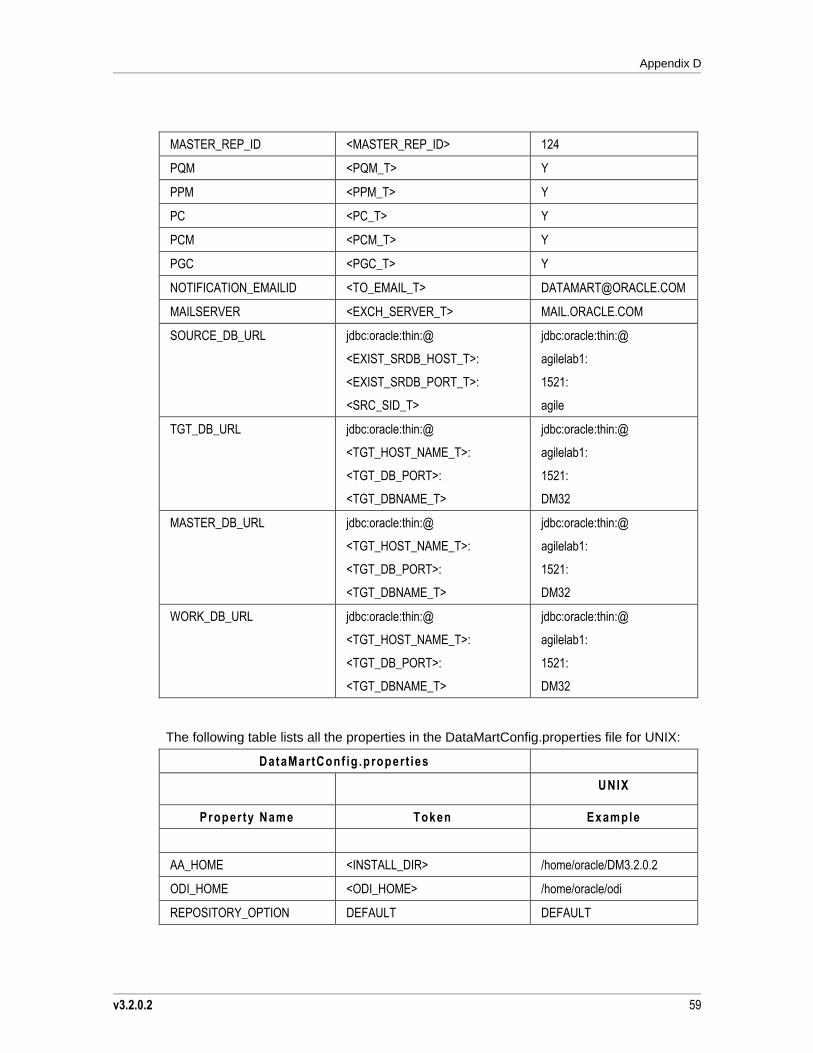
Appendix D
v3.2.0.2 59
MASTER_REP_ID <MASTER_REP_ID> 124
PQM <PQM_T> Y
PPM <PPM_T> Y
PC <PC_T> Y
PCM <PCM_T> Y
PGC <PGC_T> Y
NOTIFICATION_EMAILID <TO_EMAIL_T> [email protected]
MAILSERVER <EXCH_SERVER_T> MAIL.ORACLE.COM
SOURCE_DB_URL jdbc:oracle:thin:@
<EXIST_SRDB_HOST_T>:
<EXIST_SRDB_PORT_T>:
<SRC_SID_T>
jdbc:oracle:thin:@
agilelab1:
1521:
agile
TGT_DB_URL jdbc:oracle:thin:@
<TGT_HOST_NAME_T>:
<TGT_DB_PORT>:
<TGT_DBNAME_T>
jdbc:oracle:thin:@
agilelab1:
1521:
DM32
MASTER_DB_URL jdbc:oracle:thin:@
<TGT_HOST_NAME_T>:
<TGT_DB_PORT>:
<TGT_DBNAME_T>
jdbc:oracle:thin:@
agilelab1:
1521:
DM32
WORK_DB_URL jdbc:oracle:thin:@
<TGT_HOST_NAME_T>:
<TGT_DB_PORT>:
<TGT_DBNAME_T>
jdbc:oracle:thin:@
agilelab1:
1521:
DM32
The following table lists all the properties in the DataMartConfig.properties file for UNIX:
DataMartConf ig .propert ies
UNIX
Property Name Token Example
AA_HOME <INSTALL_DIR> /home/oracle/DM3.2.0.2
ODI_HOME <ODI_HOME> /home/oracle/odi
REPOSITORY_OPTION DEFAULT DEFAULT
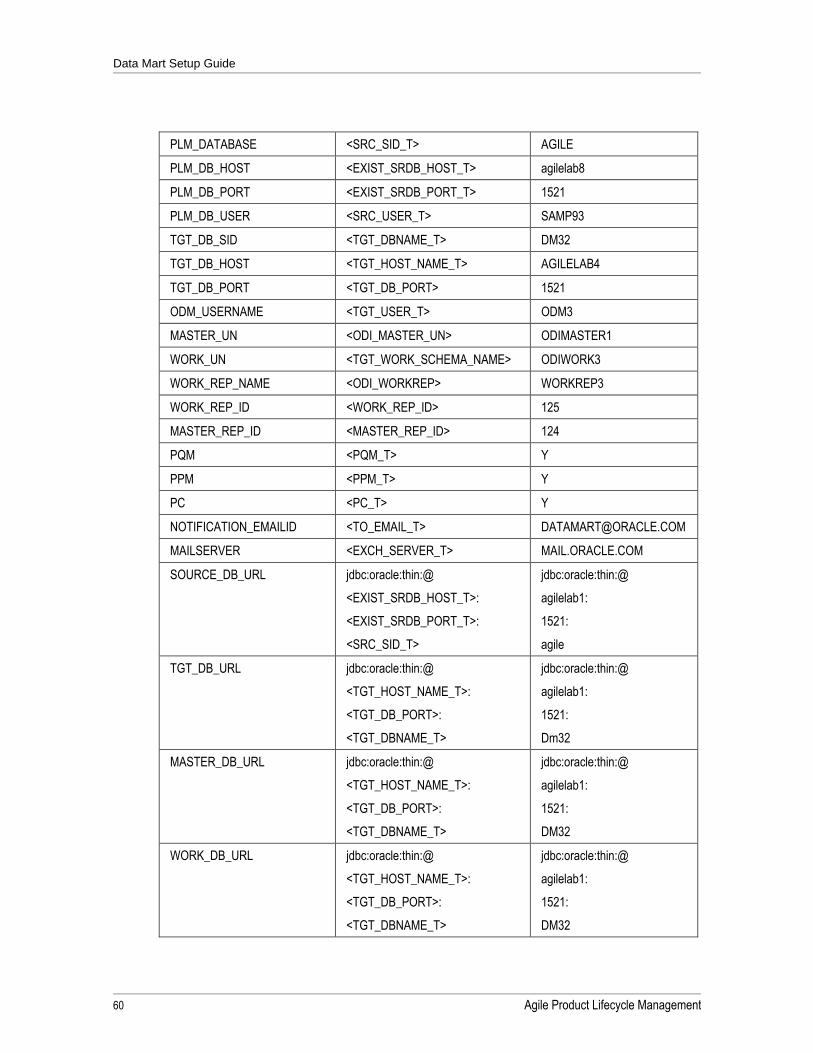
Data Mart Setup Guide
60 Agile Product Lifecycle Management
PLM_DATABASE <SRC_SID_T> AGILE
PLM_DB_HOST <EXIST_SRDB_HOST_T> agilelab8
PLM_DB_PORT <EXIST_SRDB_PORT_T> 1521
PLM_DB_USER <SRC_USER_T> SAMP93
TGT_DB_SID <TGT_DBNAME_T> DM32
TGT_DB_HOST <TGT_HOST_NAME_T> AGILELAB4
TGT_DB_PORT <TGT_DB_PORT> 1521
ODM_USERNAME <TGT_USER_T> ODM3
MASTER_UN <ODI_MASTER_UN> ODIMASTER1
WORK_UN <TGT_WORK_SCHEMA_NAME> ODIWORK3
WORK_REP_NAME <ODI_WORKREP> WORKREP3
WORK_REP_ID <WORK_REP_ID> 125
MASTER_REP_ID <MASTER_REP_ID> 124
PQM <PQM_T> Y
PPM <PPM_T> Y
PC <PC_T> Y
NOTIFICATION_EMAILID <TO_EMAIL_T> [email protected]
MAILSERVER <EXCH_SERVER_T> MAIL.ORACLE.COM
SOURCE_DB_URL jdbc:oracle:thin:@
<EXIST_SRDB_HOST_T>:
<EXIST_SRDB_PORT_T>:
<SRC_SID_T>
jdbc:oracle:thin:@
agilelab1:
1521:
agile
TGT_DB_URL jdbc:oracle:thin:@
<TGT_HOST_NAME_T>:
<TGT_DB_PORT>:
<TGT_DBNAME_T>
jdbc:oracle:thin:@
agilelab1:
1521:
Dm32
MASTER_DB_URL jdbc:oracle:thin:@
<TGT_HOST_NAME_T>:
<TGT_DB_PORT>:
<TGT_DBNAME_T>
jdbc:oracle:thin:@
agilelab1:
1521:
DM32
WORK_DB_URL jdbc:oracle:thin:@
<TGT_HOST_NAME_T>:
<TGT_DB_PORT>:
<TGT_DBNAME_T>
jdbc:oracle:thin:@
agilelab1:
1521:
DM32
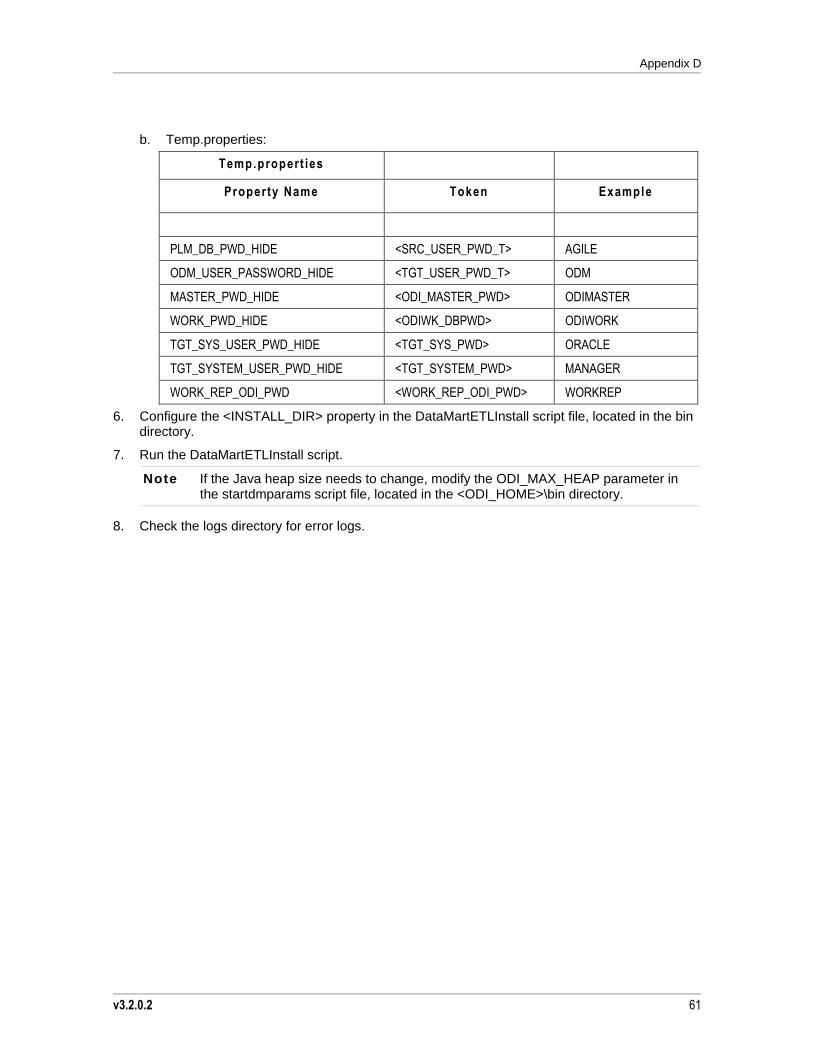
Appendix D
v3.2.0.2 61
b. Temp.properties:
Temp.propert ies
Property Name Token Example
PLM_DB_PWD_HIDE <SRC_USER_PWD_T> AGILE
ODM_USER_PASSWORD_HIDE <TGT_USER_PWD_T> ODM
MASTER_PWD_HIDE <ODI_MASTER_PWD> ODIMASTER
WORK_PWD_HIDE <ODIWK_DBPWD> ODIWORK
TGT_SYS_USER_PWD_HIDE <TGT_SYS_PWD> ORACLE
TGT_SYSTEM_USER_PWD_HIDE <TGT_SYSTEM_PWD> MANAGER
WORK_REP_ODI_PWD <WORK_REP_ODI_PWD> WORKREP
6. Configure the <INSTALL_DIR> property in the DataMartETLInstall script file, located in the bin directory.
7. Run the DataMartETLInstall script.
Note If the Java heap size needs to change, modify the ODI_MAX_HEAP parameter in the startdmparams script file, located in the <ODI_HOME>\bin directory.
8. Check the logs directory for error logs.

Data Mart Setup Guide
62 Agile Product Lifecycle Management