Automatic Exchange of Information (“AEOI”) for the Common ...
Inland Revenue Department The Government of the Hong Kong Special Administrative Region
AEOI Portal
A Guide to Return Filing
January 2018
For more information, please visit the webpage about the AEOI Portal

Preface The purpose of this guide is to provide step-by-step instructions on how to file a Financial Account Information Return by using the AEOI Portal. It specifies:
(a) what information is required for online filing; (b) how a data file is prepared; (c) the procedures to be taken before online filing (e.g. encryption); and (d) the steps of online filing process.
This guide is provided for information purposes only, and is subject to changes without notice. Screen shoots contained in this guide are intended for illustration only and may not exactly match with the actual screens displayed in the AEOI Portal. In case of doubt, enquiries can be made to the Inland Revenue Department (“IRD”) by email to:
(a) [email protected] (General Enquiry); (b) [email protected] (Enquiry relating to XML Schema).
Other relevant publications are available in IRD’s website and the AEOI Portal:
(a) Guidance for Financial Institutions; (b) Financial Account Information Return XML Schema and User Guide; (c) A Guide to Account Registration.
1

Table of Contents
Page 1 Introduction
1.1 Financial Account Information Return 3 1.2 Who can file the Return 3 2 Issue of Notice of Filing Return
3
3 Pre-filing Process
3.1 Overview 5 3.2 Prepare XML File 5 3.3 Encrypt XML File 7 3.4 Upload Data File 7 3.5 Delete Data File 11 4 Online Filing Process
15
5 Post-submission of Return
5.1 View Return 24 5.2 Amend Data Record 25
2
AEOI Portal – A Guide to Return Filing
1 Introduction 1.1 Financial Account Information Return 1.1.1 The Financial Account Information Return (BIR80) (“Return”) is a form prescribed by the Board of Inland Revenue for financial institutions (“FIs”) to report financial account information in relation to reportable accounts. Pursuant to sections 50C(4)(c) and 50I(1) of the Inland Revenue Ordinance (Cap. 112) (“IRO”), the Commissioner of Inland Revenue has designated that completed Returns have to be submitted in the form of an electronic record through the AEOI Portal. 1.2 Who can file the Return 1.2.1 The Return can only be filed by any of the following persons:
(a) corporate FI; (b) for non-corporate FI, the person maintaining financial accounts
(“PMFA”) under section 50E of the IRO; or (c) service provider (“SP”) engaged under section 50H of the IRO.
1.2.2 For the purposes of uploading data file(s) and/or online filing the Return, the FI, PMFA or SP (hereinafter collectively referred to as “Subscribing Organization”) must authorize an individual (“Authorized Person”) holding the e-Cert (Organisational) with AEOI Functions of the Subscribing Organization. In case the FI is a non-corporate entity, it may upload data file(s) to the AEOI Portal. However, it cannot file the Return which must be filed by the PMFA or SP. 1.2.3 The Return must be signed by an Authorized Person holding the e-Cert (Organisational) with AEOI Functions of the Subscribing Organization. The Authorized Person must have the following capacities:
director or officer (if the Subscribing Organization is a corporation); principal officer or responsible person1 (if the Subscribing Organization is
a non-corporate entity). 2 Issue of Notice of Filing Return 2.1 IRD will issue an electronic notice (“Notice”) to each reporting FI, which has commenced to maintain reportable accounts, requiring it to file the Return. The Notice will be sent to the Message Box of the FI’s AEOI Account and an alert
1 Including a partner for a partnership, a trustee for a trust, etc.
3

AEOI Portal – A Guide to Return Filing
message will then be issued to the email address of each contact person of the FI, its SP and PMFA, as provided in the profile of the FI’s AEOI Account. In general, the Notice will be issued in January each year starting from 2018 and the completed Return has to be submitted within 5 months from the date of the Notice.
2.2 The Subscribing Organization can log in the FI’s AEOI Account and check the current return status by using “Check Return Status” function.
4

AEOI Portal – A Guide to Return Filing
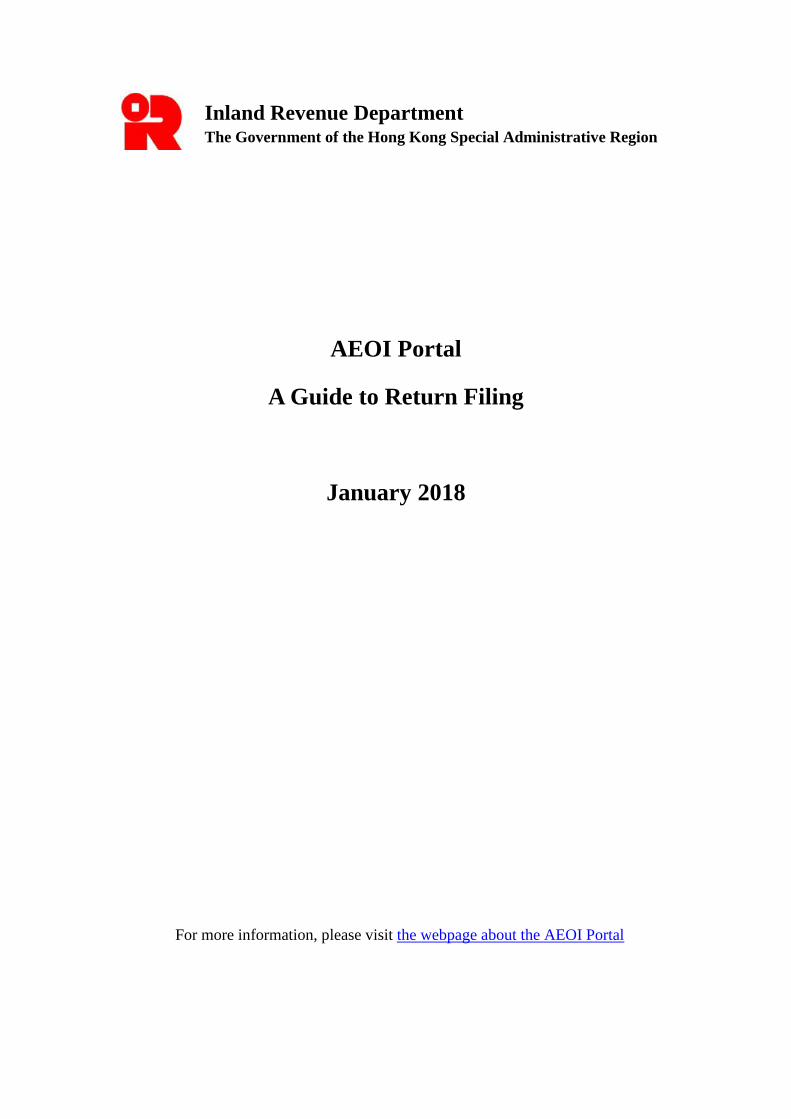
3 Pre-filing Process 3.1 Overview 3.1.1 A FI that maintains reportable accounts during the period covered by the Return (“Specified Period”) is required to prepare a data file containing the required information of the reportable accounts. The following diagram summarizes the required steps: 3.1.2 If a FI receives the Notice mentioned in paragraph 2.1 but there is no data file needed to be attached, the Subscribing Organization may proceed to online filing the Return directly (i.e. paragraph 4). 3.2 Prepare XML File 3.2.1 The required information in relation to reportable accounts should be contained in a data file in accordance with the Return XML Schema issued by IRD. FIs may refer to the Financial Account Information Return XML Schema User Guide which explains the information required to be included in each data element of the Return XML Schema. 3.2.2 A data file may be prepared by using self-developed software or the Data Preparation Tool developed by IRD.
Does the FI maintain reportable accounts during the Specified Period?
Online filing
Yes
Prepare XML file (Paragraph 3.2)
No
Upload encrypted file to the AEOI Portal (Paragraph 3.4)
Encrypt XML file (Paragraph 3.3)
Is FI a trust and all the information of the reportable accounts already reported to the tax authority of a participating jurisdiction in which it is a tax resident?
Yes
No
Complete Form IR1463
5
AEOI Portal – A Guide to Return Filing
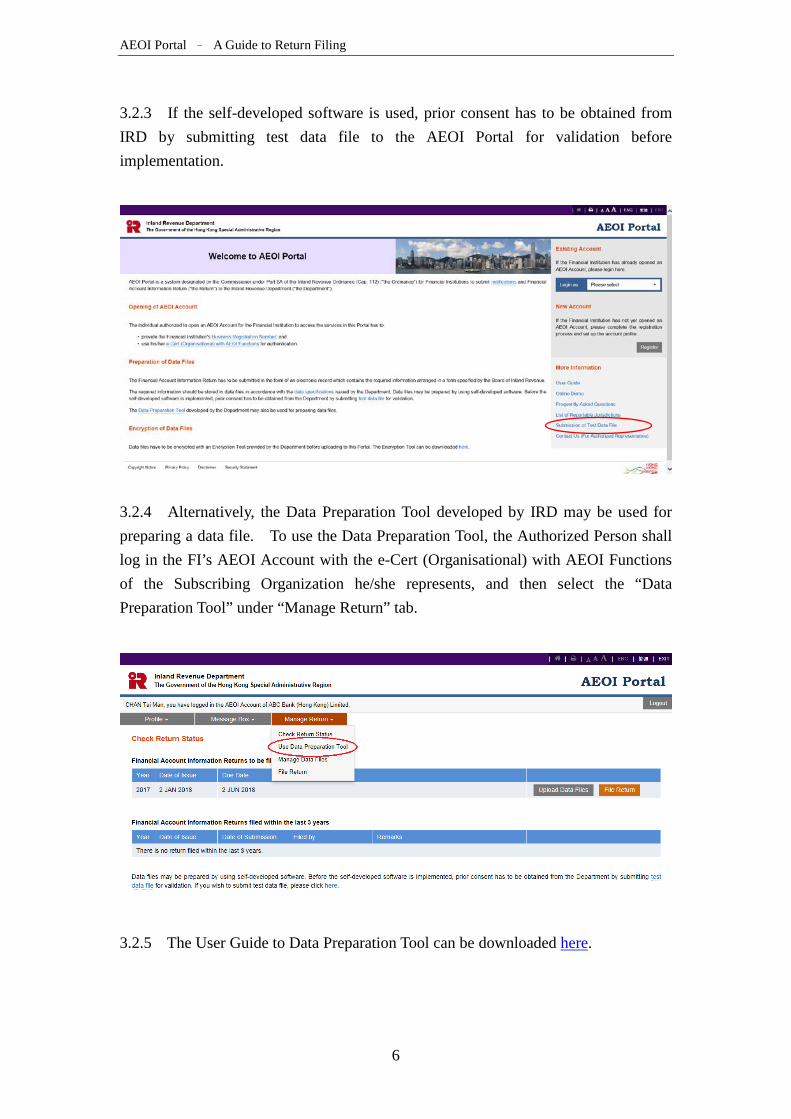
3.2.3 If the self-developed software is used, prior consent has to be obtained from IRD by submitting test data file to the AEOI Portal for validation before implementation.
3.2.4 Alternatively, the Data Preparation Tool developed by IRD may be used for preparing a data file. To use the Data Preparation Tool, the Authorized Person shall log in the FI’s AEOI Account with the e-Cert (Organisational) with AEOI Functions of the Subscribing Organization he/she represents, and then select the “Data Preparation Tool” under “Manage Return” tab.
3.2.5 The User Guide to Data Preparation Tool can be downloaded here.
6
AEOI Portal – A Guide to Return Filing
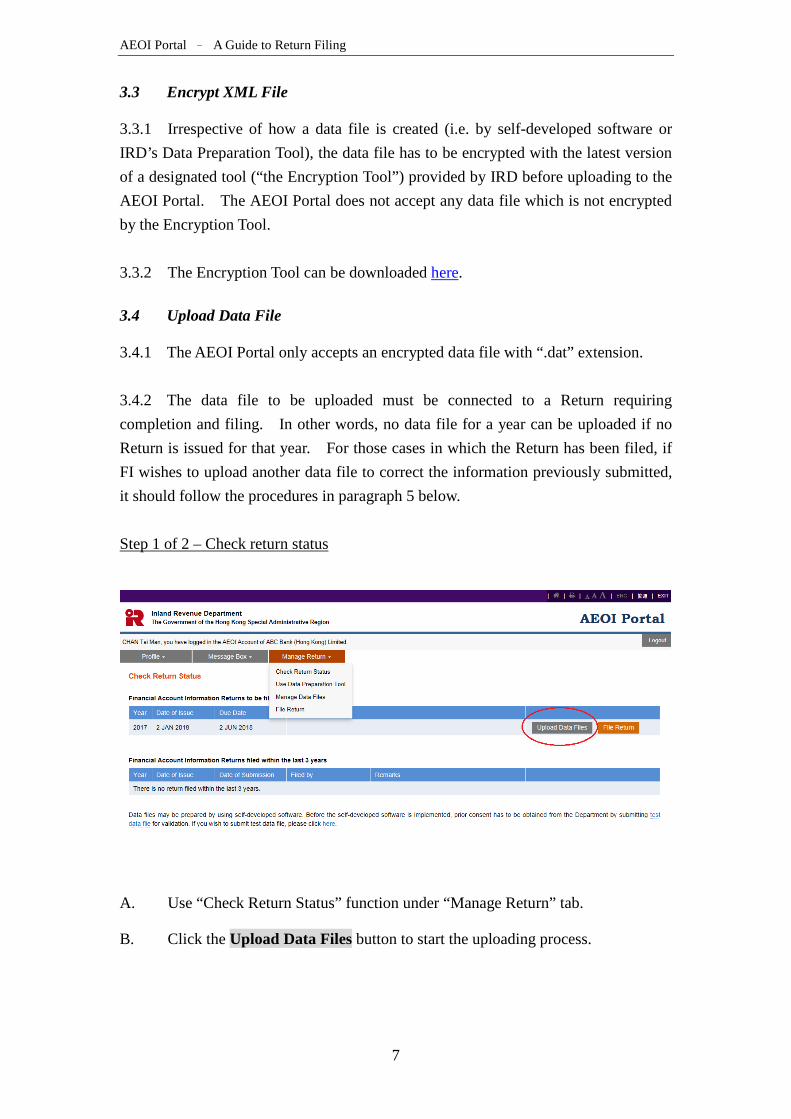
3.3 Encrypt XML File 3.3.1 Irrespective of how a data file is created (i.e. by self-developed software or IRD’s Data Preparation Tool), the data file has to be encrypted with the latest version of a designated tool (“the Encryption Tool”) provided by IRD before uploading to the AEOI Portal. The AEOI Portal does not accept any data file which is not encrypted by the Encryption Tool. 3.3.2 The Encryption Tool can be downloaded here. 3.4 Upload Data File 3.4.1 The AEOI Portal only accepts an encrypted data file with “.dat” extension. 3.4.2 The data file to be uploaded must be connected to a Return requiring completion and filing. In other words, no data file for a year can be uploaded if no Return is issued for that year. For those cases in which the Return has been filed, if FI wishes to upload another data file to correct the information previously submitted, it should follow the procedures in paragraph 5 below. Step 1 of 2 – Check return status
A. Use “Check Return Status” function under “Manage Return” tab.
B. Click the Upload Data Files button to start the uploading process.
7
AEOI Portal – A Guide to Return Filing
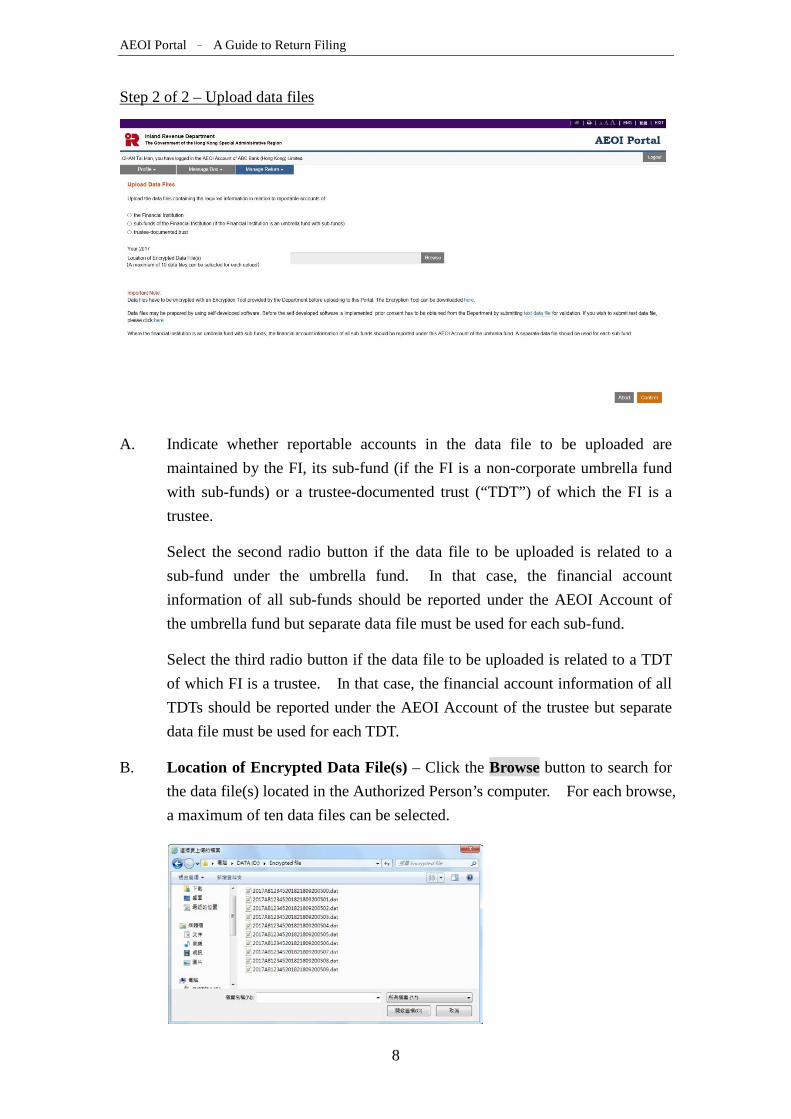
Step 2 of 2 – Upload data files
A. Indicate whether reportable accounts in the data file to be uploaded are
maintained by the FI, its sub-fund (if the FI is a non-corporate umbrella fund with sub-funds) or a trustee-documented trust (“TDT”) of which the FI is a trustee. Select the second radio button if the data file to be uploaded is related to a sub-fund under the umbrella fund. In that case, the financial account information of all sub-funds should be reported under the AEOI Account of the umbrella fund but separate data file must be used for each sub-fund. Select the third radio button if the data file to be uploaded is related to a TDT of which FI is a trustee. In that case, the financial account information of all TDTs should be reported under the AEOI Account of the trustee but separate data file must be used for each TDT.
B. Location of Encrypted Data File(s) – Click the Browse button to search for the data file(s) located in the Authorized Person’s computer. For each browse, a maximum of ten data files can be selected.
8
AEOI Portal – A Guide to Return Filing
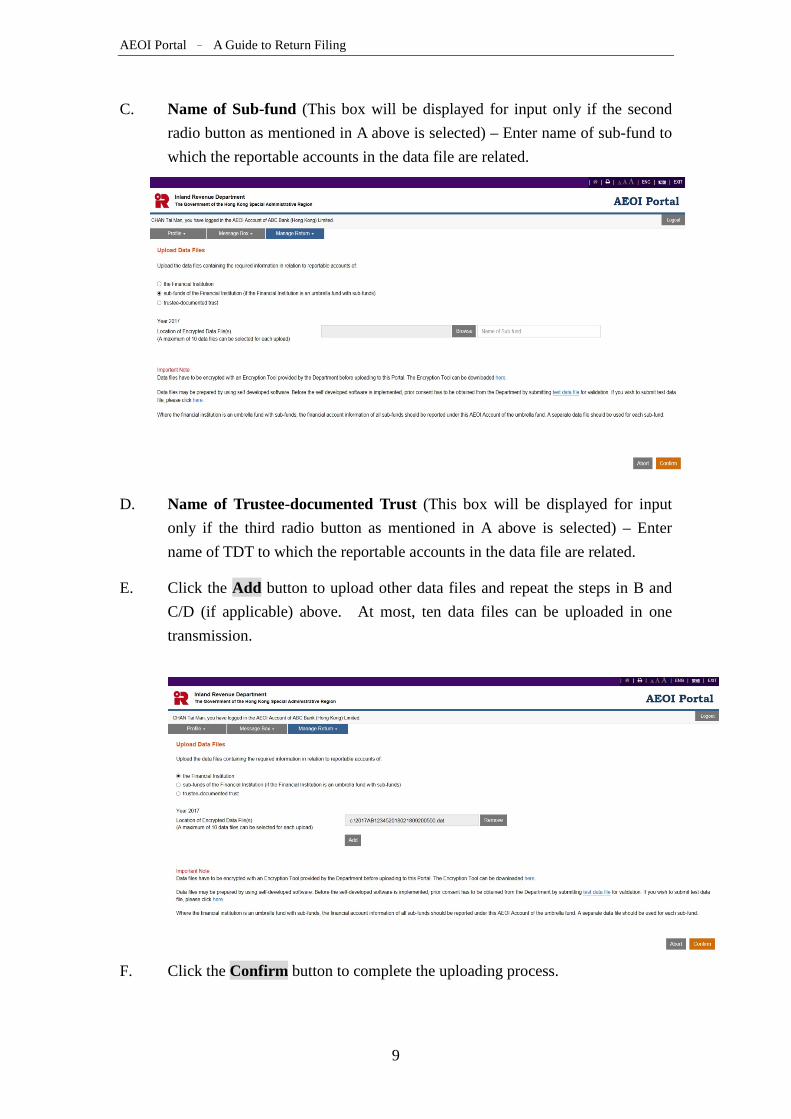
C. Name of Sub-fund (This box will be displayed for input only if the second
radio button as mentioned in A above is selected) – Enter name of sub-fund to which the reportable accounts in the data file are related.
D. Name of Trustee-documented Trust (This box will be displayed for input only if the third radio button as mentioned in A above is selected) – Enter name of TDT to which the reportable accounts in the data file are related.
E. Click the Add button to upload other data files and repeat the steps in B and C/D (if applicable) above. At most, ten data files can be uploaded in one transmission.
F. Click the Confirm button to complete the uploading process.
9

AEOI Portal – A Guide to Return Filing
G. Click the Abort button if the Authorized Person wishes to terminate the uploading process.
Acknowledgement 3.4.3 For each successful upload of data file(s), an acknowledgement will be generated.
A. Click the Print button if the Authorized Person wishes to print the
acknowledgement.
B. Click the Save button if the Authorized Person wishes to save the acknowledgement.
C. Click the Close button and the Authorized Person will be directed to the “Manage Data Files” function page.
Validation Results 3.4.4 The system will check if the data files conform to the Return XML Schema issued by IRD and send the validation result to the Message Box of the FI’s AEOI Account as well as an alert message to the email address of each contact person of the Subscribing Organization on the next business day.
10
AEOI Portal – A Guide to Return Filing
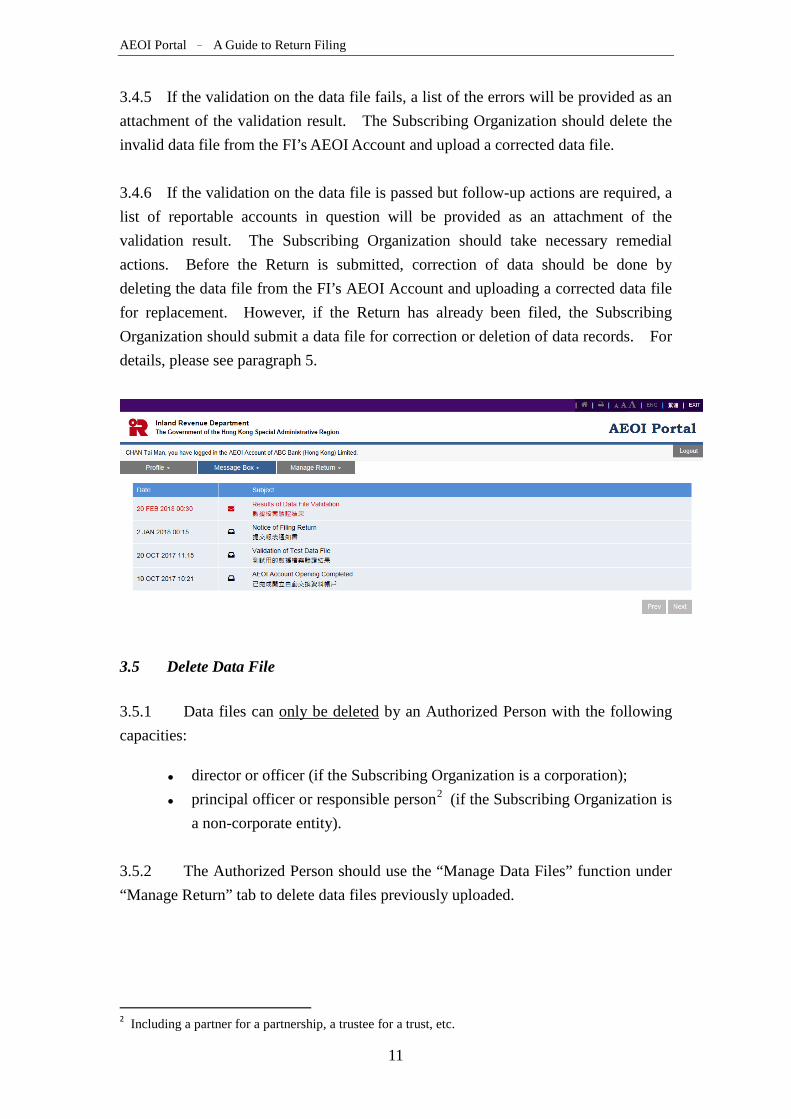
3.4.5 If the validation on the data file fails, a list of the errors will be provided as an attachment of the validation result. The Subscribing Organization should delete the invalid data file from the FI’s AEOI Account and upload a corrected data file. 3.4.6 If the validation on the data file is passed but follow-up actions are required, a list of reportable accounts in question will be provided as an attachment of the validation result. The Subscribing Organization should take necessary remedial actions. Before the Return is submitted, correction of data should be done by deleting the data file from the FI’s AEOI Account and uploading a corrected data file for replacement. However, if the Return has already been filed, the Subscribing Organization should submit a data file for correction or deletion of data records. For details, please see paragraph 5.
3.5 Delete Data File 3.5.1 Data files can only be deleted by an Authorized Person with the following capacities:
director or officer (if the Subscribing Organization is a corporation); principal officer or responsible person2 (if the Subscribing Organization is
a non-corporate entity).
3.5.2 The Authorized Person should use the “Manage Data Files” function under “Manage Return” tab to delete data files previously uploaded.
2 Including a partner for a partnership, a trustee for a trust, etc.
11
AEOI Portal – A Guide to Return Filing
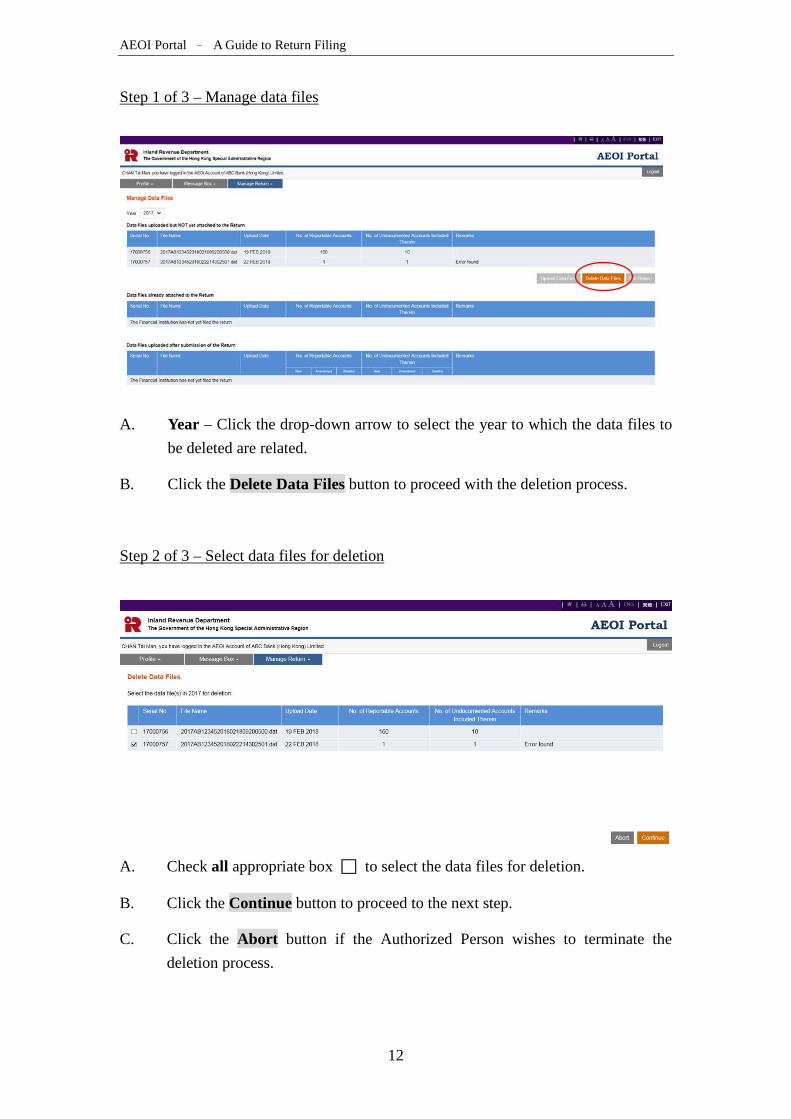
Step 1 of 3 – Manage data files
A. Year – Click the drop-down arrow to select the year to which the data files to be deleted are related.
B. Click the Delete Data Files button to proceed with the deletion process.
Step 2 of 3 – Select data files for deletion
A. Check all appropriate box □ to select the data files for deletion.
B. Click the Continue button to proceed to the next step.
C. Click the Abort button if the Authorized Person wishes to terminate the
deletion process.
12

AEOI Portal – A Guide to Return Filing
Step 3 of 3 – Confirm with e-Cert (Organisational) with AEOI Functions
A. Click the drop-down arrow to select the Authorized Person’s capacity in the Subscribing Organization deleting the data files. There are 4 allowable options:
“director” – if the Authorized Person is a director of the corporation (i.e. corporate FI, corporate SP or corporate PMFA) that deletes the data files;
“officer” – if the Authorized Person is a manager or company secretary of the corporation (i.e. corporate FI, corporate SP or corporate PMFA) that deletes the data files;
“principal officer” – if the Authorized Person is a principal officer of a non-corporate entity (i.e. non-corporate FI, non-corporate SP or non-corporate PMFA) that deletes the data files;
“responsible person”3 – if the Authorized Person is a responsible person of a non-corporate entity (i.e. non-corporate FI, non-corporate SP or non-corporate PMFA) that deletes the data files.
B. File Location – Click the Browse button to search for the same e-Cert (Organisational) with AEOI Functions as used for authentication during login.
3 Including a partner for a partnership, a trustee for a trust, etc.
13
AEOI Portal – A Guide to Return Filing
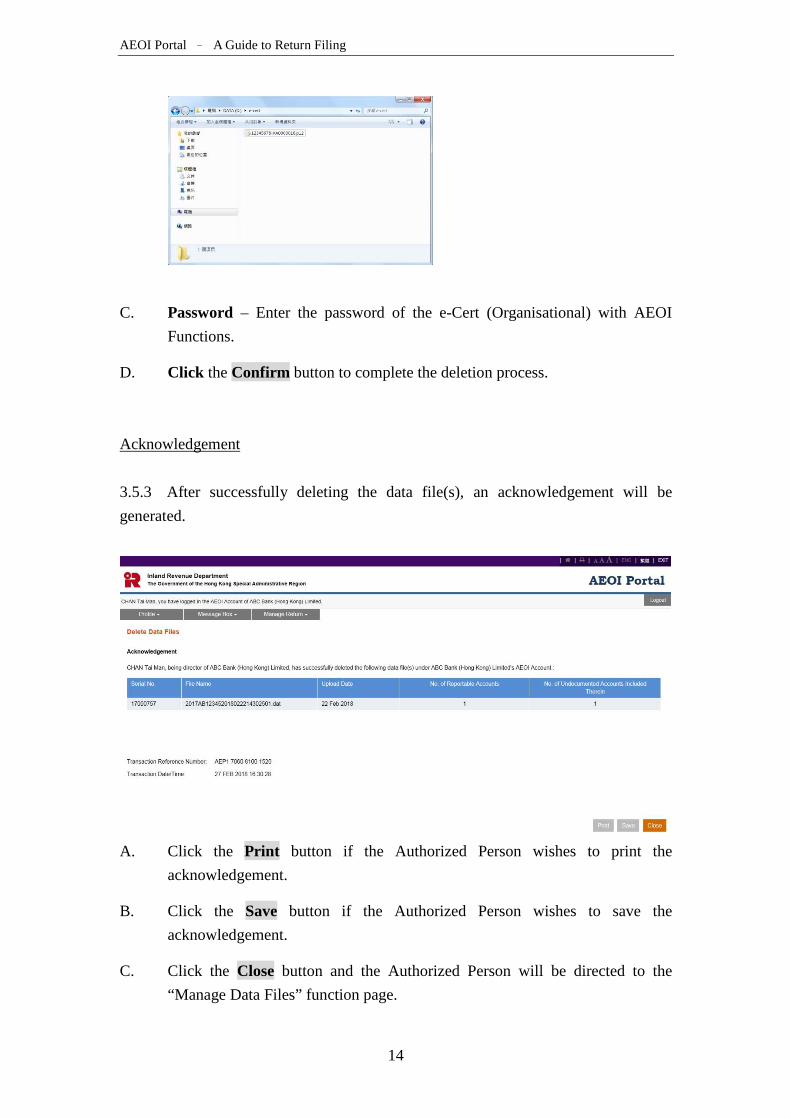
C. Password – Enter the password of the e-Cert (Organisational) with AEOI
Functions.
D. Click the Confirm button to complete the deletion process. Acknowledgement 3.5.3 After successfully deleting the data file(s), an acknowledgement will be generated.
A. Click the Print button if the Authorized Person wishes to print the
acknowledgement.
B. Click the Save button if the Authorized Person wishes to save the acknowledgement.
C. Click the Close button and the Authorized Person will be directed to the “Manage Data Files” function page.
14

AEOI Portal – A Guide to Return Filing
Confirmation 3.5.4 A confirmation will be sent to the Message Box of the FI’s AEOI Account and an alert message will be issued to the email address of each contact person of the Subscribing Organization instantly.
4 Online Filing Process 4.1 The Authorized Person may start the online filing process by using the “File Return” function under “Manage Return” tab or clicking the File Return button in the “Check Return Status” function page.
4.2 After selecting the year, the Authorized Person must read the notes and instructions carefully. During the Return filing process, the Authorized Person may also click the hyperlinks displayed on the screens to read the notes and instructions.
15
AEOI Portal – A Guide to Return Filing
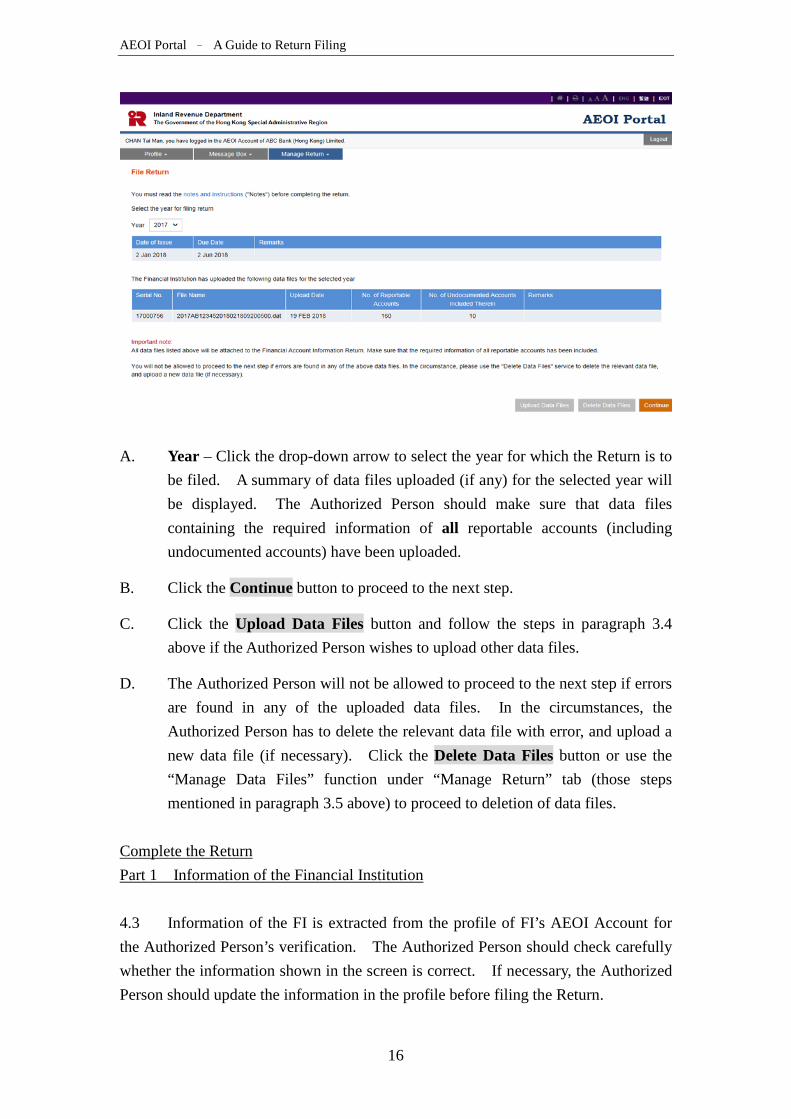
A. Year – Click the drop-down arrow to select the year for which the Return is to
be filed. A summary of data files uploaded (if any) for the selected year will be displayed. The Authorized Person should make sure that data files containing the required information of all reportable accounts (including undocumented accounts) have been uploaded.
B. Click the Continue button to proceed to the next step.
C. Click the Upload Data Files button and follow the steps in paragraph 3.4 above if the Authorized Person wishes to upload other data files.
D. The Authorized Person will not be allowed to proceed to the next step if errors are found in any of the uploaded data files. In the circumstances, the Authorized Person has to delete the relevant data file with error, and upload a new data file (if necessary). Click the Delete Data Files button or use the “Manage Data Files” function under “Manage Return” tab (those steps mentioned in paragraph 3.5 above) to proceed to deletion of data files.
Complete the Return Part 1 Information of the Financial Institution 4.3 Information of the FI is extracted from the profile of FI’s AEOI Account for the Authorized Person’s verification. The Authorized Person should check carefully whether the information shown in the screen is correct. If necessary, the Authorized Person should update the information in the profile before filing the Return.
16

AEOI Portal – A Guide to Return Filing
Click the Continue button to proceed to the next step. Part 2 Person carrying out due diligence and reporting obligations 4.4 The Authorized Person is required to indicate the person(s) carrying out due diligence and reporting obligations. For this purpose, names of the FI, PMFA and SPs, if any, will be extracted from the profile of FI’s AEOI Account. The Authorized Person needs to tick the appropriate box □ to indicate the person(s) carrying out the obligations.
17
AEOI Portal – A Guide to Return Filing
A. Person establishing the due diligence procedures – Check the appropriate
box(es) indicating the person(s) establishing the due diligence procedures under section 50B(1) of the IRO. If the obligations were carried out by previous PMFA (for the non-corporate FI) or SP previously engaged, the Authorized Person should check the box “Others” and input the name(s) of the person(s) in the space provided. DO NOT input the name of the individual who performed the operations such as solely doing the ground work.
B. Person maintaining and/or applying the due diligence procedures – Check the appropriate box(es) indicating the person(s) maintaining and/or applying the due diligence procedures under section 50B(2) of the IRO. If the obligations were carried out by the previous PMFA (for the non-corporate FI) or SP previously engaged, the Authorized Person should check the box “Others” and input the name(s) of the person(s) in the space provided. DO NOT input the name of the individual who performed the operations such as solely doing the ground work.
C. Person furnishing the Return – Name of the Subscribing Organization will be extracted from the Authorized Person’s e-Cert (Organisational) with AEOI Functions, tick the box □ to confirm who files the Return under section 50C(1) of the IRO.
D. Click the Continue button to proceed to the next step. Part 3 Elections made by the Financial Institution 4.5 Election of an option is not mandatory. The Authorized Person should tick the appropriate box ONLY IF the relevant option has been elected by the FI for due diligence and/or reporting purpose.
18
AEOI Portal – A Guide to Return Filing
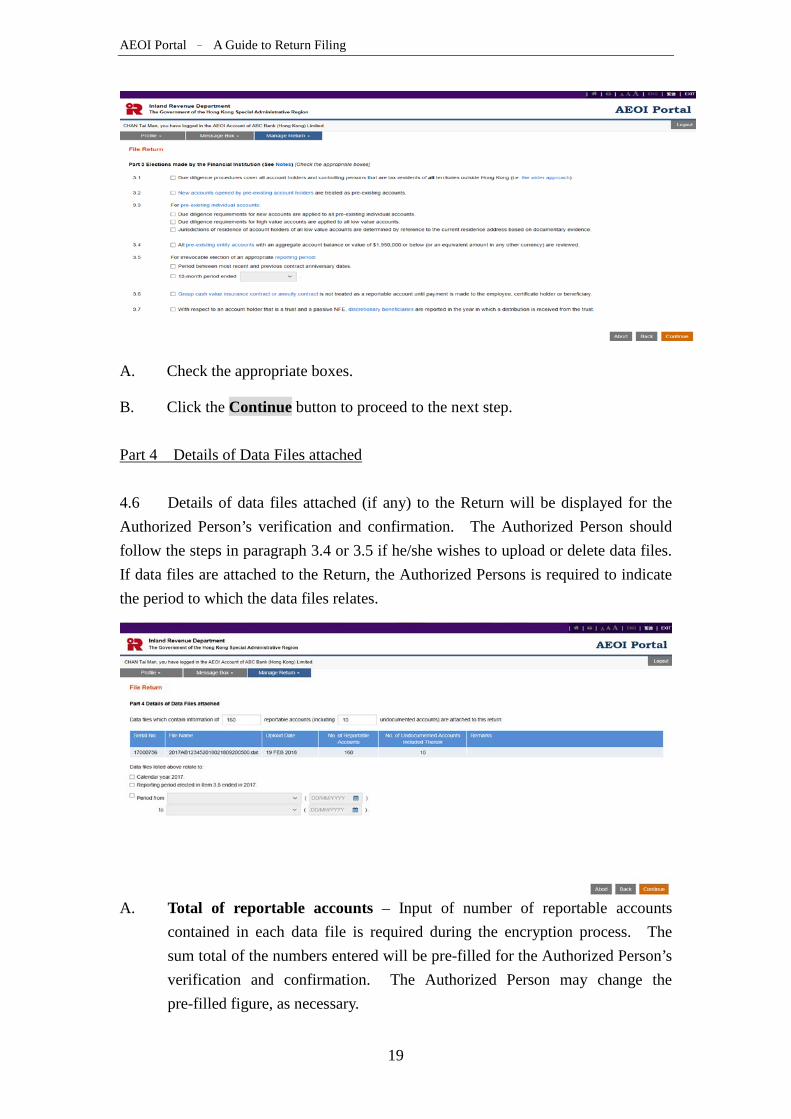
A. Check the appropriate boxes.
B. Click the Continue button to proceed to the next step. Part 4 Details of Data Files attached 4.6 Details of data files attached (if any) to the Return will be displayed for the Authorized Person’s verification and confirmation. The Authorized Person should follow the steps in paragraph 3.4 or 3.5 if he/she wishes to upload or delete data files. If data files are attached to the Return, the Authorized Persons is required to indicate the period to which the data files relates.
A. Total of reportable accounts – Input of number of reportable accounts
contained in each data file is required during the encryption process. The sum total of the numbers entered will be pre-filled for the Authorized Person’s verification and confirmation. The Authorized Person may change the pre-filled figure, as necessary.
19

AEOI Portal – A Guide to Return Filing
B. Total of undocumented accounts – Input of number of undocumented
accounts contained in each data file is required during the encryption process. The sum total of the numbers entered will be pre-filled for the Authorized Person’s verification and confirmation. The Authorized Person may change the pre-filled figure, as necessary.
C. Period to which the data files relate – Check the appropriate box(es) to indicate the period to which the data files relate if data files are attached. If the FI commenced or ceased business within the reporting period, tick the third checkbox and state the date of commencement or date of cessation of business.
D. Click the Continue button to proceed to next step. 4.7 If no data file is attached to the Return, the Authorized person is required to indicate the reason of either:
all the information of reportable accounts in relation to the trust is reported
to the tax authority of a participating jurisdiction in which it is tax resident (Form IR1463 must be completed); or
no reportable account is maintained during the year.
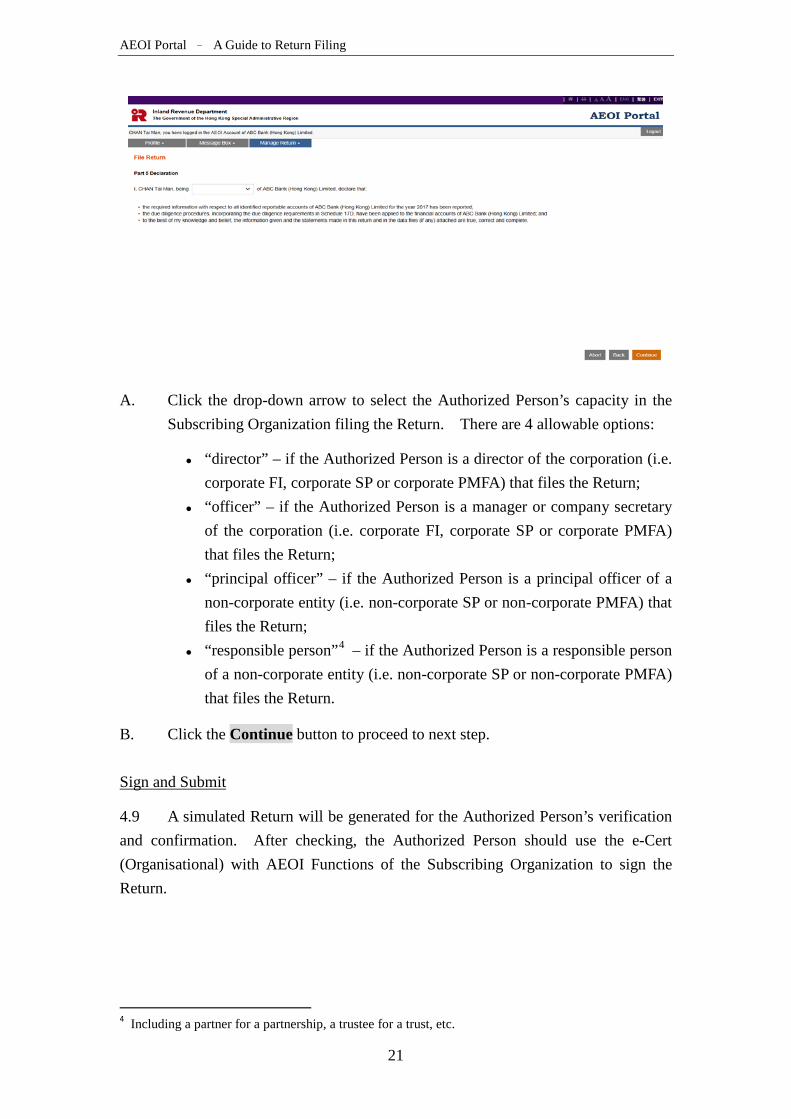
Part 5 Declaration 4.8 Before signing and submitting the Return, the Authorized Person should ensure that the due diligence procedures have been applied to the financial accounts of the FI and the required information with respect to all identified reportable accounts of the FI has been reported, and make the declaration accordingly.
20
AEOI Portal – A Guide to Return Filing
A. Click the drop-down arrow to select the Authorized Person’s capacity in the
Subscribing Organization filing the Return. There are 4 allowable options:
“director” – if the Authorized Person is a director of the corporation (i.e. corporate FI, corporate SP or corporate PMFA) that files the Return;
“officer” – if the Authorized Person is a manager or company secretary of the corporation (i.e. corporate FI, corporate SP or corporate PMFA) that files the Return;
“principal officer” – if the Authorized Person is a principal officer of a non-corporate entity (i.e. non-corporate SP or non-corporate PMFA) that files the Return;
“responsible person”4 – if the Authorized Person is a responsible person of a non-corporate entity (i.e. non-corporate SP or non-corporate PMFA) that files the Return.
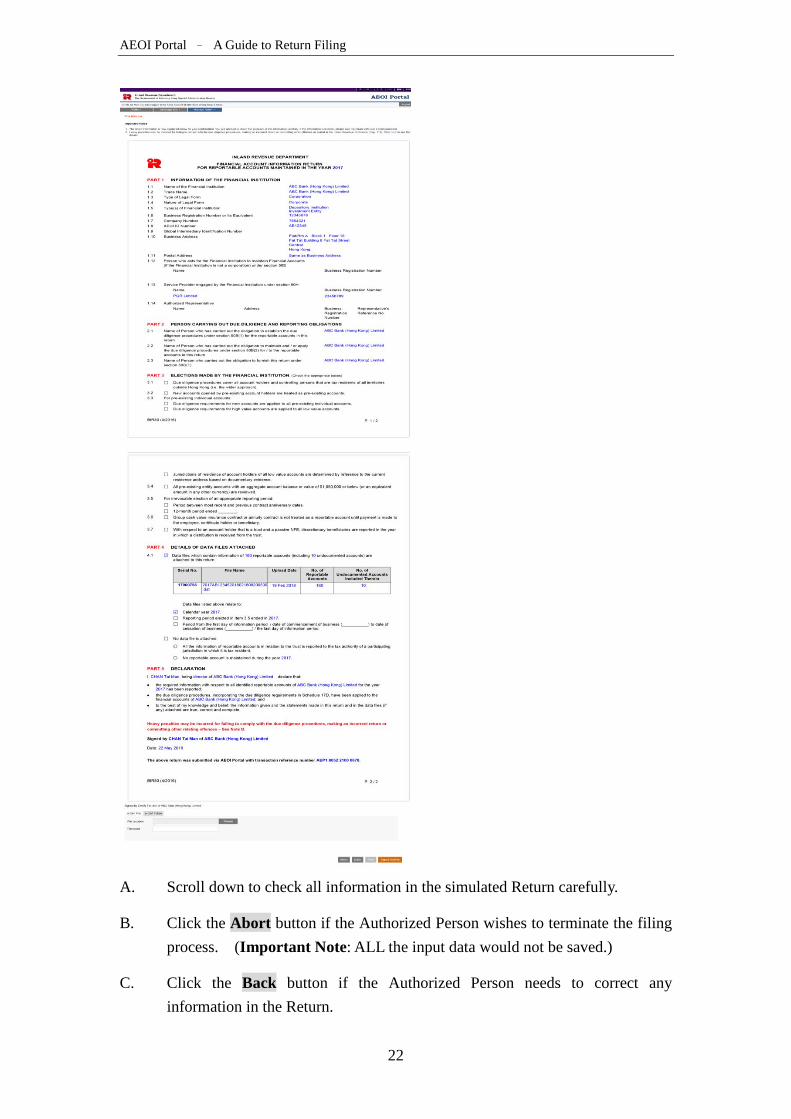
B. Click the Continue button to proceed to next step. Sign and Submit 4.9 A simulated Return will be generated for the Authorized Person’s verification and confirmation. After checking, the Authorized Person should use the e-Cert (Organisational) with AEOI Functions of the Subscribing Organization to sign the Return.
4 Including a partner for a partnership, a trustee for a trust, etc.
21
AEOI Portal – A Guide to Return Filing
A. Scroll down to check all information in the simulated Return carefully.
B. Click the Abort button if the Authorized Person wishes to terminate the filing
process. (Important Note: ALL the input data would not be saved.)
C. Click the Back button if the Authorized Person needs to correct any information in the Return.
22

AEOI Portal – A Guide to Return Filing
D. Click the Print button if the Authorized Person wishes to print the simulated Return.
E. File Location – Click the Browse button to search for the e-Cert (Organisational) with AEOI Functions located on the Authorized Person’s computer.
F. Password – Enter the password of the e-Cert (Organisational) with AEOI
Functions.
G. Click the Confirm button to complete the return filing process. Acknowledgement 4.10 For successful submission of the Return, an acknowledgement will be generated.
A. Click the Print button if the Authorized Person wishes to print the
acknowledgement.
23

AEOI Portal – A Guide to Return Filing
B. Click the Save button if the Authorized Person wishes to save the acknowledgement.
C. Click the Close button and the Authorized Person will be directed to the “Check Return Status” function page.
Confirmation 4.11 Upon completion of filing, a confirmation will be sent to the Message Box of the FI’s AEOI Account and an alert message will be issued by email to the email address of each contact person of the Subscribing Organization.
5 Post-submission of Return 5.1 View Return 5.1.1 A Return can be viewed under the “Check Return Status” function within 3 years after submission. However, all data files uploaded and the data records therein cannot be subsequently downloaded or retrieved from the AEOI Portal.
24

AEOI Portal – A Guide to Return Filing
Click the View Return button in the same row of the Return which the Authorized Person wishes to view. 5.2 Amend Data Record 5.2.1 If the FI, PMFA or SP discovers that there is misleading, false or inaccurate information in the data file attached to a Return or some information has been omitted in the data file, it should submit a new data file to rectify such errors or omissions. Data files containing corrected information can be uploaded by an Authorized Person with any of the following capacities:
director or officer if the Subscribing Organization is a corporation; or principal officer or responsible person5 if the Subscribing Organization
is a non-corporate entity.
Step 1 of 5 – Check Return Status 5.2.2 The Authorized Person should first use the “Check Return Status” function under “Manage Return” tab. Record of Returns filed within the last 3 years will then be displayed.
Click the Manage Data Files button in the same row of the Return requiring rectification.
5 Including a partner for a partnership, a trustee for a trust, etc.
25
AEOI Portal – A Guide to Return Filing
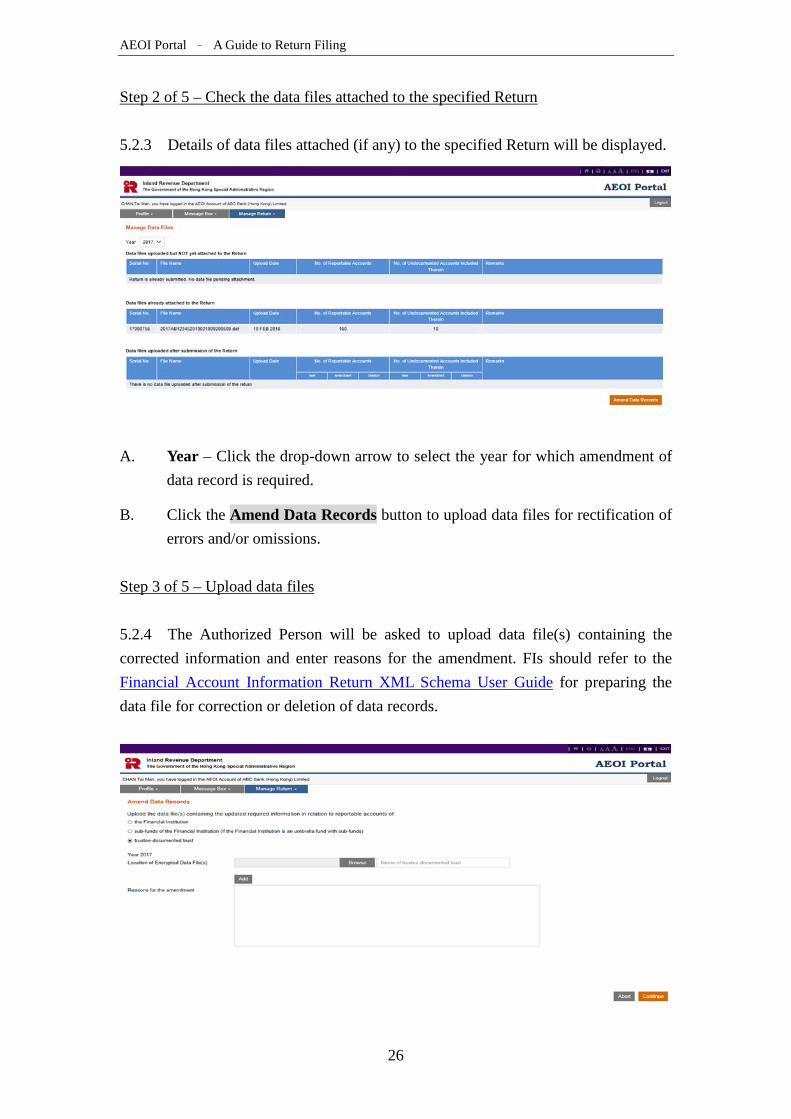
Step 2 of 5 – Check the data files attached to the specified Return 5.2.3 Details of data files attached (if any) to the specified Return will be displayed.
A. Year – Click the drop-down arrow to select the year for which amendment of
data record is required.
B. Click the Amend Data Records button to upload data files for rectification of errors and/or omissions.
Step 3 of 5 – Upload data files 5.2.4 The Authorized Person will be asked to upload data file(s) containing the corrected information and enter reasons for the amendment. FIs should refer to the Financial Account Information Return XML Schema User Guide for preparing the data file for correction or deletion of data records.
26

AEOI Portal – A Guide to Return Filing
A. Indicate whether reportable accounts in the data files are maintained by the FI, its sub-fund (if the FI is an umbrella fund with sub-funds) or a TDT of which the FI is a trustee. See paragraph 3.4 above.
B. Location of Encrypted Data File(s) – Click the Browse button to search for the data file located on the Authorized Person’s computer. For each browse, only one data file can be selected.
C. Name of Sub-fund (This box will be displayed for input only if the second radio button is selected) – Enter name of sub-fund to which the reportable accounts in the data file are related.
D. Name of Trustee-documented Trust (This box will be displayed for input only if the third radio button is selected) – Enter name of TDT to which the reportable accounts in the data file are related.
E. Click the Add button to upload another data file and repeat the steps in B and C/D (if applicable) above. At most, five data files can be uploaded in one transmission.
F. Reasons for the amendment – Enter the reasons for the amendment here.
G. Click the Continue button to proceed to the next step.
H. Click the Abort button if the Authorized Person wishes to terminate the uploading process.
Step 4 of 5 – Select capacity 5.2.6 The Authorized Person has to indicate his/her capacity in the Subscribing Organization uploading the data file(s).
27
AEOI Portal – A Guide to Return Filing
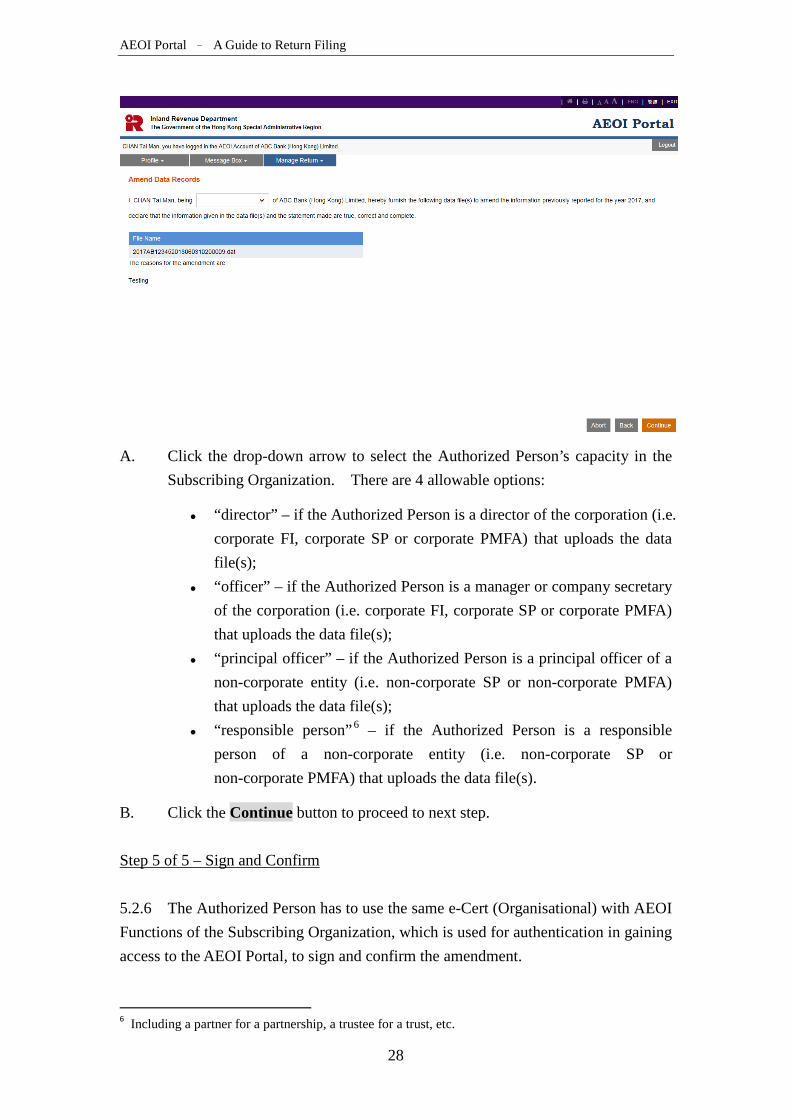
A. Click the drop-down arrow to select the Authorized Person’s capacity in the Subscribing Organization. There are 4 allowable options:
“director” – if the Authorized Person is a director of the corporation (i.e. corporate FI, corporate SP or corporate PMFA) that uploads the data file(s);
“officer” – if the Authorized Person is a manager or company secretary of the corporation (i.e. corporate FI, corporate SP or corporate PMFA) that uploads the data file(s);
“principal officer” – if the Authorized Person is a principal officer of a non-corporate entity (i.e. non-corporate SP or non-corporate PMFA) that uploads the data file(s);
“responsible person”6 – if the Authorized Person is a responsible person of a non-corporate entity (i.e. non-corporate SP or non-corporate PMFA) that uploads the data file(s).
B. Click the Continue button to proceed to next step. Step 5 of 5 – Sign and Confirm 5.2.6 The Authorized Person has to use the same e-Cert (Organisational) with AEOI Functions of the Subscribing Organization, which is used for authentication in gaining access to the AEOI Portal, to sign and confirm the amendment.
6 Including a partner for a partnership, a trustee for a trust, etc.
28
AEOI Portal – A Guide to Return Filing
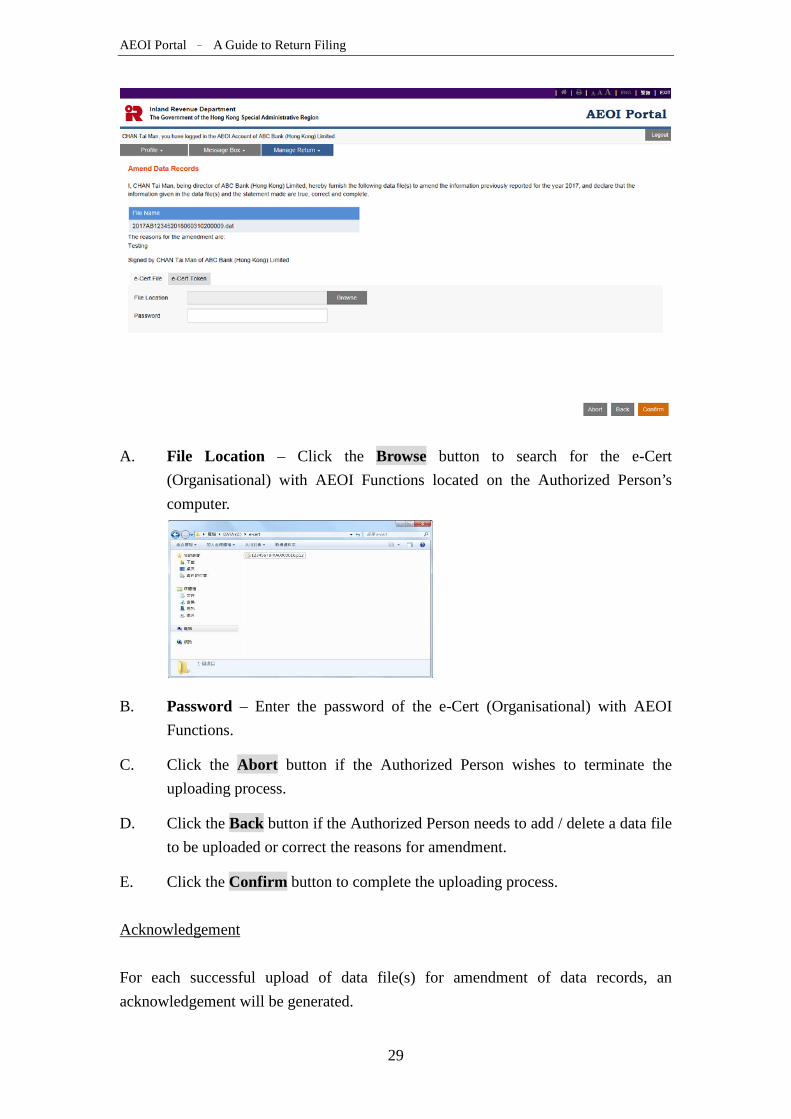
A. File Location – Click the Browse button to search for the e-Cert
(Organisational) with AEOI Functions located on the Authorized Person’s computer.
B. Password – Enter the password of the e-Cert (Organisational) with AEOI Functions.
C. Click the Abort button if the Authorized Person wishes to terminate the uploading process.
D. Click the Back button if the Authorized Person needs to add / delete a data file to be uploaded or correct the reasons for amendment.
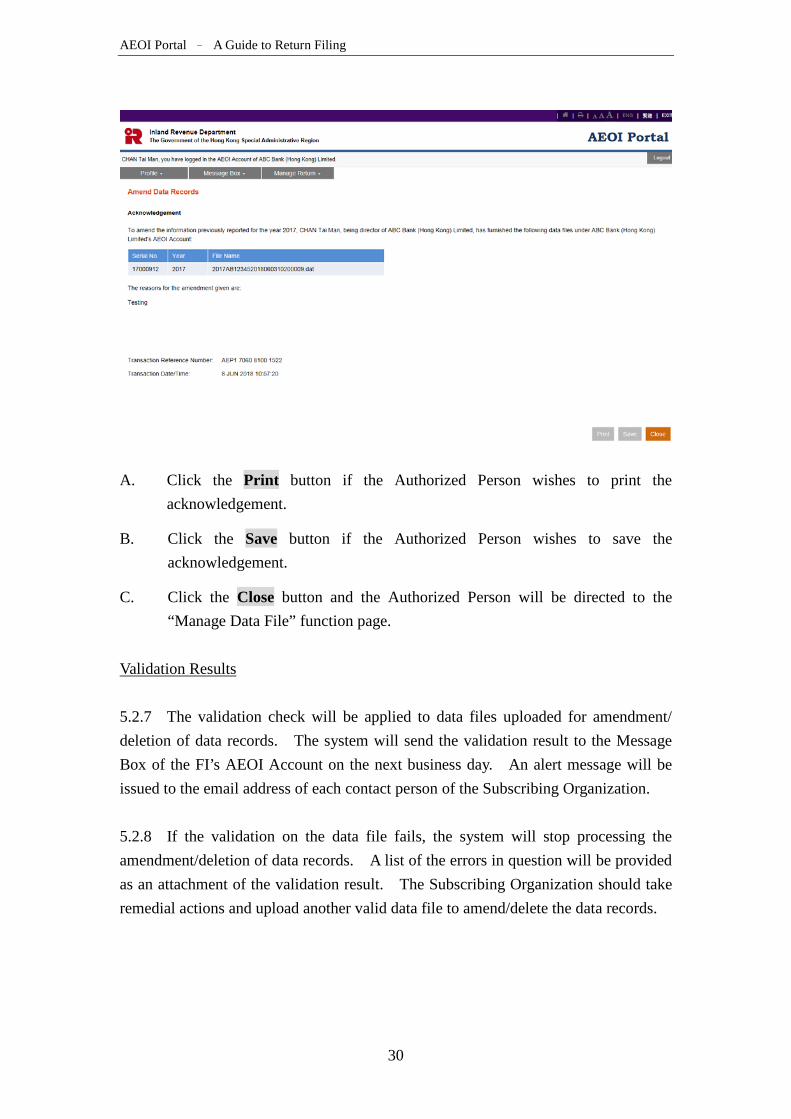
E. Click the Confirm button to complete the uploading process. Acknowledgement For each successful upload of data file(s) for amendment of data records, an acknowledgement will be generated.
29
AEOI Portal – A Guide to Return Filing
A. Click the Print button if the Authorized Person wishes to print the
acknowledgement.
B. Click the Save button if the Authorized Person wishes to save the acknowledgement.
C. Click the Close button and the Authorized Person will be directed to the “Manage Data File” function page.
Validation Results
5.2.7 The validation check will be applied to data files uploaded for amendment/ deletion of data records. The system will send the validation result to the Message Box of the FI’s AEOI Account on the next business day. An alert message will be issued to the email address of each contact person of the Subscribing Organization.
5.2.8 If the validation on the data file fails, the system will stop processing the amendment/deletion of data records. A list of the errors in question will be provided as an attachment of the validation result. The Subscribing Organization should take remedial actions and upload another valid data file to amend/delete the data records.
30