Advanced Rhythm Production Station - fxpansion1.comfxpansion1.com/manuals/pdf/DR008_Manual.pdf ·...
32
fxpansion DR-008 www.fxpansion.com User Manual version 1.10 - 07/06/2002 THIS MANUAL IS COPYRIGHT (C) ANGUS F. HEWLETT / FXPANSION AUDIO 2000-2002. ALL RIGHTS RESERVED. NO PART MAY BE REPRODUCED WITHOUT PERMISSION. VST® TECHNOLOGY BY STEINBERG MEDIA TECHNOLOGIES AG. ALL TRADEMARKS ACKNOWLEDGED DR-008 Advanced Rhythm Production Station
-
Upload
trinhthien -
Category
Documents
-
view
215 -
download
1
Transcript of Advanced Rhythm Production Station - fxpansion1.comfxpansion1.com/manuals/pdf/DR008_Manual.pdf ·...

fxpansion DR-008
www.fxpansion.com
User Manual version 1.10 - 07/06/2002
THIS MANUAL IS COPYRIGHT (C) ANGUS F. HEWLETT / FXPANSION AUDIO
2000-2002. ALL RIGHTS RESERVED. NO PART MAY BE REPRODUCED WITHOUT
PERMISSION. VST® TECHNOLOGY BY STEINBERG MEDIA TECHNOLOGIES AG.
ALL TRADEMARKS ACKNOWLEDGED
DR-008 Advanced Rhythm Production Station

2 www.fxpansion.com
1. Welcome 4
2. Getting Started 42.1 Installing 4
2.2 The Configuration Screen 5
3. In use 7Finding your way around 7
3.1 Main Controls 8
3.1.1 View Modes 8
3.1.2 Program Name readout 8
3.1.3 Menus 8
3.1.3.1 Loading a kit 8
3.1.3.2 Saving a kit 8
3.1.3.3 Wizards 9
Importing an LM-4-kit 9
Clear All 10
3.1.3.4 Controllers (see also Automation) 10
3.1.3.5 Config 10
3.1.3.6 Samples 10
3.1.3.7 Browser 10
3.1.3.8 About 10
3.1.4 Padlock 10
3.1.5 Multimutes 11
3.1.6 Rude Solo Light 11
3.1.7 Octave buttons 11
3.1.8 Window Selectors 11
3.2 Workspace and View Modes 11
3.2.1 Common features 12
3.2.1.1 Loading a module in to an empty pad 12
3.2.1.2 Loading a wave or preset in to an empty pad 12
3.2.1.3 Using Rapid-Preview Mode 12
3.2.1.4 Previewing an active pad 13
3.2.1.5 Modifying the settings for an active pad 13
3.2.1.6 Using Drag-and-Drop 14
3.2.1.7 Keyboard Modifiers 14
3.2.2 Overview Mode 14
3.2.3 Details Mode 15

3
fxpansion DR-008
www.fxpansion.com
3.2.4 Mix Mode 15
3.2.5 Edit Mode 16
3.3 The Browser 16
3.4 Automation and controllers 163.4.1 Full Automation 17
3.4.2 16-way Mapped Automation 17
3.4.3 128-way Map and Controllers 17
3.4.4 MIDI NRPN Implementation 18
4 The Modules 19
4.1 Working with modules 19
4.2 Samplers 194.2.1 Easy Sampler 19
4.2.2 Ultra Sampler 20
4.2.3 Quad Sampler 21
4.2.4 Velo Sampler 22
4.3 Synthesizers 22
4.3.1 The Eights Bass 22
4.3.2 HiHat 23
4.3.3 SnareDrum 23
4.3.4 809 Bass 24
4.3.5 809 Snare 24
4.3.6 808 Hat 24
4.3.7 HX-Bass 24
4.3.8 HX-Drum 25
4.3.9 Tambourine 25
4.3.10 Stompin’ Kick 25
4.3.11 DrumSynth008 25
4.4 Drum Deploy performance modules 274.4.1 DD Layer 27
4.4.2 DD Autoflam 27
4.4.3 DD Alternator 28
4.4.4 DD Autoroll 28
4.4.5 DD Sequencer 28
5. Credits and thanks 30
*Module Header 31
6. GForce Groove Library 32
4 www.fxpansion.com
1
2
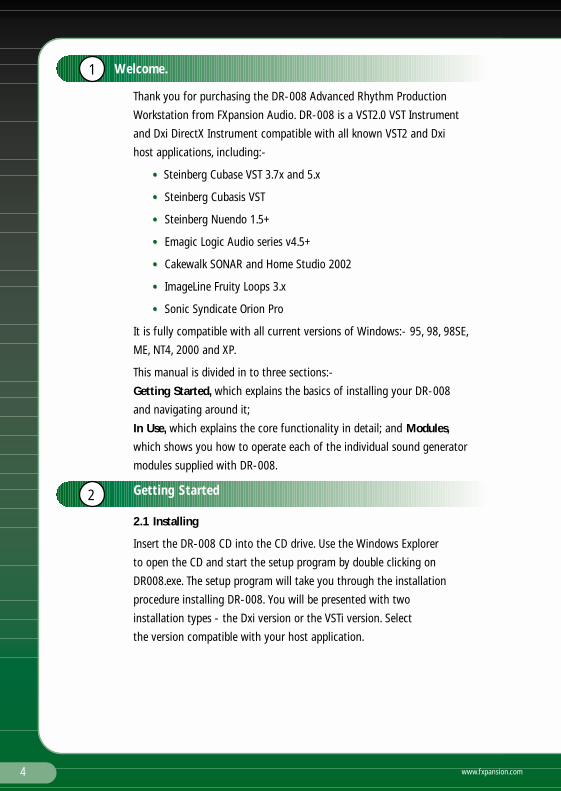
Welcome.
Thank you for purchasing the DR-008 Advanced Rhythm Production
Workstation from FXpansion Audio. DR-008 is a VST2.0 VST Instrument
and Dxi DirectX Instrument compatible with all known VST2 and Dxi
host applications, including:-
•• Steinberg Cubase VST 3.7x and 5.x
• • Steinberg Cubasis VST
• • Steinberg Nuendo 1.5+
• • Emagic Logic Audio series v4.5+
• • Cakewalk SONAR and Home Studio 2002
• • ImageLine Fruity Loops 3.x
• • Sonic Syndicate Orion Pro
It is fully compatible with all current versions of Windows:- 95, 98, 98SE,
ME, NT4, 2000 and XP.
This manual is divided in to three sections:-
Getting Started, which explains the basics of installing your DR-008
and navigating around it;
In Use, which explains the core functionality in detail; and Modules,
which shows you how to operate each of the individual sound generator
modules supplied with DR-008.
Getting Started
2.1 Installing
Insert the DR-008 CD into the CD drive. Use the Windows Explorer
to open the CD and start the setup program by double clicking on
DR008.exe. The setup program will take you through the installation
procedure installing DR-008. You will be presented with two
installation types - the Dxi version or the VSTi version. Select
the version compatible with your host application.

5
fxpansion DR-008
www.fxpansion.com
Continued on page 6
The following files and folders will be installed:
•• DR-008.DLL - the main engine and VST interface.
• • Dr8Dxi2.DLL - the Dxi interface.
• • MODULES Folder - the folder where all the modules are kept. New
modules from FXpansion or third parties can be placed in here.
• • WIZARDS Folder - the folder where DR-008's import wizards are kept.
New wizards.
• • PRESETS Folder - where presets for all DR-008's modules are stored.
Please take time to register DR-008. Registration will give you access to free
technical support and a host of new kits for DR-008.
The CD also contains GMEDIA Music’s GForce Multi-Format Groove Library.
The Groove Library has been specifically created for DR-008 and features
fifteen different drum kits and more than 200 MIDI loops. Further
information about loading these files can be found on page 32.
2.2 The Configuration Screen
The Configuration screen is displayed
the first time your VST or Dxi host
program loads DR-008. If you’re using
Logic Audio, you will need to press the
ENTER key to dismiss this window the
first time you see it – for some reason Logic disables the mouse while it’s loading,
so you won’t be able to change any of the settings the first time around. You can
also access the Configuration screen at any time when using DR-008 – just press
the CONFIG button in the menu area. Note that you’ll have to re-load DR-008 after
changing the output configuration, path locations, or automation mode. So, what
do all these options do?

6 www.fxpansion.com
OUTPUTS and AUX SENDS let you set, respectively, the number of output and aux
send destinations you want DR-008 to provide in the host’s mixer. Note that this
is only supported in multi-out enabled hosts – currently that means Cubase,
Nuendo, Cubasis and Orion Pro. Outputs beyond the first stereo pair, as well as all
Aux Sends, are unavailable in some versions of SONAR, Logic Audio and Fruity
Loops. This is an unfortunate limitation of these hosts, and something they all
plan to address at a later date.
PATHS allows you to instruct DR-008 where to look for Modules, Presets (*.drs),
Wizards, Samples and Kits. If the Modules and Wizards paths are not set correctly,
DR-008 will not work, and will warn you to that effect.
SAMPLERS allows you to choose which sampler modules you’d like to use by
default when loading wave (WAV, AIFF) files from the drag-drop Browser window
and Explorer-style Open dialog. See the Modules section for more information on
the capabilities of each of these sampler modules.
AUTOMATION MODE lets you choose four different configurations for
automating DR-008’s various functions. Full Automation is good if you want to
automate lots of controls, but don’t need to edit them afterwards; Logic (16-way
map) is a special mode for Logic Audio users providing 16 channels of ‘mapped’
automation; 128-way map is a good general-purpose automation setup providing
128 channels of mapped automation and 16 assignable MIDI Continuous
Controllers; and Disabled switches off all VST/Dxi automation.
Further options for configuring automation can be found in the Controllers menu
on the main screen.
SHOW THIS DIALOG ON START causes the Config dialog to appear every time
you load the DR-008. Unchecking it means that the Config dialog is shown only
when you use the Config button in the main menu.
ENABLE QUICK-PREVIEW – when this checbox is activated, the DR-008
‘pre-loads’ samples and presets in the Open dialog as you hilight them with the
mouse or arrow keys. This feature is particularly useful if you want to be able to
find the right sounds for a track quickly and with the minimum number of clicks;
it’s explained in more detail under Workspace ‘Common Features’. (page 12)Continued on page 7

7
fxpansion DR-008
www.fxpansion.com
3
Continued on page 8
OPEN ALL EDITORS IN SAME WINDOW – when this box is checked, all popup
Editor Windows are opened in the same window frame - so in effect, as you open
a new popup editor, the last one closes. Good if you’re short on screen space
and/or hate ‘screen clutter’.
ENABLE ANIMATION – when checked, the pads in the workspace light up
whenever that pad is triggered. This uses a small amount of CPU; if your system is
low on power, especially if it has an old PCI graphics card such as an ‘S3’-based
card, this feature could cause clicks or dropouts - unchecking the box disables it.
ONESHOT DEFAULTS TO ON – when checked, the pads are initialized with the
HOLD button switched on (which causes them to play in ‘one-shot’ mode,
ignoring any MIDI Note-Off messages and playing the sound to the end). When
unchecked, the pads are initialized with the HOLD button switched off, and
respond normally to MIDI Note-Offs. If you’re using the Cubase Drum Grid editor,
you should be sure to check this box.
SHOW PADS AS NUMBERS – by default, DR-008 displays the pad identifiers as
note names as used by Cubase - ‘C’ to ‘B7’. Checking this box shows them as MIDI
note numbers instead, which may be less confusing if your host application does
not follow the same conventions as Cubase.
In use
Finding your way around
The diagram (right) shows the
functions of each of the
different areas of the main
screen. Each of these will be
explained in detail in the next
section (‘In Use’). Workspace Area - this is where each pad is displayed. There are four differentview modes with Overview being shown here.
Viewmode Selector -choose the Viewmodeyou would like to view your Workspace in..Also displays the name of the currentlyloaded soundbank.
Padlock - whenselected the padlockdisables the the dragand drop functionality.
Multimutes - thesebuttons allow you tomute a number of padswith a single click.
Rude Solo LightLights up red if any pads are selected.
Octave Selectors -these buttons allowyou to hop about inMix and Edit modes.
Menus - these menuscontrol DR-008’s mainfunctions

8 www.fxpansion.com
3.1 Main Controls
This section deals with the various controls on the ‘frame surround’ the grey
outer area around the outside of the Workspace Area.
3.1.1 View Modes
These controls let you select which view mode the Workspace is currently in.
‘Overview’ allows you to see all the pads on screen at once; ‘Details’ provides
more information about each pad, at the expense of not being able to see them
all at once; ‘Mix’ provides larger and easy-to-use controls for adjusting volume,
pan and suchlike; ‘Edit’ allows you to edit the settings of the currently-loaded
modules, as well as the main workspace settings.
3.1.2 Program Name
Shows the name of thecurrently-loaded patch. Use the host application to edit the name of the patch.
3.1.3 Menus
3.1.3.1 Loading a kit
The ‘Load’ menu button is where you load in a pre-made DR-008 kit and all
its associated settings. You can either load it normally, or ‘Merge’ the new
kit in to the current kit. When merging, sounds from the new kit are only
loaded in to slots where there is no sound loaded in the currently-open kit.
Future versions of DR-008 will support a wider variety of merge options.
3.1.3.2 Saving a kit
This menu allows you to save all the current settings (including automation
and Multimute configuration, and settings for all currently-loaded Modules)
in a DR-008 Bank File (*.db8). There are three options when saving:-
• • ‘Save settings only’ saves all the above settings, and stores a
reference to each of the wave files used in the project. If you move
the wave files afterwards and reload the kit, the DR-008 will try to

9
fxpansion DR-008
www.fxpansion.com
find the files; because only references to the files are stored in the bank,
not the files themselves, editing or deleting the wave files used in the
bank will change the way the banks sounds.
• • ‘Save settings and clone samples’ saves the bank as above, but
creates a new copy of all the wave data (in a subdirectory relative to
wherever you save the new bank file), and stores references to the
new copy of the wave data in the file. So you can safely move or
delete the old samples, if you want to. This is also convenient for
‘rounding-up’ all the samples used in a project in to one place.
• • ‘Save bank with samples’ saves the bank as above, but also stores
all the wave data in the file. Note that this can create very large files,
but it’s very convenient for archiving bankfiles, sharing them with
friends or colleagues, or moving them between computers. If you
want to share these bank files with friends over the Internet, we
recommend that you compress them with the WinRAR utility, as it
compresses them a lot better than WinZIP meaning shorter
download times.
3.1.3.3 Wizards
The Wizards menu allows you to access any installed DR-008 Wizard
modules. Currently available are wizards for importing LM-4 kits, and
resetting the DR-008 by clearing all the pads. Future Wizards will provide
functionality such as beat slicing, pitch scaling, and import of further
formats such as Battery *.kit, E-mu SF2 and others.
Importing an LM-4-kit
This Wizard allows you to import drum kits
made for Steinberg’s LM-4 drum sampler.
There are a wide variety of high-quality
multisampled kits available in ‘LM-4’ format.
The Wizard also allows you to ‘shift’ the location of the pads as they’re imported,
allowing you to import multiple LM-4 kits at once by shifting them up or down by
one or more octaves. The LM-4 Wizard normally uses the VeloSampler module for
sample playback, as it’s the only module that supports the 128-way velocity
switching contained in many LM-4 kits. However, not all kits require this – the
wizard allows you to use an alternative sampler module where possible.

10 www.fxpansion.com
Clear All
This Wizard clears all the pads and resets the DR-008. Before doing so, it
will ask ‘are you sure’, so that you don’t accidentally lose work.
3.1.3.4 Controllers
This menu allows you to access the automation and MIDI Controllers
settings. See the ‘Automation’ section for more information.
3.1.3.5 Config
This menu displays the Config dialog box. See ‘Config’ under
‘Getting Started’ for details.
3.1.3.6 Samples
This menu is reserved for future functionality.
3.1.3.7 Browser
This menu toggles (shows/hides) the ‘Tree View’-style Browser window,
which allows you to drag and drop samples and presets from your drives on
to the DR-008’s pads.
3.1.3.8 About
Displays information about the current version of DR-008.
3.1.4 Padlock
The Padlock enables/disables the drag-and-drop functionality between pads.
When illuminated, the DR-008 is ‘locked’, and all inter-pad drag-and-drop is
disabled (drag- and-drop from the Browser to the pads is still allowed). When
disabled or ‘unlocked’, modules/samples can be dragged and dropped between
pads; hold CTRL and drag to ‘clone’ a pad, leaving the original in place and
creating a copy in the new location.
11
fxpansion DR-008
www.fxpansion.com
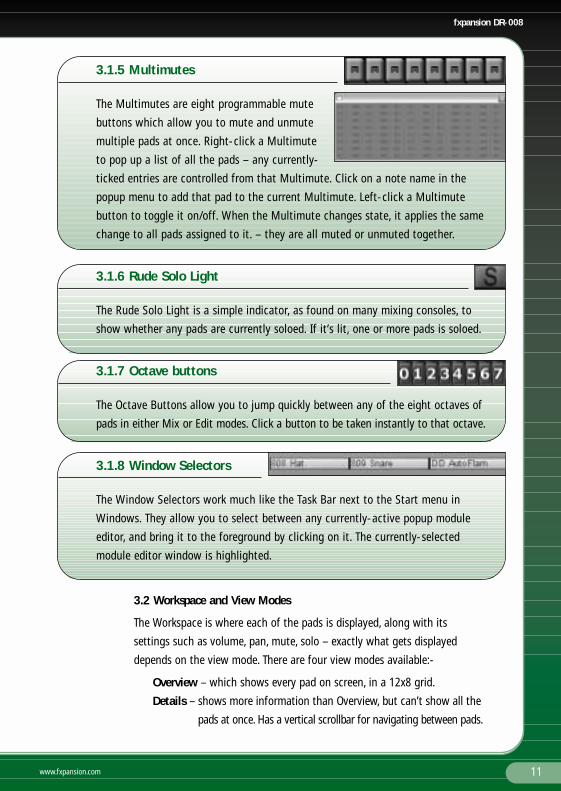
3.1.5 Multimutes
The Multimutes are eight programmable mute
buttons which allow you to mute and unmute
multiple pads at once. Right-click a Multimute
to pop up a list of all the pads – any currently-
ticked entries are controlled from that Multimute. Click on a note name in the
popup menu to add that pad to the current Multimute. Left-click a Multimute
button to toggle it on/off. When the Multimute changes state, it applies the same
change to all pads assigned to it. – they are all muted or unmuted together.
3.1.6 Rude Solo Light
The Rude Solo Light is a simple indicator, as found on many mixing consoles, to
show whether any pads are currently soloed. If it’s lit, one or more pads is soloed.
3.1.7 Octave buttons
The Octave Buttons allow you to jump quickly between any of the eight octaves of
pads in either Mix or Edit modes. Click a button to be taken instantly to that octave.
3.1.8 Window Selectors
The Window Selectors work much like the Task Bar next to the Start menu in
Windows. They allow you to select between any currently-active popup module
editor, and bring it to the foreground by clicking on it. The currently-selected
module editor window is highlighted.
3.2 Workspace and View Modes
The Workspace is where each of the pads is displayed, along with its
settings such as volume, pan, mute, solo – exactly what gets displayed
depends on the view mode. There are four view modes available:-
Overview – which shows every pad on screen, in a 12x8 grid.
Details – shows more information than Overview, but can’t show all the
pads at once. Has a vertical scrollbar for navigating between pads.

12 www.fxpansion.com
Mix – provides large, graphical volume and pan faders for fine-tuning
the levels of each pad. Has a horizontal scrollbar, and allows you
to jump between groups of pads using the octave buttons.
Edit – provides a compressed version of the information in Mix mode,
plus an edit area where you can modify the settings for the
individual modules loaded on each pad.
3.2.1 Common features
Regardless of which view mode you’re currently working in, some
functionality is the same:-
3.2.1.1 Loading a module in to an empty pad
Right-clicking an empty pad brings up a popup menu similar to
the one shown here. This menu shows a list of currently-
available module objects, be they samplers, synthesizers or
DrumDeploy performance objects. Simply select a module from
the menu, and it will be loaded in to the pad.If there is suitable
data in the DR-008 Clipboard, the PASTE option will also be available, allowing
you to paste a previously-selected module and its settings in to the pad.
3.2.1.2 Loading a preset or wave file in to an empty pad
To load a preset or wave file in to an empty pad, simply double click the
dark-blue area of the pad and an Explorer-style ‘Open’ window will appear.
Browse through the disk as you normally would, and select the file you
want to load – it can be a WAV, AIFF or DRS (DR-008 Module Settings) file.
If it’s a .DRS file, the right module to handle the settings will automatically
be loaded. The directory the ‘Open’ window defaults to depends on
the following:-
• • plain doubleclick: opens at the last-used path.
• • Ctrl+doubleclick: opens at the ‘Presets Path’ specified in Config.
• • Shift+doubleclick: opens at the ‘Samples Path’ specified in Config.
You can also load in a preset or wave using the drag-and-drop Browser, see
the ‘Browser’ section for more information on that.
3.2.1.3 Using Rapid-Preview Mode Rapid Preview Mode
is provided as a way of quickly finding the right sounds or samples for your

13
fxpansion DR-008
www.fxpansion.com
track. What it does, when activated (see Config) is to pre-load sounds or
samples in to a pad as soon as you hilight them in the Open dialog box. This
means that any MIDI data coming in to that pad now triggers the new,
highlighted sound.
Typically, how you’d use it is to set up a pattern in your sequencer with
some basic sounds, run the sequencer, and then load new samples in to the
DR-008 as the sequencer runs.
Especially useful is the fact that the Open dialog box allows the use of the
keyboard arrow keys – you can scroll through a whole directory of samples
at the touch of a button, listening to them all in turn in the context of
your track.
Pressing the ‘Open’ button then confirms the loading of the currently
selected sample, and dismisses the dialog; the ‘Cancel’ button dismisses the
dialog and restores the old sound back to the pad.
3.2.1.4 Previewing an active pad
Left-clicking on an active pad will trigger the sound, the same as MIDI
trigger data from your sequencer or keyboard would. A Note-off message is
sent when you release the mouse button.
3.2.1.5 Modifying settings for an active pad
Right-clicking an active pad – that’s to say, one which has a module,
sample or preset loaded in to it – brings up the following menu.
Open/Close Editor toggles the popup editor window for that pad.
Presets pops up a menu showing all presets available for the
currently-loaded module in the Presets folder, and allowing you to
select a new preset for the module.
Name allows you to set the name of the pad.
Load - allows you to load a new wave or preset file in to the pad (see above).
Save - allows you to save the pad’s settings as a new preset (*.drs) file.
Objects pops up the same menu as you would get by rightclicking an empty pad.
Clear, Copy, Cut and Paste provide the standard Clipboard operations at pad
level; they work exactly as normal Windows clipboard functions.
14 www.fxpansion.com
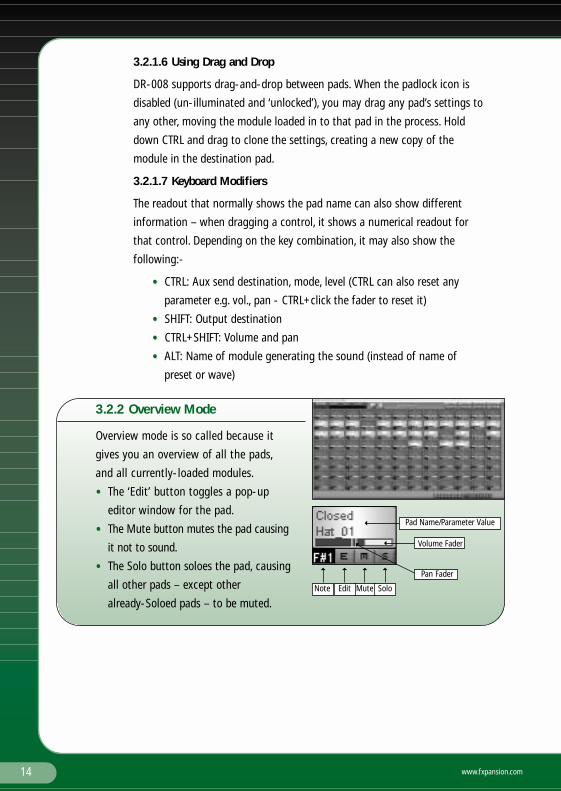
3.2.1.6 Using Drag and Drop
DR-008 supports drag-and-drop between pads. When the padlock icon is
disabled (un-illuminated and ‘unlocked’), you may drag any pad’s settings to
any other, moving the module loaded in to that pad in the process. Hold
down CTRL and drag to clone the settings, creating a new copy of the
module in the destination pad.
3.2.1.7 Keyboard Modifiers
The readout that normally shows the pad name can also show different
information – when dragging a control, it shows a numerical readout for
that control. Depending on the key combination, it may also show the
following:-
• • CTRL: Aux send destination, mode, level (CTRL can also reset any
parameter e.g. vol., pan - CTRL+click the fader to reset it)
• • SHIFT: Output destination
• • CTRL+SHIFT: Volume and pan
• • ALT: Name of module generating the sound (instead of name of
preset or wave)
3.2.2 Overview Mode
Overview mode is so called because it
gives you an overview of all the pads,
and all currently-loaded modules.
• • The ‘Edit’ button toggles a pop-up
editor window for the pad.
• • The Mute button mutes the pad causing
it not to sound.
• • The Solo button soloes the pad, causing
all other pads – except other
already-Soloed pads – to be muted.Note MuteEdit Solo
Pad Name/Parameter Value
Volume Fader
Pan Fader

15
fxpansion DR-008
www.fxpansion.com
3.2.3 Details Mode
Details mode gives you a more detailed view of
each pad, showing the choke group, hold, aux,
and output settings for the pad.
The volume, pan, edit, mute, etc. controls work
exactly as in Overview Mode.
The Hold button, when activated, causes the pad
to ignore any MIDI note-off messages and play to
the end of the sound or sample. This is very useful
when working with the Cubase Drum Editor, which
sends note-offs after a very short time causing some
samplers to ‘cut’ the sound.
The Choke button is used to assign the pad to a choke group.
When a pad assigned to a choke group is triggered, it ‘cuts’ all other
pads in that group. This is very useful for programming authentic-sounding
HiHats - it allows you to cut any open hats whenever a closed hat is played.
The Output button allows you to assign the pad to one of the DR-008’s
multi-outs (multi-out enabled host applications only).
The Aux faders control the level of signal sent to the selected Aux Output
(multi-outs enabled host applications only). Right-click the Aux fader to select
the operating mode (pre or post fader) and destination output for the aux signal.
3.2.4 Mix Mode
Mix mode provides large faders for fine control
of the volume of each pad, and larger, easier-
to-use mute, solo, aux, etc. controls. Aside
from their appearance, the controls work
largely the same as Details mode. The important differences are
the additional volume faders and pan knobs, and the fact that the
Aux Send destinations and modes are assigned by a left-click above
the knob, rather than by right-clicking the knob itself. Because this
mode shows 24 out of the 96 channels at any one time, it allows
you to navigate between the fader banks with the octave buttons
or with the horizontal scroll bar at the bottom of the screen.
Pan
Hold
Choke
Solo
Output selector
Edit Mute
Volume
Note
Pad Name/Parameter Value
Aux 2
Aux 1

16 www.fxpansion.com
3.2.5 Edit Mode
Edit mode provides the same controls as Mix
mode, albeit in a somewhat compressed form.
However, in addition it also provides an editor
for the parameters of whatever module is
loaded in to the pad (equivalent to the floating popup editor windows
accessible from the ‘E’ button). Because of space limitations, it breaks
them in to ‘pages’ of six parameters. Here we can see an Ultra Sampler
module; the light-grey highlights in the page-select area indicate that
there are a total of seven (out of a possible ten) pages available; the
dark-grey highlight shows that we are on page three. Click one of the
other boxes to change the current page.
Above the page selector are the six parameter slots, which provide a
fader and a (read-only) text readout for editing the parameter – this shows the
name of the parameter when the fader is idle, and the value when the fader is active.
As in Mix mode, navigate using the octave buttons and/or horizontal scroll bar.
Right-clicking in the parameter area of Edit Mode will trigger the sound.
3.3 The Browser
DR-008’s Browser is a tree-style popup window capable of
displaying WAV, AIFF and DRS (DR-008 module preset format) files.
The browser exists to allow you to arrange kits quickly by simply
dragging and dropping the samples or presets on to the pads in the
workspace. It works just like a simplified version of the Windows
Explorer’s ‘tree’ view – a ‘+’ next to a folder indicates that it has
one or more subfolders or DR-008 compatible files contained within; click the ‘+’
to open the folder.
3.4 Automation and controllers
DR-008 has a comprehensive automation system with three different
operating modes to suit different requirements, plus MIDI NRPN-based
automation. Automation mode can be set in the Config screen. Note to Dxi
users:- the ‘VST Parameters’ referred to in this section are mapped by the
Dxi shell to DX8 parameters; in SONAR you can use either DX8-style
17
fxpansion DR-008
www.fxpansion.com
automation, or take advantage of SONAR’s superior NRPN handling and
use the NRPN system.
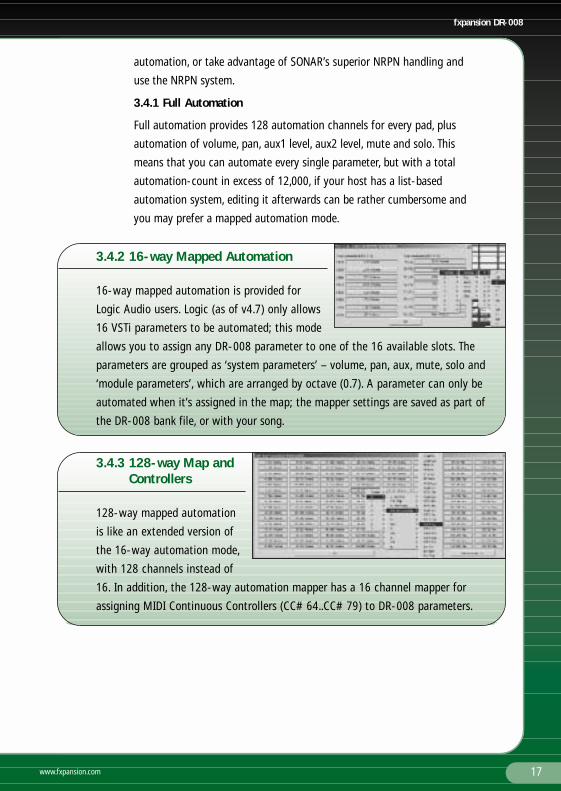
3.4.1 Full Automation
Full automation provides 128 automation channels for every pad, plus
automation of volume, pan, aux1 level, aux2 level, mute and solo. This
means that you can automate every single parameter, but with a total
automation-count in excess of 12,000, if your host has a list-based
automation system, editing it afterwards can be rather cumbersome and
you may prefer a mapped automation mode.
3.4.2 16-way Mapped Automation
16-way mapped automation is provided for
Logic Audio users. Logic (as of v4.7) only allows
16 VSTi parameters to be automated; this mode
allows you to assign any DR-008 parameter to one of the 16 available slots. The
parameters are grouped as ‘system parameters’ – volume, pan, aux, mute, solo and
‘module parameters’, which are arranged by octave (0.7). A parameter can only be
automated when it’s assigned in the map; the mapper settings are saved as part of
the DR-008 bank file, or with your song.
3.4.3 128-way Map andControllers
128-way mapped automation
is like an extended version of
the 16-way automation mode,
with 128 channels instead of
16. In addition, the 128-way automation mapper has a 16 channel mapper for
assigning MIDI Continuous Controllers (CC# 64..CC# 79) to DR-008 parameters.

18 www.fxpansion.com
3.4.4 MIDI NRPN Implementation
All DR-008 parameters can be controlled with MIDI NRPN messages. DR-008
understands the full 14-bits of controller select messages, but only 7-bit
data entry messages (i.e. controller #6 only). The NRPN message is
interpreted as follows:-
Coarse = 0..95: Pad select; Fine= 0..127: Pad parameter select
Data = 0..127: Pad parameter data (0..1)
Coarse = 96: Pad volume; Fine = 0..95: Pad select
Data = 0..127: Pad volume data (0..1 = -inf..+12dB)
Coarse = 97: Pad pan position; Fine = 0..95: Pad select
Data = 0..127: Pad pan position data (0 = 100% L, 127 = 100% R)
Coarse = 98: Pad Aux1 level; Fine = 0..95: Pad select
Data = 0..127: Pad aux1 data (0..1 = -inf..+0dB)
Coarse = 99: Pad Aux2 level; Fine = 0..95: Pad select
Data = 0..127: Pad aux2 data (0..1 = -inf..+0dB)
Coarse = 100: Pad Mute switch Fine = 0..95: Pad select
Data = 0..127: 0..63 = off, 64..127 = on
Coarse = 101: Pad Solo switch; Fine = 0..95: Pad select
Data = 0..127: 0..63 = off, 64..127 = on
Note that some hosts and MIDI devices do not split the coarse and fine
values as shown above. If they only allow a single NRPN number (usually
0..16383), you can calculate the equivalent with:
NRPN-address = (128 * Coarse) + Fine.
So, for example, parameter 3 of pad 14 would be at address
(14 x 128) + 3 = 1795. Note that pads are counted from zero for the
purposes of this calculation, so pad C1, or MIDI note 36, is pad number 12.

19
fxpansion DR-008
www.fxpansion.com
4
Continued on page 20
The Modules
4.1 Working with modules
If you haven’t already gathered, modules are of central importance to the
DR-008 concept. DR-008 does not on its own posess any sound generating
capability whatsoever – this is all provided by the various modules.
• • Samplers, which are used to play and manipulate sampled wave data
(WAV or AIFF format);
• • Synthesizers, which use mathematical algorithms and/or digital
models of vintage equipment to generate the sound;
• • Drum Deploy modules, which do not generate any sound in
themselves, but instead act as MIDI processors for incoming note
data before redirecting it to other pads.
Each pad holds a single module, and each module can be re-used as many
times as you like. Because of the way DR-008 is designed, memory-intensive
items (such as wave data) are managed centrally; using the same wave in
two different modules will not use any extra memory.
To edit a module’s settings, either use the ‘Edit’ view mode, or ‘pop up’ its
editor window using the ‘E’ button. You can preview the sound by right-
clicking anywhere on the editor window, or in the parameter area of the
‘Edit’ view mode. This version of DR-008 comes with around 20 modules,
however the design is such that new modules can and will be made
available – many of them for free – at regular intervals.
Each of the module header (see right) features a useful
set of shortcut icons. (For a full description see page 31)
4.2 Samplers
4.2.1 Easy Sampler
As its name suggests, Easy Sampler is the easiest-to-use
of the sampler modules, and consumes the least CPU –
less than 0.5% on a P3-500. It holds a single wave file, mono or
stereo. To load a wave in to the Easy Sampler, click on the ‘folder’ icon;
to unload a wave, click the ‘x’ icon. Easy Sampler has the following controls:-
Pi – Pitch (+/- 1 oct)

20 www.fxpansion.com
Vpi – Velocity to Pitch. When turned up, this control causes louder notes to be
played at a relatively higher pitch.
Fc – Filter Cutoff. This controls the cutoff frequency of the Easy Sampler’s simple
Low Pass filter. When turned down, this control removes some of the treble
frequencies from the sound, making it less ‘bright’.
VFc – Velocity to Filter Cutoff. When turned up, this control causes louder notes
to sound brighter than quiet notes, by increasing the cutoff frequency for the
filter on loud notes.
Adc – Amplitude Decay. This control can be used to ‘shorten’ the sound by making
the amplitude decrease with time.
PDc – Pitch Decay. This control ‘bends’ the sound by making the pitch decrease
over time.
4.2.2 Ultra Sampler
Ultra Sampler is, like Easy Sampler, a single-wave stereo
sampler module. However, it has a much more complex and
powerful signal path. This enables it to do some quite drastic
things to your sound, but at the expense of consuming
considerably more CPU time. The upper area of the screen
controls the main oscillator – it supports reversed sample
playback, offset of the sample start point (adjustable from
velocity), looping (with control over the loop points – automatically snapped
to a zero crossing – and number of repetitions), pitch control (+/- 2 octaves),
velocity-to-pitch (positive or negative), and a pitch envelope capable of
generating a variety of slopes – the initial pitch slope is controlled with
the ‘slope’ parameter; the ‘sweep’ parameter controls how the slope changes
(becoming steeper, shallower or even turning back on itself) over time.
Both looping and pitch EG can be switched off via the switches provided.
Beyond the oscillator, the Ultra Sampler has a five-stage signal path, using
terminology that may be familiar to you from analog synthesis:-
VCA1, VCF1, Drive, VCF2, VCA2.
Continued on page 21
21
fxpansion DR-008
www.fxpansion.com
VCA1 and VCA2 are amplifiers and amplitude envelope generators. The controls are
fairly self-explanatory: attack rate, decay rate, release rate (rate of decay after note-
off), gain, and velocity->gain. This last control is used to make the Ultra Sampler
respond to velocity in the normal way, playing higher velocities louder (or it can be
set to work in reverse, if you prefer!).
VCF1 and VCF2 are ‘Moog-style’ 24dB resonant filters, switchable from low pass
to high pass (via the ‘response curve’ button at the top of each filter). Cutoff and
resonance are as you would expect; Sweep controls the amount of enveloping
(positive or negative) that’s applied to the cutoff frequency; Decay controls how
quickly the envelope decays.
Note that UltraSampler does not have a Band Pass or Notch filter, but these can
be accomplished with the existing filters, using one as a high-pass and one as a
low-pass and overlapping the cutoff frequencies.
The Drive unit sits between the two filters on the signal path; it’s a fairly
straightforward waveshaping distortion unit with ‘positive’ or ‘negative’ shaping
depending on the position of the Drive knob. The Sweep knob controls the
behaviour of the distortion unit over time – to the right of center, distortion
increases with time; to the left of center, it decreases.
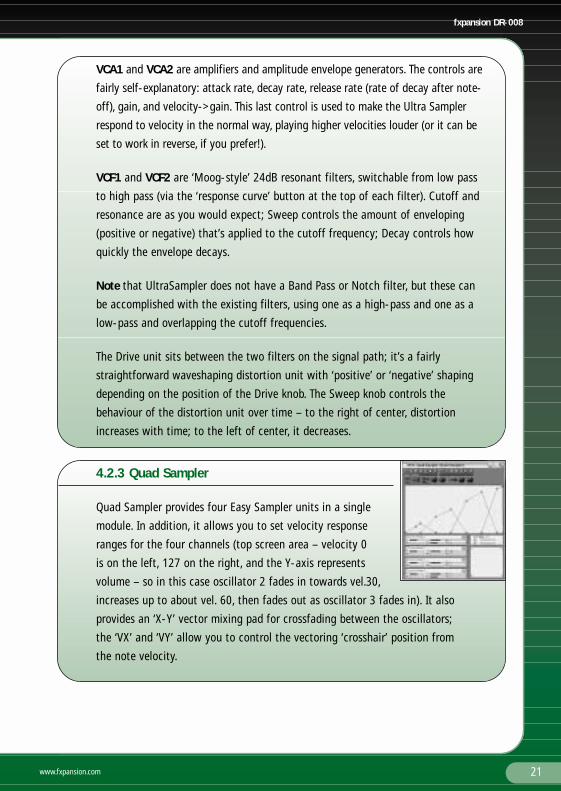
4.2.3 Quad Sampler
Quad Sampler provides four Easy Sampler units in a single
module. In addition, it allows you to set velocity response
ranges for the four channels (top screen area – velocity 0
is on the left, 127 on the right, and the Y-axis represents
volume – so in this case oscillator 2 fades in towards vel.30,
increases up to about vel. 60, then fades out as oscillator 3 fades in). It also
provides an ‘X-Y’ vector mixing pad for crossfading between the oscillators;
the ‘VX’ and ‘VY’ allow you to control the vectoring ‘crosshair’ position from
the note velocity.

22 www.fxpansion.com
4.2.4 Velo Sampler
The final sampler in the current version of DR-008 is the
‘Velo Sampler’. This is a velocity-switching sampler, providing up
to 128-way velocity switching between samples. This is essential
for realistic-sounding acoustic kits. Velo Sampler is also the only
one of the current sampler modules to support ‘multi-triggering’
What this means is, the module is polyphonic, and when it starts to play a new
sound, the old one is not ‘cut’ This is again important for realistic acoustic kits,
but can use quite a lot of CPU – disable it by activating the ‘Mono’ (monophonic)
button. As with the Easy Sampler and Quad Sampler, a simple Low Pass filter is
provided, with velocity control; in addition there is a ‘Velocity Sensitivity’ slider to
adjust how much the sampler’s gain control responds to velocity. It’s important to
note that some velocity-switched drum kit libraries are already scaled according
to velocity (with low-velocity hits being much quieter), and so don’t need to use
the Velo Sampler’s gain control (turn the slider right down). Others, however, are
level-normalized, and rely on the sampler to provide velocity-based level
adjustment – turn the slider up when working in this way. To add a wave to the
Velo Sampler, click the ‘+’ button; to remove the currently highlighted wave use
the ‘x’ button. You can adjust a wave’s properties using the green ‘tools’ button,
and replace the current wave with a new one while keeping the properties the
same with the blue ‘replace’ button.
4.3 Synthesizers
4.3.1 The Eights Bass
A fat, smooth, versatile synthesized kick. The Eights Bass
uses ‘two-stage’ decay envelopes for both pitch and
amplitude. For the Pitch envelope, the first stage envelope – ‘Pitch Init’ and ‘Pitch
DC1 – controls a fast, exponential decay from the initial pitch – ‘Pitch Init’ -
towards a ‘target’ pitch (set initially by ‘Pitch Base’); the second envelope – ‘Pitch
Base’ and ‘Pitch DC2’ controls a slow, linear envelope. Values for Pitch DC2 above
64 actually cause the base pitch to increase with time, instead of decreasing. The
amplitude envelope works on a similar principle – a fast, exponential initial decayContinued on page 23

23
fxpansion DR-008
www.fxpansion.com
(‘Amp DC1’), and a slower linear decay ‘Amp DC2’ The ratio between these two
envelopes – which, in effect, controls the shape of the overall amplitude decay
envelope – is set by the ‘Amp Ratio’ control.
4.3.2 HiHat
An analog-style hi hat tone generator, based on a tone
signal and noise signal mixed and then fed through a
high-frequency bandpass filter. NoiseDcy and ToneDcy
control the decay rates of, respectively, the noise signal and the tone signal. The
tone signal is in fact generated from two ring-modulated sinusoid waves – Freq A
and Freq B control the frequencies of these two oscillators. Cutoff and Resonance
control the filter, as you would expect; Mix controls the relative levels of the noise
and tone components of the signal.
4.3.3 SnareDrum
An analog-modelled snare drum with a three-
oscillator architecture. Oscillator 1 and 2 are
identical:- noise generators with Decay, Cutoff,
Resonance and Mix parameters. These set,
respectively, the amplitude decay time; the cutoff
frequency of a bandpass filter; the resonance or Q of the bandpass filter; and the
level of the oscillator in the overall output signal. Usually you would use one of
these oscillators to create a high-frequency ‘snappy’ sound, at around 3KHz with
a short decay time, and the other at a lower frequency – say 700Hz – lower
overall volume, and longer decay time to create a irsnare reverblc sound. The final
oscillator is a swept pitch oscillator, with ‘Pitch’, ‘Pitch Amount’ (pitch envelope
amount), ‘Decay’ (pitch envelope decay), ‘AmpDecay’ (amplitude decay rate) and
‘Mix’ (overall level). This oscillator is used to create the ‘body’ of the snare sound. In
addition to the oscillators, the Snare Drum has controls for Drive (a simple distortion
unit), and ‘Main’ (overall signal level).

24 www.fxpansion.com
4.3.4 809 Kick
The 809 Kick module is modelled on the classic Roland
808 and 909 drum boxes. Frequency’ controls the base
pitch; ‘Sweep’ controls the amount of pitch envelope;
‘Dirt’ adds harmonic noise to the signal; ‘Click’ controls the level of the initial
attack click; ‘Decay’ and ‘Release’ control how quickly the sound dies away.
4.3.5 809 Snare
A snare drum based on the circuitry used in the
classic Roland drum boxes. Parameters are tone
(controls the frequency of the main oscillator), Noise (controls the ratio of the
noise generator to the tuned oscillator), Filter (similar to the ‘Snappy’ parameter
on the 808 and 909), and Decay (controls the amplitude decay time).
4.3.6 808 Hat
808 Hat is, as you might expect, a hi-hat model based
on the TR-808. It uses a set of tuned pulse oscillators
to generate a complex metallic tone, and then passes
the signal through a bandpass filter and envelope generator. You can change
the sound from closed hi-hat to open by adjusting the Decay parameter.
4.3.7 HX-Bass
HX-Bass uses the same algorithm as ‘The Eights Bass’
(see above), but with the addition of a distortion unit
and some internal fine-tuning to provide a harder, more
aggressive bass drum sound, suitable for hard-house and other styles requiring
seriously punchy bass drums. The distortion unit is a ‘swept waveshaper’, with
positive and negative distortion, and increasing or decreasing distortion level.

25
fxpansion DR-008
www.fxpansion.com
4.3.8 HX-Drum
HX-Drum is similar to HX-Bass (see left), but is tuned
differently for producing hard-hitting synth tom sounds,
rather than bass drums.
4.3.9 Tambourine
A fairly simple module for generating tunable tambourine sounds. Parameters are
tune, amplitude decay, and volume compression (allowing you to add sustain).
4.3.10 Stompin’ Kick
Stompin’ Kick is a big, heavyweight kick drum generator,
ideal for trance ‘four-on-the-floor’ kicks and suchlike.
Stompin’ Kick features a variable-shape envelope (similar to that used on the
Waldorf Attack), waveshaper/distortion unit for adding thickness and harmonics,
and a variable low-pass filter with velocity modulation.
4.3.11 DrumSynth008
Overview
Sounds are created using two bandpass filters with an
extraordinary bandwidth range: from completely open
(no filtering) right down to a single frequency (sine wave).
The filters are fed with a mixture of noise and sampled
waveform and each have their own envelope generator.
The first bandpass filter has some additional controls that
are particularly useful for kick drum and tom sounds:
A pitch envelope for producing a swept-frequency sine wave, and waveshaping
distortion to produce odd or even harmonics. The second bandpass filter envelope
has an adjustable attack, and decay shape variable from logarithmic to linear
which is useful for snare drum and hi-hat sounds. Multiple triggering is available
for clap and guiro sounds, and when set for no decay between triggers this holds
the envelope at maximum level for extra ‘punch’. Hard clipping can be achieved Continued on page 26

26 www.fxpansion.com
by increasing the output level of each bandpass filter. This is useful for rim-shot
sounds, and like the harmonics control can add ‘bite’. This is followed by a simple
tone control filter. See the next two pages for more information on DrumSynth008.
PARAMETERS
1 Level Osc1 amplitude (pre hard clipping)
1 Freq Osc1 centre frequency
1 Decay Osc1 envelope decay time
2 Level Osc2 amplitude (pre hard clipping)
2 Freq Osc2 centre frequency
2 Decay Osc2 envelope decay time
1 Harmonics Osc1 waveshaping distortion (left=odd, right=even)
1 Width Osc1 bandwidth (or sweep startpoint if following parameter set)
1 Sweep Osc1 frequency sweep time
2 Shape Osc2 envelope shape from logarithmic (sharp) to linear (full)
2 Width Osc2 bandwidth
2 Attack Osc2 envelope attack time
Filter Tone control filter (left=lowpass, right=highpass)
Level Trim Output level trim (post hard clipping)
Waveform Select waveform: TR-808 cowbell/ride, TR-909 open hat/closed
hat/crash/ride
WaveTune Waveform transpose
Wave Mix Waveform mix with white noise generator
Trigger Number of triggers
Trig Delay Time between each trigger
Trig Decay Decay rate between each trigger
Key Release Release time (100% = ignore key release)
Polarity Invert Osc1 polarity - some filter settings will phase against
each other
Start Phase Starting phase for both oscillators - adds an adjustable DC click
Vel > Frq1 Velocity control of Osc1 frequency
Vel > Lev1 Velocity control of Osc1 level
Vel > Frq2 Velocity control of Osc2 frequency
Vel > Lev2 Velocity control of Osc2 level
Vel > Wave Velocity control of waveform transpose
Vel > Tone Velocity control of tone control filter

27
fxpansion DR-008
www.fxpansion.com
DrumSynth008 signal flow diagram
4.4 Drum Deploy performance modules
Drum Deploy modules provide a way to process incoming MIDI data in
various ways, and re-route a single note to several different sound
generator modules. Note that in the current version, DR-008 does not
support ‘chaining’ of Drum Deploy modules – you can’t, for example, control
a DD Layer from a DD Autoroll. Drum Deploy modules only allow you to
control sampler or synthesizer modules.
4.4.1 DD Layer
DD Layer allows you to layer up to four pads and trigger
them with a single key. Click the ‘note’. controls to select
which pads to layer, and the ‘vol%’ controls to adjust the velocity response
of each pad. Once set-up, any note event sent to the DD Layer will
be relayed to all four selected pads.
4.4.2 DD Autoflam
DD Autoflam allows you to create ‘Flam’ effects
where several sounds are triggered (or the same
sound retriggered) within a short space of time. It
operates identically to DD Layer, except that there is
an additional ‘Delay’ parameter. This delay is in milliseconds, and
in each case is relative to the arrival of the original note event.

28 www.fxpansion.com
4.4.3 DD Alternator
DD Alternator causes hits to be re-routed to one of
up to four different pads. The first hit is routed to the
first pad, the next to the second, and so on. Any empty entries in the DD
Alternator’s selection boxes are skipped, so if only entries I and II are used,
it will give a simple two-way alternation effect. DD Alternator is useful for
creating ‘left-stick, right-stick’, effects, as well as breathing life in to
otherwise ‘static-sounding’ patterns by providing variation in the hits.
4.4.4 DD Autoroll
DD AutoRoll provides a way of creating automatic
‘Drum Roll’ effects. The length of each stage of
the roll – ‘ramp up’, ‘hold’ and ‘ramp down’ can
be set (in terms of the number of hits), and the
roll rate can be set in milliseconds. DD AutoRoll allows you to alternate
between two different pads on alternate ‘hits’ of the roll – select these
with the ‘Pad A’ and ‘Pad B’ controls.
4.4.5 DD Sequencer
DD Sequencer is the most powerful Drum Deploy
module included in the current DR-008, and gives
some idea of where DrumDeploy technology is
going in the future. DD Sequencer is a 16-step
pattern sequencer, with eight assignable channels.
It automatically syncs to the tempo of your host
application’s song. Click in a grid square to toggle a note in that square;
drag up/down on a grid square to increase/decrease the velocity of that
square (it will get darker or lighter to indicate the current velocity). Click
the ‘destination’ area to the left of the grid to assign each sequencer track
to a pad; DD Sequencer also allows you to enable/disabled looped playback,
and to adjust the ‘Swing’ aka Shuffle of the track. Because DD Sequencers
are triggered by MIDI notes from your host
Continued on page 29

29
fxpansion DR-008
www.fxpansion.com
sequencer, you can use the host to ‘chain’ patterns by triggering different
DD Sequencer modules in sequence. Also, because DD Sequencers can be
triggered/cut at any time, you’re not limited to a 16-step grid – you could
equally well use it for 12-step or 8-step by adjusting the note length in your
host sequencer.
30 www.fxpansion.com
5 Credits and Thanks
Concept, engine design and main program code: Angus Hewlett
Module design and coding: Paul Kellett, Bram de Jong, Angus Hewlett
This Manual: Angus Hewlett - Ian Legge (Artwork)
Sounds: Joeri Vankeirsbilck, Paul Kellett, Mikael Adle, Gareth Joseph,
Ian Booth, Dave Culling, Hans van Even, Shane Etter, Angus Hewlett
Sanity Checks/Reality Checks: Laura Porter
Thanks in no particular order to:-
Joeri Vankeirsbilck, Merlijn Blauw, Patrice Tarabbia, Frederic Vanmol,
Martin Fay, Chris Hornsby, Bram de Jong, Steve Duda, Eddie MacArthur,
Matt @ Topaz Productions, Laurent de Soras, Dave Waugh, Paul Kellett,
Chuck Piers, Marc Gallo, Shane Etter, Sascha Franck, Mayur Maha,
Tom Renckens, Andy Voelkel, Brian Kavtaradze, Redster, Neil Crane,
Ben @ KVR-VST, Jerry the cat, #musicDSP on Efnet, smartelectronix.com,
the MusicDSP mailing list - and of course all who participated in the Public
Beta programme!
DR-008 Advanced Rhythm Production Workstation
Manual version 1.10 - 07/06/2002
THIS MANUAL IS COPYRIGHT (C) ANGUS F. HEWLETT / FXPANSION AUDIO2000-2002. ALL RIGHTS RESERVED. NO PART MAY BE REPRODUCED WITHOUTPERMISSION. VST® TECHNOLOGY BY STEINBERG MEDIA TECHNOLOGIES AG.ALL TRADEMARKS ACKNOWLEDGED.
DR-008 Advanced Rhythm Production StationDR-008Advanced Rhythm Production Station

31www.fxpansion.com
Module Header
There are a number of useful functions
that can be accessed by clicking on
these module header icons. Below is a description of the function of each icon:-
1. Load Preset - load a preset file in to the current module via an explorer-style dialog.
2. Save Preset - save the current preset.
3. Previous Preset - loads the previous preset in the current folder.
4. Next Preset - loads the next preset in the current folder.
5. Load Preset By Menu - displays the available presets in the current folder in
a menu, allows you to load one.
6. Randomize - click to create a new random patch or mutate the existing one;
CTRL+click to set the randomization mode for this patch.
7. MIDI Learn - arms the current module for MIDI controller learn.
A. Load Wave - loads a sample via an explorer-style dialog.
B. Unload Wave - clears the sample from memory.
C. Previous Sample.
D. Next Sample.
E. Load Sample By Menu.
F. Launch WAV editor with current sample.
G. Reload Sample.
1 2 3 4 5 6 7 A B C D E F G
32 www.gmediamusic.com
6 GForce Groove Library
GMEDIA Music’s GForce Multi-Format Groove Library bundled with the DR-008
features fifteen different drum kits and more than 200 MIDI loops and grooves.
Each MIDI groove triggers the appropriate drum samples either by loading in the
whole kit as a .DR8 file, or by loading in the individual samples according to their
note numbers (the number in brackets within the name of each sample).
Utilising both the MIDI Files and the corresponding DR-008 banks it’s possible to
achieve sonic excellence and yet retain the all important flexibility. For example,
how many times have you wanted to remove a single drum from an audio loop?
With MIDI it’s easy, simply open up your sequencer’s edit page and delete the
appropriate notes. Similarly, changing the tempo of a loop or even assigning
different plug-in effects to different drums is a cinch.
All MIDI Grooves are saved with each drum on its own track and when opened,
each track will list the instrument and note number. If you want to audition all
the grooves within a particular section or kit, simply load in the MIDI File marked
‘ALL’. This will play each groove sequentially with a bar gap between each groove.
All loops and grooves found here have been customised for DR-008 from the
GMEDIA Music range of sample products (past, present and future) each
consisting of MIDI, WAV, AIFF and SoundFonts.
For more information visit: www.gmediamusic.com