Advanced Reporting Creating a Report Job and Compensation
66
Advanced Reporting – Creating a Report – Job and Compensation A general overview of creating a report using Advanced Reporting CONFIDENTIAL
Transcript of Advanced Reporting Creating a Report Job and Compensation

Advanced Reporting – Creating a
Report – Job and Compensation A general overview of creating a report using Advanced
Reporting
CONFIDENTIAL
Creating a Report
This guide will step through creating a general employee and compensation report, including
the use of Advanced Reporting features such as Table Restrictions, Date Options and
Calculated Columns. The guide assumes the user has access to and basic navigation
knowledge of Analytics and the Online Report Designer.
Note that table labels, column labels and other types of configuration are specific to the
instance, and may differ from those shown here.

Start your query
We’ll start by creating a basic query that shows all active employees:
• We will build a report beginning with the Job Information table – this table contains each employees Job
data for the history of their employment
• We will include the employees Hire Date as sourced from their Employment Information
• We will also bring in other types of personal data about the employee, including Name, Gender and
Birthdate
• We will only include currently active employees from selected Companies
• We will use Date Options to confirm that we are viewing current data only, and work through how to
switch to using other date filters
In the following example we will use Detailed Reporting to create the query and Report Designer to report on
the query. Note that these same steps are all available if you wish to both build the query and report on it
using just the Report Designer function.

Navigate to Detailed Reporting
© 2014 SAP AG or an SAP affiliate company. All rights reserved. 4
From the Analytics menu, select the
Analytics sub-tab (if applicable) and
choose Detailed Reporting from the
Tools menu:

© 2014 SAP AG or an SAP affiliate company. All rights reserved. 5
Detailed Reporting Data Structure Overview
Detailed Reporting is made up of groups of tables containing
columns.
Groups: the “source” of the data. Eg: tables in the Employee Profile group are from
Employee Profile
Tables: contain data for a common “object”
• Foundation Objects (eg: Department, Legal Entity, Pay Components)
• Employee data (eg: Employment Details, Job Information, Compensation)
• Position data (eg: Position, Position Matrix Relationships)
Columns: specific pieces of information relating to the “object”
• Columns with a indicate this column can be used as a “joining” to link to another table
• Columns with parentheses at the end indicate the column is an auto join. Auto join fields
are fields stored in another table, however are brought into tables where there is an
appropriate link. Typically, tables that contains a code for a picklist label or FO Names
have an auto joins linking the label / name to the code in the table. In this example, the
columns Pay Group (Name) and Pay Type (Label) are auto joins. Auto joins allow the
user to more easily pull labels into their reports (rather than navigating to the table that
contains the label and pulling that into the query).

© 2014 SAP AG or an SAP affiliate company. All rights reserved. 6
Detailed Reporting Data Structure Overview
Tables: (in this example) Business
Unit, citizenshipInfo, Compensation,
Compensation Information
Groups: Employee Central,
employee Profile, Metadata
Framework and Miscellaneous
Columns (joining): (in this
example) Pay Type and User ID
Columns (standard)
Columns (auto join): (in this example)
Pay Group (Name) and Pay Type (Label)
Columns (standard)

© 2014 SAP AG or an SAP affiliate company. All rights reserved. 7
Start with the Job Information Table
We will start with the Job Information table as it stores information about an
employees “Job”, for example:
• when they are hired, terminated and other events (promotion, job change,
demotion)
• their Department, Division, Cost Centre, Business Unit, Location and other “place”
details
• their status (active, paid leave, suspended, etc.)
• their employee class, category and other “type” details
• their job (grade, title, scale etc) details
• any other details that relate to the employees “job”
• the start and end dates that apply to these details (for example: hired on 1st
January, suspended on 1st June, terminated on 30th June)

EC Job Information > Job Information Table
As a general rule, the Job Information
table will contain the information found in
the Job Information and Organizational
Information sections of the Job
Information portlet – with the ability to link
to other tables for the other sections in this
portlet (eg: Position Information, EEO
Category):
© 2014 SAP AG or an SAP affiliate company. All rights reserved. 8

Choose Columns from Job Information
© 2014 SAP AG or an SAP affiliate company. All rights reserved. 9
Open the Detailed Reporting -> Employee Central folder and scroll down to the
Job Information table:

Choose Columns from Job Information
© 2014 SAP AG or an SAP affiliate company. All rights reserved. 10
Use CTRL + click to select User ID,
Effective Start Date, Effective End Date,
Employment Status, Business Unit,
Company, Department, Division and any
other Job Information column required in
the report, then drag these columns onto
the canvas:

Choose Columns from Job Information
© 2014 SAP AG or an SAP affiliate company. All rights reserved. 11
Query preview showing selected columns:
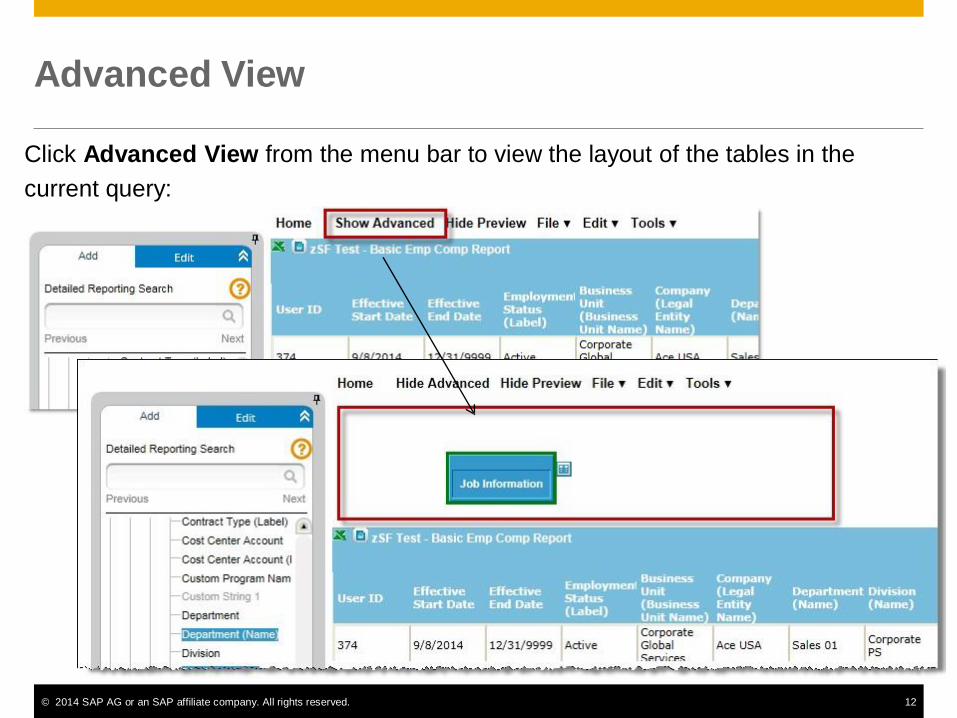
Advanced View
© 2014 SAP AG or an SAP affiliate company. All rights reserved. 12
Click Advanced View from the menu bar to view the layout of the tables in the
current query:
© 2014 SAP AG or an SAP affiliate company. All rights reserved. 13
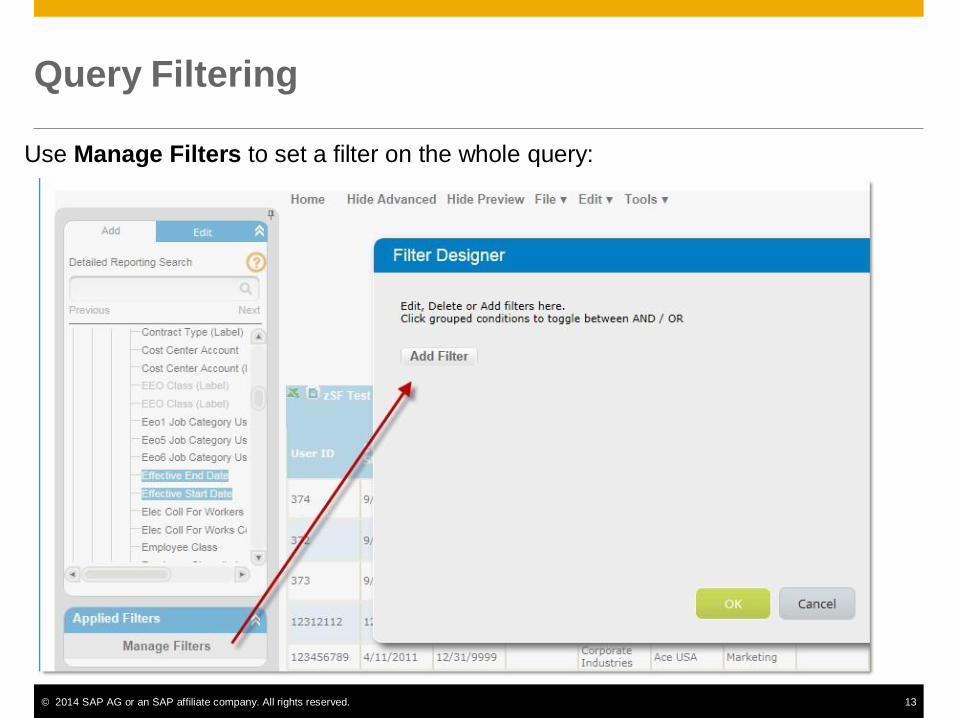
Query Filtering
Use Manage Filters to set a filter on the whole query:

© 2014 SAP AG or an SAP affiliate company. All rights reserved. 14
Query Filtering - Overview
Manage Filters overview:
Filter Field: contains a list of the
tables that are included in the query,
and the columns in those tables –
from here select the column the filter
will be applied to
Operator: select an inclusive,
exclusive or a “like” filter
Value:
- Custom Filter: enter a single
value to be filtered
- Report Values: set a list of
values to be filtered
- Field Comparison: choose
another column in the query to
compare to

Query Filtering – Set Status Filters
© 2014 SAP AG or an SAP affiliate company. All rights reserved. 15
We will be filtering on employees that have not terminated – select these
Employment Statuses for filtering and click OK:

Query Filtering – Set Company Filters
© 2014 SAP AG or an SAP affiliate company. All rights reserved. 16
Manage Filters now shows the Employment Status filter – click Add to set another
filter on Company:
© 2014 SAP AG or an SAP affiliate company. All rights reserved. 17
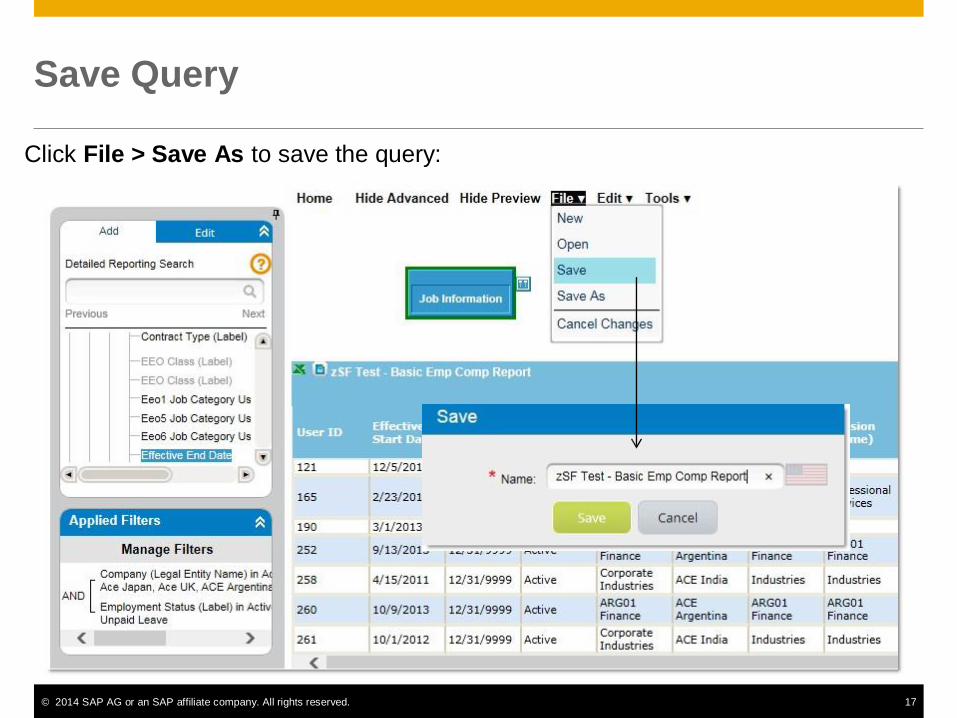
Save Query
Click File > Save As to save the query:
© 2014 SAP AG or an SAP affiliate company. All rights reserved. 18
Add the Employment Details Table
We will use the employees Hire Date from the Employment Details table. This table
contains information about an employees overall Employment including:
• their original hire / service / tenure date
• their termination date (note this date is not always populated, and is recorded in
the Job Information table instead)
• their “OK to Rehire” flag
• any other details that relate to the employees “employment”
• this table contains one record per employee and as such, does not have an
effective start / end date

© 2014 SAP AG or an SAP affiliate company. All rights reserved. 19
EC Employment Details > Employment Details Table
As a general rule, the Employment Details table will contain the information found
in the Employment Details portlet – this table provides the mapping between an
employees User ID (under which their Job information is stored) and their Person ID
(under which their Personal Information is stored):
Choose Columns from Employment Details
© 2014 SAP AG or an SAP affiliate company. All rights reserved. 20
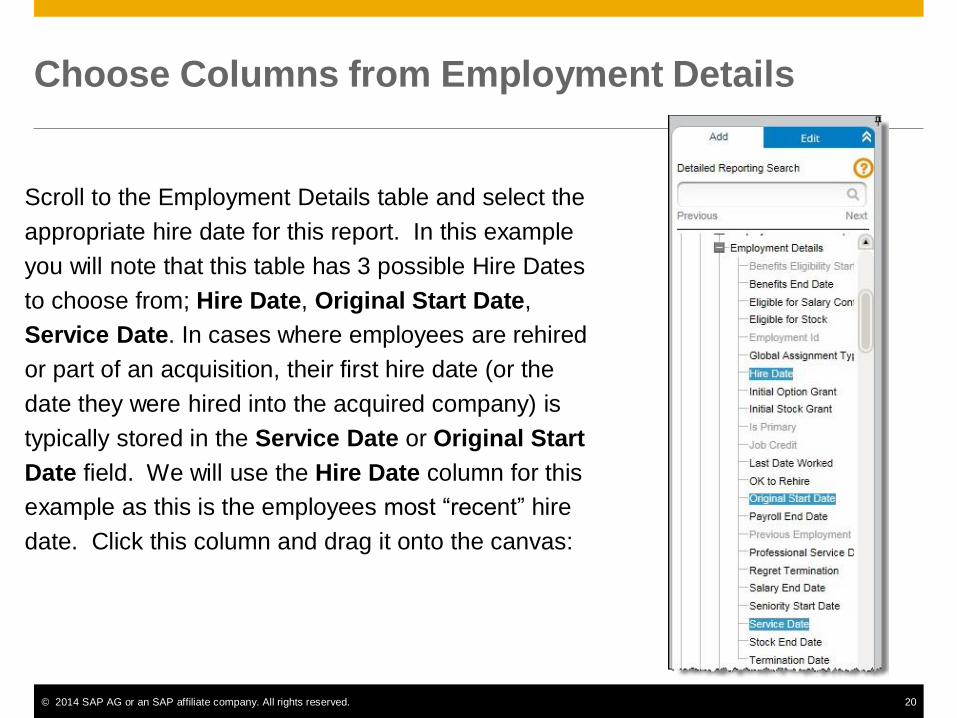
Scroll to the Employment Details table and select the
appropriate hire date for this report. In this example
you will note that this table has 3 possible Hire Dates
to choose from; Hire Date, Original Start Date,
Service Date. In cases where employees are rehired
or part of an acquisition, their first hire date (or the
date they were hired into the acquired company) is
typically stored in the Service Date or Original Start
Date field. We will use the Hire Date column for this
example as this is the employees most “recent” hire
date. Click this column and drag it onto the canvas:

Join Selector Step 1 (Advanced View)
© 2014 SAP AG or an SAP affiliate company. All rights reserved. 21
If Advanced View is on, a Join Selector will be presented to you. This option
allows you to change how tables are linked in the query. Note the default path that is
offered and check that this is the path required for the report.
Here the path offered in
Step 1 is from the
Supervisor column in the
Job table, to the User
column in the
Employment table.
This is not suitable for this
report, as we are looking
for the Hire Date of the
Employee (User) not the
Hire Date of the Manager
(Supervisor). Click the
right arrow to customise
this join:
© 2014 SAP AG or an SAP affiliate company. All rights reserved. 22
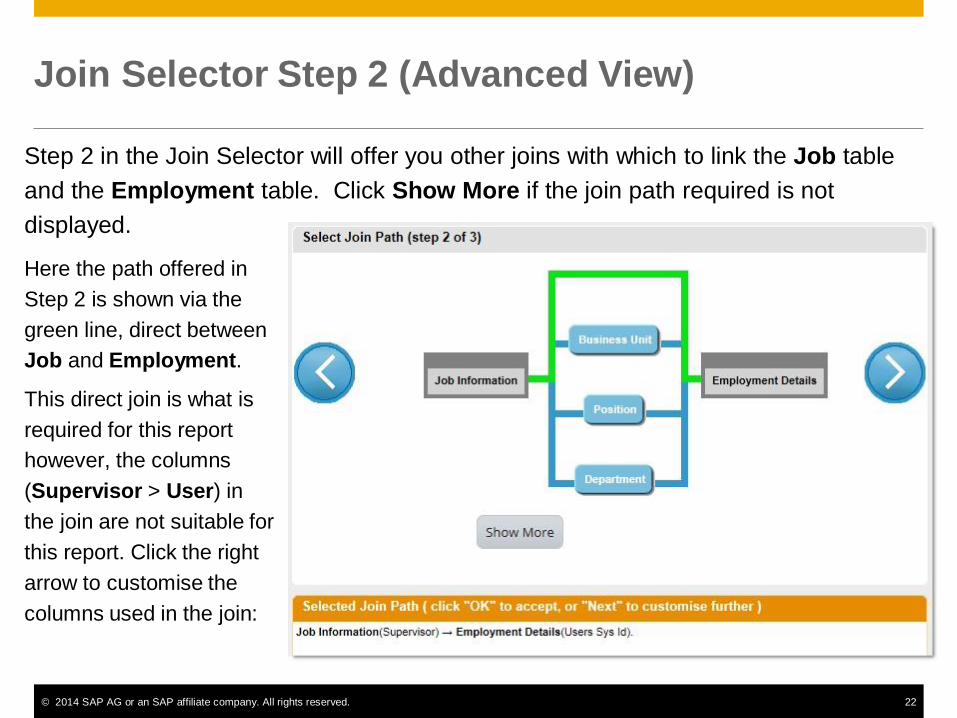
Join Selector Step 2 (Advanced View)
Step 2 in the Join Selector will offer you other joins with which to link the Job table
and the Employment table. Click Show More if the join path required is not
displayed.
Here the path offered in
Step 2 is shown via the
green line, direct between
Job and Employment.
This direct join is what is
required for this report
however, the columns
(Supervisor > User) in
the join are not suitable for
this report. Click the right
arrow to customise the
columns used in the join:

Join Selector Step 3 (Advanced View)
© 2014 SAP AG or an SAP affiliate company. All rights reserved. 23
Step 3 in the Join Selector will offer you other columns to use in the join selected
from Step2.
Here the columns available for joining Job and Employment are displayed. Click the User >
User join, note the updated Join Path and click OK to save:

© 2014 SAP AG or an SAP affiliate company. All rights reserved. 24
Review Query
Note that we now have two tables in our query, linked via the employees User ID
and the Hire Date column has been added to the results. In the query results we
have a preview of the columns we’ve selected from each of the tables:
© 2014 SAP AG or an SAP affiliate company. All rights reserved. 25
Add the Compensation Table
We will use the Amount and Pay Component from the Compensation table. This
table contains information about an employees Compensation including:
• recurring compensation amounts
• the relevant pay component the compensation is paid under
• the frequency of the recurring compensation

EC Compensation > Compensation Table
As a general rule,
the Compensation
table will contain the
information found in
the Compensation
section of the
Compensation
Information portlet::
© 2014 SAP AG or an SAP affiliate company. All rights reserved. 26

Choose Columns from Compensation
© 2014 SAP AG or an SAP affiliate company. All rights reserved. 27
Scroll to the Compensation table and select the
Amount, Frequency and Pay Component columns
using CTRL + click. Drag them onto the canvas:

© 2014 SAP AG or an SAP affiliate company. All rights reserved. 28
Join Selector Step 1 (Advanced View)
The Join Selector will present a selection of possible joins (option to move to step 2
to explore more join options). Click on the Job Information table to view the join
details if the path from Job Information > Compensation (highlighted in green).
Here we can see that this path is via the Pay Type column, which is not suitable for
this report.

© 2014 SAP AG or an SAP affiliate company. All rights reserved. 29
Join Selector Step 1 (Advanced View)
Click on the Employment Details table to view the join path (highlighted in green)
from that table to Compensation. This time we see that the join is via the User and
their Compensation ID. Click OK to select this join for the report:

Review Query
Note that we now have four tables in our query and the Amount, Frequency and
Pay Component columns have been added to the results. Note that the
Compensation Information table is used to join Employment Details and
Compensation. As there are no columns currently in the query from
Compensation Information it appears in the Advanced View in a different format:
© 2014 SAP AG or an SAP affiliate company. All rights reserved. 30

Calculate Compensation
We now have compensation amounts in our query, note in the Frequency field that
some of these amounts are paid annually, monthly, bi-monthly and quarterly. We
can create a calculated column that shows all amounts as annual.
Choose Calculated Columns from the
Edit menu and click the + for the
Calculated Columns section to create a
new calculation:
© 2014 SAP AG or an SAP affiliate company. All rights reserved. 31

Calculated Column Designer
ghts reserved. 32
Name: choose a name for your
calculated column
Data Type: choose whether
your calculation is text, number
or date
Format: choose a format for
number or date calculations
(eg: show the date as dd-
MMM-yyyy)
Number/Date/Text groups: a
list of all the columns available
from the tables that are
included in the query. These
columns are grouped into their
base format, click each header
to slide open the list of columns
available in that base format.
© 2014 SAP AG or an SAP affiliate company. All ri

Calculated Column Designer - Canvas
Click and drag columns from
the list and click operands and
function buttons at the top to
build your formula for the
calculation.
Here we have used the
IF/THEN/ELSE condition to
output amount * 12 if the
frequency of the compensation
is monthly.
Static values are input with
Click this button to add a text,
number or date static value
into the calculation.
© 2014 SAP AG or an SAP affiliate company. All rights reserved. 33

Calculated Columns List
© 2014 SAP AG or an SAP affiliate company. All rights reserved. 34
The new Annual Salary calculation will appear
in the Calculated Columns list. Click the
green light to toggle between showing or not
showing this calculation in the query. Select
the calculation and use the buttons to edit or
delete it.
Click Done to return to the query results.
© 2014 SAP AG or an SAP affiliate company. All rights reserved. 35
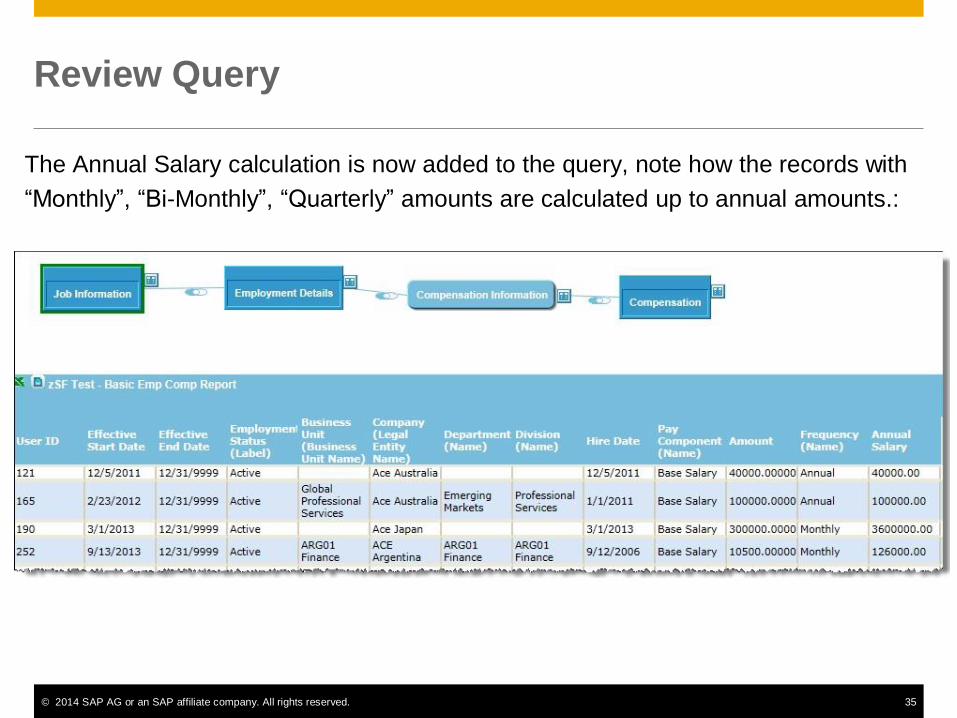
Review Query
The Annual Salary calculation is now added to the query, note how the records with
“Monthly”, “Bi-Monthly”, “Quarterly” amounts are calculated up to annual amounts.:

Add the Job Relationships Table
We will now add the employees HR Manager into the query. HR Managers (and
other people the employee has a job “relationship” with) are found in the Job
Relationships table.
As a general rule, the Job
Relationships table will
contain the information
found in the Job
Relationships portlet::
© 2014 SAP AG or an SAP affiliate company. All rights reserved. 36

Choose Columns from Job Relationships
© 2014 SAP AG or an SAP affiliate company. All rights reserved. 37
The Job Relationships table can be found in the
Detailed Reporting > Employee Central folder.
Scroll to the Job Relationships table and select the
Related User Id and Relationship Type columns
using CTRL + click. Drag them onto the canvas:
© 2014 SAP AG or an SAP affiliate company. All rights reserved. 38
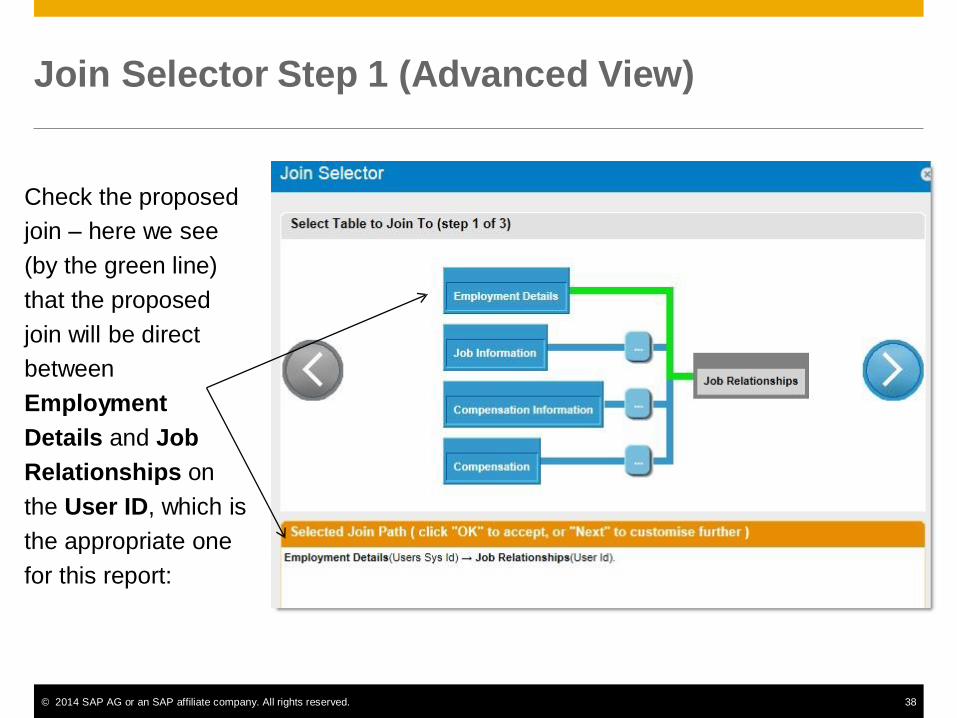
Join Selector Step 1 (Advanced View)
Check the proposed
join – here we see
(by the green line)
that the proposed
join will be direct
between
Employment
Details and Job
Relationships on
the User ID, which is
the appropriate one
for this report:

© 2014 SAP AG or an SAP affiliate company. All rights reserved. 39
Join Selector Step 1 (Advanced View)
Note that there is also a indirect join between Job Information and Job
Relationships offered which may also be appropriate – click Job Information to
view the details of this join.
Selecting this join shows that the
indirect join will travel via the
Employment Details table. Since
there is already a direct join
offered between Employment
Details and Job Relationships,
there is no need for this indirect
join. Click Employment Details to
select the direct join and click OK
(there is no need to move through
steps 2 and 3):
© 2014 SAP AG or an SAP affiliate company. All rights reserved. 40
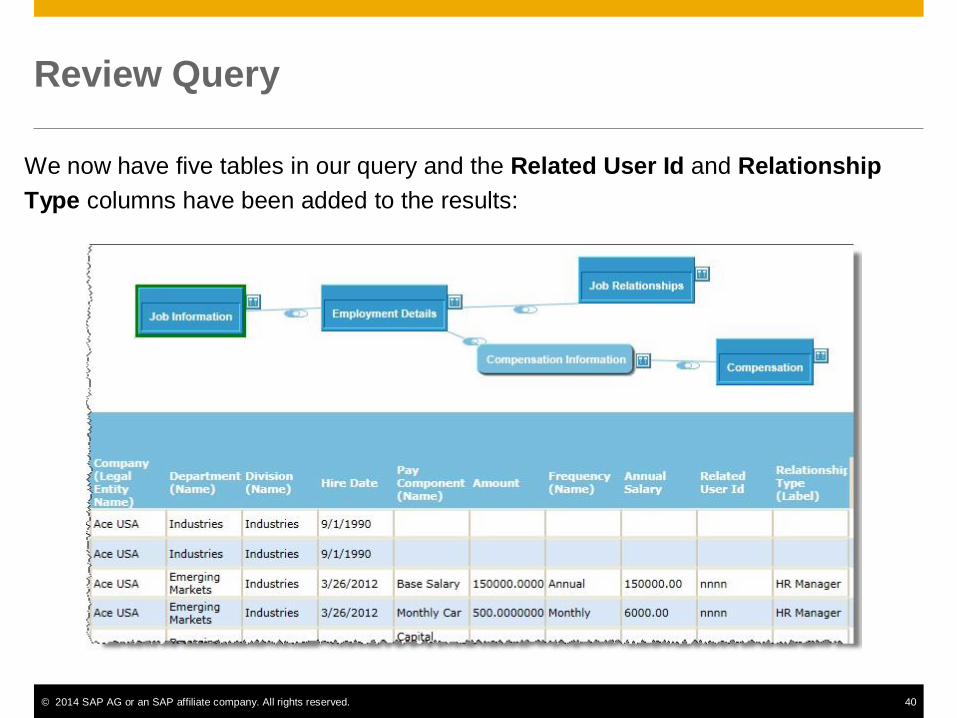
Review Query
We now have five tables in our query and the Related User Id and Relationship
Type columns have been added to the results:

© 2014 SAP AG or an SAP affiliate company. All rights reserved. 41
Query QA
Whilst reviewing the query results, its noted that some employees results are
duplicated. Employee mhoff1 below has duplicated Base Salary and Performance
Bonus records due to having two relationships defined; HR Manager and Matrix
Manager:
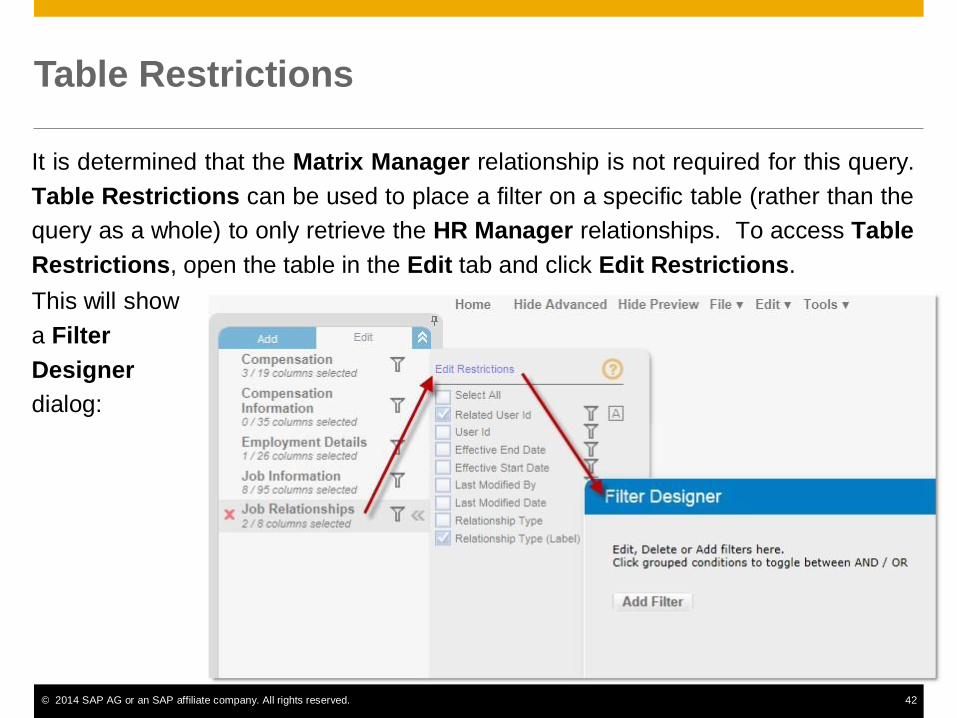
Table Restrictions
It is determined that the Matrix Manager relationship is not required for this query.
Table Restrictions can be used to place a filter on a specific table (rather than the
query as a whole) to only retrieve the HR Manager relationships. To access Table
Restrictions, open the table in the Edit tab and click Edit Restrictions.
This will show
a Filter
Designer
dialog:
© 2014 SAP AG or an SAP affiliate company. All rights reserved. 42
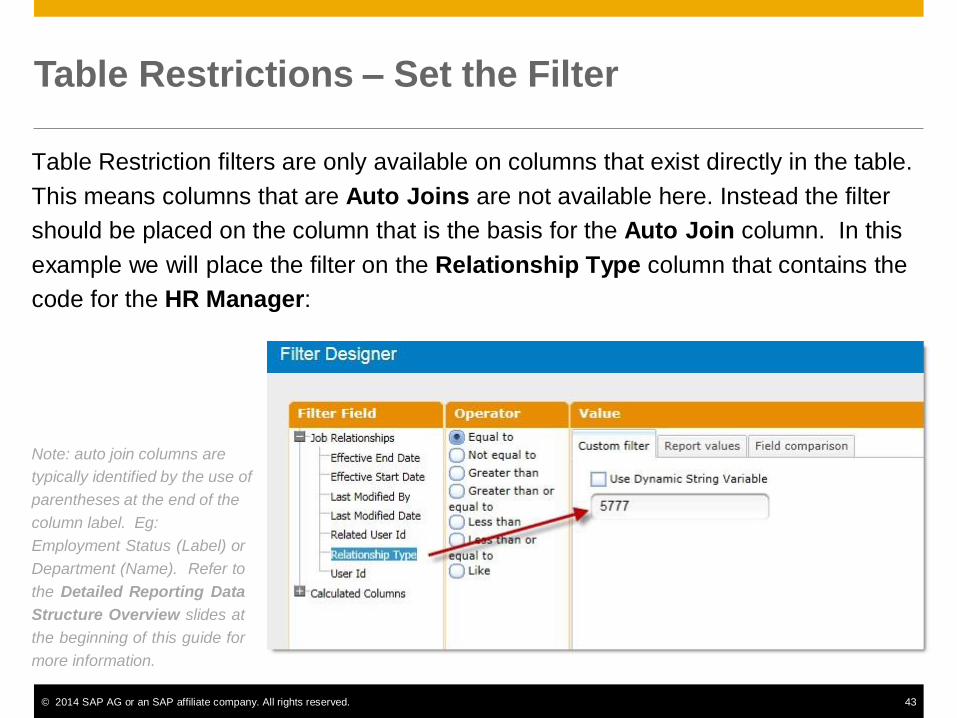
Table Restrictions – Set the Filter
© 2014 SAP AG or an SAP affiliate company. All rights reserved. 43
Table Restriction filters are only available on columns that exist directly in the table.
This means columns that are Auto Joins are not available here. Instead the filter
should be placed on the column that is the basis for the Auto Join column. In this
example we will place the filter on the Relationship Type column that contains the
code for the HR Manager:
Note: auto join columns are
typically identified by the use of
parentheses at the end of the
column label. Eg:
Employment Status (Label) or
Department (Name). Refer to
the Detailed Reporting Data
Structure Overview slides at
the beginning of this guide for
more information.

© 2014 SAP AG or an SAP affiliate company. All rights reserved. 44
Date Options – Date Filters
Click on Edit -> Date Options to
review the date filters for the
query. The Current Date option
is the default Date Options
setting. The Job Information
table is the Driving table as it
was the first table pulled into the
query. The Date Options for
other tables in the query can be
set via the Related Table
Options section (for all tables),
or on the Overrides
(Advanced) tab (for individual
settings):

© 2014 SAP AG or an SAP affiliate company. All rights reserved. 45
Setting Date Options
This report will be reviewed quarterly, and
as such, will default to the beginning of
each quarter. Select As Of Date from the
Date Type drop down, and set the
dynamic variable First Day of Current
Quarter for both the Driving Table and
Related Tables. Note that First Day of
Current Quarter is variable and will
change depending on where “today” is in
the current quarter.
Check Selectable At Runtime to allow
report users to change the date settings:
Note: for additional information on Date Options and examples
of the effects of using Date Options, please see the Advanced
Reporting – Overview of Date Options guide.

Don’t Forget to Save!
© 2014 SAP AG or an SAP affiliate company. All rights reserved. 46

Increase Rows Per Page
© 2014 SAP AG or an SAP affiliate company. All rights reserved. 47
Query results will default to showing 10 rows per page. This can be increased up to
a maximum of 100 rows, should a larger result set be required in the preview. Type
the required number into the Rows per page box and click Go:

© 2014 SAP AG or an SAP affiliate company. All rights reserved. 48
Export Query
It might also be necessary to view more rows of the query than the 100 row
maximum allows. Click the excel icon to export the whole query to excel:

© 2014 SAP AG or an SAP affiliate company. All rights reserved. 49
Reporting Results
Now that we have a query showing employees and their compensation amounts for
the quarter, we can create a report to show the individual rows in the query and
also to sum up and pivot the compensation. Navigate to Report Designer and
create a new report:

© 2014 SAP AG or an SAP affiliate company. All rights reserved. 50
Create a Report – List View
Drag a List Report component onto the canvas and click [click for full editor] to
choose the Employee & Compensation query:

© 2014 SAP AG or an SAP affiliate company. All rights reserved. 51
Add the Query
Click in the top left corner and click Select to choose your query from the saved
list and click OK:

© 2014 SAP AG or an SAP affiliate company. All rights reserved. 52
Formatting
Apply any required formatting via the right click menu in the left bar, apply fonts to
the whole query or set the runtime background colour on the component:

Preview the List Report
© 2014 SAP AG or an SAP affiliate company. All rights reserved. 53

Create a Report – Pivot View
© 2014 SAP AG or an SAP affiliate company. All rights reserved. 54
Drag a Pivot Table component onto the canvas and click Select to choose the
Employee & Compensation query:

© 2014 SAP AG or an SAP affiliate company. All rights reserved. 55
Add the Query
Ensure the Pivot Queries tab is selected and click New Query to choose your
query from the list:

Pivot Design View
The columns in the query will appear as available columns for the pivot – drag these
onto the COLUMNS, ROWS or the white canvas to build your pivot:
Columns with represent
number columns, aggregation
options will include
mathematical functions like
Sum
Columns with represent
text or date columns,
aggregation options will not
Click to change the query
© 2014 SAP AG or an SAP affiliate company. All rights reserved. 56

Choose the Pivot Aggregation
57
Choose the desired pivot aggregation. Drag the Annual Salary (calculated column)
onto the canvas and choose the Sum aggregation:
© 2014 SAP AG or an SAP affiliate company. All rights reserved.

Choose the Pivot Columns
© 2014 SAP AG or an SAP affiliate company. All rights reserved. 58
Choose the desired pivot rows. Drag the Pay Component (Name) column onto the
COLUMNS bar:
© 2014 SAP AG or an SAP affiliate company. All rights reserved. 59
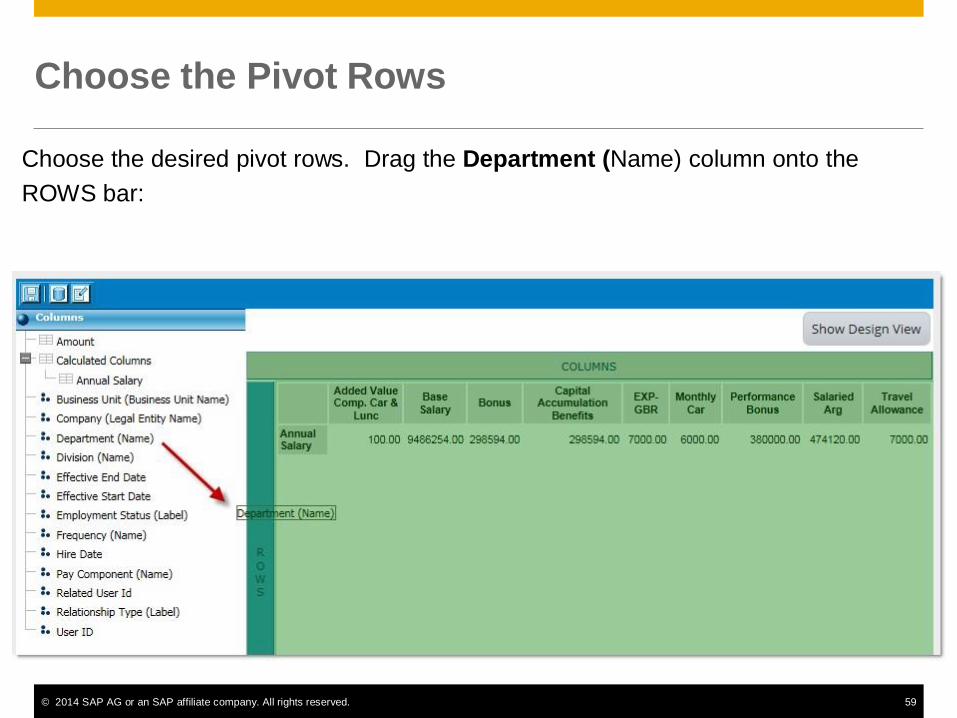
Choose the Pivot Rows
Choose the desired pivot rows. Drag the Department (Name) column onto the
ROWS bar:
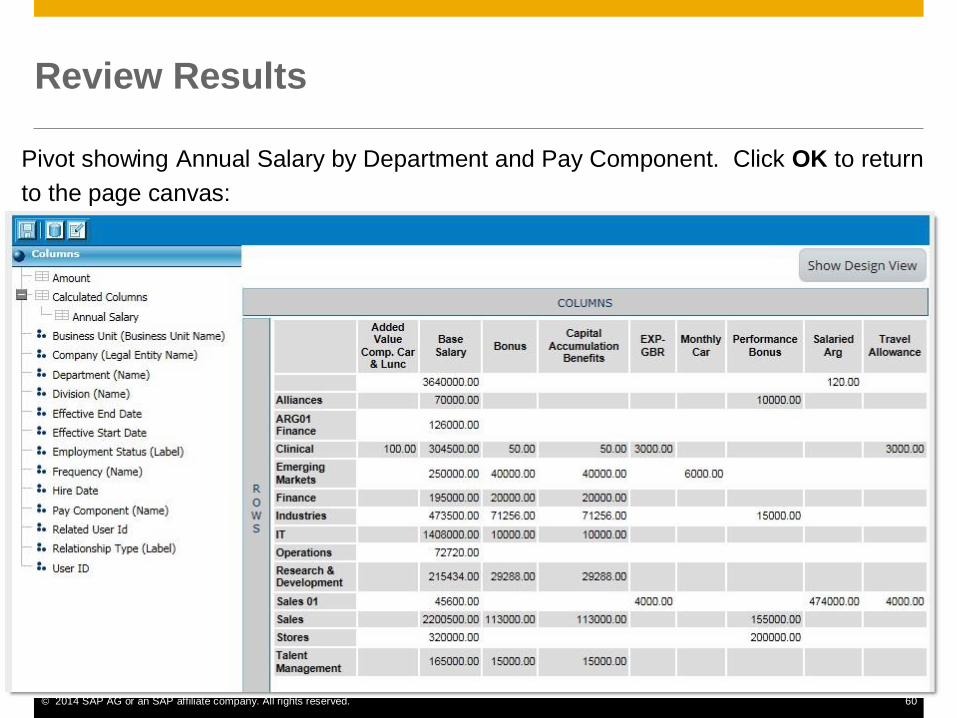
Review Results
Pivot showing Annual Salary by Department and Pay Component. Click OK to return
to the page canvas:
© 2014 SAP AG or an SAP affiliate company. All rights reserved. 60

Choose Pivot Formatting
© 2014 SAP AG or an SAP affiliate company. All rights reserved. 61
From the Page Canvas click [click for full editor] to set pivot formatting
including fonts, colours and alternate row formatting:

© 2014 SAP AG or an SAP affiliate company. All rights reserved. 62
Check Results and Preview Report
Choose File -> Preview to see how the report will appear to the report user:

Check Results and Preview Report
© 2014 SAP AG or an SAP affiliate company. All rights reserved. 63

Important Disclaimers and Legal Information
© 2014 SAP AG or an SAP affiliate company. All rights reserved. 64
Coding Samples
Any software coding and/or code lines / strings ("Code") included in this documentation are only examples
and are not intended to be used in a productive system environment. The Code is only intended to better
explain and visualize the syntax and phrasing rules of certain coding. SAP does not warrant the correctness
and completeness of the Code given herein, and SAP shall not be liable for errors or damages caused by
the usage of the Code, unless damages were caused by SAP intentionally or by SAP's gross negligence.
Accessibility
The information contained in the SAP documentation represents SAP's current view of accessibility criteria
as of the date of publication; it is in no way intended to be a binding guideline on how to ensure accessibility
of software products. SAP in particular disclaims any liability in relation to this document. This disclaimer,
however, does not apply in cases of wilful misconduct or gross negligence of SAP. Furthermore, this
document does not result in any direct or indirect contractual obligations of SAP.
© 2014 SAP AG or an SAP affiliate company. All rights reserved. 65
Gender-Neutral Language
As far as possible, SAP documentation is gender neutral. Depending on the context, the reader is
addressed directly with "you", or a gender-neutral noun (such as "sales person" or "working days") is used.
If when referring to members of both sexes, however, the third-person singular cannot be avoided or a
gender-neutral noun does not exist, SAP reserves the right to use the masculine form of the noun and
pronoun. This is to ensure that the documentation remains comprehensible.
Internet Hyperlinks
The SAP documentation may contain hyperlinks to the Internet. These hyperlinks are intended to serve as a
hint about where to find related information. SAP does not warrant the availability and correctness of this
related information or the ability of this information to serve a particular purpose. SAP shall not be liable for
any damages caused by the use of related information unless damages have been caused by SAP's gross
negligence or willful misconduct. All links are categorized for transparency (see:
http://help.sap.com/disclaimer).
© 2014 SAP AG or an SAP affiliate company. All rights reserved. 66
© 2015 SAP SE or an SAP affiliate company.
All rights reserved.
No part of this publication may be reproduced or transmitted in any form or for any purpose without the
express permission of SAP SE or an SAP affiliate company. The information contained herein may be
changed without prior notice.
Some software products marketed by SAP SE and its distributors contain proprietary software components
of other software vendors. National product specifications may vary.
These materials are provided by SAP SE or an SAP affiliate company for informational purposes only,
without representation or warranty of any kind, and SAP or its affiliated companies shall not be liable for
errors or omissions with respect to the materials. The only warranties for SAP or SAP affiliate company
products and services are those that are set forth in the express warranty statements accompanying such
products and services, if any. Nothing herein should be construed as constituting an additional warranty.
SAP and other SAP products and services mentioned herein as well as their respective logos are
trademarks or registered trademarks of SAP SE (or an SAP affiliate company) in Germany and other
countries. All other product and service names mentioned are the trademarks of their respective companies.
Please see http://www.sap.com/corporate-en/legal/copyright/index.epx for additional trademark information
and notices.