Chapter 17 GUI Programming - Component Layout, Additional GUI Components
description

Advanced Swing Components In graphical programming (I), the basic event handling and Swing components have been discussed. This section
strengthens the understanding of the Java Swing further to some more complex components which are used
intensively in real world Swing applications.
Dialogs
As we have mentioned, there are root containers that host other components. We have seen JFrame a lot in
previous chapter. In this section, we want to discuss another root container: Dialog. The
javax.swing.JDialog is the base class for all kinds of dialogs. Normally, you may not need to implement a
dialog by yourself, Swing provides some standard dialogs that you can use directly. Every dialog is dependent on
a frame, the dialog will be destroyed as soon as the frame is destroyed. A dialog can be modal, which means it
blocks user input to all other windows in the program. Let us take a look at three basic classes that support the
modal dialog.
JOptionPane
JOptionPane is used to create a set of standard modal dialogs. For most simple dialogs, you create and show the
dialog using one of JOptionPane’s showXxxDialog methods. The two most important methods are the
showMessageDialog and showOptionDialog.
Figure 1: Validation Error
Recall the example for the user registration panel developed in previous chapter. Once the user enters the
invalid date of birth in the formatted field, an error dialog will come out showing the validation error, as shown
in Figure 1. This is a typical scenario inwhich you could use the JOptionPane’s showMessageDialog method.
There are several overloads for this method, the complete one is:
showMessageDialog(component,message,title,messageType,icon)
The component indicates the parent component for the dialog, it can be set to null. The message argument
specifies the message showing on the dialog. The title determines the title of the dialog. The message type is an
integer value such as PLAIN_MESSAGE, WARNING_MESSAGE and ERROR_MESSAGE from the JOptionPane class.
The icon refers to the icon showing before the message. The title, message type and icon optional default values
will be used if not specified. The following code shows how the validation error dialog is created:
JOptionPane.showMessageDialog(null,
"'" + dateOfBirth + "' is not a valid date",
"Validation Error", JOptionPane.ERROR_MESSAGE);
Another example that utilizes the showOptionDialog method is shown in Figure 2.

Figure 2: Using option dialog for confirmation
The following code shows how to create and use such an option dialog:
Object[] options = { "Yes, please", "No, thanks"};
// show an option dialog
int option = JOptionPane.showOptionDialog(null,
"Do you want to save the document first?",
"Confirmation",JOptionPane.YES_NO_OPTION,
JOptionPane.QUESTION_MESSAGE, null, options, options[0]);
// check the option user has chosen
if (option == JOptionPane.YES_OPTION)
saveDocument();
else
newDocument();
The code uses the showOptionDialog method to show an option dialog with YES or NO choices. The options
array customizes the text on the buttons related to the two choices. The return value of the method is an integer
that indicates the decision made by the user. If the user chooses the YES option, we save the document, otherwise
a new document will be created. You can also use the JOptionPane’s showConfirmDialog to solve the same
problem. The difference between the two methods is the showOptionDialog allows you to specify the text
information on the buttons.
Figure 3: An input dialog example
Another type of dialog provided by the JOptionPane is the input dialog that allows users to input information.
For example, if the user wants to save the content of the document to different storage systems such as a flat file
or a database, you could create an input dialog like the one shown in Figure 3 asking the user to choose the proper
storage system to save the document.
JFileChooser
Swing provides a very useful class: javax.swing.filechooser.JFileChooser. This component can be
used to select a file from the local file system or save a file. Figure 4 illustrates how the native open and save
dialogs provided by the JFileChooser look like.
Object[] options = { "File", "Database"};
// show an input dialog
String storage = JOptionPane.showInputDialog(null,
"Save current document to",
"Select Storage",JOptionPane.PLAIN_MESSAGE,
null, options, options[0]);
// check the storage user has chosen
if (options[0].equals(storage))
saveToFile();
else
saveToDatabase();
Figure 4: Open and save dialog provided by JFileChooser
It is very easy to create a JFileChooser, you can simply create a JFileChooser class and show the open or
save dialog as follows:
JFileChooser fileChooser = new JFileChooser();
fileChooser.showOpenDialog(); // show the open dialog
fileChooser.showSaveDialog(); // show the save dialog
However, it is not quite interesting just to show the dialog. Both methods return an integer indicating the user’s
actions (open, save or cancel). For example, when the user selects a file and clicks the open button, you should
know what the user does and what file the user has opened:
int decision = fileChooser.showOpenDialog();
// check the decision
if (decision==JfileChooser.APPROVE_OPTION){
// get the selected file
File selectedFile = fileChooser.getSelectedFile();
// read data from the file
…
}
The showSaveDialog works exactly the same way. By checking the returned value from the dialog, you can
decide what to do.
int decision = fileChooser.showSaveDialog();
// check the decision
if (decision==JfileChooser.APPROVE_OPTION){
// get the selected file
File selectedFile = fileChooser.getSelectedFile();
// write data to the file
…
}
Another interesting feature of the file chooser is that you are able to restrict the user to open or save certain types

of files by applying a file filter. For example, if you want to restrict the user only to manipulate .txt files, you
could implement a file filter as follows:
fileChooser.setFileFilter(new FileFilter() {
// The description of the type of file such as .txt
public String getDescription() {
return "*.txt";
}
public boolean accept(File file) {
// accept only directories or file with .txt extension
return file.isDirectory() ||
file.getAbsolutePath().endWith(".txt");
}
});
The getDescription method returns the string of the supported type, “*.txt” in this case. The description will
be shown at the Files of Type drop down list in the dialog. The accept method is responsible for checking the
file whether it is acceptable or should be filtered. In this case, all the directories and all files with “.txt” extension
are acceptable.
Figure 5: The dialog created by JColorChooser
JColorChooser
Besides the dialogs to choose files by using JFileChooser, Swing provides a JColorChooser class to create
a dialog to choose various colors, as shown in Figure 5. It is simpler to use color chooser compared with the way
for file chooser.
Color color = JColorChooser.showDialog(component,
"Choose Font Color",Color.BLACK);
The first argument is the parent component for this dialog, the second argument is the title of the dialog, and the
third argument is the default value for the color dialog. As Swing has done so much for you to choose a color, you
do not have to implement a complicated dialog for this purpose.
Advanced Containers
The normal containers like JFrame, JPanel and Dialogs contain components without any special effects,
developers have to arrange the layout and put the components on the right place. However, it lacks of support for
some particular layout arrangement such as tabs, split bars between different areas, trees and tables. Java Swing
provides special components including JTabbedPane, JSplitPane, JTree and JTable for those situations.

JTabbedPane
With the JTabbedPane component, several components, such as panels, could share the same space. The user
chooses which component to view by selecting the tab corresponding to the desired component. Figure 6 shows
an example of using the JTabbedPane with three tabs. Each tab contains different components, when user choose
different tab, those components will be presented within the shared area. The complete implementation of this
example is shown in Program 1.
Figure 6: JTabbedPane Demo
Program 1
/* JTabbedPaneDemo.java: a simple example showing JTabbedPane*/
package com.javabook.gui.containers;
import javax.swing.JButton;
import javax.swing.JFrame;
import javax.swing.JLabel;
import javax.swing.JPanel;
import javax.swing.JTabbedPane;
import javax.swing.JTextField;
public final class JTabbedPaneDemo extends JFrame{
public JTabbedPaneDemo(){
init();
}
private void init() {
JTabbedPane tabbedPane = new JTabbedPane();
JPanel tabOnePanel = new JPanel();
JPanel tabTwoPanel = new JPanel();
JPanel tabThreePanel = new JPanel();
tabOnePanel.add(new JLabel("Label in Tab One"));
tabTwoPanel.add(new JButton("Button in Tab Two"));
tabThreePanel.add(new JTextField("Text field in Tab
Three"));
tabbedPane.addTab("Tab One", tabOnePanel);
tabbedPane.addTab("Tab Two", tabTwoPanel);
tabbedPane.addTab("Tab Three", tabThreePanel);
this.getContentPane().add(tabbedPane);
this.setDefaultCloseOperation(JFrame.EXIT_ON_CLOSE);
this.setTitle("JTabbedPane Demo");
this.setSize(400,250);
this.setVisible(true);
}
public static void main(String[] args) {
new JTabbedPaneDemo();
}
}
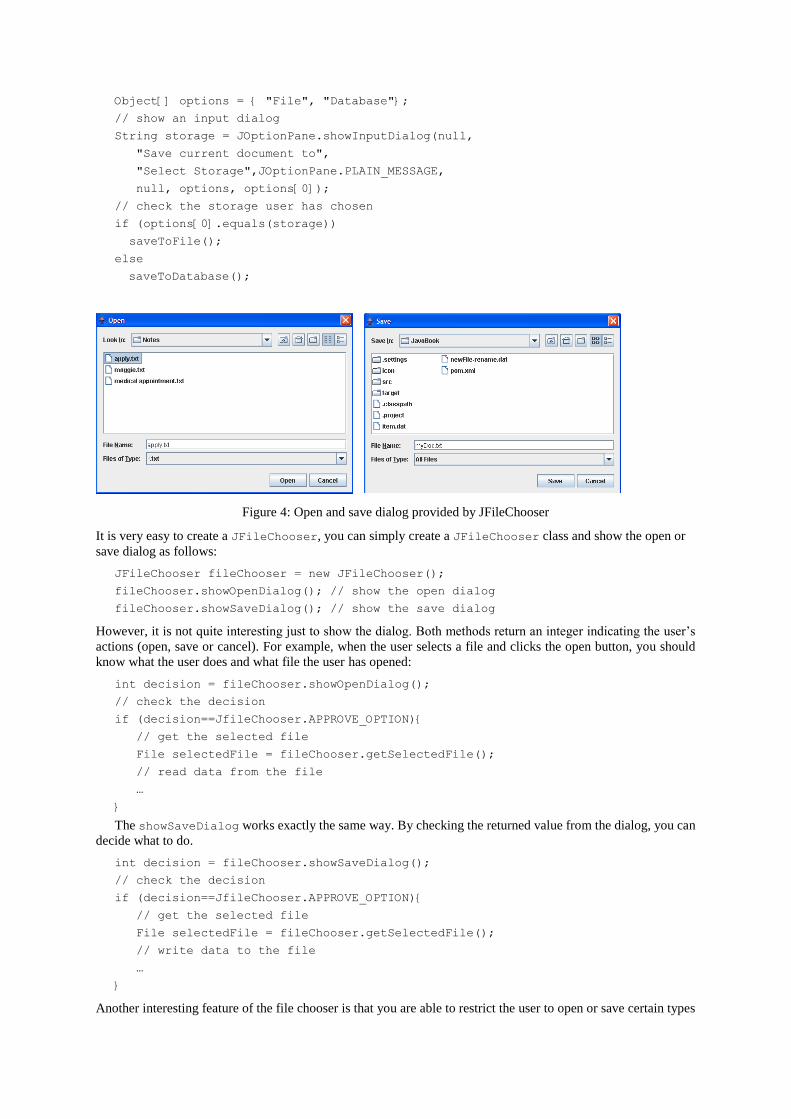
The init method creates the JTabbedPane and three separate JPanel with a sub-component each. These three
JPanels are then added as a tab for each of them using the addTab method from the JTabbedPane class.
Figure 7: JSplitPane Demo
JSplitPane
A JSpiltPane displays two components in a vertical or horizontal arrangement. By dragging the divider bar that
appears between the components, the user can specify the size of each component area. It is able to divide screen
space among three or more components by nesting split panes as shown in Figure 7 which nests two split panes.
The complete implementation of this example is given in Program 2.
Program 2
/* JSplitPaneDemo.java: a simple example showing JSplitPane */
package com.javabook.gui.containers;
import javax.swing.JFrame;
import javax.swing.JLabel;
import javax.swing.JPanel;
import javax.swing.JSplitPane;
public class JSplitPaneDemo extends JFrame {
public JSplitPaneDemo(){
init();
}
private void init(){
JPanel leftPanel = new JPanel();
JPanel rightPanel = new JPanel();
JPanel topPanel = new JPanel();
JPanel bottomPanel = new JPanel();
leftPanel.add(new JLabel("Left Panel"));
rightPanel.add(new JLabel("Right Panel"));
bottomPanel.add(new JLabel("Bottom Panel"));
//horizontal arrangement for the split pane
JSplitPane topPane = new
JSplitPane(JSplitPane.HORIZONTAL_SPLIT,
leftPanel, rightPanel);
//vertical arrangement for the split pane
JSplitPane mainPane = new
JSplitPane(JSplitPane.VERTICAL_SPLIT,
topPane, bottomPanel);
this.getContentPane().add(mainPane);
this.setTitle("JSplitPane Demo");
this.pack();
this.setDefaultCloseOperation(JFrame.EXIT_ON_CLOSE);
this.setVisible(true);
}
public static void main(String[] args) {
new JSplitPaneDemo();
}

}
When creating a JSplitPane, it is able to control how the two components split each other by giving a int value
(HORIZONTAL_SPLIT or VERTICAL_SPLIT). The first component passing into the constructor of the
JSplitPane will be on the left or top depending on the split policy and the second component will be on the right
or bottom. It is also fairly easy to nest split panes, developers just need to pass the JSplitPane instance to the
constructor arguments, as shown in the program code, the top pane is actually a split pane which nests inside the
main split pane with another JPanel object.
JTree
JTree is very useful when there is hierarchical data that needs to be displayed in the GUI application. A JTree
object does not actually contain the data; it simply provides a view of the data. Like any non-trivial Swing
component, the tree gets data by querying its data model. Every tree has a root node from which all nodes descend.
A node can either have children or not.
As shown in Figure 8, the tree displays the some of the sections of the book. The root of the tree is the title of
the book, and each chapter is a sub node under the root. Especially, the chapter 14 contains the section 13.4.8 and
all the component sections. If the user selects one of the sections, a text showing the path of selection will be
shown in the text area on the right side of the frame. This simple example demonstrates how to create a JTree
instance with various tree nodes, and also how to handle selection event with TreeSelectionListener interface. The
complete implementation of this example is given in Program 3.
Figure 8: JTree Demo
Program 3
/* JTreeDemo.java: a simple example showing JTree */
package com.javabook.gui.containers;
import javax.swing.JFrame;
import javax.swing.JScrollPane;
import javax.swing.JSplitPane;
import javax.swing.JTextArea;
import javax.swing.JTree;
import javax.swing.event.TreeSelectionEvent;
import javax.swing.event.TreeSelectionListener;
import javax.swing.tree.*;
public class JTreeDemo extends JFrame {
public JTreeDemo(){
init();
}

private void init() {
final JTextArea textArea = new JTextArea();
final JTree tree = makeTree();
//add the selection listener
tree.addTreeSelectionListener(new TreeSelectionListener(){
//when user select a node, this method will be fired
public void valueChanged(TreeSelectionEvent event) {
//get the current selection
DefaultMutableTreeNode node =
(DefaultMutableTreeNode)
event.getPath().getLastPathComponent();
//prepare the sections
StringBuffer sectionString = new StringBuffer();
//print all the sections on the tree path
Object [] sections = node.getUserObjectPath();
for(int i=0;i<sections.length;i++){
sectionString.append(sections[i]);
if(i != sections.length-1){
sectionString.append("-->");
}
}
//show the sections in the text area
textArea.setText("Reading "+sectionString);
}
});
//split the tree and text area in a horizontal way
final JSplitPane mainPane
= new JSplitPane(JSplitPane.HORIZONTAL_SPLIT,
new JScrollPane(tree),
new JScrollPane(textArea));
this.getContentPane().add(mainPane);
this.setTitle("JTree Demo");
this.setSize(500,400);
this.setVisible(true);
this.setDefaultCloseOperation(JFrame.EXIT_ON_CLOSE);
}
private JTree makeTree() {
//create a tree of book sections
DefaultMutableTreeNode root =
new DefaultMutableTreeNode("Master Java");
//create chatper 1 to 18 nodes
for(int i=1;i<=18;i++){
root.add(new DefaultMutableTreeNode("Chatper "+i));
}
//get the chapter 16 from the root node
DefaultMutableTreeNode ch15Node =
(DefaultMutableTreeNode)root.getChildAt(15);
//create the 16.1.2 sections
DefaultMutableTreeNode sectionNode =
new DefaultMutableTreeNode(
"16.1.2 - Advanced Containers");
//add the four sub-sections
sectionNode.add(new DefaultMutableTreeNode("JTabbedPane"));
sectionNode.add(new DefaultMutableTreeNode("JSplitPane"));
sectionNode.add(new DefaultMutableTreeNode("JTree"));
sectionNode.add(new DefaultMutableTreeNode("JTable"));
//add the 16.1.2 section to the chapter 15 node
ch15Node.add(sectionNode);
//create a new tree with the root
JTree tree = new JTree(root);
//set the selection mode to single
tree.getSelectionModel().setSelectionMode
(TreeSelectionModel.SINGLE_TREE_SELECTION);
return tree;
}
public static void main(String[] args) {
new JTreeDemo();
}
}
The example creates a tree with its default tree model by passing the root tree node into the constructor. The
creation of the tree nodes are straightforward. The setSelectionMode method is used to determine what selection
mode should be used including SINGLE_TREE_SELECTION, CONTIGUOUS_TREE_SELECTION and
DISCONTIGUOUS_TREE_SELECTION.
If the DefaultTreeModel does not suit the needs of the application, then it is able to create a customized data
model that implements the TreeModel interface. It is also possible to change the look and feel of each tree node
by providing an instance of DefaultTreeCellRenderer to the JTree instance use the setCellRenderer method.
Moreover, the setRootVisible(boolean visiable) method can be used to control the visibility of the root node and
the setShowsRootHandles(boolean handle) method can be used to control whether to show the root handles.
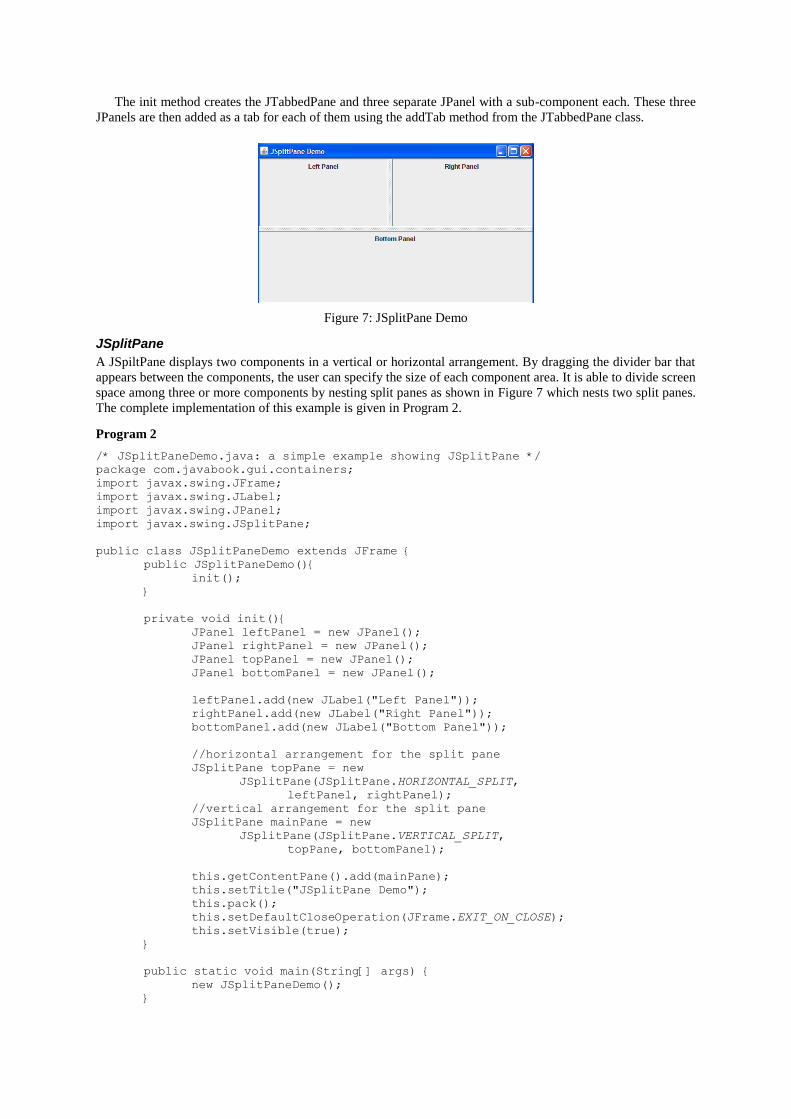
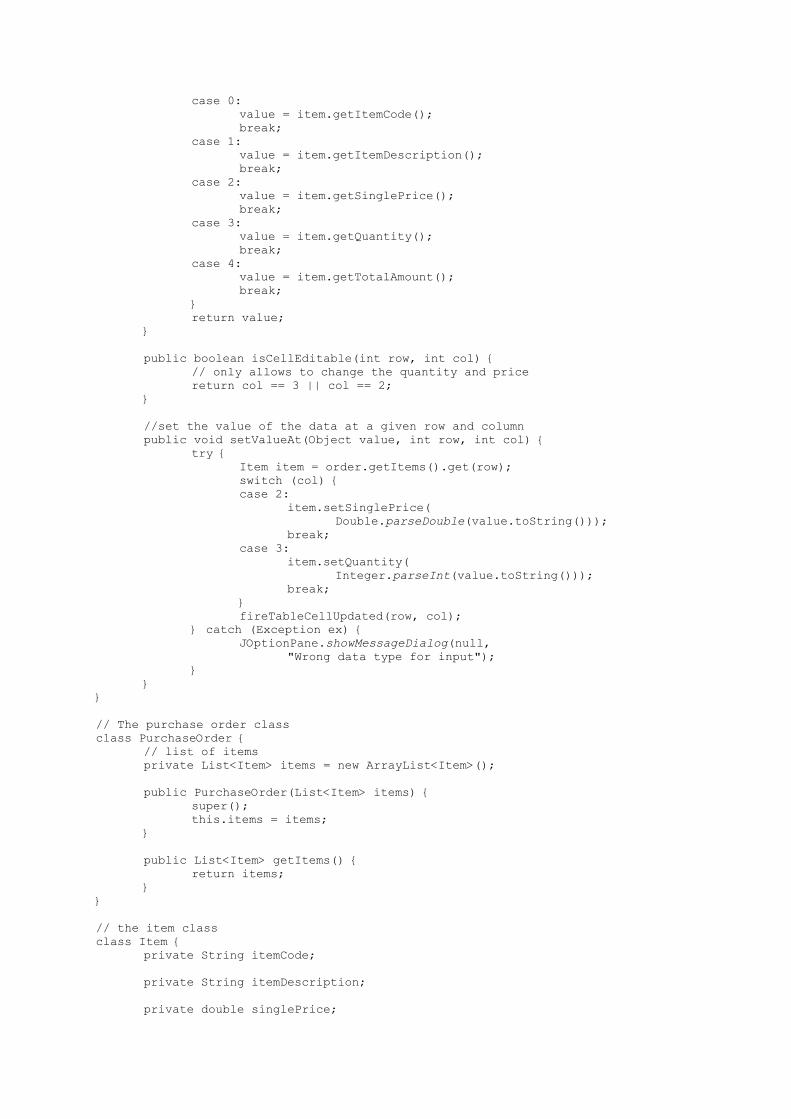
JTable
Unlike the JTree which displays the hierarchical data, JTable class provides a way to display data as a table, JTable
does not contain or cache data; it is simply a view of the data. Every table object uses a table model object to
manage the actual table data. Figure 9 shows a simple JTable example that displays items for a given purchase
order. The example not only demonstrates the ability of the JTable displaying data, it also allows the user to edit
particular columns of data such as the unit price and quantity which will dynamically updates the original data.
The total amount will be recalculated after the price or quantity has been updated and reflected on the table. The
complete implementation of this example is given in Program 4.
Figure 9: Purchase Order Table
Program 4
/* JTableDemo.java: a simple example showing JTable */
package com.javabook.gui.containers;
import java.util.ArrayList;
import java.util.List;

import javax.swing.JFrame;
import javax.swing.JOptionPane;
import javax.swing.JScrollPane;
import javax.swing.JTable;
import javax.swing.table.AbstractTableModel;
public class JTableDemo extends JFrame {
public JTableDemo(PurchaseOrder order) {
init(order);
}
private void init(PurchaseOrder order) {
JTable orderTable =
new JTable(new PurchaseOrderTableModel(order));
this.getContentPane().add(new JScrollPane(orderTable));
this.pack();
this.setVisible(true);
this.setTitle("Purchase Order Table");
this.setDefaultCloseOperation(JFrame.EXIT_ON_CLOSE);
}
public static void main(String[] args) {
new JTableDemo(makeOrder());
}
private static PurchaseOrder makeOrder() {
List<Item> items = new ArrayList<Item>();
items.add(new Item("0001", "Mastering Java", 100, 50));
items.add(new Item("0002", "Mastering C++", 90, 30));
items.add(new Item("0003", "Mastering C#", 120, 40));
items.add(new Item("0004", "Mastering C", 70, 10));
return new PurchaseOrder(items);
}
}
//The table model for the purchase order
class PurchaseOrderTableModel extends AbstractTableModel {
//column names for the purchase order table
private String[] columnNames = new String[]
{ "Item Code", "Description","Unit Price",
"Quantity", "Total Amount" };
private PurchaseOrder order;
public PurchaseOrderTableModel(PurchaseOrder order) {
this.order = order;
}
//get the name of a given column showing on the table
public String getColumnName(int col) {
return columnNames[col].toString();
}
public int getColumnCount() {
return columnNames.length;
}
public int getRowCount() {
return order.getItems().size();
}
//get the value for a given row and column
public Object getValueAt(int row, int col) {
Item item = order.getItems().get(row);
Object value = null;
switch (col) {
case 0:
value = item.getItemCode();
break;
case 1:
value = item.getItemDescription();
break;
case 2:
value = item.getSinglePrice();
break;
case 3:
value = item.getQuantity();
break;
case 4:
value = item.getTotalAmount();
break;
}
return value;
}
public boolean isCellEditable(int row, int col) {
// only allows to change the quantity and price
return col == 3 || col == 2;
}
//set the value of the data at a given row and column
public void setValueAt(Object value, int row, int col) {
try {
Item item = order.getItems().get(row);
switch (col) {
case 2:
item.setSinglePrice(
Double.parseDouble(value.toString()));
break;
case 3:
item.setQuantity(
Integer.parseInt(value.toString()));
break;
}
fireTableCellUpdated(row, col);
} catch (Exception ex) {
JOptionPane.showMessageDialog(null,
"Wrong data type for input");
}
}
}
// The purchase order class
class PurchaseOrder {
// list of items
private List<Item> items = new ArrayList<Item>();
public PurchaseOrder(List<Item> items) {
super();
this.items = items;
}
public List<Item> getItems() {
return items;
}
}
// the item class
class Item {
private String itemCode;
private String itemDescription;
private double singlePrice;

private int quantity;
public Item(String itemCode, String itemDescription,
double singlePrice, int quantity) {
this.itemCode = itemCode;
this.itemDescription = itemDescription;
this.singlePrice = singlePrice;
this.quantity = quantity;
}
public String getItemCode() {
return itemCode;
}
public void setItemCode(String itemCode) {
this.itemCode = itemCode;
}
public String getItemDescription() {
return itemDescription;
}
public void setItemDescription(String itemDescription) {
this.itemDescription = itemDescription;
}
public int getQuantity() {
return quantity;
}
public void setQuantity(int quantity) {
this.quantity = quantity;
}
public double getSinglePrice() {
return singlePrice;
}
public void setSinglePrice(double singlePrice) {
this.singlePrice = singlePrice;
}
public double getTotalAmount() {
return getSinglePrice() * getQuantity();
}
}//End JTableDemo.java
The creation of the user interface is very simple in this example, the init method simply instantiates a JTable
instance by passing a customized TableModel implementation (PurchaseOrderTableModel). Notice that the
PurchaseOrderTableModel does not implement the TableModel directly, as the AbstractTableModel provides a
lot of default implementation for the TableModel, it then gives more flexibility. The getColumnName method is
used to get the name of a given column. For example, column two as defined in the model refers to Unit Price
displayed on the table heading. The getColumnCount simply get the total number of columns that the model has.
getRowCount identifies how many rows the model has. isCellEditable tells the JTable which set of cells are
editable. In this example, the column two and three allows user to edit.The getValueAt method is used by the
JTable to extract data at a given row and column. The setValueAt in contrast is used to update the value for a given
row and column. In general, the implementation of the setValueAt method needs to validate the input value and
notify the table view that the data has been changed by using the fireTableCellUpdated(row, col) method.
Similar to the TreeModel, TableModel(Model) provides a way to control the actual data without affecting the
user interface(View), along with the delegation event model(Controller) which controls what actions need to be
taken when certain event raises. This Model-View-Controller (MVC) philosophy exists in all of the Java GUI
development process, all most every component provided by Java GUI library adopts this philosophy as its
primary design principle. The next section will briefly explain MVC more in details.

Model-View-Controller Model-View-Controller known as MVC is a design pattern derived from SmallTalk language to build visual
applications. It is also the design principle behind Java Swing library. The basic idea of this pattern is to divide a
visual application into three separate parts: Model, View, and Controller.
Model represents the state or data of the application
View is the visual representation of the application data
Controller is responsible for capturing user inputs on the view and converting to the model
The isolation of these three parts enforces a basic software design principle known as Single Responsibility
Principle (SRP) introduced by Tom DeMarco in his book Structured Analysis and Systems Specification, Yourdon
Press Computing Series, 1979. It then had been re-interpreted by Robert Cecil Martin (Uncle Bob) for Object-
Orientation as part of his Principles of Object-Oriented Design. According to Uncle Bob’s interpretation, a
responsibility is a reason to change, and a class or module should have one and only one reason to change.
Applying this principle to the MVC pattern, the model only needs to change when the structure of data is different,
the view only needs to change when a different view is required, or the controller only needs to change how it
handles different models and views. For example, if you want to change the look and feel of your Swing
components from Windows XP to Solaris Motif, you will not expect to change the state or data bound to those
components. It is what MVC helps you, to avoid changing the models when you have to change your view of
those models. The following code simply changes the whole look and feel of your Swing program to Solaris Motif
schema:
UIManager.setLookAndFeel(
"com.sun.java.swing.plaf.motif.MotifLookAndFeel");
The concept of the MVC design pattern is to split the model, the view, and the controller into three different
entities. The Java Swing toolkit, however, has made a slight modification against the original MVC, as shown in
Figure 10. It merges the View and Controller into one entity: a UI Component also known as a UI delegate.
Figure 10: Swing MVC
The model of Swing MVC is categorised as two models:
GUI-state models: interfaces that define the visual status of a GUI control, such as whether a checkbox
is checked or which items are selected in the list.
Application-data models: interfaces that represent the data with real value to the application, such as the
items in the list or row data in a table.
Swing MVC component’s view and controller responsibilities are handled by a generic component class (such as
JButton, JCheckBox and so on). The responsibilities of look and feel specific aspects has been further delegated
to the UI object provided by the current look and feel schema. For example, if you have a checkbox component
on your screen, the model is the state of the checkbox which is an implementation of ButtonModel interface.
The JCheckBox class is the component which displays the state checked or unchecked as a checkbox. It also
listens for some sort of activity, interprets it and dispatches it to the model to change the state. This delegation
model is very powerful because it enables the pluggable look and feel in Swing, by simply switching the PLAF,
the entire UI look will be changed.
Java Applet Swing provides an excellent library to develop standalone GUI applications running on top of the operating
systems over various platforms. However, at the very beginning when the Java first came out, it provided
interactive features to the web applications that can not be done by HTML. These features were brought to the
MV
CG
et user inputs
Cre
ate
data
mod
el
Render to the user M
V C
Create data m
odel
Swing UI Component
Get user inputs
Ren
der
to the
use
r
Generic MVC Swing MVC
MV
CG
et user inputs
Cre
ate
data
mod
el
Render to the user
MV
CG
et user inputs
Cre
ate
data
mod
el
Render to the user M
V C
Create data m
odel
Swing UI Component
Get user inputs
Ren
der
to the
use
r M
V C
Create data m
odel
Swing UI Component
Get user inputs
Ren
der
to the
use
r
Generic MVC Swing MVC

users by means of Java Applets that run inside a web browser. Java Applet is a very old technology introduced in
the first version of the Java language in 1995. It was also the dominant technology provided by Java at that time.
Java developers at the early years were normally writing Java Applets rather than the standalone applications
using AWT. Although, Applet is used to develop interactive web applications, the actual code is running inside
the client’s Java virtual machine (JVM) rather than executing on the server side such as the web servers.
o
Figure 11: Applet development and execution
Figure 11 depicts how an applet is developed and hosted at the server side, and then accessed and executed at
the client side. The Java Applets are executed in a sandbox by most web browsers, preventing them from accessing
local data for security concerns. The client machine will download the applet from the web server and the browser
either embeds the applet into a web page or opens a new window showing the GUI. The Java Applet program
differs from the normal standalone application in many ways such as:
Applets are usually loaded automatically via its lifecycle methods rather than executing via the main
method;
Applets are embedded inside the web page and executed in browsers;
Accessing local data is strictly restricted due to security reasons.
To embed the applet into the web page, you can use either the deprecated <applet> HTML tag or the new
<object> tag. For example, the following HTML shows how to use the <applet> tag:
<applet code="HelloWorldApplet.class" width="200" height="200">
<param name="message" value="Hello World!">
</applet>
The applet tag uses the code attribute to locate the applet class. If the applet is packaged into a jar file, the
codebase attribute can be used to locate the URI of the jar file. The width and height attributes determine the
rectangular area where the applet is executed. If your applet needs to read some parameters, you could provide
param tag specifying a name/value pair nested inside the applet tag. The identical approach of making use of the
new object tag is shown as the following:
<object classid="java:HelloWorldApplet.class" width="200" height="200">
<param name="message" value="Hello World!">
</object>
Which one to use is up to your choice, even though it is recommended to use the object tag over the applet
tag, as the latter has been deprecated and may be removed in the future.
Java also provides a very useful command line tool the Applet viewer that can be used to load the applet during
development. Before we jump into a real applet example, it is worth to mention about the lifecycle of a Java
Applet.
The Lifecycle of Applets
As we have pointed out that the applets will be loaded automatically by the JVM at runtime, the Applets
specification defines a set of standard methods that each applet must follow. These methods including init,
HelloHello
Hello Java<app=
“Hello”>
4
APPLET
Development
“hello.java”
AT
SUN.COM
The Internet
hello.class
AT SUN’S
WEB
SERVER
2 31 5
Create
Applet
tag in
HTML
document
Accessing
from
Your Organisation
The browser
creates
a new
window and
a new thread
and
then runs the
code
HelloHello
Hello Java<app=
“Hello”>
4
APPLET
Development
“hello.java”
AT
SUN.COM
The Internet
hello.class
AT SUN’S
WEB
SERVER
2 31 5
Create
Applet
tag in
HTML
document
Accessing
from
Your Organisation
The browser
creates
a new
window and
a new thread
and
then runs the
code
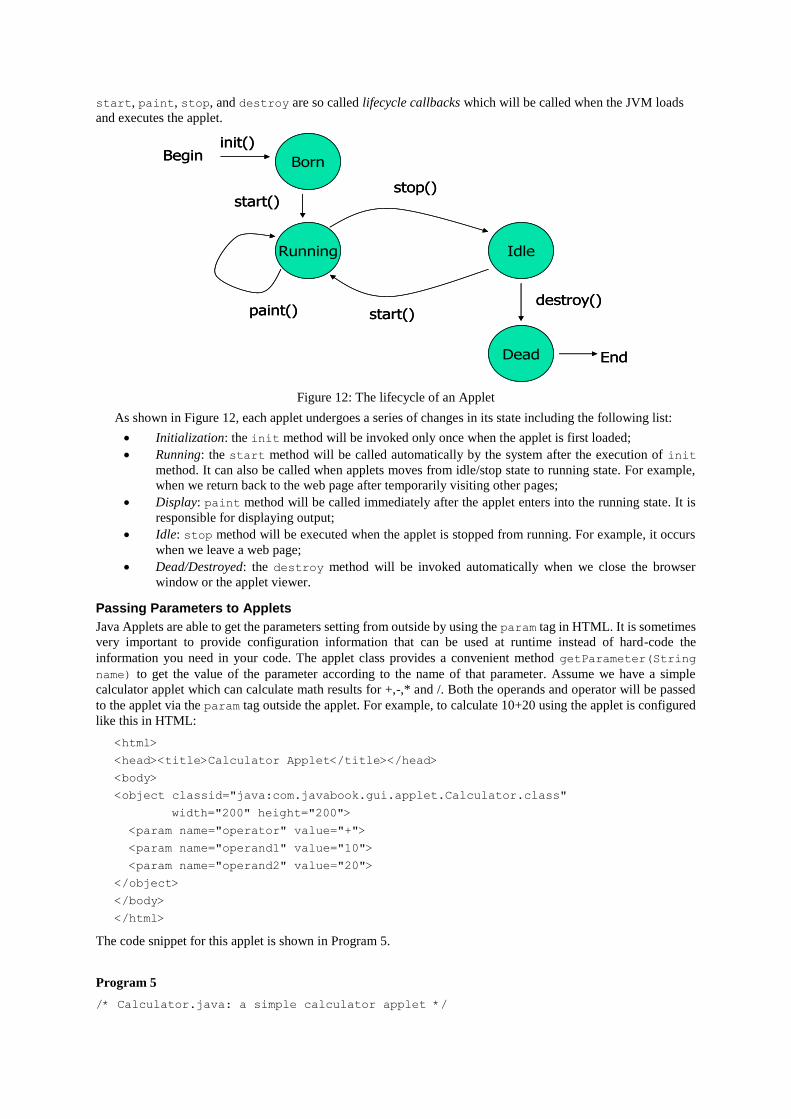
start, paint, stop, and destroy are so called lifecycle callbacks which will be called when the JVM loads
and executes the applet.
Figure 12: The lifecycle of an Applet
As shown in Figure 12, each applet undergoes a series of changes in its state including the following list:
Initialization: the init method will be invoked only once when the applet is first loaded;
Running: the start method will be called automatically by the system after the execution of init
method. It can also be called when applets moves from idle/stop state to running state. For example,
when we return back to the web page after temporarily visiting other pages;
Display: paint method will be called immediately after the applet enters into the running state. It is
responsible for displaying output;
Idle: stop method will be executed when the applet is stopped from running. For example, it occurs
when we leave a web page;
Dead/Destroyed: the destroy method will be invoked automatically when we close the browser
window or the applet viewer.
Passing Parameters to Applets
Java Applets are able to get the parameters setting from outside by using the param tag in HTML. It is sometimes
very important to provide configuration information that can be used at runtime instead of hard-code the
information you need in your code. The applet class provides a convenient method getParameter(String
name) to get the value of the parameter according to the name of that parameter. Assume we have a simple
calculator applet which can calculate math results for +,-,* and /. Both the operands and operator will be passed
to the applet via the param tag outside the applet. For example, to calculate 10+20 using the applet is configured
like this in HTML:
<html>
<head><title>Calculator Applet</title></head>
<body>
<object classid="java:com.javabook.gui.applet.Calculator.class"
width="200" height="200">
<param name="operator" value="+">
<param name="operand1" value="10">
<param name="operand2" value="20">
</object>
</body>
</html>
The code snippet for this applet is shown in Program 5.
Program 5
/* Calculator.java: a simple calculator applet */
Born
Running Idle
Dead
Begininit()
start()
paint()
stop()
start()destroy()
End
Born
Running Idle
Dead
Begininit()
start()
paint()
stop()
start()destroy()
End

import java.lang.*;
import java.awt.*;
import javax.swing.*;
import javax.swing.JApplet;
public class Calculator extends JApplet{
private String operator;
private String message;
private double operand1;
private double operand2;
private double result;
public void init() {
try {
operator = getParameter("operator");
operand1 = Double.parseDouble(getParameter("operand1"));
operand2 = Double.parseDouble(getParameter("operand2"));
calculate(operator,operand1,operand2);
}
catch(Exception e) {
message = e.getMessage();
}
}
public void paint(Graphics g) {
Dimension s = size();
g.setColor(Color.WHITE);
g.fillRect(0, 0, s.width, s.height);
g.setColor(Color.BLACK);
g.drawString(message, 50, 50);
}
public void calculate(String opr, double opd1, double opd2) {
double res = 0;
if (opr.equals("+"))
res = opd1 + opd2;
else if (opr.equals("-"))
res = opd1 - opd2;
else if (opr.equals("*"))
res = opd1 * opd2;
else if (opr.equals("/"))
res = opd1 / opd2;
else
throw new IllegalArgumentException("invalid operator: " + opr);
message = opd1 + " " + opr + " " + opd2 + " = " + res;
}
}
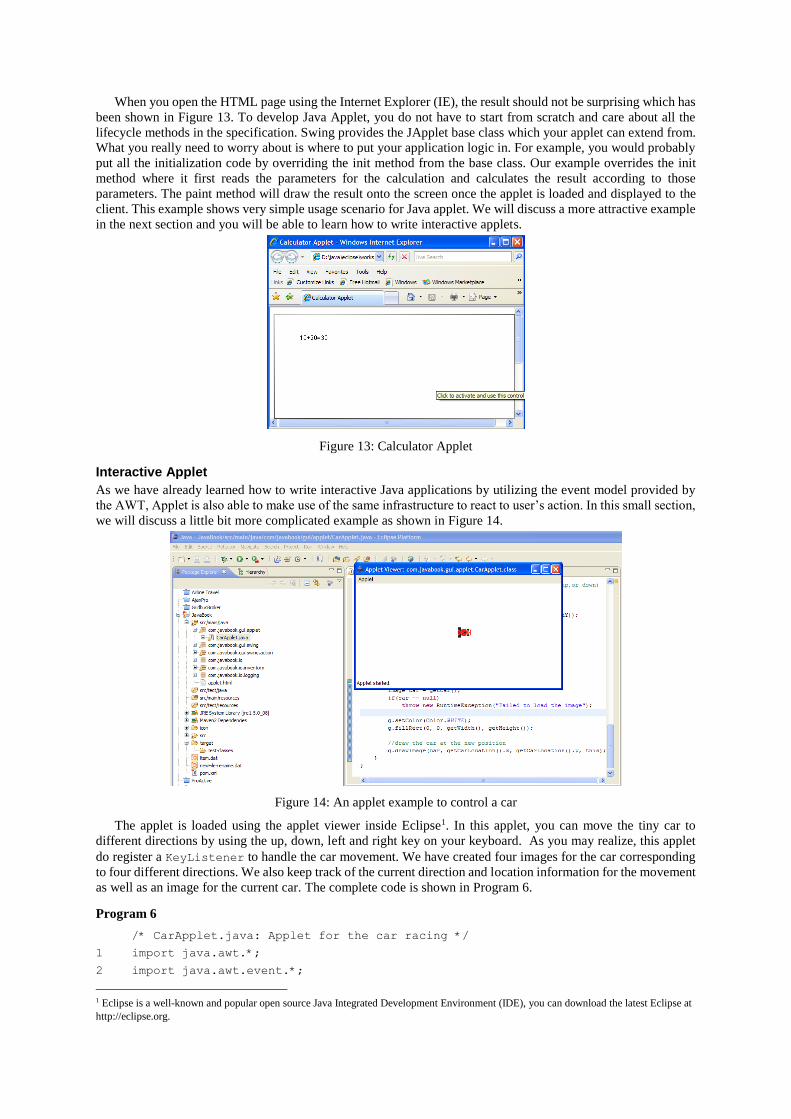
When you open the HTML page using the Internet Explorer (IE), the result should not be surprising which has
been shown in Figure 13. To develop Java Applet, you do not have to start from scratch and care about all the
lifecycle methods in the specification. Swing provides the JApplet base class which your applet can extend from.
What you really need to worry about is where to put your application logic in. For example, you would probably
put all the initialization code by overriding the init method from the base class. Our example overrides the init
method where it first reads the parameters for the calculation and calculates the result according to those
parameters. The paint method will draw the result onto the screen once the applet is loaded and displayed to the
client. This example shows very simple usage scenario for Java applet. We will discuss a more attractive example
in the next section and you will be able to learn how to write interactive applets.
Figure 13: Calculator Applet
Interactive Applet
As we have already learned how to write interactive Java applications by utilizing the event model provided by
the AWT, Applet is also able to make use of the same infrastructure to react to user’s action. In this small section,
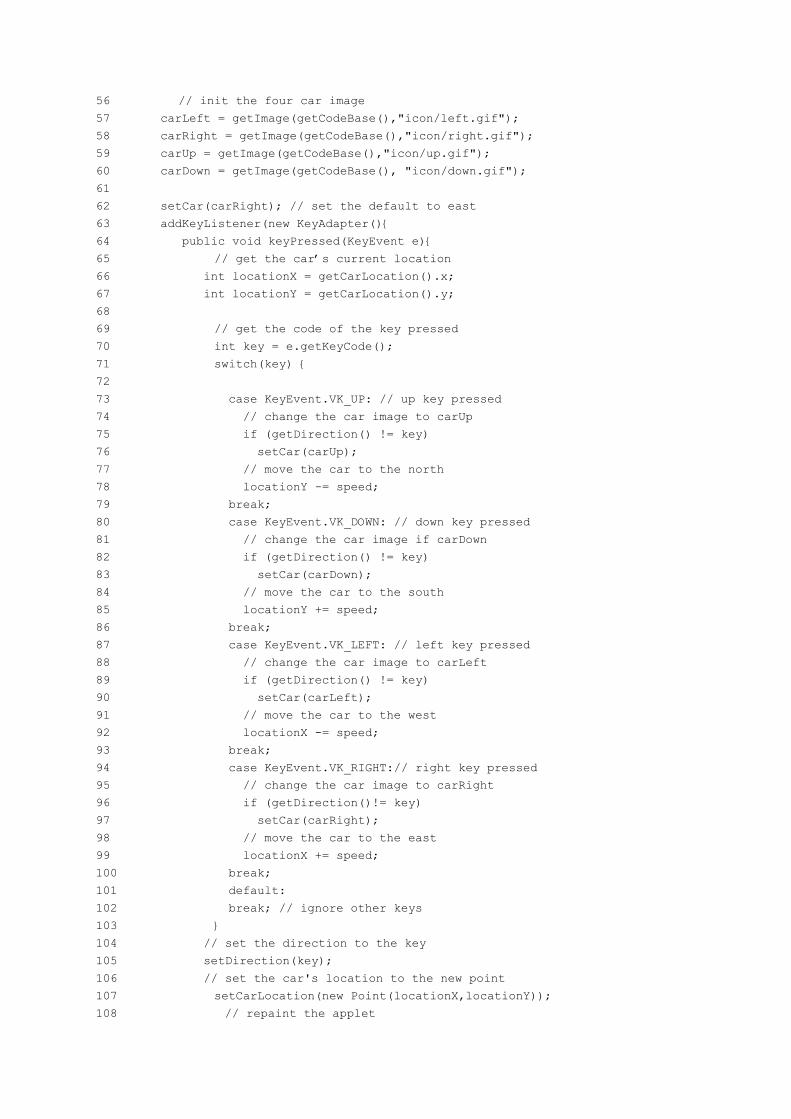
we will discuss a little bit more complicated example as shown in Figure 14.
Figure 14: An applet example to control a car
The applet is loaded using the applet viewer inside Eclipse1. In this applet, you can move the tiny car to
different directions by using the up, down, left and right key on your keyboard. As you may realize, this applet
do register a KeyListener to handle the car movement. We have created four images for the car corresponding
to four different directions. We also keep track of the current direction and location information for the movement
as well as an image for the current car. The complete code is shown in Program 6.
Program 6
/* CarApplet.java: Applet for the car racing */
1 import java.awt.*;
2 import java.awt.event.*;
1 Eclipse is a well-known and popular open source Java Integrated Development Environment (IDE), you can download the latest Eclipse at
http://eclipse.org.

3 import javax.swing.JApplet;
4
5 public class CarApplet extends JApplet{
6 // car images in different direction
7 private Image carLeft = null;
8 private Image carRight = null;
9 private Image carUp = null;
10 private Image carDown = null;
11 // current car
12 private Image carImage = null;
15 // geometric information for the car
14 private int direction = -1;
15 private Point carLocation = new Point(25,25);
16 // speed for the car
17 private int speed = 10;
18
19 public void setCar(Image carImage) {
20 this.carImage = carImage;
21 }
22
23 public Image getCar() {
24 return carImage;
25 }
26
27 private int getDirection() {
28 return direction;
29 }
30
31 private void setDirection(int direction) {
32 this.direction = direction;
33 }
34
35 private Point getCarLocation() {
36 return carLocation;
37 }
38
39 private void setCarLocation(Point carLocation) {
40 this.carLocation = carLocation;
41 }
42
43 public void paint(Graphics g) {
44 Image car = getCar(); // get current car image
45 if (car == null) // throw exception if null
46 throw new RuntimeException("Error");
47 // first clean the whole area
48 g.setColor(Color.WHITE);
49 g.fillRect(0, 0, getWidth(), getHeight());
50 // draw the car at the new position
51 g.drawImage(car, getCarLocation().x, getCarLocation().y, this);
52
53 }
54
55 public void init() {
56 // init the four car image
57 carLeft = getImage(getCodeBase(),"icon/left.gif");
58 carRight = getImage(getCodeBase(),"icon/right.gif");
59 carUp = getImage(getCodeBase(),"icon/up.gif");
60 carDown = getImage(getCodeBase(), "icon/down.gif");
61
62 setCar(carRight); // set the default to east
63 addKeyListener(new KeyAdapter(){
64 public void keyPressed(KeyEvent e){
65 // get the car’s current location
66 int locationX = getCarLocation().x;
67 int locationY = getCarLocation().y;
68
69 // get the code of the key pressed
70 int key = e.getKeyCode();
71 switch(key) {
72
73 case KeyEvent.VK_UP: // up key pressed
74 // change the car image to carUp
75 if (getDirection() != key)
76 setCar(carUp);
77 // move the car to the north
78 locationY -= speed;
79 break;
80 case KeyEvent.VK_DOWN: // down key pressed
81 // change the car image if carDown
82 if (getDirection() != key)
83 setCar(carDown);
84 // move the car to the south
85 locationY += speed;
86 break;
87 case KeyEvent.VK_LEFT: // left key pressed
88 // change the car image to carLeft
89 if (getDirection() != key)
90 setCar(carLeft);
91 // move the car to the west
92 locationX -= speed;
93 break;
94 case KeyEvent.VK_RIGHT:// right key pressed
95 // change the car image to carRight
96 if (getDirection()!= key)
97 setCar(carRight);
98 // move the car to the east
99 locationX += speed;
100 break;
101 default:
102 break; // ignore other keys
103 }
104 // set the direction to the key
105 setDirection(key);
106 // set the car's location to the new point
107 setCarLocation(new Point(locationX,locationY));
108 // repaint the applet
109 repaint();
110 }});
111 }
112 }
The above code has 112 lines, which is probably is the longest code list we have ever seen in this book so far.
Do not be scared by the length of the code, because the logic behind the implementation is relatively simple and
straightforward. Let us look at this example to understand how the magic to move a car in the applet happens.
From lines 1 to 3, we import the required Java packages for the applet. As you may notice, the CarApplet
extends the javax.swing.JApplet class which is essential for every applet (you can also extend your applet
directly from java.awt.Applet, however, in this case, you lose the opportunity to utilize Java Swing
components). Lines 7 to 10 define four car images that will be used for different directions including north, south,
west and east. It is also important to know what the current car image is null, the image object at line 12 serves
this purpose. Besides the car images that you need to draw on the screen, the geometric information for your car
is also very important and must be recorded in the program. The properties defined at lines 14 and 15 make these
information available to the entire applet. A car speed property at line 17 is for you to control how far the car will
move. From lines 19 to 42 are some common setter/getter methods.
The paint method from lines 43 to 53 is very important for you to understand how we simulate the movement
on the screen. The movement of the car is actually simulated by repainting the car image according to its current
location and direction as soon as the client types the up, down, left or right key. In the paint method, we first get
the current car image, and then the runtime exception will be thrown if the car image is null to prevent faulty
operations. Before we draw the car image, we have to fill the whole applet area with white color to overwrite the
previous car image on the screen. Then we just invoke the drawImage method to draw the car image at current
car location recorded in the program.
Now, you have seen how we simulate the movement of the car. The only thing left is to determine which
direction the car will move and how far the move will be. Let us take a deep look at the init method, especially
the inner KeyListener class from lines 55 to 120. The first part of the init method concentrates on loading the
car images from the external image files. The getImage method will load the image file to an image object. We
have used the getCodeBase method to find out the codebase for this applet. If you run the applet using the applet
viewer, the codebase will be the directory where you put your applet class in. For example, my applet class is at
file:/D:/java/eclipse/workspace/JavaBook/target/classes/com/javabook/gui/applet/CarApplet.class,the
getCodeBase method returns file:/D:/java/eclipse/ workspace/JavaBook/target/classes, We also put all our .gif
files into the file:/D:/java/eclipse/workspace/JavaBook/target/classes/icon directory. So I could use the
getCodeBase() + "/icon/carLeft.gif" to get the absolute URI of the image file for loading. That is what
exactly lines 57 to 60 do to load the images. At line 62, we set the default car image as the one to the east.
In order to capture the key event, the CarApplet has to register a KeyListener. At line 63, we make use of
the convenient KeyAdapter class to provide our key KeyListener implementation as an anonymous inner class.
The keyPressed method has been overridden to handle the key event. The first step is to find out the car’s current
location as shown as lines 66 and 67. Then it is important to determine which key the user has actually pressed.
We gain this information by invoking the KeyEvent.getKeyCode at line 70. The switch-case-default
statement captures cases for up, down, left and right. Other keys pressed by the user will be ignored. Each situation
for the movement looks pretty similar. If up key is pressed, we replace the current car image with carUp if the
current direction is not north, then we decrease the Y location by speed amount simulating moving car to north
by speed amount. If down key is pressed, we replace the current car image to carDown if the current direction is
not south, then we increase the Y location by speed amount simulating moving car to south by speed amount. If
left key is pressed, we replace the current car image to carLeft if the current direction is not west, then we
decrease the X location by speed amount simulating moving car to west by speed amount. If right key is pressed,
we replace the current car image to carRight if the current direction is not east, then we increase the X location
by speed amount simulating moving car to east by speed amount. As soon as we replace the car image with correct
direction and recalculate the new location for the car, we record the direction and the car location by setting the
properties in the program. Finally, the repaint method is called to tell the applet to repaint itself. Consequently,
the applet itself will invoke the paint method to redraw the proper car image at new location.
Until now, you should get a very clear understanding about the magic we did in this example. You can actually
extend this example to be more interesting such as a car racing game. To that extent, you probably need animation
support for the car, as a hint, you could use the MediaTracker class to accomplish this challenging work. The
gif files used in this example can be downloaded from the book website.

Figure 15 A simple audio player applet
AudioClip Interface
Java applet supports playing audio clips within an applet application via AudioClip interface as shown below.
public interface AudioClip{
void play();
void loop();
void stop();
}
The play method simple restarts the audio clip each time it is called, the stop method stops playing the audio clip
and the loop method plays the audio clip in a loop. The applet supports playing several types of audio clips: an
AU file, an AIFF file, a WAV file, and a MIDI file. In order to get an instance of AudioClip, the
Applet.getAudioClip can be used by passing the URL of the required audio clip. Figure 15 shows a simple audio
player applet. This simple player controls the audio from a given URL entered by the user. The complete code is
shown in Program 7.
Program 7
package com.javabook.gui.applet;
import java.applet.AudioClip;
import java.awt.BorderLayout;
import java.awt.event.ActionEvent;
import java.awt.event.ActionListener;
import java.net.MalformedURLException;
import java.net.URL;
import javax.swing.JApplet;
import javax.swing.JButton;
import javax.swing.JLabel;
import javax.swing.JPanel;
import javax.swing.JTextField;
public class SimpleAudioPlayer extends JApplet {
private AudioClip currentAudio;
private final JLabel loggerLabel = new JLabel();
public void init() {
//load the player GUI
try {
javax.swing.SwingUtilities.invokeAndWait(new Runnable() {
public void run() {
createPlayerGUI();
}
});
} catch (Exception e){
e.printStackTrace();
}

}
private void loadAudioClip(String audioClipUrl)
throws MalformedURLException{
//load the audio clip from the given url
AudioClip audioClip = getAudioClip(new URL(audioClipUrl));
//set it as the current playing clip
setPlayingAudioClip(audioClip);
}
private void log(String message){
loggerLabel.setText(message);
}
private void createPlayerGUI(){
//create the information panel at the top of the applet
final JTextField audioUrlField = new JTextField(50);
final JLabel label = new JLabel("Audio clip URL ->");
JPanel infoPanel = new JPanel();
infoPanel.setLayout(new BorderLayout());
infoPanel.add(label,BorderLayout.WEST);
infoPanel.add(audioUrlField,BorderLayout.CENTER);
//create the control panel at the bottom of the applet
final JButton playBtn = new JButton("Play");
final JButton loopBtn = new JButton("Loop");
final JButton stopBtn = new JButton("Stop");
JPanel controlPanel = new JPanel();
controlPanel.add(playBtn);
controlPanel.add(loopBtn);
controlPanel.add(stopBtn);
//hook event handlers for actions
playBtn.addActionListener(new ActionListener(){
public void actionPerformed(ActionEvent event) {
try{
loadAudioClip(audioUrlField.getText());
getPlayingAudioClip().play();
log("INFO -> Play Audio!");
}catch(Exception ex){
log("ERROR -> "+ex.getMessage());
}
}
});
stopBtn.addActionListener(new ActionListener(){
public void actionPerformed(ActionEvent event) {
AudioClip audioClip = getPlayingAudioClip();
if(audioClip != null){
audioClip.stop();
log("INFO -> Audio Stopped!");
}else{
log("INFO -> No Audio to Stop!");
}
}
});
loopBtn.addActionListener(new ActionListener(){
public void actionPerformed(ActionEvent event) {
try{
loadAudioClip(audioUrlField.getText());
getPlayingAudioClip().loop();
log("INFO -> Loop Audio!");
}catch(Exception ex){
log("ERROR -> "+ex.getMessage());
}

}
});
//add these two panel to the main applet
getContentPane().setLayout(new BorderLayout());
getContentPane().add(infoPanel, BorderLayout.NORTH);
getContentPane().add(controlPanel, BorderLayout.CENTER);
//add the error display label to the south
getContentPane().add(loggerLabel, BorderLayout.SOUTH);
}
public AudioClip getPlayingAudioClip() {
return currentAudio;
}
public void setPlayingAudioClip(AudioClip audipClip) {
this.currentAudio = audipClip;
}
}
The loadAudioClip method internally use the getAudioClip(URL url) method of the Applet class to get an
instance of the AudoClip interface. Whenever a specific button is clicked, the action listener implemented will try
to invoke the play, loop and stop method on the given AudioClip. All other codes are related to GUI creation
which will not be explained further. It needs to be aware how the Applet.init method invokes the Swing component
creation method createPlayerGUI. It uses javax.swing.SwingUtilities.invokeAndWait method instead
of directly calling the method. The reason behind this is that Swing components should be created, queried, and
manipulated on the event-dispatching thread, but browsers don't invoke applet lifecycle methods from that thread.
For this reason, the lifecycle methods — init, start, stop, and destroy — should use the SwingUtilities method
invokeAndWait (or, if appropriate, invokeLater) so that code that refers to the Swing components is executed on
the event-dispatching thread. For more information about threads, please refer to the thread programming chapter.
Instead of using the AudioClip interface, Applet class provides a method play which serves the same purpose of
playing audio clips.
AppletContext
Applets can obtain additional services from an AppletContext object, which returns from the method
getAppletContext () in the java.awt.Applet class. The methods of the AppletContext interface include:
getApplets () - returns an enumeration of references to other applets running on same html page.
getApplet (String name) - returns a reference to the applet called name used in the Name attribute in the
applet tag.
showDocument(URL url) and showDocument (URL url, String target) are used to load the web page
linked to the url. In the first case the applet page will be replaced. In the second case, target can be
"_self" - show in current frame
"_parent" - show in parent container
"_top" - show in topmost frame
"_blank" - show in a new, top-level window
"string" - show in a frame with that string name.
showStatus (String msg) - show the string msg on the bottom edge status line of the browser frame.
getImage (URL url), getAudioClip (URL url) - return image and audioclip references.
InputStream getStream(String key)returns the stream to which specified key is associated
within this applet context.
Iterator getStreamKeys()finds all the keys of the streams in this applet context.
void setStream(String key, InputStream stream) associates the specified stream with
the specified key in this applet context.
Figure 16 demonstrates a simple example using the AppletContext object to load web pages. The program
load the URL entered by the user and open the web site. The status bar will be updated according to the action.
For example, the figure depicts one scenario that the user forget to put protocol http before the website
www.gridbus.org. The complete code is shown in Program 8. Note, this example will only work in web browsers.

Figure 16 An example using AppletContext
Program 8
/* AppletContextDemo.java An example shows how to use AppletContext interface */
package com.javabook.gui.applet;
import java.applet.AppletContext;
import java.awt.BorderLayout;
import java.awt.event.ActionEvent;
import java.awt.event.ActionListener;
import java.net.URL;
import javax.swing.JApplet;
import javax.swing.JButton;
import javax.swing.JLabel;
import javax.swing.JPanel;
import javax.swing.JTextField;
public class AppletContextDemo extends JApplet {
public void init(){
//load the player GUI
try {
javax.swing.SwingUtilities.invokeAndWait(new Runnable() {
public void run() {
createGUI();
}
});
} catch (Exception e){
e.printStackTrace();
}
}
private AppletContext loadContext(){
return this.getAppletContext();
}
protected void createGUI() {
final JLabel label = new JLabel("Enter Web Site URL");
final JTextField webUrl = new JTextField(50);
JPanel webPanel = new JPanel();
webPanel.setLayout(new BorderLayout());
webPanel.add(label, BorderLayout.WEST);
webPanel.add(webUrl,BorderLayout.CENTER);

JPanel controlPanel = new JPanel();
JButton showDocument = new JButton("Show Page");
showDocument.addActionListener(new ActionListener(){
public void actionPerformed(ActionEvent event) {
AppletContext context = loadContext();
try{
context.showDocument(
new URL(webUrl.getText()),
"_self");
context.showStatus("Page Loaded!");
}catch(Exception ex){
context.showStatus(
"ERROR-> "+ex.getMessage());
}
}
});
controlPanel.add(showDocument);
getContentPane().setLayout(new BorderLayout());
getContentPane().add(webPanel,BorderLayout.NORTH);
getContentPane().add(controlPanel,BorderLayout.CENTER);
}
}//End AppletContextDemo.java
TheAppletContext.showDocument method is used to show the web page, and the AppletContext.showStatus
method is used to update the status information in the web browser’s status bar . The program get the
AppletContext object via Applet.getAppletContext method.
AppletStub
AppletStub serves as the interface between the applet and the browser environment or applet viewer environment
in which the application is running. In general, developers does not need to deal with this interface directly as it
will be automatically set by the Applet runtime when the Applet is first created by using the setStub method. The
methods of the AppletStub interface include:
void appletResize(int width, int height) is called when the applet want to resize
AppletContext getAppletContext() returns the applet’s context
URL getCodeBase() returns the code base URL
URL getDocumentBase returns the document base URL
String getParameter(String name) looks up the parameter by a given name
boolean isActive() determines whether the applet is active
It is possible to change the default AppletStub by implementing your own AppleStub object. The following
example shows an example of running an applet as a standalone Java windows application by using a mock applet
stub, as shown in Figure 17. This applet has been added into a JFrame object and it simply prints the code base
and document base as well as its parameter value. The complete code is shown in Programs 16.9 and 16.10.
Figure 17: An applet running as a standalone application

Program 9
/* MockAppletStub.java A customized applet stub implementation*/
package com.javabook.gui.applet;
import java.applet.Applet;
import java.applet.AppletContext;
import java.applet.AppletStub;
import java.io.IOException;
import java.net.MalformedURLException;
import java.net.URL;
import java.util.Properties;
public class MockAppletStub implements AppletStub {
private Applet applet;
public MockAppletStub(Applet applet){
this.applet = applet;
}
public void appletResize(int width, int height) {
this.applet.setSize(width, height);
}
public AppletContext getAppletContext() {
return this.applet.getAppletContext();
}
public URL getCodeBase() {
return ClassLoader.getSystemResource(".");
}
public URL getDocumentBase() {
return ClassLoader.getSystemResource(".");
}
public String getParameter(String name) {
Properties props = new Properties();
try {
props.load(new
URL(getDocumentBase().toExternalForm()
+"/"+"parameters.properties").openStream());
//get the property from the file
return props.getProperty(name);
} catch (MalformedURLException e) {
e.printStackTrace();
} catch (IOException e) {
e.printStackTrace();
}
return null;
}
public boolean isActive() {
return true;
}
}//End MockAppletStub.java
Program 10
/* AppletStubDemo.java An example shows how to use AppletStub interface */
package com.javabook.gui.applet;
import java.awt.Graphics;
import javax.swing.JApplet;
import javax.swing.JFrame;

public class AppletStubDemo extends JApplet{
public void init(){
setStub(new MockAppletStub(this));
}
public void paint(Graphics g){
super.paint(g);
g.drawString("Document Base :"
+this.getDocumentBase().toExternalForm(), 50, 50);
g.drawString("Code Base :"
+this.getCodeBase().toExternalForm(), 50, 100);
g.drawString("Parameter Name has value : '"
+ this.getParameter("name")+"'", 50,150);
}
public static void main(String [] args){
AppletStubDemo demo = new AppletStubDemo();
demo.init();
demo.start();
JFrame frame = new JFrame();
frame.getContentPane().add(demo);
frame.setTitle("AppletStub Demo");
frame.setSize(400,300);
frame.setVisible(true);
frame.setDefaultCloseOperation(JFrame.EXIT_ON_CLOSE);
}
}//End AppletStubDemo.java
The MockAppletStub implements the AppletStub interface, it simply returns the code base and document base
as the current directory where the class has been loaded. The getParameter returns the parameter value by looking
up the properties defined in a parameters.properties file located in the current document base.
Building Non-Blocking GUI The previous sections have discussed a lot of components that can be used to build a GUI application on both
standaalone application and web-based application. However, there is one important topic that has not been
mentioned is how to build a non-blocking GUI. A non-blocking GUI simply means when user perform a specific
action (normally long running activities) on the user interface such as submitting changes that needs to write huge
amount of data into an external database system, it should not block the other user activities even those actions
may take minutes to finish. It is the fundemantal requirement for almost every GUI applications, otherwise the
end user will not endeavor any operations that freezes the user interface. For example, an anti-virus scanning takes
huge amount of time and it should run in background and won’t freeze the main setting page of the anti-virus
software.
Programming Java Swing or Applet gives a lot of benefits of building GUI applications, however, the non-
blocking requirement cannot be automatically accomplished by the framework itself, the developer is responsible
for writing applications that can fulfil this requirement in a special manner which needs multithread techniques
and some Swing utilitites come into the picture. Before we discuss deeply into this important topic, some
background knowledge is required to understand why it has to be in a special way rather than the standard way of
doing.
Event Dispatcher Thread
In any GUI applications even in Microsoft .NET windows form applications, all the GUI components have a
implicit and strict rule to follow which only allows a single thread access to those components. That particular
thread is referred to as an event dispatcher thread. The event dispatcher thread runs a infinite loop and waiting to
process any income events from the GUI applications. this thread executes drawing and event-handling code. For
example, the paint() and actionPerformed() methods are automatically executed in the event-
dispatching thread A possible presodu code demonstrating that loop is listed as follows:
while(true){
if(!eventQueue.isEmpty()){
//get the next available event

Event nextEvent = eventQueue.get(0);
//handle the event
handleEvent(nextEvent);
}
}
The implication of this single thread model is that any updates to the GUI have to be done within this thread,
other threads which wish to access the GUI components will cause exceptions.
Accessing Swing Components in Other Threads
There are several typical situations that the Swing components need to be accessed by other threads
The previous non-blocking is one of these problems. Others may due to the program whose GUI must be updated
by other non-AWT events: For example, a socket server monitor that manages all the possible socket connections
between the server and the client, the connection panel must be updated when a client join or quit the server.
Those updates are in other threads managed by the server socket other than the GUI.
Java Swing frameworks provides a SwingUtilities class that can be used to solve the problems that accessing
the components in other threads. SwingUtilities defines two static methods:
invokeLater(Runnable runnable): Requests that some code be executed in the event-dispatching
thread. This method returns immediately, without waiting for the code to execute.
invokeAndWait(Runnable runnable): Acts like invokeLater(), except that this method waits for the
code to execute. As a rule, you should use invokeLater() instead of this method.
The logic inside the Runnable implementation will be gurranted to execute inside the event dispatcher thread
which will not cause any exceptions. For example, the long running operations can be implemented inside a
runnable implementation and updates GUI inside the run methods.
Real Time Clock Example
To further strength the understanding of this topic, suppose we need to implement a simple real time clock which
will update a label in a frame showing the current time. This operation needs to run forever until the application
quits. The example code is shown in Program 11.
Program 11
package com.javabook.gui.thread;
import java.awt.event.ActionEvent;
import java.awt.event.ActionListener;
import java.util.Date;
import javax.swing.JButton;
import javax.swing.JFrame;
import javax.swing.JLabel;
import javax.swing.JPanel;
import javax.swing.SwingUtilities;
/* NonBlockingClock.java */
public class NonBlockingClock extends JFrame {
private JLabel clockLabel;
public NonBlockingClock() {
initComponents();
}
private void initComponents() {
clockLabel = new JLabel(
new Date(System.currentTimeMillis()).toString());
JButton button = new JButton("Start Clock");
button.addActionListener(new ActionListener() {
public void actionPerformed(ActionEvent event) {

updateClock();
}
});
JPanel panel = new JPanel();
panel.add(clockLabel);
panel.add(button);
getContentPane().add(panel);
pack();
setTitle("Clock Window");
setDefaultCloseOperation(JFrame.EXIT_ON_CLOSE);
setVisible(true);
}
private void updateClock() {
//start updater thread
new ClockUpdater(clockLabel).start();
}
public static void main(String[] args) {
new NonBlockingClock();
}
}
/* The clock updater thread whick updates the clock every second */
class ClockUpdater extends Thread {
private JLabel clockLabel;
public ClockUpdater(JLabel clockLabel) {
this.clockLabel = clockLabel;
}
public void run() {
while (true) {
//invoke setTime inside the event dispatcher thread
SwingUtilities.invokeLater(new Runnable() {
public void run() {
setTime();
}
});
try {
Thread.sleep(1000);
} catch (InterruptedException e) {
e.printStackTrace();
}
}
}
private void setTime() {
clockLabel.setText(
new Date(System.currentTimeMillis()).toString());
}
}

By running this program, the window shown as Figure 18. Once a start clock button is clicked, a new
ClockUpdater thread is started and periodically (every second) updates the clock label. The update method has
been invoked inside the SwingUtilities to make sure that the operation is executed inside the event dispatcher
thread.
Figure 18: A real time clock example