Advanced Edmodo20Edmodo%20for... · 4 E – Search bar Review: The Edmodo home screen A The...
52
Advanced Edmodo East Irondequoit Central School District Professional Development Instructor: Candie Black [email protected] Fall 2014
Transcript of Advanced Edmodo20Edmodo%20for... · 4 E – Search bar Review: The Edmodo home screen A The...

Advanced Edmodo East Irondequoit Central School District
Professional Development
Instructor: Candie Black
Fall 2014

2
WHO IS USING EDMODO? ..................................................................................................................................... 3
REVIEW: THE EDMODO HOME SCREEN .................................................................................................................. 4
REVIEW: JOINING A GROUP .................................................................................................................................. 6
REVIEW: CREATING STUDENT GROUPS ................................................................................................................. 7
REVIEW: LOCKING & RESETTING THE GROUP CODE .............................................................................................. 8
LIBRARY ................................................................................................................................................................. 9
FOLDERS .............................................................................................................................................................. 11
ADDING DOCUMENTS TO A FOLDER .................................................................................................................... 13
REVIEW: POSTS ................................................................................................................................................... 15
REVIEW: NOTES .................................................................................................................................................. 17
REVIEW: ALERTS ................................................................................................................................................. 18
REVIEW: POLLS ................................................................................................................................................... 19
ASSIGNMENTS ..................................................................................................................................................... 20
EDITING AN ASSIGNMENT ............................................................................................................................................... 22
THE STUDENTS’ ASSIGNMENT SCREEN ............................................................................................................................... 22
MONITORING WHICH STUDENTS HAVE TURNED IN THEIR ASSIGNMENTS ................................................................................... 25
GRADING AN ASSIGNMENT ............................................................................................................................................. 26
CREATING A NEW GRADE (WITHOUT ADDING AN ASSIGNMENT) ............................................................................................. 29
ANNOTATING AN ASSIGNMENT........................................................................................................................................ 30
QUIZZES ............................................................................................................................................................... 34
CREATING AN ONLINE QUIZ ON EDMODO .......................................................................................................................... 34
LOADING QUESTIONS FROM A PREVIOUSLY CREATED QUIZ ..................................................................................................... 37
PREVIEWING A QUIZ ...................................................................................................................................................... 37
ASSIGNING QUIZ TO A CLASS (OR CLASSES) ......................................................................................................................... 37
PRINTING A QUIZ .......................................................................................................................................................... 38
ABOUT THIS QUIZ – ENTER A DESCRIPTION OF THE QUIZ (OPTIONAL) ....................................................................................... 38
QUIZ OPTIONS ............................................................................................................................................................. 38
TAKING A QUIZ ............................................................................................................................................................. 39
GRADES ............................................................................................................................................................... 40
GROUP OPTIONS ................................................................................................................................................. 41
SETTINGS .................................................................................................................................................................... 41
MANAGING MEMBERS .................................................................................................................................................. 42
PARENT CODES ............................................................................................................................................................ 43
AWARDING A BADGE TO A STUDENT ................................................................................................................................. 45
CREATING A STUDENT BADGE .......................................................................................................................................... 47
DESIGNATING A COLLEAGUE AS A “CO-TEACHER” ............................................................................................... 51

3
Who is using Edmodo?

4
E – Search bar
Review: The Edmodo home screen
The following icons are found along the right-hand margin of most Edmodo pages:
1. Store – Edmodo allows you to download and purchase educational apps
through their site. (Note: Edmodo provides incentives in the form of store
credit for things such as getting a certain number of students to join your
groups. These incentives come in the form of Edmodo cash that have an
expiration date.)
2. Manage My Apps
3. Apps Launcher
4. Snapshot
A – Home button
B – Progress button C – Discover button D – Library button F – Notifications
G – Your account H
– Y
ou
r gr
ou
ps
I –
Yo
ur
com
mu
nit
ies

5
A – Click the “Home” button to return to the home screen.
B – Use the “Progress” button to track how your students are doing and to award them
badges (Advanced Edmodo PD offered in August will cover this).
C – The “Discover” button suggests apps and links you might find useful as well as teachers
you might know or would like to invite to connect with you on Edmodo. You can also join different communities by topic on this page and follow various publishers. Finally, you can browse different topics to search for content on Edmodo.
D – Your “Library” is where all of your uploaded content is located. Content can be viewed
in several ways: (1) by item (unsorted); (2) by folders (sorted by name only – not by class; (3) content that is attached to posts only; or (4) content from your linked Google Drive.
E – The search bar allows you to search posts, groups, users, and apps by search term.
F – The “Notifications” button will have a little red circle next to it when you have a
notification to be read (such as a post someone has made).
G – Your account contains various options such as “Getting started” (to set up your
account), “Invitations” (from people who would like to connect with you), “Profile” (information about you that you wish to share), “Settings” (), “Help” (to get more information on a topic), “Report a Problem” (), and “Logout”.
H – The “Groups” section is where all of the groups (or classes) you have created are
located. Notice the plus icon in the upper right-hand corner – this is what you will use to create a new group.
I – The “Communtiies” section displays all of the communities to which you belong.

6
Review: Joining a group
a) Join my group – “Advanced Edmodo” by locating the “Groups” box on the left margin and clicking on the “plus” icon in the upper right hand corner of the box. Two options will be displayed: Create and Join. Click “Join”.
b) A box will appeared labeled “Join Group”. To join another person’s group, you must either receive an invitation from that person OR have the join code (alphanumeric code) = j7pj7t (for Advanced Edmodo).
c) Enter the code I give you and click on “Join”.
d) Notice that you will now have the group “Advanced Edmodo” listed in your group box.

7
Review: Creating student groups
a) If you have created any groups or have joined the groups that others have created, they will be listed here. Click on the “+” (plus) icon to reveal two possible options:
a) Create - this allows you to create a group that you will manage.
b) Give a name to the group. (Hint: if creating a student group, it is a good idea to give it a simple name that clearly identifies the group. For example, “French 2-1”.)
c) Select a grade or a grade range.
d) Select a subject area.
e) Select a subject.
f) Click on “Create”.
g) Indicate your anticipated group size and type in a description of the group.
h) Do NOT click the box “Default all new members to read-only” as this will prevent students from posting.
i) Click on the box “Moderate all Posts and Replies” only if you want to supervise all student posts. (This can be very time consuming. It is recommended for younger students or any learners that might need close supervision of their postings.)
j) Click on “Finish”.

8
Review: Locking & resetting the group code
a) Because Edmodo wishes to keep your groups secure (that is, only give access to all of the information on your Edmodo account to the groups and members you have approved), when a new group is created, the group code will be unlocked and displayed for 14 days. After that time, the group will automatically be locked so that no one else can join. Edmodo sends an email to the teacher before the group code is locked.
b) As the teacher, you can lock the group code anytime you would like by clicking on the group and then clicking on the Lock icon next to the group code.
c) To unlock the group code (called “resetting”), either click on the Lock icon or pull down the “LOCKED” box and choose “Reset”. This creates a brand new join code (different from the first) that you can give people to join your group. Like any other group code, it will be automatically locked after 14 days.

9
Library
Your library is where all of the documents you upload are located. It is important that you
use a logical naming system for your files. A good folder/file name will identify:
The class or level (for example, “French 2” or FR2)
The unit (for example, “Unit 1” or U1)
In addition, good file names depict logical, chronological order (for example, day –
type of item, as in “01 – Quiz on adjectives”).
Note: As mentioned in class, there are some significant differences between what you seen
on the screen when using a desktop computer versus using the Edmodo App on an iPad or
smartphone. In the same vein, the “teacher” screen and “student” screen have significant
differences. One of these differences is that the “Library” from the teacher screen is called
the “Backpack” on the student screen. If a student opens up his/her “backpack” to retrieve
a document he/she had previously downloaded from your Edmodo folder and cannot see
anything, instruct the student to pull down the menu in the upper center of the screen to
select another display option.

10
There are several display (filter) options for the library :
1. Library items – this will display all Library items in alphabetical order – first folders and then files. If you use Edmodo for multiple classes, your folders/files will be respectively mixed together, unless of course, you have properly named them starting with the class, then the unit. For this reason, “Library Items” is not a very productive display method.
2. Folders – this will display only the folders that you have created to contain the files you’ve uploaded. These folders will be arranged in alphabetical order, so in order to have multiple classes grouped together, it is important to name each folder logically (see above and next page for more information on this).
3. Attached to Posts – this will display only those files that you have attached to a post (this can be useful to quickly find an assignment you have given to students).
4. Google drive – You can link your Google Drive to Edmodo. This option will allow you display and use your files from Google Drive to upload (or post) in Edmodo

11
Folders
This is where you will upload and organize your course materials.
a) Plan out how you will organize your course materials. (Note that you can only create one level of folders, that is, you will not be able to put a folder inside another folder.) It is recommended that you create a folder for each unit.
b) Click on “Add folder”.
c) Click on “New folder”, give the folder a name and click on “Add”.
a. Because Edmodo only allows one level of folders under each group (that is, you cannot currently have subfolders), it is important that each folder identify the group and then the topic (otherwise, when you open your library, all the folders from every group will be jumbled together). The following naming system is recommended.
Class-Unit#-Unit name
For example: FR2 – Unit 1 – Personal ID

12
d) Repeat this process until you have added a folder for each of your units. Notice that Edmodo will put the most recently created folder on top. You can reorder these folders by dragging them into the correct order.
e) Use the columns of dots to change the order of folders.
f) Click on the “Disable” button to prevent group members from viewing the contents of this folder. Click “Enable” to allow group members to view the contents of the folder.
g) Click on the “Remove” button to remove the folder. (Be careful: removing a folder will also remove the contents of the folder as well.)

13
Adding documents to a folder
a) Click on “Add to folder” to choose from 3 options: Upload file, New link or Add from Library
b) For the most part, you will use the 1st option: Upload file from your school computer. Click on “Upload file”.
c) Click on “Upload Files”. Locate the file on your school server. (I have created two files for you to practice uploading to folders:
a. Sample Word doc
b. Sample PDF
d) Click on “Choose”. The computer will upload the file. Once complete, click on “Add”.
14
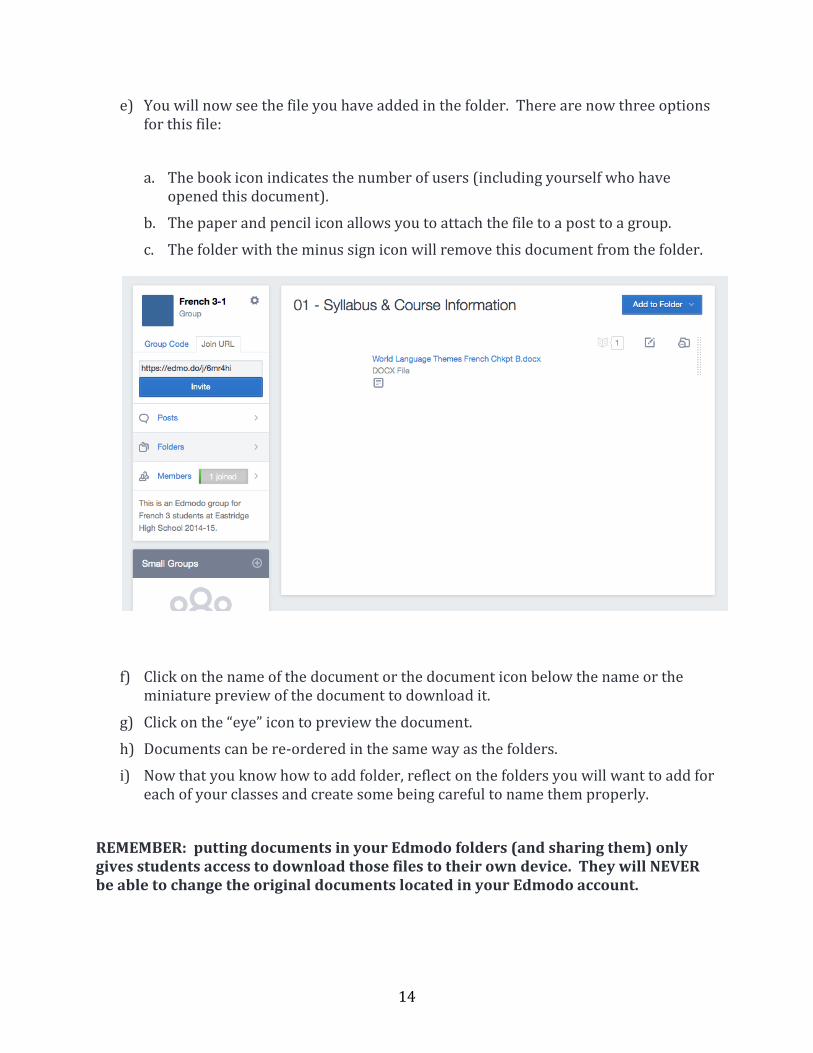
e) You will now see the file you have added in the folder. There are now three options for this file:
a. The book icon indicates the number of users (including yourself who have opened this document).
b. The paper and pencil icon allows you to attach the file to a post to a group.
c. The folder with the minus sign icon will remove this document from the folder.
f) Click on the name of the document or the document icon below the name or the miniature preview of the document to download it.
g) Click on the “eye” icon to preview the document.
h) Documents can be re-ordered in the same way as the folders.
i) Now that you know how to add folder, reflect on the folders you will want to add for each of your classes and create some being careful to name them properly.
REMEMBER: putting documents in your Edmodo folders (and sharing them) only gives students access to download those files to their own device. They will NEVER be able to change the original documents located in your Edmodo account.

15
Review: Posts
a) This is where your class’ posts will appear.
b) Notice that you can sort your posts by a variety of factors: posts by you, by your
students, by date, or by type of posts.
c) There are also several different kinds of “posts”:
a. Notes – sends a short note to a group. Example – Warmup Question: In
what country would you most like to study abroad in college?
b. Alerts – sends an urgent note to the group. Example: “Mr. X’s 3rd block
History class will take place in the Library today.”
c. Polls – send a multiple choice question to a group. Example – “Should cell
phones be allowed in classrooms at Eastridge HS?” (Answers: Yes, No,
Maybe)

16
d. Assignments – this function allows you to post an assignment with a due date
including attaching a file or link.
e. Quizzes – this function allows you to post a quiz with a due date including
attaching a file or link.

17
Review: Notes
a) Type the note in the large box.
b) Choose the class (group) to which to send this note. (Note: you can send a note to
multiple groups at the same time or to individual students.)
c) Upload a file that will be attached to this note by using the first icon on the lower left
that looks like a document. (optional)
d) Upload a link that will be attached to this note by using the 2nd icon on the lower left
that looks like a chain link. (optional)
e) Upload a file that will be attached to this note that you already have uploaded into
your Edmodo Library using the 3rd icon on the lower left that looks like an open
book. (optional)
f) Click on send to send the note immediately OR click on the “Clock” icon in the lower
left to schedule a date/time for the note to be sent out.
g) Keep in mind that students can respond to posts and their language is not restricted
and all members of the group can see them (including parents if they are members
of your Edmodo group). You will have to teach them good digital citizenship and set
up the expectation that only school-appropriate language is acceptable in Edmodo
(unlike, for instance, posts that can be seen on a student’s Facebook page).
h) As the teacher, you are able to edit or delete any of the students’ posts.

18
Review: Alerts
a) The NOTE and the ALERT have basically the same function. The Alert is designed to
be more of an urgent message and therefore is restricted to no more than 140
characters in length. It will be displayed in a larger font and in bold to recipients
and will appear in the “Notifications” section of the Edmodo screen.
b) Type the alert in the box.
c) Choose the class (group) to which to send the alert. (Note: you can send an alert to
multiple groups at the same time or to individual students.)
d) Click on send to send the alert immediately OR click on the “Clock” icon in the lower
left to schedule a date/time for the alert to be sent out.

19
Review: Polls
a) Enter the question you would like to ask the class.
b) Enter at least two and up to nine different answer choices. (Two answers are the
default number. Click on the “Add Answer” button for more boxes.)
c) Choose the class (group) to which to send this poll. (Note: you can send a poll to
multiple groups at the same time or to individual students.)
d) Click on send to send the poll immediately OR click on the “Clock” icon in the lower
left to schedule a date/time for the poll to be sent out.
e) Each member of a group can only vote once. All poll answers are collected
anonymously, that is, the student’s identity is not revealed as the poll results come
in.

20
Assignments
a) Required steps to create an assignment:
a. Enter the assignment title
b. Enter a description for the assignment
c. Choose the due date.
d. Choose whether to lock the assignment after its due date or not. (Locking the
assignment means that Edmodo will not accept assignments being submitted
after the due date.)
e. Choose the class (group) to which to assign this assignment. (Note: you can
assign an assignment to multiple groups at the same time or to individual
students.)
f. Click on send to send the assignment post immediately OR click on the
“Clock” icon in the lower left to schedule a date/time for the post to be sent
out.
b) Additional options for assignments:
a. Attach/upload a file(document, PDF) that will be used for the assignment by
using the first icon on the lower left that looks like a document.

21
i. Note: while you can add as many files as you want to this assignment,
you must upload them individually (which can be time consuming).
Unfortunately, there is not currently a means by which to select
multiple files and upload them all at once. Maximum file size is
100MB, but there is no limit on the total number of files.
ii. You can also attach/upload a file that you already have uploaded into
your Edmodo Library using the 3rd icon on the lower left that looks
like an open book.
b. Attach/upload a link (a website that the students will use to complete the
assignment) by using the 2nd icon on the lower left that looks like a chain link.
c) If you have already assigned an assignment (for another class or in a previous year),
you can “Load” it from the Library. Click on “Load Assignment” and Edmodo will
display all previously assigned assignments. Choose the one you want and change
any of the settings (due date, attached files, group(s) to which it should be sent,
etc…)
d) Practice: Use the “assignment worksheets” (document, PDF) provided to you to
enter two practice assignments with each of these files attached.
e) Practice: Add a link to the assignments (can be any website such as
www.google.com).
Sample Teacher assignment screen

22
Editing an assignment
a) To edit the written part of an assignment, find it and click on the top right-hand corner on the “Pencil” icon.
b) Once an assignment is posted, you are not able to remove an uploaded file or add any new files to the assignment.
The students’ assignment screen
a) When you send an assignment to a class (or an individual), the student will click on that class (as he/she might join multiple classes taught by other teachers), and will see a screen similar to the one below labeled “Latest Posts”:
b) The assignment screen indicates I, as the teacher, have assigned this “Sample assignment” to the class called EHS FR2-1, of which the student is a part. The due date is clearly listed, as is the time that I posted the assignment. The assignment is also listed in the “Notifications” section (bell) of the student’s screen.
c) The student can choose to “Reply” if he or she has (a) questions about the assignment or (b) a helpful hint to complete the assignment.
d) To submit a completed assignment, the student clicks on the “Turn In” button.

23
e) The student is brought to the above screen on which he/she will:
a. Type in the answer the assignment in the top box;
b. Add a “reaction” in the form of an emoticon (this requires students to reflect on the assignment – DON’T take this personally!!);
c. If necessary, students can use one of the three button below the “reaction” emoticons to :
i. Upload a file (worksheet, word document, PDF) using the 1st icon that looks like a page;
ii. Attach a link to a website by using the 2nd icon that looks like a chain link;
iii. Upload a file from his/her “backpack”(remember this is the equivalent of the student’s “library”).
iv. Students can also type in comments about the assignment.

24
d. The student then clicks on the “Turn in Assignment” button to submit.
e. Once submitted, the student will be shown the following screen:
f. Notice that students have a button that allows them to “Resubmit the Assignment” (by the due date) if they wish.
g. The student’s screen will show that the assignment is “awaiting grade”, meaning that the teacher has not yet graded it.

25
Monitoring which students have turned in their assignments
a) When you open an assignment that you have assigned to a group, Edmodo displays the number of students that have turned it in along with the due date.
b) Click on “Turned in” to view a detailed list of which students have submitted the assignment.

26
Grading an assignment
a) On the teacher screen, you can see on the assignment post how many of your students have turned in the assignment.
b) To grade an assignment, click on the “Progress icon” along the top of the screen (heartbeat shape) and choose the class for which you will grade the assignment.
c) The students to whom the assignment was assigned are listed along the left margin. Notice that the “Sample Assignment” appears in a table with the grade listed (0% as it is not yet graded) and the status for the student’s assignment “Turned In”.
d) Click on the word “Turned In” for the first student and the following screen will appear:
a. To view the student’s work, click on “View work”.
b. To enter a grade immediately, enter the score and the total possible points.
c. The same can be done when you view the students work on the screen on the next page.

27
d. As the teacher, you can enter the grade and possible points in the upper right and click on the “Grade” button. (Edmodo permits you to enter alpha characters, such as “A, B, C, D” or even words such as “Excused”, but these cannot be used to calculate the student’s average.)
e. You can also type a note to this student and click on “Add comment”.
f. Notice that there is a pull-down menu in the upper left-hand corner. You can choose to have Edmodo show you assignments that meet the following criteria:
i. All assignments;
ii. All ungraded assignments;
iii. All graded assignments;
iv. All students names who have not yet turned the assignment in.

28
e) Once you have graded the assignment, the student will see the following screen:
f) You may change or delete a grade at any time. Click on “Clear” and re-enter the correct grade. Students are alerted about any changes in grade via their Edmodo account.
g) If you use Edmodo frequently for assignments, you can use the “Export” button in the upper right-hand corner of the grade sheet for any class to export the grades to a CSV (comma separated values) file that can be read by Excel.

29
Creating a new grade (without adding an assignment)
a) On the grade screen, click on the “New Grade” button in the upper left. The dialog box below will appear.
a. Enter the description for the grade
b. Enter the total possible points.
c. Click on “Create New Grade”.
b) Edmodo will add another column to the left in the grade sheet for this new grade.

30
Annotating an assignment
a) After a student has “turned in” his or her assignment, the teacher may annotate that assignment provided that it was submitted in one of three possible formats:
a. Microsoft Word Document
b. Microsoft PowerPoint Presentation
c. PDF (Adobe Portable Document Format)
d. Notice that I as the teacher can now click and open the DOC file that the student attached to this assignment.
b) Click on the pencil icon below the document name (the word “Annotate” will appear if you hover your mouse over the icon).

31
a. Across the top menu, you can find four buttons:
i. Zoom out (magnifying glass with a minus sign)
ii. Zoom in (magnifying glass with a plus sign)
iii. Comment (menu that expands to allow you to put comments on top of the student’s assignment).
iv. Download (this would be used if you wanted to keep a copy of the assignment outside of Edmodo; while this can be useful to track a particular student’s progress, it can be very time-consuming to download all of your student’s work).
b. Comments
i. Click on the comment button to get the following expanded menu:
1. Comment (with a further pull-down menu) – similar to the “track changes” function of Microsoft Word, you can enter several different types of comments:
a. Point comments – your comments will be placed in the right margin with a line pointing to the portion of the student’s text to which the comments apply.
b. Area comments – your comments will be placed in the right margin with a box around the portion of the student’s text to which the comments apply.

32
c. Text comments – your comments will be placed in the right margin with the portion of the student’s text to which the comments apply being highlighted.
2. Draw – click on the “draw” button and literally draw on the student’s assignment.
3. Highlight – click on the “highlight” button to highlight words/sentences on the student’s assignment. You can also change the color of the highlighting.
4. Add a free-floating text box (not attached to a comment along the right margin) – click on the “text” button, click somewhere on the student’s assignment and begin typing. You can also change the size and color of the font.
5. To strike-out (put a line through) portions of the student’s text, click on the “strikeout” tool and then select the text.

33
c) There is no need to “save” the annotations (in fact, there is no “save” button). All annotations are automatically saved by Edmodo.
d) To delete any of your annotations, simple click on one and type the “Delete” button on your keyboard. You will be prompted with a confirmation of whether you really want to delete or not.
e) Keep in mind that all annotated files will redownload as “flattened” documents in PDF form. That is, the annotations are added permanently to the document. While the student can further annotate it (change highlighting, add textboxes and even reply to your comments), the annotations cannot be deleted by the student.

34
Quizzes
Creating an online quiz on Edmodo
a) Click on Quiz on the “Post” bar along the top margin.
b) From here you will choose “Create a Quiz”. (Note that you can also “Load a previously created quiz”.)
c) In the box in the upper left, give a meaningful name to the quiz. (Note: naming conventions for files and quizzes are very important so as to be able identify and locate quizzes in the future. I suggest naming each quiz in the same way you would name a file: Course – Unit – Topic of Quiz. Here are several examples:
a. FR2 – Unit 3 – Quiz 02 – Family members
b. IB Physics 11 – Unit 2 – Quiz 03 – String Theory
c. NOTE: simply naming a quiz “Quiz 02” will not give you enough information
d) Enter the time limit (in minutes) in the box marked as such in the upper right-hand corner. This is the amount of time that students will have to start and finish the quiz. Keep in mind that these online quizzes can be completed in class under your supervision OR you can assign them as homework, in which case you cannot control

35
when the student will complete the quiz, but you can control how long the student has to complete the quiz once he/she decides to start it.
e) Before you type in each question, you must first indicate the type of question. You have the choice of:
a. Multiple choice
b. True/false
c. Short answer *
d. Fill in the blank*
e. Matching
*Note: Edmodo can easily grade multiple choice, true/false, and matching questions as the correct answers are very clear. Keep in mind that you must be very clear in asking short answer or fill in the blank questions to students to guide them to a singular answer.
Examples of clear short answer questions:
What is the atomic symbol of silver? In what year did the French Revolution take place (write the numeral)?

36
Examples of unclear short answer questions (where a correct answer could be marked wrong because of lack of clarity in the question):
Name a long, yellow fruit in French. (Should the answer be in the singular “banane” or the plural “bananes”? Should the answer include an article (definite, indefinite) “une banane”, “les bananes”. Students will get unnecessarily discouraged if they enter an answer which is correct, but is stated differently than you entered.
Who wrote the novel “Light in August”? (Should the student give the author’s full name or just their last name?)
f) After choosing the question type, click on “+Add first question” and type in the actual question and answer(s) following the prompts from Edmodo. If a question is a multiple choice or true/false question, make sure to click on “Set as Correct Answer” next to the correct answer. Repeat steps “E” and “F” for each question in your quiz. Note that you can attach a link or library item to any question. (insert screen shot from question)
a. For matching questions, you will enter the prompts in one column and the correct answers in the corresponding other column. (Students will “re-arrange” the answers until they match up with the correct prompts.)
b. For short answer questions, simply type in the correct answer in the box. Edmodo will NOT grade short answer questions, but will prompt you to “grade” these as correct or incorrect for each student.
c. For fill-in-the-blank, type in your question and enter underscores in place of the word to fill in (for example: The name of our school is _______________.). The number of underscores does not have to correspond exactly with the number of letters in the answer. Once you enter the prompt, Edmodo will copy it below the prompt and insert a box where you put the underscores. In this box, you will type the word to be filled in.
g) Quizzes, like assignments, are automatically saved (that is, you don’t need to save them at certain intervals). Click on “assign quiz” to assign it to a particular class or classes along with a due date and time limit.

37
Loading questions from a previously created quiz
(This information is being provided to the participant, but this skill will not be covered in the
course.)
a) If you already have a question in a previously created quiz that you would like to use, instead of typing in the question and answers, choose the “Load Question”.
b) A box labeled “Load a previously created Question” will appear with ALL of the questions you’ve ever made on Edmodo.
c) Choose the question you wish to include.
d) If you have many questions, you can quickly find a particular question by using the “Search” feature. Type in a key word and Edmodo will display the questions from your bank that meet the criteria.
Previewing a quiz
a) It is highly recommended to use the “Preview quiz” feature and take the quiz
yourself as the teacher to make sure that there are no errors and that the correct
answers have been designated.
b) Click on “Preview” below the “Assign quiz” button to see the actual quiz that
students see.
Assigning quiz to a class (or classes)
a) Once your quiz is ready to go, you must assign it to a class or multiple classes.
b) Click on “Assign quiz”.
c) Choose the class or classes to which to assign the quiz.
d) Choose a deadline date by which the quiz must be taken by students.
e) Choose whether to “Add the Quiz Score to the Gradebook” or not. If you are using a quiz as a pretest or a check for understanding, you may not want to put the grade in the gradebook.

38
Printing a quiz
a) If you wish to have a printed copy of the quiz, click on “Print” below the “Assign
quiz” button.
About this quiz – enter a description of the quiz (optional)
a) Entering a description for the quiz is helpful for students and parents, but also for you to reuse a quiz from year to year.
b) The description can include a synopsis of the quiz or instructions.
Quiz options
c) Show results – click this box to show the results to the individual student immediately after they complete the quiz. Keep in mind that if students are taking this quiz online and you show them the results when they are done, students will be able to communicate with others who have not yet taken the test about the correct and incorrect answers.
d) Randomize questions – click this box to display questions in a random order to each student who takes it. Note: for quizzes done during class, I recommend not checking this box, that is, keep the questions in a pre-established order, so that you can go over the quiz together. For quizzes that you assign online (meaning students will may take the quiz at different times so long as it is before the deadline), it is a very helpful tool to randomize questions. This prevents students from colluding on the test (meaning two students who arranged to take the quiz together while communicating with each other via phone or in person will not be able to take the quiz together because each student will be shown questions in a different order).
e) Note: students can begin a quiz and then leave the Edmodo webpage and the answers they have entered will be saved. The quiz will remain open and students will be able to log back into Edmodo and reopen the quiz provided that the time limit has not expired. This obviously presents opportunities for cheating so it is important to designate an appropriate time limit that is long enough for a student to reasonably complete the quiz but not so long that they could start the quiz, leave and go get information, and then return to the quiz.

39
Taking a quiz
a) The following information is displayed:
a. Name of quiz
b. Due date
c. # of questions in the quiz
d. Time that teacher sent the quiz notification out
e. Students will click on “Take Quiz”.
b) The next screen will display:
a. The name of the quiz
b. The description of the quiz
c. The # of questions
d. The time limit of the quiz in minutes
e. Students click on “Start Quiz”.
c) Quiz screen
a. Name of quiz
b. Progress bar in the upper middle of the screen showing how many questions the student has completed and the remaining time.
c. Each question is displayed with any answers as well as its point value.
d. Along the left margin will be the question numbers. Students can click on the question numbers to answer the question or to go back and review their answers. Students can also click on the “Previous” and “Next” buttons to navigate between questions.
e. Along the right margin is the “Submit Quiz” button which students will click when they have finished, the description of the quiz and the teacher’s name who designed the quiz.
f. Note: If a student doesn’t finish the quiz before the time limit has expired, Edmodo will automatically close the quiz and submit the answers. All unanswered questions will be marked as incorrect.
40
Grades
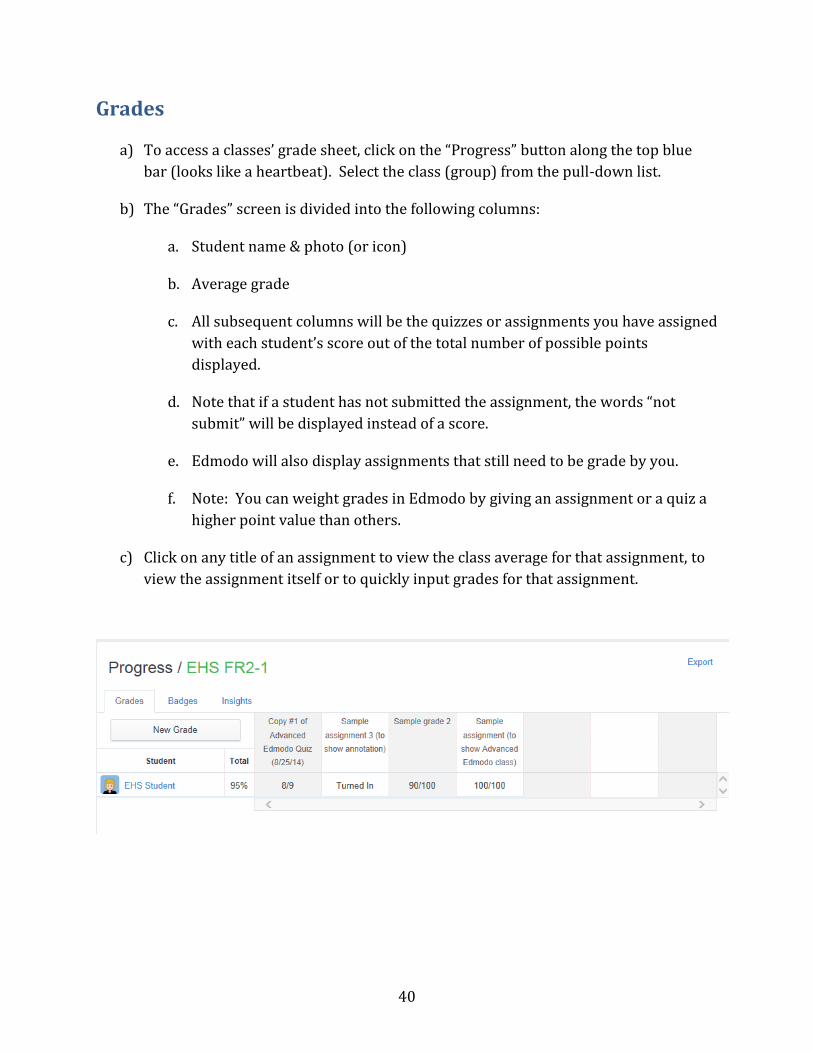
a) To access a classes’ grade sheet, click on the “Progress” button along the top blue
bar (looks like a heartbeat). Select the class (group) from the pull-down list.
b) The “Grades” screen is divided into the following columns:
a. Student name & photo (or icon)
b. Average grade
c. All subsequent columns will be the quizzes or assignments you have assigned
with each student’s score out of the total number of possible points
displayed.
d. Note that if a student has not submitted the assignment, the words “not
submit” will be displayed instead of a score.
e. Edmodo will also display assignments that still need to be grade by you.
f. Note: You can weight grades in Edmodo by giving an assignment or a quiz a
higher point value than others.
c) Click on any title of an assignment to view the class average for that assignment, to
view the assignment itself or to quickly input grades for that assignment.

41
Group Options
a) Navigate to a particular group.
b) Members – this section on the left margin indicates the number of current members. Click on the word “Members” to expand and see all members of the group.
a. The names and photos/images of each member are located in the body of the site.
b. You can click on any member’s name to see his/her profile.
Settings
a) Click on the “Gear” next to the group name to change any of the settings such as:
a. The group name
b. Default new members to “read-only”
c. Change the grade level or set a range of grade levels
d. Change the subject area
e. Archive a group – click on “Group settings”, then “Archive group”. When a group is archived, no one can post or add anything to it (view access only), however, you can unarchive at a later date.
f. Delete a group – when a group is deleted, all group members are removed from the group (students will still have an Edmodo account, but they will not be members of the previous group) and all posts associated with the group will also be deleted. Items in your Library will not be deleted.

42
Managing members
a) Click on any group (class) to see the members. Click on the word “Members”.
b) This screen allows you to view the student’s full name and any parents associated with that student’s account.
c) Click on a student’s name to get more details: full name, username, profile, grades, type of access (“Student”).
d) With the students’ names displayed, you can click on “More” to do the following:
a. change a member to “Read-only” or “Contributor”;
b. reset a student’s password;
c. remove a student from a group (this deletes all of their grade information);
d. generate a parent code from this screen.
e) You can also create small groups within a class in this
screen.
43
Parent Codes
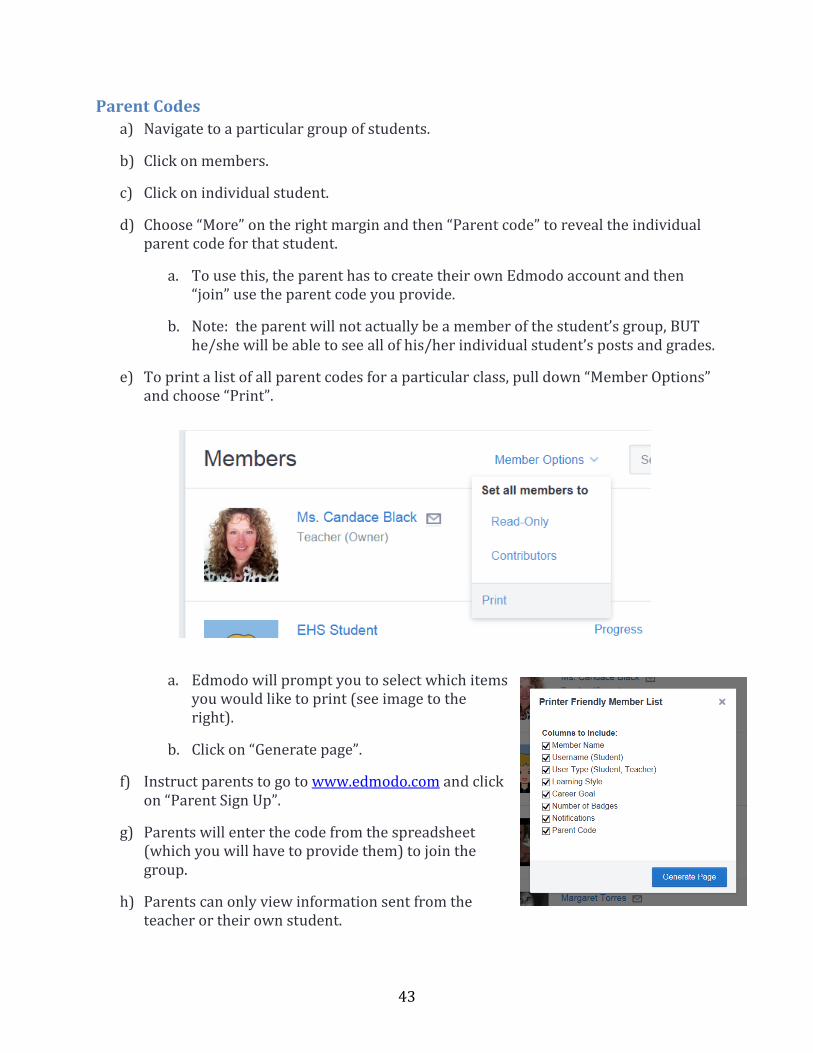
a) Navigate to a particular group of students.
b) Click on members.
c) Click on individual student.
d) Choose “More” on the right margin and then “Parent code” to reveal the individual parent code for that student.
a. To use this, the parent has to create their own Edmodo account and then “join” use the parent code you provide.
b. Note: the parent will not actually be a member of the student’s group, BUT he/she will be able to see all of his/her individual student’s posts and grades.
e) To print a list of all parent codes for a particular class, pull down “Member Options” and choose “Print”.
a. Edmodo will prompt you to select which items you would like to print (see image to the right).
b. Click on “Generate page”.
f) Instruct parents to go to www.edmodo.com and click on “Parent Sign Up”.
g) Parents will enter the code from the spreadsheet (which you will have to provide them) to join the group.
h) Parents can only view information sent from the teacher or their own student.

44
i) Parents cannot send messages to other students or other parents, only to the teacher and their own student.

45
Awarding a badge to a student
a) Edmodo has pre-made badges that you can award to student (such as “Star Performer” or “Student of the Month”). Before awarding a badge to an individual student, you must first add a badge (or multiple badges) to the particular class (this makes the badge available to the class. Once the badge is added to the class, you may award it to any student in that class. You may also retract badges from students. When you award a badge to a student, they receive a notification and can access the badge from their profile or progress screens.
b) Click on the “Progress” button along the top blue bar (looks like a heartbeat). Select
the class (group) from the pull-down list.
c) Click on the “Badges” tab and then on the button “Add badges to this group”.
a. This screen is divided into two sections: “My Student Badges” (these are badges that you make) and “By Edmodo” (these are badges that Edmodo has made that you can use. In the beginning, you will not have any “My Student Badge”. Information on how to create your own badges can be found on the following pages.
b. To add a badge to a class from this screen, click on ONE badge and click the blue button labeled “Add badge to this group”. Currently, you can only add one badge at a time to a class. If you have more than one section of a class (for instance French 2, Sections 1 & 2), you must add the badges to each class.

46
c. The badge will appear in the table (student list). Simply click on the square underneath the badge that corresponds to the student to whom you would like to award the badge. A checkmark will appear in the square – the badge has been awarded and the student will be notified.
d. To retract the badge, simply click again in the square and the checkmark will disappear. Students are NOT notified when you retract a badge (only when you award them).
47
Creating a student badge
a) You as the teacher can also create your own student badges using the following process:
a. Give the title to a new badge.
b. Enter a description of the badge (what does the student have to do to achieve it?).
c. Upload an image for the badge.
b) Planning is essential in order to make a badge properly. Here is what you must consider:
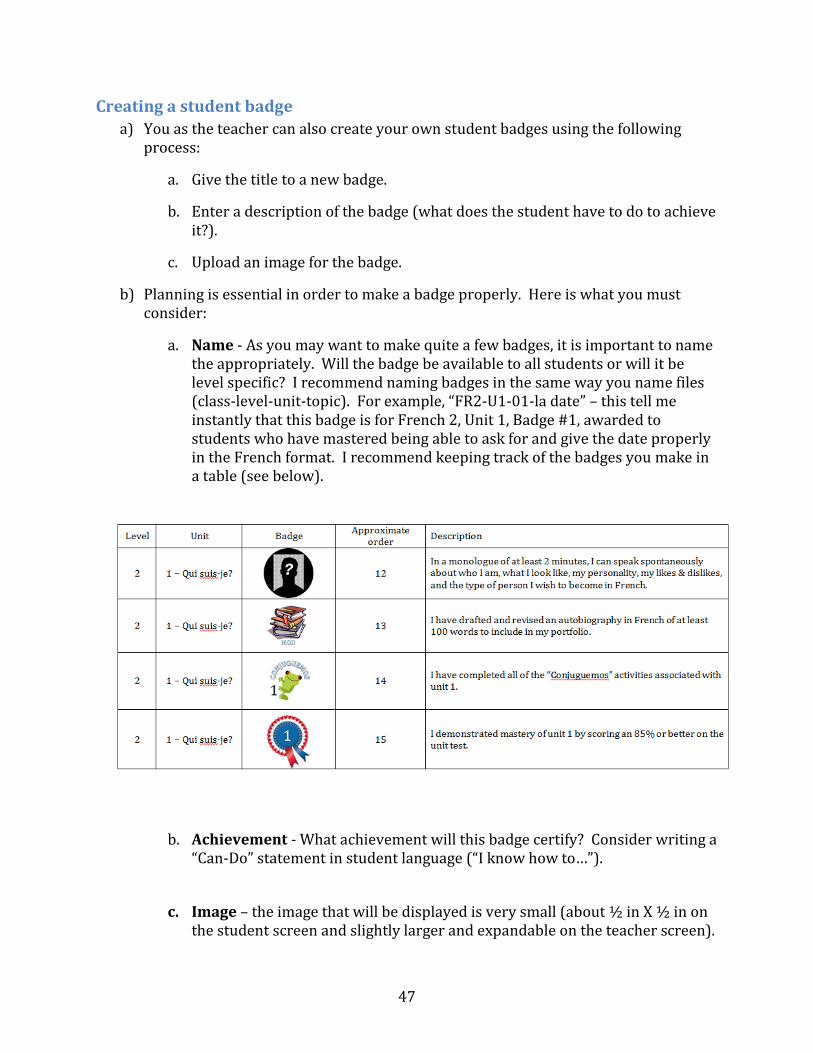
a. Name - As you may want to make quite a few badges, it is important to name the appropriately. Will the badge be available to all students or will it be level specific? I recommend naming badges in the same way you name files (class-level-unit-topic). For example, “FR2-U1-01-la date” – this tell me instantly that this badge is for French 2, Unit 1, Badge #1, awarded to students who have mastered being able to ask for and give the date properly in the French format. I recommend keeping track of the badges you make in a table (see below).
b. Achievement - What achievement will this badge certify? Consider writing a “Can-Do” statement in student language (“I know how to…”).
c. Image – the image that will be displayed is very small (about ½ in X ½ in on the student screen and slightly larger and expandable on the teacher screen).

48
In order for the image to be meaningful, it must be rather small and uncomplicated. Very little text will be able to be legible given the size.
i. Badges are displayed in circular format, so the original image must fit in a ½ in. X ½ in. circle (but can be resized).
ii. Find a simple image on the internet. Copy it into “MS Paint” (Start menu, Accessories).
iii. Draw a circle (click on the circle icon, hold down the shift key (this makes a perfect circle instead of an oval), and drag the mouse until you have a circle of approximately the correct size.
iv. Resize the circle and place it over the image so that the image is approximately in the center, keeping in mind that Edmodo will crop a small ring around the interior of the circle which will not be visible in the badge, so leave a little bit of room around your image.
v. Click on the “Rectangular selection” tool. Click and hold the mouse as you draw a square tightly around the circle.
vi. Click on the crop button. This will crop your image to the size of the selected rectangle.
vii. Save your image with a meaningful name.
49
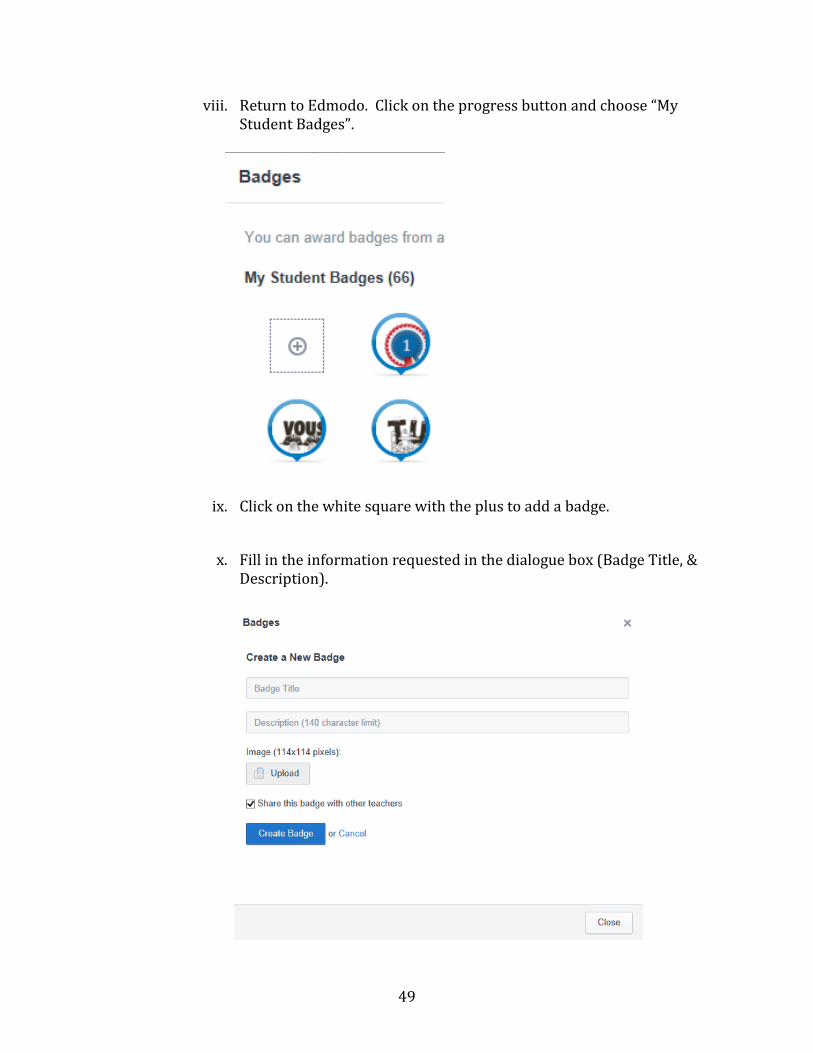
viii. Return to Edmodo. Click on the progress button and choose “My Student Badges”.
ix. Click on the white square with the plus to add a badge.
x. Fill in the information requested in the dialogue box (Badge Title, & Description).

50
xi. If you wish to share this badge with other teachers, click the box that is labeled “Share this badge with other teachers”.
xii. Click on the “Upload” button and navigate to the badge image you saved from MS Paint. Select it. Edmodo will need 5-10 seconds to complete this process.
xiii. Click on the “Create badge” button. Your new badge will be added to your list of student badges and is now available to add to classes and then awarded to individual students.
c) Note: Before awarding your first badge to a student (or announcing to students that you will be awarding badges), make sure that you are prepared to consistently devote time to this during the year (weekly or bi-weekly). Badges can be very motivating for students, but if they perceive that you are not consistent in awarding them, the badges will lose their effectiveness.

51
Designating a colleague as a “co-teacher”
Other teachers (such as those you co-teach with or aides) can join any of your groups with
the join code. Since they have a teacher account (as opposed to a student or parent
account), once they join they group, they can add assignments, polls and alerts like the
primary teacher, but they cannot manage students.
To designate a teacher who has joined your group as a “co-teacher” with all the rights and
privileges therein, open the Edmodo group, click on “Members” – all students’ and other
teachers’ names will appear. To the right of the teacher’s name, you will see the word
“More” and a downward arrow. Click on this arrow to pull down a menu that allows you to
designate his or her as a “Co-Teacher”. This is also the screen you will use to remove a
teacher from a group.
If you are Co-Teacher, you must join the primary teacher’s group and then request that the
teacher-owner of the Edmodo group change your status to “Co-Teacher”.

52