Advance your website creation skills using Word Press and...
16
Advance your website creation skills using Word Press and take your skills further with this fast paced workshop. Refine current Word Press websites, add additional features and drive more traffic to your site In this extension to Build and Publish a website we will look at additional/optional features available in Wordpress, and some more Plug-ins. It is hoped that there will be some time at the end for questions. Contents Recap................................................................................................................................................... 2 Style Sheets – CSS ............................................................................................................................... 2 Forms .................................................................................................................................................. 3 Maps ................................................................................................................................................... 4 Tables .................................................................................................................................................. 5 Akismet ............................................................................................................................................... 5 CPanel / web host portal .................................................................................................................. 13 Create and manage Users ................................................................................................................. 14 HTML ................................................................................................................................................. 15 Widgets ............................................................................................................................................. 15 Google Fonts ..................................................................................................................................... 16
Transcript of Advance your website creation skills using Word Press and...

Advance your website creation skills using Word Press and take your skills further
with this fast paced workshop. Refine current Word Press websites, add additional
features and drive more traffic to your site
In this extension to Build and Publish a website we will look at additional/optional
features available in Wordpress, and some more Plug-ins.
It is hoped that there will be some time at the end for questions.
Contents Recap ................................................................................................................................................... 2
Style Sheets – CSS ............................................................................................................................... 2
Forms .................................................................................................................................................. 3
Maps ................................................................................................................................................... 4
Tables .................................................................................................................................................. 5
Akismet ............................................................................................................................................... 5
CPanel / web host portal .................................................................................................................. 13
Create and manage Users ................................................................................................................. 14
HTML ................................................................................................................................................. 15
Widgets ............................................................................................................................................. 15
Google Fonts ..................................................................................................................................... 16

Recap
In the Introduction we looked at creating pages, adding images and hyperlinks,
changing themes, adding themes, creating a custom menu and adding some plug-
ins
You are again starting with an empty shell of a site, unless you are able to continue
with a site from the previous class.
Create a page or two, insert some Lorem Ipsum text if you wish
(http://lipsum.com/).
Recommended pages would be Contact Us and Sale items.
For the theme, install Opportune (https://wordpress.org/themes/opportune/) and
make it our default theme.
If you like, in Appearance > Customise, in the Header Image option select Hide
Image to remove the large image from every page.
This is a simple, free theme available in the Wordpress library.
If you wish to practice, create a custom menu.
Style Sheets – CSS
Style Sheets (or Cascading Style Sheets or CSS) is the method used to control the
look and layout of a page. This is core web language, not something unique to
Wordpress.
You can read up a lot more on what CSS is, as well as examples at W3 Schools
(http://www.w3schools.com/css/).
For this we need a plug in - Simple Custom CSS
(https://wordpress.org/plugins/simple-custom-css/)
Depending on your preferred Theme, you may not actually need to do this, but in
the case of Opportune, you also need this plugin.
Once Activated, you will find that you have an additional option under Appearance
called Custom CSS. Navigate to this option and you will find a big empty field.
CSS can be applied to all HTML Tags, or to selected Tags by using a Class or ID
to identify the particular Tag.
A nice easy way exercise would be to change the colour of all of the Heading 1’s.
To do this put this code into the CSS filed:
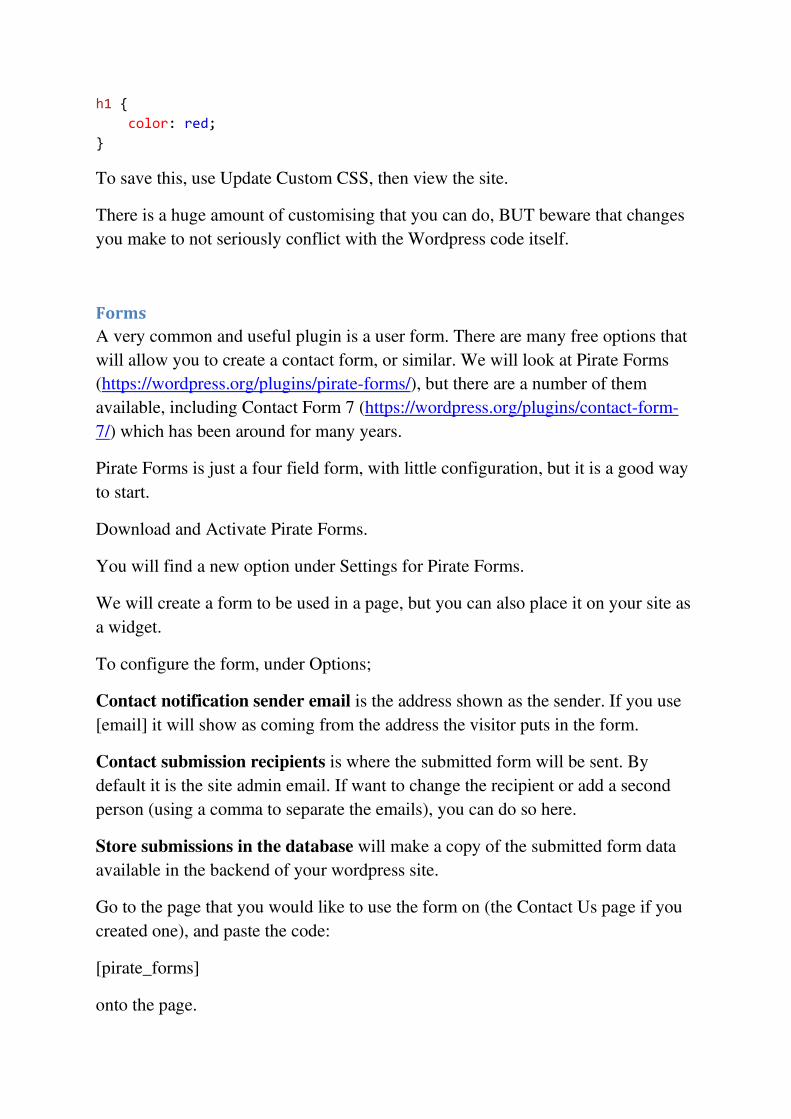
h1 {
color: red;
}
To save this, use Update Custom CSS, then view the site.
There is a huge amount of customising that you can do, BUT beware that changes
you make to not seriously conflict with the Wordpress code itself.
Forms
A very common and useful plugin is a user form. There are many free options that
will allow you to create a contact form, or similar. We will look at Pirate Forms
(https://wordpress.org/plugins/pirate-forms/), but there are a number of them
available, including Contact Form 7 (https://wordpress.org/plugins/contact-form-
7/) which has been around for many years.
Pirate Forms is just a four field form, with little configuration, but it is a good way
to start.
Download and Activate Pirate Forms.
You will find a new option under Settings for Pirate Forms.
We will create a form to be used in a page, but you can also place it on your site as
a widget.
To configure the form, under Options;
Contact notification sender email is the address shown as the sender. If you use
[email] it will show as coming from the address the visitor puts in the form.
Contact submission recipients is where the submitted form will be sent. By
default it is the site admin email. If want to change the recipient or add a second
person (using a comma to separate the emails), you can do so here.
Store submissions in the database will make a copy of the submitted form data
available in the backend of your wordpress site.
Go to the page that you would like to use the form on (the Contact Us page if you
created one), and paste the code:
[pirate_forms]
onto the page.

Preview the page. Submit the form, incorrectly first, then completely.
If you used a real email address it should be received almost immediately. If you
chose to store the form submission in the Database, then you will find an entry
under Contacts.
Maps
Adding a live map to your site can be useful for if you have an actual location, and
some map plugins offer additional options in addition to single points on a map,
like selecting areas (eg school zones, areas covered, etc).
For this plugin we will be using WP Google Maps
(https://wordpress.org/plugins/wp-google-maps/).
This is a free plug in, with cut down features from the paid version. As a result,
you will not be able to do everything, but if nothing else it will give you an idea of
the options you have available to you.
Install WP Google Maps and Activate the plugin
You will see a new option on the left side navigation called Maps
Select this, and under it you have the option of Maps.
Go into this, and start by clicking My first map (You may have to scroll to the
bottom of the first screen and click on “OK, Let’s Start”, though you could give the
developers feedback at this screen).
Under the tab General Settings, scroll down and you will see a map on the right
side.
Use the Left mouse button to move the globe, use the Zoom Level in the upper half
of the page to zoom in to the area that you want to use, and Right mouse button
click on the map in the lower part of the screen to add a location. You can move a
placed marker by clicking and dragging with the Left mouse button.
Once placed use Add Marker and Save Map.
Take note of the Short code: at the top of the page. This is probably [wpgmza
id="1"]
Go to the page that you would like to use the map on (possibly a Contact Us page),
and past this code onto the page.

Preview the page.
Now you probably want to fine tune your map, so back to the settings.
Under Marker Listing Options you can remove markers. You will probably want to
do this as the plugin comes with a marker in California that you don’t want.
Other options include using an area rather than a point, or a connected series of
lines.
You can also change the Theme to make the map look a bit more unique.
Save your changes.
Tables
A mainstay of layout for many years, tables have now returned to their primary
purpose of displaying data. Should you need to display information this way, there
is a plugin for that.
TablePress (https://wordpress.org/plugins/tablepress/) is an easy to use plugin for
creating tables.
Install and activate.
To create a table, you will see a TablePress section in the left side menu.
Use Add New Table. Name the table. Define settling like rows and columns.
There are a number of quite versatile options available, including the ability to add
an image into a table cell. You can also duplicate, add and delete rows and/or
columns.
Save your changes.
To insert the table, go to the page you wish it to appear on and paste the code
(possibly [table=/1]).
Akismet
A very useful plugin to filter spam. This plug in is bundled with Wordpress, so
does not need downloading, only activating and configuring.
This is also a difficult one to configure in class as it requires setting up an account,
to create your API key.
For commercial use, there is a fee.
I would not expect you to want to do this in class, and setting up dozens of email
accounts each year to cover students is preventative.
Pictures and a description will have to suffice.
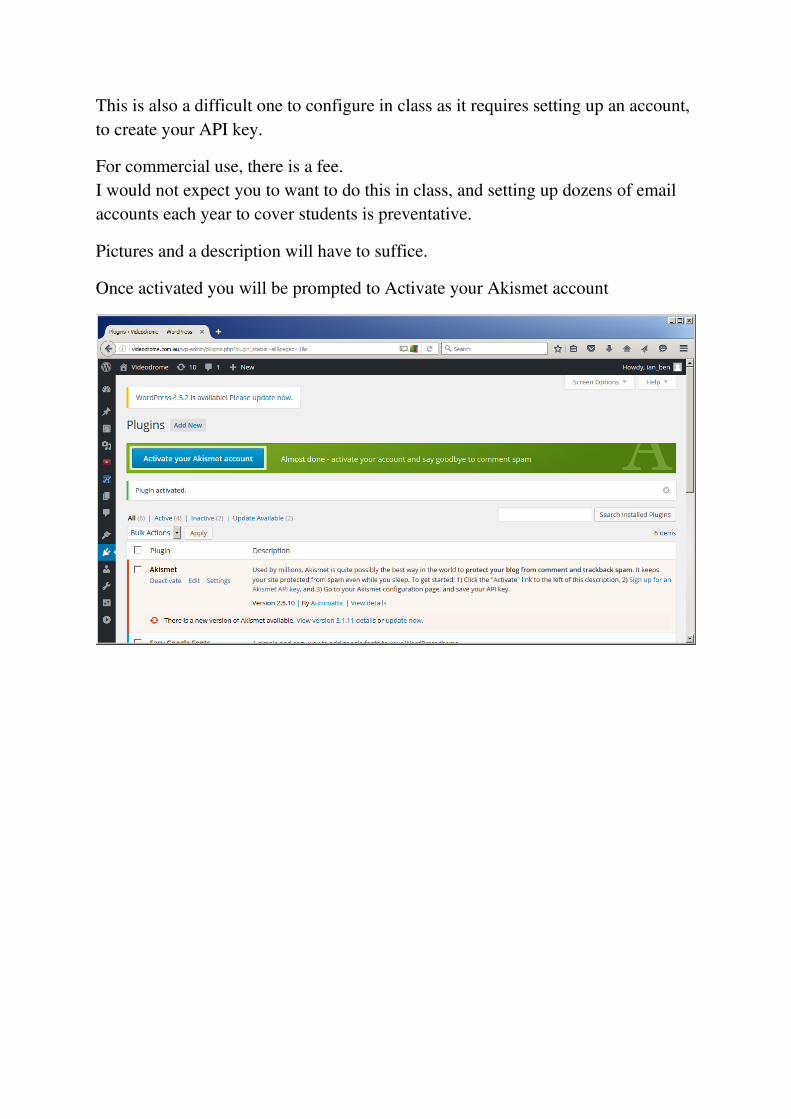
Once activated you will be prompted to Activate your Akismet account
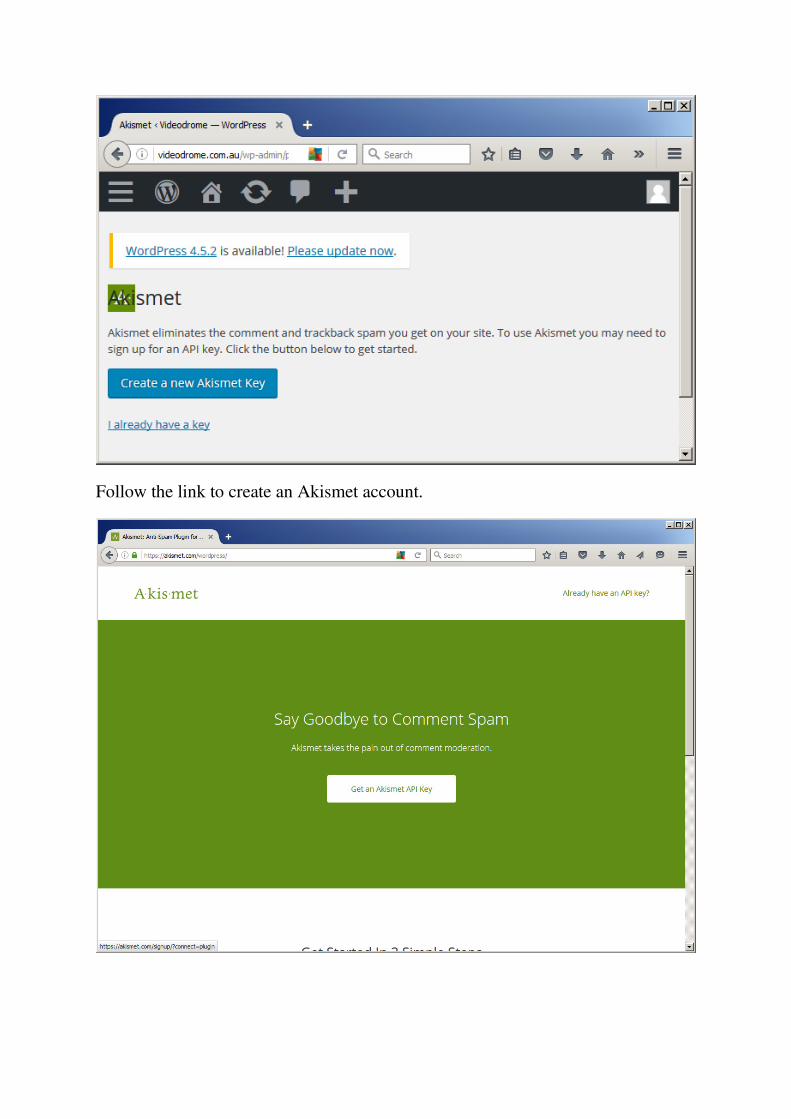
Follow the link to create an Akismet account.

Next, you have to nominate a plan. Unfortunately this service is not free for
commercial use.
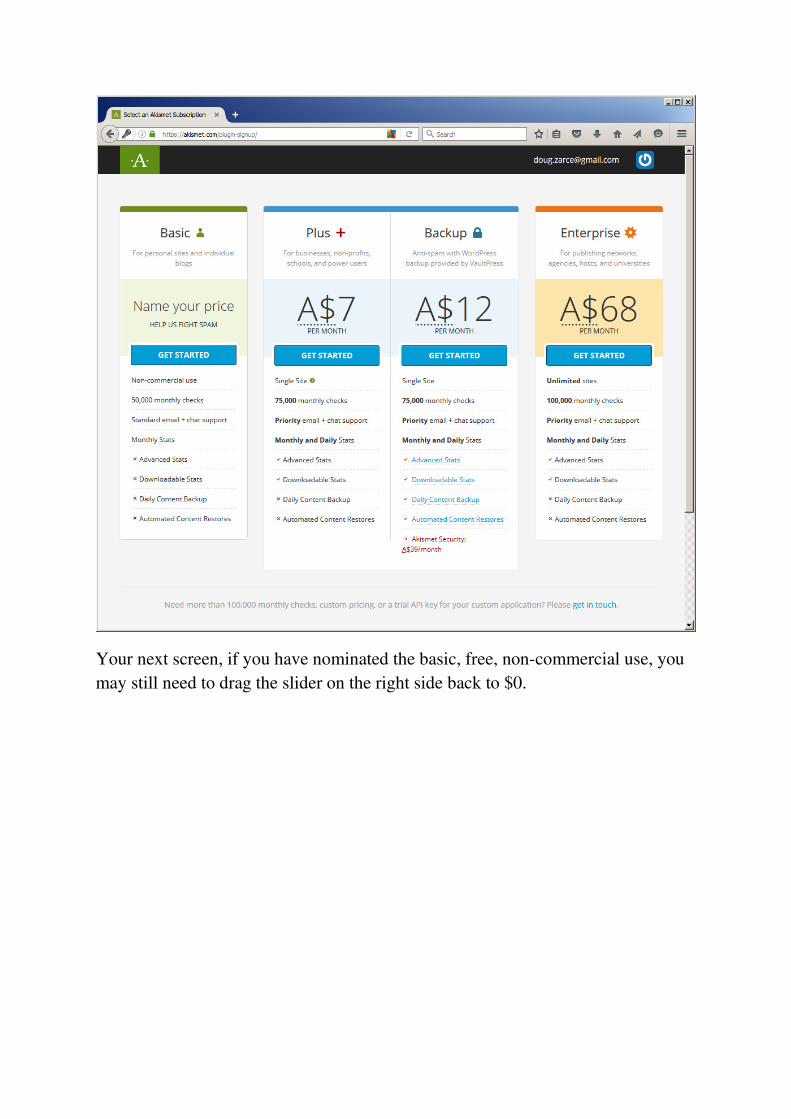
Your next screen, if you have nominated the basic, free, non-commercial use, you
may still need to drag the slider on the right side back to $0.

When finished you will be provided with an Akismet API key

You now have your Akismet API key.
Go back to your plugins page, you will find that there is an Akismet option in the
left side menu.
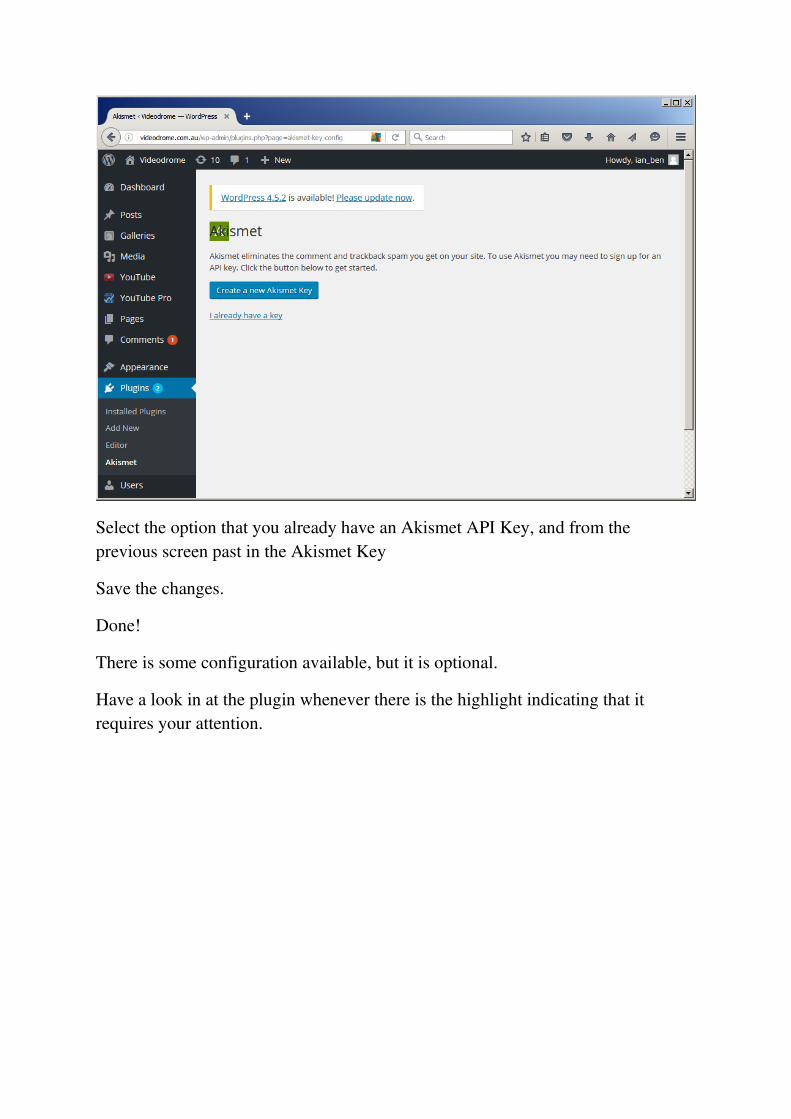
Select the option that you already have an Akismet API Key, and from the
previous screen past in the Akismet Key
Save the changes.
Done!
There is some configuration available, but it is optional.
Have a look in at the plugin whenever there is the highlight indicating that it
requires your attention.

Time and interest permitting, we can look at the following aspects of the back end
of Wordpress and site hosting:
CPanel / web host portal
This will vary from host to host. Once you are paying a hosting organisation, they
will normally provide you with an interface to control your server space. This is
that interface.
The only really mandatory section is the Quick Install (or similar), that you will
use for installing your instance of Wordpress.

Other things to be aware of include:
• File Management
• Database Management
• Creating/managing sub-domains.
Create and manage Users
If there is more than yourself maintaining the site you want to create a secondary
user account for them.
This is done under Users > Add New.
Most of these questions are familiar as you did them for your master account. The
new option to be aware of is the Role.
They are:
� Super Admin – somebody with access to the site network administration features and all other
features. See the Create a Network article.
� Administrator – somebody who has access to all the administration features within a single site.
� Editor – somebody who can publish and manage posts including the posts of other users.
� Author – somebody who can publish and manage their own posts.
� Contributor – somebody who can write and manage their own posts but cannot publish them.

� Subscriber – somebody who can only manage their profile.
(from https://codex.wordpress.org/Roles_and_Capabilities)
HTML
If there are any specific HTML questions, please ask
Widgets
If any students want to cover Widgets in more details, please ask.
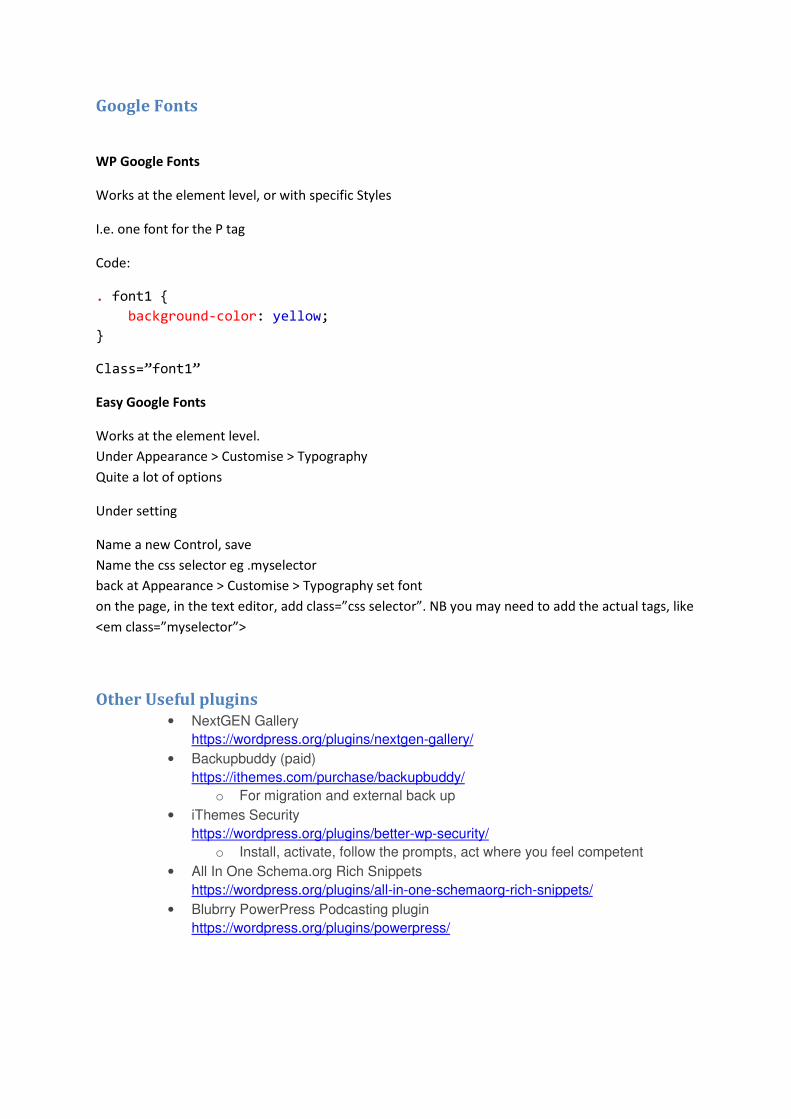
Google Fonts
WP Google Fonts
Works at the element level, or with specific Styles
I.e. one font for the P tag
Code:
. font1 {
background-color: yellow;
}
Class=”font1”
Easy Google Fonts
Works at the element level.
Under Appearance > Customise > Typography
Quite a lot of options
Under setting
Name a new Control, save
Name the css selector eg .myselector
back at Appearance > Customise > Typography set font
on the page, in the text editor, add class=”css selector”. NB you may need to add the actual tags, like
<em class=”myselector”>
Other Useful plugins
• NextGEN Gallery
https://wordpress.org/plugins/nextgen-gallery/
• Backupbuddy (paid)
https://ithemes.com/purchase/backupbuddy/
o For migration and external back up
• iThemes Security
https://wordpress.org/plugins/better-wp-security/
o Install, activate, follow the prompts, act where you feel competent
• All In One Schema.org Rich Snippets
https://wordpress.org/plugins/all-in-one-schemaorg-rich-snippets/
• Blubrry PowerPress Podcasting plugin
https://wordpress.org/plugins/powerpress/