ADTRAN 3120 / 3130 Configuration Guide - FreedomVoice
18
1 AdTran Configuration Guide v3.1 ADTRAN 3120 / 3130 Configuration Guide 5600 Avenida Encinas, Suite 170 Phone & Fax: (800) 477-1477
Transcript of ADTRAN 3120 / 3130 Configuration Guide - FreedomVoice
1
AdTran Configuration Guide v3.1
ADTRAN 3120 / 3130 Configuration Guide
5600 Avenida Encinas, Suite 170Phone & Fax: (800) 477-1477
2
Introduction
Thank you for choosing FreedomVoice for your industry-leading hosted VoIP phone system. We are glad to have you on board as part of our team and this document should help answer any questions you may have on setting up the AdTran router.
There are two main parts to this document. The first is the Internet Configuration Guide that covers setting up basic Internet access and getting the router online. The second section is the AdTran QoS Configuration Guide which provides the procedure for configuring QoS (Quality of Service) on the device.
Part 1; The Internet Configuration Guide will step you through the procedure for configuring Internet access
on the AdTran 3120/3130 router in its new or reset state. Setting up the router is a four step process:
1. Change the default password.
2. Configuration of the Public Interface (Internet access).
3. Disabling the SIP ALG (application level gateway).
4. Configuring SNTP (simple network time protocol).
5. Enabling Remote Access.
ADTRAN 3120 / 3130
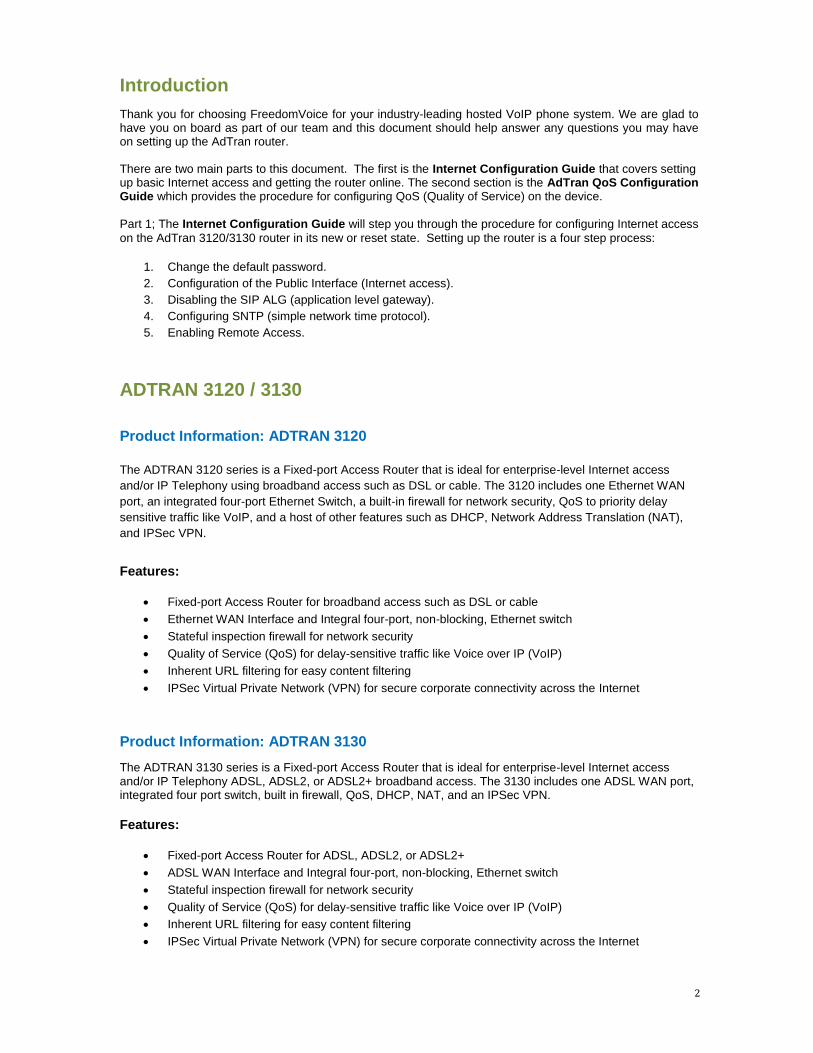
Product Information: ADTRAN 3120
The ADTRAN 3120 series is a Fixed-port Access Router that is ideal for enterprise-level Internet access
and/or IP Telephony using broadband access such as DSL or cable. The 3120 includes one Ethernet WAN
port, an integrated four-port Ethernet Switch, a built-in firewall for network security, QoS to priority delay
sensitive traffic like VoIP, and a host of other features such as DHCP, Network Address Translation (NAT),
and IPSec VPN.
Features:
Fixed-port Access Router for broadband access such as DSL or cable
Ethernet WAN Interface and Integral four-port, non-blocking, Ethernet switch
Stateful inspection firewall for network security
Quality of Service (QoS) for delay-sensitive traffic like Voice over IP (VoIP)
Inherent URL filtering for easy content filtering
IPSec Virtual Private Network (VPN) for secure corporate connectivity across the Internet
Product Information: ADTRAN 3130
The ADTRAN 3130 series is a Fixed-port Access Router that is ideal for enterprise-level Internet access and/or IP Telephony ADSL, ADSL2, or ADSL2+ broadband access. The 3130 includes one ADSL WAN port, integrated four port switch, built in firewall, QoS, DHCP, NAT, and an IPSec VPN.
Features:
Fixed-port Access Router for ADSL, ADSL2, or ADSL2+
ADSL WAN Interface and Integral four-port, non-blocking, Ethernet switch
Stateful inspection firewall for network security
Quality of Service (QoS) for delay-sensitive traffic like Voice over IP (VoIP)
Inherent URL filtering for easy content filtering
IPSec Virtual Private Network (VPN) for secure corporate connectivity across the Internet
3
Change Default Username/Password
It is important that you change the default username and password to something secure. This new login information ensures that no one within the LAN can make unauthorized changes, but can also be used as the default remote login information for remote access to the router in the event changes need to be made remotely by a partner or a FreedomVoice representative.
Default login information:
Gateway: “10.10.10.1”
Username: “admin”
Password: “password”
Follow these steps to update the admin login information:
1. From the “System” section in the left column, select “Passwords”.
2. Scroll to the bottom of the page and select the “Enable” tab.
3. Check “Use password” and enter your new password twice.
4. Click the “Apply” button toward the bottom of the page.
5. Click the “Save” button at the top of the page.
Configuring Internet Access
Follow these steps closely to set up the AdTran 3120/3130 via the built in GUI. Your ISP should have provided you with general instructions related to your internet connection. If you are unsure what these
settings are, contact your ISP with regard to the settings you will need for your router. In 99% of all cases your service provider will either have you to set your router to DHCP mode or they will provide you with IP address, Gateway, Subnet and DNS server settings. You will need this information to continue the set up.
Follow these steps to configure internet access:
1. From the “System” section in the left column, select “Public Interface”.
2. Go to “IP Settings” halfway down the page. Your ISP settings will determine whether you need tochoose “Static” or “DHCP” from the drop down. If your ISP has provided you with a specific IP,select “Static”. If you select “DHCP” skip to step 10. (Screenshot Internet)
3. Enter your IP address in the related field.
4. Enter your subnet mask in the related field.
5. Enter your default gateway in the related field.
6. Click the “Apply” button toward the bottom of the page.
7. Click the “Save” button at the top of the page.
8. From the “System” section in the left column, select “Hostname/DNS”.
9. Enter the primary and secondary DNS addresses provided by ISP. (Screenshot DNS)
10. Click the “Apply” button toward the bottom of the page.
11. Click the “Save” button at the top of the page.
12. Cycle power on the router and give the device 3-5 minutes to boot.
13. Cycle power on any connected devices such as computers, phones etc.
NOTE: See next page for configuration screenshot.
4
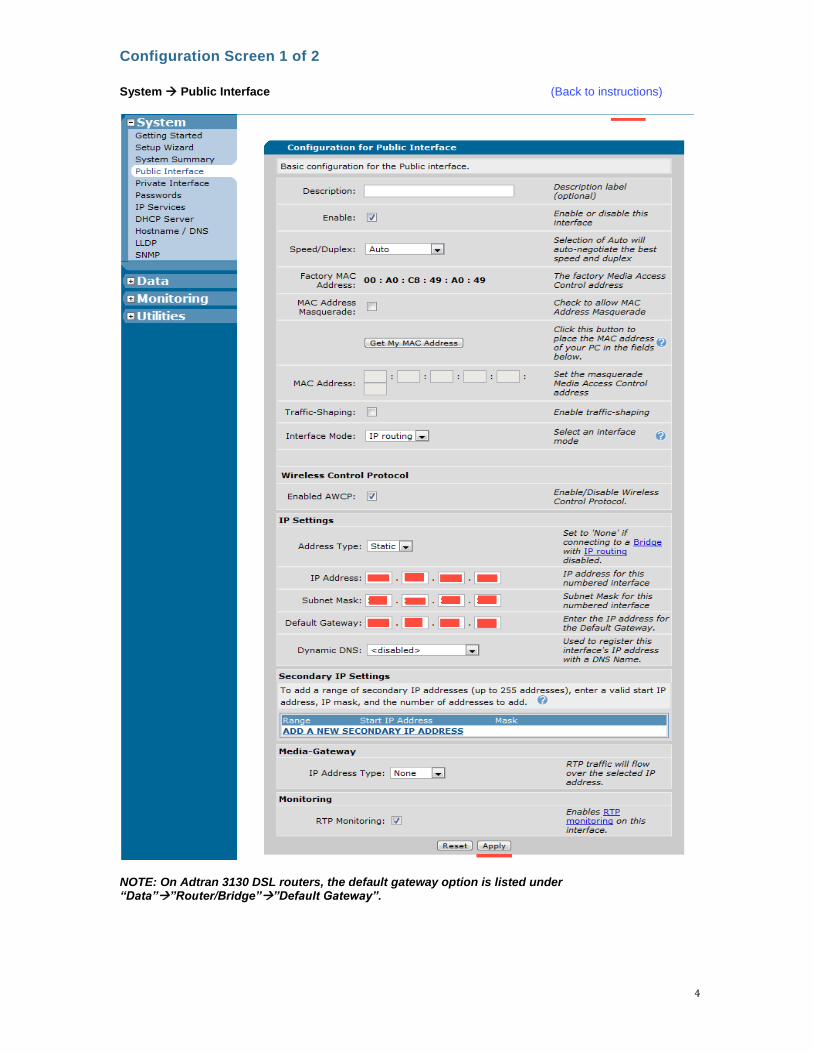
Configuration Screen 1 of 2
System Public Interface (Back to instructions)
NOTE: On Adtran 3130 DSL routers, the default gateway option is listed under “Data””Router/Bridge””Default Gateway”.
5
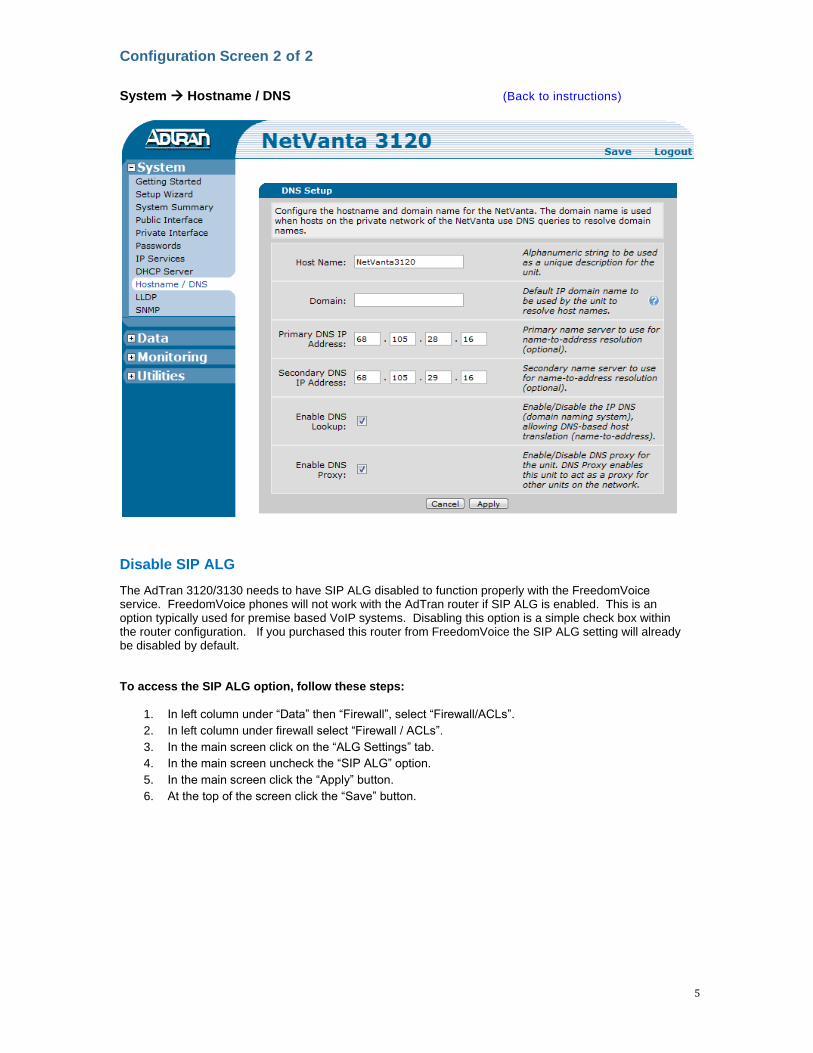
Configuration Screen 2 of 2
System Hostname / DNS (Back to instructions)
Disable SIP ALG
The AdTran 3120/3130 needs to have SIP ALG disabled to function properly with the FreedomVoice service. FreedomVoice phones will not work with the AdTran router if SIP ALG is enabled. This is an option typically used for premise based VoIP systems. Disabling this option is a simple check box within the router configuration. If you purchased this router from FreedomVoice the SIP ALG setting will already be disabled by default.
To access the SIP ALG option, follow these steps:
1. In left column under “Data” then “Firewall”, select “Firewall/ACLs”.
2. In left column under firewall select “Firewall / ACLs”.
3. In the main screen click on the “ALG Settings” tab.
4. In the main screen uncheck the “SIP ALG” option.
5. In the main screen click the “Apply” button.
6. At the top of the screen click the “Save” button.
6
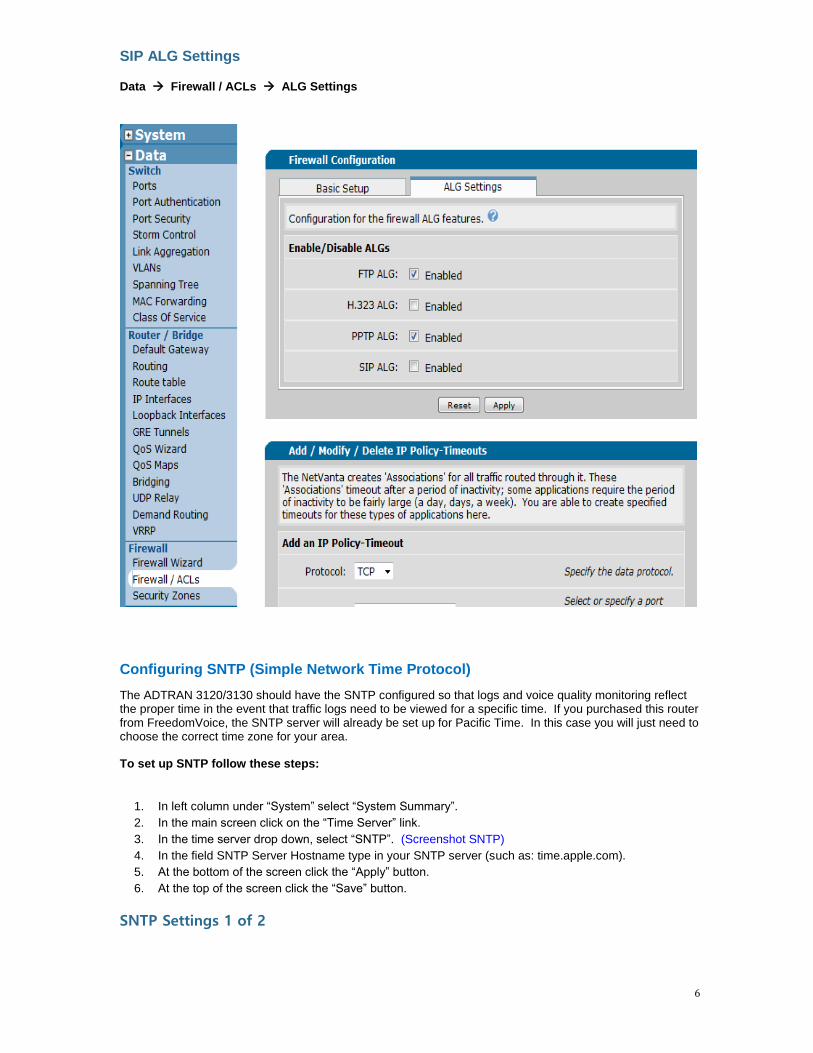
SIP ALG Settings
Data Firewall / ACLs ALG Settings
Configuring SNTP (Simple Network Time Protocol)
The ADTRAN 3120/3130 should have the SNTP configured so that logs and voice quality monitoring reflect the proper time in the event that traffic logs need to be viewed for a specific time. If you purchased this router from FreedomVoice, the SNTP server will already be set up for Pacific Time. In this case you will just need to choose the correct time zone for your area.
To set up SNTP follow these steps:
1. In left column under “System” select “System Summary”.
2. In the main screen click on the “Time Server” link.
3. In the time server drop down, select “SNTP”. (Screenshot SNTP)
4. In the field SNTP Server Hostname type in your SNTP server (such as: time.apple.com).
5. At the bottom of the screen click the “Apply” button.
6. At the top of the screen click the “Save” button.
SNTP Settings 1 of 2

7
System System Summary
SNTP Settings 2 of 2
System System Summary Time Server (Back to instructions)
8
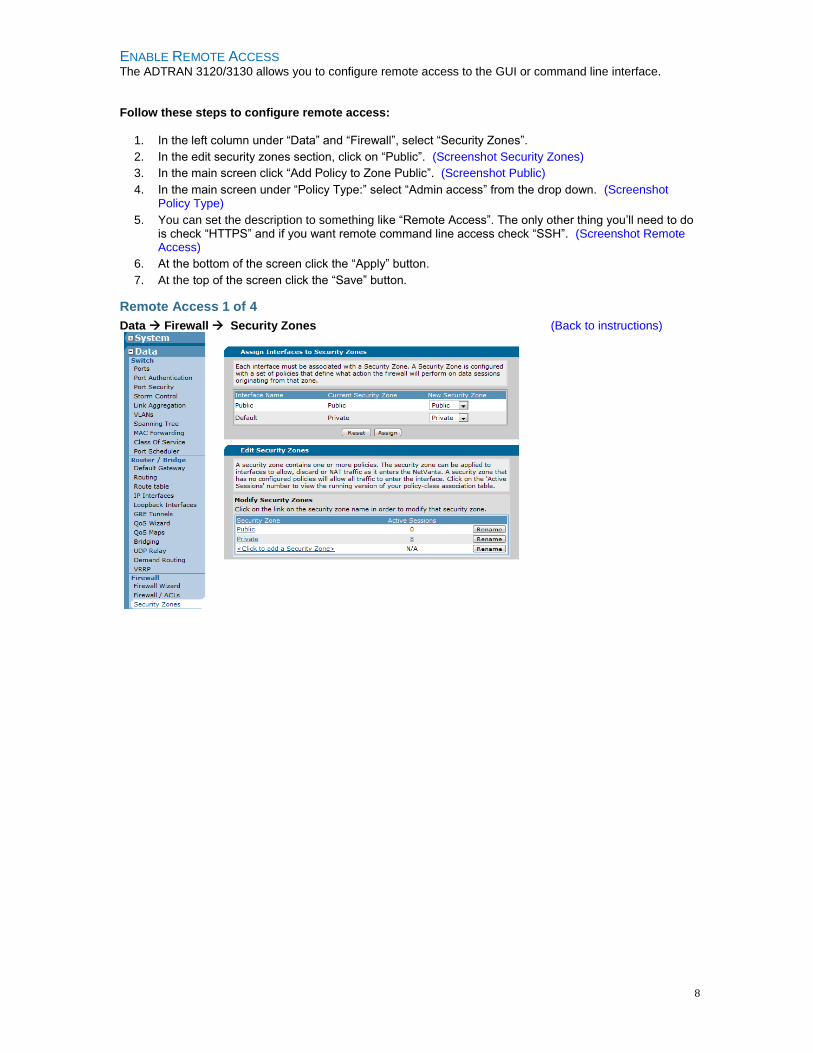
ENABLE REMOTE ACCESS The ADTRAN 3120/3130 allows you to configure remote access to the GUI or command line interface.
Follow these steps to configure remote access:
1. In the left column under “Data” and “Firewall”, select “Security Zones”.
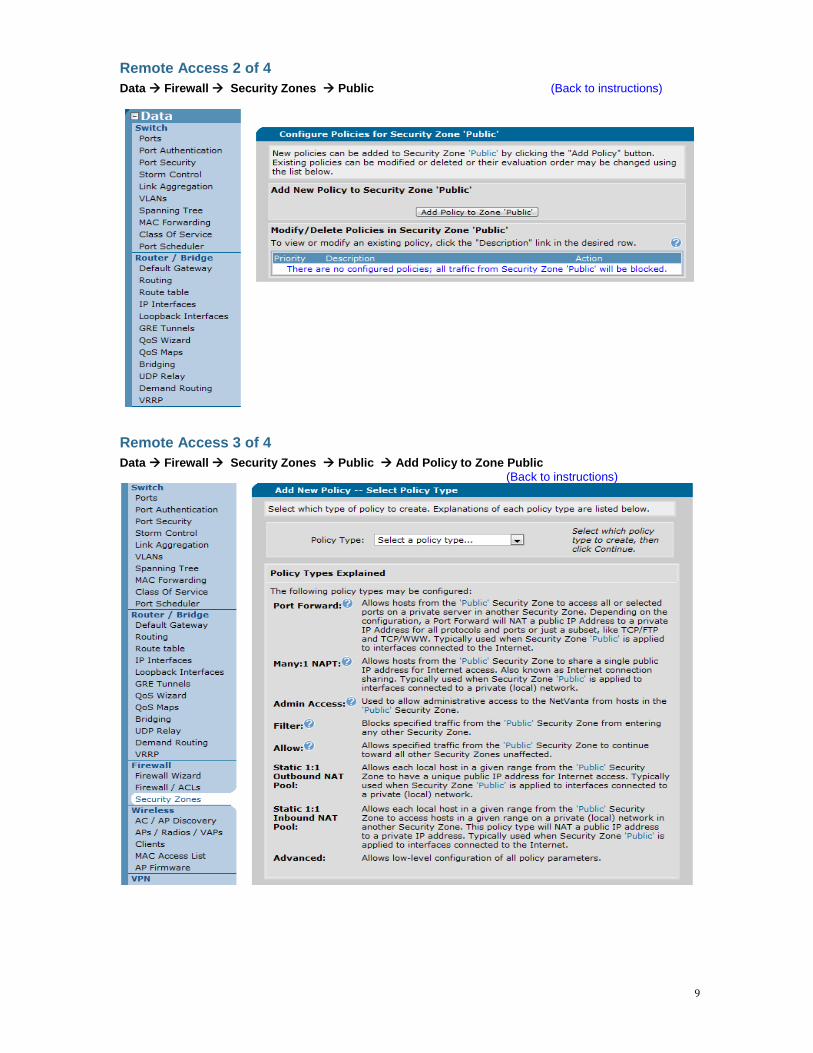
2. In the edit security zones section, click on “Public”. (Screenshot Security Zones)
3. In the main screen click “Add Policy to Zone Public”. (Screenshot Public)
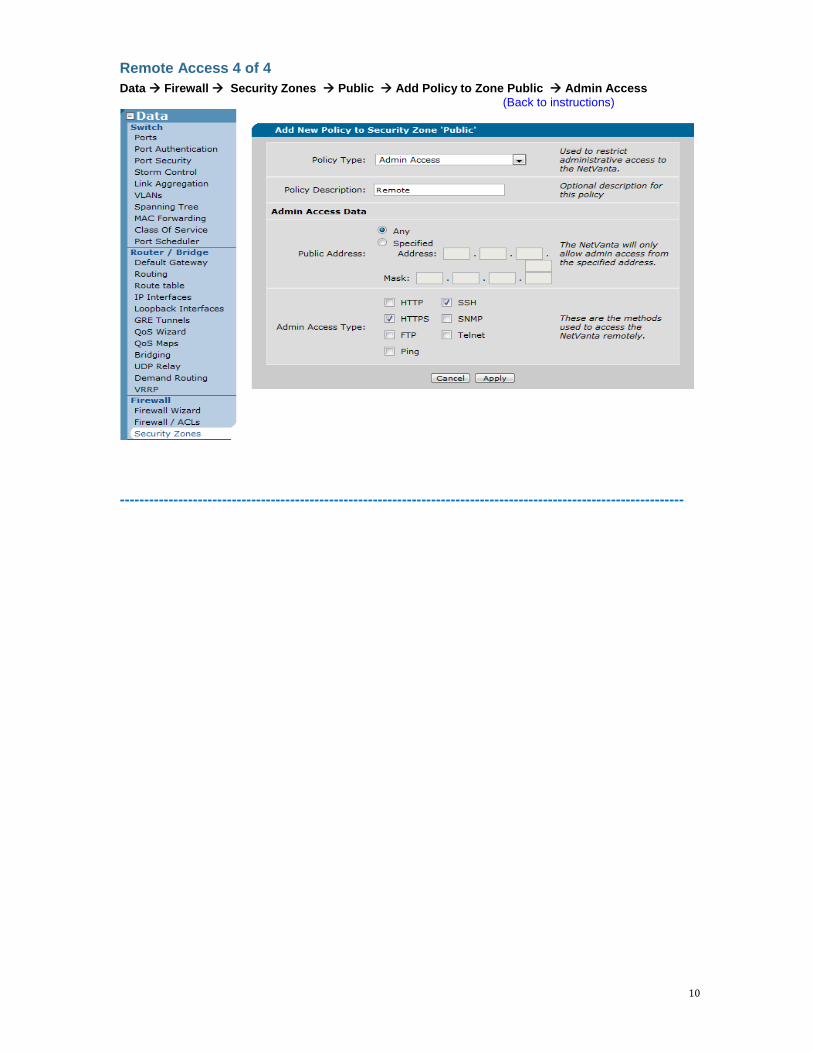
4. In the main screen under “Policy Type:” select “Admin access” from the drop down. (ScreenshotPolicy Type)
5. You can set the description to something like “Remote Access”. The only other thing you’ll need to dois check “HTTPS” and if you want remote command line access check “SSH”. (Screenshot RemoteAccess)
6. At the bottom of the screen click the “Apply” button.
7. At the top of the screen click the “Save” button.
Remote Access 1 of 4
Data Firewall Security Zones (Back to instructions)
9
Remote Access 2 of 4
Data Firewall Security Zones Public (Back to instructions)
Remote Access 3 of 4
Data Firewall Security Zones Public Add Policy to Zone Public
(Back to instructions)
10
Remote Access 4 of 4
Data Firewall Security Zones Public Add Policy to Zone Public Admin Access
(Back to instructions)
--------------------------------------------------------------------------------------------------------------------

11
Configuring QoS The AdTran 3120/3130 comes partially preconfigured for QoS when ordered directly from FreedomVoice. If
the router is reset or the router has been purchased from a different source, you can follow these instructions
to set up QoS. There are two ways to edit router settings: through the GUI (Graphical User Interface) or CLI
(Command Line Interface).
First, enable traffic shaping on the public (WAN) interface and set your measured upload rate.
1. From “System” in the left column, click on “Public Interface”.
2. Check the “Traffic-Shaping” box.
3. Enter a traffic-shaping rate equal to that of your measured upload speed.
4. At the bottom of the screen click the “Apply” button.
5. At the top of the screen click the “Save” button.
Configuring QoS with the GUI, Step 1: Create Access Control Lists
Data Firewall / ACLs Configure ACLs
12
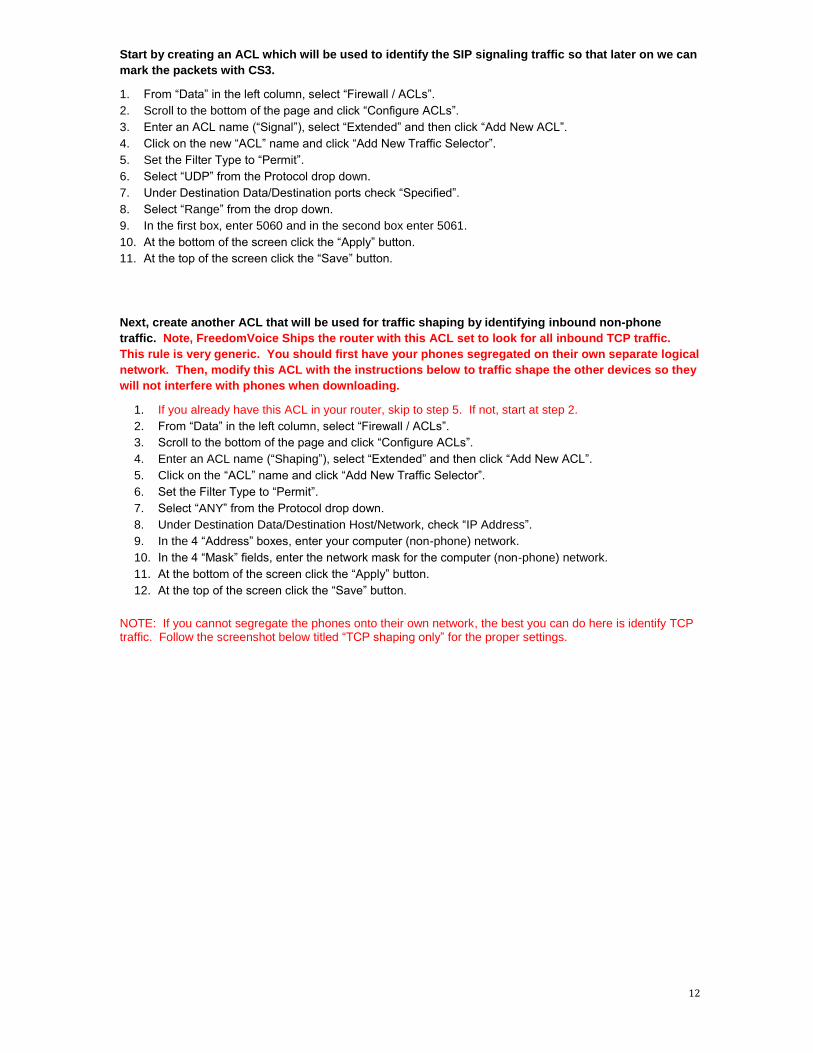
Start by creating an ACL which will be used to identify the SIP signaling traffic so that later on we can
mark the packets with CS3.
1. From “Data” in the left column, select “Firewall / ACLs”.
2. Scroll to the bottom of the page and click “Configure ACLs”.
3. Enter an ACL name (“Signal”), select “Extended” and then click “Add New ACL”.
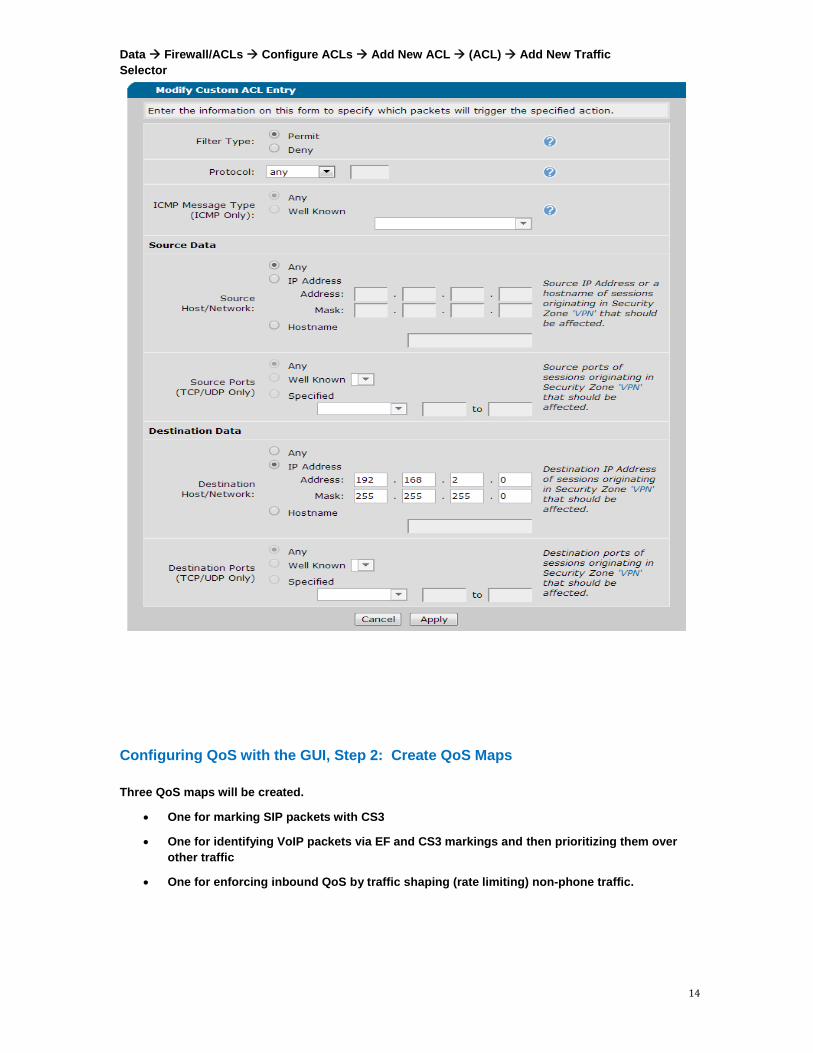
4. Click on the new “ACL” name and click “Add New Traffic Selector”.
5. Set the Filter Type to “Permit”.
6. Select “UDP” from the Protocol drop down.
7. Under Destination Data/Destination ports check “Specified”.
8. Select “Range” from the drop down.
9. In the first box, enter 5060 and in the second box enter 5061.
10. At the bottom of the screen click the “Apply” button.
11. At the top of the screen click the “Save” button.
Next, create another ACL that will be used for traffic shaping by identifying inbound non-phone
traffic. Note, FreedomVoice Ships the router with this ACL set to look for all inbound TCP traffic.
This rule is very generic. You should first have your phones segregated on their own separate logical
network. Then, modify this ACL with the instructions below to traffic shape the other devices so they
will not interfere with phones when downloading.
1. If you already have this ACL in your router, skip to step 5. If not, start at step 2.
2. From “Data” in the left column, select “Firewall / ACLs”.
3. Scroll to the bottom of the page and click “Configure ACLs”.
4. Enter an ACL name (“Shaping”), select “Extended” and then click “Add New ACL”.
5. Click on the “ACL” name and click “Add New Traffic Selector”.
6. Set the Filter Type to “Permit”.
7. Select “ANY” from the Protocol drop down.
8. Under Destination Data/Destination Host/Network, check “IP Address”.
9. In the 4 “Address” boxes, enter your computer (non-phone) network.
10. In the 4 “Mask” fields, enter the network mask for the computer (non-phone) network.
11. At the bottom of the screen click the “Apply” button.
12. At the top of the screen click the “Save” button.
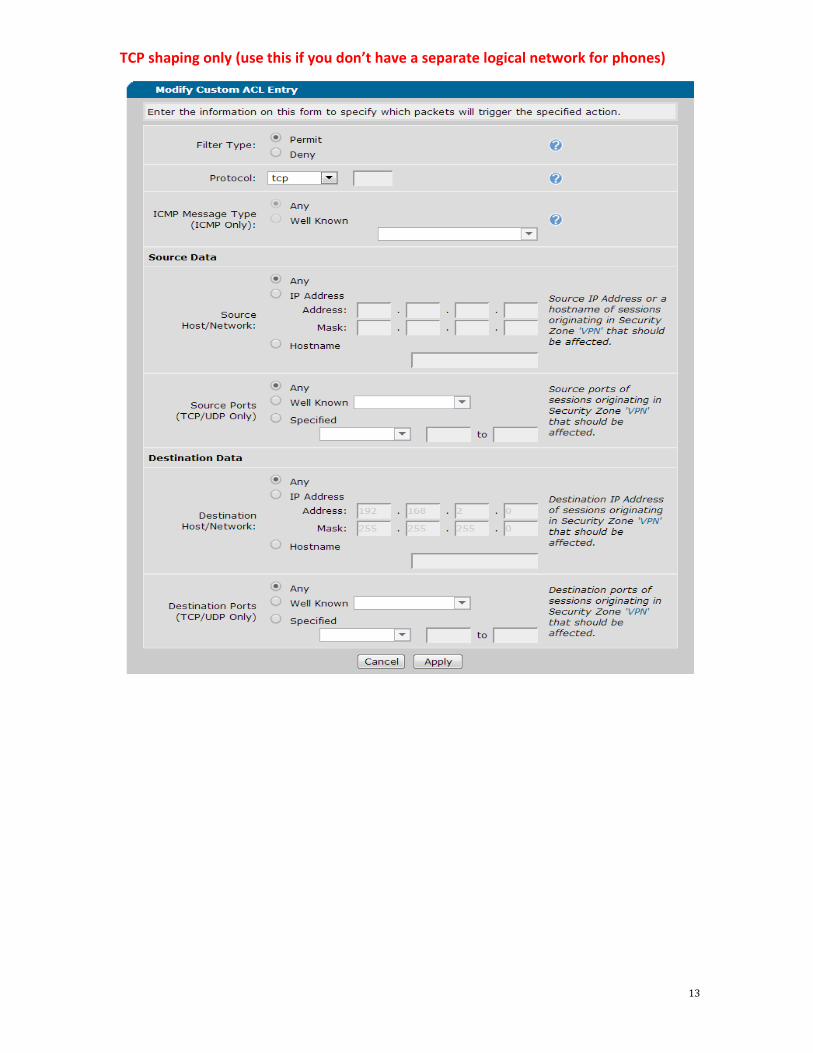
NOTE: If you cannot segregate the phones onto their own network, the best you can do here is identify TCP traffic. Follow the screenshot below titled “TCP shaping only” for the proper settings.
13
TCP shaping only (use this if you don’t have a separate logical network for phones)
14
Data Firewall/ACLs Configure ACLs Add New ACL (ACL) Add New Traffic
Selector
Configuring QoS with the GUI, Step 2: Create QoS Maps
Three QoS maps will be created.
One for marking SIP packets with CS3
One for identifying VoIP packets via EF and CS3 markings and then prioritizing them over
other traffic
One for enforcing inbound QoS by traffic shaping (rate limiting) non-phone traffic.
15
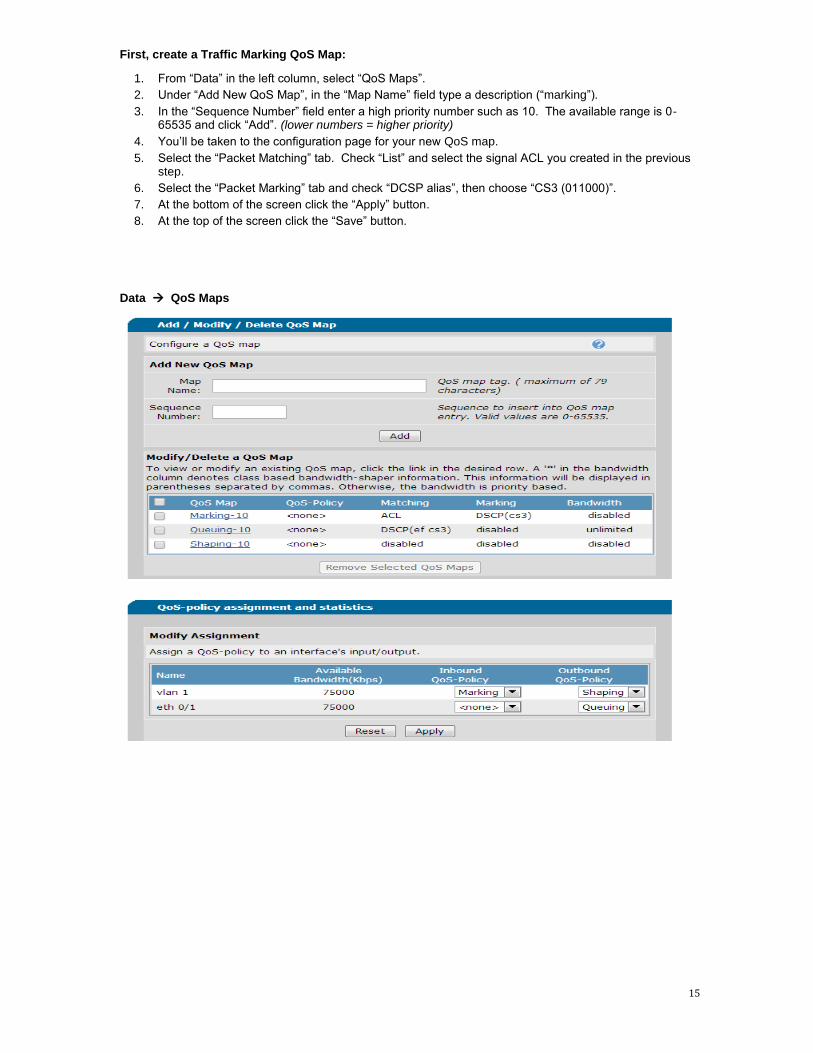
First, create a Traffic Marking QoS Map:
1. From “Data” in the left column, select “QoS Maps”.
2. Under “Add New QoS Map”, in the “Map Name” field type a description (“marking”).
3. In the “Sequence Number” field enter a high priority number such as 10. The available range is 0-65535 and click “Add”. (lower numbers = higher priority)
4. You’ll be taken to the configuration page for your new QoS map.
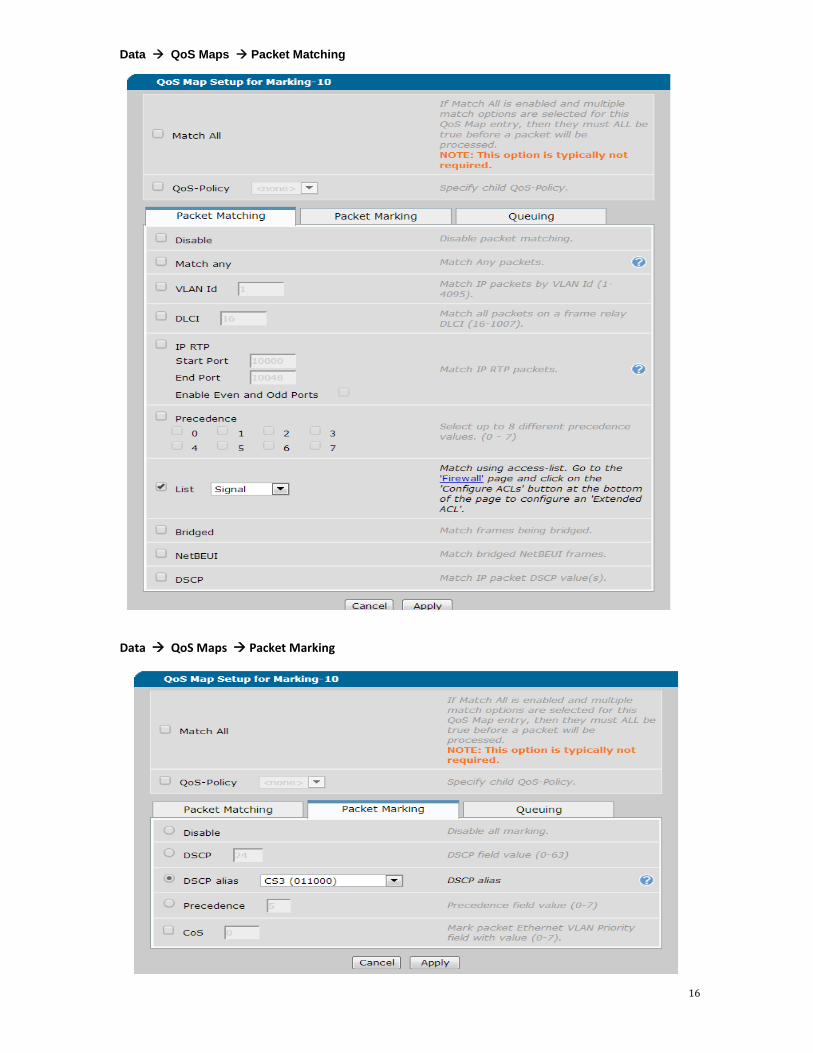
5. Select the “Packet Matching” tab. Check “List” and select the signal ACL you created in the previousstep.
6. Select the “Packet Marking” tab and check “DCSP alias”, then choose “CS3 (011000)”.
7. At the bottom of the screen click the “Apply” button.
8. At the top of the screen click the “Save” button.
Data QoS Maps
16
Data QoS Maps Packet Matching
Data QoS Maps Packet Marking
17
Next, create a traffic queuing QoS Map:
1. From “Data” in the left column, select “QoS Maps”.
2. Under “Add New QoS Map”, in the “Map Name” field, use a name such as “queuing”.
3. In the “Sequence Number” field enter a high priority number such as 10.
4. You’ll be taken to the configuration page for your new QoS map.
5. Select the “Packet Matching” tab.
6. Check “DSCP” and click “Add a new DSCP Line”.
7. Select “EF” from the first dropdown.
8. Select “CS3” from the second dropdown.
9. Select the “Queuing” tab and select the radio button “Unlimited Priority Bandwidth”.
10. At the bottom of the screen click the “Apply” button.
11. At the top of the screen click the “Save” button.
Lastly, create a traffic shaping QoS Map:
1. From “Data” in the left column, select “QoS Maps”.
2. Under “Add New QoS Map”, in the “Map Name” field, use a name such as “Shaping”.
3. In the “Sequence Number” field enter a high priority number such as 10.
4. You’ll be taken to the configuration page for your new QoS map.
5. Select the “Packet Matching” tab.
6. Check “List” and select the “Shaping” ACL created earlier.
7. Select the “Queuing” tab and select the radio button “Traffic Class Queuing”.
8. Under “Bandwidth”, check the box next to “Percent Remaining”.
9. Enter “100” in the “Percent Remaining” field.
10. At the top of the screen click the “Save” button.
Configuring QoS with the GUI, Step 3: Apply QoS
Finally, attach the QoS policies to the Vlan 1 and Eth0/1 interfaces:
1. From “Data” in the left column, select “QoS Maps”.
2. Under QoS-policy assignment and statistics, locate “vlan 1”.
3. For vlan 1 “Inbound QoS-Policy”, select your “Marking” QoS policy.
4. For eth 0/1 “Outbound QoS-Policy”, select your “Queuing” QoS policy.
5. For vlan 1 “Outbound QoS-Policy”, select your “Shaping” QoS policy.
6. At the bottom of the screen click the “Apply” button.
7. At the top of the screen click the “Save” button.
- QoS is now complete
--------------------------------------------------------------------------------------------------------------------------------------------

18
Technical Support
Technical support for FreedomVoice is available from 3:00 AM PST to 6:00 PM PST, Monday through Friday, Saturday from 6:30am PST to 3:30pm PST and can be reached either by phone or by email.
Emergency support is available 24/7.
Phone: 888-955-3520 ext. 2
Use this number to reach a trained FreedomVoice technical support representative during normal support hours. If calling outside of normal hours, you will be provided the option to either leave a voicemail message or
connect to the emergency support service (see below).
Numerous documents and support materials are available through the FreedomVoice Weblink. Please log into Weblink and select the support tab and review the documentation that is available online there.
Support Email: [email protected]
Emails are automatically forwarded to our ticketing system. An auto-reply will be sent within a few minutes
indicating the case number generated. Emails are generally returned within two hours during normal support
hours, but may take longer depending on the current volume of tickets received. All emails should, however,
be returned same day. For an issue that requires a faster turn-around time, please use the phone numbers
listed above.