ADT Pulse® Interactive Solutions OC810-ADT Wireless Outdoor ...
16
ADT Pulse ® Interactive Solutions OC810-ADT Wireless Outdoor Day/Night Camera Installation Guide
Transcript of ADT Pulse® Interactive Solutions OC810-ADT Wireless Outdoor ...

ADT Pulse® Interactive Solutions OC810-ADT Wireless
Outdoor Day/Night Camera Installation Guide

OC810-ADT Wireless Outdoor Day/Night Camera Installation Guide
Table of Contents INTRODUCTION ........................................................................................................... 1
Overview ....................................................................................................................... 1 OC810-ADT Camera Features .......................................................................... 1
Package Contents ....................................................................................................... 2 Physical Details – OC810-ADT Camera ................................................................. 3
Front Panel ............................................................................................................ 3 Rear Panel .............................................................................................................. 4
INSTALLATION ............................................................................................................. 5 Adding the OC810-ADT Wireless Outdoor Day/Night Camera to the ADT Security System ........................................................................................................... 5 PIR Video Motion Detection ...................................................................................... 9
Enabling Motion Detection via the ADT Security System ....................... 11
APPENDIX A: SPECIFICATIONS ............................................................................ 13
APPENDIX B: REGULATORY APPROVALS .......................................................... 14 FCC Statement .......................................................................................................... 14 CE Approvals ............................................................................................................. 14
UNITED STATES LICENSE INFORMATION: AL Alabama Electronic Security Board of Licensure, 7956 Vaughn Rd., Montgomery 36116, (334) 264-9388; AK 37950, 5520 Lake Otis Pkwy., Anchorage, AK 99507; AR E12-041, Regulated by Arkansas Bd. of Private Investigators & Private Security Agencies, #1 State Police Plaza Dr., Little Rock, AR 72209, (501) 618-8600; AZ ROC 279591; CA ACO7155, alarm company operators are licensed and regulated by the Bureau of Security & Investigative Services, Dept. of Consumer Affairs, Sacramento, CA 95814, 974443, PPO17232; CT ELC.0106069-L5; DC ECS902743; FL EF0001121; GA LVA205265, -205326, -205572, -205679, -205878, LVU405673, -004349; HI CT-32297; ID ELE-SC-2643; IL 124001792; LA F1639, F1640, F1643, F1654, F1655; MA 172C; MI 3601206258, 5103208 - 4182 Pier North Dr. Ste. D, Flint, MI 48504; MN TS650251; NC 7535P2, 7561P2, 7562P10, 7563P7, 7565P1, 7566P9 - Alarm Systems Licensing Bd., 4901 Glenwood Ave, Ste. 200, Raleigh, 27612 (919) 788-5320; NM 374838; NV 0077105; NJ Electrical Contractor Lic. #'s 34FA00140500, 34BA00179000, 7895 Browning Rd., Pennsauken, NJ 08109; NY 12000305615, Licensed by NYS Dept. of State; OH 50-18-0018, 50-25-0023, 50-29-0003, 50-31-0014, 50-48-0008, 50-50-0005, 50-76-0006, 50-89-0016, 53-89-1726; OK 1995; OR 196560; PA Pennsylvania Home Improvement Contractor Registration Number: PA090797; RI 35683; TN ACC-1688, -1689, -1690, -1691, -1692, -1693, -1694, -1695, -1696; TX B17944 -140 Heimer Rd. Ste. 100, San Antonio, TX 78232 - Texas Private Security Bureau, 5805 N. Lamar Blvd., Austin 78752; UT 8289653; VA 11-7345, 11-7348, 11-7351, 11-7354, 11-7598, 11-7900, 11-8205, 11-8353, 11-8447 2705147728 Class B Contractor Classification ESC; WA ADTLLL881DO, 11824 N Creek Pkwy #105, Bothell, WA 98011; WI 1210943; WV 049758.
MS 15019511 ©2013 ADT LLC dba ADT Security Services. All rights reserved. ADT, the ADT logo, 800 ADT.ASAP and the product/service names listed in this document are marks and/or registered marks. Unauthorized use is strictly prohibited. Canada Licence number: RBQ 3019-4070-50. ©2013 ADT Security Services Canada, Inc. All rights reserved. ADT, the ADT logo, 800.ADT.ASAP and the product/service names listed in this document are marks and/or registered marks. Unauthorized use is strictly prohibited. Document 957YU606MY Version 2.3
ii ADT Pulse® Interactive Solutions

OC810-ADT Wireless Outdoor Day/Night Camera Installation Guide
Introduction This section provides details of the OC810-ADT Wireless Outdoor Day/Night Camera features, components and capabilities.
Overview
The OC810-ADT Wireless Outdoor Day/Night Camera (hereafter referred to as the wireless camera) has an Integrated Microcomputer and a high quality digital Image Sensor, enabling it to display high quality, live streaming video to your web or mobile client over an 802.11n Wireless LAN.
OC810-ADT Camera Features
• Standalone Design: The wireless camera is a standalone device which requires a power source and a wireless connection to the ADT Pulse® gateway.
• Triple Video Support: The wireless camera can support H.264, MEPG4 and MJEPG video for different image compression.
• Day/Night Switch: With the automatic day/night switching feature, the wireless camera is able to view and record crisper images in the dark within a 25 foot area.
• Standard Compliance: The wireless camera complies with the IEEE802.11n (DSSS) specifications for Wireless LANs.
• Supports 802.11n Wireless Stations: The 802.11n Draft standard provides for backward compatibility with the 802.11g wireless network.
• Speeds up to 108Mbps: All speeds up to the 802.11n maximum of 108Mbps are supported.
• Security Support: Full WEP (64/128 Bit), WPA and WPA2 Personal standards are supported on the Wireless interface allowing advanced encryption of wireless data.
ADT Pulse® Interactive Solutions 1

OC810-ADT Wireless Outdoor Day/Night Camera Installation Guide
Package Contents
1. OC810-ADT Wireless Outdoor Day/Night Camera
2. Antenna
3. Power Adapter
4. Ethernet Cable
5. Power Extension Cable(with water sealing cap)
6. Stand
7. Mounting Screws
8. Quick Installation Guide
2 ADT Pulse® Interactive Solutions
OC810-ADT Wireless Outdoor Day/Night Camera Installation Guide
Physical Details – OC810-ADT Camera
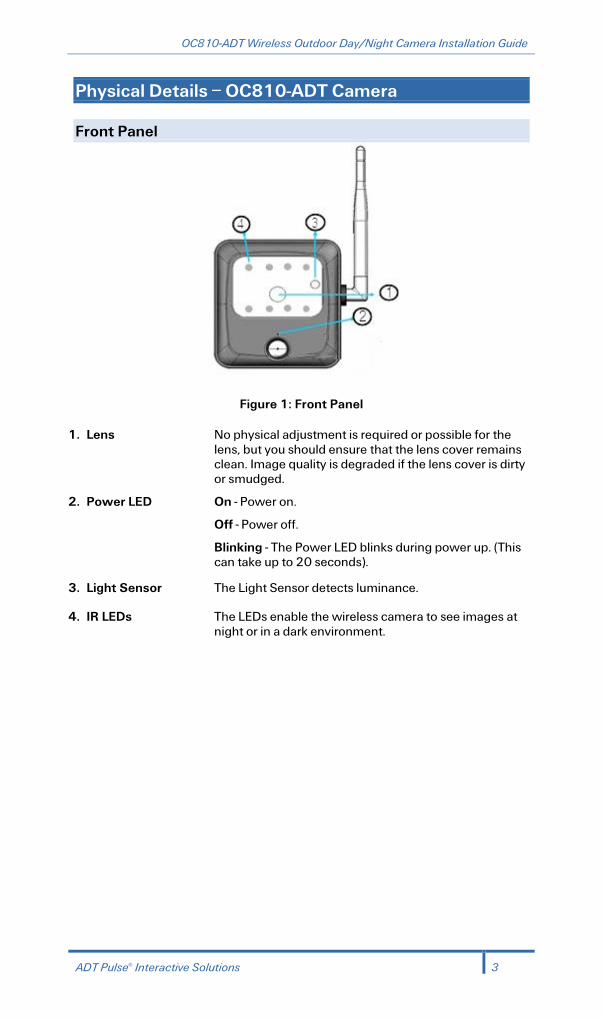
Front Panel
Figure 1: Front Panel
1. Lens No physical adjustment is required or possible for the lens, but you should ensure that the lens cover remains clean. Image quality is degraded if the lens cover is dirty or smudged.
2. Power LED On - Power on.
Off - Power off.
Blinking - The Power LED blinks during power up. (This can take up to 20 seconds).
3. Light Sensor The Light Sensor detects luminance.
4. IR LEDs The LEDs enable the wireless camera to see images at night or in a dark environment.
ADT Pulse® Interactive Solutions 3

OC810-ADT Wireless Outdoor Day/Night Camera Installation Guide
Rear Panel
Figure 2: Rear Panel
1. Antenna The antenna is adjustable with best results typically obtained with the antenna positioned vertically.
2. Power Port The supplied 12V power adapter plugs power to the wireless camera’s power port.
IMPORTANT
DO NOT USE ANY POWER ADAPTER OTHER THAN THE ONE SPECIFIED FOR THIS CAMERA. DOING SO MAY DAMAGE THE WIRELESS CAMERA.
3. Ethernet Port The Ethernet port enables connectivity of the wireless camera to your ADT Pulse gateway.
IMPORTANT
• PLUGGING IN THE ETHERNET CABLE WILL DISABLE THE WIRELESS INTERFACE. (ONLY ONE INTERFACE CAN BE ACTIVE AT ANY TIME.)
• THE ETHERNET CABLE SHOULD ONLY BE CONNECTED OR DISCONNECTED WHEN THE OUTDOOR DIGITAL CAMERA IS POWERED OFF. ATTACHING OR DETACHING THE ETHERNET CABLE WHILE THE CAMERA IS POWERED ON DOES NOT SWITCH THE INTERFACE BETWEEN WIRED AND WIRELESS.
• DETACHING THE ETHERNET CABLE WHEN THE OUTDOOR DIGITAL CAMERA IS POWERED ON WILL DISCONNECT THE OUTDOOR DIGITAL CAMERA FROM THE NETWORK.
4. Reset Button When pressed and held for ten (10) seconds, the communication configuration of the wireless camera will be reset to the default manufacturer settings.
IMPORTANT
THE RESET BUTTON WILL RESET THE CAMERA COMMUNICATION CONFIGURATION SETTINGS AND SHOULD ONLY BE USED UNDER THE DIRECTION OF ADT SUPPORT.
4 ADT Pulse® Interactive Solutions

OC810-ADT Wireless Outdoor Day/Night Camera Installation Guide
Installation This section provides details of installing and configuring the OC810-ADT Wireless Outdoor Day/Night Camera.
Adding the OC810-ADT Wireless Outdoor Day/Night Camera to the ADT Security System
NOTE:
The OC810-ADT wireless camera can only be added to a Pulse system that supports video.
1. Open your web browser. In the address bar, type:
https://Portal.ADTPulse.com.
2. Type your Username and Password, and then click the Sign In button.
3. Click the System tab, and then click the Manage Devices button.
ADT Pulse® Interactive Solutions 5

OC810-ADT Wireless Outdoor Day/Night Camera Installation Guide
4. In the Manage Devices Assistant, click Cameras.
5. Click the picture of the OC810 or select it from the drop-down list, and then
click the Continue button.
6. Assign the wireless camera a unique name (this is usually based on the
location of the wireless camera) in the space provided, and then type the wireless camera’s MAC ID or Server Name.
6 ADT Pulse® Interactive Solutions

OC810-ADT Wireless Outdoor Day/Night Camera Installation Guide
7. Click the Continue button.
8. Attach the antenna to the wireless camera. To adjust the antenna, screw to the rear mounting point and set the antenna to the upright position to improve wireless reception.
9. Connect the wireless camera to the Device Port of the gateway using a standard LAN cable.
10. Connect the supplied 12V power adapter to power up the wireless camera, and then click the Continue button.
NOTE
The Power LED turns on briefly, and then starts blinking during startup, which takes approximately 5 to 20 seconds. After startup is completed, the Power LED remains ON.
ADT Pulse® Interactive Solutions 7
OC810-ADT Wireless Outdoor Day/Night Camera Installation Guide
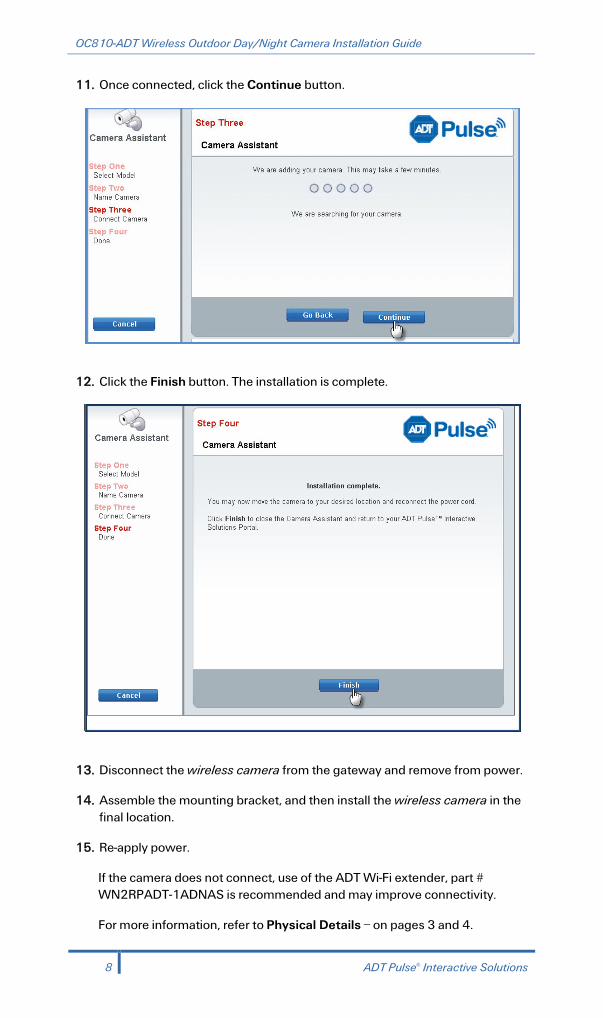
11. Once connected, click the Continue button.
12. Click the Finish button. The installation is complete.
13. Disconnect the wireless camera from the gateway and remove from power.
14. Assemble the mounting bracket, and then install the wireless camera in the final location.
15. Re-apply power.
If the camera does not connect, use of the ADT Wi-Fi extender, part # WN2RPADT-1ADNAS is recommended and may improve connectivity.
For more information, refer to Physical Details – on pages 3 and 4.
8 ADT Pulse® Interactive Solutions

OC810-ADT Wireless Outdoor Day/Night Camera Installation Guide
PIR Video Motion Detection
The motion event will be captured when a significant image changes within the Window of Interest. The Window of Interest is defined below.
The following installation hints should be noted:
1. Take care not to install facing direct sunlight, bodies of water, or areas of moving shadows as these can lead to unintended triggers.
2. Avoid aiming the PIR camera near or toward hot objects such as air conditioners.
3. It is preferable to install the PIR sensor underneath eaves or porch coverings to prevent exposure to rain and ice.
4. Avoid direct sunlight or headlights from automobiles.
5. Avoid breeze and corrosive gases.
6. Make sure that the coverage area of PIR sensor does not extend into undesired areas that might cause unwanted activations.
ADT Pulse® Interactive Solutions 9

OC810-ADT Wireless Outdoor Day/Night Camera Installation Guide
7. While choosing the installation area, be aware that the PIR sensor may
detect unimportant motions, such as moving trees or shadows caused by excessive wind.
NOTE:
Video motion detection is susceptible to light reflection, shade or tree/leaves movement, etc. within the Window of Interest. To reduce the number of unwanted video events, please adjust the camera to reduce these noise factors appearing in the Window of Interest.
10 ADT Pulse® Interactive Solutions

OC810-ADT Wireless Outdoor Day/Night Camera Installation Guide
Enabling Motion Detection via the ADT Security System
1. Click the Automations tab, and then click the Add Automation button.
2. Select a trigger for this automation from the Trigger drop-down list.
3. Select Motion from the Event drop-down list.
4. Select the conditions under which you want the automation action to occur from Active drop-down list.
5. Click Add Actions.
6. From the Delay drop-down list, select the delay option you want to use for
this action.
7. From the Action drop-down list, select the action you want to take place when the trigger occurs.
ADT Pulse® Interactive Solutions 11

OC810-ADT Wireless Outdoor Day/Night Camera Installation Guide
8. Click OK.
9. Click Save.
12 ADT Pulse® Interactive Solutions
OC810-ADT Wireless Outdoor Day/Night Camera Installation Guide
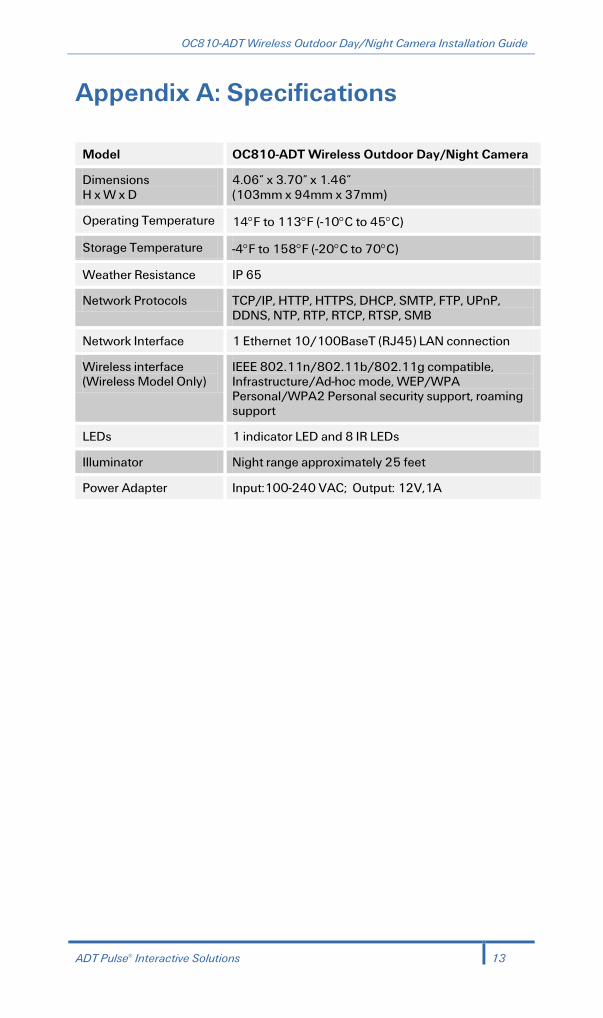
Appendix A: Specifications
Model OC810-ADT Wireless Outdoor Day/Night Camera
Dimensions H x W x D
4.06” x 3.70” x 1.46” (103mm x 94mm x 37mm)
Operating Temperature 14°F to 113°F (-10°C to 45°C)
Storage Temperature -4°F to 158°F (-20°C to 70°C)
Weather Resistance IP 65
Network Protocols TCP/IP, HTTP, HTTPS, DHCP, SMTP, FTP, UPnP, DDNS, NTP, RTP, RTCP, RTSP, SMB
Network Interface 1 Ethernet 10/100BaseT (RJ45) LAN connection
Wireless interface (Wireless Model Only)
IEEE 802.11n/802.11b/802.11g compatible, Infrastructure/Ad-hoc mode, WEP/WPA Personal/WPA2 Personal security support, roaming support
LEDs 1 indicator LED and 8 IR LEDs
Illuminator Night range approximately 25 feet
Power Adapter Input:100-240 VAC; Output: 12V,1A
ADT Pulse® Interactive Solutions 13

OC810-ADT Wireless Outdoor Day/Night Camera Installation Guide
Appendix B: Regulatory Approvals
FCC Statement
This equipment generates uses and can radiate radio frequency energy and, if not installed and used in accordance with the instructions, may cause harmful interference to radio communications. However, there is no guarantee that interference will not occur in a particular installation. If this equipment does cause harmful interference to radio or television reception, which can be determined by turning the equipment off and on, the user is encouraged to try to correct the interference by one of the following measures:
• Reorient or relocate the receiving antenna.
• Increase the separation between the equipment and receiver.
• Connect the equipment into an outlet on a circuit different from that to which the receiver is connected.
• Consult the dealer or an experienced radio/TV technician for help. To assure continued compliance, any changes or modifications not expressly approved by the party responsible for compliance could void the user's authority to operate this equipment. (Example - use only shielded interface cables when connecting to computer or peripheral devices).
FCC Radiation Exposure Statement This equipment complies with FCC RF radiation exposure limits set forth for an uncontrolled environment. This equipment should be installed and operated with a minimum distance of 20 centimeters between the radiator and your body. This device complies with Part 15 of the FCC Rules. Operation is subject to the following two conditions: (1) This device may not cause harmful interference, and (2) This device must accept any interference received, including interference that may cause undesired operation. This transmitter must not be co-located or operating in conjunction with any other antenna or transmitter.
CE Approvals
The OC810-ADT Wireless Outdoor Day/Night Camera meets the guidelines of the European Union and comply with the 99/5/EEC and RTTE 99/5EG directives, including the following standards:
• EN60950-1
• EN300 328
• EN301 489
• EN55024
This is a Class B product. In a domestic environment, this product may cause radio interference in which case the user may be required to take adequate measures.
This product is UL and cUL certified and comply with UL60950-1 Information Technology Equipment applicable requirement.
14