Adobe Captivate 9 - Kennesaw State University · Revised 4/25/2016 Page 4 of 24 Introduction Adobe...
24
Adobe Captivate 9 Accessibility Learning Technologies, Training & Audiovisual Outreach University Information Technology Services
Transcript of Adobe Captivate 9 - Kennesaw State University · Revised 4/25/2016 Page 4 of 24 Introduction Adobe...
Adobe Captivate 9 Accessibility
Learning Technologies, Training & Audiovisual Outreach
University Information Technology Services
Copyright © 2016 KSU Division of University Information Technology Services
This document may be downloaded, printed, or copied for educational use without further permission of the
University Information Technology Services Division (UITS), provided the content is not modified and this
statement is not removed. Any use not stated above requires the written consent of the UITS Division. The
distribution of a copy of this document via the Internet or other electronic medium without the written
permission of the KSU - UITS Division is expressly prohibited.
Published by Kennesaw State University – UITS 2016
The publisher makes no warranties as to the accuracy of the material contained in this document and
therefore is not responsible for any damages or liabilities incurred from UITS use.
University Information Technology Services
Adobe Captivate 9
Accessibility
Table of Contents
Introduction ............................................................................................................................................................ 4
Learning Objectives ................................................................................................................................................. 4
Enable Accessibility ................................................................................................................................................. 5
Project Information ................................................................................................................................................. 5
Slide Label ............................................................................................................................................................... 7
Slide Accessibility .................................................................................................................................................... 8
Slide Tab Order ....................................................................................................................................................... 9
Object Label .......................................................................................................................................................... 11
Object Accessibility ............................................................................................................................................... 12
Keyboard Shortcut ................................................................................................................................................ 13
Slide Notes ............................................................................................................................................................ 14
Adding Notes ..................................................................................................................................................... 14
Removing Notes ................................................................................................................................................ 15
Closed Captioning ................................................................................................................................................. 15
Adding Captions ................................................................................................................................................ 15
Adjusting Caption Display Time ........................................................................................................................ 16
Removing Captions ........................................................................................................................................... 18
Text-to-Speech ...................................................................................................................................................... 18
Adding Text-to-Speech ...................................................................................................................................... 18
Changing the Speech Agent .............................................................................................................................. 20
Removing Text-to-Speech ................................................................................................................................. 21
Play Bar Closed Caption ........................................................................................................................................ 22
Enable Closed Captioning ................................................................................................................................. 22
Configure Closed Captioning............................................................................................................................. 23
Additional Help ..................................................................................................................................................... 24
Revised 4/25/2016 Page 4 of 24
Introduction
Adobe Captivate® is designed to help you create instructional videos, also called screen casts.
This booklet explains how to create an Adobe Captivate project with accessibility.
Learning Objectives
After completing the instructions in this booklet, you will be able to:
Enable accessibility
Add accessibility to multiple area to a project
Setup shortcut keys for buttons
Add text for slide notes
Convert the slide notes for closed captioning
Convert the slide notes to text-to-speech
Configure the play bar to enable Closed Captioning
Page 5 of 24
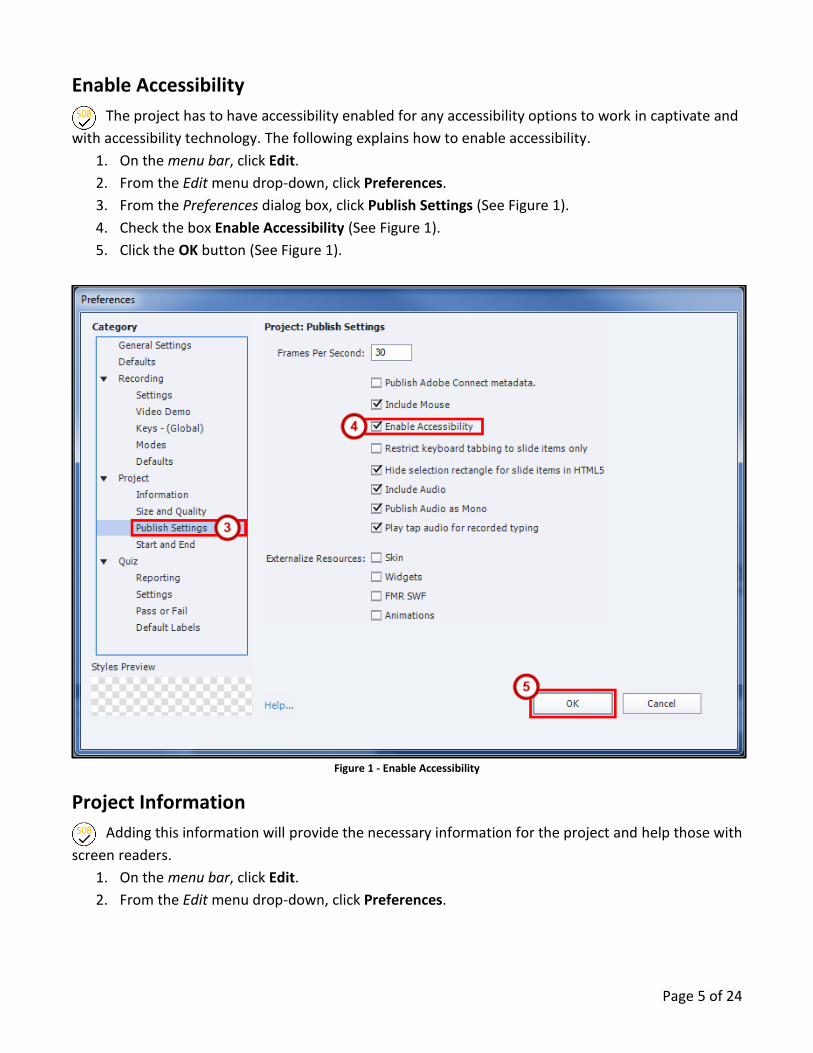
Enable Accessibility
The project has to have accessibility enabled for any accessibility options to work in captivate and
with accessibility technology. The following explains how to enable accessibility.
1. On the menu bar, click Edit.
2. From the Edit menu drop-down, click Preferences.
3. From the Preferences dialog box, click Publish Settings (See Figure 1).
4. Check the box Enable Accessibility (See Figure 1).
5. Click the OK button (See Figure 1).
Figure 1 - Enable Accessibility
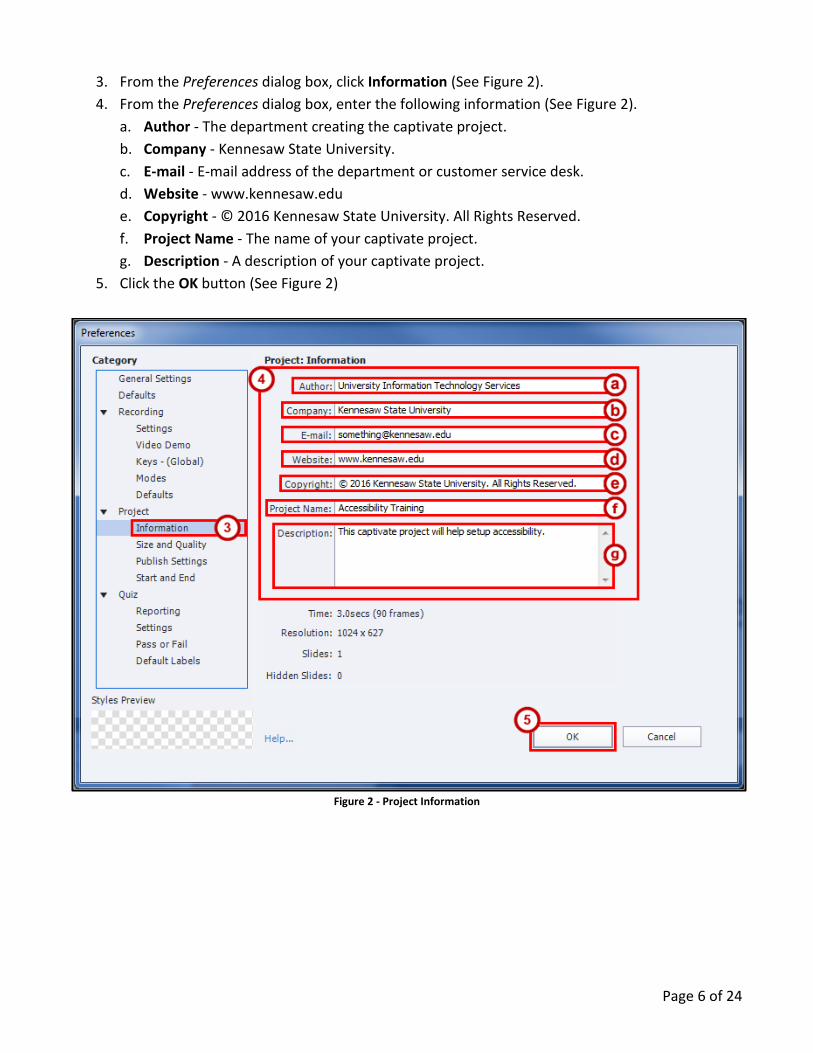
Project Information
Adding this information will provide the necessary information for the project and help those with
screen readers.
1. On the menu bar, click Edit.
2. From the Edit menu drop-down, click Preferences.
Page 6 of 24
3. From the Preferences dialog box, click Information (See Figure 2).
4. From the Preferences dialog box, enter the following information (See Figure 2).
a. Author - The department creating the captivate project.
b. Company - Kennesaw State University.
c. E-mail - E-mail address of the department or customer service desk.
d. Website - www.kennesaw.edu
e. Copyright - © 2016 Kennesaw State University. All Rights Reserved.
f. Project Name - The name of your captivate project.
g. Description - A description of your captivate project.
5. Click the OK button (See Figure 2)
Figure 2 - Project Information
Page 7 of 24
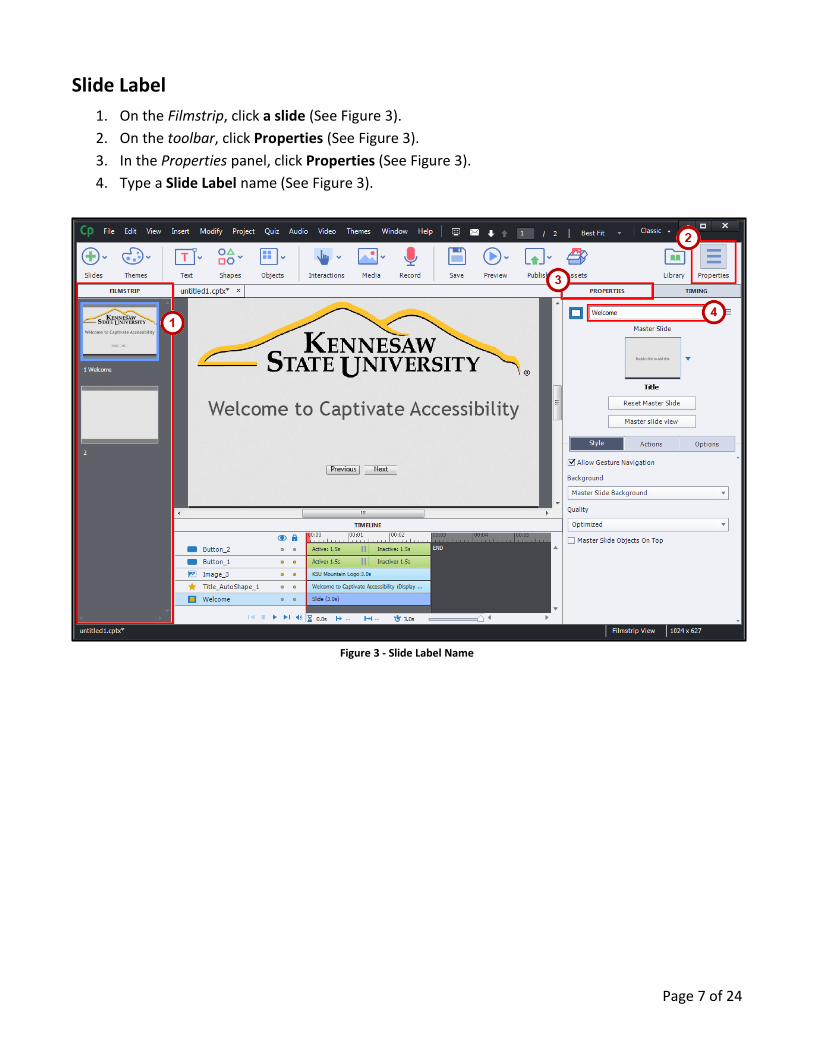
Slide Label
1. On the Filmstrip, click a slide (See Figure 3).
2. On the toolbar, click Properties (See Figure 3).
3. In the Properties panel, click Properties (See Figure 3).
4. Type a Slide Label name (See Figure 3).
Figure 3 - Slide Label Name
Page 8 of 24
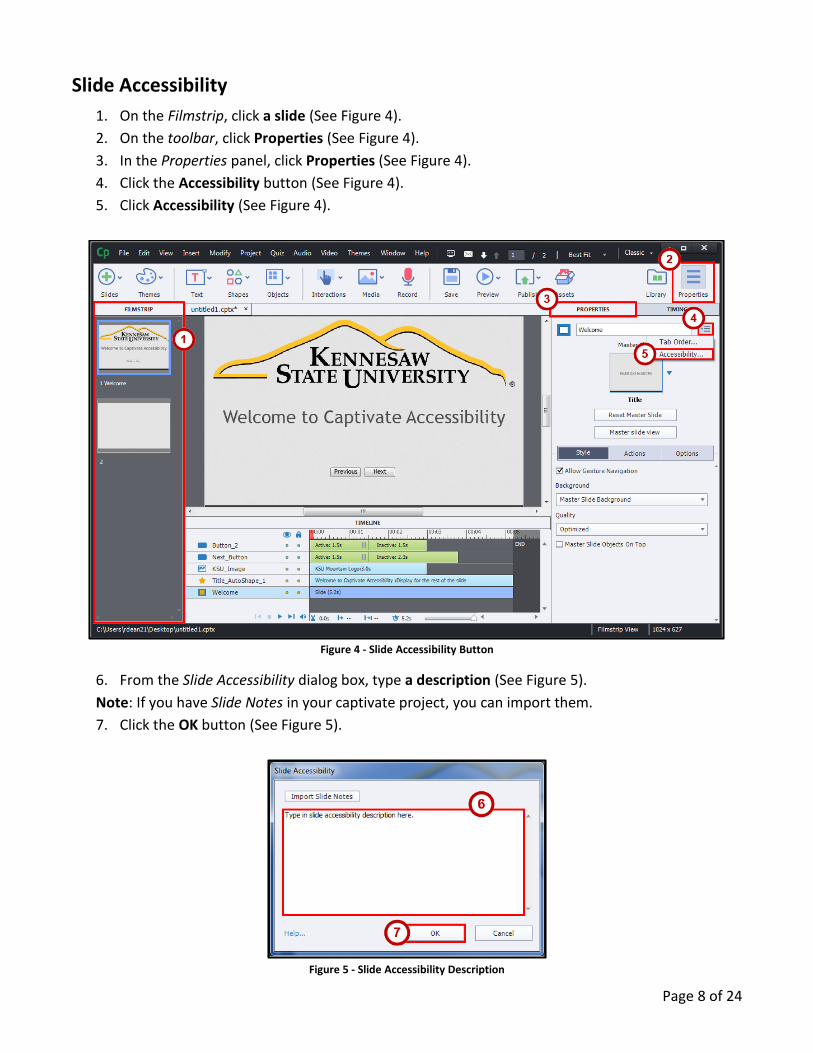
Slide Accessibility
1. On the Filmstrip, click a slide (See Figure 4).
2. On the toolbar, click Properties (See Figure 4).
3. In the Properties panel, click Properties (See Figure 4).
4. Click the Accessibility button (See Figure 4).
5. Click Accessibility (See Figure 4).
Figure 4 - Slide Accessibility Button
6. From the Slide Accessibility dialog box, type a description (See Figure 5).
Note: If you have Slide Notes in your captivate project, you can import them.
7. Click the OK button (See Figure 5).
Figure 5 - Slide Accessibility Description
Page 9 of 24
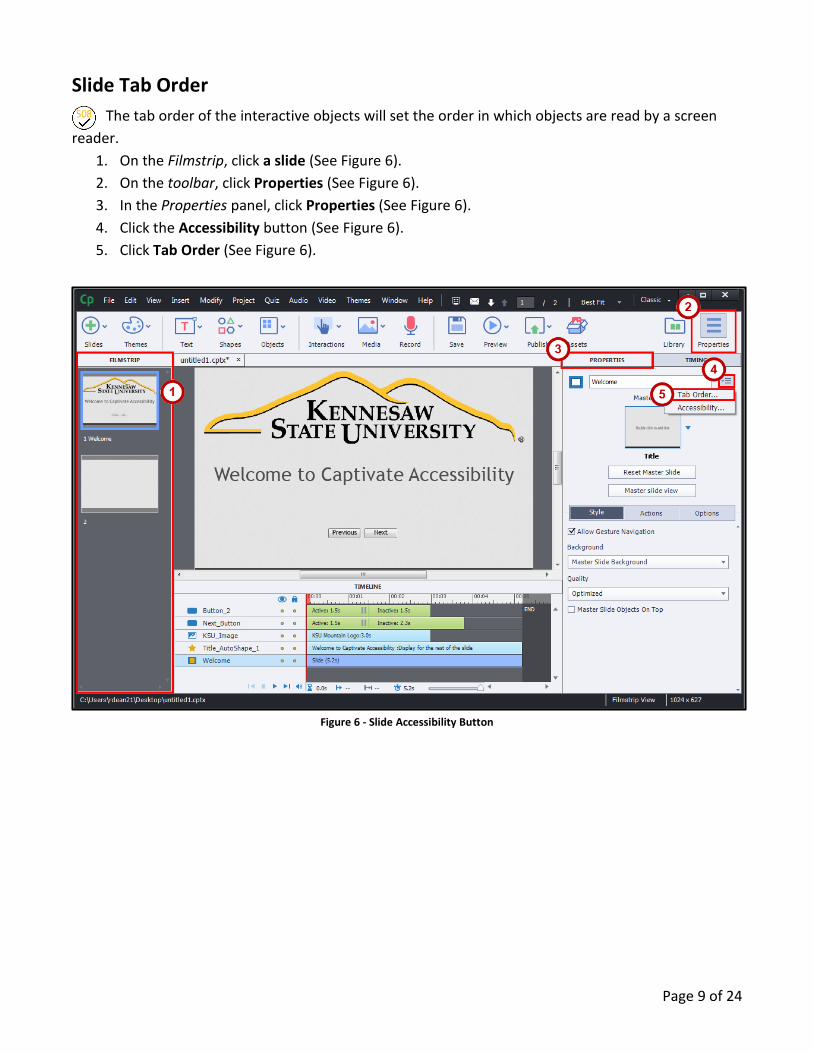
Slide Tab Order
The tab order of the interactive objects will set the order in which objects are read by a screen
reader.
1. On the Filmstrip, click a slide (See Figure 6).
2. On the toolbar, click Properties (See Figure 6).
3. In the Properties panel, click Properties (See Figure 6).
4. Click the Accessibility button (See Figure 6).
5. Click Tab Order (See Figure 6).
Figure 6 - Slide Accessibility Button
Page 10 of 24
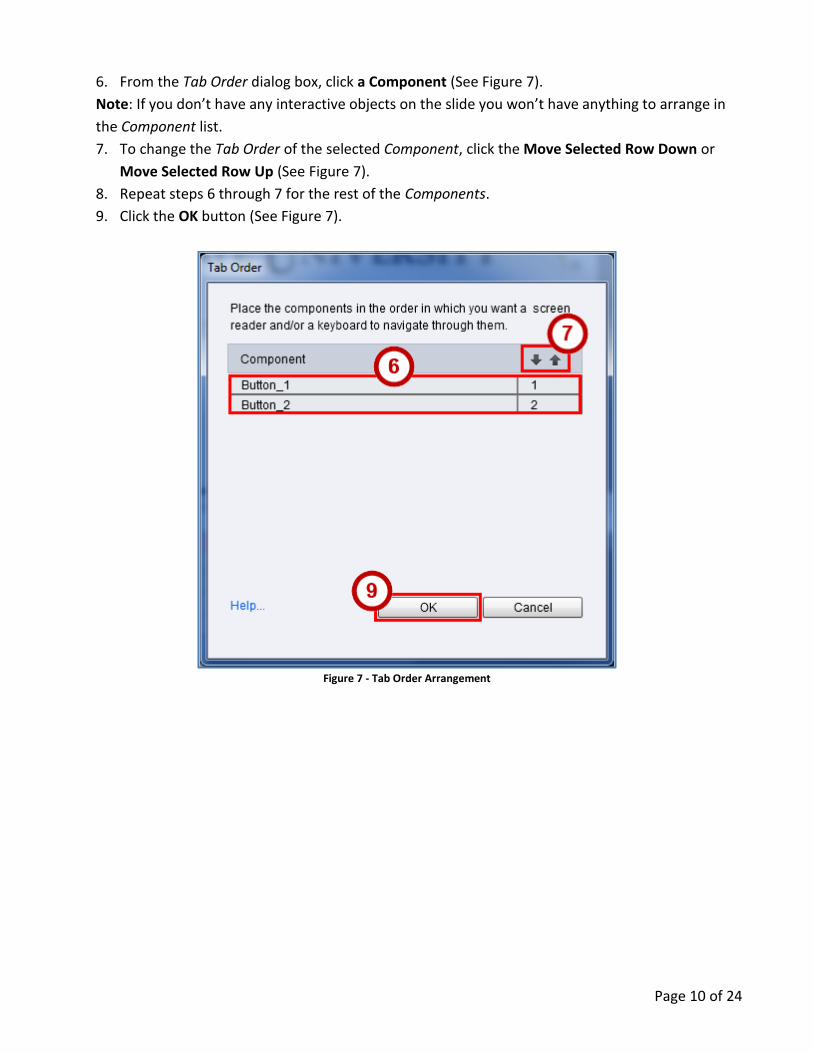
6. From the Tab Order dialog box, click a Component (See Figure 7).
Note: If you don’t have any interactive objects on the slide you won’t have anything to arrange in
the Component list.
7. To change the Tab Order of the selected Component, click the Move Selected Row Down or
Move Selected Row Up (See Figure 7).
8. Repeat steps 6 through 7 for the rest of the Components.
9. Click the OK button (See Figure 7).
Figure 7 - Tab Order Arrangement
Page 11 of 24
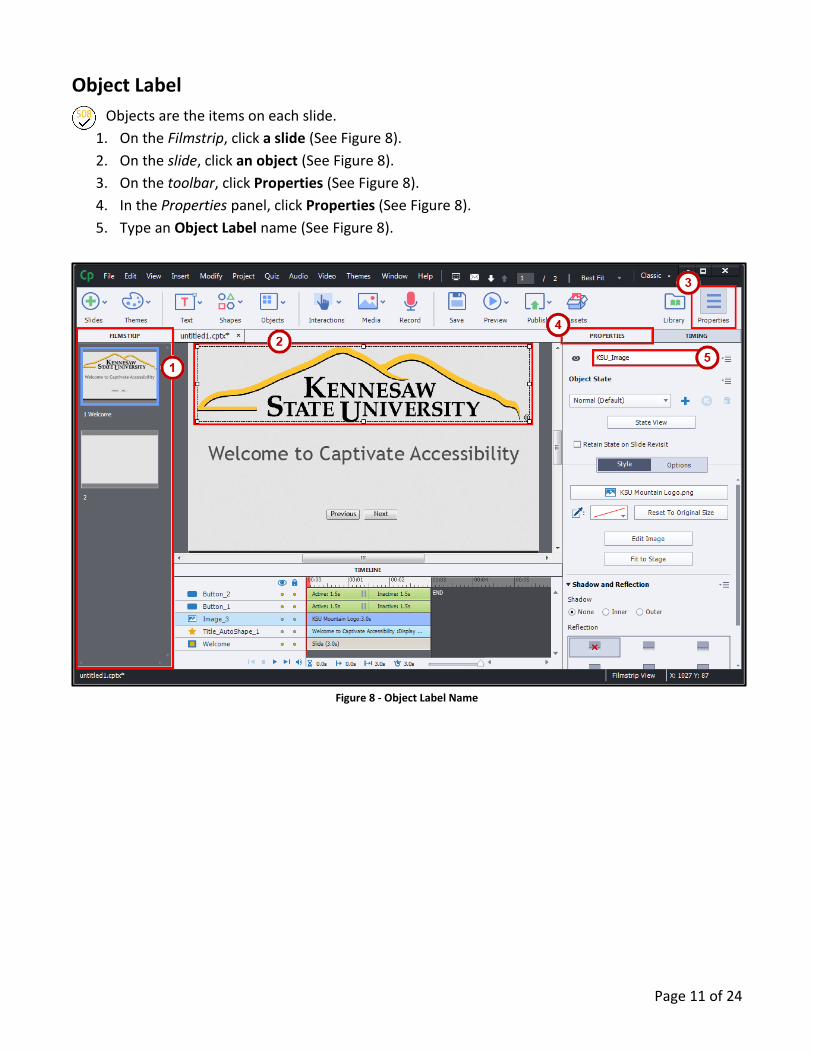
Object Label
Objects are the items on each slide.
1. On the Filmstrip, click a slide (See Figure 8).
2. On the slide, click an object (See Figure 8).
3. On the toolbar, click Properties (See Figure 8).
4. In the Properties panel, click Properties (See Figure 8).
5. Type an Object Label name (See Figure 8).
Figure 8 - Object Label Name
Page 12 of 24
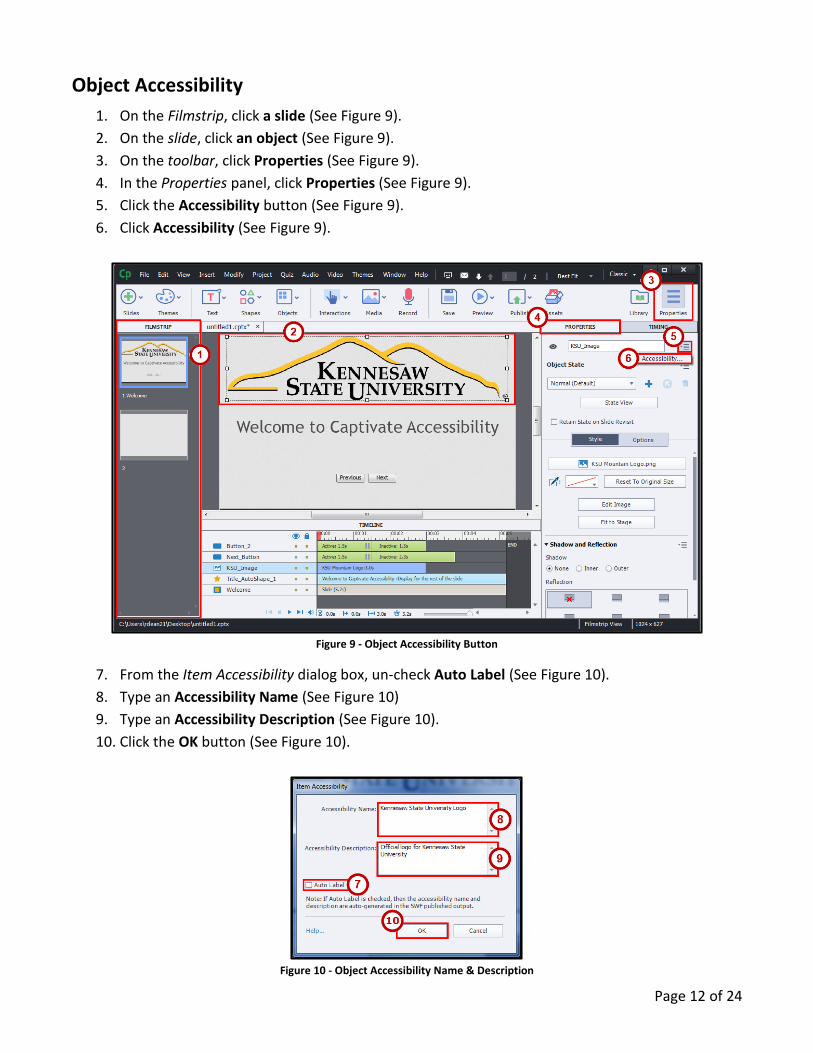
Object Accessibility
1. On the Filmstrip, click a slide (See Figure 9).
2. On the slide, click an object (See Figure 9).
3. On the toolbar, click Properties (See Figure 9).
4. In the Properties panel, click Properties (See Figure 9).
5. Click the Accessibility button (See Figure 9).
6. Click Accessibility (See Figure 9).
Figure 9 - Object Accessibility Button
7. From the Item Accessibility dialog box, un-check Auto Label (See Figure 10).
8. Type an Accessibility Name (See Figure 10)
9. Type an Accessibility Description (See Figure 10).
10. Click the OK button (See Figure 10).
Figure 10 - Object Accessibility Name & Description
Page 13 of 24
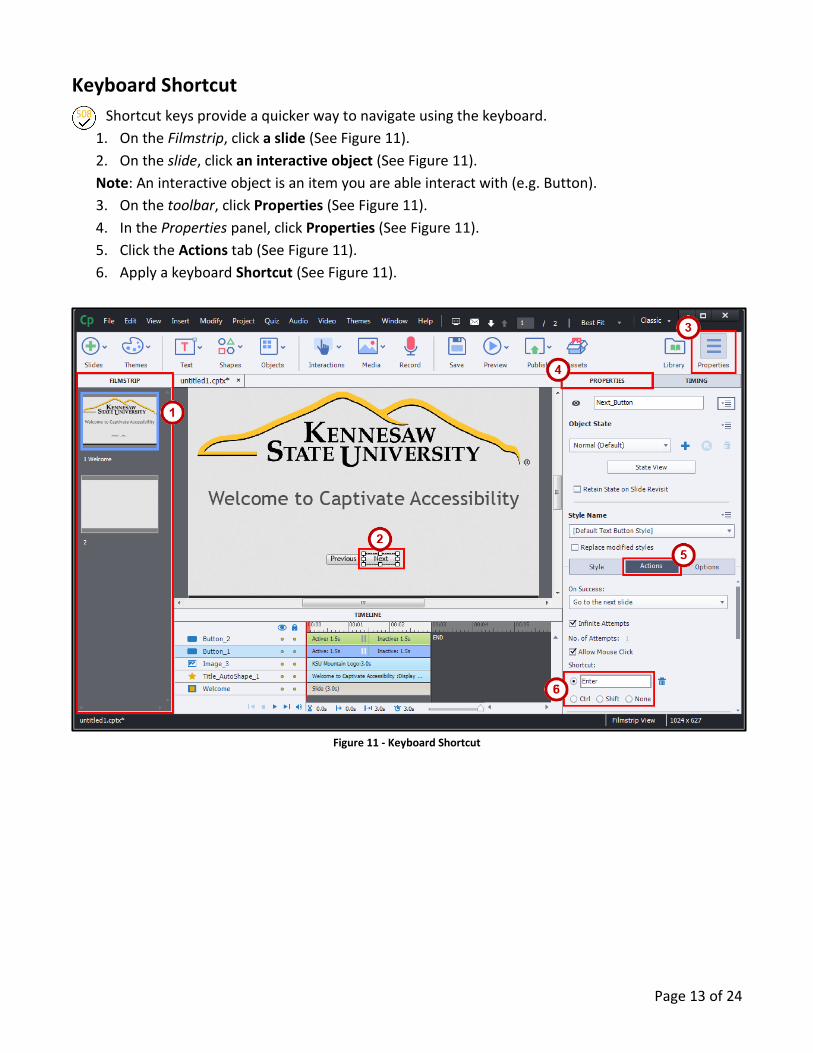
Keyboard Shortcut
Shortcut keys provide a quicker way to navigate using the keyboard.
1. On the Filmstrip, click a slide (See Figure 11).
2. On the slide, click an interactive object (See Figure 11).
Note: An interactive object is an item you are able interact with (e.g. Button).
3. On the toolbar, click Properties (See Figure 11).
4. In the Properties panel, click Properties (See Figure 11).
5. Click the Actions tab (See Figure 11).
6. Apply a keyboard Shortcut (See Figure 11).
Figure 11 - Keyboard Shortcut
Page 14 of 24
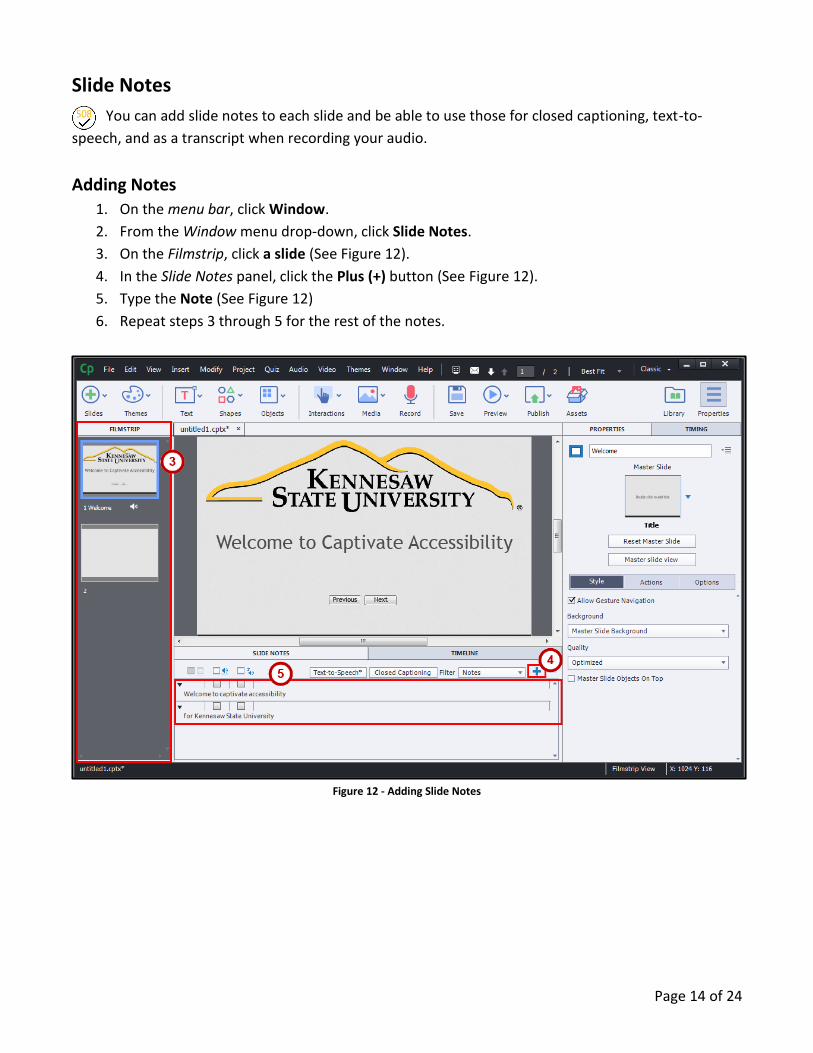
Slide Notes
You can add slide notes to each slide and be able to use those for closed captioning, text-to-
speech, and as a transcript when recording your audio.
Adding Notes
1. On the menu bar, click Window.
2. From the Window menu drop-down, click Slide Notes.
3. On the Filmstrip, click a slide (See Figure 12).
4. In the Slide Notes panel, click the Plus (+) button (See Figure 12).
5. Type the Note (See Figure 12)
6. Repeat steps 3 through 5 for the rest of the notes.
Figure 12 - Adding Slide Notes
Page 15 of 24
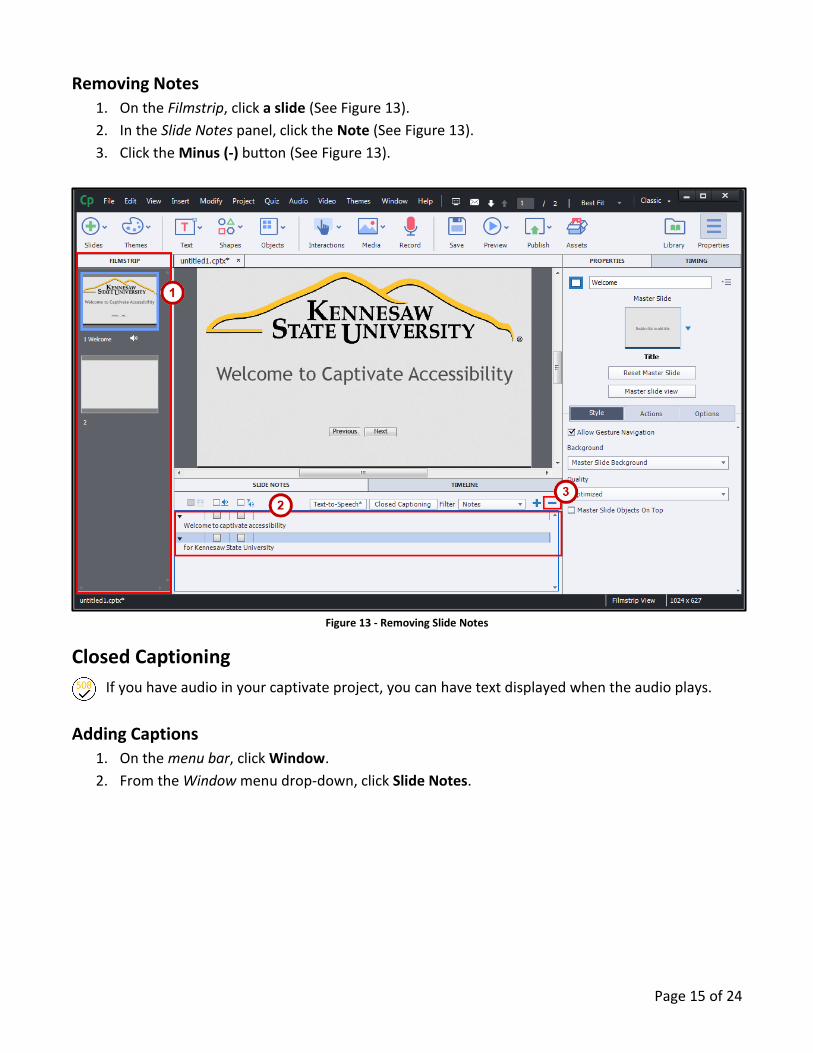
Removing Notes
1. On the Filmstrip, click a slide (See Figure 13).
2. In the Slide Notes panel, click the Note (See Figure 13).
3. Click the Minus (-) button (See Figure 13).
Figure 13 - Removing Slide Notes
Closed Captioning
If you have audio in your captivate project, you can have text displayed when the audio plays.
Adding Captions
1. On the menu bar, click Window.
2. From the Window menu drop-down, click Slide Notes.

Page 16 of 24
3. On the Filmstrip, click a slide (See Figure 14).
4. In the Slide Notes panel, check the Closed Captioning check-box (See Figure 14).
Note: You need to have an audio file on the slide to be able to enable the Closed Captioning.
Figure 14 - Adding Closed Captioning
Adjusting Caption Display Time
1. On the menu bar, click Window.
2. From the Window menu drop-down, click Slide Notes.
3. On the Filmstrip, click a slide (See Figure 15).
4. In the Slide Notes panel, click the Closed Captioning button (See Figure 15).
Figure 15 - Closed Captioning
Page 17 of 24
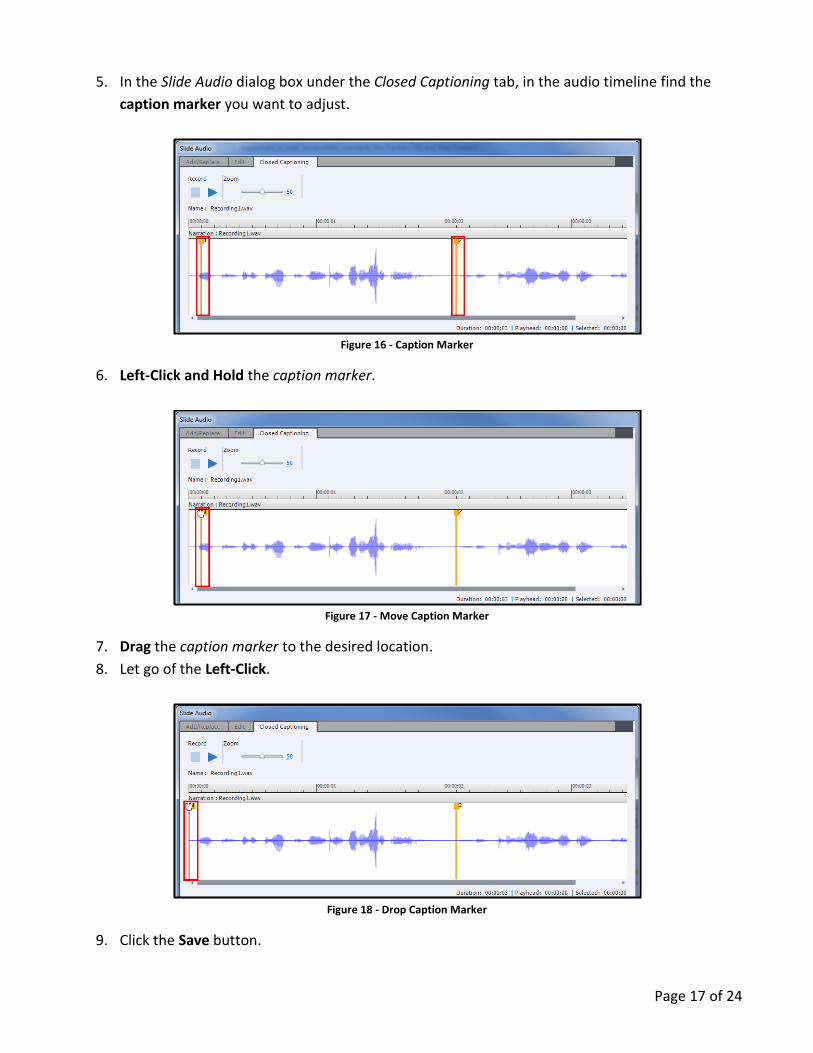
5. In the Slide Audio dialog box under the Closed Captioning tab, in the audio timeline find the
caption marker you want to adjust.
Figure 16 - Caption Marker
6. Left-Click and Hold the caption marker.
Figure 17 - Move Caption Marker
7. Drag the caption marker to the desired location.
8. Let go of the Left-Click.
Figure 18 - Drop Caption Marker
9. Click the Save button.
Page 18 of 24
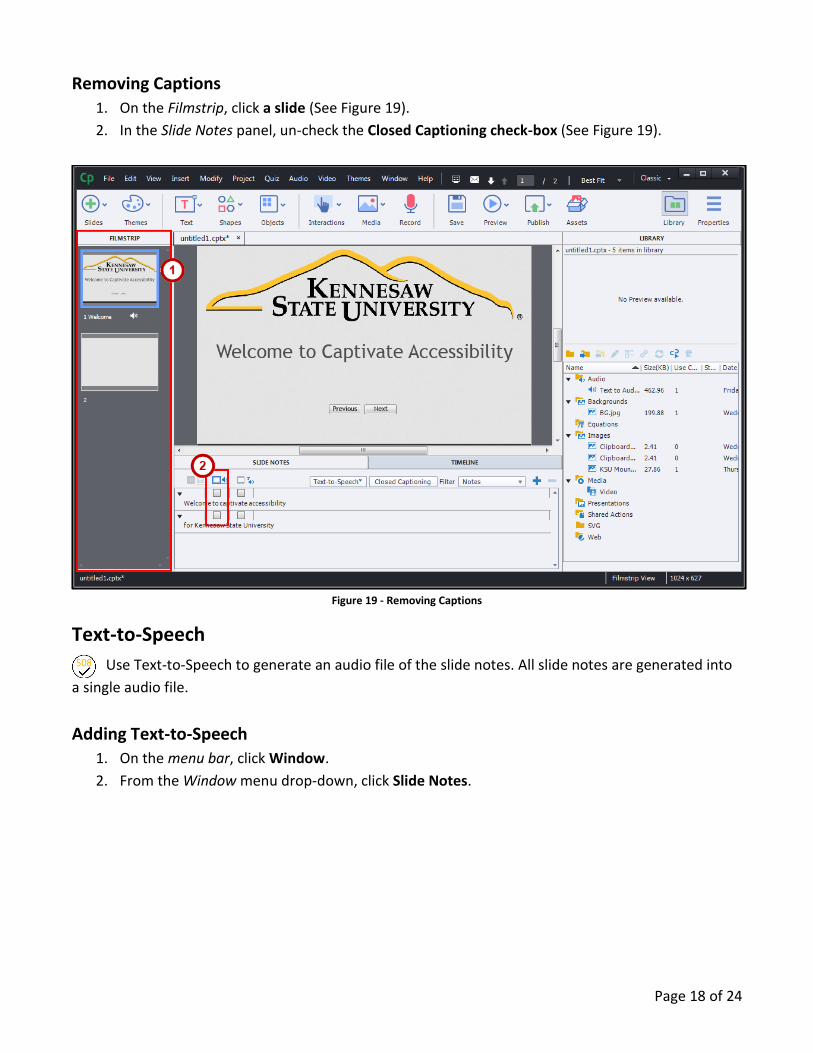
Removing Captions
1. On the Filmstrip, click a slide (See Figure 19).
2. In the Slide Notes panel, un-check the Closed Captioning check-box (See Figure 19).
Figure 19 - Removing Captions
Text-to-Speech
Use Text-to-Speech to generate an audio file of the slide notes. All slide notes are generated into
a single audio file.
Adding Text-to-Speech
1. On the menu bar, click Window.
2. From the Window menu drop-down, click Slide Notes.
Page 19 of 24
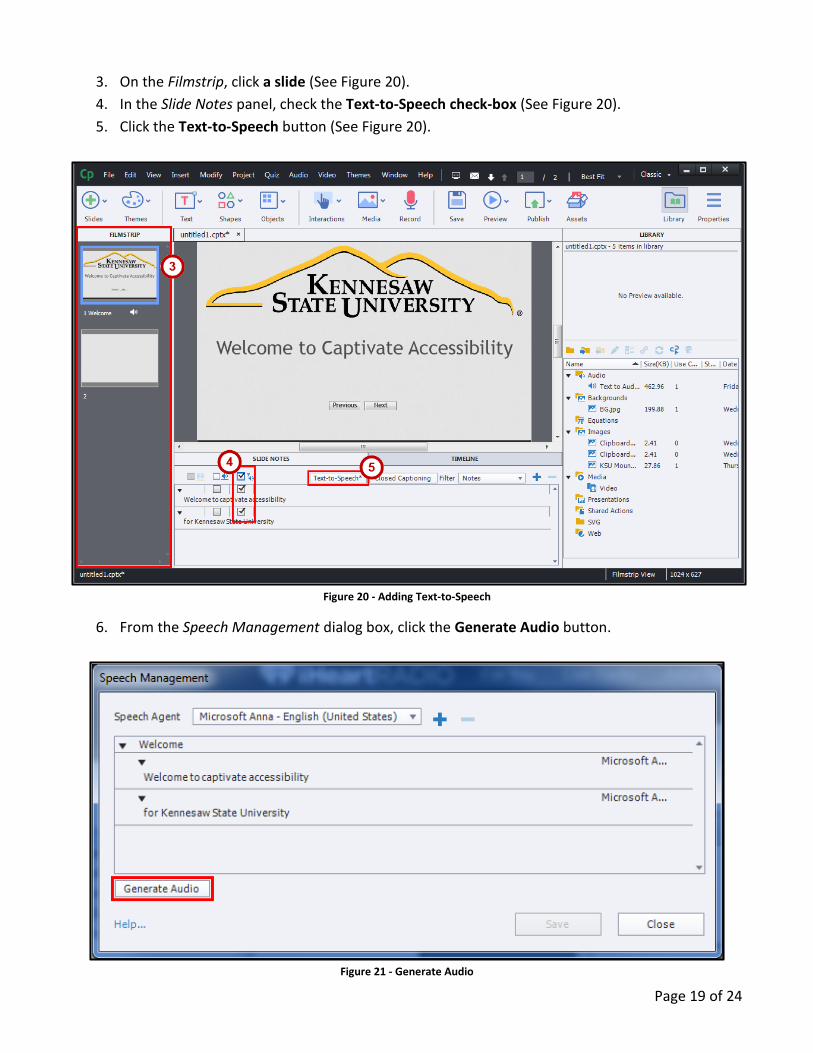
3. On the Filmstrip, click a slide (See Figure 20).
4. In the Slide Notes panel, check the Text-to-Speech check-box (See Figure 20).
5. Click the Text-to-Speech button (See Figure 20).
Figure 20 - Adding Text-to-Speech
6. From the Speech Management dialog box, click the Generate Audio button.
Figure 21 - Generate Audio
Page 20 of 24
Changing the Speech Agent
1. On the Filmstrip, click a slide.
2. In the Slide Notes panel, click the Text-to-Speech button.
3. From the Speech Management dialog box, click a Caption.
Note: To select multiple captions at the same time, hold down the Ctrl button on the keyboard
while clicking each caption.
Figure 22 - Text-to-Speech Captions
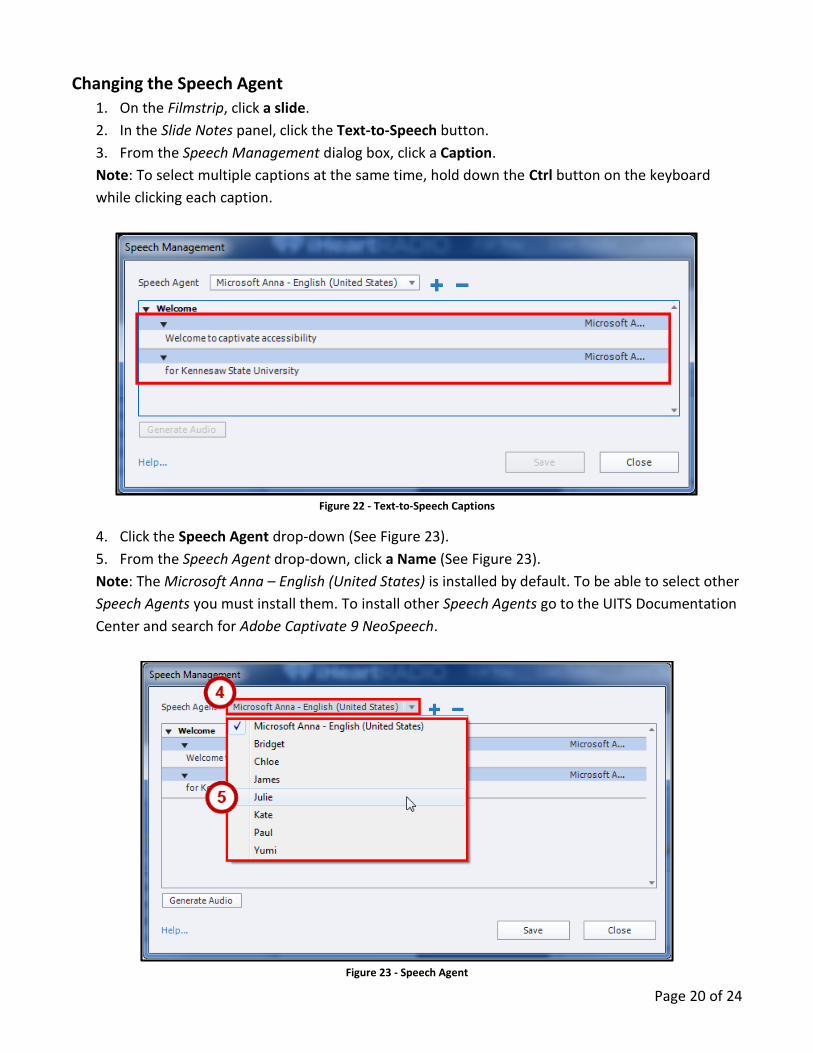
4. Click the Speech Agent drop-down (See Figure 23).
5. From the Speech Agent drop-down, click a Name (See Figure 23).
Note: The Microsoft Anna – English (United States) is installed by default. To be able to select other
Speech Agents you must install them. To install other Speech Agents go to the UITS Documentation
Center and search for Adobe Captivate 9 NeoSpeech.
Figure 23 - Speech Agent
Page 21 of 24
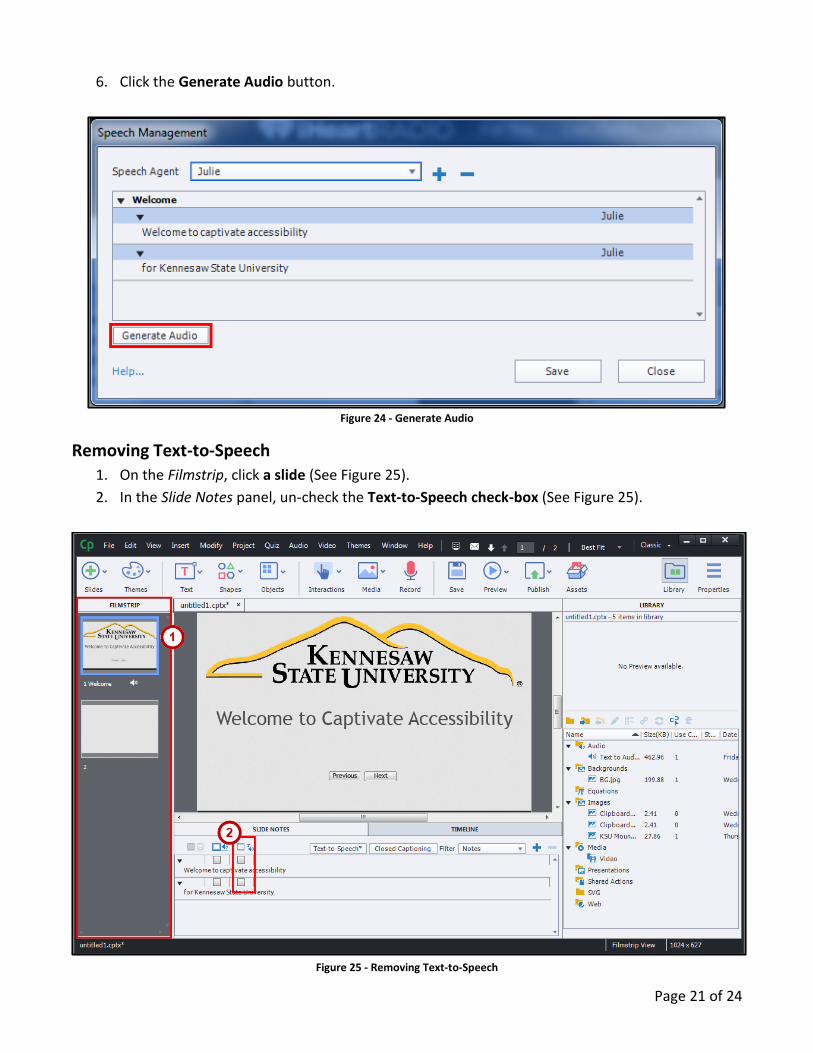
6. Click the Generate Audio button.
Figure 24 - Generate Audio
Removing Text-to-Speech
1. On the Filmstrip, click a slide (See Figure 25).
2. In the Slide Notes panel, un-check the Text-to-Speech check-box (See Figure 25).
Figure 25 - Removing Text-to-Speech
Page 22 of 24
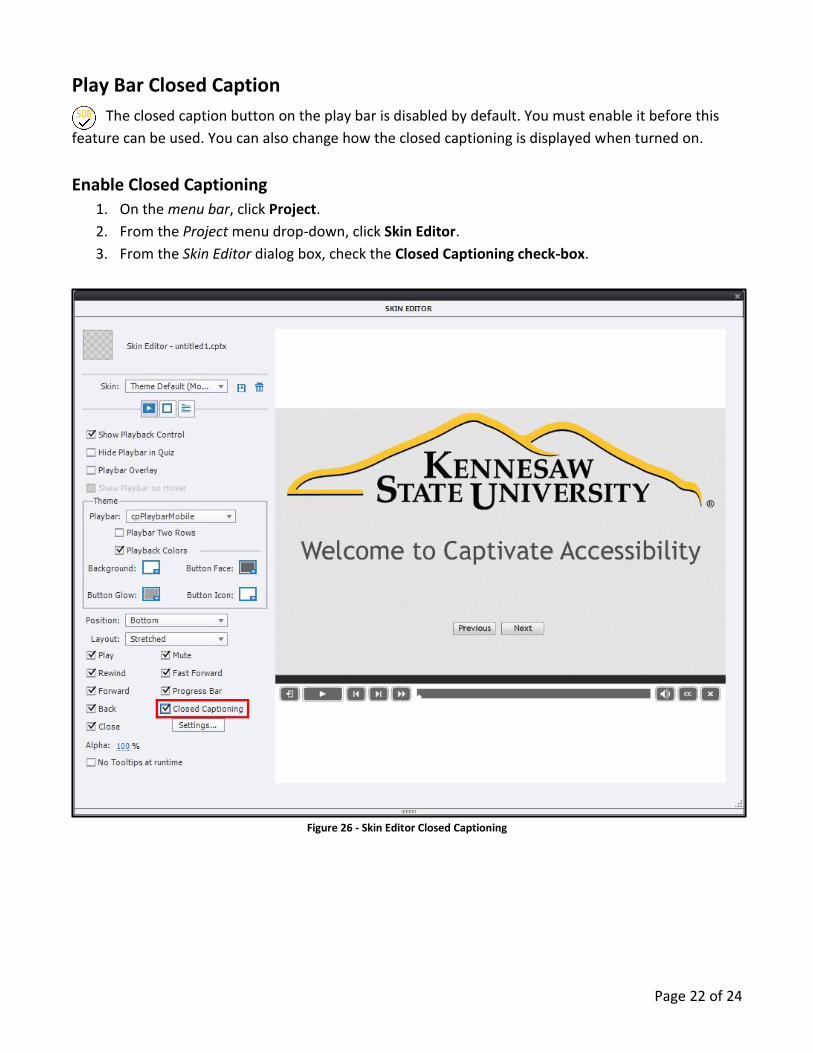
Play Bar Closed Caption
The closed caption button on the play bar is disabled by default. You must enable it before this
feature can be used. You can also change how the closed captioning is displayed when turned on.
Enable Closed Captioning
1. On the menu bar, click Project.
2. From the Project menu drop-down, click Skin Editor.
3. From the Skin Editor dialog box, check the Closed Captioning check-box.
Figure 26 - Skin Editor Closed Captioning
Page 23 of 24
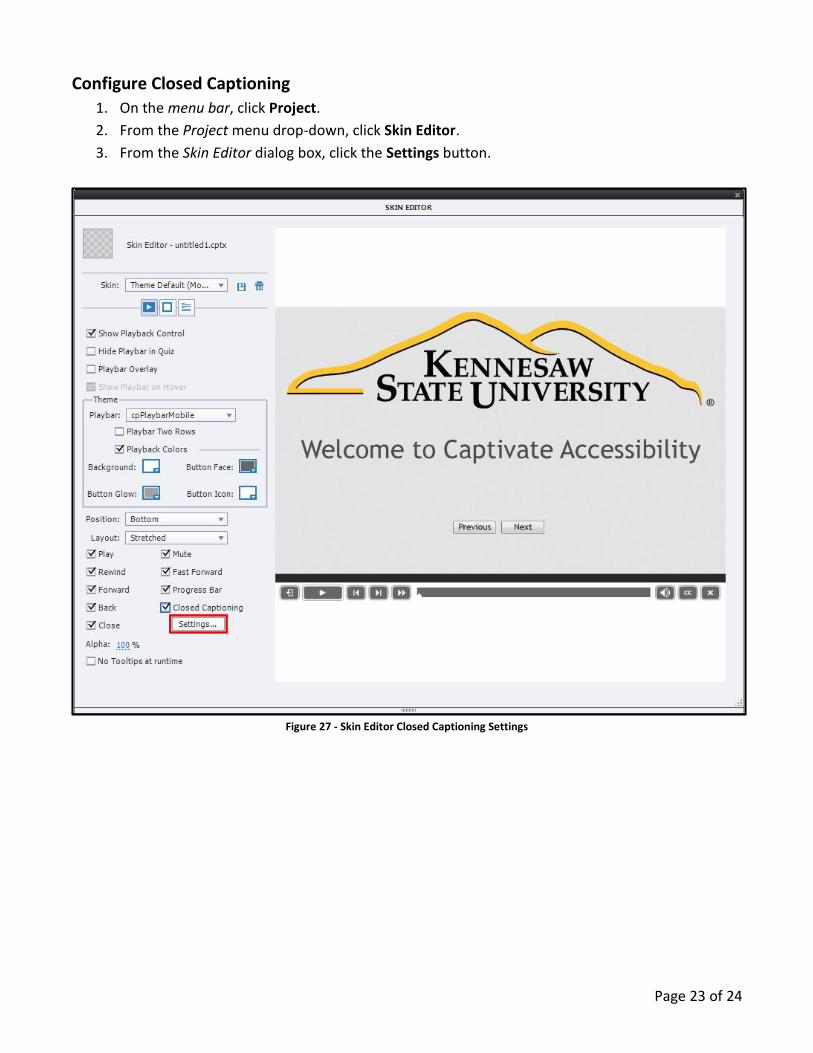
Configure Closed Captioning
1. On the menu bar, click Project.
2. From the Project menu drop-down, click Skin Editor.
3. From the Skin Editor dialog box, click the Settings button.
Figure 27 - Skin Editor Closed Captioning Settings
Page 24 of 24
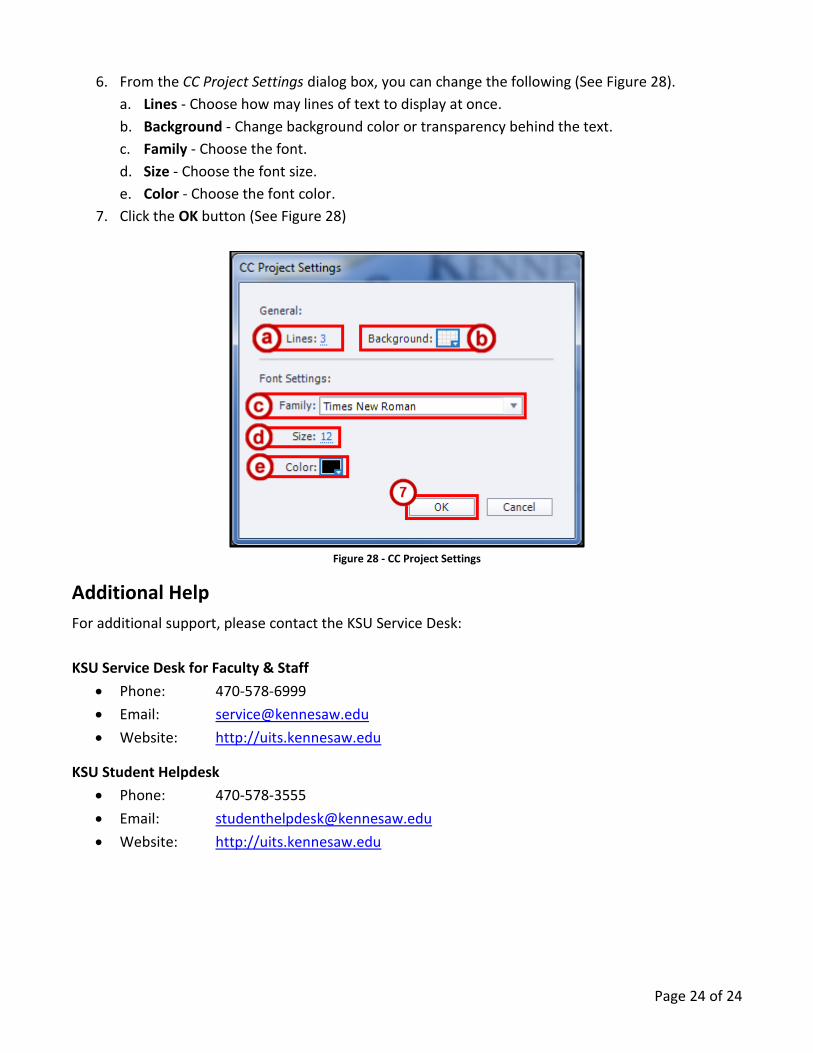
6. From the CC Project Settings dialog box, you can change the following (See Figure 28).
a. Lines - Choose how may lines of text to display at once.
b. Background - Change background color or transparency behind the text.
c. Family - Choose the font.
d. Size - Choose the font size.
e. Color - Choose the font color.
7. Click the OK button (See Figure 28)
Figure 28 - CC Project Settings
Additional Help
For additional support, please contact the KSU Service Desk:
KSU Service Desk for Faculty & Staff
Phone: 470-578-6999
Email: [email protected]
Website: http://uits.kennesaw.edu
KSU Student Helpdesk
Phone: 470-578-3555
Email: [email protected]
Website: http://uits.kennesaw.edu