Adobe AEM Dispatcher Caching Basics.Adobe AEM Dispatcher Caching Basics. Rookie “getting...
27
Adobe AEM Dispatcher Caching Basics. Rookie “getting started” tutorial. Impressions of familiarity with Adobe AEM Dispatcher from present junior developer for future juniors. Part 0. Introduction. Current tutorial consists of 5 parts. Part 1. Abstract view of the Adobe AEM Dispatcher and of its goals. Part 2. Environment installation. Part 3. Environment initial settings for enable cache. Part 4. Cache invalidation. Part 5. Useful external tools for advanced using of the dispatcher.
Transcript of Adobe AEM Dispatcher Caching Basics.Adobe AEM Dispatcher Caching Basics. Rookie “getting...
Adobe AEM Dispatcher Caching Basics. Rookie “getting started” tutorial. Impressions of familiarity with Adobe AEM Dispatcher from present junior developer for future juniors.
Part 0. Introduction. Current tutorial consists of 5 parts. Part 1. Abstract view of the Adobe AEM Dispatcher and of its goals. Part 2. Environment installation. Part 3. Environment initial settings for enable cache. Part 4. Cache invalidation. Part 5. Useful external tools for advanced using of the dispatcher.
Part 1. Abstract view of the Adobe AEM Dispatcher and of its goals. There are two basic approaches to web publishing:
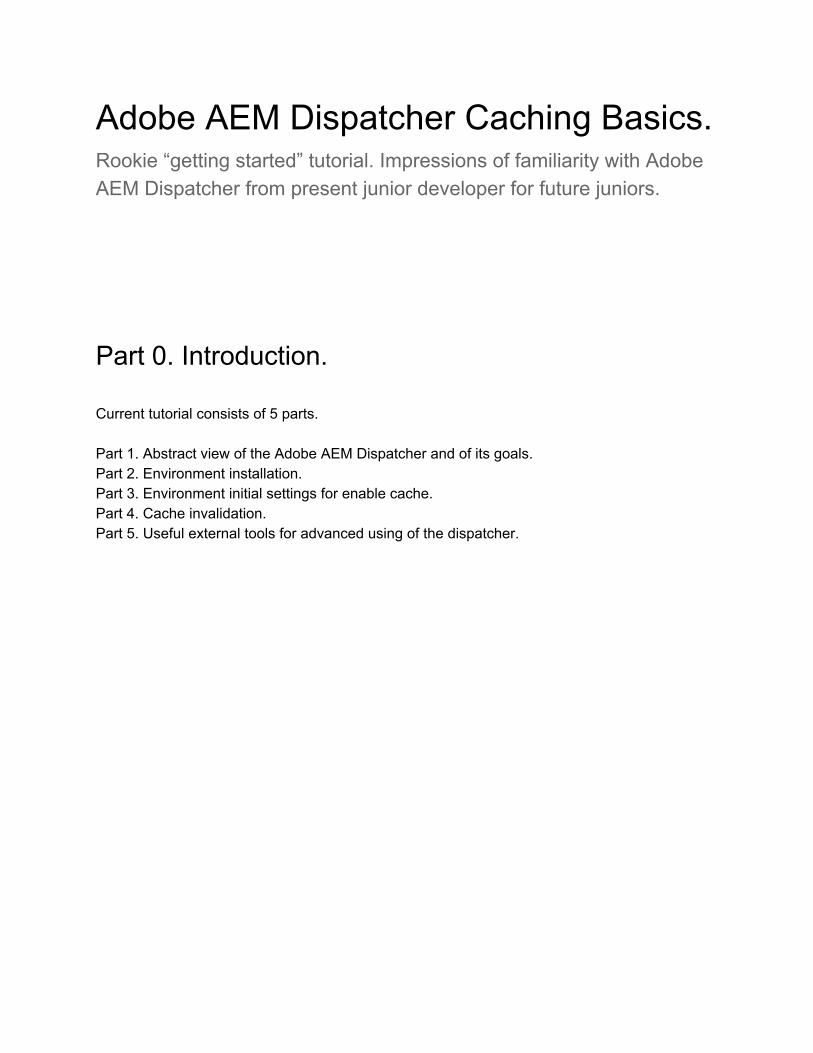
1. Static Web Servers: such as Apache or IIS, are very simple, but fast.
The first static web servers were created at the era of the web childhood in the middle of the 90s years of the XXth century.
Apache HTTP Server (“httpd”) was one of them and it became very quickly the most popular static web server. The Apache HTTP Server (“httpd”) was launched in 1995 and it has been the most popular web server on the Internet since April 1996. It has celebrated its 20th birthday in February 2015. The Apache HTTP Server creation became very important for open source world which includes java open source software. This server was created by 1015 developers which formed original Apache Group. In 1999 members of the Apache Group formed the Apache Software Foundation (ASF) which greatly expanded the number of Open Source software projects. For example, java applications development is almost painless today thanks to a dozens projects of Apache Open Source software such as felix (OSGi implementation), jackrabbit (jcr implementation) and sling which are used in Adobe AEM.
One of the greatest feature of the static web servers is that their abilities and properties may be expanded, improved and customized by the 3rt party plugins.
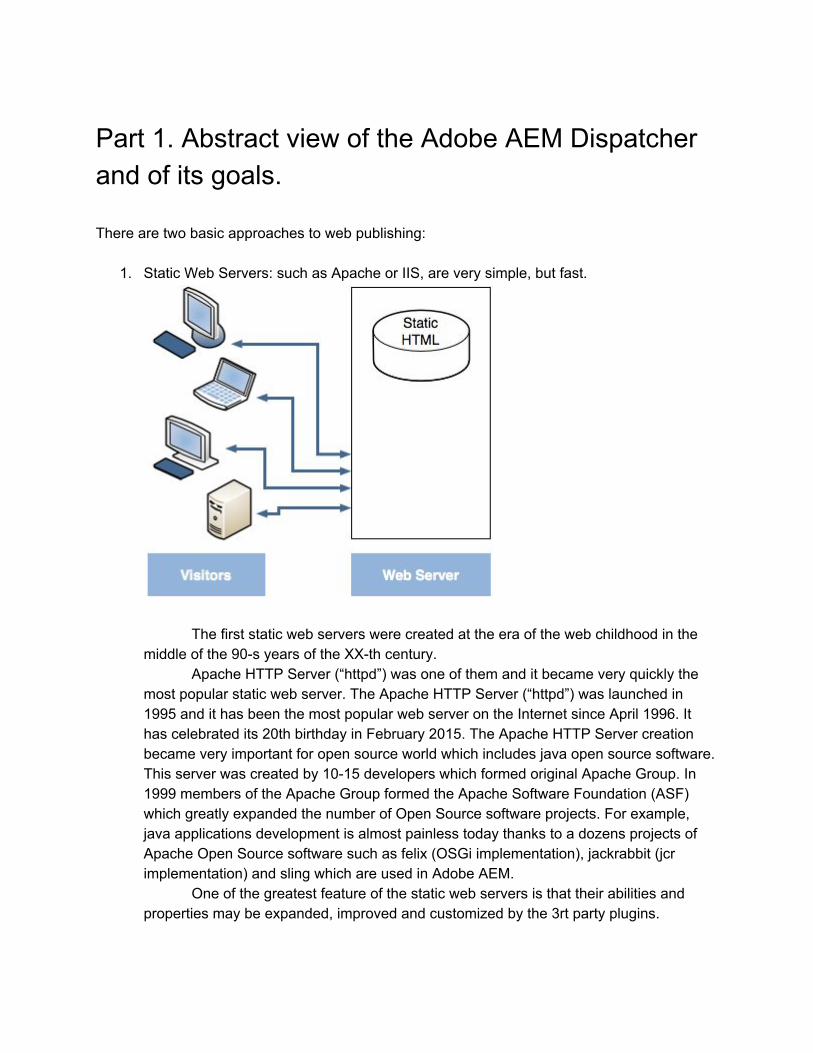
2. Content Management Servers: which provide dynamic, realtime, intelligent content, but require much more computation time and other resources.
We may use the 2nd approach by default when are working with Adobe AEM.
Minimal environment configuration for web publishing with Adobe AEM consists of two AEM instances: author and publish.
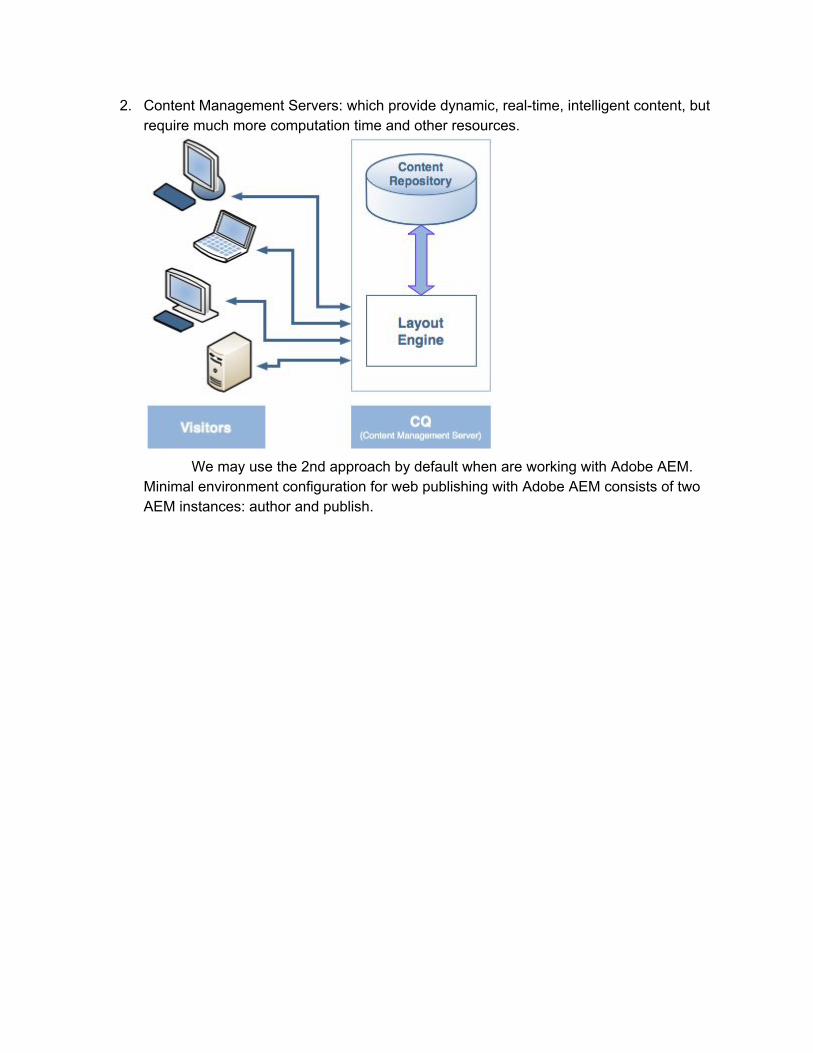
3. The Dispatcher helps realize both approaches at the same time for building and configuring both fast and dynamic environment. The dispatcher works as part of a static HTML server (such as Apache). It means that the dispatcher is only the 3rd party plugin (plugins are called “modules” for apache httpd) for static web servers. This plugin was written by Adobe.
Such environment provides caching with aim of: storing (or “caching”) as much of the site content as is possible, in the form of a static
website; accessing the layout engine as little as possible.
It means that:
static content is handled with exactly the same speed and ease as on a static web server; additionally you can use the administration and security tools available for your static web server(s);
dynamic content is generated as needed, without slowing the system down any more than absolutely necessary.
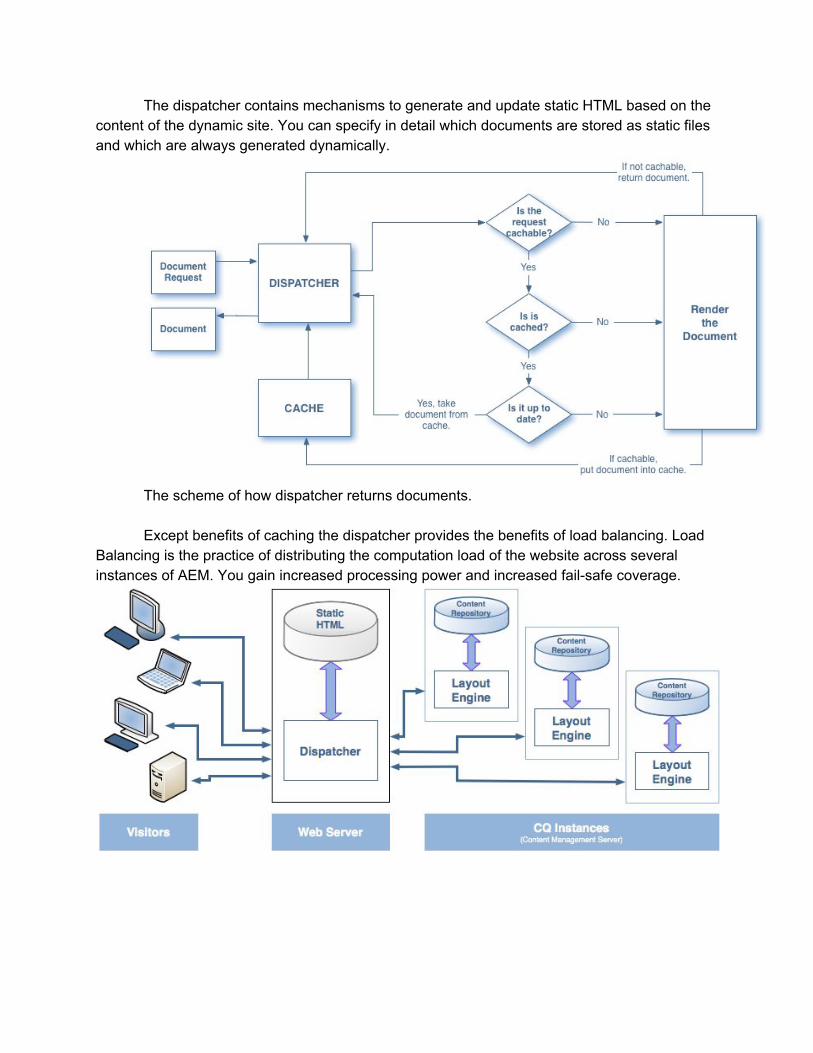
The dispatcher contains mechanisms to generate and update static HTML based on the content of the dynamic site. You can specify in detail which documents are stored as static files and which are always generated dynamically.
The scheme of how dispatcher returns documents. Except benefits of caching the dispatcher provides the benefits of load balancing. Load
Balancing is the practice of distributing the computation load of the website across several instances of AEM. You gain increased processing power and increased failsafe coverage.
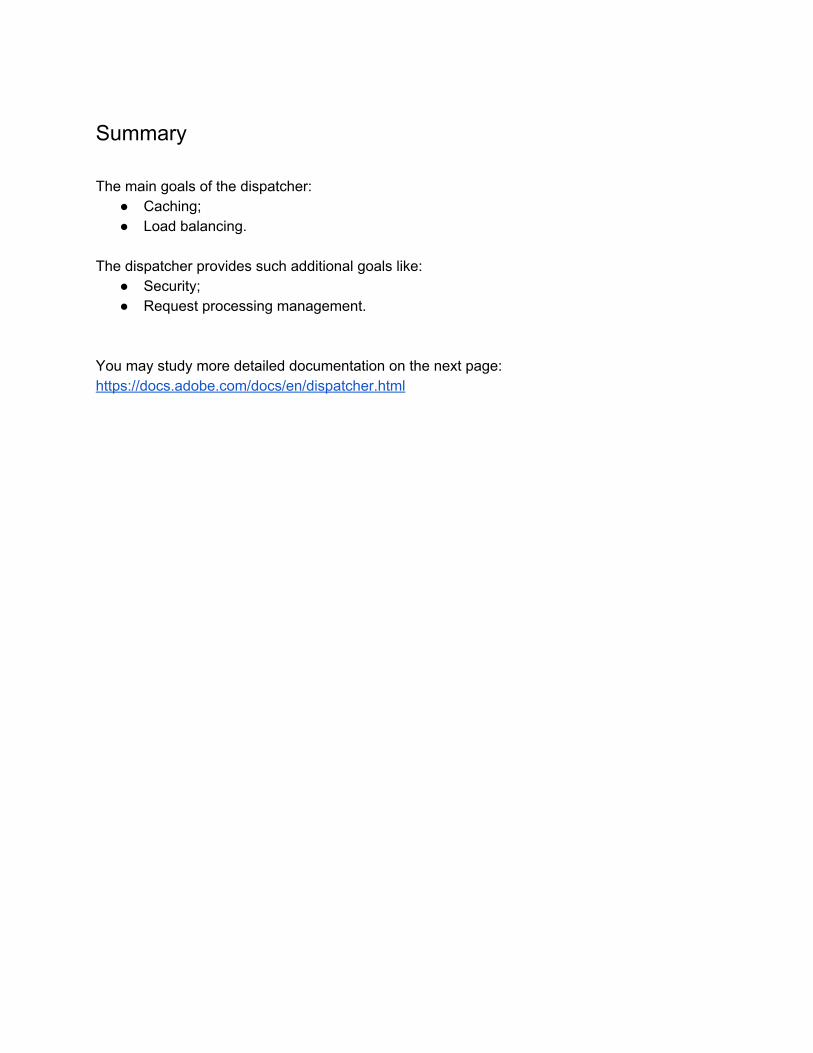
Summary The main goals of the dispatcher:
Caching; Load balancing.
The dispatcher provides such additional goals like:
Security; Request processing management.
You may study more detailed documentation on the next page: https://docs.adobe.com/docs/en/dispatcher.html
Part 2. Environment installation.
We consider for demonstration purposes only local environment installation in our “getting started” tutorial. We assume that you already have installed AEM author (http://localhost:4502) and publish (http://localhost:4503) instances. Then you need to install only couple of things for dispatcher working environment.
1. You need to choose one of three supported static web servers and install it: Apache HTTP Server (“httpd”); Microsoft IIS; Oracle IPlanet.
2. Then you need to install and enable Adobe AEM Dispatcher module (plugin) for corresponding static web server.
2.1 Static web server installation. We consider for demonstration purposes installation of Apache HTTP Server (“httpd”).
We assume that your local environment is based on some kind of Windows OS family. If you have another OS family then installation steps will be quite similar.
We assume that we have next working environment: 1. Windows 7 Professional SP1 x64 OS; 2. Adobe AEM 6.1 author instance (http://localhost:4502); 3. Adobe AEM 6.1 publish instance (http://localhost:4503).
Important note: before downloading httpd distributives you should to check if
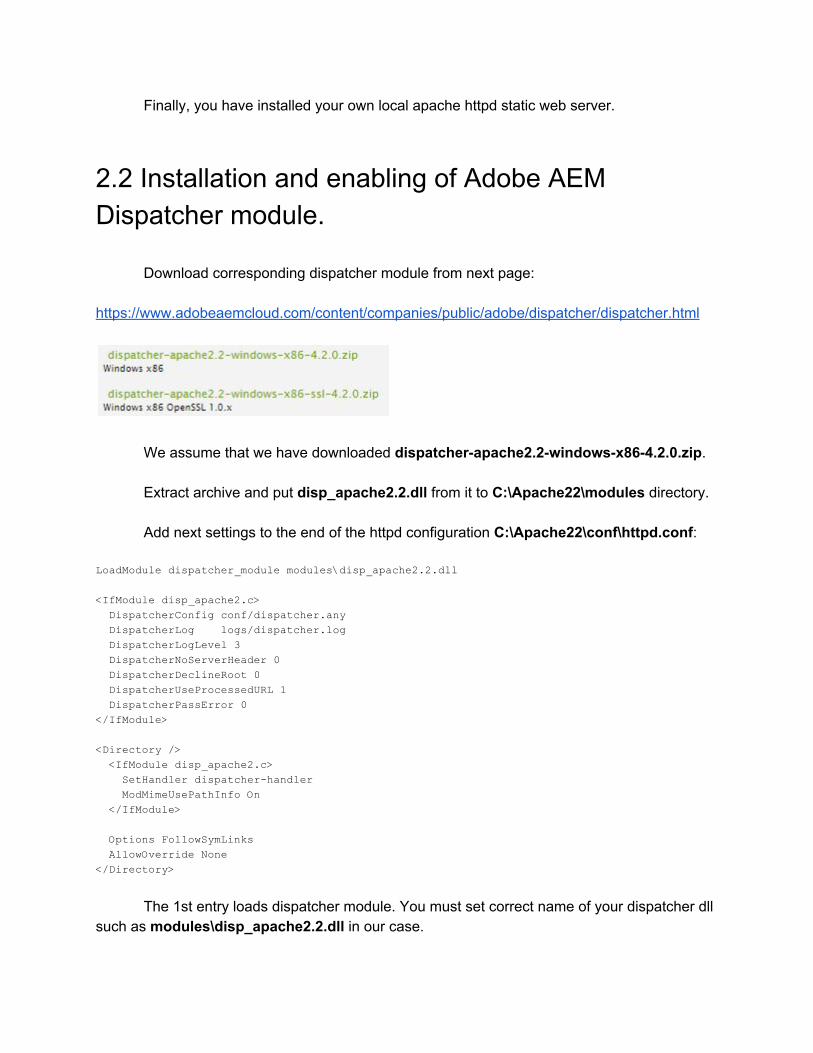
corresponding dispatcher module exists for the version of your future httpd server. Different versions of dispatcher module have been written by Adobe and shared on the next page: https://www.adobeaemcloud.com/content/companies/public/adobe/dispatcher/dispatcher.html
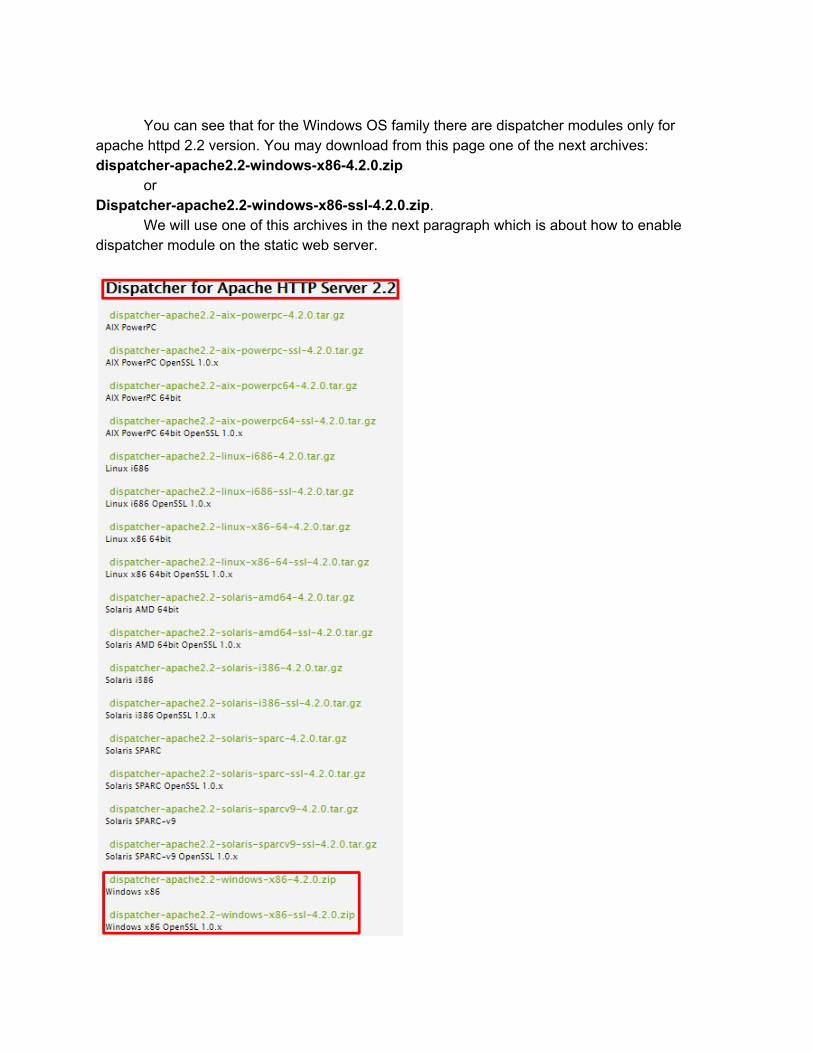
You can see that for the Windows OS family there are dispatcher modules only for
apache httpd 2.2 version. You may download from this page one of the next archives: dispatcherapache2.2windowsx864.2.0.zip
or Dispatcherapache2.2windowsx86ssl4.2.0.zip.
We will use one of this archives in the next paragraph which is about how to enable dispatcher module on the static web server.
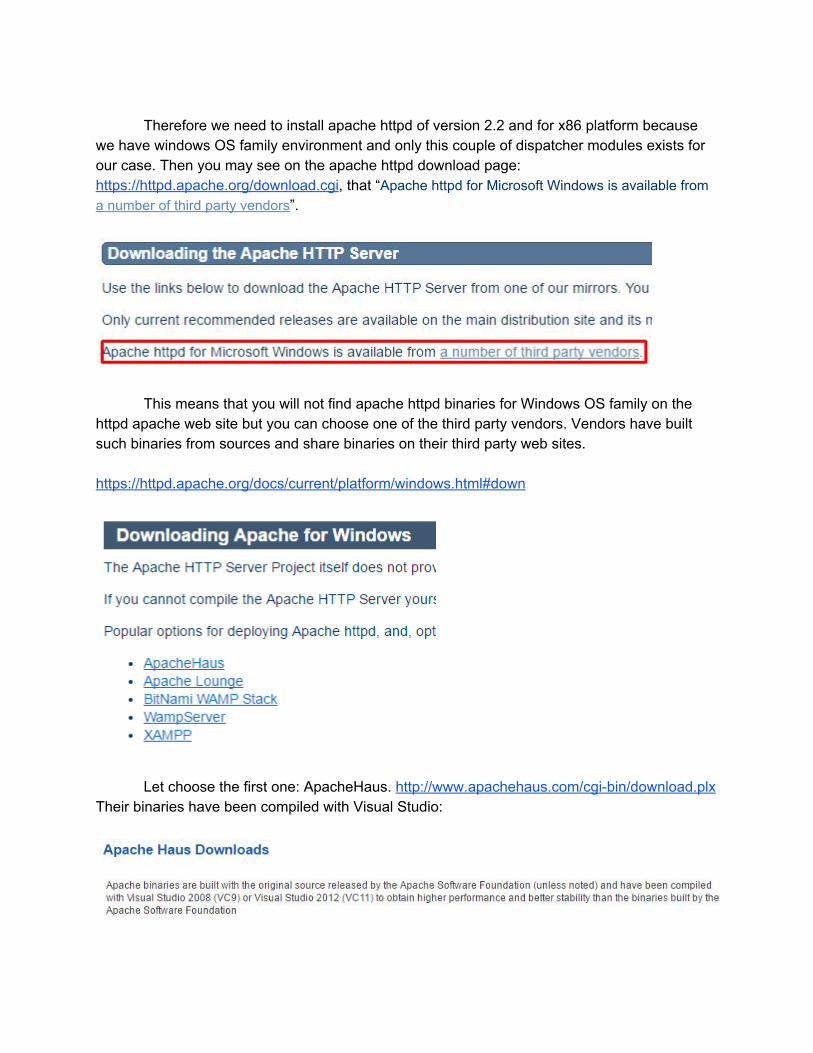
Therefore we need to install apache httpd of version 2.2 and for x86 platform because
we have windows OS family environment and only this couple of dispatcher modules exists for our case. Then you may see on the apache httpd download page: https://httpd.apache.org/download.cgi, that “Apache httpd for Microsoft Windows is available from a number of third party vendors”.
This means that you will not find apache httpd binaries for Windows OS family on the httpd apache web site but you can choose one of the third party vendors. Vendors have built such binaries from sources and share binaries on their third party web sites. https://httpd.apache.org/docs/current/platform/windows.html#down
Let choose the first one: ApacheHaus. http://www.apachehaus.com/cgibin/download.plx Their binaries have been compiled with Visual Studio:
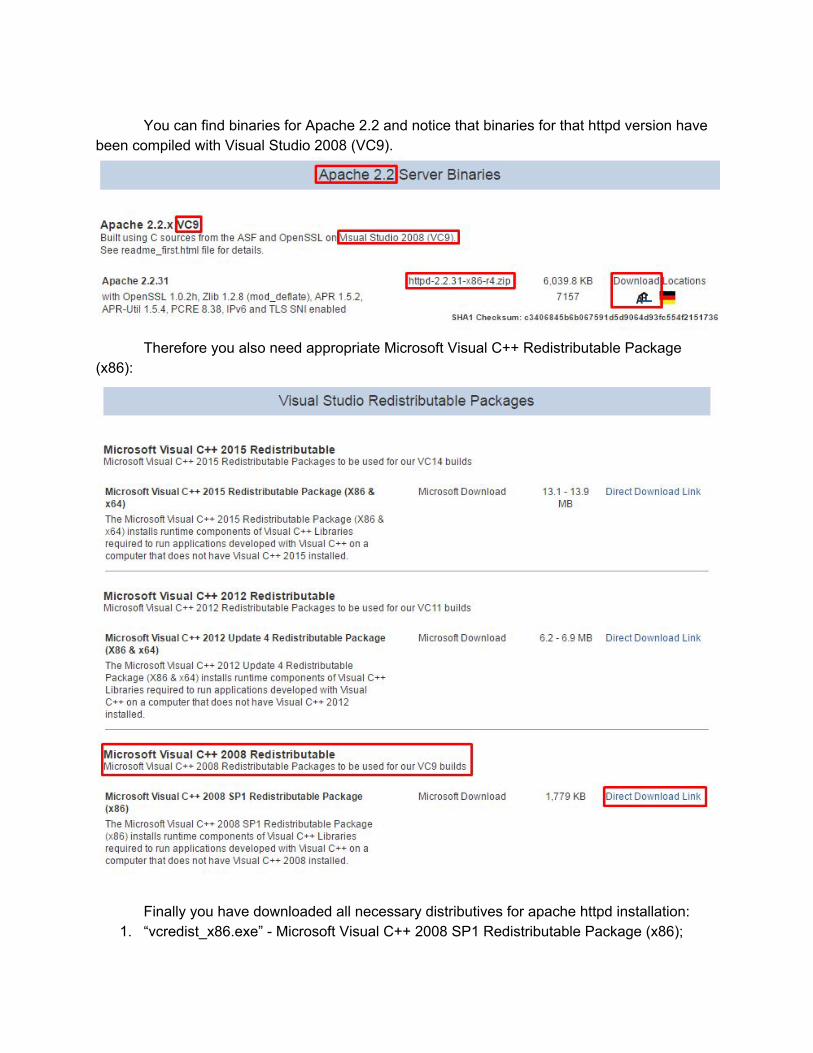
You can find binaries for Apache 2.2 and notice that binaries for that httpd version have
been compiled with Visual Studio 2008 (VC9).
Therefore you also need appropriate Microsoft Visual C++ Redistributable Package
(x86):
Finally you have downloaded all necessary distributives for apache httpd installation: 1. “vcredist_x86.exe” Microsoft Visual C++ 2008 SP1 Redistributable Package (x86);
2. “httpd2.2.31x86r4.zip” Apache HTTP Server (“httpd”).
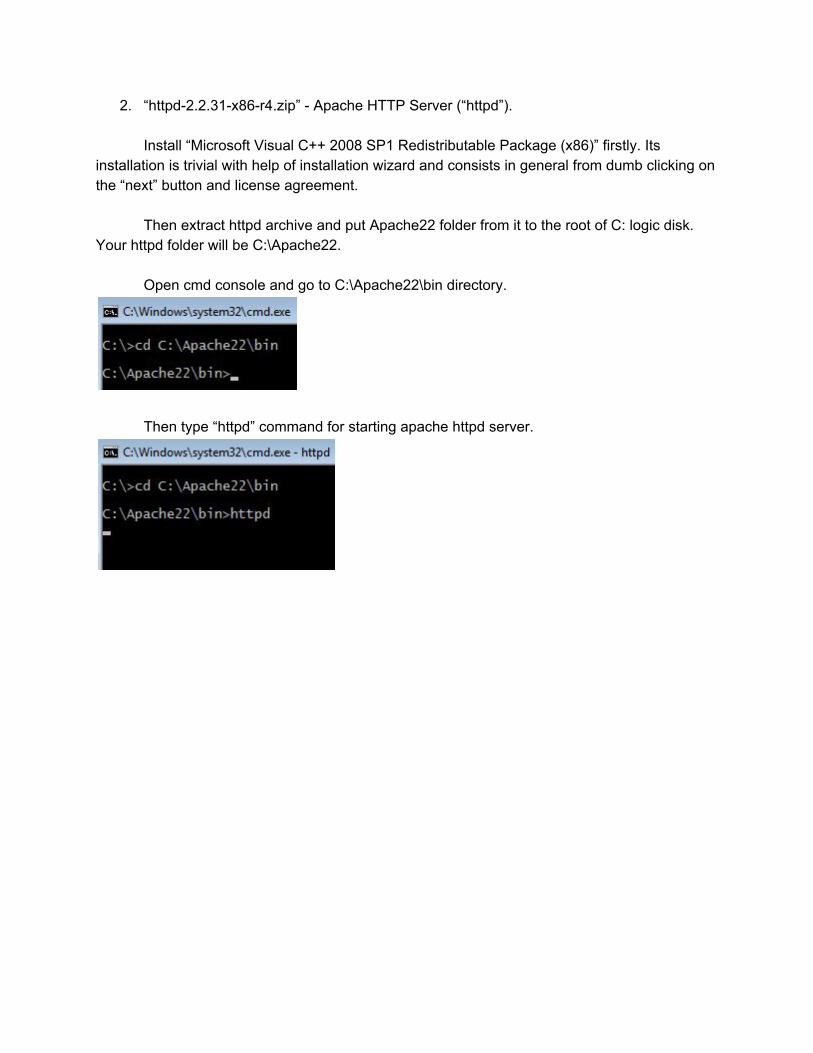
Install “Microsoft Visual C++ 2008 SP1 Redistributable Package (x86)” firstly. Its installation is trivial with help of installation wizard and consists in general from dumb clicking on the “next” button and license agreement.
Then extract httpd archive and put Apache22 folder from it to the root of C: logic disk. Your httpd folder will be C:\Apache22.
Open cmd console and go to C:\Apache22\bin directory.
Then type “httpd” command for starting apache httpd server.
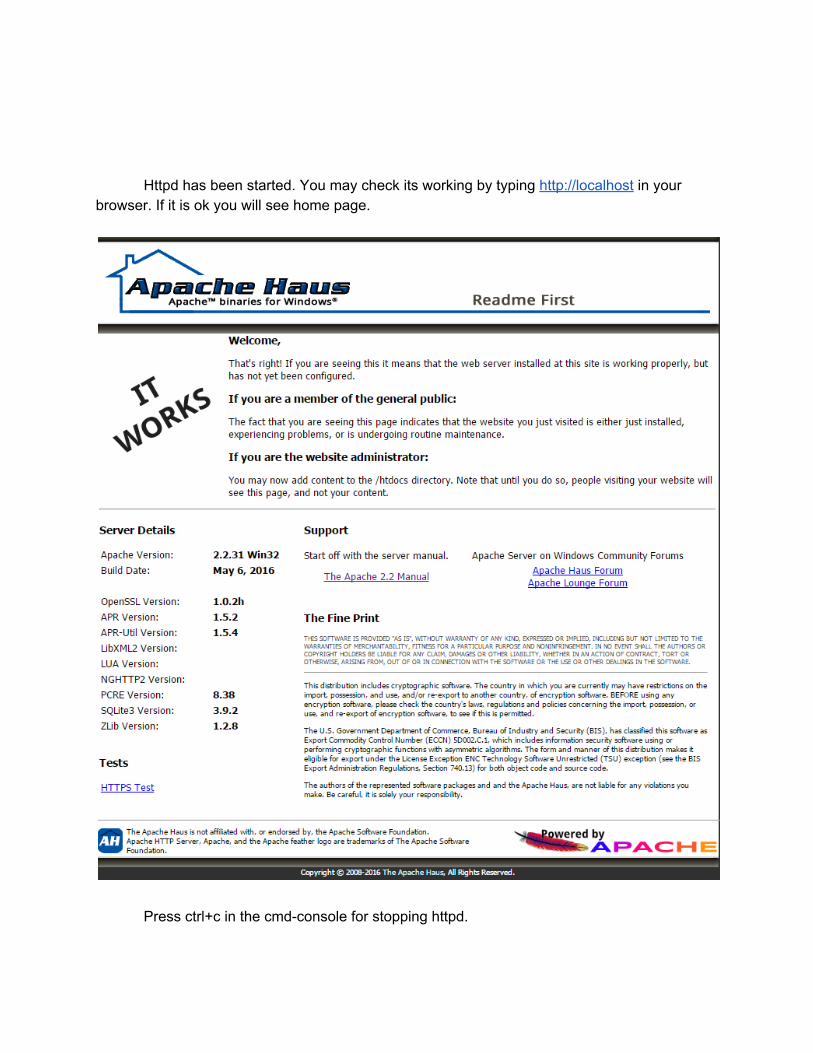
Httpd has been started. You may check its working by typing http://localhost in your browser. If it is ok you will see home page.
Press ctrl+c in the cmdconsole for stopping httpd.
Finally, you have installed your own local apache httpd static web server.
2.2 Installation and enabling of Adobe AEM Dispatcher module.
Download corresponding dispatcher module from next page: https://www.adobeaemcloud.com/content/companies/public/adobe/dispatcher/dispatcher.html
We assume that we have downloaded dispatcherapache2.2windowsx864.2.0.zip. Extract archive and put disp_apache2.2.dll from it to C:\Apache22\modules directory. Add next settings to the end of the httpd configuration C:\Apache22\conf\httpd.conf:
LoadModule dispatcher_module modules\disp_apache2.2.dll <IfModule disp_apache2.c> DispatcherConfig conf/dispatcher.any DispatcherLog logs/dispatcher.log DispatcherLogLevel 3 DispatcherNoServerHeader 0 DispatcherDeclineRoot 0 DispatcherUseProcessedURL 1 DispatcherPassError 0 </IfModule> <Directory /> <IfModule disp_apache2.c> SetHandler dispatcherhandler ModMimeUsePathInfo On </IfModule> Options FollowSymLinks AllowOverride None </Directory>
The 1st entry loads dispatcher module. You must set correct name of your dispatcher dll
such as modules\disp_apache2.2.dll in our case.
The 2nd “ifmodule” block sets some initial properties for the dispatcher:
DispatcherConfig set full name of the dispatcher configuration file. It is conf/dispatcher.any in our case. You may copy default dispatcher.any file from the early extracted dispatcher archive.
DispatcherLog set full name of the dispatcher’s log file. It is logs/dispatcher.log in our case.
DispatcherLogLevel log level for the log file from the most briefly 0 (errors) to the most detailed 3 (debug). It is debug level in our case.
DispatcherUseProcessedURL defines whether to use preprocessed URLs for all further processing by Dispatcher:
0 use the original URL passed to the web server. 1 the dispatcher uses the URL already processed by the handlers that
precede the dispatcher (i.e. mod_rewrite) instead of the original URL passed to the web server.
The 3rd “directory” block sets for the dispatcher to handle the incoming requests for the complete website. Finally, all installations for httpd and dispatcher have been completed. Restart your httpd server because configuration changes are not applied during working of the httpd server and are applied only during httpd server startup. If you see that logs/dispatcher.log exists then you have correct worked httpd server and correct enabled dispatcher module.
Summary. For setting up your dispatcher environment you have to install next software:
1. One of three supported static web servers; 2. Enable dispatcher module on such installed static web server.
Detailed and useful documentation you can find on these pages: https://docs.adobe.com/docs/en/dispatcher/dispinstall.html https://docs.adobe.com/docs/en/aem/60/deploy/technicalrequirements.html#par_title_15
Part 3. Environment initial setting for enable cache. In this part we will set initial configuration for dispatcher. Such settings will allow dispatcher to cache content from AEM publish instance. By default resources will be cached if next conditions is completed:
HTTP request method is GET; Request URL has extension (for example, *.html or *.xml); Request URL has no query string (there are no parameters after extension); Request has no “Authorization” header (unless AllowAuthorized is 1).
Settings are configured by the dispatcher configuration file. In our demonstration case this file is conf/dispatcher.any. The configuration file contains a series of single valued or multivalued properties that control behavior of the dispatcher:
property names are prefixed with a forward slash (“/”); multivalued properties enclose child items using braces (“”); comments begin from ‘#’ symbol.
3.1 Renders. First of all you should set renders for dispatcher. Renders are AEM instances from which dispatcher receives content that may be cached. If you set more than one render in the configuration file then dispatcher will use load balancing between these AEM instances. In our case we have to set only one render that is our publish AEM instance. /renders /rend01 /hostname "localhost" /port "4503" You may restart httpd and check that dispatcher is able to request resources from publish AEM instance. For example, if you have worked page http://localhost:4503/content/geometrixx/en.html then the dispatcher should work at the page http://localhost/content/geometrixx/en.html. Note
that we don’t set the port in request url because dispatcher (more precisely, httpd) works on the port 80 which is default for the browsers.
3.2 Filters. User the /filter section to specify the HTTP requests that dispatcher accepts. All other requests are sent back to the web server with a 404 error code (page not found). Let allow access to all resources for our demonstration case. /filter /0001 /type "allow" /glob "*" Filters types: “allow” or “deny”. Globs will be compared against the entire request line, e.g.: /0001 /type "allow" /glob "* /index.html *" This glob matches request “GET /index.html HTTP/1.1” but not “GET /index.html?a=b HTTP/1.1”. Except “globs” you may use separately “url”, “method”, “protocol”, “extension”. Additionally except “url” you may use “path”, “selectors”, “extension”, “suffix”. When multiple filters patterns apply to a request then the last filter pattern that applies is effective. After setting above mentioned filter you may restart httpd and check that dispatcher has access to all resources of the publish instance. Of course you should deny access for some resources due to security purposes in real production environment but in our demonstration case we simply have allowed access to all resources.
3.3 Cache Cache section determines resources that will be cached by dispatcher. This section has block of the rules which are quite similar to the filters rules. Except rules cache section contains some additional settings. For example, /docroot determines location of the directory where cached files are stored. The value must be the exact same path as the document root of the web server so that dispatcher and the web server handle the same files. For our demonstration purposes let’s set docroot for storing cache and allow caching of all resources which are received from our render (publish instance): /cache /docroot "/Apache22/htdocs" /rules /0000 /glob "*" /type "allow" After these changes you may restart httpd, open new private browser window for unauthorized access without using “Authorization” header (chrome ctrl+shift+n, firefox ctrl+shift+p) and visit next page: http://localhost/content/geometrixx/en/products.html. Cached resources should appear inside htdocs directory. Resources have the urllike hierarchy: directories form paths to the resources and static htmlfiles contain rendered content of the resource.
3.4 Headers You saw that there is only html content in cached htmlfiles. But what should we do if we want to cache response headers which received from renders? For example, if response from renders contains “ContentType” header which determine encoding then htmlcontent without this header may not be displayed correctly without precise encoding settings. For such purposes dispatcher configuration file has /headers block inside /cache sections. Let’s set some popular and useful headers for caching: /cache /headers "CacheControl" "ContentDisposition" "ContentType" "Expires" "LastModified" "XContentTypeOptions" After changing headers in your dispatcher configuration file delete all cache from htdocs directory and restart httpd then again visit page http://localhost/content/geometrixx/en/products.html. Finally you may find not only cached htmlfile products.html in htdocs/content/geometrixx/en directory but there is products.html.h near the original htmlfile. This *.h file contains headers for corresponding cached htmlfile.
Summary You may quickly enable cache by the next initial settings of the dispatcher configuration file:
1. set renders; 2. set filters; 3. set htdocs and rules for cache sections; 4. set headers for storing httpheaders.
Detailed and useful documentation you can find on this page:
https://docs.adobe.com/docs/en/dispatcher/dispconfig.html
4. Cache invalidation. Invalidation is mechanism for pointing obsolete cached resources. There are some tools for automatic invalidation and manual invalidation. But firstly let’s set initial configuration for invalidation section of the dispatcher configuration file then study how invalidation works at the low level and finally return to study tools for invalidation.
4.1 Invalidation section initial settings. Inside /cache section there is /invalidate block which determines cached files that may be automatically invalidated when content is updated. For example, the following configuration invalidates all HTML pages: /cache
/invalidate
/0000 /glob "*" /type "deny" /0001 /glob "*.html" /type "allow"
With automatic invalidation dispatcher doesn’t delete cached files after updating content but checks their validity when they are next requested. Documents in the cache that are not autoinvalidated will remain in the cache until a content update explicitly deletes them. For our demonstration purposes let allow for all cache be invalidated automatically: /cache
/invalidate
/0000 /glob "*" /type "allow"
Restart httpd server after updating /invalidate section for using new changes.
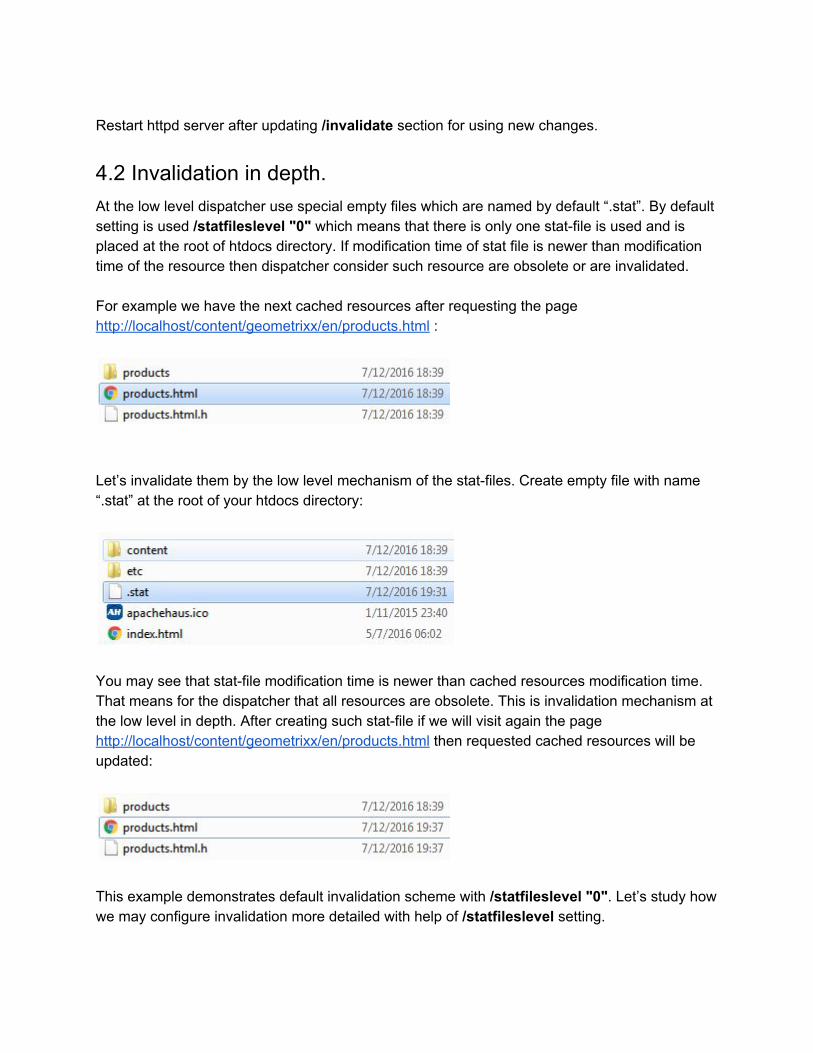
4.2 Invalidation in depth. At the low level dispatcher use special empty files which are named by default “.stat”. By default setting is used /statfileslevel "0" which means that there is only one statfile is used and is placed at the root of htdocs directory. If modification time of stat file is newer than modification time of the resource then dispatcher consider such resource are obsolete or are invalidated. For example we have the next cached resources after requesting the page http://localhost/content/geometrixx/en/products.html :
Let’s invalidate them by the low level mechanism of the statfiles. Create empty file with name “.stat” at the root of your htdocs directory:
You may see that statfile modification time is newer than cached resources modification time. That means for the dispatcher that all resources are obsolete. This is invalidation mechanism at the low level in depth. After creating such statfile if we will visit again the page http://localhost/content/geometrixx/en/products.html then requested cached resources will be updated:
This example demonstrates default invalidation scheme with /statfileslevel "0". Let’s study how we may configure invalidation more detailed with help of /statfileslevel setting.
4.3 Setting /statfileslevel. You may use /statfileslevel property of the dispatcher configuration file to selectively invalidate cached files according to their path. There are some rules for /statfileslevel property mechanism:
Dispatcher creates .stat files in each folder from the docroot folder down to the level that you specify. The docroot folder is level 0.
When a file is updated dispatcher locates the folder on the file path that is at the statfileslevel and invalidates all files below that folder.
If level of the updated file is less than statfileslevel then all files in such folder are invalidated. Files below that folder are not invalidated.
When a file is updated then all files from file folder up to the root level inclusive will be invalidated.
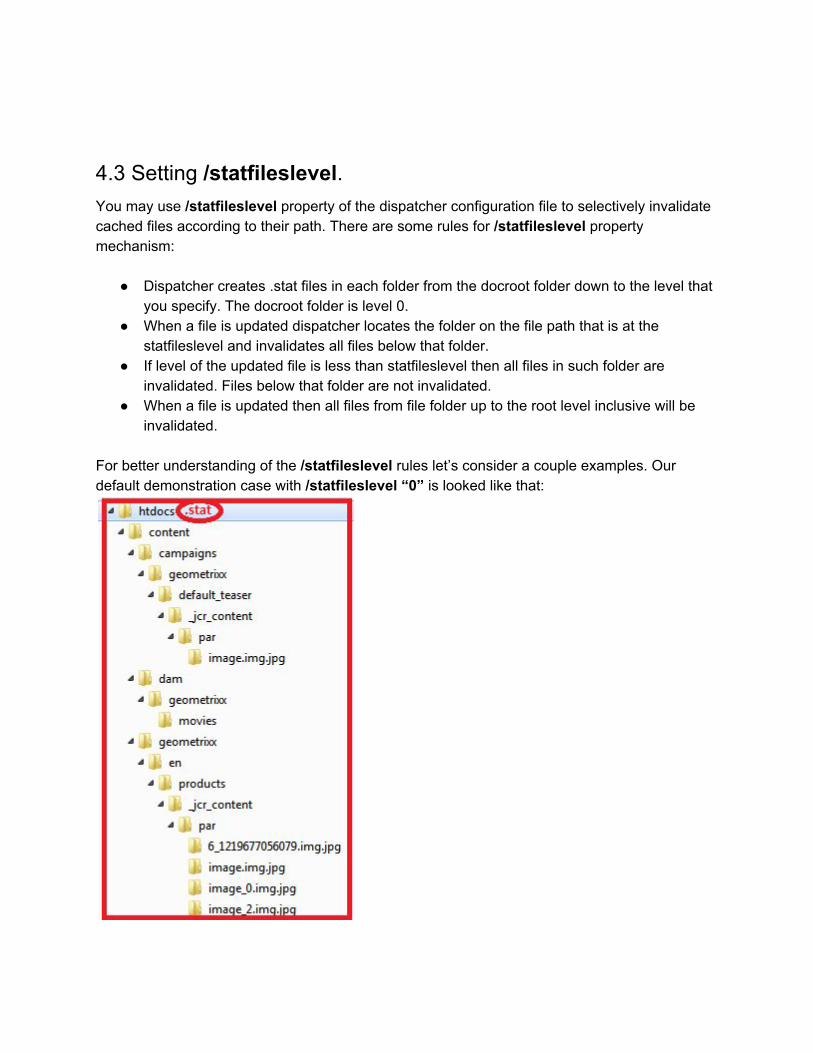
For better understanding of the /statfileslevel rules let’s consider a couple examples. Our default demonstration case with /statfileslevel “0” is looked like that:
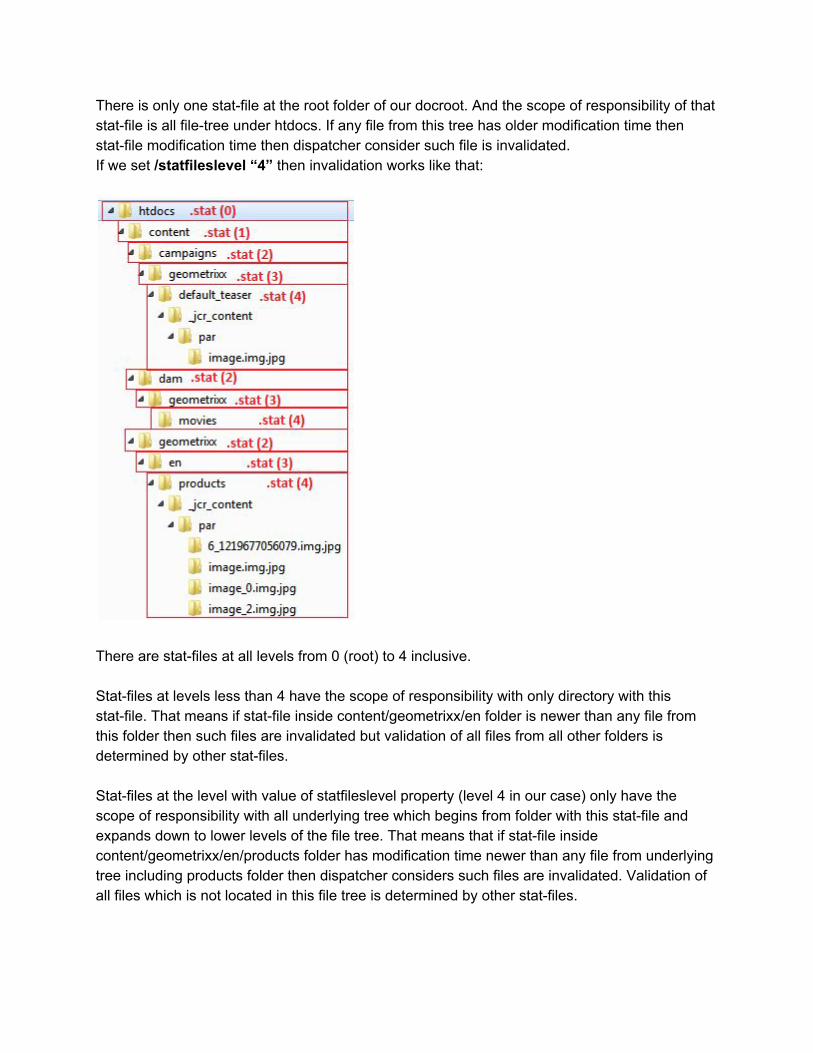
There is only one statfile at the root folder of our docroot. And the scope of responsibility of that statfile is all filetree under htdocs. If any file from this tree has older modification time then statfile modification time then dispatcher consider such file is invalidated. If we set /statfileslevel “4” then invalidation works like that:
There are statfiles at all levels from 0 (root) to 4 inclusive. Statfiles at levels less than 4 have the scope of responsibility with only directory with this statfile. That means if statfile inside content/geometrixx/en folder is newer than any file from this folder then such files are invalidated but validation of all files from all other folders is determined by other statfiles. Statfiles at the level with value of statfileslevel property (level 4 in our case) only have the scope of responsibility with all underlying tree which begins from folder with this statfile and expands down to lower levels of the file tree. That means that if statfile inside content/geometrixx/en/products folder has modification time newer than any file from underlying tree including products folder then dispatcher considers such files are invalidated. Validation of all files which is not located in this file tree is determined by other statfiles.
4.4 Automatic invalidation. Flush agents. For automatic invalidation purposes you may enable author or publish flush agents. It’s recommended to use publish flush agent for more robust autoinvalidation because using author flush agent may cause next issues:
The Dispatcher must be reachable from the authoring instance. If your network (e.g. the firewall) is configured such that access between the two is restricted this may not be the case.
Publication and cache invalidation take place at the same time. Depending on the timing a user may request a page just after it was removed from the cache and just before the new page is published. AEM now returns the old page and the Dispatcher caches it again. This is more of an issue for large sites.
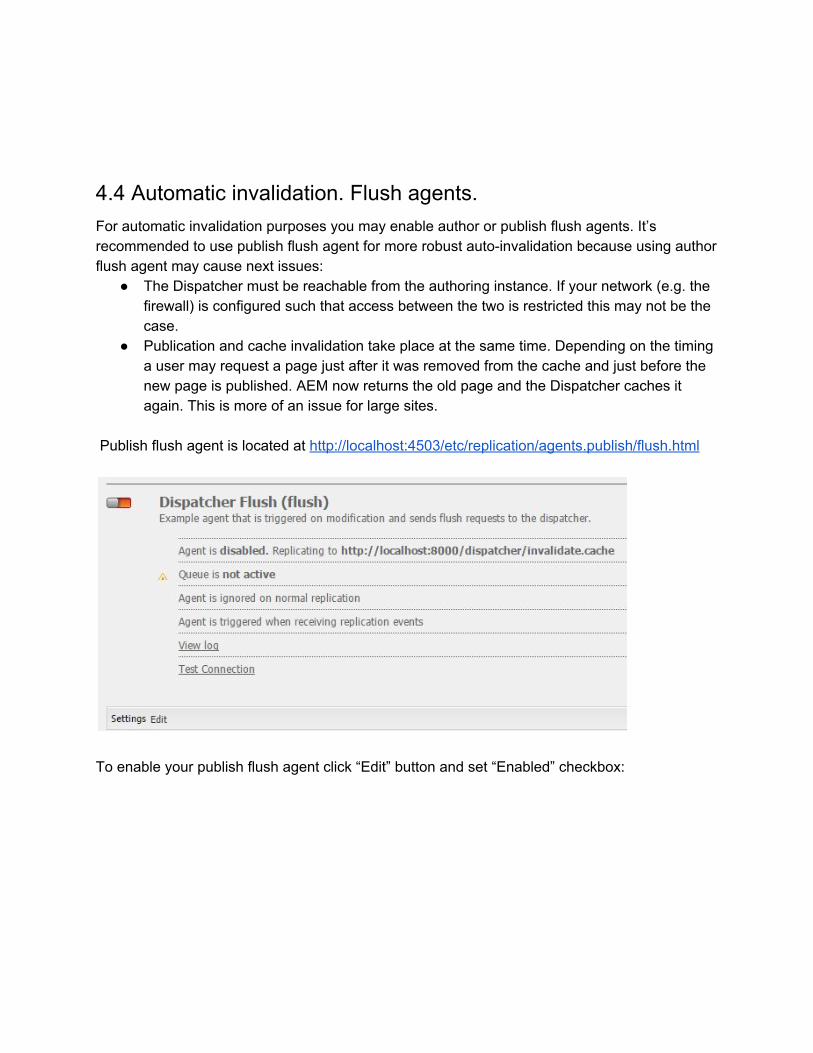
Publish flush agent is located at http://localhost:4503/etc/replication/agents.publish/flush.html
To enable your publish flush agent click “Edit” button and set “Enabled” checkbox:
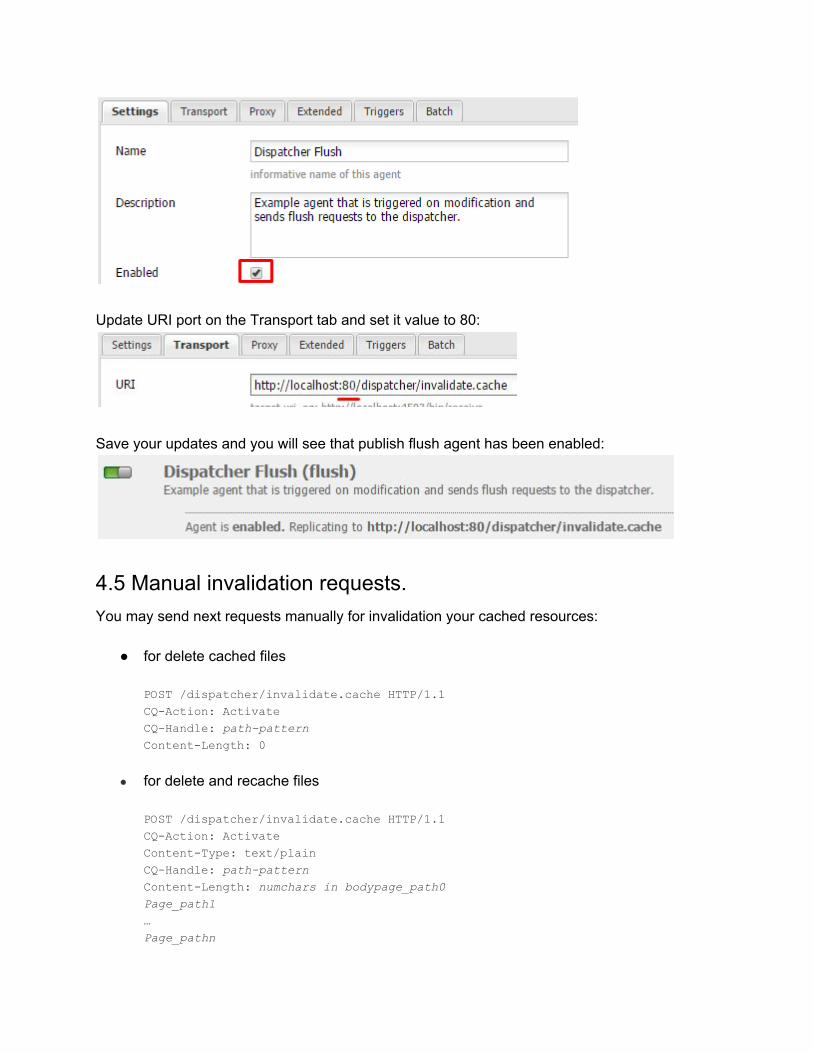
Update URI port on the Transport tab and set it value to 80:
Save your updates and you will see that publish flush agent has been enabled:
4.5 Manual invalidation requests. You may send next requests manually for invalidation your cached resources:
for delete cached files POST /dispatcher/invalidate.cache HTTP/1.1 CQAction: Activate CQHandle: pathpattern ContentLength: 0
for delete and recache files POST /dispatcher/invalidate.cache HTTP/1.1 CQAction: Activate ContentType: text/plain CQHandle: pathpattern ContentLength: numchars in bodypage_path0 Page_path1 … Page_pathn

Summary Detailed and useful documentation you can find on these pages: http://docs.adobe.com/docs/en/dispatcher/dispconfig.html http://docs.adobe.com/docs/en/dispatcher/pageinvalidate.html
5. Useful tools There are a few useful tools for advanced using of the dispatcher:
static web servers tools
rewrite module
AEM tools for mappings
repository mappings tree /etc/map
ResourceProvider Interface
5.1 Rewrite module You may enable rewrite module by uncommenting next line in your httpd.conf file: LoadModule rewrite_module modules/mod_rewrite.so Initial settings for rewrite module may look like: <IfModule mod_rewrite.c>
RewriteEngine On RewriteLog "logs/rewrite.log" RewriteLogLevel 9
# your rule 1 # your rule 2
… # your rule n </IfModule>
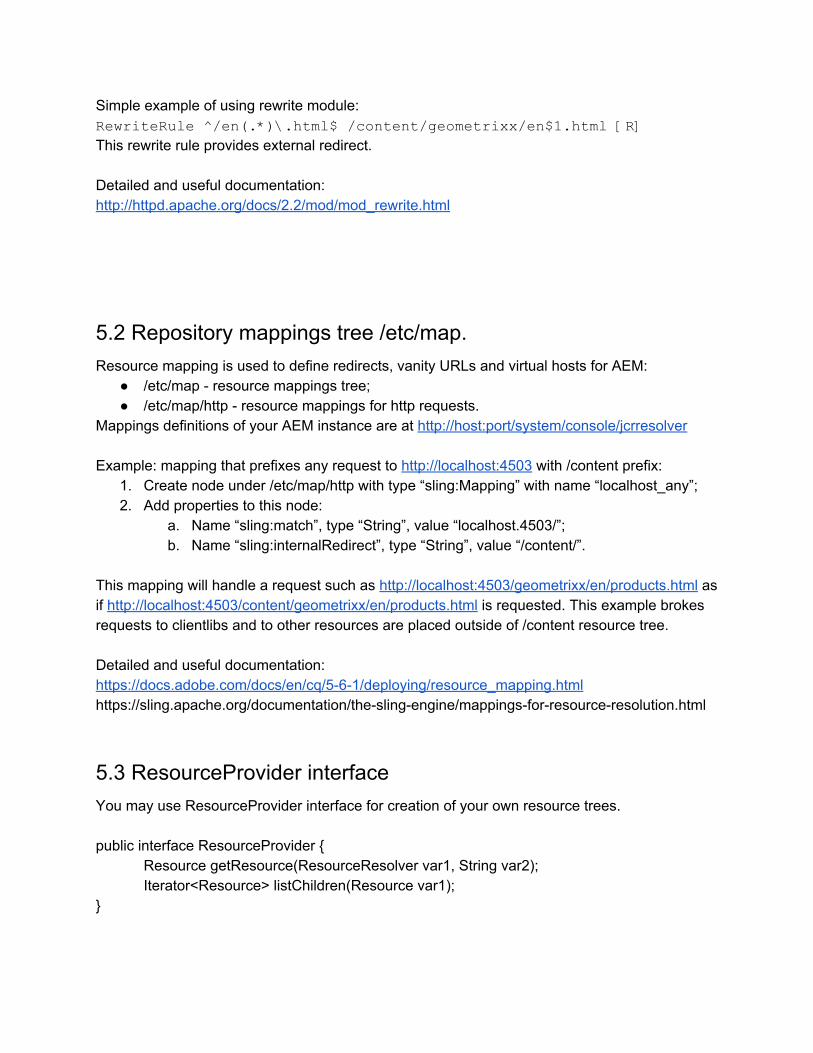
Simple example of using rewrite module: RewriteRule /en(.*)\.html$ /content/geometrixx/en$1.html [R] This rewrite rule provides external redirect. Detailed and useful documentation: http://httpd.apache.org/docs/2.2/mod/mod_rewrite.html
5.2 Repository mappings tree /etc/map. Resource mapping is used to define redirects, vanity URLs and virtual hosts for AEM:
/etc/map resource mappings tree; /etc/map/http resource mappings for http requests.
Mappings definitions of your AEM instance are at http://host:port/system/console/jcrresolver Example: mapping that prefixes any request to http://localhost:4503 with /content prefix:
1. Create node under /etc/map/http with type “sling:Mapping” with name “localhost_any”; 2. Add properties to this node:
a. Name “sling:match”, type “String”, value “localhost.4503/”; b. Name “sling:internalRedirect”, type “String”, value “/content/”.
This mapping will handle a request such as http://localhost:4503/geometrixx/en/products.html as if http://localhost:4503/content/geometrixx/en/products.html is requested. This example brokes requests to clientlibs and to other resources are placed outside of /content resource tree. Detailed and useful documentation: https://docs.adobe.com/docs/en/cq/561/deploying/resource_mapping.html https://sling.apache.org/documentation/theslingengine/mappingsforresourceresolution.html
5.3 ResourceProvider interface You may use ResourceProvider interface for creation of your own resource trees. public interface ResourceProvider
Resource getResource(ResourceResolver var1, String var2); Iterator<Resource> listChildren(Resource var1);
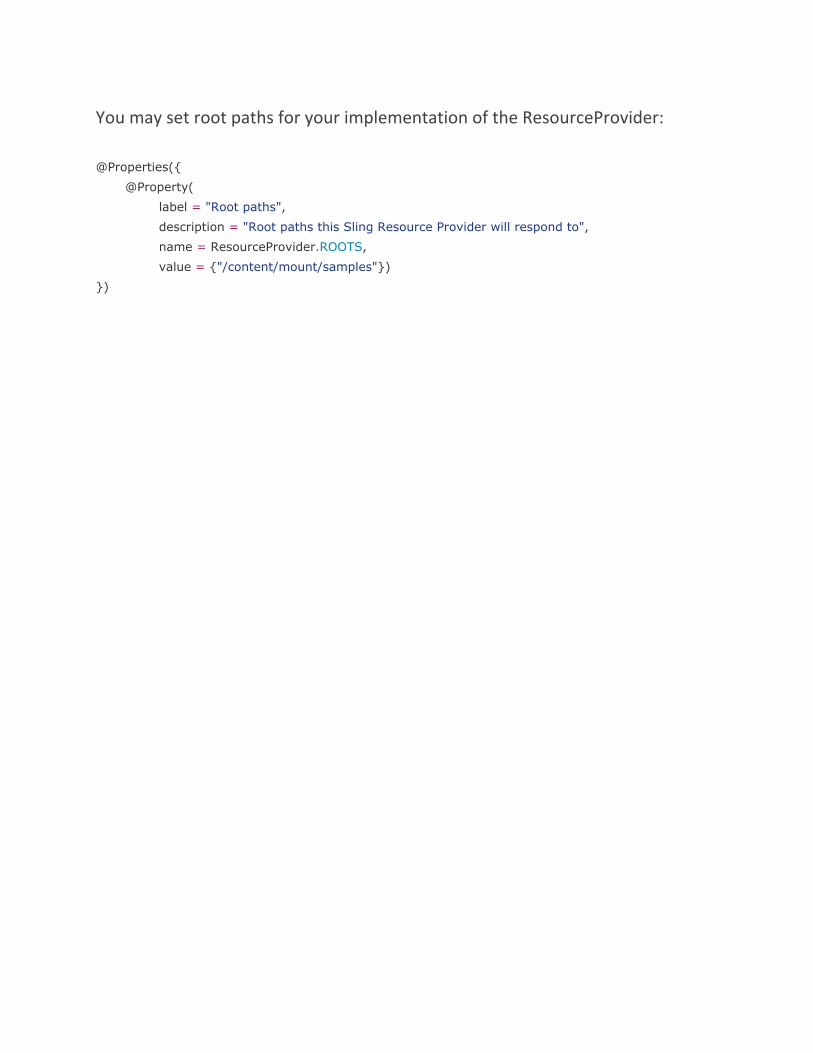
You may set root paths for your implementation of the ResourceProvider:
@Properties(
@Property(
label = "Root paths",
description = "Root paths this Sling Resource Provider will respond to",
name = ResourceProvider.ROOTS,
value = "/content/mount/samples")
)