Administrator's Guide - HP® Official Site | Laptop …h10032. This guide is a comprehensive...
101
HP Smart Zero Core 4.3 Administrator's Guide
Transcript of Administrator's Guide - HP® Official Site | Laptop …h10032. This guide is a comprehensive...

HP Smart Zero Core 4.3
Administrator's Guide

© Copyright 2013 Hewlett-PackardDevelopment Company, L.P.
Microsoft, Windows, and Windows Vista areU.S. registered trademarks of MicrosoftCorporation.
Confidential computer software. Validlicense from HP required for possession,use or copying. Consistent with FAR 12.211and 12.212, Commercial ComputerSoftware, Computer SoftwareDocumentation, and Technical Data forCommercial Items are licensed to the U.S.Government under vendor's standardcommercial license.
The information contained herein is subjectto change without notice. The onlywarranties for HP products and services areset forth in the express warranty statementsaccompanying such products and services.Nothing herein should be construed asconstituting an additional warranty. HP shallnot be liable for technical or editorial errorsor omissions contained herein.
Second Edition: August 2013
First Edition: May 2013
Document Part Number: 727358-002

Table of contents
1 Welcome ........................................................................................................................................................... 1Intended audience ................................................................................................................................ 1Document organization ........................................................................................................................ 1
2 Getting started .................................................................................................................................................. 2Logging in to the desktop ..................................................................................................................... 2
Selecting a connection type ................................................................................................. 2Configuring a basic connection ............................................................................................................ 2Using the desktop ................................................................................................................................. 3
3 Navigating clients .............................................................................................................................................. 4Using the client toolbar ......................................................................................................................... 4
Understanding the system status icon ................................................................................. 4Using client information screens .......................................................................................................... 5
Using the Status tab ............................................................................................................ 5Using the Network tab ......................................................................................................... 6Using the Net Tools tab ....................................................................................................... 6Using the System Information tab ........................................................................................ 7Using the Systems Logs tab ................................................................................................ 7Hiding client information screens ......................................................................................... 7
4 Configuring clients ............................................................................................................................................ 9Using the client control panel ............................................................................................................... 9
Accessing the client control panel ....................................................................................... 9Using the client control panel (User Mode) .......................................................................... 9
Main control panel options (User Mode) ............................................................. 9Additional control panel options (User Mode) ................................................... 10
Using the client control panel (Administrator Mode) .......................................................... 11Main control panel options (Administrator Mode) .............................................. 11Additional control panel options (Administrator Mode) ...................................... 12
Overview of RDP connection features ............................................................................................... 14Using Kiosk Mode with RDP .............................................................................................. 15Using RemoteFX with RDP ............................................................................................... 15Using Multimedia Redirection with RDP ............................................................................ 15Using multi-monitor sessions with RDP ............................................................................. 16Using device redirection with RDP .................................................................................... 16
iii

Using USB redirection with RDP ....................................................................... 16Using mass storage redirection with RDP ......................................................... 17Using printer redirection with RDP .................................................................... 17Using audio redirection with RDP ..................................................................... 18Using smart card redirection with RDP ............................................................. 18
Setting RDP options .......................................................................................................... 18Overview of Citrix connection features ............................................................................................... 19
Citrix connection management features ............................................................................ 19Citrix receiver features ....................................................................................................... 19
HDX MediaStream support matrix .................................................................... 20Citrix connection support matrix ........................................................................................ 21
Overview of VMware Horizon View connection features .................................................................... 21Using Kiosk Mode with VMware Horizon View .................................................................. 21Using Multimedia Redirection with VMware Horizon View ................................................ 22Using multi-monitor sessions with VMware Horizon View ................................................. 22Using keyboard shortcuts with VMware Horizon View ...................................................... 22Using device redirection with VMware Horizon View ......................................................... 23
Using USB redirection with VMware Horizon View ........................................... 23Using mass storage redirection with VMware Horizon View ............................. 23Using printer redirection with VMware Horizon View ........................................ 23Using audio redirection with VMware Horizon View .......................................... 23Using smart card redirection with VMware Horizon View ................................. 24Using webcam redirection with VMware Horizon View ..................................... 24
Additional VMware Horizon View connection options ........................................................ 25Using advanced command line arguments with VMware Horizon View ........... 25
Using a Teradici-accelerated t410 system with VMware Horizon View ............................. 26Switching to the standard VMware Horizon View client .................................... 26
Changing the VMware Horizon View protocol type ........................................................... 26Installing certificates on clients ........................................................................................................... 27
VMware Horizon View HTTPS and certificate management requirements ....................... 27Redirecting USB devices .................................................................................................................... 28Mapping a serial or parallel printer ..................................................................................................... 29
5 Troubleshooting clients ................................................................................................................................... 30Troubleshooting network connectivity ................................................................................................ 30Troubleshooting firmware corruption .................................................................................................. 31
Reimaging client device firmware ...................................................................................... 31Troubleshooting serial or parallel printer configuration ...................................................................... 31Troubleshooting Citrix password expiration ....................................................................................... 31Using system diagnostics to troubleshoot .......................................................................................... 32
Saving system diagnostic data .......................................................................................... 32
iv

Uncompressing the system diagnostic files ....................................................................... 32Uncompressing the system diagnostic files on Windows-based systems ........ 32Uncompressing the system diagnostic files in Linux- or Unix-based systems . . 32
Viewing the system diagnostic files ................................................................................... 32Viewing files in the Commands folder ............................................................... 33Viewing files in the /var/log folder ...................................................................... 33Viewing files in the /etc folder ............................................................................ 33
6 HP Smart Zero Client Services ....................................................................................................................... 34Supported operating systems ............................................................................................................. 34Preparing to install HP Smart Zero Client Services ............................................................................ 35Downloading and installing HP Smart Zero Client Services ............................................................... 35
7 Using the Profile Editor ................................................................................................................................... 36Accessing the Profile Editor ............................................................................................................... 36Loading a client profile ....................................................................................................................... 36Modifying a client profile ..................................................................................................................... 36
Selecting the platform of a client profile ............................................................................. 36Selecting the connection type of a client profile ................................................................. 37Modifying the registry settings of a client profile ................................................................ 37
Enabling or disabling menu items on clients ..................................................... 37Enabling or disabling user configurations on clients ......................................... 37
Adding files to a client profile ............................................................................................. 38Adding a configuration file to a client profile ...................................................... 38
Adding certificates to a client profile ................................................. 38Adding a symbolic link to a client profile ........................................................... 39
Saving the client profile ...................................................................................................... 39Configuring a serial or parallel printer ................................................................................................ 39
Obtaining the printer baud rate .......................................................................................... 40Setting up printer ports ...................................................................................................... 40Installing printers on the server .......................................................................................... 40
8 Using Automatic Intelligence ........................................................................................................................... 42Viewing the Automatic Update website .............................................................................................. 42Creating an Automatic Update profile ................................................................................................ 42Updating clients .................................................................................................................................. 42
Using the broadcast update method .................................................................................. 43Using the DHCP tag update method ................................................................................. 43
Example of performing DHCP tagging .............................................................. 43Using the DNS alias update method .................................................................................. 44
v

Using the manual update method ...................................................................................... 44Performing a manual update ............................................................................. 44
Using HP Intelligent Delivery Service ................................................................................................. 45How HP Intelligent Delivery Service works ........................................................................ 45Starting, stopping, and pausing HP Intelligent Delivery Service ........................................ 45Viewing the HP Intelligent Delivery Service application log ............................................... 45HP Intelligent Delivery Service registry keys ..................................................................... 45
Using HP Device Manager ................................................................................................................. 45
Appendix A Client keyboard language ............................................................................................................... 46
Appendix B Customizing the client login screen ................................................................................................ 48Customizing the screen background .................................................................................................. 48
Common attributes ............................................................................................................ 48Elements ............................................................................................................................ 51Image ................................................................................................................................. 53Text .................................................................................................................................... 53
Customizing the client login dialog box .............................................................................................. 56Customizing the central frame ........................................................................................... 56Customizing the text for the header ................................................................................... 57Customizing the icon for the header .................................................................................. 57
Appendix C HP Smart Zero Core registry settings ............................................................................................ 58root > Audio ........................................................................................................................................ 58root > ConnectionManager ................................................................................................................. 59root > ConnectionType ....................................................................................................................... 59
root > ConnectionType > freerdp ....................................................................................... 60root > ConnectionType > view ........................................................................................... 64root > ConnectionType > xen ............................................................................................ 68
root > Display ..................................................................................................................................... 77root > Network .................................................................................................................................... 78root > USB .......................................................................................................................................... 82root > keyboard .................................................................................................................................. 82root > logging ..................................................................................................................................... 83root > mouse ...................................................................................................................................... 83root > printer-mapping-mgr ................................................................................................................ 84root > printers ..................................................................................................................................... 84root > screensaver ............................................................................................................................. 84root > time .......................................................................................................................................... 85root > translation ................................................................................................................................ 85
vi

root > users ........................................................................................................................................ 86root > zero-login ................................................................................................................................. 88
Appendix D VMware Horizon View USB configuration ...................................................................................... 90USB options in previous HP Smart Zero Core releases ..................................................................... 90VMware Horizon View USB device families ....................................................................................... 90
Index ................................................................................................................................................................... 92
vii

viii
1 Welcome
This guide is a comprehensive reference that describes how to administer HP Smart Zero Core onHP Smart Zero Clients, as well as the software prerequisites and installation tasks involved withperforming a standard or custom server installation.
Intended audienceThis guide is intended for administrators and technical personnel who are responsible for installing,configuring, and administering HP Smart Zero Client systems.
Document organizationThis guide is divided into the following chapters and appendixes:
● Getting started on page 2—Describes how to log in to and use the desktop and configure abasic connection.
● Navigating clients on page 4—Provides an overview of the client toolbar and informationscreens.
● Configuring clients on page 9—Describes the settings available in the client control panel, anoverview of connection features, and other configurations such as device redirection and printerport mapping.
● Troubleshooting clients on page 30—Describes common troubleshooting issues and solutions.
● HP Smart Zero Client Services on page 34—Describes software requirements and providesinformation on how to use the InstallShield Wizard to perform both a standard installation and acustom installation, as well as start up and launch an HP Smart Zero Client for the first time.
● Using the Profile Editor on page 36—Describes using the Profile Editor to set up and edit clientprofiles, which contain connection information, settings, and files used in the self-configurationprocess.
● Using Automatic Intelligence on page 42—Defines the Automatic Intelligence directorystructure and how to attach configuration files to a profile, and also describes how to view theHP Smart Zero Client Services website and remotely manage client profiles stored on theAutomatic Intelligence server.
● Client keyboard language on page 46—Lists the client keyboard language options.
● Customizing the client login screen on page 48—Describes the common attributes andelements used in customizing the client login screen background.
● HP Smart Zero Core registry settings on page 58—Lists the HP Smart Zero Core registrysettings. The tables in this section describe the registry key path, application functions, andoptions as presented in the Registry Editor component of the Profile Editor.
● VMware Horizon View USB configuration on page 90—Describes USB configuration withVMware Horizon View.
Intended audience 1

2 Getting started
This chapter includes the following topics:
● Logging in to the desktop
● Configuring a basic connection
● Using the desktop
Logging in to the desktopDuring system startup, the client attempts to detect and install settings automatically. If you previouslyconfigured the client using either HP Smart Zero Client Services or HP Device Manager, log in to thedesktop using the standard login screen.
Selecting a connection typeFor small deployments where you do not need device management, the Select Connection Typescreen will display during the initial setup. Use this screen to select the connection type to be used.
The following default connection types are available:
● Citrix
● Microsoft RDP7
● VMware Horizon View
● Web Browser
TIP: In the login dialog, a yellow warning icon indicates that you did not configure an HP Smart ZeroClient Services server. In this case, the client cannot automatically detect an update server. Todisable this notification, do one of the following:
Configure an HP Smart Zero Client Services server as described in HP Smart Zero Client Serviceson page 34.
—or—
Using the Configuration menu, under the Additional Configuration > Automatic Update dialog, disableautomatic updates.
Configuring a basic connectionTo configure a basic connection:
1. In the Connection Selection screen, click the type of connection you want to use.
2. In the Remote Connection Server dialog box, under server name or address, type one of thefollowing:
● Server URL
● Server Hostname
● Server IP address
2 Chapter 2 Getting started

3. Click OK.
4. Log in to the desktop using the following information:
● Username
● Password
● Domain
NOTE: You only need to configure the connection once. The configuration is stored for futuresessions. To change the connection, choose Select Connection Type from the configuration menu.
Using the desktopDesktops typically launch full-screen on all available monitors.
To return to the local desktop from inside a full-screen remote desktop, use this shortcut:
▲ Press Ctrl+Alt+End.
To toggle between desktop systems, use this shortcut:
▲ Press Ctrl+Alt+Tab.
TIP: To configure shortcuts, use the Control Panel.
Using the desktop 3
3 Navigating clients
This chapter discusses the following topics:
● Using the client toolbar
● Using client information screens
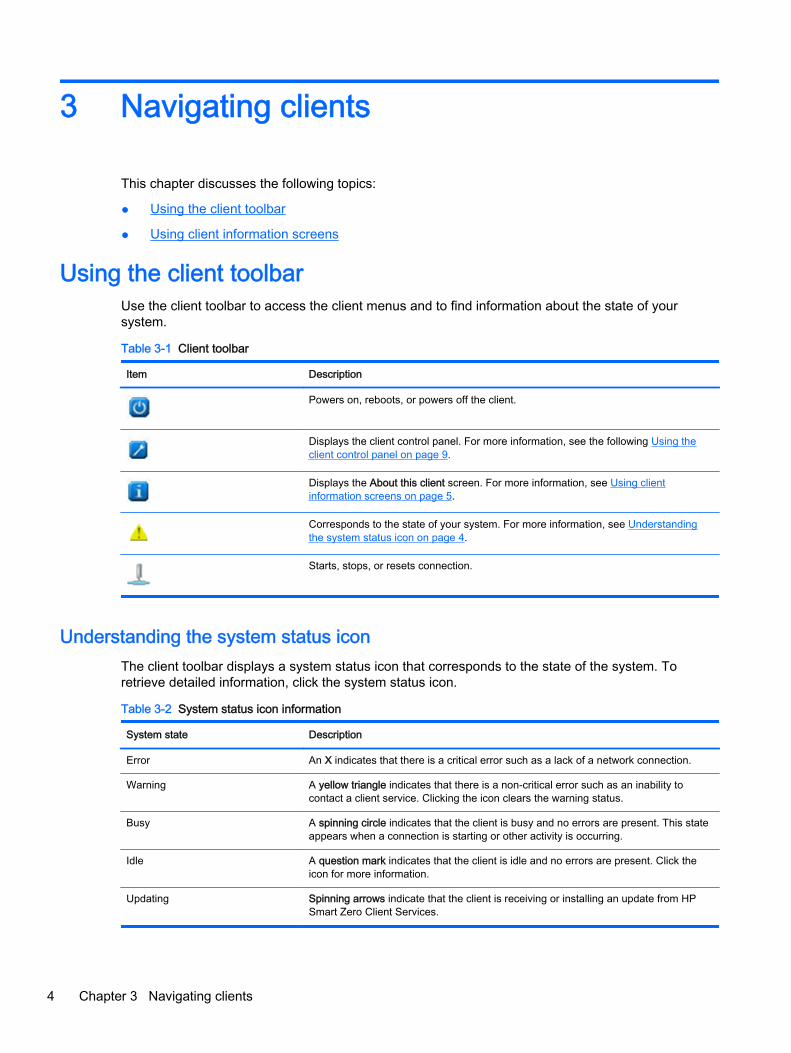
Using the client toolbarUse the client toolbar to access the client menus and to find information about the state of yoursystem.
Table 3-1 Client toolbar
Item Description
Powers on, reboots, or powers off the client.
Displays the client control panel. For more information, see the following Using theclient control panel on page 9.
Displays the About this client screen. For more information, see Using clientinformation screens on page 5.
Corresponds to the state of your system. For more information, see Understandingthe system status icon on page 4.
Starts, stops, or resets connection.
Understanding the system status iconThe client toolbar displays a system status icon that corresponds to the state of the system. Toretrieve detailed information, click the system status icon.
Table 3-2 System status icon information
System state Description
Error An X indicates that there is a critical error such as a lack of a network connection.
Warning A yellow triangle indicates that there is a non-critical error such as an inability tocontact a client service. Clicking the icon clears the warning status.
Busy A spinning circle indicates that the client is busy and no errors are present. This stateappears when a connection is starting or other activity is occurring.
Idle A question mark indicates that the client is idle and no errors are present. Click theicon for more information.
Updating Spinning arrows indicate that the client is receiving or installing an update from HPSmart Zero Client Services.
4 Chapter 3 Navigating clients

Using client information screensTo access the client information screens:
▲ On the client toolbar, click .
To learn more about the tabs available under the About this client screen, see the following sections:
● Using the Status tab
● Using the Network tab
● Using the Net Tools tab
● Using the System Information tab
● Using the Systems Logs tab
● Hiding client information screens
Using the Status tabUse the Status tab to monitor and identify issues regarding the system's network, client service, andclient connectivity.
The following table describes the items shown on this tab.
Table 3-3 About this client—Status
Item Description
Network Displays a green check mark indicator if the system isfunctioning normally, and shows information including:
● IP address
● Gateway
● MAC address
If the client network is not functioning normally, this item maydisplay a Warning or Error status and message.
Smart Client Service Displays a green check mark indicator, if normal, andgenerates a system message that indicates the name of theconfigured HP Smart Zero Client Services server.
If HP Smart Zero Client Services is improperly configured orpoints to an invalid server, one of the following errors willappear:
● An X and error message indicates that an error hasoccurred while attempting to retrieve client settings fromthe server.
● A warning message indicates that an error occurredwhile attempting to retrieve client settings from theserver.
Connection Displays a green check mark if the client is connected to theserver.
When the connection is improperly set up or points to aninvalid server, one of the following errors will appear:
● An X indicates that a connection has not beenconfigured for your system.
Using client information screens 5

Table 3-3 About this client—Status (continued)
Item Description
● A warning message indicates that an error occurredwhile attempting to connect to the server.
Using the Network tabUse the Network tab to view network and interface settings shown in the three different panes asdescribed in the table below.
Table 3-4 About this client—Network
Pane Item
Interface ● Name
● State
● IP address
● Network mask
● MAC address
● DHCP server address
● Interface statistics
Network ● Default gateway
DNS Settings ● Hostname
● Default domain
● Name servers
Using the Net Tools tabUse the Net Tools tab to configure options for monitoring system performance and troubleshootnetwork issues using the following procedure:
1. In the Net Tools tab, under Select Tool, choose one of the options described in the followingtable.
Table 3-5 About this client—Net Tools
Option Description
Ping Use this tool to attempt to establish contact with anotherdevice on the network using an IP address that youspecify.
● If successful, the tool reports the total amount of timein milliseconds it took to receive a response from thedevice.
● If unsuccessful, the tool does not return any data.
DNS Lookup Use this tool to resolve a domain name into an IP addressusing the DNS name servers registered under theNetwork tab.
6 Chapter 3 Navigating clients

Table 3-5 About this client—Net Tools (continued)
Option Description
The tool returns the IP of the server if it can be resolved.Otherwise, it returns an error code and message.
Trace Route Use this tool to track the path that a network packet takesfrom one device to another.
● If successful, the tool reports the path it took througheach router or other network device to thedestination.
● If unsuccessful, the tool returns an error message.
2. Type or select the options you want to monitor.
3. When completed, click Start Process.
Using the System Information tabThe System Information tab provides the following information about your client:
● Platform
● Total RAM
● Serial number
● OS kernel version
● OS build ID
● Main software installed
Using the Systems Logs tabThe System Logs tab displays all the logs placed on the following:
● System kernel
● X Server
● HP Smart Zero Client Services
NOTE: To generate additional diagnostic reports or log information, select Enable Debug Mode.This information might be requested by HP for troubleshooting purposes.
Hiding client information screens1. Click , select Administrator/User Mode Switch, and then log in as the Administrator.
2. Under , select Additional Configuration > Advanced > XTerminal.
3. On the XTerminal command line, type regeditor, and then press Enter.
4. In the Registry Editor, under Smart Client Registry > root/SystemInfo/Pages, select the itemcorresponding to the tab you want to hide:
● General
● NetTools
Using client information screens 7

● Network
● SoftwareInformation
● SystemLogs
5. Set the value to 0, and then click Save.
6. When completed, reboot the system.
8 Chapter 3 Navigating clients

4 Configuring clients
Beyond the basic setup described in Getting started on page 2, there are many additional optionsavailable for each connection type. These options provide many unique system configurations andmake sure that the client can be customized for most environments.
This chapter includes the topics as follows:
● Using the client control panel
● Overview of RDP connection features
● Overview of Citrix connection features
● Overview of VMware Horizon View connection features
● Installing certificates on clients
● Redirecting USB devices
● Mapping a serial or parallel printer
Using the client control panelThe client control panel provides users and administrators access to options that allow themconfigure the client.
Accessing the client control panel
To access the client control panel, click on the client toolbar. The client control panel supportsthe following modes of operation:
● User Mode (default)
● Administrator Mode
Using the client control panel (User Mode)This section describes the client control panel options available in User Mode.
Main control panel options (User Mode)
Table 4-1 Main control panel options (User Mode)
Menu option Description
Select Connection Type Lets you configure one of the following connection types:
● Citrix
● RDP7
● VMware Horizon View
● Web Browser
Using the client control panel 9

Table 4-1 Main control panel options (User Mode) (continued)
Menu option Description
Administrator/User Mode Switch Lets authorized administrators access the AdministratorMode control panel menus.
NOTE: Before using this option, be sure to set up apassword for the Administrator Mode control panel menus.
Language Lets you display the client interface in a different language.
Keyboard Layout Lets you change the keyboard layout to accommodate thelanguage used by the keyboard.
Audio Lets you control the audio level.
Additional Configuration Opens the additional options menu. For information aboutthe additional options available in User Mode, see Additionalcontrol panel options (User Mode) on page 10.
Additional control panel options (User Mode)
Table 4-2 Additional control panel options (User Mode)
Menu option Description
Date and Time Lets you set up the date and time zone using the following options:
● Time zone
● Time
● Date
● Use NTP time servers specified by DHCP
● Use the time server of your choice
● Do not use a time server
Display Preferences Lets you configure and test the following custom options for yourdisplay hardware:
● Resolution
● Depth
● Orientation
● Primary display video connector (DVI-I or DVI-D)
● Secondary monitor mode
Mouse Lets you set up custom options for your mouse hardware.
Network Lets you configure the following network settings:
● Wired settings
◦ Network speed
◦ Duplex settings
◦ Connection method
● DNS settings
● IPSec settings
10 Chapter 4 Configuring clients

Table 4-2 Additional control panel options (User Mode) (continued)
Menu option Description
● VPN settings
● HP Velocity settings
● Wireless settings
◦ Duplex settings
◦ Connection method
NOTE: Many wireless networks have security that requires adifferent authentication and either a password or key.
Printer Mapping Lets you set up a printer and share it across the network.
Using the client control panel (Administrator Mode)This section describes the client control panel options available in Administrator Mode.
To log in as an administrator:
1. On the client toolbar, click .
2. In the menu, select Administrator/User Mode Switch.
3. In the Switch to Admin box, under Administrative Password, type your password and then clickOK.
Main control panel options (Administrator Mode)
Table 4-3 Main control panel options (Administrator Mode)
Menu option Description
Edit Default Connection Lets you edit the following default connection settings,depending on the connection type previously configured:
● Network
● Window
● Options
● Local Resources
● Experience
● Advanced
Administrator/User Mode Switch Returns you to User Mode.
Audio Lets you control the playback and recording levels for thedefault audio device. The default audio device can bechanged by selecting the Sound menu option.
Additional Configuration Opens the additional options menu. For information aboutthe additional options available in Administrator Mode, seeAdditional control panel options (Administrator Mode)on page 12.
Using the client control panel 11
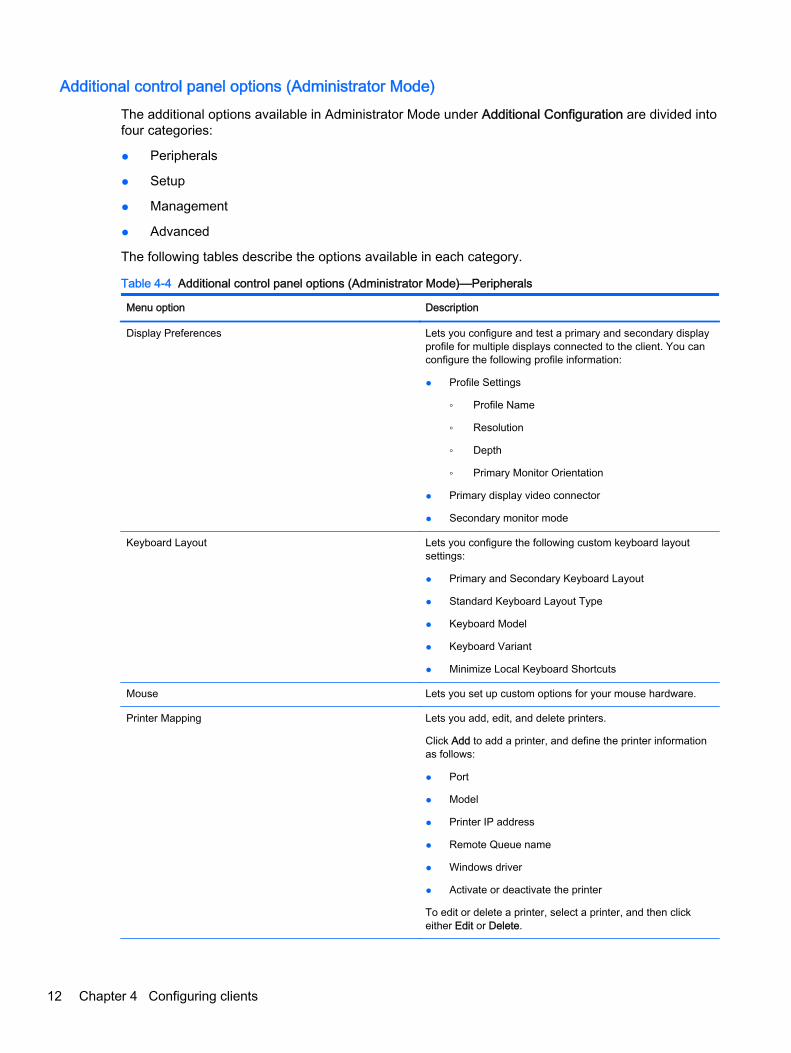
Additional control panel options (Administrator Mode)The additional options available in Administrator Mode under Additional Configuration are divided intofour categories:
● Peripherals
● Setup
● Management
● Advanced
The following tables describe the options available in each category.
Table 4-4 Additional control panel options (Administrator Mode)—Peripherals
Menu option Description
Display Preferences Lets you configure and test a primary and secondary displayprofile for multiple displays connected to the client. You canconfigure the following profile information:
● Profile Settings
◦ Profile Name
◦ Resolution
◦ Depth
◦ Primary Monitor Orientation
● Primary display video connector
● Secondary monitor mode
Keyboard Layout Lets you configure the following custom keyboard layoutsettings:
● Primary and Secondary Keyboard Layout
● Standard Keyboard Layout Type
● Keyboard Model
● Keyboard Variant
● Minimize Local Keyboard Shortcuts
Mouse Lets you set up custom options for your mouse hardware.
Printer Mapping Lets you add, edit, and delete printers.
Click Add to add a printer, and define the printer informationas follows:
● Port
● Model
● Printer IP address
● Remote Queue name
● Windows driver
● Activate or deactivate the printer
To edit or delete a printer, select a printer, and then clickeither Edit or Delete.
12 Chapter 4 Configuring clients

Table 4-4 Additional control panel options (Administrator Mode)—Peripherals (continued)
Menu option Description
Sound Lets you set up the audio input and playback settings foryour client.
USB Manager Lets you configure the redirection options for USB devices.
Table 4-5 Additional administrator control panel options—Setup
Menu option Description
Date and Time Lets you set up the date and time zone using the followingoptions:
● Time zone
● Time
● Date
● Use NTP time servers specified by DHCP
● Use the time server of your choice
● Do not use a time server
Language Lets you display the client interface in a different language.
Network Lets you configure the following network settings:
● Wired settings
◦ Network speed
◦ Duplex settings
◦ Connection method
● Wireless settings
◦ Connection method
● DNS settings
● IPSec settings
● VPN settings
● HP Velocity settings
NOTE: Many wireless networks have security that requiresa different authentication and either a password or key.
Security Lets you set up or change system passwords for the clientadministrator and user.
Table 4-6 Additional administrator control panel options—Management
Menu option Description
Automatic Update Lets you configure the Automatic Update server manually.
Factory Reset Lets you restore the client to its default factory configuration.
VNC Shadow Lets you use VNC Shadowing.
Using the client control panel 13
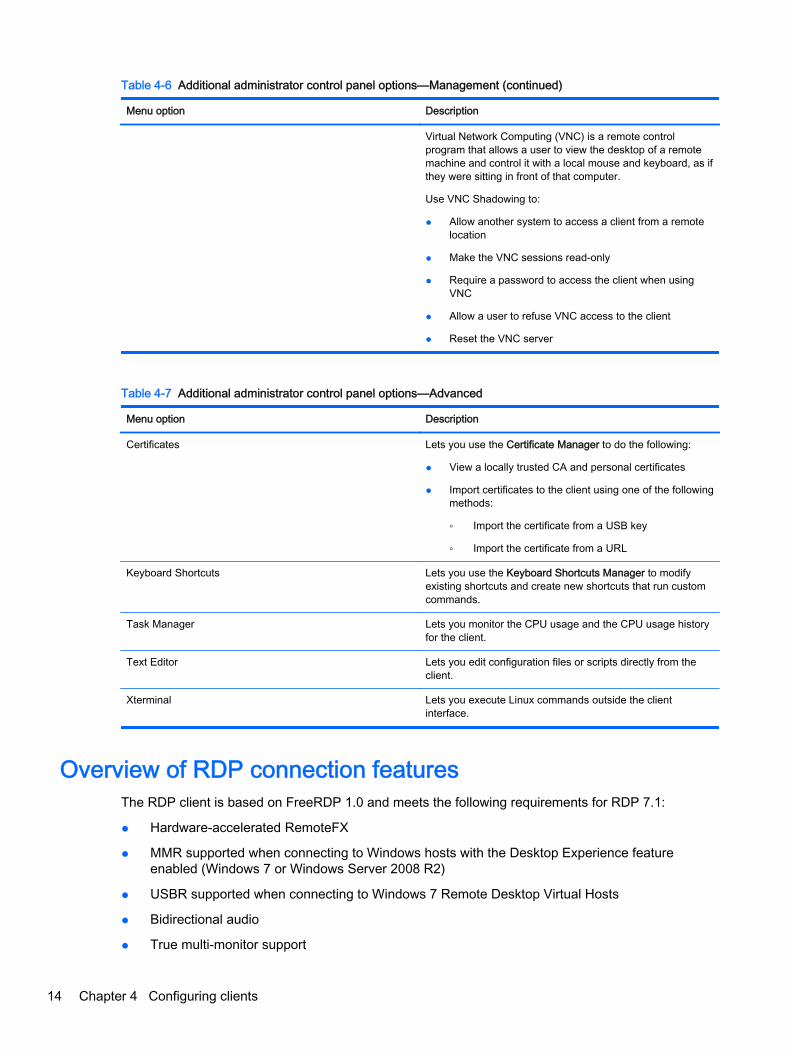
Table 4-6 Additional administrator control panel options—Management (continued)
Menu option Description
Virtual Network Computing (VNC) is a remote controlprogram that allows a user to view the desktop of a remotemachine and control it with a local mouse and keyboard, as ifthey were sitting in front of that computer.
Use VNC Shadowing to:
● Allow another system to access a client from a remotelocation
● Make the VNC sessions read-only
● Require a password to access the client when usingVNC
● Allow a user to refuse VNC access to the client
● Reset the VNC server
Table 4-7 Additional administrator control panel options—Advanced
Menu option Description
Certificates Lets you use the Certificate Manager to do the following:
● View a locally trusted CA and personal certificates
● Import certificates to the client using one of the followingmethods:
◦ Import the certificate from a USB key
◦ Import the certificate from a URL
Keyboard Shortcuts Lets you use the Keyboard Shortcuts Manager to modifyexisting shortcuts and create new shortcuts that run customcommands.
Task Manager Lets you monitor the CPU usage and the CPU usage historyfor the client.
Text Editor Lets you edit configuration files or scripts directly from theclient.
Xterminal Lets you execute Linux commands outside the clientinterface.
Overview of RDP connection featuresThe RDP client is based on FreeRDP 1.0 and meets the following requirements for RDP 7.1:
● Hardware-accelerated RemoteFX
● MMR supported when connecting to Windows hosts with the Desktop Experience featureenabled (Windows 7 or Windows Server 2008 R2)
● USBR supported when connecting to Windows 7 Remote Desktop Virtual Hosts
● Bidirectional audio
● True multi-monitor support
14 Chapter 4 Configuring clients

Using Kiosk Mode with RDPBy default, only the server hostname is required to connect. The login screen identifies andauthenticates the user. Additional login information can be set in the Connection Settings dialog boxavailable in Administrator Mode.
To enable Kiosk Mode, where the client performs an automatic login to the remote desktop on bootusing predefined user credentials, do the following:
1. In Administrator Mode, click on the client toolbar.
2. Click Edit Default Connection.
3. Type a username and password for the Kiosk user.
TIP: The username is a generic expression with restricted domain privileges.
4. Under Advanced, do the following:
a. Set the Autostart Priority to 1.
b. Select Autoreconnect.
5. Click Save.
6. Click Reconnect.
This causes the RDP session to automatically log in on boot. Additionally, if the connection is everlost due to a logout, disconnect, or network failure, it will automatically reconnect as soon as theconnection is restored. The remote host can be configured to autostart any desired applications onlogin.
To return to the login screen and minimize the session, press Ctrl+Alt+End. This enables you tomodify the client settings.
Using RemoteFX with RDPRemoteFX (RFX) is an advanced graphics display protocol that is designed to replace the graphicscomponent of the traditional RDP protocol. It uses the hardware acceleration capabilities of the serverGPU to encode the screen contents via the RFX codec and send screen updates to the client. RFXuses advanced pipelining technologies and adaptive graphics to make sure that it delivers the bestpossible experience based on content type, CPU and network bandwidth availability, and renderingspeed.
RFX is enabled by default. The administrator or user does not have to change any settings to enableit. The client negotiates with any RDP server it contacts, and if RemoteFX is available, it will be used.
To disable RFX, set the registry key value to:
● root/ConnectionType/freerdp/connections/{UUID}/remoteFx to ‘0’
TIP: HP recommends that you enable or disable RFX on the remote host.
Using Multimedia Redirection with RDPMultimedia Redirection (MMR) is a technology that integrates with Windows Media Player on theremote host and streams the encoded media to the client instead of playing it on the remote host andre-encoding it via RDP. This technology reduces the server load and network traffic, and greatlyimproves the multimedia experience, supporting 24 fps playback of 1080p videos with automatic
Overview of RDP connection features 15
audio syncing. MMR is enabled by default. A client will negotiate with any RDP server it contacts, andif MMR is available, it will be used.
MMR also uses an advanced codec detection scheme that identifies whether the client supports thecodec being requested by the remote host before attempting to redirect it. The result is that onlysupported codecs will be redirected and all unsupported codecs fall back to server-side rendering.
To disable MMR on the client for all RDP connections, set the value of the registry key to:
● root/ConnectionType/freerdp/general/enableMMR to ‘0’
Because RemoteFX already delivers acceptable multimedia performance, you can disable MMR withRFX by setting the registry key to:
● root/ConnectionType/freerdp/connections/{UUID}/disableMMRwithRFX to ‘1
TIP: For simplified management, HP recommends that MMR be enabled or disabled on the remotehost.
Using multi-monitor sessions with RDPTrue multi-monitor support does not require special configuration by the administrator or user. TheRDP client automatically identifies which monitor is specified as the primary monitor in the localsettings and places the taskbar and desktop icons on that monitor. If a different primary monitor isdesired, it can be set via the local Display settings, available in the Configuration menu. When awindow is maximized within the remote session, the window will only cover the monitor it wasmaximized on.
Display preferences and monitor resolutions can be viewed but not modified within the remotesession. To modify the session resolution, log out of the session and change the resolution on thelocal client. The recommended auto setting uses DDC to communicate with the monitor andautomatically sets the resolution to the preferred native resolution of the monitor.
By default, all RDP sessions will be full-screen and span all monitors to enhance the virtualizationexperience. Additional window options are available through the Edit Default Connection option in theConfiguration menu. Usually, these options are used only on systems supporting multiplesimultaneous connections, such as HP ThinPro.
NOTE: The HP t410 All-in-One Smart Zero Client supports a 1366x768 screen resolution only.
When using RFX, the supported screen resolution is 1280x768 only. This causes small black bars toappear on the sides of the connection.
Using device redirection with RDPDevice redirection makes sure that when a user plugs a device into the client, the device isautomatically detected and accessible in the remote session. RDP supports redirection of manydifferent types of devices.
Using USB redirection with RDPIn systems connected to a Windows 7 SP1 host, RDP supports redirection for a wide variety of USBdevices running in a Hyper-V Virtual Machine.
In systems connected to a Windows 8 or Windows Server 2012 host, HP Smart Zero Core enablesUSB redirection to all installations.
USB redirection works by transmitting low-level USB protocol calls over the network to the remotehost. Any USB device plugged into the local host appears within the remote host as a native USB
16 Chapter 4 Configuring clients

device, as if it were plugged in locally. Standard Windows drivers support the device in the remotesession, and all device types are supported without requiring additional drivers on the client.
Not all devices default to USB redirection. For example, USB keyboards, mice, and other inputdevices usually are not set to be redirected, as the remote session expects input to come from theclient. Some devices such as mass storage, printers, and audio devices use additional options forredirection.
Using mass storage redirection with RDPBy default, the RDP session redirects all mass storage devices to the remote host using high-leveldrive redirection. When a device such as a USB flash drive, USB DVD-ROM drive, or USB externalHDD is plugged into the system, the client detects and mounts the drive on the local file system. RDPthen detects a mounted drive and redirects it to the remote host. Within the remote host, it will appearas a new disk drive in Windows Explorer, with the name <device label> on <clienthostname>; for example, Bill_USB on HP04ab598100ff.
There are three restrictions to this type of redirection.
● The device will not appear in the taskbar on the remote host with an icon to eject the device.Because of this, make sure to give the device a sufficient amount of time to sync data after acopy before removing the device to be sure that the device does not corrupt. Typically, less thanone second is required after the file copy dialog finishes, but up to 10 seconds might be requireddepending on the device write speed and network latency.
● Only file systems supported by the client will be mounted. The supported file systems areFAT32, NTFS, ISO9660 (CD-ROMs), UDF (DVD-ROMs), and ext3.
● The device will be treated as a directory; common drive tasks like formatting and modification ofthe disk label will not be available.
If desired, you can disable mass storage redirection. Turn off USB redirection. Then, change theregistry key entries as described in the following table.
Table 4-8 Disabling USB redirection
Registry entry Value to set Description
root/USB/root/holdProtocolStatic 1 Makes sure that the USBR type will not be automaticallychanged when a connection is set or unset
root/USB/root/protocol local Makes sure that the RDP connection does not attempt toredirect any devices to the remote session
To completely disable local mounting of USB mass storage devices or to disable the redirection ofUSB mass storage devices but still allow other devices to redirect, in the client file system, delete theudev rule /etc/udev/rules.d/010_usbdrive.rules.
Using printer redirection with RDPBy default, RDP has two methods of printer redirection enabled:
● USB redirection—Any USB printer plugged into the device will show up as a local printer in theremote session. The standard printer installation process must happen in the remote session ifthe printer is not already installed on that remote host. There are no settings to manage locally.
● High-level redirection—If either USB redirection is unavailable on the remote host or the printeris a parallel or serial printer, use high-level redirection. Configure the printer to use a local printer
Overview of RDP connection features 17

spooler, and the RDP client automatically sets up a remote printer that sends print spoolingcommands through a virtual channel from the remote host to the client.
This method requires both that the printer be configured on the client and a Windows driver bespecified on the client because the RDP client needs to specify to the remote host which driverto use for the remote printer. This Windows driver must match the driver that the printer woulduse when locally attached to a Windows operating system. This information is usually foundunder the Model in the printer properties.
NOTE: See Configuring a serial or parallel printer on page 39 for more information.
Using audio redirection with RDPBy default, high-level audio redirection will redirect audio from the remote host to the client. Basicvoice control might need to be set up, and RDP 7.1 contains a number of advanced audio redirectionfeatures that might require additional configuration.
● RDP delivers the highest quality audio as the network bandwidth allows. RDP reduces audioquality to play on low-bandwidth connections.
● No native audio or video syncing mechanisms are available in standard RDP. Longer videosmight not sync with audio. MMR or RemoteFX can resolve this issue.
● If USBR is enabled, HP recommends that all USB audio devices be redirected by USBR. Thismakes sure that all audio is mixed locally to improve quality. If USB redirection of an audiodevice is required, be sure that the RDP sound setting is set to Leave at remote computerinstead of Bring to this computer. Configure this setting using the Local Resources page in theConnection Settings available in Administrator Mode.
Disable MMR if all audio devices are set to local, because it will only play multimedia through thedefault audio device.
● Microphone redirection is enabled by default. The default microphone volume might need to beadjusted on the client. This can be done through the Configuration menu.
● Both the local and remote volume settings will affect the final volume. HP recommends settingthe local volume to a maximum and adjusting the volume within the remote host.
Using smart card redirection with RDPBy default, smart cards will be redirected using high-level redirection, allowing them to be used to login to the session and other remote applications. To enable smartcard login, check the Allowsmartcard login box on the login screen or within the Connection Settings. This will allow the user toconnect without first specifying credentials. The RDP client will then start the RDP session, and theuser will be prompted to authenticate by smart card.
This technology requires drivers for the smart card reader driver to be installed on the client. Bydefault, the CCID and Gemalto drivers are installed, which adds support for the majority of smart cardreaders available. Additional drivers can be installed by adding them to /usr/lib/pkcs11/.
NOTE: When smart card login is enabled, Network Level Authentication is not supported and isautomatically disabled.
Setting RDP optionsFor the best user experience, use the Experience tab in the Connection Settings to set theConnection Speed to LAN. If bandwidth reduction is required, the connection speed can be set toModem, which will disable all experience options.
18 Chapter 4 Configuring clients
The additional options described in the following table can be configured via the check boxes on theOptions tab.
Table 4-9 General connection options
Connection option Description
Enable Motion Events Enabled by default. Sends a message to the RDP server every time the pointingdevice is moved. If this is disabled, “hover over” options, such as tooltips, often fail toappear.
Enable Data Compression Enabled by default. Data compression can be disabled to reduce the server and clientCPU usage, but this results in a drastic increase in the network bandwidth.
Enable Encryption Enabled by default. Causes all traffic to be encoded with TLS or RC4 encryption. Canbe disabled to reduce the client and host CPU usage.
Force bitmap updates Enabled by default. Causes bitmaps to be saved even when not shown, increasingthe client memory usage but improving the redraw of background images.
Attach to console Disabled by default. When enabled, RDP can be used to connect to servers that haveRDP disabled and only have the Administrator console active. Primarily used fordebugging.
Send hostname Sends the specified text string as the client hostname instead of the systemhostname.
Overview of Citrix connection featuresA Citrix connection accesses the Citrix SBC (Server-Based Computing) and VDI (Virtual DesktopInfrastructure) services.
Configure a Citrix remote connection with the connection wizard. If the default values do not meetyour requirements, use the extended options to complete the connection setup process.
Citrix connection management featuresWhen using a Citrix connection, you can configure the client to automatically perform the followingfunctions:
● Launch resources when only a single resource is published
● Launch a specified resource
● Launch a published desktop
● Reconnect sessions on connection startup
● Log off the connection after a specified timeout period
● Launch published resources use the following configurable shortcuts:
◦ Desktop icons
◦ Start menu icons
◦ Taskbar icons
Citrix receiver featuresCitrix receiver features include the following:
Overview of Citrix connection features 19

● Latest version at the time of release:
◦ 12.1.5 for x86
◦ 12.5 for ARM/SoC
● Window size and depth settings
● Seamless window support
● Sound quality settings
◦ Low
◦ Medium
◦ High
◦ Disabled
● Static drive mapping
● Dynamic drive mapping
● USB redirection for XenDesktop and VDI-in-a-Box
● Smart card virtual channel enablement
NOTE: This feature is equivalent to a smart card login/authentication when using direct, non-PNAgent connections. With a PNAgent connection, smart card virtual channel enablementenables or disables the smart card virtual channel but does not provide for initial connectionauthentication. For a smart card authentication to XenApp and XenDesktop, use the providedWeb Browser connection instead of the Citrix connection and be sure to enable web access.
● Printer mapping
● Serial port mapping
● HDX MediaStream (hardware-accelerated on most models)
NOTE: See HDX MediaStream support matrix on page 20 for more information.
● HDX Flash Redirection (x86-only)
● HDX Webcam Compression
● HDX RealTime (MS Lync Optimization) (x86-only)
HDX MediaStream support matrix
Table 4-10 HDX MediaStream support matrix
Feature Support
Frame rate ● 24 fps
Resolution ● 1080p
● 720p
Video containers ● WMV
● AVI
● MPG
● MPEG
20 Chapter 4 Configuring clients

Table 4-10 HDX MediaStream support matrix (continued)
Feature Support
● MOV
● MP4
Video codecs ● WMV2
● WMV3 / VC-1
● H.264 / AVC / MPEG-4 Part 10
● MPEG-4 Part 2
● H.263
● DivX
● Xvid
● MPEG1
Audio codecs ● MP3
● WMA
● AAC
● PCM
● mpeg-audio
● MLAW / ULAW
Citrix connection support matrixThe following table describes the supported Citrix backends.
Table 4-11 Citrix connection support matrix
Backend
XenApp XenDesktop VDI-in-a-Box
Access type
Direct (legacy) 4.5 / 5 / 6 / 6.5
Native (PNAgent) 4.5 / 5 / 6 / 6.5 4.5 / 5.5 / 5.6.5 5.x
Web browser 4.5 / 5 / 6 / 6.5 4.5 / 5.5 / 5.6.5 5.x
Overview of VMware Horizon View connection featuresUsing Kiosk Mode with VMware Horizon View
In Kiosk Mode, the client performs an automatic login to a remote desktop using predefined usercredentials at startup. If you lose a connection because of a logout, disconnect, or network failure, theconnection automatically restores when connectivity returns.
To minimize the session and return to the login screen, use the keyboard shortcut Ctrl+Alt+End.
To set up a Kiosk Mode login:
Overview of VMware Horizon View connection features 21

1. As the administrator, click and select Edit Connection Settings.
2. Under Network, specify the following settings:
● Username
● Password
● Domain
● Desktop (If applicable)
3. Click OK.
4. Click and select Advanced Configuration > Advanced > XTerminal.
a. On the X Terminal command prompt, type regeditor and press Return.
b. In the client registry, set the value as follows:
Value Entry
Connection Type/view/connections/UUID/autostart 1
Connection Type/view/connections/UUID/autoreconnect registry 1
IMPORTANT: Be sure to click Save after each entry.
5. When completed, click Quit.
6. Reboot the system.
Using Multimedia Redirection with VMware Horizon ViewVMware Horizon View connections support MMR functionality when used with the Microsoft RDPprotocol.
For more information, see Using Multimedia Redirection with RDP on page 15.
Using multi-monitor sessions with VMware Horizon ViewVMware Horizon View supports multi-monitor sessions. To enhance the virtualization experience, thedefault VMware Horizon View sessions use full-screen and span all monitors. To choose a differentwindow size, select Full Screen – All Monitors under the protocol type of the desktop pool for theconnection and then choose another option from the window size list. The next time you connect to asession the window will open in the selected size.
Using keyboard shortcuts with VMware Horizon ViewWindows keyboard shortcuts
To help administer Windows systems, VMware Horizon View supports Windows keyboard shortcuts.For example, when Ctrl+Alt+Del is used, VMware Horizon View displays a message that provides thefollowing options:
● Send a Ctrl+Alt+Del command.
● Disconnect the session—Use this when you have no other way of ending the session.
22 Chapter 4 Configuring clients
Windows keyboard shortcuts will be forwarded to the remote desktop session. The result is that localkeyboard shortcuts, such as Ctrl+Alt+Tab and Ctrl+Alt+F4, will not function while inside the remotesession. To switch sessions, the top bar can be enabled by unchecking Hide top menu bar in theGeneral tab of the Connection Settings or via the registry key root/ConnectionType/view/connections/{UUID}/hideMenuBar.
Media keys
VMware Horizon View uses media keys to control options such as volume, play/pause, and muteduring a remote desktop session. This supports multimedia programs such as Windows MediaPlayer.
Using device redirection with VMware Horizon ViewUsing USB redirection with VMware Horizon View
To enable USBR for VMware Horizon View connections, select VMware Horizon View as the remoteprotocol in the USB Manager.
For more information on USBR, including device- and class-specific redirection, see Using USBredirection with RDP on page 16.
NOTE: For information on configuring USB redirection for versions of HP Smart Zero Core that donot use the USB Manager, see USB options in previous HP Smart Zero Core releases on page 90.
Using mass storage redirection with VMware Horizon ViewYou must use the RDP connection protocol to use mass storage redirection with a VMware HorizonView connection.
To perform drive redirection of a USB drive or internal SATA drive:
▲ Disable USBR by using the USB Manager to set the Remote Protocol to Local.
This creates a network-mapped drive in the virtual desktop session for each internal and externalmass storage device connected to the client. The file system format of the storage being remoteddoes not matter. For example, an ext3-formatted USB key can be used on a Windows connection.
For more details, see Using mass storage redirection with RDP on page 17.
Using printer redirection with VMware Horizon ViewFor connections made with the PCoIP protocol, USBR supports printers. For connections made withthe RDP protocol, see Using printer redirection with RDP on page 17 for more information.
Using audio redirection with VMware Horizon ViewIf you do not need the audio recording capability, use high-level audio redirection. Audio will play outof the 3.5 mm jack or, by default, a USB headset if it is plugged in. Use the local audio manager toadjust the input/output level, select playback, and capture devices.
The VMware Horizon View client does not support high level audio-record redirection via the PCoIPconnection type. If you need audio-recording support, use one of the following methods:
● If you are using the Teradici PCoIP Client on the t410 system, install the Teradici audio driverfrom http://techsupport.teradici.com on the virtual desktop. This allows high-level audioredirection through either the 3.5 mm jack or a USB headset.
Overview of VMware Horizon View connection features 23

NOTE: Only systems with Teradici PCoIP Client 1.2 or higher support high-level audioredirection using a USB headset. Systems with older versions of the client will redirect theheadset through USBR.
● If your system uses VMware Horizon View Client 1.7 or higher, use the RDP protocol to allow forhigh-level audio redirection through either the 3.5 mm jack or a USB headset.
NOTE: To use high-level audio-record redirection through the RDP protocol, the server mustsupport it and be configured to allow audio recording over a remote session. The client must berunning Windows 7 or greater. You also must make sure the HKLM\SYSTEM\CurrentControlSet\Control\Terminal Server\WinStations\RDP-Tcp\fDisableAudioCapture registry key is set to 0.
● If you have a USB headset with a microphone, use USBR. Set the USB headset to be redirectedinto the session. The headset will show up as an audio device. By default, USB audio devicesare not redirected and the view client uses high-level audio redirection. To redirect the USBheadset, use the client’s USB Manager and select the USB headset to be redirected. Make surethat VMware Horizon View is selected as the USBR protocol and make sure that the headset ischecked under the Devices to be redirected.
NOTE: VMware does not recommend using USBR for headsets. A large amount networkbandwidth is required to stream audio data over the USBR protocol. Also, you might experiencepoor audio quality with this method.
Using smart card redirection with VMware Horizon ViewTo use a smart card to log in to the VMware Horizon View server:
1. In the Connection Settings dialog box, under General, select Allow smartcard login.
After starting the connection, the VMware Horizon View client will display a list of servercredentials.
2. To unlock the credentials and access the VMware Horizon View Manager server, type theappropriate PIN for the server.
NOTE: After you supply the correct PIN, the user’s credentials will be used to log in to the VMwareHorizon View Manager server. Please see the VMware Horizon View documentation for details onconfiguring the server to support smart card login. As long as the server is configured to allow smartcard login, the user’s credentials will pass through and they will be logged in to the desktop withouthaving to enter their PIN again.
NOTE: To log in to the VMware Horizon View Manager administrator server with a smart card, thelocal smart card driver must be installed on the client. See Using smart card redirection with RDPon page 18 for more information on smart card driver installation. Once logged in to the remote host,the smart card will be passed to the remote host using a virtual channel, not USBR This virtualchannel redirection makes sure that the smart card can be used for tasks such as email signing,screen locking, and so on, but might cause the smart card to not show as a smart card device in theWindows Device Manager.
NOTE: The remote host must have the proper smart card drivers installed.
Using webcam redirection with VMware Horizon ViewThe VMware Horizon View client does not support high-level webcam redirection. Webcams can beused only if they are redirected using USBR. The webcam might perform poorly or not at all. SeeUsing USB redirection with RDP on page 16 for more information.
24 Chapter 4 Configuring clients

Additional VMware Horizon View connection optionsTo access additional VMware Horizon View connection options in the client, select Edit ConnectionSettings > General in the VMware Horizon View Connection Manager.
The following table describes the general login options in the VMware Horizon View ConnectionManager.
Table 4-12 Login options
Option Description
Automatic Login Select Automatic Login to make sure that the client uses thefollowing credentials when signing into the broker:
● hostname
● username
● password
If you check the Automatic Login box, this information will fillin the correct fields when the VMware Horizon View clientstarts. However, to initiate the connection, you need to clickConnect.
NOTE: HP recommends selecting the Automatic Login box.
Allow Smartcard login Select Allow Smartcard login to enable smart card login.
NOTE: For more information on smart cards, see Usingsmart card redirection with VMware Horizon Viewon page 24.
Close After Disconnect To exit the VMware Horizon View client after users log out oftheir desktops or the session terminates with an error, selectClose After Disconnect.
This option is a security feature designed so that a user doesnot need to take an additional step to fully log out after theyare finished with their desktop session.
The Close After Disconnect option is enabled by default forsecurity purposes, but may be changed if users find that theyare often switching to a new desktop pool after logging out ofa session and do not want to fully log in again.
Hide top menu bar To make the top menu bar invisible for users, select Hide topmenu bar.
This option enabled by default. You may disable it if usersprefer to access options for window size or desktop poolselection in a VMware Horizon View session.
Connection Security Level Use the Connection Security Level to adjust the securitylevel that the VMware Horizon View client uses whenconnecting to the server.
NOTE: For more information, see VMware Horizon ViewHTTPS and certificate management requirementson page 27 for details on how connection security levelsbehave.
Using advanced command line arguments with VMware Horizon ViewTo use advanced command line arguments:
Overview of VMware Horizon View connection features 25

1. In the VMware Horizon View Connection Manager, navigate to Edit Connection Settings >General.
2. Under Command Line Arguments, enter arguments that pass to the VMware Horizon View clientwhen it starts.
For more help on using advanced command line options, do one of the following:
● On the command line, type vmware-view--help and then press Enter.
● See the Linux Horizon View client documentation provided by VMware athttp://www.vmware.com.
NOTE: The information in this section does not apply to the Teradici-accelerated PCoIP client.
Using a Teradici-accelerated t410 system with VMware Horizon ViewA Teradici-accelerated t410 system uses a Teradici PCoIP client to connect to the VMware HorizonView desktop. To verify whether your system is Teradici-accelerated, look for the teradici-pcoip-clientlabel listed in the System Information pane.
NOTE: Teradici-accelerated units cannot use the RDP protocol to connect with a remote desktopsession.
NOTE: The Teradici PCoIP client does not support forwarding traffic via an HTTP proxy. You willneed to switch to the standard VMware Horizon View client to connect through a proxy. SeeSwitching to the standard VMware Horizon View client on page 26 for more information.
Switching to the standard VMware Horizon View clientTo switch to the standard VMware Horizon View client:
1. Open an Xterminal and run the following command:
mv /usr/bin/teradici_signature_check /usr/bin/teradici_signature_check.bak
IMPORTANT: The command should be typed on a single line, with a single space before eachfile path.
2. Restart the client.
To switch back to the Teradici PCoIP-optimized client:
1. Open an Xterminal and run the following command:
mv /usr/bin/teradici_signature_check.bak /usr/bin/teradici_signature_check
IMPORTANT: The command should be typed on a single line, with a single space before eachfile path.
2. Restart the client.
Changing the VMware Horizon View protocol typeThe VMware Horizon View client connects to desktops using one of the following protocol types:
● PCoIP protocol
● RDP protocol
26 Chapter 4 Configuring clients

To change the connection type:
1. In the VMware Horizon View client under Desktop, select a pool that supports one of thefollowing protocols:
● PCoIP
● RDP 2
2. On the pull-down list, select a connection type.
NOTE: Use the VMware Horizon View Manager to configure which connection protocol should beused for each desktop pool.
TIP: HP recommends using the PCoIP protocol to enhance the desktop experience. However, theRDP protocol provides more options for customization and might work better on slower connections.To access the Experience options, use the Connection Settings dialog box.
For more details on specific options for RDP connections, see Setting RDP options on page 18.
Installing certificates on clientsUse the Certificate Manager when installing a Certificate Authority (CA) certificate. This action copiesthe certificate to the user’s local certificate store (/usr/local/share/ca-certificates) and configuresOpenSSL to use the certificate for connection verification.
If desired, use HP Smart Zero Client Services to attach the certificate to a profile, as described inAdding certificates to a client profile on page 38.
NOTE: For more information, see http://linux.die.net/man/1/x509.
NOTE: Generally, a self-signed certificate will work as long as it is valid according to specificationand can be verified by OpenSSL.
VMware Horizon View HTTPS and certificate management requirementsVMware Horizon View Client 1.5 and VMware Horizon View Server 5.0 and later require HTTPS. Bydefault, the VMware Horizon View client warns about untrusted server certificates, such as self-signed (like the VMware Horizon View Manager default certificate) or expired certificates. If acertificate is signed by a Certificate Authority (CA) and the CA is untrusted, the connection will returnan error and the user will not be allowed to connect.
HP recommends that a signed certificate verified by a standard trusted root CA be used on theVMware Horizon View Manager server. This makes sure that users will be able to connect to theserver without being prompted or required to do any configuration. If using an internal CA, theVMware Horizon View client connection returns an error until you complete one of the following tasks:
● In Administrator Mode, access the client control panel and select Additional Configuration >Advanced > Certificates to open the Certificate Manager. Then, import the certificate from a fileor URL.
● Use a remote profile update to import a certificate.
● In the VMware Horizon View Manager, select Edit Connection Settings > General. SetConnection Security Level to Allow all Connections, and then click Apply.
Installing certificates on clients 27
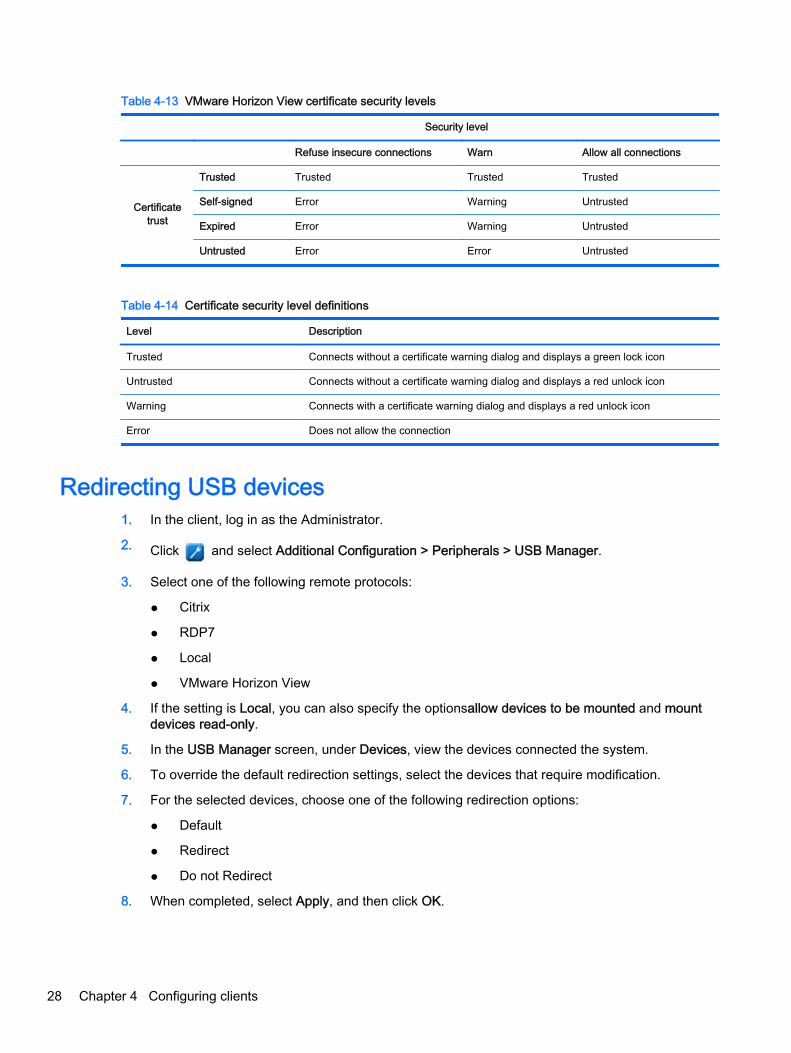
Table 4-13 VMware Horizon View certificate security levels
Security level
Refuse insecure connections Warn Allow all connections
Certificatetrust
Trusted Trusted Trusted Trusted
Self-signed Error Warning Untrusted
Expired Error Warning Untrusted
Untrusted Error Error Untrusted
Table 4-14 Certificate security level definitions
Level Description
Trusted Connects without a certificate warning dialog and displays a green lock icon
Untrusted Connects without a certificate warning dialog and displays a red unlock icon
Warning Connects with a certificate warning dialog and displays a red unlock icon
Error Does not allow the connection
Redirecting USB devices1. In the client, log in as the Administrator.
2. Click and select Additional Configuration > Peripherals > USB Manager.
3. Select one of the following remote protocols:
● Citrix
● RDP7
● Local
● VMware Horizon View
4. If the setting is Local, you can also specify the optionsallow devices to be mounted and mountdevices read-only.
5. In the USB Manager screen, under Devices, view the devices connected the system.
6. To override the default redirection settings, select the devices that require modification.
7. For the selected devices, choose one of the following redirection options:
● Default
● Redirect
● Do not Redirect
8. When completed, select Apply, and then click OK.
28 Chapter 4 Configuring clients

Mapping a serial or parallel printer1. On the client toolbar, click .
2. Select Additional Configuration > Printer Mapping.
3. In the Printer Mapping screen, click Add to add a printer.
4. In the HP Printer Creation dialog box under Port, select one of the following options:
● Parallel
● Serial #1
● Serial #2
NOTE: Select Serial #1 if you have only one serial printer.
5. Under Model, type the name and model number of your printer.
NOTE: This is an optional step. However, HP recommends that you do this so that the printername is displayed in the Mapping screen.
6. Under Windows Driver, type the name of the Windows printer driver for the printer.
NOTE: This is an optional step. However,HP recommends that you install at least the Generic/Text Only Windows driver in order to use the printer on the server. Without a driver, Windowsmight not use the printer properly.
7. Select Active to activate the new printer.
8. To create the new printer, select Create.
When completed, the new printer will be displayed in the HP Printer Creation dialog box.
Mapping a serial or parallel printer 29

5 Troubleshooting clients
This chapter discusses the following topics:
● Troubleshooting network connectivity
● Troubleshooting firmware corruption
● Troubleshooting serial or parallel printer configuration
● Troubleshooting Citrix password expiration
● Using system diagnostics to troubleshoot
Troubleshooting network connectivity1. Ping the client server by doing the following:
a. On the client toolbar, click to access the About this client screen, and then click on theNet Tools tab.
b. Under Select Tool, select Ping.
c. In the Target Host box, type the server address, and then click Start Process.
If the ping is successful, the system will display the following output:
PING 10.30.8.52 (10.30.8.52) 56(84) bytes of data.
64 bytes from 10.30.8.52: icmp_seq-1 ttl=64 time=0.81 5 ms 64 bytes from 10.30.8.52: icmp_seq=2 ttl=64 time=0.735 ms
If the ping is unsuccessful, the client might be disconnected from the network and experience along delay with no system output.
2. If the client does not respond to the ping, do the following:
a. Check the network cable and check the network settings in the client control panel.
b. Try pinging other servers or clients.
c. If you can reach other network clients, verify that you typed the correct server address.
d. Ping the server using the IP address instead of the domain name or vice-versa.
3. Check the system logs by doing the following:
a. On the client toolbar, click to access the About this client screen, and then click on theSystem Logs tab.
b. Check for any errors in the logs.
c. If there is an error, then the Server is not set up notification appears. Verify that the serveris set up properly and that HP Smart Zero Client Services is running.
30 Chapter 5 Troubleshooting clients

Troubleshooting firmware corruptionIf the client beeps two times after it is powered on or does not appear to boot, then the devicefirmware may be corrupt. It is possible to resolve this by downloading the client image fromhttp://www.hp.com, copying the image to a removable USB flash drive, and then booting the clientfrom that flash drive.
Reimaging client device firmware1. Download the image from http://www.hp.com.
2. Unpack the image to the path C:\USBBoot.
3. Format a USB flash drive.
4. Copy all the files from C:\USBBoot to the root of the USB flash drive.
5. Power off the client.
6. Insert the USB flash drive into the client.
7. Power on the client. The client will boot to the USB flash drive.
8. Follow the on-screen instructions to reimage the client.
9. When the reimage process completes, remove the USB flash drive and press Enter.
Troubleshooting serial or parallel printer configurationBefore configuring printer ports, obtain the printer's baud rate from the printer's documentation. If youdo not have that documentation, find the baud rate by completing the following:
1. Turn the printer on while pressing and holding the Feed button.
2. Release the Feed button after a few seconds. The printer will enter a self-test mode and print outthe required information.
TIP: You might need to turn the printer off to cancel the test mode or press Feed again to print adiagnostic page.
NOTE: Most serial printers will print a diagnostic page when you perform this operation. If yourprinter will not print the diagnostic page, see the printer's documentation.
To enter the printer's baud rate:
1. Using the Profile Editor under Registry, select root/printer-mapping-mgr/{UUID}/BaudRate.
2. Enter your printer's baud rate.
NOTE: The UUID will match the UUID of the printer in root/printer. Look there and match theprinter with the UUID in the root/printer-mapping-mgr.
3. Click Save.
4. Right-click the UUID, and then click Apply Changes.
Troubleshooting Citrix password expirationIf users are not being prompted to change expired Citrix passwords, then make sure the XenAppServices site (PNAgent site) has the Prompt authentication method set to allow users to changeexpired passwords. If you allow users to change their passwords by connecting directly to the domain
Troubleshooting firmware corruption 31

controller, then make sure the time of the client is in sync with the domain controller and use the fulldomain name (for example, domain_name.com) when entering the Citrix login credentials. For moreinformation, see Citrix documentation.
Using system diagnostics to troubleshootSystem diagnostics take a snapshot of the client that can be used to help solve issues withoutphysical access to the client. This snapshot contains log files from the BIOS information and theprocesses active at the time the system diagnostics were run.
TIP: Check the Enable Debug Mode box in the System Logs tab of the About this client screen togenerate more information in the diagnostic report. This information may be requested by HP fortroubleshooting. Because the system resets log files when it reboots, be sure to capture logs before areboot.
Saving system diagnostic data1. Insert a USB flash drive into the client.
2. On the client toolbar, click to access the About this client screen, and then click the SystemLogs tab.
3. Click Diagnostic, and then save the compressed diagnostic file Diagnostic.tgz to the USB flashdrive.
Uncompressing the system diagnostic filesThe system diagnostic file Diagnostic.tgz is compressed and will need to be uncompressed beforeyou can view the diagnostic files.
Uncompressing the system diagnostic files on Windows-based systems1. Download and install a copy of the Windows version of 7-Zip.
NOTE: You may obtain a free copy of 7-Zip for Windows at http://www.7-zip.org/download.html.
2. Insert the USB flash drive that contains the saved system diagnostic file, and then copyDiagnostic.tgz to the desktop.
3. Right-click Diagnostic.tgz and select 7-zip > Extract files.
4. Open the newly created folder named Diagnostic and repeat step 3 on Diagnostic.tar.
Uncompressing the system diagnostic files in Linux- or Unix-based systems1. Insert the USB flash drive that contains the saved system diagnostic file, and then copy
Diagnostic.tgz to the home directory.
2. Open a terminal and browse to the home directory.
3. On the command line, type tar xvfz Diagnostic.tgz.
Viewing the system diagnostic filesThe system diagnostic files are divided into the Commands, /var/log, and /etc folders.
32 Chapter 5 Troubleshooting clients

Viewing files in the Commands folderThis table describes the files to look for in the Commands folder.
Table 5-1 Commands folder files
File Description
demidecode.txt This file contains information on the system BIOS and graphics.
dpkg_--list.txt This file lists the packages installed at the time system diagnostics were run.
ps_-ef.txt This file lists the active processes at the time system diagnostics were run.
Viewing files in the /var/log folderThe useful file in the /var/log folder is Xorg.0.log.
Viewing files in the /etc folderThe /etc folder contains the file system at the time the system diagnostics were run.
Using system diagnostics to troubleshoot 33

6 HP Smart Zero Client Services
Clients will detect an update server automatically and configure themselves on the first boot. Thissimplifies device installation and maintenance.
The diagram below describes how the clients communicate with the server when receiving profilesand client update kits.
Server
HP Smart Zero Client Services
InstallsAutomatic Intelligence
Profile Editor
Intelligent Delivery (Broadcast Service)
Internet Information Services (IIS)Automatic Intelligence
(HTTP Server)
Client Kit
Client Kit
ProfileRemote Connection Server
Settings
Files
Send
s B
road
cast
Rec
eive
s Se
rver
UR
L
Che
cks
for C
lient
Kits
Inst
alls
Clie
nt K
its
Che
cks
for P
rofil
e
Inst
alls
Pro
file
BroadcastClient Automatic Update
Client Kit Client Kit Profile
Client
Supported operating systemsHP Smart Zero Client Services supports the following operating systems:
● Windows 7
● Windows Server 2008
● Windows Server 2008 R2
● Windows Server 2003
● Windows Vista
● Windows XP
NOTE: The installer is 32-bit only, although it is supported on both the 32-bit and 64-bit versions ofthe Windows operating system.
34 Chapter 6 HP Smart Zero Client Services

Preparing to install HP Smart Zero Client ServicesBefore installing HP Smart Zero Client Services, verify the configuration and installation status of thefollowing components:
● Internet Information Services (IIS)
● .NET Framework 3.5
For information about installing or enabling these components on the operating system that you areusing for the server, go to http://www.microsoft.com.
Downloading and installing HP Smart Zero Client ServicesTo download and install HP Smart Zero Client Services:
1. Go to http://www.hp.com/support.
2. Click Drivers & Software, type the name of your client model in the field, and then clickSEARCH.
3. Click on your client model in the list of results.
4. Under Select operating system, click HP Smart Zero Client.
5. Under Software - System Management, locate Smart Zero Client Services, and then click theDownload button.
6. Launch the installation wizard and follow the on-screen instructions to complete the installation.
NOTE: The installation wizard can also be used to add, modify, repair, and remove components ofHP Smart Zero Client Services.
Preparing to install HP Smart Zero Client Services 35

7 Using the Profile Editor
HP Smart Zero Client Services contains the Profile Editor, which allows administrators to create clientprofiles and upload them to the Automatic Update server. The client profile contains connectioninformation, settings, and files that the clients download and use in the self-configuration process.
This section includes the following topics:
● Accessing the Profile Editor
● Loading a client profile
● Modifying a client profile
● Configuring a serial or parallel printer
NOTE: See Appendix C HP Smart Zero Core registry settings on page 58 for a comprehensive listand description of registry keys.
Accessing the Profile Editor▲ Click Start > All Programs > Hewlett-Packard > HP Automatic Update Server > Profile Editor.
Loading a client profileThe Profile Editor will automatically load the default profile that was created during the HP Smart ZeroClient Services installation process. This is indicated by the Profile.xml link in the Profile Editorpane.
To load a profile:
1. In the Profile Editor pane, click Profile.xml.
2. Select the desired profile, and then click Open.
Modifying a client profileUse the various screens in the Profile Editor to modify a client profile as discussed in the followingtopics:
● Selecting the platform of a client profile
● Selecting the connection type of a client profile
● Modifying the registry settings of a client profile
● Adding files to a client profile
● Saving the client profile
Selecting the platform of a client profileUse the Platform link in the Profile Editor to access the Platform pane, which can be used to configurethe following settings:
36 Chapter 7 Using the Profile Editor
● Client software versions compatible with your hardware
● Optional client kits that provide additional registry settings
To set up the client profile platform:
1. In the Platform pane, under Smart Zero Client versions > OS Build ID, select an OS Build ID.
TIP: Be sure to create a different profile for each hardware type.
NOTE: If a client kit is installed, the additional registry settings are automatically displayed inthe client kit box and the Registry pane.
2. When complete, click Next.
Selecting the connection type of a client profileUse the Connection link in the Profile Editor to access the Remote Connection Server pane, whichcan be used to set up a connection type for the client profile using the following procedure:
1. In the Remote Connection Server pane, under Type, choose the desired Connection Type.
2. Under Server, type the name or IP address of the server to be configured.
3. When complete, click Next.
Modifying the registry settings of a client profileUse the Registry link in the Profile Editor to access the Registry Editor, which can be used to changedefault values in client profile settings using the following procedure:
1. Expand the folders in the Registry settings tree to locate the option to be changed.
2. Click the option, and then change the default value in the Value field.
Enabling or disabling menu items on clients1. In the Registry settings tree, navigate to root > zero-login > controls.
2. Expand the folder for the menu item to be either enabled or disabled and click on the authorizedsetting.
3. Type the appropriate number in the Value field:
● 0 (disable)
● 1 (enable)
Enabling or disabling user configurations on clients1. In the Registry settings tree, navigate to root > users > user > apps.
2. Expand the folder for the menu item to be either enabled or disabled and click on the authorizedsetting.
3. Type the appropriate number in the Value field:
● 0 (disable)
● 1 (enable)
Modifying a client profile 37

Adding files to a client profileUse the Files link in the Profile Editor to access the Additional Configuration Files pane, which can beused to add configuration files to be automatically installed on the client when the profile is installed.This is typically used for the following reasons:
● To add certificates
● To modify device settings when a registry setting for the change is unavailable
● To modify the behavior of the system by inserting custom scripts or modifying existing scripts
You can also specify a symbolic link that points to a file already installed on the client. Use this whenthe file needs to be accessed from more than one directory.
Adding a configuration file to a client profile1. In the Additional Configuration Files pane, click Add a file.
2. Click Import File, locate the file to be imported, and then click Open.
NOTE: Files can also be exported using the Export File button, if further details about the fileare required.
3. In the Path field, set the path where the file will be installed on the client.
4. In the File details pane, set the Owner, Group, and Permissions fields to the appropriate values.
NOTE: Typically, setting the owner and group as root and the permissions as 644 issatisfactory. If a special owner, group, or permissions are required, refer to standard Unix filepermissions for guidelines on changing the file details.
5. Click Save to finish adding the configuration file to the client profile.
NOTE: A file installed as part of a profile will automatically overwrite any existing file on the filesystem at the destination path. Additionally, a second profile without the file attached will not revertpreviously attached files. All files that have been installed through profile attachment are permanentand must be reverted manually or through a factory reset.
Adding certificates to a client profile
Client profiles for HP Smart Zero Core 4.1.1 and later versions automatically include certificates thatare imported to a standard client certificate store for the following applications:
● VMware Horizon View, Citrix, RDP
● Automatic Update
● HP Smart Zero Client Services
● Web browser stores (if installed)
To import other certificates to a client profile for HP Smart Zero Core 4.1.1 or later versions:
1. In the Additional Configuration Files pane, click Add a file.
2. Click Import File, locate the certificate, and then click Open.
NOTE: The certificate should be formatted as a .pem or .crt file.
3. In the Path field, set the path to the following:
/usr/local/share/ca-certificates
38 Chapter 7 Using the Profile Editor

4. Click Save to finish adding the certificate to the client profile.
5. After installing the client profile, use the Certificate Manager to confirm that the certificate wasproperly imported.
Installing Citrix certificates on HP Smart Zero Core 4.1.0 and earlier versions
HP Smart Zero Core 4.1.0 and earlier versions do not have the Certificate Manager add-on, and theonly certificate store supported in the Profile Editor is the Citrix certificate store. Other stores requireyou to run client scripts after importing certificates. They also require a custom update.
Follow these steps to install a certificate used in a Citrix session:
1. In the Additional Configuration Files pane, click Add a file.
2. Click Import File, locate the certificate you want to import, and then click Open.
NOTE: The certificate should be formatted as a .pem or .crt file.
3. In the Path field, set the path to the following:
/usr/lib/ICAClient/keystore/cacerts/<cert>
4. Click Save to finish adding the certificate to the client profile.
Adding a symbolic link to a client profile1. In the Additional Configuration Files pane, click Add a file.
2. In the Type drop-down list, select Link.
3. In the Symbolic link details pane, set the Link field to the path of the desired file already installedon the client.
4. Click Save to finish adding the symbolic link.
Saving the client profile1. In the Profile Editor, click the Finish link in the left-hand pane to access the Current profile pane.
2. Click Save Profile to save to the current client profile, or click Save Profile As to save as a newclient profile.
NOTE: If Save Profile is disabled, your client profile has not changed since the last time it wassaved.
3. Click the Finish button in the Current profile pane to exit the Profile Editor.
Configuring a serial or parallel printerUse the Profile Editor to set up the serial or parallel printer ports. A USB printer automatically mapswhen plugged in.
This section includes the following topics:
● Obtaining the printer baud rate
● Setting up printer ports
● Installing printers on the server
Configuring a serial or parallel printer 39

Obtaining the printer baud rateBefore configuring printer ports, obtain the printer's baud rate. If available, check the printer'sdocumentation before going further. If it is not available, follow these steps:
1. For most printers, press and hold the Feed button while turning the device on.
2. After a few seconds, release the Feed button. This allows the printer to enter a test mode andprint the required information.
TIP: You might need to turn the printer off to cancel the Test mode or press Feed again to printa diagnostic page.
Setting up printer ports1. In the Profile Editor, select Registry, and then enable the Show all settings checkbox.
2. Enable printer port mapping for your connection type:
● Citrix—Navigate to root > ConnectionType > xen > general and set the lastComPortNumregistry key to a value from 1–4, depending on the number of mapped printer portsrequired.
● RDP—Navigate to root > ConnectionType > freerdp. Right-click on the connections folder,select New connection, and then click OK. Set the portMapping registry key to 1 to enableprinter port mapping.
● VMware Horizon View—Navigate to root > ConnectionType > view. Right-click on theconnections folder, select New connection, and then click OK. Under the xfreerdpOptionsfolder, set the portMapping registry key to 1 to enable printer port mapping.
3. Navigate to root > Serial.
4. Set the Baud registry key to the baud rate of your serial or parallel printer.
Installing printers on the server1. On the Windows desktop, select Start > Printers and Faxes.
2. Select Add Printer, and then click Next.
3. Select Local Printer attached to this Computer and, if required, deselect Automatically detectand install my Plug and Play printer.
4. When completed, click Next.
5. In the menu, select a port.
NOTE: The port you need is in the section of ports labeled TS###, where ### is a numberbetween 000–009, 033–044. The appropriate port depends on your hostname and the printeryou want to install. For example, with a hostname of ZTAHENAKOS and a serial printer, selectthe port with (ZTAHENAKOS:COM1). For a parallel printer, select (ZTAHENAKOS:LPT1). TheTS### is assigned by the server, so it will not be the same every time.
6. Select the manufacturer and driver for your printer.
TIP: If desired, use the driver disc Windows Update to install the driver.
NOTE: For basic or test printing, the Generic Manufacturer or Generic/Text Only printer usuallyworks.
40 Chapter 7 Using the Profile Editor

7. If prompted to keep the existing driver and it is known to work, keep it, and then click Next.
8. Assign a name to the printer. To use it as the default printer, select Yes, and then click Next.
9. To share the printer, select Share name and assign it a share name. Otherwise, click Next.
10. On the next page, you may request a test print. HP recommends this because it will verify theprinter setup is correct. If it is not set up properly, review the settings and try again.
NOTE: If the client disconnects from the server, the printer will need to be set up again the nexttime the client connects.
Configuring a serial or parallel printer 41

8 Using Automatic Intelligence
This section includes the following topics:
● Viewing the Automatic Update website
● Creating an Automatic Update profile
● Updating clients
● Using HP Intelligent Delivery Service
● Using HP Device Manager
Viewing the Automatic Update website1. On the server desktop, select Start > Control Panel, and then click Administrative Tools.
2. Double-click Internet Information Services (IIS) Manager.
3. In the left pane of the IIS Manager, expand the following items:
“Server name” > Sites > HP Automatic Update > auto-update
NOTE: The physical location where the Automatic Update files are stored is as follows:
C:\Program Files (x86)\Hewlett-Packard\HP Smart Client Service\auto-update
Creating an Automatic Update profileThis section describes how to create an Automatic Update profile for a single MAC address.
1. Obtain the MAC address of the client using the system info. For example, the following stepsuse the MAC address 00fcab8522ac.
2. Use the Profile Editor to create or modify a client profile (see Using the Profile Editoron page 36) until you are ready to save the client profile.
3. In the Profile Editor, click the Finish link in the left-hand pane to access the Current profile pane.
4. Click Save profile as to save the client profile as the following:
C:\Program Files (x86) Hewlett-Packard\HP Smart Client Service\auto-update\PersistentProfile\MAC\00fcab8522ac.xml
5. Click the Finish button in the Current profile pane to exit the Profile Editor.
6. Reboot the client that uses the specified MAC address to initiate the Automatic Update process.
Updating clients● Using the broadcast update method
● Using the DHCP tag update method
● Using the DNS alias update method
42 Chapter 8 Using Automatic Intelligence

● Using the manual update method
Using the broadcast update methodTo do a broadcast update, plug the client into the same network as the update server. A broadcastupdate relies on HP Smart Zero Client Services, which works with IIS to automatically push updatesto the client.
NOTE: Broadcast updates work only if the client is on the same subnet as the server.
TIP: To verify that the broadcast updates are working, run the Profile Editor and make somechanges. Connect the thin client and verify that it has downloaded the new profile. If it has not, seeTroubleshooting clients on page 30.
Using the DHCP tag update methodOn the Windows Server 2003 and Windows Server 2008 systems, DHCP tagging enables a client toupdate. Use this method to update specific clients; however, if you have only one or two clients toupdate, consider using the manual update method instead. Otherwise, HP recommends thebroadcast update method.
Example of performing DHCP taggingThe example in this section shows how to perform DHCP tagging on a Windows 2008 R2 Server.
NOTE: To use DHCP tagging, see your DHCP server documentation.
1. On the server desktop, select Start > Administrative Tools > DHCP.
2. In the left pane of the DHCP screen, click the domain where the clients are connected.
3. In the right pane of the DHCP screen, expand and right-click IPv4, and then click Set PredefinedOptions.
4. In the Predefined Options and Values dialog, click Add.
5. In the Option Type box, configure the options as described in the following table.
Table 8-1 Example DHCP tagging options
Field Entry
Name Type auto-update.
Data Type Select String.
Code Type 137.
Description Type HP Automatic Update.
6. Click OK.
7. In the Predefined Options and Values dialog, under Value > String, type the update serveraddress in the format of the following example:
http://auto-update.dominio.com:18287/auto-update
8. To complete the setup, click OK. DHCP tagging is now ready to update specific clients.
Updating clients 43
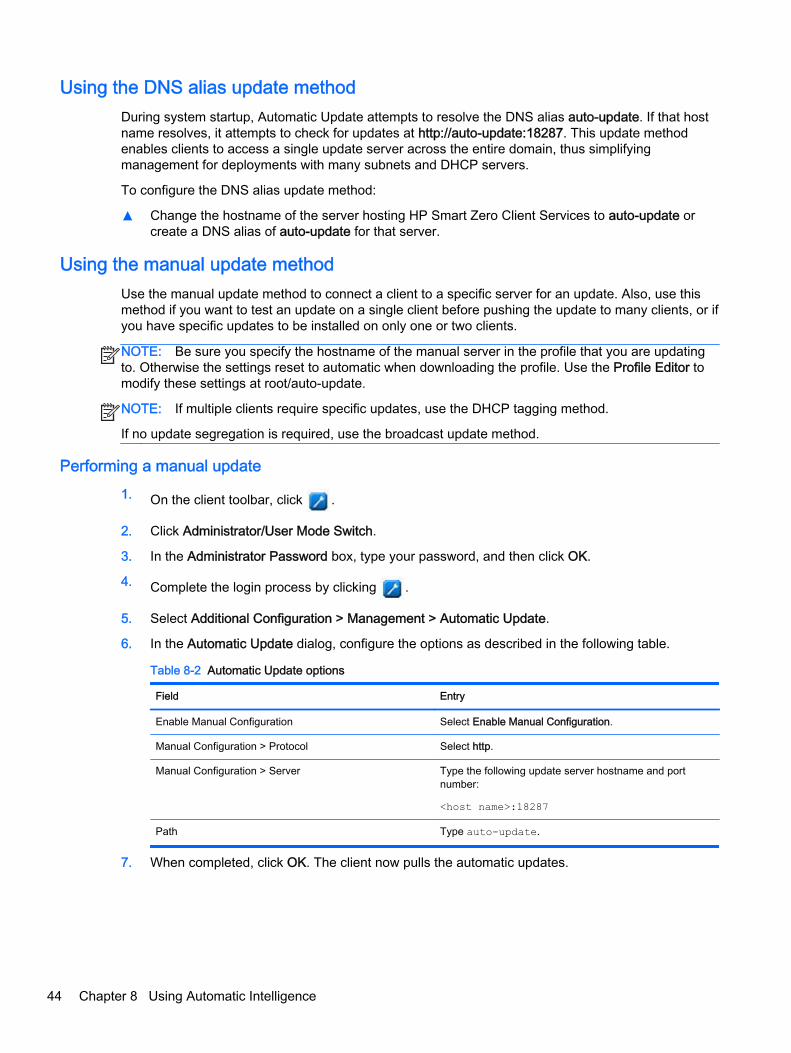
Using the DNS alias update methodDuring system startup, Automatic Update attempts to resolve the DNS alias auto-update. If that hostname resolves, it attempts to check for updates at http://auto-update:18287. This update methodenables clients to access a single update server across the entire domain, thus simplifyingmanagement for deployments with many subnets and DHCP servers.
To configure the DNS alias update method:
▲ Change the hostname of the server hosting HP Smart Zero Client Services to auto-update orcreate a DNS alias of auto-update for that server.
Using the manual update methodUse the manual update method to connect a client to a specific server for an update. Also, use thismethod if you want to test an update on a single client before pushing the update to many clients, or ifyou have specific updates to be installed on only one or two clients.
NOTE: Be sure you specify the hostname of the manual server in the profile that you are updatingto. Otherwise the settings reset to automatic when downloading the profile. Use the Profile Editor tomodify these settings at root/auto-update.
NOTE: If multiple clients require specific updates, use the DHCP tagging method.
If no update segregation is required, use the broadcast update method.
Performing a manual update1. On the client toolbar, click .
2. Click Administrator/User Mode Switch.
3. In the Administrator Password box, type your password, and then click OK.
4. Complete the login process by clicking .
5. Select Additional Configuration > Management > Automatic Update.
6. In the Automatic Update dialog, configure the options as described in the following table.
Table 8-2 Automatic Update options
Field Entry
Enable Manual Configuration Select Enable Manual Configuration.
Manual Configuration > Protocol Select http.
Manual Configuration > Server Type the following update server hostname and portnumber:
<host name>:18287
Path Type auto-update.
7. When completed, click OK. The client now pulls the automatic updates.
44 Chapter 8 Using Automatic Intelligence

Using HP Intelligent Delivery ServiceHow HP Intelligent Delivery Service works
The Windows service listens for broadcasts from clients on a high-level output. When a broadcast isreceived, HP Intelligent Delivery Service responds with the URL of the Automatic Intelligence server,which the client uses to check for updates.
Starting, stopping, and pausing HP Intelligent Delivery Service1. On the server desktop, select Start > Administrative Tools > Server Manager.
2. In the left pane of the Server Manager, expand Configuration and select Services.
3. In the center pane, under Services, double-click HP Broadcast Server Service, and then selectProperties.
4. In the HP Broadcast Server Properties dialog box, under Service Status, select one of thefollowing options:
● Start Service
● Stop Service
● Pause Service
Viewing the HP Intelligent Delivery Service application log1. On the server desktop, select Start > Administrative Tools > Server Manager.
2. In the left pane of the Server Manager, expand Diagnostics > Event Viewer > Windows Logs >Application.
3. The application log is displayed in the center pane under HPSmartClientService.
HP Intelligent Delivery Service registry keysThe registry keys used in the HP Intelligent Delivery Service are shown in the following table.
Table 8-3 HP Intelligent Delivery Service registry keys
Registry key Path
Port HKLM\SYSTEM\CurrentControlSet\Services\HP Broadcast Server
ServerURL HKLM\SYSTEM\CurrentControlSet\Services\HP Broadcast Server
Using HP Device ManagerThe HP Device Manager Agent runs in the background of the client. Use HP Device Manager toremotely select and manipulate clients’ required business needs.
For more information on HP Device Manager, see the HP Device Manager User Guide.
Using HP Intelligent Delivery Service 45
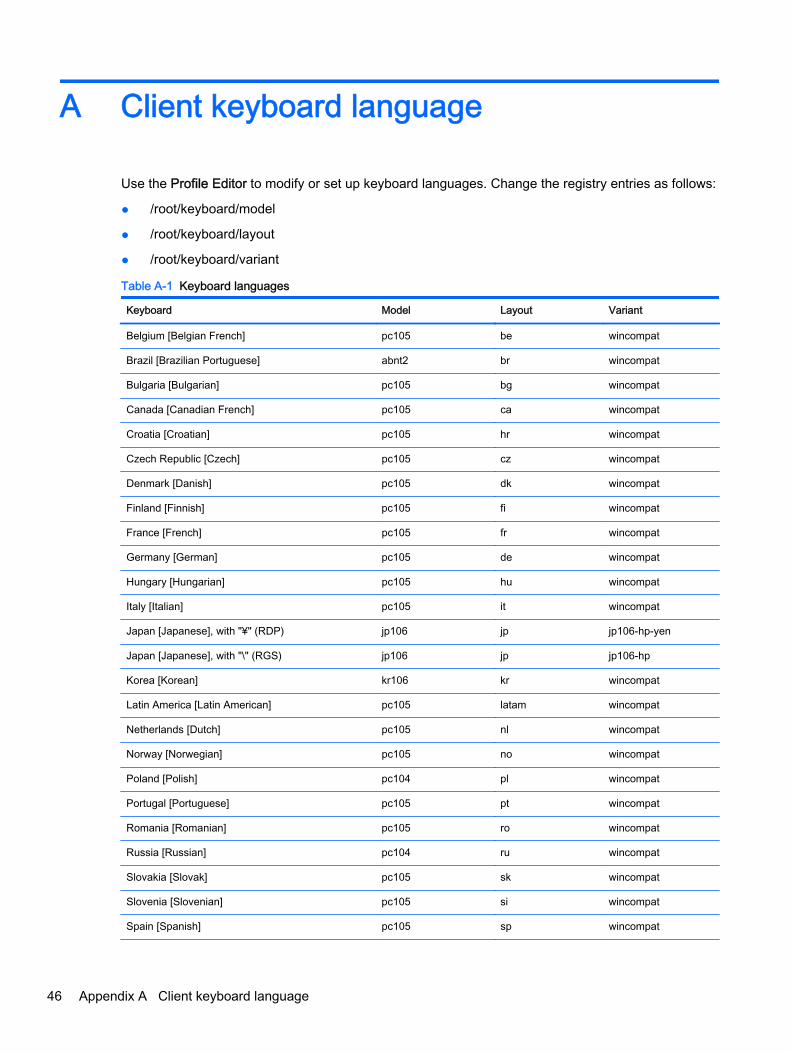
A Client keyboard language
Use the Profile Editor to modify or set up keyboard languages. Change the registry entries as follows:
● /root/keyboard/model
● /root/keyboard/layout
● /root/keyboard/variant
Table A-1 Keyboard languages
Keyboard Model Layout Variant
Belgium [Belgian French] pc105 be wincompat
Brazil [Brazilian Portuguese] abnt2 br wincompat
Bulgaria [Bulgarian] pc105 bg wincompat
Canada [Canadian French] pc105 ca wincompat
Croatia [Croatian] pc105 hr wincompat
Czech Republic [Czech] pc105 cz wincompat
Denmark [Danish] pc105 dk wincompat
Finland [Finnish] pc105 fi wincompat
France [French] pc105 fr wincompat
Germany [German] pc105 de wincompat
Hungary [Hungarian] pc105 hu wincompat
Italy [Italian] pc105 it wincompat
Japan [Japanese], with "¥" (RDP) jp106 jp jp106-hp-yen
Japan [Japanese], with "\" (RGS) jp106 jp jp106-hp
Korea [Korean] kr106 kr wincompat
Latin America [Latin American] pc105 latam wincompat
Netherlands [Dutch] pc105 nl wincompat
Norway [Norwegian] pc105 no wincompat
Poland [Polish] pc104 pl wincompat
Portugal [Portuguese] pc105 pt wincompat
Romania [Romanian] pc105 ro wincompat
Russia [Russian] pc104 ru wincompat
Slovakia [Slovak] pc105 sk wincompat
Slovenia [Slovenian] pc105 si wincompat
Spain [Spanish] pc105 sp wincompat
46 Appendix A Client keyboard language

Table A-1 Keyboard languages (continued)
Keyboard Model Layout Variant
Sweden [Swedish] pc105 se wincompat
Switzerland [Swiss French] pc105 ch wincompat-fr_ch
Switzerland [Swiss German] pc105 ch wincompat-de_ch
Turkey [Turkish] pc105 tr wincompat
Ukraine [Ukrainian] pc105 ua wincompat
United Kingdom [English] pc104 gb wincompat
United States [English] pc105 us wincompat
United States [English], Dvorak pc105 us wincompat-dvorak
United States [English], International pc105 us wincompat-intl
47
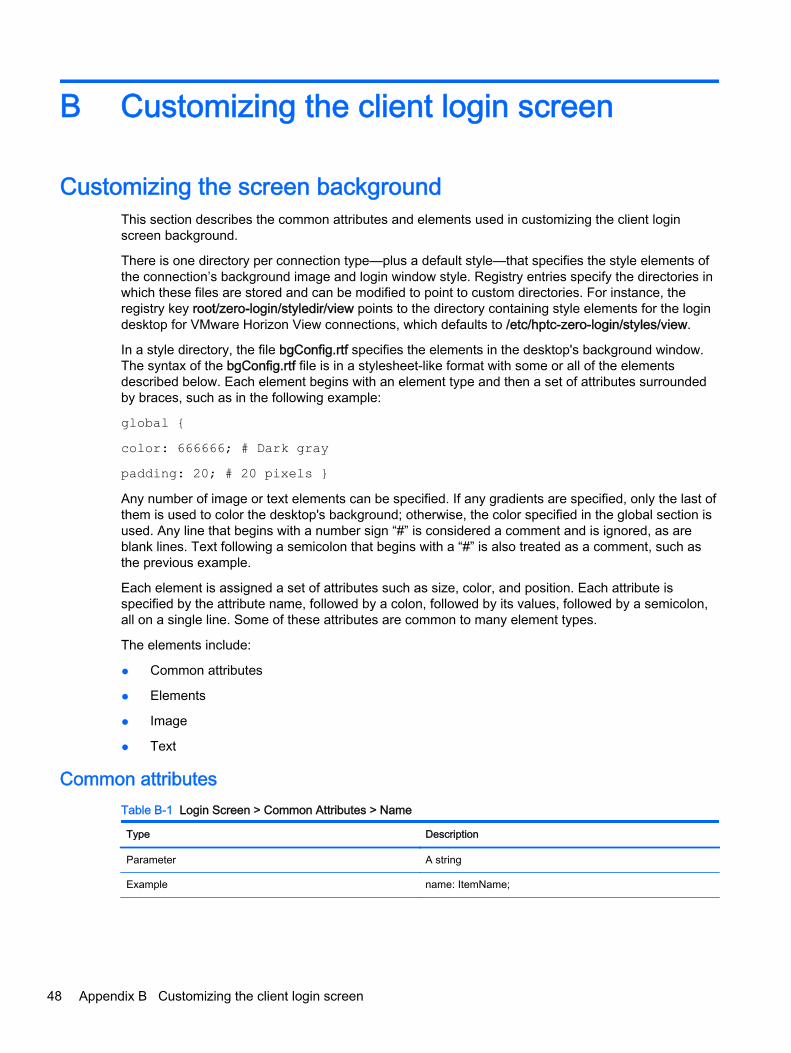
B Customizing the client login screen
Customizing the screen backgroundThis section describes the common attributes and elements used in customizing the client loginscreen background.
There is one directory per connection type—plus a default style—that specifies the style elements ofthe connection’s background image and login window style. Registry entries specify the directories inwhich these files are stored and can be modified to point to custom directories. For instance, theregistry key root/zero-login/styledir/view points to the directory containing style elements for the logindesktop for VMware Horizon View connections, which defaults to /etc/hptc-zero-login/styles/view.
In a style directory, the file bgConfig.rtf specifies the elements in the desktop's background window.The syntax of the bgConfig.rtf file is in a stylesheet-like format with some or all of the elementsdescribed below. Each element begins with an element type and then a set of attributes surroundedby braces, such as in the following example:
global {
color: 666666; # Dark gray
padding: 20; # 20 pixels }
Any number of image or text elements can be specified. If any gradients are specified, only the last ofthem is used to color the desktop's background; otherwise, the color specified in the global section isused. Any line that begins with a number sign “#” is considered a comment and is ignored, as areblank lines. Text following a semicolon that begins with a “#” is also treated as a comment, such asthe previous example.
Each element is assigned a set of attributes such as size, color, and position. Each attribute isspecified by the attribute name, followed by a colon, followed by its values, followed by a semicolon,all on a single line. Some of these attributes are common to many element types.
The elements include:
● Common attributes
● Elements
● Image
● Text
Common attributesTable B-1 Login Screen > Common Attributes > Name
Type Description
Parameter A string
Example name: ItemName;
48 Appendix B Customizing the client login screen

Table B-1 Login Screen > Common Attributes > Name (continued)
Type Description
Default
Use Specifies a string to associate with the element. It is usedonly in debugging output, such as when a syntax or valueerror is found in attribute parsing.
Table B-2 Login Screen > Common Attributes > padding
Type Description
Parameter An absolute (pixel) or percentage value
Example padding: 20;
Default
Use An object will be positioned on the screen as if the screenwere smaller on all sides by the padding value. For example,if an element would normally be placed at 0,0 with a paddingof 20, it would be placed at 20,20 instead. If specified in theglobal element, it will apply to all subsequent elements,leaving an empty gutter around the screen edge, unlessthose elements override the padding with their own paddingvalue.
Table B-3 Login Screen > Common Attributes > color
Type Description
Parameter RRGGBB 6-digit hex value or rrr,ggg,bbb 0–255,0–255,0–255 form
Example color: ff8800;
Default 255,255,255 (white)
Use Specifies the color of the element
Table B-4 Login Screen > Common Attributes > alpha
Type Description
Parameter 0–255 integer
Example alpha: 127;
Default 255 (fully opaque)
Use Specifies the opacity of the element. 255 is fully opaque; 0 isfully transparent. Elements are layered over the backgroundin the order they are defined.
Customizing the screen background 49

Table B-5 Login Screen > Common Attributes > size
Type Description
Parameter WWxHH, where WW is the width in absolute pixels or in apercentage of screen width and HH is the height in absolutepixels or in a percentage of the screen height.
Example size: 256x128;
Default The natural size of the element; for example, the pixel size ofan image.
Use Specifies the size of the element. Elements will be scaled tomatch the specified size.
Table B-6 Login Screen > Common Attributes > position
Type Description
Parameter XX,YY where XX and YY are positions in absolute pixels orin percentages of the screen width and height.
Example position: 50%, 90%;
Default 0,0 (the upper left)
Use Specifies the position of the element. See the alignmenttable as well.
Table B-7 Login Screen > Common Attributes > alignment
Type Description
Parameter [left I hcenter I right] [top I vcenterIbottom]
Example alignment: left bottom;
Default hcenter vcenter—the element is centered at the givenposition.
Use The combination of position and alignment specify both ananchor point for the element and how the element is alignedrelative to that anchor point. For example, with a position of90%,70% and an alignment of right bottom, the element ispositioned so that its right edge is at 90% of the width of thescreen and its bottom edge is at 70% of the height of thescreen.
Table B-8 Login Screen > Common Attributes > context
Type Description
Parameter [login I desktop I all]
Example context: login;
Default all
Use Specifies whether the element should be shown only on thelogin screen for the protocol, on the desktop screen for the
50 Appendix B Customizing the client login screen

Table B-8 Login Screen > Common Attributes > context (continued)
Type Description
protocol (if any), or on both. Only some protocols (forexample, Citrix XenDesktop) have a desktop screen.
ElementsTable B-9 Login Screen > Elements > Custom > Global
Type Description
Use Specifies the global background or padding values.
Common attributes recognized name, color, padding
● color—specifies the solid background color of thescreen, if no gradients are specified
● padding—specifies the default padding for allsubsequent elements
Table B-10 Login Screen > Elements > Custom > Gradient
Type Description
Use Specifies a full-screen gradient for use in the background.
Common attributes recognized name, context
Table B-11 Login Screen > Elements > Custom > Type
Type Description
Parameter Specifies a full-screen gradient for use in the background.
Example Type: linear;
Default linear
Use Linear gradients can be either horizontally oriented orvertically oriented; coordinates given in colors are a fractionof the width or height. Radial gradients are centered on thescreen center; coordinates are a fraction of the distance tothe screen edge (top and bottom or left and right).
Table B-12 Login Screen > Elements > Custom > Axis
Type Description
Parameter [height I width]
Example axis: width;
Default height
Use For linear gradients, the axis specifies the direction of thegradient (top-to-bottom or left-to-right). For radial gradients,
Customizing the screen background 51

Table B-12 Login Screen > Elements > Custom > Axis (continued)
Type Description
the axis specifies whether the radius of the gradient is half-screen height or half-screen width.
Table B-13 Login Screen > Elements > Custom > Metric
Type Description
Parameter [linear I squared]
Example metric: linear;
Default squared
Use For radial gradients, the metric specifies whether the colorinterpolation between points is done with a dx2+dy2 distancecalculation (squared) or the square root of number (linear).Squared interpolation is somewhat quicker to draw.
Table B-14 Login Screen > Elements > Custom > colors
Type Description
Parameter A space-separated list of [value,color] pairs, where the valueis a 0.0–1.0 floating point fraction of the axis of measurement(for example, the width of the screen in a linear width-axisgradient) and the color is the color of the gradient at thatpoint. The value runs top-to-bottom for vertical lineargradients; left-to-right for horizontal linear gradients; andcenter-to-edge for radial gradients. Colors are specified aseither six-digit hex or three 0–255 comma-separated values.
Example colors: 0.0,000000 0.5,996600 0.9,255,255,255;
Default Not applicable
Use Colors are interpolated along the linear or radial axisbetween the points and colors specified. If no values aregiven, the colors are assumed to be evenly spaced on theaxis between 0.0 and 1.0. If the first fractional value isgreater than 0.0, the first color will be used in the spacebetween the screen edge and the first value. Likewise, if thelast value is less than 1.0, the last color will be used betweenthe last value and the screen edge. Values must be inincreasing sorted values, though a value can be repeated fora sharp transition. For example, “0.0, CCCCCC 0.5,EEEEEE0.5,660000 1.0,330000” in a vertical linear gradient wouldspecify a gradient between light grays on the upper half anddark reds on the lower half.
Table B-15 Login Screen > Elements > Custom > dithered
Type Description
Parameter [true | false]
Example dithered: true;
52 Appendix B Customizing the client login screen

Table B-15 Login Screen > Elements > Custom > dithered (continued)
Type Description
Default false
Use If a gradient shows signs of color banding, dithering willeliminate this visual artifact. Dithering is not supported forradial gradients with the squared metric.
ImageTable B-16 Login screen > Image
Type Description
Use Specifies an image to overlay a portion of the background.
Common attributes recognized name, size, alpha, position, alignment, context
Common attributes See the tables following.
Table B-17 Login screen > Custom Attributes > Source
Type Description
Parameter File path
Example source: /writable/misc/Company_logo.png;
Default Not applicable
Use Specifies the absolute pathname to the image file. Manyformats are supported; for example, png, jpg,and gif. Theimage may have transparent regions.
Table B-18 Login screen > Custom Attributes > Proportional
Type Description
Parameter [true | false]
Example proportional: false;
Default true
Use When true, if the image needs to be scaled, its aspect ratiowill be maintained to fit within the rectangle specified. Whenfalse, non-proportional scaling is done to make the imageexactly fit the specified size.
TextTable B-19 Login screen > Text
Type Description
Use Specifies a string of text to lay over the background
Customizing the screen background 53

Table B-19 Login screen > Text (continued)
Type Description
Common attributes recognized name, size, color, alpha, position, alignment, context
Common attributes See the tables below.
Table B-20 Login screen > Text > text-locale
Type Description
Parameter Localized text
Example text-de_DE: Dieser Text is in Deutsch.;
Default Not applicable
Use When in the matching locale, this text will be used for thestring. The supported text strings are as follows:
● de_DE (German)
● en_US (English)
● es_ES (Spanish)
● fr_FR (French)
● ja_JP (Japanese)
● zh_CN (Simplified Chinese)
NOTE: The file encoding is UTF-8.
Table B-21 Login screen > Text > text
Type Description
Parameter Default text text:
Example This will be shown on the screen.;
Default Not Applicable
Use If no matching localized text is specified, this text string willbe used instead.
NOTE: The text rendering engine does not support HTML-style markup.
Table B-22 Login screen > Text > font-locale
Type Description
Parameter locale-specific fontName
Example font-ja_JP: kochi-gothic;
Default Not applicable
Use When in the matching locale, this font will be used when thestring is rendered. See the description for text-locale
54 Appendix B Customizing the client login screen

Table B-22 Login screen > Text > font-locale (continued)
Type Description
previous. The name must match one of the fonts under /usr/share/fonts/ truetype. For Japanese text, it might benecessary to select kochi-gothic; for Simplified Chinese text,u mi ng.
Table B-23 Login screen > Text > font
Type Description
Parameter fontName
Example font: DejaVuSerif-Bold
Default ; DejaVuSerif
Use If no matching localized font is specified, this font will beused instead. The name must match one of the fonts under /usr/share/fonts/truetype.
Table B-24 Login screen > Text > font-size
Type Description
Parameter Pixels (for example, 20) or percentage of the screen height(for example, 5%) or points (for example, 12pt)
Example font-size: 12pt;
Default Not applicable
Use Specifies the default size of the font. The text may be furtherscaled if size, max-width, and/or max-height are specified.
Table B-25 Login screen > Text > max-width
Type Description
Parameter Size in pixels or in a percentage of the screen width
Example max-width: 90%;
Default Not applicable
Use If the string would otherwise turn out to be wider than thesize given, it is scaled down to fit within the width specified.
Table B-26 Login screen > Text > max-height
Type Description
Parameter Size in pixels or in a percentage of screen height.
Example max-height: 64;
Customizing the screen background 55

Table B-26 Login screen > Text > max-height (continued)
Type Description
Default Not applicable
Use If the text would otherwise turn out to be taller than the sizegiven, it is scaled down to fit the height specified.
Customizing the client login dialog boxThis section provides examples that describe how to customize the client login dialog box.
Figure B-1 Components in the client login dialog box
The client login dialog box uses one directory per connection type plus a default style that specifiesthe style elements of the connection’s background image and the login window style.
The registry entries specify the directories in which these files are stored and can be modified to pointto custom directories. Within a style’s directory, files with the .qss suffix customize the styleelements of the login area.
The *.qss files are Qt stylesheets. For more information about Qt stylesheets, seehttp://qt-project.org/.
Most of the elements in the login area can be customized using qss-style elements. Each has beenassigned an ID so they are easily addressable using the #elementID selector.
Customizing the central frameThis section provides an example of different ways to customize the central area of the login dialogbox.
QFrame#centralFrame {
/* Sea green dialog
background color */ background-color: rgb(46,139,87);
/* Rounded, thicker borders */
border-width: 6px;
border-radius:
16px;
/* Make sure it is at least 400 pixels wide */
56 Appendix B Customizing the client login screen

min-width:
400px; }
Customizing the text for the headerThis section provides an example of different ways to customize the text in the login header.
LoginArea QLabel#loginHeader {
/* Change the login text at the top */
qproperty-text: "Login Here";
color: white;
font-size: 16pt;
font-weight: bold;
}
NOTE: Text that is overridden in the .qss file will not be localized when the locale changes.
Customizing the icon for the headerThis section provides an example of different ways to customize the icon in the upper-right of thelogin header.
LoginArea QLabel#loginIcon {
/* Substitute my company logo for the normal
one. */ image: url
(/writable/misc/MyCompanyLogo .png); min
width: 48px;
min-height: 48px;
}
It can have a different style when it is not enabled:
QPushButton#connectButton:dis
abled { /* Flat gray */
background: rgb(204,204,204);
border-radius: 3;
color: rgb(102,102,102);
font-size: 12pt;
}
Customizing the client login dialog box 57
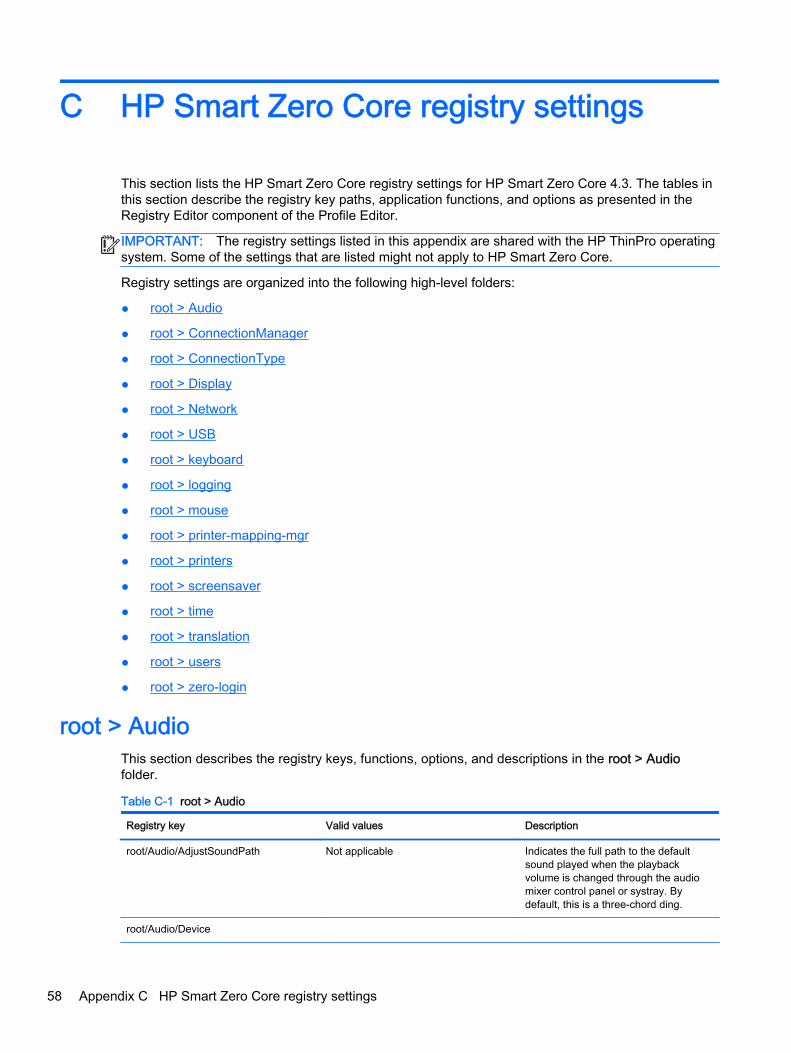
C HP Smart Zero Core registry settings
This section lists the HP Smart Zero Core registry settings for HP Smart Zero Core 4.3. The tables inthis section describe the registry key paths, application functions, and options as presented in theRegistry Editor component of the Profile Editor.
IMPORTANT: The registry settings listed in this appendix are shared with the HP ThinPro operatingsystem. Some of the settings that are listed might not apply to HP Smart Zero Core.
Registry settings are organized into the following high-level folders:
● root > Audio
● root > ConnectionManager
● root > ConnectionType
● root > Display
● root > Network
● root > USB
● root > keyboard
● root > logging
● root > mouse
● root > printer-mapping-mgr
● root > printers
● root > screensaver
● root > time
● root > translation
● root > users
● root > zero-login
root > AudioThis section describes the registry keys, functions, options, and descriptions in the root > Audiofolder.
Table C-1 root > Audio
Registry key Valid values Description
root/Audio/AdjustSoundPath Not applicable Indicates the full path to the defaultsound played when the playbackvolume is changed through the audiomixer control panel or systray. Bydefault, this is a three-chord ding.
root/Audio/Device
58 Appendix C HP Smart Zero Core registry settings

Table C-1 root > Audio (continued)
Registry key Valid values Description
root/Audio/OutputMute 1—Mute the internal speaker andheadphone jack.
0—Do not mute the internal speakerand headphone jack.
Not applicable
root/Audio/OutputVolume 1–100 Indicates the volume setting for theinternal speaker and headphone jack,scaling from 1 to 100.
root/Audio/PlaybackDevice 1 is the internal audio controller.
2 and 3 are for additional devices, suchas a USB headset.
The device to use for playback.
root/Audio/RecordMute 1—Mute the microphone jack.
0—Do not mute the microphone jack.
Not applicable
root/Audio/RecordVolume 1–100 Indicates the volume setting for themicrophone jack, scaling from 1 to 100.
root/Audio/VisibleInSystray 0—Icon is not visible
1—Icon is visible
Indicates whether a speaker icon isvisible in the system tray.
root > ConnectionManagerThis section describes the registry keys, functions, options, and descriptions in the root >ConnectionManager folder.
Table C-2 root > ConnectionManager
Registry key Valid values Description
root/ConnectionManager/customLogoPath
root/ConnectionManager/defaultConnection
[type]:[label] This must be set to a valid connectionusing the format '[type]:[label]' toproperly launch a connection at startup.
For example, 'xen:Default Connection'.
root/ConnectionManager/splashLogoPath
Indicates the full path to the defaultimage displayed while a connection isloading.
This is the splash screen that will beseen after clicking Connect on the HPThinPro control panel.
root/ConnectionManager/useKioskMode
root/ConnectionManager/useSplashOnConnectionStartup
Set to '1' to enable the splash screenimage specified by 'splashLogoPath' onconnection startup.
By default, this is disabled on HP SmartZero Core and enabled on HP ThinPro.
root > ConnectionTypeThis section describes the registry keys, functions, options, and descriptions in the root >ConnectionType folders as follows.
root > ConnectionManager 59

root > ConnectionType > freerdpThis section describes the registry keys and functions in the root > ConnectionType > freerdp folder.
Table C-3 root > ConnectionType > freerdp
Registry key Description
root/ConnectionType/freerdp/authorizations/user/add Indicates whether the user has permission to add a newconnection of this type using the HP ThinPro Control Center.Not applicable to HP Smart Zero Core. Set to 1 to allow, 0 todeny access.
root/ConnectionType/freerdp/authorizations/user/general Indicates whether the user has permission to modify thegeneral settings for this connection type using the HPThinPro Control Center. Not applicable to HP Smart ZeroCore. Set to 1 to allow, 0 to deny access.
root/ConnectionType/freerdp/connections/{UUID}/address The IP or hostname of the remote host to connect to.
root/ConnectionType/freerdp/connections/{UUID}/application
root/ConnectionType/freerdp/connections/{UUID}/attachToConsole
root/ConnectionType/freerdp/connections/{UUID}/audioLatency
The average milliseconds of offset between the audio streamand the display of corresponding video frames afterdecoding.
root/ConnectionType/freerdp/connections/{UUID}/authorizations/user/edit
Indicates whether the user has permission to modify theconnection settings for this connection. Set to 1 to allow, 0 todeny access.
NOTE: The connection can be edited in AdministratorMode even when this key is set to 0.
root/ConnectionType/freerdp/connections/{UUID}/authorizations/user/execution
Indicates whether the user has permission to modify theconnection settings for this connection. Set to 1 to allow, 0 todeny access.
NOTE: The connection can be edited in AdministratorMode even when this key is set to 0.
root/ConnectionType/freerdp/connections/{UUID}/autoReconnect
When set to 1, the connection will be restarted when it isclosed or disconnected. This is frequently useful for kioskstyle applications. When set to 0, the connection will notrestart when closed or disconnected.
root/ConnectionType/freerdp/connections/{UUID}/autoReconnectDelay
Indicates the amount of time in seconds to wait beforerestarting the connection. The default of 0 will cause theconnection to restart immediately upon close or disconnect.This setting takes effect only when 'autoReconnect' is set to1.
root/ConnectionType/freerdp/connections/{UUID}/autostart When set to 1, the connection will be automatically startedon boot. This is useful for kiosk style applications. By default,connections are not automatically started.
root/ConnectionType/freerdp/connections/{UUID}/autostartDelay
Indicates the amount of time in seconds to wait beforestarting the connection on boot. The default of 0 will causethe connection to start immediately upon boot. This settingtakes effect only when 'autostart' is set to 1.
root/ConnectionType/freerdp/connections/{UUID}/colorDepth This setting is deprecated. It is used to reduce the colordepth of the connection below that of the native desktopresolution. This is frequently used to reduce networkbandwidth.
60 Appendix C HP Smart Zero Core registry settings

Table C-3 root > ConnectionType > freerdp (continued)
Registry key Description
NOTE: Reducing color depth to a level not supported bythe video driver may cause screen corruption or launchfailures.
root/ConnectionType/freerdp/connections/{UUID}/compression
If set to 1, compression of RDP data between client andserver will be enabled. Setting to '0' will disable compression.Compression is enabled by default.
root/ConnectionType/freerdp/connections/{UUID}/dependConnectionId
root/ConnectionType/freerdp/connections/{UUID}/directory
root/ConnectionType/freerdp/connections/{UUID}/disableMMRwithRFX
If not 0, disables multimedia redirection if a valid remoteFXsession is established.
root/ConnectionType/freerdp/connections/{UUID}/domain The default domain to supply to the remote host during login.If a domain is not specified, the default domain for theremote host will be used.
root/ConnectionType/freerdp/connections/{UUID} /extraEnvValues/{UUID}/key
root/ConnectionType/freerdp/connections/{UUID} /extraEnvValues/{UUID}/value
root/ConnectionType/freerdp/connections/{UUID}/fallBackConnection
When set to the UUID of another available connection, thatconnection will be autostarted if the current connection failsor experiences an error and fails to start. The UUID of thedesired fallback connection is typically found by running'connection-mgr list' on the client, or by navigating to root/ConnectionType/<type>/connections/.
root/ConnectionType/freerdp/connections/{UUID}/frameAcknowledgeCount
Number of video frames the server can push without waitingfor acknowledgement from the client. Lower numbers resultin a more responsive desktop but lower frame rate. If set to0, frame acknowledge will not be used in the client-serverinteractions.
root/ConnectionType/freerdp/connections/{UUID}/hasDesktopIcon
If set to 1, an icon for the connection will be shown on thedesktop. Not applicable to HP Smart Zero Core.
root/ConnectionType/freerdp/connections/{UUID}/label The name of the connection show in the HP ThinPro ControlCenter. On HP Smart Zero Core, this will typically be set to'Default Connection' and does not show in the user interface.
root/ConnectionType/freerdp/connections/{UUID}/mouseMotionEvents
When set to 0, mouse motion events will not be sent to theserver. This may prevent some user feedback such astooltips from functioning properly.
root/ConnectionType/freerdp/connections/{UUID}/offScreenBitmaps
When set to 0, off-screen bitmaps will be disabled. Thismight slightly increase performance but will cause blocks ofthe screen to be updated asynchronously, causing screentransitions to update non-uniformly.
root/ConnectionType/freerdp/connections/{UUID}/password The default password to supply to the remote host duringlogin. This value will be stored encrypted. Generally thissetting is used for kiosk style applications where a genericpassword is used for login.
root/ConnectionType/freerdp/connections/{UUID}/perfFlagDesktopComposition
If set to 1, allows desktop composition, such as translucentborders, if supported by the server. Turning it off may
root > ConnectionType 61

Table C-3 root > ConnectionType > freerdp (continued)
Registry key Description
improve performance on low-bandwith connections.Generally, this affects only RemoteFX.
root/ConnectionType/freerdp/connections/{UUID}/perfFlagFontSmoothing
If set to 1, allows font smoothing when supported by theserver and enabled. Turning it off can improve performanceon low-bandwith connections.
root/ConnectionType/freerdp/connections/{UUID}/perfFlagNoCursorSettings
If set to 1, disables cursor blinking, which can improveperformance on low-bandwidth RDP connections.
root/ConnectionType/freerdp/connections/{UUID}/perfFlagNoCursorShadow
If set to 1, turns off mouse cursor shadows, which canimprove performance on low-bandwidth RDP connections.
root/ConnectionType/freerdp/connections/{UUID}/perfFlagNoMenuAnimations
If set to 1, turns off menu animations, which can improveperformance on low-bandwidth RDP connections.
root/ConnectionType/freerdp/connections/{UUID}/perfFlagNoTheming
If set to 1, turns off user interface themes, which can improveperformance on low-bandwidth RDP connections.
root/ConnectionType/freerdp/connections/{UUID}/perfFlagNoWallpaper
If set to 1, turns off the desktop wallpaper, which canimprove performance on low-bandwidth RDP connections.
root/ConnectionType/freerdp/connections/{UUID}/perfFlagNoWindowDrag
If set to 1, turns off full-content window drag, which canimprove performance on low-bandwidth RDP connections.The window outline will be used instead.
root/ConnectionType/freerdp/connections/{UUID}/port The port number to use when contacting the RDP server. Bydefault, this is set to 3389 and will rarely need to bechanged.
root/ConnectionType/freerdp/connections/{UUID}/portMapping
If set to 1, the following local serial and parallel ports will beredirected to the remote host: ttyS0, ttyS1, ttyS2, ttyS3,ttyUSB0, lp0.
root/ConnectionType/freerdp/connections/{UUID}/printerMapping
If set to 1, the CUPS printer redirection plugin will beactivated, causing all printers defined locally through CUPSto be redirected to the remote host.
root/ConnectionType/freerdp/connections/{UUID}/rdpEncryption
If set to 1, standard RDP encryption will be used to encryptall data between the client and server.
root/ConnectionType/freerdp/connections/{UUID}/remoteFx Use RemoteFX, if available.
root/ConnectionType/freerdp/connections/{UUID}/seamlessWindow
If set to 1, window decorations will be disabled. This might bedesirable in a multi-monitor configuration to allow theconnection to be set to the size of the primary monitor.
root/ConnectionType/freerdp/connections/{UUID}/sendHostname
The supplied text will be sent to the remote host as the clienthostname. If left blank, the system hostname will be sent tothe hostname.
NOTE: The general settings key 'root/ConnectionType/freerdp/coreSettings/sendHostname' must be set to'hostname' for this key to be used.
root/ConnectionType/freerdp/connections/{UUID}/smartcard If set to 1, local smart card authentication will be allowed onthe remote host. This will disable the Network LevelAuthentication (NLA).
root/ConnectionType/freerdp/connections/{UUID}/sound When set to the default Bring to this computer, sound will beredirected from the remote host to the client using a standardvirtual channel. When set to Leave at remote computer,sound will be left at the remote host. This might be useful
62 Appendix C HP Smart Zero Core registry settings

Table C-3 root > ConnectionType > freerdp (continued)
Registry key Description
when using a USB-redirected audio device. If set to anyother value, audio will be disabled.
HP recommends that sound be set to Bring to this computerbecause this will improve audio quality and ensure that anyclient audio redirected through other virtual channels such asMMR matches local audio settings.
root/ConnectionType/freerdp/connections/{UUID}/startMode If set to the default focus and the connection is alreadystarted, the connection will be given focus. Otherwise, anerror will be returned stating that the connection is alreadystarted.
root/ConnectionType/freerdp/connections/{UUID}/timeoutError
The number of milliseconds to wait after losing connectionwith the server before presenting an error dialog box andclosing the connection. Disabled if 0.
root/ConnectionType/freerdp/connections/{UUID}/timeoutWarning
The number of milliseconds to wait after losing connectionwith the server before warning the user that connection hasbeen lost. Disabled if 0.
root/ConnectionType/freerdp/connections/{UUID}/username The default username to supply to the remote host duringlogin. Generally, this setting is used for kiosk styleapplications where a generic username is used for login.
root/ConnectionType/freerdp/connections/{UUID}/waitForNetwork
If set to 1, the connection will not be launched untilnetworking is available. This makes sure that on a slownetwork, the connection does not launch before networkingis available, causing a failure.
root/ConnectionType/freerdp/connections/{UUID}/xkbLayoutId
If not empty, provide an XKB layout ID to bypass the systemkeyboard. To access the list of available IDs, type in aterminal: xfreerdp --kbd-list
root/ConnectionType/freerdp/coreSettings/appName The internal application name to use when tracking the PIDof the connection for connection status monitoring. This keyshould not need to be modified.
root/ConnectionType/freerdp/coreSettings/className The internal X Windows application class name to use whentracking the PID of the connection for connection statusmonitoring. This key should not need to be modified.
root/ConnectionType/freerdp/coreSettings/disableLinkDropWarning
If set to 1, zero-login need not run a dialog when there isnetwork link death, because the protocol handles suchsituations.
root/ConnectionType/freerdp/coreSettings/editor The internal application name to use when launching theconnection editor for this connection type. This key shouldnot need to be modified.
root/ConnectionType/freerdp/coreSettings/generalSettingsEditor
The internal application name to use when launching thegeneral settings editor for this connection type. This keyshould not need to be modified.
root/ConnectionType/freerdp/coreSettings/icon16Path The internal application icon path for the 16x16 pixel icon forthis application. This icon is the small icon to the left of theconnection name in the connection dialog.
root/Connection Type/freerdp/coreSettings/icon32Path The internal application icon path for the 32x32 pixel icon forthis application.
root/Connection Type/freerdp/coreSettings/icon48Path The internal application icon path for the 48x48 pixel icon forthis application. This is the large icon in the top left of theconnection editor for this connection type.
root > ConnectionType 63
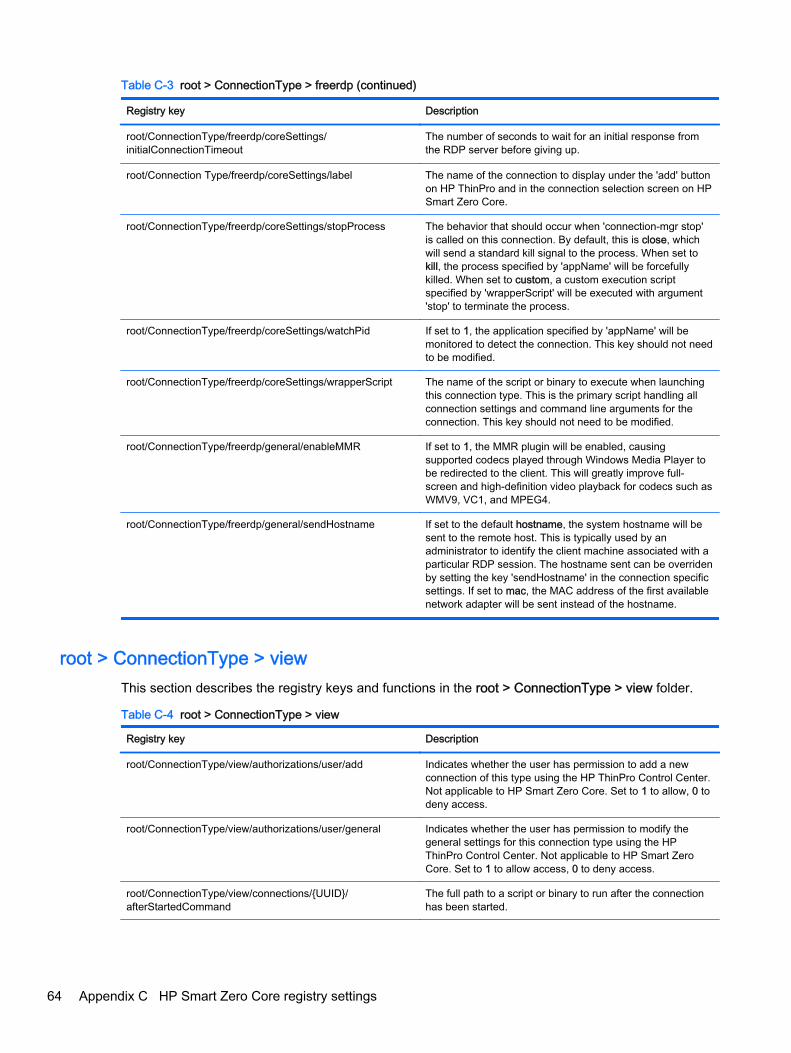
Table C-3 root > ConnectionType > freerdp (continued)
Registry key Description
root/ConnectionType/freerdp/coreSettings/initialConnectionTimeout
The number of seconds to wait for an initial response fromthe RDP server before giving up.
root/Connection Type/freerdp/coreSettings/label The name of the connection to display under the 'add' buttonon HP ThinPro and in the connection selection screen on HPSmart Zero Core.
root/ConnectionType/freerdp/coreSettings/stopProcess The behavior that should occur when 'connection-mgr stop'is called on this connection. By default, this is close, whichwill send a standard kill signal to the process. When set tokill, the process specified by 'appName' will be forcefullykilled. When set to custom, a custom execution scriptspecified by 'wrapperScript' will be executed with argument'stop' to terminate the process.
root/ConnectionType/freerdp/coreSettings/watchPid If set to 1, the application specified by 'appName' will bemonitored to detect the connection. This key should not needto be modified.
root/ConnectionType/freerdp/coreSettings/wrapperScript The name of the script or binary to execute when launchingthis connection type. This is the primary script handling allconnection settings and command line arguments for theconnection. This key should not need to be modified.
root/ConnectionType/freerdp/general/enableMMR If set to 1, the MMR plugin will be enabled, causingsupported codecs played through Windows Media Player tobe redirected to the client. This will greatly improve full-screen and high-definition video playback for codecs such asWMV9, VC1, and MPEG4.
root/ConnectionType/freerdp/general/sendHostname If set to the default hostname, the system hostname will besent to the remote host. This is typically used by anadministrator to identify the client machine associated with aparticular RDP session. The hostname sent can be overridenby setting the key 'sendHostname' in the connection specificsettings. If set to mac, the MAC address of the first availablenetwork adapter will be sent instead of the hostname.
root > ConnectionType > viewThis section describes the registry keys and functions in the root > ConnectionType > view folder.
Table C-4 root > ConnectionType > view
Registry key Description
root/ConnectionType/view/authorizations/user/add Indicates whether the user has permission to add a newconnection of this type using the HP ThinPro Control Center.Not applicable to HP Smart Zero Core. Set to 1 to allow, 0 todeny access.
root/ConnectionType/view/authorizations/user/general Indicates whether the user has permission to modify thegeneral settings for this connection type using the HPThinPro Control Center. Not applicable to HP Smart ZeroCore. Set to 1 to allow access, 0 to deny access.
root/ConnectionType/view/connections/{UUID}/afterStartedCommand
The full path to a script or binary to run after the connectionhas been started.
64 Appendix C HP Smart Zero Core registry settings

Table C-4 root > ConnectionType > view (continued)
Registry key Description
root/ConnectionType/view/connections/{UUID}/afterStoppedCommand
The full path to a script or binary to run after the connectionhas finished.
root/ConnectionType/view/connections/{UUID}/appInMenu
root/ConnectionType/view/connections/{UUID}/appOnDesktop
root/ConnectionType/view/connections/{UUID}/attachToConsole
root/ConnectionType/view/connections/{UUID}/authorizations/user/edit
Indicates whether the user has permission to modify theconnection settings for this connection. Set to '1' to allowaccess, 0 to deny access.
NOTE: The connection can be edited in AdministratorMode even when this key is set to '0'.
root/ConnectionType/view/connections/{UUID}/authorizations/user/execution
Indicates whether the user has permission to execute theconnection. Set to 1 to allow access, 0 to deny access.
NOTE: The connection can be edited in AdministratorMode even when this key is set to 0.
root/ConnectionType/view/connections/{UUID}/automaticLogin
When enabled, the VMware Horizon View client will attemptto automatically login if all fields are provided. If this is notenabled, users will have to manually click Connect in theVMware Horizon View client to contact the VMware HorizonView server, log in, and select a desktop.
root/ConnectionType/view/connections/{UUID}/autoReconnect
If 1, the system will attempt to automatically restart theconnection after it has been closed. If required, credentialsshould be supplied through the zero-login/defaultCredentials field. "autostart" is frequently usedin conjunction with this setting.
root/ConnectionType/view/connections/{UUID}/autoReconnectDelay
Indicates the amount of time in seconds to wait beforerestarting the connection. The default of 0 will cause theconnection to restart immediately upon close or disconnect.This setting takes effect only when 'autoReconnect' is set to1.
root/ConnectionType/view/connections/{UUID}/autostart If greater than 0, the system will attempt to automaticallystart the connection when the client is booted. If required,credentials should be supplied through the zero-login/defaultCredentials field. "autoReconnect" is frequentlyused in conjunction with this setting.
root/ConnectionType/view/connections/{UUID}/autostartDelay
Indicates the amount of time in seconds to wait beforestarting the connection on boot. The default of 0 will causethe connection to start immediately upon boot. This settingtakes effect only when 'autostart' is set to 1.
root/ConnectionType/view/connections/{UUID}/beforeStartingCommand
The full path to a script or binary to run before the connectionhas started.
root/ConnectionType/view/connections/{UUID}/closeAfterDisconnect
If set to 1, the connection will be closed after the first desktopis disconnected. If this is not enabled, the VMware HorizonView client will return to the desktop selection screen. This isenabled by default to prevent users from accidently leavingthe connection at the desktop selection screen after loggingoff.
root/ConnectionType/view/connections/{UUID}/colorDepth
root > ConnectionType 65
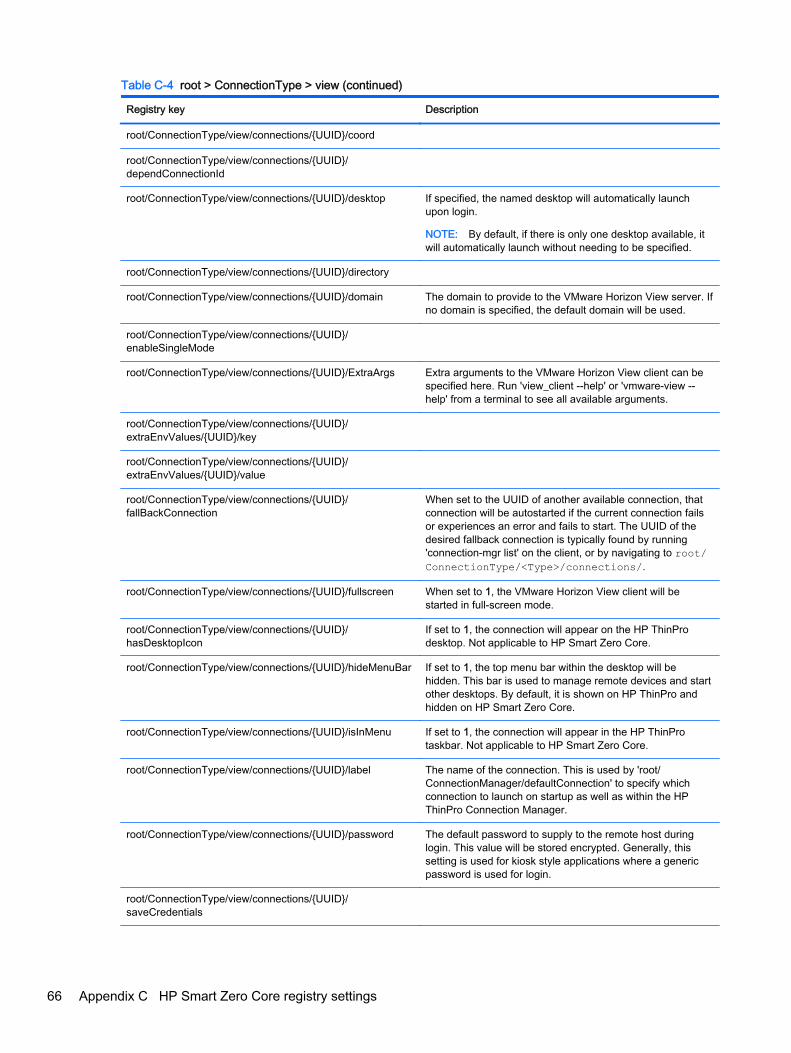
Table C-4 root > ConnectionType > view (continued)
Registry key Description
root/ConnectionType/view/connections/{UUID}/coord
root/ConnectionType/view/connections/{UUID}/dependConnectionId
root/ConnectionType/view/connections/{UUID}/desktop If specified, the named desktop will automatically launchupon login.
NOTE: By default, if there is only one desktop available, itwill automatically launch without needing to be specified.
root/ConnectionType/view/connections/{UUID}/directory
root/ConnectionType/view/connections/{UUID}/domain The domain to provide to the VMware Horizon View server. Ifno domain is specified, the default domain will be used.
root/ConnectionType/view/connections/{UUID}/enableSingleMode
root/ConnectionType/view/connections/{UUID}/ExtraArgs Extra arguments to the VMware Horizon View client can bespecified here. Run 'view_client --help' or 'vmware-view --help' from a terminal to see all available arguments.
root/ConnectionType/view/connections/{UUID}/extraEnvValues/{UUID}/key
root/ConnectionType/view/connections/{UUID}/extraEnvValues/{UUID}/value
root/ConnectionType/view/connections/{UUID}/fallBackConnection
When set to the UUID of another available connection, thatconnection will be autostarted if the current connection failsor experiences an error and fails to start. The UUID of thedesired fallback connection is typically found by running'connection-mgr list' on the client, or by navigating to root/ConnectionType/<Type>/connections/.
root/ConnectionType/view/connections/{UUID}/fullscreen When set to 1, the VMware Horizon View client will bestarted in full-screen mode.
root/ConnectionType/view/connections/{UUID}/hasDesktopIcon
If set to 1, the connection will appear on the HP ThinProdesktop. Not applicable to HP Smart Zero Core.
root/ConnectionType/view/connections/{UUID}/hideMenuBar If set to 1, the top menu bar within the desktop will behidden. This bar is used to manage remote devices and startother desktops. By default, it is shown on HP ThinPro andhidden on HP Smart Zero Core.
root/ConnectionType/view/connections/{UUID}/isInMenu If set to 1, the connection will appear in the HP ThinProtaskbar. Not applicable to HP Smart Zero Core.
root/ConnectionType/view/connections/{UUID}/label The name of the connection. This is used by 'root/ConnectionManager/defaultConnection' to specify whichconnection to launch on startup as well as within the HPThinPro Connection Manager.
root/ConnectionType/view/connections/{UUID}/password The default password to supply to the remote host duringlogin. This value will be stored encrypted. Generally, thissetting is used for kiosk style applications where a genericpassword is used for login.
root/ConnectionType/view/connections/{UUID}/saveCredentials
66 Appendix C HP Smart Zero Core registry settings

Table C-4 root > ConnectionType > view (continued)
Registry key Description
root/ConnectionType/view/connections/{UUID}/server The address of the remote host to connect to. This istypically a URL such as 'https://server.domain.com'.
root/ConnectionType/view/connections/{UUID}/sessionEndAction
root/ConnectionType/view/connections/{UUID}/singleDesktop
root/ConnectionType/view/connections/{UUID}/smartcard Enabling this will forward any locally attached smart cards tothe remote host, allowing them to be used by applications onthe remote host. This does not enable smart card login forthe VMware Horizon View server login, only for the remotehost.
root/ConnectionType/view/connections/{UUID}/startMode If set to the default focus and the connection is alreadystarted, it will be given focus. Otherwise, an error will bereturned stating the connection is already started.
root/ConnectionType/view/connections/{UUID}/username The default username to supply to the remote host duringlogin. Generally, this setting is used for kiosk styleapplications where a generic username is used for login.
root/ConnectionType/view/connections/{UUID}/viewSecurityLevel
If set to the default Refuse insecure connections, theVMware Horizon View client will not allow the user toconnect to the server if the server's SSL certificate is invalid.If set to Warn, the VMware Horizon View client will warn ifthe server's certificate cannot be verified, and if it is self-signed or expired, the user still will not be allowed toconnect. If set to Allow all connections, the server certificatewill not be verified and connections to any server will beallowed.
root/ConnectionType/view/connections/{UUID}/waitForNetwork
If set to 1, the connection will not be launched untilnetworking is available. This makes sure that, on a slownetwork, the connection does not launch before networkingis available, causing a failure.
root/ConnectionType/view/connections/{UUID}/windowsizeHeight
Not applicable to HP Smart Zero Core.
root/ConnectionType/view/connections/{UUID}/windowsizePercentage
root/ConnectionType/view/connections/{UUID}/windowsizeWidth
Not applicable to HP Smart Zero Core.
root/ConnectionType/view/connections/{UUID}/windowType Not applicable to HP Smart Zero Core.
root/ConnectionType/view/coreSettings/appName The internal application name to use when tracking the PIDof the connection for connection status monitoring. This keyshould not need to be modified.
root/ConnectionType/view/coreSettings/className The internal X Windows application class name to use whentracking the PID of the connection for connection statusmonitoring. This key should not need to be modified.
root/ConnectionType/view/coreSettings/editor The internal application name to use when launching theconnection editor for this connection type. This key shouldnot need to be modified.
root/ConnectionType/view/coreSettings/icon16Path The internal application icon path for the 16x16 pixel icon forthis application. This is the small icon to the left of theconnection name in the connection dialog.
root > ConnectionType 67

Table C-4 root > ConnectionType > view (continued)
Registry key Description
root/ConnectionType/view/coreSettings/icon32Path The internal application icon path for the 32x32 pixel icon forthis application.
root/ConnectionType/view/coreSettings/icon48Path The internal application icon path for the 48x48 pixel icon forthis application. This is the large icon in the top left of theconnection editor for this connection type.
root/ConnectionType/view/coreSettings/label The name of the connection to display under the 'add' buttonon HP ThinPro and in the connection selection screen on HPSmart Zero Core.
root/ConnectionType/view/coreSettings/serverRequired Tells whether a server name or address is unused, optional,or required for this connection type.
root/ConnectionType/view/coreSettings/stopProcess The behavior that should occur when 'connection-mgr stop'is called on this connection. By default, this is close, whichwill send a standard kill signal to the process. When set tokill, the process specified by 'appName' will be forcefullykilled. When set to custom, a custom execution scriptspecified by 'wrapperScript' will be executed with argument'stop' to terminate the process gracefully.
root/ConnectionType/view/coreSettings/watchPid If set to 1, the application specified by 'appName' will bemonitored to detect the connection. This key should not needto be modified.
root/ConnectionType/view/coreSettings/wrapperScript The name of the script or binary to execute when launchingthis connection type. This is the primary script handling allconnection settings and command line arguments for theconnection. This key should not need to be modified.
root/ConnectionType/view/general/rdpOptions Options specified here will be forwarded directly to the RDPclient if RDP is used as the display protocol for the VMwareHorizon View connection. To see a full list of options, type'rdesktop --help' from the client terminal.
root/ConnectionType/view/gui/viewManager/name The name of the settings editor for this application. This keyshould not need to be modified.
root/ConnectionType/view/gui/viewManager/status The active status of the settings editor for this application.This key should not need to be modified.
root/ConnectionType/view/gui/viewManager/title The window title of the settings editor for this application.This key should not need to be modified.
root/ConnectionType/view/gui/viewManager/widgets/autostart
root/ConnectionType/view/gui/viewManager/widgets/fallBackConnection
root/ConnectionType/view/gui/viewManager/widgets/label
root > ConnectionType > xenThis section describes the registry keys and functions in the root > ConnectionType > xen folder.
68 Appendix C HP Smart Zero Core registry settings

Table C-5 root > ConnectionType > xen
Registry key Description
root/ConnectionType/xen/authorizations/user/add Indicates whether the user has permission to add a newconnection of this type using the HP ThinPro Control Center.Not applicable to HP Smart Zero Core. Set to 1 to allow, 0 todeny access.
root/ConnectionType/xen/authorizations/user/general Indicates whether the user has permission to modify thegeneral settings for this connection type using the HPThinPro Control Center. Not applicable to HP Smart ZeroCore. Set to 1 to allow, 0 to deny access.
root/ConnectionType/xen/connections/{UUID}/address The address of the remote host to connect to. This istypically a URL such as 'http://server.domain.com'.
root/ConnectionType/xen/connections/{UUID}/afterStartedCommand
The full path to a script or binary to run after the connectionhas been started.
root/ConnectionType/xen/connections/{UUID}/afterStoppedCommand
The full path to a script or binary to run after the connectionhas finished.
root/ConnectionType/xen/connections/{UUID}/appInMenu If set to 1, all applications for this connection will bedisplayed in the taskbar menu.
root/ConnectionType/xen/connections/{UUID}/appOnDesktop
If set to 1, all applications for this connection will bedisplayed on the desktop.
root/ConnectionType/xen/connections/{UUID}/authorizations/user/edit
Indicates whether the user has permission to modify theconnection settings for this connection. Set to 1 to allow, 0 todeny access.
NOTE: The connection can be edited in AdministratorMode even when this key is set to 0.
root/ConnectionType/xen/connections/{UUID}/authorizations/user/execution
Indicates whether the user has permission to execute theconnection. Set to 1 to allow, 0 to deny access.
NOTE: The connection will always be available to launch inAdministrator Mode.
root/ConnectionType/xen/connections/{UUID}/autoReconnect
If set to 1, the system will attempt to automatically restart theconnection after it has been closed. If required, credentialsshould be supplied though the zero-login/defaultCredentials field. "autostart" is frequently usedin conjunction with this setting.
root/ConnectionType/xen/connections/{UUID}/autoReconnectDelay
Indicates the amount of time in seconds to wait beforerestarting the connection. The default of 0 will cause theconnection to restart immediately upon close or disconnect.This setting takes effect only when 'autoReconnect' is set to1.
root/ConnectionType/xen/connections/{UUID}/autostart If greater than 0, the system will attempt to automaticallystart the connection when the client is booted. If required,credentials should be supplied though the zero-login/defaultCredentials field. "autoReconnect" is frequentlyused in conjunction with this setting.
root/ConnectionType/xen/connections/{UUID}/autostartDelay Indicates the amount of time in seconds to wait beforestarting the connection on boot. The default of 0 will causethe connection to start immediately upon boot. This settingtakes effect only when 'autostart' is set to 1.
root/ConnectionType/xen/connections/{UUID}/autoStartDesktop
To automatically start the first desktop available when youlaunch a Citrix connection, set the key value to 1.
root > ConnectionType 69

Table C-5 root > ConnectionType > xen (continued)
Registry key Description
root/ConnectionType/xen/connections/{UUID}/autoStartResource
To automatically start a desktop or an application when youlaunch a Citrix connection, set the value of following key tothe name of the desktop or application you want to start.
root/ConnectionType/xen/connections/{UUID}/beforeStartingCommand
The full path to a script or binary to run before the connectionhas started.
root/ConnectionType/xen/connections/{UUID}/clearCredentialsTimeout
root/ConnectionType/xen/connections/{UUID}/connectionEndAction
root/ConnectionType/xen/connections/{UUID}/coord
root/ConnectionType/xen/connections/{UUID}/dependConnectionId
root/ConnectionType/xen/connections/{UUID}/disableSaveCredentials
root/ConnectionType/xen/connections/{UUID}/domain The domain to provide to the XenDesktop Server. If nodomain is specified, the default domain for the server will beused.
root/ConnectionType/xen/connections/{UUID}/enablePNADesktopIcons
root/ConnectionType/xen/connections/{UUID}/enablePNAStartMenuItems
root/ConnectionType/xen/connections/{UUID}/extraEnvValues/{UUID}/key
root/ConnectionType/xen/connections/{UUID}/extraEnvValues/{UUID}/value
root/ConnectionType/xen/connections/{UUID}/fallBackConnection
When set to the UUID of another available connection, thatconnection will be autostarted if the current connection failsor experiences an error and fails to start. The UUID of thedesired fallback connection is typically found by running'connection-mgr list' on the client, or by navigating to root/ConnectionType/<type>/connections/
root/ConnectionType/xen/connections/{UUID}/folder
root/ConnectionType/xen/connections/{UUID}/fullscreen When set to 1, the ICA client will be started in full-screenmode.
root/ConnectionType/xen/connections/{UUID}/hasDesktopIcon
If set to 1, an icon for the connection will be shown on thedesktop. Not applicable to HP Smart Zero Core.
root/ConnectionType/xen/connections/{UUID}/isInMenu
root/ConnectionType/xen/connections/{UUID}/label The name of the connection. This is used by root/ConnectionManager/defaultConnection to specifywhich connection to launch on startup, as well as within theHP ThinPro Connection Manager.
root/ConnectionType/xen/connections/{UUID}/logOnMethod
root/ConnectionType/xen/connections/{UUID}/password If set, this password will be supplied as the default to thelogin dialog if the user and domain match their defaults here.Typically used with autostart connections.
70 Appendix C HP Smart Zero Core registry settings

Table C-5 root > ConnectionType > xen (continued)
Registry key Description
root/ConnectionType/xen/connections/{UUID}/savePassword
root/ConnectionType/xen/connections/{UUID}/startMode If set to the default focus and the connection is alreadystarted, it will be given focus. Otherwise, an error will bereturned stating the connection is already started.
root/ConnectionType/xen/connections/{UUID}/username The default username to supply to the remote host duringlogin. Generally, this setting is used for kiosk styleapplications where a generic username is used for login.
root/ConnectionType/xen/connections/{UUID}/waitForNetwork
If set to 1, the connection will not be launched untilnetworking is available. This makes sure that on a slownetwork, the connection does not launch before networkingis available, causing a failure.
root/ConnectionType/xen/coreSettings/appName The internal application name to use when tracking the PIDof the connection for connection status monitoring. This keyshould not need to be modified.
root/ConnectionType/xen/coreSettings/autoLogoutDelay This setting applies to Citrix servers with multiple publishedapps or desktops. If less than 0, no auto-logout is performed.Otherwise, it is the number of seconds between the closingof the last Xen application and the time the Xen desktop willbe automatically closed. Citrix process delays can extend theauto-logout time.
root/ConnectionType/xen/coreSettings/autoLogoutDelaySingleApp
This setting applies to Citrix servers with a single publishedapp or desktop. If less than 0, no auto-logout is performed.Otherwise, it is the number of seconds between the closingof the last Xen application and the time the Xen desktop willbe automatically closed. Citrix process delays can extend theauto-logout time.
root/ConnectionType/xen/coreSettings/className The internal X Windows application class name to use whentracking the PID of the connection for connection statusmonitoring. This key should not need to be modified.
root/ConnectionType/xen/coreSettings/editor The internal application name to use when launching theconnection editor for this connection type. This key shouldnot need to be modified.
root/ConnectionType/xen/coreSettings/generalSettingsEditor The internal application name to use when launching thegeneral settings editor for this connection type. This keyshould not need to be modified.
root/ConnectionType/xen/coreSettings/icon16Path The internal application icon path for the 16x16 pixel icon forthis application. This icon is the small icon to the left of theconnection name in the connection dialog.
root/ConnectionType/xen/coreSettings/icon32Path The internal application icon path for the 32x32 pixel icon forthis application.
root/ConnectionType/xen/coreSettings/icon48Path The internal application icon path for the 48x48 pixel icon forthis application. This icon is the large icon in the top left ofthe connection editor for this connection type.
root/ConnectionType/xen/coreSettings/label The name of the connection to display under the 'add' buttonon HP ThinPro and in the connection selection screen on HPSmart Zero Core.
root/ConnectionType/xen/coreSettings/serverRequired Tells whether a server name or address is unused, optional,or required for this connection type.
root > ConnectionType 71

Table C-5 root > ConnectionType > xen (continued)
Registry key Description
root/ConnectionType/xen/coreSettings/stopProcess The behavior that should occur when 'connection-mgr stop'is called on this connection. By default, this is close, whichwill send a standard kill signal to the process. When set tokill, the process specified by 'appName' will be forcefullykilled. When set to custom, a custom execution scriptspecified by 'wrapperScript' will be executed with argument'stop' to terminate the process.
root/ConnectionType/xen/coreSettings/watchPid If set to 1, the application specified by 'appName' will bemonitored to detect the connection. This key should not needto be modified.
root/ConnectionType/xen/coreSettings/wrapperScript The name of the script or binary to execute when launchingthis connection type. This is the primary script handling allconnection settings and command line arguments for theconnection. This key should not need to be modified.
root/ConnectionType/xen/general/allowReadOn{AthruZ} Set to 1 to allow the user to read the mapped drive from theremote host. If this is set to 0, no files will show up in themapped drive on the remote host.
root/ConnectionType/xen/general/allowWriteOn{AthruZ} Set to 1 to allow the user to write to the mapped drive fromthe remote host. If this is set to 0, the user will be able toread and copy files off of the drive, but will not be able tomake any changes or add new files to the drive.
root/ConnectionType/xen/general/async Directly maps to the Citrix INI file settingCommPollSize=boolean, which enables asynchronouspolling. The default is 0 for 'Off'.
root/ConnectionType/xen/general/autoReconnect Directly maps to the Citrix INI file settingTransportReconnectEnabled=boolean, which enablesautomatic session reconnect. The default is 0.
NOTE: This is not the same as the connection-specific‘autoReconnect’. This reconnect occurs internally within theCitrix client without restarting the connection.
root/ConnectionType/xen/general/bitmapCacheSize Directly maps to the Citrix INI file settingPersistentCacheMinBitmap=integer, which is theminimum size of bitmap for caching. The default is 8192. Onall clients, this is set to a default of 2048.
root/ConnectionType/xen/general/colorDepth Forces ICA to use a specific color depth for all connections.This is usually done in either specialized environmentswhere the automatic depth selection fails or in very slownetworks to reduce congestion.
root/ConnectionType/xen/general/colorMapping Set to Shared - Approximate Colors to enable and Private -Exact Colors to disable. Enabled by default. Maps to theCitrix INI file setting ApproximateColors=boolean, whichuses approximate colors from the default colormap ratherthan a private colormap and precise colors. Used only whenthe DesiredColor value is 2 (256 colors). The default isFalse.
root/ConnectionType/xen/general/defaultBrowserProtocol Set to TCP/IP HTTP Browser by default. Can be set to SSL/TLS HTTPS Browser or TCP/IP Browser. Maps to the CitrixINI file setting BrowserProtocol=[UDP|HTTPonTCP],which controls the protocol used to locate the ICA host forthe connection. If not specified, the default value from the[WFClient] section of wfclient.ini is used.
72 Appendix C HP Smart Zero Core registry settings

Table C-5 root > ConnectionType > xen (continued)
Registry key Description
root/ConnectionType/xen/general/drivePathMappedOn{AthruZ}
The local filesystem directory to map to the remote host.Typically, this is set to /media to allow all connected USBdrives to be mapped to the remote host through a singledrive letter.
root/ConnectionType/xen/general/enableAlertSound Set to the default 1 to enable Windows alert sounds. Set to 0to disable. Indirectly maps to the Citrix INI file settingDisableSound=boolean, which disables Windows alertsounds. The default is False.
root/ConnectionType/xen/general/enableAudioInput Set to the default 1 to enable audio input. This will set boththe ‘AllowAudioInput’ and ‘EnableAudioInput’ settings to 1 inthe wfclient.ini and appsrv.ini.
root/ConnectionType/xen/general/enableDataCompression Set to the default 1 to enable data compression, or set to 0 todisable. Directly maps to the Citrix INI file settingCompress=boolean, which controls data compression.
root/ConnectionType/xen/general/enableDriveMapping Allows directories on the local filesystem to be forwarded tothe remote host through a virtual drive. Typically,/mediawould be mapped to Z to allow USB drives to be forwardedto the remote host. If USB redirection is enabled, this shouldbe disabled to prevent storage conflicts. To be properlymapped to the remote host in this fashion, the USB devicemust use one of the following filesystems: FAT32, NTFS,ext2, or ext3.
root/ConnectionType/xen/general/enableForceDirectConnect Set to 1 to force the connection to bypass the Citrix WebInterface and PNAgent services. Authentication will occur onthe server after the initial connection has been made.
root/ConnectionType/xen/general/enableHDXFlashRedirection
Control the behavior of HDX Flash Redirection by setting it toAlways, Ask, or Never. The default is "Always", which is touse HDX Flash Redirection if possible and not prompt theuser. "Ask" will dynamically prompt the user within thesession. "Never" will disable the feature.
root/ConnectionType/xen/general/enableHDXMediaStream Set to 0 to disable HDX MediaStream. When HDXMediaStream is disabled, media files will still play throughstandard streaming, but the quality might not be as high.
root/ConnectionType/xen/general/enableMapOn{AthruZ} Allows drive mapping to occur using the specified drive onthe remote host. Must be set to a valid local directory fordrive mapping to work properly. Other drive letters are alsoavailable when all keys are shown.
root/ConnectionType/xen/general/enableOffScreenSurface Directly maps to the Citrix INI file settingEnableOSS=boolean, which enables the server to createand use X pixmaps for off-screen drawing. Reducesbandwidth in 15- and 24-bit color at the expense of X servermemory and processor time. The default is On.
root/ConnectionType/xen/general/enableSmartCard If set to 1, ‘DisableCtrlAltDel’ will be set to 'Off' and smartcard login will be enabled. If set to 0, ‘SmartCardAllowed’ willbe set to 'Off', disabling smart card login.
root/ConnectionType/xen/general/enableWindowsAlertSounds
root/ConnectionType/xen/general/encryptionLevel Directly maps to the Citrix INI file settingEncryptionLevelSession=[None | Basic | RC5 (128 bit - Login Only) | RC5 (40 bit) | RC5 (56 bit) | RC5 (128 bit)], which specifies the level
root > ConnectionType 73

Table C-5 root > ConnectionType > xen (continued)
Registry key Description
of encryption on a per-connection basis. Encryption protocolsfor all levels are defined in the [EncryptionLevelSession]section of module.ini.
root/ConnectionType/xen/general/hotKey{1 thru 12}Char The hotkey character to forward to the remote session. Forexample, F1 for hotKey1Char.
root/ConnectionType/xen/general/hotKey{1 thru 12}Shift The key shift state combination used to activate the chosenhotkey character. Defaults to Ctrl+Shift. Can be set to Shift,Ctrl, Alt, Alt+Shift, Alt+Ctrl, or Ctrl+Shift.
root/ConnectionType/xen/general/httpAddresses/{UUID}/address
root/ConnectionType/xen/general/keyPassthroughEscapeChar
Directly maps to the Citrix INI file settingKeyPassthroughEscapeChar=string, which is the keyfor the keyboard command to disable the transparentkeyboard mode. The default is F2. All clients are set to F1 bydefault.
root/ConnectionType/xen/general/keyPassthroughEscapeShift
Directly maps to the Citrix INI file settingKeyPassthroughEscapeShift=string, which is the keyfor the keyboard command to disable the transparentkeyboard mode. The default is Ctrl. All clients are set to Altby default.
root/ConnectionType/xen/general/localTextEcho Can be set to On, Off, or the default Auto. Indirectly maps tothe Citrix INI file setting ZLKeyboardMode=[0|1|2], whichcontrols keyboard latency reduction.
0=off
1=always on
2=dynamic selection based on actual latency
root/ConnectionType/xen/general/mouseClickFeedback Can be set to On, Off, or the default Auto. Indirectly maps tothe Citrix INI file setting ZLKeyboardMode=[0|1|2], whichcontrols keyboard latency reduction.
0=off
1=always on
2=dynamic selection based on actual latency
root/ConnectionType/xen/general/mouseMiddleButtonPaste Directly maps to the Citrix INI file settingMouseSendsControlV=boolean, which enables a middle-button paste emulation function for Windows sessions. Thedefault is False. All clients are set to 0 by default.
root/ConnectionType/xen/general/noInfoBox Directly maps to the Citrix INI file settingPopupOnExit=boolean, which causes the client manager,wfcmgr, to pop up when a client session terminates.
root/ConnectionType/xen/general/printerAutoCreation Set to 0 to disable printer mapping.
root/ConnectionType/xen/general/proxyAddress The proxy address to use if a manual proxy setting isselected through 'proxyType'.
root/ConnectionType/xen/general/proxyPassword The proxy password to use if a manual proxy setting isselected through 'proxyType'. This field will be encryptedusing rc4 encryption.
74 Appendix C HP Smart Zero Core registry settings

Table C-5 root > ConnectionType > xen (continued)
Registry key Description
root/ConnectionType/xen/general/proxyPort The proxy port to use if a manual proxy setting is selectedthrough 'proxyType'.
root/ConnectionType/xen/general/proxyType Selects the type of proxy to use for XenDesktop connections.'Use Browser settings' is supported only if a local browser isinstalled.
root/ConnectionType/xen/general/proxyUser The proxy user to use if a manual proxy setting is selectedthrough 'proxyType'.
root/ConnectionType/xen/general/seamlessWindow Directly maps to the Citrix INI file settingTWIMode=boolean, which controls seamless mode forpublished applications. All clients are set to 1 by default.
root/ConnectionType/xen/general/sessionSharingClient Directly maps to the Citrix INI file settingEnableSessionSharingClient=boolean, which sendssession-sharing requests to other ICA sessions on the sameX display. The default is False. All clients are set to 1 bydefault.
root/ConnectionType/xen/general/sound Can be set to the default High Quality, Med Quality, LowQuality, orDisabled. Quality indirectly maps to the Citrix INIfile setting AudioBandwidthLimit=[0|1|2].
0=high
1=medium
2=low
root/ConnectionType/xen/general/speedScreen
root/ConnectionType/xen/general/tcpAccel
root/ConnectionType/xen/general/tcpAddresses/{UUID}/address
root/ConnectionType/xen/general/transparentKeyPassthrough
Can be set to Translated (Local), Direct in full screendesktops only (FullScreenOnly), or Direct (Remote).Indirectly maps to the Citrix INI file settingTransparentKeyPassthrough=string, which enableskeyboard shortcut sequences defined by the local Windowsmanager in the session. Keywords are Local, Remote, andFullScreenOnly. The default is FullScreenOnly.
root/ConnectionType/xen/general/useAlternateAddress Directly maps to the Citrix INI file settingUseAlternateAddress=boolean, which uses analternate address for firewall connections. The default isFalse. All clients are set to 0 by default.
root/ConnectionType/xen/general/useBitmapCache Directly maps to the Citrix INI file settingPersistentCacheEnabled=boolean. The default isFalse. All clients are set to 0 by default.
root/ConnectionType/xen/general/useEUKS Controls use of Extended Unicode Keyboard Support onWindows servers. The default is 0.
0—No EUKS
1—EUKS used as fallback
2—Use EUKS whenever possible
root/ConnectionType/xen/general/useLocalIM Directly maps to the Citrix INI file settinguseLocalIME=boolean, which uses the local X input
root > ConnectionType 75
Table C-5 root > ConnectionType > xen (continued)
Registry key Description
method to interpret keyboard input. This is supported only forEuropean languages. The default is True. All clients are setto 1 by default.
root/ConnectionType/xen/general/waitForNetwork If set to 1, the connection will not be launched untilnetworking is available. This makes sure that, on a slownetwork, the connection does not launch before networkingis available, causing a failure.
root/ConnectionType/xen/general/windowHeight If 'windowSize' is set to Fixed Size, this key will be used toset the height of the window in pixels.
root/ConnectionType/xen/general/windowPercent If 'windowType' is set to Percentage of Screen Size, this keywill be used to set the size of the window. Valid values are 0–100.
root/ConnectionType/xen/general/windowSize When set to Full Screen (the default), the connection will bemaximized without borders on all available screens. Whenset to Percentage of Screen Size the'windowSizePercentage' key can be used to specify the sizeof the window as a percentage as the total screen area.When set to Fixed Size the 'windowSizeWidth' and'windowSizeHeight' keys can be used to specify the size ofthe window in pixels. To have "Percentage of Screen Size"take effect "enableForceDirectConnect" has to be set to 1and "seamlessWindow" has to be set to 0.
NOTE: This setting will only work with XenApp and only ifthe server allows direct connections.
root/ConnectionType/xen/general/windowWidth If 'windowSize' is set to 'Fixed Size', this key will be used toset the width of the window in pixels
root/ConnectionType/xen/gui/fbpanel/autohide Whether to autohide the taskbar. Set to 'true' to autohide thetaskbar.
root/ConnectionType/xen/gui/fbpanel/edge The default position of the taskbar when more than onepublished desktop or application is available.
root/ConnectionType/xen/gui/fbpanel/hidden Set to 1 to completely hide the taskbar. Can be hidden only ifautoStartResource or autoStartDesktop is enabled.
root/ConnectionType/xen/gui/XenDesktopPanel/disabled Set to 1 to disable the Xen Desktop Panel and its taskbar.Usually, set to 1 when autoStartResource orautoStartDesktop is enabled.
root/ConnectionType/xen/gui/XenManager/name The name of the settings editor for this application. This keyshould not need to be modified.
root/ConnectionType/xen/gui/XenManager/status The active status of the settings editor for this application.This key should not need to be modified.
root/ConnectionType/xen/gui/XenManager/title The window title of the settings editor for this application.This key should not need to be modified.
root/ConnectionType/xen/gui/XenManager/widgets/address
root/ConnectionType/xen/gui/XenManager/widgets/appInMenu
root/ConnectionType/xen/gui/XenManager/widgets/appOnDesktop
76 Appendix C HP Smart Zero Core registry settings

Table C-5 root > ConnectionType > xen (continued)
Registry key Description
root/ConnectionType/xen/gui/XenManager/widgets/autoReconnect
root/ConnectionType/xen/gui/XenManager/widgets/autostart
root/ConnectionType/xen/gui/XenManager/widgets/autoStartDesktop
root/ConnectionType/xen/gui/XenManager/widgets/autoStartResource
root/ConnectionType/xen/gui/XenManager/widgets/domain
root/ConnectionType/xen/gui/XenManager/widgets /enablePNADesktopIcons
root/ConnectionType/xen/gui/XenManager/widgets/enablePNAStartMenuItems
root/ConnectionType/xen/gui/XenManager/widgets/fallBackConnection
root/ConnectionType/xen/gui/XenManager/widgets/folder
root/ConnectionType/xen/gui/XenManager/widgets/hasDesktopIcon
root/ConnectionType/xen/gui/XenManager/widgets/isInMenu
root/ConnectionType/xen/gui/XenManager/widgets/label
root/ConnectionType/xen/gui/XenManager/widgets/password
root/ConnectionType/xen/gui/XenManager/widgets/username
root/ConnectionType/xen/gui/XenManager/widgets/waitForNetwork
root > DisplayThis section describes the registry keys, functions, options, and descriptions in the root > Displayfolder.
Table C-6 root > Display
Registry key Description
root/Display/Configuration/displaymode Specifies the display mode of the unit. A value of 0 denotesstandard mode (1–4 monitors), whereas a value of 1 denotesa 6-monitor mode. The HP t610 with the appropriate add-oncard is the only supported hardware.
root/Display/Configuration/primaryprofile This must always be set to default.
root/Display/Configuration/secondarymode If supported, specifies the position of the secondary monitorrelative to the primary monitor.
0—Same As
1—Above
root > Display 77
Table C-6 root > Display (continued)
Registry key Description
2—Right Of
3—Left Of
4—Below
5—None
NOTE: This is hardware-dependent and is not supportedon all models. The HP t5535z does not support two monitors.
root/Display/Configuration/swapstate Specifies which connector contains the primary monitor. Thisis hardware-dependent and might not be implemented on allmodels. Generally, 0 means the primary monitor is on theVGA connector and 1 means the 'other' connector. For theHP t5565z, 0 means the primary is on the DVI-I connectorand 1 means the primary is on the DVI-D connector. The HPt5335z does not support two monitors.
root/Display/Profiles/{UUID}/colorScaling The color temperature or direct RGB scaling for thin clientswith built-in monitors. The entry is a six-digit hex valueRRGGBB, where ffffff would indicate full (100%) scaling onall three color channels.
root/Display/Profiles/{UUID}/depth The display bit depth per pixel. A higher bit depth meansbetter quality, but more data and thus a lower performance.
root/Display/Profiles/{UUID}/height The desired monitor resolution width. A value of 0 meansauto-detect the resolution.
root/Display/Profiles/{UUID}/label Display profile name. This should be default.
root/Display/Profiles/{UUID}/orientation Specifies monitor orientation:
0—Normal
1—Rotate left
2—Rotate right
3—Invert
root/Display/Profiles/{UUID}/refresh Specifies the desired monitor refresh rate; not all refreshrates are supported for all resolutions. The values supportedby the client depend on the monitor. A value of 0 meansauto-detect the refresh rate.
IMPORTANT: Picking a refresh rate that is not supportedby the monitor attached to the client results in a blackscreen. HP recommends leaving this set to 0.
root/Display/Profiles/{UUID}/width The desired monitor resolution width. A value of '0' meansauto-detect the resolution.
root > NetworkThis section describes the registry keys, functions, options, and descriptions in the root > Networkfolder.
78 Appendix C HP Smart Zero Core registry settings
Table C-7 root > Network
Registry key Description
root/Network/ActiveDirectory/Domain Active Directory domain.
root/Network/ActiveDirectory/DynamicDNS Enable dynamic DNS.
root/Network/ActiveDirectory/Enabled Enables Active Directory.
root/Network/ActiveDirectory/Method Method used to provide user credentials.
root/Network/ActiveDirectory/Password Active Directory domain user password, only valid in staticmethod.
root/Network/ActiveDirectory/Username Active Directory domain username, only valid in staticmethod.
root/Network/DNSServers Additional DNS servers for Domain Name resolution can bespecified here. The specified servers will be used in additionto any servers retrieved through DHCP. Up to five IPv4 orIPv6 addresses may be specified, separated by commas.
root/Network/FtpProxy FTP proxy address.
root/Network/Hostname Hostname of the client.
root/Network/HttpProxy HTTP proxy address.
root/Network/HttpsProxy HTTPS proxy address.
root/Network/iPeak/Status If set to 1, HP Velocity will be enabled. This technology addsredundancy to TCP packets in an attempt to correct networkloss issues. Even when enabled, it should not affect networkpacket transmission if the server-side component is notdetected.
root/Network/IPSec/IPSecRules/{UUID}/DstAddr Destination address for the IPsec rule.
root/Network/IPSec/IPSecRules/{UUID}/MMAuthMethod Authentication method for the IPsec rule. Enter PSK to use apre-shared key and Certificate to use certificate files.
root/Network/IPSec/IPSecRules/{UUID}/MMAuthMethodCACert
When the authentication method is ‘Certificate’, the CAcertificate file's path is saved in this key.
root/Network/IPSec/IPSecRules/{UUID}/MMAuthMethodClientCert
When the authentication method is 'Certificate', the clientcertificate file's path is saved in this key.
root/Network/IPSec/IPSecRules/{UUID} /MMAuthMethodPresharedKey
When the authentication method is 'PSK', the pre-shared keyvalue is saved in this key.
root/Network/IPSec/IPSecRules/{UUID}/MMAuthMethodPrivateKey
When the authentication method is 'Certificate', the clientcertificate file's corresponding private key file path is saved inthis key.
root/Network/IPSec/IPSecRules/{UUID}/MMDHGroup Phase 1 Diffie-Hellman group.
root/Network/IPSec/IPSecRules/{UUID}/MMEncryptionAlg Phase 1 encryption algorithm.
root/Network/IPSec/IPSecRules/{UUID}/MMIntegrityAlg Phase 1 integrity algorithm.
root/Network/IPSec/IPSecRules/{UUID}/MMLifetimeMinutes Phase 1 lifetime.
root/Network/IPSec/IPSecRules/{UUID}/QMAHEnable Enables Phase 2 AH.
root/Network/IPSec/IPSecRules/{UUID}/QMAHIntegrityAlg Phase 2 AH integrity algorithm.
root/Network/IPSec/IPSecRules/{UUID}/QMESPEnable Enables Phase 2 ESP.
root > Network 79

Table C-7 root > Network (continued)
Registry key Description
root/Network/IPSec/IPSecRules/{UUID}/QMESPEncryptionAlg
Phase 2 ESP encryption algorithm.
root/Network/IPSec/IPSecRules/{UUID}/QMESPIntegrityAlg Phase 2 ESP integrity algorithm.
root/Network/IPSec/IPSecRules/{UUID}/QMLifetimeSeconds Phase 2 lifetime.
root/Network/IPSec/IPSecRules/{UUID}/RuleDescription Description for the IPsec rule, such as purpose for creatingthe rule.
root/Network/IPSec/IPSecRules/{UUID}/RuleEnable Rule enable or disable flag. When set to 1 the rule will beenabled. Set to 0 to disable the rule.
root/Network/IPSec/IPSecRules/{UUID}/RuleName Name of the IPsec rule.
root/Network/IPSec/IPSecRules/{UUID}/SrcAddr Source address for the IPsec rule.
root/Network/IPSec/IPSecRules/{UUID}/TunnelDstAddr Tunnel destination address for the IPsec rule.
root/Network/IPSec/IPSecRules/{UUID}/TunnelEnable Enables tunnel setting for the IPsec rule. When enabled, therule is 'apply to tunnel mode'.
root/Network/IPSec/IPSecRules/{UUID}/TunnelSrcAddr Tunnel source address for the IPsec rule.
root/Network/SearchDomains Additional search domains for FQDN resolution can bespecified here. The specified domains will be appended toany incomplete server definitions in an attempt to generatean FQDN that can be resolved through DNS. For example, asearch domain of 'mydomain.com', will allow the serverdefinition 'myserver' to resolve properly to'myserver.mydomain.com' even if the DNS server does nothave 'myserver' in its name resolution tables. Up to fiveadditional search domains can be specified.
root/Network/VPN/AutoStart Auto-starts VPN on system boot.
root/Network/VPN/Domain VPN domain.
root/Network/VPN/Gateway VPN gateway.
root/Network/VPN/Group VPN group.
root/Network/VPN/GroupPassword VPN group password.
root/Network/VPN/Password VPN user password.
root/Network/VPN/Type VPN type.
root/Network/VPN/Username VPN user name.
root/Network/Wired/DefaultGateway The default gateway the device will use to communicate tothe internet. Typically, this is the address of the router.
NOTE: This setting will take effect only when 'Method' isset to 'Static'.
root/Network/Wired/EthernetSpeed The link speed of the primary ethernet network interface.Automatic will allow it to choose the fastest available linkspeed, (usually 1 Gbps or 100 Mbps depending on theswitch). The link speed can also be forced to a single speed(100 Mbps or 10 Mbps) and duplex mode (full or half) tosupport switches or hubs that do not perform appropriateauto-negotiation.
root/Network/Wired/Interface The default ethernet interface or NIC.
80 Appendix C HP Smart Zero Core registry settings

Table C-7 root > Network (continued)
Registry key Description
root/Network/Wired/IPAddress The IPv4 address of the device. This setting will take effectonly when 'Method' is set to 'Static'.
root/Network/Wired/IPv6Enable Set this key to 1 when working in an IPv6 environment.
root/Network/Wired/Method When set to Automatic, the device will use DHCP to attemptto retrieve network settings. When set to 'Static', the'IPAddress', 'SubnetMask', and 'DefaultGateway' can be setmanually using the available keys. HP does not recommendusing 'Static' in a generic client profile, as it will cause allclients to receive the same IP address.
root/Network/Wired/Security/CACert Path to the CA certification file.
root/Network/Wired/Security/Identity Identity or anonymous identity.
root/Network/Wired/Security/InnerAuth PEAP inner authentication protocols.
root/Network/Wired/Security/InnerAuthTTLS TTLS inner authentication protocols.
root/Network/Wired/Security/Password Password.
root/Network/Wired/Security/PEAPVersion PEAP version.
root/Network/Wired/Security/PrivateKey Path to the private key file, only for use in TLSauthentication.
root/Network/Wired/Security/Type Wired 802.1x authentication types.
root/Network/Wired/Security/UserCert Path to the user certification file, only for use in TLSauthentication.
root/Network/Wired/Security/Username Username.
root/Network/Wired/SubnetMask The subnet mask of the device; for example, 255.255.255.0for a standard class C subnet. This setting will take effectonly when 'Method' is set to 'Static'.
root/Network/Wireless/DefaultGateway The default gateway the device will use to communicate tothe internet. Typically, this is the address of the router. Thissetting will take effect only when 'Method' is set to 'Static'.
root/Network/Wireless/Interface The default wireless interface or wireless network adapter.
root/Network/Wireless/IPAddress The IPv4 address of the device. This setting will take effectonly when 'Method' is set to 'Static'.
root/Network/Wireless/IPv6Enable Set this key to 1 when working in an IPv6 environment.
root/Network/Wireless/Method When set to Automatic, the device will use DHCP to attemptto retrieve network settings. When set to 'Static', the'IPAddress', 'SubnetMask', and 'DefaultGateway' can be setmanually using the available keys. HP does not recommendusing 'Static' in a generic client profile, as it will cause allclients to receive the same IP address.
root/Network/Wireless/Security/CACert Path to the CA certification file.
root/Network/Wireless/Security/Identity Identity or anonymous identity.
root/Network/Wireless/Security/InnerAuth PEAP inner authentication protocols.
root/Network/Wireless/Security/InnerAuthTTLS TTLS inner authentication protocols.
root/Network/Wireless/Security/Password Password.
root > Network 81

Table C-7 root > Network (continued)
Registry key Description
root/Network/Wireless/Security/PEAPVersion PEAP version.
root/Network/Wireless/Security/PrivateKey Path to the private key file, only used in TLS authentication.
root/Network/Wireless/Security/Type Wireless authentication types.
root/Network/Wireless/Security/UserCert Path to the user certification file, only for use in TLSauthentication.
root/Network/Wireless/Security/Username Username.
root/Network/Wireless/Security/WEPAuth WEP authentication type.
root/Network/Wireless/Security/WEPIndex WEP password index, only for use in WEP.
root/Network/Wireless/SSID The selected wireless access point SSID.
root/Network/Wireless/SSIDHidden The hidden status of the selected wireless access pointSSID.
root/Network/Wireless/SubnetMask The subnet mask of the device; for example, 255.255.255.0(for a standard class C subnet). This setting will only takeeffect when 'Method' is set to 'Static'.
root > USBThis section describes the registry keys, functions, options, and descriptions in the root > USB folder.
Table C-8 root > USB
Registry key Description
root/USB/root/mass-storage/allowed If set to 1, mass storage devices will be auto-mounted whenthe protocol is "local".
root/USB/root/mass-storage/read-only If set to 1, when mass storage devices are auto-mountedlocally, they will be mounted read-only.
root/USB/root/protocol Keeps track of the current owner of the remote USB. Usedinternally only.
root > keyboardThis section describes the registry keys, functions, options, and descriptions in the root > keyboardfolder.
Table C-9 root > keyboard
Registry key Description
root/keyboard/enable2 If set to 1, the secondary keyboard layout 'layout2' can beswitched to through the keyboard shortcut defined by'switch'.
root/keyboard/layout The keyboard layout defines what symbols the keysgenerate. This is frequently language dependent. English(en), Spanish (es), French (fr), German (de), and Japanese(jp) are the most common layouts.
82 Appendix C HP Smart Zero Core registry settings

Table C-9 root > keyboard (continued)
Registry key Description
root/keyboard/layout2 The secondary keyboard layout.
root/keyboard/model The keyboard model defines which keys are where on thekeyboard. The most common is the standard 'pc104' orinternational 'pc105'. Other models are also supported.
root/keyboard/model2 The secondary keyboard model.
root/keyboard/numlock If set to the default 1, the numlock function will be turned onat boot; otherwise, the numlock light will be turned off.
root/keyboard/rdp_kb An internal key used to map the model/layout to an RDPkeyboard map. This key should not need to be modified.
root/keyboard/switch Used to set the keyboard shortcut to switch between the firstand second layout, if 'enable2' is set. Valid values aregrp:ctrl_shift_toggle, grp:ctrl_alt_toggle, andgrp:alt_shift_toggle.
root/keyboard/variant The keyboard variant defines slight variations in the layout.Typically, the wincompat variation is used, as it most closelymatches Windows keyboard layouts.
root/keyboard/variant2 The secondary keyboard variant.
root/keyboard/XkbLayout An internal key used to map the model/layout to an XKBkeyboard layout. This key should not need to be modified.
root/keyboard/XkbModel An internal key used to map the model/layout to an XKBkeyboard model. This key should not need to be modified.
root > loggingThis section describes the registry keys, functions, options, and descriptions in the root > loggingfolder.
Table C-10 root > logging
Registry key Description
root/logging/general/debug If set to 1, debugging will be enabled on all debug supportedsubsystems. This is usually used in conjunction with'generateDiagnostic.sh' or the System Information Diagnostictool to generate a diagnostic bundle with system debug logsincluded.
root > mouseThis section describes the registry keys, functions, options, and descriptions in the root > mousefolder.
Table C-11 root > mouse
Registry key Description
root/mouse/MouseHandedness Whether the mouse is right-handed or left-handed. 0 forright-handed, 1 for left-handed.
root > logging 83

Table C-11 root > mouse (continued)
Registry key Description
root/mouse/MouseSpeed The acceleration of the mouse pointer. Typically a numberfrom 0–25 is in the usable range. 0 will completely disableacceleration, causing the pointer to move at a constant slow,but measurable pace.
root/mouse/MouseThreshold The number of pixels before acceleration will be enabled. 0will set the acceleration to a natural curve that graduallyscales acceleration, allowing for both precise and quickmovements.
root > printer-mapping-mgrThis section describes the registry keys, functions, options, and description in the root > printer-mapping-mgr folder.
Table C-12 root > printer-mapping-mgr
Registry key Description
root/printer-mapping-mgr/{UUID}/BaudRate For serial printers, this defines the baud rate of the printer.By default, this will be set to 9600.
root/printer-mapping-mgr/{UUID}/Port An internal key used to identify the port, usually set to thesame as root/printers/{UUID}/Port.
root > printersThis section describes the registry keys, functions, options, and descriptions in the root > printersfolder.
Table C-13 root > printers
Registry key Description
root/printers/{UUID}/Active If set to 1, the printer will be marked active and can beredirected to remote sessions.
root/printers/{UUID}/Port The port for the printer. For a local printer, this will frequentlybe /dev/ttyS0, /dev/lp0, or /dev/ttyUSB0. If a network printeris defined, this will be set to Network, and a 'ServerIP' keywill be defined with the IP address of the printer.
root/printers/{UUID}/PrinterMDL Set to the printer model. This is a text field used to identifythe printer in local and remote sessions.
root/printers/{UUID}/WindowsDriver Set to the exact Windows Driver model. This is used by RDPand Citrix printer mapping to identify which printer driver toinstall on the remote host.
root > screensaverThis section describes the registry keys, functions, options, and descriptions in the root > screensaverfolder.
84 Appendix C HP Smart Zero Core registry settings
Table C-14 root > screensaver
Registry key Description
root/screensaver/enableDPMS Set to 0 to disable monitor power management. This willcause the monitor to stay on unless turned off manually.
root/screensaver/off Timeout delay to turn the monitor off (in minutes).
root/screensaver/standby Timeout delay to put the monitor into standby (in minutes).
root/screensaver/suspend Timeout delay to suspend the monitor (in minutes).
root > timeThis section describes the registry keys, functions, options, and descriptions in the root > time folder.
Table C-15 root > time
Registry key Description
root/time/NTPServers A comma-separated list of NTP servers to use. Private NTPservers or large virtual NTP clusters such as 'pool.ntp.org'are the best choices to minimize server load. Clear this fieldto return to using DHCP servers (tag 42) instead of a fixedlist.
root/time/timezone Used to manually specify the timezone. Timezones shouldbe specified in the following format: '[region]/[subregion]' asdefined by 'Linux timezone:' in the client date and timecontrol panel menu item.
root/time/use24HourFormat Choose according to locale:
0—AM/PM format
1—24-hour format
root/time/useDHCPTimezone If set to 1, clients will attempt to set the timezone throughDHCP. To properly set the timezone through this key, makesure that the DHCP server for the clients forwards the 'tcode'DHCP tag (usually tag 101, though 100 and 2 can work).
root/time/useNTPServers Set to 1 to enable the use of NTP time servers tosynchronize the client clock. If this is enabled, make sure anNTP server is specified via DHCP or the 'NTPServers' key.
root > translationThis section describes the registry keys, functions, options, and descriptions in the root > translationfolder.
Table C-16 root > translation
Registry key Description
root/translation/coreSettings/localeMapping/{language} An internal key used to provide the text string next to theappropriate language on the language selector. This keyshould not need to be modified.
root/translation/coreSettings/localeSettings Changes the locale for the client. This locale will also beforwarded to the remote connection. Valid locales are:
root > time 85

Table C-16 root > translation (continued)
Registry key Description
en_US (English), de_DE (German), es_ES (Spanish), andfr_FR (French). Other locales, such as ja_JP (Japanese) andzh_CN (Chinese), might be available as client updates.
root/translation/gui/LocaleManager/name The name of the settings editor for this application. This keyshould not need to be modified.
root/translation/gui/LocaleManager/status The active status of the settings editor for this application.This key should not need to be modified.
root/translation/gui/LocaleManager/title The window title of the settings editor for this application.This key should not need to be modified.
root/translation/gui/LocaleManager/widgets/localeSettings
root > usersThis section describes the registry keys, functions, options, and descriptions in the root > usersfolder.
Table C-17 root > users
Registry key Description
root/users/root/password The password for Administrator Mode. If empty,Administrator Mode is locked. Administrator Mode givesaccess to all control panel items.
root/users/user/apps/hptc-auto-update/authorized If set to 0, users will not be able to access Automatic Updateserver settings. The default configuration is disabledbecause clients will receive their Automatic Update serverURL through broadcast or DHCP tag.
root/users/user/apps/hptc-cert-mgr/authorized If set to 0, users will not be able to access CertificateManager settings. This might be useful in a DHCP-onlyenvironment where all certificate manager settings are givento clients by the DHCP server.
root/users/user/apps/hptc-color-temp/t410aio/authorized If set to 0, users will not be able to modify the screen colortemperature.
root/users/user/apps/hptc-date-mgr/authorized If set to 0, users will not be able to access local client dateand time settings. This might be useful in an environmentwhere the client date and time is set by NTP.
root/users/user/apps/hptc-display-prefs/authorized If set to 0, users will not be able to modify the screenresolution, bit depth, or refresh rate.
root/users/user/apps/hptc-display-prefs/t410aio/authorized If set to 0 users will not be able to modify the screenresolution, bit depth or refresh rate.
root/users/user/apps/hptc-i18n-mgr/authorized If set to 1, the locales control panel item will be enabled forusers. This is normally disabled because it has a directcontrol available from root/zero-login/controls.
root/users/user/apps/hptc-keyboard-layout/authorized If set to 1, the full keyboard layout control panel item will beenabled for users. This is normally disabled because it has adirect control available from root/zero-login/controls.
86 Appendix C HP Smart Zero Core registry settings

Table C-17 root > users (continued)
Registry key Description
root/users/user/apps/hptc-mixer/authorized If set to 0, the full-size mixer control panel will be disabled forusers. It is usually redundant, as the mini control covers thesame functions. To fully disable volume control, root/zero-login/controls/audio/authorized must alsobe set to 0.
root/users/user/apps/hptc-mouse/authorized If set to 0, users will not be able to modify local client mousesettings. Users will still be able to modify mouse settingsthrough remote host settings.
root/users/user/apps/hptc-network-mgr/authorized If set to 0, users will not be able to access network settings.This might be useful in a DHCP-only environment where allnetwork settings are given to clients by the DHCP server.
root/users/user/apps/hptc-printer-mapping-mgr/authorized If set to 0, users will not be able to set Windows driver valuesfor locally attached printers, which might prevent someprinters from mapping to remote sessions properly. Thissetting does not affect USB redirection.
root/users/user/apps/hptc-printer-mgr/authorized If set to 0, users will not be able to set Windows driver valuesfor CUPS attached printers, which might prevent someprinters from mapping to remote sessions properly. Thissetting does not affect USB redirection.
root/users/user/apps/hptc-profile-mgr/authorized If set to 0, users will not be able factory reset the client. Theonly way to factory-reset a device if this control is disabled isto update the client with a new configuration that has thiscontrol enabled or to restore the factory image via USB key.
root/users/user/apps/hptc-root-xterm/authorized If set to 1, a root X terminal control panel item will be enabledfor users.
CAUTION: Enabling root terminal access is a security riskand is not recommended in a production environment. Theroot terminal should only be enabled for use in debugging aprotected, non-production environment.
root/users/user/apps/hptc-shortcut-mgr/authorized If set to 1, the shortcut manager item will be enabled forusers.
root/users/user/apps/hptc-switch-admin/authorized If set to 1, the Admin/User mode Switch will be enabled forusers.
root/users/user/apps/hptc-vncshadow/authorized If set to 1, the VNC Shadowing control panel item will beenabled for users.
root/users/user/apps/scim-setup/authorized If set to 1, the SCIM (Input Method) control panel item will beenabled for users
NOTE: SCIM is used for local Asian language input andmight not be present on the system without the installation ofan Asian language kit.
root/users/user/AutoBrightEnabled Set to 1 to enable automatic brightness configuration on theHP t410 All-in-one when in 'Power over Ethernet' mode. Thisfeature attempts to lower the brightness when power usagegoes above a critical threshold to prevent the Ethernet switchfrom shutting off power to the unit.
root/users/user/MaxPowerDetectEnabled Set to 1 to enable the maximum power detection algorithmon the HP t410 All-in-one when in 'Power over Ethernet'mode. This feature attempts to determine the actualmaximum power that can be drawn from the Ethernet switch.Shorter Ethernet cables translate to higher maximum power.
root > users 87
Table C-17 root > users (continued)
Registry key Description
root/users/user/OnDemandCPUThrottleEnabled Set to 1 to enable on-demand CPU throttling on the HP t410All-in-one when in 'Power over Ethernet' mode. This featurelowers the CPU frequency when power usage goes above acritical threshold to prevent the Ethernet switch from shuttingoff power to the unit.
root/users/user/WOLEnabled Set to 0 to disable Wake On LAN.
root > zero-loginThis section describes the registry keys, functions, options, and descriptions in the root > zero-loginfolder.
Table C-18 root > zero-login
Registry key Description
root/zerologin/buttons/configure/authorized Enables or disables the configuration menu. If set to 0, userswill not be able to configure any device settings.
root/zero-login/buttons/info/authorized Enables or disables the system information panel. If set to 0,users will not be able to view any information about thesystem.
root/zerologin/buttons/shutdown/authorized Enables or disables the shutdown button on the login screen.If set to 0, users will only be able to power off the device bypressing the power button directly.
root/zero-login/controls/audio/authorized If set to 0, users will be unable to change the sound outputvolume. This might be useful in an environment that shouldhave all sound muted or set to a specific volume. To fullyprevent users from changing sound output levels, be sureroot/users/user/apps/hptc-mixer/authorizations is also set to 0.
root/zerologin/controls/connection/authorized If set to 0, users will be unable to redefine the connectiontype. This is disabled by default because it is normallyundesirable to allow users to change the connection type in aproduction environment.
root/zero-login/controls/i18n/authorized If set to 0, users will be unable to change the locale. This isuseful in a single language environment.
root/zero-login/controls/keyboard/authorized If set to 0, users will be unable to change the keyboardlayout. This is useful in a single language environment.
root/zero-login/defaultCredentials/domain If set, this domain name will be supplied as the default to thelogin dialog if no alternative has been saved through"RememberMe". This is useful in environments where asingle domain name is dominantly used.
root/zero-login/defaultCredentials/domainList Colon-separated list of domains; for example,domain1:domain2:(…). These domains are madeavailable in a menu on the login screen. A particular domaincan be preselected by setting it in the root/zero-login/defaultCredentials/domain registry key.
root/zerologin/defaultCredentials/password If set, this password will be supplied as the default to thelogin dialog if the user and domain match their defaults here.Typically used with auto-start connections.
88 Appendix C HP Smart Zero Core registry settings

Table C-18 root > zero-login (continued)
Registry key Description
root/zerologin/defaultCredentials/readOnly If set to 1, login username, password, and domain will beread-only fields. This is only useful for connections that auto-start and auto-reconnect.
root/zerologin/defaultCredentials /rememberMe If set to 1, the username and domain used for a connectionwill be preserved as defaults for the next time the login dialogappears. For most connection types, the user can toggle thisvalue with the "Remember Me" checkbox.
root/zerologin/defaultCredentials /smartcard Supplied as the default to the login dialog if the user anddomain match their defaults here. Typically, used withautostart connections.
root/zerologin/defaultCredentials /username If set, this username will be supplied as the default to thelogin dialog if no alternative has been saved through"RememberMe". Typically, used with autostart connections.
root/zero-login/styledir/default The directory in which the default style (.qss) andbackground (.rtf) files reside.
root/zero-login/styledir/rdesktop The directory in which the default style (.qss) andbackground (.rtf) files reside for use with rdesktopconnections.
root/zero-login/styledir/view The directory in which the default style (.qss) andbackground (.rtf) files reside for use with VMware HorizonView connections.
root/zero-login/styledir/xen The directory in which the default style (.qss) andbackground (.rtf) files reside for use with Citrix XenDesktopconnections.
root > zero-login 89

D VMware Horizon View USB configuration
This appendix includes the following topics:
● USB options in previous HP Smart Zero Core releases
● VMware Horizon View USB device families
USB options in previous HP Smart Zero Core releasesTo disable USBR on audio devices:
1. In the client registry, modify the entry /etc/vmware/config.
2. Add the following line:
viewusb.ExcludeFamily = “audio-in;audio-out;”
To exclude or include a particular device:
1. Obtain that device’s VID and PID.
2. In the client registry, modify the entry /etc/vmware/config.
3. Add the appropriate line:
● Viewusb.ExcludeVidPid = “vid-0f0_pid-0001;vid-**21_pid-*8*a;”
● Viewusb.IncludeVidPid = “vid-003a_pid-1234”
NOTE: The information in this section does not apply to a Teradici-accelerated t410 unit. To controlUSBR on that unit, upgrade to HP Smart Zero Core 4.3 or higher, which includes a built-in USBManager GUI.
NOTE: For more information on VMware Horizon View USB configuration, see Using VMwareHorizon View Client for Linux at http://www.vmware.com.
VMware Horizon View USB device familiesTable D-1 VMware Horizon View USB device families
Family Family name
Vendor vendor
Unknown unknown
Other other
Audio In audio-in
Audio Out audio-out
Communications comm
Human Interface Device hid
Bootable HID hid-bootable
90 Appendix D VMware Horizon View USB configuration

Table D-1 VMware Horizon View USB device families (continued)
Family Family name
Force Feedback Device physical
Imaging imaging
Printer printer
Mass Storage storage
Smartcard Reader smart-card
Security security
Video video
Wireless Adapter wireless
Bluetooth bluetooth
Wireless USB wusb
PDA Pda
VMware Horizon View USB device families 91

Index
AAdministrator Mode
control panel, using 11switching to User Mode 11
audio redirectionRDP 18VMware Horizon View 23
Automatic Intelligenceusing 42
Ccertificates
installing 27VMware Horizon View 27
CitrixHDX MediaStream 20overview 19support matrix 21
client control panelaccessing 9using in Administrator Mode
11using in User Mode 9
client information screenshiding 7using 5
client login screencustomizing 48
client profileadding files 38adding symbolic link 39certificates 38loading 36modifying 36registry settings 37saving 39
client toolbarusing 4
clientsconfiguring 9keyboard language 46navigating 4
troubleshooting 30updating. See updating clients
connectionsconfiguring 2default types 2edit default 11selecting 2, 9
Ddesktop
shortcuts 3using 3
device redirectionRDP 16VMware Horizon View 23
Ggetting started 2
HHDX MediaStream 20HP Device Manager 45HP Intelligent Delivery Service 45HP Smart Zero Client Services
installing 35overview 34Profile Editor. See Profile Editorsupported operating systems
34
KKiosk Mode
RDP 15VMware Horizon View 21
Mmass storage redirection
RDP 17VMware Horizon View 23
MMRRDP 15VMware Horizon View 22
Multimedia Redirection. See MMR
Pparallel printer configuration 39printer configuration 39printer mapping 29printer redirection
RDP 17VMware Horizon View 23
Profile Editorusing 36
RRDP
audio redirection 18device redirection 16experience options 18Kiosk Mode 15mass storage redirection 17MMR 15multi-monitor sessions 16overview 14printer redirection 17RFX 15smart card redirection 18USB redirection 16
registry settings 58RemoteFX. See RFXRFX 15
Sserial printer configuration 39settings, administrator
audio 11automatic update 13certificates 14date and time 13display preferences 12factory reset 13keyboard layout 12keyboard shortcuts 14language 13mouse 12network 13printer mapping 12security 13sound 13task manager 14text editor 14USB 13Xterminal 14
settings, useraudio 10date and time 10display preferences 10keyboard layout 10language 10mouse 10

network 10printer mapping 11
settings, VNC shadowingfactory reset 13
smart card redirectionRDP 18VMware Horizon View 24
system diagnostics 32system status icon 4
Ttroubleshooting
firmware corruption 31network connectivity 30printer configuration 31using system diagnostics 32
Uupdating clients
broadcast update 43DHCP tagging update 43DNS alias update 44manual update 44
USB redirectionRDP 16USB Manager 28VMware Horizon View 23
User Modecontrol panel, using 9switching to Administrator
Mode 10
VVirtual Network Computing. See
VNCVMware Horizon View
audio redirection 23certificates 27changing protocols 26command line arguments 25connection options 25device redirection 23keyboard shortcuts 22Kiosk Mode 21mass storage redirection 23MMR 22multi-monitor sessions 22overview 21printer redirection 23security levels 28smart card redirection 24
Teradici-accelerated 26USB configuration 90USB redirection 23webcam redirection 24
VNC shadowing 13
Wwebcam redirection
VMware Horizon View 24