Adapting Existing Non-Formal Education Techniques to...
58
Adapting Existing Non-Formal Education Techniques to Conform to Universal Design Adapting CSIRO-SEC Hands-On Forensic Frenzy Program for Students with Visual Disabilities Sponsored by Commonwealth Scientific and Industrial Research Organisation (CSIRO) An Interactive Qualifying Project Proposal submitted to CSIRO Education and the Faculty of WORCESTER POLYTECHNIC INSTITUTE By Jillian Cohen Chad Mondor Sally Trabucco Spring 2009 Approved: ______________________ Stephen Weininger, Advisor ______________________ Robert Kinicki, Co-Advisor ______________________ Thidinalei Tshiguvho, Co-Advisor
Transcript of Adapting Existing Non-Formal Education Techniques to...
Adapting Existing Non-Formal Education Techniques to
Conform to Universal Design
Adapting CSIRO-SEC Hands-On Forensic Frenzy Program for
Students with Visual Disabilities
Sponsored by Commonwealth Scientific and Industrial Research Organisation
(CSIRO)
An Interactive Qualifying Project Proposal submitted to CSIRO Education and the Faculty of
WORCESTER POLYTECHNIC INSTITUTE
By
Jillian Cohen
Chad Mondor
Sally Trabucco
Spring 2009
Approved: ______________________
Stephen Weininger, Advisor
______________________ Robert Kinicki, Co-Advisor
______________________
Thidinalei Tshiguvho, Co-Advisor
ii | P a g e
Table of Authorship
Section # Section Title Primary Author Primary Editor
1 Introduction Jillian All
2 Background
2.1 Non-formal education Sally All
2.1.1 Definition and
comparison to formal
Sally All
2.1.2 Evaluation and
Assessment
Sally All
2.1.3 CSIRO Science
Education Centre
Programs
Sally All
2.2 Visual Impairment Jillian All
2.2.1 Definition Jillian All
2.2.2 Barriers Present for
students
Jillian All
2.2.3 Adaptations for
students
Jillian All
2.2.4 Universal Design Jillian All
2.3 CSIRO Programs Chad All
2.3.1 Forensic Studies Chad All
2.3.2 Tyre Forensics Chad All
2.3.3 Use in Forensic Frenzy Chad All
2.3.4 Casting and Moulds Chad All
3 Methodology Chad All
3.1 Universal Design
Equipmet
Chad All
3.1.1 TIPOPIC Versions Chad All
3.1.2 TIPOPIC Qualifications Chad All
3.2 Procedure to build
TIPOPIC
Chad All

iii | P a g e
3.2.1 TIPOPIC Casing Chad All
3.2.2 Plaster Mixing and
Pouring
Chad All
3.2.3 Tyre Moulding
Procedure
Chad All
3.3 Assessment Sally All
3.4 Sample Size Sally All
3.5 Data Analysis Sally All
iv | P a g e
Table of Contents Table of Authorship ...................................................................................................................................... ii
Table of Contents ......................................................................................................................................... iv
Table of Figures ............................................................................................................................................ vi
List of Tables ............................................................................................................................................... vii
Nomenclature ............................................................................................................................................ viii
1 Introduction .......................................................................................................................................... 1
2 Background ........................................................................................................................................... 3
2.1 Non-formal Education ................................................................................................................... 3
2.1.1 Definition and Comparison to Formal Education ................................................................. 3
2.1.2 Evaluation and Assessment .................................................................................................. 4
2.1.3 CSIRO Science Education Centre Programs .......................................................................... 5
2.2 Visual Impairment ......................................................................................................................... 6
2.2.1 Definition............................................................................................................................... 6
2.2.2 Barriers Present for Students ................................................................................................ 7
2.2.3 Adaptations for Students ...................................................................................................... 7
2.2.4 Universal Design .................................................................................................................... 7
2.3 CSIRO Programs .......................................................................................................................... 10
2.3.1 Forensic Studies .................................................................................................................. 10
2.3.2 Tyre Forensics ..................................................................................................................... 11
2.3.3 Use in Forensic Frenzy ........................................................................................................ 11
2.3.4 Castings and Moulds ........................................................................................................... 12
3 Methodology ....................................................................................................................................... 13
3.1 Universal Design Equipment ....................................................................................................... 15
3.1.1 TIPOPIC Versions ................................................................................................................. 15
3.1.2 TIPOPIC Qualifications......................................................................................................... 16
3.2 Procedure to Build TIPOPIC......................................................................................................... 17
3.2.1 TIPOPIC Casing .................................................................................................................... 18
3.2.2 Plaster Mixing and Pouring ................................................................................................. 19
3.2.3 Tyre Moulding Procedure ................................................................................................... 21
3.3 Methods of Assessment .............................................................................................................. 23
3.4 Sample Size ................................................................................................................................. 26
v | P a g e
3.5 Data Analysis ............................................................................................................................... 27
References .................................................................................................................................................. 31
Appendix A: Vision Student Accessibility Matrix (SAM) ......................................................................... 33
Appendix B: Observational Checklist ...................................................................................................... 42
Appendix C: Pre-Program Survey ............................................................................................................ 45
Appendix D: Post-Program Survey .......................................................................................................... 48
vi | P a g e
Table of Figures Figure 1 - Flow chart describing breakdown of purpose of project ............................................................ 14
Figure 2 - Course of action .......................................................................................................................... 14
Figure 3 - Requirements of category rankings ............................................................................................ 17
Figure 4 - Diagram of TIPOPIC Casing ......................................................................................................... 19
Figure 5 - Lubricated Tyre ........................................................................................................................... 20
Figure 6 - TIPOPIC Casing ............................................................................................................................ 20
Figure 7 - Spreading Plaster of Paris ........................................................................................................... 21
Figure 8 - TIPOPIC before sealant ............................................................................................................... 22
Figure 9 - Assessment Types and corresponding survey statements ......................................................... 24
Figure 10 - Sample Size, FF=Forensic Frenzy, TT=tyre track Station ........................................................... 27
Figure 11 - Grade level bins ........................................................................................................................ 28
Figure 12 - Gender bins ............................................................................................................................... 28
Figure 13 - Disability bins ............................................................................................................................ 29
Figure 14 - Tyre Track Station bins .............................................................................................................. 30
Figure 15 – Type of School Attended bins .................................................................................................. 30

vii | P a g e
List of Tables Table 1 - Feasibility Rating of TIPOPIC Versions .......................................................................................... 16

viii | P a g e
Nomenclature AT: Assessment Type
CSIRO: Commonwealth Scientific and Industrial Research Organisation
CSIRO-SEC: Commonwealth Scientific and Industrial Research Organisation- Science Education Centre
ddH2O: Distilled and De-ionized Water
MSDS: Material Safety Data Sheet
SAM: Student Accessibility Matrix
TIPOPIC: Tyre Inverse Plaster Of Paris Investigation Chamber

1 | P a g e
1 Introduction Non-formal education is valuable to the overall learning experience of students. Unfortunately, most
non-formal education techniques are not able to communicate the desired objective to students with
disabilities. Universal Design is a method of adapting these programs to influence all students regardless
of impairments. It reduces barriers present in educational settings so that all students have equal
opportunities to learn.
The Commonwealth Scientific and Industrial Research Organisation (CSIRO), in Victoria Australia, strives
to educate students about science through a variety of exciting educational programs. CSIRO is working
to implement Universal Design into their educational programs so that all students have equal
opportunities to gain knowledge and understanding about science. The process of implementing
Universal Design entails the development of the program so that a student who has any type of
disability or impairment will have the same learning opportunities as a student without any disability or
impairment. It is also important that the modifications to the program do not interfere with the delivery
of the program’s objective, to introduce students to science.
One of the programs that CSIRO offers to educators is titled Forensic Frenzy. CSIRO reaches out to
students in grades five through ten and teaches them the fundamentals of forensic science in hopes that
they will acquire an interest in the subject. Students take on the role of forensic investigators and
examine evidence using scientific techniques to solve a crime. The activities included in the Forensic
Frenzy program are based on evidence left behind at the scene of the crime. The activities include
fingerprint analysis, footprint analysis through soil testing, fabric and fibre analysis, and tyre track
identification. The activity that the team has been asked to modify is tyre track identification.
The current method for identification of tyres in the Forensic Frenzy program revolves around the use of
photographs. A photograph of the tyre track left behind at the crime scene is compared to photographs
of the tyres that belong to the cars of the four suspects. To a student without any disability, this task
would seem relatively easy. However, to a student who is visually impaired, the comparison of the
photographs is extremely difficult and may even be impossible. It would be beneficial to students with
visual impairments to have a tactile aid for the tyre track identification activity.
In order to address the problem, the WPI project team set out to create a plaster mould of the tyre to
represent the inverse print that the tyre track would exhibit. The team developed four prototypes
culminating in a final design. By using Plaster of Paris, the team was able to create the inverse print of
the tyre in hopes of creating a tactile aid for the use of all students. The final design will be implemented
into the Forensic Frenzy program so that students participating in the program will be able to feel the
comparisons of the tyre track left at the scene of a crime to the tyre itself.
After implementing the new approach to the tyre track identification activity, the team must assess the
effectiveness that the piece of equipment has on the Forensic Frenzy program and compare the
assessment to the previous methods of tyre identification. Students will either participate in the tyre
track activity by means of photograph analysis or by means of tactile learning. Throughout the activity,
2 | P a g e
they will be assessed. The assessment is composed of three parts: a pre-program survey, observation,
and a post-program survey. The pre-program survey defines the level of knowledge that the students
have before going through the program. During the activity, the team will observe the students’
interactions and behaviours. After the completion of the activity, the student will participate in a post-
program survey that will assess the amount of knowledge and interest gained in the activity. The set of
data that comes from photograph analysis will be compared to the set of data from tactile learning. The
desired outcome of implementing Universal Design is that students will gain the same amount of
educational learning and stimuli regardless of disability. If this outcome is achieved, the team will have
reached the primary step in implementing Universal Design into CSIRO’s educational programming.
3 | P a g e
2 Background To best understand the CSIRO objectives, a variety of subjects were analysed by the team. Within the
non-formal education setting there are many types of students. Some students have disabilities and
impairments and others do not. Implementing Universal Design into the educational setting will allow
all students to gain the same opportunities regardless of impairments.
To be able to implement Universal Design into CSIRO’s science programs, the project team researched
an assortment of methods that are suggested for students with visual impairments in an educational
setting. The project team also needed to research assessments that can accommodate all types of
students. The team found that assessments vary widely between formal and non-formal education.
The project team must convert a primarily vision based activity, the tyre track identification station, to a
tactile learning opportunity. Different moulding techniques were researched to determine the most
effective means of tactile learning.
2.1 Non-formal Education Non-formal education, occasionally referred to as informal education in literature, is an integral part to
learning in most educational systems. Non-formal education gives students a chance to learn and
explore at their own pace, following their individual motivations.
2.1.1 Definition and Comparison to Formal Education
To define and clarify the term non-formal education, formal and informal education must first be clearly
defined. According to Mark K. Smith, formal education is the “hierarchically structured, chronologically
graded ‘education system’, running from primary school through the university and including, in
addition to general academic studies, a variety of specialised programmes and institutions for full-time
technical and professional training” (Smith, 2001). Formal education is typically what students
experience in schools as part of a larger educational system, public or otherwise. In contrast, informal
education is “the truly lifelong process whereby every individual acquires attitudes, values, skills, and
knowledge from daily experiences and the educative influences and resources in his or her
environment” (Smith, 2001). Informal education is simply the knowledge that one gains through
interaction with his or her environment and the other individuals in it.
In contrast to these types of education is non-formal education, which falls between both of these
extremes. Non-formal education is “any organised educational activity outside the established formal
system- whether operating separately or as an important feature of some broader activity- that is
intended to serve identifiable learning clienteles and learning objectives” (Smith, 2001). Common
examples of non-formal education are field trips, museum or national park visits, and hands on projects
provided by outside vendors. Non-formal education increases interest and curiosity for learning by
providing students an opportunity to explore things which they find interesting and allows them to learn
based upon their own motivations. Non-formal education is sometimes referred to as informal
education. In this proposal non-formal and informal education will be used as defined above.
4 | P a g e
2.1.2 Evaluation and Assessment
Assessment is an essential element of both formal and non-formal education. Particularly in non-formal
education, the issue of assessing both individual progress and the effectiveness of the program as a
whole is not well established. Assessment of these two aspects is clarified by the following distinction:
“Assessment is a test of individual performance, whereas evaluation is a means of
gathering a more broad range of data concerning effectiveness of programs and
exhibits.” (MacKendrick, Osgood, & Teske, 2008, p64).
In this sense, most non-formal educators are concerned with evaluation rather than assessment of
individual student progress. Evaluation is preferred because non-formal education is designed to be fun,
low-stress, and self-motivated. If the students are asked to participate in an assessment tool, they may
experience anxiety and decreased levels of enjoyment of the activity (ibid, p63). For this reason, when
evaluating a program or assessing students in a non-formal environment, care must be taken to use
tools that are not stressful to students. The most common types of assessments used in non-formal
settings include questionnaires, interviews, observation, focus groups, surveys, question and answer
sessions, and minute papers (ibid, p62). Of these the most practical for projects such as the ones
presented by CSIRO are observation, minute papers, and questionnaires.
Observations made by outside evaluators are considered to be the best form of assessment. Students
often will not recognize they are being observed by outside parties and, therefore, stress to students is
minimized. Additionally, structured observation using a checklist of clear behaviour associated with the
learning objectives of the project can provide clear data to analyse (ibid, p74).
Minute papers have been recommended as the second choice of assessment. It is essential to first
explain to students that the minute paper is not a test (as long as no grade will be given on an individual
basis for the paper). The minute paper gives students an opportunity to show their enthusiasm for
particular parts of the project and point out areas that may be unclear. This is accomplished by asking
two open ended questions, one regarding what the student enjoyed and the other about things the
students struggled with or did not understand (ibid, p74). These minute papers would take a significant
amount of time to analyse and may be difficult to draw strong comparable data from. However, minute
papers work well and provide clear feedback from the students as long as there is adequate time for
performance and analysis.
The third recommendation for assessment of non-formal education is a questionnaire. Questionnaires
are least desirable because of the close resemblance to a test. Many students, particularly younger
students, may not understand the difference between a test and a questionnaire which may result in
unneeded stress. With this stress the data may not be accurate; however the data will be more precise
than other methods. The data are collected using a series of questions of various styles, including
multiple choice and short answer, which gives the precise data. (ibid, p74).
In order to have standardized data, a baseline of understanding must be established before the program
is implemented. This baseline gives a comparison to the post-program data gathered. Two types of pre-
program tools are recommended for use in creating this baseline. The first would be to provide students
5 | P a g e
with pre-program information packets. These packets would be provided by the non-formal educators
to the formal teachers in order to give background information on the subject, including any terms that
may be unfamiliar to the students (ibid, p69). The main problem with this method, assuming the formal
teacher presents the information to the students, is one of understanding and retention. Understanding
new material may be difficult for students, particularly those with disabilities, and even if understood,
students may forget the new material before the start of the program. Additionally, this method does
not account for students who may already have advanced knowledge of the subject (ibid, p70).
The second method would be to perform background knowledge probes prior to the start of the
program, which provides data on the students’ level of understanding (ibid, p69). These background
knowledge probes could include a simple set of rating scales for each skill or knowledge area that asks
the student’s perceived skill or comfort level. For example, the student would be asked to rate his or her
knowledge of science from 1-5, 1 indicating no knowledge and 5 indicating advanced knowledge. The
background probe could also ask open ended questions for which students provide answers, such as
asking the student to explain his or her past experience with forensic studies. Rating scales are more
likely to be used by a formal teacher as they are quick to complete and therefore would not detract
from instruction time (ibid, p70). The background knowledge probes are a good choice because they
give a clear baseline to compare post-program data. However, one must consider the importance of
filling gaps in background knowledge essential to the program. With this, the best pre-program system
would be to provide information packets and subsequently perform background knowledge probes
(ibid, p70). Coupled with a pre-program system such as this, the post-program assessment could provide
the non-formal educators with feedback regarding the effectiveness of the program. Additionally, if the
data were to be shared with the formal educators, it would provide a chance for them to assess the
usefulness to the class as a whole and any gaps in knowledge still to be filled (ibid, p77).
2.1.3 CSIRO Science Education Centre Programs
The Commonwealth Scientific and Industrial Research Organisation (CSIRO) is a governmental scientific
agency in Australia. CSIRO has a non-formal science education centre program which “operates a range
of science education projects to alert school students, their families and teachers to the contribution of
scientific research to our community” (Science for Schools, 2008). CSIRO currently has nine centres
including at least one in each state and territory (Science for Schools, 2008). The Victorian Centre,
located just outside Melbourne in Highett, is the focus of this section, as that will be the operating base
for the project team. CSIRO projects are divided into two broad categories, one tailored toward primary
school students (grades pre-6) and the other toward secondary school students, which includes grades
7-VCE (Victorian Certificate of Education, obtained by completing years 11 and 12) (School Programs
[Victoria] [Overview], 2008). Each program also specifically targets defined age groups. The Victorian
Centre offers sixteen primary school programs covering topics such as small animals, robotics, physics,
chemistry, energy, scientific method, natural disasters, weather, and astronomy (School Programs
[Victoria] [Overview], 2008). Additionally, fifteen secondary school programs are offered, including
topics such as chemistry, forensics, DNA manipulation, photonics, robotics, energy, and health (School
Programs [Victoria] [Overview], 2008). These programs meet certain learning standards that are specific
6 | P a g e
in the online descriptions and often parallel formal learning objectives (School Programs [Victoria]
[Overview], 2008).
2.2 Visual Impairment The visually impaired have a disadvantage in the educational setting. Many programs have not been
updated to support Universal Design, so students with any type of impairment will not gain the same
amount of learning and excitement as students without a visual impairment. It is important to
understand the classifications of vision impairment and the definition of being legally blind in Australia.
It is also crucial to be aware of the barriers that are present to students with visual impairments and
what can be done to improve their quality of learning.
2.2.1 Definition
Vision impairment is defined as a limitation of one or more functions of the eye (RIDBC, 2008). The most
common impairments affect the sharpness or clarity of vision, normal range of vision, or colour. The
government of Australia defines a person as “legally blind” if his or her “degree of sight loss entitles
them to special benefits.” An Australian person is legally blind if he or she has 6/60 vision, meaning he or
she cannot see at six meters what a person with normal vision can see at 60 meters (Vision Australia,
2007). If a person’s field of vision is reduced to less than 20 degrees, they are also considered legally
blind.
Approximately one percent of Australia’s population suffers from a significant visual impairment, which
is equivalent to more than 400,000 people (University of New Castle, 2005). Eighty percent of these
impairments are found to be caused by one of five main eye conditions: cataracts, glaucoma, under-
corrected refractive error, diabetic retinopathy, and age-related macular degeneration (CERA, 2008).
With the exception of macular degeneration, all these conditions can be evident in children. Some of
these conditions are congenital while others may develop later in childhood. Fortunately, the majority of
vision loss is correctable. According to the Centre for Education and Research on Ageing (CERA) at least
50% of vision loss is correctable and 25% is preventable (CERA, 2008). This correction is accomplished
through various treatments and the use of visual aids such as glasses or contact lenses.
While there are many opportunities for correction, a number of children still remain visually impaired to
the extent that special adaptations are needed for them to learn properly. One study found that only 3%
to 5% of print material is available in an accessible format for the visually impaired (Vision Australia,
2007). For students whose visual impairments cannot be corrected, there are a variety of means that
can help them in the classroom, all depending on the severity of their disability. Repeating important
phrases, speaking clearly and audibly, using a microphone, and verbalizing all points that are written out
will allow the student to use his or her sense of hearing to take information in. Supplying lecture notes
in a variety of formats, including in large print and in Braille, making sure there is proper lighting in the
classroom, verbally describing all motions and demonstrations, and using simple language are also
helpful to these students (University of New Castle, 2005).
7 | P a g e
2.2.2 Barriers Present for Students
In a non-formal educational setting, the barriers to students with visual impairments are significant. In
CSIRO’s Forensic Frenzy program, students rely on their ability to see evidence that is left behind at a
crime scene. There is a considerable amount of observation that must be done that is inaccessible to
students with visual impairments.
In any situation where printed material is provided to the students, the size and font of the text is crucial
for students that have low vision. If the text is not enlarged properly, the student may not be able to
read instructions or worksheets and would have a disadvantage compared to the students with normal
vision. Additionally, if material is in colour, the contrast may be a barrier to these students. Therefore, it
is important for any material used in the classroom to be accessible to all students (University of New
Castle, 2005). Due to the fact that CSIRO uses photographs in their educational programming, students
with visual impairments will not be able to distinguish one photograph from another.
It is important for appropriate dialogues to be used in the vicinity of students with visual impairments.
The students do not have the ability to watch interactions between people or even know if a question is
directed towards them. Descriptors such as “up here” or “over there” are often accompanied by hand
gestures that a student with a visual impairment will not be able to properly observe (University of New
Castle, 2005).
2.2.3 Adaptations for Students
To make learning more accessible for students with visual impairments, adaptations can be made to
both materials that are used for learning and to the students’ environment. When adapting materials, it
is important to consider the purpose of the lesson and define what the material is supposed to teach.
The material should end up serving that purpose. Being aware of the student’s best learning channel,
whether it is auditory or tactile, should be considered when adapting the material. The student should
be able to gain the same amount of information from the adapted material as the sighted students do
from the original material. This learning should be measurable. Examples of modifications and
adaptations in materials include enlarging text, adding texture, minimizing glare, eliminating
unnecessary detail, shifting from two-dimensional to three-dimensional, giving extra time, and changing
the media from written to oral or taped, or from verbal to graphic (Bishop, 2004, p107-108).
Adapting the learning environment can also be particularly helpful to a student with visual impairments.
The student should be allowed preferential seating for best use of available vision (Bishop, 2004, p109).
The student should be allowed enough time to complete their best work on assignments, and their best
work should be expected. The same quality of work should be expected from the student with a visual
impairment as a student with normal vision. Lighting conditions should be monitored to minimize glare
and maximize sight potential. Also, maintaining organisation is important so the students are familiar
and comfortable in their learning space (Bishop, 2004, 109).
2.2.4 Universal Design
Universal design, according to the National Universal Design for Learning Task Force, is a “framework for
designing educational environments that enable all learners to gain knowledge, skills, and enthusiasm
8 | P a g e
for learning. This is accomplished by simultaneously reducing barriers to the curriculum and providing
rich supports for learning” (National Universal Design for Learning Task Force, 2008). Accommodations
are often made for students that have disabilities or impairments so that assignments and activities are
accessible to them. Many of the accommodations made by educators for students with disabilities are
incorporated into the classroom to enhance the level of understanding for all of the students. A variety
of techniques have been shown to make educational material more accessible and more easily
understood for all students, whether they have a disability or not (Simone, Vozzola, Worobey, 2007).
The Universal Design principles are as follows:
1. Provide material to students to prepare them in advance
2. Determine which specific activities are essential to achieve learning goals
3. Integrate multi-sensory activities
4. Simplify instructions
5. Encourage group work
6. Focus on the individual strengths of students
7. Be aware of the presentation style
8. Ensure that all equipment is easily accessible to students
9. Ensure safety when using any equipment
10. Allow students additional time if needed
A detailed description of each principle follows:
1. Providing preparatory material to students is important because it introduces them to the
concepts before an activity and allows them to familiarize themselves with the material before
seeing it in the classroom. Educators should make sure that materials, such as worksheets, are
converted to formats and fonts that are suitable for all students. The alternate formats depend
on the student’s actual need and can include Braille or an enlarged font. By providing the
information in advance, students also are given repetition. Repetition allows information to be
introduced through different mechanisms multiple times and allows the students to gain a
greater understanding of the subject.
2. By recognizing the primary and secondary objectives of an activity, educators are able to identify
which areas must be modified to accommodate all students. For example, if the goal of the
activity is to observe a chemical reaction that results from the mixture of two chemicals, the
measurement of the chemicals themselves is not an important concept to the activity. The
students could be given preset volumes to mix to remove the barrier that is associated with the
task and focus the students’ attention on the most important objective.
3. Integrating multi-sensory activities are essential to learning in the classroom. It helps reinforce
concepts and allows the student to access material through multiple mediums. Students are
able to take advantage of their abilities and utilize their strongest senses. Additionally, multi-
sensory activities allow students to access material through different mechanisms which keep
them more engaged in the activity. For example, if an activity requires the students to observe
9 | P a g e
photographs and compare them, it would be beneficial to also include a tactile mould so that
students would be able to see and feel the comparison.
4. Simplifying instructions gives the students clear and concise directions. By doing this, students
are more likely to understand the procedure and even complete the activity independently.
Also, by breaking the instructions into smaller steps and appending images makes the
instructions easier to follow. Students with language and vocabulary barriers will benefit
especially well from these modified instructions because they will gain a better understanding of
the simpler language and images.
5. Group work should be encouraged in the learning environment because students can focus on
their strengths and contribute to the understanding of the entire group. If a student doesn’t
understand the procedure of a certain part of the activity, another group member will be able to
complete it and aid the whole group in better understanding. Allowing students to take
advantage of their own strengths and share them with the group makes group work much more
effective, productive, and satisfying for all students.
6. Focusing on the individual strengths of the students allows the educator to incorporate activities
into the curriculum that the students are capable of completing. If programs and activities are
created with a broad range of student abilities in mind, fewer adaptations will have to be made
in the future. Additionally, focusing on the strengths of the students will make the curriculum
more accessible and more enjoyable for all students.
7. It is important for the educator to be aware of the presentation style they are using. This style
should be accessible to all students. The presenter should avoid pacing back and forth or turning
their back to the students. The presenter should always face the students directly so that their
voice is projected forward and so their expressions are always visible.
8. All equipment used in a program or activity should be in reach of the student. The activities
should be based at a level that can be easily and safely assessed by the students. By using
adjustable tables and workstations, and keeping necessary equipment in reach and organized,
more students will be able to gain knowledge and experiences. These changes will also make the
program or activity accessible to students with disabilities.
9. Safety is a primary consideration that should be taken into account when conducting an activity.
Suitable materials should be used that will not break and are less likely to harm a student.
Proper storage and properly labelling any hazardous or sharp material will familiarize the
students with the dangers. It is important to create a safe environment for students.
10. Students in the classroom have a wide range of abilities. If needed, it is necessary to allow
students more time to complete tasks. It is important students do not feel rushed because they
may not be able to do their best or fully understand the objectives of the activity. Providing
more time is particularly important for students with disabilities or impairments. It may take
them longer to read and comprehend the material.
Past studies have been completed assessing the extent to which Universal Design has been
implemented into existing CSIRO-SEC non-formal education programs (Simone, Vozzola & Worobey,
2007). This report presents the Student Accessibility Matrix, SAM, which illustrates the barriers that

10 | P a g e
students with disabilities encounter in educational settings. The vision impairment section of this matrix
is given in Appendix A.
2.3 CSIRO Programs CSIRO, the Commonwealth Scientific and Industrial Research Organisation, is the national science
agency of Australia, consisting of over 15 business divisions involved in over 740 research activities. The
mission of CSIRO is to serve the people of Australia by fostering an interest in science and research by
exploring problems and developing solutions for industry, environmental, and consumer markets
(www.csiro.au, 2009).
The Science Education Centres division of CSIRO are “the base for CSIRO Education outreach programs
around Australia” (www.csiro.au, 2009). The programs that CSIRO-SEC offers strive to bring interactive
activities to schools throughout the country for not only the students, but for professional educators as
well. The three goals of the CSIRO-SEC program are to alert students, teachers, and parents to
contributions society makes to scientific research, to engage students in scientific learning so that they
may choose to pursue a career in research, engineering, or scientific theory, and finally to elucidate the
applications of scientific practices to students and teachers in real-world scenarios.
CSIRO-SEC in Victoria offers over 30 programs to primary and secondary schools in the Melbourne area
covering a broad range of biological, chemical, and physics problems applied to solutions used in
industry and nature (www.CSIRO.au, School programs (Victoria) (Overview), 2009)
The Forensic Frenzy Program, an interactive forensic analysis activity offered by CSIRO-SEC to grade
levels 5-10, is a primary example of an interactive non-formal education program that may be better
adapted to coincide with Universal Design structure. The objective of this project is to better adjust the
Forensic Frenzy Program to reach a broader range of students, regardless of whether or not they have
visual, audible or other disabilities or impairments. The goal is to use this adapted Forensic Frenzy
program to collect data to determine if adapting non-formal education techniques to Universal Design
positivity influences education using the assessment tools such as SAM.
2.3.1 Forensic Studies
This project addresses the implementation of Universal Design into science education programs. An
established non-formal education program must be selected to test and compare improvements that
could be made to the program in order to determine the effectiveness of modifications in favour of
Universal Design.
CSIRO Science Education Centre of Australia provides a plethora of non-formal science education
programs to age groups ranging from primary education to secondary education. Forensic studies, by
their nature as an observational science, require acute use of the senses to analyse physical evidence to
elucidate events that have transpired and to gather information present at the scene of a crime. The
Forensic Frenzy program offered by CSIRO allows students to analyse the details of a mock crime scene
and, by using various observational skills, gather information to determine the series of events involved
in the crime and the role of the characters involved (Forensic Frenzy Teacher Booklet, 2006).
11 | P a g e
Many of the observational techniques used in the Forensic Frenzy program rely on visual methods of
observation. Therefore, they may be significantly improved in accordance with adopting a Universal
Design method so that the activities are not lost to those students with visual impairments. One aspect
of the mock study is to use visual observation to identify patterns of tyre tracks that have been left at
the scene of the crime and compare them to the original tyre to determine a match between a suspect’s
car and the tyre tracks at the crime scene.
This purpose of this activity is lost to those who have visual disabilities. They are unable to visually
compare the tyre track to its tyre complement. Forensic related investigations require acute observation
using all senses. The overall goal of the Forensic Frenzy activity follows the three goals of the CSIRO-SEC
department; mainly to reach out to students about the importance of science and its applications. For
this reason, forensic studies adapted to Universal Design are crucial for those students with visual
disabilities so that this goal is achieved. CSIRO-SEC would be better equipped to spark interest in science
and engineering to those with sensory impairments if their programs were adapted to Universal Design.
2.3.2 Tyre Forensics
Common practices in modern forensics include the casting of tyre tracks at crime scenes to prepare data
to be utilized in a court of law (Bodziak, 2008). Tracks left by tyres are the indentations in road materials,
marks on pavement, or other detailing remnants that a tyre leaves while moving backward or forward
when a load is applied. Track evidence involves the collection of those tyre track indentations and
includes but is not limited to measurements such as the track width, tread width, pattern, wheelbase,
turning diameter, and rolling circumference (Bodziak, 2008).
Tyre tracks may be left on a number of materials not limited to concrete, pavement, snow, dirt, mud,
sand or other driving surfaces. The techniques to analyse tyre tracks depend on many environmental
conditions at the time of driving.
Casting these tracks is common practice in forensics for those tyres leaving indentations in dirt, snow,
sand or other malleable surfaces. Common casting materials include epoxies, resins, rubbers, waxes and
other adhesive materials to mould to the contours of the track. Casting tyres or tracks provides a
method for those people with visual impairments to practice the activity of tyre forensics by making
what is normally a visual observation into a tactile feedback mechanism.
2.3.3 Use in Forensic Frenzy
To improve this non-formal education program towards Universal Design, tyre tread and tyre track
evidence must be made more accessible to students with visual impairments. A casting mould of tyres
will be implemented in this section of the Forensic Frenzy education program so that students will be
able to compare the imprint of a tyre to that of the original using tactile methods of examination.
This method of Universal Design accomplishes much beyond the scope of making this activity accessible
to students with visual disabilities. Students will be able to compare the tyre to its inverse. The imprint
of tyre tracks yield the inverse pattern to the tyre. This fact will stimulate the thought processes of
students to visually and geometrically compare an original three dimensional mould to its inverse to

12 | P a g e
identify matches. In addition, this side effect will allow students with visual disabilities to better
understand inverse images, patterns and designs.
Students will be able to compare a casting of a tyre, an alternate representation of the tyre track, to the
original tyre by physical means instead of simple visual observation. This is a powerful tool in
understanding how tyre forensic studies are actually practiced in crime scenes.
Most importantly, this method of improvement will allow students with visual impairments to
participate in a non-formal education program that would otherwise be lost to them in purpose and
understanding. Visually disabled students will be able to feel the ridges of the tyres and tyre tracks to
compare them, identify matches, and complete the activity by identifying the vehicle at the scene of the
crime.
2.3.4 Castings and Moulds
Several commercial products are available that may be used to properly mould rubber tyres, capturing
all the contours and details necessary for forensic analysis. Great-Stuff™ manufactures insulating foam
that hardens and may be used in addition to a silicone spray to yield an accurate physical mould of tyres.
Plaster of Paris is another commercially available product that may be used to create a hard but brittle
mould of tyres for use in observation. Epoxy resins are available which harden to fit the shape of a
mould and remain strong and durable.
Plaster of Paris is a commercially available powder that hardens similar to cement but remains slightly
malleable after drying. It is comprised primarily of calcium sulphate hemihydrate (CaSO4·½H2O) and is
created by heating gypsum to temperatures above 150°C with water. This mixture releases heat, has a
consistency of paste, and hardens after minutes of setting. Plaster of Paris creates accurate moulds, is
inexpensive, and relatively simple to use. It has a quick cure time and poses no health concerns
according to publicly available Material Safety Data Sheet (MSDS) reports (www.sciencestuff.com,
2006). Plaster of Paris is slightly brittle, which is to be expected from such a moulding substance.
For these reasons, Plaster of Paris is an ideal substance to select in creating tyre tracks for use in school
systems with children of all ages. It can be used to create a prop simulating tyre tracks running through
dirt for use in the Forensic Frenzy program to modify the program towards using Universal Design.
13 | P a g e
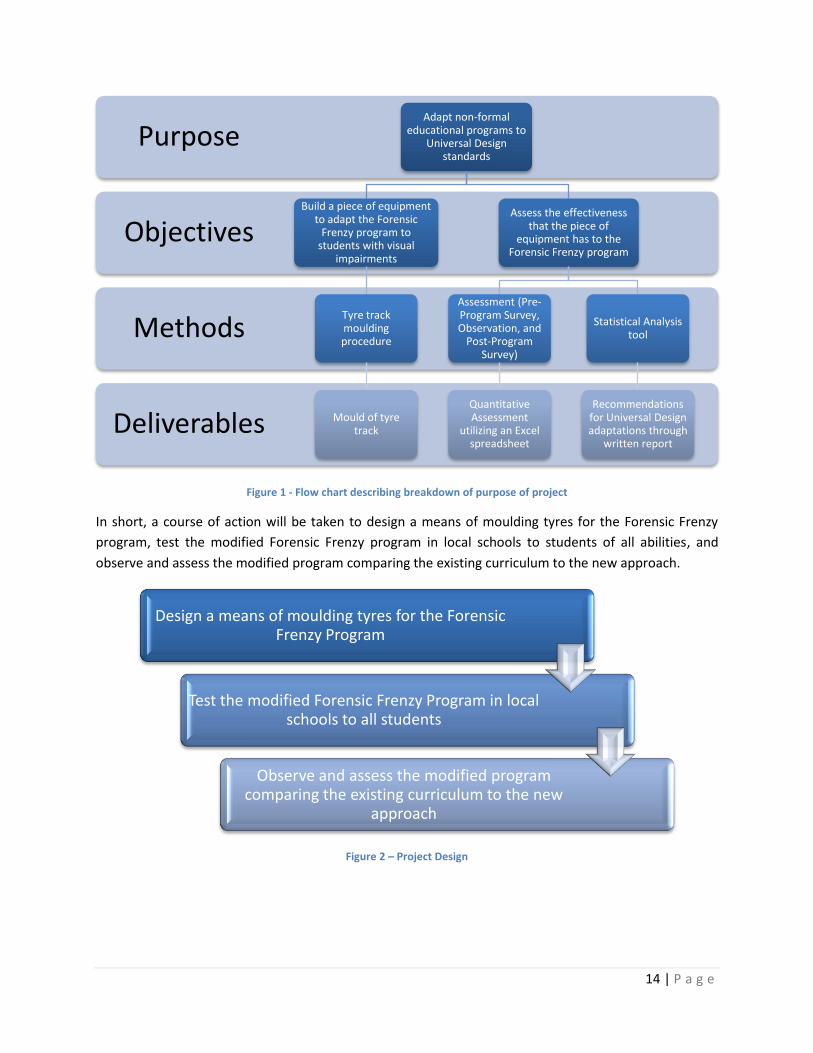
3 Methodology The broad scope purpose of working with CSIRO is to adapt non-formal educational programs towards
Universal Design standards. The majority of non-formal education programs lack Universal Design
implemented into the interactive activities, causing students with visual, hearing, or sensory disabilities
to take away less from the overall experience.
To better accomplish this goal within a specific program, two objectives have been set for the scope of
this project.
First, a piece of equipment must be built or improved upon to adapt a non-formal education program to
students with visual impairments. For the purposes of working with CSIRO’s existing non-formal
education programs, the Forensic Frenzy program was selected to better adjust existing equipment to
assist students with visual impairments in understanding the purpose of the demonstrations.
Second, to determine if the changes to the piece of equipment have an effect on the level of
understanding to all students involved, there must be a method of data collection and analysis.
Therefore the second objective is to assess the effectiveness that the piece of equipment has on the
understanding of the students progressing through Forensic Frenzy program.
Extensive research on the topics of Universal Design, assessment techniques, students with disabilities,
and forensics was completed and allowed three specific methods to be formulated. A method of
producing a tyre track mould was created and tested as a piece of equipment better designed using
Universal Design standards. Specific types of assessment techniques were chosen to gather data.
Specifically, a pre-program survey, observation, and post-program survey were selected as methods that
are used to collect data from students by a non-intrusive and accurate means. Methods of statistical
analysis must be determined to analyse, compare, and make conclusions from the data.
Using these methods, this project offers three deliverables. A piece of Universal Design equipment is
created, implemented and used within the Forensic Frenzy program. A quantitative assessment is
provided of all the data collected including any statistical correlations that may be found within bins of
data. Finally, recommendations are provided on how to adapt CSIRO and other non-formal education
programs to comply with Universal Design.
14 | P a g e
Figure 1 - Flow chart describing breakdown of purpose of project
In short, a course of action will be taken to design a means of moulding tyres for the Forensic Frenzy
program, test the modified Forensic Frenzy program in local schools to students of all abilities, and
observe and assess the modified program comparing the existing curriculum to the new approach.
Figure 2 – Project Design
Deliverables
Methods
Objectives
PurposeAdapt non-formal
educational programs to Universal Design
standards
Build a piece of equipment to adapt the Forensic
Frenzy program to students with visual
impairments
Tyre track moulding procedure
Mould of tyre track
Assess the effectiveness that the piece of
equipment has to the Forensic Frenzy program
Assessment (Pre-Program Survey, Observation, and
Post-Program Survey)
Quantitative Assessment
utilizing an Excel spreadsheet
Statistical Analysis tool
Recommendations for Universal Design adaptations through
written report
Design a means of moulding tyres for the Forensic Frenzy Program
Test the modified Forensic Frenzy Program in local schools to all students
Observe and assess the modified program comparing the existing curriculum to the new
approach
15 | P a g e
3.1 Universal Design Equipment In modifying a non-formal education program to better adapt to Universal Design standards, the “tyre
tracks” activity of the Forensic Frenzy program was selected as the model case study. As stated in
Section 2.2.4, students who have visual impairments do not benefit from this activity.
3.1.1 TIPOPIC Versions
The use of moulding materials to conform to a rubber tyre and cure to hardness was found to be the
most effective method to recreate a realistic tyre track. After extensive research, a testing phase ensued
which resulted in four consecutive versions of a Tyre Inverse Plaster of Paris Investigation Chamber
(TIPOPIC), the deliverable piece of equipment for use in the Forensic Frenzy program.
Version 0.1 of TIPOPIC utilized Great-Stuff™ insulation foam. The intention was to use a pressurized
canister to spray Great-Stuff™ insulation foam into the grooves of the rubber tyre. Great-Stuff™ is
commercially used to seal cracks on doors. Great-Stuff™ is highly flexible due to its nature as a
conforming insulation material and is therefore highly durable. Unfortunately, there are major safety
concerns with human contact to Great-Stuff™ as it easily irritates the skin after prolonged exposure and
is extremely harmful if applied to the eyes or ingested. In addition, Great-Stuff™ did not successfully
adhere to rubber surfaces after three trials and therefore had to be dismissed as a possible means to
mould tyres.
Version 0.2 of TIPOPIC utilized Plaster of Paris as a moulding material. Much cheaper than commercially
available resin materials, Plaster of Paris is just as effective at creating accurate moulds of materials and
is a much easier and safer substance to work with when compared to epoxy resins. MSDS listings reveal
that Plaster of Paris is an inert and innocuous material safe to the touch after curing (www.dap.com,
2002). Twenty-Five lb bags (11.84 kg) produced by DAP™ are available at local hardware stores for
approximately US$15 and covers over 10,000 cubic centimetres per bag making it a relatively
inexpensive option. The working time is between 15—20 minutes from time of reaction to setting and
the solid product continues to harden over the next three days (www.dap.com, 2005).
Version 0.2 of TIPOPIC was created using a casing of a 15 inch x 1 inch x 40 inch cardboard box with an
open cover. Cracks in the casing were sealed with masking tape. A large five gallon bucket was used to
combine two parts Plaster of Paris with one part ddH2O. The mixture was stirred rapidly using a simple
paint stirrer until solution was homogeneous and thick. The solution was poured into the cardboard
chamber until full. The solution cured for approximately nine minutes until an object could be pushed
into the plaster and removed without any adhering to the surface. A tyre, coated in silicone spray as a
lubricant, was pushed across the surface with pressure applied to simulate a vehicle travelling across a
dirt surface. The result was a defined tyre track with high resolution directly comparable to the original
tyre. The tracks remained relatively durable to the touch, but after prolonged exposure to touch and
investigation over time, the tracks would wear and become brittle. The stability of the cardboard
container was subpar and the equipment was prone to snapping if not carried with an equal load
applied to the entire bottom surface.
16 | P a g e
The third version of TIPOPIC, Version 0.3, was built following the same procedure as the previous
version but utilized a wooden chamber made of 2x4 inch wood blocks and particle board to house the
plaster. This provided the needed stability in the casing that the previous version lacked.
The major revision of TIPOPIC, Version 1.0, makes two improvements from Version 0.3. The casing was
shortened to allow easier one-person transport. The major addition to this revision was coating the
plaster with a layer of common tile sealant to improve the durability of the material.
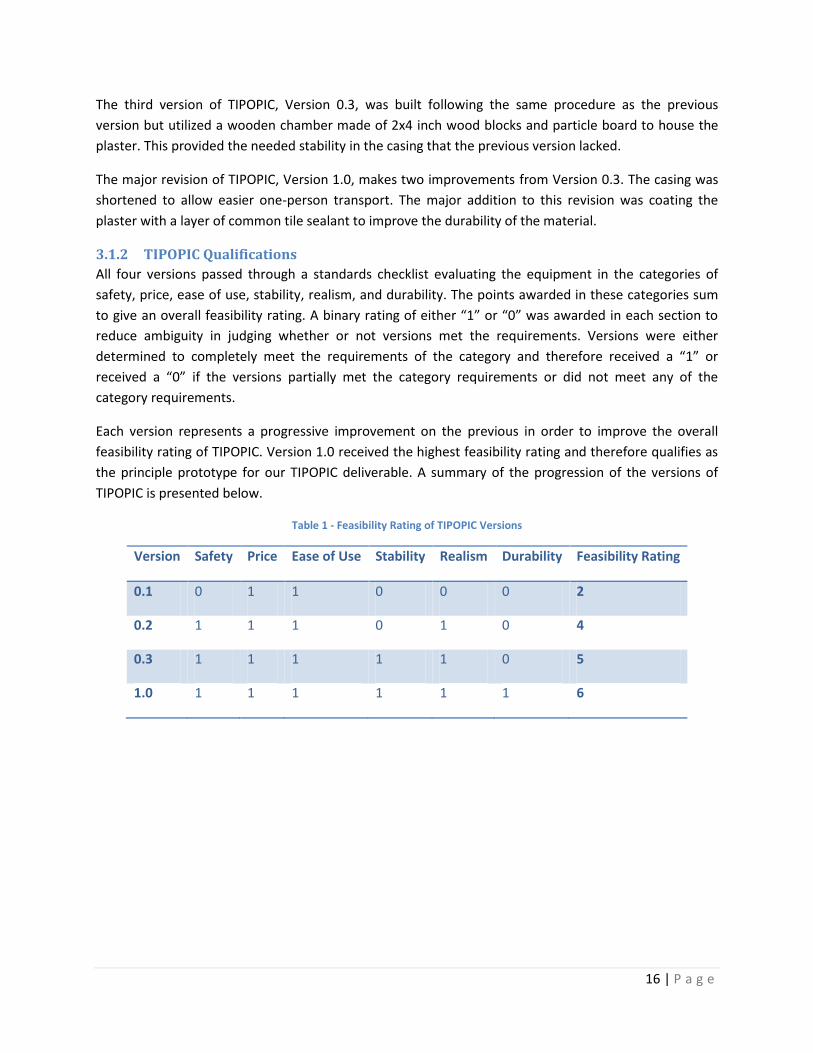
3.1.2 TIPOPIC Qualifications
All four versions passed through a standards checklist evaluating the equipment in the categories of
safety, price, ease of use, stability, realism, and durability. The points awarded in these categories sum
to give an overall feasibility rating. A binary rating of either “1” or “0” was awarded in each section to
reduce ambiguity in judging whether or not versions met the requirements. Versions were either
determined to completely meet the requirements of the category and therefore received a “1” or
received a “0” if the versions partially met the category requirements or did not meet any of the
category requirements.
Each version represents a progressive improvement on the previous in order to improve the overall
feasibility rating of TIPOPIC. Version 1.0 received the highest feasibility rating and therefore qualifies as
the principle prototype for our TIPOPIC deliverable. A summary of the progression of the versions of
TIPOPIC is presented below.
Table 1 - Feasibility Rating of TIPOPIC Versions
Version Safety Price Ease of Use Stability Realism Durability Feasibility Rating
0.1 0 1 1 0 0 0 2
0.2 1 1 1 0 1 0 4
0.3 1 1 1 1 1 0 5
1.0 1 1 1 1 1 1 6
17 | P a g e
The requirements of each category are listed below in tabular form.
Figure 3 - Requirements of category rankings
3.2 Procedure to Build TIPOPIC Version 1.0 of the proposed TIPOPIC prototype is safe and healthy for typical human contact, is
comprised of materials that are commonly found and relatively inexpensive to purchase, is easy, simple
and fast to recreate, is stable to be transported from one venue to another, is a realistic imitation of an
actual tyre track, and is durable enough to withstand years of usage. For this reason, the procedure to
•Has an acceptable MSDS rating as provided by the manufacturer
•Conditions for creating the equipment are safe
•Conditions for using the piece of equipment are safe
•Equipment poses no health risks to childrean of any age
Safety
•Price analysis is feasible for CSIRO-SEC implementations across all of the Forensic Frenzy programs offeredPrice
•Equipment is easy to create and build
•Equipment is easy to understand and use
•Equipment requires little or no setupEase of Use
•Equipment is easy to transport
•Equipment is not brittle
•Equipment may be easily mass producedStability
•Equipment provides a realistic representation of tyre tracks that may be found at crime scenes
•Tyre tracks are in high resolution and all patterns of the original tyre may be found clearly in the tyre track
Realism
•Equipment does not deteriorate significantly over acceptable lengths of time.
•Equipment can withstand typical use on a daily basis
•Equipment is not easily breakable by misuse
Durability
18 | P a g e
construct TIPOPIC for use in the Forensic Frenzy program has been fully outlined below so as to allow for
consistent recreation.
The process involves three steps: building of the casing, plaster mixing and pouring, and tyre moulding
procedure
3.2.1 TIPOPIC Casing
Materials
Two 30 inch 2x4 wooden planks cut to size
Two 18 inch 2x4 wooden planks cut to size
Flat 15x30 inch sheet of at least ½ inch Particle Board
Screws
Tools
Table or hand saw and bench
Protective eye and hand equipment
Electric hand drill
Drill bits
Sandpaper
Procedure
1. After obtaining all materials and tools necessary to create the casing, secure a safe location,
preferably a workshop that provides the necessary safety standards to proceed with
woodworking. Ensure to follow all safety guidelines as outlined in the safety manuals provided
while using the table or hand saw and the electric drill. Observe standard safety guidelines
throughout the entire procedure. Wear protection gear at all times.
2. Cut all 2x4 planks and particle board to the specified sizes using a standard table or hand saw.
Ensure that all pieces are smooth using sandpaper.
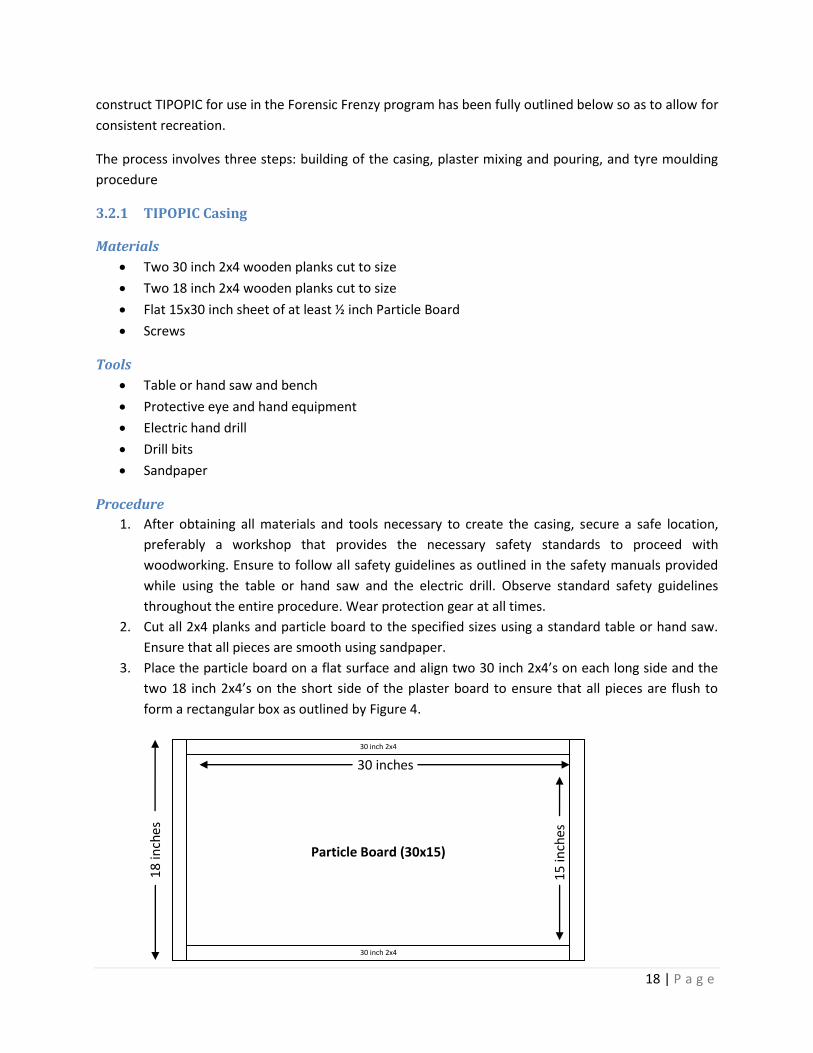
3. Place the particle board on a flat surface and align two 30 inch 2x4’s on each long side and the
two 18 inch 2x4’s on the short side of the plaster board to ensure that all pieces are flush to
form a rectangular box as outlined by Figure 4.
30 inch 2x4
30 inch 2x4
30 inches
15
inch
es
18
inch
es
Particle Board (30x15)
19 | P a g e
Figure 4 - Diagram of TIPOPIC Casing
4. The 2x4 wooden planks should be flush and touching the bottom of the flat surface so that the
particle board overlaps with the sides of the wooden planks, not the bottom of the wooden
planks.
5. Obtain the necessary drill bit for the standardized screws to be used, and drill three evenly
spaced holes piercing each 18 inch 2x4 into the particle board. Drill in screws.
6. Drill four even spaced holes piercing each 30 inch 2x4 into the particle board. Drill in screws.
7. Drill 2 holes on both the left and the right side of each 18 inch 2x4 so that the holes piece into
the 30 inch 2x4s located on each end of the 18 inch particle board. Drill in screws.
8. Ensure that the entire casing is snug, stable, and level. Drill in additional screws if necessary to
ensure stability.
9. Clean up properly and sand down TIPOPIC container once more for safe handling.
3.2.2 Plaster Mixing and Pouring
After building the necessary compartment for this step, this procedure must the followed to ensure
proper casting of the tyre. Ensure that all materials and tools are procured and ready to be used for both
this step and the steps in Section 3.2.3 before proceeding. This is a time-dependent step that will
require strict adherence to the time protocols described.
Materials
Tyre
Household cleaner
Paper Towels
Empty 5 gallon bucket
Paint stirrer
Silicone spray
25 lb (11.84 kg) bag Plaster of Paris (DAP™)
Duct Tape
ddH2O
gloves and safety goggles
TIPOPIC casing
Tools
Stop Watch
Procedure
1. Ensure that safety equipment is worn at all times, as reacting Plaster of Paris may be harmful if
handled inappropriately according to MSDS.
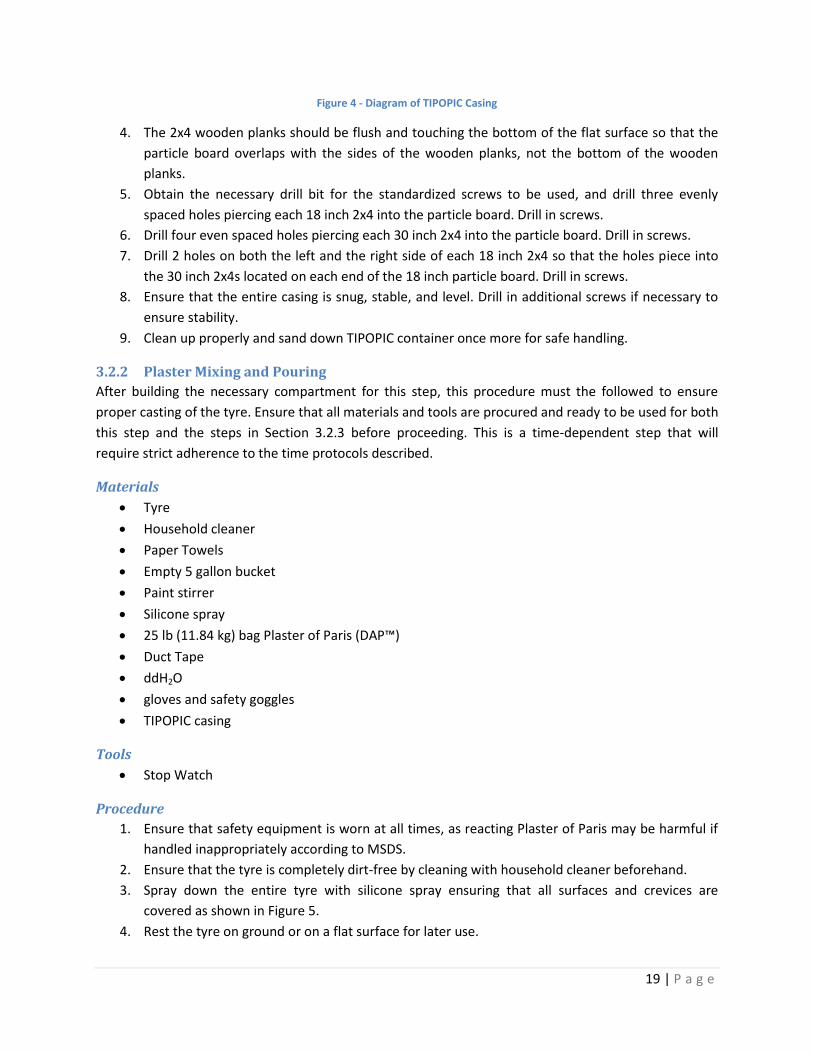
2. Ensure that the tyre is completely dirt-free by cleaning with household cleaner beforehand.
3. Spray down the entire tyre with silicone spray ensuring that all surfaces and crevices are
covered as shown in Figure 5.
4. Rest the tyre on ground or on a flat surface for later use.
20 | P a g e
Figure 5 - Lubricated Tyre
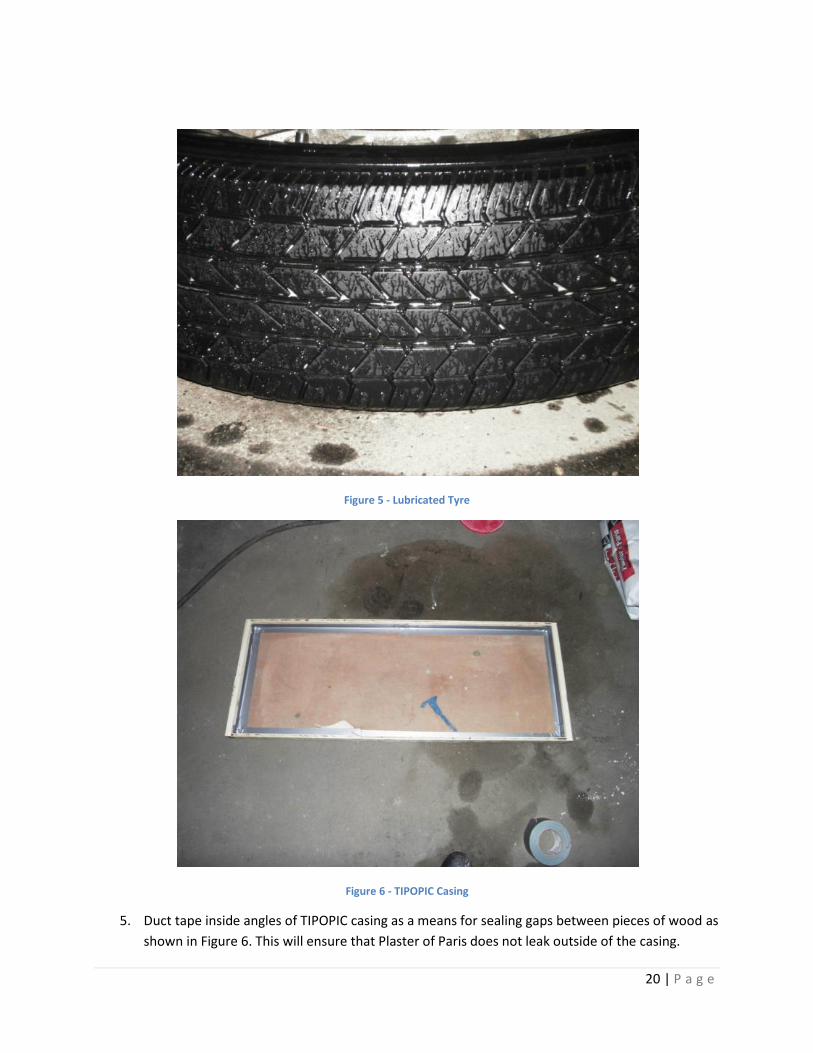
Figure 6 - TIPOPIC Casing
5. Duct tape inside angles of TIPOPIC casing as a means for sealing gaps between pieces of wood as
shown in Figure 6. This will ensure that Plaster of Paris does not leak outside of the casing.
21 | P a g e
6. Fill 5-gallon bucket with ddH2O equivalent to half the volume of the amount of Plaster of Paris
being used.
7. Slowly add Plaster of Paris to ddH2O while mixing vigorously with paint stirrer.
8. Continue mixing until all of the Plaster of Paris is added. The mixture should be a thick,
homogeneous consistency.
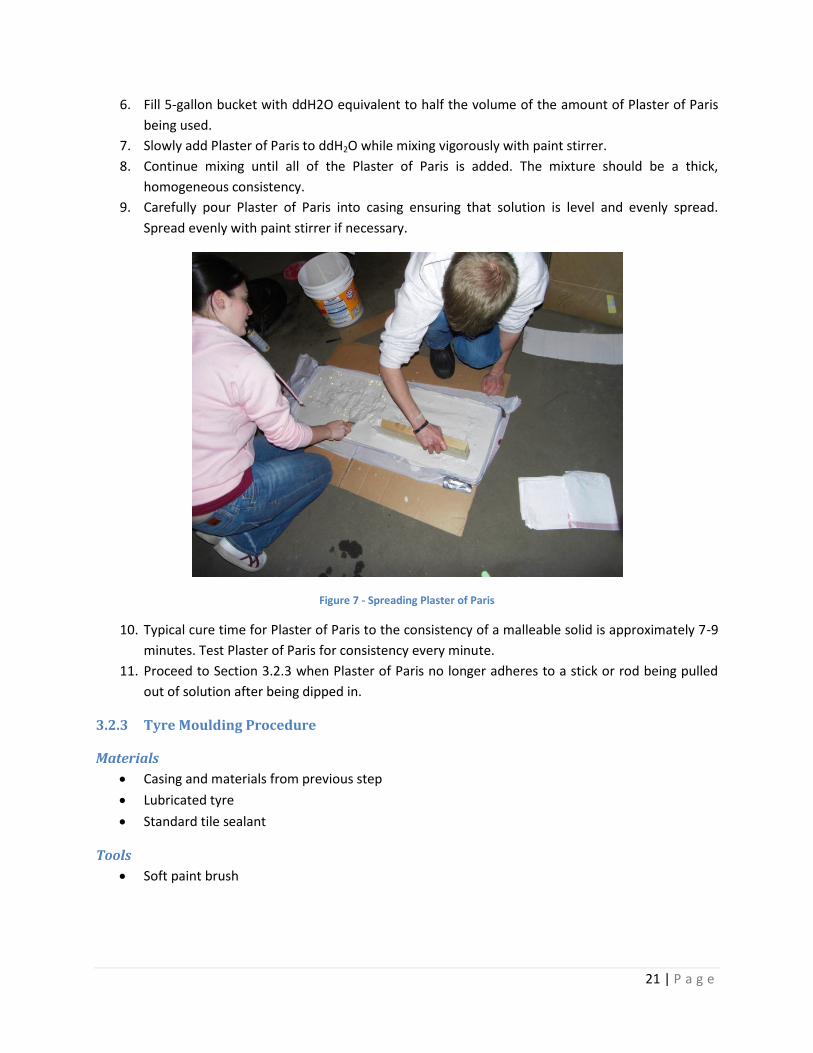
9. Carefully pour Plaster of Paris into casing ensuring that solution is level and evenly spread.
Spread evenly with paint stirrer if necessary.
Figure 7 - Spreading Plaster of Paris
10. Typical cure time for Plaster of Paris to the consistency of a malleable solid is approximately 7-9
minutes. Test Plaster of Paris for consistency every minute.
11. Proceed to Section 3.2.3 when Plaster of Paris no longer adheres to a stick or rod being pulled
out of solution after being dipped in.
3.2.3 Tyre Moulding Procedure
Materials
Casing and materials from previous step
Lubricated tyre
Standard tile sealant
Tools
Soft paint brush
22 | P a g e
Procedure
1. Once the Plaster of Paris has cured to the recommended consistency, place the tyre on the long
end of casing so that the tyre is parallel to the 30 inch 2x4 planks.
2. Using one person to guide the tyre from one end of the casing to the other and a second person
to apply pressure to the top of the tyre, roll the tyre through the Plaster of Paris from one side
of the casing to the other providing the necessary amount of force to allow the solution to
indent to form a visible tyre track.
3. When the tyre has been rolled to the opposite side of the casing, remove tyre from the Plaster,
clean and dispose of properly.
4. Allow Plaster of Paris to cure and harden for at least 24 hours in a cool, dry location.
5. After Plaster of Paris has completely cured, apply tile sealant according to instructions on the
bottle with a paint brush to the entire surface of the plaster.
6. Allow to dry and seal overnight.
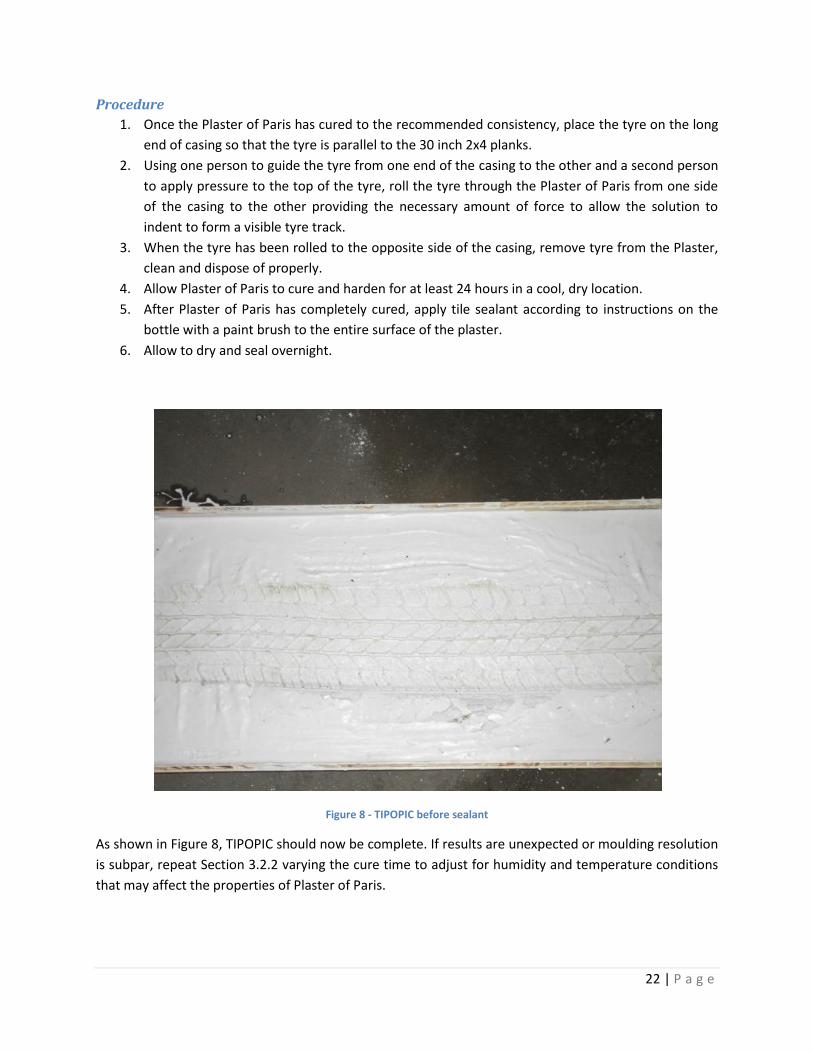
Figure 8 - TIPOPIC before sealant
As shown in Figure 8, TIPOPIC should now be complete. If results are unexpected or moulding resolution
is subpar, repeat Section 3.2.2 varying the cure time to adjust for humidity and temperature conditions
that may affect the properties of Plaster of Paris.

23 | P a g e
3.3 Methods of Assessment To compare the accessibility of both the existing program and the new approach to both students with
and without visual impairments, certain data is collected. This data takes the form of answers to various
assessments. There will be three assessments of the sample group of students taking part in the
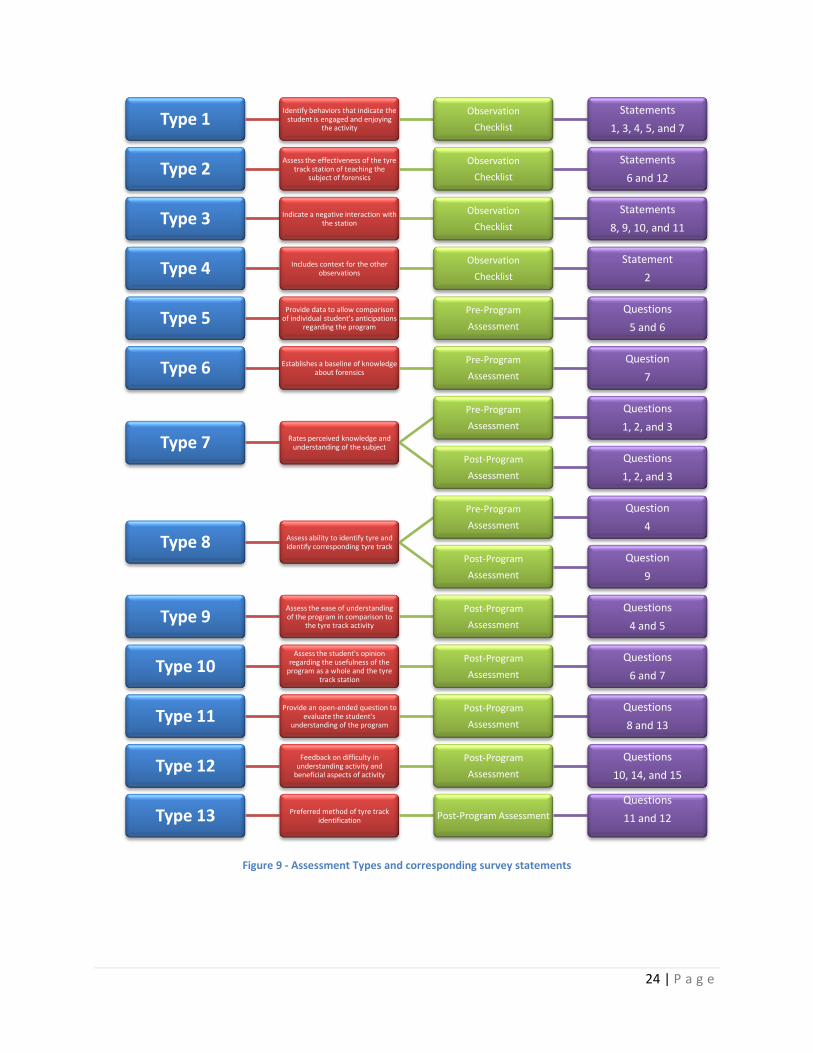
program. Each assessment contains statements and questions that are categorized by type or purpose.
These categorizations will be designated “Assessment Types” or “AT.” A full list of statements and
questions corresponding to each Assessment Type are listed in Figure 9.
24 | P a g e
Figure 9 - Assessment Types and corresponding survey statements
Type 1Identify behaviors that indicate the
student is engaged and enjoying the activity
Observation
Checklist
Statements
1, 3, 4, 5, and 7
Type 2Assess the effectiveness of the tyre
track station of teaching the subject of forensics
Observation
Checklist
Statements
6 and 12
Type 3 Indicate a negative interaction with the station
Observation
Checklist
Statements
8, 9, 10, and 11
Type 4 Includes context for the other observations
Observation
Checklist
Statement
2
Type 5Provide data to allow comparison
of individual student's anticipations regarding the program
Pre-Program
Assessment
Questions
5 and 6
Type 6 Establishes a baseline of knowledge about forensics
Pre-Program
Assessment
Question
7
Type 7 Rates perceived knowledge and understanding of the subject
Pre-Program
Assessment
Questions
1, 2, and 3
Post-Program
Assessment
Questions
1, 2, and 3
Type 8 Assess ability to identify tyre and identify corresponding tyre track
Pre-Program
Assessment
Question
4
Post-Program
Assessment
Question
9
Type 9Assess the ease of understanding of the program in comparison to
the tyre track activity
Post-Program
Assessment
Questions
4 and 5
Type 10Assess the student's opinion
regarding the usefulness of the program as a whole and the tyre
track station
Post-Program
Assessment
Questions
6 and 7
Type 11Provide an open-ended question to
evaluate the student's understanding of the program
Post-Program
Assessment
Questions
8 and 13
Type 12Feedback on difficulty in
understanding activity and beneficial aspects of activity
Post-Program
Assessment
Questions
10, 14, and 15
Type 13 Preferred method of tyre track identification Post-Program Assessment
Questions
11 and 12
25 | P a g e
One assessment is an observational checklist that lists behaviours indicating levels of understanding. The
observational checklist was chosen as one type of assessment for this project because it is effective in
the non-formal education setting, including the Forensic Frenzy program. The checklist is completed for
each student by one project team member. It is important that the assessment is non-intrusive in order
to minimize stress for the participants. The project group provides each student with an ID sticker
containing a randomly assigned number in order to obtain accurate results and easily track data from all
three assessments per student. The list of numbers assigned to each school is recorded in order for
correlations regarding specific schools to be made. This number is used by the project team when using
the observational checklist to ensure the ID of the student is connected with the observations. The
number is also entered into the pre- and post-program surveys by the student to connect all the data to
the correct individual.
The observation checklist has four Assessment Types (See Appendix B). AT1 was designed to identify the
behaviours that indicate the student is engaged and enjoying the activity. To assess the tyre track
stations effectiveness at teaching the subject of forensics statements, AT2 has been created. AT2 gives
quantitative data that is comparable among different subgroups of the sample population. Although it is
the intention for all students to enjoy the tyre track activity, it is still essential to include a group of
behaviours that would indicate the contrary. AT3, also present in the observation checklist, indicates a
negative interaction with the station. This implies that the student is not enjoying the station, and is
either confused or not engaged. This data is essential when comparing the original tyre track station
with the modified station which includes the tactile component. AT4, the final assessment type present
in the observational checklist, is important to provide context for the other observations. AT4 asks if
there are any members of the student’s group with a visual impairment. If the student’s group has at
least one student with a visual impairment, the other behaviours on the checklist may vary for the
student. For example, statement 1 (in AT1) indicates that the student makes eye contact with the other
students in the group. If there is a student with visual impairments in the group, this observation may
not be relevant because of the physical limitations of the student. Other students are less likely to
attempt eye contact with the visually impaired student, and therefore this piece of data would need to
be considered in that context.
The other two forms of assessment provide pre- and post- program comparisons as a pair. Both are
framed as a survey and students are informed it is not an individual test and that they are not going to
be graded. This is intended to help alleviate stress associated with assessment and ensure accurate data
is collected. The first survey, given prior to the start of the activity, includes questions regarding the
background knowledge of the students. The pre-program assessment (Appendix C) includes four
assessment types, and gathers demographic information. The first Assessment Type gathers information
about the students’ expectations from the program. AT5 provides data to allow the project team to
compare individual students’ anticipations regarding the program. In a question looking for similar
information, the second Assessment Type present in the pre-program assessment, AT6, uses pre-
program question 7 to establish a baseline of knowledge about forensics and assess any prior interaction
with the topic. If the student has had an experience with forensics, he or she may already know the
information presented or may already have an opinion on forensics.
26 | P a g e
Similar questions are used in the post-program assessment to evaluate the change in comfort level and
knowledge of the students. These questions include those in Assessment Types 7 and 8. AT7 gives scales
for the student to rate his or her perceived knowledge and understanding of the subject. These are
questions 1, 2, and 3 on both the pre- and post-program assessments. They provide a comparison
between the pre-program and post-program responses, and any trends will be correlated to the
Forensic Frenzy program or the tyre track station. AT8, present in both the pre-program and post-
program surveys, gathers data similar to the rating scales. In question 4 of the pre-program survey and
question 9 on the post-program survey, the student is given the opportunity to assess his or her
perceived ability to identify a tyre based upon its track. This allows the project team to correlate the
instructive nature of the tyre track station to any change in the student’s evident ability.
Additionally, the post-program assessment (Appendix D) includes questions directly relating to the
student’s experience in the Forensic Frenzy program and specifically the tyre track station. Five other
assessment types exist in the post-program survey. AT9 will be used to assess the ease of understanding
of the program as a whole and in comparison to the tyre track activity. The student is given the
opportunity to rate his or her understanding, based on the same scale as past questions. A scale is used
to give a wider range of responses than a polar (yes or no) question. This same scale is used to gather
similar data in AT10, which assesses the student’s opinion regarding the usefulness of the program as a
whole and usefulness of the tyre track station in particular. AT11 provides an open-ended question to
evaluate the student’s understanding of the program. These questions allow the student to express his
or her understanding of the tyre track activity in his or her own words.
It is important for the project team to receive feedback regarding any areas of the program that may be
confusing or difficult to understand and any areas that are particularly enjoyable or beneficial. This
provides recommendations for improvement of the program. AT12 gives the student an opportunity to
provide this type of feedback.
One of the most important aspects for the project team to consider is the preferred method of tyre
track identification. This is accomplished with AT13. These questions allow the project team to evaluate
the accessibility of the modified tyre track activity compared to the original activity.
Due to the varying formats that are best suited for those with disabilities, the assessments are provided
to the students based upon their needs. The project team provides Internet based copies of the
assessment through the SharePoint program. Additionally, the project team has paper copies available
for the students in multiple formats. An adaptable electronic version is in progress to comply with any
computer program that is indicated.
3.4 Sample Size The assessments described in Section 3.3 are presented to the sample group. This sample group is
comprised of every student who has the opportunity to experience the tyre track station, in either the
original format or the adapted format. Sixteen schools are exposed to the Forensic Frenzy program, with
30 students per school. Of these 480 students, half participate in the tyre track identification activity,
totalling a sample size of 240 students. The majority of the sample is comprised of students in
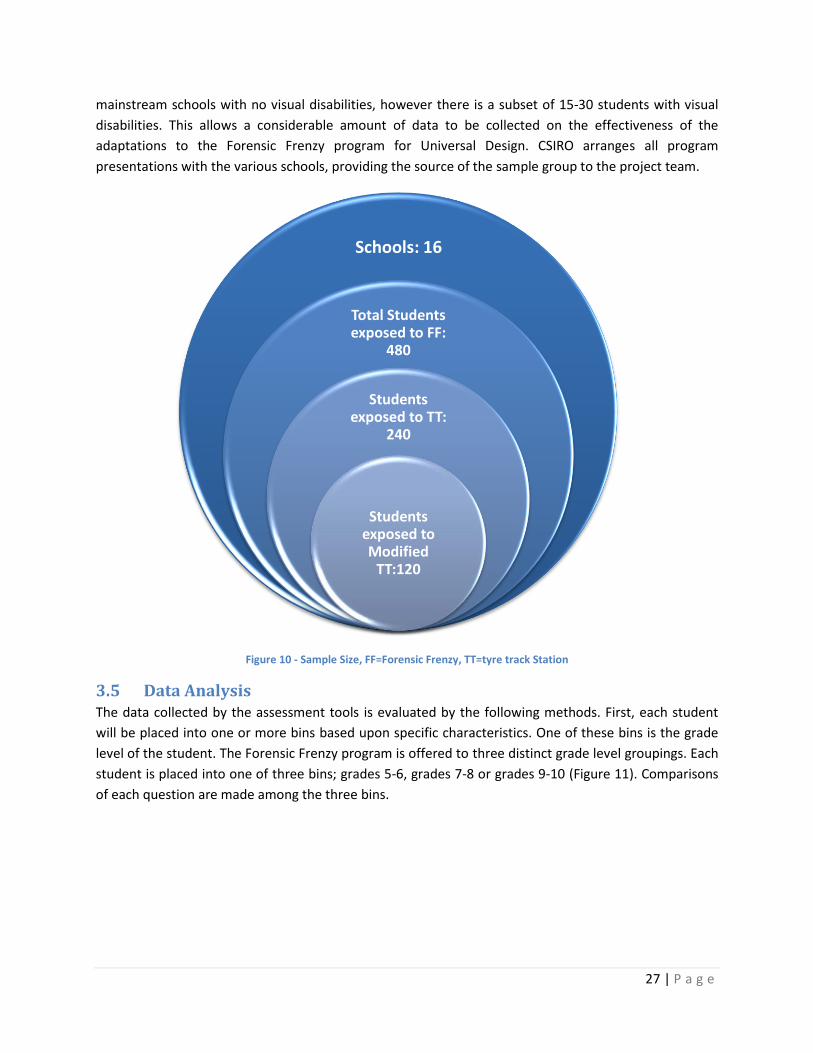
27 | P a g e
mainstream schools with no visual disabilities, however there is a subset of 15-30 students with visual
disabilities. This allows a considerable amount of data to be collected on the effectiveness of the
adaptations to the Forensic Frenzy program for Universal Design. CSIRO arranges all program
presentations with the various schools, providing the source of the sample group to the project team.
Figure 10 - Sample Size, FF=Forensic Frenzy, TT=tyre track Station
3.5 Data Analysis The data collected by the assessment tools is evaluated by the following methods. First, each student
will be placed into one or more bins based upon specific characteristics. One of these bins is the grade
level of the student. The Forensic Frenzy program is offered to three distinct grade level groupings. Each
student is placed into one of three bins; grades 5-6, grades 7-8 or grades 9-10 (Figure 11). Comparisons
of each question are made among the three bins.
Schools: 16
Total Students exposed to FF:
480
Students exposed to TT:
240
Students exposed to Modified
TT:120
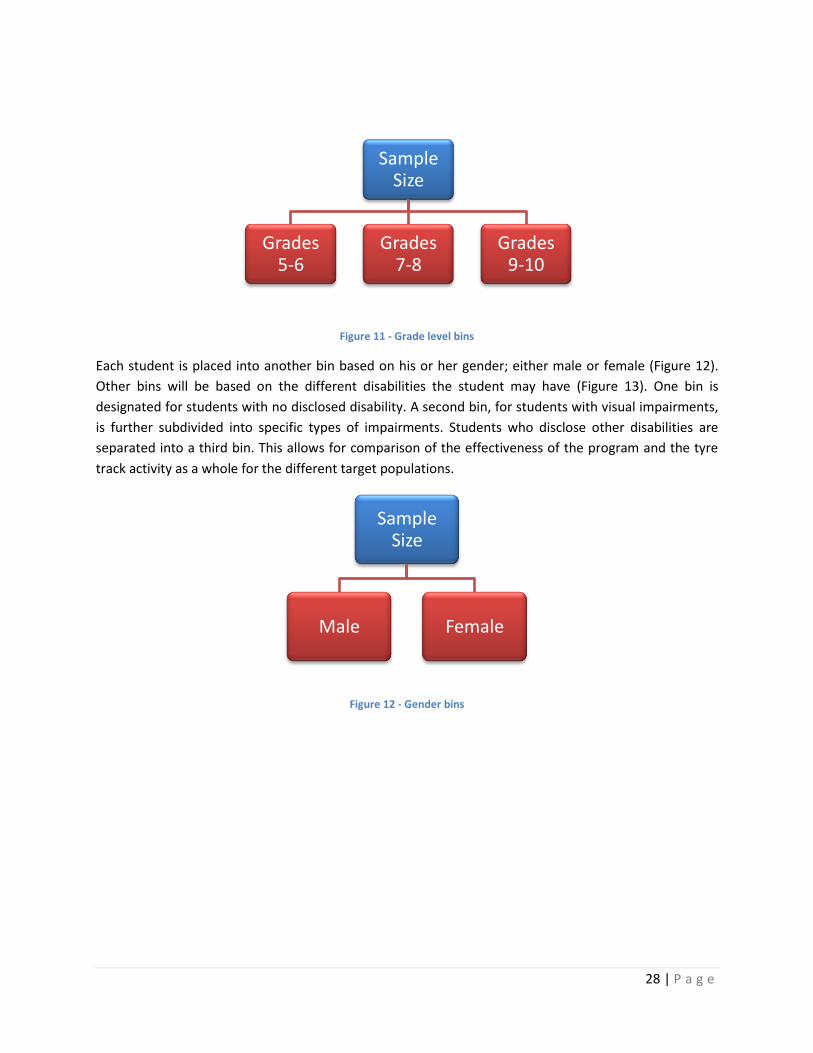
28 | P a g e
Figure 11 - Grade level bins
Each student is placed into another bin based on his or her gender; either male or female (Figure 12).
Other bins will be based on the different disabilities the student may have (Figure 13). One bin is
designated for students with no disclosed disability. A second bin, for students with visual impairments,
is further subdivided into specific types of impairments. Students who disclose other disabilities are
separated into a third bin. This allows for comparison of the effectiveness of the program and the tyre
track activity as a whole for the different target populations.
Figure 12 - Gender bins
Sample Size
Grades 5-6
Grades 7-8
Grades 9-10
Sample Size
Male Female
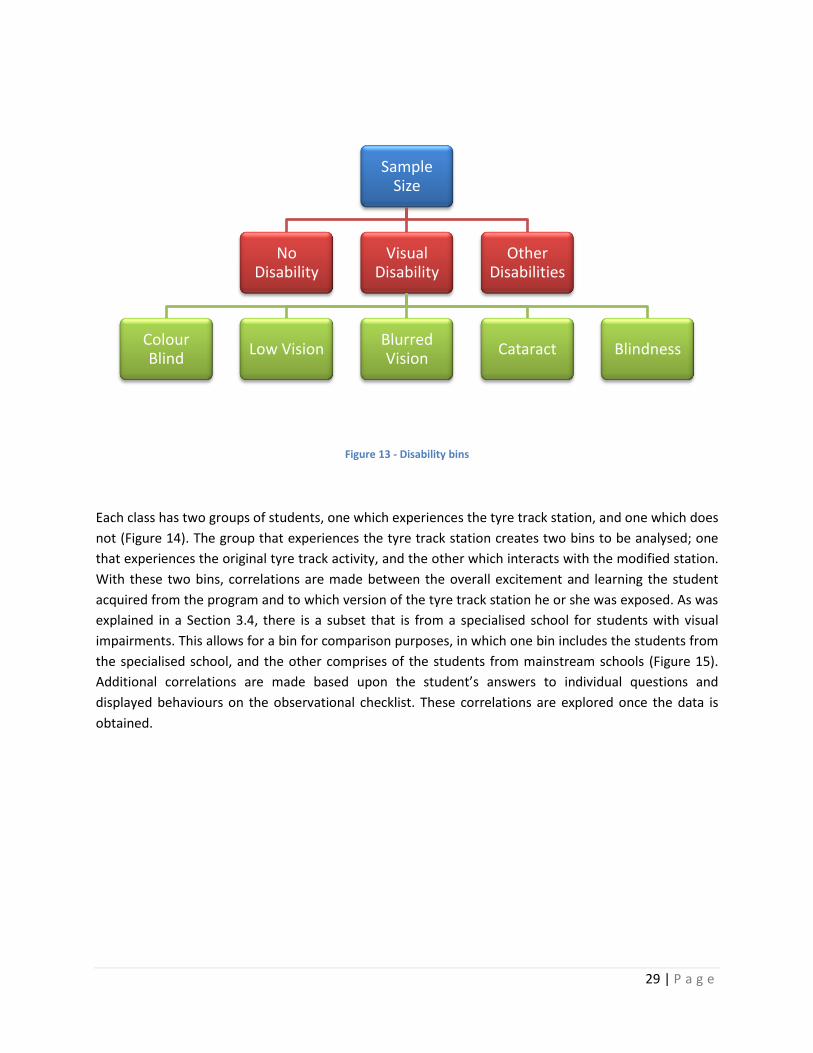
29 | P a g e
Figure 13 - Disability bins
Each class has two groups of students, one which experiences the tyre track station, and one which does
not (Figure 14). The group that experiences the tyre track station creates two bins to be analysed; one
that experiences the original tyre track activity, and the other which interacts with the modified station.
With these two bins, correlations are made between the overall excitement and learning the student
acquired from the program and to which version of the tyre track station he or she was exposed. As was
explained in a Section 3.4, there is a subset that is from a specialised school for students with visual
impairments. This allows for a bin for comparison purposes, in which one bin includes the students from
the specialised school, and the other comprises of the students from mainstream schools (Figure 15).
Additional correlations are made based upon the student’s answers to individual questions and
displayed behaviours on the observational checklist. These correlations are explored once the data is
obtained.
Sample Size
No Disability
Visual Disability
Colour Blind
Low VisionBlurred Vision
Cataract Blindness
Other Disabilities
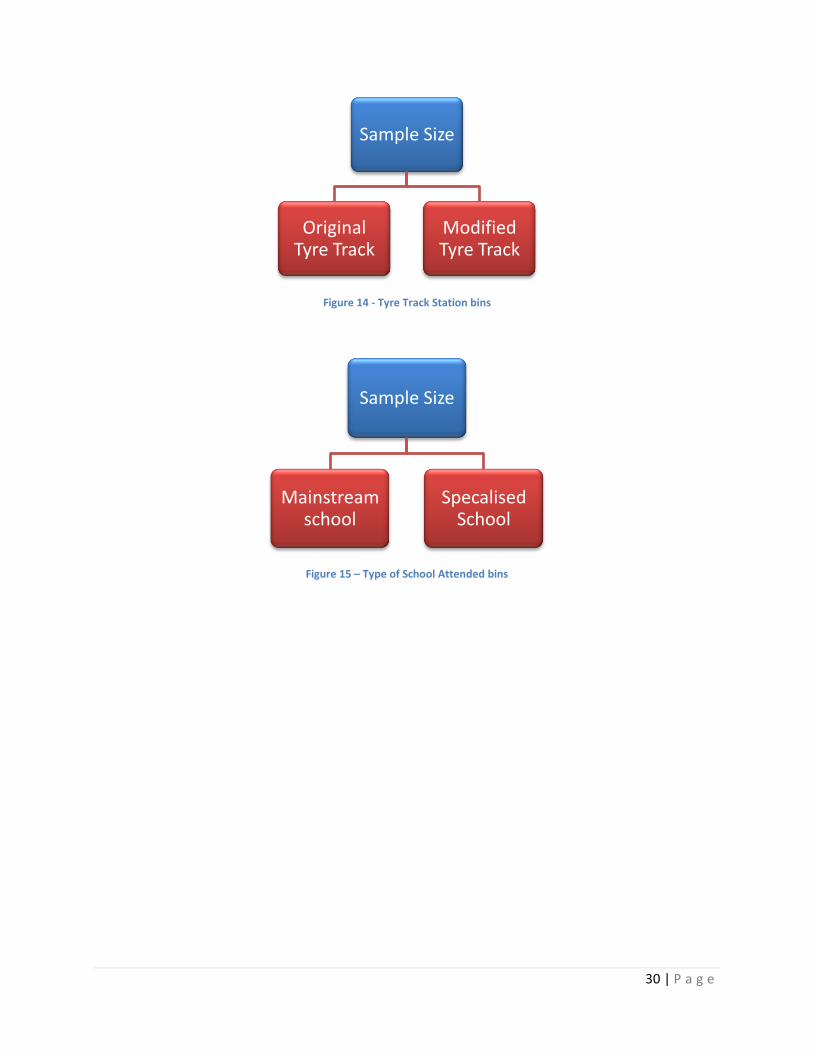
30 | P a g e
Figure 14 - Tyre Track Station bins
Figure 15 – Type of School Attended bins
Sample Size
Original Tyre Track
Modified Tyre Track
Sample Size
Mainstream school
Specalised School
31 | P a g e
References
American Foundrymen's Society Incorporated. (1962). Moulding methods and materials (First Edition
ed.). Des Plaines, Illinois: American Foundrymen's society.
Australian Parliament. (2006). Disability discrimination act (DDA) 1992. Retrieved 28 January, 2009, from
http://scaletext.law.gov.au/html/pasteact/0/311/top.htm
Bishop, V. E. (2004). Teaching visually impaired children. Springfield, IL: Thomas Books.
Bruins, P. F. (1968). Epoxy resin technology. Polytechnic Institute of Brooklyn, New York, USA:
Interscience Publishers, John Wiley & Sons, Inc.
CBMI. (2007). Facts about childhood blindness. Retrieved 28 January, 2009, from
http://www.cbm.org.au/Content.aspx?id=56
CERA. (2008). The vision initiative. Retrieved 02 February, 2009, from
http://www.cera.org.au/research/pophealth/tvi.html
Conroy, P. W. (2007). Paraprofessionals and students with visual impairments: Potential pitfalls and
solutions Retrieved from http://find.galegroup.com/itx/infomark.do?&contentSet=IAC-
Documents&type=retrieve&tabID=T002&prodId=PROF&docId=A180218001&source=gale&srcprod=PR
OF&userGroupName=mlin_c_worpoly&version=1.0
CSIRO. (2008). School programs [victoria] [overview]. Retrieved 05 February, 2009, from
http://www.csiro.au/org/VicSchoolPrograms.html
CSIRO. (2008). Science for schools. Retrieved 05 February, 2009, from
http://www.csiro.au/csiro/channel/pchaq.html
CSIRO Education. (2006). Forensic frenzy project description (Project Description. Highett, VIC, Australia:
CSIRO Science Education Centre.
CSIRO Education. (2006). Forensic frenzy teacher booklet. Highett, VIC, Australia: Department of
Education.
DAP. (2002). MSDS - plaster of paris. Retrieved 24 February, 2009, from
http://www.dap.com/docs/msds/00071008_english.pdf
DAP. (2005). Technical bulletin - plaster of paris. Retrieved 24 February, 2009, from
http://www.dap.com/docs/tech/00071008.pdf
Fuchs, D., Fuchs, L. S., Power, M. H., & Dailey, A. M. (1985). Bias in the assessment of handicapped
children. American Educational Research Journal, 22(2), 185-198.
Lee, H., Neville, K. (1967). Handbook of epoxy resins. New York, New York, USA: McGraw-Hill Book
Company.
32 | P a g e
MacKendrick, O. & Teske. (2008). Assessing the learning of students with disabilities in informal
education. Worcester, MA: Worcester Polytechnic Institute.
National Universal Design for Learning Task Force. (2008). Universal design for learning. Retrieved 20
February, 2009, from http://www.advocacyinstitute.org/UDL/
NIIR Board of Consultants & Engineers. (2006). The complete book on biodegradable plastics and
polymers. Kamla Nagar, Delhi, India: Asia Pacific Business Press Inc.
Royal Institute for Blind and Deaf Children (RIDBC). General information – visual impairments. Retrieved
28 January, 2009, from http://www.ridbc.org.au/resources/vi_info.asp
ScienceStuff. (2006). MSDS :: Calcium sulfate (plaster of paris). Retrieved 24 February, 2009, from
http://www.sciencestuff.com/msds/C1458.html
Shepard, L. A. (1999). The role of assessment in a learning culture. Educational Researcher, 29(7), 4-14.
Simone, N., Vozzola, E., & Worobey, L. (2007). Adapting hands-on science programs for students with
disabilities. Unpublished Bachelor of Science, Worcester Polytechnic Institute, Worcester, MA.
Smith, M. K. (2009). Non-formal education @ the encyclopedia of informal education. Retrieved 05
February, 2009, from http://www.infed.org/biblio/b-nonfor.htm
University of New Castle, Australia. (2005). Vision Impairment/Blindness. Retrieved 28 January, 2009,
from http://newcastle.edu.au/service/disability/disabilities/info-sheets/vision-blindness.html
University of West Virginia. (2005). Strategies for teaching students with vision impairments. Retrieved
28 January, 2009, from http://www.as.wvu.edu/~scidis/vision.html
Vision Australia. (2007). Retrieved 02 February, 2009, from
http://www.visionaustralia.org.au/info.aspx?page=1136
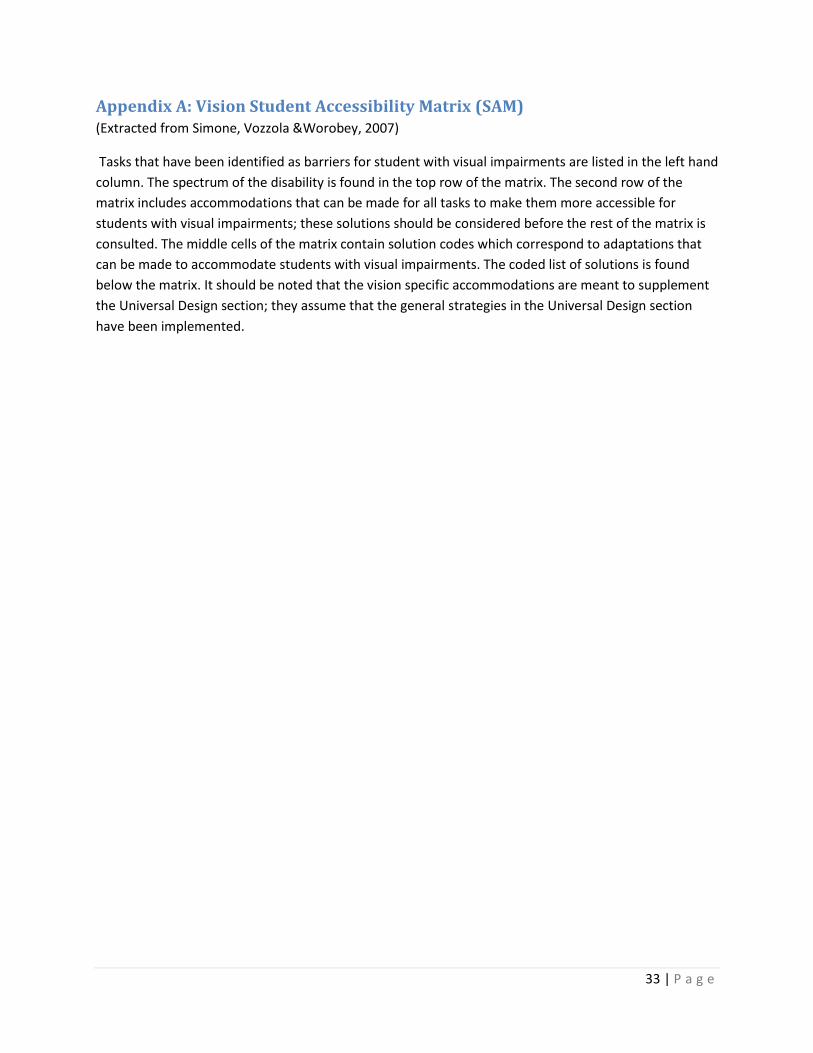
33 | P a g e
Appendix A: Vision Student Accessibility Matrix (SAM) (Extracted from Simone, Vozzola &Worobey, 2007)
Tasks that have been identified as barriers for student with visual impairments are listed in the left hand
column. The spectrum of the disability is found in the top row of the matrix. The second row of the
matrix includes accommodations that can be made for all tasks to make them more accessible for
students with visual impairments; these solutions should be considered before the rest of the matrix is
consulted. The middle cells of the matrix contain solution codes which correspond to adaptations that
can be made to accommodate students with visual impairments. The coded list of solutions is found
below the matrix. It should be noted that the vision specific accommodations are meant to supplement
the Universal Design section; they assume that the general strategies in the Universal Design section
have been implemented.
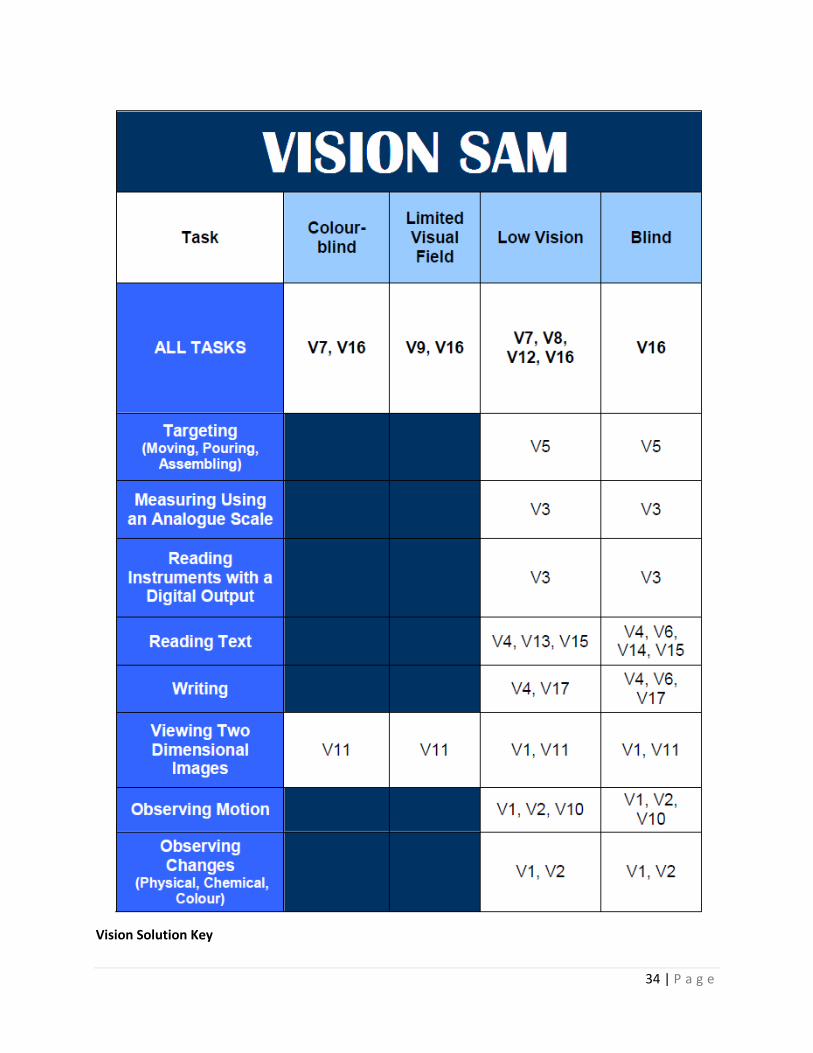
34 | P a g e
Vision Solution Key
35 | P a g e
V1 - Access through Touch
V2 - Access through Sound/Smell
V3- Technology with Verbal Output
V4- Audio Recording
V5- Aids for Targeting
V6- Braille
V7- Increase Colour Contrast
V8- Enlarged Text
V9- Ensure Task or Demonstration is in Visual Field
V10- First Person Experience
V11- Good Keys and Legends
V12- Magnify/Enlarge
V13- Use Screen Magnifier
V14- Use Screen Reader
V15- Simplify
V16- Team Approach
V17 - Using Computers as a Writing Alternative
V1
Access through touch:
Incorporate activities which have tactile elements in them
Allow the student to touch/feel what is happening in different activities when it is safe to do so
Make a three dimensional (tactile) diagram of the concept being taught
Students who are blind or visually impaired often have a more developed sense of touch as they have
learned to use it more effectively. Different textures can be used to explain concepts and the differences
between them. Students should be allowed feel different types of materials that are being talked about
when it is safe to do so. Providing actual objects, as opposed to photos of the objects, will be a valuable
addition for all students, especially students with visual impairments. During different reactions, allow
students to feel what is happening. If an experiment involves dissolving a substance, let the student feel
the mixture at the beginning, middle, and end of the process. This way the student has a connection
36 | P a g e
with the material by touching it. If it is safe for a student to touch part of an experiment only while
wearing protective gloves, the loss of tactility is tolerable.
Three dimensional diagrams or models can be made to illustrate many different concepts including how
the solar system is arranged, the components of a cell, or the structure of a plant. Craft supplies, such as
Plaster of Paris, Popsicle sticks, and clay can all be used to make tactile diagrams.
There are also different types of paper which will become raised to make diagrams and graphs on paper
more tactile. Piaf paper and thermoform paper are both used for this purpose. Thermoform paper can
be placed over a raised surface and heated to conform to the surface. The thermoform paper can then
be removed and used on its own. Piaf paper uses heat sensitivity to raise different areas based on
greyscale shading, making the dark outlines of different diagrams three dimensional.
V2
Access through sound/smell:
Incorporate activities which contain changes in sound
Incorporate activities which contain changes in smell when it is safe to do so
Incorporate sounds into the activities to give students feedback
It is important to incorporate activities which have changes in sound and smell to make the activities
more multi-sensory. Changes in sound and smell can be used during reactions, allowing students with
visual impairment to detect changes through their stronger senses. Sounds can also accompany visual
changes to reinforce them when a complete substitute cannot be made. For example, if a noise like a
click is used to signal that something has happened, the student will know when the visual change has
occurred. Including nonverbal sounds and smells ensures that students with visual impairments can gain
an understanding of what is happening during the reaction.
V3
Technology with verbal output:
Talking tape measures, scales, rulers, and colour readers
For students that have severe vision impairments, there are devices such as talking tape measures and
other tools which utilize a verbal output. These can allow students to participate in measuring activities
that they otherwise would not be able to perform.
V4
Audio Recording:
Record instructions on audio tape or in mp3 format
Allow the students to submit audio tapes detailing their ideas and observations
37 | P a g e
For activities with complicated instructions, it can be hard to remember all of the instructions through
memory. As an alternative to converting instructions to large text or Braille, they can be converted to
audio format, utilizing a much stronger sensory input channel. In audio format, students can play
instructions step by step, pausing in between and allowing time to complete the activity. The students
can also review steps if they miss something the first time around. Mp3 formats are very accessible as
they can be used on computers, which make it possible to read the labels on recordings using a screen
reader or magnifier.
In addition to using audio recordings as an alternative format for delivering information to students,
students can also record their own ideas and observations. This way, time is saved and students do not
have write or type their answers, a task which may be difficult for some students.
V5
Aids for Targeting:
Use containers with large openings
Use a funnel
A guide system can be helpful
If substances are being moved from one container to another, ensure that the openings are large
enough for the student to move the material to the right place easily. If the opening is too small, the
student may not be able to see it and will have difficulty targeting. Using a funnel is an easy way to
widen the opening and make it easier for students with all different types of visual impairments to
target small openings. For students with severe vision impairments, a device or person to guide the
student to the area to pour is often very helpful.
V6
Braille:
Convert text-based documents into Braille
Allow students to use a Braille typewriter to record their answers
Although Braille is not the most widely used written communication method for students with visual
impairments, for those who do use the medium it is important to supply them with access to Braille
material. Many different places will transcribe information into Braille. In Australia, the Vision Australia
Information Library Service (VAILS) will convert various materials into Braille form, but it usually takes
about two weeks. Braille can also be applied to measuring devices like rulers so blind students can read
the increments on the tool.
Students can also use Braille typewriters to record their answers.
V7
Increase Colour Contrast:
38 | P a g e
Utilize contrasting colours in measurement devices, PowerPoint, worksheets and visual aids
Minimize use of colours which cannot be seen by students
It is difficult for students with visual impairments to see objects or text that have very little colour
contrast; these students need maximum colour contrast to see well. To account for this, it is best to use
a light background with dark text or vice versa. Specifically, a light yellow or white background with
black text works best. This applies to devices such as rulers, text on computer screens, and PowerPoint
slides. In addition, adding colour to a clear liquid can make the liquid easier to see when measuring
volumes.
Avoid non-contrasting colour combinations, such as red and green, because students who are colour-
blind may not be able to distinguish the difference between such colours. If an experiment is being done
where the colour change goes from red to green, it is suggested to use materials which will produce
other colours or completely report the results in a drawing or illustration in which alternate colours can
be used.
V8
Enlarged Text:
Use a larger font size (18 is usually sufficient)
Use a copier to enlarge a textual document
For students with visual impairments, text is not accessible if it is not transcribed into the right format. It
is important to find a font size that ensures students with low vision are able to comfortably read the
material. When material is in an electronic format the font size can be altered before being printed out
and if material from a book is being used or worksheets are being copied, a copier can be used to
enlarge the print of the text. Eighteen point font is usually sufficient for most users, but it depends
greatly on the level of impairment. Some students may be able to read smaller text, but visual fatigue
will set in much quicker. Text on measuring devices can also be enlarged as well as number keys on tools
like calculators.
V9
Ensure Task or Demonstration is in Visual Field
Place objects in student’s visual field
Encourage student to scan entire area
For students with a limited visual field, it is important that objects are located within the student’s visual
field. The visual field can be different for each student, so it is important to first identify where the
student’s visual range lies. An activity may need to be relocated in a vertical or horizontal direction.
Additionally, activities may need to be positioned closer to students. Also, for students with a limited
visual field, a task which is normally spread out may need to be consolidated so all the tools and
39 | P a g e
materials can be seen at once. While students may have a limited visual field, it is still important to
encourage them to scan the entire area so they are aware of their surroundings.
V10
First Person Experience:
Show the student what is happening by having them experience it
First person experience allows a student to better understand certain phenomena such as force. For
example, to show the effect of force on movement, push the student on a skateboard, rather than just
showing a demonstration to the class. The student will be able to experience movement and gain a
better understanding of force and the resultant motion.
V11
Good Keys and Legends
Use good keys and legends when using diagrams or grasp
Ensure that keys and legends are simple
Incorporate textures into the keys and legends if tactile diagrams are being used
It is easier for a student to understand diagrams, whether they be tactile or enlarged two-dimensional, if
there is a good key which is not overly complex. The simpler and more self-explanatory a diagram or
graph is, the easier it is to understand. This is especially important for visually impaired students
because if a student is accessing a diagram in a tactile manner there is only a very limited area that can
be accessed at one time. Also, for students with low vision if the diagram is not labelled well it will be
difficult to understand.
V12
Magnify/Enlarge:
Enlarge images from microscopes or demonstrations using a camera
Supply magnifying glasses to students with visual impairments
Enlarge the size of pictures and diagrams
Enlarge the size of objects and buttons
Using cameras connected to projectors or televisions to enlarge small demonstrations can allow
students to see what is happening better. Similarly, connecting a microscope to a projector or television
can give the student access to phenomena that occur on a scale that is normally too small for them to
see. Magnifying glasses can be used to enlarge objects that are too small for students to see. In addition
to using optics to enlarge objects in real time, enlarging the physical size of buttons or objects will make
it easier for students to see or use them.
V13
40 | P a g e
Use Screen Magnifier:
Put things in an electronic format and use computer software to magnify information displayed
on computer screen
Screen magnifier software can be used to enlarge text or pictorial images to the desired level. It should
be noted that for internet use, not all websites are compatible with screen magnifiers.
V14
Use Screen Reader
Put things in an electronic format and use computer software to read written material to
students
Screen readers are accessed through a computer. The software translates the electronic text into a
verbal output. It should be noted not all websites and PDF files are compliant with screen readers.
V15
Simplify:
Simplify instructions and explanations, be concise
Use less text
Simplify visual displays to ensure they are easy to comprehend
Too much text can become overwhelming and confusing for all students, particularly students with
visual impairments. To account for this, it is important to make sure that written instructions and textual
documents are as concise as possible. Also, pictures can be used in place of text in instances where
students have low vision but are able to see the pictures.
For students with visual impairments, it can become very confusing if there are too many lines on a
graph or if there are too many different figures on one diagram. By simplifying the graphs and diagrams,
they are easier to understand for everyone and can be seen better on worksheets and posters. It should
also be noted that different colour lines on graphs should be used with caution. Coloured lines are good
when material is printed in colour but may be difficult to distinguish and if the graph is copied in black
and white at any point, the colours will be changed to gray shades, which can be very hard to read.
V16
Team Approach:
Put students in teams so that the students can help each other
Students with visual impairments may require peer helpers during classroom activities. Using a team
approach to learning can optimize each student’s strengths within activities. This way, every student can
contribute in his or her own way and complete all the activities. For students with visual impairments,
41 | P a g e
peer helpers may need to read off the numbers on a scale or stop watch, verbally explain visual changes,
and aid the student in any other areas where vision is required. It is important to note that in some
cases, a trained observer may be needed to describe visual changes because a student observer may not
know what to look for. It is important to ensure that every member of the group contributes; therefore,
while one member of the group may read the digital outputs from a scale, the student who is blind or
visually impaired could record data or hold/position other objects.
V17
Use Computers as a Writing Alternative
Allow students to type answers
Students with visual impairments, especially blind students, will have difficulty writing manually. As an
alternative to manual writing, these students may use computers to input their answers. With the
support of technologies like screen readers and screen magnifiers, it is easier for students to record their
answers and observations.
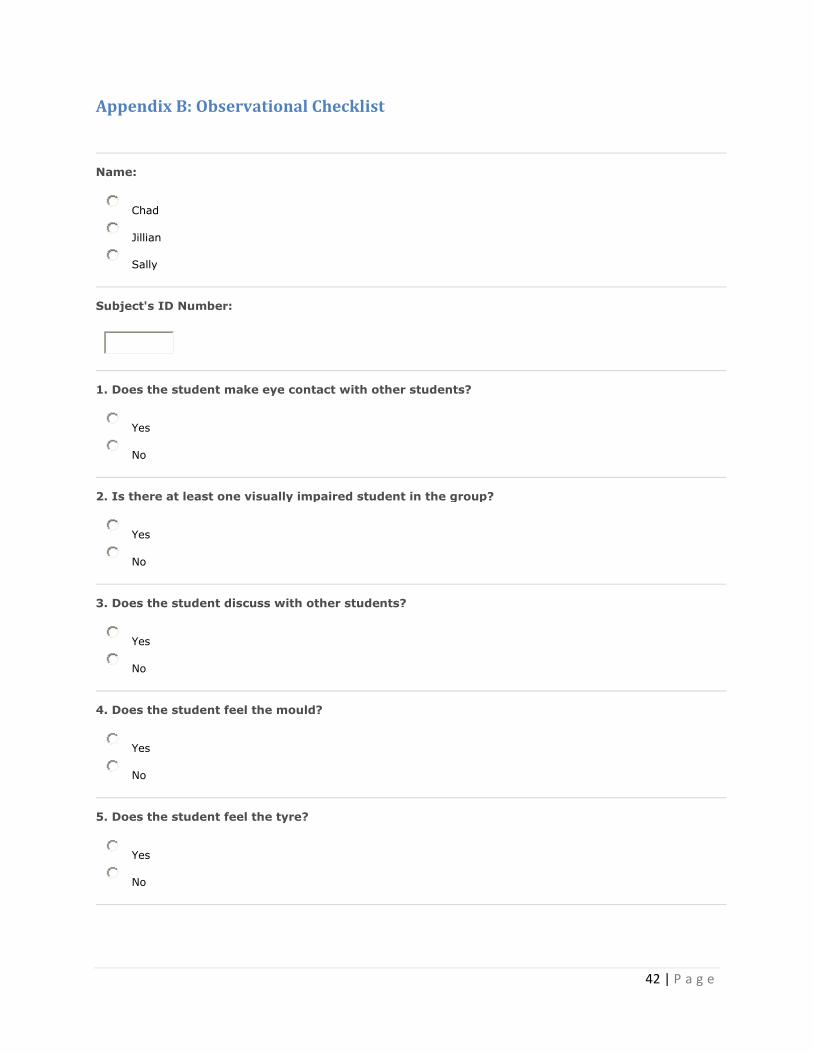
42 | P a g e
Appendix B: Observational Checklist
Name:
Chad
Jillian
Sally
Subject's ID Number:
1. Does the student make eye contact with other students?
Yes
No
2. Is there at least one visually impaired student in the group?
Yes
No
3. Does the student discuss with other students?
Yes
No
4. Does the student feel the mould?
Yes
No
5. Does the student feel the tyre?
Yes
No
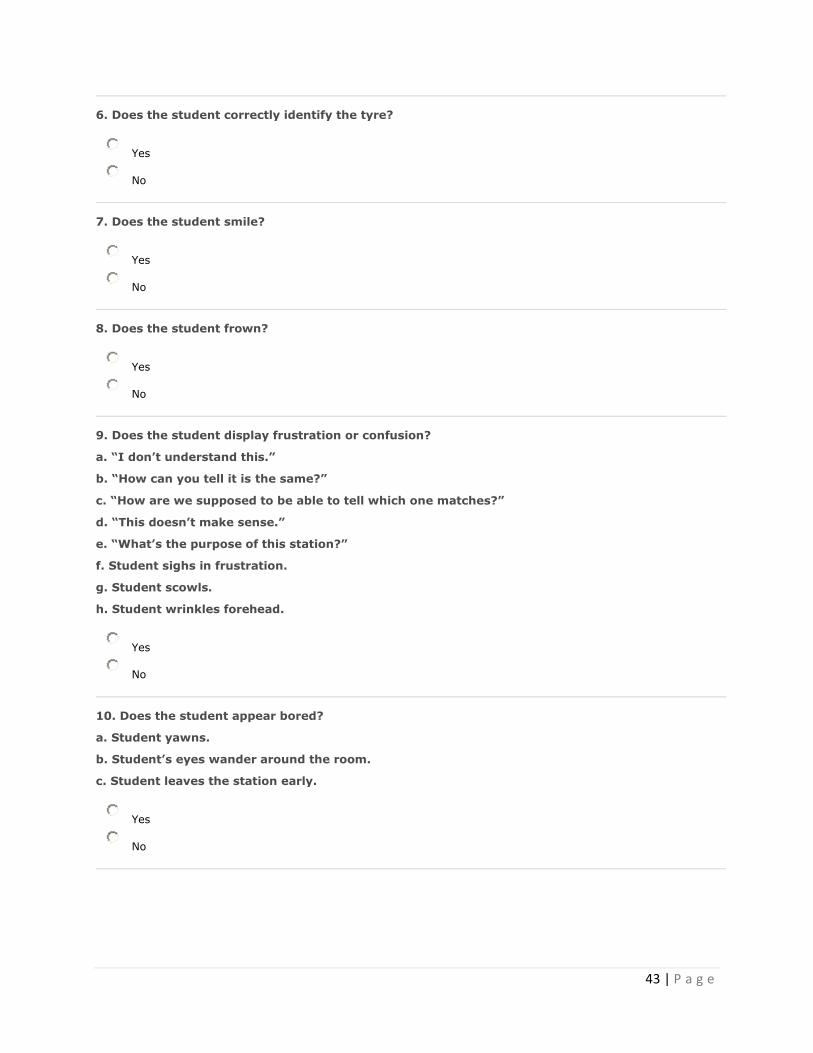
43 | P a g e
6. Does the student correctly identify the tyre?
Yes
No
7. Does the student smile?
Yes
No
8. Does the student frown?
Yes
No
9. Does the student display frustration or confusion?
a. “I don’t understand this.”
b. “How can you tell it is the same?”
c. “How are we supposed to be able to tell which one matches?”
d. “This doesn’t make sense.”
e. “What’s the purpose of this station?”
f. Student sighs in frustration.
g. Student scowls.
h. Student wrinkles forehead.
Yes
No
10. Does the student appear bored?
a. Student yawns.
b. Student’s eyes wander around the room.
c. Student leaves the station early.
Yes
No
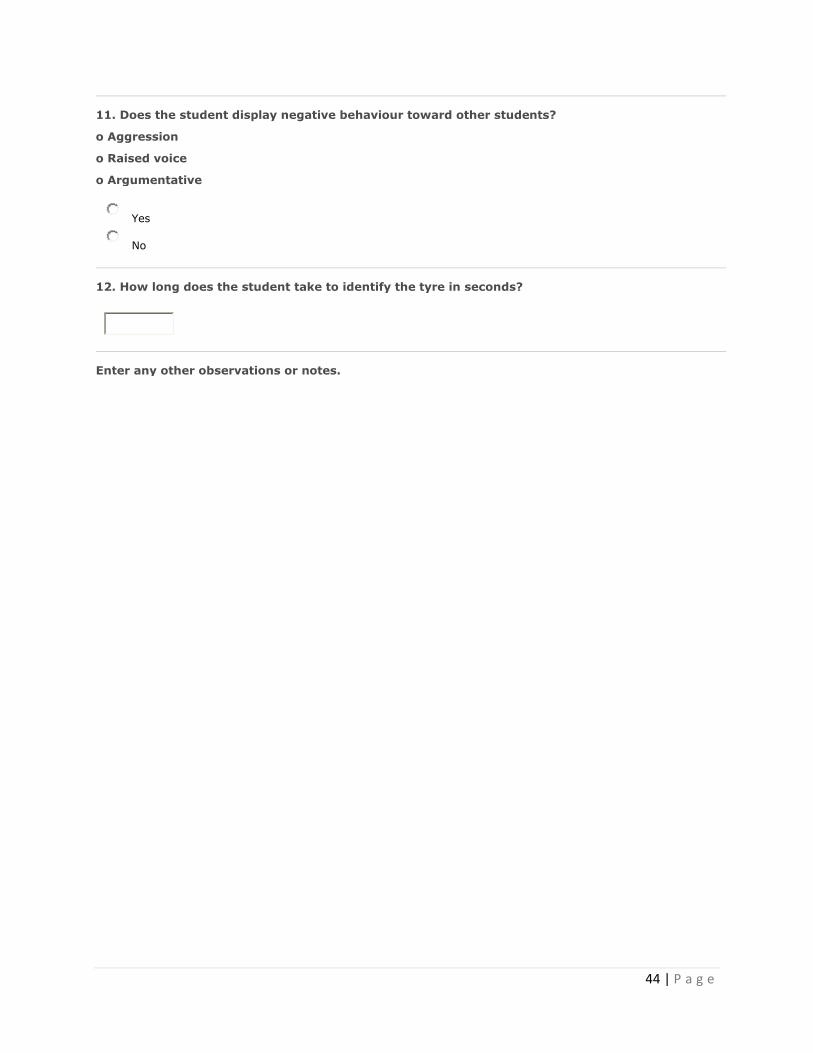
44 | P a g e
11. Does the student display negative behaviour toward other students?
o Aggression
o Raised voice
o Argumentative
Yes
No
12. How long does the student take to identify the tyre in seconds?
Enter any other observations or notes.
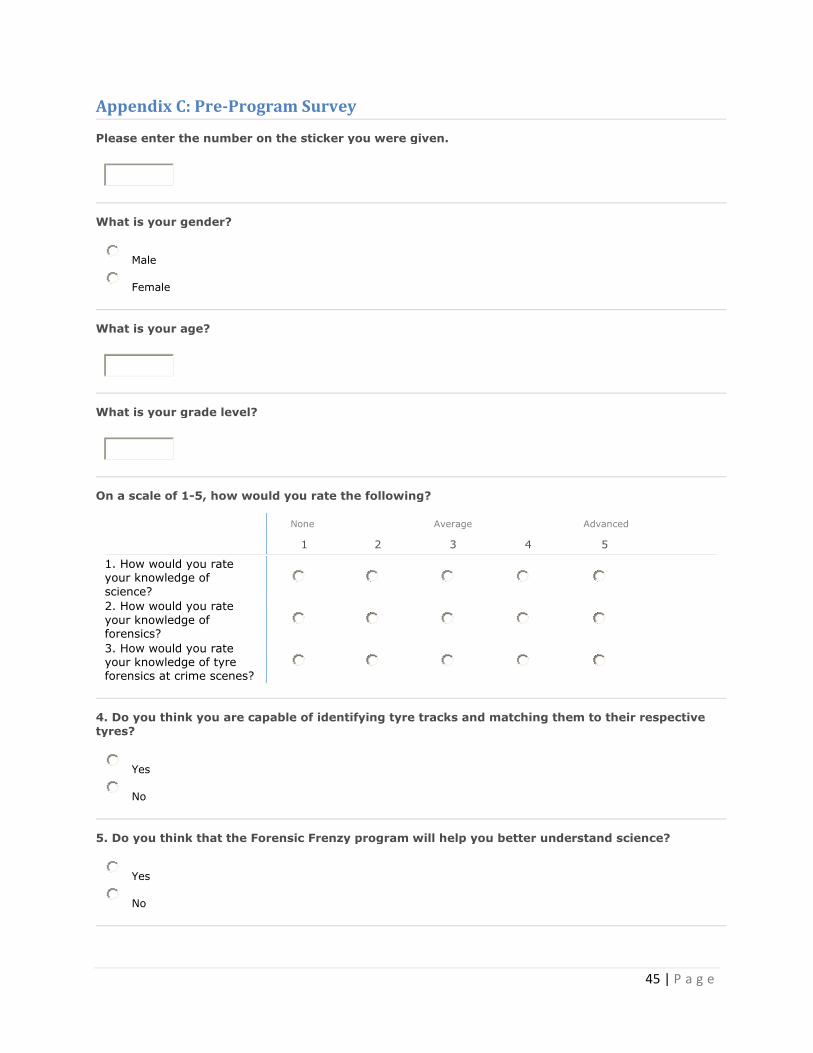
45 | P a g e
Appendix C: Pre-Program Survey
Please enter the number on the sticker you were given.
What is your gender?
Male
Female
What is your age?
What is your grade level?
On a scale of 1-5, how would you rate the following?
None
Average
Advanced
1 2 3 4 5
1. How would you rate your knowledge of
science?
2. How would you rate
your knowledge of forensics?
3. How would you rate your knowledge of tyre forensics at crime scenes?
4. Do you think you are capable of identifying tyre tracks and matching them to their respective
tyres?
Yes
No
5. Do you think that the Forensic Frenzy program will help you better understand science?
Yes
No
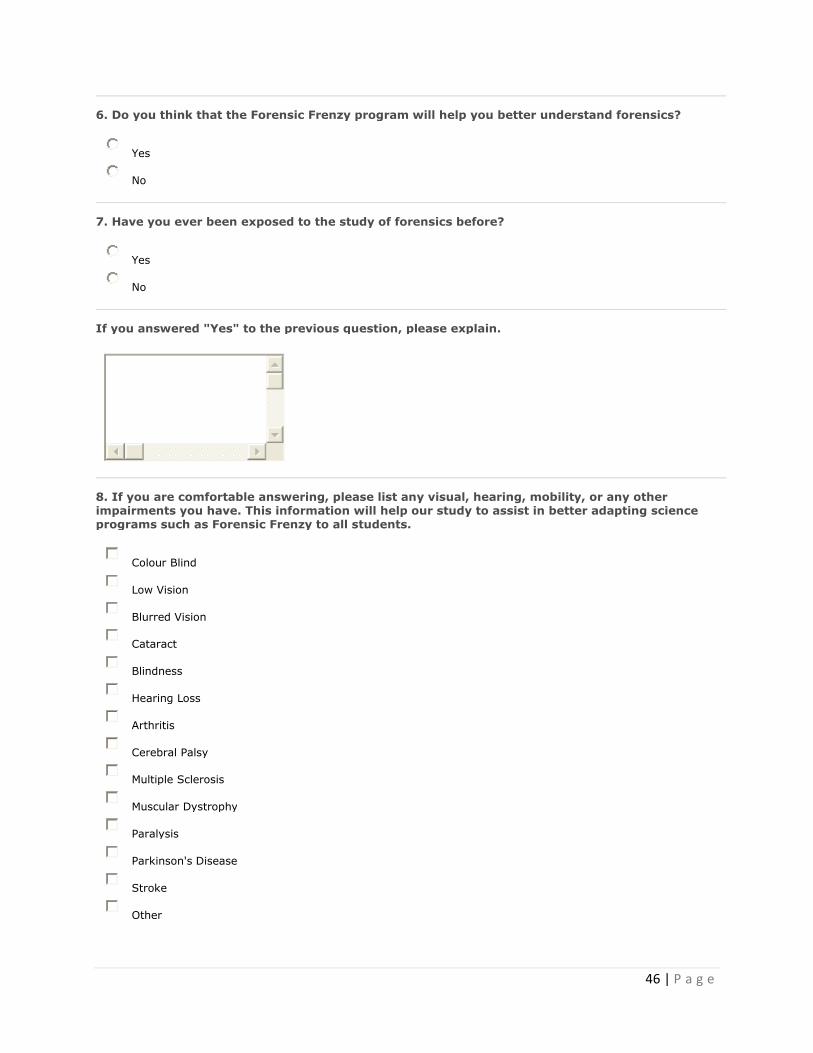
46 | P a g e
6. Do you think that the Forensic Frenzy program will help you better understand forensics?
Yes
No
7. Have you ever been exposed to the study of forensics before?
Yes
No
If you answered "Yes" to the previous question, please explain.
8. If you are comfortable answering, please list any visual, hearing, mobility, or any other impairments you have. This information will help our study to assist in better adapting science programs such as Forensic Frenzy to all students.
Colour Blind
Low Vision
Blurred Vision
Cataract
Blindness
Hearing Loss
Arthritis
Cerebral Palsy
Multiple Sclerosis
Muscular Dystrophy
Paralysis
Parkinson's Disease
Stroke
Other

47 | P a g e
If you answered "Other," please explain.
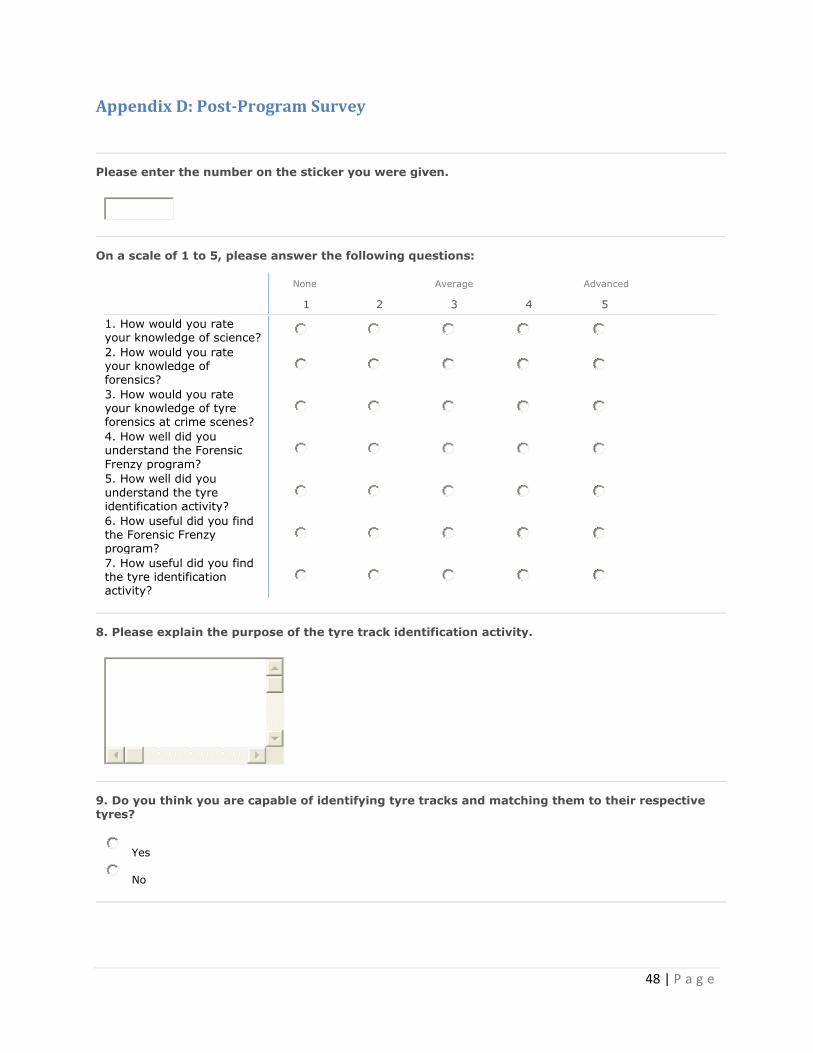
48 | P a g e
Appendix D: Post-Program Survey
Please enter the number on the sticker you were given.
On a scale of 1 to 5, please answer the following questions:
None
Average
Advanced
1 2 3 4 5
1. How would you rate your knowledge of science? 2. How would you rate your knowledge of forensics?
3. How would you rate your knowledge of tyre forensics at crime scenes?
4. How well did you understand the Forensic
Frenzy program?
5. How well did you
understand the tyre identification activity?
6. How useful did you find the Forensic Frenzy program?
7. How useful did you find the tyre identification activity?
8. Please explain the purpose of the tyre track identification activity.
9. Do you think you are capable of identifying tyre tracks and matching them to their respective tyres?
Yes
No
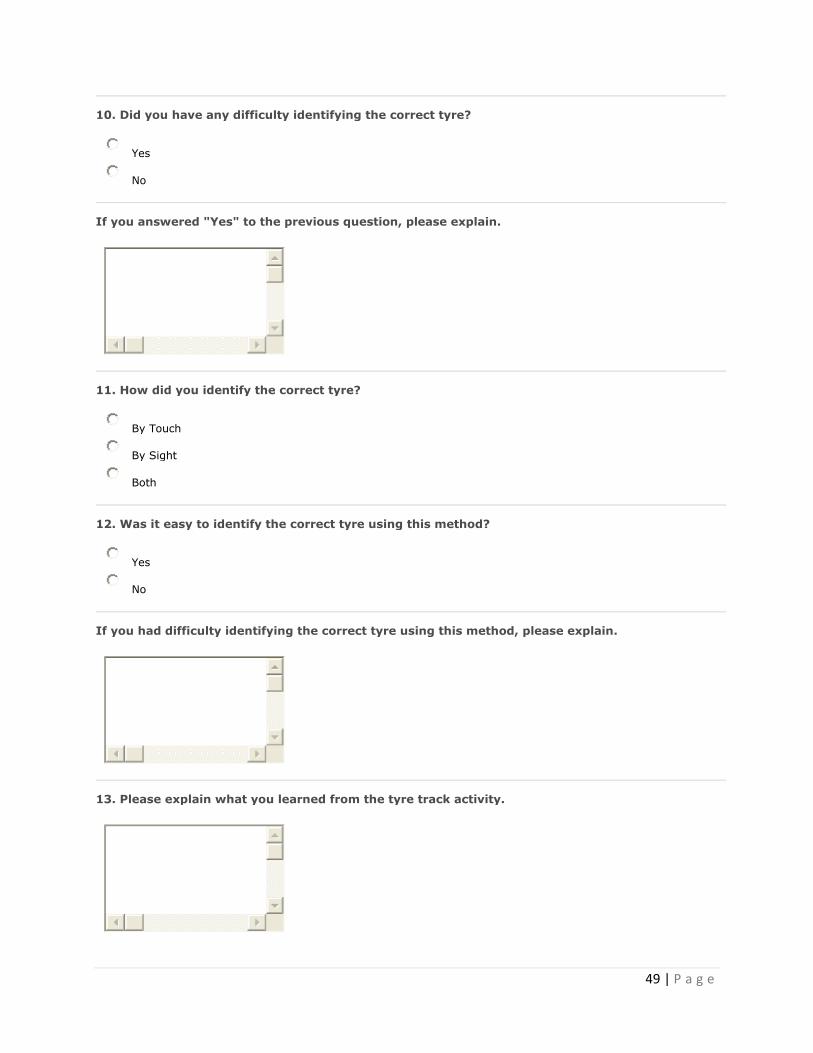
49 | P a g e
10. Did you have any difficulty identifying the correct tyre?
Yes
No
If you answered "Yes" to the previous question, please explain.
11. How did you identify the correct tyre?
By Touch
By Sight
Both
12. Was it easy to identify the correct tyre using this method?
Yes
No
If you had difficulty identifying the correct tyre using this method, please explain.
13. Please explain what you learned from the tyre track activity.

50 | P a g e
14. What did you enjoy or find interesting about this tyre track activity?
15. What was unclear or confusing about the tyre track activity?