ADAPT REVIT Link 2009 Manual 1008 v1 1 · PDF file... such as steel, wood or generic ... for...
23
[email protected] www.adaptsoft.com ADAPT Corporation, Redwood City, California, USA, Tel: +1 (650) 306-2400 Fax: +1 (650) 306-2401 ADAPT International Pvt. Ltd, Kolkata, India, Tel: +91 33 302 86580 Fax: +91 33 224 67281 STRUCTURAL CONCRETE SOFTWARE ADAPT-REVIT LINK 2009 USER MANUAL Copyright 2008
Transcript of ADAPT REVIT Link 2009 Manual 1008 v1 1 · PDF file... such as steel, wood or generic ... for...

[email protected] www.adaptsoft.com ADAPT Corporation, Redwood City, California, USA, Tel: +1 (650) 306-2400 Fax: +1 (650) 306-2401
ADAPT International Pvt. Ltd, Kolkata, India, Tel: +91 33 302 86580 Fax: +91 33 224 67281
STRUCTURAL CONCRETE SOFTWARE
ADAPT-REVIT LINK
2009
USER MANUAL
Copyright 2008

ADAPT-Revit Link 2009
2
LIST OF CONTENTS
1 OVERVIEW ............................................................................................................... 3 2 INSTALLATION ....................................................................................................... 4 3 EXPORT DATA FROM REVIT STRUCTURE ....................................................... 5
3.1 SELECTING LEVELS....................................................................................... 5 3.2 SELECTING COMPONENTS AND LOADS................................................... 6
3.2.1 Beams.......................................................................................................... 7 3.2.2 Columns ...................................................................................................... 7 3.2.3 Walls ........................................................................................................... 7 3.2.4 Slabs............................................................................................................ 8 3.2.5 Openings ..................................................................................................... 8 3.2.6 Footings....................................................................................................... 8 3.2.7 Point Loads ................................................................................................. 8 3.2.8 Line Loads .................................................................................................. 9 3.2.9 Patch Loads................................................................................................. 9 3.2.10 Load Combinations..................................................................................... 9
3.3 SELECTING LOAD CASES ........................................................................... 10 3.4 CREATING THE INPUT FILE ....................................................................... 11
4 IMPORT DATA INTO ADAPT-BUILDER............................................................ 12 4.1 SELECTING LEVELS IN ADAPT-BUILDER............................................... 12 4.2 SELECTING COMPONENTS TO BE IMPORTED....................................... 13 4.3 SELECTING LOADS / LOAD CASES........................................................... 14 4.4 SELECTING LOAD COMBINATIONS......................................................... 15
5 EXPORT DATA FROM ADAPT-BUILDER.......................................................... 16 5.1 MATERIAL PROPERTIES ............................................................................. 16 5.2 LOAD CASES.................................................................................................. 16 5.3 LOAD COMBINATIONS................................................................................ 16 5.4 LEVELS............................................................................................................ 16 5.5 BEAMS AND COLUMNS............................................................................... 16 5.6 WALLS............................................................................................................. 17 5.7 SLABS AND FOOTINGS................................................................................ 17 5.8 POINT, LINE AND PATCH LOADS.............................................................. 17 5.9 EXPORT FUNCTIONALITY IN ADAPT-BUILDER.................................... 17
5.9.1 Exporting Structural Components and Loads ........................................... 17 5.9.2 Exporting Reinforcement.......................................................................... 18
6 IMPORT DATA INTO REVIT................................................................................ 19 6.1 SELECTING FILES ......................................................................................... 20 6.2 SELECTING LEVELS..................................................................................... 20 6.3 COMPONENTS / LOADS............................................................................... 21 6.4 LOAD CASES.................................................................................................. 22 6.5 IMPORT LOG FILE......................................................................................... 23

ADAPT-Revit Link 2009
3
1 OVERVIEW
This document describes how to use the ADAPT-Revit Link. The link enables bi-directional transfer of model information between Autodesk Revit® Structure 2009 and the ADAPT-Builder™ v3 suite of programs, ADAPT-Modeler, ADAPT-Floor Pro, and ADAPT-MAT. The transfer of information between the programs is done with a transfer file, also referred to as the input file. Additionally, this guide shows how to automatically generate a Revit Structure model from a project originally created in ADAPT-BUILDER. Figure 1-1 shows the workflow for bi-directional integration. Figure 1-2 shows the workflow for creating a Revit model based on an ADAPT-Builder model.
FIGURE 1-1: Workflow for bi-directional integration FIGURE 1-2: Workflow for creating a Revit Structure model from ADAPT-Builder
ADAPT-Builder3D FEM Analysis of Slabs
Revit Structure3D Physical Model
Revit StructureUpdated
3D Physical Model
Model Analyze & Design Document & CoordinateModel Analyze & Design Document & Coordinate
Transfer• Project Parameters• Geometry• Loads
Update Project Modelincluding reinforcement bars
ADAPT-Builder3D FEM Analysis of Slabs
Revit Structure3D Slab Model
Model Analyze & Design Document & CoordinateModel Analyze & Design Document & Coordinate
Create Revit StructureModel of Design
ADAPT-Builder3D Modeling of Slabs from
AutoCAD

ADAPT-Revit Link 2009
4
2 INSTALLATION
Ensure that Revit Structure 2009 is installed on your computer before installing the link. For a proper installation of the link, please close Revit in case it is open. Please note that the ADAPT-Revit Link setup will modify the initialization file of Revit Structure (Revit.ini) and therefore, if you change the initialization file manually, the link may not operate properly. In case the initialization file is corrupted, a copy of the original initialization file is stored in your Revit link program folder.
FIGURE 2-1: Access the ADAPT-Revit Link through the Tools menu
Once you finish installing the link, two new items will be added to the Tools menu item in Revit Structure. They can be found under External Tools as shown in Figure 2-1. The first option Send Model to ADAPT… shall be chosen when data must be exported from Revit Structure to ADAPT-Builder. The second option Import Model from ADAPT… shall be chosen if data must be imported from ADAPT-Builder into Revit.

ADAPT-Revit Link 2009
5
3 EXPORT DATA FROM REVIT STRUCTURE
Select Send Model to ADAPT… from the External Tools menu to export a model from Revit Structure to ADAPT-Builder. The ADAPT-Revit Export window shown in Figure 3-1 will appear on the screen. The window contains four tabs: Levels, Components/Loads, Load Cases and About.
FIGURE 3-1: ADAPT-Revit Export window
3.1 SELECTING LEVELS On the Levels tab, all levels of the model are listed. As the default, all levels are selected into the ADAPT list box, which means that once the model is exported, the information for all levels of the structure is transferred to ADAPT-Builder. You have the option of selecting which floors to export. Levels can be moved from the Revit list box to the right list box and vice versa using either ‘Select All’ or ‘Deselect All’, or by highlighting the desired levels and moving them with the arrow buttons. Those levels that remain in the Revit list box are not exported. ADAPT-Builder imports one slab or foundation model at a time from the transfer file regardless of whether the file contains the entire project model or just a few levels. Therefore, for performance reasons, you may choose to limit the number of floors exported at a time.

ADAPT-Revit Link 2009
6
3.2 SELECTING COMPONENTS AND LOADS On the Components/Loads tab, you have the option to select which of the components should be exported and which should be ignored. Figure 3-2.1 shows the screen that lets you select the different items.
FIGURE 3-2.1: Components/Loads tab
Please note that the link only transfers concrete components. All other components that are made of other materials, such as steel, wood or generic material, will be ignored. In addition to components selected by the dialog box shown in Figure 3-2.1, all concrete material properties are also exported as default. The following concrete material properties are exported to ADAPT-Builder:
• Material Name • Unit Weight • Poisson Ratio • Thermal Expansion Coefficient • Modulus of Elasticity • Shear Modulus • Compressive Strength • Concrete Type
As you can see in Figure 3-2.1, the following items can be exported to ADAPT-Builder:

ADAPT-Revit Link 2009
7
3.2.1 Beams Concrete beams with rectangular cross sections are exported if Export Beams is checked. The rectangular cross section must be defined with parameters ‘b’ as width and ‘h’ as depth. The following beam properties are exported:
• Coordinates of end points • Width • Depth • Offset • Material
The offset is the average offset of the two ends of the beam. Since Floor Pro only supports horizontal beams, the object is placed at its average height. It is recommended to select ‘Top’ for the ‘z-Direction Justification’.
3.2.2 Columns Concrete columns with rectangular, square or circular cross sections are exported if Export Columns is checked. Rectangular sections are identified by parameters ‘b’ as width and ‘h’ as depth. Square and circular columns are identified by ‘b’ as their dimension or diameter. Since both square and circular columns are identified with the same parameter ‘b’, if the Family name has the word ‘Round’ in it, the link assumes the column is circular, otherwise it is assumed the column is square. For each level, columns on top of the slab and below the slab are exported. If a column is modeled continuous, it is broken into pieces for export. We recommend users model discrete columns for each level. The modeling of discrete columns enables the re-importing of changes from ADAPT-Builder back to Revit Structure. The following properties of columns are exported to FloorPro:
• Coordinate • Angle • Width • Depth • Shape • Offset at top • Offset at bottom • Material
3.2.3 Walls Walls that have at least one layer of concrete are exported. Walls are similar to columns in the sense that they will be broken into discrete walls per level if modeled continuously, and walls above and below the selected levels are exported. Only straight walls on plan are exported, and walls with curved geometries are ignored. Openings in walls are not imported to

ADAPT-Revit Link 2009
8
ADAPT-Builder. The following information for each wall is transferred to ADAPT-Builder:
• Coordinates of each end • Thickness • Offset at the top • Offset at the bottom • Material
3.2.4 Slabs Concrete floors as well as mat foundations are exported as slab regions if Export Slabs is selected. The total thickness of the slab is reported. If the slab is layered, the material of the first structural layer will be reported. The following properties are exported:
• Slab Geometry • Material • Thickness • Offset
3.2.5 Openings Openings are exported if Export Openings is checked. The geometry of all openings for the selected levels will be exported.
3.2.6 Footings Wall footings and isolated footings are exported if Export Footings is checked. Footings with material properties other than concrete are ignored. Geometry of isolated footings is identified by ‘Width’ and ‘Length,’ while geometry of the wall foundation is governed by the geometry of the host walls connected to the foundation. The information transferred for footings is the same as those of slabs.
3.2.7 Point Loads All point loads for the selected levels and selected load cases are exported if Export Point Loads is checked. The following information is exported for each point load:
• Coordinate • Intensity • Load Case

ADAPT-Revit Link 2009
9
3.2.8 Line Loads All line loads for the selected levels and selected load cases are exported if Export Point Loads is checked. The following information is exported for each line load:
• Coordinates of the two ends • Intensity • Load Case
3.2.9 Patch Loads All patch loads for the selected levels and selected load cases are exported if Export Point Loads is checked. The following information is exported for each patch load:
• Patch load geometry • Intensity • Load Case
3.2.10 Load Combinations All the load combinations defined in Revit Structure can be exported to ADAPT-Builder. Only those load cases used in a load combination are exported. For each load combination, the following information is transferred:
• Name • State • List of Load Cases • List of Load Case Factors
The load combination name can consist only of the 26 letters of the alphabet and of the following special characters: underscore “_”, dash “-“, plus sign “+”, parenthesis “( )”. Spaces in load combination names are not allowed. The state of a load combination can be ‘ultimate’ or ‘serviceability’ and will appear in ADAPT-Builder programs as either ‘Strength’ or ‘Serviceability’ load combination.

ADAPT-Revit Link 2009
10
3.3 SELECTING LOAD CASES You have control over which load cases to export. Thus, if point, line or patch load is checked to be exported, only those instances of the loads which have a load case same as one of the selected cases will be exported. Selection of load cases is similar to selecting levels (see Figure 3-3.1).
FIGURE 3-3.1: Load Cases

ADAPT-Revit Link 2009
11
3.4 CREATING THE INPUT FILE Once the desired data for export is selected, you can click on the button Export Data. This operation extracts the relevant project model information and writes it to the ADAPT input file. It also assigns an ADAPT Floor ID to each slab element in Revit. This ID is created to enable the tracking of floors between Revit and ADAPT-Builder and to allow the user to change floor geometries in ADAPT-Builder and to apply these changes to the Revit model. To accept the creation of the ADAPT Floor IDs, select Yes on the respective message. When the operation is complete, the user is asked to specify a location and file name to save the input file (Figure 3-4.1). You will use this input file to import the desired level into ADAPT-Builder.
FIGURE 3.4-1
After the input file is created, you will receive a confirmation message. Click OK and the ADAPT-Revit Export window will close.

ADAPT-Revit Link 2009
12
4 IMPORT DATA INTO ADAPT-BUILDER
After a model is exported from Revit Structure to the input file, the user can open ADAPT-Builder programs and import a selected floor of the model. Ensure that REVIT is chosen for Import/Export loading/geometry when opening ADAPT-Builder. In the File menu, select REVIT in the Import submenu (Fig. 4-1) and browse to the location where you saved your input file.
FIGURE 4-1: Import Revit model into ADAPT-Builder
4.1 SELECTING LEVELS IN ADAPT-BUILDER Once you have selected the input file, the Import Options window appears in ADAPT-Builder (see Fig. 4.1-1). In this window you can select levels, components, loads and load cases as well as load combinations to be imported into ADAPT-Builder. Once you made all selections, you can click on the OK button to import the floor into ADAPT-Builder. On the bottom of the page you can select the level in the drop down box that you wish to import. In cases where you have already imported this level into ADAPT-Builder but changes have occurred in Revit, you have the option to update the already imported level in ADAPT-Builder. Ensure that you have the model opened in ADAPT-Builder and after selecting the level, check the checkmark for Keep original model.

ADAPT-Revit Link 2009
13
For example, let’s assume your patch loads have changed in Revit for a floor that you already imported into ADAPT-Builder. First you have to generate the input file that contains the new patch loads for this level. Then you simply open your floor model in Builder, and select and delete all patch loads (e.g. with the help of the Select by Type function). You must then select Patch Loads and the appropriate load cases from the tab Loads/Load Cases. Doing so will import the updated patch loads into your existing model.
FIGURE 4.1-1: Import Options
4.2 SELECTING COMPONENTS TO BE IMPORTED On the Components (Fig. 4.1-1) tab you can select which of the listed components you wish to import. ADAPT-Builder can only import beams, columns, walls, slabs and drop caps/panels made of concrete. Drop caps/panels are imported into ADAPT-Builder as thickened slab regions.

ADAPT-Revit Link 2009
14
4.3 SELECTING LOADS / LOAD CASES On the Loads/Load Cases tab (Fig. 4.3-1) you can select which type of loads to import and which load cases to bring into ADAPT-Builder. Point loads, line loads and patch loads are pre-selected. However, you can simply de-select them if you don’t want to import any of them. The load cases that are available for you to import are listed in the Static list box. Select those you would like to import and click on the arrow pointing to the ADAPT list box. All load cases listed in the ADAPT list box are imported.
FIGURE 4.3-1: Loads and load cases

ADAPT-Revit Link 2009
15
4.4 SELECTING LOAD COMBINATIONS The Load Combinations tab (Fig. 4.4-1) allows you to select the load combinations in the Static list box that you would like to import. After selecting them, simply click on the arrow button to bring them to the ADAPT list box. All load combinations listed in the ADAPT list box are imported to ADAPT-Builder.
FIGURE 4.4-1: Load Combinations
ADAPT-Revit Link 2009
16
5 EXPORT DATA FROM ADAPT-BUILDER
After the analysis and design process is complete in ADAPT-Builder, the model can be exported to Revit Structure. Modifications made to the model in ADAPT-Builder—for example, the addition, modification, or deletion of components to the model—can be transferred back to the main Revit Model. The following explains the types of changes to a model that can be transferred back to Revit Structure.
5.1 MATERIAL PROPERTIES Material properties can be modified inside ADAPT-Builder programs and the changes brought back into Revit. At this point, material that is created in Builder and does not exist in Revit will not be imported into Revit. You must define the material manually in Revit before importing.
5.2 LOAD CASES New load cases created in ADAPT-Builder will be added in Revit Structure once imported. Load cases are identified by their name and a change in the name of a load case creates a new load case in Revit Structure. If a new load case is added to Revit, double-check the Nature and the Category of the load case in the Load Case tab of the Structural Settings menu item in Revit’s Settings menu.
5.3 LOAD COMBINATIONS Load Combinations can be added, deleted or modified in ADAPT-Builder. Load cases and load case factors can be changed; the state of a load combination and the name of the load combination can also be changed in ADAPT-Builder. These changes are updated in Revit Structure once a model is re-imported.
5.4 LEVELS Elevation of each level can be changed in ADAPT-Builder and once the model is imported to Revit Structure, the elevation of the levels will be updated.
5.5 BEAMS AND COLUMNS All properties of beams and columns can be modified in ADAPT-Builder. A new component can be added to the model, or an existing component can be deleted. Components added or updated in ADAPT can be re-imported into Revit Structure. In the current implementation of the link, new components can only be created in Revit Structure if the cross section of the column or beam family exists. Changes made to components with cross sections that do not exist will be ignored.

ADAPT-Revit Link 2009
17
5.6 WALLS All properties of walls can be modified. New walls can be added or existing walls can be deleted. Similar to columns and beams, the wall compound structure has to exist in Revit Structure before you import the data. Otherwise the modification will be ignored.
5.7 SLABS AND FOOTINGS The only modification to slabs that can be re-imported back to Revit Structure is the offset. Neither the geometry of the slab nor the thickness and material of it can be modified. A slab can be deleted or added. For new slabs, all properties such as material, thickness, geometry and offset are exported to Revit Structure. Openings added to slabs will be ignored. In case the geometry changes in ADAPT-Builder and you want to update your Revit model, you can delete the slab in Revit and import the modified slab. However, you must ensure that the slab thickness and material are the same as a slab that already exists in the slab family in Revit.
5.8 POINT, LINE AND PATCH LOADS All properties of loads such as location and intensity, as well as load case, can be modified. A new load can be added or an existing load can be deleted. All changes will be sent back to the original Revit Structure model.
5.9 EXPORT FUNCTIONALITY IN ADAPT-BUILDER Once all the modifications to the model are complete, you are ready to export the data out of ADAPT-Builder. All information is exported to input files. You can export two sets of data. You can export structural components and loads to an input file, and you can export the entire reinforcement information (i.e., base reinforcement and calculated reinforcement) to a rebar input file. If you want to import changes made to structural components or loads to Revit, you only need an input file. However, if you would like to import reinforcement from ADAPT-Builder into Revit, you need the rebar input file as well. To import reinforcement into Revit you must have an input file containing structural and load information as well as a rebar input file containing the reinforcement information.
5.9.1 Exporting Structural Components and Loads Go to the File menu and select Revit from the Export submenu (Fig. 5.9-1). A Save As window will appear where you can browse to the location where you want to save the input file and provide a unique name for this file. Click Save and you are ready to import your floor into Revit.

ADAPT-Revit Link 2009
18
FIGURE 5.9-1: Export structural components and loads to input file
5.9.2 Exporting Reinforcement If you want to import reinforcement information into Revit, you have to generate a rebar input file in ADAPT-Builder. Go to the File menu and select Rebar from the Export submenu. A Save As window will appear where you can browse to the location where you want to save the rebar input file and provide a unique name for this file. Click Save and the rebar input file is generated containing base reinforcement as well as calculated reinforcement.
ADAPT-Revit Link 2009
19
6 IMPORT DATA INTO REVIT
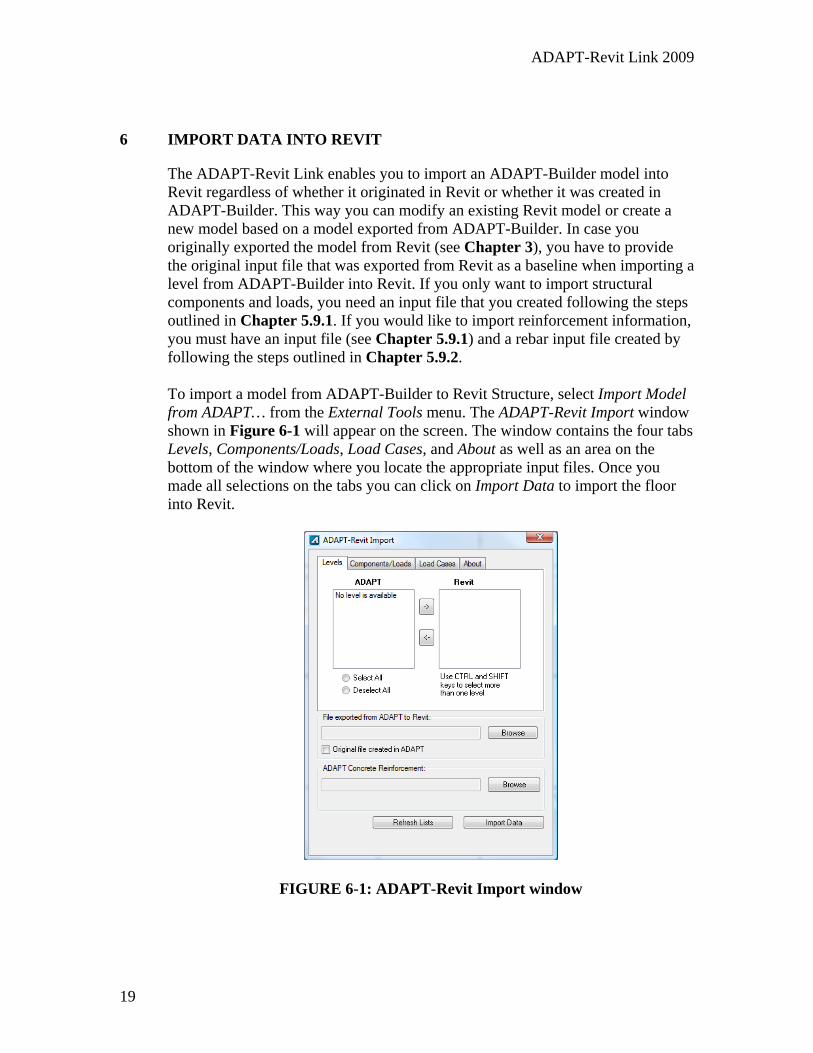
The ADAPT-Revit Link enables you to import an ADAPT-Builder model into Revit regardless of whether it originated in Revit or whether it was created in ADAPT-Builder. This way you can modify an existing Revit model or create a new model based on a model exported from ADAPT-Builder. In case you originally exported the model from Revit (see Chapter 3), you have to provide the original input file that was exported from Revit as a baseline when importing a level from ADAPT-Builder into Revit. If you only want to import structural components and loads, you need an input file that you created following the steps outlined in Chapter 5.9.1. If you would like to import reinforcement information, you must have an input file (see Chapter 5.9.1) and a rebar input file created by following the steps outlined in Chapter 5.9.2. To import a model from ADAPT-Builder to Revit Structure, select Import Model from ADAPT… from the External Tools menu. The ADAPT-Revit Import window shown in Figure 6-1 will appear on the screen. The window contains the four tabs Levels, Components/Loads, Load Cases, and About as well as an area on the bottom of the window where you locate the appropriate input files. Once you made all selections on the tabs you can click on Import Data to import the floor into Revit.
FIGURE 6-1: ADAPT-Revit Import window

ADAPT-Revit Link 2009
20
6.1 SELECTING FILES First, you have to select the appropriate input files on the lower part of the ADAPT-Revit Import window. In case where you did not export any model originally from Revit, check the Original file created in ADAPT check box. Next, provide the location of the File exported from Adapt to Revit by clicking on Browse. You must choose the file that you created following the steps outlined in Chapter 5.9.1. You can also import reinforcement information. After creating the appropriate rebar input file (see Chapter 5.9.2), you have to browse to its location by clicking on Browse for the ADAPT Concrete Reinforcement input file. Once all appropriate files are selected, click on Refresh Lists to populate the four tabs with the data to choose from for the actual import. You can now select the information on each of the four tabs you wish to import. In case where your Revit model has negative floor elevations, you will see a message informing you that the level elevations are different. Simply acknowledge the warning by hitting OK.
6.2 SELECTING LEVELS In the Revit list box you will usually find three levels listed (Figure 6.2-1). The first level in the list is the level below the slab you wish to import, and it contains the lower supports. The second level is the level you actually want to import. The third level in the list box is the level above the slab you import, which contains the upper supports. You usually do not deselect any level, however, you could move them to the ADAPT list box.
FIGURE 6.2-1: ADAPT-Revit Import window

ADAPT-Revit Link 2009
21
6.3 COMPONENTS / LOADS On the Components/Loads tab (Fig. 6.3-1) you can choose any of the components such as beams or columns as well as any of the load types such as point, line or patch loads. This is very similar to the import function in ADAPT-Builder which is described in Chapter 4.2. Drop caps/panels are not imported into Revit unless they are modeled as thickened slab regions. On this tab you can also choose to import Rebar. If you choose this option, Revit will import the reinforcement information given in the rebar input file. Isolated or banded reinforcement created in ADAPT-Builder will be mapped to the “Rebar Bar” family in Revit. You notice that underneath the Rebar check box there is an option to Rotate and Center (Banded). If you bring in banded reinforcement, for example five bars, and do not select this option, Revit will create five reinforcement bars vertically arranged. If you do select this option, the five bars will be rotated by 90 degrees so that they are horizontally arranged and centered along the axis that is defined by the equivalent bar shown in ADAPT-Builder. Distributed reinforcement created in ADAPT-Builder will be mapped to the “Rebar bar” family in Revit. Mesh reinforcement created in ADAPT-Builder will be mapped to the “Area Reinforcement” family in Revit. The ADAPT-Revit link maps the bar sizes based on diameter. The default tolerance is four percent and can be changed in the initialization file of the program that is located in the link’s program folder.
FIGURE 6.3-1: Components / Loads tab

ADAPT-Revit Link 2009
22
6.4 LOAD CASES The Load Cases tab (Figure 6.4-1) lets you select the available load cases to be imported. By default, all available load cases will be listed in the Revit list box. In case you don’t want a load case to be imported, simply select the load case and hit the arrow between the list boxes pointing to the left. This moves the selected load case into the ADAPT list box. Selecting Deselect All moves all load cases into the ADAPT list box and no load case will be imported. Selecting Select All moves all load cases into the Revit list box.
FIGURE 6.4-1: Load Cases tab

ADAPT-Revit Link 2009
23
6.5 IMPORT LOG FILE Once you have made all selections, click Import Data. In case you do not import any reinforcement information, a message appears at the end of the import procedure telling you that there was no file available for reinforcement import. Simply confirm this message (Fig. 6.5-1).
FIGURE 6.5-1: Import Alert
In case Revit produces any warnings or error messages after importing, the ADAPT-Revit Link compiles a log file with those messages and places this log file into the folder where your input file resides. A separate message will alert you to the existence and location of the log file. As soon as the import is complete and you have confirmed any alert messages, the Success message is displayed (Fig. 6.5-2) which tells you that the import is complete. Simply confirm this message by clicking OK and the ADAPT-Revit Import window closes automatically.
FIGURE 6.5-2: Import Success message