AD Utilities to Maintain Oracle Applications - rEFERENCE gUIDE
94
Oracle Applications AD Utilities Reference Guide Release 11i (11.5.7) May 2002 Part No. A96507-01
-
Upload
abdulgani11 -
Category
Documents
-
view
40 -
download
1
description
Applications
Transcript of AD Utilities to Maintain Oracle Applications - rEFERENCE gUIDE

Oracle Applications
AD Utilities Reference Guide
Release 11i (11.5.7)
May 2002
Part No. A96507-01

Oracle Applications, AD Utilities Reference Guide, Release 11i (11.5.7)
Part No. A96507-01
Copyright © 2000, 2002, Oracle Corporation. All rights reserved.
Primary Author: Carole Eubanks, Michael Fiore, Yun Shaw
Contributors: Subash Chadalavada, Venkat Dameria, Miles Fender, William Greene, My-Xuan Ho, Rick Lotero, Matthew Lobaugh, Kent Noble, Andrew Rist, Roger Sanders, Alice Sun
The Programs (which include both the software and documentation) contain proprietary information of Oracle Corporation; they are provided under a license agreement containing restrictions on use and disclosure and are also protected by copyright, patent and other intellectual and industrial property laws. Reverse engineering, disassembly or decompilation of the Programs, except to the extent required to obtain interoperability with other independently created software or as specified by law, is prohibited.
The information contained in this document is subject to change without notice. If you find any problems in the documentation, please report them to us in writing. Oracle Corporation does not warrant that this document is error-free. Except as may be expressly permitted in your license agreement for these Programs, no part of these Programs may be reproduced or transmitted in any form or by any means, electronic or mechanical, for any purpose, without the express written permission of Oracle Corporation.
If the Programs are delivered to the U.S. Government or anyone licensing or using the programs on behalf of the U.S. Government, the following notice is applicable:
Restricted Rights Notice Programs delivered subject to the DOD FAR Supplement are "commercial computer software" and use, duplication, and disclosure of the Programs, including documentation, shall be subject to the licensing restrictions set forth in the applicable Oracle license agreement. Otherwise, Programs delivered subject to the Federal Acquisition Regulations are "restricted computer software" and use, duplication, and disclosure of the Programs shall be subject to the restrictions in FAR 52.227-19, Commercial Computer Software - Restricted Rights (June, 1987). Oracle Corporation, 500 Oracle Parkway, Redwood City, CA 94065.
The Programs are not intended for use in any nuclear, aviation, mass transit, medical, or other inherently dangerous applications. It shall be the licensee's responsibility to take all appropriate fail-safe, backup, redundancy, and other measures to ensure the safe use of such applications if the Programs are used for such purposes, and Oracle Corporation disclaims liability for any damages caused by such use of the Programs.
Oracle is a registered trademark, and JInitiator, Oracle Discoverer, OracleMetaLink, Oracle Store, Oracle8, Oracle8i, Oracle9i, PL/SQL, SQL*Net, and SQL*Plus are trademarks or registered trademarks of Oracle Corporation. Other names may be trademarks of their respective owners.
iii
Contents
Send Us Your Comments .................................................................................................................. vii
Preface............................................................................................................................................................ ix
Intended Audience ................................................................................................................................ ixDocumentation Accessibility ............................................................................................................... ixStructure................................................................................................................................................... xRelated Documents................................................................................................................................. xTraining and Support............................................................................................................................ xiConventions........................................................................................................................................... xii
1 About AD Utilities
Overview .............................................................................................................................................. 1-1Setting the Environment ................................................................................................................... 1-2Running the AD Utilities .................................................................................................................. 1-3
Responding to Prompts ............................................................................................................... 1-4AD Timing Report ........................................................................................................................ 1-5
2 AD Administration
About AD Administration ................................................................................................................ 2-1Using the Interactive Mode .............................................................................................................. 2-2
Database Tasks.............................................................................................................................. 2-2File System Tasks.......................................................................................................................... 2-7
Using the Non-Interactive Mode ................................................................................................... 2-12

iv
3 AutoPatch
About AutoPatch ................................................................................................................................. 3-1Patch Structure .............................................................................................................................. 3-2AutoPatch Modes ......................................................................................................................... 3-2
Running AutoPatch ............................................................................................................................ 3-4Responding to Prompts ............................................................................................................... 3-4Restarting AutoPatch ................................................................................................................... 3-6Understanding AutoPatch Messages......................................................................................... 3-7
4 AutoUpgrade
Using AutoUpgrade............................................................................................................................ 4-1Starting and Stopping .................................................................................................................. 4-1Responding to Prompts ............................................................................................................... 4-2
Running the Upgrade......................................................................................................................... 4-5Main Menu..................................................................................................................................... 4-5Choose Database Parameters ...................................................................................................... 4-6Choose Overall Tasks and their Parameters............................................................................. 4-9Run the Selected Tasks............................................................................................................... 4-11Exit AutoUpgrade....................................................................................................................... 4-12
Monitoring AutoUpgrade ............................................................................................................... 4-13Manager and Worker Messages ............................................................................................... 4-13Viewing the Details .................................................................................................................... 4-13Acceptable Errors........................................................................................................................ 4-14Correcting Worker Errors.......................................................................................................... 4-16
Restarting AutoUpgrade.................................................................................................................. 4-16
5 Patch History
The Patch History Database.............................................................................................................. 5-1Patch History Database and AutoPatch Modes ....................................................................... 5-2
Searching the Patch History Database ............................................................................................ 5-3Simple Patches Search.................................................................................................................. 5-4Advanced Patches Search............................................................................................................ 5-5Simple Files Search ....................................................................................................................... 5-7Advanced Files Search ................................................................................................................. 5-8

v
Patch History Reports ...................................................................................................................... 5-10Patch Summary Report.............................................................................................................. 5-11Patch Details Report................................................................................................................... 5-12Files Copied Report .................................................................................................................... 5-13Bug Fixes Report......................................................................................................................... 5-13Action Summary Report............................................................................................................ 5-14File History Report ..................................................................................................................... 5-16
6 Other AD Utilities
AD Controller (adctrl) ........................................................................................................................ 6-1AD File Identification (adident) ...................................................................................................... 6-2AD Splicer (adsplice) ......................................................................................................................... 6-3
Splicing New Products ................................................................................................................ 6-3File Character Set Converter (adncnv) ............................................................................................ 6-5AD Relink (adrelink) ......................................................................................................................... 6-6
Running AD Relink ...................................................................................................................... 6-6Optional Arguments .................................................................................................................... 6-8
AD Merge Patch (admrgpch) ............................................................................................................ 6-9AD Configuration (adutconf) ........................................................................................................... 6-9AutoConfig ........................................................................................................................................ 6-10
Using AutoConfig ...................................................................................................................... 6-11License Manager .............................................................................................................................. 6-13
Index

vi

vii
Send Us Your Comments
Oracle Applications, AD Utilities Reference Guide, Release 11i (11.5.7)
Part No. A96507-01
We welcome your comments and suggestions on the quality and usefulness of this publication. Your input is an important part of the information used for revision.
■ Did you find any errors?■ Is the information clearly presented?■ Do you need more information? If so, where?■ Are the examples correct? Do you need more examples?■ What features did you like most about this manual?
If you find any errors or have any suggestions for improvement, please indicate the document title and part number and the chapter, section, and page number, if available. Send comments to us by email at [email protected]. If you would like a reply, please give your name, address, and telephone number.

viii

ix
Preface
AD Utilities Reference Guide and AD Procedures Guide make up the Maintaining Oracle Applications Documentation Set. This AD Utilities Reference Guide provides information about the Oracle Applications DBA (AD) utilities, which are tools for installing, updating or patching, and upgrading Oracle Applications products. It is a companion to the AD Procedures Guide, which describes how to maintain the Oracle Applications file system and the database using the DBA utilities.
Intended AudienceThis book is intended for anyone who needs to know how the AD utilities work.
Documentation AccessibilityOur goal is to make Oracle products, services, and supporting documentation accessible, with good usability, to the disabled community. To that end, our documentation includes features that make information available to users of assistive technology. This documentation is available in HTML format, and contains markup to facilitate access by the disabled community. Standards will continue to evolve over time, and Oracle Corporation is actively engaged with other market-leading technology vendors to address technical obstacles so that our documentation can be accessible to all of our customers.
For additional information, visit the Oracle Accessibility Program web site at http://www.oracle.com/accessibility/.
Accessibility of Code Examples in DocumentationJAWS, a Windows screen reader, may not always correctly read the code examples in this document. The conventions for writing code require that closing braces

x
appear on an otherwise empty line. JAWS may not always read a line of text that consists solely of a bracket or brace.
Accessibility of Links to External Web Sites in DocumentationThis documentation may contain links to Web sites of other companies or organizations that Oracle Corporation does not own or control. Oracle Corporation neither evaluates nor makes any representations regarding the accessibility of these Web sites.
StructureThis book contains the following chapters:
■ Chapter 1 provides general information about the AD utilities and instructions for setting the environment.
■ Chapter 2 describes the AD Administration utility, which you use to perform maintenance tasks on an Oracle Applications system.
■ Chapter 3 describes the AutoPatch utility, which applies updates or patches and adds new products and languages to an Oracle Applications system.
■ Chapter 4 describes AutoUpgrade and the way you use it to upgrade to the latest version of Oracle Applications.
■ Chapter 5 describes the patch history database, how it is enabled, the patch history interface, and the reports that show patch history information.
■ Chapter 6 provides information about several other AD utilities.
Related DocumentsAll Release 11i documentation is included on the Oracle Applications Document Library CD, which is supplied in the Release 11i CD Pack. You can download some soft-copy documentation from http://docs.oracle.com. You can also purchase hard-copy documentation from the Oracle Store at http://oraclestore.oracle.com.

xi
Update or patch readme files may contain information about new documentation that you can download.
Training and SupportOracle offers a complete set of training courses and multi-level support services.
Training You can attend training courses at any Oracle Education Center, arrange for trainers to teach at your facility, or use Oracle Learning Network (OLN) — Oracle University’s online education utility. Oracle training professionals can also develop
If you are looking for... See these documents...
Additional information Oracle Applications ConceptsUpgrading Oracle ApplicationsInstalling Oracle ApplicationsMaintaining Oracle Applications Documentation Set: Oracle Applications AD Procedures GuideOracle Applications Installation Update Notes*Oracle Applications Release Notes*Oracle Applications NLS Release Notes*Oracle Applications System Administrator’s GuideOracle Self-Service Web Applications Implementation ManualOracle Workflow GuideOracle Application Object Library/Workflow Technical Reference Manual
Application-specific features
Oracle Applications user’s guidesOracle Applications implementation manualsMultiple Organizations in Oracle ApplicationsMultiple Reporting Currencies in Oracle ApplicationsOracle Applications CRM Supplemental Installation Guide
Information about custom development
Oracle Applications User Interface Standards for Forms-based ProductsOracle Applications Developers’ Guide
Database information Oracle8i ConceptsOracle8i Backup and Recovery GuideOracle8i ReferenceOracle8i Designing and Tuning for PerformanceOracle8i National Language Support Guide
*Available only on OracleMetaLink
Note: Documentation associated with this release was current as of the time it was released. OracleMetaLink contains the most up-to-date information.

xii
custom courses using your organization structure, terminology, and data as examples.
SupportThe Oracle support team includes your Technical Representative and Account Manager. It also includes Oracle consultants and support specialists who have expertise in your business area, and in managing an Oracle8i server and your hardware and software environment.
OracleMetaLink is a self-service, web-based support connection, which is maintained by Oracle Support Services 24 hours a day, 7 days a week. Use it to obtain information and advice from technical libraries and forums, download patches, look at bug details, and create or update TARs. Register at http://metalink.oracle.com, and check for updates and information before you install or upgrade your Oracle Applications. The Start Here CD also contains links to the various resources on OracleMetaLink.
ConventionsThe following conventions are used in this book:
Special notes alert you about particular information within the body of the book. They include Additional Information, Attention, Note, and Warning.
Convention Meaning
UNIX:Windows:
Indicates platform-specific information. This guide contains information for both UNIX and Windows platforms.
$ or C:\> Represents the platform-specific command prompt. Your prompt may differ.
Monospace text Represents command line text. Type this text exactly as shown.
< > Text enclosed in angle brackets represents a variable. Substitute a value for the variable text. Do not type the brackets.
[ ] Encloses optional items or indicate a function key. Do not type the brackets.
| Represents an or option among several options. You must enter only one of the options. Do not type the vertical bar.
\ In examples of commands you type online, a backslash at the end of a line signifies that you must type the entire command on one line. Do not type the backslash.

About AD Utilities 1-1
1About AD Utilities
The Oracle Applications DBA utilities, commonly known as the AD utilities, are a set of tools to install, upgrade, update or patch, and maintain Oracle Applications products. This chapter contains the following topics:
■ Overview
■ Setting the Environment
■ Running the AD Utilities
OverviewThe three primary utilities are AD Administration, AutoUpgrade, and AutoPatch. These utilities may call other utilities for specific tasks, but you can also run the other utilities directly. The following is a brief description of each of the AD utilities:
AD UtilityExecutable Name Action
AD Administration adadmin Performs maintenance tasks on Oracle Applications.
AutoPatch adpatch Applies patches and adds new languages and off-cycle products.
AutoUpgrade adaimgr Upgrades to the latest version of Oracle Applications.
AD Controller adctrl Determines the status of AutoUpgrade, AD Administration, or AutoPatch workers and restarts failed tasks.
AD Configuration adutconf.sql Reports standard information about the installed configuration of Oracle Applications.

Setting the Environment
1-2 AD Utilities Reference Guide
Setting the EnvironmentBefore you start any AD utility, you must first set the Applications environment:
1. Log in as applmgr (Applications file system owner).
2. Run the environment or command file for the current APPL_TOP and database.
UNIX:
The environment file is typically APPSORA.env, and is located under APPL_TOP. From a Bourne or Korn shell, type the following:
$ . APPSORA.env
Windows:
Run %APPL_TOP%\envshell.cmd using either Explorer or the Run command from the Start menu. This creates a Command Prompt window that contains the required environment settings for Oracle Applications. Run all subsequent commands in this Command Prompt window.
AD File Identification
adident Identify the version and translation level of one or more Oracle Applications files.
AD Splicer adsplice Installs off-cycle products.
File Character Set Converter
adncnv Converts files from one character set to another.
AD Relink adrelink Relinks Oracle Applications executable programs with the Oracle server product libraries.
AD Merge Patch admrgpch Merges multiple patches into a single, integrated patch.
AutoConfig adautocfg Helps manage the various system configuration files.
License Manager adlicmgr.sh Licenses additional products or languages, and adds country-specific functionality.
Note: See the Oracle Applications Installation Update Notes for any additional steps.
AD UtilityExecutable Name Action

Running the AD Utilities
About AD Utilities 1-3
3. If you have made any changes to the environment, check that it is correctly set by typing the following commands:
UNIX:
$ echo $TWO_TASK$ echo $ORACLE_HOME$ echo $PATH
Windows:
C:\> echo %LOCAL%C:\> echo %ORACLE_HOME%C:\> echo %PATH%C:\> echo %APPL_CONFIG%
ORACLE_HOME must be set to the proper database directory, and TWO_TASK or LOCAL must identify the correct database. APPL_CONFIG must be set to the product group registry subkey (Windows).
4. Ensure that there is sufficient temporary disk space.
You should have at least 50 MB in the temporary directories denoted by $APPLTMP, $APPLPTMP, and $REPORTS60_TEMP (UNIX) or %APPLTMP%, %APPLPTMP%, and %REPORTS60_TEMP% (Windows). You should also have space in the operating system’s default temporary directory, which is usually /tmp or /usr/tmp (UNIX) or C:\temp (Windows).
5. Shut down all concurrent managers if you plan to relink Oracle Applications product files or modify Oracle Applications database objects.
Running the AD UtilitiesTo run an AD utility, type the utility’s start command (such as adpatch, adadmin or adaimgr) and answer the prompts.
You can exit AutoPatch, AD Administration, AutoUpgrade, AD Controller, and AD Splicer by entering abort at any prompt. Then, you can restart by typing the start command for that utility. When you restart, you can enter a new file name or specify the log file from the previous session. When you reuse a log file, the utility adds the message “Start of <utility name> session” to the end of the file and appends messages from the continued session as it generates them.
Additional Information: See Administer Concurrent Managers in Oracle Applications System Administrator’s Guide.

Running the AD Utilities
1-4 AD Utilities Reference Guide
You can then do one of the following:
■ Continue Session (the default)
The utility restarts at the point where your last session stopped.
■ Start New Session
The utility asks you to confirm your choice if you choose not to continue the previous session. It then starts from the beginning.
Responding to PromptsAfter you start a utility, it prompts you to supply information. Prompts typically include a description of the information needed, and may include a default answer (in square brackets). For example:
The ORACLE username specified below for Application Object Library uniquely identifies your existing product group: APPLSYS
Enter the ORACLE password of Application Object Library [APPS] :
Press Return to accept the default value, or type a new value after the colon and press Return.
Log FileThe log file prompt refers to the name of the log file that records the session. The default file name is <utility name>.log (for example, for AD Administration, the default log file is adadmin.log).
<utility name> records your <utility name> session in a text file you specify. Enter your <utility name> log file name or press [Return] to accept the default name shown in brackets.
Filename [<utility name>.log] :
Attention: We recommend that you choose Continue Session. Some actions from the first session may be voided or duplicated by the new session.
Attention: Read the prompts carefully to make sure you supply the correct information.

Running the AD Utilities
About AD Utilities 1-5
The utility places the log file in $APPL_TOP/admin/<SID>/log, where <SID> is the value of your ORACLE_SID or TWO_TASK variable (UNIX), or in %APPL_TOP%\admin\<SID>\log, where <SID> is the value of your LOCAL variable (Windows).
AD Timing ReportAutoUpgrade, AutoPatch, and AD Administration each produce an AD Timing report named adt<session_id>.lst. It is located in $APPL_TOP/admin/<SID>/out (UNIX) or %APPL_TOP%\admin\<SID>\out (Windows). The report provides information on long-running processes, such as:
■ Time-consuming jobs
■ Failed jobs
■ Incomplete jobs
■ Total run time
■ Percent Usage by Product
■ Percent Usage by Phase and Product
You can also generate a report manually during or after an upgrade to view timing statistics from a prior session:
UNIX:$ cd $AD_TOP/admin/sql$ sqlplus <APPS username>/<APPS password> @adtimrpt.sql <session id> \ <output file>
Windows:C:\> cd %AD_TOP%\admin\sqlC:\> sqlplus <APPS username>/<APPS password> @adtimrpt.sql <session id> \ <output file>
Note: Review the log files for error messages after you run a utility. There may be one or more worker files if you are running steps in parallel mode. Review these adwork<number>.log files (adwork01.log, adwork02.log...) for details about the errors.

Running the AD Utilities
1-6 AD Utilities Reference Guide

AD Administration 2-1
2AD Administration
You use AD Administration (adadmin) to perform maintenance tasks on an installed Oracle Applications system to ensure that it runs smoothly. This chapter contains these sections:
■ About AD Administration
■ Using the Interactive Mode
■ Using the Non-Interactive Mode
About AD AdministrationThere are two types of AD Administration tasks: those performed on database objects and those performed on the file system. You can run all database and file system tasks in interactive mode by supplying the necessary information at the AD Administration prompts and then choosing an option from one of the AD Administration menus.
You can also run some of the tasks in non-interactive mode. This mode is useful for scheduling routine tasks that require no user intervention. AD Administration (like AutoPatch and AutoUpgrade) can run parallel workers for most database tasks and for some file system tasks.
AD Administration writes session information to a log file with a default name of adadmin.log. It saves the log file in $APPL_TOP/admin/<SID>/log, where <SID> is the value of your ORACLE_SID or TWO_TASK variable (UNIX), or in %APPL_TOP%\admin\<SID>\log, where <SID> is the value of the LOCAL variable (Windows).
Using the Interactive Mode
2-2 AD Utilities Reference Guide
Using the Interactive ModeStart the AD Administration utility with the adadmin command. AD Administration prompts you for the information it needs about your installation and then displays the Main Menu. You can choose to maintain Applications database objects, maintain Applications files, or exit.
Database TasksFrom the Main Menu, choose the Maintain Applications Database Objects Menu option to see a list of tasks you can perform on installed Oracle Applications database objects.
When you select a task from this menu, AD Administration validates your init.ora parameters against applora.txt. Run these tasks only on the administration node.
Select a task number to perform a task. The following pages describe each task on this menu.
Note: The option names and numbers may differ depending on the configuration of your Applications database.

Using the Interactive Mode
AD Administration 2-3
Validate APPS schemaRuns a SQL script (advrfapp.sql) against the APPS schema to verify the integrity of the schema. It determines:
■ Problems you MUST fix (not specific to the APPS schema)
■ Problems you MUST fix (specific to the APPS schema)
■ Issues you may want to address (specific to the APPS schema)
The problems and issues are described in separate sections in a report named <APPS schema name>.lst. This report is located in $APPL_TOP/admin/<SID>/out, where <SID> is the value of the ORACLE_SID or TWO_TASK variable (UNIX), or in %APPL_TOP%\admin\<SID>\out, where <SID> is the value of your LOCAL variable (Windows). Review the report, fix any problems, and rerun the task until no problems are listed.
You can also run this task with SQL*Plus:
UNIX:$ cd $APPL_TOP/admin/<SID>/out$ sqlplus <system username>/<system password> @$AD_TOP/admin/sql/advrfapp.sql \ <APPS schema name> <AOL schema name>
Windows:C:\> cd %APPL_TOP%\admin\<SID>\outC:\> sqlplus <system username>/<system password> \ @%AD_TOP%\admin\sql\advrfapp.sql <APPS schema name> <AOL schema name>
Compile APPS schemaSpawns parallel workers to compile invalid database objects in the APPS schema.
Additional Information: See Compiling Invalid Database Objects in AD Procedures Guide.
Note: You must fix all problems in the first two sections before running the Maintain Mulitple Reporting Currencies task. You should resolve issues in the third section as soon as possible.
Additional Information: See Compiling Invalid Database Objects in AD Procedures Guide.

Using the Interactive Mode
2-4 AD Utilities Reference Guide
AD Administration prompts:
Run Invoker’s Rights processing in incremental mode [No] ?
When you type Yes at this prompt, Invoker Rights processing runs only on packages that have changed since Invoker Rights processing was last run.
Compile menu informationCompiles menu data structures. Choose this task after you have uploaded menu entries to the FND_MENU_ENTRIES table, or if Compile Security concurrent requests submitted from the Menus form (after changing menu entries) fail for any reason. It’s a good idea to run this task after applying any patch that you suspect contains menu entries.
AD Administration asks if you want to force compilation of all menus. If you choose the default (No), only menus with changes are compiled. If you enter Yes, all menus are compiled. Compiling all menus is generally not advised.
Recreate grants and synonyms for APPS schema(s)Recreates grants and synonyms for the Oracle Applications public schema (APPLSYSPUB), recreates grants on some packages from SYSTEM to APPS, and spawns parallel workers to recreate grants and synonyms linking sequences and tables in the base schemas to the APPS schemas.
To proactively verify that grants and synonyms are up to date, first run the Validate APPS Schema task. If you determine that grants and synonyms are missing, run this option to recreate them.
Note: This task compiles objects owned and referenced by the APPS schema only. Use a separate utility or script (such as the utlrp.sql script provided with the database in the $ORACLE_HOME/rdbms/admin directory) to compile all objects within a database.
Additional Information: See the Oracle server documentation. See also Invoker Rights in Oracle Applications Concepts.

Using the Interactive Mode
AD Administration 2-5
Compile flexfield data in AOL tablesCompiles flexfield data structures in Oracle Application Object Library (AOL) tables. Using this option after you modify flexfields for the first time improves performance at runtime.
Maintain multi-lingual tablesCalls PL/SQL routines to maintain multi-lingual tables. Run this task when adding a language.
Check DUAL tableVerifies that the DUAL table exists in the SYS schema, is accessible by Applications, and contains only one row. If the DUAL table does not exist, or if it does not contain exactly one row, Oracle Applications products that access this table will fail.
Maintain [or Convert to] Multiple Reporting Currencies schema(s)If you have installed Multiple Reporting Currencies (MRC) functionality, this menu option is called Maintain Multiple Reporting Currencies schema(s). If you have not, it is called Convert to Multiple Reporting Currencies option, which you use to install MRC.
MRC is implemented using an adjunct schema, which is an extra schema that contains synonyms to objects in the APPS schema, exact copies of some objects in the APPS schema, and modified copies of other objects in the APPS schema.
Beginning with Release 11i, MRC takes advantage of Invoker Rights, which eliminates the need to duplicate packages in other APPS schemas such as APPS_MRC.
After applying any database patch, choose the Maintain Multiple Reporting Currencies schema(s) task to synchronize the database objects in the MRC schema with those that may have changed in the APPS schema. It does the following:
Note: To set up grants and synonyms for the MRC schema, choose the Maintain MRC task from the Database Objects menu after compiling the APPS schema and fixing any issues.
Additional Information: See Invoker Rights in Oracle Applications Concepts.

Using the Interactive Mode
2-6 AD Utilities Reference Guide
■ Asks for the number of parallel workers (for compiling invalid objects in parallel).
■ Updates system privileges and grants to the existing MRC schema.
■ Calls a PL/SQL procedure to maintain database objects in the MRC schema.
■ Compiles all invalid objects in the MRC schema in parallel and runs Invoker Rights processing.
■ Recreates MRC triggers.
Accept the default answers (Yes) to all questions unless a patch readme file instructs you to do otherwise.
Once AD Administration completes the process, check the log file (adadmin.log) for problems. It is located in $APPL_TOP/admin/<SID>/out directory (UNIX) or %APPL_TOP%\admin\<SID>\out (Windows). Rerun this task until the report contains no problems.
Convert to Multi-OrgAppears as a menu choice only if Multi-Org or Multiple Sets of Books Architecture is not installed in your database. Use it to convert a standard product group (not Multiple Sets of Books Architecture and not Multi-Org) into a Multi-Org product group with one operating unit defined at the site level. The Convert to MultiOrg task does the following:
■ Asks for the number of parallel workers (for compiling invalid objects in parallel).
■ Confirms that you want to run this task.
■ Creates scripts to disable and re-enable triggers in the APPS schema.
■ Disables all triggers in the APPS schema.
■ Converts seed data and transaction data to Multi-Org in parallel.
■ Re-enables all previously enabled triggers in the APPS schema.
Note: Shut down the Concurrent Managers before updating the MRC schema.
Additional Information: See Converting to Multiple Reporting Currencies in AD Procedures Guide. See also Multiple Reporting Currencies in Oracle Applications.

Using the Interactive Mode
AD Administration 2-7
File System TasksFrom the AD Administration Main Menu, choose the Maintain Applications Files Menu option. This menu lists tasks related to the Oracle Applications product files.
Select the task number to perform a task. Unlike the database tasks, which are performed only on the administration server, the file system tasks are performed on different servers. The following pages describe each task on this menu.
Create Applications environment file (UNIX)We recommend backing up the existing environment file before you begin.
Choose this option to create an environment file that defines Oracle Applications environment variables. At the prompt for the name of the environment file, enter any name, with a .env extension. The default file name is <SID>.env. For example, if the database name is apptest, the default environment file name is apptest.env.
Additional Information: See Multiple Organizations in Oracle Applications. See also Converting to Multi-Org in AD Procedures Guide.

Using the Interactive Mode
2-8 AD Utilities Reference Guide
Respond to the prompts for additional information needed for the Applications environment. After the utility generates the environment file, you can make customizations in adovars.env and run the generated environment file as necessary.
- or -
Create Applications environment subkey in registry (Windows)We recommend backing up the existing environment subkey before you begin.
Choose this option to create an environment subkey in the Windows registry that defines Oracle Applications variables. At the prompt for the subkey name, enter any name. No extension is necessary. The default is <SID>. For example, if your database name is apptest, the environment subkey name is also apptest.
Respond to the prompts for additional information needed for the Applications environment. After the utility generates the environment subkey, you can customize it as necessary.
This task may require you to update your original environment file. To update this Applications environment file based on the values in your Applications registry subkey, perform the following steps:
1. Run %APPL_TOP%\envshell.cmd using either Explorer or the Run command from the Start menu. This creates a Command Prompt window that contains the required environment settings for Oracle Applications. Run all subsequent commands in this window.
2. Run the command adregenv <registry subkey>. In the following example, PROD is the name of the database:
C:\> adregenv PROD
3. Adregenv creates two files, called APPS.sh and APPS.cmd, in the APPL_TOP directory. Rename the APPS.cmd file to <SID>.cmd to replace the existing file. For example:
C:\> cd %APPL_TOP%C:\prodapps> move APPS.cmd PROD.cmd
Note: The Oracle Applications registry subkeys are created under the \\HKEY_LOCAL_MACHINE\SOFTWARE\ORACLE\ APPLICATIONS\11.5.0 subkey in the Windows registry.

Using the Interactive Mode
AD Administration 2-9
4. To have the changes take effect, close the command prompt session and open a new one using envshell.cmd.
Relink Applications programs Relinks Oracle Applications executable programs with the Oracle server libraries so that they function with the Oracle database. For each product, you choose whether to link all executables or only specific ones.
You also have the option of relinking executables with debug information intact. Use this option only if requested to do so by Oracle Support Services. By default, AD Administration relinks all executables without debug information.
AD Administration does not link executables for the AD product. To relink AD executables, run the adrelink utility.
Copy files to destinationsCopies files from each product area to central locations where they can be easily referenced by non-Applications programs. This option uses revision-based copy logic to ensure that the destination file versions are the same as, or higher than, the source file versions.
The file types and their respective destinations are shown in the following table:
The directories for the variables are specified in the adovars.env file (UNIX) and the adovars.cmd file (Windows).
Additional Information: See AD Relink (adrelink) in Chapter 6.
Attention: We recommend that you do not use the "force" option to overwrite existing files. Copying files with this option updates all JAR files. JInitiator then downloads required JAR files to each client again, causing runtime performance degradation.
These files: ...are copied to (UNIX) ...are copied to (Windows)
Java files $JAVA_TOP %JAVA_TOP%
HTML files $OAH_TOP %OAH_TOP%
Media files $OAM_TOP %OAM_TOP%
Using the Interactive Mode
2-10 AD Utilities Reference Guide
Convert character setConverts the character set of files in the APPL_TOP. This task prompts for the source (or current) character set and the converted (destination) character set.
Before the conversion, the utility backs up the product source files and the APPL_TOP/admin source files. It saves product files in the <PROD>_TOP directories in the format <prod>_s_<char_set>.zip. It saves admin source files in the APPL_TOP/admin directory in the format admin_s_<char_set>.zip
After the conversion, it creates backups of the converted product files and the converted APPL_TOP/admin files. It saves product files in the <PROD>_TOP directories in the format <prod>_d_<char_set>.zip. It saves admin source files in the APPL_TOP/admin directory in the format admin_d_<char_set>.zip.
Verify files necessary for runtimeVerifies that all files needed to run Oracle Applications for the current configuration are in the current APPL_TOP. Choose this task if you suspect missing files at runtime.
Generate message filesGenerates message binary files (extension .msb) from Oracle Application Object Library tables. Oracle Applications uses these files to display messages. Choose this task only when instructed to do so in an update or a patch.
Generate form files, report files, and graphics filesThese menu options are described as follows:
Choose the Generate forms files task to generate executable Oracle forms files (extension .fmx) from the binary form definition files (extension .fmb). The definition files are located under AU_TOP and the executable files are stored under each product’s directory.
Shoose the Generate reports files task to generate the binary Oracle Reports report files (extension .rdf).
Note: When this option is used to copy reports or graphics files, the default destination is under AU_TOP.
Additional Information: See Generating Files in the AD Procedures Guide.
Using the Interactive Mode
AD Administration 2-11
Choose the Generate graphics files task to generate the Oracle Graphics files (extension .ogd) from the graphics definition files (extension .ogx).
All these tasks perform the same actions, except as noted:
■ Prompt for the number of parallel workers (for generating files in parallel).
■ Display the current character set (from NLS_LANG) and ask if you want to generate forms, report, or graphics objects in this character set.
■ (When generating forms), asks if you want to regenerate Oracle Forms PL/SQL library files, menu files, and executable files.
■ Ask for the products for which you want to generate forms, reports, or graphics objects.
■ Ask if you want to generate specific forms, reports, or objects for each selected product.
■ Display the current set of installed languages and asks if you want to generate forms, reports, or graphics files in these languages.
■ Create a list of all objects to generate.
■ Display the list of objects to be generated. You can generate specific objects or all objects.
■ Generate all selected objects for all selected products in parallel.
Generate product JAR filesRun this task whenever you upgrade the Developer6i technology stack. It performs the following actions:
■ Generates all JAR (Java archive) files that are out-of-date.
Additional Information: See Generating Files in the AD Procedures Guide.
Note: If any forms, reports, or graphics objects did not generate successfully, AD Administration displays a list of warnings or errors, and asks if you want to continue as if successful. Review the AD Administration log file to determine if the problems require attention. If you choose not to continue and restart your session at a later time, AD Administration attempts to regenerate only the files that did not generate successfully.
Using the Non-Interactive Mode
2-12 AD Utilities Reference Guide
■ Generates product JAR files in APPL_TOP and JAVA_TOP.
■ Copies Oracle Forms registry file (Registry.dat) from ORACLE_HOME/forms60/java to JAVA_TOP/oracle/forms/registry.
■ Signs JAR files, if on the web server.
■ Recreates appsborg.zip under APPL_TOP and JAVA_TOP.
This task will fail if any Oracle product JAR files do not generate successfully. Review the AD Administration log file to determine whether the problems require additional attention. When you restart a failed AD Administration session, it attempts to generate only the Oracle product JAR files that did not generate successfully.
Using the Non-Interactive ModeAD Administration can run some file system and database tasks in non-interactive mode. This allows you to schedule routine tasks to run without user intervention.
Creating a Defaults FileBefore you can run AD Administration non-interactively, create an AD Administration defaults file for the current environment (APPL_TOP and ORACLE_SID/TWO_TASK for UNIX or LOCAL for Windows).
1. Specify defaultsfile=<Defaults File Name> on the AD Administration command line.
UNIX:
The file must be under the $APPL_TOP/admin/<SID> directory, where <SID> is the database name (ORACLE_SID/TWO_TASK). For example:
$ adadmin defaultsfile=$APPL_TOP/admin/testdb1/adadmindef.txt
Windows:
The file must be under the %APPL_TOP%\admin\ <SID> directory, where <SID> is the database (LOCAL). For example:
Note: The Convert to Multiple Reporting Currencies, Create Applications environment file, Convert character set, Convert to MultiOrg, and the Copy files to destinations tasks are not supported in non-interactive mode.

Using the Non-Interactive Mode
AD Administration 2-13
C:\> adadmin defaultsfile=%APPL_TOP%\admin\testdb1\adadmindef.txt
2. Run AD Administration through the maintenance task that you would like to run non-interactively in the future. This action creates a defaults file you can use later.
3. Verify that your defaults file exists.
Running in Non-Interactive ModeUsing the defaults file created for the current environment, run AD Administration from the command line. The command parameter is interactive=no. For example:
UNIX:$ adadmin defaultsfile=$APPL_TOP/admin/testdb1/adadmindef.txt \ logfile=adadmin_noninteractive.log workers=5 interactive=no
Windows:C:\> adadmin defaultsfile=%APPL_TOP%\admin\testdb1\adadmindef.txt \ logfile=adadmin_noninteractive.log workers=5 interactive=no
This command runs AD Administration in non-interactive mode and does the following:
■ Reads the defaults file.
■ Records the non-interactive session in the log file called adadmin_noninteractive.log.
■ Uses five parallel workers.
Restart a Failed Non-Interactive SessionUse the restart=yes command line parameter. This prevents AD Administration from asking questions the defaults file cannot answer. For example:
$ adadmin defaultsfile=$APPL_TOP/admin/testdb1/adadmindef.txt \ logfile=adadmin_noninteractive.log workers=5 interactive=no restart=yes
Note: All questions during the session must be answered. If they are not, AD Administration may abort during the non-interactive session.

Using the Non-Interactive Mode
2-14 AD Utilities Reference Guide

AutoPatch 3-1
3AutoPatch
AutoPatch (adpatch) is a utility that applies updates and patches, and adds new products and languages to an Oracle Applications installation. This chapter describes the way AutoPatch works, and contains these sections:
■ About AutoPatch
■ Running AutoPatch
About AutoPatchYou use AutoPatch to apply updates to the file system or the database. During an AutoPatch operation, it will:
■ Copy files
■ Archive files in libraries
■ Relink executables
■ Run SQL scripts or binary executables
■ Generate forms, reports, and message files
■ Generate Java archive (JAR) files
■ Update database objects
AutoPatch takes no action if it finds no new updates to your files or database objects. Before it makes any changes, AutoPatch first makes a backup copy.
Note: See Patching Your System in AD Procedures Guide for more detail about applying patches and the patching process.

About AutoPatch
3-2 AD Utilities Reference Guide
Patch StructurePatches generally consist of a top-level directory, several files in the top-level directory, and one or more subdirectories. The top-level directory is named <patchnum>, where <patchnum> is the number for the patch. The most important files in the top-level directory are: README.txt, README.html, c<patchnum>.drv, d<patchnum>.drv, and g<patchnum>.drv.
The README.txt or README.html file contains important information about the patch. It describes what the patch does, and may include a list of the files included in the patch or information about which servers to run the patch on.
A patch may contain one or more drivers: a copy driver, a database driver, and a generate driver. The copy driver is named c<patchnum>.drv, and contains commands to change Oracle Applications files. In a multi-server environment, run the copy driver on all servers containing one or more of the files being replaced by the patch or, if in doubt, apply it on all servers.
The database driver is named d<patchnum>.drv and contains commands to change Oracle Applications database objects. Run the database driver on the admin node only, and only after running the copy driver.
The generate driver is named is g<patchnum>.drv and contains commands to generate new forms, reports, graphics, or message files. Run this driver file as directed in the readme file, after running any copy or database drivers.
AutoPatch ModesAutoPatch can apply patches in normal mode, test mode, or pre-install mode.
Attention: The README.txt or README.html file in the top-level directory may contain steps that must be performed manually before and after you run AutoPatch.
WARNING: Patches must always be applied in their entirety. If you apply a patch to update the file system, you must also apply the corresponding database and generation portions (if any).
Additional Information: See Applying Patches in AD Procedures Guide.

About AutoPatch
AutoPatch 3-3
Normal ModeThis is the default mode. AutoPatch takes the following actions when it applies patches in normal mode:
■ Reads and validates the patch driver file.
■ Reads product file driver files.
■ Extracts object modules from the product libraries (so it can compare version numbers on the object modules it extracts).
■ Compares the version numbers of the exiting files against the files in the patch (version checking).
Test ModeIn test mode, AutoPatch doesn’t actually apply the patch. Instead, it lists each file it would have copied, relinked, executed, or generated and shows exactly what actions it would have performed had it applied the patch.
AutoPatch test mode works the same as normal mode, with the following exceptions. It does not:
■ Copy any files from the patch directory to the installation area.
■ Archive any object modules into the product libraries.
■ Relink any executables.
■ Generate any forms, reports, PL/SQL libraries, or menu files.
■ Run any sql or exec commands (commands that change the database).
■ Update the Patch History File (applptch.txt).
■ Update patch information in the database.
■ Update the release version in the database.
Pre-install ModeIn this mode, you apply only the copy driver portion of the patch. You may need to use the pre-install mode when you update AD utilities or apply family consolidated
Attention: Before applying any Oracle Applications patch, regardless of the mode used, review the patch readme file and any additional documentation referenced in the patch.
Running AutoPatch
3-4 AD Utilities Reference Guide
upgrade patches. The patch readme file will instruct you when to use the pre-install mode.
AutoPatch operation is the same in pre-install mode as it is in normal mode, except for these restrictions. AutoPatch does not:
■ Run SQL scripts or exec commands, or generate any files, such as forms or reports, since these actions require AutoPatch to connect to a database.
■ Read the Oracle Applications product driver files to determine valid on-site files.
■ Relink any executables, except for AOL and AD.
■ Apply maintenance packs.
Running AutoPatchAutoPatch is located in the AD_TOP/bin directory, but you start it from the patch directory that contains the unzipped patch files, using the adpatch command. You can exit AutoPatch by entering abort at any prompt. You can then restart AutoPatch from where the session ended or from the beginning.
Responding to PromptsIn addition to the prompts described in Chapter 1, AutoPatch also asks for the following information:
AutoPatch log fileThe default log file is adpatch.log. This file is in $APPL_TOP/admin/<SID>/log, where <SID> is the value of your ORACLE_SID or TWO_TASK variable (UNIX), or in %APPL_TOP%\admin \<SID>\log, where <SID> is the value of ORACLE_SID or LOCAL (Windows).
Note: Because AutoPatch does not read driver files in pre-install mode, it copies all product files in the patch to the APPL_TOP directory, even if they should not exist on the admin server node. Run AutoPatch in pre-install mode only if the patch requires it.
Additional Information: See Applying Patches in AD Procedures Guide.

Running AutoPatch
AutoPatch 3-5
SYSTEM and AOL user passwordsAfter you enter the SYSTEM and AOL user passwords, AutoPatch validates the password information for all Oracle Applications schemas and displays this information on the screen.
Patch directoryAutoPatch asks you to specify the directory that holds the patch driver file. The default is the directory from which you started AutoPatch. If necessary, change the full path name to the directory where you unloaded the patch files. You must have write permission to use AutoPatch with this directory.
Patch driver fileAutoPatch prompts for the patch driver file, which is typically c<patchnum>.drv, d<patchnum>.drv, or g<patchnum>.drv in the patch directory. After you enter the file name, AutoPatch checks the integrity of the patch driver file and determines which patches in the file need to be applied.
Review patch contents and start updateAfter AutoPatch reads and validates the patch driver file, it displays a message like the following:
Do you want to see the list of fixes in this patch [No] ? y
Pause every 24 lines when displaying list of fixes [No] ?
aru 12345 contains: Fix 1 for product "fnd" Apply=Y: "Initial setting"
This message lists the short name of each product that requires updating. AutoPatch then asks if you want to continue:
Do you want to continue with AutoPatch [Yes] ?
Note: When applying a patch, we recommend you change the log file name. Use the associated driver file name with a .log extension, such as d123456.log.
Running AutoPatch
3-6 AD Utilities Reference Guide
Number of parallel workersBy default, AutoPatch runs database updates and file generation commands in parallel mode and prompts you for the number of parallel workers:
Enter the number of parallel workers [3] :
After you specify the number of parallel workers, AutoPatch displays messages like the following as it begins to update the Oracle Applications products:
Performing version checking for driver files...Copying driver files into installation area...Determining valid on-site files...Screening out files not valid for this installation...Extracting object modules from product libraries...Performing version checking...Determining what executables to link...Determining what Oracle Forms files to generate...Determining what Oracle Reports libraries to generate...Determining what Oracle Reports files to generate......
In parallel mode, AutoPatch assigns tasks to workers, the workers run the tasks to completion, and AutoPatch assigns new tasks. Use the AD Controller utility to monitor and alter AutoPatch parallel worker status.
Restarting AutoPatchIf you aborted the AutoPatch session or it did not run to completion, restart with the adpatch command. AutoPatch prompts for the name of the log file. If you provide a log file name from the previous session, it appends to that log file.
AutoPatch then asks if you want to complete the previous session. If you answer No, AutoPatch asks you to confirm your choice and then restarts from the beginning. If you answer Yes, AutoPatch restarts where the previous session stopped.
Additional Information: See the AD Controller (adctrl) Chapter 6.
Note: AutoPatch runs all database actions based on phase order, which is not necessarily the order in which the commands are listed in the database patch driver.

Running AutoPatch
AutoPatch 3-7
If you get an error indicating that the FND_INSTALL_PROCESSES table already exists, you must determine if AutoPatch, or any other AD Utility, is running in another session, or whether a previous patch session did not run to completion. If any AD utility is running in another session or on another server, wait until that session is complete before you resume in the current environment. If a previous patch session did not complete, resume applying that patch before you continue with a new one.
Understanding AutoPatch MessagesMonitor AutoPatch to check for error messages while it is running. Informational messages are written to an informational log file in the same directory as the AutoPatch log file. This log file has the same base file name, but with an .lgi extension instead of a .log extension. For example, if the AutoPatch log file is named d123456.log, the AutoPatch informational log file is named d123456.lgi.
The following example message indicates that AutoPatch will not update the files listed because they are not out of date.
Will not apply POXPOPAA.rdf: Files are identical.Patch : /d01/appl/patch/po/reports/US/POXPOPAA.rdf, v115.3On-Site: /d01/appl/115/po/11.5.0/reports/US/POXPOPAA.rdf, v115.3
Not running file ’wip patch/115/sql wipmlprb.pls’ against schema ’apptest’because the corresponding PL/SQL object in the database is up to date.Revision in File = 115.8Revision in Database = 115.8
AutoPatch reviews the contents of the applcust.txt file to determine if any registered customized files will be replaced by the patch. If so, it displays a message listing the customized files it will replace.
Error MessagesIn parallel mode, AutoPatch uses the number of parallel worker processes you specified. When AutoPatch fails before or after the worker processes, a message
Note: AutoPatch may not work properly if you partially apply a copy file system driver and then try to reapply the same driver from the beginning.
Additional Information: See Customization Standards in Oracle Applications Developer’s Guide.

Running AutoPatch
3-8 AD Utilities Reference Guide
appears asking whether to continue. We recommend you review the log files to determine the source of the error and restart AutoPatch once the error is resolved. If an error or a problem cannot be resolved, you should:
■ Verify that all steps in the readme file were completed
■ Check OracleMetaLink for additional information regarding the patch being applied
If a worker fails its job, you do not need to wait until the other workers and the manager stop. You can fix the problem and restart the worker while the manager is running.
Successful Completion MessageAutoPatch displays a message like the following once it runs to completion:
A job timing report has been generated for the current session. You should check the file/d01/appl/115/admin/apptest/out/adt01302.lstfor details.
Purging timing information for prior sessions.
sqlplus -s APPS/APPS @/d01/appl/115/admin/apptest/ad/11.5.0/admin/sql/adtpurge.sql 10 1000
Done purging timing information for prior sessions.
AutoPatch is complete.
AutoPatch may have written informational messages to the file/d01/appl/115/admin/apptest/log/adpatch.lgi
You should check the file/d01/appl/115/admin/apptest/log/adpatch.log
for errors.
Review the log files when AutoPatch has finished successfully.
Additional Information: See Troubleshooting in the AD Procedures Guide.

AutoUpgrade 4-1
4AutoUpgrade
You run AutoUpgrade to upgrade Oracle Applications products from an earlier release to the base version of the new release. This chapter describes how to run AutoUpgrade. It contains these sections:
■ Using AutoUpgrade
■ Running the Upgrade
■ Monitoring AutoUpgrade
■ Restarting AutoUpgrade
Using AutoUpgradeA complete upgrade of an Oracle Applications installation requires several AD utilities, including Rapid Install, AutoUpgrade, and AutoPatch. Once you complete the pre-upgrade tasks, including running Rapid Install to create the new file systems and install the required technology stack components, you run AutoUpgrade to upgrade products from an earlier release of Oracle Applications to the base version of the latest release.
Starting and StoppingBefore starting AutoUpgrade, complete the steps in the Setting the Environment section of Chapter 1. Then, start AutoUpgrade from any directory by typing adaimgr at the command prompt. The utility starts and displays the first prompt in the series of questions it asks about the upgrade.
Additional Information: See Overview of an Upgrade in Upgrading Oracle Applications.

Using AutoUpgrade
4-2 AD Utilities Reference Guide
You can stop the upgrade process before it is complete by typing abort at any prompt. If you take this action, AutoUpgrade saves the actions it has taken to that point in restart files. It uses these files to restart the upgrade from where the last session ended. If an error occurs while you are upgrading the database, you can correct the error without stopping AutoUpgrade.
Responding to PromptsThe first action AutoUpgrade takes is to ask a series of questions about your installation and about the upgrade process itself. In addition to the general questions about your installation described in the Responding to Prompts section of Chapter 1, it asks the following questions that are specific to the upgrade process.
Software compatibilityAutoUpgrade prompts you to verify that the installation is made up of a certified combination of components:
Are you certain you are running a certified release combination [No] ?
If you are uncertain whether a release combination is certified, see Oracle Applications Installation Update Notes and the Certify web page for the latest certification information. Access Certify from OracleMetaLink (Product Lifecycle > Certifications).
Applications environment nameThe Applications environment name is set by Rapid Install during the pre-upgrade process. The default is <SID>. The following prompt appears when AutoUpgrade starts running. You can change the default environment name.
Please enter the name of the Oracle Applications Environment that this APPL_TOP
Note: Although AutoUpgrade can be used with non-graphic terminal devices, we recommend using a window-based terminal so you can monitor and control upgrade processes in other windows while AutoUpgrade is running.
Additional Information: See Restarting AutoUpgrade in this chapter.
Additional Information: See Frequently Asked Questions about Certify, OracleMetaLink Doc ID: 119139.1.

Using AutoUpgrade
AutoUpgrade 4-3
belongs to.
The Applications Environment name must be unique across all OracleApplications Environments at your site, must be from 1 to 8 characterslong, and may only contain alphanumeric characters.
Sample Applications Environment names are: "prod", "test", and "demo".
Applications Environment Name [<SID>] :
Files installed in APPL_TOPThe server configuration information is set by Rapid Install during the pre-upgrade process. The configuration determines the types of files that were unloaded by Rapid Install on a given node (such as Java files, HTML files, forms files, and concurrent programs files). AutoUpgrade prompts for answers pertaining to server configuration. You can change the defaults if they are different for your installation.
NOTE: If you do not have or choose not to have certain types of files installedin this APPL_TOP, you may not be able to perform certain tasks.
Example 1: If you don’t have files used for installing or upgradingthe database installed in this area, you cannot install or upgradethe database from this APPL_TOP.
Example 2: If you don’t have forms files installed in this area, you cannotgenerate them or run them from this APPL_TOP.
Example 3: If you don’t have concurrent program files installed in this area,you cannot relink concurrent programs or generate reports from this APPL_TOP.
Do you currently have or want to install files used for installing or upgradingthe database in this APPL_TOP [Yes] ? Yes *
Do you currently have or want to install Java and HTML files for HTML-basedfunctionality in this APPL_TOP [Yes] ? Yes *
Do you currently have or want to install Oracle Applications forms filesin this APPL_TOP [Yes] ? Yes *
Do you currently have or want to install concurrent program filesin this APPL_TOP [Yes] ? Yes *

Using AutoUpgrade
4-4 AD Utilities Reference Guide
APPL_TOP nameLike the Applications environment name, the APPL_TOP name is a default you set when you run Rapid Install. Once the name is provided, it is stored for use by all other AD utilities. You can change the default, if necessary.
Please enter the name Oracle Applications will use to identify this APPL_TOP.
The APPL_TOP name you select must be unique within an Oracle ApplicationsEnvironment, must be from 1 to 8 characters long, and may only containalphanumeric and underscore characters.
AutoPatch has computed a default APPL_TOP name for youbased on the servers you have implemented in this APPL_TOP.
APPL_TOP Name [tafnw1] :
The default name is derived from the configuration of the environment and is a variation of the string tafnw1, where:
t stands for server (formerly, tier)
a stands for the admin server
f stands for the forms server
n stands for the concurrent processing server (formerly, node)
w stands for the web server
The trailing 1 allows for multiple APPL_TOPs within an Applications environment with the same configuration (the 1 must be manually changed to a 2 for the second identical configuration). If a server is not implemented in this APPL_TOP, its corresponding letter is replaced by an underscore.
For example, if all servers are implemented, the default APPL_TOP name is tafnw1. If only the forms server is implemented, the default is t_f__1. If a second forms server is implemented, the default is still t_f__1, and it must be manually changed to t_f__2.
AutoUpgrade log file nameThe AutoUpgrade log file is where the AutoUpgrade manager stores information about actions taken during the upgrade. Enter a new name or accept the default (adaimgr.log). The file is located in $APPL_TOP/admin/<SID>/log, where <SID> is the value of the ORACLE_SID or TWO_TASK variable (UNIX), or in %APPL_TOP%\admin\<SID>\log, where <SID> is the value of the ORACLE_SID or LOCAL variable (Windows).

Running the Upgrade
AutoUpgrade 4-5
Identify your Organization TypeAutoUpgrade automatically determines whether your products are installed for commercial use. If you installed the commercial versions of products, AutoUpgrade prompts you to choose one of these options. Choose Option 2 to convert commercial Oracle Financials products to Oracle Public Sector Financials products during the upgrade.
1) Continue to use Oracle Applications for Commercial or for-profit use.2) Convert Oracle Applications to government, education or not-for-profit use.
AutoUpgrade does not ask these questions if you have previously installed public sector, education, or not-for-profit products. Once not-for-profit products are installed, they cannot be converted to commercial products.
LanguageAutoUpgrade automatically displays the languages that are currently installed and the base language.
Reading FND_LANGUAGES to see what is currently installed.Currently, the following language is installed:
Code Language Status---- --------------------------------------- ---------US American English Base
Your base language will be AMERICAN.
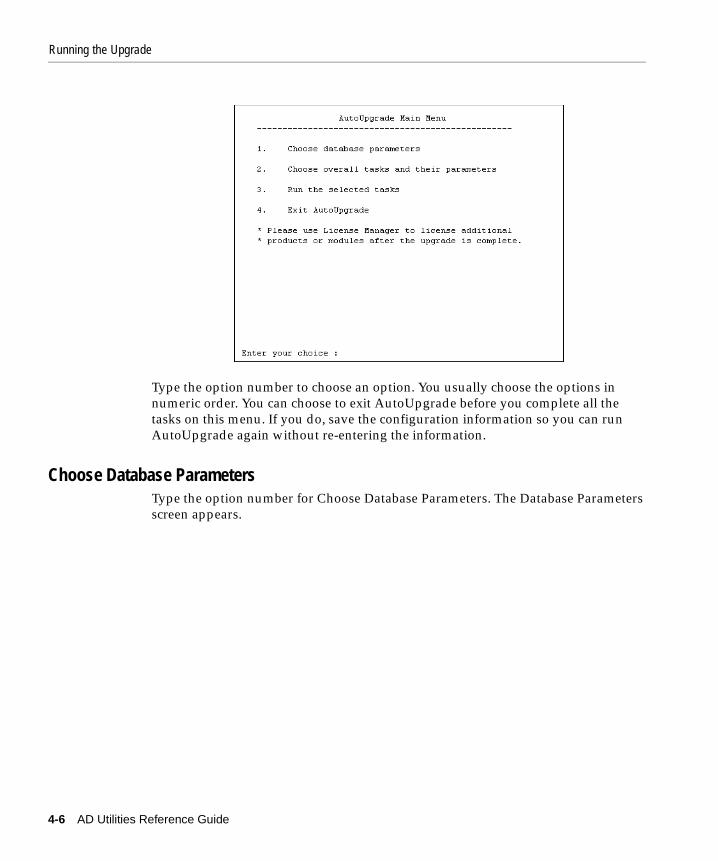
Running the UpgradeThe user interface for AutoUpgrade is a main menu and several screens that present upgrade information. After you supply answers to the initial AutoUpgrade prompts, the AutoUpgrade Main Menu appears.
Main MenuThe Main Menu presents the options you use to configure and run the upgrade. Use options 1 and 2 to configure the upgrade, then use option 3 to start the upgrade process.
Additional Information: See Language Codes in the Oracle 8i National Language Support Guide.
Running the Upgrade
4-6 AD Utilities Reference Guide
Type the option number to choose an option. You usually choose the options in numeric order. You can choose to exit AutoUpgrade before you complete all the tasks on this menu. If you do, save the configuration information so you can run AutoUpgrade again without re-entering the information.
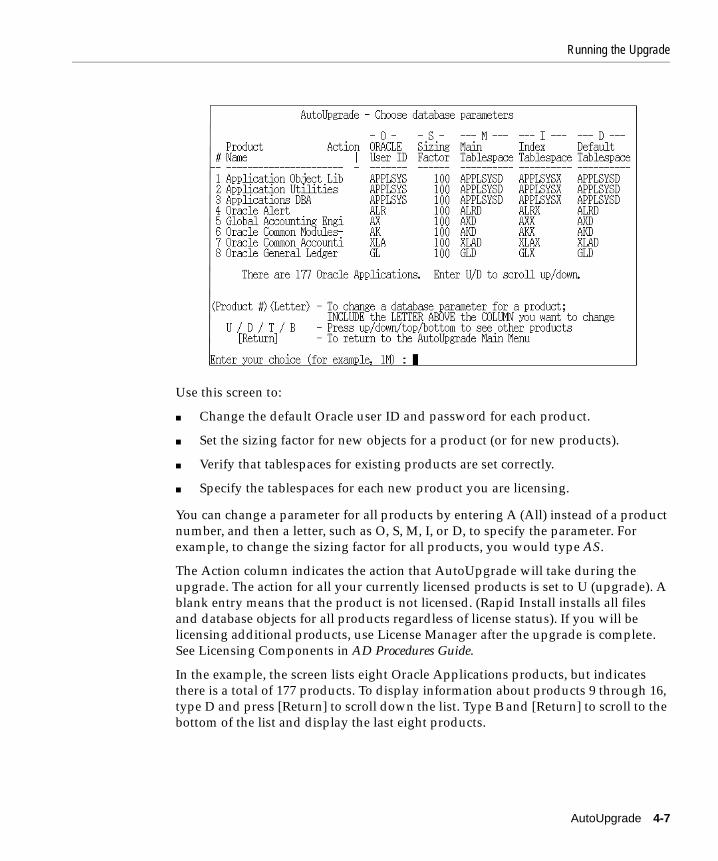
Choose Database Parameters Type the option number for Choose Database Parameters. The Database Parameters screen appears.
Running the Upgrade
AutoUpgrade 4-7
Use this screen to:
■ Change the default Oracle user ID and password for each product.
■ Set the sizing factor for new objects for a product (or for new products).
■ Verify that tablespaces for existing products are set correctly.
■ Specify the tablespaces for each new product you are licensing.
You can change a parameter for all products by entering A (All) instead of a product number, and then a letter, such as O, S, M, I, or D, to specify the parameter. For example, to change the sizing factor for all products, you would type AS.
The Action column indicates the action that AutoUpgrade will take during the upgrade. The action for all your currently licensed products is set to U (upgrade). A blank entry means that the product is not licensed. (Rapid Install installs all files and database objects for all products regardless of license status). If you will be licensing additional products, use License Manager after the upgrade is complete. See Licensing Components in AD Procedures Guide.
In the example, the screen lists eight Oracle Applications products, but indicates there is a total of 177 products. To display information about products 9 through 16, type D and press [Return] to scroll down the list. Type B and [Return] to scroll to the bottom of the list and display the last eight products.
Running the Upgrade
4-8 AD Utilities Reference Guide
Option O: Oracle User IDThis column lists the Oracle User ID (username/password) that owns each product’s database objects. You cannot change the User ID for products that are currently installed and in use.
To change the Oracle User ID, type <product number>O. AutoUpgrade prompts for the Oracle username. Accept the default or enter a new username (up to 30 characters). To change only the password, press [Return] when AutoUpgrade prompts for the username, and enter the new password at the next prompt.
Observe these restrictions and guidelines when changing user IDs:
■ You cannot change the usernames and passwords for the following products:
– Oracle Application Object Library (AOL)
– Oracle Applications DBA (AD)
– Oracle Applications Utilities (AU)
– Oracle Applications Shared Technology (SHT)
These products use the Oracle Application Object Library username determined by AutoUpgrade. You can change the password for Oracle Application Object Library manually after you run AutoUpgrade.
■ Oracle Human Resources, Oracle Payroll, FastFormula, and DateTrack must be installed under the same schema. If you change the schema for one of these products, AutoUpgrade automatically changes the schema for the others.
Option S: Sizing FactorThis column shows the sizing factor that AutoUpgrade applies to new product tables and indexes. To change a sizing factor, type <product number>S and enter the new sizing factor at the prompt.
The sizing factor affects only the new database objects added when upgrading. It does not affect objects already installed in the database.
Attention: We recommend you do not change the Oracle username.
Additional Information: See Changing Oracle Applications Schema Passwords in AD Procedures Guide.

Running the Upgrade
AutoUpgrade 4-9
Options M, I, D: Main Tablespace, Index Tablespace, and Default Tablespace The Main Tablespace and Index Tablespace columns show the Oracle server tablespaces in which AutoUpgrade places product tables and indexes. The Default Tablespace column shows the tablespace used for operations that do not specify a tablespace, and defaults to the main tablespace for that product. The default tablespace names follow a standard naming convention using the product’s abbreviation followed by a D for data or an X for indexes.
Use the M, I, or D option to change a product’s main tablespace, index tablespace, or default tablespace, respectively. These tablespaces must exist before you start the upgrade. AutoUpgrade verifies tablespace names when you enter them, and when you return to the Main Menu.
If you specify new main or index tablespaces when upgrading, AutoUpgrade places only new database objects in those tablespaces. It does not move existing tables or indexes to the new tablespaces.
When you have completed the information on this screen, press [Enter] at the prompt to return to the AutoUpgrade Main Menu.
Choose Overall Tasks and their Parameters From the Main Menu, enter the option number for Choose Overall Tasks and their Parameters. The Tasks screen appears. This screen displays the tasks that AutoUpgrade will perform during the upgrade processing. By default, AutoUpgrade performs all these tasks.
Note: Non-licensed products are installed with the sizing factor shown on the Database Parameters screen. We recommend that you leave the sizing factor at the default (100), so you can later license a new product and use it immediately. The DBA may then set the newly licensed product’s table and index next extent based on use.
Attention: Entering AM or AI will not change the tablespaces for products that are already installed in the database. You can change the tablespaces for these products, however, by entering the product number explicitly, such as <product number>M or <product number>I.

Running the Upgrade
4-10 AD Utilities Reference Guide
Review the options on this screen, and take the opportunity to modify the default environment file name, if necessary. To return to the Main Menu, press [Return] at the prompt on this screen. Descriptions of the options are as follows:
Create Applications environment file (Option 1) During the upgrade, AutoUpgrade creates an environment file that defines Oracle Applications environment variables. The default name for the environment file is <SID>.env, where <SID> is the value of the ORACLE_SID or TWO_TASK variable (UNIX); or <SID>.cmd, where <SID> is the value of ORACLE_SID or LOCAL (Windows). Type the option number at the prompt to specify a new file name. The name can contain up to 30 characters. Press [Return] to accept the default name.
Verify files necessary for install/upgrade (Option 2)When you choose this option, AutoUpgrade verifies that all files necessary for the upgrade are present. You may want to run this task as a pre-upgrade step outside the critical downtime window to identify missing files before you begin the upgrade process.
Install or upgrade database objects (Option 3)Verifies files, upgrades database objects for existing product groups, and installs new database objects. Running this task verifies files even if you set the Do It? flag
Additional Information: See Overview of an Upgrade in Upgrading Oracle Applications.

Running the Upgrade
AutoUpgrade 4-11
for Option 2 to No, and regardless of whether you ran Option 2 as a pre-upgrade step.
Run the Selected TasksAfter you have configured the upgrade with the first two tasks on the Main Menu, type the option number for Run the Selected Tasks to start the upgrade. AutoUpgrade performs the tasks listed on the Tasks screen, and prompts for information based on those tasks. During the process, it takes these actions:
Environment FileAsks a series of questions related to the configuration stored in the environment file. For example, it asks questions about parallel concurrent processing, file-naming conventions, directory paths for log, output, and temporary files, and so on.
Number of WorkersLaunches multiple worker processes to perform the upgrade processes in parallel. It automatically determines the default value for the number of workers by adding 2 to the number of CPUs on the machine where the database server is running. For example, on single-processor machines, the default is 3.
AutoUpgrade prompts for the number of workers that you want to use. Accept the default or enter a different value — up to 99 workers.
Initialization ParametersVerifies the database initialization parameters and displays a warning message if one or more have incorrect values:
Your parameter value enqueue_resources is 200 and should be >= 5000
Your parameters in init.ora file are not set up correctly.Do you wish to continue [No] ?
If any parameter value is incorrect, press [Return] to quit. Change the initialization parameter in your database initialization file to the recommended value, then shut down and restart the database. You can then restart AutoUpgrade and continue the session. See Restarting AutoUpgrade in this chapter.
Note: It is inefficient to have more than two workers over the number of CPUs on the database server because the CPU may waste time switching between the processes.

Running the Upgrade
4-12 AD Utilities Reference Guide
Verifying FilesAs AutoUpgrade verifies files, it asks for the name of the log file in which the output from these tasks should be stored:
Please enter the filename you wish to use or press [RETURN] to accept the default filename [adiuvf.lst] :
The log file (adiuvf.lst) is stored in $APPL_TOP/admin/<SID>/out (UNIX), or %APPL_TOP\admin\<SID>\out (Windows). You can accept the default name or enter a new one at this prompt.
If AutoUpgrade finds that any files are missing, it displays a failure message and stops. It lists the missing files in the adaimgr.log file. Review the missing files, correct the problems, and restart AutoUpgrade. See Restarting AutoUpgrade in this chapter.
After AutoUpgrade completes the last task, it returns you to the Main Menu.
Exit AutoUpgradeAutoUpgrade has run all the tasks to completion when the Main Menu appears again on the screen. To end the AutoUpgrade session, type the option number for Exit AutoUpgrade. AutoUpgrade exits, and this portion of the upgrade is complete. The next step is to perform the post-upgrade tasks as described in Upgrading Oracle Applications.
You can also choose the Exit AutoUpgrade option any time you have access to the Main Menu, for example, after AutoUpgrade completes all the actions for one of the tasks you selected on the Main Menu, or if you press [Return] at the prompt on one of the AutoUpgrade screens.
Any time you choose the Exit AutoUpgrade option, the utility exits and saves the actions taken up to that point in a restart file. Specify this file when you restart AutoUpgrade, so that it starts from the point where it stopped.
Warning: AutoUpgrade may fail if the initialization parameters are not set correctly.

Monitoring AutoUpgrade
AutoUpgrade 4-13
Monitoring AutoUpgrade This section describes the AutoUpgrade status messages and tells you where to find AutoUpgrade log and restart files.
Manager and Worker MessagesAutoUpgrade acts as a manager that coordinates a number of workers, assigning them jobs that they run during the upgrade. When AutoUpgrade is upgrading database objects, you see messages like the following on the screen:
Assigned: file afmisc.drv on worker 1 for product fnd username APPLSYS. Assigned: file afpt.drv on worker 2 for product fnd username APPLSYS. Assigned: file alaf.drv on worker 3 for product alr username APPLSYS.Completed: file afmisc.drv on worker 1 for product fnd username APPLSYS. Assigned: file afform.drv on worker 1 for product fnd username APPLSYS.Completed: file afpt.drv on worker 2 for product fnd username APPLSYS.
These messages indicate what each worker is doing. The example shows three workers running upgrade scripts on two products, which are identified by their abbreviations (fnd and alr).
Worker Failed MessageThe manager displays a message if a worker cannot complete its job. For example:
FAILED: file afform.drv on worker 1 for product fnd username APPLSYS.
In this example, worker 1 failed on the file afform.drv for Oracle Application Object Library (fnd). The worker, the failed job, and all jobs that depend on the failed job are idle after a worker fails. The manager continues to assign jobs that are not dependent on the failed job to the other workers.
The AutoUpgrade session is not complete until all jobs run successfully. When a worker fails, determine the cause of failure, fix the problem, and restart the worker.
Viewing the DetailsThe manager and workers maintain separate log files that record the actions they perform, as well as separate restart files that they refer to when restarting jobs. The log files record AutoUpgrade actions in more detail than the messages you see on the screen. Review the log files if AutoUpgrade encounters errors.
Additional Information: See AD Controller (adctrl) in Chapter 6.

Monitoring AutoUpgrade
4-14 AD Utilities Reference Guide
Manager log filesThe manager uses the AutoUpgrade log file (adaimgr.log) to record the actions it performs during the upgrade. See AutoUpgrade log file name in this chapter.
Worker log filesThe worker log files are named adworkxx.log, where xx indicates the worker number. For example, worker 1 uses the log file adwork01.log.These files reside in $APPL_TOP/admin/<SID>/log, where <SID> is the value of the ORACLE_SID or TWO_TASK variable (UNIX), or in %APPL_TOP%\admin\<SID>\log, where <SID> is the value of ORACLE_SID or LOCAL (Windows).
Restart filesRestart files are used by AutoUpgrade to continue processing at the point where it stopped.
Acceptable ErrorsIf you encounter a failure in the worker log file that is caused by any of the reasons described in this section, or if you suspect that the problem may be a concurrency issue, restart the failed worker with AD Controller. Contact Oracle Support Services if the worker encounters the same error while running the job again.
Oracle Server Error MessagesThe following Oracle server error messages indicate acceptable problems and do not require any action:
ORA-00942: table or view does not existORA-00955: name is already used by an existing objectORA-01418: specified index does not existORA-01430: column being added already exists in tableORA-01434: private synonym to be dropped does not existORA-01442: column to be modified to NOT NULL is already NOT NULLORA-01451: column to be modified to NULL cannot be modified to NULLORA-04043: object <object name> does not existORA-04080: trigger ’<trigger name>’ does not exist
The following Oracle error messages may also indicate acceptable problems:
ORA-00054: resource busy and acquire with NOWAIT specifiedORA-00060: deadlock detected while waiting for resource
Additional Information: See AD Controller (adctrl) in Chapter 6.

Monitoring AutoUpgrade
AutoUpgrade 4-15
ORA-00604: error occurred at recursive SQL level #ORA-01555: snapshot too old: rollback segment number # with name name too small
If you consistently receive ORA-1555 errors, the problem may be due to insufficient rollback space. Try increasing the size of rollback segments or adding additional rollback segments before restarting the workers.
Database Object DifferencesSeveral different types of warnings may be reported when AutoUpgrade compares database objects in the upgrade to those from the previous release:
Warning: The missing column is NOT NULLWarning: The existing index is UNIQUE and the new index is nonunique.Warning: NO default value can be applied.
AutoUpgrade may also indicate that extra database objects exist, or that there are differences in the constraints of columns. Such warnings and differences are usually not a problem. There may be differences due to database customizations, or because obsolete objects or columns were not dropped by Oracle Applications during the upgrade. If you have custom database objects that rely on these Applications objects, review these warnings after the upgrade to determine whether you need to modify your customizations.
Import MessagesAutoUpgrade may run the Oracle Import utility (IMP) when upgrading Oracle Applications. The following IMP messages may indicate acceptable problems:
IMP-00041: Warning: object created with compilation warningsWarning: the objects were exported by SYSTEM, not by you
DataMerge Error MessagesDataMerge (addmimp) runs during an upgrade to import seed data that is needed by Oracle Applications. A message in the following format indicates a problem with a DataMerge temporary file:
addmimp: <function name> : error : <error with temporary file>
Here, <function name> is the name of a DataMerge function, such as dmmactin or dmmactwrt. The error descriptions vary, but always specify a problem with a temporary file.
Additional Information: See information on rollback segments in the Oracle server documentation.

Restarting AutoUpgrade
4-16 AD Utilities Reference Guide
This error may not occur again if you immediately restart AutoUpgrade or the AutoUpgrade worker. Persistent DataMerge errors may indicate a problem with the APPLTMP variable, a lack of available space in the temporary directory, insufficient rollback space, or incorrect access privileges on the directory.
Correcting Worker Errors When a worker fails its job, you do not have to wait until the other workers and the manager stop. Use the worker log files to determine the problem, then, after you fix the problem, you can restart the worker while the manager is running.
Restarting AutoUpgradeIf AutoUpgrade failed, or if you aborted it, you must run it again. If you logged out of the applmgr account after you stopped AutoUpgrade, be sure that the environment is set up properly before you restart. Do this by logging back in to applmgr and resetting the environment.
Restart AutoUpgrade by re-issuing the adaimgr command. When AutoUpgrade prompts for the name of the log file, specify the file from the previous session or supply a new file name. When you reuse the log file, AutoUpgrade adds a "**Start of AutoUpgrade Session**" message to the end of the file and appends messages from the new session as it generates them.
AutoUpgrade then asks if you want to continue with your previous session or start a new one:
Your previous AutoUpgrade session did not run to completion.Do you wish to continue with your previous AutoUpgrade session [Yes] ?
Note: Changes made to environment variables while AutoUpgrade is running do not take effect until all workers are restarted.
Additional Information: See Determining Worker Errors in AD Procedures Guide for information on handling a failed worker. See also AD Controller (adctrl) in Chapter 6.
Additional Information: See Setting the Environment in Chapter 1.

Restarting AutoUpgrade
AutoUpgrade 4-17
Continue SessionThe default is to continue the previous session. Press [Return] to choose this action. AutoUpgrade determines where the last session stopped and restarts at that point. It retains all configuration information you entered in the last session.
Start New SessionIf you enter No at the Continue prompt, AutoUpgrade asks you to confirm that you do not want to continue the previous session. It then restarts from the beginning. You must re-enter any previous configuration information.
Attention: If the machine failed while AutoUpgrade was running the upgrade, the AutoUpgrade restart files may have been corrupted.
Warning: Do not restart AutoUpgrade from the beginning if it began to upgrade products in the database and then stopped. If this happens, determine why AutoUpgrade stopped, correct the problem, and restart the previous session. Alternatively, you can restore the last saved database and file system, then start AutoUpgrade again from the beginning.

Restarting AutoUpgrade
4-18 AD Utilities Reference Guide
Patch History 5-1
5Patch History
This chapter describes the patch history database, how it is enabled, the patch history interface, and the reports that show patch history information. This information assumes familiarity with DBA tasks and the AutoPatch utility.
This chapter contains the following sections:
■ The Patch History Database
■ Searching the Patch History Database
■ Patch History Reports
The Patch History DatabaseIn earlier releases, patch history information was stored in the patch history file (applptch.txt) only. This file contained information about all patches successfully applied to an Oracle Applications system. The new AutoPatch patch history database feature moves the contents of this file to database tables. Using the Oracle Applications Manager patch history interface, you can access all patch history information from the database through a set of query options and reports.
With the patch history database feature, you can determine:
■ which patches have been applied to a system.
■ when patches were applied.
■ what bug fixes were included in a patch.
■ when a file was last patched.
The patch history database and interface do not change the process of applying a patch. You still apply patches with AutoPatch, but after each driver is run on each server, AutoPatch uploads the patch information to the database.

The Patch History Database
5-2 AD Utilities Reference Guide
The database stores the following key information for all patches:
■ Patch number
■ Patch type (such as mini-pack or maintenance pack)
■ Driver file name
■ Type of driver file (copy, database, or generate)
■ Platform
■ APPL_TOP on which the patch was applied
■ Contents of the patch
■ Language of the patch
■ Servers on which the patch was applied
■ Bug fixes included in the patch
■ Whether the fix was applied successfully
■ Reason a bug fix was not applied, if any
If the patch is a maintenance pack, the database also stores the maintenance pack level.
Patch History Database and AutoPatch ModesAutoPatch stores the patch information in the database in different ways, depending on which AutoPatch mode you use when applying the patch. If the patch is not successful, patch information is not written to the database or to the patch history file.
Normal modeIf there is an existing patch history file (applptch.txt), the information it contains is uploaded to the database. The patch history file is renamed to applptch_succ_<MMDDRRHH24MISS>.txt (if the upload was successful), or to applptch_fail_<MMDDRRHH24MISS>.txt (if unsuccessful), where <MMDDRRHH24MISS> represents the month, day, year, and time the file was renamed. For example, for a successful upload on November 3, 2002 at 1:35pm and 42 seconds, the file is renamed to applptch_succ_110302133542.txt.
Additional Information: See AutoPatch Modes in Chapter 3.
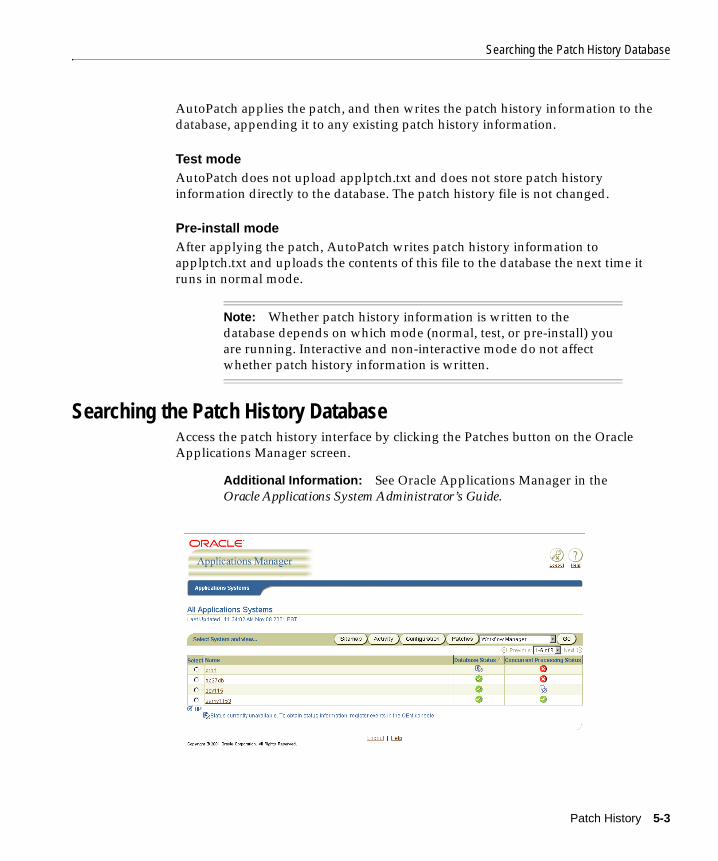
Searching the Patch History Database
Patch History 5-3
AutoPatch applies the patch, and then writes the patch history information to the database, appending it to any existing patch history information.
Test modeAutoPatch does not upload applptch.txt and does not store patch history information directly to the database. The patch history file is not changed.
Pre-install modeAfter applying the patch, AutoPatch writes patch history information to applptch.txt and uploads the contents of this file to the database the next time it runs in normal mode.
Searching the Patch History DatabaseAccess the patch history interface by clicking the Patches button on the Oracle Applications Manager screen.
Note: Whether patch history information is written to the database depends on which mode (normal, test, or pre-install) you are running. Interactive and non-interactive mode do not affect whether patch history information is written.
Additional Information: See Oracle Applications Manager in the Oracle Applications System Administrator’s Guide.

Searching the Patch History Database
5-4 AD Utilities Reference Guide
From the Oracle Applications Manager screen, you can perform several types of searches:
■ Simple Patches Search
■ Advanced Patches Search
■ Simple Files Search
■ Advanced Files Search
You can also click the Sitemap button and then choose any of the four search screens from the Patches section.
Simple Patches SearchClick the Patches button on the Oracle Applications Manager to access the Simple Patches Search screen. From this screen you can:
■ Search for applied patches.
■ Access the Simple Files Search screen.

Searching the Patch History Database
Patch History 5-5
■ Access the Advanced Patches Search screen.
Use the View option buttons and the Go button at the top of the screen to toggle between the Search Patches and the Search Files screens.
To perform a simple search, complete at least one of the following fields:
■ Patch
Enter the patch number.
■ Applied between <begin date> and <end date>
Search for patches that were applied during a specified period of time. Click the calendar icon to choose the date, or type it in the format mm/dd/yy. For example, you can enter only a begin date to see all patches applied from that date through today’s date. You can enter only an end date to see all patches applied up to that date. Or enter the begin date and the end date to see all patches applied between the two dates.
■ Language
You can choose only one language in this field. Use the Advanced Patches Search screen to choose multiple languages.
Click Submit.
Advanced Patches SearchClick the Advanced Search button in the Simple Patches Search screen to see the Advanced Patches Search screen. From this screen you can:

Searching the Patch History Database
5-6 AD Utilities Reference Guide
■ Search for applied patches.
■ Access the Simple Patches Search screen.
■ Access the Simple Files Search screen.
■ Access patch history migrated from another Applications system.
In addition to the fields on the Simple Patches Search screen, the Advanced Patches Search screen has further criteria to narrow the results of a query:
■ Applications System Name (required)
Defaults to the name of your Applications system. If you have migrated patch history information from another system, and want to search those records, enter the name of that system now.
■ Patch
Enter the patch number.
■ Product
Enter the short name of the product that owns the patch, such as AD or GL. This field is not case-sensitive.

Searching the Patch History Database
Patch History 5-7
■ Applied between <begin date> and <end date>
Search for patches that were applied during a specified period of time. Click the calendar icon to choose the date, or type it in the format mm/dd/yy. For example, you can enter only a begin date to see all patches applied from that date through today’s date. You can enter only an end date to see all patches applied up to that date. Or enter the begin date and the end date to see all patches applied between the two dates.
■ APPL_TOP name
Enter the name of the APPL_TOP where the patches were applied.
■ Only Patches that change Database
Choose Yes to search for patches that have database drivers, and No to search for patches that do not.
■ Language
Use the drop-down menu to limit the query to patches for a specific language. You can choose only one language in this field. Use the Advanced Patches Search screen to choose multiple languages.
■ Server Type
Choose the types of server implemented on the APPL_TOP where the patches were applied. The options are Any Type, Forms server, Concurrent processing server, Web server, and Admin server. You can choose one or more servers. Hold down the Ctrl key and click the servers on the list. Any Type returns patch information for all servers.
You must enter a value in at least one of these fields. Click Submit.
Simple Files SearchClick the Search Files button on the Simple Patches Search screen or the Advanced Patches Search screen to see the Simple Files Search screen. From this screen you can:
■ Search for files that have been patched.
■ Access the Simple Patches Search screen.
■ Access the Advanced Files Search screen.

Searching the Patch History Database
5-8 AD Utilities Reference Guide
The Simple Files Search screen has the following input fields:
■ File name (required)
Enter a file name, but not a directory path. This field is case-sensitive.
■ Applied between <begin date> and <end date>
Search for files that were updated during a specified period of time. Click the calendar icon to choose the date, or type it in the format mm/dd/yy. For example, you can enter only a begin date to see all files updated from that date through today’s date. You can enter only an end date to see all files up to that date. Or enter the begin date and the end date to see all files updated between the two dates.
■ Language
You can choose only one language in this field. Use the Advanced Patches Search screen to choose multiple languages.
Enter a value in File name field — the other fields are optional. Click Submit.
Advanced Files SearchClick the Advanced Search button on the Simple Files Search screen to see the Advanced Files Search screen. From this screen you can:
■ Search for files that have been patched.
■ Access the Simple Files Search screen.

Searching the Patch History Database
Patch History 5-9
■ Access the Simple Patches Search screen.
■ Access patch history migrated from another Applications system.
In addition to the fields on the Simple Files Search screen, the Advanced Files Search screen has further criteria to narrow the results of a query:
■ Applications System Name (required)
Defaults to the name of your Applications system. If you have migrated patch history information from another system, and want to search those records, enter the name of that system now.
■ File name
Enter a file name, but not a directory path. This field is case-sensitive.
■ Latest Version Only
Choose Yes to see information on the latest version of the file only. Choose No to see information for all versions of the selected file.
■ Applied between <begin date> and <end date>
Search for patches that were applied during a specified period of time. Click the calendar icon to choose the date, or type it in the format mm/dd/yy. For example, you can enter only a begin date to see all patches applied from that

Patch History Reports
5-10 AD Utilities Reference Guide
date through today’s date. You can enter only an end date to see all patches applied up to that date. Or enter the begin date and the end date to see all patches applied between the two dates.
■ APPL_TOP name
Enter the name of the APPL_TOP that contains the files.
■ Only Patches that change Database
Choose Yes to search for files contained in patches that have database drivers. Choose No to search for patches that do not have database drivers.
■ Language
Use the drop-down menu to limit the query to patches for a specific language. Unlike the Simple Files Search screen, you can choose more than one language in this field. Hold down the Ctrl key and click any number of languages from the list.
■ Server Type
Choose the types of server implemented on the APPL_TOP where the patches were applied. The options are Any Type, Forms server, Concurrent processing server, Web server, and Admin server. You can choose one or more servers. Hold down the Ctrl key while choosing two or more servers from the list. Any Type returns patch information for all servers.
Enter a value in File name field — the other fields are optional. Click Submit.
Patch History ReportsWhen you search the patch history database using any search method, the results appear on screen as a report. You can see the following reports after a successful search:
■ Patch Summary
■ Patch Details
■ Files Copied
■ Bug Fixes
■ Action Summary
■ File History

Patch History Reports
Patch History 5-11
The top portion of each report displays the search criteria, and the bottom portion displays the results of the search. The navigation path at the top of the report is a link. Click the link to see the respective report.
Click the heading of a column to sort the information based on the content in that column. The sortable columns have column headings that appear 3-dimensional. The sort alternates between ascending and descending each time you click the column heading.
Patch Summary ReportThe Patch Summary report displays the results of a query from either the Simple Patches Search screen or the Advanced Patches Search screen. Each line item represents an applied patch, and each page can contain up to 25 line items. If the Patch Summary report is more than one page long, use the Previous and Next links or the drop-down list to see other pages.
The details provided for each patch are:
Patch Name The patch number.
APPL_TOP Name The APPL_TOP where the patches were applied.
Language The language of the patch.
Patch Applied Y indicates that the patch was applied successfully and N that it was not.
Completion Date The date and time the patch was completed.
Details Clicking this link accesses the Patch Details report.

Patch History Reports
5-12 AD Utilities Reference Guide
If there are no patches matching the query criteria, the Patch Name column contains the message "The above criteria resulted in no rows".
Patch Details ReportThe Patch Details report provides details for a specific patch. Click the Details link in a selected row of the Patch Summary report to open the Patch Details report. The patch summary information from the Patch Summary report appears at the top of the Patch Details report.
This report contains the following information:
To see additional details for a patch, click on one of the following buttons:
Select Determines which driver file details are presented in the Files Copied report, the Bug Fixes report, or the Action Summary report.
Driver File The name of the AutoPatch driver file.
Start Date The date and time the application of the driver file began.
End Date The date and time the application of the driver file completed.
AutoPatch Options
Any AutoPatch command line options used to run the driver file.
Platform The platform of the driver file.
Patch Top The location of the driver file when it was run.
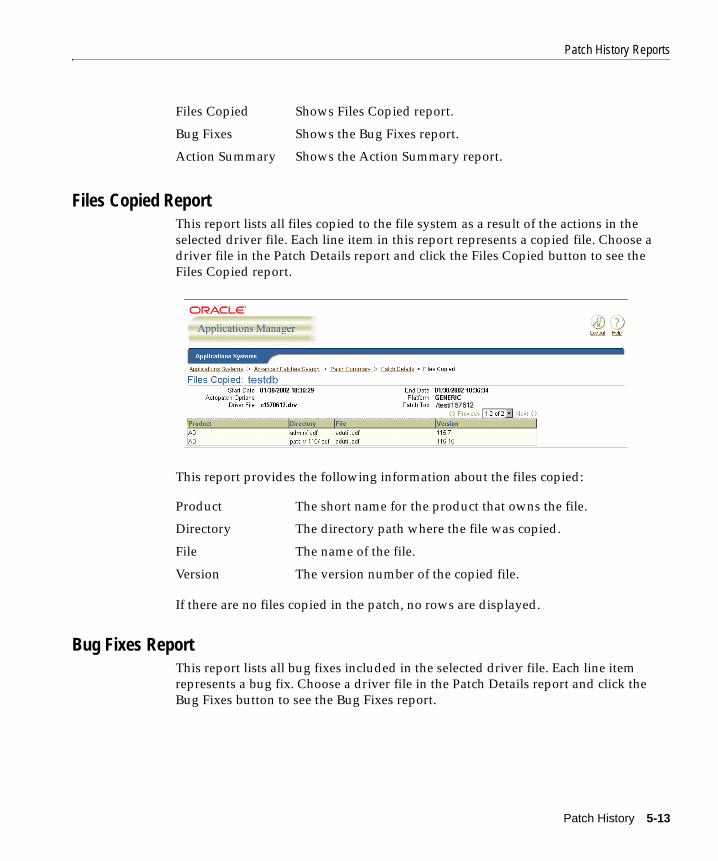
Patch History Reports
Patch History 5-13
Files Copied ReportThis report lists all files copied to the file system as a result of the actions in the selected driver file. Each line item in this report represents a copied file. Choose a driver file in the Patch Details report and click the Files Copied button to see the Files Copied report.
This report provides the following information about the files copied:
If there are no files copied in the patch, no rows are displayed.
Bug Fixes ReportThis report lists all bug fixes included in the selected driver file. Each line item represents a bug fix. Choose a driver file in the Patch Details report and click the Bug Fixes button to see the Bug Fixes report.
Files Copied Shows Files Copied report.
Bug Fixes Shows the Bug Fixes report.
Action Summary Shows the Action Summary report.
Product The short name for the product that owns the file.
Directory The directory path where the file was copied.
File The name of the file.
Version The version number of the copied file.
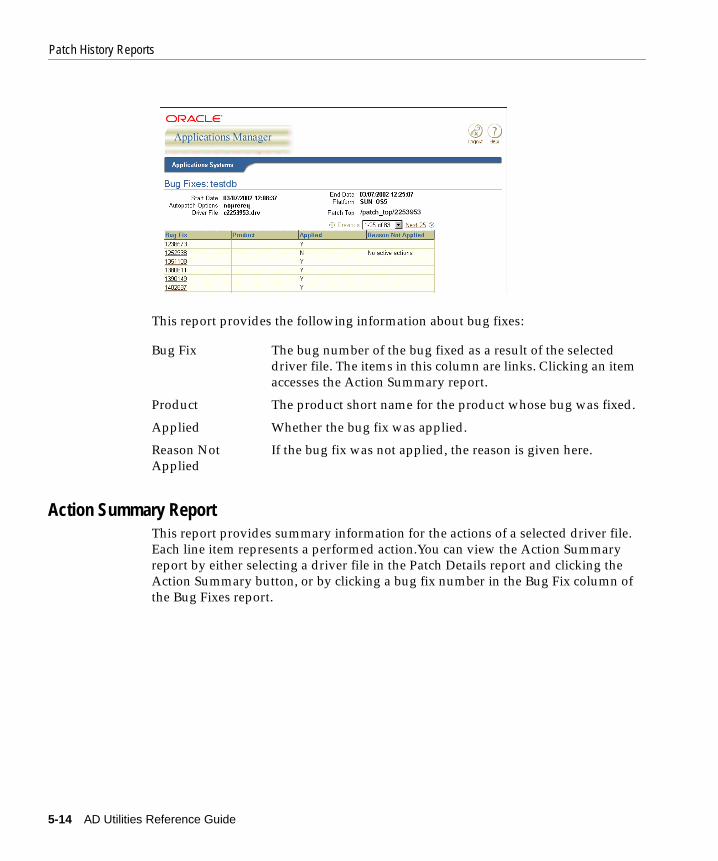
Patch History Reports
5-14 AD Utilities Reference Guide
This report provides the following information about bug fixes:
Action Summary ReportThis report provides summary information for the actions of a selected driver file. Each line item represents a performed action.You can view the Action Summary report by either selecting a driver file in the Patch Details report and clicking the Action Summary button, or by clicking a bug fix number in the Bug Fix column of the Bug Fixes report.
Bug Fix The bug number of the bug fixed as a result of the selected driver file. The items in this column are links. Clicking an item accesses the Action Summary report.
Product The product short name for the product whose bug was fixed.
Applied Whether the bug fix was applied.
Reason Not Applied
If the bug fix was not applied, the reason is given here.

Patch History Reports
Patch History 5-15
The Action Summary report provides the following summary information:
Action DetailsToggling the Details link in a selected row of the Action Summary report to Show expands the action item and shows more details.
Details Toggle between Show and Hide. Show expands the action item and provides more details about the action. Hide contracts and hides the action details.
Bug Fix The bug number of the bug fixed as a result of the selected driver file.
Run Whether the action was executed.
Action The type of action performed on the patched file.
Phase The phase in which the action occurred, if any.
Product The product short name for the product that owns the file referenced by the action.
Directory The directory path for the file referenced by the action.
File The name of the file referenced by the action.
Before Vers The version of the file before the patch.
After Vers The version of the file after the patch.
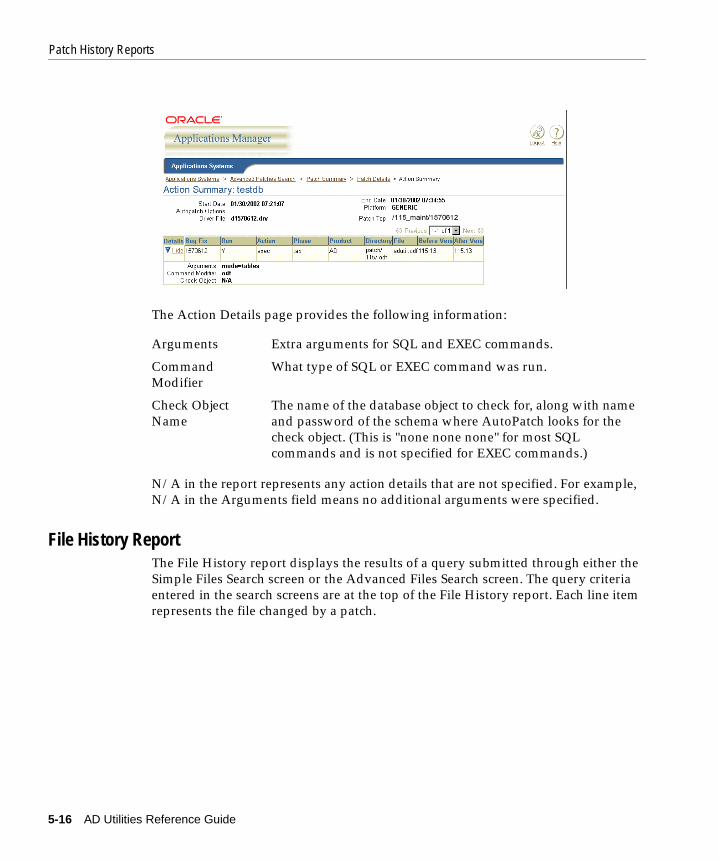
Patch History Reports
5-16 AD Utilities Reference Guide
The Action Details page provides the following information:
N/A in the report represents any action details that are not specified. For example, N/A in the Arguments field means no additional arguments were specified.
File History ReportThe File History report displays the results of a query submitted through either the Simple Files Search screen or the Advanced Files Search screen. The query criteria entered in the search screens are at the top of the File History report. Each line item represents the file changed by a patch.
Arguments Extra arguments for SQL and EXEC commands.
Command Modifier
What type of SQL or EXEC command was run.
Check Object Name
The name of the database object to check for, along with name and password of the schema where AutoPatch looks for the check object. (This is "none none none" for most SQL commands and is not specified for EXEC commands.)

Patch History Reports
Patch History 5-17
The details provided for a file are:
If no files were patched, "The above criteria resulted in no rows" appears in the APPL_TOP Name column.
APPL_TOP Name The APPL_TOP containing the files.
Product The product short name for the product that owns the file.
Directory The directory path where the file is located.
File The name of the file.
Version The version number of the file.
Date Applied The date this version of the file was applied by a patch.
Patch Details Click on the patch number to see the patch details report.

Patch History Reports
5-18 AD Utilities Reference Guide

Other AD Utilities 6-1
6Other AD Utilities
This chapter contains information about the following AD utilities:
■ AD Controller (adctrl)
■ AD Configuration (adutconf)
■ AD File Identification (adident)
■ AD Splicer (adsplice)
■ File Character Set Converter (adncnv)
■ AD Relink (adrelink)
■ AD Merge Patch (admrgpch)
■ AutoConfig
■ License Manager
AD Controller (adctrl)Use AD Controller to determine the status of AutoUpgrade, AD Administration, or AutoPatch workers and to control worker operation.
To start AD Controller:
1. Log in as applmgr and set the environment as described in Setting the Environment in Chapter 1.
Note: Run this utility in its own window, not in the same window as AutoUpgrade, AD Administration, or AutoPatch.

AD File Identification (adident)
6-2 AD Utilities Reference Guide
2. Start AD Controller with the adctrl command. It prompts you to:
■ Confirm the value of APPL_TOP.
■ Specify an AD Controller log file (the default is adctrl.log). The log file is in $APPL_TOP/admin/<SID>/log, where <SID> is the value of the ORACLE_SID or TWO_TASK variable (UNIX); or in %APPL_TOP%\admin\<SID>\log, where <SID> is the value of ORACLE_SID or LOCAL (Windows).
■ Supply the Oracle Application Object Library username and password of the product group.
AD Controller displays the main menu.
Type a number to select an option. Press [Return] to return to the menu.
AD File Identification (adident)Use this utility to identify the version and translation level of Oracle Applications files. It is useful when collecting information about your site for Oracle Support Services.
Run the utility with the adident <file> command. If the specified file contains version information, AD File Identification displays it in a compact format. The translation level (used to distinguish different translation levels of the same file
Additional Information: See Troubleshooting in the AD Procedures Guide.

AD Splicer (adsplice)
Other AD Utilities 6-3
version) is shown in parentheses after the file version. For most files, the translation level is zero. For example:
$ adident $AD_TOP/sql/adutconf.sql adutconf.sql: 115.13 (0)
Not all Oracle Applications files contain version information. If the specified file does not, AD File Identification displays a warning.
AD Splicer (adsplice)Products introduced after a given release — not on the base Oracle Applications CD for that release — are called off-cycle products. AutoPatch can install many off-cycle products, but others may require the AD Splicer utility. AD Splicer modifies the APPL_TOP and database so that AutoPatch and AD Administration recognize the off-cycle product as a valid Oracle Applications product for the given release.
AutoPatch and AD Administration recognize products added by AD Splicer, however, AutoUpgrade ignores products for an existing release that have been added by this utility.
Splicing New ProductsPatches that contain off-cycle products contain the AD Splicer files you need to splice in the new product, including control files and a readme file that describes how to run the utility. AD Splicer contains two kinds of control files: product definition and product configuration.
Product Definition FilesThere are two Product Definition Files per spliced product. Do not edit these files.
Additional Information: See License Off-cycle Products in AD Procedures Guide.
Attention: Do not use AD Splicer to add custom products to the APPL_TOP.
<prod>prod.txt Language-independent information for product <prod>
<prod>terr.txt Language-dependent information for product <prod>

AD Splicer (adsplice)
6-4 AD Utilities Reference Guide
Product Configuration FileThere is one Product Configuration File (newprods.txt) for each group of related spliced products. You must edit this file before you copy AD Splicer control files to any APPL_TOP. Each spliced product in newprods.txt has an entry similar to the following:
product=zsabase_product_top=*APPL_TOP*oracle_schema=zsasizing_factor=100main_tspace=*Product_Name*Dindex_tspace=*Product_Name*Xtemp_tspace=*Temporary_Tablespace*default_tspace=*Product_Name*D
The newprods.txt file must contain all the entries shown in the example for each spliced product, and the entries must be in the exact order shown. Here is the basic information about each product entry line in newprods.txt.
Entry Description
product= Identifies the product being spliced. Cannot be modified. The product abbreviation <prod> is also used to name the <prod>prod.txt and <prod>terr.txt control files for this product. Most internal references use <prod>.
base_product_top= Identifies the base directory that contains the product’s files. The default value, *APPL_TOP*, means the product’s files are written in the directory the APPL_TOP environment is set to. If you want the product files written to another directory, provide the full pathname here.
oracle_schema= Identifies the Oracle schema where database objects for the product are created. The default Oracle schema is the same as the product abbreviation. You can change this if you want to put the product’s database objects in a different schema. Moving a product’s objects from one schema to another involves import/export and updates to internal Oracle Applications tables, so choose your initial schema carefully.
sizing_factor= Identifies the sizing factor Oracle Applications uses when creating tables and indexes for this product. The default value of 100 means 100%.The product’s tables and indexes are created with the default sizes determined by Oracle. We recommend you do not change the sizing factor.
main_tspace= Specifies the tablespace where this product’s tables are created. To correctly follow OFA standards, create a new tablespace called <prod>D (where prod is the product abbreviation listed in the product= line) to hold the tables for this new product prior to running AD Splicer. Then set this value to <prod>D. AD Splicer fails if run with the default value (*Product_Name*D).

File Character Set Converter (adncnv)
Other AD Utilities 6-5
File Character Set Converter (adncnv)AD Administration, AutoPatch, and Rapid Install convert Oracle files from one character set to another automatically. If necessary, you can use the File Character Set Converter to manually convert files from other vendors. Use the following command to convert one file at a time:
$ adncnv <source file> <source char set> <destination file> <dest char set>
The following parameters are required:
The path and file name for the source and the destination files can be the same if the source file’s directory and the APPLTMP directory are on the same file system. In general, it is simpler and safer to use different source and destination file names.
index_tspace= Specifies the tablespace where this product’s indexes are created. To correctly follow OFA standards, create a new tablespace called <prod>X (where prod is the product abbreviation listed in the product= line) to hold the indexes for this new product prior to running AD Splicer. Then set this value to <prod>X. AD Splicer fails if run with the default value (*Product_Name*X).
temp_tspace= Specifies the tablespace used by this product for creating temporary segments. In general, each Oracle Applications database should have a separate tablespace dedicated to temporary segments, and all Oracle Applications schemas (including the APPS schema) should use this tablespace for temporary segments. We recommend that you set this value to the temporary tablespace for the Oracle Applications database in which you are installing this product. AD Splicer fails if you run it with the default value (*Temporary_Tablespace*).
default_tspace= Specifies the default tablespace where this product’s objects are created. The default tablespace is used if scripts create tables or indexes for this product without explicitly specifying a tablespace. We recommend that you set this to the same value you used for the main_tspace= line. AD Splicer fails if run with the default value (*Product_Name*D).
source file Path and file name of the file to convert.
source char set Current character set.
destination file Path and file name for converted file.
dest char set New character set for converted file.
Entry Description

AD Relink (adrelink)
6-6 AD Utilities Reference Guide
For example, to convert the file afcmstat.sql from the character set we8dec to the character set we8hp, you would type:
UNIX:$ cd $FND_TOP/sql$ cp afcmstat.sql afcmstat.old$ adncnv afcmstat.old we8dec afcmstat.sql we8hp
Windows:C:\> cd %FND_TOP%\sqlC:\> copy afcmstat.sql afcmstat.oldC:\> adncnv afcmstat.old we8dec afcmstat.sql we8hp
AD Relink (adrelink)This utility relinks Oracle Applications executable programs with the Oracle server product libraries. For most products, you run this utility in AD Administration by choosing the Relink Applications Programs task from the Maintain Applications Files menu. However, because you cannot use AD Administration to relink AD executables, you must run AD Relink manually to link these programs.
If an error occurs during relinking, or if you are not sure that the relinking was successful, review adrelink.log. If AD Relink was run from AutoUpgrade, AD Administration, or AutoPatch, it is located in APPL_TOP/admin/<SID>/log, where <SID> is the value of your ORACLE_SID or TWO_TASK variable (UNIX) or the value of ORACLE_SID or LOCAL (Windows). If you run AD Relink from the command line, the file is in APPL_TOP/admin/log. As it runs, AD Relink appends information about the latest relink action to the end of the file.
To recover disk space, you can delete the adrelink.log file if you do not need the information. A new log file is created each time AD Relink runs.
Running AD RelinkPerform the following steps to run AD Relink:
Suggestion: If you cannot convert to the same file name, convert to a different file name or change APPLTMP to a directory on the same file system as the source file directory.
Additional Information: See Chapter 2 in this manual.

AD Relink (adrelink)
Other AD Utilities 6-7
1. Log on as applmgr and follow the instructions in Chapter 1 for verifying that the environment is correctly set.
2. When relinking files on a concurrent processing server, shut down the concurrent managers. When relinking files on a forms server, have all Oracle Applications users log off before proceeding.
3. Run AD Relink with this command:
UNIX:
$ adrelink.sh force={y | n} [<optional arguments>] <product module> \ [<other product modules>]
Windows:
Open a Command Prompt window and run %APPL_TOP%\relinkenv.cmd to set the environment for that window. Then, run the following command:
C:\> sh adrelink.sh force={y | n} [<optional arguments>] <product module> \ [<other product modules>]
The force parameter can be set to n or y. There is no default value. The force=n setting means relink the executable program only if the dependent libraries or object files are more recent than the current executable program. With force=y, the utility relinks regardless of the status of the libraries or object files.
Use <optional arguments> to add special parameters, such as one that creates backup files or one that links executables with debugging information.
Identify the executable programs to be relinked as <product module> or <other product modules>. Enclose product abbreviations and program names in quotation marks, as in “ad adadmin”. If there are several product modules, separate them with a space. For example, to link the adaimgr program:
UNIX:$ adrelink.sh force=y "ad adaimgr"
Windows:C:\> sh adrelink.sh force=y "ad adaimgr.exe"
To relink the adctrl and adworker modules:
Additional Information: See Concurrent Managers in Oracle Applications System Administrator’s Guide.
AD Relink (adrelink)
6-8 AD Utilities Reference Guide
UNIX:$ adrelink.sh force=y "ad adctrl" "ad adworker"
Windows:C:\> sh adrelink.sh force=y "ad adctrl.exe" "ad adworker.exe"
Type adrelink to see online instructions about the syntax. Type adrelink examples to see more examples.
Optional ArgumentsYou can add optional arguments when running AD Relink.
Create a backupIf you are using the force=y variable, AD Relink creates a backup copy of the existing executable, and then renames the executable. If there is already a backup copy, AD Relink renames it, then renames the executable.
You can set the backup_mode variable as follows:
For example, to relink adaimgr and back up all executables, type the following:
UNIX:$ adrelink.sh force=y backup_mode=all "ad adaimgr"
Windows:C:\> sh adrelink.sh force=y backup_mode=all "ad adaimgr.exe"
Include debugging informationIn some cases, you may want to link an executable with debugging information intact, especially if you receive object modules that were compiled in debug mode.
To link an executable in debug mode, specify the argument link_debug=y on the command line as one of the <optional arguments>. Place the debug argument first, if you have any other optional arguments. For example, to relink the Applications DBA module adpatch with debug:
backup_mode=none Do not back up any executables.
backup_mode=all Back up all executables.
backup_mode=file Back up files to adlinkbk.txt (the default).

AD Configuration (adutconf)
Other AD Utilities 6-9
UNIX:$ adrelink.sh force=y link_debug=y "ad adpatch"
Windows:C:\> sh adrelink.sh force=y link_debug=y "ad adpatch.exe"
AD Merge Patch (admrgpch)Each time AutoPatch starts, it prompts for information and attempts to connect to the Oracle Applications system. In addition, there may be duplicate link, generate, and database tasks in a collection of patches. When patches are applied individually, these tasks are performed multiple times. Applying a patch driver that contains merged updates reduces the patch application time by eliminating redundant system verification and duplicate patch tasks.
AD Merge Patch merges multiple AutoPatch compatible patches into a single, integrated patch. It is an executable located in AD_TOP/bin. The command for merging patches is admrgpch. See Merging Patches in AD Procedures Guide for complete instructions.
AD Configuration (adutconf)This utility is a SQL script that reports standard information about the installed configuration of Oracle Applications. Run this task only when asked to do so by Oracle Support in order to debug or document the status of your installation. Running AD Configuration generates a file (adutconf.lst) that contains the following:
■ SQL*Plus PAUSE and NEWPAGE settings
■ rollback segment information
■ information about the product group
■ whether Multi-Org is installed
■ list of operating units
■ whether Multiple Reporting Currency (MRC) is installed
■ list of registered products
■ information on all registered schemas
AutoConfig
6-10 AD Utilities Reference Guide
■ information about all installed products, including shared and dependent products
■ status of localization modules
■ the base language and other installed languages
■ NLS init.ora settings
Use the following command to run this script The output file is written to adutconf.lst in the current working directory.
UNIX:$ cd $APPL_TOP/admin/<SID>/out$ sqlplus <APPS schema username>/<APPS schema password> \ @$AD_TOP/sql/adutconf.sql
Windows:C:\> cd %APPL_TOP%\admin\<SID>\outC:\> sqlplus <APPS schema username>/<APPS schema password> \ @%AD_TOP%\sql\adutconf.sql
AutoConfig AutoConfig provides a centralized procedure for configuring, re-configuring, or patching an Applications instance using standard utilities. It manages your Release 11i configuration files, such as httpd.conf, jserv.properties, appsweb.cfg, and others as well as configuration information stored in the database, such as application_system_name, TCF:Port, ICX_REPORT_SERVER, ECX_UTL_LOG_DIR, and others. Using AutoConfig, you can perform a variety of functions, such as upgrading your configuration, transitioning the web server or the concurrent manager to a different node, or adding or subtracting a node from your current configuration.
All the information required for managing the configuration of your APPL_TOP and technology stack is collected in a central repository called the Applications Context. When AutoConfig runs, it uses information stored in the Context file to generate all configuration files and update database profiles.
AutoConfig components include:
Applications Context An XML file located in the APPL_TOP that contains information specific to that APPL_TOP.

AutoConfig
Other AD Utilities 6-11
Using AutoConfigRapid Install delivers an environment within the AutoConfig framework. To use AutoConfig for installations of Release 11i that were completed prior to Release 11.5.7, you must follow the instructions in Using AutoConfig to Manage System Configureation with Oracle Applications 11i (OracleMetaLink Doc: 165195.1) for details.
Re-configuring your systemIf your installation was configured using AutoConfig, it can also be reconfigured using AutoConfig. When a change is made to the Applications Context file, or any associated template, you can run AutoConfig to propagate that value to the configuration files in both the APPL_TOP and the ORACLE_HOMEs in the associated technology stack.
Changing your configurationThere are two ways your configuration can be changed: apply a patch to an AutoConfig file or run the Context Editor tool. Applying a patch adds or changes the variables in your Applications Context, AutoConfig template files, or the AutoConfig driver files.
The Context Editor is a wizard that shows the current values in your Context, and steps you through the process of making changes. To run the Context Editor:
UNIX:<COMMON_TOP>/util/rapidwiz/editcontext.sh
Windows:<COMMON_TOP>\util\rapidwiz\EditContext.cmd
The editor contains three screens:
AutoConfig file templates
Files that include name tags that will be replaced with instance-specific information from the Applications Context when the files are copied to their destination (instantiated).
AutoConfig file driver A file driver, similar to standard Applications file drivers, that lists the AutoConfig file templates and their destination locations.
AutoConfig scripts A set of wrapper scripts that are provided as a simplified interface to the AutoConfig APIs.

AutoConfig
6-12 AD Utilities Reference Guide
■ Use the first screen to locate your Applications Context and read it into the editor. Enter the path to your Applications Context (APPL_TOP/admin/<SID>.xml). Click Next to continue.
■ Use the second screen to view your current values and change them as needed. The screen displays the main values in the Context. Use the Detail button to access the values that you can edit. Move the mouse over the field title to display details. Changes the values as needed and click Next.
■ Use the third screen to save the changes you have made. Enter the path to your Applications Context and click Finish. If you do not want to save changes, click Cancel.
Running AutoConfigTo generate new configuration files for the APPL_TOP and the ORACLE_HOMEs in the supported technology stack, use this command, where <COMMON_TOP> = full path to COMMON_TOP directory and <CONTEXT_NAME> = the Applications Context name. Both UNIX and Windows prompt for the APPS password.
UNIX:<COMMON_TOP>/admin/scripts/<CONTEXT_NAME>/adautocfg.sh
Windows:<COMMON_TOP>\admin\scripts\<CONTEXT_NAME>\adautocfg.cmd
Each AutoConfig session creates a rollback script in case you need to revert to the previous configuration settings. The script and all backup configuration files are stored in <APPL_TOP>/admin/out/<MMDDhhmm> where <MMDDhhmm> = (month, day, hour, and minute of each AutoConfig run).
To roll back an AutoConfig session:
UNIX:$ cd <APPL_TOP>/admin/out/MMDDhhmm/restore.sh
Windows:C:/> cd <APPL_TOP>\admin\out\MMDDhhmm/restore.cmd
Note: You must run AutoConfig and restart your server process to implement the changes.

License Manager
Other AD Utilities 6-13
Reviewing AutoConfig log filesAutoConfig stores log files under <APPL_TOP>/admin/log. The files are named with the same extension as those used for the rollback directory, APPL_TOP/admin/out/<MMDDhhmm>.
There is one log file for each AutoConfig session. It contains information about every action that AutoConfig performed during the session.
License Manager Rapid Install licenses products, country-specific functionalities, and languages during the initial installation of Oracle Applications. To license additional products, country-specific functionalities, or languages at any time after the installation, use License Manager. You can also use License Manager to change the language configuration and review currently licensed products in your Oracle Applications system.
When licensing products, License Manager automatically licenses additional dependent products. You may need to apply mini-packs and perform implementation steps for these products, and you may also need to perform product-specific implementation steps before using the new product.
To run License Manager, type adlicmgr.sh (UNIX) or adlicmgr.cmd (Windows).
Additional Information: See the product-specific Oracle Applications implementation manuals.
Additional Information: See Licensing Components in AD Procedures Guide for complete instructions on using this utility.

License Manager
6-14 AD Utilities Reference Guide

Index-1
IndexAaccessibility
statement of, ixaction details report, 5-15action summary report, 5-14AD Administration
description of main menu, 2-2non-interactive mode, 2-12starting command, 2-2
AD Configurationdescription of, 6-9
AD File Identificationdescription of, 6-2
AD Relinkbackup options, 6-8description of, 6-6
AD Splicerdescription of, 6-3
AD utilitiesoverview, 1-1stopping and starting, 1-3when to use, 1-1
adadmin, 1-1, 2-2adadmin.log, 1-4, 2-1adaimgr, 1-1adaimgr.log, 4-14adautocfg, 1-2, 6-12adctrl, 1-1adident, 1-2, 6-2adjunct schema
using in MRC, 2-5adlicmgr, 1-2adlicmgr.cmd, 6-13
adlicmgr.sh, 6-13admrgpch, 1-2adncnv, 6-5adovars.env
using for customizations, 2-8adpatch, 1-1, 3-6adregenv, 2-8adrelink, 1-2
description of, 6-6when to use, 2-9
adrelink.log, 6-6adsplice, 1-2, 6-3adutconf.sql, 1-1, 6-9advanced files search, 5-8advanced patches search, 5-5advrfapp.sql, 2-3adworkxx.log, 4-14AOL
compiling flexfields in tables, 2-5validating passwords, 3-5
APPL_TOP name, 4-4applcust.txt, 3-7Applications Context file
description of, 6-10Applications Environment Name, 4-2APPS schema
compiling with AD Administration, 2-3validating with AD Administration, 2-3
APPS.cmdgenerating, 2-8
APPSORA, 1-2APPS.sh
generating, 2-8AutoConfig

Index-2
changing configuration with, 6-11configuring your system with, 6-11description of, 6-10file drivers, 6-10reviewing log files, 6-13running, 6-12scripts, 6-10templates, 6-10
AutoPatcherror messages in, 3-7failed workers in, 3-7monitering parallel workers in, 3-6parallel mode, 3-6phase order, 3-6rerstarting, 3-6result of abort command, 3-6reviewing patch contents, 3-5running
in pre-install mode, 3-3in test mode, 3-3
specifying parallel workers, 3-6starting, 3-4successful completion message in, 3-8validating passwords, 3-5
AutoUpgradeacceptable error messages, 4-14Database Parameters screen, 4-6error correction, 4-16exiting, 4-12main menu, 4-5manager log files, 4-14monitoring, 4-13number of worker processes, 4-11parallel mode, 4-11restarting, 4-11starting, 4-1stopping, 4-2Tasks screen, 4-9worker log files, 4-14
Bbug fixes report, 5-13
Ccertification information
where to find, 4-2Certify
how to access, 4-2character set
converting, 2-10, 6-5code examples
accessibility of, ixCompile Security concurrent requests, 2-4Context file
description of, 6-10Continue Session prompt
in AutoUpgrade, 4-17
Ddatabase objects
maintaining, 2-2upgrading, 4-10
DBA utilitiesabout, 1-1
debug informationincluding in relink, 2-9
defaults filecreating, 2-12
disabled communitysupport for, ix
docs.oracle.com, xdocumentation accessibility, ixdocumentation library
contents, xDUAL table
verifying, 2-5
Eeditcontext, 6-11environment
setting, 1-2environment file
AutoUpgrade, 4-11creating, 2-7specifying name, 4-10updating, 2-8

Index-3
environment subkeycreating, 2-8
envshell.cmd, 1-2running, 2-8
executable programsrelinking with server libraries, 2-9
FFile Character Set Conversion
description of, 6-5file history report, 5-16file system
maintenance tasks, 2-7files
copying (to destinations), 2-9generating JAR files, 2-11generating message files, 2-10verify for runtime, 2-10
files copied report, 5-13flexfield data
compiling, 2-5FND_INSTALL_PROCESSES table
errors in, 3-7FND_MENU_ENTRIES, 2-4force argument
for relinking, 6-7form files
generating, 2-10
Ggrants and synonyms
recreating, 2-4graphics files
generating, 2-10
Iinitialization parameters
checking with AutoUpgrade, 4-11interactive mode
in AD Administration, 2-1Invoker Rights
description of, 2-5
JJAR files
generating, 2-11JAWS
code examples, x
Llanguage installation
specifying language, 4-5License Manager
using, 6-13log file, 1-4
in AD Administration, 2-1in AutoPatch, 3-4in AutoUpgrade, 4-4
log filesmanager, 4-14worker, 4-14
Mmenu data structures
compiling, 2-4menu information
compiling, 2-4message files
generating, 2-10MetaLink
see OracleMetaLinkmulti-lingual tables
maintaining, 2-5Multi-Org
converting to, 2-6Multiple Reporting Currencies (MRC)
adjunct schema in, 2-5maintaining, 2-5
Nnon-interactive mode
in AD Administration, 2-1restarting a failed session, 2-13running in, 2-12using defaults file in, 2-12

Index-4
Oonline education
about, xiOracle Learning Network
about, xiOracle Support Services
contacting, xiiORACLE user ID
changing password, 4-8product, 4-8
OracleMetaLinkusing, xii
oraclestore.oracle.com, x
Pparallel workers
failing in AutoPatch, 3-7monitering status of, 3-6specifying in AutoPatch, 3-6
passwordsvalidating in AutoPatch, 3-5
patchdriver files, 3-2readme.txt file, 3-2reviewing contents, 3-5structure, 3-2
patch details report, 5-12patch directory
specifying for patch driver file, 3-5patch driver file, 3-5patch history database, 5-1
searching, 5-3patch history reports, 5-10patch summary report, 5-11phase order
in AutoPatch, 3-6
Rrelinking
AD executables, 2-9executable programs, 2-9force argument, 6-7with debug information, 2-9
report filesgenerating, 2-10
responding to prompts, 1-4restart file
using, 4-12
Sserver libraries
relinking with executables, 2-9session information
writing to log file, 2-1simple files search, 5-7simple patches search, 5-4sizing factor
setting during upgrade, 4-8splicing new products, 6-3Start New Session prompt
in AutoUpgrade, 4-17synonyms
recreating with AD Administration, 2-4SYSTEM passwords
validating, 3-5
Ttablespaces
specifying during upgrade, 4-9temporary disk space, 1-3test mode
running AutoPatch in, 3-3training
about, xi
Uupgrade, running, 4-11utlrp.sql, 2-4
Wweb sites
accessibility to external, xworker
number of processes, 4-11