![LCL-resonance damping strategies for grid-connected ...Filter-based AD improves stability by adding a digital filter next to the current controller [11–16]. For feedback-based AD,](https://static.fdocuments.in/doc/165x107/5f7d1e3417a65079300d223e/lcl-resonance-damping-strategies-for-grid-connected-filter-based-ad-improves.jpg)
Ad Art VS Sports Controller - Soccer Manual -...
27
n Ad Art VS Sports Controller Soccer Scoreboard Software Manual Version 1.3 (10/08/2012) Page 1 of 27
Transcript of Ad Art VS Sports Controller - Soccer Manual -...

n
Ad Art VS Sports Controller
Soccer ScoreboardSoftware Manual
Version 1.3(10/08/2012)
Page 1 of 27
Table of Contents
1. Introduction 1.1. What is Ad Art VS Sports Controller?
1.2. Purpose of This Manual.
1.3. Conventions Used in This manual.
2. System Overview 2.1. The Ad Art VS Sports Controller System - How Does it Work?
2.2. Ad Art VS Sports Controller Software Overview.
3. Main Scoreboard Window 3.1. Main Scoreboard Window Functionality: What Does it Do?
3.2. Main Scoreboard Window User Interface: How Does it Work?
4. Output Display Window 4.1. Output Display Window Functionality: What Does it Do?
5. Appendices: 5.1. Appendix A: Using the Ad Art VS Sports Controller with a remote console/hand-held device.
5.2. Appendix B: Ad Art VS Sports Controller configuration files.
Page 2 of 27

1. Introduction
1.1 What is Ad Art VS Sports Controller?
The “VS” in Ad Art's VS Sports Controller is an acronym that stands for “Video Scoreboard”. Ad Art VS Sports Controller is control software developed to generate and output sports scoring and game tracking information to electronic sign hardware. This manual focuses specifically on Soccer scoreboards. With Ad Art VS Sports Controller, a scoreboard operator can easily track and enter real time game, team, and time data during a live event. It enables an operator to manage individual team scoring, shots, saves, corner kicks, and time-outs left. Control of the game clock and scoring can be provided via a computer or laptop, a remote console, and/or a hand-held remote controller.
Ad Art VS Sports Controller runs on standard computers. Ad Art VS Sports Controller has been fully tested running on the Windows XP, and Windows 7 operating systems. Although officially unsupported, it should also work with other operating systems such as Windows 2000, Vista, and Macintosh/Linux under the WINE emulator.
1.2 Purpose of This Manual
This manual provides a general description and operating instructions. It is intended for to provide general user interaction and setup instructions. It is assumed that personnel using and setting up the Ad Art VS Sports Controller software have a working knowledge of computer hardware and software as well as basic networking skills.
Although not required, some manual editing of ASCII text and INI files can be done to configure the software. These files contain configuration information that adheres to a sensitive structure. It is therefore recommended that only users who already have some experience editing these types of files manipulate them.
This manual follows a consistent format in describing each of the main software windows that comprise Ad Art VS Sports Controller. First, a general description is provided, explaining the purpose and function of the window. Then, an item-by-item explanation of the user interface is provided, detailing the use of components in the graphical user interface. Our intent is to make it easy for a user to gain access to relevant information quickly, without scanning through the whole manual to find it.
Page 3 of 27

1.3 Conventions Used In This Manual
Typographic ConventionsThe following conventions will be used throughout this manual.
Directory Structure:
All of the software will be installed in a single subdirectory on the drive you specified during the installation process. The default root directory is C:\AdArtVS. Therefore, subdirectories referred to in this documentation are located in this main directory. The software does not use the Windows registry, so no entries will be added. The installer will add a new font to your windows system, which will NOT be removed if the program is un-installed. The font will be located in the \WINDOWS\FONTS folder.
Typefaces:
ALL CAPS Computer keys, mouse buttons, directories, (e.g., ENTER, C:\FOLDER\FILES, CTRL+P, etc.).
Bold Names Names of interface menus, fields, buttons, etc. are set in bold type.
Keystroke Combinations
KEY1 + KEY2 Simultaneous keystrokes. Hold the first key and press the second key.
Mouse Operations
LMB Left mouse button
RMB Right mouse button
Selecting Single-clicking an element with the LMB so that it becomes active or selected.
Deselecting Single-clicking an element with the LMB so that it becomes inactive or unselected.
Activating Selecting an option by clicking on its radio button.
Deactivating Unselecting an option by clicking on its radio button.
Clicking Placing your mouse pointer over something and then pressing a mouse button. This nearly always means the LMB.
Right clicking Clicking an element with your RMB.
Double clicking Rapidly clicking an element twice.
Dragging Selecting an element with your mouse pointer and continuing to hold the mouse button down as you move your mouse. This nearly always means with the LMB.
Note, Hint, and Warning Symbols
The warning symbol will highlight a discussion that warns the user about
something. You should pay special attention to text marked with this symbol.
Page 4 of 27

The note symbol will highlight a discussion that is particularly noteworthy.
The hint symbol will highlight tips and suggestions that are usually of a time
saving nature.
Working With The Interface
In no time, you’ll find yourself mastering the intuitive graphical user interface. Most user interface functions are listed on the interface panels in plain text. Listed below are a few other conventions involved with the graphical user interface:
Button A button refers to an area on the screen that you click on with your mouse to cause some function to occur. Generally, only a single click is required. There are also special types of buttons, like toggle, pop-up menu, etc. Some buttons become highlighted, indicating a chosen or active status.
Dialog Box Dialog boxes appear on the screen for operations like file loading and saving. This term also refers to smaller windows that appear requesting the user to input data into various fields.
Hints Hints are small text boxes that appear when the mouse cursor or pointer hovers over a button. The hint text will further identify the button or its function, thus helping you navigate the user interface more efficiently.
Information Display Information Displays are text displays found throughout the different panels. These displays cannot be changed directly and simply provide information and feedback.
Input Field Input fields (edit boxes) are areas on the screen where you can enter data.
Pop-up Menu Pop-up menus (sometimes called a “context” menu) offer a convenient way to select program commands or options. To use, right click on an area in the program. The menu will pop up and as you move your pointer over the menu, each item will become highlighted. When the desired selection is highlighted, click the LMB. If you decide not to select an item, simply move the pointer off the menu and click the LMB in an unrelated area of the screen.
Radio Button A radio button is a small button that becomes highlighted with a dot when clicked. This indicates the adjacent feature is active. These buttons usually operate in together in groups of two or more.
Check Box A check box is a small box that can be checked or unchecked when clicked. This indicates the adjacent feature is active.
Scroll bar A scroll bar allows you to navigate a window’s contents by dragging the slider’s button along the bar. Alternatively, you can click to the right, left, top or bottom of the button or use the arrow buttons at either end to incrementally change the position of the button. The effect is a scrolling of the content of a window within the defined space of that window.
Page 5 of 27
2. System Overview
2.1 The Ad Art VS Sports Controller System - How Does It Work?
How does one get scoring and other game information from the comfort of a control room out to a stadium scoreboard during a live event? Ad Art VS Sports Controller is a software solution that works in harmony with Ad Art provided electronic displays. It is the link between the operator and the scoreboard. The main purpose of Ad Art VS Sports Controller is to generate and format game related data in the comfort of the control room and/or other appropriate locations, and then to send it out to the scoreboard's electronic display in real time.
The soccer implementation of Ad Art VS Sports Controller consists of two separate software components, a client-side application and a server-side application. The client-side application is called Ad Art Soccer Controller and the server-side application is called AAFieldSportServer.
AAFieldSportServer runs on a dedicated host computer connected to the actual scoreboard. The server software formats and displays the game state in an Output Display window which is positioned in the LED sign screen capture area. Users of the Ad Art Soccer Controller client application will not be able to see this Output Display window on their computer screen during normal operation. AAFieldSportServer also takes care of saving the game state, logging system events and errors, and outputting an audio clip when the game horn is blown (the scoreboard computers audio port is connected to the stadium's sound system). The server communicates with its clients over a TCP/IP network connection, either over a LAN or the Internet. Multiple software clients (controllers) can connect to the scoreboard server simultaneously.
Ad Art Soccer Controller software, the client application, communicates with the server over TCP/IP - passing data to the server or sending commands for it to execute. Therefore, the computer running Ad Art Soccer Controller must have an Internet or LAN connection. One or more instances of Ad Art Soccer Controller software can be run from multiple client computers simultaneously. Each client's state and data will be synchronized automatically by the server when data is entered or changed by any single client. This makes it possible for multiple users to control all or part of the scoreboard from multiple locations.
In addition to Ad Art Soccer Controller software, AAFieldSportServer can be remote controlled by two other devices – a Remote Console, and a Hand-held Remote Controller. These also act as clients, but they do not communicate over a TCP/IP connection. Rather they are hard-wired to the server using the server's serial ports.
SPECIAL NOTE: The Soccer implementation of Ad Art VS Sports Controller uses the same architecture as the Lacrosse implementation. In some cases, a single scoreboard will be used for both events on the same field. For this reason, Ad Art Soccer Controller software and Ad Art Lacrosse Controller software share a feature called Game Modes. Game Modes allow users of Ad Art Soccer Controller software or the Remote Console to both monitor the current mode the scoreboard is in, as well as change the mode of the scoreboard.
Page 6 of 27

2.2 Ad Art VS Sports Controller Software Overview
Ad Art VS Sports Controller is made up of two main windows. One window is only visible on the client software, Ad Art Soccer Controller. The other window is only visible on the server software, AAFieldSportServer. These windows are described below:
● Main Scoreboard Window - Ad Art Soccer Controller (Figure 2.1): The scoreboard operator will use this window during a game to input and update game related information as the game progresses. It also acts as a kind of preview screen, in that most data visible on the form window is updated in real time and stays in sync with data displayed on the scoreboard. Some data field edits will not be seen on the scoreboard until the UPDATE SIGN button is manually pressed.
Page 7 of 27
Illustration 1: Screen View of the Main Scoreboard Window (Figure 2.1)

● Output Display Window - AAFieldSportServer (Figure 2.2): This is the screen capture area used by AAFieldSportServer that gets output directly to the scoreboard's display electronics. It acts as the drawing surface for scoreboard data.
Page 8 of 27
Illustration 2: Screen View of the Output Display Window (Figure 2.2)
3. Main Scoreboard Window
3.1 Main Scoreboard Window Functionality: What Does it Do?
The Main Scoreboard window allows the user to input, delete, and change data fields that correspond with related scoreboard information. Data can be entered in various ways: typing in values, clicking up/down buttons, clicking form buttons, using arrow keys on the keyboard, or using keyboard shortcuts. The window is laid out to resemble the actual scoreboard, so it is immediately familiar and intuitive. Almost all input fields use Hints, making this window very user friendly.
The underlined letter in the label section of input fields indicates the shortcut key on the
keyboard. Hold the ALT key on the keyboard in combination with the letter (i.e. ALT + U will select the UPDATE SIGN button).
UP and DOWN keys on the keyboard will only adjust values of a numeric input field that
currently has focus (is currently selected).
Hovering the mouse cursor over some buttons and input boxes will display a Hint about their
function. It will show the hint in the lower left “status” portion of the window, or it will pop up a small “text bubble” where your cursor is if “Show Bubble Hints” is selected in the Setup Menu.
A user can tab to each input field in sequence by using the TAB key on the keyboard.
Double clicking into an input field will select all of the existing text in the field. It is quicker
to type over “selected” text because it is automatically replaced and does not need to be manually deleted first. Single clicking will only select the field and give it focus but does not select the existing text.
Most of the buttons in the Main Scoreboard window will have an immediate effect to change and update data on the scoreboard. When manually editing input boxes, edits will not be updated on the scoreboard until the UPDATE SIGN button is clicked. Ad Art Soccer Controller is designed to keep the state of the game current, so the Main Scoreboard window may be minimized during operation or even closed completely without interrupting the scoreboard operation.
During a game, if the window is closed, current game information will NOT be lost, nor
will the scoreboard go blank. Simply run the program again, and game state will be restored back into the interface.
To completely reset Main Scoreboard Window input fields to their default values, select the Reset Game item located in the Setup Menu.
If the Main Scoreboard Window is closed, CLOCKS WILL CONTINUE TO COUNT
while the application is closed. Re-start the application if you want to stop or reset clocks.
A major function of the Main Scoreboard window is monitoring and controlling the Game Clock. The Game Clock corresponds with the length of each period, counting down from standard durations. The operator will start and stop
Page 9 of 27

the Game Clock as the rules of the game dictate. The operator can also adjust the values of the Game Clock quickly and easily by using predefined time interval buttons. If the clock needs to be adjusted manually, it can still be edited by typing a new time into the input field – as long as the clock is stopped.
Input fields cannot be edited by typing while the Game Clock is running. Team Names
especially should be typed in and the scoreboard updated before the Game Clock starts.
The Game Clock can also be controlled by a Remote Console and Hand-held Remote Controller.
See the Appendix to learn how to use this feature.
As each period ends, the operator will typically select the Next Period button which will reset the Game Clock to it's next logical value and reset TOL values (timeouts left) automatically. The sequence of periods in the software interface follow the same sequence as a typical game of soccer:
1. (Blank)2. Pre-Game3. 1st HALF4. HALFTIME5. 2nd HALF6. OVERTIME
Towards the bottom of the Main Scoreboard window is a helpful UNDO button. This feature allows the user to “go back in time” and undo a series of actions taken.
Sometimes it may be appropriate to show promotional animations, sponsor advertisements, or other useful information during a soccer game. Since the scoreboard screen doubles as a full featured digital display, it is possible to play any media or imagery on the scoreboard, not just scoring information. With that in mind, there are two other buttons towards the bottom of the Main Scoreboard window that allow for the screen capture area on the server to capture either scoring data or other media/messages. SHOW SCORE will put the server's Output Display screen in its default scoreboard display mode. SHOW MSGS (messages) will allow other applications, like a media player, to display on top of the scoreboard capture area.
Messaging functionality is set up in advance by qualified Ad Art technicians. A media
player with messaging content will already be playing and will already occupy the space used by the screen capture area used by the server's Output Display window. Setting up a media player on the server is beyond the scope of this manual.
The remaining functions of the Main Scoreboard Window will be explained further in the next section.
Page 10 of 27
3.2 Main Scoreboard Window User Interface: How Does It Work?
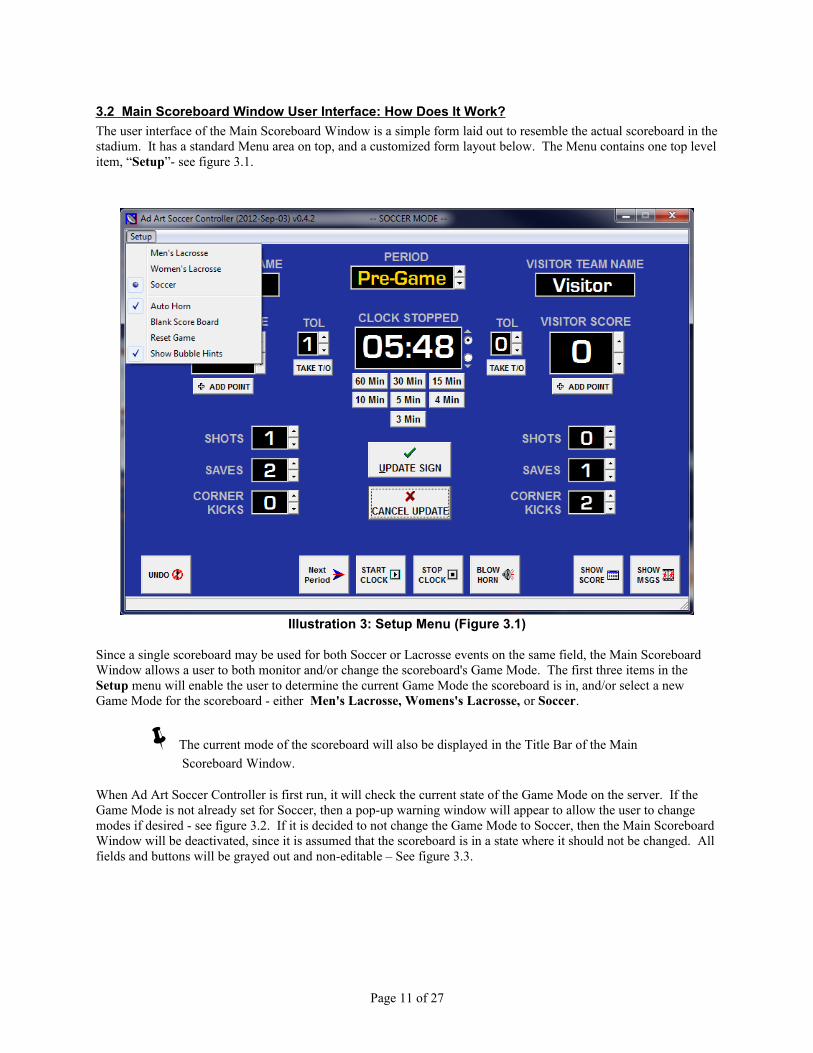
The user interface of the Main Scoreboard Window is a simple form laid out to resemble the actual scoreboard in the stadium. It has a standard Menu area on top, and a customized form layout below. The Menu contains one top level item, “Setup”- see figure 3.1.
Since a single scoreboard may be used for both Soccer or Lacrosse events on the same field, the Main Scoreboard Window allows a user to both monitor and/or change the scoreboard's Game Mode. The first three items in the Setup menu will enable the user to determine the current Game Mode the scoreboard is in, and/or select a new Game Mode for the scoreboard - either Men's Lacrosse, Womens's Lacrosse, or Soccer.
The current mode of the scoreboard will also be displayed in the Title Bar of the Main
Scoreboard Window.
When Ad Art Soccer Controller is first run, it will check the current state of the Game Mode on the server. If the Game Mode is not already set for Soccer, then a pop-up warning window will appear to allow the user to change modes if desired - see figure 3.2. If it is decided to not change the Game Mode to Soccer, then the Main Scoreboard Window will be deactivated, since it is assumed that the scoreboard is in a state where it should not be changed. All fields and buttons will be grayed out and non-editable – See figure 3.3.
Page 11 of 27
Illustration 3: Setup Menu (Figure 3.1)

Be very cautious before changing Game Modes if not on-site during a game. Since there is
no way of knowing what is happening with the scoreboard when not in view of it, it may be possible to disrupt a game in progress by changing the mode.
If it is desired to switch game modes after running in Soccer mode, then choosing an appropriate menu item will change the Game Mode - either Men's Lacrosse, Womens's Lacrosse, or Soccer. A pop-up warning window will appear after making a menu item selection to allow the user to confirm whether they really want to change modes - see figure 3.4.
Page 12 of 27
Illustration 4: Change To Soccer Game Mode Alert (Figure 3.2)
Illustration 5: Deactivated Main Scoreboard Window (Figure 3.3)

In addition to displaying data visually, the server is tied into the stadium sound system in order to convey information audibly. Hardware in the server computer will make an audible sound of a horn blowing whenever the controller sends it a command to do so. By checking Auto-Horn, the horn sound will play automatically when the Game Clock count reaches zero.
The Blank Score-board item is a toggle that will switch between showing the scoreboard in its normal scoring mode, or turning it completely black when selected. This toggle may be handy when operators need to change the scoreboard but keep the changes from being visible to the public. It can also be used to blank the scoreboard when there is no game in session.
The user can also select the Reset Game item from this menu, which will reset all data fields in the Main Scoreboard Window to their default values. A pop-up warning window will appear if this is selected to allow the user to confirm the selection - see figure 3.2.
Finally, selecting the Show Bubble Hints item from the Setup menu will toggle the display of pop-up style on- screen Hints in the Main Scoreboard Window. Hint Bubbles appear when the mouse cursor is hovered over an on-screen item. Not all buttons or other on-screen items will display Hint Bubbles. Some screen items will display hints only in the “Status Bar” in the lower left corner of the window, regardless of whether this option is checked or not.
A primary function of the Main Scoreboard Window is to send data entered by the operator to the scoreboard. All data that use buttons for input is sent to the scoreboard in real time. So when a change is made using a button, the change is reflected immediately on the scoreboard. Typing data into any input field will require the user to press the UPDATE SIGN button (ALT + U, keyboard shortcut) in order for the new text to be visible on the scoreboard. A yellow border will toggle between the UPDATE SIGN and CANCEL UPDATE buttons as a visual cue to remind the user what needs to be done. The yellow flashing border will cease after one of the buttons is selected. If the user decides to cancel the change, selecting the CANCEL UPDATE button will reset the edited fields to their prior values.
Page 13 of 27
Illustration 7: Reset Game Alert (Figure 3.5)
Illustration 6: Change Game Mode Alert (Figure 3.4)
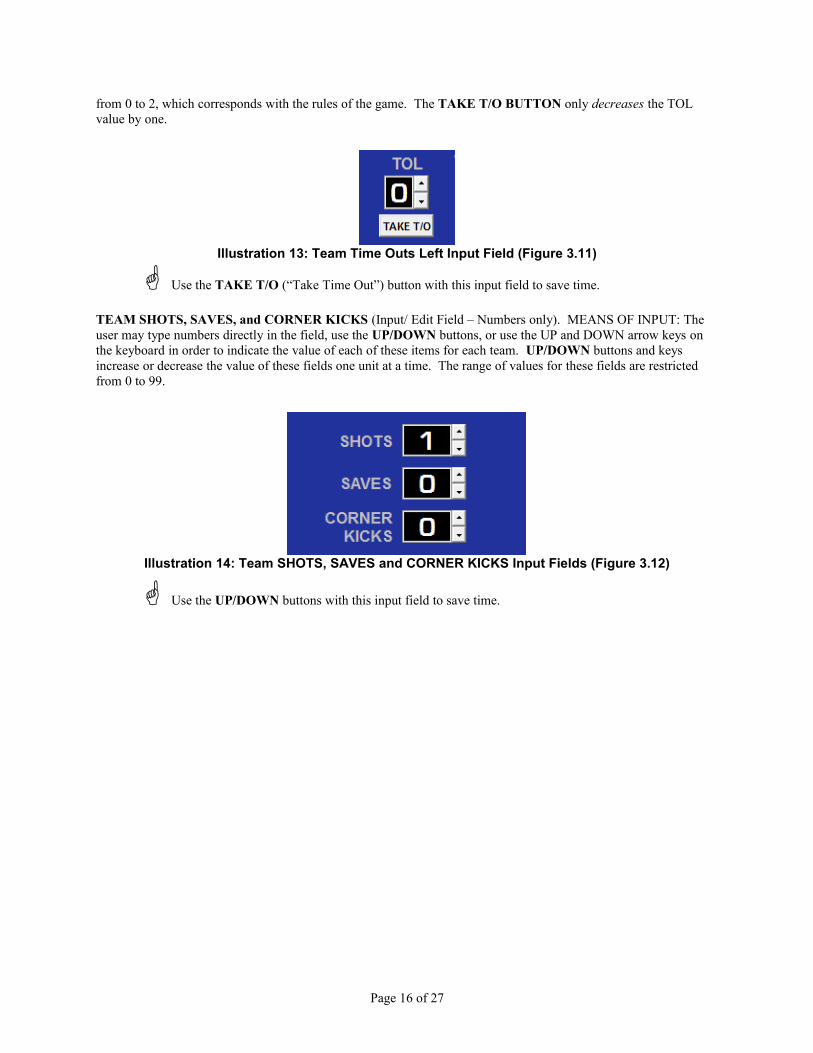
Multiple input fields can be edited before updating or canceling, if preferred.
If data is typed into numeric fields, then the UPDATE SIGN button will need to be pressed
for the sign to reflect the edit. The buttons associated with numeric fields will typically be used under most circumstances, so changes occur instantly.
UNDO (button). When pressed, this button will conveniently undo the last action performed in the Main Scoreboard window. This makes it easier to recover from some mistakes that may take longer to fix otherwise. There is a limit of 20 sequential actions that can be undone.
UNDO will have no effect on changes to the Game Clock if it is running. If the Game Clock is not
running, then changes to the clock can be undone.
Actions can still be undone after a game is reset. Actions can NOT be undone if the Game Mode is
changed because the undo history is cleared when the game mode changes.
SHOW SCORE/ SHOW MESSAGES (buttons). These two buttons work together to toggle the screen capture functionality on the server between two modes. When SHOW SCORE is pressed, the scoreboard will displayed. This is the normal mode of the server. Since the scoreboard screen doubles as a full featured digital display, it is possible to play any media or messages on the scoreboard, not just scoring information. Pressing the SHOW MSGS (messages) button will allow other content to be viewed on the scoreboard's digital display.
The rest of the form layout is broken up into three categories: Team Information, Game Information, and Time Information. Each category is enumerated below:
Page 14 of 27
Illustration 8: Update Sign and Cancel Update Buttons (Figure 3.6)
Illustration 10: SHOW SCORE and SHOW MSGS (messages) buttons (Figure 3.8)
Illustration 9: Undo Button (Figure 3.7)

Team Information:
TEAM NAMES (Input/ Edit Field – ASCII text). MEANS OF INPUT: The user will type in the names of the two teams playing the game directly into the input field. Each team favors one side of the window or the other. This layout accommodates grouping of other team related information, such as Score, Shots, Saves, Corner Kicks, and Time Outs Left in a logical way under each team. After editing Team Names, select the UPDATE SIGN button as discussed previously.
The input fields for team names will allow as many characters as can be typed. However,
approximately 9 characters will be visible on the scoreboard. Therefore, choose team names carefully.
Use Upper and lower case letters to fit more characters in the box. Abbreviations may be necessary.
The default team name values are “Home” and “Visitor”. These names will be automatically entered
into the fields when Reset Game is selected from the Setup Menu. The Remote Console does not have the capability to change team names.
TEAM SCORES (Input/ Edit Field – Numbers only). MEANS OF INPUT: The user may type numbers directly in the field, use the + ADD POINT BUTTON, use the UP/DOWN buttons, or use the UP and DOWN arrow keys on the keyboard in order to adjust the score for each team. UP/DOWN buttons and keys increase or decrease the score one point at a time. + ADD POINT BUTTON only increases the score by one point. Scores can be manually edited by typing into the input field directly, but this type of edit will require the user to click the UPDATE SIGN button.
Use the + ADD POINT button with this input field to save time.
TEAM TOL (Time Outs Left) (Input/ Edit Field – Numbers only). MEANS OF INPUT: The user may type numbers directly in the field, use the TAKE T/O (time out) BUTTON, use the UP/DOWN buttons, or use the UP and DOWN arrow keys on the keyboard in order to indicate the number of time outs left for each team. UP/DOWN buttons and keys increase or decrease the TOL value one unit at a time. The range of values for TOL are restricted
Page 15 of 27
Illustration 11: Team Name Input Fields (Figure 3.9)
Illustration 12: Team Score Input Field (Figure 3.10)
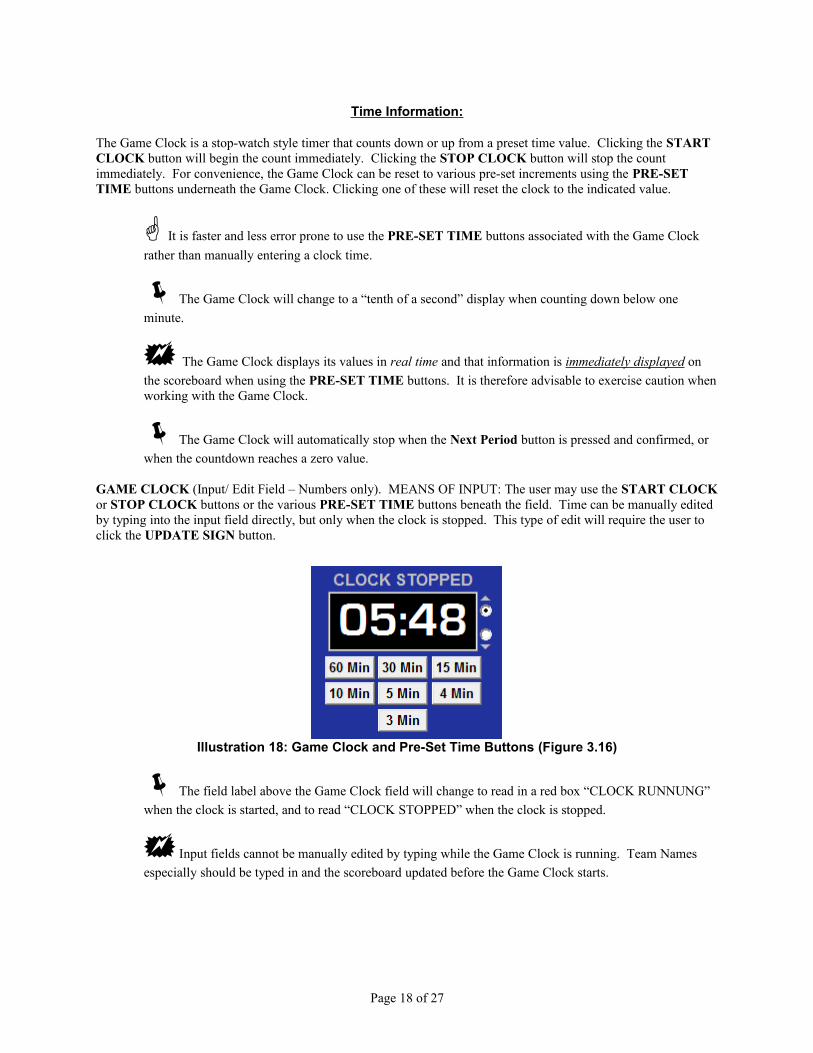
from 0 to 2, which corresponds with the rules of the game. The TAKE T/O BUTTON only decreases the TOL value by one.
Use the TAKE T/O (“Take Time Out”) button with this input field to save time.
TEAM SHOTS, SAVES, and CORNER KICKS (Input/ Edit Field – Numbers only). MEANS OF INPUT: The user may type numbers directly in the field, use the UP/DOWN buttons, or use the UP and DOWN arrow keys on the keyboard in order to indicate the value of each of these items for each team. UP/DOWN buttons and keys increase or decrease the value of these fields one unit at a time. The range of values for these fields are restricted from 0 to 99.
Use the UP/DOWN buttons with this input field to save time.
Page 16 of 27
Illustration 13: Team Time Outs Left Input Field (Figure 3.11)
Illustration 14: Team SHOTS, SAVES and CORNER KICKS Input Fields (Figure 3.12)

Game Information:
PERIOD (Input Field). MEANS OF INPUT: The user may use the UP/DOWN buttons in order to change the Period of the game. UP/DOWN buttons increase or decrease the PERIOD value one unit at a time. Text values shown in the PERIOD input field are fixed and cannot be edited manually by the user. The values are:“blank” (no output), Pre-Game, 1st HALF, HALFTIME, 2nd HALF, and OVERTIME.
Only the UP/DOWN buttons can be used with this input field.
NEXT PERIOD (button). When pressed, this button will conveniently progress the PERIOD field to the next logical value, reset the Game Clock to the appropriate time for that period, and reset any TOL (time-outs left) to their appropriate values. A pop-up warning window will appear if this button is pressed to allow the user to confirm the selection - see figure 3.9. See figure 3.10 for button appearance.
BLOW HORN (button). When pressed, this button will cause the server computer to make an audible sound of a horn blowing.
When Auto-Horn is selected in the menu, this button only needs to be used in rare instances.
Page 17 of 27
Illustration 15: Game Period Input Field (Figure 3.13)
Illustration 17: Focus on Next Period and Blow Horn Buttons (Figure 3.15)
Illustration 16: Next Period Alert (Figure 3.14)
Time Information:
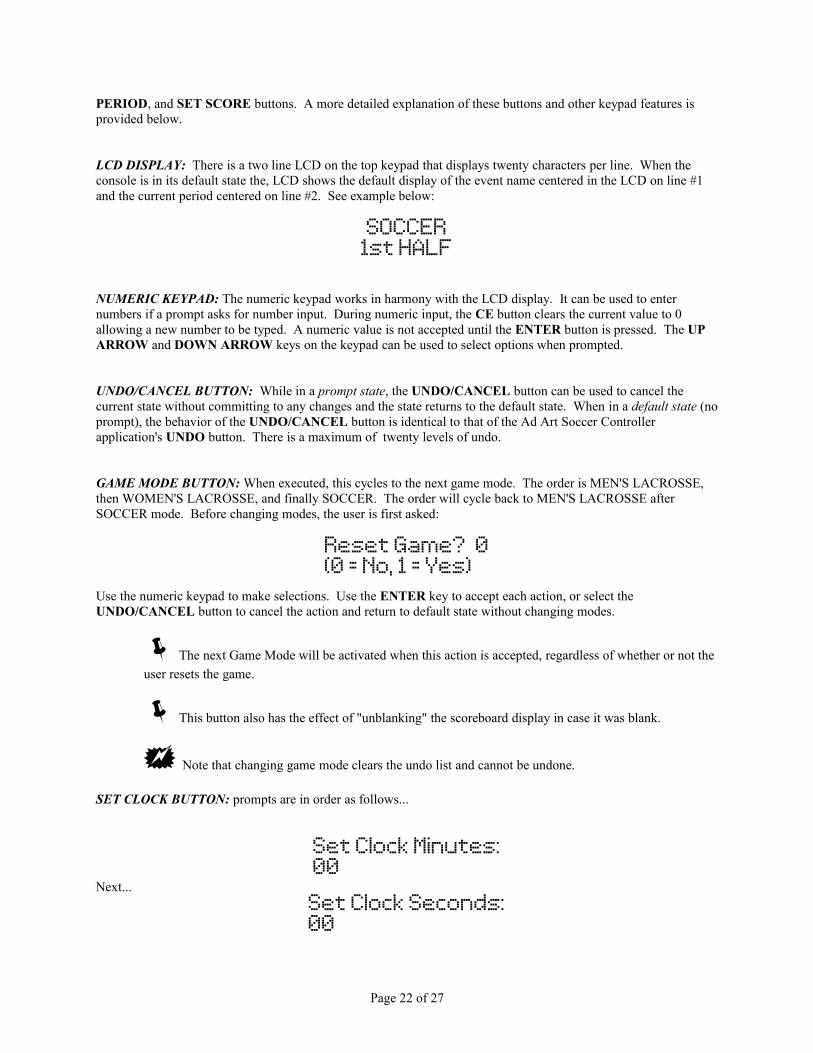
The Game Clock is a stop-watch style timer that counts down or up from a preset time value. Clicking the START CLOCK button will begin the count immediately. Clicking the STOP CLOCK button will stop the count immediately. For convenience, the Game Clock can be reset to various pre-set increments using the PRE-SET TIME buttons underneath the Game Clock. Clicking one of these will reset the clock to the indicated value.
It is faster and less error prone to use the PRE-SET TIME buttons associated with the Game Clock
rather than manually entering a clock time.
The Game Clock will change to a “tenth of a second” display when counting down below one
minute.
The Game Clock displays its values in real time and that information is immediately displayed on
the scoreboard when using the PRE-SET TIME buttons. It is therefore advisable to exercise caution when working with the Game Clock.
The Game Clock will automatically stop when the Next Period button is pressed and confirmed, or
when the countdown reaches a zero value.
GAME CLOCK (Input/ Edit Field – Numbers only). MEANS OF INPUT: The user may use the START CLOCK or STOP CLOCK buttons or the various PRE-SET TIME buttons beneath the field. Time can be manually edited by typing into the input field directly, but only when the clock is stopped. This type of edit will require the user to click the UPDATE SIGN button.
The field label above the Game Clock field will change to read in a red box “CLOCK RUNNUNG”
when the clock is started, and to read “CLOCK STOPPED” when the clock is stopped.
Input fields cannot be manually edited by typing while the Game Clock is running. Team Names
especially should be typed in and the scoreboard updated before the Game Clock starts.
Page 18 of 27
Illustration 18: Game Clock and Pre-Set Time Buttons (Figure 3.16)

To the right of the Game Clock field are two count direction radio buttons. Selecting the UP radio
button will ADD values to the current Game Clock time (count up). Selecting the DOWN radio button will SUBTRACT values from the current Game Clock time (count down).
Selecting these radio buttons will have an immediate effect if the game clock is currently running.
Therefore use caution when using these radio buttons during a game.
Page 19 of 27
Illustration 19: Focus on Game Clock Start/Stop Buttons (Figure 3.17)

4. Output Display Window
4.1 Output Display Window Functionality: What Does it Do?
As mentioned earlier in this manual, the main function of AFieldSportServer's Output Display window is to format and display the scoreboard in the screen capture area used by the electronic display. AFieldSportServer is the server side software component of the Ad Art VS Sports Controller. AAFieldSportServer runs on a dedicated host computer connected to the actual scoreboard (sometimes referred to as the scoreboard or sign computer). Therefore, users of Ad Art Soccer Controller software will not be able to see this screen during operation.
For reference, Figure 4.1 below shows a picture of the Output Display window. All Output Display window items correspond with the Ad Art Soccer Controller Main Scoreboard window.
The Output Display window is designed to remain on top of all other application windows that may be running on the server computer. This is to ensure nothing but scoreboard information appears in the capture area of the screen, and subsequently on the scoreboard. As mentioned earlier in this manual, the SHOW SCORE and SHOW MSGS (messages) buttons in the Main Scoreboard Window of Ad Art Soccer Controller software will toggle the state of the Output Display Window to allow messages or media to be displayed on top of scoreboard data when desired.
The mouse cursor will disappear when it intersects the Output Display Window. This behavior is
intentional by design, so the mouse cursor does not accidentally display on the scoreboard during a game.
The Output Display window can be custom configured. For example, by default, the capture area is designed to be located on the top left corner of the computer screen, and set to a specific rectangular area (measured in pixels). The position and size corresponds to the “capture area” of the LED display electronics. The Output Display window settings can be changed in the AAFieldSportServer.ini file. This file is automatically generated when the server software is first run, and located in the server program's installation folder. There are many configuration settings that can be modified in this file, but most of these have already been configured by qualified Ad Art technicians. The INI file should generally be left alone after the scoreboard is initially set up.
Page 20 of 27
Illustration 20: Output Display Window (Figure 4.1)

Appendices
Appendix A: Using the Ad Art VS Sports Controller With a Remote Console and Hand-held Remote Controller
Remote Console Operation:
Some deployments require the scoreboard to be controlled from the field level without the use of a computer. Or there may be instances where the scoreboard will be controlled by more than one person in more than one location. To facilitate this operation, Ad Art provides a Remote Console solution that plugs into the server computer running the AAFieldSportServer application. The Remote Console is hard-wired to the server using the server's serial port. This console allows a scoreboard operator located in or near the field to control AAFieldSportServer exclusively for most functions or simultaneously with an operator in the control room during a game.
The Remote Console is programmed by Ad Art technicians, who mapped keys on the console's keypads to various functions that are equally implemented by Ad Art Soccer Controller software. The keypad keys are labeled to indicate what function they serve. All keys on the keypad perform identical functionality (except for GAME MODE and UNDO/CANCEL) as their Ad Art Soccer Controller counterparts. See the photograph below.
The console is split into two keypads. The top keypad allows the user to navigate prompts in order to set the Game Clock, change between Game Modes, and set /advance Game Periods by using the included numeric keypad. The user is prompted and given feedback from the included LCD display. The bottom keypad of the Console allows the operator to control team related functions for each team. Most labeled keys correspond with software buttons in the Ad Art Soccer Controller application. Some buttons have an immediate effect while others will prompt the user for more input. For Soccer events, the buttons that prompt for input are the GAME MODE, SET CLOCK, SET
Page 21 of 27
Illustration 21: Remote Console
PERIOD, and SET SCORE buttons. A more detailed explanation of these buttons and other keypad features is provided below.
LCD DISPLAY: There is a two line LCD on the top keypad that displays twenty characters per line. When the console is in its default state the, LCD shows the default display of the event name centered in the LCD on line #1 and the current period centered on line #2. See example below:
SOCCER1st HALF
NUMERIC KEYPAD: The numeric keypad works in harmony with the LCD display. It can be used to enter numbers if a prompt asks for number input. During numeric input, the CE button clears the current value to 0 allowing a new number to be typed. A numeric value is not accepted until the ENTER button is pressed. The UP ARROW and DOWN ARROW keys on the keypad can be used to select options when prompted.
UNDO/CANCEL BUTTON: While in a prompt state, the UNDO/CANCEL button can be used to cancel the current state without committing to any changes and the state returns to the default state. When in a default state (no prompt), the behavior of the UNDO/CANCEL button is identical to that of the Ad Art Soccer Controller application's UNDO button. There is a maximum of twenty levels of undo.
GAME MODE BUTTON: When executed, this cycles to the next game mode. The order is MEN'S LACROSSE, then WOMEN'S LACROSSE, and finally SOCCER. The order will cycle back to MEN'S LACROSSE after SOCCER mode. Before changing modes, the user is first asked:
Use the numeric keypad to make selections. Use the ENTER key to accept each action, or select the UNDO/CANCEL button to cancel the action and return to default state without changing modes.
The next Game Mode will be activated when this action is accepted, regardless of whether or not the
user resets the game.
This button also has the effect of "unblanking" the scoreboard display in case it was blank.
Note that changing game mode clears the undo list and cannot be undone.
SET CLOCK BUTTON: prompts are in order as follows...
Next...
Page 22 of 27
Reset Game? 0(0 = No, 1 = Yes)
Set Clock Minutes:00
Set Clock Seconds:00

Next...
Or depending on which arrow key was pressed...
Use the ENTER key to accept each prompt entry, or select the UNDO/CANCEL button at any time to return to the default state without setting the Game Clock.
SET PERIOD BUTTON: prompt is as follows...
Values for Periods according to each Game Mode are:
UP/DOWN ARROW keys are used to change the desired period (the display changes with each arrow press to show the current period). Use the ENTER key to accept, or select the UNDO/CANCEL button to return to the default state without changing the period.
SET SCORE BUTTON (Home Team): prompt is as follows...
Use the NUMERIC KEYPAD to select a two digit numeric value. Use the ENTER key to accept, or select the UNDO/CANCEL button to return to the default state without changing the score.
SET SCORE BUTTON (Visitor Team): prompt is as follows...
Use the NUMERIC KEYPAD to select a two digit numeric value. Use the ENTER key to accept, or select the UNDO/CANCEL button to return to the default state without changing the score.
Page 23 of 27
Count Up/Down?: DOWN(use arrow keys)
Count Up/Down?: UP(use arrow keys)
Set Period: 1st HALF(use arrow keys)
Set Home Score:00
Set Visitor Score:00
MEN'S LACROSSE – (blank), Pre-Game, 1st QTR, 2nd QTR, HALFTIME, 3rd QTR, 4th QTR, OVERTIME
WOMEN'S LACROSSE – (blank), Pre-Game, 1st HALF, HALFTIME, 2nd HALF, OVERTIME
SOCCER – (blank), Pre-Game, 1st HALF, HALFTIME, 2nd HALF, OVERTIME
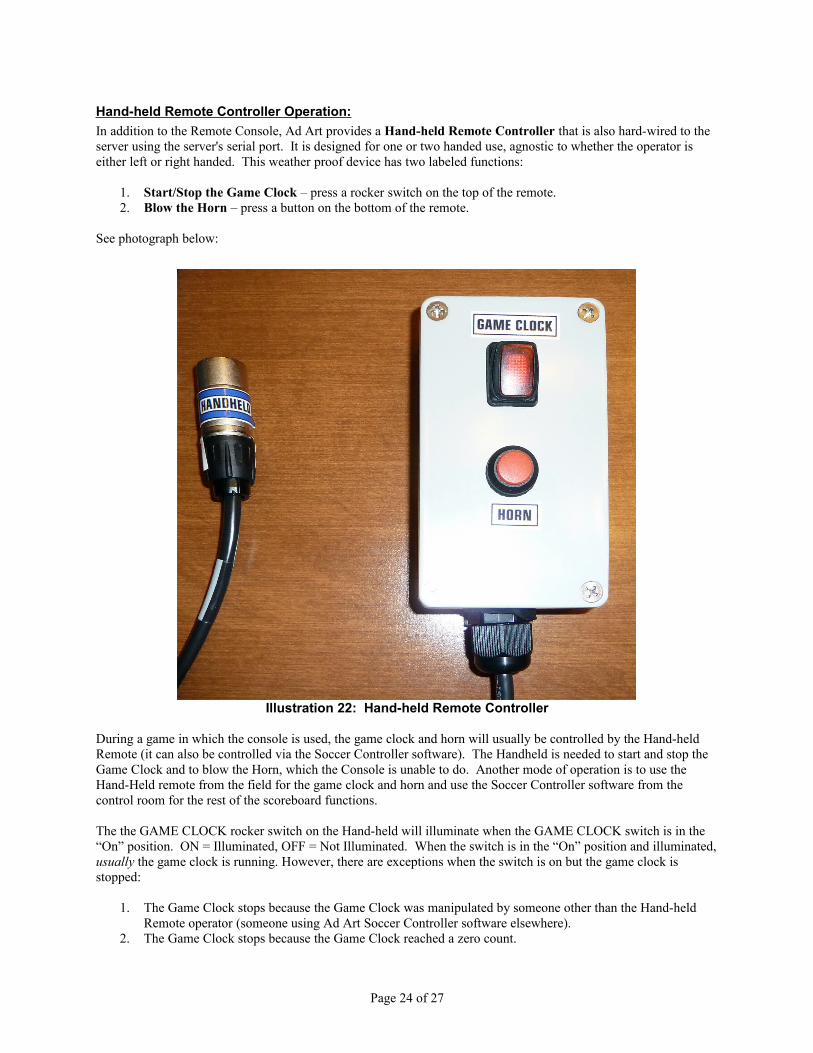
Hand-held Remote Controller Operation:
In addition to the Remote Console, Ad Art provides a Hand-held Remote Controller that is also hard-wired to the server using the server's serial port. It is designed for one or two handed use, agnostic to whether the operator is either left or right handed. This weather proof device has two labeled functions:
1. Start/Stop the Game Clock – press a rocker switch on the top of the remote.2. Blow the Horn – press a button on the bottom of the remote.
See photograph below:
During a game in which the console is used, the game clock and horn will usually be controlled by the Hand-held Remote (it can also be controlled via the Soccer Controller software). The Handheld is needed to start and stop the Game Clock and to blow the Horn, which the Console is unable to do. Another mode of operation is to use the Hand-Held remote from the field for the game clock and horn and use the Soccer Controller software from the control room for the rest of the scoreboard functions.
The the GAME CLOCK rocker switch on the Hand-held will illuminate when the GAME CLOCK switch is in the “On” position. ON = Illuminated, OFF = Not Illuminated. When the switch is in the “On” position and illuminated, usually the game clock is running. However, there are exceptions when the switch is on but the game clock is stopped:
1. The Game Clock stops because the Game Clock was manipulated by someone other than the Hand-held Remote operator (someone using Ad Art Soccer Controller software elsewhere).
2. The Game Clock stops because the Game Clock reached a zero count.
Page 24 of 27
Illustration 22: Hand-held Remote Controller

3. The Game Clock stops because the Console operator or Soccer Controller operator used RESET GAME, SET CLOCK, or PERIOD ADVANCE functions.
Under these circumstances the clock will stop even though the Hand-held GAME CLOCK rocker switch is still in the ON position. To start the clock again, the operator must switch the GAME CLOCK rocker switch to the OFF position and then back to ON when ready to start the clock again.
It is good practice to always make sure the GAME CLOCK toggle switch is in the OFF position
whenever the Game Clock stops. The Hand-held Remote Control operator should pay close attention to the scoreboard's Game Clock during a game.
Page 25 of 27

Appendix B: Ad Art VS Sports Controller Configuration Files
Installation Overview:
The Installation program will place all needed Ad Art VS Sports Controller software files in the default installation folder chosen at the time of install. These files include the application executable files (“SoccerController.exe” or “AAFieldSportServer.exe”), this software manual document file, log files (in a “logs” sub-folder) saved game files (in a “gamesaves” sub-folder), and an audio file (“buzzer.wav”). Several font files are also installed in the default installation and computer system's ”fonts” sub-folder (EurostileLTStd-BoldCn.otf, Euros.TTF, Eurosti.TTF, Eurostib.TTF, ArialN.TTF, ArialNb.TTF, ArialNbi.TTF, and ArialNi.TTF).
Ad Art Soccer Controller Configuration:
Ad Art Soccer Controller software is a client application that runs on most computers. It is designed to communicate with its server software component (AAFieldSportServer.exe) over the TCP/IP network protocol. The configuration settings for Ad Art Soccer Controller software are stored in an INI file (SoccerController.ini) located in the same directory as the program.
When Ad Art VS Sports Controller software is run for the first time, it automatically
generates its INI file using default values. It is best to leave this file alone under most circumstances. However, all settings stored in the INI file may be edited manually, as the INI file is merely a text file. Only manually edit the INI file when the software is not running.
Content from a sample INI file with example settings is provided below:
[Settings]FormVersion=0Flags=0PixelsPerInch=96MinMaxPos(1920x1080)=-1,-1,-1,-1MinMaxPos=-1,-1,-1,-1NormPos(1920x1080)=561,239,1361,807NormPos=561,239,1361,807Scoreboard_Host_Or_IP=LocalHostScoreBoardPort=38240
Most of these settings should be left alone, however two settings merit special attention. These settings will need to be configured correctly, or Ad Art Soccer Controller will not be able to communicate with AAFieldSportServer. These settings are:
1. Scoreboard_Host_Or_IP= This setting should be set to the server computer's valid DNS host name or LAN/Internet IP address that is accessible to the client computer.
2. ScoreBoardPort= This setting should be set to a valid TCP port that corresponds with the port configured for AAFieldSportServer. The default port number is 38240. This port should also be kept open on any firewall software that may be running on the client computer.
AAFieldSportServer Configuration:
AAFieldSportServer is the server-side software component of the Ad Art VS Sports Controller. This software runs on a dedicated computer connected to the actual scoreboard. The server software formats and displays the game state in an Output Display window which is positioned in the sign's screen capture area.
Page 26 of 27
AAFieldSportServer.exe software is designed to keep the state of the game current, even if the application should accidentally be closed out. After re-starting the application, all game values (including clock timing) will display and resume just as it was before being closed. This is possible, in part, because saved game-state settings are stored in a local sub-folder of the server's install directory named “gamesaves”.
AAFieldSportServer.exe software will also keep a log of all major server activity for historical and troubleshooting purposes. Log files are stored in a local sub-folder of the server's install directory named “logs”. These are ASCII text files that are human readable in any text editor.
An INI file that contains configuration settings for the server software is located in the same directory as the AAFieldSportServer.exe program. Most of these settings define the graphical layout of the scoreboard – these should be left alone.
When AAFieldSportServer.exe is run for the first time, it automatically generates this INI
file. It is typically not necessary to manually edit this file. Only qualified Ad Art technicians should configure this file, so contact them if there is a need to re-configure AAFieldSportServer.exe.
Content from a sample INI file with examples of the remainder of settings is provided below:
[SETTINGS]ConsoleComPort=HandComPort=
[frmSignOutput]FormVersion=0Flags=0PixelsPerInch=96MinMaxPos(1024x768)=-1,-1,0,0MinMaxPos=-1,-1,0,0NormPos(1024x768)=0,0,480,240NormPos=0,0,480,240
Four settings merit attention. These settings will need to be configured correctly to define the Output Display window and to communicate with the remote Console/Handheld controllers. These settings are:
1. ConsoleComPort= This setting should be set to correspond with the serial port used to communicate with the Remote Console Controller.
2. HandComPort= This setting should be set to correspond with the serial port used to communicate with the Hand-held Remote Controller.
3. NormPos(####x###)= This setting should be set to define the Output Display window pixel area in comma separated notation – the first two values indicate the x and y pixel coordinates defining the upper left corner of the rectangle, while the last two values indicate the x and y pixel coordinates defining the lower right corner of the rectangle.
Page 27 of 27