Activate Your License 2 - EasyDuplicateFinder · from your iTunes library. Photos Scan (Mac only)...
45
Transcript of Activate Your License 2 - EasyDuplicateFinder · from your iTunes library. Photos Scan (Mac only)...


1
Activate Your License ........................................................................................ 2Offline Activation .............................................................................................. 3Getting Started Using the Program .................................................................. 5Special Easy Duplicate Finder Scan Modes .................................................... 15Configuring Easy Duplicate Finder Settings ................................................... 39Easy Duplicate Finder Keyboard Shortcuts ..................................................... 44

2
Thank you for installing Easy Duplicate Finder! You are now only a few steps away from having a duplicate-free computer. In this Quick Start Guide we'll show you how to delete duplicate files quickly and easily.
Activate Your License The first thing you should do is activate your license. To do that, make sure your computer is connected to the Internet and open Easy Duplicate Finder. Then click on the Register button in the bottom left corner.
A popup window will appear. Post your license key in there and click on Activate License.

3
Offl ine Activation If your computer is not connected to the Internet and there's no way for you to go online, follow these steps to activate your copy of Easy Duplicate Finder.
1. Purchase a license key and install Easy Duplicate Finder on your computer.
2. Open Easy Duplicate Finder, click on the hamburger menu and go to "About".
3. Copy the product key from the popup that appears.
4. Now you'll need to go online and navigate to this page to open a support ticket. Make sure you send both your product key and your license key to the Support Team along with other relevant information.

4
5. Our Support Team will generate activation data for your copy of Easy Duplicate Finder and email it to you. The activation data will look like this:
6. Copy the activation data from the email, save it as a text file and put the file on a flash drive.
7. Connect the flash drive to your offline computer, open the text file with the activation data, select all of it and copy it. Important: don't paste it anywhere at this point!
8. Open Easy Duplicate Finder. If you have valid activation data and if you've followed these steps correctly, your copy of Easy Duplicate Finder will become activated.
If you're on Windows, you can ask the Support Team to email you a Master File that you can save to the folder where Easy Duplicate Finder is installed. Then simply open Easy Duplicate Finder and it will get activated.

5
Getting Started Using the Program First of all, you'll need to open Easy Duplicate Finder. If you are on Windows, double-click on EDF's (Easy Duplicate Finder's) desktop icon. If you are on a Mac, go to Launchpad and click on EDF's icon there. Easy Duplicate Finder will open and show you a welcoming message. From there you can launch Easy Duplicate Finder Tips:
We recommend that you go through them before you start your first scan. When you are ready, click on the Get Started button and start adding folders that you want to check for duplicates:
Step 1: Select a Scan Mode Before you start scanning your computer for duplicate files, select the scan mode that suits you best. There are fifteen scan modes: SHA 256 Checksum +

6
File Size, Byte-by-Byte Comparison, Filename Only (fast scan), Email Mode, Contacts Scan, Music Scan, iPhoto Scan (Mac), iTunes Scan (Windows & Mac), Photos Scan (Mac), Google Drive Scan, Folder Comparison, Dropbox Scan, Outlook Mail, Outlook Contacts, Empty Folders. The File Search mode is selected by default.
Step 2: Add Folders to Scan The easiest way to scan your computer for duplicates is to use Easy Duplicate Finder's Wizard. To start the Wizard, click on the menu icon in the top right corner of the program window and select Open Wizard:
Then follow the Wizard's instructions:

7
Select what sort of duplicates you want to find (for example, photos), then select where Easy Duplicate Finder should look for them:
Then simply start the scan. If you don't feel like using the Wizard, drag and drop folders into the Include to Scan area:

8
If you've saved your previous scan results as a list, click on the Import Saved List button and choose the relevant option:
Easy Duplicate Finder has an option for you to save your favorite scan settings as scan profiles and load them whenever you want to run a specific scan. To create and save a scan profile, select all relevant scan settings that you want to include in the profile (scan mode, folders to scan, file types, file size) and click on the "Save scan profile" icon, then save the .csp file to your computer.

9
To load a scan profile from a file, click on the "Load scan profile" icon and select the .csp file.
Step 3: Scan for Duplicate Files Once you've added all the folders you want to check for duplicate files, click on the green Start Scan button:
Now all you have to do is wait for the scan to complete. Step 4: Manage Your Duplicates When the scan is complete, you will get a brief summary of the results where you will see how many duplicates were detected and how much space they occupy:

10
To manage your duplicates, you can either proceed to Step 3 by clicking on Go Fix Them! or click on the Remove All Now link to automatically delete all detected duplicates. You can also save the scan results for future use by clicking on the Save Scan link. If you decide to inspect the scan results (recommended), you will see all duplicate files organized into groups with the original file (the first file in each duplicate group or the file located in the Master Folder when you're using the Folder Comparison mode) left untouched and the duplicates pre-selected for removal. You can examine the selection and preview each file by expanding each group and clicking on it. Make sure the Preview mode is on and the eye icon is not grayed out:

11
You can switch between two views - the Group View and the Classic View by clicking on the respective icons:
If you are unsure which files to keep and which to delete, you can use the Assistant to help you. To launch it, click on the menu icon and select Open Assistant:

12
Then follow the Assistant's prompts:
If you'd rather continue exploring, here are a few tips to help you manage your duplicates more efficiently. You can organize the search results by file type (e.g. display only documents, music, photos, etc.). To do that, simply select the file type in the top bar:

13
Easy Duplicate Finder has lots of handy bulk selection options. Click on the pencil icon button to view them.
When you've finished selecting duplicates, click on the Trash Can icon to delete the duplicates or click on the green hamburger menu button and choose the option that suits you best:

14
You can move the duplicates to another folder, replace the actual files with a link to the original file and rename the duplicates. If you've deleted a file by accident, don't close Easy Duplicate Finder and use the Undo feature by clicking on the green arrow button:

15
Special Easy Duplicate Finder Scan Modes Easy Duplicate Finder has 15 scan modes for all types of files, cloud storage, and a scan mode to remove empty folders. By default, it uses the "SHA 265 Checksum + File Size" scan mode, which compares the hashtag checksums and file size. There's also the "Bite-by-Bite Comparison" mode that compares files by their content, and the "Filename Only" that only compares file names. Email Mode The Email Mode will help you find and manage duplicate emails in your native email client (Microsoft Outlook or Outlook Express on Windows; Mac Mail on a Mac). To scan your email client for duplicate emails, select the email mode from the scan modes drop-down menu, then add some folders to the Include area by clicking inside the Include area:
Easy Duplicate Finder will retrieve the list of your email accounts to add to the scan:

16
When you've added the account(s) you want to scan, click on the Start Scan button and wait for the scan to run its course.
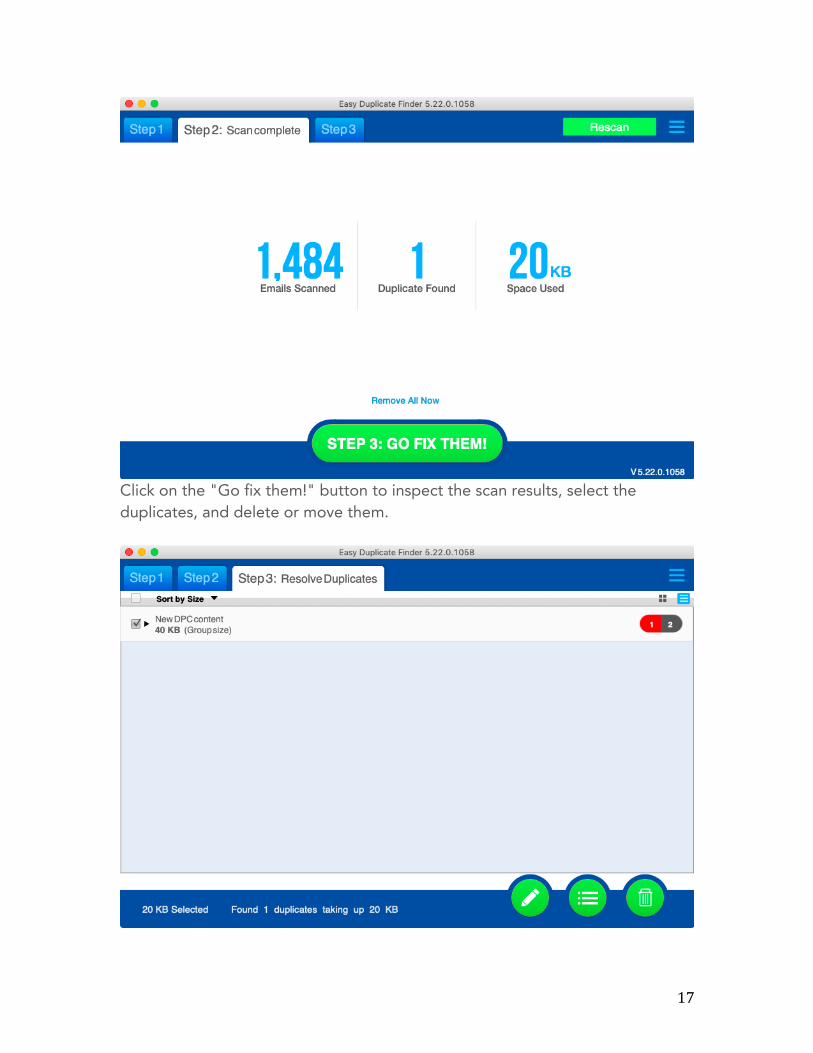
17
Click on the "Go fix them!" button to inspect the scan results, select the duplicates, and delete or move them.

18
Contacts Scan The Contacts Scan mode will find duplicate entries in your computer's native email contacts manager app. To scan your PC or Mac for duplicate contacts, add the contacts folder you want to scan to the scan area by inside the Include area. A new window will open where you'll be able to select the folder you want to scan. Click on it, then click OK to close the popup:
Click on the Start Scan button to start the scan. When the scan is finished, you'll be presented with a summary:
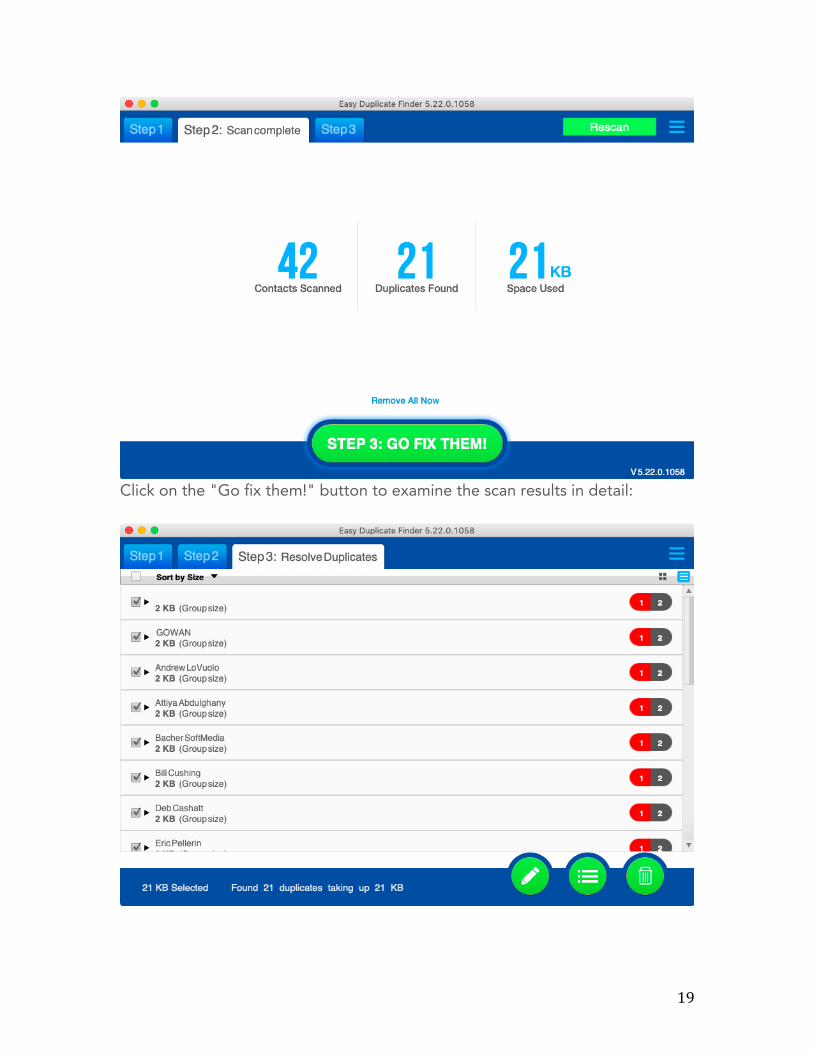
19
Click on the "Go fix them!" button to examine the scan results in detail:

20
Use the bulk selection options to select the duplicates you want to delete (or keep the default selection), then click on the trash can icon to remove the duplicate entries. Music Scan The Music Scan mode is designed to quickly help you find and manage duplicate songs in your music library. It uses ID3 tags to compare compositions, plus you can enable BASS audio fingerprint comparison in EDF Settings (Preferences on a Mac). The audio fingerprinting technology compares music files by their content, which offers very accurate results (although the scan may take longer, depending on a number of compositions you're checking). To enable audio fingerprinting, go to Settings, navigate to the Music Tags tab, check the "Use fingerprint comparison mode" checkbox and adjust the sensitivity threshold. The higher the threshold, the more accurate the results will be.
Click OK to apply the changes.

21
Now add the folders containing your music to the Include area by either dragging & dropping them there or clicking on the Add link and browsing to them.
Click on the Start Scan button and wait for the scan to finish. You'll be presented with a summary:
22
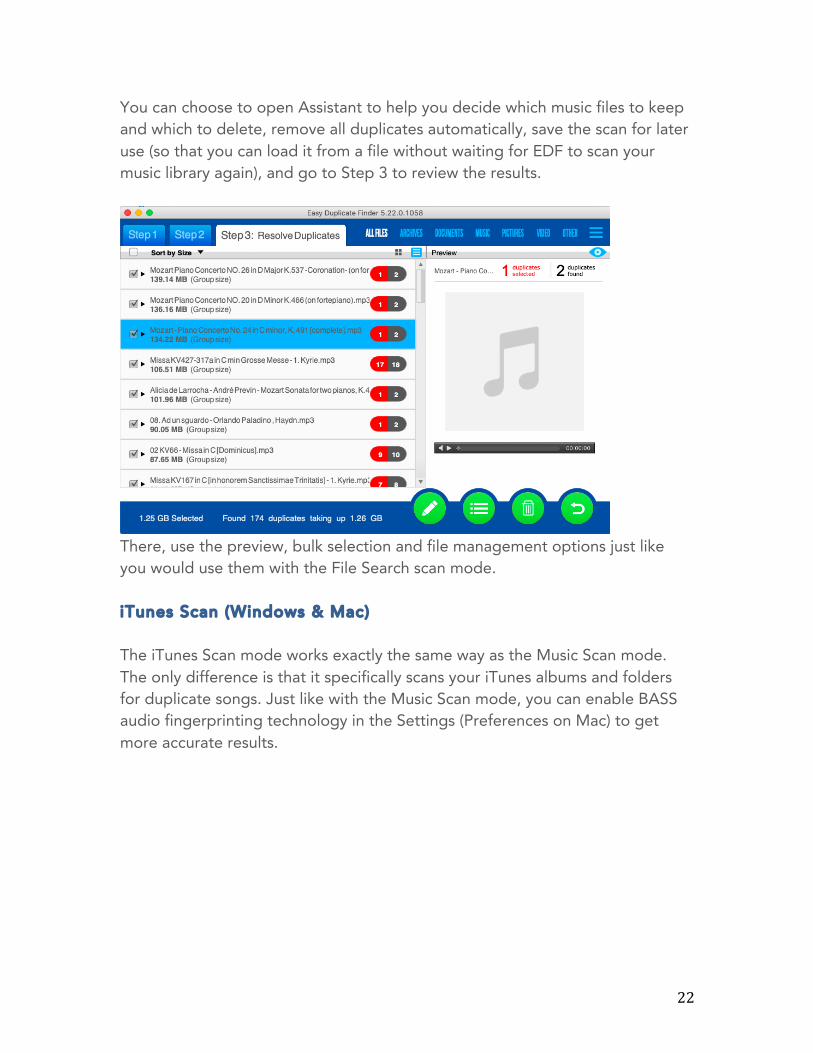
You can choose to open Assistant to help you decide which music files to keep and which to delete, remove all duplicates automatically, save the scan for later use (so that you can load it from a file without waiting for EDF to scan your music library again), and go to Step 3 to review the results.
There, use the preview, bulk selection and file management options just like you would use them with the File Search scan mode. iTunes Scan (Windows & Mac) The iTunes Scan mode works exactly the same way as the Music Scan mode. The only difference is that it specifically scans your iTunes albums and folders for duplicate songs. Just like with the Music Scan mode, you can enable BASS audio fingerprinting technology in the Settings (Preferences on Mac) to get more accurate results.

23
When you've finished deleting iTunes duplicates, we recommend that you go to Settings - Tools and run the Track Cleaner. Doing this will remove invalid tracks from your iTunes library. Photos Scan (Mac only) The Photos Scan Mode is designed to find exact duplicates in Mac Photos app. Because of the way Photos works, Easy Duplicate Finder will place duplicate photos in the EDF Trash album, which you will then need to clean up manually.
24
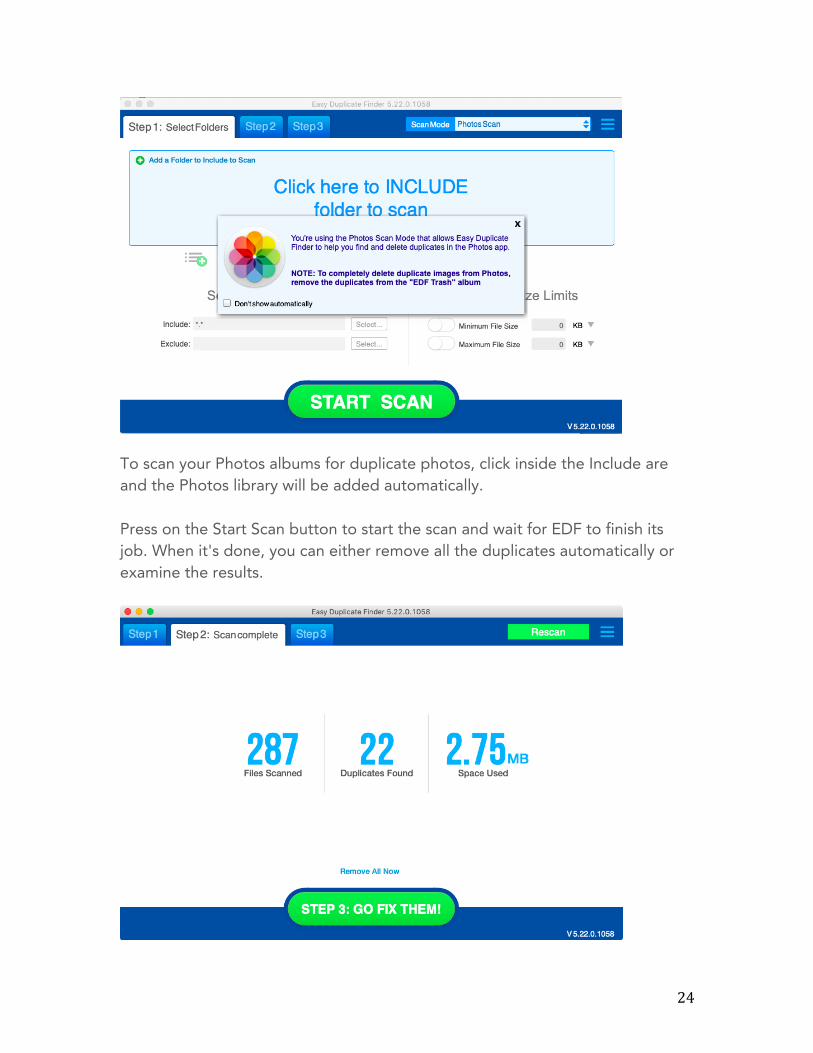
To scan your Photos albums for duplicate photos, click inside the Include are and the Photos library will be added automatically. Press on the Start Scan button to start the scan and wait for EDF to finish its job. When it's done, you can either remove all the duplicates automatically or examine the results.

25
Use bulk file selection and file management buttons just like you would in the File Search mode.
Don't forget to open Photos and delete everything from the EDF Trash album there! Google Drive Scan Mode The Google Drive scan mode is designed to find and remove duplicate files from your Google Drive cloud storage. When you're using this mode, you don't have to download any files to your computer and thus save time, Internet traffic and bandwidth. The whole duplicate-finding process happens in the cloud, so make sure you are connected to the Internet. To use this mode, open Easy Duplicate Finder, select the Google Drive mode from the scan modes drop-down menu, then click inside the Include area to add Drive folders to the scan. Easy Duplicate Finder will ask permission to access your Google Drive:

26
Select which Drive folders you want to scan - you can add your whole drive or expand the selection and choose specific folders:

27
Click on the Start Scan button to launch the scan. When EDF is done, you'll get a summary screen from which you can either remove all duplicate files automatically, or click on the "Go fix them" button to examine the results.
If you decide to proceed to Step 3, use all the options just like you would with the File Search mode.

28
Folder Comparison Scan Mode The Folder Comparison mode lets you easily compare files in two or more folders where the files in the source (master) folder are considered originals and matching files in target folders are considered duplicates. This mode is particularly handy for merging folders and eliminating duplicate files on a very targeted basis. To scan your folders using the mode, select Folder Comparison from the scan modes drop-down menu. Then add the folder with the original files to the left Include window, and the folders where you want to look for duplicates to the right Include window.
Click on the Start Scan button and wait for the scan to finish. You will be presented with a summary where you'll be able to open Assistant, remove all duplicates automatically, save the scan to a file for later use, or click on the "Go fix them" button and inspect the results.

29
On Step 3, inspect the results and use the file management options just like you would when using the File Search mode. Files in the Master folder that contains the original files are marked with "M" for convenience. They are also protected from accidental deletion.

30
Dropbox Scan Mode The Dropbox scan mode is designed to find and remove duplicate files from your Dropbox cloud storage. When you're using this mode, you don't have to download any files to your computer and thus save time, Internet traffic and bandwidth. The whole duplicate-finding process happens in the cloud, so make sure you are connected to the Internet. To use this mode, open Easy Duplicate Finder, select the Dropbox Scan mode from the scan modes drop-down menu, then click inside the Include area to add Dropbox folders to the scan. Easy Duplicate Finder will ask permission to access your Dropbox and you'll need to sign in:
Dropbox will email you a confirmation code that you'll need to enter on the next screen:

31
When you've confirmed the integration, you'll be able to add Dropbox folders to the scan:

32
When ready, click on the Start Scan button to launch the scan. When EDF is done, you'll get a summary screen from which you can either remove all duplicate files automatically, or click on the "Go fix them" button to examine the results.
If you decide to proceed to Step 3, use all the options just like you would with the File Search mode.

33
Outlook Mail Scan Mode Easy Duplicate Finder has a special scan mode for finding and removing duplicates from the Microsoft Outlook email client. This mode works on Windows and Mac as long as you have the email client installed. If you have an older Windows version that includes Outlook Express, then you should use the Email Scan Mode instead. Open EDF and select Outlook Mail from the scan modes drop-down menu:
Click inside the Include area to add the Outlook folders you want to check for duplicate emails. Unlike other Outlook duplicate emails finder, EDF uses metadata to compare messages. This is a much safer approach and it saves you the trouble of finding PST and OST folders.

34
You may want to go to Settings > Contacts and Emails and check the parameters Easy Duplicate Finder uses to compare your email messages.

35
When you've added the account(s) you want to scan, click on the Start Scan button and wait for the scan to run its course.
Click on the "Go fix them!" button to inspect the scan results, select the duplicates, and delete or move them.
36
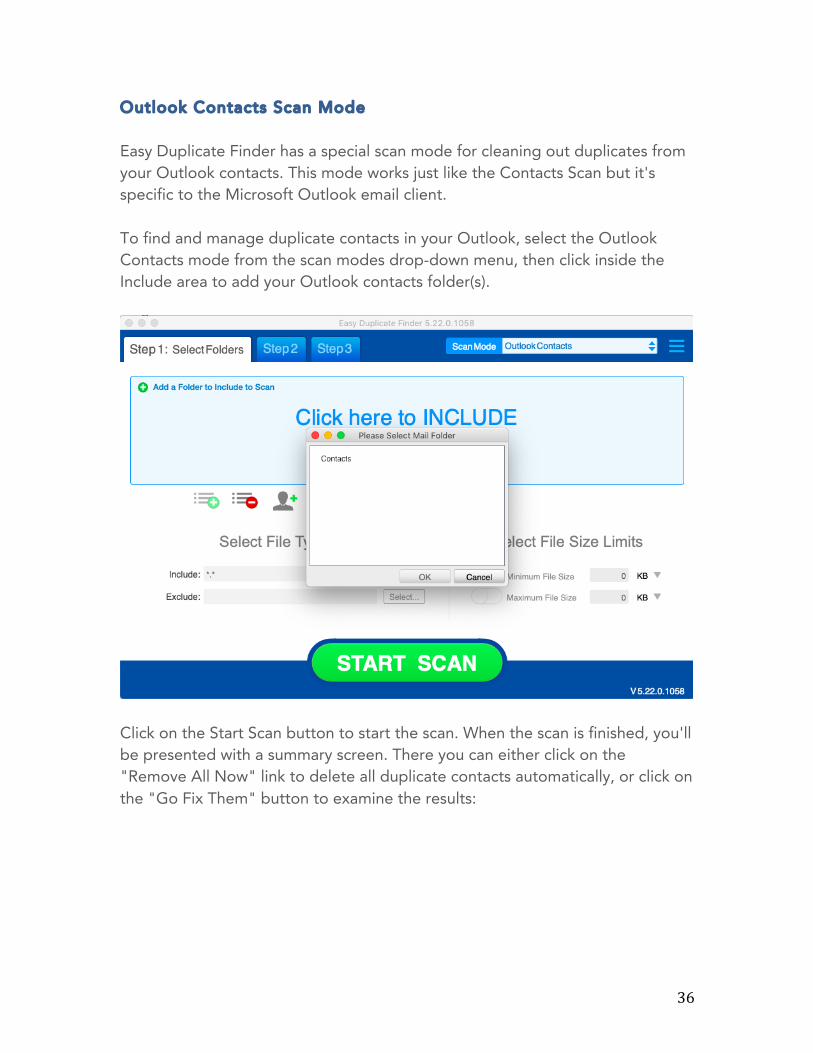
Outlook Contacts Scan Mode Easy Duplicate Finder has a special scan mode for cleaning out duplicates from your Outlook contacts. This mode works just like the Contacts Scan but it's specific to the Microsoft Outlook email client. To find and manage duplicate contacts in your Outlook, select the Outlook Contacts mode from the scan modes drop-down menu, then click inside the Include area to add your Outlook contacts folder(s).
Click on the Start Scan button to start the scan. When the scan is finished, you'll be presented with a summary screen. There you can either click on the "Remove All Now" link to delete all duplicate contacts automatically, or click on the "Go Fix Them" button to examine the results:

37
Click on the "Go fix them!" button to examine the scan results in detail:

38
Use the bulk selection options to select the duplicates you want to delete (or keep the default selection), then click on the trash can icon to remove the duplicate entries. Empty Folders Scan Mode Easy Duplicate Finder has a handy scan mode that will help you identify and delete empty folders from your computer. Select Empty Folders from the Scan Modes drop-down menu and add the folders you want to scan to the Include area (you can add your whole drive).
Press on the Start Scan button and wait for EDF to find empty folders on your PC or Mac. You will then be able to remove them just like you remove duplicate files.

39
Configuring Easy Duplicate Finder Settings Easy Duplicate Finder has lots of different settings you can configure. To access the Settings page (Preferences on a Mac), click on the hamburger menu and click on Settings/Preferences. The Settings screen will open. The General tab lets you configure general application settings, such as startup, behavior with folders, right-click options, list saving and file moving options, and more.
The File Search tab is where you can select additional scan options.

40
The Logging tab lets you control how Easy Duplicate Finder creates and stores logs. These logs may come in handy if you need to contact tech support and troubleshoot the app.

41
The Music Tags tab lets you select which music ID3 tags to include to the scan when you're using the Music Scan or iTunes Scan modes.
The Contacts and Emails tab lets you configure additional settings when using Contacts and Email scan modes (including Outlook Mail and Outlook Contacts).

42
The Tools tab offers you handy utilities: the SHA256 calculator that lets you calculate the hash for any file and the Track Cleaner for automatically removing deal iTunes track to prevent sync issues.
The Ignore List tab (Advanced Settings in previous EDF versions) lets you configure which drives, folders, and file types you want to exclude from all Easy Duplicate Finder scans.
By default, the Ignore List contains important system and application folders. We recommend you to keep these folders there to avoid system conflicts.

43
If you want to add custom drives or folders to the Ignore List, click on the Add folder icon button and browse to the drive or folder you want to add. You can also add file masks to the global Ignore List. File types added here will always override any file type settings selected on the main screen. To add a file mask, click on the Add Mask icon, type the mask in the popup window and click Add to save it. For example, if you want to always ignore text files, type "*.txt" without the quote marks and then click Add.
To remove an item from the Ignore List, select it and then click on the Remove icon. You can also clear the Ignore List by clicking on the Clear icon. However, we don't recommend doing that unless you absolutely have to.

44
Easy Duplicate Finder Keyboard Shortcuts In addition to drag & drop support, Easy Duplicate Finder supports a vast range of keyboard shortcuts: Key combination (Windows)
Key combination (Mac OS)
UI Element Action
CTRL+A CMD+A INCLUDE in the scan
Select ALL items in the list
CTRL+A CMD+A EXCLUDE from scan
Select ALL items in the list
DEL DEL INCLUDE in the scan , EXCLUDE from scan
Remove selected item from the list
CTRL+S CMD+S Scan results Select ALL in this folder CTRL+SHIFT+S CMD+SHIFT+S Scan results Select ALL in this folder
and subfolders SHIFT+LCLICK SHIFT+LCLICK Scan results Select range (originals in
each group will remain unselected)
UP, LEFT UP Scan results Scroll UP DOWN, RIGHT DOWN Scan results Scroll DOWN PgUp PgUP Scan results Scroll one page UP PgDn PgDn Scan results Scroll one page DOWN Home Home Scan results Scroll to the first item in
the list End End Scan results Scroll to the last item in
the list ESC Main window Exit full screen That's it! We hope you will enjoy using Easy Duplicate Finder, and it will help you save space and keep your files organized!