Cyrus: Unintrusive Application-Level Record-Replay for Replay Parallelism
Action Replay™ For Wii™
User Guide
v1.0

2
Contents
4 Chapter 1: Let’s Get Started 4 Thank you for choosing Action Replay™ for Wii™
4 Safety Information
4 Carton Contents
5 Chapter 2: Installing the Action Replay Code Engine 5 Wii Firmware Requirements
5 Obtaining your Wii MAC Address
5 Registering and Downloading the Action Replay Code Engine
6 Transferring the Action Replay Code Engine to your Action Replay Memory Card
6 Connecting your Action Replay Memory Card to your Wii Console
7 Chapter 3: Loading and Choosing Codes
7 Checking the Set Date
7 Loading the Action Replay Code Engine
8 Action Replay Code Engine Overview
8 Choose Codes and Play
8 Load game without codes enabled
9 Updating the Action Replay Code Engine
9 Pro Tip
10 Chapter 4: Powersaves
10 What are Powersaves
10 Using Powersaves with your Wii games
10 Downloading Powersaves
10 What are Community Saves
11 Chapter 5: Media Manager Installation
11 Minimum System Requirements
11 Installation
11 Connecting the Action Replay Memory Card
12 Connecting your SD Memory Card 12 Media Manager Overview
13 Chapter 6: Media Manager Working with Video 13 Introduction and Overview
14 Simple Mode Part 1: About
14 Simple Mode Part 2: Choosing the Right Quality Setting
14 Simple Mode Part 3: Encoding and Copying to your Memory Card
15 Expert Mode Part 1: About
15 Expert Mode Part 2: Quality Settings Tab
15 Expert Mode Part 3: Dimensions Tab
15 Expert Mode Part 4: File Size Tab
15 Expert Mode Part 5: Time
16 DVD Ripping Specific Information Part 1: About
16 DVD Ripping Specific Information Part 2: Choosing the Right Files
16 Suitable Source Media
16 Batch List Encoding
17 Chapter 7: Media Manager Working with Music 17 Introduction and Overview
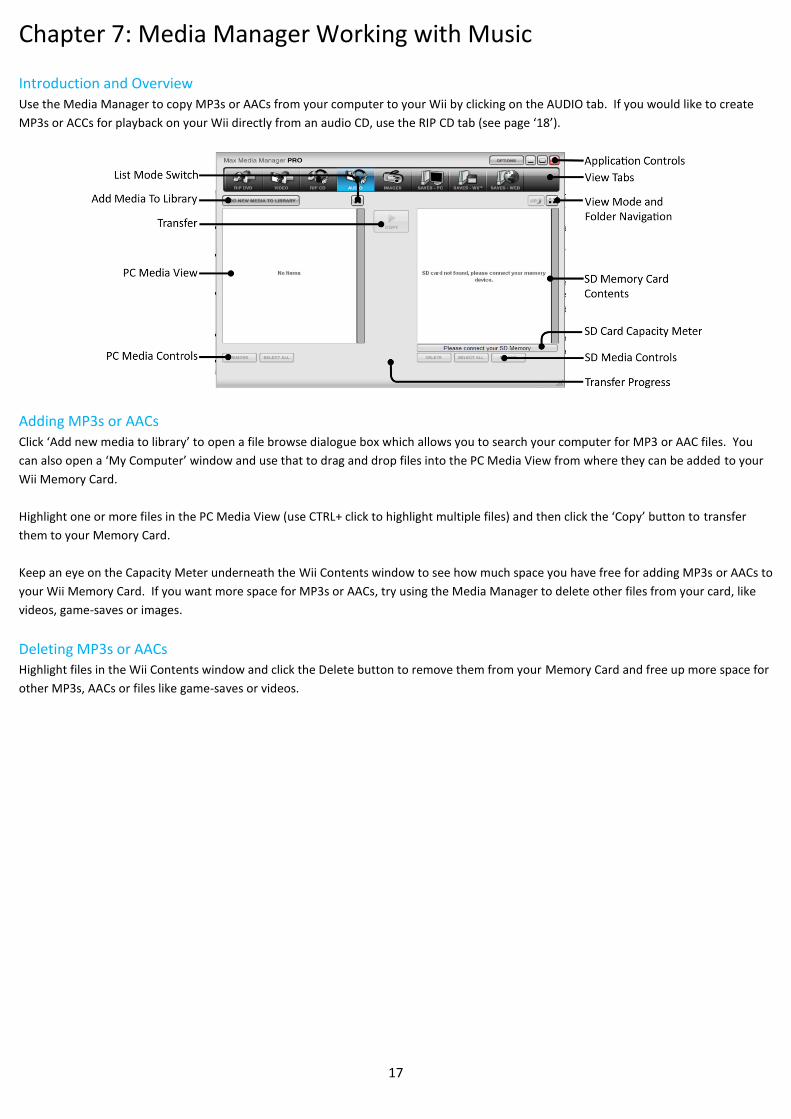
17 Adding MP3s or AACs
17 Deleting MP3s or AACs
18 Ripping CDs Part 1: About
18 Ripping CDs Part 2: CDDB Lookup
18 Ripping CDs Part 3: Selecting Tracks and Ripping
18 Ripping CDs Part 4: Recording Options
18 Playing Back your MP3s or AACs on your Wii
3
19 Chapter 8: Media Manager Working with Images
19 Introduction and Overview
19 Copy Options
19 Transferring your Images 19 Deleting Images
20 Chapter 9: Media Manager Saves Online 20 Introduction 21 Powersaves Part 1: About 21 Powersaves Part 2: Overview 21 Powersaves Part 3: Save Controls 21 Powersaves Part 4: Downloading and Using a Powersave 22 Community Part 1: About 22 Community Part 2: Overview 22 Community Part 3: Downloading and Using a Community Save 22 My Uploads Part 1: What is My Uploads? 22 My Uploads Part 2: Overview 22 My Uploads Part 3: Deleting an Upload 23 Saves in your PC Database Part 1: About 23 Saves in your PC Database Part 2: Editing Saves in your PC Database 23 Saves in your PC Database Part 3: Deleting Saves from your PC Database 23 Saves in your PC Database Part 4: Transferring Saves to your Wii 23 Saves in your PC Database Part 5: Adding Saves To Your PC Database From Your Wii 23 Uploading a Save to the Community Part 1: Getting Started 24 Uploading a Save to the Community Part 2: Upload Your Gamesave 24 Saves on your Wii Memory Card Part 1: Introduction and Overview 24 Saves on your Wii Memory Card Part 2: Copying Saves to your PC Database 24 Saves on your Wii Memory Card Part 3: Deleting Saves 25 Options Screen Part 1: About 25 Options Screen Part 2: General 25 Options Screen Part 3: Gamesaves 25 Options Screen Part 4: Folders
26 Technical Support and Customer Services
4
Chapter 1: Let’s Get Started
Thank you for choosing Action Replay™ for Wii™ The Wii Action Replay™ is here, giving you access to full code engine powered cheats and Powersaves that made Action Replay™ world famous on platforms like DS™ and GBA™. Using full code engine powered cheats transform your Wii™ games by arming yourself with Infinite Lives, Infinite health, Ammo and Time. Unlock secret levels, characters and vehicles. Turbo-charge your gaming using special Powersaves which are preloaded on the Action Replay Memory Card and downloadable direct from Datel’s server. Now you can become all-powerful and beat any game.
In addition Wii™ Action Replay™ includes a fully featured media management solution for the Wii™. You can create Wii-friendly audio and video clips directly from CDs, unprotected DVDs and files you already have on your PC.
Includes access to the constantly updated Action Replay™ Cheats database, and a Action Replay™ Memory Card with built in USB card reader for safe and smooth data transfers via any Internet Enabled PC.
Safety Information • Never try to dismantle the product yourself, or push objects of any kind into the product, as this may cause short circuits which could result in a fire or electric shock. • None of the components can be replaced or repaired by users. • Avoid exposing your product to rain, moisture or other liquids to protect against damage to the product or injury to you. • Keep all products away from operating machinery. • Dispose of the product according to local standards and regulations. • Do not expose the product to temperatures in excess of 40oC or below -10oC. • As with any gaming peripheral you are advised to take regular breaks during your gaming session especially if any discomfort occurs.
Carton Contents Please verify that your carton contains the following:
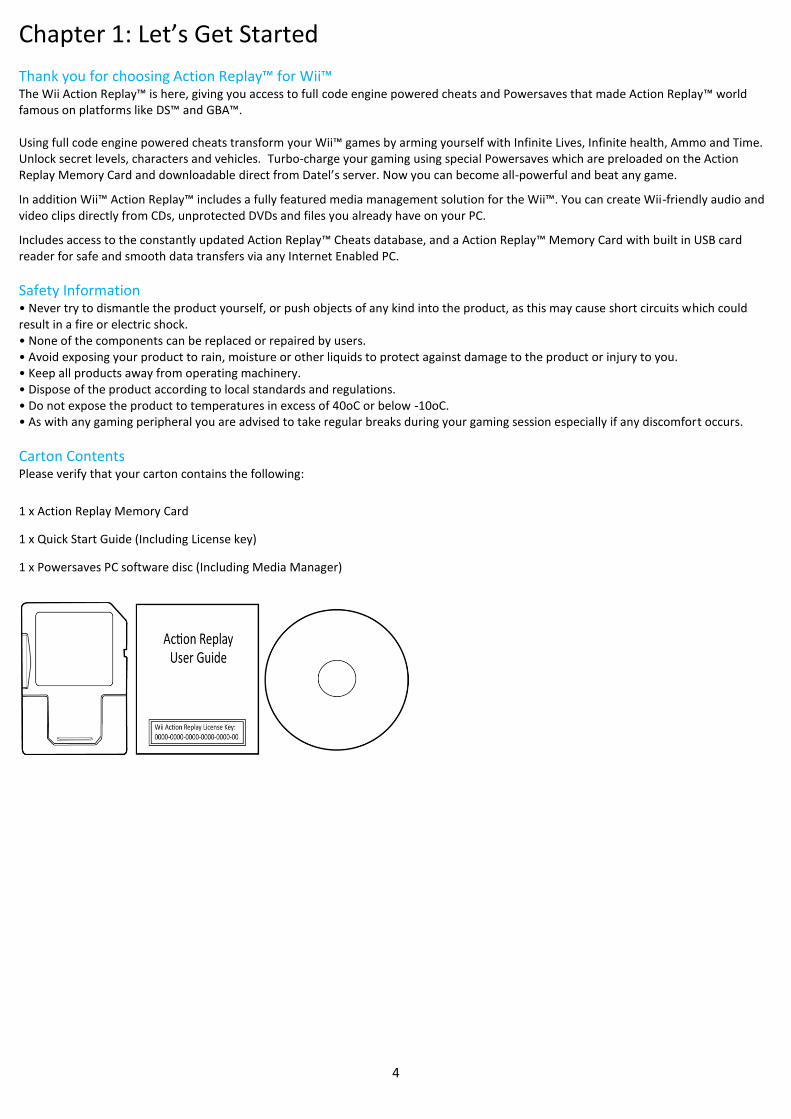
1 x Action Replay Memory Card
1 x Quick Start Guide (Including License key)
1 x Powersaves PC software disc (Including Media Manager)
5
Chapter 2: Installing the Action Replay Code Engine
Wii Firmware Requirements In order for you to operate Action Replay your Wii console needs to be running Wii firmware version v4.3. Your current Wii firmware version number is displayed in top right of the Wii Settings screen which is accessible by following these steps:
Step 1: Turn on your Wii console and load the Wii Menu.
Step 2: Select from the bottom left of the Wii menu the option (Wii Options).
Step 3: Select the option (Wii Settings).
In order to update your Wii console firmware select the option ‘Wii System Update’ from within the Wii settings screen.
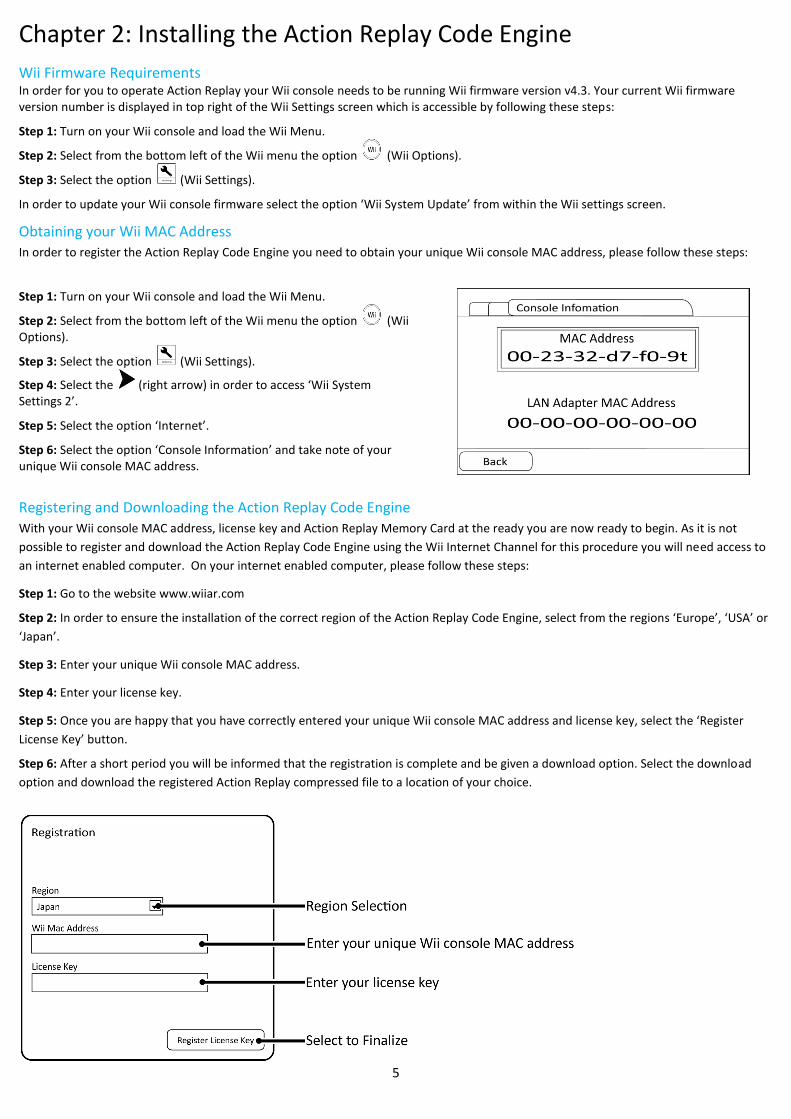
Obtaining your Wii MAC Address In order to register the Action Replay Code Engine you need to obtain your unique Wii console MAC address, please follow these steps:
Step 1: Turn on your Wii console and load the Wii Menu.
Step 2: Select from the bottom left of the Wii menu the option (Wii Options).
Step 3: Select the option (Wii Settings).
Step 4: Select the (right arrow) in order to access ‘Wii System Settings 2’.
Step 5: Select the option ‘Internet’.
Step 6: Select the option ‘Console Information’ and take note of your unique Wii console MAC address.
Registering and Downloading the Action Replay Code Engine With your Wii console MAC address, license key and Action Replay Memory Card at the ready you are now ready to begin. As it is not
possible to register and download the Action Replay Code Engine using the Wii Internet Channel for this procedure you will need access to
an internet enabled computer. On your internet enabled computer, please follow these steps:
Step 1: Go to the website www.wiiar.com
Step 2: In order to ensure the installation of the correct region of the Action Replay Code Engine, select from the regions ‘Europe’, ‘USA’ or
‘Japan’.
Step 3: Enter your unique Wii console MAC address.
Step 4: Enter your license key.
Step 5: Once you are happy that you have correctly entered your unique Wii console MAC address and license key, select the ‘Register
License Key’ button.
Step 6: After a short period you will be informed that the registration is complete and be given a download option. Select the download
option and download the registered Action Replay compressed file to a location of your choice.
6
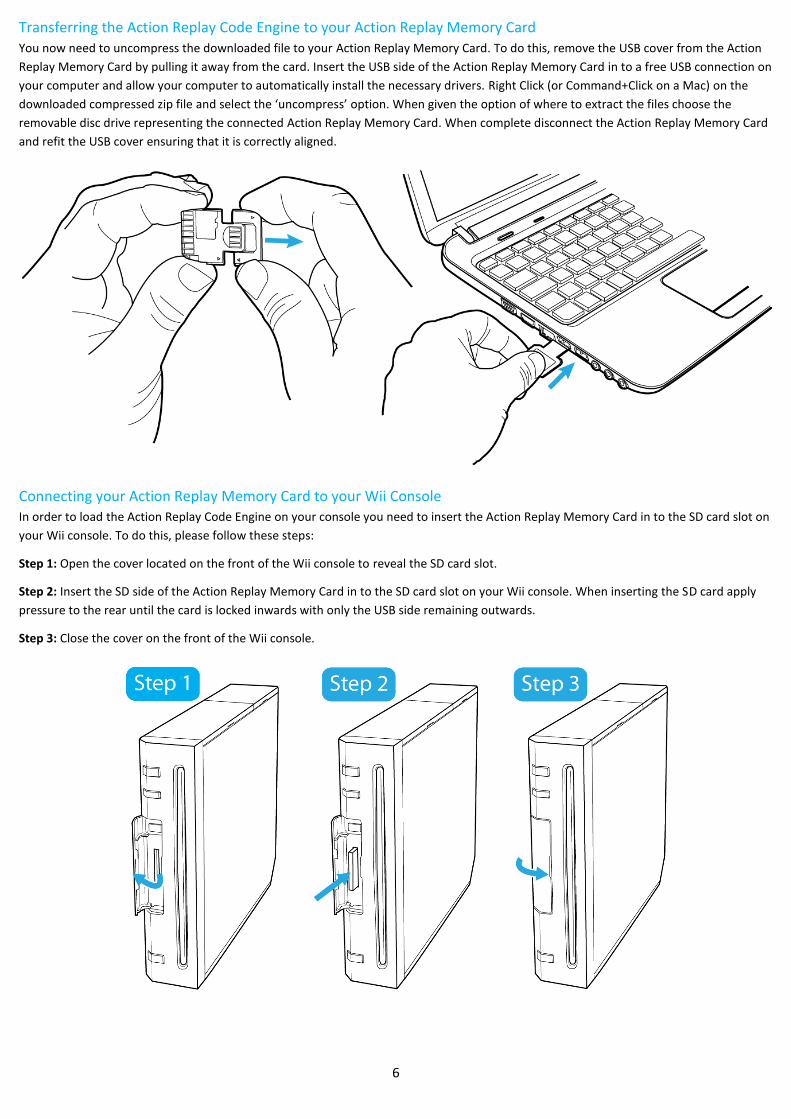
Transferring the Action Replay Code Engine to your Action Replay Memory Card You now need to uncompress the downloaded file to your Action Replay Memory Card. To do this, remove the USB cover from the Action
Replay Memory Card by pulling it away from the card. Insert the USB side of the Action Replay Memory Card in to a free USB connection on
your computer and allow your computer to automatically install the necessary drivers. Right Click (or Command+Click on a Mac) on the
downloaded compressed zip file and select the ‘uncompress’ option. When given the option of where to extract the files choose the
removable disc drive representing the connected Action Replay Memory Card. When complete disconnect the Action Replay Memory Card
and refit the USB cover ensuring that it is correctly aligned.
Connecting your Action Replay Memory Card to your Wii Console In order to load the Action Replay Code Engine on your console you need to insert the Action Replay Memory Card in to the SD card slot on
your Wii console. To do this, please follow these steps:
Step 1: Open the cover located on the front of the Wii console to reveal the SD card slot.
Step 2: Insert the SD side of the Action Replay Memory Card in to the SD card slot on your Wii console. When inserting the SD card apply
pressure to the rear until the card is locked inwards with only the USB side remaining outwards.
Step 3: Close the cover on the front of the Wii console.
7
Chapter 3: Loading and Choosing Codes
Checking the Set Date
Before continuing to the next section, in order for you to correctly load the Action Replay Code Engine on your Wii console you need to
ensure that the date on your Wii console is set correctly. To do this, please follow these steps:
Step 1: Turn on your Wii console and load the Wii Menu.
Step 2: Select from the bottom left of the Wii menu the option (Wii Options).
Step 3: Select the option (Wii Settings).
Step 4: Select the option ‘Calendar’.
Step 5: Select the option ‘Date’
Step 6: If required adjust the day, month and year using the (up arrows) or (down arrows) ensuring that the correct date is entered.
Step 7: Select the option ‘Confirm’, in order to apply the changes.
Loading the Action Replay Code Engine Having followed the previous sections, you are now ready to begin using the Action Replay Code Engine. In order to load the Action Replay
Code Engine each time you wish to use cheat codes, please follow these steps:
Step 1: Turn on your Wii console and load the Wii Menu.
Step 2: Select from the bottom Right of the Wii menu the option (Wii Message Board).
Step 3: Select from the bottom left of the message menu the option (Calendar).
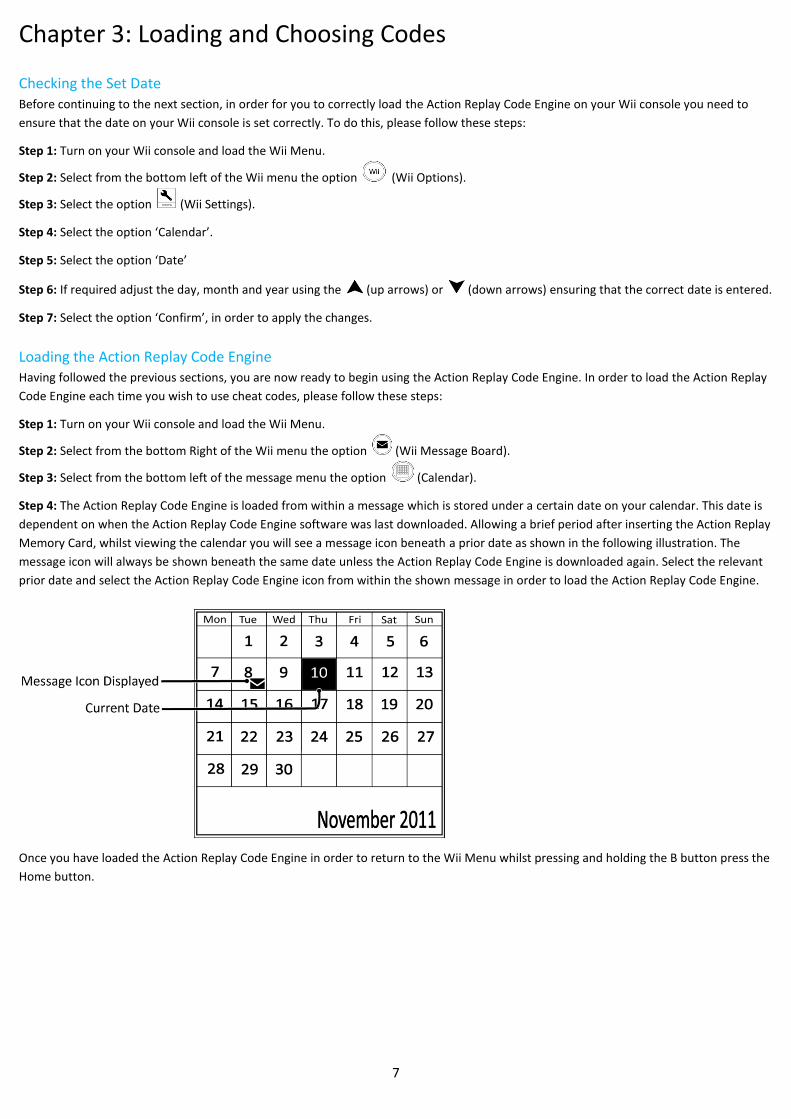
Step 4: The Action Replay Code Engine is loaded from within a message which is stored under a certain date on your calendar. This date is
dependent on when the Action Replay Code Engine software was last downloaded. Allowing a brief period after inserting the Action Replay
Memory Card, whilst viewing the calendar you will see a message icon beneath a prior date as shown in the following illustration. The
message icon will always be shown beneath the same date unless the Action Replay Code Engine is downloaded again. Select the relevant
prior date and select the Action Replay Code Engine icon from within the shown message in order to load the Action Replay Code Engine.
Once you have loaded the Action Replay Code Engine in order to return to the Wii Menu whilst pressing and holding the B button press the
Home button.
8
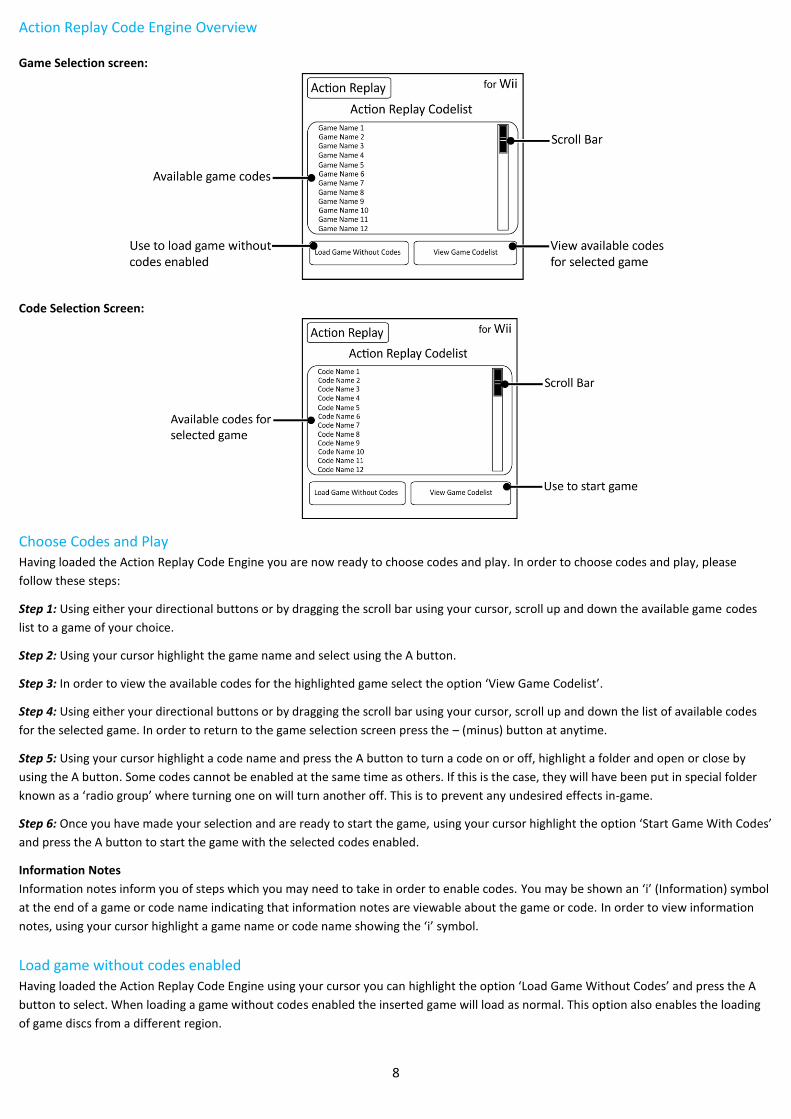
Action Replay Code Engine Overview
Game Selection screen:
Code Selection Screen:
Choose Codes and Play Having loaded the Action Replay Code Engine you are now ready to choose codes and play. In order to choose codes and play, please
follow these steps:
Step 1: Using either your directional buttons or by dragging the scroll bar using your cursor, scroll up and down the available game codes
list to a game of your choice.
Step 2: Using your cursor highlight the game name and select using the A button.
Step 3: In order to view the available codes for the highlighted game select the option ‘View Game Codelist’.
Step 4: Using either your directional buttons or by dragging the scroll bar using your cursor, scroll up and down the list of available codes
for the selected game. In order to return to the game selection screen press the – (minus) button at anytime.
Step 5: Using your cursor highlight a code name and press the A button to turn a code on or off, highlight a folder and open or close by
using the A button. Some codes cannot be enabled at the same time as others. If this is the case, they will have been put in special folder
known as a ‘radio group’ where turning one on will turn another off. This is to prevent any undesired effects in-game.
Step 6: Once you have made your selection and are ready to start the game, using your cursor highlight the option ‘Start Game With Codes’
and press the A button to start the game with the selected codes enabled.
Information Notes
Information notes inform you of steps which you may need to take in order to enable codes. You may be shown an ‘i’ (Information) symbol
at the end of a game or code name indicating that information notes are viewable about the game or code. In order to view information
notes, using your cursor highlight a game name or code name showing the ‘i’ symbol.
Load game without codes enabled
Having loaded the Action Replay Code Engine using your cursor you can highlight the option ‘Load Game Without Codes’ and press the A
button to select. When loading a game without codes enabled the inserted game will load as normal. This option also enables the loading
of game discs from a different region.

9
Updating the Action Replay Code Engine If you were to repeat the steps beneath the section ‘Registering and Downloading the Action Replay Code Engine’ see page ‘5’ you can
change the date which the Action Replay message icon is shown to a more recent date.
The latest codelist is downloadable from Datel’s website www.codejunkies.com. Insert the USB side of the Action Replay Memory Card in to a free USB connection on your computer and copy the downloadable codelist XML file to the root of your Action Replay Memory Card. Having transferred the latest codelist reinsert the Action Replay Memory Card in to your Wii console.
Pro Tip After loading the Action Replay Code Engine on your console it is possible to remove the Action Replay Memory Card and edit the XML (codelist) file. Having edited the XML file using your computer reinsert the Action Replay Memory Card in to your Wii console. In order to load the edited XML file, whilst pressing and holding the buttons 1 and 2 press the – (minus) button. You can also choose to edit the XML file using your computer before loading the Action Replay Code Engine, in which case the edited XML file is automatically loaded.
10
Chapter 4: Powersaves
What are Powersaves Powersaves are created exclusively by Datel’s team of professional gamers to give you the freedom to pick up your gaming just where and
how you want in your games. Preloaded on your Action Replay Memory Card is a selection of Powersaves ready for usage with your Wii
games. In order to use Powersaves with your Wii games you will need to copy the Powersaves of your choice from your Action Replay
Memory Card to your Wii consoles internal memory as detailed in the next section. Download additional Powersaves to your Action Replay
Memory Card using the media manager software as detailed on page ‘22’.
Using Powersaves with your Wii games In order to load Powersaves in your Wii games you need to copy the Powersaves from your Action Replay Memory Card to the Wii console
internal memory. In order to do this, please follow these steps:
Step 1: Connect your Action Replay Memory Card to your Wii Console (see page ‘6’).
Step 2: Turn on your Wii console and load the Wii Menu.
Step 3: Select from the bottom left of the Wii menu the option (Wii Options).
Step 4: Select the option (Data Management).
Step 5: Select the option (Save Data).
Step 6: Select the option (Wii).
Step 7: Ensuring that your Action Replay Memory Card is inserted into your Wii console, select the option ‘SD Card’.
Step 8: You are now presented with a list of the Powersaves stored on the Action Replay Memory Card. Select the Powersave you would
like to copy to the Wii console internal memory.
Step 9: Select the option ‘Copy’.
Step 10: Select the option ‘Yes’ to confirm the copy to the Wii internal memory.
After a brief period the chosen Powersave will be copied to the Wii internal memory and be ready for loading within the relevant game.
You must first play this game
When trying to copy a Powersave if you are informed that you must first play this game this may be due to a number of reasons. If you
have previously played the relevant game on your Wii console this is not the cause. The message may be reported if the Powersave is
intended for usage with a different region or release of the game.
Downloading Powersaves The Action Replay Memory Card is preloaded with a selection of Powersaves which you can use with your Wii games. In order to explore
and download additional Powersaves you will need to use the media manager software as detailed on page ‘22’.
What are Community Saves Community saves are game save files which have being uploaded by fellow users of the Wii Action Replay or the product Wii Max Media
Manager Pro PC software. In order to explore and download community saves you will need to use the media manager software as
detailed on page ‘23’.
11
Chapter 5: Media Manager Installation
Minimum System Requirements
To get maximum functionality out of the Media Manager, you need a set-up that meets the following minimum requirements:
Minimum System Requirements
Computer /
Processor
1GHz+ processor
Communication Internet connection (for CDDB look-up, gamesave downloading, product activation)
USB Port (USB 2.0 highly recommended)
Operating System Windows® XP Home or XP Pro, Windows® Vista™, Windows® 7
Memory 512Mb RAM
Install size: 10MB of free hard-disk space for program installation plus additional hard drive space for storing
media (Up to 2GB recommended for larger video files)
Display 800X600 SVGA or higher, True Colour
Drive CD-ROM drive (for installation and CD ripping)
Installation Insert the CD-ROM titled “Wii Powersaves” into your PC CD-ROM drive and wait a couple of seconds (if you have auto-run enabled) for the
installation to start. If you don’t have auto-run enabled, located the SETUP.EXE program on the CD and run it. Follow the on-screen
instructions to install the software to a location of your choice.
When you first run your PC application you’re asked whether you would like to look online for an upgraded version of the software. It’s
highly recommended that you do this, as new features and improved support for different file formats are being added all the time.
NOTE: Because the media manager for Wii can be improved and revised through this online update, you may find in the future that
functionality described in this manual becomes out of date. If this is ever the case, the new functionality will be covered in the ‘readme.txt’
file included with the new release.
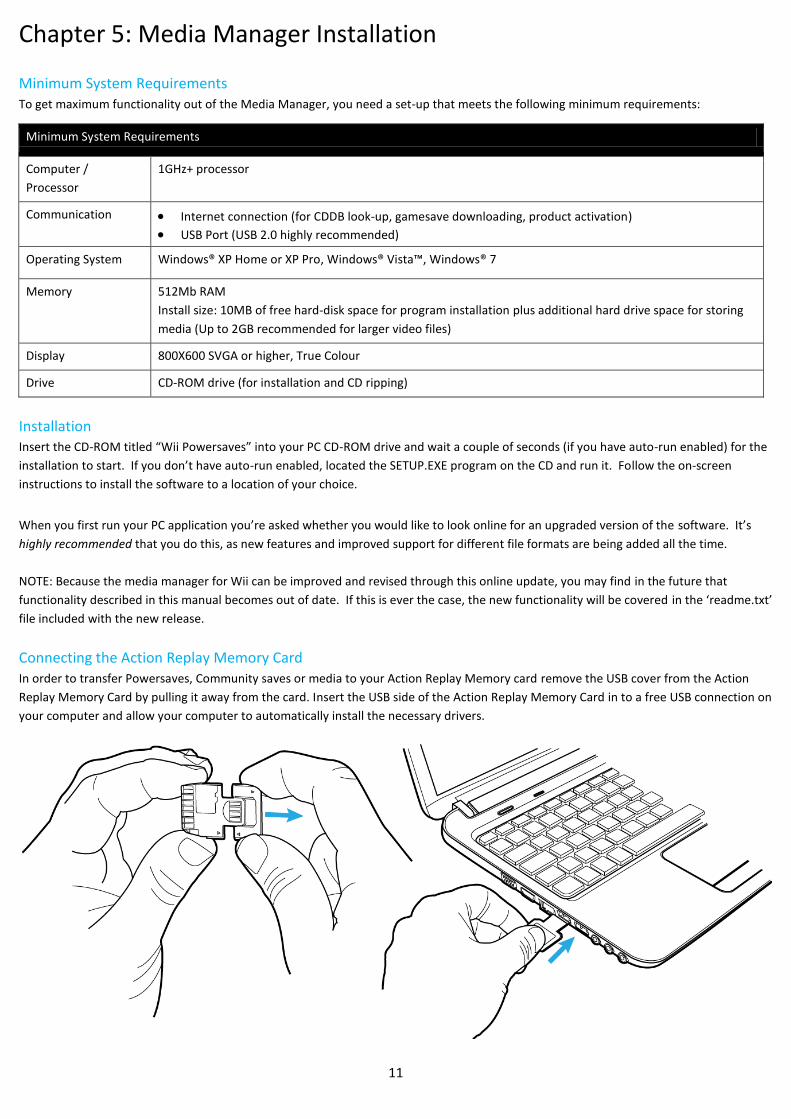
Connecting the Action Replay Memory Card
In order to transfer Powersaves, Community saves or media to your Action Replay Memory card remove the USB cover from the Action
Replay Memory Card by pulling it away from the card. Insert the USB side of the Action Replay Memory Card in to a free USB connection on
your computer and allow your computer to automatically install the necessary drivers.
12
Connecting your SD Memory Card Connect the SD Memory Card you would like to use with your Wii to your PC using a USB SD Memory Card Adapter (not included) and wait
a couple of seconds for Windows® to detect it. You may wish to use an SD memory card in place of your Action Replay Memory Card for
storing larger converted or compatible media files.
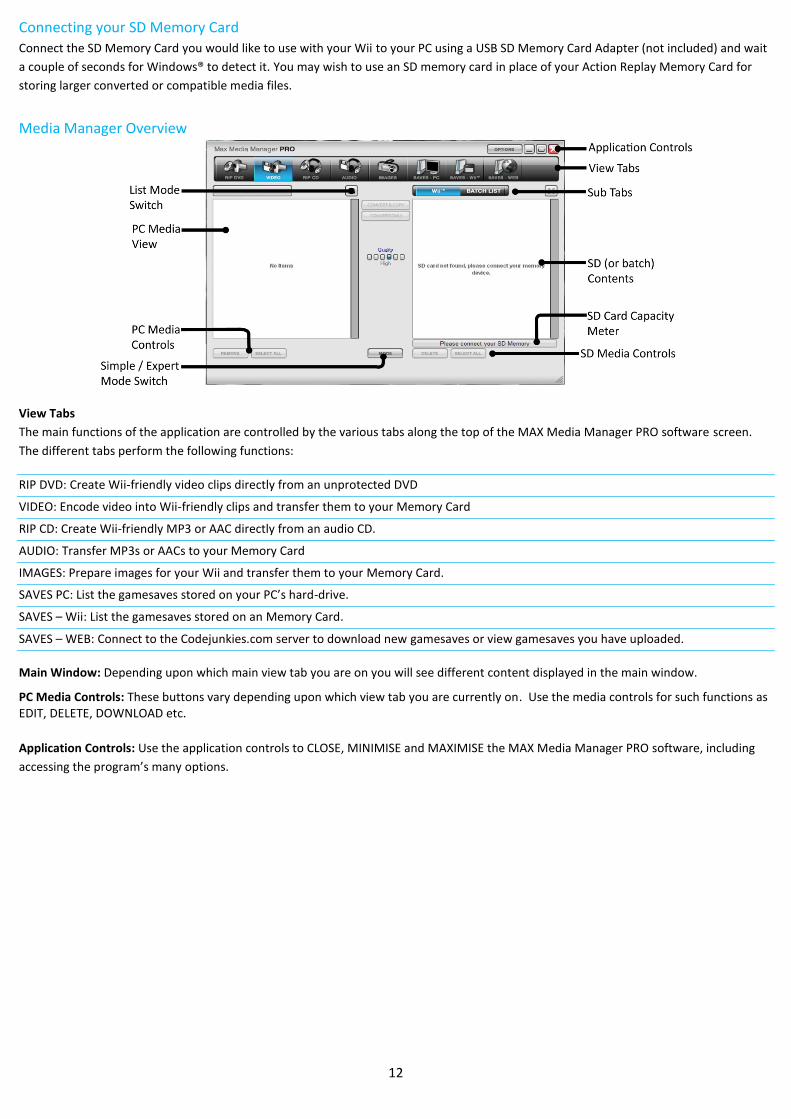
Media Manager Overview
View Tabs
The main functions of the application are controlled by the various tabs along the top of the MAX Media Manager PRO software screen.
The different tabs perform the following functions:
RIP DVD: Create Wii-friendly video clips directly from an unprotected DVD
VIDEO: Encode video into Wii-friendly clips and transfer them to your Memory Card
RIP CD: Create Wii-friendly MP3 or AAC directly from an audio CD.
AUDIO: Transfer MP3s or AACs to your Memory Card
IMAGES: Prepare images for your Wii and transfer them to your Memory Card.
SAVES PC: List the gamesaves stored on your PC’s hard-drive.
SAVES – Wii: List the gamesaves stored on an Memory Card.
SAVES – WEB: Connect to the Codejunkies.com server to download new gamesaves or view gamesaves you have uploaded.
Main Window: Depending upon which main view tab you are on you will see different content displayed in the main window.
PC Media Controls: These buttons vary depending upon which view tab you are currently on. Use the media controls for such functions as EDIT, DELETE, DOWNLOAD etc.
Application Controls: Use the application controls to CLOSE, MINIMISE and MAXIMISE the MAX Media Manager PRO software, including
accessing the program’s many options.
13
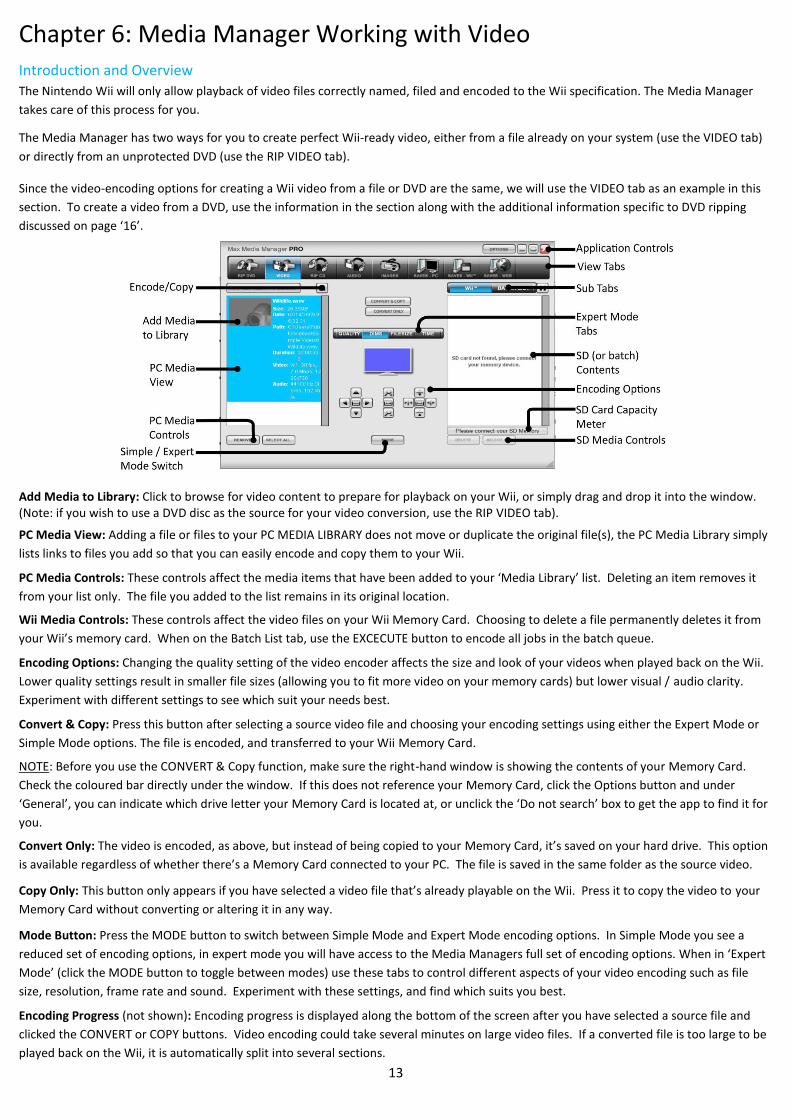
Chapter 6: Media Manager Working with Video
Introduction and Overview The Nintendo Wii will only allow playback of video files correctly named, filed and encoded to the Wii specification. The Media Manager
takes care of this process for you.
The Media Manager has two ways for you to create perfect Wii-ready video, either from a file already on your system (use the VIDEO tab)
or directly from an unprotected DVD (use the RIP VIDEO tab). Since the video-encoding options for creating a Wii video from a file or DVD are the same, we will use the VIDEO tab as an example in this
section. To create a video from a DVD, use the information in the section along with the additional information specific to DVD ripping
discussed on page ‘16’.
Add Media to Library: Click to browse for video content to prepare for playback on your Wii, or simply drag and drop it into the window. (Note: if you wish to use a DVD disc as the source for your video conversion, use the RIP VIDEO tab).
PC Media View: Adding a file or files to your PC MEDIA LIBRARY does not move or duplicate the original file(s), the PC Media Library simply
lists links to files you add so that you can easily encode and copy them to your Wii.
PC Media Controls: These controls affect the media items that have been added to your ‘Media Library’ list. Deleting an item removes it
from your list only. The file you added to the list remains in its original location.
Wii Media Controls: These controls affect the video files on your Wii Memory Card. Choosing to delete a file permanently deletes it from
your Wii’s memory card. When on the Batch List tab, use the EXCECUTE button to encode all jobs in the batch queue.
Encoding Options: Changing the quality setting of the video encoder affects the size and look of your videos when played back on the Wii.
Lower quality settings result in smaller file sizes (allowing you to fit more video on your memory cards) but lower visual / audio clarity.
Experiment with different settings to see which suit your needs best.
Convert & Copy: Press this button after selecting a source video file and choosing your encoding settings using either the Expert Mode or
Simple Mode options. The file is encoded, and transferred to your Wii Memory Card.
NOTE: Before you use the CONVERT & Copy function, make sure the right-hand window is showing the contents of your Memory Card.
Check the coloured bar directly under the window. If this does not reference your Memory Card, click the Options button and under
‘General’, you can indicate which drive letter your Memory Card is located at, or unclick the ‘Do not search’ box to get the app to find it for
you.
Convert Only: The video is encoded, as above, but instead of being copied to your Memory Card, it’s saved on your hard drive. This option
is available regardless of whether there’s a Memory Card connected to your PC. The file is saved in the same folder as the source video.
Copy Only: This button only appears if you have selected a video file that’s already playable on the Wii. Press it to copy the video to your
Memory Card without converting or altering it in any way.
Mode Button: Press the MODE button to switch between Simple Mode and Expert Mode encoding options. In Simple Mode you see a
reduced set of encoding options, in expert mode you will have access to the Media Managers full set of encoding options. When in ‘Expert
Mode’ (click the MODE button to toggle between modes) use these tabs to control different aspects of your video encoding such as file
size, resolution, frame rate and sound. Experiment with these settings, and find which suits you best.
Encoding Progress (not shown): Encoding progress is displayed along the bottom of the screen after you have selected a source file and
clicked the CONVERT or COPY buttons. Video encoding could take several minutes on large video files. If a converted file is too large to be
played back on the Wii, it is automatically split into several sections.
14
Simple Mode Part 1: About A quick and easy way to get perfectly good video onto your Wii is to use the Media Manager video encoding capabilities in Simple Mode.
In this mode, you can still set the encoding quality before converting your video.
Simple Mode Part 2: Choosing the Right Quality Setting The quality settings affect the amount of compression the Media Manager uses when it encodes the selected video files. Higher settings
(to the right) offer sharper, smoother video, but larger file sizes. Lower settings (to the left) give less sharp, lower-quality videos, but
smaller file sizes. Using a MEDIUM to HIGH setting usually produces an output file of good quality for a reasonable file size.
Results will vary from video to video based on the amount and type of movement in the source video so experiment with different settings
to find ones that work best.
Simple Mode Part 3: Encoding and Copying to your Memory Card To create your first Wii-ready video file from a video file you already have on your PC, follow these steps (see page ‘16’ for information on
what types of video make suitable source files):
1. Click the ADD NEW MEDIA TO LIBRARY button to browse for a video file to add. You can only add video file formats listed on page ‘16’.
2. Click on the video file in the PC Media Library window (the left-hand window) and then choose a Quality setting by clicking one of the six
‘Quality’ buttons in the centre of the screen.
3. To encode the video and transfer it directly to the Wii Memory Card, click the CONVERT & COPY button. If you would like to encode the
video but not transfer it immediately to the card, click the CONVERT button (this creates a copy in the same folder as the source movie and
lists the new outputted file in your PC Media Library). Videos that have been converted can be transferred to a Wii Memory Card at any
time (no further encoding will be required).
Once a video has been transferred to your Wii Memory Card, view it by transferring the card to your Wii, and from the main Wii menu, go
to Photo Channel. Press Start, then the SD Card button, and select the movie you want to watch.
If your encoded video has been split into sections, you can view them in sequence by selecting Slideshow.
15
Expert Mode Part 1: About When you click the MODE button on the VIDEO or DVD VIDEO tab you switch between Simple Mode and Expert Mode. When in Expert
Mode, you see a new set of sub-tabs appear in the middle of the screen with additional encoding settings available. The options of each of
these tabs are discussed below.
Expert Mode Part 2: Quality Settings Tab Options on this tab affect the quality of the video and audio channels of the output video file. The option ‘Keep Source’ retains the settings
already present in the video you’re converting.
Resolution: Pressing this button gives you a menu which allows you to select from a wide range of resolution options. You can choose your
resolution according to a percentage of the original source, screen size or aspect ratio.
Video Quality: This slider bar works in exactly the same way as the buttons described in Simple Mode. The higher the quality, the larger the
file.
Framerate: Again, this button gives you options to choose from. The greater the framerate, the smoother the movie, but the file size is
larger. By matching a PAL or NTSC framerate and resolution, you can convert a video file to PAL or NTSC respectively.
Sound: Choose between Stereo and Mono sound, and from a variety of quality settings. Where the sound coming from both channels is
predominantly the same, choosing Mono over Stereo will have little impact on reducing the size of the outputted file.
Expert Mode Part 3: Dimensions Tab (DIMS)
If the video you’re converting is off-centre, misaligned or zoomed in or out, you can correct this with the button marked ‘DIMMS’ (which is
short for ‘Dimensions’.
Position: Use the control arrows to change the position of the source file with relation to the output file. This can be useful for correcting
an off-centre source file or for eliminating subtitles or channel logos. Use the reset button in the centre to restore to default settings.
Zoom (middle): Use the zoom in and zoom out controls to magnify or shrink the source file with relation to the output file whilst
maintaining the aspect ratio. Use the reset button in the centre to restore to default settings.
Stretch / Shrink: Use the stretch and shrink controls to manually change the dimensions of the outputted file without linking those
dimensions to the aspect ratio of the source file. This can be useful for correcting files that have been encoded to a different video size
(widescreen, cinema screen etc) and have had their aspect ratio distorted.
Expert Mode Part 4: File Size Tab Choose this tab and press the Estimate Video Size button and the Media Manager estimates the eventual file size of the converted video,
based on the currently chosen settings. If this is larger than you would like, go back and alter a few settings to encode it smaller. If you can
afford it to be a little larger, increase the quality. It’s a great way of finding out how big a converted file will be before going through the
process of actually converting it.
Expert Mode Part 5: Time Tab
Use the Time tab if you would like to encode only part of the source movie, for instance if you would like to crop the credits from the start
or end. Use the up and down arrows for Start Time and End Time to control Hours, Minutes, Seconds and even Frames.
The Media Manager will show you the total length of your output file after your changes.
16
DVD Ripping Specific Information Part 1: About If you would like to generate a Wii-compatible video directly from a DVD, first ensure the DVD is not CSS protected (the law prevents us
from allowing you to RIP DVD video to a file, even if you own the DVD, if it is protected using CSS).
If the DVD isn’t protected, insert it into your DVD drive and click on the ‘RIP DVD’ tab. On the tab, you might find the DVD has been
automatically detected (you see the files listed in the left-hand window). Otherwise, click the Browse button above the window (the one
with three dots on it) to choose your DVD drive manually. After doing this, you may need to click Refresh for the DVD contents to be
displayed.
DVD Ripping Specific Information Part 2: Choosing the Right Files When DVD has been read in, you see a list of the video files on the disc displayed in the left-hand window.
The Media Manager will try to understand the disc and automatically select the parts of the disc containing the actual feature film (not the
menus) however, you can also select which files to encode manually.
Alongside the filenames (Video 1, Video 2 etc) you see the durations of the videos on the disc displayed. Use these to identify the sections
of the DVD you wish to convert. For example, most DVDs include a number of menu files (which will appear in the list as very short videos).
Typically you would choose to not convert those, leaving you with 1-4 large files selected.
When you have made your selection of source files, use the Simple Mode or Expert Mode encoding options to create the perfect Wii video
file for your needs (see earlier in this chapter).
NOTE: When the Media Manager encounters multiple files for encoding from a DVD, it will automatically ‘stitch’ the movie files back
together to create one continuous output file.
Suitable Source Media The following types of video file are accepted source media for the Media Manager software:
AVI
MPG / MPEG
VOB (DVD)
WMV 1&2
MOV
MPE
3GP
MP4
We are always looking to expand our support for new file types, so ensure you have the latest version of the software for the maximum
support.
Batch List Encoding
If you have a large number of files that you would like encode and copy to your Memory Card, the Media Manager includes a ‘Batch List’
mode where you can add encoding jobs to a list (rather than encode immediately) ready for you to execute when you are ready (like when
you are not using your PC).
To create batch jobs, use the Media Manager in the normal way but set the sub tab on the VIDEO or DVD VIDEO tab to BATCH LIST rather
than Wii. In this mode, when you click the CONVERT & COPY button, the job, with all its parameters will be added to the batch list window
awaiting execution.
When you have built up your batch list and would like to begin encoding, click the EXECUTE button below the batch list. The Media
Manager will now encode all the jobs in the list, using the individual settings specified.
17
Chapter 7: Media Manager Working with Music
Introduction and Overview
Use the Media Manager to copy MP3s or AACs from your computer to your Wii by clicking on the AUDIO tab. If you would like to create
MP3s or ACCs for playback on your Wii directly from an audio CD, use the RIP CD tab (see page ‘18’).
Adding MP3s or AACs
Click ‘Add new media to library’ to open a file browse dialogue box which allows you to search your computer for MP3 or AAC files. You
can also open a ‘My Computer’ window and use that to drag and drop files into the PC Media View from where they can be added to your
Wii Memory Card.
Highlight one or more files in the PC Media View (use CTRL+ click to highlight multiple files) and then click the ‘Copy’ button to transfer
them to your Memory Card.
Keep an eye on the Capacity Meter underneath the Wii Contents window to see how much space you have free for adding MP3s or AACs to
your Wii Memory Card. If you want more space for MP3s or AACs, try using the Media Manager to delete other files from your card, like
videos, game-saves or images.
Deleting MP3s or AACs Highlight files in the Wii Contents window and click the Delete button to remove them from your Memory Card and free up more space for
other MP3s, AACs or files like game-saves or videos.
18
Ripping CDs Part 1: About
If you would like to listen to tracks from a CD you own on your Wii, click on the RIP CD tab at the top of the screen.
Insert your audio CD in your CD ROM drive and wait a few seconds. The Media Manager may detect the CD automatically, if not, click the
REFRESH button to index the CD.
Ripping CDs Part 2: CDDB Lookup The Media Manager includes the ability to connect to a CD Database to automatically retrieve and name the tracks on your CD (this will
only work on commercially available CDs, not home compilations). If you have an active Internet connection, you will see the names of the
tracks on your CD alongside their track number in the main window.
Ripping CDs Part 3: Selecting Tracks and Ripping Use the check boxes alongside each track to choose which tracks to convert and copy to your Wii Memory Card. When you are ready,
choose either TO PC (to copy the track to the location on your PC specified in the FOLDERS tab of the OPTIONS menu) or TO SD to put the
MP3s or AACs directly onto your Wii Memory Card. You can also use this screen to play the tracks on your PC, or rename them before
ripping; just use the respective buttons next to each track in the list.
Ripping CDs Part 4: Recording Options To the right of the window displaying the CD tracks are the Recording Options, which function as follows:
AAC Audio: By checking the box you can choose to convert audio tracks to the audio format AAC (required for Wii Photo Channel v1.1+).
VBR Encoding: By checking or unchecking the box, you can turn on or off the VBR (Variable BitRate) Encoding. This option lowers the
encoding rate when there’s very little going on during an MP3 or AAC track, so it reduces the resulting file size with little or no drop in
quality. Ripping the tracks takes a little longer when it’s activated, though.
Audio Sample Rate: You can set the audio sample encoding rate with the slider. The higher the encoding rate, the better the MP3 or AAC
sounds, but the larger the file size.
Destination: Click here to choose or create the destination folder for when you rip your CDs to your PC’s hard drive.
Use the capacity meter to ensure you have sufficient space on your Wii for the tracks you wish to rip.
Playing Back your MP3s or ACCs on your Wii Because the Nintendo Wii lacks a dedicated music player, the only way to play back MP3s or ACCs is to use them as the background to a
slideshow. Simply put the MP3s or AACs you wish to play in a folder on your Memory Card, and add one or more jpegs. Transfer the card to
your Wii, and from the opening screen, go into Photo Channel, and watch the jpeg you put in the folder with your MP3s as a slideshow.
When in Slideshow Mode, select Settings to choose the background tunes, which can be one or all of the MP3s or ACCs stored in the folder
with the jpeg.
If you select to play all your MP3s or AACs, it will play them in the order in which they appear in the folder. If you want to play them in a
specific order, edit the file names by adding ‘01’ to the first track you wish to hear, ‘02’ to the second, etc.
The Wii Photo Channel version 1.1 and above does not support MP3 files and instead supports the audio format AAC. The Media Manager
for Wii does not convert files from audio formats such as mp3, aac, ogg vorbis or flac. In order to do this, you must use a separate audio
converter (not supplied).
19
Chapter 8: Media Manager Working with Images
Introduction and Overview Your Wii is ideal for showing off your digital pictures in the comfort of your living room, so why not use the Media Manager to copy them
from your PC to your Wii Memory Card?
The Wii requires your images to be in JPG format (native format for most digital cameras).
Copy Options Before you click the COPY button, choose which (if any) of the Media Managers re-sampling options you would like to apply to your
images. These options automatically resize your images to get the best picture quality in the smallest file size (which also makes them
quicker to load on the Wii).
Straight Copy: This will leave your original image as it is. Using this option, if the image you copy is larger than your TV screen, you can use
the Wii to zoom in on the image to see additional detail. File sizes may be large using this setting, and loading times slow.
Copy and Strech to 16:9: This option stretches your image so that it’s the same aspect ratio a widescreen television. This option avoids
wasted space at the edge of the screen, but causes distortion in your images as they’re stretched to fit.
Copy and Limit Size 800x600: If your images are considerably bigger than your TV screen, you can use these options to reduce the size to a
more appropriate level. Not only does this save space on your Memory Card, it also means you can display the whole image on the screen
without shrinkage, making loading faster. An 800x600 ratio is ideal for small TVs.
Copy and Limit Size 1600x1200: As above, but a size setting of 1600x1200 for larger TV screens.
Transferring your Images Click ‘Add new media to library’ to open a file browse dialogue box which allows you to browse your computer for image files. You can also
open a ‘My Computer’ window and use that to drag-and-drop files into the PC Media View from where they can be added to your Wii’s
Memory Card.
Highlight one or more files in the PC Media View (use CTRL+ click to highlight multiple files) and then click the ‘Copy’ button to transfer
them to your card.
Keep an eye on the Capacity Meter underneath the Wii Contents window to see how much space you have free for adding images to your
card. If you want more space for images, try deleting other files from your Wii’s Memory Card like videos, game-saves or MP3s.
Deleting Images Highlight files in the Wii Contents window and click the Delete button to remove them from your Memory Card and free up more space for
other images or files like game-saves or videos.
20
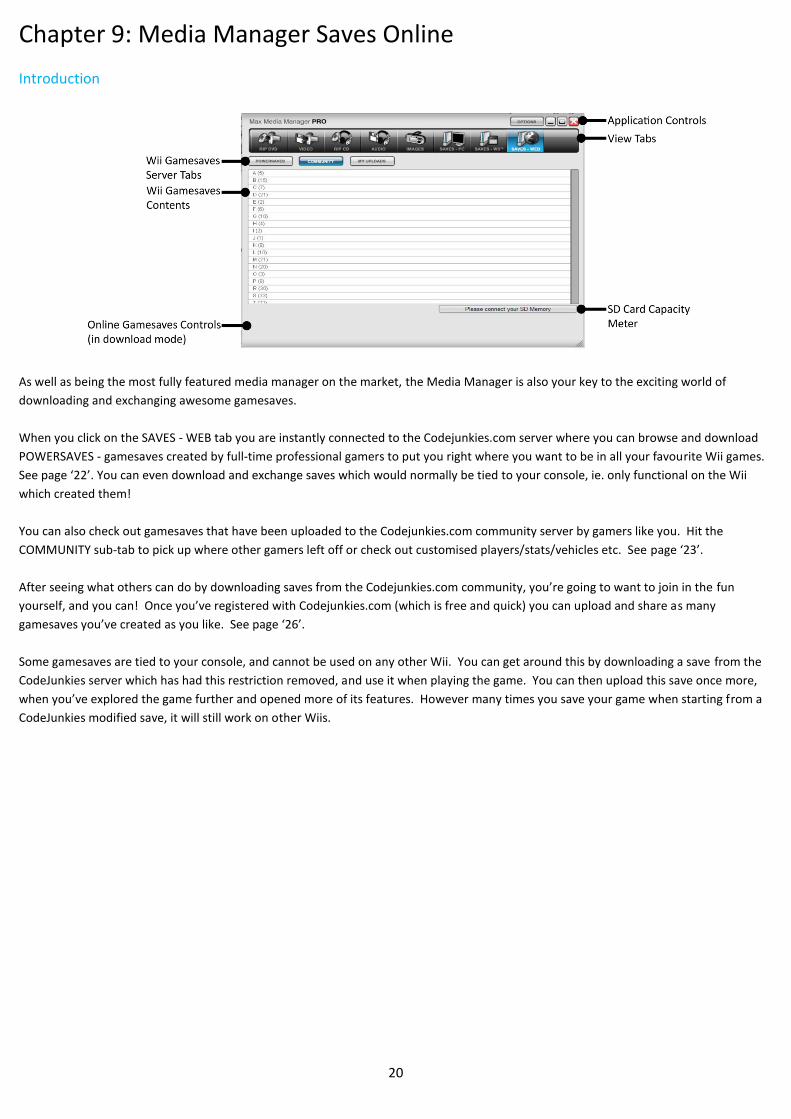
Chapter 9: Media Manager Saves Online
Introduction
As well as being the most fully featured media manager on the market, the Media Manager is also your key to the exciting world of
downloading and exchanging awesome gamesaves.
When you click on the SAVES - WEB tab you are instantly connected to the Codejunkies.com server where you can browse and download
POWERSAVES - gamesaves created by full-time professional gamers to put you right where you want to be in all your favourite Wii games.
See page ‘22’. You can even download and exchange saves which would normally be tied to your console, ie. only functional on the Wii
which created them!
You can also check out gamesaves that have been uploaded to the Codejunkies.com community server by gamers like you. Hit the
COMMUNITY sub-tab to pick up where other gamers left off or check out customised players/stats/vehicles etc. See page ‘23’.
After seeing what others can do by downloading saves from the Codejunkies.com community, you’re going to want to join in the fun
yourself, and you can! Once you’ve registered with Codejunkies.com (which is free and quick) you can upload and share as many
gamesaves you’ve created as you like. See page ‘26’.
Some gamesaves are tied to your console, and cannot be used on any other Wii. You can get around this by downloading a save from the
CodeJunkies server which has had this restriction removed, and use it when playing the game. You can then upload this save once more,
when you’ve explored the game further and opened more of its features. However many times you save your game when starting from a
CodeJunkies modified save, it will still work on other Wiis.
21
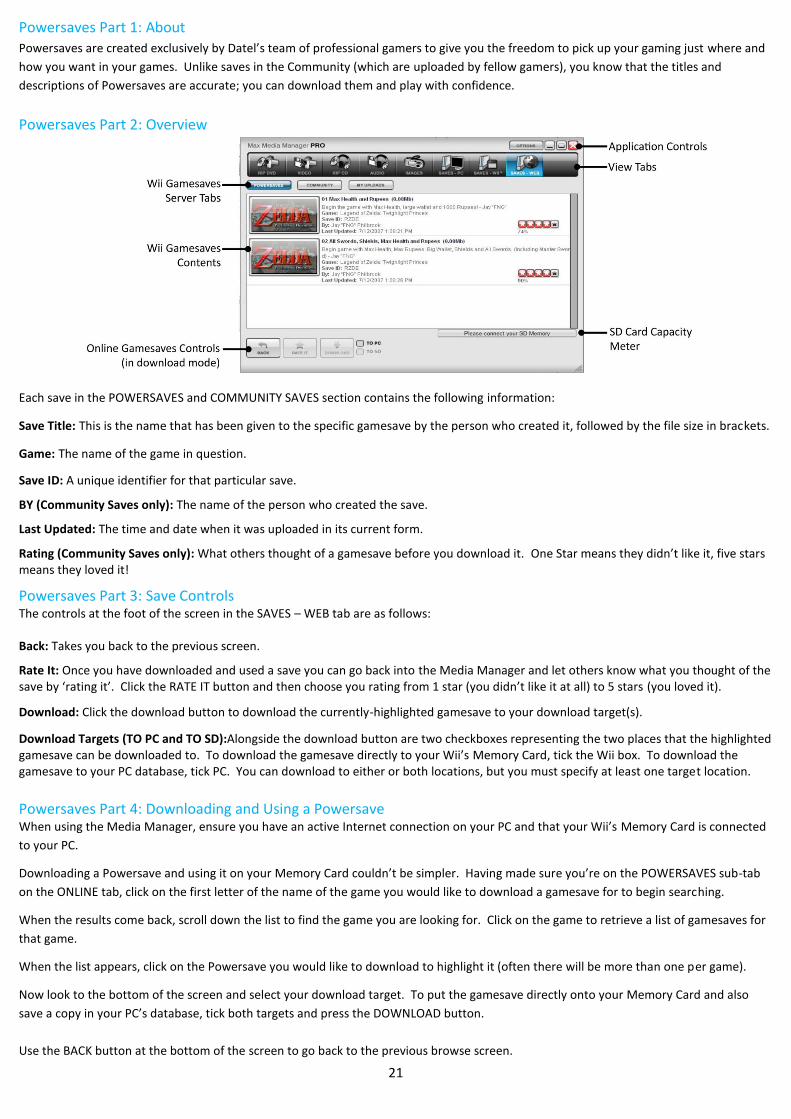
Powersaves Part 1: About Powersaves are created exclusively by Datel’s team of professional gamers to give you the freedom to pick up your gaming just where and
how you want in your games. Unlike saves in the Community (which are uploaded by fellow gamers), you know that the titles and
descriptions of Powersaves are accurate; you can download them and play with confidence.
Powersaves Part 2: Overview
Each save in the POWERSAVES and COMMUNITY SAVES section contains the following information:
Save Title: This is the name that has been given to the specific gamesave by the person who created it, followed by the file size in brackets.
Game: The name of the game in question.
Save ID: A unique identifier for that particular save.
BY (Community Saves only): The name of the person who created the save.
Last Updated: The time and date when it was uploaded in its current form.
Rating (Community Saves only): What others thought of a gamesave before you download it. One Star means they didn’t like it, five stars means they loved it!
Powersaves Part 3: Save Controls The controls at the foot of the screen in the SAVES – WEB tab are as follows: Back: Takes you back to the previous screen.
Rate It: Once you have downloaded and used a save you can go back into the Media Manager and let others know what you thought of the save by ‘rating it’. Click the RATE IT button and then choose you rating from 1 star (you didn’t like it at all) to 5 stars (you loved it).
Download: Click the download button to download the currently-highlighted gamesave to your download target(s).
Download Targets (TO PC and TO SD):Alongside the download button are two checkboxes representing the two places that the highlighted gamesave can be downloaded to. To download the gamesave directly to your Wii’s Memory Card, tick the Wii box. To download the gamesave to your PC database, tick PC. You can download to either or both locations, but you must specify at least one target location.
Powersaves Part 4: Downloading and Using a Powersave When using the Media Manager, ensure you have an active Internet connection on your PC and that your Wii’s Memory Card is connected
to your PC.
Downloading a Powersave and using it on your Memory Card couldn’t be simpler. Having made sure you’re on the POWERSAVES sub-tab
on the ONLINE tab, click on the first letter of the name of the game you would like to download a gamesave for to begin searching.
When the results come back, scroll down the list to find the game you are looking for. Click on the game to retrieve a list of gamesaves for
that game.
When the list appears, click on the Powersave you would like to download to highlight it (often there will be more than one per game).
Now look to the bottom of the screen and select your download target. To put the gamesave directly onto your Memory Card and also
save a copy in your PC’s database, tick both targets and press the DOWNLOAD button.
Use the BACK button at the bottom of the screen to go back to the previous browse screen.
22
Community Part 1: About Clicking on the COMMUNITY server tab sets the Media Manager to display gamesaves that have been uploaded by fellow Media Manager
users. If you upload a gamesave using the Media Manager, this is where it will appear!
Community Part 2: Overview Much of the functionality for the COMMUNITY server screen is the same as the POWERSAVES tab (see earlier in this section), however, particular to this tab are: Created By: Because saves in the COMMUNITY have been uploaded by gamers just like yourself, when they are listed they always include a credit to the person who uploaded them.
Ratings: To help reward people who upload the best saves to the community and help users decide which saves to download a ratings
system is in place for all user-uploaded saves. You can rate every save on Codejunkies.com to help other Media Manager users decide
which saves to download but remember: ONLY RATE SAVES YOU HAVE DOWNLOADED AND TRIED. There is no point in rating a save that
you have not tried.
To rate a save (after you have downloaded and tested it), find it listed in the community and click to highlight it before clicking on the RATE
IT button at the bottom of the screen. You can only rate each save once.
Community Part 3: Downloading and Using a Community Save To upload a gamesave to the community server, you need to be registered with Codejunkies.com. Follow the link from the options
dialogue to sign up (it’s quick and free).
To upload a gamesave you have created, you first need the gamesave to be in your PC Database. To do this follow the instructions on page
‘26’, ‘Saves on your Wii Memory Card Part 2: Copying Saves to your PC Database’.
Once the gamesave is stored in your PC Database, correctly named and described, click on PC DATABASE tab and find the gamesave. To
upload the gamesave follow the instructions on page ‘26’, ‘Uploading a Save to the Community Part 2: Upload Your Gamesave’.
My Uploads Part 1: About My Uploads is your way to view, edit, delete and download gamesaves that you have uploaded to the server.
You will only see any content if you have uploaded saves to the community (see section page ‘26’, Uploading a Save to the Community Part
1: Getting Started).
If you have uploaded one or more gamesaves, you can use this sub-tab to keep your gamesaves up to date (for instance, if you keep
improving a gamesave) or to edit the save name or description to make them more helpful to other users.
You should also try to delete gamesaves that you have replaced or that you no longer wish to list in the community. This helps to keep the
content fresh for other users and ensure that only the best saves are shared online.
My Uploads Part 2: Overview
Much of the functionality for the COMMUNITY server screen is the same as the POWERSAVES tab (see earlier in this section), however,
particular to this tab is:
Date Added: Look at the date added to identify different versions of saves you have uploaded.
Delete: Because the gamesaves shown on this sub-tab were uploaded by you, you will see a delete button at the bottom of the screen. Ratings: Use the ratings on your gamesaves to see how popular your gamesaves have been. This can help you make your gamesaves even more popular in future by enabling you to see which types of gamesaves people like the most!
My Uploads Part 3: Deleting an Upload To delete a gamesave you have uploaded to the community, highlight the gamesave you would like to remove by clicking on it then press
the delete button at the bottom of the screen. You will be asked to confirm this action before the save is actually removed.
23
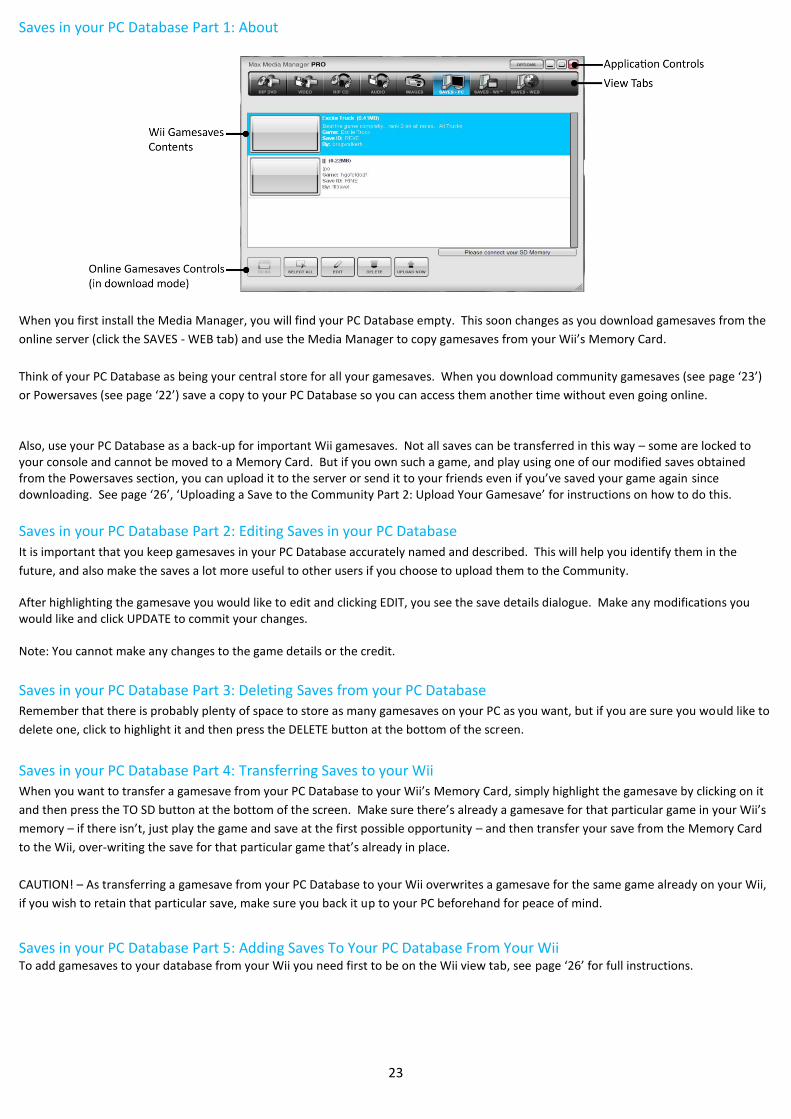
Saves in your PC Database Part 1: About
When you first install the Media Manager, you will find your PC Database empty. This soon changes as you download gamesaves from the
online server (click the SAVES - WEB tab) and use the Media Manager to copy gamesaves from your Wii’s Memory Card.
Think of your PC Database as being your central store for all your gamesaves. When you download community gamesaves (see page ‘23’)
or Powersaves (see page ‘22’) save a copy to your PC Database so you can access them another time without even going online.
Also, use your PC Database as a back-up for important Wii gamesaves. Not all saves can be transferred in this way – some are locked to your console and cannot be moved to a Memory Card. But if you own such a game, and play using one of our modified saves obtained from the Powersaves section, you can upload it to the server or send it to your friends even if you’ve saved your game again since downloading. See page ‘26’, ‘Uploading a Save to the Community Part 2: Upload Your Gamesave’ for instructions on how to do this.
Saves in your PC Database Part 2: Editing Saves in your PC Database
It is important that you keep gamesaves in your PC Database accurately named and described. This will help you identify them in the
future, and also make the saves a lot more useful to other users if you choose to upload them to the Community.
After highlighting the gamesave you would like to edit and clicking EDIT, you see the save details dialogue. Make any modifications you would like and click UPDATE to commit your changes. Note: You cannot make any changes to the game details or the credit.
Saves in your PC Database Part 3: Deleting Saves from your PC Database Remember that there is probably plenty of space to store as many gamesaves on your PC as you want, but if you are sure you would like to
delete one, click to highlight it and then press the DELETE button at the bottom of the screen.
Saves in your PC Database Part 4: Transferring Saves to your Wii When you want to transfer a gamesave from your PC Database to your Wii’s Memory Card, simply highlight the gamesave by clicking on it
and then press the TO SD button at the bottom of the screen. Make sure there’s already a gamesave for that particular game in your Wii’s
memory – if there isn’t, just play the game and save at the first possible opportunity – and then transfer your save from the Memory Card
to the Wii, over-writing the save for that particular game that’s already in place.
CAUTION! – As transferring a gamesave from your PC Database to your Wii overwrites a gamesave for the same game already on your Wii,
if you wish to retain that particular save, make sure you back it up to your PC beforehand for peace of mind.
Saves in your PC Database Part 5: Adding Saves To Your PC Database From Your Wii To add gamesaves to your database from your Wii you need first to be on the Wii view tab, see page ‘26’ for full instructions.

24
Uploading a Save to the Community Part 1: Getting Started When you’ve made a gamesave that you’d like to share with the community, the first step is to make sure it’s in your PC Database. Follow
the steps described in on page ‘25’ under the section ‘Saves on your Wii Memory Card Part 2: Copying Saves to your PC Database’.
The next step is to find the save in your PC Database (click onto the PC DATABASE tab on the view tabs). Make sure you have filled out all
the relevant details for your gamesave so that other users know exactly what your gamesave includes, where it puts them, etc. If you want
to modify the details do so now (see page ‘24’ for instructions).
Next, make sure you have entered your Codejunkies.com username and password into the Media Manager options screen. If you have not
already got a Codejunkies.com username and password, go to the options screen and follow the link to the Codejunkies.com registration
page. Registration is quick and free, and just allows us to prevent spamming of the server.
Uploading a Save to the Community Part 2: Upload Your Gamesave
Once you have completed the steps described simply highlight the save and click the UPLOAD button.
You will see a progress bar (at the bottom of the screen) display the status of the upload. Once complete, switch to the MY UPLOADS (see
page ‘23’) to see your gamesave live on the server. You can even look on the community (see page ‘23’) to see your gamesave as others
would.
Saves on your Wii Memory card Part 1: Introduction and Overview
When you click on the SAVES - WII tab-view, you are looking at the gamesaves you currently have on your Wii Memory Card. The
information about the gamesaves is limited to the icon image, the region, the game ID and the date and size.
Additional information such as save titles and description (as seen on the Online and PC Database tabs) are not compatible with the Wii
and as such are no longer visible.
Saves on your Wii Memory card Part 2: Copying Saves to your PC Database To transfer gamesaves from your Memory Card to your PC Database, first highlight the save or saves you would like to copy. You can select
multiple files by using your keyboards ‘CTRL’ key when you click your mouse or by clicking the SELECT ALL button on the Media Manager
interface.
Once you have made your selection, click the TO PC button on the interface.
For each game-save you selected, you will then be asked to complete the FILE DETAILS dialogue. This is so you will be able to identify
exactly what the save does amidst your growing collection. Once you have completed the save details dialogue for each save, you can
switch to your PC Database view where the saves will be visible.
Saves on your Wii Memory card Part 3: Deleting Saves
To delete a save or saves on your Memory Card, simply highlight them (use CTRL and click or SELECT ALL for multiple saves) and then press
the DELETE button underneath the Wii contents window.
WARNING: Deleting a game save is permanent, and cannot be undone.
25
Options Screen Part 1: About Click the OPTIONS button on the top bar to access the options screen.
You will see four tabs relating to settings for different aspects of the Media Manager.
Options Screen Part 2: General Use this tab to specify the drive letter for your Memory Card (if it cannot be automatically detected) and check for online updates.
Check for Updates: The current version of your Media Manager software is shown here. You may need this when speaking to Datel
technical support. You should keep the Media Manager software up to date by downloading new versions when they become available.
The Media Manager should automatically notify you when new updates are available, but if not, you can manually check for and download
updates by clicking the UPDATE NOW button.
Device Drive: On certain PC configurations it may be necessary to tell your Media Manager software which drive letter the Wii’s Memory
Card is on (for instance, if you have another USB storage device present). If this is the case, tick the box that says ‘DO NOT SEARCH’, and
then choose the drive letter for the Memory Card in the drive letter selector.
If you are not sure which drive letter your card is, connect your Memory Card to your PC (using the supplied USB lead) and open ‘My
Computer’. Look at the drives listed under ‘Devices with Removable Storage’. You should see something like ‘Removable Drive (F)’.
Options Screen Part 3: Gamesaves Use this tab to enter your Codejunkies registration details (required for uploading), check your product license number and filter your
gamesave content.
Username: The username you chose when you registered on Codejunkies.com
Password: The password you chose when you registered on Codejunkies.com
License Key: This is the license key supplied with your Action Replay product. Enter it here.
Region Filter: This is where you set the default region of your Media Manager software. The Media Manager can connect to up to three
databases, USA, EUROPE and JAPAN. Whenever you browse Powersaves, Community saves or upload your own gamesaves, you will be
connected to the database you specify with these checkboxes.
If you own games from one region only, eg. USA, then you need only tick the USA checkbox. You will subsequently always be connected
your chosen server. However, if you own games from different regions (for instance Japanese import games) then you should change the
region setting accordingly depending upon which gamesaves you are looking for (or uploading).
Choosing ALL will show you gamesaves from all the regions. If you select this option, pay attention to the region of gamesaves you intend
to download to ensure they are for the same region as the game you own.
Options Screen Part 4: Folders Choose where you would like to store MP3s or AACs generated by CD ripping on your PC.
26
Technical Support and Customer Services Before contacting Datel’s customer service department, please ensure that you have read through and understood the information in this user guide. Please ensure that you have information on when and where you purchased this product to hand.
Datel Customer Services USA ATTN: Customer Services, Datel Design & Development Inc 33 North Garden Avenue, Suite 900, Clearwater, FL 33755 UNITED STATES
Email: [email protected] Web: http://us.codejunkies.com/support Datel Customer Services Europe
Customers Services, Datel Ltd
Stafford Road, Stone, STAFFS, ST15 0DG
UNITED KINGDOM
Email: [email protected]
Web: http://uk.codejunkies.com
© 2012 Datel Ltd. Action Replay is a trademark of Datel Ltd. Action Replay™ for Nintendo® Wii™ is a 100% unofficial product and is NOT sponsored, endorsed or approved by Nintendo®, nor any games developer or publisher. Wii, DS and GBA are trademarks or registered trademarks of NINTENDO in the United States and/or other countries.