ACS Express 5 0 1 User Guide
142
Americas Headquarters Cisco Systems, Inc. 170 West Tasman Drive San Jose, CA 95134-1706 USA http://www.cisco.com Tel: 408 526-4000 800 553-NETS (6387) Fax: 408 527-0883 User Guide for the Cisco Secure ACS Express 5.0.1 August 2009 Customer Order Number: Text Part Number: OL-20148-01
Transcript of ACS Express 5 0 1 User Guide

User Guide for the Cisco Secure ACS Express 5.0.1August 2009
Americas HeadquartersCisco Systems, Inc.170 West Tasman DriveSan Jose, CA 95134-1706 USAhttp://www.cisco.comTel: 408 526-4000
800 553-NETS (6387)Fax: 408 527-0883
Customer Order Number: Text Part Number: OL-20148-01

THE SPECIFICATIONS AND INFORMATION REGARDING THE PRODUCTS IN THIS MANUAL ARE SUBJECT TO CHANGE WITHOUT NOTICE. ALL STATEMENTS, INFORMATION, AND RECOMMENDATIONS IN THIS MANUAL ARE BELIEVED TO BE ACCURATE BUT ARE PRESENTED WITHOUT WARRANTY OF ANY KIND, EXPRESS OR IMPLIED. USERS MUST TAKE FULL RESPONSIBILITY FOR THEIR APPLICATION OF ANY PRODUCTS.
THE SOFTWARE LICENSE AND LIMITED WARRANTY FOR THE ACCOMPANYING PRODUCT ARE SET FORTH IN THE INFORMATION PACKET THAT SHIPPED WITH THE PRODUCT AND ARE INCORPORATED HEREIN BY THIS REFERENCE. IF YOU ARE UNABLE TO LOCATE THE SOFTWARE LICENSE OR LIMITED WARRANTY, CONTACT YOUR CISCO REPRESENTATIVE FOR A COPY.
The Cisco implementation of TCP header compression is an adaptation of a program developed by the University of California, Berkeley (UCB) as part of UCB’s public domain version of the UNIX operating system. All rights reserved. Copyright © 1981, Regents of the University of California.
NOTWITHSTANDING ANY OTHER WARRANTY HEREIN, ALL DOCUMENT FILES AND SOFTWARE OF THESE SUPPLIERS ARE PROVIDED “AS IS” WITH ALL FAULTS. CISCO AND THE ABOVE-NAMED SUPPLIERS DISCLAIM ALL WARRANTIES, EXPRESSED OR IMPLIED, INCLUDING, WITHOUT LIMITATION, THOSE OF MERCHANTABILITY, FITNESS FOR A PARTICULAR PURPOSE AND NONINFRINGEMENT OR ARISING FROM A COURSE OF DEALING, USAGE, OR TRADE PRACTICE.
IN NO EVENT SHALL CISCO OR ITS SUPPLIERS BE LIABLE FOR ANY INDIRECT, SPECIAL, CONSEQUENTIAL, OR INCIDENTAL DAMAGES, INCLUDING, WITHOUT LIMITATION, LOST PROFITS OR LOSS OR DAMAGE TO DATA ARISING OUT OF THE USE OR INABILITY TO USE THIS MANUAL, EVEN IF CISCO OR ITS SUPPLIERS HAVE BEEN ADVISED OF THE POSSIBILITY OF SUCH DAMAGES.
CCDE, CCENT, CCSI, Cisco Eos, Cisco HealthPresence, Cisco IronPort, the Cisco logo, Cisco Nurse Connect, Cisco Pulse, Cisco SensorBase, Cisco StackPower, Cisco StadiumVision, Cisco TelePresence, Cisco Unified Computing System, Cisco WebEx, DCE, Flip Channels, Flip for Good, Flip Mino, Flipshare (Design), Flip Ultra, Flip Video, Flip Video (Design), Instant Broadband, and Welcome to the Human Network are trademarks; Changing the Way We Work, Live, Play, and Learn, Cisco Capital, Cisco Capital (Design), Cisco:Financed (Stylized), Cisco Store, Flip Gift Card, and One Million Acts of Green are service marks; and Access Registrar, Aironet, AllTouch, AsyncOS, Bringing the Meeting To You, Catalyst, CCDA, CCDP, CCIE, CCIP, CCNA, CCNP, CCSP, CCVP, Cisco, the Cisco Certified Internetwork Expert logo, Cisco IOS, Cisco Lumin, Cisco Nexus, Cisco Press, Cisco Systems, Cisco Systems Capital, the Cisco Systems logo, Cisco Unity, Collaboration Without Limitation, Continuum, EtherFast, EtherSwitch, Event Center, Explorer, Follow Me Browsing, GainMaker, iLYNX, IOS, iPhone, IronPort, the IronPort logo, Laser Link, LightStream, Linksys, MeetingPlace, MeetingPlace Chime Sound, MGX, Networkers, Networking Academy, PCNow, PIX, PowerKEY, PowerPanels, PowerTV, PowerTV (Design), PowerVu, Prisma, ProConnect, ROSA, SenderBase, SMARTnet, Spectrum Expert, StackWise, WebEx, and the WebEx logo are registered trademarks of Cisco Systems, Inc. and/or its affiliates in the United States and certain other countries.
All other trademarks mentioned in this document or website are the property of their respective owners. The use of the word partner does not imply a partnership relationship between Cisco and any other company. (0910R)
Any Internet Protocol (IP) addresses used in this document are not intended to be actual addresses. Any examples, command display output, and figures included in the document are shown for illustrative purposes only. Any use of actual IP addresses in illustrative content is unintentional and coincidental.
User Guide for the Cisco Secure ACS Express 5.0.1 © 2009 Cisco Systems, Inc. All rights reserved.

OL-20148-01
C O N T E N T S
About This Guide ix
Chapter Overview ix
Documentation Updates x
Notices iii-x
OpenSSL/Open SSL Project iii-x
License Issues iii-x
xiii
Obtaining Documentation, Obtaining Support, and Security Guidelines xiii
C H A P T E R 1 Overview 1-1
System Overview 1-1
ACS Express Features 1-2
Protocols 1-2
Authentication 1-3
Credential Source 1-3
Machine Authentication 1-3
Access Policies 1-3
Serviceability and Availability 1-4
Administration 1-4
Digital Certificate 1-4
System Description 1-4
Deployment Scenarios 1-4
Enterprise Branch 1-5
Retail Branch 1-5
Small-To-Medium Businesses 1-6
Password Policies 1-7
Password Rules 1-8
Changing Internal User Passwords 1-9
Authentication, Authorization, and Accounting 1-9
RADIUS 1-9
RADIUS Authentication Requests 1-10
TACACS+ 1-10
TACACS+ Authentication Requests 1-10
EAP 1-10
iiiUser Guide for Cisco Secure ACS Express 5.0.1

Contents
Overview of User Authentication 1-11
Configuration Overview 1-12
Network Resources 1-13
Users and Identity Stores 1-13
Internal User Database 1-13
External User Database 1-13
Access Policies 1-13
Access Rules 1-14
RADIUS Access Services 1-14
Device Administration 1-15
Access Rules 1-15
TACACS+ Access Service 1-15
C H A P T E R 2 Using the ACS Express GUI 2-1
Logging In and Logging Out 2-1
Logging In 2-1
Logging Out 2-2
Navigating the GUI 2-2
Workspace 2-2
Status Pane 2-3
Navigation Pane 2-3
Content Pane 2-4
Dashboard 2-4
Configuration Summary 2-5
Usage Summary 2-5
Server Information 2-6
Server Status 2-6
Using Online Help 2-6
Configuration Tips 2-6
C H A P T E R 3 Configuring Network Resources 3-1
Network Devices 3-1
Adding One Device 3-2
Adding Many Devices 3-2
Editing Devices 3-3
Editing Many Devices 3-3
Copying Network Devices 3-4
Deleting Network Devices 3-4
Device Groups 3-4
ivUser Guide for Cisco Secure ACS Express 5.0.1
OL-20148-01

Contents
Adding Device Groups 3-5
Editing Device Groups 3-5
Copying Device Groups 3-6
Deleting Device Groups 3-6
C H A P T E R 4 Configuring Users and Identity Stores 4-1
Internal User Database 4-1
Users 4-2
Adding Users 4-3
Editing Users 4-3
Copying Users 4-4
Deleting Users 4-4
User Password Policy 4-5
Changing Internal User Passwords 4-6
User Groups 4-6
Adding User Groups 4-7
Editing User Groups 4-7
Copying User Groups 4-7
Deleting User Groups 4-9
External User Databases 4-9
Microsoft Active Directory 4-9
Active Directory Credentials 4-11
LDAP Databases 4-12
Adding an LDAP CA Certificate 4-15
Deleting an LDAP CA Certificate 4-15
One-Time-Password Servers 4-16
Required OTP Server Configuration 4-18
C H A P T E R 5 Configuring Access Policies 5-1
Access Services 5-2
RADIUS Access Services 5-2
Adding a RADIUS Access Service 5-3
Editing a RADIUS Access Service 5-7
Copying a RADIUS Access Service 5-8
Deleting a RADIUS Access Service 5-8
TACACS+ Access Service 5-8
Adding One TACACS+ Access Service Access Rule 5-9
Adding Many TACACS+ Access Rules 5-10
Editing a TACACS+ Access Rule 5-12
vUser Guide for Cisco Secure ACS Express 5.0.1
OL-20148-01

Contents
Editing Many TACACS+ Access Rules 5-12
Copying a TACACS+ Access Rule 5-12
Deleting a TACACS+ Access Rule 5-13
Policy Elements 5-13
RADIUS Responses 5-13
Adding RADIUS Responses 5-13
Editing RADIUS Responses 5-14
Copying RADIUS Responses 5-14
Deleting a RADIUS Responses 5-15
Time of Day 5-15
Adding a Time of Day Block 5-16
Editing a Time of Day Block 5-16
Copying a Time of Day Block 5-17
Deleting a Time of Day Block 5-17
C H A P T E R 6 Reports and Troubleshooting 6-1
Reports and Logs 6-1
Reports 6-2
Usage Summary Reports 6-2
Authentication Report 6-2
Device Commands Report 6-4
Accounting Logs 6-5
Troubleshooting 6-5
Connectivity Tests 6-5
Process Status 6-7
Server Logs 6-8
ACS Express Logging Configuration 6-9
Server Logs 6-10
C H A P T E R 7 System Administration 7-1
Administrators 7-2
Adding Administrators 7-3
Editing Administrators 7-3
Deleting Administrators 7-5
Administrator Password Policy 7-5
Extensible Authentication Protocol (EAP) 7-6
Certificates 7-7
Installing Certificates 7-8
Generating Self-Signed Certificates 7-9
viUser Guide for Cisco Secure ACS Express 5.0.1
OL-20148-01

Contents
Downloading Certificates 7-10
Adding CA Certificates 7-11
Editing CA Certificates 7-11
Deleting CA Certificates 7-12
Protocol Settings 7-12
RADIUS Dictionary 7-15
Editing a RADIUS Dictionary 7-16
Managing Attributes in a RADIUS Dictionary 7-16
Adding an Attribute to a RADIUS Dictionary 7-18
Editing an Attribute in a RADIUS Dictionary 7-20
Deleting an Attribute in a RADIUS Dictionary 7-20
Web Console 7-20
Web Console Certificate 7-21
Installing a Web Certificate 7-21
Generating a Self-Signed Certificate 7-23
Login Settings 7-23
Replication 7-24
System Summary 7-26
A P P E N D I X A XML Configuration Files A-1
Empty Configuration File A-1
Import/Export Schema A-1
IN D E X
viiUser Guide for Cisco Secure ACS Express 5.0.1
OL-20148-01

Contents
viiiUser Guide for Cisco Secure ACS Express 5.0.1
OL-20148-01

About This Guide
This document provides information for system administrative users who manage the Cisco Secure ACS Express server for their organization.
Chapter OverviewThis document has the following chapters:
• Chapter 1, “Overview,” provides an overview of Cisco Secure ACS Express 5.0.1
• Chapter 2, “Using the ACS Express GUI,” provides information about how to use the ACS Express GUI.
• Chapter 3, “Configuring Network Resources,” provides information about how to manage your network Devices and Device Groups.
• Chapter 4, “Configuring Users and Identity Stores,” provides information about Users and User Groups, and how to manage users through the ACS Express internal database and how to configure ACS Express to use external databases.
• Chapter 5, “Configuring Access Policies,” provides information about how to set up your ACS Express server to process RADIUS authentication requests from users and TACACS+ requests from devices. This chapter provides information about how to customize your ACS Express server for your network’s requirements.
• Chapter 6, “Reports and Troubleshooting,” provides information about reports and diagnostic information to help you troubleshoot system problems.
• Chapter 7, “System Administration,” provides information about how to manage your site’s system administrators and how to control various appliance and application settings.
• Appendix A, “XML Configuration Files,” provides an empty configuration file and the XML Import/Export schema file.
This document also includes an Index.
ixUser Guide for Cisco Secure ACS Express 5.0.1
OL-20148-01

About This GuideNotices
Documentation UpdatesTable 1 lists the updates to the User Guide for Cisco Secure ACS Express 5.0.1.
NoticesThe following notices pertain to this software license.
OpenSSL/Open SSL ProjectThis product includes software developed by the OpenSSL Project for use in the OpenSSL Toolkit (http://www.openssl.org/).
This product includes cryptographic software written by Eric Young ([email protected]).
This product includes software written by Tim Hudson ([email protected]).
License Issues
The OpenSSL toolkit stays under a dual license, i.e. both the conditions of the OpenSSL License and the original SSLeay license apply to the toolkit. See below for the actual license texts. Actually both licenses are BSD-style Open Source licenses. In case of any license issues related to OpenSSL please contact [email protected].
OpenSSL License:
Copyright © 1998-2007 The OpenSSL Project. All rights reserved.
Redistribution and use in source and binary forms, with or without modification, are permitted provided that the following conditions are met:
1. Redistributions of source code must retain the copyright notice, this list of conditions and the following disclaimer.
2. Redistributions in binary form must reproduce the above copyright notice, this list of conditions, and the following disclaimer in the documentation and/or other materials provided with the distribution.
3. All advertising materials mentioning features or use of this software must display the following acknowledgment: “This product includes software developed by the OpenSSL Project for use in the OpenSSL Toolkit (http://www.openssl.org/)”.
4. The names “OpenSSL Toolkit” and “OpenSSL Project” must not be used to endorse or promote products derived from this software without prior written permission. For written permission, please contact [email protected].
5. Products derived from this software may not be called “OpenSSL” nor may “OpenSSL” appear in their names without prior written permission of the OpenSSL Project.
Table 1 Updates to the User Guide for Cisco Secure ACS Express 5.0.1
Date Description
11/30/09 Updated the list of supported Microsoft Active Directory servers and included the following note in Chapter 4, “Configuring Users and Identity Stores”:
ACS Express 5.0.1 does not support Windows 2008 Server R2.
xUser Guide for Cisco Secure ACS Express 5.0.1
OL-20148-01

About This GuideNotices
6. Redistributions of any form whatsoever must retain the following acknowledgment:
“This product includes software developed by the OpenSSL Project for use in the OpenSSL Toolkit (http://www.openssl.org/)”.
THIS SOFTWARE IS PROVIDED BY THE OpenSSL PROJECT “AS IS”' AND ANY EXPRESSED OR IMPLIED WARRANTIES, INCLUDING, BUT NOT LIMITED TO, THE IMPLIED WARRANTIES OF MERCHANTABILITY AND FITNESS FOR A PARTICULAR PURPOSE ARE DISCLAIMED. IN NO EVENT SHALL THE OpenSSL PROJECT OR ITS CONTRIBUTORS BE LIABLE FOR ANY DIRECT, INDIRECT, INCIDENTAL, SPECIAL, EXEMPLARY, OR CONSEQUENTIAL DAMAGES (INCLUDING, BUT NOT LIMITED TO, PROCUREMENT OF SUBSTITUTE GOODS OR SERVICES; LOSS OF USE, DATA, OR PROFITS; OR BUSINESS INTERRUPTION) HOWEVER CAUSED AND ON ANY THEORY OF LIABILITY, WHETHER IN CONTRACT, STRICT LIABILITY, OR TORT (INCLUDING NEGLIGENCE OR OTHERWISE) ARISING IN ANY WAY OUT OF THE USE OF THIS SOFTWARE, EVEN IF ADVISED OF THE POSSIBILITY OF SUCH DAMAGE.
This product includes cryptographic software written by Eric Young ([email protected]). This product includes software written by Tim Hudson ([email protected]).
Original SSLeay License:
Copyright © 1995-1998 Eric Young ([email protected]). All rights reserved.
This package is an SSL implementation written by Eric Young ([email protected]).
The implementation was written so as to conform with Netscapes SSL.
This library is free for commercial and non-commercial use as long as the following conditions are adhered to. The following conditions apply to all code found in this distribution, be it the RC4, RSA, lhash, DES, etc., code; not just the SSL code. The SSL documentation included with this distribution is covered by the same copyright terms except that the holder is Tim Hudson ([email protected]).
Copyright remains Eric Young’s, and as such any Copyright notices in the code are not to be removed. If this package is used in a product, Eric Young should be given attribution as the author of the parts of the library used. This can be in the form of a textual message at program startup or in documentation (online or textual) provided with the package.
Redistribution and use in source and binary forms, with or without modification, are permitted provided that the following conditions are met:
1. Redistributions of source code must retain the copyright notice, this list of conditions and the following disclaimer.
2. Redistributions in binary form must reproduce the above copyright notice, this list of conditions and the following disclaimer in the documentation and/or other materials provided with the distribution.
3. All advertising materials mentioning features or use of this software must display the following acknowledgement:
“This product includes cryptographic software written by Eric Young ([email protected])”.
The word ‘cryptographic’ can be left out if the routines from the library being used are not cryptography-related.
4. If you include any Windows specific code (or a derivative thereof) from the apps directory (application code) you must include an acknowledgement: “This product includes software written by Tim Hudson ([email protected])”.
THIS SOFTWARE IS PROVIDED BY ERIC YOUNG “AS IS” AND ANY EXPRESS OR IMPLIED WARRANTIES, INCLUDING, BUT NOT LIMITED TO, THE IMPLIED WARRANTIES OF MERCHANTABILITY AND FITNESS FOR A PARTICULAR PURPOSE ARE DISCLAIMED. IN NO
xiUser Guide for Cisco Secure ACS Express 5.0.1
OL-20148-01
About This GuideNotices
EVENT SHALL THE AUTHOR OR CONTRIBUTORS BE LIABLE FOR ANY DIRECT, INDIRECT, INCIDENTAL, SPECIAL, EXEMPLARY, OR CONSEQUENTIAL DAMAGES (INCLUDING, BUT NOT LIMITED TO, PROCUREMENT OF SUBSTITUTE GOODS OR SERVICES; LOSS OF USE, DATA, OR PROFITS; OR BUSINESS INTERRUPTION) HOWEVER CAUSED AND ON ANY THEORY OF LIABILITY, WHETHER IN CONTRACT, STRICT LIABILITY, OR TORT (INCLUDING NEGLIGENCE OR OTHERWISE) ARISING IN ANY WAY OUT OF THE USE OF THIS SOFTWARE, EVEN IF ADVISED OF THE POSSIBILITY OF SUCH DAMAGE.
The license and distribution terms for any publicly available version or derivative of this code cannot be changed. i.e. this code cannot simply be copied and put under another distribution license [including the GNU Public License].
xiiUser Guide for Cisco Secure ACS Express 5.0.1
OL-20148-01

About This GuideNotices
Obtaining Documentation, Obtaining Support, and Security Guidelines
For information on obtaining documentation, obtaining support, providing documentation feedback, security guidelines, and also recommended aliases and general Cisco documents, see the monthly What’s New in Cisco Product Documentation, which also lists all new and revised Cisco technical documentation, at:
http://www.cisco.com/en/US/docs/general/whatsnew/whatsnew.html
xiiiUser Guide for Cisco Secure ACS Express 5.0.1
OL-20148-01

About This GuideNotices
xivUser Guide for Cisco Secure ACS Express 5.0.1
OL-20148-01

OL-20148-01
C H A P T E R 1
OverviewThis chapter contains the following sections:
• System Overview, page 1-1
• ACS Express Features, page 1-2
• Deployment Scenarios, page 1-4
• Password Policies, page 1-7
• Authentication, Authorization, and Accounting, page 1-9
• Overview of User Authentication, page 1-11
• Configuration Overview, page 1-12
System OverviewCisco Secure ACS Express (referred to as ACS Express from here on) is an easy to use access control server that operates as a centralized RADIUS and TACACS+ server. It extends access security by combining authentication and authorization within a centralized identity networking solution, allowing greater flexibility and user-productivity gains. ACS Express supports a broad variety of access connections, including wired and wireless LAN, firewalls, and VPNs.
ACS Express is an entry-level RADIUS AAA and TACACS+ server addressing the small-to-medium sized business (SMB) such as retail branches and enterprise branch market segments. ACS Express controls user and machine access to various networks including wireless, wired, and virtual private networks. ACS Express also controls administrative access to network devices using RADIUS and TACACS+. ACS Express ships as an appliance with easy-to-use management interfaces to facilitate deployment and configuration.
The primary function of ACS Express is to control user access and client machines requesting access to protected resources within a corporate network. ACS Express interacts with AAA-enabled network devices to authenticate a user or device and authorize the user or device with entitlements granted to the user or device.
ACS Express controls user and client access to an enterprise network by way of various transports including wireless, wired, and VPN (Network Access) using RADIUS. For network access, ACS Express and the AAA-enabled devices such as a Network Access Server (NAS) communicate using the RADIUS protocol. ACS Express supports various NASs including Cisco IOS/PIX devices, Cisco VPN concentrators, Cisco Airespace controllers, Cisco Aironet access points, Juniper and Microsoft devices, and any IETF RADIUS-compliant NAS. ACS Express supports various authentication methods including CHAP, PAP, MS-CHAPv2, EAP-TLS, PEAP, EAP-FASTv0, and LEAP.
1-1User Guide for Cisco Secure ACS Express 5.0.1

Chapter 1 OverviewACS Express Features
After a NAS submits a user’s credentials to ACS Express, it can validate them against various user databases. ACS Express can communicate with Active Directory, LDAP, and One-Time-Password user databases. ACS Express also provides its own user database to manage local users. During the credential validation process, the user database might return data describing a user’s profile within an enterprise (such as a User Group). When using Active Directory, ACS Express can also process machine authentication requests and enforce that both the machine and user are successfully authenticated prior to gaining network access.
After the credentials are validated, ACS Express then determines the entitlements granted to the user. For network access, an entitlement is a RADIUS authentication response returned to the originating NAS. An administrator can define rules to determine the returned entitlements. Conditions for the rules might include a user’s profile (user group), how (wireless, wired, or other) and when (time of day) a user attempts to access the enterprise network.
ACS Express also controls network administrator access to configure a network device (Device Administration Access). For device administration, ACS Express supports NASs that communicate using TACACS+ or RADIUS. Credential validation and entitlement determination are processed in the same manner as described for network access. Entitlements for device administration specify the maximum administrative privilege level allowed. Conditions for the rules might include a user’s profile (user group), the device being configured, and when (time of day) a user attempts to configure a network device.
ACS Express supports up to 50 NASs and is aimed at small-to-medium businesses requiring 350 or fewer successful user authentications per twenty-four hour period.
ACS Express is delivered as an appliance. You use the command-line interface (CLI) to set up the ACS Express appliance. You use the GUI to configure the ACS Express server. ACS Express can be deployed in pairs where the configuration from the primary Express server is replicated to the secondary server.
ACS Express FeaturesThis section lists the ACS Express features.
• Protocols, page 1-2
• Authentication, page 1-3
• Access Policies, page 1-3
• Serviceability and Availability, page 1-4
• Administration, page 1-4
• Digital Certificate, page 1-4
• System Description, page 1-4
ProtocolsACS Express supports the following key protocols:
• RADIUS, page 1-9
• TACACS+, page 1-10
• EAP, page 1-10
1-2User Guide for Cisco Secure ACS Express 5.0.1
OL-20148-01

Chapter 1 OverviewACS Express Features
AuthenticationACS Express uses authentication to verify an individual’s identity during a login attempt. ACS Express uses the following authentication methods:
• Credential Source
• Machine Authentication
Credential Source
ACS Express supports the use of a local database, an external token server, LDAP, and AD as credential sources based on network access policies. ACS Express supports the use of token server using proxy RADIUS.
Machine Authentication
Machine authentication enables a client machine to authenticate itself using the identity and credentials of the computer to ACS Express. ACS Express supports only Windows Machine Authentication against Active Directory.
ACS Express supports the Machine Authentication configuration for the protocols listed in Table 1-1. You configure the outer and inner EAP methods using the GUI.
As part of the certificate setup, you must install the EAP and CA server certificate for ACS Express and enable auto-enrollment on the Active Directory for client machine to obtain a machine certificate.
Access PoliciesACS Express supports the following access policies:
• Group Mapping—Supports the mapping of external groups to determine entitlements for user or machines
• Time-based—Supports access based on time of day (ToD) and day of week
• RADIUS Response Sets—Supports the returning of RADIUS attribute or values in an authentication response based on Group Mapping and Time Based Conditions
• Machine Access Restrictions—Supports Machine Address Restriction to require machine authentication as a prerequisite for successful user authentication
• Access Policy—Supports definition and application of an Access Service
Table 1-1 Supported Machine Authentication Protocols
Outer Methods Inner Methods
PEAP EAP-MSCHAPv2
PEAP EAP-TLS
EAP-TLS
1-3User Guide for Cisco Secure ACS Express 5.0.1
OL-20148-01

Chapter 1 OverviewDeployment Scenarios
Serviceability and AvailabilityACS Express replicates configurations performed at the primary server to a secondary server. ACS Express also supports a primary-secondary AAA server deployment where a NAS can contact a secondary AAA server when the primary server is not reachable.
AdministrationACS Express supports the following administrative features:
• Web-based GUI—You can perform system administration and configuration of ACS Express remotely and securely using a web browser.
• Command-Line Interface—You can access the CLI using the server console or SSH. The CLI enables administrators to copy and paste configurations from another ACS Express server. The CLI can be used for programmatic and batch configuration.
• Administrative Access Control—Provides different levels of access for administrators and operators. Restricts operators to read-only access to specific pages.
• Password Policies—Supports password expiration, forced change, and lockout. Password Policy applies to the administrators log on to the machine.
• Logging—Supports RADIUS accounting logs, debug logs, and backup of the logs off the machine
• Reporting—Provides usage and troubleshooting reports
Digital CertificateCisco Secure ACS Express supports the addition of CA certificates. The administrator can install, generate a self-signed certificate, and download a configured certificate.
System DescriptionCisco Secure ACS Express is an easy to use access control server that operates as a centralized RADIUS and TACACS+ server. It extends access security by combining authentication and authorization within a centralized identity networking solution, allowing greater flexibility and user-productivity gains. ACS Express supports a broad variety of access connections, including wired and wireless LAN, firewalls, and VPNs.
Cisco Secure ACS Express is delivered in an appliance you can rack mount. The ACS Express appliance uses an Intel Celeron 3.2 GHz processor with 1 GB of memory and a 250 GB hard disk drive.
Deployment ScenariosThis section describes three deployment scenarios in which ACS Express might be used:
• Enterprise Branch
• Retail Branch
• Small-To-Medium Businesses
1-4User Guide for Cisco Secure ACS Express 5.0.1
OL-20148-01

Chapter 1 OverviewDeployment Scenarios
Enterprise BranchLarge enterprises are likely to have a centralized AAA network that manages the various regions within a corporate network. Large enterprises will also maintain user and machine identities in centralized user databases, such as Active Directory.
An enterprise might have several branch sites where they want to mitigate adverse impacts of a WAN outage and have a local AAA server present. A single or pair of ACS Express would be deployed at the branch site. ACS Express would be configured to authenticate users, machines, or both against the centralized user database. The enterprise might deploy a user database at the branch site.
The branch site would provide wireless and wired network access. VPN access would typically be managed by the central office. Figure 1-1 shows an example enterprise branch deployment scenario.
Figure 1-1 Enterprise Branch Office Scenario
Retail BranchLarge retail chains might plan to deploy one or two ACS Express servers in each store or location. Each location might maintain its own database of store employees, and the central office could maintain a database for corporate employees. ACS Express would be configured to authenticate user and machine identities against both the location and corporate database. The location would provide wireless and wired network access. Figure 1-2 shows an example for retail branch deployment scenario.
CorporateHQ
Telecommuter
Wired Host
WirelessSupplicant
User
Sales
User
FinanceRADIUS NAS and TACACS Clients
EAP
ACS ExpressSecondary
ACS ExpressSecondary
Local UserDatabase
T+
WANLink
ServiceProviderNetwork
OTPServers
ACSEnterprise
ADInfrastructure
LDAPServers
AP
Branch Office Central Office/HQ Data Center
DeviceAdmin
IT
VPNConcentrator
VPNConcentrator
SwitchSwitch
RADIUS
ACS ExpressPrimary
ACS ExpressPrimary
WirelessSupplicantWireless
Supplicant
Wired HostWired Host
Telecommuter
21
19
46
1-5User Guide for Cisco Secure ACS Express 5.0.1
OL-20148-01

Chapter 1 OverviewDeployment Scenarios
Figure 1-2 Retail Branch Office Scenario
Small-To-Medium BusinessesSmall-to-medium businesses (SMB) might consist of single site with a few hundred employees. The user and machine identities would be maintained in a central database, such as Active Directory or LDAP. The SMB site might also maintain a one-time password (OTP) server to authenticate users accessing the network using a virtual private network (VPN).
The SMB site might deploy a single or pair of ACS Express servers. ACS Express would be configured to authenticate users and machine identities against the appropriate database based on the type of access. An SMB site would provide wired, wireless, and VPN access. Figure 1-3 shows an example SMB deployment scenario.
CorporateHQ
Wired Host
WirelessSupplicant
Sales WarehouseRADIUS NAS and TACACS Clients
EAP
ACS ExpressSecondary
ACS ExpressSecondary
Local UserDatabase
T+
WANLink
ServiceProviderNetwork
OTPServers
ACSEnterprise
ADInfrastructure
LDAPServers
AP
Branch Office Central Office/HQ Data Center
DeviceAdmin
IT
SwitchSwitch
RADIUS
ACS ExpressPrimary
ACS ExpressPrimary
WirelessSupplicantWireless
Supplicant
Wired HostWired Host
21
19
48
1-6User Guide for Cisco Secure ACS Express 5.0.1
OL-20148-01

Chapter 1 OverviewPassword Policies
Figure 1-3 Small-Medium Business Scenario
Password PoliciesACS Express supports the use of a local database, as well as external token server, LDAP, and AD as credential source based on an Access Service.
ACS Express supports the use of token server using proxy RADIUS. Password policy applies to both administrative and local users, but you use different windows to configure the password policies.
Administrator password policy configuration is stored within the ACS Express server. You use the ACS Express GUI to update policy configuration.
The local users password policy configuration is stored in the local database. You use the ACS Express GUI to update the policy configuration for local users. This is independent of the password policy configuration for administrators.
Table 1-2 lists and describes the ACS Express password policy configuration items. You can modify the various password fields using the GUI under Users & Identity Stores > Internal User Database > Users.
Telecommuter
Wired Host
WirelessSupplicant
User
Sales
User
FinanceRADIUS NAS and TACACS Clients
EAP
ACS ExpressSecondary
ACS ExpressSecondary
Local UserDatabase
T+
ServiceProviderNetwork
AP
DeviceAdmin
IT
VPNConcentrator
VPNConcentrator
SwitchSwitch
RADIUS
ACS ExpressPrimary
ACS ExpressPrimary
WirelessSupplicantWireless
Supplicant
Wired HostWired Host
Wired HostWired HostServiceService
Telecommuter
21
19
47
Wired HostWired Host
1-7User Guide for Cisco Secure ACS Express 5.0.1
OL-20148-01

Chapter 1 OverviewPassword Policies
Password RulesYour password must adhere to the following rules:
• Contain at least one lower-case letter
• Contain at least one upper-case letter
• Contain at least one number
• Contain at least one of the following special characters:
! $ % ^ & * ( ) _ + | ~ - = ` { } [ ] : " ; ' < > ? , . /
• No character of the password may be repeated more than three times consecutively
• At least eight (8) characters in length
• Cannot include your username
• Cannot reuse your current password
• Password should not contain the words cisco or ocsic.
Table 1-2 Password Policies
Password Policy Description
Minimum length Specifies the minimum acceptable password length.
Upper-case required Specifies whether an upper-case character is required in a user password. Default is TRUE.
Lower-case required Specifies whether a lower-case character is required in a user password. Default is TRUE.
Number required Specifies whether a number is required in a user password. Default is TRUE.
Disallow user name Indicates whether you can use your username for a user password; default is TRUE, disallowing username as password.
Cannot Reuse Last Password Indicates whether you can use your most recent password. Default is TRUE meaning that you cannot reuse your last password after it has expired.
Enable Password Lockout after N Attempts
Specifies whether there is a maximum number of failed password attempts. Default is TRUE.
Number of Failed Attempts Specifies the number of failed attempts before user is locked out of the system. Defaults to 8.
After a user has been locked out due to exceeding failed number of attempts, an administrator must reactivate the user account before it can be used again.
1-8User Guide for Cisco Secure ACS Express 5.0.1
OL-20148-01

Chapter 1 OverviewAuthentication, Authorization, and Accounting
Changing Internal User PasswordsProtocol password change is supported using MS-CHAPv2 and TACACS+. Individual users can change their password using the ACS Express GUI.
Users who authenticate in the internal database can change their password at any time on the ACS Express Primary server. To change your password, point your browser to a URL like the following:
https://<hostname>/changeuserpassword.do
Where hostname is the name of the ACS Express primary server.
Users who authenticate through an external database such as AD, LDAP, or OTP cannot use this window to change their passwords.
Note Passwords cannot be changed on the Secondary server in a replicated environment.
Authentication, Authorization, and AccountingACS Express provides authentication, authorization, and accounting (AAA or triple A) functionality using the RADIUS protocol, TACACS+, and EAP.
• RADIUS, page 1-9
• TACACS+, page 1-10
• EAP, page 1-10
RADIUSRemote Authentication Dial In User Service (RADIUS) is an AAA (authentication, authorization, and accounting) protocol that supports network access. ACS Express supports the RADIUS protocol as defined in Internet Request for Comments (RFC) 2138 and also the following:
Note ACS Express conforms substantially to the following RFCs.
• RFC 2284—PPP Extensible Authentication Protocol (EAP)
• RFC 2865—Remote Authentication Dial In User Service
• RFC 2866—RADIUS Accounting
• RFC 2867—RADIUS Accounting Modifications for Tunnel Protocol Support
• RFC 2869—RADIUS Extensions
ACS Express supports authentication on old and new RADIUS ports. ACS Express accepts authentication requests on port 1645 and port 1812. For accounting, ACS Express accepts accounting packets on port 1646 and 1813.
ACS Express supports vendor-specific attributes (VSAs) from IOS/PIX, VPN concentrators, Airespace, Aironet, Juniper, and Microsoft. ACS Express also enables you to define custom VSAs.
1-9User Guide for Cisco Secure ACS Express 5.0.1
OL-20148-01

Chapter 1 OverviewAuthentication, Authorization, and Accounting
RADIUS Authentication Requests
When the ACS Express server receives a RADIUS authentication request from a network device:
1. ACS Express attempts to find a matching RADIUS Access Service.
2. ACS Express evaluates the RADIUS Access Services in the order shown above and stops on the first matching service.
3. A match is determined by evaluating the selection rules for each service.
4. ACS Express will then apply the authentication rules specified for the matched service.
5. If no service matches, access will be denied.
TACACS+The Terminal Access Controller Access-Control System (TACACS+) protocol is a Cisco-proprietary enhancement to the original TACACS protocol. TACACS+ provides access control for routers, network access servers (NAS), and other networked computing devices using one or more centralized servers.
TACACS+ supports many protocols and provides separate authentication, authorization and accounting services using TCP port 49. TACACS+ encrypts the body of the TCP packet for secure communications.
ACS Express supports privilege levels by group, local and external TACACS+ users, and separate shared secrets from RADIUS.
TACACS+ Authentication Requests
When the ACS Express server receives a TACACS+ authentication request from a network device:
• The user credentials are authenticated against the specified user database. If the credentials are not valid, access is denied.
• If valid, the user database might also return the user groups to which the user belongs.
• Based on the accessed network device, user groups, and time of access, ACS Express attempts to find a matching access rule.
• ACS Express evaluates the access rules in the order shown above and stops on the first matching rule.
• ACS Express applies the result for the matching rule.
• Access could be denied, or granted applying the specified privilege level, idle and session timeout.
• If no rule matches, the default response rule is applied.
EAPExtensible Authentication Protocol (EAP), defined by RFC 3748, is an authentication framework used in wireless networks and Point-to-Point connections. The EAP protocol is most often used in wireless LANs, but can be also used for wired LAN authentication.
ACS Express supports the following EAP methods:
• EAP-TLS—EAP-Transport Level Security is defined in RFC 2716
• PEAP v0—Protected EAP, version 0
1-10User Guide for Cisco Secure ACS Express 5.0.1
OL-20148-01

Chapter 1 OverviewOverview of User Authentication
• PEAP v1—Protected EAP, version 1
• EAP-FAST v0—Flexible Authentication via Secure Tunneling
Note ACS Express 5.0.1 is not fully compliant with the latest EAP-FAST RFC, including EAP-FASTv1 and EAP-FASTv1a.
• LEAP—Lightweight Extensible Authentication Protocol
Overview of User AuthenticationThe primary role of ACS Express is to authenticate users accessing a network. This section provides an overview of user authentication. Figure 1-4 shows the flow of events as they occur in user authentication.
Figure 1-4 User Authentication Overview
The following events relate to the numbers shown in Figure 1-4.
1. A user attempts to connect to the network.
A user's credentials are sent from the user's computer to a network device. For example, an 802.1.x supplicant on a computer laptop will capture a user's credentials and transmit to a Network Device via LEAP.
2. The network device sends an authentication request to the ACS Express server.
After the network device receives the credentials, the device will send an authentication request to the ACS Express server to authenticate the credentials. The authentication request is sent using either the RADIUS or TACACS+ protocol.
3. ACS Express authenticates the credentials.
Based on the protocol, network device or contents or both of the authentication request (called Selection Rules), ACS Express determines the appropriate access service to apply. The access service determines which database to use to authenticate the credentials.
For example, an access service could specify that authentication requests from wireless controllers be authenticated against Active Directory.
4. The user database returns an authentication response to the ACS Express server.
The user database returns a response to the ACS Express server indicating whether the provided credentials are valid and to which user group the user belongs. Typically, user groups describe a user's role within your organization. For example, a user might belong to a user group for Employees and another for the Finance department.
5. The ACS Express server returns an authentication response to the network device.
If a user's credentials are not valid, the ACS Express server returns the appropriate RADIUS or TACACS+ reject response.
1-11User Guide for Cisco Secure ACS Express 5.0.1
OL-20148-01

Chapter 1 OverviewConfiguration Overview
If the credentials are valid, the ACS Express server evaluates the access service further to determine if any access rules are specified. Access rules specify user entitlements. Matching rules are determined by various criteria such as user groups or time of access. The entitlements are specified as RADIUS or TACACS+ attribute-value pairs which are returned to a network device.
For example, an access service might have an access rule stating that any user belonging to the Employees user group is entitled to have access to the employee VLAN.
6. The network device returns an authentication response to user.
When the network device receives a response from the ACS Express server, the device enforces any specified entitlements and return the appropriate response to the user.
Configuration OverviewThis section provides an overview of the required configuration for the ACS Express server. Each section is associated with a drawer in the ACS Express GUI as shown in Figure 1-5.
Figure 1-5 ACS Express GUI
Table 1-3 ACS Express GUI Layout
Callout Description
1 Status pane
2 Navigation pane
3 Content pane
1-12User Guide for Cisco Secure ACS Express 5.0.1
OL-20148-01

Chapter 1 OverviewConfiguration Overview
Network ResourcesThe Devices and Device Groups that make up your network are your network resources. Use the GUI to add all Device Groups in your configuration, then add your devices into the Device Groups. See Network Devices, page 3-1 for more detailed information.
Users and Identity StoresConfigure your ACS Express server with the Users and User Groups required for your installation. ACS Express can authenticate users with its internal user database and also through remote or external databases.
• Internal User Database, page 1-13
• External User Database, page 1-13
Internal User Database
Use the GUI to add all local users into the internal user database. Each local user must belong to at least one User Group, so create the User Groups first, then configure your local Users. See Internal User Database, page 4-1 for more detailed information.
External User Database
ACS Express supports the following external user databases:
• Microsoft Active Directory, page 4-9
• LDAP Databases, page 4-12
• One-Time-Password Servers, page 4-16
Access PoliciesAccess Services in ACS Express are classified into two types:
• Network Access
• Device Administration
Network Access policies apply to users attempting to access a wireless, wired, or VPN network. Network Access policies also support various authentication schemes like PAP, CHAP, MSCHAPv2, PEAP, EAP-TLS, EAP-FAST, LEAP, and Windows machine authentication. Network Access policies apply to network devices that communicate with ACS Express via RADIUS. Network Access policies can be configured to authenticate users against Active Directory, LDAP, One-Time-Password databases, or the ACS Express internal user database.
Device Administration policies apply to users who attempt to access and configure a network device. ACS Express can authenticate and authorize the maximum allowed privilege level for users. Network devices communicate with ACS Express via TACACS+ or RADIUS. You can configure Device Administration policies to authenticate users against Active Directory, LDAP, One-Time-Password databases, or the ACS Express internal user database.
1-13User Guide for Cisco Secure ACS Express 5.0.1
OL-20148-01

Chapter 1 OverviewConfiguration Overview
Access Rules
Access rules enable you to use the ACS Express server to do the following:
• Specify user entitlements based on the user’s role in your organization.
• Assign different VLANs for employees and contractors.
• Restrict network access based on the ToD such as from Monday to Friday from 9:00 am to 5:00 pm (0900 to 1700).
We find it very helpful to create a worksheet to list the rules we want to enforce. Each rule should specify the access conditions and the resulting user entitlements. Access conditions include the type of network access, groups to which a user should belong, and the ToD the user is allowed access. Results specify granted entitlements if all the conditions are met.
Table 1-4 shows an example worksheet.
With a completed worksheet, you can configure the policy elements including the ToD periods in which to allow access and the entitlements you grant users when they log in to the network. Entitlements are specified as a RADIUS response returned to the network device.
Configuring Policy Elements
See Policy Elements, page 5-13 for detailed information about configuring policy elements including the following:
• RADIUS Responses, page 5-13
• Time of Day, page 5-15
RADIUS Access Services
After you have set up your access rules, you can create the RADIUS Access Services your require. A RADIUS Access Service specifies the network device groups from which to process requests, a database to use for authentication, protocol settings, and access rules to grant entitlements.
Based on your worksheet, create a RADIUS Access Service for each network access type. For example, from the example worksheet in Table 1-4, we would create two RADIUS Access Services, Wireless Access and VPN Access. We also need to configure for two User Groups, Employee and RemoteUser.
A RADIUS Access Service requires the following configuration:
• General Settings—Specifies the name and description of access service.
Table 1-4 Example Access Rule Worksheet
Network Access User Groups Time of Access Entitlements
Wireless Access Employee Mon-Fri, 8:00 am to 6:00 pm (0800 to 1800)
Assign VLAN Employee
Wireless Access Employee Sat-Sun, 8:00 am to 6:00 pm (0800 to 1800)
Deny access
VPN Access Employee, RemoteUsers
Mon-Sun, 7/24 Assign VPN Group RemoteUsers
1-14User Guide for Cisco Secure ACS Express 5.0.1
OL-20148-01

Chapter 1 OverviewConfiguration Overview
• Selection Rules—Specifies the network devices groups for the types of network access. From the example worksheet, the Wireless Access access service would handle requests from the Wireless Controllers device group.
• Authentication Rules—Specifies the configured database for user authentication and the protocol settings.
Configure the access rules as listed in your worksheet. See Access Services, page 5-2 for more detailed information.
Device Administration
Network devices can communicate with ACS Express via TACACS+ or RADIUS. This section describes how to configure a Device Administration policy for network devices to communicate via TACACS+.
You should already have done the following:
• Configure your network devices for login authentication against a AAA server.
– See Network Resources, page 1-13.
• Configure the user database.
– See Users and Identity Stores, page 1-13.
Access Rules
To determine your Device Administration access rules, we find it very helpful to create a worksheet to list your rules. Each rule should specify the access conditions and the resulting privilege level if granted. Access conditions include the network device group being administered, groups a user should belong to, and allowed time of access. Results specify the command privilege to grant if all the conditions are met. See Table 1-5 for an example device access rule worksheet.
With a completed worksheet, you can now configure the policy elements. See Policy Elements, page 5-13 for detailed information about configuring policy elements including the following:
• RADIUS Responses, page 5-13
• Time of Day, page 5-15
TACACS+ Access Service
After you have set up your access rules, you can create the TACACS+ Access Services you require. A TACACS+ Access Service specifies the conditions required including the network device groups from which to process requests, User Groups, and Time of Access and specifies the privilege level to grant if all conditions are met. A TACACS+ authentication request must also match the session Timeout Settings for Idle Timeout and Session Timeout.
Table 1-5 Example Device Access Rule Worksheet
Network Access User Groups Time of Access Privilege Level
Wireless Controllers Read-Write Admin Mon-Fri, 8:00 am to 6:00 pm (0800 to 1800)
15
Wireless Controllers Read-Only Admins — Deny Access
VPN Concentrators Read-Only Admin — 1
1-15User Guide for Cisco Secure ACS Express 5.0.1
OL-20148-01

Chapter 1 OverviewConfiguration Overview
Create a TACACS Access Service based on your worksheet. For example, from the example worksheet in Table 1-5, we would create TACACS+ Access Services for requests from the following:
• Wireless controllers from members of the Read-Write Admin group
• Wireless controllers from members of the Read-Only Admins group
• VPN Concentrators from members of the Read-Only Admins group
Configure the access rules as listed in your worksheet. See TACACS+ Access Service, page 5-8 for more detailed information.
1-16User Guide for Cisco Secure ACS Express 5.0.1
OL-20148-01

OL-20148-01
C H A P T E R 2
Using the ACS Express GUIThis chapter provides information about the ACS Express graphical user interface (GUI).
This chapter contains the following sections:
• Logging In and Logging Out, page 2-1
• Navigating the GUI, page 2-2
• Using Online Help, page 2-6
Logging In and Logging OutACS Express uses a web-based browser to log in and log out of the graphical user interface (GUI).
• Logging In, page 2-1
• Logging Out, page 2-2
Logging InTo log in to ACS Express, launch a browser and enter a URL into the browser address field:
https://server_name.domain
Where server_name is the name and domain is the IP address of the ACS Express server.
Figure 2-1 shows an example of the ACS Express login window. Enter your username and password to log in. Click Reset to clear the Username and Password fields.
2-1User Guide for Cisco Secure ACS Express 5.0.1

Chapter 2 Using the ACS Express GUINavigating the GUI
Figure 2-1 ACS Express Login Window
Logging OutTo log out of a session on the ACS Express server, click Logout in the upper-right corner of the GUI window (Figure 2-2) in the status pane. This area of the GUI also has the hostname of the ACS Express server and an About button for software version information. Click the circle with the question mark (?) to access online help.
Figure 2-2 ACS Express Server Status Pane
Navigating the GUIThe top-level window of the ACS Express GUI is called the Workspace. The Workspace contains the following areas:
• Status Pane
• Navigation Pane
• Content Pane
WorkspaceFigure 2-3 shows an example of the top-level ACS Express window called the Workspace.
2-2User Guide for Cisco Secure ACS Express 5.0.1
OL-20148-01

Chapter 2 Using the ACS Express GUINavigating the GUI
Figure 2-3 Cisco ACS Express Workspace
Status Pane
The ACS Express GUI has a top-level application Status pane with the following items.
• Product Name—Cisco Secure ACS Express displays on the left side of the status bar
• Server Hostname—Name of the server where you are currently logged in
• Login Name—User ID for current session
• Logout—Logs you out of the application and displays the login window
• About—Displays information about the currently installed software version and server hostname
Navigation Pane
The navigation pane contains six drawers, and each drawer contains subitems that display data in the content pane. The following list describes navigational behaviors:
• Clicking on a drawer name highlights and expands the drawer.
• Clicking on a drawer arrow expands the drawer.
• Clicking on an item highlights the drawer name and selected item, and the content pane is refreshed.
Table 2-1 ACS Express GUI Layout
Callout Description
1 Status pane
2 Navigation pane
3 Content pane
2-3User Guide for Cisco Secure ACS Express 5.0.1
OL-20148-01

Chapter 2 Using the ACS Express GUINavigating the GUI
• After refreshing the content pane, a status dialog will temporarily appear until the content pane is downloaded fully.
• Clicking on a drawer in which an item was previously selected does the following:
– Highlights the drawer
– Expands the drawer
– Selects the previously selected item
– Refreshes the content pane
• After you log in, the GUI keeps track of the last selected item in a cookie. If the cookie is present, the last selected item will be active upon login.
• You can collapse the navigation pane by clicking the toggle on left edge of the content pane. With the navigation pane collapsed, click the toggle again to display the navigation pane.
• Only one drawer and item can be active at a time.
Content Pane
The content pane displays information about the item you select from a drawer in the navigation pane.
DashboardThe Dashboard, Figure 2-4, displays the following collections of information:
• Configuration Summary
• Usage Summary
• Server Information
• Server Status
2-4User Guide for Cisco Secure ACS Express 5.0.1
OL-20148-01

Chapter 2 Using the ACS Express GUINavigating the GUI
Figure 2-4 ACS Express Dashboard
Configuration Summary
The Configuration Summary displays the following information:
• Network—Number of Devices and Device Groups configured in the Network drawer
• Identity—Number of Internal users, Internal User Groups, and External Databases configured in the Identity drawer
• Access Policy—Number of Radius Responses, ToD, RADIUS Access Services, and TACACS+ Access Services configured in the Access Policy drawer
• System Administration—Status of Replication and the SNMP Agent
Usage Summary
The Usage Summary displays graphical information about network and device access. These graphs are refreshed each time you click to view the Dashboard.
• RADIUS Access—Number of successful and failed user authentications and number of unique user logins
• TACACS+ Access—Number of successful and failed device authentications
2-5User Guide for Cisco Secure ACS Express 5.0.1
OL-20148-01

Chapter 2 Using the ACS Express GUIUsing Online Help
Server Information
The Server Information displays the following information:
• Hostname of the ACS Express server
• IP address of the ACS Express server
• Version of ACS Express software currently installed
• Total memory installed in the ACS Express appliance
• Total disk space in the /opt directory and amount of that disk space in use
• Total disk space in the /localdisk and amount of that disk space in use
• Length of time ACS Express server has been operating since last reboot
Server Status
The Server Status section displays graphical information about CPU, memory, and /opt disk utilization percentages. These graphs are refreshed each time you click to view the Dashboard and every five seconds while the graphs are displayed.
Using Online HelpACS Express provides online help in the form of HTML files mapped to the GUI windows. To access online help, click the Question Mark icon in the upper-right corner of the GUI window (Figure 2-5). ACS Express provides context sensitive help, so the window that displays after you click the online help icon is specific to the window from which you requested online help.
Figure 2-5 Online Help Icon
Along with the HTML online help files, you can also access a PDF version of the ACS Express User Guide from the online help.
Configuration TipsThe ACS Express GUI provides configuration tips at each location on a GUI window where you must provide a value or make a choice.
Simply hover your cursor over the name of the GUI field (underlined), and a configuration tip will appear as shown in Figure 2-6 specific to that field.
2-6User Guide for Cisco Secure ACS Express 5.0.1
OL-20148-01

Chapter 2 Using the ACS Express GUIConfiguration Tips
Figure 2-6 Configuration Tips By Cursor
Additionally, some GUI windows have configuration tips available. These pages have an additional Configuration Tip icon, Figure 2-7, next to the online help icon. If displayed on a window, click this icon for general configuration tips about the window.
Figure 2-7 Configuration Tip Icon
2-7User Guide for Cisco Secure ACS Express 5.0.1
OL-20148-01

Chapter 2 Using the ACS Express GUIConfiguration Tips
2-8User Guide for Cisco Secure ACS Express 5.0.1
OL-20148-01

OL-20148-01
C H A P T E R 3
Configuring Network ResourcesThis chapter provides information about configuring the network devices and device groups.
This chapter contains the following sections:
• Network Devices, page 3-1
• Device Groups, page 3-4
Figure 3-1 shows the Network Resources drawer of the ACS Express GUI.
Figure 3-1 Network Drawer
Network DevicesWithin the Network Resources drawer you find Devices and Device Groups. This is helpful to group devices by their access type or location.
This section contains the following topics:
• Adding One Device, page 3-2
• Adding Many Devices, page 3-2
• Editing Devices, page 3-3
• Copying Network Devices, page 3-4
• Deleting Network Devices, page 3-4
3-1User Guide for Cisco Secure ACS Express 5.0.1

Chapter 3 Configuring Network ResourcesNetwork Devices
Adding One DeviceBefore you can add a device to the list of network devices, the device group to which you plan to associate the device must already be created. See Adding Device Groups, page 3-5.
To add a device:
Step 1 In the navigation area, choose Network Resources > Devices.
The list of configured network devices displays in the content area.
Step 2 In the Network Devices content area, click Add > Add One.
The Add One dialog window appears. Table 3-1 describes the properties of a network device.
Figure 3-1 shows the Network drawer in the navigation area of the GUI.
Step 3 Enter a device name.
Step 4 Enter the device’s IP address.
Step 5 Use the pull-down menu to select an appropriate Network Device Group.
Step 6 Enter a shared secret to use with the device’s RADIUS or TACACS+ server.
Step 7 Click Save to add the network device to that network device group, or click Cancel to abort.
After the network device is created, the network device content area is refreshed showing the newly- configured network device.
Adding Many DevicesBefore you can add a device to the list of network devices, the device group to which you plan to associate the network device must already be created. See Adding Device Groups, page 3-5.
Use Add Many when you want to add up to ten devices to a network device group.
Note ACS Express supports a maximum of 50 devices.
Table 3-1 Device Properties
Field Description
Name Required; alphanumeric string of 1-32 characters that specifies the name of the device; must be unique for all devices
IP Address Required; IP version 4 address; must be unique for all devices
Network Device Group Required; each device must be part of a specific preconfigured network device group
RADIUS Shared Secret Shared secret used when authenticating with RADIUS access server
TACACS+ Shared Secret Shared secret used when authenticating with TACACS+ access server
3-2User Guide for Cisco Secure ACS Express 5.0.1
OL-20148-01

Chapter 3 Configuring Network ResourcesNetwork Devices
To add many devices:
Step 1 In the navigation area, choose Network Resources > Devices.
The list of configured network devices displays in the content area.
Step 2 In the Network Devices content area, click Add > Add Many.
The Add Many dialog window appears. Table 3-1 describes the properties of a network device.
Step 3 Use the pull-down menu to select an appropriate Network Device Group.
Step 4 Enter a shared secret to use with the device’s RADIUS or TACACS+ server.
Step 5 Enter a name and an IP address for each device you want to add, up to ten devices.
Step 6 Click Save to add the network device to that network device group, or click Cancel to abort.
After the network devices are created, the network device content area is refreshed showing the newly- configured network devices.
Editing DevicesTo edit a device or multiple devices:
Step 1 In the navigation area, choose Network Resources > Devices.
The list of configured network devices displays in the content area.
Step 2 In the content area, click on a device name or check its check box, then click Edit.
Note You can edit multiple devices by checking the check box of each device you want to modify.
The selected device’s Edit window displays its currently configured properties.
Step 3 Select any field and make any desired changes.
Table 3-1 describes the properties of a network device.
Step 4 Click Save to save your changes, or click Cancel to abort.
Editing Many DevicesTo edit multiple devices:
Step 1 In the navigation area, choose Network Resources > Devices.
The list of configured network devices displays in the content area.
Step 2 In the content area, check the check box of each device you want to modify, then click Edit.
The Edit Many window displays the selected devices and their current settings. Table 3-1 describes the properties of a Network Resource device.
3-3User Guide for Cisco Secure ACS Express 5.0.1
OL-20148-01

Chapter 3 Configuring Network ResourcesDevice Groups
Step 3 Select the fields you want to modify and make any desired changes.
Step 4 Click Save to save your changes, or click Cancel to abort.
Copying Network DevicesYou can make a copy of an existing network device to add a similar device to the configuration. To copy a network device:
Step 1 In the navigation area, choose Network Resources > Devices.
The list of configured network devices displays in the content area.
Step 2 In the content area, check the check box of the device you want to copy, then click Copy.
A Network Device Copy window displays a copy of the selected device. The new device inherits the Network Device Group and the Shared Secret properties of the copied device. Table 3-1 describes the properties of a network device.
Step 3 Enter a device name.
Step 4 Enter the device’s IP address.
Step 5 Click Save to save your changes and add a new device, or click Cancel to abort.
Deleting Network DevicesTo delete a network device:
Step 1 In the navigation area, choose Network Resources > Devices.
The list of configured network devices displays in the content area.
Step 2 In the content area, check the check box of the device you want to delete, then click Delete.
Note You can delete multiple devices by clicking the check box of each device you want to delete.
The Confirm Deletion window appears asking if you are sure you want to delete the selected device.
Step 3 Click Yes to delete the device, or click No to abort.
Device GroupsNetwork device groups provide a way for you to list the different types of devices in your network. For example, you might specify a different network device group for your routers, switches, VPN concentrators, wireless access points, and wireless controllers.
3-4User Guide for Cisco Secure ACS Express 5.0.1
OL-20148-01

Chapter 3 Configuring Network ResourcesDevice Groups
Device Group Properties
Table 3-2 lists the properties of a network device group.
This section contains the following topics:
• Adding Device Groups, page 3-5
• Editing Device Groups, page 3-5
• Copying Device Groups, page 3-6
Adding Device GroupsTo add a network device group:
Step 1 In the navigation area, choose Network Resources > Device Groups.
The list of configured network device groups displays in the content area.
Step 2 In the Network Device Groups content area, click Add.
The Network Device Group Add window appears. Table 3-2 describes the properties of a network device group.
Step 3 Enter a device group name.
Step 4 Enter a description of the device group.
Step 5 Click Save to add the network device group, or click Cancel to abort.
After the network device group is created, the network device group content area is refreshed showing the newly-configured network device group.
Editing Device GroupsTo edit a network device group:
Step 1 In the navigation area, choose Network Resources > Device Groups.
The list of configured network device groups displays in the content area.
Step 2 In the content area, select a device group to edit by checking a device group check box, then click Edit.
The selected device group Edit window displays its currently configured properties.
Table 3-2 Device Group Properties
Field Description
Name Required; alphanumeric string of 1-32 characters that specifies the name of the device group; must be unique for all device groups
Description Optional; description of the device group; might be used to describe the type of devices in a device group
3-5User Guide for Cisco Secure ACS Express 5.0.1
OL-20148-01

Chapter 3 Configuring Network ResourcesDevice Groups
Step 3 Select either field and make any desired changes.
Table 3-2 describes the properties of a network device group.
Step 4 Click Save to save your changes, or click Cancel to abort.
Copying Device GroupsTo copy a network device group:
Step 1 In the navigation area, choose Network Resources > Device Groups.
The list of configured network device groups displays in the content area.
Step 2 In the content area, select a device group to copy by checking a device group check box, then click Copy.
A Network Device Group Copy window displays a copy of the selected device group. The new device group inherits the description of the copied device. Table 3-2 describes the properties of a network device.
Step 3 Enter a new name for the copied network device group.
Step 4 Click Save to create the device group, or click Cancel to abort.
Deleting Device GroupsTo delete a network device:
Note You cannot delete a network device group if a device or service is using the network device group.
Step 1 In the navigation area, choose Network Resources > Device Groups.
The list of configured network device groups displays in the content area.
Step 2 In the content area, check a device group check box, then click Delete.
Note You can delete multiple device groups by clicking the check box of each device group you want to delete.
The Confirm Deletion window displays asking if you are sure you want to delete the selected device group.
Step 3 Click Yes to delete the device group, or click No to abort.
3-6User Guide for Cisco Secure ACS Express 5.0.1
OL-20148-01

OL-20148-01
C H A P T E R 4
Configuring Users and Identity StoresYou configure ACS Express identity elements from the Users & Identity Stores drawer (see Figure 4-1) of the ACS Express GUI. You can use the internal user database to configure users and user groups. You can use an external user database for Active Directory, an LDAP database, or a One-Time Password (OTP) server.
This chapter contains the following sections:
• Internal User Database, page 4-1
– Users, page 4-2
– User Groups, page 4-6
• External User Databases, page 4-9
– Microsoft Active Directory, page 4-9
– LDAP Databases, page 4-12
– One-Time-Password Servers, page 4-16
Figure 4-1 Users & Identity Stores Drawer
Internal User DatabaseACS Express has an internal database used to store user configuration internally. Use the GUI to add, delete, copy and edit, individual users and user groups. This section contains the following topics:
• Users, page 4-2
4-1User Guide for Cisco Secure ACS Express 5.0.1

Chapter 4 Configuring Users and Identity StoresInternal User Database
• User Groups, page 4-6
UsersTable 4-1 lists the user properties you enter through the GUI.
This section contains the following topics:
• Adding Users, page 4-3
• Editing Users, page 4-3
• Copying Users, page 4-4
• Deleting Users, page 4-4
• User Password Policy, page 4-5
Table 4-1 User Properties
Field Description
General Settings
Name Required; must be unique among all Internal User Groups.
Description Optional; description of the user.
User Group Required; this list is populated with existing User Groups. When you set this to the name of a User Group, ACS Express uses the properties specified in that User Group to authenticate the user.
Status Required; default is Enabled which permits user access. When set to Disabled, user is denied access.
Supplementary Information
Full Name Optional; full name of the user.
Manager Optional; name of the user’s manager.
Phone Number Optional; phone number of user.
Email Optional; e-mail address of user.
Authentication Information
Password Required; must adhere to rules specified in Password Policy for this user or the specified User Group. See User Password Policy, page 4-5 for information about passwords.
Confirm Password Required; enter your password again to confirm.
Password never expires When checked, the user’s password never expires.
Password expires in: Number of days until the user’s password expires.
Note You must choose one of the two password expiration options.
4-2User Guide for Cisco Secure ACS Express 5.0.1
OL-20148-01

Chapter 4 Configuring Users and Identity StoresInternal User Database
Adding Users
To add a new user:
Step 1 In the navigation area, choose Users & Identity Stores > Internal User Database > Users.
The list of users configured in the Internal User Database displays in the content area.
Step 2 In the content area, click Add.
The Add User dialog window appears. Table 4-1 describes the GUI fields used to define and describe a user.
Step 3 Enter a name for the new user.
Step 4 Enter an optional description of the user.
Step 5 Use the pull-down menu to assign the user to a User Group.
When you set this to the name of a User Group, ACS Express uses the properties specified in that User Group to authenticate the user.
Note The User Group must exist before you can assign users to it.
Step 6 Accept the user status as Enabled or change it to Disabled.
If a user’s status is set to Disabled, the user will be denied access.
Step 7 Enter a full name of the user (optional).
Step 8 Enter the user’s manager’s name (optional).
Step 9 Enter the user’s phone number (optional).
Step 10 Enter the user’s e-mail address (optional).
Step 11 Enter an initial password in the Password field.
See User Password Policy, page 4-5, for information about password policies.
Step 12 Enter the password again in the Confirm Password field.
Step 13 Either check the check box to specify Password Never Expires or enter a number of days for the Password Expires in (days) field.
Step 14 Click Save to add the user to the selected User Group, or click Cancel to abort.
After the user is created, the content area is refreshed showing the newly-configured user.
Editing Users
To edit a user:
Step 1 In the navigation area, choose Users & Identity Stores > Internal User Database > Users.
The list of users configured in the Internal User Database displays in the content area.
Step 2 In the content area, click on a user name, or check a user’s check box, then click Edit.
The content area displays the selected user’s Edit configuration window.
4-3User Guide for Cisco Secure ACS Express 5.0.1
OL-20148-01

Chapter 4 Configuring Users and Identity StoresInternal User Database
Step 3 Select any field and make any desired changes.
Table 4-1 describes the GUI fields used to define and describe a user.
Step 4 Click Save to save your changes, or click Cancel to abort.
Copying Users
You can make a copy of an existing user to add a user with similar characteristics to the internal database. When you copy a user’s properties, the ACS Express GUI copies the user’s Description, User Group, and Supplemental information. To copy a user:
Step 1 In the navigation area, choose Users & Identity Stores > Internal User Database > Users.
The list of users configured in the Internal User Database displays in the content area.
Step 2 In the content area, check a user’s check box, then click Copy.
The content area displays the Copy configuration window with copied properties in their respective fields.
Step 3 Enter a name for the new user.
Table 4-1 describes the GUI fields used to define and describe a user.
Step 4 Select any other fields you might want to change and make desired changes.
Step 5 Enter an initial password in the Password field.
See User Password Policy, page 4-5, for information about password policies.
Step 6 Enter the password again in the Confirm Password field.
Step 7 Either check the check box to specify Password Never Expires or enter a number of days for the Password Expires in (days) field.
Step 8 Click Save to save your changes, or click Cancel to abort.
Deleting Users
To delete a user:
Step 1 In the navigation area, choose Users & Identity Stores > Internal User Database > Users.
The list of users configured in the Internal User Database displays in the content area.
Step 2 In the content area, check the check box of the user you want to delete, then click Delete.
Note You can delete multiple users by checking the check box of each user you want to delete.
The Confirm Deletion window appears asking if you are sure you want to delete the selected user.
Step 3 Click Yes to delete the device, or click No to abort.
4-4User Guide for Cisco Secure ACS Express 5.0.1
OL-20148-01

Chapter 4 Configuring Users and Identity StoresInternal User Database
User Password Policy
Use the Password Policy window to define your site’s password policies.
Password Complexity
The Password Complexity part of the Password Policy window defines rules about required characters, password length, and other password rules.
Password Lockout
The Password Lockout part of the Password Policy window defines two conditions pertaining to password lockout, Password Never Locked Out and Number of Invalid Logins.
Note An internal user’s Password Lockout state is not replicated.
Table 4-2 Password Complexity
Field Description
Required Characters
Lowercase Characters Requires lowercase characters in passwords
Uppercase Characters Requires uppercase characters in passwords
Numbers Requires numbers in passwords
Special Characters Requires at least one special character in the password. The following special characters are allowed:
! $ % ^ & * ( ) _ + | ~ - = ` { } [ ] : " ; ' < > ? , . /
Disallow Character Repetition Specifies that a password cannot contain repeated characters
Minimum Password Length Specifies the minimum password length
Disallow Username in Password Disallows passwords that contain the user’s username
Disallow Reuse of Previous Password Disallows a user’s previous password
Table 4-3 Password Lockout
Field Description
Password Never Locked Out Check box; when checked eliminates any password lockouts.
Number of Invalid Logins Numeric string indicates the number of invalid login attempts before password lockout occurs.
4-5User Guide for Cisco Secure ACS Express 5.0.1
OL-20148-01

Chapter 4 Configuring Users and Identity StoresInternal User Database
Changing Internal User Passwords
Users who authenticate in the internal database can change their password at any time on the ACS Express Primary server. To change your password, point your browser to a URL like the following:
https://<hostname>/changeuserpassword.do
Where hostname is the name of the ACS Express Primary server.
Users who authenticate through an external database such as AD, LDAP, or OTP cannot use this window to change their passwords.
Note Password changes for internal users are not supported on the secondary server in a replicated environment either through a protocol like TACACS+, MS-CHAPv2, PEAP/EAP, MS-CHAPv2, or using the password change URL listed above. Internal users in a replicated environment can only change their password on the primary server.
Your new password must adhere to the following rules:
• Contain at least one lowercase letter
• Contain at least one uppercase letter
• Contain at least one number
• Contain at least one of the following special characters:
! $ % ^ & * ( ) _ + | ~ - = ` { } [ ] : " ; ' < > ? , . /
• No character of the password may be repeated more than three times consecutively
• At least eight (8) characters in length
• Cannot include your username
• Cannot reuse your current password
• Password should not contain the words cisco or ocsic.
User GroupsUser Groups provide a way for you to group the users in your network. For example, you might specify different user groups for supervisors, system administrators, regular employees, and temporary workers.
User Group Properties
Table 4-4 lists the properties of a user group.
Table 4-4 User Group Properties
Field Description
Name Required; a string of 1-32 characters that specifies the name of the user group; must be unique for all user groups
Description Optional; description of the user group; might be used to describe the type of users in a user group
Status Indicates user group status, enabled or disabled
4-6User Guide for Cisco Secure ACS Express 5.0.1
OL-20148-01

Chapter 4 Configuring Users and Identity StoresInternal User Database
This section contains the following topics:
• Adding User Groups, page 4-7
• Editing User Groups, page 4-7
• Copying User Groups, page 4-7
• Deleting User Groups, page 4-9
Adding User Groups
To add a User Group:
Step 1 In the navigation area, choose Users & Identity Stores > Internal User Database > User Groups.
The list of User Groups configured in the Internal User Database displays in the content area.
Step 2 In the content area, click Add.
The Add User Groups page appears. Table 4-4 lists the properties of a User Group.
Step 3 Enter a name for the new user group.
Step 4 Optionally, enter a description of the new user group.
Step 5 Accept or change the User Group Status.
The default setting for a new User Group is Enabled.
Step 6 Click Save to save your changes, or click Cancel to abort.
Editing User Groups
To edit User Groups:
Step 1 In the navigation area, choose Users & Identity Stores > Internal User Database > User Groups.
The list of User Groups configured in the Internal User Database displays in the content area.
Step 2 Click on a User Group name, or check a User Group check box, then click Edit.
The content area displays the selected User Group’s Edit configuration window.
Step 3 Select any field and make any desired changes.
Table 4-4 lists the properties of a User Group.
Step 4 Click Save to save your changes, or click Cancel to abort.
Copying User Groups
To copy a User Group:
Step 1 In the navigation area, choose Users & Identity Stores > Internal User Database > User Groups.
The list of User Groups configured in the Internal User Database displays in the content area.
4-7User Guide for Cisco Secure ACS Express 5.0.1
OL-20148-01

Chapter 4 Configuring Users and Identity StoresInternal User Database
Step 2 Check a User Group’s check box, then click Copy.
The content area displays the Copy User Group window and copies selected User Group properties.
Step 3 Enter a name for the new user group.
Step 4 Make any other changes you desire.
Table 4-4 lists the properties of a User Group.
Step 5 Click Save to save your changes, or click Cancel to abort.
4-8User Guide for Cisco Secure ACS Express 5.0.1
OL-20148-01

Chapter 4 Configuring Users and Identity StoresExternal User Databases
Deleting User Groups
To delete a User Group:
Note You cannot delete a user group if it is being used by a user or a service.
Step 1 In the navigation area, choose Users & Identity Stores > Internal User Database > User Groups.
The list of User Groups configured in the Internal User Database displays in the content area.
Step 2 In the content area, check the check box of the user group you want to delete, then click Delete.
Note You can delete multiple user groups by clicking the check box of each user group you want to delete.
The Confirm Deletion window appears asking if you are sure you want to delete the selected user group.
Step 3 Click Yes to delete the device, or click No to abort.
External User DatabasesACS Express provides a way to authenticate users against an external user database. ACS Express supports the following external database options:
• Microsoft Active Directory, page 4-9
• LDAP Databases, page 4-12
• One-Time-Password Servers, page 4-16
ACS Express supports the following external databases:
• Microsoft Active Directory
• LDAP
ACS Express has been tested with and supports the following LDAP databases:
• Java Directory Server (JDS) 5.2 from Sun Microsystems
• Fedora Directory Server (FDS) 1.0.2, an open source LDAP database
Microsoft Active DirectoryACS Express supports the following Microsoft Active Directory (AD) server configurations:
• Windows 2000 Server SP4
• Windows 2003 Server RTM
• Windows 2003 Server SP1
• Windows 2003 Server R2
• Windows 2003 Server R2 SP2
4-9User Guide for Cisco Secure ACS Express 5.0.1
OL-20148-01

Chapter 4 Configuring Users and Identity StoresExternal User Databases
• Windows 2008 Server (32 and 64 bits)
Note ACS Express 5.0.1 does not support Windows 2008 Server R2. See Active Directory Credentials, page 4-11 for information about who can add users to the AD database.
To configure ACS Express to use an AD external database:
Step 1 In the navigation area, click Users & Identity Stores > External User Databases > Active Directory.
The Active Directory Domain Configuration window (Figure 4-2) appears in the content area. Table 4-5 describes the fields of the Domain Configuration window.
Figure 4-2 Active Directory Domain Configuration
Step 2 Enter the Domain Name.
Step 3 Enter the Bind Username.
Step 4 Enter the password for the Bind user and repeat the password in the Confirm Bind Password field.
Step 5 You might (optionally) enter the AD container to which you want the ACS Express server to be joined.
If no container is provided, ACS Express will be joined to the default container set up by your AD administrator.
Step 6 Enter a domain controller in the Preferred Domain Controller field (optional).
The ACS Express server connects only to the specified domain controller. If you do not specify a Preferred Domain Controller, the server voluntarily chooses one among all the available domain controllers and connects to it.
Step 7 Check the Enable Cross Forest Trusts check box if you want the ACS Express server to get all the domain controllers from the cross-forests that are trusted while joining the domain (optional).
Note If you specify a preferred domain controller, the ACS Express server connects only to that domain controller even if you check the Enable Cross Forest Trusts check box.
Step 8 Click Save and Join to save your changes and join the ACS Express server to your AD domain, or click Cancel to abort.
4-10User Guide for Cisco Secure ACS Express 5.0.1
OL-20148-01

Chapter 4 Configuring Users and Identity StoresExternal User Databases
Note After you enter all the AD connection values, you can use Test Connection to validate AD connectivity and ensure that the credentials are correct.
For authentication against AD to work, the ACS Express server must be joined to AD. The Join Status field shows the join status of the ACS Express server. If not joined to an AD container, the status will be Not Joined as shown in Figure 4-2. If joined to an AD container, the status will display something like this:
Joined to Domain: ad_domain.cisco.com
If you configure your site for replication, a Secondary Join Status field displays the join status of the secondary ACS Express server.
The Restore Defaults button restores all the fields to their original state or default values and leaves the domain to which the ACS Express server might be joined.
Active Directory Credentials
When ACS Express is configured to use Active Directory (AD) as an external database, the ACS Express appliance must be joined to the AD domain. AD controls who is allowed to join computers to the domain.
There are two basic scenarios:
1. Any user with a valid domain account can add a computer to the domain.
This is the default configuration for Windows Active Directory. It permits any successfully authenticated user to add as many as ten computers to the domain. Many enterprises leave their domains set up this way so that administrative access is not required for a computer to join the domain.
2. Permission to add a computer to the domain is restricted to a privileged set of users.
Table 4-5 Active Directory Domain Configuration Properties
Field Description
Domain Name Required; 1-30 character string.
Bind Username Required; username with which to bind, 1-125 character string.
Bind Password Required; password of the bind user, 1-32 character string.
Confirm Bind Password Required.
Container Optional; name of the AD container to which the ACS Express server will be joined (0-1024 character string), such as:
OU=AAA, OU=SECURITY
Preferred Domain Controller
Optional; name of the domain controller to connect with the ACS Express server, 1- 255 character string.
Enable Cross Forest Trusts
Check box; when checked allows only the domain controllers from the trusted cross-forests.
4-11User Guide for Cisco Secure ACS Express 5.0.1
OL-20148-01

Chapter 4 Configuring Users and Identity StoresExternal User Databases
When permission to add a computer to a domain is restricted, a user adding the computer must log in with an account that has appropriate administrative rights and provide a password. If your organization restricts who can add computers to the domain, joining the ACS Express appliance to the domain might require explicit permissions. For example, adding computers to the domain might be restricted to users in the Domain Administrators group or delegated within Organizational Units to specifically designated users or groups.
Your organization's policies determine who can join a domain, and these policies are enforced through Active Directory. ACS Express applies the same rules for the ACS Express appliance domain as have been defined in Active Directory for adding windows computers to the domain. For example:
• If any user with a valid domain account can join a Windows computer to a domain, joining the ACS Express appliance does not require an administrative user account and password.
• If only administrators or delegated users are allowed to add computers, the user adding the ACS Express must supply a valid administrative or delegate user.
LDAP DatabasesACS Express has been tested with and supports the following LDAP databases:
• Java Directory Server (JDS) 5.2 from Sun Microsystems
• Fedora Directory Server (FDS) 1.0.2, an open source LDAP database
There are four areas of configuration for an LDAP database:
• LDAP Database—Provides information required to communicate with the external LDAP server.
• Domain Filtering—Enables you to strip the domain delimiter and the domain name from the incoming packet.
• User Settings—Enables you to provide specific information about users associated with this LDAP database.
• Group Settings—Enables you to provide specific information about groups associated with this LDAP database.
To configure ACS Express to use an LDAP Database:
Step 1 In the navigation area, choose Users & Identity Stores > External User Databases > LDAP.
The Configure LDAP Database window appears in the content area. Table 4-6 describes the fields of the Configure LDAP Database window.
Table 4-6 LDAP Database Configuration Parameters
Field Description
LDAP Database Settings
Primary Server Hostname/IP Required; name or IP address of the LDAP primary server.
Secondary Server Hostname/IP Optional; name or IP address of the LDAP secondary server.
Use SSL When checked, uses SSL when accessing the LDAP database.
Note Using SSL requires you to install an LDAP CA certificate.
Server Port Required; number of the LDAP server port; default is port 389 for non-SSL and port 636 for SSL.
4-12User Guide for Cisco Secure ACS Express 5.0.1
OL-20148-01

Chapter 4 Configuring Users and Identity StoresExternal User Databases
Bind Username Required; username to bind with LDAP.
Bind Password Required; password of the LDAP bind user.
Confirm Bind Password Repeat the password of the LDAP bind user to confirm.
Server Timeout Required; number of seconds to wait for LDAP server response before server timeout; default is 5. The range is 1-99,999.
In some cases, the LDAP remote server might time out faster than the ACS Express server. In these cases, you might want to configure a smaller timeout value.
Failback Retry Interval Required; number of seconds to wait before trying to reconnect to the LDAP server; default is 300. The range is 1-99,999.
User Settings
User Directory Subtree Required; specifies the user directory subtree.
User Object Type Required; user object type label used for LDAP search; default is uid.
User Object Class Required; user object class label used for LDAP search; default is Person.
User Password Attribute Required; user’s password within the LDAP database; default is userpassword.
Group Membership Attribute Required; specifies the attribute name for the user’s Group membership in the LDAP servers.
User DN Required; specifies the attribute name that holds the complete distinguished name of the user in the LDAP server.
In the following example, the distinguished name of the user is represented by the attribute entrydn in Fedora LDAP for the user user1.
entrydn: cn=user1,ou=people,dc=cisco,dc=com
Domain Filtering Settings
Strip Domain Name Check this check box to strip the domain delimiter and the domain name from the username prior to authentication.
Domain Delimiter Character to use as domain delimiter. This is usually the @ when the Domain Location is a suffix, but can be others such as the backslash (\), commonly used when the Domain Location is a prefix.
Domain Location Select whether the domain name is a prefix or a suffix (in relation to the domain delimiter).
Group Settings
Group Directory Subtree Required; specifies the top-level path from which the LDAP groups will be searched from the user interface, as in the following:
dc=cisco,dc=com
Group Directory Subtree is used when configuring RADIUS Access Services and TACACS+ Access Service.
Table 4-6 LDAP Database Configuration Parameters (continued)
Field Description
4-13User Guide for Cisco Secure ACS Express 5.0.1
OL-20148-01

Chapter 4 Configuring Users and Identity StoresExternal User Databases
In the LDAP Database area of the LDAP Database window, you configure parameters required to communicate with the primary and secondary LDAP servers.
Step 2 Enter a value for the Primary Server Hostname/IP of the LDAP primary server.
This field is required and can be a hostname or an IP address.
Step 3 Enter a value for the Secondary Server Hostname/IP of the LDAP secondary server.
This field is optional and can be a hostname or an IP address.
Step 4 Check the Use SSL check box if you plan to use SSL.
Step 5 Enter a number to specify the server port to use.
By default, ACS Express uses port 389, but enter 636 if you have chosen Use SSL.
Step 6 Enter the Bind Username.
Step 7 Enter the password for the Bind user, and also enter the password in the Confirm Bind Password field.
Step 8 Accept the default value for Server Timeout (5 seconds) or modify it.
Step 9 Accept the default value for Failback Retry Interval (300 seconds) or modify it.
In the User Settings area of the LDAP Database window, you configure user parameters.
Step 10 Enter a name for the User Directory Subtree.
Step 11 Enter a type for the User Object Type.
Step 12 Enter a class for the User Object Class.
Step 13 Enter a password for the User Password Attribute.
Step 14 Enter the names of any groups for this user in Group Membership Attribute.
In the Domain Filtering area of the LDAP Database window, you configure parameters that can strip the domain delimiter and domain name from the user name.
Step 15 Enter a domain for the User DN.
Step 16 If you want to enable domain name stripping, check the Strip Domain Name check box.
Domain name stripping removes the domain delimiter and the domain from the packet leaving just the user name for database or authentication purposes.
Step 17 Enter the Domain Delimiter.
The most common delimiters are the at sign (@) and the backslash (\).
Step 18 Accept Suffix (the default setting) for Domain Location, or use the pull-down menu to select Prefix.
When Domain Location is set to suffix, the at sign (@) is used as the domain delimiter. When Domain Location is set to prefix, the backslash (\) is used as the domain delimiter.
In the Group Settings area of the LDAP Database window, you configure parameters that affect the Group Object used when configuring RADIUS Access Services and TACACS+ Access Services.
Group Object Type Required; group object type label used when configuring RADIUS Access Services and TACACS+ Access Services; default is cn.
Group Object Class Required; group object class label used when configuring RADIUS Access Services and TACACS+ Access Service; default is GroupOfUniqueNames.
Table 4-6 LDAP Database Configuration Parameters (continued)
Field Description
4-14User Guide for Cisco Secure ACS Express 5.0.1
OL-20148-01

Chapter 4 Configuring Users and Identity StoresExternal User Databases
Step 19 Enter the Group Directory Subtree.
This is the Group object used when configuring RADIUS and TACACS+ access rules.
Step 20 Enter the Group Object Type.
This is the Group object used when configuring RADIUS and TACACS+ access rules.
Step 21 Enter the Group Object Class.
This is the Group object used when configuring RADIUS and TACACS+ access rules.
Step 22 After modifying the LDAP Database information, click Save to save your changes, or click Cancel to abort.
The Restore Defaults button restores all the fields to their original states, removing any information you might have already entered and changing any other fields to their default values.
Click Test Connection to test the LDAP parameters you entered in the LDAP Database area. After clicking Test Connection, the ACS Express server attempts to access the primary and secondary LDAP servers using the current configuration, the parameters you have set for this section.
Adding an LDAP CA Certificate
If you configure your LDAP server to use SSL, you must install an LDAP CA Certificate. To install an LDAP CA Certificate:
Step 1 In the navigation area, choose Users & Identity Stores.
Step 2 Click the plus sign to the left of LDAP Database under External Users Databases, then click Certificates.
The LDAP Databases Certificates window appears and lists any LDAP CA Certificates that have been installed.
Step 3 Click Add.
Step 4 Use Browse to locate the LDAP CA Certificate file.
ACS Express supports PEM format for LDAP CA certificates.
Step 5 After you have selected the certificate file to install, click Add.
After you successfully add the certificate, the changes do not take effect until you restart the ACS Express server.
Deleting an LDAP CA Certificate
To delete an LDAP CA Certificate:
Step 1 In the navigation area, choose Users & Identity Stores.
Step 2 Click the plus sign to the left of LDAP Database under External Users Databases, then click Certificates.
The LDAP Database Certificates window appears and lists any LDAP CA Certificates that have been installed.
4-15User Guide for Cisco Secure ACS Express 5.0.1
OL-20148-01

Chapter 4 Configuring Users and Identity StoresExternal User Databases
Step 3 Check the check box of the LDAP CA Certificate you want to delete, then click Delete.
A Confirm Deletion dialog asks:
Are you sure you want to delete the selected items (s)?
Step 4 Click Yes to delete the selected certificate, or click No to abort and retain the certificate.
After you delete the certificate, the changes do not take effect until you restart the ACS Express server.
One-Time-Password ServersACS Express supports the use of token servers for the increased security provided by one-time passwords (OTPs). OTP authentication uses the RADIUS enabled token servers (as currently used by ACS). ACS Express supports any token server using the RADIUS server built into the token server.
ACS Express sends a standard RADIUS authentication request to a RADIUS-enabled token server. The RADIUS authentication request contains the following attributes:
• User-Name (RADIUS attribute 1)
• User-Password (RADIUS attribute 2)
• NAS-IP-Address (RADIUS attribute 4)
• NAS-Port (RADIUS attribute 5)
• NAS-Identifier (RADIUS attribute 32)
4-16User Guide for Cisco Secure ACS Express 5.0.1
OL-20148-01

Chapter 4 Configuring Users and Identity StoresExternal User Databases
To configure an OTP server to use as an external user database:
Step 1 In the navigation area, choose Users & Identity Stores > External User Databases > One-Time-Password Server.
The OTP Server window appears in the content area. Table 4-7 describes the fields of the OTP Server window.
Note See Required OTP Server Configuration, page 4-18 for information about configuration required on your OTP server for it to work properly with ACS Express.
Step 2 Enter the primary server’s IP address in the Primary Server IP field.
Step 3 Enter the secondary server’s IP address in the Secondary Server IP field.
Step 4 Enter the number of the ports to use for authentication requests in the Server Port field.
Step 5 Enter the shared secret used with the primary (and secondary) OTP server in the Shared Secret field.
This shared secret must match the shared secret in the OTP server configuration.
Step 6 Accept the default of 3 for Maximum Retries, or enter a different value.
Maximum Retries is the number of times the ACS Express server attempts to contact the OTP server before issuing a timeout.
Step 7 Accept the default of 5 seconds for Server Timeout, or enter a different value.
The Server Timeout value is the length of time in seconds after the ACS Express server attempts to contact the OTP server before issuing a timeout. The Server Timeout value doubles with each successive retry, so if the first retry were set for 5 seconds, the second retry would occur 10 seconds after the first timeout, and the third retry would occur 20 seconds after the second timeout before marking the primary OTP server as inactive and trying to contact the secondary OTP server.
Note If you experience timeout problems with your primary OTP server, you might want to modify your OTP server configuration for fewer retries and a shorter timeout value to enable the ACS Express server to mark the primary OTP server inactive and to contact the secondary OTP server instead.
Step 8 Accept the default of 120 seconds for Failback Retry Interval, or enter a different value.
The Failback Retry Interval specifies the amount of time to wait before attempting to restore the connection to the primary OTP server after having marked it as inactive.
Step 9 Click Test Connection to connect with the OTP server and check your configuration.
Step 10 Click Save to save your changes, or click Cancel to abort.
After you complete the OTP Server configuration, you can click Test Connection to attempt to connect with the OTP server and check your configuration.
If you have modified the OTP Server configuration, perhaps while experiencing problems with a server, click Restore Defaults to reset the configuration to its default values.
4-17User Guide for Cisco Secure ACS Express 5.0.1
OL-20148-01

Chapter 4 Configuring Users and Identity StoresExternal User Databases
When Primary OTP Server Is Down
When the primary OTP server is down, we recommend setting Failback Retry Interval to a very high value to avoid repeated failures. If the OTP server is down, authentication will fail during that time.
If you know that the OTP is down, set it the Failback Retry Interval to a very high value such as 30 days so authentication will always fall to secondary. (There are 2,595,000 seconds in 30 days.)
Required OTP Server Configuration
If you use an OTP server as an external user database, ACS Express requires additional configuration on the OTP server. The OTP server must be configured to return a Cisco attribute value pair with the following string in the RADIUS Access Response to the ACS Express server:
ACS:CiscoSecure-Group-Id=<group>
Where group is the group name to match with the groups in the RADIUS and TACACS+ Access Rules. See RADIUS Access Services, page 5-2 and TACACS+ Access Service, page 5-8 for more information.
Table 4-7 One-Time Password Server Configuration Parameters
Field Description
Primary Server IP Required; IP address of the primary server.
Secondary Server IP IP address of the secondary server (optional).
Server Port Required; TCP port to use for authentication requests (default is 1812).
Shared Secret Required; secret shared with primary server.
Maximum Retries Required; maximum number of retries after timeout occurs.
Server Timeout Required; amount of time in seconds before indicating server timeout. For each successive retry, the previous timeout value is doubled. You must specify a number greater than zero. The default value is 5 seconds.
Failback Retry Interval
Required; amount of time in seconds before attempting to restore the connection to the server.
4-18User Guide for Cisco Secure ACS Express 5.0.1
OL-20148-01

OL-20148-01
C H A P T E R 5
Configuring Access PoliciesA RADIUS access policy is a collection of selection rules, authentication rules, and results you set to process RADIUS authentication requests that the ACS Express server receives before granting access to your network for various users and user groups. There are similar access policies for TACACS+ requests for the devices that are connected to your network.
Selection rules specify information like sending device and RADIUS request attributes and values you might expect in the access request. Authentication rules include the database to use to authenticate the user, the protocol to use, and policy elements like User Group membership and time of access. The results specify the entitlements you grant for a particular access service.
Network Access policies apply to users attempting to access a wireless, wired, or VPN network. Network Access policies also support various authentication schemes like PAP, CHAP, MSCHAPv2, PEAP, EAP-TLS, EAP-FAST, LEAP, and Windows machine authentication. Network Access policies apply to network devices that communicate with ACS Express via RADIUS. Network Access policies can be configured to authenticate users against Active Directory, LDAP, One-Time-Password databases or the ACS Express internal user database.
Device Administration policies apply to users who attempt to access and configure a network device. ACS Express can authenticate and authorize the maximum allowed privilege level for users. Network devices communicate with ACS Express via TACACS+ or RADIUS. You can configure Device Administration policies to authenticate users against Active Directory, LDAP, One-Time-Password databases or the ACS Express internal user database.
This chapter contains the following sections:
• Access Services, page 5-2
– RADIUS Access Services, page 5-2
– TACACS+ Access Service, page 5-8
• Policy Elements, page 5-13
– RADIUS Responses, page 5-13
– Time of Day, page 5-15
5-1User Guide for Cisco Secure ACS Express 5.0.1

Chapter 5 Configuring Access PoliciesAccess Services
Figure 5-1 shows the Access Policies drawer of the ACS Express GUI.
Figure 5-1 Access Policies Drawer
Access ServicesACS Express supports two types of access services:
• RADIUS Access Services
• TACACS+ Access Service
RADIUS Access ServicesACS Express uses RADIUS Access Services to configure rules on how to validate credentials for users who attempt to log in. You configure the following elements for a RADIUS Access Service:
• Status
– Name
– Status
• Selection Rules
– Assign the Available Device Groups
– Assign RADIUS Request Attributes
• Results
– Select an authentication database
– Select an EAP method
– Configure Session Authorization Rules
This section has the following topics:
• Adding a RADIUS Access Service, page 5-3
• Editing a RADIUS Access Service, page 5-7
• Copying a RADIUS Access Service, page 5-8
5-2User Guide for Cisco Secure ACS Express 5.0.1
OL-20148-01

Chapter 5 Configuring Access PoliciesAccess Services
• Deleting a RADIUS Access Service, page 5-8
Adding a RADIUS Access Service
To add a RADIUS Access Service:
Step 1 Choose Access Policies, then RADIUS Access Services under Access Services.
The Access Policies: Access Services > RADIUS Access Services window displays any currently defined RADIUS access services.
Step 2 Click Add.
The Add RADIUS Access Services window (Figure 5-2) displays the General Settings tab.
Figure 5-2 Add RADIUS Access Service
Step 3 Enter a name for the RADIUS Access Service.
Step 4 To disable this RADIUS Access Service, use the pull-down menu to change the status to Disabled. Otherwise, accept the default status of Enabled.
Step 5 Click the Selection Rules tab.
The Selection Rules window (Figure 5-3) enables you to set up the Network Device Groups from which you might receive an Access Request and to specify the RADIUS Request Attributes you expect to receive in an incoming RADIUS access request. Incoming RADIUS access requests must match the conditions you set on this window to enable the actions you specify on the Results window.
You should create a RADIUS Access Service for each type of device that might send an request access. For example, in a wireless environment, you should set up a RADIUS Access Service for Wireless Access Points and Wireless Controllers. If your site allows VPN access, you should set up a RADIUS Access Service for VPN Concentrators.
You must assign at least one of the Available Device Groups under Network Device Groups to each RADIUS Access Service. Click one of the Available Device Groups to select it, then click the single greater than button (>) to assign the selected device group to this RADIUS Access Service.
5-3User Guide for Cisco Secure ACS Express 5.0.1
OL-20148-01

Chapter 5 Configuring Access PoliciesAccess Services
Figure 5-3 Add RADIUS Access Service Selection Rules
The single less than button (<) moves an assigned Device Group you select back to the Available Device Groups. The double greater than button (>>) moves all Available Device Groups to the Assigned Device Groups, and the double less than button (<<) moves all Assigned Device Groups to the Available Device Groups.
The Selection Rules window (Figure 5-3) also enables you to list RADIUS attributes under RADIUS Request Attributes from predefined dictionaries and to specify expected values to match against incoming RADIUS access requests.
Step 6 Use the pull-down menu to select a Dictionary.
The following dictionaries are supported:
• RADIUS IETF
• Cisco IOS
• Cisco VPN 5000
• Microsoft
• Four custom dictionaries you define.
You define custom dictionaries at System Administration > Radius Dictionary.
Step 7 Use the pull-down menu to select RADIUS attributes specific to the selected dictionary, and enter a value to assign to the selected attribute.
Each attribute and value you specify (also known as an attribute value pair or AV pair) must be present in an incoming RADIUS access request.
Step 8 Click the Results tab.
The Results tab window (Figure 5-4) enables you to select the Authentication Database, select EAP Settings, and define Session Access Rules.
5-4User Guide for Cisco Secure ACS Express 5.0.1
OL-20148-01

Chapter 5 Configuring Access PoliciesAccess Services
Figure 5-4 Add RADIUS Access Service Results
Step 9 Use the pull-down menu to select an Authentication Database.
Choose the Authentication Database with which to authenticate the incoming RADIUS access request.
Note The pull-down menu only lists configured databases.
Step 10 Choose the Protocol Settings to use for authentication for this access rule.
You use Session Access Rules to determine the entitlements granted to a user who has been authenticated. If the credentials are not valid, access is denied and ACS Express sends a response to the network device.
See Table 5-1, Authentication Protocols and Compatible Databases, for a list of compatible databases for each authentication protocol.
Table 5-1 Authentication Protocols and Compatible Databases
Authentication Protocol
Databases
Local AD LDAP OTP
TACACS+ (ASCII) Yes Yes Yes Yes
PAP/ASCII Yes Yes Yes Yes
CHAP Yes No No No
MSCHAPv2 Yes Yes No No
EAP-MSCHAPv2 Yes Yes No No
LEAP Yes Yes Yes1 No
EAP-TLS Yes Yes Yes No
PEAP (EAP-TLS) Yes Yes Yes No
PEAP (EAP-GTC) Yes Yes Yes Yes
PEAP (EAP-MSCHAPV2) Yes Yes No No
5-5User Guide for Cisco Secure ACS Express 5.0.1
OL-20148-01

Chapter 5 Configuring Access PoliciesAccess Services
1 LEAP uses clear text passwords.
Note ACS Express 5.0.1 is not fully compliant with the latest EAP-FAST RFC, including EAP-FASTv1 and EAP-FASTv1a.
Step 11 To add a Session Access Rule, click Add, and choose Add One.
The Add Access Rule dialog box appears (Figure 5-5).
Figure 5-5 Add Access Rule
Step 12 Check the Enabled check box to enable the access rule.
In the Selection Rules area, you specify the User Group and any ToD or machine access restrictions. If you specify more than one User Group in an authentication rule, the user must belong to all User Groups you specify.
Step 13 Click Search DB to locate the User Group with which to associate this access rule.
The Search Database Groups dialog appears.
Note This does not occur with OTP servers.
Step 14 Enter a full or partial name (with wildcards) in the Search Filter field, then click Search.
EAP-FASTv0 (EAP-GTC) Yes Yes Yes No
EAP-FASTv0 (EAP-MSCHAPv2) Yes Yes No No
Table 5-1 Authentication Protocols and Compatible Databases (continued)
Authentication Protocol
Databases
Local AD LDAP OTP
5-6User Guide for Cisco Secure ACS Express 5.0.1
OL-20148-01

Chapter 5 Configuring Access PoliciesAccess Services
Note The group search is case-sensitive. Use the asterisk (*) as a wildcard.
Step 15 Check to select an entry from the search, then click Apply to select the group, or click Cancel to abort.
Step 16 Use the pull-down menu to choose any Machine Access Restrictions.
When a successful Machine Authentication occurs, the ACS Express server creates and caches a machine session. The machine session expires after the MAR timeout period and the expired sessions are cleaned up each hour.
During the period after the machine session expires and before the clean up occurs, if a machine re-authenticates successfully, it will use the existing session instead of creating a new session. If a user authentication occurs from the machine whose session has expired and has MAR enforced in the access rules, the user authentication will be rejected.
Step 17 Use the pull-down menu to choose any Time of Day block.
This field is optional. If not selected, ToD is ignored.
Step 18 Use the pull-down menu to choose a RADIUS Response.
Step 19 Click Apply to save this RADIUS Access Service, or click Cancel to abort.
Editing a RADIUS Access Service
To edit a RADIUS Access Service:
Step 1 Choose Access Policies, then RADIUS Access Services under Access Services.
The Access Policies: Access Services > RADIUS Access Services window displays any currently defined RADIUS access services.
Step 2 Choose the RADIUS Access Service you want to modify by checking its check box, then click Edit > Edit Status, Edit Selection Rules, or Edit Results.
The Edit dialog box for the tab you selected appears. You can click the other tabs to make changes in those areas.
Step 3 Make the changes you want to make to the access service.
Step 4 Click Save to save your changes, or click Cancel to abort.
5-7User Guide for Cisco Secure ACS Express 5.0.1
OL-20148-01

Chapter 5 Configuring Access PoliciesAccess Services
Copying a RADIUS Access Service
To copy a RADIUS Access Service:
Step 1 Choose Access Policies, then RADIUS Access Services under Access Services.
The Access Policies: Access Services > RADIUS Access Services window displays any currently defined RADIUS access services.
Step 2 Choose the RADIUS Access Service you want to modify by checking its check box, then click Copy.
The Copy dialog box for the RADIUS Access Service you selected appears. The name of the access service is listed as “Copy-of-access_service.”
Step 3 Change the name of the access service, and make any other changes you want to make to the copied access service.
Step 4 Click Save to save your changes, or click Cancel to abort.
Deleting a RADIUS Access Service
To delete a RADIUS Access Service:
Step 1 Choose Access Policies, then RADIUS Access Services under Access Services.
The Access Policies: Access Services > RADIUS Access Services window displays any currently defined RADIUS access services.
Step 2 Choose the RADIUS Access Service you want to delete by checking its check box, then click Delete.
The Confirm Deletion dialog box appears asking if you are sure you want to delete the selected access service.
Step 3 Click Yes to delete the selected RADIUS Access Service, or click No to abort and return to the list of known RADIUS Access Services.
TACACS+ Access ServiceThis section describes how to manage the TACACS+ Access Service. ACS Express supports only one TACACS+ Access Service. To use the TACACS+ Access Service, you configure the user database to be used, the timeout settings, and access rules. The user database and timeout settings are common to all TACACS+ access rules.
To use the TACACS+ Access Service, you must also configure devices with the TACACS+ Shared Secret and configure access rules in TACACS+ Access Service that permit access.
This section has the following topics:
• Adding One TACACS+ Access Service Access Rule, page 5-9
• Adding Many TACACS+ Access Rules, page 5-10
• Editing a TACACS+ Access Rule, page 5-12
• Copying a TACACS+ Access Rule, page 5-12
5-8User Guide for Cisco Secure ACS Express 5.0.1
OL-20148-01

Chapter 5 Configuring Access PoliciesAccess Services
• Deleting a TACACS+ Access Rule, page 5-13
Adding One TACACS+ Access Service Access Rule
To add one TACACS+ Access Service access rule:
Step 1 Choose Access Policies, then TACACS+ Access Services under Access Services.
The Access Policies: Access Services > TACACS+ Access Services window displays any currently defined TACACS+ access services as shown in Figure 5-6.
Figure 5-6 Adding a TACACS+ Access Service
Step 2 Click Add > Add One.
The Add Access Rule dialog box appears. The default Status of a new access rule is Enabled.
Step 3 Accept the Status of Enabled, or use the pull-down menu to change it to Disabled.
Step 4 Use the pull-down menu to choose one of the Network Device Groups.
Step 5 Choose a User Group with which to associate this access rule by clicking Search DB.
The Search Database Groups dialog box appears.
Note This does not occur with OTP servers.
Step 6 Enter a full or partial name (with wildcards) in the Search Filter field, then click Search.
Note The search is case sensitive. Use the asterisk (*) as a wildcard.
Step 7 Check to select an entry from the search, then click Apply to select the user group, or click Cancel to abort.
Step 8 Choose one of the previously configured ToD blocks.
ToD blocks indicate when access is permitted (days and times). This field is optional. If not selected, ToD is ignored.
5-9User Guide for Cisco Secure ACS Express 5.0.1
OL-20148-01

Chapter 5 Configuring Access PoliciesAccess Services
To permit access with this access rule, uncheck the Deny Access check box under Results. If you permit access by unchecking the Deny Access check box, you must also choose a privilege level.
Step 9 Use the pull-down menu to choose a privilege level (0-15) for the access rule.
Step 10 Click Save to save your changes, or click Cancel to abort.
Adding Many TACACS+ Access Rules
To add many TACACS+ Access rules:
Step 1 Choose Access Policies, then TACACS+ Access Services under Access Services.
The Access Policies: Access Services > TACACS+ Access Services window displays any currently defined TACACS+ access services.
Step 2 Click Add > Add Many.
The Add Many dialog box appears (Figure 5-7). The default status of a new access rules is Enabled.
Figure 5-7 Adding Many TACACS+ Authorization Rules
Step 3 Check the Status check box to enter the properties of each access rule you want to add.
After you check in the Status check box, the fields and pull-down menus for that line become active.
Step 4 Use the pull-down menu to choose a Network Device Group.
Step 5 Enter a User Group to associate each access rule.
Step 6 Choose a ToD block to use for each access rule.
This field is optional. If not selected, ToD is ignored.
Step 7 To permit access, use the pull-down menu to select a Privilege Level for each access rule.
5-10User Guide for Cisco Secure ACS Express 5.0.1
OL-20148-01

Chapter 5 Configuring Access PoliciesAccess Services
Step 8 Click Save to save your changes, or click Cancel to abort.
5-11User Guide for Cisco Secure ACS Express 5.0.1
OL-20148-01

Chapter 5 Configuring Access PoliciesAccess Services
Editing a TACACS+ Access Rule
To edit a TACACS+ Access rule:
Step 1 Choose Access Policies, then TACACS+ Access Services under Access Services.
The Access Policies: Access Services > TACACS+ Access Services window displays any currently defined TACACS+ access services.
Step 2 Choose the access rule you want to modify by checking its check box, then click Edit.
The TACACS+ Access Service > Edit Access Rule window appears.
Step 3 Make the changes you desire, then click Save to save your changes, or click Cancel to abort.
Editing Many TACACS+ Access Rules
ACS Express enables you to change one or more properties of the TACACS+ Access Rules you have already configured at the same time.
To edit more than one TACACS+ Access rules:
Step 1 Choose Access Policies, then TACACS+ Access Services under Access Services.
The Access Policies: Access Services > TACACS+ Access Services window displays any currently defined TACACS+ access services.
Step 2 Check the check box of each TACACS+ Access Rule you want to modify, then click Edit.
The TACACS+ Access Service > Edit Many window appears. The ACS Express GUI also displays the rules you selected to edit and the values currently set for each property.
Step 3 Check the check box of the each property you want to modify or add to the TACACS+ Access Rules you have selected to edit.
When you choose a property to add or modify, its associated field becomes active enabling you to add or change a value.
Step 4 After making all the changes you would like, click Save to save your changes, or click Cancel to abort.
Copying a TACACS+ Access Rule
To copy a TACACS+ Access rule:
Step 1 Choose Access Policies, then TACACS+ Access Services under Access Services.
The Access Policies: Access Services > TACACS+ Access Services window displays any currently defined TACACS+ access services.
Step 2 Choose the access rule you want to copy by checking its check box, then click Copy.
TACACS+ Access Service > Edit Access Rule window appears.
Step 3 Make the changes you desire, then click Save to save your changes, or click Cancel to abort.
5-12User Guide for Cisco Secure ACS Express 5.0.1
OL-20148-01

Chapter 5 Configuring Access PoliciesPolicy Elements
Deleting a TACACS+ Access Rule
To delete a TACACS+ Access rule:
Step 1 Choose Access Policies, then TACACS+ Access Services under Access Services.
The Access Policies: Access Services > TACACS+ Access Services window displays any currently defined TACACS+ access services.
Step 2 Choose the access rule you want to delete by checking its check box, then click Delete.
A Confirm Deletion dialog box appears asking if you are sure you want to delete the access rule.
Step 3 Click Yes to delete the selected access rule, or click No to abort and retain the rule.
Policy ElementsUse the ACS Express GUI to configure the following policy elements:
• RADIUS Responses, page 5-13
• Time of Day, page 5-15
RADIUS ResponsesRADIUS Responses enable you to define a set of RADIUS attribute value pairs from a collection of environment dictionaries. ACS Express supports attributes from the following dictionaries:
• RADIUS - IETF
• Cisco Airespace
• Cisco IOS
• Cisco VPN 3000 ASA PIX 7.+
• Cisco VPN 5000
• Four custom Dictionaries
• Juniper
• Microsoft
Adding RADIUS Responses
ACS Express enables you to configure RADIUS response sets (or RADIUS attribute sets) with up to ten attribute/value (AV) pairs.
To add a RADIUS Response (or a RADIUS attribute set):
Step 1 Choose Access Policies, then RADIUS Response under Policy Elements.
The Access Policies > Policy Elements > RADIUS Response window displays any currently defined RADIUS attribute sets.
5-13User Guide for Cisco Secure ACS Express 5.0.1
OL-20148-01

Chapter 5 Configuring Access PoliciesPolicy Elements
Step 2 To define a new RADIUS attribute set, choose Access Policies > Policy Elements > RADIUS Response and click Add.
The Add window appears.
Step 3 Enter a name for the new attribute set.
Step 4 Enter an (optional) description of the attribute set.
Step 5 Choose a Dictionary from the drop-down menu that contains the attribute you want to use.
Step 6 Under the Attribute list, select the attribute you want to use.
Step 7 Enter the value of the attribute in the Tag field.
Enter as many AV pairs for this RADIUS Response (up to 10) as you want.
Step 8 Click Save to save your changes, or click Cancel to abort.
Editing RADIUS Responses
To edit a RADIUS Response (or a RADIUS attribute set):
Step 1 Choose Access Policies, then RADIUS Response under Policy Elements.
The Access Policies > Policy Elements > RADIUS Response window displays any currently defined RADIUS attribute sets.
Step 2 To edit a RADIUS attribute set, check its check box to select a RADIUS attribute set, or click the name of an existing attribute set.
The Access Policies > Policy Elements > RADIUS Response > Edit window appears.
Step 3 Make any desired changes to the attribute set.
Step 4 Click Save to save your changes, or click Cancel to abort.
Copying RADIUS Responses
To copy a RADIUS Response (or a RADIUS attribute set):
Step 1 Choose Access Policies, then RADIUS Response under Policy Elements.
The Access Policies > Policy Elements > RADIUS Response window displays any currently defined RADIUS attribute sets.
Step 2 To copy a RADIUS attribute set, check its check box to select a RADIUS attribute set, or click the name of an existing attribute set.
The Access Policies > Policy Elements > RADIUS Response > Edit window appears.
5-14User Guide for Cisco Secure ACS Express 5.0.1
OL-20148-01

Chapter 5 Configuring Access PoliciesPolicy Elements
Step 3 Change the name of the RADIUS Response, and make any other desired changes to the attribute set.
Step 4 Click Save to save your changes, or click Cancel to abort.
Deleting a RADIUS Responses
To delete a RADIUS Response (or a RADIUS attribute set):
Step 1 Choose Access Policies, then RADIUS Response under Policy Elements.
The Access Policies > Policy Elements > RADIUS Response window displays any currently defined RADIUS attribute sets.
Step 2 To delete a RADIUS attribute set, check its check box, then click Delete.
A dialog box informs you that you are about to permanently delete the selected RADIUS attribute set.
Step 3 Click OK to delete the selected attribute set, or click Cancel to abort.
Time of DayThe ToD window enables you to select a block of hours on any day (or days) of the week in which to allow access. For example, you might want to define a weekday shift, an afternoon shift, and a night shift, and only allow users access during their normal work hours. Figure 5-8 is an example of a block of hours that defines a weekday shift from 8:00 am to 6:00 pm (0800 to 1800), Monday through Friday.
This section contains the following topics:
• Adding a Time of Day Block, page 5-16
• Editing a Time of Day Block, page 5-16
• Copying a Time of Day Block, page 5-17
• Deleting a Time of Day Block, page 5-17
5-15User Guide for Cisco Secure ACS Express 5.0.1
OL-20148-01

Chapter 5 Configuring Access PoliciesPolicy Elements
Figure 5-8 Time of Day Block
Adding a Time of Day Block
To add a ToD block:
Step 1 Choose Access Policies, then Time of Day under Policy Elements.
The Access Policies > Policy Elements > Time of Day window displays a list of any currently defined ToD blocks.
Step 2 To define a new ToD block, click Add.
The Access Policies > Policy Elements > Time of Day > Add window displays the seven day, 24-hour grid.
Step 3 Enter a name for this ToD block.
This name becomes a menu item selection used when you configure User Groups.
Step 4 You might (optionally) enter a description of this ToD block.
Step 5 Use your mouse to select the hours in the grid that you want to enable access for this ToD block.
You can click specific hours in the grid, or you can select a row of hours at a time. To select a row of hours, left-click to select the first hour, then press Shift and hold it until you left-click the ending hour in the row. You can continue to press Shift to select additional hours or rows in the grid.
Step 6 Click Save to save your ToD block or click Cancel to abort.
Editing a Time of Day Block
To edit a ToD block:
Step 1 Choose Access Policies, then Time of Day under Policy Elements.
5-16User Guide for Cisco Secure ACS Express 5.0.1
OL-20148-01

Chapter 5 Configuring Access PoliciesPolicy Elements
The Access Policies > Policy Elements > Time of Day window displays a list of any currently defined ToD blocks.
Step 2 To edit a ToD block, check its check box to select a ToD block, or click the name of an existing ToD block and click Edit.
The Access Policies > Policy Elements > Time of Day > Add window displays the seven day, 24-hour grid.
Step 3 Make any desired changes for this ToD block.
This name becomes a menu item selection used when you configure User Groups.
Step 4 You might (optionally) enter a description of this ToD block.
Step 5 Use your mouse to select the hours in the grid that you want to enable access for this ToD block.
You can click specific hours in the grid, or you can select a row of hours at a time. To select a row of hours, left-click to select the first hour, then press Shift and hold it until you left-click the ending hour in the row. You can continue to press Shift to select additional hours or rows in the grid.
Step 6 Click Save to save your ToD block or click Cancel to abort.
Copying a Time of Day Block
To copy a ToD block:
Step 1 Choose Access Policies, then Time of Day under Policy Elements.
The Access Policies > Policy Elements > Time of Day window displays a list of any currently defined ToD blocks.
Step 2 To copy a ToD block, check its check box or click the name of an existing ToD block, then click Copy.
The Access Policies > Policy Elements > Time of Day > Copy window displays the seven day, 24-hour grid.
Step 3 Enter a name for the new ToD block.
This name becomes a menu item selection used when you configure User Groups.
Step 4 You might (optionally) enter a description of this ToD block.
Step 5 Use your mouse to make any changes you desire in this ToD block.
You can click specific hours in the grid, or you can select a row of hours at a time. To select a row of hours, left-click to select the first hour, then press Shift and hold it until you left-click the ending hour in the row. You can continue to press Shift to select additional hours or rows in the grid.
Step 6 Click Save to save the ToD block or click Cancel to abort.
Deleting a Time of Day Block
To delete a ToD block:
Step 1 Choose Access Policies, then Time of Day under Policy Elements.
5-17User Guide for Cisco Secure ACS Express 5.0.1
OL-20148-01

Chapter 5 Configuring Access PoliciesPolicy Elements
The Access Policies > Policy Elements > Time of Day window displays a list of any currently defined ToD blocks.
Step 2 To delete a ToD block, check the check box of the ToD block you want to delete, then click Delete.
A dialog box appears and asks if you are sure you want to delete the ToD block.
Step 3 Click OK to delete the ToD block or click Cancel to abort.
5-18User Guide for Cisco Secure ACS Express 5.0.1
OL-20148-01

OL-20148-01
C H A P T E R 6
Reports and TroubleshootingThe reports and troubleshooting drawer provides access to the Reports and Logs section and the Troubleshooting section.
Figure 6-1 shows the Reports and Troubleshooting menu.
This chapter contains the following sections:
• Reports and Logs, page 6-1
– Reports, page 6-2
– Troubleshooting, page 6-5
Figure 6-1 Reports and Troubleshooting Menu
Reports and LogsThe Reports & Logs menu enables you to do the following:
• View and download reports related to RADIUS/TACACS+ usage summary, authentication report, device commands report, and accounting logs
• Enable users to view and download logs and reports related to usage statistics, authentication and RADIUS accounting
• View authentication reports
6-1User Guide for Cisco Secure ACS Express 5.0.1

Chapter 6 Reports and TroubleshootingReports and Logs
ReportsThis section discusses the following topics:
• Downloading Authentication Reports, page 6-3
• Usage Summary Reports, page 6-2
• Authentication Report, page 6-2
• Device Commands Report, page 6-4
• Accounting Logs, page 6-5
Usage Summary Reports
The Usage Summary Report provides a summary report for network access and device administration for the last seven days. This window provides the following tabs:
• RADIUS Access, page 6-2
• TACACS+ Access, page 6-2
RADIUS Access
The RADIUS Access Report provides the network access statistics for the past seven days in both the graphical and tabular format. The graph provides the plots for unique user login attempts (orange line), successful authentications (blue line), and failed authentication attempts (red line).
The tabular format provides a listing of the number of unique users, total number of authentication requests, successful authentication attempts, and failed authentication attempts.
TACACS+ Access
The TACACS+ Access Report provides the device administration statistics for the past seven days in both the graphical and tabular format. The graph provides the plots for successful authentications (blue line) and failed authentications (red line).
The tabular format provides a listing of the total number of authentication requests, successful authentication attempts, and failed authentication attempts.
Authentication Report
The Authentication Report function enables you to generate authentication reports that include information about authentication attempts by all users and all devices. The default authentication report you generate will list authentication attempts for all users and all devices for the current day.
To generate a report for a specific day, user, or device, check the specific check box, then select the date or enter the user or device name in the field provided.
Click Generate Report to initiate a report and display the report on the GUI. From a displayed report, click Download to download the report to your computer. Authentication Report data is stored for 31 days.
6-2User Guide for Cisco Secure ACS Express 5.0.1
OL-20148-01

Chapter 6 Reports and TroubleshootingReports and Logs
Downloading Authentication Reports
The ACS Express GUI enables you do download authentication reports to your computer in Microsoft Office Excel Comma Separated Values (.csv) file format. When you attempt to download a report, a dialog box opens to indicate the file you have chosen to download and to provide you with the option to open the file using Microsoft Office Excel or to save it to disk.
If you use a Microsoft operating system, such as Windows XP, and the Microsoft Internet Explorer (IE) browser to download reports, IE attempts to open some of these report files within the browser window instead of opening the files in Microsoft Excel (or another spreadsheet application you might have installed).
6-3User Guide for Cisco Secure ACS Express 5.0.1
OL-20148-01

Chapter 6 Reports and TroubleshootingReports and Logs
To prevent IE from attempting to open .csv report files, complete the following steps:
Step 1 Open a disk or folder on your computer such as C:\ or My Documents.
Step 2 Choose Tools > Folder Options and then click the File Types tab.
It might take several seconds to load all the registered file types.
Step 3 Scroll down the list of Registered file types until you locate the XLS-Excel worksheet entry and highlight it as shown in Figure 6-2.
Figure 6-2 Downloading .CSV Format File
Step 4 Click Advanced and uncheck the Browse in same window check box near the bottom of the Edit File Type window.
Step 5 Click OK.
Device Commands Report
The Device Commands Report option enables you to generate device command reports that include information about device commands used by all users and all devices. The default device commands report you generate will list device commands used by all users and all devices for the current day.
To generate a report for a specific day, user, or device, check the specific check box, then select the date or enter the user or device name in the field provided.
Click Generate Report to initiate the report. A dialog box asks if you want to open the report or save the file to disk. The default report reader format is Microsoft Office Excel.
6-4User Guide for Cisco Secure ACS Express 5.0.1
OL-20148-01

Chapter 6 Reports and TroubleshootingTroubleshooting
Accounting Logs
The ACS Express server automatically records all attributes received in Accounting Request packets, including the following:
• Date and time
• User Name
• NAS Port
• NAS Identifier
• Accounting status
• Accounting session ID
When an accounting log reaches 10 MB in size, the log rolls over automatically, and a new accounting log begins. Also, a new accounting log begins each day. From the Accounting Logs window, click a log’s check box to view, download, or delete the selected log. You can also click to download or delete all accounting logs.
TroubleshootingThe troubleshooting section enables you to perform network connectivity tests, download debug logs, and check and manually restart the ACS Express server processes for AAA. This section discusses the following topics:
• Connectivity Tests, page 6-5
• Process Status, page 6-7
• Server Logs, page 6-8
Connectivity TestsThe Connectivity Tests window enables you to perform the following connectivity tests:
• ping
• traceroute
• nslookup
• AD Domain Diagnostics
To use the connectivity tests, enter the hostname or IP address of the network destination with which you want to connect, and click one of the three connectivity test buttons.
Figure 6-3 shows an example of the connectivity test window.
6-5User Guide for Cisco Secure ACS Express 5.0.1
OL-20148-01

Chapter 6 Reports and TroubleshootingTroubleshooting
Figure 6-3 Connectivity Test Window
ping
Use ping to determine if a particular host is reachable across an IP network. The ping function works by sending packets to the target network destination and waiting for a reply.
Figure 6-4 shows an example of ping output.
Figure 6-4 ping Output
traceroute
Use tracerroute to determine the route taken by packets across a network. tracerroute is helpful when troubleshooting network problems. tracerroute shows a list of routers that the packets traverse enabling you to identify the path taken to reach a particular network destination.
nslookup
Use nslookup, or name server lookup, to find the IP address of a particular computer using DNS lookup. The output of nslookup should include the server name and IP address.
AD Domain Diagnostics
Use AD Domain Diagnostics if you experience problems joining the ACS Express server to an AD domain. AD Domain Diagnostics performs several diagnostic checks and provides information about the domain controller, global catalog, and domain ports.
After clicking AD Domain Diagnostics, the GUI displays the results of the diagnostics. The following is an example of the output:
IP DiagnosticsLocal host name: acsxp-srv15Local IP Address: 209.165.200.224
Domain Diagnostics:Domain: acsxpdev.cisco.comSubnet site: Default-First-Site-NameDNS query for: _gc._tcp.acsxpdev.cisco.com
6-6User Guide for Cisco Secure ACS Express 5.0.1
OL-20148-01

Chapter 6 Reports and TroubleshootingTroubleshooting
DNS query for: _ldap._tcp.acsxpdev.cisco.comFound SRV records:acsxp-ad01.acsxpdev.cisco.com:3268Found SRV records:acsxp-ad01.acsxpdev.cisco.com:389Testing Active Directory TCP connectivity:Global Catalog: acsxp-ad01.acsxpdev.cisco.comgc: 3268/tcp - goodDomain Controller: acsxp-ad01.acsxpdev.cisco.comldap: 389/udp - goodldap: 389/tcp - goodsmb: 445/tcp - goodkdc: 88/tcp - goodkpasswd: 464/tcp - goodDomain Controller: acsxp-ad01.acsxpdev.cisco.com:3268Domain controller type: Windows 2003Domain Name: ACSXPDEV.CISCO.COMisGlobalCatalogReady: TRUEdomainFunctionality: 0 = (DS_BEHAVIOR_WIN2000)forestFunctionality: 0 = (DS_BEHAVIOR_WIN2000)domainControllerFunctionality: 2 = (DS_BEHAVIOR_WIN2003)Domain Controller: acsxp-ad01.acsxpdev.cisco.com:389Domain controller type: Windows 2003Domain Name: ACSXPDEV.CISCO.COMisGlobalCatalogReady: TRUEdomainFunctionality: 0 = (DS_BEHAVIOR_WIN2000)forestFunctionality: 0 = (DS_BEHAVIOR_WIN2000)domainControllerFunctionality: 2 = (DS_BEHAVIOR_WIN2003)Forest Name: ACSXPDEV.CISCO.COM
Retrieving zone data from acsxpdev.cisco.com
Computer Account DiagnosticsJoined as: acsxp-srv15Key Version: 6Service Principal Names: host/acsxp-srv15.acsxpdev.cisco.comhost/acsxp-srv15HTTP/acsxp-srv15.acsxpdev.cisco.comHTTP/acsxp-srv15
AD Agent Process Status: Running in connected mode
Process StatusThe Process Status window displays the status of the following ACS Express servers and processes:
• ACS Express Server—the RADIUS and TACACS+ server
• ACS Express Server Agent—the database agent
• ACS Express Database (DB) Lock Manager—the transactional manager for the database
• ACS Express Web Server—the web server for the administration console
• ACS Express Active Directory (AD) Agent—the Active Directory agent
Figure 6-5 shows an example of the process status window.
6-7User Guide for Cisco Secure ACS Express 5.0.1
OL-20148-01

Chapter 6 Reports and TroubleshootingTroubleshooting
Figure 6-5 Process Status Window
Server LogsThe Server Logs window provides a configuration area for both ACS Express and operating system (OS) logging and provides a list of current server logs.
Figure 6-6 shows an example of the server logs window.
6-8User Guide for Cisco Secure ACS Express 5.0.1
OL-20148-01
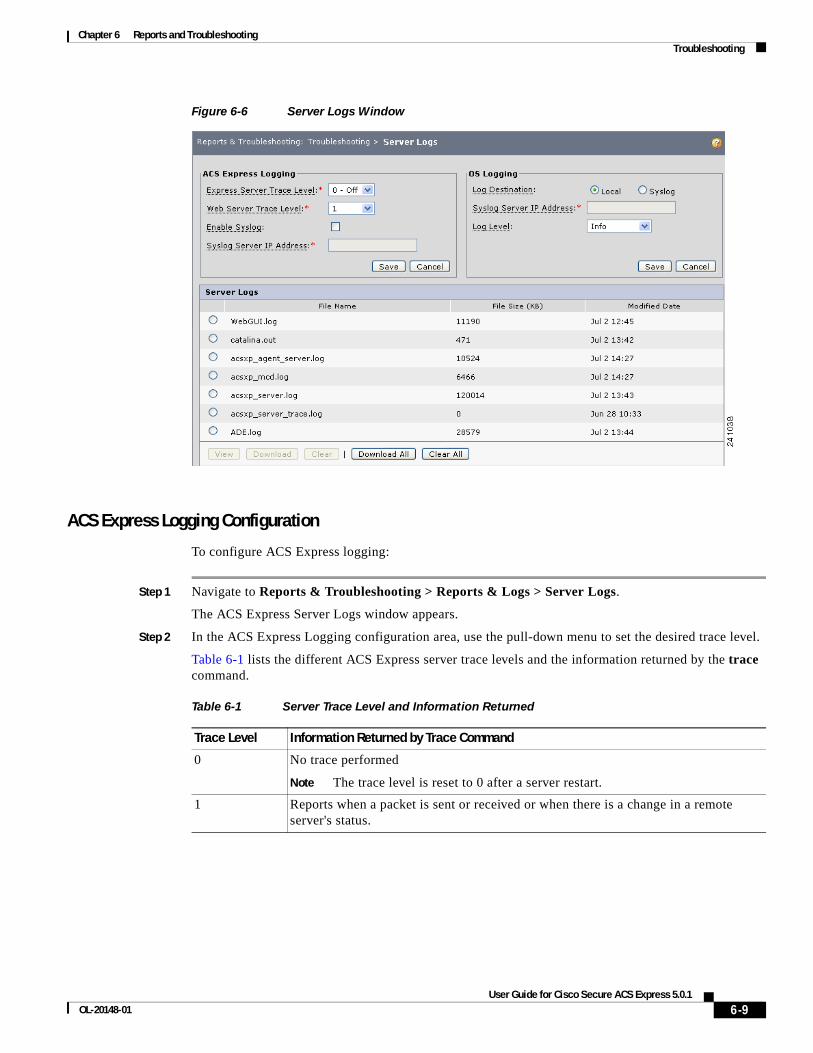
Chapter 6 Reports and TroubleshootingTroubleshooting
Figure 6-6 Server Logs Window
ACS Express Logging Configuration
To configure ACS Express logging:
Step 1 Navigate to Reports & Troubleshooting > Reports & Logs > Server Logs.
The ACS Express Server Logs window appears.
Step 2 In the ACS Express Logging configuration area, use the pull-down menu to set the desired trace level.
Table 6-1 lists the different ACS Express server trace levels and the information returned by the trace command.
Table 6-1 Server Trace Level and Information Returned
Trace Level Information Returned by Trace Command
0 No trace performed
Note The trace level is reset to 0 after a server restart.
1 Reports when a packet is sent or received or when there is a change in a remote server's status.
6-9User Guide for Cisco Secure ACS Express 5.0.1
OL-20148-01

Chapter 6 Reports and TroubleshootingTroubleshooting
Step 3 Set the Web Server Trace Level to the desired level.
Step 4 Enable logging by checking the Enable Syslog check box.
Step 5 If logging to an external Syslog server, enter the IP address of the server in the Syslog Server IP Address field.
Step 6 Click Save to save your changes or click Cancel to abort.
Server Logs
This section of the Server Logs window lists each current server log by file name and includes the file size and date of its last modification. You can download one or a collection of server logs by checking a check box to select the log, then clicking Download.
2 Indicates the following:
• Which services and session managers are used to process a packet
• Which client and vendor objects are used to process a packet
• Detailed remote server information for LDAP and RADIUS, such as sending a packet and timing out
• Details about poorly formed packets
• Details included in trace level 1
3 Indicates the following:
• Error traces in TCL scripts when referencing invalid RADIUS attributes
• Which scripts have been executed
• Details about local UserList processing
• Details included in trace levels 1 and 2
4 Indicates the following:
• Information about advanced duplication detection processing
• Details about creating, updating, and deleting sessions
• Trace details about all scripting APIs called
• Details included in trace levels 1, 2, and 3
5 Indicates the following:
• Details about use of the policy engine including:
– Which rules were run
– What the rules did
– If the rule passed or failed
– Detailed information about which policies were called
• Details included in trace levels 1, 2, 3, and 4
Table 6-1 Server Trace Level and Information Returned (continued)
Trace Level Information Returned by Trace Command
6-10User Guide for Cisco Secure ACS Express 5.0.1
OL-20148-01

Chapter 6 Reports and TroubleshootingTroubleshooting
The following logs are available:
• WebGUI.log—The Web GUI log contains information about the current user interface transaction.
This log rolls over when it reaches 10 MB. The ACS Express server keeps two rollover versions of the Web GUI log files named WebGui-01.log and WebGui-02.log, the older of the logs.
• acsxp_adagent.log—The ACS Express AD Agent Log contains information related to AD Domain connectivity. All AD joining and leaving transactions are logged here.
• acsxp_agent_server.log— The ACS Express Server Agent Log contains information related the server agent (watchdog) process. All process restarts and transactions can be found in this log.
• acsxp_mcd.log—Log of the MCD internal database.
• acsxp_server.log—Log for the ACS Express authentication server process. This log contains a record of all RADIUS and TACACS+ authentication attempts.
• ADE.log—The Application Deployment Engine log contains information related to the ACS Express operating system and command-line interface.
6-11User Guide for Cisco Secure ACS Express 5.0.1
OL-20148-01

Chapter 6 Reports and TroubleshootingTroubleshooting
6-12User Guide for Cisco Secure ACS Express 5.0.1
OL-20148-01

OL-20148-01
C H A P T E R 7
System AdministrationThe System Administration menu provides access to the administrator area of the GUI and enables you to manage administrative users and to control various appliance and application settings. Figure 7-1 shows the System Administration drawer of the ACS Express GUI.
Note Administrators can use the GUI or the command-line interface to manage ACS Express.
Figure 7-1 System Administration Drawer
This chapter contains the following sections:
• Administrators, page 7-2
• Extensible Authentication Protocol (EAP), page 7-6
• RADIUS Dictionary, page 7-15
• Web Console, page 7-20
• Replication, page 7-24
• System Summary, page 7-26
7-1User Guide for Cisco Secure ACS Express 5.0.1

Chapter 7 System AdministrationAdministrators
AdministratorsThe Administrator window lists all configured administrators and enables you to add, edit, and delete administrators. You also use the Administrator window to manage your site’s administrator password policy.
The Administrator window (Figure 7-2) lists each configured administrator and includes their name and whether they are enabled, their administrative privileges (read-write or read-only), and their password status.
Figure 7-2 Administrators Window
This section includes the following topics:
• Adding Administrators, page 7-3
• Editing Administrators, page 7-3
• Deleting Administrators, page 7-5
• Administrator Password Policy, page 7-5
7-2User Guide for Cisco Secure ACS Express 5.0.1
OL-20148-01

Chapter 7 System AdministrationAdministrators
Adding AdministratorsTo add an administrator:
Step 1 Choose the System Administration drawer, then click Administrators.
The Administrators window appears listing all currently-configured administrators.
Step 2 Click Add.
The Add Administrator window appears. Figure 7-3 shows an example of the Add Administrator window.
Figure 7-3 Add Administrator Window
Step 3 Enter the user ID of the user you want to assign as an administrator.
The default status of a new administrator is Enabled. You might choose to change this to Disabled before you click Save.
Step 4 Under Authentication Information, enter a password in the password field for this administrator to use, then enter the same password in the Password Confirmation field.
The default status of a new administrator is Read-Write. You might choose to change this to Read-Only before you click Save. A read-only administrator can view, but not modify, certain administrator pages.
Step 5 Click Save to create the new administrator or click Cancel to abort.
The Administrator window appears and lists the newly-created administrator.
Editing AdministratorsTo edit an administrator:
Step 1 Choose the System Administration drawer, then click Administrators.
7-3User Guide for Cisco Secure ACS Express 5.0.1
OL-20148-01

Chapter 7 System AdministrationAdministrators
The Administrators window appears listing all currently-configured administrators.
Step 2 Choose the administrator you want to modify by checking the appropriate check box, then click Edit.
The Edit window for that administrator appears.
Step 3 Make any desired changes.
Note You cannot change the name of an administrator. If a name change is required, delete the administrator then add the administrator again with the new name.
7-4User Guide for Cisco Secure ACS Express 5.0.1
OL-20148-01

Chapter 7 System AdministrationAdministrators
Step 4 Click Save to create the new administrator or click Cancel to abort.
The Administrator window appears and lists the newly-created administrator.
Deleting AdministratorsTo delete an administrator:
Step 1 Choose the System Administration drawer, then click Administrators.
The Administrators window appears listing all currently-configured administrators.
Step 2 Choose the administrator you want to delete by checking the appropriate check box, then click Delete.
A Confirm Deletion window appears to ensure you want to delete this administrator.
Step 3 Click Yes to delete the administrator or click No to retain the administrator.
Administrator Password PolicyUse the Password Policy window to define your site’s password policies for administrators.
Note Changes you make to the administrator password policy are applied only to newly-configured administrators, not to existing administrators. Existing administrators must change their password for a modified password policy to take effect.
Password Complexity
The Password Complexity part of the Password Policy window defines rules about required characters, password length, and other password rules. Table 7-1 lists and describes the rules for password complexity.
Table 7-1 Password Complexity
Field Description
Required Characters
Lowercase Characters Check to require lowercase characters in passwords.
Uppercase Characters Check to require uppercase characters in passwords.
Numbers Check to require numbers in passwords.
Minimum Password Length Number (1-999) specifies the minimum password length
Disallow Username in Password Check to disallow passwords that contain the user’s username.
Disallow Reuse of Previous Password Check to disallow a user to use his or her previous password.
7-5User Guide for Cisco Secure ACS Express 5.0.1
OL-20148-01

Chapter 7 System AdministrationExtensible Authentication Protocol (EAP)
Password Lockout
The Password Lockout section of the Password Policy window enables you to define password lockout conditions. Table 7-2 lists and describes the conditions for password lockout.
Locked-Out Administrators
If an administrator has been locked out due to surpassing the number of invalid logins, the Password Status field will contain a message like the following:
Password locked. This account is disabled.
To unlock a disabled administrator account, another administrator must change the disabled administrator’s password and set the account status to Enabled.
Extensible Authentication Protocol (EAP)ACS Express supports the following implementations of the Extensible Authentication Protocol (EAP):
• EAP-TLS—EAP-Transport Level Security is defined in RFC 2716
• PEAPv0—Protected EAP, version 0
• PEAPv1—Protected EAP, version 1
• EAP-FAST v0—Flexible Authentication via Secure Tunneling
• LEAP—Lightweight Extensible Authentication Protocol
These protocols use certificates and keys to help secure network communications. This section of the ACS Express GUI helps you manage certificate files and keys required for EAP.
This section includes the following topics:
• Certificates, page 7-7
• Protocol Settings, page 7-12
Password Expiration Enabled Check box; enables password expiration and password lockout.
Expiration Days Number of days until a password expires.
Table 7-1 Password Complexity (continued)
Field Description
Table 7-2 Password Lockout
Field Description
Password Never Locked Out Check box; when checked this eliminates password lockout and allows an unlimited number of unsuccessful login attempts.
Number of Invalid Logins Number (1-999) of invalid login attempts before password lockout occurs.
7-6User Guide for Cisco Secure ACS Express 5.0.1
OL-20148-01

Chapter 7 System AdministrationExtensible Authentication Protocol (EAP)
CertificatesACS Express uses a server certificate file with a server RSA private key file and a server private key password to ensure secure communications for your network.
Note This certificate applies only to PEAP and EAP-TLS, and not EAP-FAST or LEAP.
The ACS Express GUI enables you to install new certificates, generate self-signed certificates, and manage a Certificate Trust List (CTL).
To view the certificates installed on your system, navigate to System Administration drawer, then click Certificates under EAP.
The Administrators window displays all currently-installed certificates and buttons that enable you to manage certificates.
Figure 7-4 shows the EAP certificates window.
Figure 7-4 EAP Certificates
Certificates Trust List
The Certificate Trust List is a list of trusted certificate authorities (CA) the server might use to validate client certificates during EAP-TLS. It is populated as you add CA certificates using the GUI. The CA is a trusted third-party entity that issues the digital certificates used for your network’s security.
The Certificate Revocation List is the URL used to obtain the list of revoked client certificates. This might contain a list of URLs.
This section contains the following topics:
• Installing Certificates, page 7-8
• Generating Self-Signed Certificates, page 7-9
• Downloading Certificates, page 7-10
• Adding CA Certificates, page 7-11
• Editing CA Certificates, page 7-11
• Deleting CA Certificates, page 7-12
7-7User Guide for Cisco Secure ACS Express 5.0.1
OL-20148-01

Chapter 7 System AdministrationExtensible Authentication Protocol (EAP)
Installing Certificates
To install a certificate on your system:
Step 1 Choose the System Administration drawer, then click Certificates under EAP.
The EAP Certificates window appears and lists the status of the currently-installed certificate (if one has been installed).
Step 2 Click Install Certificate.
The Install Certificates dialog box (Figure 7-5) appears. Table 7-3 lists the properties required to install a new certificate.
Figure 7-5 Installing Certificates
Step 3 Use the pull-down menu to specify the Certificate Format of the certificate you plan to install, either PEM/DER or PFX/P12.
Step 4 Use Browse to locate a Server Certificate File on your system.
Step 5 Use Browse to locate a Server RSA Private Key File on your system.
Step 6 Enter the your site’s Server Private Key Password, then enter it again in the Confirm Server Private Key Password field.
Table 7-3 Installing Certificates Properties
Property Description
Certificate Format Choose the format of the certificate from the drop-down menu. ACS Express supports PEM/DER or PFX/P12(PKCS12) format.
Server Certificate File Use Browse to locate a current valid Server Certificate File.
Server RSA Private Key File Use Browse to locate a current valid Server RSA Private Key File.
Server Private Key Password Password to be used with server private key.
This password would have been received from your system administrator.
Confirm Server Private Key Password Re-enter the password to be used with server private key.
7-8User Guide for Cisco Secure ACS Express 5.0.1
OL-20148-01

Chapter 7 System AdministrationExtensible Authentication Protocol (EAP)
Note If you use replication, the Server Private Key Password you use on the primary server must match the the Server Private Key Password you use on the secondary server.
Step 7 Click Install to install the certificate or click Cancel to abort.
Generating Self-Signed Certificates
A self-signed certificate is not signed or validated by a higher-level CA and is implicitly trusted by default.
In a typical public key infrastructure, a particular public key certificate is considered to be valid and is attested by a digital signature from a certificate authority. Users, or their software, check that the private key used to sign some certificate matches the public key in the CA's certificate. Since CA certificates are often signed by other higher-ranking CAs, there must be a highest-ranking CA which provides the ultimate authority in the typical PKI scheme.
Each CA maintains a digital signature used to attest the validity of Server Certificate Files and Server RSA Private Key Files, and have access to the Server Private Key Password and Confirm Server Private Key Password.
To generate a self-signed certificate:
Step 1 Choose the System Administration drawer, then click Certificates under EAP.
The EAP Certificates dialog box (Figure 7-4) displays the current certificate and the Certificate Trust List.
Step 2 Click Generate Self-Signed Certificate.
The Generate Self-Signed Certificate dialog box appears (Figure 7-6).
Figure 7-6 Generate Self-Signed Certificate
7-9User Guide for Cisco Secure ACS Express 5.0.1
OL-20148-01

Chapter 7 System AdministrationExtensible Authentication Protocol (EAP)
Step 3 Enter a Common Name to be used to generate the certificate.
Step 4 You might optionally enter an Organization Name and Organization Unit.
Step 5 Enter the Key to be used to generate this certificate, then re-enter the key in the Confirm Key field.
Step 6 Click Generate to generate the certificate or click Cancel to abort.
Downloading Certificates
To download a certificate:
Step 1 Choose the System Administration drawer, then click Certificates under EAP.
The EAP Certificates dialog (Figure 7-4) displays the current certificate and the Certificate Trust List.
Step 2 Click Download Certificate.
The Download Certificate dialog box opens and displays the certificate filename to be downloaded, the type of file, and server name from which it will download. Figure 7-7 shows an example of the Download Certificate dialog box.
Table 7-4 Create Self-Signed Certificate Fields
Fields Description
Common Name Name to be used to generate the certificate; alphanumeric string from 1-64 characters,
Organization Name Organization name to be used to generate the certificate; alphanumeric string from 1-64 characters,
Organization Unit Organizational unit to be used to generate the certificate; alphanumeric string from 1-64 characters,
Private Key Password Your private key password to be used to protect the private key file; string from 1-32 characters. This is the same password used as the Server Private Key Password when installing certificates (see Table 7-3).
Confirm Private Key Password
Re-enter the private key password to confirm accuracy.
7-10User Guide for Cisco Secure ACS Express 5.0.1
OL-20148-01

Chapter 7 System AdministrationExtensible Authentication Protocol (EAP)
Figure 7-7 Download Certificate Dialog
Step 3 Make sure Save To Disk is checked, then click OK to download the certificate file, or click Cancel to abort.
Adding CA Certificates
You add Certificate Authority (CA) certificates by adding certificates to the Certificate Trust List. To add a CA Certificate to the Certificate Trust List (CTL):
Step 1 Choose the System Administration drawer, then click Certificates under EAP.
The EAP Certificates window (Figure 7-4) displays the current Server Certificate and the Certificate Trust List.
Step 2 In the Certificate Trust List area of the Certificates window, click Add.
The Add CA Certificate window appears.
Step 3 Click Browse to locate a certificate file for the CA you want to add.
ACS Express supports PEM format for CA certificate files.
Step 4 After choosing a CA certificate file, click Add.
The Certificates window displays a message like Successfully saved settings and lists the newly added CA in the Certificate Trust List.
Editing CA Certificates
To edit a CA Certificate in the Certificate Trust List (CTL):
Step 1 Choose the System Administration drawer, then click Certificates under EAP.
The EAP Certificates window (Figure 7-4) displays the current Server Certificate and the Certificate Trust List.
7-11User Guide for Cisco Secure ACS Express 5.0.1
OL-20148-01

Chapter 7 System AdministrationExtensible Authentication Protocol (EAP)
Step 2 In the Certificate Trust List area of the Certificates window, choose the CA you want to edit by checking its check box, then click Edit.
The Edit Certificate window displays the General Settings and the Certificate Revocation Settings of the CA you chose to edit. The only fields you can modify are Distribution URL and Ignore Expiration Date. See Table 7-5 for a description of the certificate revocation settings.
Step 3 Make the changes you want to make to the CA’s certificate revocation settings, then click Save to save your changes or click Cancel to abort.
The Certificates window displays a message like Successfully saved settings and lists the current Server Certificate settings and its Certificate Trust List.
Deleting CA Certificates
To delete a CA Certificate in the Certificate Trust List (CTL):
Step 1 Choose the System Administration drawer, then click Certificates under EAP.
The EAP Certificates window (Figure 7-4) displays the current Server Certificate and the Certificate Trust List.
Step 2 In the Certificate Trust List area of the Certificates window, choose the certificate you want to delete by checking its check box, then click Delete.
A Confirm Deletion dialog asks:
Are you sure you want to delete the selected items (s)?
Step 3 Click Yes to delete the selected certificate, or click No to abort and retain the certificate.
Protocol SettingsThe Protocol Settings window displays the EAP settings for the different EAP protocols ACS Express supports. Figure 7-8 shows the EAP Protocol Settings window.
Table 7-5 Certificate Revocation Settings
Field Description
Distribution URL URL where you download the Certificate Revocation List
CRL Next Retrieval Date and time of next scheduled CRL download (display only)
Ignore Expiration Date Check to ignore certificate expiration date. A green check mark on the GUI indicates you can use the certificate as long as you choose.
CRL Last Retrieval Date and timestamp of last CRL download (display only)
7-12User Guide for Cisco Secure ACS Express 5.0.1
OL-20148-01

Chapter 7 System AdministrationExtensible Authentication Protocol (EAP)
Figure 7-8 EAP Protocol Settings
PEAP Settings
Table 7-6 lists the PEAP protocol settings you can modify.
PEAP supports session caching which permits a client to authenticate by resuming a previously cached session, resulting in fewer messages and less delay. Session resumption is only possible after the client has successfully authenticated at least once to create a valid cached session. Session caching must be enabled on both the client and the server. After a session expires, the client must authenticate again to renew the cached session.
Table 7-6 PEAP Protocol Settings
Field Description
Session Cache Timeout Maximum number of minutes a session can exist before timeout.
Note Session caching must be enabled on both the client and the server.
Enable Session Cache Check box; enables the session cache.
Enable Fast Reconnect Check box; enables fast reconnect
Note Fast Reconnect is only possible if it and session caching are enabled on both the client and the server.
7-13User Guide for Cisco Secure ACS Express 5.0.1
OL-20148-01

Chapter 7 System AdministrationExtensible Authentication Protocol (EAP)
PEAP also supports Fast Reconnect. Fast Reconnect allows PEAP to skip the second (inner) authentication phase when a session is resumed, resulting in even fewer messages and less delay. Fast Reconnect is only possible if it and session caching are enabled on both the client and the server.
EAP-FAST Settings
Table 7-7 lists the EAP-FAST protocol settings you can modify.
EAP-TLS Settings
Table 7-8 lists the EAP-TLS protocol settings you can modify.
EAP-TLS supports session caching which permits a client to authenticate by resuming a previously cached session, resulting in fewer messages and less delay. Session resumption is only possible after the client has successfully authenticated at least once to create a valid cached session. Session caching must be enabled on both the client and the server. After a session expires, the client must authenticate again to renew the cached session.
Machine Access Restriction
The Session Cache Timeout should be set to the maximum number of minutes a session can exist before timeout.
Note When the attribute MAR session cache timeout has a non-default value configured, the machine session is not released when the time is reached.
Table 7-7 EAP-FAST Protocol Settings
Field Description
Authority Identifier Authority identifier is the name of the authority that issued the token.
Tunnel PAC TTL Duration to set for time-to-live for Tunnel PAC.
Table 7-8 EAP-TLS Protocol Settings
Field Description
Session Cache Timeout Maximum number of minutes a session can exist before timeout.
Note Session caching must be enabled on both the client and the server.
Enable Session Cache Check box; enables the session cache.
EAP-TLS Certificate Comparison
Check each check box for type of certificate comparison to perform:
SAN—The user’s identity is compared to the SubjectAltName extension of the certificate.
CN—The user’s identity is compared to the CommonName field of the certificate.
Binary—The user’s identity is compared on a binary basis with a certificate stored in the Identity Store for that user.
7-14User Guide for Cisco Secure ACS Express 5.0.1
OL-20148-01

Chapter 7 System AdministrationRADIUS Dictionary
RADIUS DictionaryThe System Administration > RADIUS Dictionary window lists the attribute dictionaries available and supported by ACS Express. These dictionaries contain attributes that can be added to RADIUS responses in the RADIUS Access Services authorization rules you configure for different User Groups, devices, and device groups.
ACS Express supports the following dictionaries, as well as four custom dictionaries you can create and modify:
• Cisco Airespace
• Cisco IOS
• Cisco VPN 3000 ASA PIX 7.+
• Cisco VPN 5000
• Juniper
• Microsoft
• RADIUS IETF
Note The RADIUS IETF dictionary contains all standard RADIUS attributes.
This section provides the following topics:
• Editing a RADIUS Dictionary, page 7-16
• Managing Attributes in a RADIUS Dictionary, page 7-16
• Adding an Attribute to a RADIUS Dictionary, page 7-18
• Editing an Attribute in a RADIUS Dictionary, page 7-20
• Deleting an Attribute in a RADIUS Dictionary, page 7-20
Figure 7-9 shows an example of the RADIUS Dictionary window.
7-15User Guide for Cisco Secure ACS Express 5.0.1
OL-20148-01

Chapter 7 System AdministrationRADIUS Dictionary
Figure 7-9 RADIUS Dictionary Window
Editing a RADIUS DictionaryYou can change the Name, Description, and Vendor ID of supported RADIUS dictionaries. To edit a RADIUS dictionary:
Step 1 Choose the System Administration drawer, then click RADIUS Dictionary.
The RADIUS Dictionary window appears as shown in Figure 7-9.
Step 2 Check the check box of the dictionary you want to modify, then click Edit.
Step 3 Modify the Name, Description, or Vendor ID to the value you want.
Step 4 Click Save to save your changes, or click Cancel to abort.
Managing Attributes in a RADIUS DictionaryACS Express enables you to add, modify, or delete attributes within a RADIUS dictionary. To manage attributes in a RADIUS dictionary:
Step 1 Choose the System Administration drawer, then click RADIUS Dictionary.
The RADIUS Dictionary window appears as shown in Figure 7-9.
Step 2 Check the check box of the dictionary that contains the attribute you want to modify or delete, then click Manage Attributes.
7-16User Guide for Cisco Secure ACS Express 5.0.1
OL-20148-01

Chapter 7 System AdministrationRADIUS Dictionary
The Attributes window for the selected RADIUS dictionary appears as shown in Figure 7-10. This window enables you to edit or delete an attribute you choose. You can also click Add to add a new attribute to the selected dictionary.
Figure 7-10 Cisco Airespace Dictionary Attributes Window
7-17User Guide for Cisco Secure ACS Express 5.0.1
OL-20148-01

Chapter 7 System AdministrationRADIUS Dictionary
Adding an Attribute to a RADIUS DictionaryACS Express enables you to add attributes to a RADIUS dictionary. Use this option to add attributes to the Custom Dictionaries or to add attributes to the existing supported dictionaries. To add attributes in a RADIUS dictionary:
Step 1 Choose the System Administration drawer, then click RADIUS Dictionary.
The RADIUS Dictionary window appears as shown in Figure 7-9.
Step 2 Check the check box of the dictionary that contains the attribute you want to add, then click Manage Attributes.
The Attributes window for the selected RADIUS dictionary appears as shown in Figure 7-10. This window enables you to add, edit, or delete an attribute you choose.
Step 3 Click Add.
The Add RADIUS Attributes window for the selected dictionary appears as shown in Figure 7-11. Table 7-9 provides a list of attribute properties and their descriptions.
Table 7-9 RADIUS Attribute Properties
Field Description
Name Required; name of attribute
Description Optional description of attribute
AuthPacket Choose whether the attribute to be added will be included in a RADIUS Request, Response, or Request-Response.
Type Use the pull-down menu to select the attribute type
Attribute Required; attribute value for this attribute (numeric string from 1-255)
Min Attribute minimum value
Max Attribute maximum value
Enums Required when attribute type is set to Tag_Unum or Enum
7-18User Guide for Cisco Secure ACS Express 5.0.1
OL-20148-01

Chapter 7 System AdministrationRADIUS Dictionary
Figure 7-11 Add RADIUS Attribute Window
Step 4 Enter the values required to properly define the new attribute.
Step 5 Click Save to save the new attribute, or click Cancel to abort.
7-19User Guide for Cisco Secure ACS Express 5.0.1
OL-20148-01

Chapter 7 System AdministrationWeb Console
Editing an Attribute in a RADIUS DictionaryACS Express enables you to modify attributes within a RADIUS dictionary. To edit attributes in a RADIUS dictionary:
Step 1 Choose the System Administration drawer, then click RADIUS Dictionary.
The RADIUS Dictionary window appears as shown in Figure 7-9.
Step 2 Check the check box of the dictionary that contains the attribute you want to modify, then click Manage Attributes.
The Attributes window for the selected RADIUS dictionary appears as shown in Figure 7-10. This window enables you to edit an attribute you choose.
Step 3 Check the check box of the attribute that contains the attribute you want to modify, then click Edit.
The Edit Attributes window appears for the attribute you selected. Table 7-9 provides a list of attribute properties and their descriptions.
Step 4 Modify the values you want to change for this attribute.
Step 5 Click Save to save the new attribute, or click Cancel to abort.
Deleting an Attribute in a RADIUS DictionaryACS Express enables you to delete attributes within a RADIUS dictionary. To delete an attribute in a RADIUS dictionary:
Step 1 Choose the System Administration drawer, then click RADIUS Dictionary.
The RADIUS Dictionary window appears as shown in Figure 7-9.
Step 2 Check the check box of the dictionary that contains the attribute you want to modify or delete, then click Manage Attributes.
The Attributes window for the selected RADIUS dictionary appears as shown in Figure 7-10.
Step 3 Check the check box of the attribute that you want to delete, then click Delete.
A Confirmation dialog appears asking if you are sure you want to delete the selected attribute.
Step 4 Click Yes to delete the attribute, or click No to retain it.
Web ConsoleThis section provides information about the following topics:
• Web Console Certificate, page 7-21
• Login Settings, page 7-23
7-20User Guide for Cisco Secure ACS Express 5.0.1
OL-20148-01

Chapter 7 System AdministrationWeb Console
Web Console CertificateThe Web Console certificate is the certificate used by the administrator for sessions using the browser. Figure 7-12 shows an example of the web console certificate window.
Figure 7-12 Web Console Certificate
This section provides information about:
• Installing a Web Certificate, page 7-21
• Generating a Self-Signed Certificate, page 7-23
Installing a Web Certificate
To install a web certificate:
Step 1 Choose the System Administration drawer, then click Certificate under Web Console.
The Web Certificate window displays the currently installed web certificate (if one has already been installed).
Step 2 Click Install Certificate.
The Web Console Install Certificate window appears. Figure 7-13 shows an example of the Web Console Install Certificate window.
Figure 7-13 Web Console Install Certificate Window
Step 3 Click Browse to find the certificate file you want to install.
ACS Express supports only PFX/PKCS12 format web certificates.
7-21User Guide for Cisco Secure ACS Express 5.0.1
OL-20148-01

Chapter 7 System AdministrationWeb Console
Step 4 Enter the Private Key Password in the field provided for it, then enter it again in the Confirm Private Key Password field.
Step 5 Click Install to install the web console certificate or click Cancel to abort.
7-22User Guide for Cisco Secure ACS Express 5.0.1
OL-20148-01

Chapter 7 System AdministrationWeb Console
Generating a Self-Signed Certificate
To generate a self-signed web console certificate:
Step 1 Choose the System Administration drawer, then click Certificate under Web Console.
The Web Certificate window displays the currently installed web certificate (if one has already been installed).
Step 2 Click Generate Self-Signed Certificate.
The Generate Self-Signed Web Console Certificate window (Figure 7-14) appears.
Figure 7-14 Generate Self-Signed Certificate
Step 3 Enter a Common Name to be used to generate the self-signed certificate.
The Common Name is required and can be an alphanumeric string from 1-64 characters.
Step 4 Enter an Organization Name to be used to generate the self-signed certificate.
The Organization Name is required and can be an alphanumeric string from 1-64 characters.
Step 5 Enter an Organization Unit to be used to generate the self-signed certificate.
The Organization Unit is required and can be an alphanumeric string from 1-64 characters.
Step 6 Enter a Key to be used to generate the self-signed certificate.
The Key is required and can be an alphanumeric string from 1-32 characters.
Step 7 Enter the same key again in the Confirm Key field to ensure accuracy.
Step 8 Click Generate to generate the self-signed web console certificate, or click Cancel to abort.
If successful, a message like the following appears:
Successfully saved settings.
Login SettingsThe Login Settings window provides a way for you to configure properties that affect a user login session. Table 7-10 describes the Login Settings properties.
Figure 7-15 shows an example of the Login Settings Window.
7-23User Guide for Cisco Secure ACS Express 5.0.1
OL-20148-01

Chapter 7 System AdministrationReplication
Figure 7-15 Login Settings Window
ReplicationACS Express uses a pair-wise replication feature that enables a pair of Express servers to be deployed to perform RADIUS request processing while providing redundancy and eliminating wasted resources.
Using the Express replication feature, a Primary ACS Express server can maintain an identical ACS Express configuration with a Secondary ACS Express server. When replication is properly configured, changes an administrator makes on the Primary machine are propagated to the Secondary machine.
Replication eliminates the need for administrators to make the same configuration changes on both ACS Express servers. Instead, the administrator makes configuration changes only on the primary ACS Express server and those changes are propagated to the secondary server automatically.
The replication feature focuses on configuration maintenance only, not session information or installation-specific information such as networking, certificates, login settings, server logging settings, replication or machine-specific configuration changes. These configuration items are not replicated because they are specific to each installation and are not likely to be identical between the Primary and Secondary servers.
ACS Express configuration changes can be made only on the Primary server. The objects replicated on the Secondary server are read-only. The only configuration you can perform on the Secondary server is that configuration required to set up the Secondary server.
Note The replicated fields display as read-only fields on the Secondary server GUI.
Table 7-10 Login Settings Properties
Field Description
Idle Session Timeout Required number of minutes of inactivity (from 10-1440) before a login session times out.
Login Welcome Message This optional field provides a way for you to enter a message that appears on the login window. This is a good location to enter a message to warn about unauthorized login attempts.
EMail Address to Report Login Problem
This optional field provides a way for you to enter an e-mail address for users to report problems they might have encountered while attempting to log in to the system.
7-24User Guide for Cisco Secure ACS Express 5.0.1
OL-20148-01

Chapter 7 System AdministrationReplication
Configuration changes made using replication are not reflected on the GUI page you are viewing. You must perform a browser reload to show the updated configuration.
To set up replication:
Step 1 First set up the Primary server.
Step 2 Choose the System Administration drawer, then click Replication.
The System Administration > Replication window appears as shown in Figure 7-16.
Figure 7-16 Replication Window
Step 3 Check the check box to Enable Replication.
Step 4 In the Local Host Designation field, use the pull-down menu to choose Primary.
Step 5 In the Replication Secret field, enter a shared secret.
The same shared secret is required in the Replication Secret field on the Secondary server.
Step 6 In the ACS Express Secondary IP Address field, enter the IPv4 address of the Secondary server.
Step 7 Click Save to save your changes.
Step 8 On the Secondary server, navigate to System Administration drawer, then click Replication.
Step 9 Check the check box to Enable Replication.
Step 10 In the Local Host Designation field, use the pull-down menu to choose Secondary.
Step 11 In the Replication Secret field, enter a shared secret.
Use the same shared secret you entered in the Replication Secret field on the Primary server.
Step 12 In the ACS Express Primary IP Address field, enter the IPv4 address of the Primary server.
Step 13 Click Save to save your changes.
Step 14 Click Synchronize Servers.
You can perform this step from either the Primary or Secondary server. Clicking Synchronize Servers triggers the replication process. After the process successfully completes, the two servers will be synchronized. Any configuration changes you make on the Primary server are made automatically on the Secondary server about one minute later.
7-25User Guide for Cisco Secure ACS Express 5.0.1
OL-20148-01

Chapter 7 System AdministrationSystem Summary
Replication and Certificates
Before you attempt to synchronize your Primary and Secondary ACS Express servers using replication, you must first separately add all certificates on each machine. The following types of certificates must be installed separately:
• EAP certificates
– Server certificate
– CA certificates
• LDAP certificates
– CA certificates
• Web Console certificates
– Server certificates
Note These certificates are required only if non-default certificates are required for your deployment.
In a replicated configuration, the EAP Server Certificates must also have the same private key between the primary and secondary in order for authentication to work.
System SummaryThe System Summary window provides a summary of information about the ACS Express server including the version of ACS Express software and the various settings and information for network, SNMP, time, and Backup and Restore. Figure 7-17 shows an example of the System Summary window.
7-26User Guide for Cisco Secure ACS Express 5.0.1
OL-20148-01
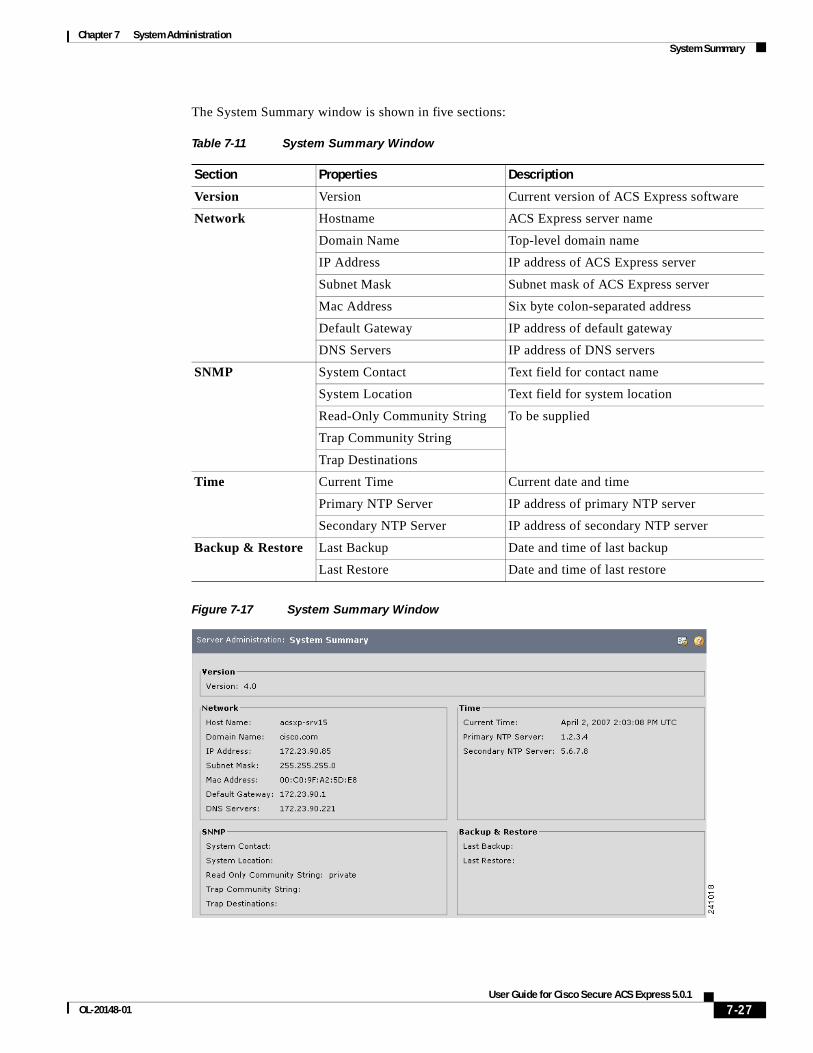
Chapter 7 System AdministrationSystem Summary
The System Summary window is shown in five sections:
Figure 7-17 System Summary Window
Table 7-11 System Summary Window
Section Properties Description
Version Version Current version of ACS Express software
Network Hostname ACS Express server name
Domain Name Top-level domain name
IP Address IP address of ACS Express server
Subnet Mask Subnet mask of ACS Express server
Mac Address Six byte colon-separated address
Default Gateway IP address of default gateway
DNS Servers IP address of DNS servers
SNMP System Contact Text field for contact name
System Location Text field for system location
Read-Only Community String To be supplied
Trap Community String
Trap Destinations
Time Current Time Current date and time
Primary NTP Server IP address of primary NTP server
Secondary NTP Server IP address of secondary NTP server
Backup & Restore Last Backup Date and time of last backup
Last Restore Date and time of last restore
7-27User Guide for Cisco Secure ACS Express 5.0.1
OL-20148-01

Chapter 7 System AdministrationSystem Summary
7-28User Guide for Cisco Secure ACS Express 5.0.1
OL-20148-01

UsOL-20148-01
A
P P E N D I X A XML Configuration FilesThis appendix provides a listing of the following XML files for reference purposes.
• Empty Configuration File, page A-1
• Import/Export Schema, page A-1
Empty Configuration FileThe following is a listing of an empty configuration file, acsxp_factory_defaults.xml.
'acsxp_factory_defaults.xml' ?It's only able 20 lines: <?xml version="1.0" encoding="UTF-8"?><acs:ACSExpress xmlns:acs="http://www.cisco.com/ACSExpress/5.0.1" xmlns:xsi="http://www.w3.org/2001/XMLSchema-instance" xsi:schemaLocation="http://www.cisco.com/ACSExpress/5.0.1/ImportExport.xsd "> <Configuration> <DeviceGroups></DeviceGroups> <Devices></Devices> <UserGroups></UserGroups> <Users></Users> <ExternalDBActiveDirectory></ExternalDBActiveDirectory> <ExternalDBLDAP></ExternalDBLDAP> <ExternalDBOTP></ExternalDBOTP> <Policies> <RadiusAttributeSets></RadiusAttributeSets> <TimeOfDays></TimeOfDays> <RadiusAccess></RadiusAccess> <TacacsPlusAccess></TacacsPlusAccess> </Policies> </Configuration></acs:ACSExpress>
Import/Export SchemaThe following is the XML Schema for the Import/Export XML file that contains the various ACS Express objects.
A-1er Guide for Cisco Secure ACS Express 5.0.1

Appendix A XML Configuration FilesImport/Export Schema
<?xml version="1.0" encoding="UTF-8"?>
<!--Document : ImportExport.xsdCreated on : November 2, 2006, 3:29 PMAuthor : ajeyakDescription: This XML Schema describes the schema for the import/export xml file
containing AR ObjectsTODO : namespacing http://acsexpress.cisco.com/ACSExpressSchema/5.0.1
--><xsd:schema xmlns:xsd="http://www.w3.org/2001/XMLSchema"
xmlns:acs="http://www.cisco.com/ACSExpress/5.0.1"targetNamespace="http://www.cisco.com/ACSExpress/5.0.1"xmlns="http://www.cisco.com/ACSExpress/5.0.1"elementFormDefault="unqualified" attributeFormDefault="unqualified">
<!-- Restrictions Block. Commonly used restrictions will be defined here --><xsd:simpleType name="StringType">
<xsd:restriction base="xsd:string"><xsd:minLength value="1"></xsd:minLength><xsd:maxLength value="253"></xsd:maxLength>
</xsd:restriction></xsd:simpleType>
<!-- The simpleTypes below are in sync with the field masks used in the UI --><xsd:simpleType name="ExpressRawStringType">
<xsd:restriction base="xsd:string"><xsd:pattern value="[^<>/]*"></xsd:pattern>
</xsd:restriction></xsd:simpleType>
<xsd:simpleType name="ExpressPasswordType"><xsd:restriction base="xsd:string">
<xsd:pattern value="[^<>]*"></xsd:pattern>
</xsd:restriction></xsd:simpleType>
<xsd:simpleType name="ExpressDescriptionType"><xsd:restriction base="xsd:string">
<xsd:pattern value="[\w ._\-,'#]*"></xsd:pattern><xsd:minLength value="0"></xsd:minLength><xsd:maxLength value="64"></xsd:maxLength>
</xsd:restriction></xsd:simpleType>
<xsd:simpleType name="ExpressSecretType"><xsd:restriction base="xsd:string">
<xsd:pattern value="[^<>/]*"></xsd:pattern><xsd:minLength value="1"></xsd:minLength><xsd:maxLength value="32"></xsd:maxLength>
</xsd:restriction></xsd:simpleType>
<xsd:simpleType name="ExpressStringType"><xsd:restriction base="xsd:string">
<xsd:pattern value="[\w ._\-]*"></xsd:pattern>
</xsd:restriction></xsd:simpleType>
A-2User Guide for Cisco Secure ACS Express 5.0.1
OL-20148-01

Appendix A XML Configuration FilesImport/Export Schema
<xsd:simpleType name="ExpressNameType"><xsd:restriction base="xsd:string">
<xsd:pattern value="[\w ._\-]*"></xsd:pattern><xsd:minLength value="1"></xsd:minLength><xsd:maxLength value="32"></xsd:maxLength>
</xsd:restriction></xsd:simpleType>
<xsd:simpleType name="ExpressWebCertKeyType"><xsd:restriction base="xsd:string">
<xsd:pattern value="[^"\\]*"></xsd:pattern>
</xsd:restriction></xsd:simpleType>
<xsd:simpleType name="ExpressExternalDBType"><xsd:restriction base="xsd:string">
<xsd:pattern value="[^<>/&]*"></xsd:pattern><xsd:minLength value="1"></xsd:minLength><xsd:maxLength value="255"></xsd:maxLength>
</xsd:restriction></xsd:simpleType><xsd:simpleType name="ExpressExternalDBContainerType">
<xsd:restriction base="xsd:string"><xsd:pattern value="[^<>/&]*"></xsd:pattern><xsd:minLength value="1"></xsd:minLength><xsd:maxLength value="1024"></xsd:maxLength>
</xsd:restriction></xsd:simpleType><xsd:simpleType name="ExpressExternalDBADDomain">
<xsd:restriction base="xsd:string"><xsd:pattern value="[0-9A-Za-z\._\-]*"></xsd:pattern><xsd:minLength value="1"></xsd:minLength><xsd:maxLength value="255"></xsd:maxLength>
</xsd:restriction></xsd:simpleType><xsd:simpleType name="ExpressExternalDBADUsername">
<xsd:restriction base="xsd:string"><xsd:pattern value="[^<>/&]*"></xsd:pattern><xsd:minLength value="1"></xsd:minLength><xsd:maxLength value="125"></xsd:maxLength>
</xsd:restriction></xsd:simpleType><xsd:simpleType name="ExpressLDAPFilterType">
<xsd:restriction base="xsd:string"><xsd:pattern value="[0-9A-Za-z]*"></xsd:pattern><xsd:minLength value="1"></xsd:minLength><xsd:maxLength value="32"></xsd:maxLength>
</xsd:restriction></xsd:simpleType><xsd:simpleType name="ExpressLDAPHostNameOrIP">
<xsd:restriction base="xsd:string"><xsd:pattern value="[0-9A-Za-z\._\-]*"></xsd:pattern><xsd:minLength value="1"></xsd:minLength><xsd:maxLength value="1024"></xsd:maxLength>
</xsd:restriction></xsd:simpleType><xsd:simpleType name="ExpressLDAPGroupObjectClassFilterType">
<xsd:restriction base="xsd:string">
A-3User Guide for Cisco Secure ACS Express 5.0.1
OL-20148-01

Appendix A XML Configuration FilesImport/Export Schema
<xsd:pattern value="[0-9A-Za-z*]*"></xsd:pattern><xsd:minLength value="1"></xsd:minLength><xsd:maxLength value="32"></xsd:maxLength>
</xsd:restriction></xsd:simpleType>
<xsd:simpleType name="ExpressServerCertKeyType"><xsd:restriction base="xsd:string">
<xsd:pattern value="[^"\\]*"></xsd:pattern>
</xsd:restriction></xsd:simpleType>
<xsd:simpleType name="ExpressGroupFilterType"><xsd:restriction base="xsd:string">
<xsd:pattern value="[^;<>]*"></xsd:pattern><xsd:minLength value="0"></xsd:minLength><xsd:maxLength value="1024"></xsd:maxLength>
</xsd:restriction></xsd:simpleType>
<xsd:simpleType name="ExpressAuthorityIdentifierType"><xsd:restriction base="xsd:string">
<xsd:pattern value="[\w ._\-]*"></xsd:pattern><xsd:minLength value="1"></xsd:minLength><xsd:maxLength value="32"></xsd:maxLength>
</xsd:restriction></xsd:simpleType>
<xsd:simpleType name="ExpressNapNameType"><xsd:restriction base="xsd:string">
<xsd:pattern value="[\w_\-]*"></xsd:pattern><xsd:minLength value="1"></xsd:minLength><xsd:maxLength value="32"></xsd:maxLength>
</xsd:restriction></xsd:simpleType>
<xsd:simpleType name="IPAddressType"><xsd:restriction base="xsd:string">
<xsd:pattern
value="((25[0-5]|2[0-4][0-9]|1[0-9][0-9]|[1-9]?[0-9])\.){3}(25[0-5]|2[0-4][0-9]|1[0-9][0-9]|[1-9]?[0-9])">
</xsd:pattern></xsd:restriction>
</xsd:simpleType>
<!-- Should be a string of length 24 made of ones and zeroes. Each bit represents one hours to make a total of
24 hours. A one (1) signifies that the hour is enabled, whereas a zero indicates disabled. -->
<xsd:simpleType name="HoursType"><xsd:restriction base="xsd:string">
<xsd:length value="24"></xsd:length><xsd:pattern value="[0,1]{24}"></xsd:pattern>
</xsd:restriction></xsd:simpleType>
<!-- Restrictions Block over -->
<!-- Objects Block. Objects will be described here -->
<xsd:complexType name="DeviceType">
A-4User Guide for Cisco Secure ACS Express 5.0.1
OL-20148-01

Appendix A XML Configuration FilesImport/Export Schema
<xsd:sequence><xsd:element name="Name" type="ExpressNameType"></xsd:element><xsd:element name="IPAddress" type="IPAddressType"></xsd:element><xsd:element name="DeviceGroupName" type="ExpressNameType"></xsd:element><xsd:element name="Secret">
<xsd:complexType><xsd:sequence><!-- At least one of the following 2 elements must be defined -->
<xsd:element name="Radius" type="ExpressSecretType" minOccurs="0"></xsd:element>
<xsd:element name="Tacacs" type="ExpressSecretType" minOccurs="0"></xsd:element>
</xsd:sequence></xsd:complexType>
</xsd:element></xsd:sequence>
</xsd:complexType>
<xsd:complexType name="DeviceGroupType"><xsd:sequence>
<xsd:element name="Name" type="ExpressNameType"></xsd:element><xsd:element name="Description" type="ExpressDescriptionType"
minOccurs="0" maxOccurs="1"></xsd:element>
</xsd:sequence></xsd:complexType>
<!-- status is optional. default is enabled @@ --><xsd:complexType name="UserType">
<xsd:sequence><xsd:element name="Username">
<xsd:simpleType><xsd:restriction base="xsd:string">
<xsd:pattern value="[\w_\- ~!@#$%^&*()+={}\[\]|:;<>.?]*"></xsd:pattern>
<xsd:minLength value="1"></xsd:minLength><xsd:maxLength value="32"></xsd:maxLength>
</xsd:restriction></xsd:simpleType>
</xsd:element><xsd:element name="Description" type="ExpressDescriptionType"
minOccurs="0"></xsd:element><xsd:element name="UserGroupName" type="ExpressNameType"></xsd:element><xsd:element name="Enabled" type="xsd:boolean"></xsd:element><xsd:element name="FullName" minOccurs="0">
<xsd:simpleType><xsd:restriction base="ExpressStringType">
<xsd:minLength value="1" /><xsd:maxLength value="32" />
</xsd:restriction></xsd:simpleType>
</xsd:element><xsd:element name="Manager" minOccurs="0">
<xsd:simpleType><xsd:restriction base="ExpressStringType">
<xsd:minLength value="1" /><xsd:maxLength value="32" />
</xsd:restriction></xsd:simpleType>
</xsd:element><xsd:element name="PhoneNumber" minOccurs="0">
A-5User Guide for Cisco Secure ACS Express 5.0.1
OL-20148-01

Appendix A XML Configuration FilesImport/Export Schema
<xsd:simpleType><xsd:restriction base="ExpressRawStringType">
<xsd:maxLength value="15" /></xsd:restriction>
</xsd:simpleType></xsd:element><xsd:element name="Email" minOccurs="0">
<xsd:simpleType><xsd:restriction base="xsd:string">
<xsd:minLength value="1"></xsd:minLength><xsd:maxLength value="75"></xsd:maxLength>
</xsd:restriction></xsd:simpleType>
</xsd:element><xsd:element name="Password">
<xsd:complexType><xsd:sequence>
<xsd:element name="Value" type="ExpressPasswordType"></xsd:element></xsd:sequence><xsd:attribute name="encrypted" type="xsd:boolean
"use="required"></xsd:attribute></xsd:complexType>
</xsd:element><xsd:element name="PasswordNeverExpires" type="xsd:boolean"></xsd:element>
<!-- If value for this element is "false", then password expiry will be set to the value provided to the element below -->
<xsd:element name="ExpiryDays" minOccurs="0" maxOccurs="1"><xsd:simpleType>
<xsd:restriction base="xsd:integer"><xsd:minInclusive value="1"></xsd:minInclusive><xsd:maxInclusive value="3650"></xsd:maxInclusive>
</xsd:restriction></xsd:simpleType>
</xsd:element></xsd:sequence>
</xsd:complexType>
<!-- status is optional. default is enabled @@ --><xsd:complexType name="UserGroupType">
<xsd:sequence><xsd:element name="Name" type="ExpressNameType"></xsd:element><xsd:element name="Description" type="ExpressDescriptionType" minOccurs="0"
maxOccurs="1"></xsd:element> <xsd:element name="Enabled" type="xsd:boolean" default="true"></xsd:element>
</xsd:sequence></xsd:complexType>
<xsd:complexType name="ADType"><xsd:sequence>
<xsd:element name="Domain" type="ExpressExternalDBADDomain" ></xsd:element><xsd:element name="Username" type="ExpressExternalDBADUsername"></xsd:element><xsd:element name="Password">
<xsd:complexType><xsd:sequence>
<xsd:element name="Value" type="ExpressPasswordType"></xsd:element></xsd:sequence><xsd:attribute name="encrypted" type="xsd:boolean"
use="required"></xsd:attribute>
</xsd:complexType></xsd:element><xsd:element name="ContainerToJoin" type="ExpressExternalDBContainerType"
minOccurs="0">
A-6User Guide for Cisco Secure ACS Express 5.0.1
OL-20148-01

Appendix A XML Configuration FilesImport/Export Schema
</xsd:element></xsd:sequence>
</xsd:complexType>
<!-- notes : im not sure whats required and whats not --><xsd:complexType name="LDAPType">
<xsd:sequence><xsd:element name="PrimaryHostName"
type="ExpressLDAPHostNameOrIP"></xsd:element><!-- different reg exp required here --><xsd:element name="SecondaryHostName" type="ExpressLDAPHostNameOrIP"
minOccurs="0"></xsd:element><xsd:element name="UseSSL" type="xsd:boolean" default="false"></xsd:element><xsd:element name="ServerPort" default="389">
<xsd:simpleType><xsd:restriction base="xsd:integer">
<xsd:minInclusive value="1"></xsd:minInclusive><xsd:maxInclusive value="65535"></xsd:maxInclusive>
</xsd:restriction></xsd:simpleType>
</xsd:element><xsd:element name="Username" type="ExpressExternalDBType"></xsd:element><xsd:element name="Password">
<xsd:complexType><xsd:sequence>
<xsd:element name="Value" type="ExpressPasswordType"></xsd:element></xsd:sequence><xsd:attribute name="encrypted" type="xsd:boolean"
use="required"></xsd:attribute>
</xsd:complexType></xsd:element><xsd:element name="ServerTimeout" default="5"><!-- ServerTimeout is specified
in seconds --><xsd:simpleType>
<xsd:restriction base="xsd:integer"><xsd:minInclusive value="1"></xsd:minInclusive><xsd:maxInclusive value="99999"></xsd:maxInclusive>
</xsd:restriction></xsd:simpleType>
</xsd:element><xsd:element name="FailbackRetryInterval" default="300">
<xsd:simpleType><xsd:restriction base="xsd:integer">
<xsd:minInclusive value="1"></xsd:minInclusive><xsd:maxInclusive value="99999"></xsd:maxInclusive>
</xsd:restriction></xsd:simpleType>
</xsd:element><!-- FailbackRetryInterval is specified in seconds -->
<xsd:element name="UserDirSubtree"><xsd:simpleType>
<xsd:restriction base="ExpressRawStringType"><xsd:minLength value="1"></xsd:minLength><xsd:maxLength value="150"></xsd:maxLength>
</xsd:restriction></xsd:simpleType>
</xsd:element><xsd:element name="UserObjectType" type="ExpressLDAPFilterType" default="uid"></xsd:element><xsd:element name="UserObjectClass" type="ExpressLDAPFilterType"
default="Person"></xsd:element>
A-7User Guide for Cisco Secure ACS Express 5.0.1
OL-20148-01

Appendix A XML Configuration FilesImport/Export Schema
<xsd:element name="UserPasswordAttribute" type="ExpressLDAPFilterType" default="userpassword">
</xsd:element><xsd:element name="GroupMembershipAttr" default="UniqueMember">
<xsd:simpleType><xsd:restriction base="ExpressRawStringType">
<xsd:minLength value="1"></xsd:minLength><xsd:maxLength value="32"></xsd:maxLength>
</xsd:restriction></xsd:simpleType>
</xsd:element><xsd:element name="UserDN" default="entrydn">
<xsd:simpleType><xsd:restriction base="ExpressRawStringType">
<xsd:minLength value="1"></xsd:minLength><xsd:maxLength value="32"></xsd:maxLength>
</xsd:restriction></xsd:simpleType>
</xsd:element>
<xsd:element name="StripDomainName" type="xsd:boolean"></xsd:element><xsd:element name="DomainDelimiter" default="@">
<xsd:simpleType><xsd:restriction base="ExpressRawStringType">
<xsd:minLength value="1"></xsd:minLength><xsd:maxLength value="5"></xsd:maxLength>
</xsd:restriction></xsd:simpleType>
</xsd:element><xsd:element name="DomainLocation" default="Suffix">
<xsd:simpleType><xsd:restriction base="xsd:string">
<xsd:pattern value="Prefix|Suffix"></xsd:pattern></xsd:restriction>
</xsd:simpleType></xsd:element>
<xsd:element name="GroupDirSubtree"><xsd:simpleType>
<xsd:restriction base="ExpressRawStringType"><xsd:minLength value="1"></xsd:minLength><xsd:maxLength value="150"></xsd:maxLength>
</xsd:restriction></xsd:simpleType>
</xsd:element><xsd:element name="GroupObjectType" type="ExpressLDAPFilterType" default="cn"></xsd:element><xsd:element name="GroupObjectClass"
type="ExpressLDAPGroupObjectClassFilterType" default="GroupOfUniqueNames"></xsd:element>
</xsd:sequence></xsd:complexType>
<xsd:complexType name="OTPType"><xsd:sequence>
<xsd:element name="PrimaryHostIP" type="IPAddressType"></xsd:element><xsd:element name="SecondaryHostIP" type="IPAddressType"
minOccurs="0"></xsd:element><xsd:element name="ServerPort" default="1812">
<xsd:simpleType><xsd:restriction base="xsd:integer">
<xsd:minInclusive value="0"></xsd:minInclusive><xsd:maxInclusive value="65535"></xsd:maxInclusive>
</xsd:restriction>
A-8User Guide for Cisco Secure ACS Express 5.0.1
OL-20148-01

Appendix A XML Configuration FilesImport/Export Schema
</xsd:simpleType></xsd:element><xsd:element name="SharedSecret" type="ExpressSecretType"></xsd:element><xsd:element name="MaxRetries" default="3">
<xsd:simpleType><xsd:restriction base="xsd:integer">
<xsd:minInclusive value="1"></xsd:minInclusive><xsd:maxInclusive value="99999"></xsd:maxInclusive>
</xsd:restriction></xsd:simpleType>
</xsd:element><xsd:element name="ServerTimeout" default="5">
<xsd:simpleType><xsd:restriction base="xsd:integer">
<xsd:minInclusive value="1"></xsd:minInclusive><xsd:maxInclusive value="99999"></xsd:maxInclusive>
</xsd:restriction></xsd:simpleType>
</xsd:element><xsd:element name="FailbackRetryInterval" default="120">
<xsd:simpleType><xsd:restriction base="xsd:integer">
<xsd:minInclusive value="1"></xsd:minInclusive><xsd:maxInclusive value="99999"></xsd:maxInclusive>
</xsd:restriction></xsd:simpleType>
</xsd:element></xsd:sequence>
</xsd:complexType>
<xsd:complexType name="RadiusAttributeSetType"><xsd:sequence>
<xsd:element name="Name" type="ExpressNameType"></xsd:element><xsd:element name="Description" type="ExpressDescriptionType"
minOccurs="0"></xsd:element><xsd:element name="Attribute" minOccurs="0"
maxOccurs="10"><xsd:complexType>
<xsd:sequence><xsd:element name="Name" type="ExpressNameType"></xsd:element><xsd:element name="Value"
type="ExpressRawStringType"></xsd:element></xsd:sequence>
</xsd:complexType></xsd:element>
</xsd:sequence>
</xsd:complexType>
<xsd:complexType name="TimeOfDayType"><xsd:sequence>
<xsd:element name="Name" type="ExpressNameType"></xsd:element><xsd:element name="Description" type="ExpressDescriptionType"
minOccurs="0"></xsd:element><xsd:element name="DayAndHours">
<xsd:complexType><xsd:sequence>
<xsd:element name="monday" type="acs:HoursType" /><xsd:element name="tuesday"
type="acs:HoursType" /><xsd:element name="wednesday"
type="acs:HoursType" />
A-9User Guide for Cisco Secure ACS Express 5.0.1
OL-20148-01

Appendix A XML Configuration FilesImport/Export Schema
<xsd:element name="thursday"type="acs:HoursType" />
<xsd:element name="friday" type="acs:HoursType" /><xsd:element name="saturday"
type="acs:HoursType" /><xsd:element name="sunday" type="acs:HoursType" />
</xsd:sequence></xsd:complexType>
</xsd:element></xsd:sequence>
</xsd:complexType>
<xsd:complexType name="NetworkAccessType"><xsd:sequence>
<xsd:element name="Name" type="ExpressNapNameType"></xsd:element><!-- <xsd:element name="Description" type="ExpressDescriptionType"
minOccurs="0"></xsd:element> --><xsd:element name="Enabled" type="xsd:boolean"></xsd:element><xsd:element name="DefaultResponse"
type="ExpressNameType"></xsd:element>
<xsd:element name="SelectionRules"><xsd:complexType>
<xsd:sequence><xsd:element name="DeviceGroups" minOccurs="1" maxOccurs="1">
<xsd:complexType> <xsd:sequence>
<xsd:element name="DeviceGroupName" minOccurs="1" maxOccurs="unbounded"
type="ExpressNameType"> </xsd:element>
</xsd:sequence> </xsd:complexType> </xsd:element>
<xsd:element name="AttributeSet" minOccurs="0" maxOccurs="1" > <xsd:complexType>
<xsd:sequence><xsd:element name="Attribute" minOccurs="1"
maxOccurs="unbounded"><xsd:complexType>
<xsd:sequence><xsd:element name="Name"
type="ExpressNameType"></xsd:element><xsd:element name="Value"
type="ExpressRawStringType"></xsd:element>
</xsd:sequence></xsd:complexType>
</xsd:element> </xsd:sequence> </xsd:complexType> </xsd:element>
</xsd:sequence></xsd:complexType>
</xsd:element><!-- leap, eap-tls, eap-fast, peap(eap-gtc, eap-mschapv2, eap-tls) --><xsd:element name="ProtocolSettings" minOccurs="0" maxOccurs="1">
<xsd:complexType> <xsd:sequence> <xsd:element name="LEAP" type="xsd:boolean" minOccurs="0"></xsd:element>
A-10User Guide for Cisco Secure ACS Express 5.0.1
OL-20148-01

Appendix A XML Configuration FilesImport/Export Schema
<xsd:element name="EAP-TLS" type="xsd:boolean" minOccurs="0"></xsd:element>
<xsd:element name="EAP-FAST" type="xsd:boolean" minOccurs="0"></xsd:element>
<xsd:element name="PEAP" minOccurs="0"> <xsd:complexType> <xsd:sequence> <xsd:element name="EAP-GTC" type="xsd:boolean"></xsd:element> <xsd:element name="EAP-MSCHAPv2" type="xsd:boolean"></xsd:element> <xsd:element name="EAP-TLS" type="xsd:boolean"></xsd:element> </xsd:sequence> </xsd:complexType> </xsd:element> </xsd:sequence> </xsd:complexType>
</xsd:element><!-- Add machine authentication related elements here --><xsd:element name="AuthDatabase">
<xsd:simpleType><xsd:restriction base="xsd:string">
<xsd:enumeration value="ActiveDirectory"></xsd:enumeration><xsd:enumeration value="InternalUserDatabase"></xsd:enumeration><xsd:enumeration
value="OneTimePasswordServer"></xsd:enumeration><xsd:enumeration value="LDAPDatabase"></xsd:enumeration>
</xsd:restriction></xsd:simpleType>
</xsd:element><xsd:element name="AccessRule" minOccurs="0"
maxOccurs="unbounded"><!-- Default rule will be applied if none of the specified rules match --><xsd:complexType>
<xsd:sequence><xsd:element name="Enabled"
type="xsd:boolean"></xsd:element><xsd:element name="ExternalGroups" minOccurs="0"
maxOccurs="1"><xsd:complexType>
<xsd:sequence minOccurs="1"maxOccurs="unbounded"><xsd:element name="Group"
type="ExpressGroupFilterType"></xsd:element>
</xsd:sequence></xsd:complexType>
</xsd:element>
<xsd:element name="TimeOfDay" minOccurs="0" type="ExpressNameType">
</xsd:element><xsd:element name="MachineAccessRestriction">
<xsd:simpleType><xsd:restriction base="xsd:string">
<xsd:patternvalue="Enforced|Exempt">
</xsd:pattern></xsd:restriction>
</xsd:simpleType></xsd:element><xsd:element name="RadiusAttributeSet"
type="ExpressNameType"></xsd:element>
A-11User Guide for Cisco Secure ACS Express 5.0.1
OL-20148-01

Appendix A XML Configuration FilesImport/Export Schema
</xsd:sequence></xsd:complexType>
</xsd:element></xsd:sequence>
</xsd:complexType>
<xsd:complexType name="DeviceAdminType"><xsd:sequence>
<xsd:element name="AuthDatabase"><xsd:simpleType>
<xsd:restriction base="xsd:string"><xsd:enumeration value="Internal User Database"></xsd:enumeration><xsd:enumeration value="Active Directory"></xsd:enumeration><xsd:enumeration value="LDAP Database"></xsd:enumeration><xsd:enumeration value="One Time Password
Server"></xsd:enumeration></xsd:restriction>
</xsd:simpleType></xsd:element><xsd:element name="DefaultResponse">
<xsd:simpleType><xsd:restriction base="xsd:string">
<xsd:patternvalue="deny|1|2|3|4|5|6|7|8|9|10|11|12|13|14|15">
</xsd:pattern></xsd:restriction>
</xsd:simpleType></xsd:element><!-- IdleTimeout --><xsd:element name="IdleTimeout" minOccurs="0" maxOccurs="1">
<xsd:simpleType><xsd:restriction base="xsd:integer">
<xsd:minInclusive value="0"></xsd:minInclusive><xsd:maxInclusive value="9999"></xsd:maxInclusive>
</xsd:restriction></xsd:simpleType>
</xsd:element><xsd:element name="SessionTimeout" minOccurs="0" maxOccurs="1">
<xsd:simpleType><xsd:restriction base="xsd:integer">
<xsd:minInclusive value="0"></xsd:minInclusive><xsd:maxInclusive value="9999"></xsd:maxInclusive>
</xsd:restriction></xsd:simpleType>
</xsd:element><xsd:element name="AccessRule" minOccurs="0" maxOccurs="unbounded">
<xsd:complexType><xsd:sequence>
<xsd:element name="Enabled"type="xsd:boolean">
</xsd:element><xsd:element name="ExternalGroups" minOccurs="0" maxOccurs="1">
<xsd:complexType><xsd:sequence minOccurs="1"
maxOccurs="unbounded"><xsd:element name="Group"
type="ExpressGroupFilterType"></xsd:element></xsd:sequence>
</xsd:complexType></xsd:element><xsd:element name="DeviceGroupName" type="ExpressNameType"
minOccurs="1" maxOccurs="1"></xsd:element><xsd:element name="TimeOfDay" type="ExpressNameType"
minOccurs="0"></xsd:element>
A-12User Guide for Cisco Secure ACS Express 5.0.1
OL-20148-01

Appendix A XML Configuration FilesImport/Export Schema
<xsd:element name="EnablePrivilege"><xsd:simpleType>
<xsd:restriction base="xsd:string"><xsd:pattern
value="deny|1|2|3|4|5|6|7|8|9|10|11|12|13|14|15"></xsd:pattern>
</xsd:restriction></xsd:simpleType>
</xsd:element></xsd:sequence>
</xsd:complexType></xsd:element>
</xsd:sequence></xsd:complexType>
<xsd:complexType name="PEAPType"><xsd:sequence>
<!-- General session timeout value is specified in minutes --><xsd:element name="SessionCacheTimeout" default="120">
<xsd:simpleType><xsd:restriction base="xsd:integer">
<xsd:minInclusive value="5"></xsd:minInclusive><xsd:maxInclusive value="99999"></xsd:maxInclusive>
</xsd:restriction></xsd:simpleType>
</xsd:element><xsd:element name="EnableSessionCache" type="xsd:boolean"
default="true"></xsd:element><xsd:element name="EnableFastReconnect" type="xsd:boolean"
default="true"></xsd:element>
</xsd:sequence></xsd:complexType>
<xsd:complexType name="EAPFASTType"><xsd:sequence>
<xsd:element name="AuthorityIdentifier" type="ExpressAuthorityIdentifierType"></xsd:element>
<xsd:element name="TunnelPACTTLValue" default="1"><xsd:simpleType>
<xsd:restriction base="xsd:integer"><xsd:minInclusive value="1"></xsd:minInclusive><xsd:maxInclusive value="99999"></xsd:maxInclusive>
</xsd:restriction></xsd:simpleType>
</xsd:element><xsd:element name="TunnelPACTTLUnits" default="Weeks">
<xsd:simpleType><xsd:restriction base="xsd:string">
<xsd:pattern value="Minutes|Hours|Days|Weeks"></xsd:pattern></xsd:restriction>
</xsd:simpleType></xsd:element>
</xsd:sequence></xsd:complexType>
<xsd:complexType name="EAPTLSType"><xsd:sequence>
<!-- General session timeout value is specified in minutes --><xsd:element name="SessionCacheTimeout" default="120">
<xsd:simpleType><xsd:restriction base="xsd:integer">
<xsd:minInclusive value="5"></xsd:minInclusive>
A-13User Guide for Cisco Secure ACS Express 5.0.1
OL-20148-01

Appendix A XML Configuration FilesImport/Export Schema
<xsd:maxInclusive value="99999"></xsd:maxInclusive></xsd:restriction>
</xsd:simpleType></xsd:element><xsd:element name="EnableSessionCache" type="xsd:boolean"
default="true"></xsd:element><xsd:element name="SAN" type="xsd:boolean" default="true"></xsd:element><xsd:element name="CN" type="xsd:boolean" default="true"></xsd:element><xsd:element name="Binary" type="xsd:boolean"
default="true"></xsd:element>
</xsd:sequence></xsd:complexType>
<xsd:complexType name="UserPasswordPolicyType"><xsd:sequence>
<xsd:element name="Lowercase" type="xsd:boolean"></xsd:element><xsd:element name="Uppercase" type="xsd:boolean"></xsd:element><xsd:element name="Numbers" type="xsd:boolean"></xsd:element><xsd:element name="SpecialCharacters" type="xsd:boolean"></xsd:element><xsd:element name="DisallowCharacterRepetition"
type="xsd:boolean"></xsd:element><xsd:element name="MinLength">
<xsd:simpleType><xsd:restriction base="xsd:integer">
<xsd:minInclusive value="1"></xsd:minInclusive><xsd:maxInclusive value="15"></xsd:maxInclusive>
</xsd:restriction></xsd:simpleType>
</xsd:element><xsd:element name="DisallowUsername" type="xsd:boolean"></xsd:element><xsd:element name="DisallowPasswordResuse"
type="xsd:boolean"></xsd:element><xsd:element name="NeverLockout" type="xsd:boolean"></xsd:element><xsd:element name="NoOfInvalidLogins">
<xsd:simpleType><xsd:restriction base="xsd:integer">
<xsd:minInclusive value="1"></xsd:minInclusive><xsd:maxInclusive value="999"></xsd:maxInclusive>
</xsd:restriction></xsd:simpleType>
</xsd:element></xsd:sequence>
</xsd:complexType>
<!-- Objects block over -->
<xsd:complexType name="ConfigType"><xsd:sequence>
<xsd:element name="DeviceGroups" minOccurs="0"><xsd:complexType>
<xsd:sequence minOccurs="0" maxOccurs="unbounded"><xsd:element name="DeviceGroup"
type="DeviceGroupType"></xsd:element>
</xsd:sequence></xsd:complexType>
</xsd:element><xsd:element name="Devices" minOccurs="0">
<xsd:complexType><xsd:sequence minOccurs="0" maxOccurs="unbounded">
<xsd:element name="Device" type="DeviceType"></xsd:element>
A-14User Guide for Cisco Secure ACS Express 5.0.1
OL-20148-01

Appendix A XML Configuration FilesImport/Export Schema
</xsd:sequence></xsd:complexType>
</xsd:element><xsd:element name="UserGroups" minOccurs="0">
<xsd:complexType><xsd:sequence minOccurs="0" maxOccurs="unbounded">
<xsd:element name="UserGroup"type="UserGroupType">
</xsd:element></xsd:sequence>
</xsd:complexType></xsd:element><xsd:element name="UserPasswordPolicy"
minOccurs="0" maxOccurs="1" type="UserPasswordPolicyType"></xsd:element><xsd:element name="Users" minOccurs="0">
<xsd:complexType><xsd:sequence minOccurs="0" maxOccurs="unbounded">
<xsd:element name="User" type="UserType"></xsd:element></xsd:sequence>
</xsd:complexType></xsd:element><xsd:element name="ExternalDBActiveDirectory" minOccurs="0">
<xsd:complexType><xsd:sequence minOccurs="0" maxOccurs="1">
<xsd:element name="AD" type="ADType"></xsd:element></xsd:sequence>
</xsd:complexType></xsd:element><xsd:element name="ExternalDBLDAP" minOccurs="0">
<xsd:complexType><xsd:sequence minOccurs="0" maxOccurs="1">
<xsd:element name="LDAP" type="LDAPType"></xsd:element></xsd:sequence>
</xsd:complexType></xsd:element><xsd:element name="ExternalDBOTP" minOccurs="0">
<xsd:complexType><xsd:sequence minOccurs="0" maxOccurs="1">
<xsd:element name="OTP" type="OTPType"></xsd:element></xsd:sequence>
</xsd:complexType></xsd:element>
<xsd:element name="Policies" minOccurs="0"><xsd:complexType>
<xsd:sequence><xsd:element name="RadiusAttributeSets"
minOccurs="0"><xsd:complexType>
<xsd:sequence minOccurs="0"maxOccurs="unbounded"><xsd:element
name="RadiusAttributeSet" type="RadiusAttributeSetType">
</xsd:element></xsd:sequence>
</xsd:complexType></xsd:element>
<xsd:element name="TimeOfDays" minOccurs="0"><xsd:complexType>
<xsd:sequence minOccurs="0"maxOccurs="unbounded">
A-15User Guide for Cisco Secure ACS Express 5.0.1
OL-20148-01

Appendix A XML Configuration FilesImport/Export Schema
<xsd:element name="TimeOfDay"type="TimeOfDayType">
</xsd:element></xsd:sequence>
</xsd:complexType></xsd:element>
<xsd:element name="NetworkAccess"minOccurs="0"><xsd:complexType>
<xsd:sequence minOccurs="0" maxOccurs="unbounded"><xsd:element name="NetworkAccessItem"
type="NetworkAccessType" /></xsd:sequence>
</xsd:complexType></xsd:element><xsd:element name="DeviceAccess"
minOccurs="0"><xsd:complexType>
<xsd:sequence><xsd:element name="DeviceAdministration"
type="DeviceAdminType" minOccurs="0" maxOccurs="1" /></xsd:sequence>
</xsd:complexType></xsd:element>
</xsd:sequence></xsd:complexType>
</xsd:element></xsd:sequence>
</xsd:complexType>
<xsd:complexType name="AdministrationType"><xsd:sequence>
<xsd:element name="EAPSettings" minOccurs="0"><xsd:complexType>
<xsd:sequence><xsd:element name="PEAP" type="PEAPType"></xsd:element><xsd:element name="EAPFAST" type="EAPFASTType"></xsd:element><xsd:element name="EAPTLS" type="EAPTLSType"></xsd:element>
<xsd:element name="MARSessionCacheTimeout" default="480"><xsd:simpleType>
<xsd:restriction base="xsd:integer"><xsd:minInclusive value="5"></xsd:minInclusive><xsd:maxInclusive value="99999"></xsd:maxInclusive>
</xsd:restriction></xsd:simpleType>
</xsd:element> </xsd:sequence>
</xsd:complexType></xsd:element><xsd:element name="LoginSettings" minOccurs="0">
<xsd:complexType><xsd:sequence>
<!-- Idle session timeout is mentioned in minutes --><xsd:element name="IdleSessionTimeout" default="30">
<xsd:simpleType><xsd:restriction base="xsd:integer">
<xsd:minInclusive value="10"></xsd:minInclusive><xsd:maxInclusive value="1440"></xsd:maxInclusive>
</xsd:restriction></xsd:simpleType>
</xsd:element><xsd:element name="LoginWelcomeMessage" minOccurs="0">
<xsd:simpleType>
A-16User Guide for Cisco Secure ACS Express 5.0.1
OL-20148-01

Appendix A XML Configuration FilesImport/Export Schema
<xsd:restriction base="ExpressStringType"><xsd:minLength value="1"></xsd:minLength><xsd:maxLength value="50"></xsd:maxLength>
</xsd:restriction></xsd:simpleType>
</xsd:element><xsd:element name="EmailHelp" minOccurs="0">
<xsd:simpleType><xsd:restriction base="xsd:string">
<xsd:minLength value="1"></xsd:minLength><xsd:maxLength value="64"></xsd:maxLength>
</xsd:restriction></xsd:simpleType>
</xsd:element></xsd:sequence>
</xsd:complexType></xsd:element>
</xsd:sequence></xsd:complexType><!-- versioning...look at targetnamspace --><xsd:element name="ACSExpress">
<xsd:complexType><xsd:sequence>
<xsd:element name="Configuration" type="ConfigType"minOccurs="0">
</xsd:element><xsd:element name="Administration"
type="AdministrationType" minOccurs="0"></xsd:element>
</xsd:sequence></xsd:complexType>
<!-- key constraint to check for unique Device Group --><xsd:key name="UniqueDeviceGroup">
<xsd:selectorxpath="./Configuration/DeviceGroups/DeviceGroup">
</xsd:selector><xsd:field xpath="Name"></xsd:field>
</xsd:key><!-- key constraint to check for unique Device --><xsd:key name="UniqueDevice">
<xsd:selector xpath="./Configuration/Devices/Device"></xsd:selector><xsd:field xpath="Name"></xsd:field>
</xsd:key><!-- key constraint to check for unique Device IP Address --><xsd:key name="UniqueIPAddress">
<xsd:selector xpath="./Configuration/Devices/Device"></xsd:selector><xsd:field xpath="IPAddress"></xsd:field>
</xsd:key><!-- key constraint to check for unique username for User --><xsd:key name="UniqueUser">
<xsd:selector xpath="./Configuration/Users/User"></xsd:selector><xsd:field xpath="Username"></xsd:field>
</xsd:key><!-- key constraint to check for unique name for User Group --><xsd:key name="UniqueUserGroup">
<xsd:selectorxpath="./Configuration/UserGroups/UserGroup">
</xsd:selector><xsd:field xpath="Name"></xsd:field>
</xsd:key><!-- key constraint to check for unique Radius Attribute Set --><xsd:key name="UniqueRadiusAttrSet">
<xsd:selector
A-17User Guide for Cisco Secure ACS Express 5.0.1
OL-20148-01

Appendix A XML Configuration FilesImport/Export Schema
xpath="./Configuration/Policies/RadiusAttributeSet"></xsd:selector><xsd:field xpath="Name"></xsd:field>
</xsd:key><!-- key constraint to check for unique Time Of Day --><xsd:key name="UniqueTimeOfDay">
<xsd:selector xpath="./Configuration/Policies/TimeOfDay"></xsd:selector><xsd:field xpath="Name"></xsd:field>
</xsd:key><!-- key constraint to check for unique Time Of Day <xsd:key name="UniqueNetworkAccessService">
<xsd:selectorxpath="./Configuration/Policies/NetworkAccess/NetworkAccessItem">
</xsd:selector><xsd:field xpath="Name"></xsd:field>
</xsd:key>-->
</xsd:element>
</xsd:schema>
A-18User Guide for Cisco Secure ACS Express 5.0.1
OL-20148-01

OL-20148-01
I N D E X
A
access rules 5-8
acsxp_adagent.log 6-11
acsxp_agent_server.log 6-11
acsxp_mcd.log 6-11
acsxp_server.log 6-11
Active Directory 4-9
AD Agent Log 6-11
AD container 4-11
Adding users 4-3
ADE.log 6-11
Administrator
disabled account 7-6
Administrators
deleting 7-5
Administrator window 7-2
Application Deployment Engine log 6-11
Assigned Device Groups 5-4
Authentication
AD 4-11
Authentication protocols and compatible databases 5-5
Available Device Groups 5-4
B
Bind user 4-10
Bind Username 4-10, 4-14
C
Certificate authority 7-7
Certificate revocation settings 7-12
Certificate Trust List 7-7, 7-12
Certificate trust list 7-12
Configuration overview 1-12
Configuration tips 2-6
Configuring LDAP 4-12
Configuring logging 6-9
Connectivity tests 6-5
Copying
users 4-4
copying 4-4
Cross-Forest Trusts
Enabling 4-10
CTL (see Certificate Trust List) 7-7
Custom dictionaries
RADIUS Attributes 7-15
D
Database
external user 4-9
Deleting
users 4-4
Deleting administrators 7-5
Device commands report 6-4
Digital certificates 7-7
Disable Session Cache 7-14
DNS lookup 6-6
Domain Controller
Preferred Domain Controller 4-10
Domain Delimiter 4-13
Domain filtering 4-14
Domain Name 4-10
IN-1User Guide for Cisco Secure ACS Express 5.0.1

Index
E
EAP 1-9
EAP-TLS Certificate Comparison 7-14
Editing
users 4-3
Extensible Authentication Protocol 1-9
External user database 1-13, 4-9
F
Failback Retry Interval 4-14, 4-18
Fast Reconnect 7-14
G
Group Directory Subtree 4-13
Group Membership Attribute 4-13, 4-14
I
Internal user database 1-13
L
LDAP
database 4-12
domain filtering 4-12
group settings 4-12
User DN 4-13
user settings 4-12
LDAP CA Certificate
adding 4-15
deleting 4-15
LDAP database 4-14
Logging 6-9
Logging In 2-1
Logging out 2-2
IN-2User Guide for Cisco Secure ACS Express 5.0.1
Login Preferences 7-23
Login session
preferences 7-23
Login URL 2-1
N
nslookup 6-6
O
One-time passwords 4-16
OTP server 4-17
Failback Retry Interval 4-17
port 4-18
secondary 4-17
Server Timeout 4-17
P
Password
changing 1-9
changing internal user 4-6
Password lockout 7-6
ping 6-6
Primary OTP server down 4-18
Primary Server Hostname 4-14
Protocols 1-2
R
RADIUS 1-9
RADIUS Access Service 5-3
RADIUS Access Services 5-3, 5-7, 5-8
RADIUS Accounting 1-9
RADIUS attributes 5-4
RADIUS authentication request 1-10
RADIUS Dictionary 7-15
OL-20148-01

Index
RADIUS Extensions 1-9
RADIUS Request Attributes 5-4
Remote Authentication Dial In User Service 1-9
Replication 7-24
Request for Comments 1-9
Restore Defaults 4-17
Restore Defaults button 4-11, 4-15
RFC 1-9
S
Save and Join 4-10
Search Database Groups 5-6, 5-9
Secondary Server Hostname 4-14
Server Agent Log 6-11
Server Certificate settings 7-12
Server Timeout 4-14
Session Cache Timeout 7-14
Session caching 7-13, 7-14
Status pane 2-2, 2-3
Strip Domain Name 4-13
T
TACACS+ 1-10
TACACS+ Access Service 5-8
TACACS+ Access Service authorization rules 5-8
Editing many 5-12
TACACS+ authentication request 1-10
Terminal Access Controller Access-Control System 1-10
Test Connection 4-15, 4-17
Token servers 4-16
tracerroute 6-6
Tunnel Protocol Support 1-9
U
User Directory Subtree 4-13, 4-14
OL-20148-01
User Groups
adding 4-7
copying 4-7, 4-9
editing 4-7
User Object Class 4-14
User Object Type 4-14
User Password Attribute 4-14
Users
4-4
adding 4-3
deleting 4-4
editing 4-3
User Settings 4-14
W
WebGUI.log 6-11
IN-3User Guide for Cisco Secure ACS Express 5.0.1

Index
IN-4User Guide for Cisco Secure ACS Express 5.0.1
OL-20148-01