Resilire: Achieving High Availability Through Virtual Machine Live Migration
Upload
hoangkhanhCategory
view
221download
0
ibm.com/redbooks
Achieving High Availability on Linux for System z with Linux-HA Release 2
Lydia ParzialeAntonio Dias
Livio Teixeira FilhoDulce SmithJin VanStee
Mark Ver
Understand Linux-HA architecture, concepts, and terminology
Learn what is new in Linux-HA Release 2
Experience a Linux-HA implementation
Front cover

Achieving High Availability on Linux for System z with Linux-HA Release 2
April 2009
International Technical Support Organization
SG24-7711-00

© Copyright International Business Machines Corporation 2009. All rights reserved.Note to U.S. Government Users Restricted Rights -- Use, duplication or disclosure restricted by GSA ADPSchedule Contract with IBM Corp.
First Edition (April 2009)
This edition applies to Linux-HA Release 2 and Heartbeat 2.0 on the IBM System z platform.
Note: Before using this information and the product it supports, read the information in “Notices” on page vii.

Contents
Notices . . . . . . . . . . . . . . . . . . . . . . . . . . . . . . . . . . . . . . . . . . . . . . . . . . . . . . viiTrademarks . . . . . . . . . . . . . . . . . . . . . . . . . . . . . . . . . . . . . . . . . . . . . . . . . . . viii
Preface . . . . . . . . . . . . . . . . . . . . . . . . . . . . . . . . . . . . . . . . . . . . . . . . . . . . . . . ixThe team that wrote this book . . . . . . . . . . . . . . . . . . . . . . . . . . . . . . . . . . . . . . ixBecome a published author . . . . . . . . . . . . . . . . . . . . . . . . . . . . . . . . . . . . . . . . xiComments welcome. . . . . . . . . . . . . . . . . . . . . . . . . . . . . . . . . . . . . . . . . . . . . . xi
Chapter 1. High availability fundamentals . . . . . . . . . . . . . . . . . . . . . . . . . . 11.1 Basic high availability concepts. . . . . . . . . . . . . . . . . . . . . . . . . . . . . . . . . . 21.2 High availability configurations . . . . . . . . . . . . . . . . . . . . . . . . . . . . . . . . . . 5
Chapter 2. Introduction to Linux-HA release 2 . . . . . . . . . . . . . . . . . . . . . . . 92.1 Linux-HA release 2 capabilities . . . . . . . . . . . . . . . . . . . . . . . . . . . . . . . . . 10
2.1.1 New in Linux-HA release 2 . . . . . . . . . . . . . . . . . . . . . . . . . . . . . . . . 102.2 Heartbeat version 2 architecture . . . . . . . . . . . . . . . . . . . . . . . . . . . . . . . . 11
2.2.1 Heartbeat layers and components . . . . . . . . . . . . . . . . . . . . . . . . . . 122.2.2 Process flow . . . . . . . . . . . . . . . . . . . . . . . . . . . . . . . . . . . . . . . . . . . 152.2.3 Security considerations in Heartbeat version 2. . . . . . . . . . . . . . . . . 162.2.4 Resource agents . . . . . . . . . . . . . . . . . . . . . . . . . . . . . . . . . . . . . . . . 172.2.5 Cluster Information Base. . . . . . . . . . . . . . . . . . . . . . . . . . . . . . . . . . 202.2.6 Fencing in Linux-HA . . . . . . . . . . . . . . . . . . . . . . . . . . . . . . . . . . . . . 23
2.3 Heartbeat cluster management tools . . . . . . . . . . . . . . . . . . . . . . . . . . . . 262.3.1 Command line interface . . . . . . . . . . . . . . . . . . . . . . . . . . . . . . . . . . 262.3.2 Heartbeat configuration management GUI . . . . . . . . . . . . . . . . . . . . 27
2.4 Constraints demystified . . . . . . . . . . . . . . . . . . . . . . . . . . . . . . . . . . . . . . . 312.4.1 Location constraints . . . . . . . . . . . . . . . . . . . . . . . . . . . . . . . . . . . . . 312.4.2 Ordering constraints . . . . . . . . . . . . . . . . . . . . . . . . . . . . . . . . . . . . . 332.4.3 Colocation constraint. . . . . . . . . . . . . . . . . . . . . . . . . . . . . . . . . . . . . 34
2.5 Active/passive configuration with Heartbeat . . . . . . . . . . . . . . . . . . . . . . . 352.6 Active/active configuration with Heartbeat . . . . . . . . . . . . . . . . . . . . . . . . 382.7 Quorum configuration with Heartbeat . . . . . . . . . . . . . . . . . . . . . . . . . . . . 41
Chapter 3. Linux-HA on System z . . . . . . . . . . . . . . . . . . . . . . . . . . . . . . . . 453.1 General considerations for Linux-HA on System z . . . . . . . . . . . . . . . . . . 46
3.1.1 snIPL . . . . . . . . . . . . . . . . . . . . . . . . . . . . . . . . . . . . . . . . . . . . . . . . . 463.1.2 Software provided by the distributions . . . . . . . . . . . . . . . . . . . . . . . 463.1.3 Connection options for the Heartbeat link . . . . . . . . . . . . . . . . . . . . . 473.1.4 Heartbeat STONITH mechanisms for the System z server . . . . . . . 49
© Copyright IBM Corp. 2009. All rights reserved. iii
3.2 Heartbeat considerations for Linux on z/VM . . . . . . . . . . . . . . . . . . . . . . . 503.2.1 Disk sharing between z/VM guests . . . . . . . . . . . . . . . . . . . . . . . . . . 513.2.2 Setting up VSMSERVE for use with snIPL . . . . . . . . . . . . . . . . . . . . 513.2.3 Locating the dmsvsma.x file . . . . . . . . . . . . . . . . . . . . . . . . . . . . . . . 533.2.4 Working with the stonith command on z/VM . . . . . . . . . . . . . . . . . . . 54
3.3 Heartbeat considerations for Linux on an LPAR . . . . . . . . . . . . . . . . . . . . 553.3.1 Setting up the Management API . . . . . . . . . . . . . . . . . . . . . . . . . . . . 553.3.2 Working with the Management API. . . . . . . . . . . . . . . . . . . . . . . . . . 56
Chapter 4. Linux-HA release 2 installation and initial configuration . . . . 574.1 Before you start . . . . . . . . . . . . . . . . . . . . . . . . . . . . . . . . . . . . . . . . . . . . . 584.2 Laboratory environment . . . . . . . . . . . . . . . . . . . . . . . . . . . . . . . . . . . . . . 60
4.2.1 z/VM hosts and guests . . . . . . . . . . . . . . . . . . . . . . . . . . . . . . . . . . . 604.2.2 Network setup . . . . . . . . . . . . . . . . . . . . . . . . . . . . . . . . . . . . . . . . . . 604.2.3 Shared disk setup . . . . . . . . . . . . . . . . . . . . . . . . . . . . . . . . . . . . . . . 614.2.4 FTP server for the SLES 10 and Red Hat Enterprise Linux 5 packages
repository . . . . . . . . . . . . . . . . . . . . . . . . . . . . . . . . . . . . . . . . . . . . . 634.2.5 DNS server for node name resolution. . . . . . . . . . . . . . . . . . . . . . . . 654.2.6 Package selection for a Linux installation . . . . . . . . . . . . . . . . . . . . . 66
4.3 Installing Linux-HA release 2 components . . . . . . . . . . . . . . . . . . . . . . . . 674.3.1 Installing Heartbeat on SLES 10 . . . . . . . . . . . . . . . . . . . . . . . . . . . . 674.3.2 Installing Heartbeat on Red Hat Enterprise Linux 5 . . . . . . . . . . . . . 744.3.3 Building RPM packages for Red Hat Enterprise Linux 5. . . . . . . . . . 824.3.4 Installing snIPL on Red Hat Enterprise Linux 5. . . . . . . . . . . . . . . . . 91
4.4 Initial configuration of Linux-HA release 2. . . . . . . . . . . . . . . . . . . . . . . . . 964.5 Two-node active/passive scenario . . . . . . . . . . . . . . . . . . . . . . . . . . . . . 1014.6 Two-node active/active scenario . . . . . . . . . . . . . . . . . . . . . . . . . . . . . . . 1094.7 Three-node quorum scenario . . . . . . . . . . . . . . . . . . . . . . . . . . . . . . . . . 117
4.7.1 Adding a new node in an existing cluster . . . . . . . . . . . . . . . . . . . . 1174.7.2 Making a cluster more robust by adding a new vote. . . . . . . . . . . . 1204.7.3 Three-node cluster and one node failing scenario . . . . . . . . . . . . . 1204.7.4 Three-node cluster and two nodes failing scenario. . . . . . . . . . . . . 1214.7.5 STONITH in action . . . . . . . . . . . . . . . . . . . . . . . . . . . . . . . . . . . . . 123
Chapter 5. Linux-HA usage scenarios. . . . . . . . . . . . . . . . . . . . . . . . . . . . 1315.1 Highly available Apache Web server. . . . . . . . . . . . . . . . . . . . . . . . . . . . 132
5.1.1 Architecture . . . . . . . . . . . . . . . . . . . . . . . . . . . . . . . . . . . . . . . . . . . 1325.1.2 Implementing the architecture. . . . . . . . . . . . . . . . . . . . . . . . . . . . . 1335.1.3 Testing the implementation . . . . . . . . . . . . . . . . . . . . . . . . . . . . . . . 146
5.2 Shared-disk clustered file system . . . . . . . . . . . . . . . . . . . . . . . . . . . . . . 1665.2.1 OCFS2 overview . . . . . . . . . . . . . . . . . . . . . . . . . . . . . . . . . . . . . . . 1665.2.2 Architectural overview of OCFS2 with Linux-HA Heartbeat . . . . . . 1675.2.3 Implementing the architecture. . . . . . . . . . . . . . . . . . . . . . . . . . . . . 169
iv Achieving High Availability on Linux for System z with Linux-HA Release 2

5.2.4 Testing the OCFS2 and Heartbeat implementations . . . . . . . . . . . 2085.3 Implementing NFS over OCFS2 under Heartbeat. . . . . . . . . . . . . . . . . . 212
5.3.1 Architecture of NFS over OCFS2 . . . . . . . . . . . . . . . . . . . . . . . . . . 2125.3.2 Implementing the architecture. . . . . . . . . . . . . . . . . . . . . . . . . . . . . 213
5.4 Implementing DRBD under Heartbeat. . . . . . . . . . . . . . . . . . . . . . . . . . . 2225.4.1 DRBD architecture . . . . . . . . . . . . . . . . . . . . . . . . . . . . . . . . . . . . . 2225.4.2 Implementation under Heartbeat. . . . . . . . . . . . . . . . . . . . . . . . . . . 2235.4.3 Configuring DRBD under Heartbeat . . . . . . . . . . . . . . . . . . . . . . . . 230
5.5 Implementing a DNS server under Heartbeat . . . . . . . . . . . . . . . . . . . . . 2355.5.1 Architecture . . . . . . . . . . . . . . . . . . . . . . . . . . . . . . . . . . . . . . . . . . . 2355.5.2 The environment . . . . . . . . . . . . . . . . . . . . . . . . . . . . . . . . . . . . . . . 2365.5.3 Implementing the DNS server . . . . . . . . . . . . . . . . . . . . . . . . . . . . . 2375.5.4 Validating the solution . . . . . . . . . . . . . . . . . . . . . . . . . . . . . . . . . . . 246
5.6 Implementing DB2 under Heartbeat . . . . . . . . . . . . . . . . . . . . . . . . . . . . 2475.6.1 Architecture of the active/passive Heartbeat scenario for DB2. . . . 2485.6.2 Setting up the environment . . . . . . . . . . . . . . . . . . . . . . . . . . . . . . . 2485.6.3 Configuring Heartbeat . . . . . . . . . . . . . . . . . . . . . . . . . . . . . . . . . . . 2505.6.4 Testing the failover . . . . . . . . . . . . . . . . . . . . . . . . . . . . . . . . . . . . . 252
Appendix A. Hints for troubleshooting Linux-HA . . . . . . . . . . . . . . . . . . 255Validating the cib.xml file . . . . . . . . . . . . . . . . . . . . . . . . . . . . . . . . . . . . . . . . 256Increasing the debug level . . . . . . . . . . . . . . . . . . . . . . . . . . . . . . . . . . . . . . . 257
Debug level setup . . . . . . . . . . . . . . . . . . . . . . . . . . . . . . . . . . . . . . . . . . . 258Debug file . . . . . . . . . . . . . . . . . . . . . . . . . . . . . . . . . . . . . . . . . . . . . . . . . 258Log management . . . . . . . . . . . . . . . . . . . . . . . . . . . . . . . . . . . . . . . . . . . 259
Monitoring the cluster status . . . . . . . . . . . . . . . . . . . . . . . . . . . . . . . . . . . . . 260Recovering from a failed takeover . . . . . . . . . . . . . . . . . . . . . . . . . . . . . . . . . 261
Appendix B. Managing Heartbeat by using a command line interface . 269
Appendix C. ConnectedToIP script . . . . . . . . . . . . . . . . . . . . . . . . . . . . . . 271
Glossary . . . . . . . . . . . . . . . . . . . . . . . . . . . . . . . . . . . . . . . . . . . . . . . . . . . . 277
Related publications . . . . . . . . . . . . . . . . . . . . . . . . . . . . . . . . . . . . . . . . . . 281IBM Redbooks . . . . . . . . . . . . . . . . . . . . . . . . . . . . . . . . . . . . . . . . . . . . . . . . 281Other publications . . . . . . . . . . . . . . . . . . . . . . . . . . . . . . . . . . . . . . . . . . . . . 281Online resources . . . . . . . . . . . . . . . . . . . . . . . . . . . . . . . . . . . . . . . . . . . . . . 281How to get Redbooks . . . . . . . . . . . . . . . . . . . . . . . . . . . . . . . . . . . . . . . . . . . 282Help from IBM . . . . . . . . . . . . . . . . . . . . . . . . . . . . . . . . . . . . . . . . . . . . . . . . 282
Index . . . . . . . . . . . . . . . . . . . . . . . . . . . . . . . . . . . . . . . . . . . . . . . . . . . . . . . 283
Contents v

vi Achieving High Availability on Linux for System z with Linux-HA Release 2

Notices
This information was developed for products and services offered in the U.S.A.
IBM may not offer the products, services, or features discussed in this document in other countries. Consult your local IBM representative for information on the products and services currently available in your area. Any reference to an IBM product, program, or service is not intended to state or imply that only that IBM product, program, or service may be used. Any functionally equivalent product, program, or service that does not infringe any IBM intellectual property right may be used instead. However, it is the user's responsibility to evaluate and verify the operation of any non-IBM product, program, or service.
IBM may have patents or pending patent applications covering subject matter described in this document. The furnishing of this document does not give you any license to these patents. You can send license inquiries, in writing, to: IBM Director of Licensing, IBM Corporation, North Castle Drive, Armonk, NY 10504-1785 U.S.A.
The following paragraph does not apply to the United Kingdom or any other country where such provisions are inconsistent with local law: INTERNATIONAL BUSINESS MACHINES CORPORATION PROVIDES THIS PUBLICATION "AS IS" WITHOUT WARRANTY OF ANY KIND, EITHER EXPRESS OR IMPLIED, INCLUDING, BUT NOT LIMITED TO, THE IMPLIED WARRANTIES OF NON-INFRINGEMENT, MERCHANTABILITY OR FITNESS FOR A PARTICULAR PURPOSE. Some states do not allow disclaimer of express or implied warranties in certain transactions, therefore, this statement may not apply to you.
This information could include technical inaccuracies or typographical errors. Changes are periodically made to the information herein; these changes will be incorporated in new editions of the publication. IBM may make improvements and/or changes in the product(s) and/or the program(s) described in this publication at any time without notice.
Any references in this information to non-IBM Web sites are provided for convenience only and do not in any manner serve as an endorsement of those Web sites. The materials at those Web sites are not part of the materials for this IBM product and use of those Web sites is at your own risk.
IBM may use or distribute any of the information you supply in any way it believes appropriate without incurring any obligation to you.
Information concerning non-IBM products was obtained from the suppliers of those products, their published announcements or other publicly available sources. IBM has not tested those products and cannot confirm the accuracy of performance, compatibility or any other claims related to non-IBM products. Questions on the capabilities of non-IBM products should be addressed to the suppliers of those products.
This information contains examples of data and reports used in daily business operations. To illustrate them as completely as possible, the examples include the names of individuals, companies, brands, and products. All of these names are fictitious and any similarity to the names and addresses used by an actual business enterprise is entirely coincidental.
COPYRIGHT LICENSE:
This information contains sample application programs in source language, which illustrate programming techniques on various operating platforms. You may copy, modify, and distribute these sample programs in any form without payment to IBM, for the purposes of developing, using, marketing or distributing application programs conforming to the application programming interface for the operating platform for which the sample programs are written. These examples have not been thoroughly tested under all conditions. IBM, therefore, cannot guarantee or imply reliability, serviceability, or function of these programs.
© Copyright IBM Corp. 2009. All rights reserved. vii

Trademarks
IBM, the IBM logo, and ibm.com are trademarks or registered trademarks of International Business Machines Corporation in the United States, other countries, or both. These and other IBM trademarked terms are marked on their first occurrence in this information with the appropriate symbol (® or ™), indicating US registered or common law trademarks owned by IBM at the time this information was published. Such trademarks may also be registered or common law trademarks in other countries. A current list of IBM trademarks is available on the Web at http://www.ibm.com/legal/copytrade.shtml
The following terms are trademarks of the International Business Machines Corporation in the United States, other countries, or both:
DB2®developerWorks®DirMaint™DS8000®HACMP™
HiperSockets™IBM®Redbooks®Redbooks (logo) ®Resource Link™
System z10™System z®z/VM®
The following terms are trademarks of other companies:
ITIL is a registered trademark, and a registered community trademark of the Office of Government Commerce, and is registered in the U.S. Patent and Trademark Office.
Novell, SUSE, the Novell logo, and the N logo are registered trademarks of Novell, Inc. in the United States and other countries.
Oracle, JD Edwards, PeopleSoft, Siebel, and TopLink are registered trademarks of Oracle Corporation and/or its affiliates.
Enterprise Linux, Red Hat, RPM, and the Shadowman logo are trademarks or registered trademarks of Red Hat, Inc. in the U.S. and other countries.
Expression, Windows, and the Windows logo are trademarks of Microsoft Corporation in the United States, other countries, or both.
UNIX is a registered trademark of The Open Group in the United States and other countries.
Linux is a trademark of Linus Torvalds in the United States, other countries, or both.
Other company, product, or service names may be trademarks or service marks of others.
viii Achieving High Availability on Linux for System z with Linux-HA Release 2

Preface
As Linux® on System z® becomes more prevalent and mainstream in the industry, the need for it to deliver higher levels of availability is increasing. IBM® supports the High Availability Linux (Linux-HA) project (http://www.linux-ha.org/), which provides high availability functions to the open source community. One component of the Linux-HA project is the Heartbeat program, which runs on every known Linux platform. Heartbeat is part of the framework of the Linux-HA project.
This IBM Redbooks® publication provides information to help you evaluate and implement Linux-HA release 2 by using Heartbeat 2.0 on the IBM System z platform with either SUSE® Linux Enterprise Server version 10 or Red Hat® Enterprise Linux® 5. To begin, we review the fundamentals of high availability concepts and terminology. Then we discuss the Heartbeat 2.0 architecture and its components. We examine some of the special considerations when using Heartbeat 2.0 on Linux on System z, particularly Linux on z/VM®, with logical partitions (LPARs), interguest communication by using HiperSockets™, and Shoot The Other Node In The Head (STONITH) by using VSMSERVE for Simple Network IPL (snIPL).
By reading this book, you can examine our environment as we outline our installation and setup processes and configuration. We demonstrate an active and passive single resource scenario and a quorum scenario by using a single resource with three guests in the cluster. Finally, we demonstrate and describe sample usage scenarios.
The team that wrote this book
This book was produced by a team of specialists from around the world working at the International Technical Support Organization (ITSO).
Lydia Parziale is a Project Leader for the ITSO in Poughkeepsie, New York, and has been employed by IBM for more than 20 years in various technology areas. She has domestic and international experience in technology management, including software development, project leadership, and strategic planning. Her areas of expertise include e-business development and database management technologies. Lydia is a certified PMP and an IBM Certified IT Specialist with an MBA in Technology Management.
© Copyright IBM Corp. 2009. All rights reserved. ix

Antonio Dias is a Deployment Engineer in Sao Paulo, Brazil, for Electronic Data Systems (EDS) do Brasil Ltda., a Hewlett-Packard Company. He has been with EDS for since December 2005 and has 15 years of experience in Linux systems field. His areas of expertise include shell scripting, Python and Perl programming, and TCP/IP networks. Antonio is a Red Hat Certified Engineer for Red Hat Enterprise Linux version 5.
Livio Teixeira Filho is a UNIX® and Linux specialist with 11 years of experience. He provides technical and problem-solving support for IBM customers, by handling complex and critical scenarios. He has experience in working on cross-UNIX platforms on data center migrations and consolidation projects. Livio has engineering and field knowledge on HA solutions and is certified as a System Expert on HACMP™. Livio is also certified in Information Technology Infrastructure Library (ITIL®) and many other technical certifications in Linux and UNIX systems.
Dulce Smith is a Software Engineer at IBM STG Lab Services. She has six years of experience in the IT field. Her areas of expertise include IBM System z, z/VM, Linux on System z, Oracle®, and DB2®. Dulce holds a bachelor degree in finance from Manhattanville College and a master degree in telecommunications from Pace University.
Jin VanStee is a System z IT Architect for mainframe clients in the New York City area. As part of the IBM technical sales team, her role is to understand and communicate the power, performance, technical benefits and economics of System z to IBM Customers. With her background in mainframe system and integration test, she contributes to the sales effort by designing technical solutions to meet customers’ requirements, as well as helps grow and protect the System z install base. She has over seven years of experience in the System z field, both in the test labs and in the technical sales role. Jin’s expertise is in Linux for System z. She has written papers and Redbooks publications, as well as presented at SHARE on Linux for System z. She holds both a Bachelor of Science degree and a Master of Science degree in computer science.
Mark Ver is a software engineer for IBM in the United States. He has 11 years of experience in testing the System z platform. His areas of expertise include Linux on System z device configuration and Linux distribution testing. He holds a degree in computer science from Carnegie Mellon University.
Thanks to the following people for their contributions to this project:
Roy P. Costa, ITSO, Poughkeepsie Center
Alan Robertson, IBM Systems & Technology Group and founder of the Linux-HA development effort, USA
x Achieving High Availability on Linux for System z with Linux-HA Release 2

Terence Walker, IBM Software Group, USA
Fabio Augusto Miranda Martins, IBM Global Technology Services, Brazil
Kyle Smith, VMWare, USA
Become a published author
Join us for a two- to six-week residency program! Help write a book dealing with specific products or solutions, while getting hands-on experience with leading-edge technologies. You will have the opportunity to team with IBM technical professionals, Business Partners, and Clients.
Your efforts will help increase product acceptance and customer satisfaction. As a bonus, you will develop a network of contacts in IBM development labs, and increase your productivity and marketability.
Find out more about the residency program, browse the residency index, and apply online at:
ibm.com/redbooks/residencies.html
Comments welcome
Your comments are important to us!
We want our books to be as helpful as possible. Send us your comments about this book or other IBM Redbooks in one of the following ways:
� Use the online Contact us review Redbooks form found at:
ibm.com/redbooks
� Send your comments in an e-mail to:
� Mail your comments to:
IBM Corporation, International Technical Support OrganizationDept. HYTD Mail Station P0992455 South RoadPoughkeepsie, NY 12601-5400
Preface xi

xii Achieving High Availability on Linux for System z with Linux-HA Release 2

Chapter 1. High availability fundamentals
This IBM Redbooks publication provides an overview of Linux-HA release 2 and the experiences gained by implementing Linux-HA release 2 on different distributions of Linux on System z. The Linux distributions that are used in this book are SUSE Linux Enterprise Server 10 (SLES 10) and Red Hat Enterprise Linux 5.
In this chapter, we describe basic concepts of high availability including split-brain, fencing, and quorum. By understanding these concepts, you will have a smoother transition to Linux-HA release 2 and the remaining chapters of this book. In addition, we describe the two most commonly used high availability configurations: active/active and active/passive. In later chapters in this book, we provide further discussions and scenarios about these two types of configuration.
1
© Copyright IBM Corp. 2009. All rights reserved. 1

1.1 Basic high availability concepts
This section provides definitions to various basic high availability concepts that are used throughout the book.
OutageFor the purpose of this book, outage is the loss of services or applications for a specific period of time. An outage can be planned or unplanned:
Planned outage Occurs when services or applications are stopped because of scheduled maintenance or changes, which are expected to be restored at a specific time.
Unplanned outage Occurs when services or applications are stopped because of events that are not in our control such as natural disasters. Also, human errors and hardware or software failures can cause unplanned outages.
UptimeUptime is the length of time when services or applications are available.
DowntimeDowntime is the length of time when services or applications are not available. It is usually measured from the time that the outage takes place to the time when the services or applications are available.
Service level agreementService level agreements (SLAs) determine the degree of responsibility to maintain services that are available to users, costs, resources, and the complexity of the services. For example, a banking application that handles stock trading must maintain the highest degree of availability during active stock trading hours. If the application goes down, users are directly affected and, as a result, the business suffers. The degree of responsibility varies depending on the needs of the user.
AvailabilityThere are several definitions of availability but, for the purpose of this book, availability is the degree in which a service or application is ready for use or available (uptime).
2 Achieving High Availability on Linux for System z with Linux-HA Release 2

High availabilityHigh availability is the maximum system uptime. The terms stated in SLAs determine the degree of a system’s high availability. A system that is designed to be highly available withstands failures that are caused by planned or unplanned outages.
Continuous operationContinuous operation is a continuous, nondisruptive, level of operation where changes to hardware and software are transparent to users. Planned outages typically occur on environments that are designed to provide continuous operation. These types of environments are designed to avoid unplanned outages.
Continuous availabilityContinuous availability is a continuous, nondisruptive, level of service that is provided to users. It provides the highest level of availability that can possibly be achieved. Planned or unplanned outages of hardware or software cannot exist in environments that are designed to provide continuous availability.
Single point of failureA single point of failure (SPOF) exists when a hardware or software component of a system can potentially bring down the entire system without any means of quick recovery. Highly available systems tend to avoid a single point of failure by using redundancy in every operation.
ClusterA cluster is a group of servers and resources that act as one entity to enable high availability or load balancing capabilities.
FailoverFailover is the process in which one or more server resources are transferred to another server or servers in the same cluster because of failure or maintenance.
FailbackFailback is the process in which one or more resources of a failed server are returned to its original owner once it becomes available.
Primary (active) serverA primary or active server is a member of a cluster, which owns the cluster resources and runs processees against those resources. When the server is compromised, the ownership of these resources stops and is handed to the standby server.
Chapter 1. High availability fundamentals 3

Standby (secondary, passive, or failover) serverA standby server, also known as a passive or failover server, is a member of a cluster that is capable of accessing resources and running processes. However, it is in a state of hold until the primary server is compromised or has to be stopped. At that point, all resources fail over the standby server, which becomes the active server.
Split-brain scenarioIn a split-brain scenario, more than one server or application that belongs to the same cluster can access the same resources, which in turn can potentially cause harm to these resources. This scenario tends to happen when each server in the cluster believes that the other servers are down and start taking over resources.
For more information about a split-brain scenario, see the High Availability Linux Project Web site at the following address:
http://www.linux-ha.org/SplitBrain
FencingFencing is a mechanism used in high availability solutions to block an unstable cluster member from accessing shared resources and communicating with other members or systems. When fencing is applied, the unstable server cannot run any processees until its communication to the other servers in the cluster is resumed. Shoot The Other Node In The Head (STONITH) is one technique that is used to implement fencing.
For more details about fencing, see 2.2.6, “Fencing in Linux-HA” on page 23, and the High Availability Linux Project Web site at the following address:
http://www.linux-ha.org/fencing
QuorumQuorum is a mechanism that is used to avoid split-brain situations by selecting a subset of the cluster to represent the whole cluster when is forced to split into multiple sub-clusters due to communication issues. The selected cluster subset can run services that make the cluster available.
For more information about quorum, see 2.7, “Quorum configuration with Heartbeat” on page 41, and the High Availability Linux Project Web site at the following address:
http://www.linux-ha.org/quorum
4 Achieving High Availability on Linux for System z with Linux-HA Release 2

1.2 High availability configurations
The most common configurations in highly available environments are the active/active configuration and the active/passive configuration.
Active/active configurationWith an active/active configuration, all servers in the cluster can simultaneously run the same resources. That is, these severs own the same resources and can access them independently of the other servers in the cluster. After a server in the cluster is no longer available, its resources are available on the other servers in the cluster.
An advantage of this configuration is that servers in the cluster are more efficient because they can all work at the same time. However, there is a level of service degradation when one server must run the resources of the server that is no longer in the cluster.
In Figure 1-1, the servers to the left of this graphic have access to the cluster resources and provide services to the set of workstations shown at the top of this figure. In addition, the servers to the right provide services to these workstations.
Figure 1-1 Active/active high availability configuration
Active Servers
High Availability
Active Servers
Workstations
Chapter 1. High availability fundamentals 5

To learn more about active/active configurations, see the High Availability Linux Project Web site at the following address:
http://www.linux-ha.org/ActiveActive
To understand the flow of an active/active scenario, see 4.6, “Two-node active/active scenario” on page 109.
Active/passive configurationAn active/passive configuration consists of a server that owns the cluster resources and other servers that are capable of accessing the resources that are on standby until the cluster resource owner is no longer available.
The advantages of the active/passive configuration are that there is no service degradation and services are only restarted when the active server no longer responds. However, a disadvantage of this configuration is that the passive server does not provide any type of services while on standby mode, making it less efficient than active/active configurations. Another disadvantage is that the system takes time to failover the resources to the standby node.
In Figure 1-2, the servers shown on the left have access to the cluster resources and provide services to the set of workstations shown at the top of the figure. The servers to the right are on standby and are ready to resume work when indicated. However, they do not provide services to the workstations while the active servers are running.
Figure 1-2 Active/passive high availability configuration
Active Servers
High Availability
Passive Servers
Workstations
6 Achieving High Availability on Linux for System z with Linux-HA Release 2

To learn more about active/passive configurations, see the High Availability Linux Project Web site at the following address:
http://www.linux-ha.org/ActivePassive
In addition, to understand the flow of an active/passive scenario, see 4.5, “Two-node active/passive scenario” on page 101.
Chapter 1. High availability fundamentals 7

8 Achieving High Availability on Linux for System z with Linux-HA Release 2

Chapter 2. Introduction to Linux-HA release 2
In this chapter, we introduce the High Availability Linux (Linux-HA) release 2 package and one of its core components called Heartbeat. The following topics are discussed:
� What is new in Linux-HA release 2� Heartbeat version 2 architecture and components� How the components communicate with each other� Security considerations in Linux-HA release 2� Resource agents (RAs)� Resource constraints� Various HA configurations� Fencing with Shoot The Other Node In The Head (STONITH)� How Linux-HA deals with quorum
2
© Copyright IBM Corp. 2009. All rights reserved. 9

2.1 Linux-HA release 2 capabilities
The Linux-HA project provides high availability solutions for Linux through an open development community. The majority of Linux-HA software is licensed under the Free Software Foundation’s GNU General Public License (GPL) and the Free Software Foundation’s GNU Lesser General Public License (LGPL).
For more information about licensing, see the following Web address:
http://www.linux-ha.org/LegalInfo
The Linux-HA release 2 software package provides the following capabilities:
� Active/active and active/passive configurations
� Failover and failback on node, IP address, or resource failure
� Failover and failback on customized resource
� Support for the Open Cluster Framework (OCF) resource standard and Linux Standard Base (LSB) resource specification
� Both command line interface (CLI) and graphical user interface (GUI) for configuration and monitoring
� Support for up to a 16-node cluster
� Multi-state (master/slave) resource support
� Rich constraint support
� XML-based resource configuration
� No kernel or hardware dependencies
� Load balancing capabilities with Linux Virtual Server (LVS)
2.1.1 New in Linux-HA release 2
Linux-HA release 2 is the current version and is superior to release 1 in both supported features and functionality. Linux-HA has the following major differences compared to release 1:
� Release 2 provides support for more than two nodes in a cluster. The Linux-HA project has tested up to 16 nodes in a cluster. By contrast, release1 only supports a maximum of two nodes in a cluster. Split-brain situations can occur in two-node clusters when the nodes lose communication with one another. The only way to avoid a split-brain situation is to configure a cluster with at least three nodes and take advantage of quorum. In this case, release 2 is required to configure a cluster of three or more nodes. In addition, multiple nodes enable higher redundancy in the cluster.
10 Achieving High Availability on Linux for System z with Linux-HA Release 2

� Release 2 uses the Cluster Information Base (CIB) cluster model and introduces the Cluster Resource Manager (CRM) component that maintains the CIB.
� Release 2 includes built-in resource monitoring, where release 1 has the limitation of only being able to monitor heartbeat loss and IP connectivity through ipfail.
� Release 2 provides additional support for OCF-based resource agents that are more flexible and powerful than the LSB resource agents.
� Starting with release 2.0.5, Linux-HA comes with an easy-to-use management GUI for configuring, managing, and monitoring cluster nodes and resources.
� Release 2 provides users with more command line administrative tools to work with the new architecture.
� Release 2 has additional support for complex resource types such as clones and groups.
� Release 2 has additional support for a sophisticated dependency model with the use of location, colocation, and ordering constraints.
The core of Linux-HA release 2 is a component called Heartbeat. Heartbeat provides the clustering capability that ensures high availability of critical resources such as data, applications, and services. It provides monitoring, failover, and failback capabilities to Heartbeat-defined resources.
The Linux-HA development community provides Heartbeat resource agents for a variety of resources such as DB2, Apache, and DNS. Customized resource agents can also be created by using one of Heartbeat’s supported resource specifications. Depending on your availability requirements, Heartbeat can manage multiple resources at one time.
We begin with a discussion of the Heartbeat version 2 architecture.
2.2 Heartbeat version 2 architecture
In this section, we provide a high level overview of the Heartbeat version 2 architecture. We describe the components in the architecture and how they interoperate to provide highly available clusters.
Figure 2-1 on page 12 illustrates a Heartbeat environment with three nodes in the cluster. It is inspired by the Architectural discussion in Novell®’s Heartbeat guide. As you can see from the diagram, there are multiple layers in Heartbeat,
Chapter 2. Introduction to Linux-HA release 2 11

with one or more components in each layer. In the next section we describe each layer and its components, followed by a description of the process flow.
Figure 2-1 Heartbeat version 2 architecture
2.2.1 Heartbeat layers and components
In this section, we describe each layer of the Heartbeat version 2 architecture and the components in each layer.
Messaging and infrastructure layerThe messaging and infrastructure layer consist of components that make up the Heartbeat program. The Heartbeat program is indicated by the heart in Figure 2-1. The components of this program send “I’m alive” signals and cluster-related messages to other cluster members so that they know the status of the current node. Every component that communicates with other cluster
Linux System
RA
Heartbeat
LRM
CRMReplica
CIB
Cluster Concensus Membership service (CCM)
Linux System
RA
LRM
ReplicaCIB
Cluster Concensus Membership service (CCM)
Resource Agent (RA)
Policy Engine
(PE)
Master Cluster
Information Base (CIB)
Linux System
Cluster Concensus Membership service (CCM)
Heartbeat
Local Resource Manager
(LRM)
Transition Engine
(TE)
CRM
Cluster Resource Manager (CRM)
DC
12 Achieving High Availability on Linux for System z with Linux-HA Release 2

members does so through this layer. This is how cluster members keep track of each other.
The Heartbeat program is crucial to the proper functioning of a cluster. Thus, the communication channel over which Heartbeat sends its signals must be highly available. If any of the underlying communication channel is lost, the whole cluster falls apart because none of the members can communicate with one another. You can provide high availability to the Heartbeat communication channel by having at least two communication media that enable cluster nodes to communicate with each other.
Membership layerAccording the SUSE Linux Enterprise Server Heartbeat guide from Novell,1 “The second layer is the membership layer. The membership layer is responsible for calculating the largest fully connected set of cluster nodes and synchronizing this view to all of its members. It performs this task based on the information it gets from the (Heartbeat) layer. The logic that takes care of this task is contained in the Cluster Consensus Membership (CCM) service, which provides an organized cluster topology overview (node-wise) to cluster components that are the higher layers.”
Resource allocation layerThe resource allocation layer is where all the cluster rules and status information are established and stored. The components in this layer make decisions on actions to take based on the cluster rules and they execute those actions. Many components make up the resource allocation layer. We briefly describe each component and how they interoperate with one another in the sections that follow.
Cluster Information BaseAccording the SUSE Linux Enterprise Server Heartbeat guide,2 in Heartbeat version 2, “the CIB is an in-memory XML representation of the entire cluster configuration and status, including node membership, resources, constraints, [and so on]. There is one master CIB in the cluster, maintained by the Designated Coordinator (DC). All the other nodes maintain a CIB replica. An administrator can manipulate the cluster’s behavior via the cibadmin CLI or the Heartbeat GUI tool.”
Any manipulation results in a change in the master CIB and is quickly propagated to the other members. A node failure also results in a change in the master CIB and is propagated to other nodes.
1 The SUSE Linux Enterprise Server Heartbeat guide from Novell is on the Web at: http://www.novell.com/documentation/sles10/pdfdoc/heartbeat/heartbeat.pdf
2 Ibid.
Chapter 2. Introduction to Linux-HA release 2 13

A Heartbeat administrator will become intimately familiar with the CIB. Therefore we discuss the CIB structure in 2.2.5, “Cluster Information Base” on page 20.
Cluster Resource ManagerEvery node in the cluster has a local CRM that maintains the CIB and communicates with the Local Resource Manager (LRM) to call the local RAs. Additionally, it communicates with the CCM service in the membership layer. The CRM processes all transactions that pass through the resource allocation layer.
One node in the cluster is elected as the Designated Coordinator (DC). The DC must maintain the master CIB and communicate changes to the master CIB to other CRMs in other nodes. The CRMs, in turn, update the local CIB replica. According to the SUSE Linux Enterprise Server Heartbeat guide, “The DC is the only entity in the cluster that can decide that a cluster-wide change needs to be performed, such as fencing a node or moving resources around.”
Policy Engine and Transition EngineAccording to SUSE Linux Enterprise Server Heartbeat guide,3 “Whenever the Designated Coordinator needs to make a cluster-wide change (react to a new CIB), the Policy Engine (PE) is used to calculate the next state of the cluster and the list of resource actions required to achieve it. The commands computed by the Policy Engine are then executed by the Transition Engine (TE). The DC sends messages to the relevant Cluster Resource Managers in the cluster, who then use their LRM to perform the necessary resource manipulations. The PE/TE pair only runs on the DC node.”
Local Resource Manager According to SUSE Linux Enterprise Server Heartbeat guide,4 “The Local Resource Manager calls the local resource agents (see “Resource layer”) on behalf of the CRM. It can thus perform start, stop, or monitor operations and report the result to the CRM. The LRM is the authoritative source for all resource related information on its local node.”
Resource layerThe resource layer is the highest layer in the Heartbeat architecture and contains the RAs that control operations to the cluster’s resources. An RA is a program that has been written to start, stop, and monitor a resource. For every resource that you want Heartbeat to manage, an associated RA handles all the operations. The RA is called by LRM to start, stop, or monitor the resource.
3 Ibid.4 Ibid.
14 Achieving High Availability on Linux for System z with Linux-HA Release 2

While most of the other components in Heartbeat work under the covers, a Heartbeat administrator comes in direct contact with RAs. There are four classes of RAs:
� Open Cluster Framework RA� Linux Standards Base RA� Classic Heartbeat RA� STONITH RA
To gain a better understanding RAs, including the different classes of RAs, see 2.2.4, “Resource agents” on page 17.
2.2.2 Process flow
Many actions, such as the following examples, can trigger a change in the cluster:
� The failing of a node or resource� Adding or removing a resource to the cluster� Starting or stopping a resource� Changing a constraint for a resource� Adding or removing a node� Migrating a resource from one node to another
The process flows as follows during a cluster membership change:
1. The cluster members communicate regular “I’m alive” signals to each other by using the heartbeat components in the messaging and infrastructure layer. They do this constantly to inform members about each other’s status. This happens regardless of any change to the cluster.
2. If a connectivity change in membership occurs, then this change is given to the CCM in the membership layer.
3. The CCM sends packets to its peers in the cluster and determines exactly which nodes are in the current membership and which ones are not.
4. Upon confirmation of membership change, the CCM notifies the CRM on the DC in the resource allocation layer.
5. The DC CRM updates the master CIM and informs peer CRMs. The CRMs, in turn, update their CIB replicas. If the node that failed is the DC, the remaining cluster members vote to select another node to become the DC. Then that node processes and propagates all the changes.
6. After the master CIB changes, the DC CRM notifies the PE. As explained in the SUSE Linux Enterprise Server Heartbeat guide,5 “The PE then looks at the CIB (including the status section) and sees what needs to be done to
5 Ibid.
Chapter 2. Introduction to Linux-HA release 2 15

bring the state of the cluster (as shown by the status section of the CIB) in line with the defined policies (in the configuration section of the CIB).”
For more information, see the following address:
http://www.linux-ha.org/BasicArchitecture#PILS
7. The PE generates a list of actions to taken in order to bring the cluster in line with the policy and gives them to the CRM. The CRM passes the list to the TE to execute. If fencing is enabled, then the STONITH daemon is invoked to reset the errant node.
8. The DC sends messages to the relevant CRMs in the cluster, which then use their LRM to perform the necessary resource manipulations locally.
9. The DC is notified when an action completes on the cluster members.
10.After all the actions are completed, the cluster goes back to an idle state and waits for further events.
Similarly, when a resource changes, the change gets relayed to the DC CRM, which in turn updates the master CIB with the new policy or state information. The DC CRM then propagates the change to peer CRMs, which update their local CIBs. Then the DC CRM starts the transition process to get the current state in line with the policy. With the help of the PE and TE, the actions required to make the changes happen are executed. Then the cluster returns to an idle state and waits for further events.
2.2.3 Security considerations in Heartbeat version 2
When cluster nodes communicate with one another, they must be able to determine that the nodes they are receiving cluster-related messages from are legitimate and not harmful nodes that might cause damage. In short, they must be able to authenticate one another. In addition to authentication, the nodes must know that cluster messages have not been intercepted and tampered with.
To protect your cluster from networking attacks, with Heartbeat, you can set up an authentication method for network communication between cluster nodes. There are three methods:
� CRC� Secure Hash Algorithm 1 (SHA1)� Message Digest algorithm 5 (MD5)
The CRC method does not perform message authentication. It only protects against corruption of the message itself. Therefore, using the CRC method makes the cluster still vulnerable to attacks.
16 Achieving High Availability on Linux for System z with Linux-HA Release 2
Both the SHA1 and MD5 are hashing methods that require a shared secret. The shared secret is a password that you customize that is used to encrypt and authenticate messages. The SHA1 method is recommended because it provides the strongest authentication scheme available. The authentication key (the shared secret) is known to all cluster members. When one cluster member sends a message to another cluster member, this authentication key is used to encrypt the message. The encrypted message is received by the intended cluster member, and that member uses the shared key to decrypt the message. In this regard, the cluster members are protected from network attacks.
The authentication method and password are determined when you first install Heartbeat. For detailed implementation information about the SHA1 method, see 4.4, “Initial configuration of Linux-HA release 2” on page 96.
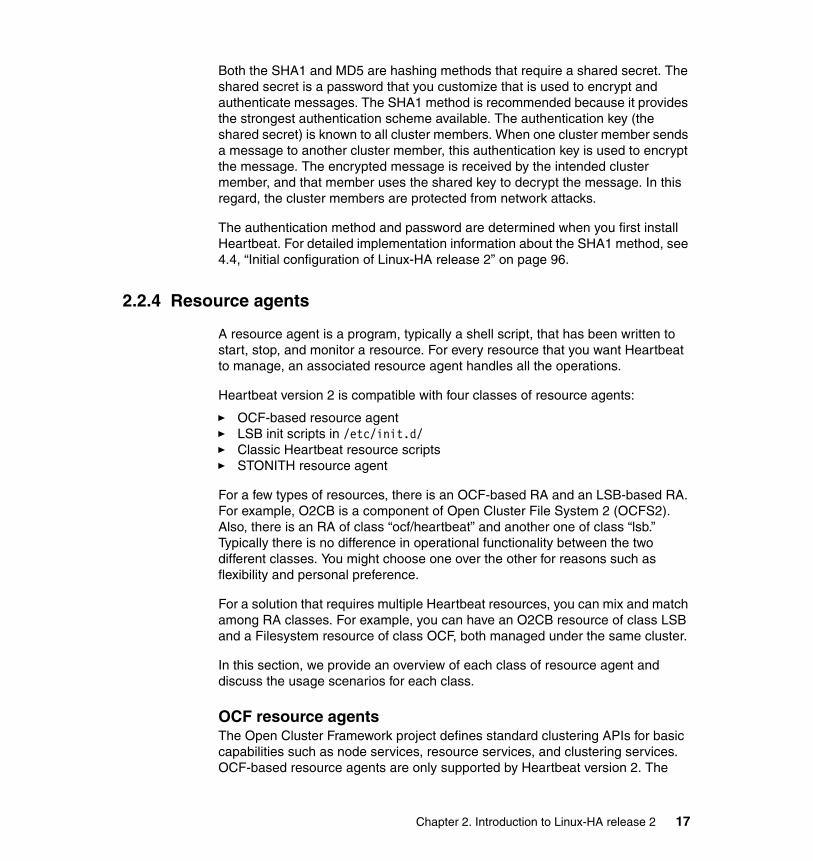
2.2.4 Resource agents
A resource agent is a program, typically a shell script, that has been written to start, stop, and monitor a resource. For every resource that you want Heartbeat to manage, an associated resource agent handles all the operations.
Heartbeat version 2 is compatible with four classes of resource agents:
� OCF-based resource agent� LSB init scripts in /etc/init.d/� Classic Heartbeat resource scripts� STONITH resource agent
For a few types of resources, there is an OCF-based RA and an LSB-based RA. For example, O2CB is a component of Open Cluster File System 2 (OCFS2). Also, there is an RA of class “ocf/heartbeat” and another one of class “lsb.” Typically there is no difference in operational functionality between the two different classes. You might choose one over the other for reasons such as flexibility and personal preference.
For a solution that requires multiple Heartbeat resources, you can mix and match among RA classes. For example, you can have an O2CB resource of class LSB and a Filesystem resource of class OCF, both managed under the same cluster.
In this section, we provide an overview of each class of resource agent and discuss the usage scenarios for each class.
OCF resource agentsThe Open Cluster Framework project defines standard clustering APIs for basic capabilities such as node services, resource services, and clustering services. OCF-based resource agents are only supported by Heartbeat version 2. The
Chapter 2. Introduction to Linux-HA release 2 17

Heartbeat version 2 package comes with over 40 OCF-based resource agents, which are in the /usr/lib/ocf/resource.d/heartbeat/ directory. For more information about the OCF project, see the following Web address:
http://opencf.org/home.html
The OCF RAs are more powerful and flexible than the LSB RAs because they are based on an open standard that is recognized by other organizations and used by other development efforts. The OCF standard is supported by a variety of organizations and companies such as IBM, COMPAQ, Open Source Development Lab, and so on. The SUSE Linux Enterprise Server Heartbeat guide states: “Third parties can include their own agents in a defined location in the file system and thus provide out-of-the-box cluster integration for their own software.”6
With OCF RAs, you can also configure resource-related parameters and options directly inside Heartbeat. LSB RAs do not allow you to do that. You can even write an OCF-based RA based on an existing LSB init script to allow for parameters and options. An example of this is the OCF O2CB agent, which is written around the LSB O2CB agent. It is used to load, start, and stop OCFS2 modules and clusters.
LSB resource agentsHeartbeat also works with the LSB init scripts in the /etc/init.d/ directory. SUSE Linux Enterprise Server (SLES) and Red Hat Enterprise Linux on System z provide these scripts with the standard distribution. A default installation of the operating system includes the basic scripts for the various services that come with the distribution such as Network File System (NFS) and cups. For more information about the LSB specification, see the following Web address:
http://refspecs.linux-foundation.org/LSB_3.2.0/LSB-Core-generic/LSB-Core-generic/iniscrptact.html
When you create a Heartbeat resource by using the LSB init script, you give Heartbeat control of this resource and should not operate this resource directly through the init script while Heartbeat is running. For example, you define an NFS server resource of type LSB in Heartbeat, and Heartbeat is running. In this case, only go through Heartbeat to stop and start the NFS server, and do not manually enter /etc/init.d/nfs start and /etc/init.d/nfs stop. Heartbeat sometimes places a lock on the init script to prevent you from doing this.
Unlike with OCF RAs, LSB resource agents do not accept any parameters or options. Some resources require you to configure resource-related parameters and options outside of Heartbeat and use Heartbeat only to start, stop, and monitor the resource.
6 Ibid.
18 Achieving High Availability on Linux for System z with Linux-HA Release 2

LSB resource agents are supported by both Heartbeat version 1 and version 2. Therefore, if you are an existing Heartbeat version 1 user and simply want to migrate to version 2, you can continue to use LSB RAs.
Heartbeat resource agentsThe classic Heartbeat RAs are script-based programs that are similar to LSB init scripts. Unlike LSB RAs, parameters are allowed with Heartbeat RAs. Many Heartbeat RAs are wrapper scripts around OCF RAs. These wrapper scripts handle argument parsing and checking, as well as logistics checking and automation.
When you see a resource with the “ocf/heartbeat” class, there is a wrapper Heartbeat RA around the OCF RA. When there is a classic Heartbeat RA wrapper for an OCF RA, you can never define or invoke the OCF RA directly. The wrapper provides the argument handling required for the resource to function properly under Heartbeat.
The Heartbeat RAs are in the /etc/ha.d/resource.d/ directory. They come packaged with Heartbeat.
STONITH resource agentShoot The Other Node In The Head (STONITH) is Linux-HA’s technique for fencing. Fencing is the term used for the actions taken to ensure that a misbehaving node in a cluster does not access shared resources and does not respond to incoming requests. By halting the errant node, you take care of both.
The STONITH resource agent provides a wrapper for instantiating STONITH objects to be used by the STONITH daemon. The STONITH daemon provides a high level interface to fence one or more errant nodes. The STONITH daemon that comes with Heartbeat version 2 uses the improved release 2 STONITH API. There are many STONITH device types, or methods, for resetting a node, such as lic_vps or ssh. They are represented by STONITH plug-ins.
The STONITH daemon and STONITH plug-ins are provided by the heartbeat-stonith package. For more information about STONITH, see 2.2.6, “Fencing in Linux-HA” on page 23. For implementation and usage examples of the STONITH plug-ins on the System z platform, see 3.1.4, “Heartbeat STONITH mechanisms for the System z server” on page 49.
Chapter 2. Introduction to Linux-HA release 2 19

2.2.5 Cluster Information Base
The CIB XML file contains everything that is needed to understand the cluster: specifically its resources and the current cluster status. The master CIB is maintained by the Designated Coordinator in the cluster, and the DC replicates the master CIB to the other nodes in the cluster. The CIB represents two parts:
� The cluster configuration, which includes node and resource information, and constraints that exist in the cluster
This information represents how the cluster administrator would like to run the cluster. This part stays the constant during the runtime of Heartbeat, and only changes when the cluster administrator makes changes to the nodes, resources or constraints as a result of a configuration change.
� A snapshot of the current cluster state
The information in the snapshot depicts which nodes are alive and which resources are active.
Whenever there is a change in the cluster state, the PE on the DC node compares the state information against the configuration information and determines a list of actions to take to get the state to conform to the configuration policies.
There are a few ways to create and manipulate the cib.xml file. The first method is to use the CLI tools. The second method is to use the graphical HA Management client. The third method is to create or edit an XML file and then use the cibadmin CLI to import it into the cluster. You can mix and match these methods in your administrative tasks. Always use the graphical management tool and the CLIs used in preference to editing the XML file manually, especially if the cluster is active. However, it might be easier to start by importing a template cib.xml file and then using the CLIs or the graphical tool to manage the cluster. For more information about the graphical management tool and the CLI tools, see 2.3, “Heartbeat cluster management tools” on page 26.
There might be times when you want to look at the XML file for specific information or update a CIB template for importing into your cluster. We discuss the CIB structure in the section that follows.
CIB structureThe CIB contains two types of information:
� Cluster configuration information
This information does not change with the status of the cluster. The configuration information includes cluster information, resources in the cluster and their constraints, and property settings related to the cluster. When the
20 Achieving High Availability on Linux for System z with Linux-HA Release 2

administrator updates the configurations of the cluster, this part of the CIB changes. For instance, when the administrator adds another node to the cluster, the configuration portion updates with the new information.
� Cluster status information
This information conveys the current status of the cluster. Think of this information as the dynamic portion of the CIB. It tells you what the cluster looks like right now, including information about current cluster membership and the status of cluster resources.
The CIB is stored and processed as white space that is insignificant to XML, and its layout and mandatory information is in the CIB Document Type Definition (DTD). The current version of the DTD is available from the following Web address:
http://hg.clusterlabs.org/pacemaker/dev/file/tip/xml/crm-1.0.dtd
High level structure of the CIBThe entire CIB is enclosed by the <cib> ... </cib> tags. The configuration section is defined in the <configuration> ... </configuration> tags. It is followed by the status section defined in the <status> ... </status> tags.
You see four general sections in the cluster configuration portion of the CIB:
� Cluster properties are defined inside the <cluster_property_set> ... </cluster_property_set> tags.
� The nodes in the cluster are defined inside the <nodes> ... </nodes> tags.
� Resources are defined inside the <resources> ... </resources> tags.
� Resource constraints are defined inside the <constraints> ... </constraints> tags.
For cluster properties, nodes, and resources, you can define attributes as nvpairs that tell Heartbeat how to run the cluster, node, or resource. In Example 2-1, the two attributes are defined to an IPaddr resource. The two attributes are IP address and the net mask associated with the IP address. An identifier (id) must be associated with each attribute. This value is arbitrary as long as it is unique in the cluster. The name denotes the name of the attribute, and the value conveys the user-defined value of the attribute. Therefore, for the first attribute in Example 2-1 on page 22, the name of the attribute is ip, and the value is 192.168.0.10.
Chapter 2. Introduction to Linux-HA release 2 21

Example 2-1 Defined attributes
<instance_attributes id="ia-ipaddr-01"><attributes>
<nvpair id="ipaddr-nv-01" name="ip" value="192.168.0.10"/><nvpair id="ipaddr-nv-mask-01" name="cidr_netmask" value="255.255.255.0"/>
</attributes></instance_attributes>
The attributes that are available for definitions associated with cluster properties are the same for each cluster. For nodes, the same concept applies.
For resources, the attributes that you can define depend on the type of resource. For example, the ip and cidr_netmask attributes apply to the IPaddr resource but not the nfsserver resource.
Remember that you do not have to define all the attributes that are available to a particular entity. For most attributes, there are default values. For some, you must define a few mandatory attributes. For example, in Example 2-1 on page 22, the ip attribute is mandatory for the IPaddr resource, but the cidr_netmask attribute is not.
In the status portion of the CIB, the status of each node in the cluster is defined inside the <node_state> ... </node_state> tags. There is one such section per cluster node. In each node_state section, there is information about the node, the resources in the node, and the operations that are active for each resource.
While the cluster is active, you can generate the CIB file by using the following command:
# cibadmin -Q > cib.xml
This command places the cib.xml file in the directory from which you are running the command.
If you are importing an XML file into a CIB, make sure that you check the syntax and semantics first by running the ciblint command as follows:
# ciblint -f myconfig.xml
For more information about the ciblint command, see “Validating the cib.xml file” on page 256.
Attention: Do not directly edit the CIB. Always use the command line tools to update or add to the CIB or use the Heartbeat GUI.
22 Achieving High Availability on Linux for System z with Linux-HA Release 2

To import an XML file that contains resource definitions into the resources section of a running CIB, use the cibadmin command as follows:
# cibadmin -C -o resources -x myresource.xml
To import an XML file containing cluster properties into the cluster properties section of a running CIB, use the following command:
# cibadmin -C -o crm_config -x mycluster_properties.xml
To import an XML file that contains constraints into the constraints section of the a running CIB, use the following command:
# cibadmin -C -o constraints -x myconstraints.xml
For more information about Heartbeat’s command line tools, see 2.3.1, “Command line interface” on page 26.
For a real-life scenario that uses CIB XML files, see 5.2, “Shared-disk clustered file system” on page 166.
2.2.6 Fencing in Linux-HA
Imagine a situation where a node in a cluster goes awry but is not completely down so that it can still access some resources and respond to certain application requests. How do you ensure that this errant node is not corrupting resources or responding with errors?
Fencing is the term used in high availability solutions to describe the act of restraining an errant node or nodes from accessing cluster resources and responding to application or network requests. A fenced node cannot do anything productive until it is fixed and brought back as an active node in the cluster.
In Linux-HA Heartbeat, there are two methods of performing fencing:
� Self-fencing (such as IBM ServeRaid)� STONITH
With self-fencing, the self-fencing resource provides the fencing capability, as in IBM ServeRaid controllers. A self-fencing resource guarantees exclusive access to its resource (such as the disk it depends on), usually with a locking mechanism.
When you have a resource that does not do self-fencing, you can use STONITH to provide fencing to your cluster. According to the Linux-HA Web site, systems with shared disks must be configured with STONITH enabled to avoid data corruption by the misbehaving node. For a discussion about when to use
Chapter 2. Introduction to Linux-HA release 2 23

STONITH, see “When to use fencing” on page 25. Also, you can find the Linux-HA Web site at the following address:
http://www.linux-ha.org/
There are many STONITH mechanisms, from shutting off networking to the errant node to human intervention methods. Heartbeat is capable of controlling these mechanisms and can prevent a potentially faulty node from corrupting shared resources by using STONITH to fence the errant node.
According to the SUSE Linux Enterprise Server Heartbeat guide,7 “With the STONITH service configured properly, Heartbeat [performs] the following [actions] if a node failure is detected:
1. Notices that the node is not sending ‘I'm alive’ packets to the cluster.
2. Sends pre-stop notifications to the other cluster nodes. These notifications include messages that the failed node will be powered off.
3. Instructs the STONITH service to power off the failed node.
4. Sends post-stop notifications to other cluster nodes after successfully powering off the failed node. These notifications include messages that the failed node will be powered off.”
STONITH is configured as a cluster resource in the Heartbeat environment. It is another class of resource agent in Heartbeat v2, similar to OCF and LSB. See 2.2.4, “Resource agents” on page 17, for more information about resource agents.
Example 2-2 shows STONITH methods that are supported by Heartbeat.
Example 2-2 STONITH methods
lnxsu1:~ # stonith -Lapcmasterapcmastersnmpapcsmartbaytechbladehpicycladesdrac3external/ibmrsaexternal/ibmrsa-telnetexternal/ipmiexternal/rackpduexternal/riloeexternal/ssh7 Ibid.
24 Achieving High Availability on Linux for System z with Linux-HA Release 2

external/vmwareexternal/xen0ibmhmcipmilanmeatwarenullnw_rpc100srcd_serialrps10sshsuicidewti_nps
To learn more about a particular plug-in, enter the stonith -h -t <plug-in-type> command as shown in Example 3-1 on page 49.
Not all of these methods are supported by Linux for System z. For a discussion around supported methods for Linux for System z, see 3.1.4, “Heartbeat STONITH mechanisms for the System z server” on page 49. Additionally, for implementation details about STONITH, see Chapter 4, “Linux-HA release 2 installation and initial configuration” on page 57, and Chapter 5, “Linux-HA usage scenarios” on page 131.
When to use fencingTo help you determine when to use STONITH and when to not use it, we present the following consideration points. As with any IT setup, the simpler it is, then the more fool proof it is, and there are cluster situations where you do not need to set up STONITH.
One consideration is whether the cluster is using a shared disk. If cluster members are using a shared disk, then STONITH must be enabled to prevent a misbehaving node from corrupting shared data. HA configurations that require disk sharing are database configurations that are not doing disk replication and Web servers that serve dynamic content. Some HA configurations do not require any disk sharing. Such examples are firewalls, edge servers (such as load balancers and caching proxy servers), and static Web servers whose content is from a single source. These scenarios do not require fencing because the misbehaving node can only possibly corrupt its own data.
Another consideration is the possibility of the misbehaving node responding to service requests. For example, a cluster node is an application server, and it loses communication to its database but still maintains communication to the Web server. This application server can still respond to Web requests, but the
Chapter 2. Introduction to Linux-HA release 2 25

response may not make sense because the application has lost communication to its database. If you do not want this to happen, then enable STONITH.
With an active/passive HA setup, the active node is the only one that responds to service requests. Usually the active node does this by possessing the floating service IP address, where the client is configured to request services from the aforementioned IP address. When the active node or a resource on that node fails, the floating IP address is moved over to a passive, or standby, node. If the cluster is not using a shared disk, then there is no need for STONITH in this case, because only the node with the floating IP address can service requests.
2.3 Heartbeat cluster management tools
Heartbeat version 2 provides two ways of configuring and managing a cluster. One method is by using the CLI tools. The other method is with the graphical HA management client. The graphical client is new with Heartbeat version 2, where the CLI tools come with version 1.
In this section, we discuss usage of both tools. Although both tools can do essentially the same job, there are situations where the CLI is more powerful than the graphical client. There are other situations where you might want to use one tool versus the other tool.
2.3.1 Command line interface
Heartbeat version 2 provides a set of comprehensive command line tools that you can use to manage your Linux-HA cluster. Here is a list of some of the most commonly used CLIs:
� Manage the CIB with the cibadmin CLI.
This CLI can dump all or part of the CIB into an XML file. It can also update, modify, or delete part or all of the CIB. You can perform other miscellaneous CIB administrative operations. This capability is also in the management GUI tool.
� Manipulate CIB attributes with the crm_attribute CLI.
This CLI is geared specifically toward querying and manipulating node attributes and cluster configuration options that are used in the CIB. This capability is also in the management GUI tool.
� Use the crm_verify CLI to verify the CIB.
This CLI checks whether your CIB configuration is correct. This capability is not in the management GUI tool.
26 Achieving High Availability on Linux for System z with Linux-HA Release 2
� Monitor a cluster’s status, including node, resource, and action status, by using the crm_mon CLI.
This capability is available in the management GUI tool.
� Manage configuration changes by using the crm_diff command.
Use this CLI directly on two XML files to assist you in easily identifying updates and applying patches. This capability is not in the management GUI tool.
� Manage resource configurations with the crm_resource CLI.
This capability is available in the management GUI tool.
� Manage resource fail counts with the crm_failcount CLI.
This tool can monitor and reset the number of times that a resource has failed on a given node. This capability is not in the management GUI tool.
� Generate and retrieve node UUIDs with the crm_uuid CLI.
This capability is also not in the management GUI tool.
� Manage a node’s standby status by using the crm_standby CLI.
A node in standby node can no longer run any of its resources. This is useful for performing system updates. This capability is available in the management GUI tool.
For a thorough understanding of all available CLIs and their options, see the SUSE Linux Enterprise Server Heartbeat guide at the following Web address:
http://www.novell.com/documentation/sles10/heartbeat/index.html?page=/documentation/sles10/heartbeat/data/cha_hb_management.html
2.3.2 Heartbeat configuration management GUI
After you set up your cluster with the nodes defined and start heartbeat, you can configure cluster options, cluster resources, and resource constraints through the Heartbeat configuration management GUI (Heartbeat GUI). To invoke the Heartbeat GUI, you use the hb_gui command. The hb_gui tool generates and maintains the CIB XML for you. There is no need to manually edit the XML file yourself with this option.
More information: For more information about initial cluster configuration, see 4.4, “Initial configuration of Linux-HA release 2” on page 96.
Chapter 2. Introduction to Linux-HA release 2 27

At any time, if you must look at the XML file, you can get a copy of the current CIB XML file by running the following command, which pipes the CIB to the cib.xml file:
# cibadmin -Q > cib.xml
The GUI is invoked through the hb_gui command. You can invoke it through any machine that has a connection to the cluster and has heartbeat installed.
When heartbeat is installed, the user name hacluster is created. This user name is used by the Linux-HA administrator to access the management GUI. You can set the password for hacluster by using the passwd hacluster command. You must do this on the node or nodes where you plan to run the management GUI tool.
For information about starting the management GUI tool and logging into it, see 4.4, “Initial configuration of Linux-HA release 2” on page 96.
You can perform the following tasks with the management GUI:
� Create, update, and delete resources (create a master/slave, or clone resources)
� Create, update, and delete resource attributes, parameters, and operations
� Migrate a resource from one node to another
� Create, update, and delete constraints
– Monitor nodes and resources
– Place a node in standby mode (which stops all running resources on that node) or active mode (which starts all resources on that node)
– Update cluster configurations such as quorum policy, STONITH enabled, default resource stickiness, and so on. Figure 2-2 on page 29 and Figure 2-3 on page 30 show all the configurations of a cluster that you can manipulate.
28 Achieving High Availability on Linux for System z with Linux-HA Release 2
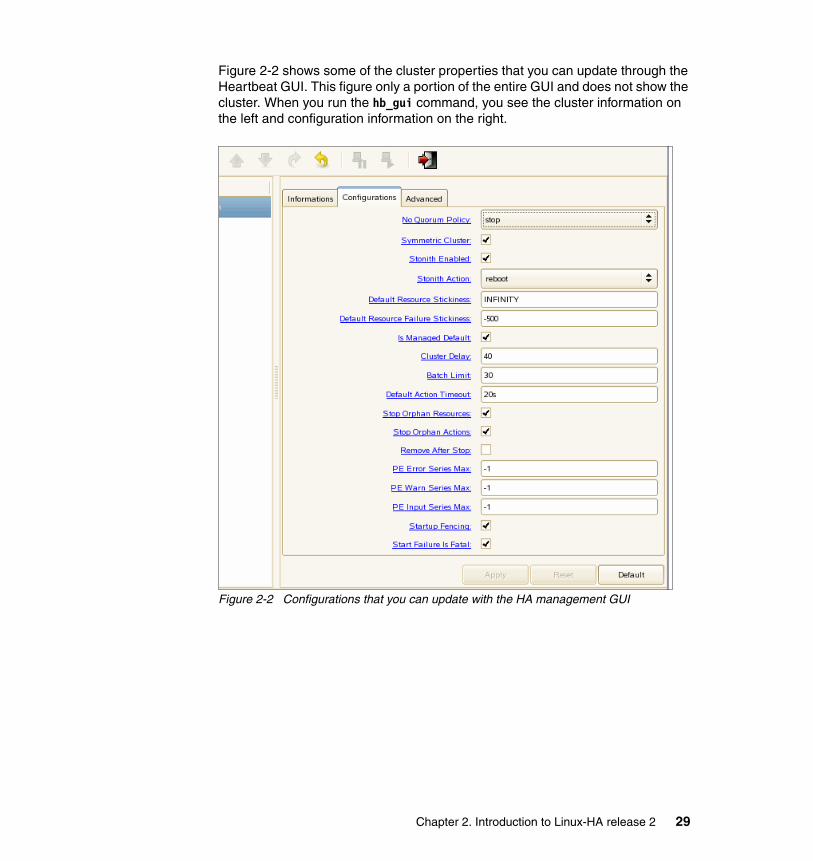
Figure 2-2 shows some of the cluster properties that you can update through the Heartbeat GUI. This figure only a portion of the entire GUI and does not show the cluster. When you run the hb_gui command, you see the cluster information on the left and configuration information on the right.
Figure 2-2 Configurations that you can update with the HA management GUI
Chapter 2. Introduction to Linux-HA release 2 29

Figure 2-3 shows more configuration options that are available for specification through the Advanced tab of the Heartbeat GUI.
Figure 2-3 More configurations that you can update with the HA management GUI
You cannot perform the following tasks with the management GUI:
� Generate the current CIB XML file. You must use the cibadmin command to generate parts or all of the XML file.
� Add nodes to the cluster. You must add nodes by editing the ha.cf file. See 4.7.1, “Adding a new node in an existing cluster” on page 117, for implementation details.
30 Achieving High Availability on Linux for System z with Linux-HA Release 2

� Configure a security method for Heartbeat communications. You must do this either during the installation of Heartbeat or by editing the authkeys file. See 4.4, “Initial configuration of Linux-HA release 2” on page 96, for implementation details.
� Perform the tasks of the crm_verify, crm_diff, crm_failcount, and crm_uuid CLIs. For information about these CLIs, see 2.3.1, “Command line interface” on page 26.
If you are just getting started with Linux-HA, after the initial setup of nodes and security, it is easier to use the management GUI to update cluster settings and create and manage resources and constraints. The GUI is easier for someone who wants to start quickly. When you become more familiar with Linux-HA, you will start to use the CLIs more often.
2.4 Constraints demystified
In Linux-HA Heartbeat, constraints are specifications for where and how you want to run your resources. They can take time to master but are important to having a functional cluster.
Heartbeat version 2 has three types of constraints:
� A location constraint specifies which cluster nodes to run for a particular resource.
� An ordering constraint specifies the order in which to run resources.
� A colocation constraint tells the cluster which resources might or might not run together on a node.
In the following sections, we provide an overview of each constraint and discuss usage scenarios. For implementation details of constraints, see Chapter 5, “Linux-HA usage scenarios” on page 131.
2.4.1 Location constraints
With location constraints, you can tell Heartbeat where cluster resources should run. In Example 2-3 on page 33, we illustrate the usage of a location constraint. In the example, the resource is an IP address. You can use the following settings to customize your location constraint:
rsc_location id The name of the location constraint. In Example 2-3 on page 33, the name is “location_IP”. Choose one that makes sense to you.
Chapter 2. Introduction to Linux-HA release 2 31

rsc The name of the resource this location constraint is for.
rule id The name of the rule for this resource. If you go through the HA Management GUI, this value is set for you. By default, it is set to prefered_<rsc_location id> and is normally fine.
score The probability of this rule being applied. INFINITY means always apply this rule. -INFINITY means never apply this rule. You can also enter an integer number to indicate how much you want to apply this rule. The higher the value is, the more likely this rule will be applied.
expression attribute, operation, and valueThese three fields define the rule of the location constraint.
expression attributeThe type of attribute to check. You can define the #uname, #is_dc, and #id options. When #uname is specified, the host name is checked. When #is_dc is specified, a node is the Designated Coordinator might or might not be checked. When #id is specified, the node ID is checked. The #id option is not commonly used and is not recommended. When you want to specify a particular node, use the #uname option.
operationThe Boolean operation that the rule checks between the expression attribute field and the value field.
#valueThe value to the option chosen in the expression attribute field. For example, if expression attribute=#uname, then the value field must be set to the host name of the node where you want the rule to apply. If expression attribute=#is_dc, then the value field can be either true or false. When it is true, the rule applies to the Designated Coordinator node. When it is false, the rule applies to nodes that are not the DC. If expression attribute=#id, then the value field must be set to the ID of the node where you want the rule to apply. As mentioned earlier, the #id option for expression attribute is not commonly used and is not recommended.
You can specify the location constraint either through the HA Management GUI interface or the CLI. See Chapter 4, “Linux-HA release 2 installation and initial configuration” on page 57, and Chapter 5, “Linux-HA usage scenarios” on page 131, for implementation details.
32 Achieving High Availability on Linux for System z with Linux-HA Release 2
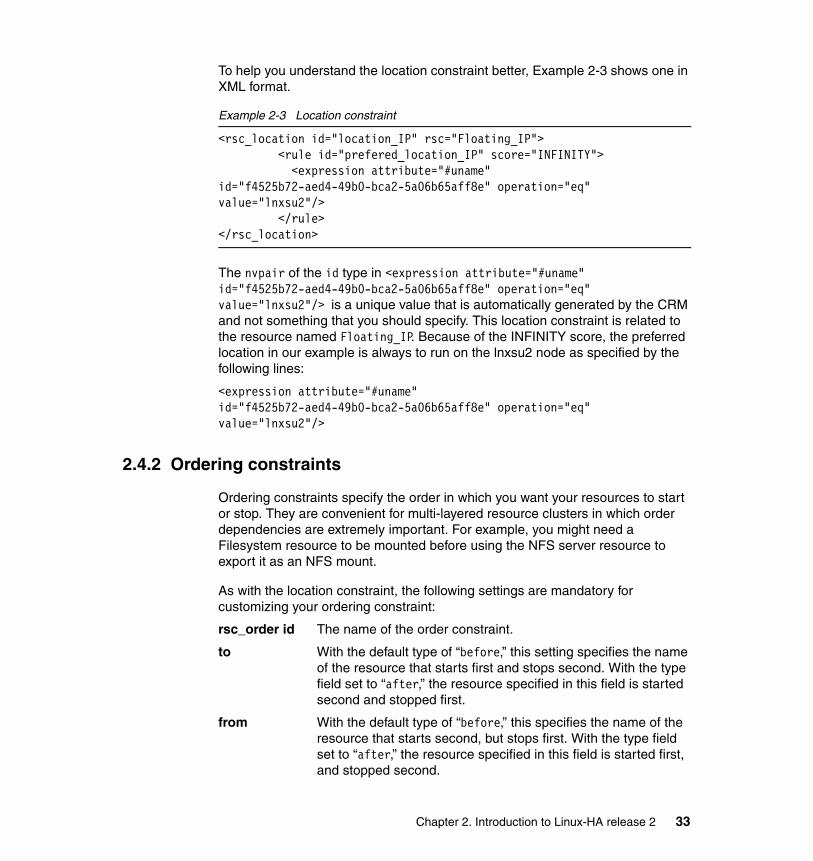
To help you understand the location constraint better, Example 2-3 shows one in XML format.
Example 2-3 Location constraint
<rsc_location id="location_IP" rsc="Floating_IP"> <rule id="prefered_location_IP" score="INFINITY"> <expression attribute="#uname" id="f4525b72-aed4-49b0-bca2-5a06b65aff8e" operation="eq" value="lnxsu2"/> </rule></rsc_location>
The nvpair of the id type in <expression attribute="#uname" id="f4525b72-aed4-49b0-bca2-5a06b65aff8e" operation="eq" value="lnxsu2"/> is a unique value that is automatically generated by the CRM and not something that you should specify. This location constraint is related to the resource named Floating_IP. Because of the INFINITY score, the preferred location in our example is always to run on the lnxsu2 node as specified by the following lines:
<expression attribute="#uname" id="f4525b72-aed4-49b0-bca2-5a06b65aff8e" operation="eq" value="lnxsu2"/>
2.4.2 Ordering constraints
Ordering constraints specify the order in which you want your resources to start or stop. They are convenient for multi-layered resource clusters in which order dependencies are extremely important. For example, you might need a Filesystem resource to be mounted before using the NFS server resource to export it as an NFS mount.
As with the location constraint, the following settings are mandatory for customizing your ordering constraint:
rsc_order id The name of the order constraint.
to With the default type of “before,” this setting specifies the name of the resource that starts first and stops second. With the type field set to “after,” the resource specified in this field is started second and stopped first.
from With the default type of “before,” this specifies the name of the resource that starts second, but stops first. With the type field set to “after,” the resource specified in this field is started first, and stopped second.
Chapter 2. Introduction to Linux-HA release 2 33

Aside from these settings, you can optionally set the following fields:
symmetrical This field can be set to one of two values, “true” or “false.” By default, it is set to “false,” which means that the resource that starts first is stopped second, and the resource that starts second is stopped first. This makes sense in most cases. For example, in our Filesystem and NFS scenario, we want to start the Filesystem resource first, before starting the NFS server that exports our Filesystem resource. When stopping the resources, we want to stop NFS before stopping Filesystem. This is because we do not want to pull the Filesystem out from under NFS. You can also set this field to “true,” which means that the resource that starts first is also stopped first. Here the stop sequence mirrors, or is symmetrical to, the start sequence.
action This field specifies the action that is related to the ordering constraint. Options are “start” and “stop.” By default, both actions are accounted for in the ordering constraint.
type This field specifies the type of order, either “before” or “after.” By default, the type is “before.”
As with the location constraint, you can specify the ordering constraint either through the HA Management GUI or the CLI. See Chapter 5, “Linux-HA usage scenarios” on page 131, for implementation details.
To help you understand the ordering constraint better, Example 2-4 shows an ordering constraint in the XML format.
Example 2-4 An ordering constraint
<rsc_order id="NFS_after_Filesystem" to="Filesystem_ocfs2" from="NFS server"/>
In Example 2-4, we define only the three mandatory fields. By default, the ordering constraint is not symmetrical and has the order type of “before.” This ordering constraint indicates to Heartbeat that the “Filesystem_ocfs2” resource must be started first before the “NFS server” resource. Reversely, “NFS server” must be stopped before “Filesystem_ocfs2”.
2.4.3 Colocation constraint
A colocation constraint tells the cluster which two resources must reside on the same node or which two resources must never reside on the same node.
34 Achieving High Availability on Linux for System z with Linux-HA Release 2

You can customize your colocation constraint by using the following settings:
rsc_colocation id Specifies the name of your colocation constraint. Choose something that is clear.
from Specifies the resource name that is checked second. Wherever the resource specified in the “to” nvpair is located, the resource in the “from” nvpair cannot be in the same place. However, vice versa is acceptable.
to Specifies the resource name that is checked first.
score INFINITY for specifying always or -INFINITY for specifying never.
You can specify the colocation constraint either through the HA Management GUI or the CLI. See Chapter 5, “Linux-HA usage scenarios” on page 131, for implementation details.
Example 2-5 illustrates one usage of the colocation constraint:
Example 2-5 Usage of a colocation constraint
<rsc_colocation id="Never_run_both_o2cb_on_same_node" from="lsb_o2cb:0" to="lsb_o2cb:1" score="-INFINITY"/>
<rsc_colocation id="Never_run_both_o2cb_on_same_node_2" from="lsb_o2cb:1" to="lsb_o2cb:0" score="-INFINITY"/>
The first rule prevents lsb_o2cb:0 from being on the same node as lsb_o2cb:1. If lsb_o2cb:1 is on every node, then lsb_o2cb:0 is not anywhere. If lsb_o2cb:0 is on every node, lsb:o2db:1 is not affected.
The second rule prevents the opposite from happening. Together, the two ensure that the two resources, lsb_o2cb:0 and lsb_o2cb:1, never run on the same node.
2.5 Active/passive configuration with Heartbeat
With an active/passive configuration, the Heartbeat version 2 cluster has one active node and one or more passive nodes. The resources are configured to run on the active node. When the cluster is started, only the active node serves the resources. The passive nodes are running but do not have any resources in production. Upon failure of the resources or the active node, Heartbeat transitions the resources to run on one of the passive nodes based on the resource’s constraint settings.
Chapter 2. Introduction to Linux-HA release 2 35

Figure 2-4 shows a cluster with members: system A and B. The administrator sets the location constraints on the Apache Web server resource to indicate that it must run on system A when the cluster is healthy.
Figure 2-4 Prefailure of an active/passive configuration
Upon a failure of system A, Heartbeat re-establishes the CIB, causing a failover action that switches the Apache Web server resource to run on system B. If STONITH is enabled, Heartbeat first evokes the STONITH daemon to fence system A so that it does not corrupt shared data or respond to incoming requests. Then on system B, the LRM triggers the Apache resource agent to start the Apache Web service. After the service is started successfully, LRM informs the DC CRM. The CRM in turn updates the master CIB and propagates the information to the remaining cluster members. In this case, only one cluster member, system B, remains. This member is also now the DC CRM. Figure 2-5 on page 37 illustrates this failover.
Workstations
System AActive Server
Apache
Linux Linux
System BPassive Server
Shared Disk System
Heartbeat
36 Achieving High Availability on Linux for System z with Linux-HA Release 2
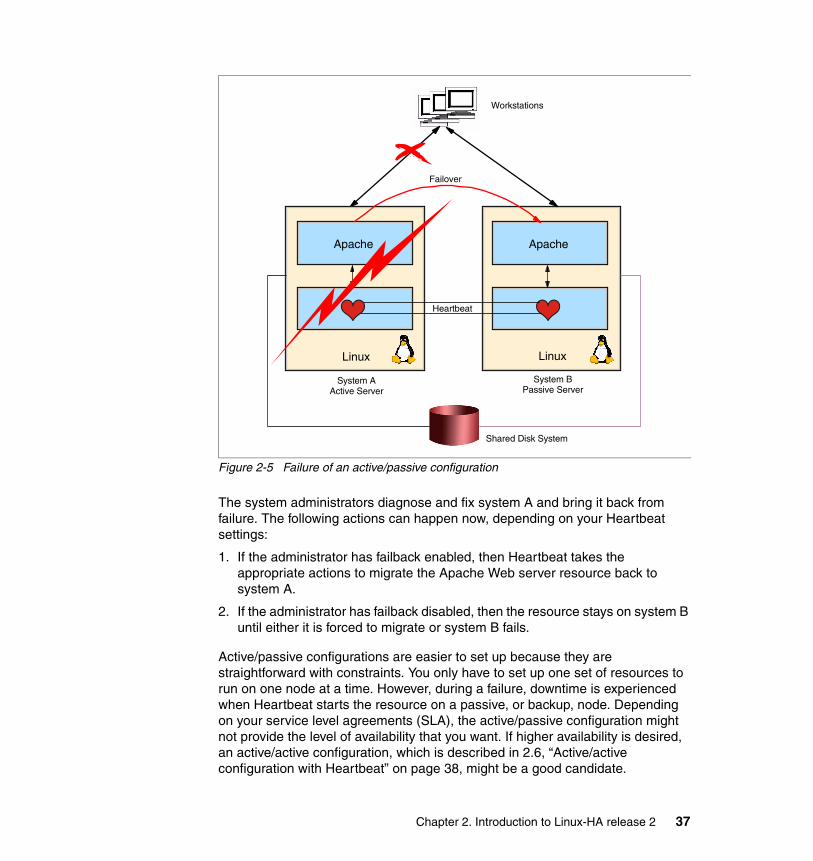
Figure 2-5 Failure of an active/passive configuration
The system administrators diagnose and fix system A and bring it back from failure. The following actions can happen now, depending on your Heartbeat settings:
1. If the administrator has failback enabled, then Heartbeat takes the appropriate actions to migrate the Apache Web server resource back to system A.
2. If the administrator has failback disabled, then the resource stays on system B until either it is forced to migrate or system B fails.
Active/passive configurations are easier to set up because they are straightforward with constraints. You only have to set up one set of resources to run on one node at a time. However, during a failure, downtime is experienced when Heartbeat starts the resource on a passive, or backup, node. Depending on your service level agreements (SLA), the active/passive configuration might not provide the level of availability that you want. If higher availability is desired, an active/active configuration, which is described in 2.6, “Active/active configuration with Heartbeat” on page 38, might be a good candidate.
Workstations
System AActive Server
Linux Linux
Apache
System BPassive Server
Shared Disk System
Apache
Heartbeat
Failover
Chapter 2. Introduction to Linux-HA release 2 37

2.6 Active/active configuration with Heartbeat
With an active/active configuration, the Heartbeat version 2 cluster has two or more active nodes running resources at the same time. The resources are configured to run on all the nodes in the cluster.
With active/active configurations in Heartbeat, you can have a load balancer in front of the cluster to load balance the incoming requests among the active nodes in the cluster. Alternatively, you can choose not to use a load balancer. Depending on your situation, you can also have a service IP address for each cluster member. When a node fails, its service IP is migrated to an active node. In both scenarios, when one active member fails, the resources are still running on the other active members, and the new incoming service is uninterrupted.
To configure the same resource to run on multiple nodes in a cluster, the administrator creates a cloned resource and specifies in Heartbeat the number of nodes on which the resource should run. By using location constraints, the administrator then determines which nodes in the cluster run the resource.
38 Achieving High Availability on Linux for System z with Linux-HA Release 2

Figure 2-6 illustrates an active/active scenario, where two systems, A and B, both run the same resource.
Figure 2-6 Prefailure of an active/active configuration
Workstations
System AActive Server
Apache
Linux Linux
System BActive Server
Shared Disk System
Heartbeat
Apache
Chapter 2. Introduction to Linux-HA release 2 39

If system A fails, the resource still runs on system B and services requests without interruption. Figure 2-7 shows what happens during a post failure in an active/active configuration.
Figure 2-7 Post failure of an active/active configuration
With an active/active HA configuration, there is no downtime in the failover because you do not have to start the resource in another node. The resources are already running on the remaining nodes. One caveat with an active/active configuration is that you must take measures to deal with in-flight transactions to the failed node. In-flight transactions are the active requests to the resource at the time of the failure. You can either drop and reset these transactions or program your application or resource to recover these transactions on one of the remaining active nodes.
The other consideration with an active/active HA configuration is to ensure that the remaining nodes have enough capacity to handle running the failed over resource. The virtualization technology and Capacity On Demand offerings of the IBM System z10™ server are perfectly suited for dynamically shifting or adding capacity to where it is needed, without interruption to the running workloads.
Workstations
System AActive Server
Linux Linux
Apache
System BActive Server
Shared Disk System
Apache
Heartbeat
40 Achieving High Availability on Linux for System z with Linux-HA Release 2

For more information about the System z10 server, see the IBM Mainframe page at the following Web address:
http://www.ibm.com/systems/z/
2.7 Quorum configuration with Heartbeat
Quorum is the name of the mechanism that Heartbeat uses to address the “split-brain” scenario. A two cluster node experiences a split-brain situation when one node loses Heartbeat communication with the other node. In this case, each node is unsure of the status of the other node and assumes that the other node is down. If fencing is enabled, then the each node tries to end the other node. If fencing is not enabled, then each node claims itself to be the DC and the CIB configurations can become out of sync. Data can also end up being corrupted if only one node is supposed to access it at a time. A split-brain situation can result in a lot of problems.
With quorum, if a node loses communication with its cluster, it self fences, which means that this node will not start heartbeat nor any of its resources. Quorum dictates that a node must, at the least, be able to communicate with one other node member to establish quorum and start its resources. This also means that you need at least three nodes to take advantage of quorum. If you only have two and you lose one, you lose all your services.
Chapter 2. Introduction to Linux-HA release 2 41
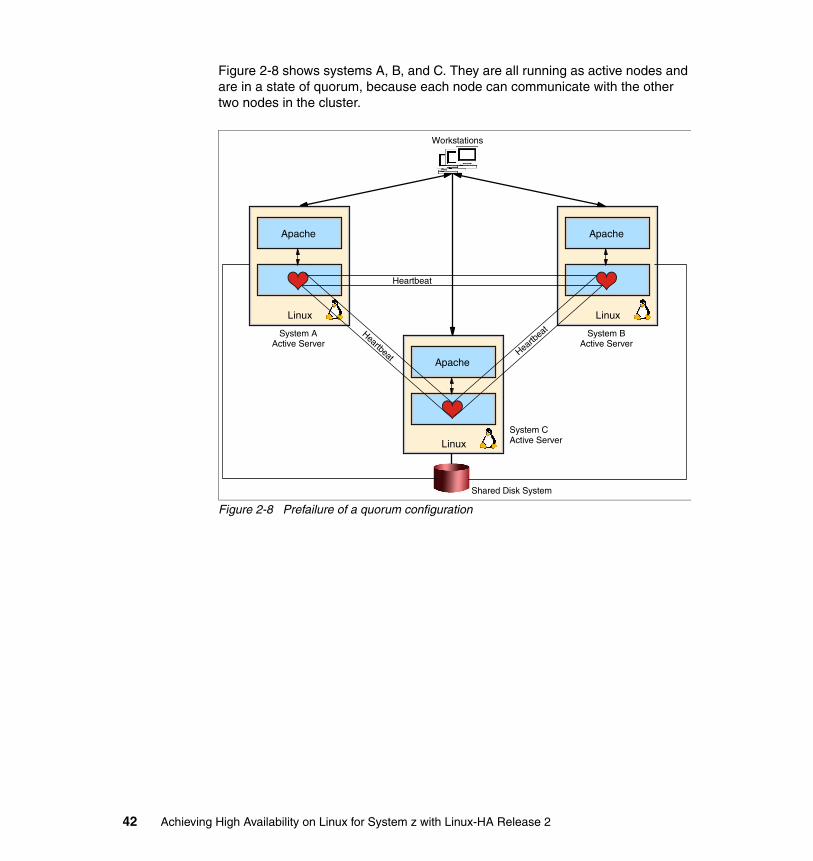
Figure 2-8 shows systems A, B, and C. They are all running as active nodes and are in a state of quorum, because each node can communicate with the other two nodes in the cluster.
Figure 2-8 Prefailure of a quorum configuration
Workstations
Shared Disk System
System AActive Server
Apache
Linux
System BActive Server
Apache
Linux
System CActive Server
Apache
Linux
Heartbeat
Heartbeat Heartbeat
42 Achieving High Availability on Linux for System z with Linux-HA Release 2
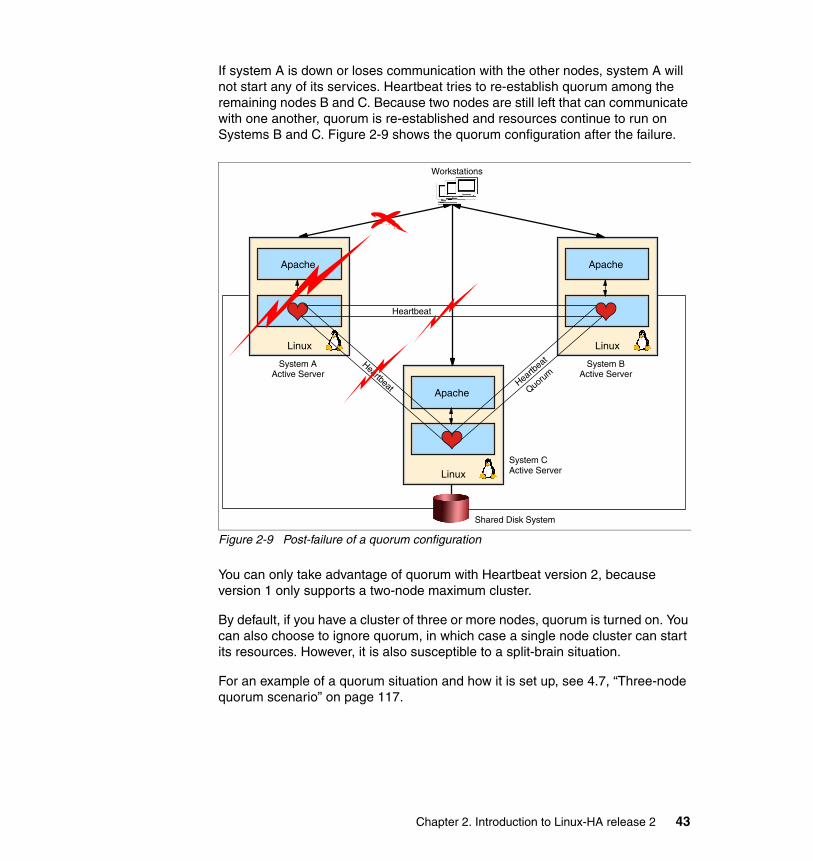
If system A is down or loses communication with the other nodes, system A will not start any of its services. Heartbeat tries to re-establish quorum among the remaining nodes B and C. Because two nodes are still left that can communicate with one another, quorum is re-established and resources continue to run on Systems B and C. Figure 2-9 shows the quorum configuration after the failure.
Figure 2-9 Post-failure of a quorum configuration
You can only take advantage of quorum with Heartbeat version 2, because version 1 only supports a two-node maximum cluster.
By default, if you have a cluster of three or more nodes, quorum is turned on. You can also choose to ignore quorum, in which case a single node cluster can start its resources. However, it is also susceptible to a split-brain situation.
For an example of a quorum situation and how it is set up, see 4.7, “Three-node quorum scenario” on page 117.
Workstations
Shared Disk System
System AActive Server
Apache
Linux
System BActive Server
Apache
Linux
System CActive Server
Apache
Linux
Heartbeat
Heartbeat Heartbeat
Quorum
Chapter 2. Introduction to Linux-HA release 2 43

44 Achieving High Availability on Linux for System z with Linux-HA Release 2

Chapter 3. Linux-HA on System z
In this chapter, we provide an overview of considerations for Linux-HA on the IBM System z platform. We discuss the following topics:
� Software availability of the Linux-HA Heartbeat product for supported distributions
� Available connections for Heartbeat links
� Options for fencing mechanisms
� Special considerations for z/VM and logical partition (LPAR) environments
3
© Copyright IBM Corp. 2009. All rights reserved. 45

3.1 General considerations for Linux-HA on System z
The z/VM and System z environment introduces platform specific tools and devices that have their own unique abilities and constraints. This affects choices for architecture layout, software distributions, and skills needed for personnel.
3.1.1 snIPL
Simple Network IPL (snIPL) is a tool that can communicate with both the z/VM systems management application interface (VSMSERVE service) and the management APIs for the System z support element. It provides a means for remotely starting and ending Linux systems on z/VM guests and System z LPARs.
snIPL can be used in conjunction with the Heartbeat I/O fencing mechanism, Shoot The Other Node In The Head (STONITH). STONITH enables the user to forcibly bring down a system, which ensures that, when a resource transfer occurs, the original system no longer has access to the targeted data resource. The tool is only included by some Linux distributions. The source code is available for download from the IBM developerWorks® site at the following address:
http://www.ibm.com/developerworks/linux/linux390/useful_add-ons_snipl.html
3.1.2 Software provided by the distributions
The availability of high availability software differs between platforms, between distributions, and sometimes from release to release within the same distribution. Linux-HA software is available on Linux for System z for the Linux distributions as explained in the following sections.
SLES 9Linux-HA release 1 packages (heartbeat, heartbeat-ldirectord, heartbeat-pils, heartbeat-stonith, and so on) are included in SUSE Linux Enterprise Server version 9 (SLES 9). The snIPL program is not included. If you need snIPL, download and build it from the source. Later versions of snIPL are available, but Heartbeat Version 1 only works with snIPL Version 2.1.2.
SLES 10Linux-HA release 2 packages are included in this distribution. The snipl package is included with the distribution starting with Service Pack 1. The package
46 Achieving High Availability on Linux for System z with Linux-HA Release 2
includes the snipl command and a prebuilt lic_vps STONITH plug-in that allows STONITH to interface with snIPL. This package also provides a version of the libhwmcaapi.so library, for LPAR use, and a version of the libvmsmapi.so library for z/VM use.
Red Hat Enterprise Linux 4 and 5Linux-HA packages are not included in Red Hat Enterprise Linux versions 4 or 5. We recommend that you build the software from the latest available sources from the Linux-HA project.1 The snIPL README instructions provide hints for locating Heartbeat prerequisite software such as libnet, so it might be useful to download the snIPL source regardless of whether snIPL will be used. Linux-HA release 2 only works with snIPL Version 2.1.3 and later.
For an example of locating the needed Linux-HA code and building the software, see 4.3.4, “Installing snIPL on Red Hat Enterprise Linux 5” on page 91.
3.1.3 Connection options for the Heartbeat link
The System z platform provides a variety of both virtual and real devices for establishing communication links. Some devices are available only for z/VM, while others allow communication between LPARs. Still others allow connections across different machines. In the following sections, we discuss some of the available device types.
Channel-to-channelThe channel-to-channel (CTC) device driver is referenced in older documentation for providing a serial link connection between two systems.2 A serial link frees you from reliance on a well behaved TCP/IP stack, which serves to remove a possible point of failure from the heartbeat layer. However, implementation of device registration on some Linux kernel versions only worked for one CTC TTY device per system. On distributions with such a kernel, only a two-node cluster can be used with the CTC device.
1 For more information about the Linux-HA project, see the following Web address: http://www.linux-ha.org/
Red Hat Cluster Suite: Red Hat Enterprise Linux provides a high availability solution called Red Hat Cluster Suite for some selected platforms. Currently Red Hat Cluster Suite is not yet available on Linux for System z. Consult your Red Hat support representative for more information regarding this software.
2 See the IBM Redbooks publication, Linux on IBM zSeries and S/390: High Availability for z/VM and Linux, REDP-0220.
Chapter 3. Linux-HA on System z 47

Furthermore, in 2006, the teletype TTY support (protocol 2) used for the serial link was removed in vanilla kernel sources to reserve use of the driver for purely networking purposes. Kernel packages provided after that date may or may not contain the TTY support depending on how quickly the distributor adopted the changes.
The question of distribution support must be evaluated carefully before choosing this connection type. The driver can still be used for point-to-point network connections. However, as with serial links, this requires a separate link per system. For a cluster of three or more systems, it is often easier to use another network connection, such as guest LANs or real HiperSockets, where only one interface must be defined to communicate with all systems in the cluster.
HiperSocketsReal HiperSockets are virtual network devices that are configured in the I/O Definition File (IODF) of the System z server. They require no physical network adapters and yet can be used to create connections between LPARs on the same machine. They cannot be used as the associated device for virtual switches (VSWITCH).
Only devices configured on the same physical channel (pchid) can talk to each other. Therefore, enough device units must be defined per channel so that each participating system in the cluster can have the triplet of devices that are needed for communication.
HiperSockets are often attractive for security reasons, since they do not involve physical LAN traffic. However, this also means that HiperSockets cannot be used to communicate between different System z servers.
Virtual switchThe z/VM virtual switch is a special guest LAN with an associated Open Systems Adapter (OSA) device to bridge the guest LAN to a physical network. All guests that are hooked to a VSWITCH can continue communicating with each other even when the connection to the real OSA card has gone down.
The z/VM guests are coupled to the VSWITCH by using virtual network interface cards (NICs) rather than real device units. Thus, only one triplet of real OSA device units is needed for communication outside of the System z machine, even if hundreds of guests are coupled to the one VSWITCH.
VSWITCHes, similar to real OSA cards, support Layer 2 functionality and the default Layer 3 functionality. This flexibility makes a VSWITCH useful when dealing with applications that require link layer information to process data packets.
48 Achieving High Availability on Linux for System z with Linux-HA Release 2

3.1.4 Heartbeat STONITH mechanisms for the System z server
Heartbeat STONITH uses plug-ins for devices that perform the actual STONITH procedure. Most devices equate to hardware-specific implementations for powering down a particular machine. Therefore, a majority of the plug-ins are not applicable to the System z platform. To list available plug-ins, use the stonith -L command.
We used the following available devices with the System z platform:
� ssh� lic_vps (snIPL)
The lic_vps plug-in serves as an interface for the STONITH software to initiate snIPL operations. With this plug-in, Heartbeat can issue recycle, activate, and deactivate instructions for z/VM guest or System z LPAR control. The ssh plug-in uses the ssh protocol to send reboot and halt instructions directly to the target system that is being fenced.
In the event of a node failure, there is no guarantee that the ssh service will be functional enough for the target to receive and process the STONITH instruction. The lic_vps plug-in also has a dependency on a working network, but relies on the z/VM service machine and the System z Support Element as being more dependable targets. The relative reliability of System z services and the ability of a z/VM environment to establish more secure virtual networks makes the lic_vps plug-in a desirable choice for implementing Heartbeat STONITH on System z.
To learn more about a particular plug-in, enter the stonith command with the -h flag as shown in Example 3-1.
Example 3-1 Obtaining additional information about a plug-in
# stonith -h -t ssh | stringsSTONITH Device: ssh - SSH-based Linux host resetFine for testing, but not suitable for production!For more information see http://openssh.orgList of valid parameter names for ssh STONITH device: hostlistFor Config info [-p] syntax, give each of the above parameters in order asthe -p value.Arguments are separated by white space.Config file [-F] syntax is the same as -p, except # at the start of a linedenotes a comment
Important: The ssh plug-in documentation lists itself as not advisable for production use.
Chapter 3. Linux-HA on System z 49

The lic_vps plug-in requires you to pass in each individual parameter to the stonith directive or pass in a parameter indicating a target configuration file as shown in Example 3-2.
Example 3-2 The stonith directive
# stonith -t lic_vps -p “snipl_file /etc/snipl.conf” -T on LNXRH1stonith: lic_vps_status: Preparing access for 9.12.4.4(type VM)stonith: Host lnxrh1 lic_vps-reset 2 request successful
Example 3-3 shows the target configuration file that is used in the command in Example 3-2.
Example 3-3 The stonith configuration file
# cat /etc/snipl.confserver=9.12.4.4type=VMuser=LNXRH1password=PW4RH1image=lnxrh1image=lnxrh2server=9.12.4.189type=VMuser=LNXRH4password=PW4RH4image=lnxrh3image=lnxrh4
3.2 Heartbeat considerations for Linux on z/VM
By using Heartbeat with Linux on z/VM, you can use the following alternative fencing mechanisms that are not directly implemented by using Heartbeat STONITH plug-ins:
� Controlled guest sends ssh messages to a Linux guest on z/VM that acts as a control point for issuing z/VM commands. The z/VM force instruction is entered by using the cpint or vmcp (newer) module and user command.
� REXEC server in z/VM sends instructions to a z/VM remote execution daemon. The service machine performs the force instruction to bring a target guest down.
� Remote message to PROP sends messages to the programmable operator facility (either through automation on console log messages or vmcp
50 Achieving High Availability on Linux for System z with Linux-HA Release 2

instructions). Have the programmable operator facility enter z/VM commands to bring guests down.
For a more detailed description of these scenarios, see the Redbooks publication Linux on IBM zSeries and S/390: High Availability for z/VM and Linux, REDP-0220.
3.2.1 Disk sharing between z/VM guests
A direct access storage device (DASD) cannot be directly attached to multiple guests on the same z/VM system at the same time. To allow two guests to access the same DASD, the device must be configured as a full pack minidisk. For the guests to have simultaneous write access to the disk, the minidisk must also be configured with the multiple-write (MW) access mode on the mdisk (Example 3-4) and associated link statements (Example 3-5).
Example 3-4 The minidisk definition
MDISK 0203 3390 0001 3338 LXC937 MW
Example 3-5 The link statement
LINK LNXSU2 0203 0203 MW
3.2.2 Setting up VSMSERVE for use with snIPL
If the Heartbeat STONITH plug-in for snIPL lic_vps is required for I/O fencing, then the VSMSERVE service must be enabled. This service has an additional requirement for a directory manager. IBM provides a directory manager called DirMaint™ that ships with the z/VM operating system. However, the feature is a fee-based feature.
If your environment is already using DirMaint, a service machine called “DIRMAINT” should be active. You can check for the feature from z/VM as shown in Example 3-6.
Example 3-6 Checking for the DIRMAINT service
Ready; T=0.01/0.01 14:54:55 pipe cp q names | split at string /, / | locate /DIRMAINT/ | console DIRMAINT - DSC Ready; T=0.01/0.01 14:54:59
Chapter 3. Linux-HA on System z 51

Alternatively, consult with your z/VM administrator to enable the feature, or consult with IBM support and follow the instructions in the z/VM 5.4 Directory Maintenance Facility Tailoring and Administration Guide, SC24-6135-04, to configure and bring up the related services.
Starting with z/VM 5.3, VSMSERVE was enabled for a full socket-based environment. However, the currently available versions of the snIPL code only support the older remote procedure call (RPC) style interface and the APIs that it supported.
To set up VSMSERVE with the RPC style interface, you must make changes to the z/VM TCP/IP profile to enable the PORTMAP service and allow connections for the VSMSERVE port (Example 3-7).
Example 3-7 Changes required in the z/VM TCP/IP profile for VSMSERVE RPC
AUTOLOG PORTMAP 0 ; -------------------------------------------------------------------PORT 111 TCP PORTMAP ; Portmap Server 111 UDP PORTMAP ; Portmap Server 845 TCP VSMSERVE ; VSM API Server
For more information about other required changes, see z/VM V5R2.0 Systems Management Application Programming, SC24-6122-02, or the Redbooks publication, Systems Management APIs for z/VM, REDP-3882. Use an obeyfile command or restart the z/VM TCP/IP stack to enable the changes.
To authorize z/VM guests for access, you can modify the VSMSERVE NAMELIST file to add a nickname definition that includes all target systems (retain all other definitions from the default NAMELIST file).
Example 3-8 NAMELIST definition
:nick.LINUXHA :list. LNXSU3 LNXSU4 LNXRH3 LNXRH4
The nickname can be used in the VSMSERVE AUTHLIST file to give the needed authorization for a group of Linux guests. The lic_vps plug-in requires at least IMAGE_OPERATION and SERVER_FUNCTIONS authorization (as defined in the default NAMELIST). A designated ID, for example OPERATOR, can then be
52 Achieving High Availability on Linux for System z with Linux-HA Release 2

used as the authorized guest for controlling all the systems. Example 3-9 shows the AUTHLIST definition that we used.
Example 3-9 AUTHLIST definition
DO.NOT.REMOVE DO.NOT.REMOVE DO.NOT.REMOVE MAINT ALL ALL VSMSERVE ALL ALL OPERATOR LINUXHA IMAGE_OPERATION OPERATOR LINUXHA SERVER_FUNCTIONS
All entries in the AUTHLIST must be in uppercase. Also note that the example is not formatted to scale. For a valid AUTHLIST, the second column must start on the sixty-sixth character position on each line and the third column must start on one hundred and thirty-first position.
3.2.3 Locating the dmsvsma.x file
To compile the lic_vps plug-in from the source, you must copy the dmsvsma.x file file from z/VM. This file contains the supported function calls for the systems management API and is used as a header for the compilation. The file is usually on the VSMSERVE user’s 193 disk.
Transfer the file as dmsvsma.x to the target Linux system. When performing the transfer, enter the ftp lcd subcommand to switch to the file mode that is being used to access the target disk. Example 3-10 shows the commands that we used to locate the dmsvsma.x file.
Example 3-10 Linking to the VSMSERVE 193 disk and locating dmsvsma.x
Ready; T=0.01/0.01 21:52:52link vsmserve 193 f193 DASD F193 LINKED R/O; R/W BY MAINT ; R/O BY 6 USERS Ready; T=0.01/0.01 21:53:01 acc f193 f DMSACP723I F (F193) R/O Ready; T=0.01/0.01 21:53:04
Hint: For users who are unfamiliar with z/VM xedit, use the right 65 and right 130 command to shift right and line up entries in the second and third columns for editing purposes. Use the left 0 command to shift the display back to the first column.
Chapter 3. Linux-HA on System z 53
list dmsvsma x * DMSVSMA X F2 Ready; T=0.01/0.01 21:53:36
3.2.4 Working with the stonith command on z/VM
Using the stonith command to manipulate z/VM guests requires. It is possible that extra configuration is needed. In this section, we explain such topics as setting up a boot device for use with image activation and using the reset directive with STONITH.
Profile exec using the stonith commandTo bring a system online, the stonith command issues an image activate directive, which logs on a guest. For a Linux system to boot up, an IPL instruction must be inserted into the z/VM guest’s profile exec as shown in Example 3-11.
Example 3-11 The profile exec commands to boot image upon guest activation
IF WORD(DIAGRC(24,-1),2) = 2 THEN /* USER IS DISCONNECTED - RC=2 */'CP IPL 202'
For a zFCP SCSI-based system, additional statements to set loaddev parameters might also be needed in the profile exec as shown in Example 3-12.
Example 3-12 The profile exec commands to load from zFCP SCSI device
‘CP SET LOADDEV PORT 50050763 00C1AFC4 LUN 57340000 00000000’IF WORD(DIAGRC(24,-1),2) = 2 THEN /* USER IS DISCONNECTED - RC=2 */'CP IPL A202'
Using the stonith reset commandUse care with the stonith "-T reset" directive under z/VM. This implements the image_recycle call, and the results vary depending on the current state of the system. The only time this directive yields a successful call is if you are logged onto the z/VM guest and the Linux operating system is down.
In the case where this instruction is given to a disconnected guest with a running Linux system, you receive the message “Image Already Active” (RCERR_IMAGEOP reason code 8), and the operation causes the Linux guest to be logged off (Example 3-13 on page 55).
54 Achieving High Availability on Linux for System z with Linux-HA Release 2

Example 3-13 Output of stonith reset on a disconnected image with a running Linux image
# stonith -t lic_vps -p "snipl_file /etc/snipl.conf" -T reset LNXRH1stonith: lic_vps_status: Preparing access for 9.12.4.4(type VM)stonith: snipl_reset_error : 200 using lnxrh1stonith: Detailed Error Descripion : * ImageRecycle : Image LNXRH1 Image Already Active
In the case where the guest is already logged off, you receive the message “Image not Active” (RCERR_IMAGEOP reason code 12), and the guest stays logged off (Example 3-14).
Example 3-14 Output of stonith reset on a deactivated image
# stonith -t lic_vps -p "snipl_file /etc/snipl.conf" -T reset LNXRH1stonith: lic_vps_status: Preparing access for 9.12.4.4(type VM)stonith: snipl_reset_error : 200 using lnxrh1stonith: Detailed Error Descripion : * ImageRecycle : Image LNXRH1 Image Not Active
Since the state of the z/VM guest after a failure cannot be guaranteed at all times, do not use the stonith action “reboot” with the lic_vps plug-in. Instead, use the stonith action “poweroff” when doing the high availability configuration.
3.3 Heartbeat considerations for Linux on an LPAR
The use of Heartbeat between LPAR systems on the same box is restricted to using HiperSockets or a physical connection, such as with an OSA card or real CTC connection. In addition, the user might also need to take the items in the following sections into consideration when implementing the lic_vps (snIPL) STONITH feature.
3.3.1 Setting up the Management API
If the Heartbeat STONITH plug-in for snIPL is required, you need a suitable version of the hwmcaapi management library. The SLES 10 snipl package comes with a version of the library but also a warning that there are no guarantees for communication with all System z machine types. The latest versions of the library are available from the IBM Resource Link™ Web site at the following address:
http://www.ibm.com/servers/resourcelink
Chapter 3. Linux-HA on System z 55
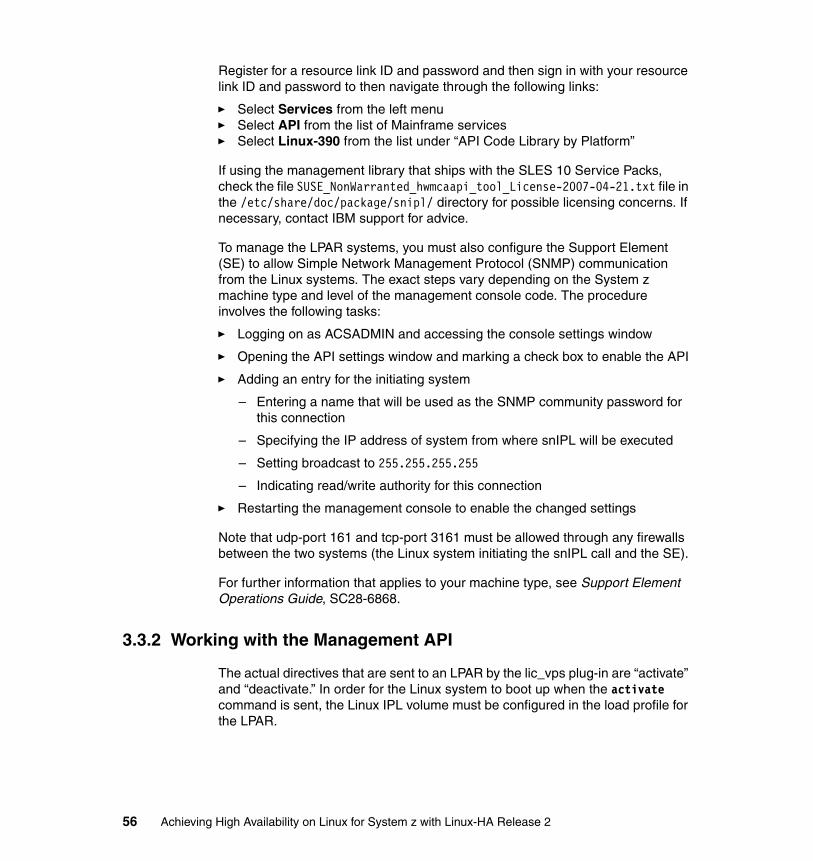
Register for a resource link ID and password and then sign in with your resource link ID and password to then navigate through the following links:
� Select Services from the left menu� Select API from the list of Mainframe services� Select Linux-390 from the list under “API Code Library by Platform”
If using the management library that ships with the SLES 10 Service Packs, check the file SUSE_NonWarranted_hwmcaapi_tool_License-2007-04-21.txt file in the /etc/share/doc/package/snipl/ directory for possible licensing concerns. If necessary, contact IBM support for advice.
To manage the LPAR systems, you must also configure the Support Element (SE) to allow Simple Network Management Protocol (SNMP) communication from the Linux systems. The exact steps vary depending on the System z machine type and level of the management console code. The procedure involves the following tasks:
� Logging on as ACSADMIN and accessing the console settings window
� Opening the API settings window and marking a check box to enable the API
� Adding an entry for the initiating system
– Entering a name that will be used as the SNMP community password for this connection
– Specifying the IP address of system from where snIPL will be executed
– Setting broadcast to 255.255.255.255
– Indicating read/write authority for this connection
� Restarting the management console to enable the changed settings
Note that udp-port 161 and tcp-port 3161 must be allowed through any firewalls between the two systems (the Linux system initiating the snIPL call and the SE).
For further information that applies to your machine type, see Support Element Operations Guide, SC28-6868.
3.3.2 Working with the Management API
The actual directives that are sent to an LPAR by the lic_vps plug-in are “activate” and “deactivate.” In order for the Linux system to boot up when the activate command is sent, the Linux IPL volume must be configured in the load profile for the LPAR.
56 Achieving High Availability on Linux for System z with Linux-HA Release 2

Chapter 4. Linux-HA release 2 installation and initial configuration
In this chapter, we show how to install and do an initial configuration of Linux-HA release 2 packages on SUSE Linux Enterprise Server 10 (SLES 10) and Red Hat Enterprise Linux 5 running on z/VM.
This chapter is organized into the following topics:
� Before you start� Laboratory environment� Installing Linux-HA release 2 components for SLES 10 and Red Hat
Enterprise Linux 5� Initial configuration of Linux-HA release 2� Two-node active/passive scenario� Two-node active/active scenario� Three-node quorum scenario
4
© Copyright IBM Corp. 2009. All rights reserved. 57

4.1 Before you start
Prior to the Linux-HA release 2 installation, you must plan how your cluster will work. Make a checklist and use it to control each cluster deployment step. By doing so, the chances to succeed and have your cluster working without losing time are high. Your checklist should include the following items among others:
� IP addresses for the production network
� IP addresses for the heartbeat network if you intend to have a dedicated network for this
� Cluster name
� Node names
� Linux distribution, either SLES 10 and Red Hat Enterprise Linux 5
� Applications scripts and available plug-ins
� Resource group names and functions
� Home nodes for the resource groups
� Activation and deactivation orders
� Dependencies rules.
We found that SLES 10 was an easy distribution to install and set up since all the packages necessary for Linux-HA release 2 are already available, pre-compiled, and supported by Novell. It took us the least amount of time to deploy Linux-HA release 2 on SLES 10.
Document every step you make. To help you plan your cluster, we created a planning worksheet, shown in Figure 4-1 on page 59. You can change this form according with the cluster features, such as the number of nodes and resources.
58 Achieving High Availability on Linux for System z with Linux-HA Release 2

Figure 4-1 Planning form
P l a n n i n g W o r k sh e e tVersion 1.0 - Two nodes Cluster
Host name Device name Management IP Management NetmaskNode Primary
Information Secondary
Host name Device Type Information (IP/Netmask in case of IP network)
CommunicationPaths
Description PathApplicationscripts or
HA Plug-in
RG name ( ID ) Resources under th Resource Group ( ID )/ /
Resource Group / /Information / /
RG Name ( ID ) Primary Location ( Home Node )
Location
Constraints RG Name ( ID ) Order(rules)
Order
Rule (Always or Never)RG Names / /
Colocation RG Names / /RG Names / /
Chapter 4. Linux-HA release 2 installation and initial configuration 59

4.2 Laboratory environment
In the following sections, we describe the Linux-HA release 2 laboratory where we deployed SLES 10 and Red Hat Enterprise Linux 5 on z/VM. We provide details about how z/VM hosts were networked and how they share storage space. We also demonstrate how the z/VM network and storage are viewed from the perspective of z/VM guests and how DNS is used to set up names for these guests. The objective is to give you a glimpse of what is needed to start deploying Linux-HA release 2 on Linux systems running under z/VM.
4.2.1 z/VM hosts and guests
In our environment, we use an IBM System z10 Enterprise Class for the hardware. We also used a hypervisor of z/VM version 5.4.
This environment consists of two LPARs. Each LPAR runs a z/VM host, VMLINUX2 and VMLINUX9. In addition, each z/VM host runs four Linux guests.
In VMLINUX2 we installed guests lnxsu1, lnxsu2, lnxrh1, and lnxrh2. Guests lnxsu1 and lnxsu2 are SLES 10 z/VM guests, and guests lnxrh1 and lnxrh2 are Red Hat Enterprise Linux 5 z/VM guests.
In VMLINUX9, we installed guests lnxsu3, lnxsu4, lnxrh3, and lnxrh4. Guests lnxsu3 and lnxsu4 are SLES 10 z/VM guests, and guests lnxrh3 and lnxrh4 are Red Hat Enterprise Linux 5 z/VM guests.
4.2.2 Network setup
z/VM guests are networked by using two different z/VM features: HiperSockets and virtual switch (VSWITCH).
HiperSockets are used for the internal communication between the guests. On the Linux guests, the interface connected to HiperSockets is presented as hsi0.
The virtual switch is used by the guests for external communication. On Linux guests, the interface connected to the virtual switch is presented as eth0.
Example 4-1 shows the network setup for the z/VM guest’s side.
Example 4-1 Network setup on z/VM guest
00: CP 00: q lan
60 Achieving High Availability on Linux for System z with Linux-HA Release 2

00: LAN SYSTEM HIPER1 Type: HIPERS Connected: 0 Maxconn: INFINITE 00: PERSISTENT UNRESTRICTED IP MFS: 16384 Accounting: OFF 00: IPTimeout: 5 00: VSWITCH SYSTEM VSWITCH1 Type: VSWITCH Connected: 4 Maxconn: INFINITE 00: PERSISTENT RESTRICTED NONROUTER Accounting: OFF 00: VLAN Unaware 00: MAC address: 02-00-00-00-00-01 00: State: Ready 00: IPTimeout: 5 QueueStorage: 8 00: RDEV: 3004.P00 VDEV: 3004 Controller: DTCVSW1 00: RDEV: 3024.P00 VDEV: 3024 Controller: DTCVSW2 BACKUP
The virtual switch is on production network 9.12.5.0/24 and on HiperSockets heartbeat network 9.12.5.0/24. For more information about how HiperSockets works, see “HiperSockets” on page 48.
4.2.3 Shared disk setup
Some of the scenarios in this book require a shared disk that is accessible by the nodes. This means that more than one z/VM guest must be able to read and write to the same device at the same time.
Our z/VM hosts shared a common IBM DS-8000 storage through an ESCON/FICON channel. This functionality is provided by the z/VM host.
Example 4-2 and Example 4-3 on page 62 list the disks in lnxsu3 and lnxsu4. They show that the disk number 0203 has the same volume ID on both guests.
Example 4-2 DASDs on LNXSU3
00: CP 00: q dasd 00: DASD 0190 3390 LX9RES R/O 107 CYL ON DASD CF40 SUBCHANNEL = 000A 00: DASD 0191 3390 LX9U1R R/W 40 CYL ON DASD CF45 SUBCHANNEL = 000E 00: DASD 019D 3390 LX9W01 R/O 146 CYL ON DASD CF43 SUBCHANNEL = 000C 00: DASD 019E 3390 LX9W01 R/O 250 CYL ON DASD CF43 SUBCHANNEL = 000B
Chapter 4. Linux-HA release 2 installation and initial configuration 61

00: DASD 0201 3390 LXDF1B R/W 1000 CYL ON DASD DF1B SUBCHANNEL = 000F 00: DASD 0202 3390 LXDF1B R/W 9016 CYL ON DASD DF1B SUBCHANNEL = 0010 00: DASD 0203 3390 LXCF46 R/W 3338 CYL ON DASD CF46 SUBCHANNEL = 0011 00: DASD 0592 3390 LX9W02 R/O 70 CYL ON DASD CF44 SUBCHANNEL = 000D
Example 4-3 DASDs on LNXSU4
00: CP 00: q dasd 00: DASD 0190 3390 LX9RES R/O 107 CYL ON DASD CF40 SUBCHANNEL = 000A 00: DASD 0191 3390 LX9U1R R/W 40 CYL ON DASD CF45 SUBCHANNEL = 000F 00: DASD 019D 3390 LX9W01 R/O 146 CYL ON DASD CF43 SUBCHANNEL = 000C 00: DASD 019E 3390 LX9W01 R/O 250 CYL ON DASD CF43 SUBCHANNEL = 000B 00: DASD 0201 3390 LXD81E R/W 1000 CYL ON DASD D81E SUBCHANNEL = 0010 00: DASD 0202 3390 LXD81E R/W 9016 CYL ON DASD D81E SUBCHANNEL = 0011 00: DASD 0203 3390 LXCF46 R/W 3338 CYL ON DASD CF46 SUBCHANNEL = 000E 00: DASD 0592 3390 LX9W02 R/O 70 CYL ON DASD CF44 SUBCHANNEL = 000D
62 Achieving High Availability on Linux for System z with Linux-HA Release 2
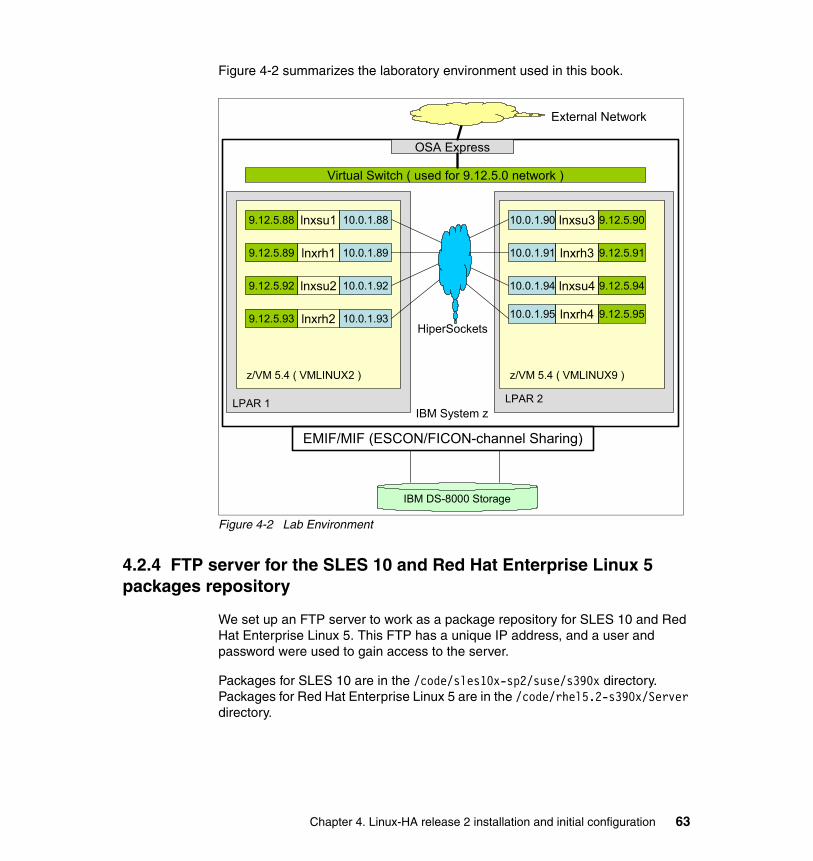
Figure 4-2 summarizes the laboratory environment used in this book.
Figure 4-2 Lab Environment
4.2.4 FTP server for the SLES 10 and Red Hat Enterprise Linux 5 packages repository
We set up an FTP server to work as a package repository for SLES 10 and Red Hat Enterprise Linux 5. This FTP has a unique IP address, and a user and password were used to gain access to the server.
Packages for SLES 10 are in the /code/sles10x-sp2/suse/s390x directory. Packages for Red Hat Enterprise Linux 5 are in the /code/rhel5.2-s390x/Server directory.
IBM System zLPAR 1 LPAR 2
z/VM 5.4 ( VMLINUX2 ) z/VM 5.4 ( VMLINUX9 )
9.12.5.88
10.0.1.89
10.0.1.92
10.0.1.93
10.0.1.90
10.0.1.91
10.0.1.94
10.0.1.95HiperSockets
EMIF/MIF (ESCON/FICON-channel Sharing)
IBM DS-8000 Storage
10.0.1.88
9.12.5.89
9.12.5.92
9.12.5.93
9.12.5.90
9.12.5.91
9.12.5.94
9.12.5.95
lnxsu1
lnxrh1
lnxsu2
lnxrh2
lnxsu3
lnxrh3
lnxsu4
lnxrh4
Virtual Switch ( used for 9.12.5.0 network )
OSA Express
External Network
Chapter 4. Linux-HA release 2 installation and initial configuration 63

Using the FTP server as a YaST repository for SLES 10To add the FTP server as a package repository for SLES 10, start YaST2. In the YaST Control Center window (Figure 4-3), in the left pane, click Software, and in the right pane, click Installation Source.
Figure 4-3 Adding an installation source on YaST
After you open the Installation Source window, use the access information for the FTP server to complete the fields.
Using the FTP server as a YUM repository for Red Hat Enterprise Linux 5We used Yellowdog Updater, Modified (YUM) to install RedHat Package Manager (RPM™) packages on RedHat Enterprise Linux.
To add the FTP server as a package repository for Red Hat Enterprise Linux 5, create the /etc/yum.repos.d/itso.repos file. Then insert the contents shown in Example 4-4 on page 65 into this file.
64 Achieving High Availability on Linux for System z with Linux-HA Release 2

Example 4-4 Contents to insert into the /etc/yum.repos.d/itso.repo file
# cd /etc/yum.repos.d# cat itso.repo[ITSO-repository]name=ITSO-repository $releasever - $basearch - Debugbaseurl=ftp://totibm:[email protected]/code/rhel5.2-s390x/Serverenabled=1gpgcheck=1gpgkey=file:///etc/pki/rpm-gpg/RPM-GPG-KEY-redhat-release#
Run YUM on each Red Hat Enterprise Linux 5 z/VM to update its repositories list, as shown in Example 4-5.
Example 4-5 Updating the YUM repositories
# yum updateLoading "rhnplugin" pluginLoading "security" pluginThis system is not registered with RHN.RHN support will be disabled.ITSO-repository 100% |=========================| 1.3 kB 00:00primary.xml.gz 100% |=========================| 712 kB 00:00ITSO-repos: ################################################## 2595/2595Skipping security plugin, no dataSetting up Update ProcessNo Packages marked for Update#
4.2.5 DNS server for node name resolution
We set up a DNS service on the Linux guest lnxrh4.itso.ibm.com and configured all nodes to use it for primary name resolution. We chose itso.ibm.com for the main domain namespace and in-addr.arpa for the reverse domain namespace.
Chapter 4. Linux-HA release 2 installation and initial configuration 65
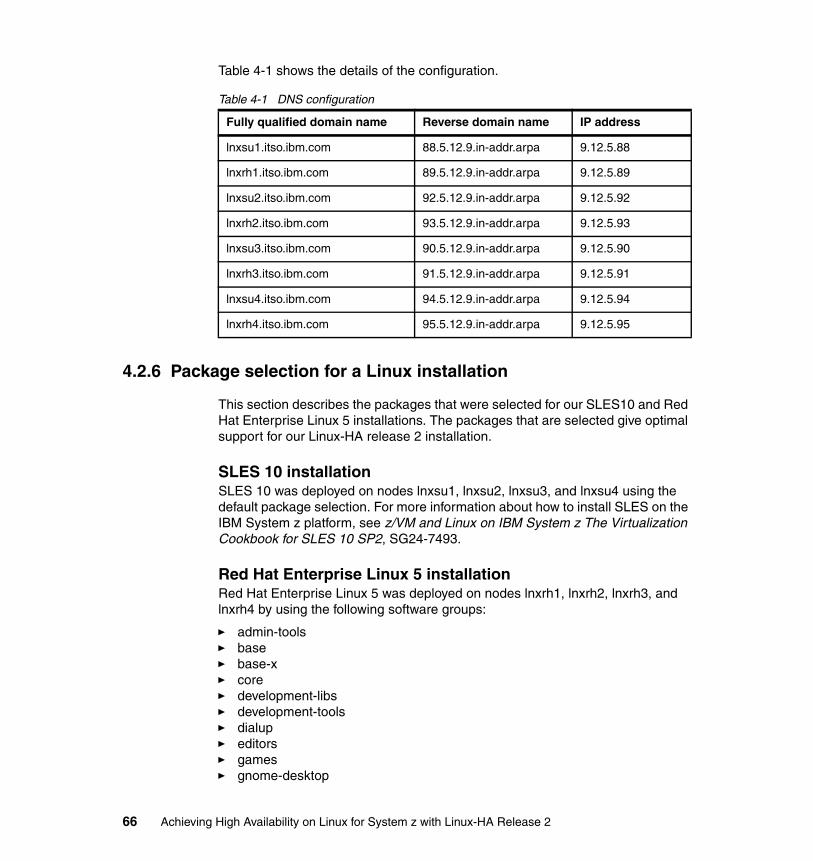
Table 4-1 shows the details of the configuration.
Table 4-1 DNS configuration
4.2.6 Package selection for a Linux installation
This section describes the packages that were selected for our SLES10 and Red Hat Enterprise Linux 5 installations. The packages that are selected give optimal support for our Linux-HA release 2 installation.
SLES 10 installationSLES 10 was deployed on nodes lnxsu1, lnxsu2, lnxsu3, and lnxsu4 using the default package selection. For more information about how to install SLES on the IBM System z platform, see z/VM and Linux on IBM System z The Virtualization Cookbook for SLES 10 SP2, SG24-7493.
Red Hat Enterprise Linux 5 installationRed Hat Enterprise Linux 5 was deployed on nodes lnxrh1, lnxrh2, lnxrh3, and lnxrh4 by using the following software groups:
� admin-tools� base� base-x� core� development-libs� development-tools� dialup� editors� games� gnome-desktop
Fully qualified domain name Reverse domain name IP address
lnxsu1.itso.ibm.com 88.5.12.9.in-addr.arpa 9.12.5.88
lnxrh1.itso.ibm.com 89.5.12.9.in-addr.arpa 9.12.5.89
lnxsu2.itso.ibm.com 92.5.12.9.in-addr.arpa 9.12.5.92
lnxrh2.itso.ibm.com 93.5.12.9.in-addr.arpa 9.12.5.93
lnxsu3.itso.ibm.com 90.5.12.9.in-addr.arpa 9.12.5.90
lnxrh3.itso.ibm.com 91.5.12.9.in-addr.arpa 9.12.5.91
lnxsu4.itso.ibm.com 94.5.12.9.in-addr.arpa 9.12.5.94
lnxrh4.itso.ibm.com 95.5.12.9.in-addr.arpa 9.12.5.95
66 Achieving High Availability on Linux for System z with Linux-HA Release 2

� gnome-software-development� graphical-internet� graphics� java� legacy-software-support� printing� sound-and-video� text-internet� x-software-development
In addition, the following packages were added:
� device-mapper-multipath� imake� libica� mesa-libGLU-devel� xorg-x11-server-Xnest� xorg-x11-server-Xvfb
4.3 Installing Linux-HA release 2 components
Linux-HA release 2 for the System z platform is based on four packages:
� heartbeat� heartbeat-pils� heartbeat-stonith� snipl
The snipl package is specific for the System z platform and works in conjunction with heartbeat-stonith. For more information about Shoot The Other Node In The Head (STONITH) concepts, see “STONITH resource agent” on page 19.
The installation process is different for SLES 10 and Red Hat Enterprise Linux 5, since Red Hat does not provides precompiled packages for Linux-HA release 2.
4.3.1 Installing Heartbeat on SLES 10
Installation of Linux-HA release 2 on SLES 10 can be done by using either rpm commands or the YaST tool. The YaST examples in this book use a GUI.
Chapter 4. Linux-HA release 2 installation and initial configuration 67

Starting the GUITo start the GUI on the client side, choose either direct Xserver access or Virtual Network Computing (VNC) software for access. We used RealVNC or TightVNC in our examples.
1. To start VNC, change the value of the disable variable in /etc/xinetd.d/vnc to no. After you make the changes, the file should read as shown in Example 4-6.
Example 4-6 VNC setup
{ type = UNLISTED port = 5902 socket_type = stream protocol = tcp wait = no user = nobody server = /usr/X11R6/bin/Xvnc server_args = :42 -inetd -once -query localhost -geometry 1280x1024 -depth 16 disable = no
}
2. To open VNC from the client side, restart the xinetd service (Example 4-7).
Example 4-7 Restarting the xinetd service
lnxsu3:/etc/xinetd.d # service xinetd restartShutting down xinetd: doneStarting INET services. (xinetd) donelnxsu3:/etc/xinetd.d #
68 Achieving High Availability on Linux for System z with Linux-HA Release 2

3. Perform steps 1 and 2 on page 68 for all nodes where you intend to use VNC. To open the VNC window on the client side, use the Web browser as shown in Figure 4-4.
Figure 4-4 VNC Authentication page
4. In the next two windows, enter your user ID and password on Linux to log in.
5. Right-click anywhere on the blue panel and select Open Terminal (Figure 4-5).
Figure 4-5 Linux Open GUI Terminal
Chapter 4. Linux-HA release 2 installation and initial configuration 69

The GUI is now up and running, and you can call the GUI applications in the opened terminal.
If your z/VM Linux guest does not have access to the Internet, you must create an FTP repository with all the required rpm packages. See “Using the FTP server as a YaST repository for SLES 10” on page 64, for instructions on how to do this.
Installing the rpm packagesInstall the rpm packages by using YaST:
1. On the opened terminal, type yast2. The tool is available for use in the graphical mode.
2. In the YaST Control Center window (Figure 4-6), in the left pane, select Software, and in the right pane, select Software Management.
Figure 4-6 Software installation
70 Achieving High Availability on Linux for System z with Linux-HA Release 2
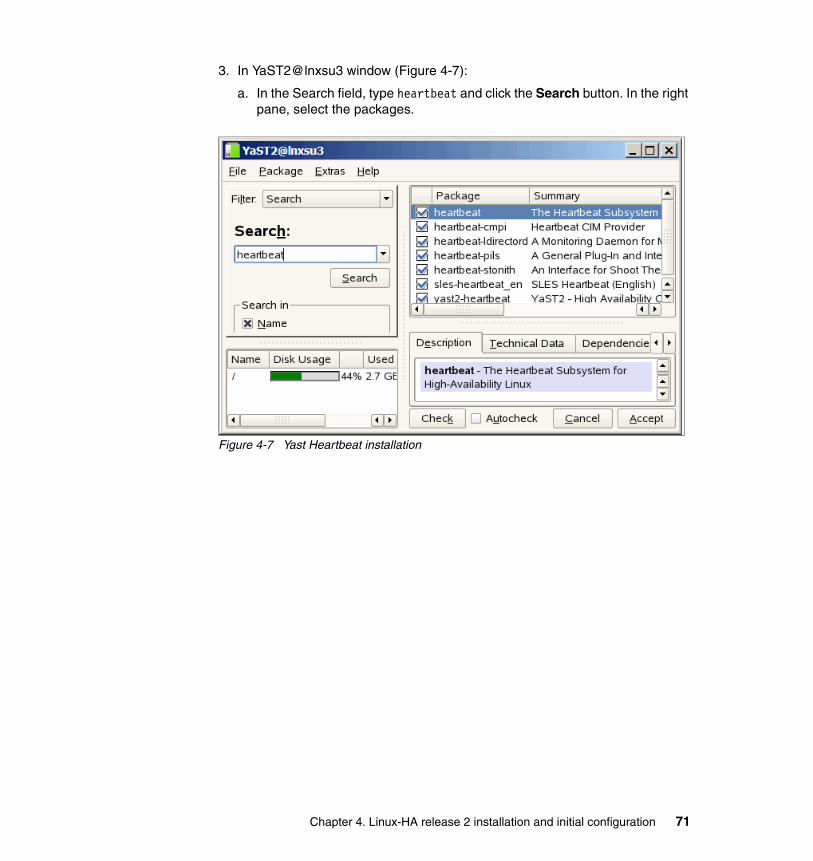
3. In YaST2@lnxsu3 window (Figure 4-7):
a. In the Search field, type heartbeat and click the Search button. In the right pane, select the packages.
Figure 4-7 Yast Heartbeat installation
Chapter 4. Linux-HA release 2 installation and initial configuration 71
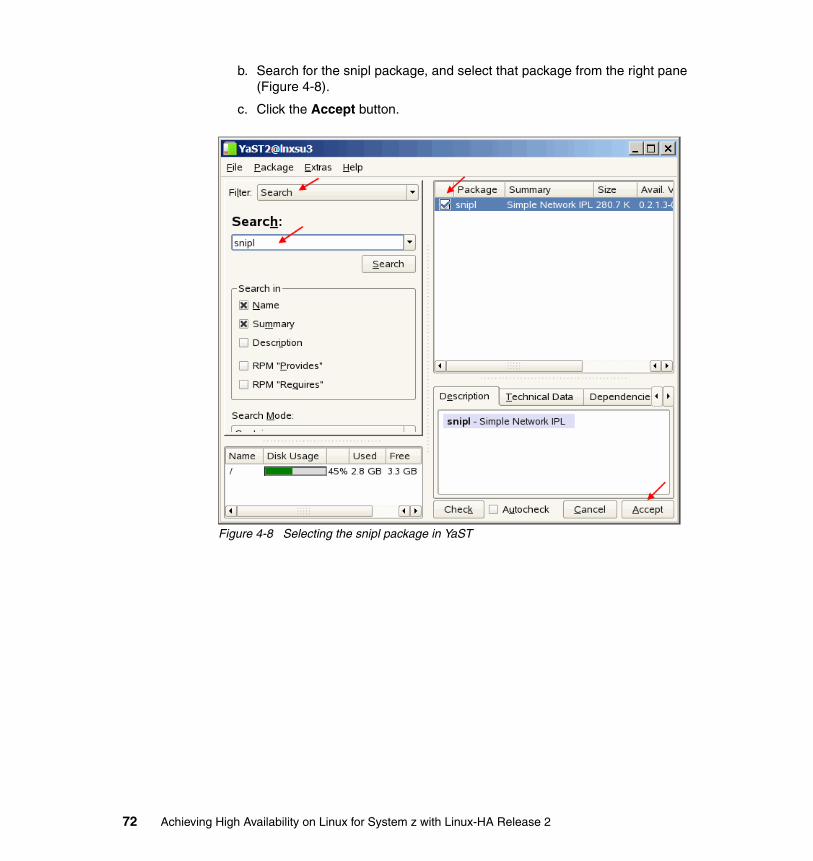
b. Search for the snipl package, and select that package from the right pane (Figure 4-8).
c. Click the Accept button.
Figure 4-8 Selecting the snipl package in YaST
72 Achieving High Availability on Linux for System z with Linux-HA Release 2
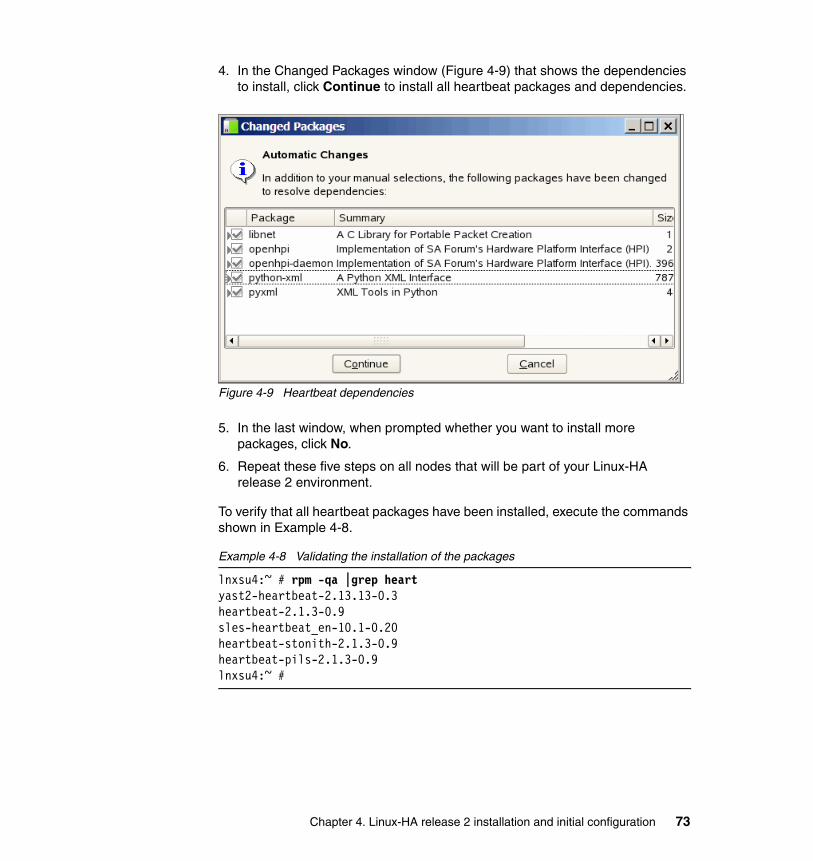
4. In the Changed Packages window (Figure 4-9) that shows the dependencies to install, click Continue to install all heartbeat packages and dependencies.
Figure 4-9 Heartbeat dependencies
5. In the last window, when prompted whether you want to install more packages, click No.
6. Repeat these five steps on all nodes that will be part of your Linux-HA release 2 environment.
To verify that all heartbeat packages have been installed, execute the commands shown in Example 4-8.
Example 4-8 Validating the installation of the packages
lnxsu4:~ # rpm -qa |grep heartyast2-heartbeat-2.13.13-0.3heartbeat-2.1.3-0.9sles-heartbeat_en-10.1-0.20heartbeat-stonith-2.1.3-0.9heartbeat-pils-2.1.3-0.9lnxsu4:~ #
Chapter 4. Linux-HA release 2 installation and initial configuration 73

4.3.2 Installing Heartbeat on Red Hat Enterprise Linux 5
Red Hat does not provide precompiled Linux-HA release 2 packages for Red Hat Enterprise Linux 5. Therefore, we must prepare the Red Hat Enterprise Linux 5 z/VM guests for package compilation. This implies that a complete set of C/C++ libraries and binaries must be available on the Red Hat Enterprise Linux 5 z/VM guests. Also all additional packages are required to solve dependencies to building the Linux-HA release 2 components.
Preparing the z/VM Red Hat Enterprise Linux 5 guestStarting with an standard Red Hat Enterprise Linux 5 installation, we need to install the following extra packages:
� beecrypt-devel-4.1.2-10.1.1� elfutils-0.125-3.el5� elfutils-devel-0.125-3.el5� elfutils-devel-static-0.125-3.el5� lynx-2.8.5-28.1� net-snmp-5.3.1-24.el5� net-snmp-devel-5.3.1-24.el5� perl-TimeDate-1.16-5.el5� perl-Net-SSLeay-1.30-4.fc6
All of these packages are available on the Red Hat Enterprise Linux 5 installation CD.
Packages to compile from the sourcesThe following packages must be compiled from the sources:
� heartbeat-2.1.4-2.1.src.rpm� libnet-1.1.2.1-2.1.src.rpm� ipvsadm-1.24-6.1.src.rpm
The first two packages are the Linux-HA release 2 Heartbeat core rpm source packages. The third package is a dependency of Heartbeat to provide load balance.
We explain how to download these packages in the following section.
Downloading the Heartbeat source packagesSince Red Hat does not provides precompiled packages of Heartbeat for Red Hat Enterprise Linux 5, you must download source packages from the official Linux-HA release 2 site at the following address:
http://www.linux-ha.org
74 Achieving High Availability on Linux for System z with Linux-HA Release 2

To download the Heartbeat source packages:
1. On the Linux-HA project page (Figure 4-10), in the right pane, click the Download Software link.
Figure 4-10 Linux-HA project page part 1
Chapter 4. Linux-HA release 2 installation and initial configuration 75
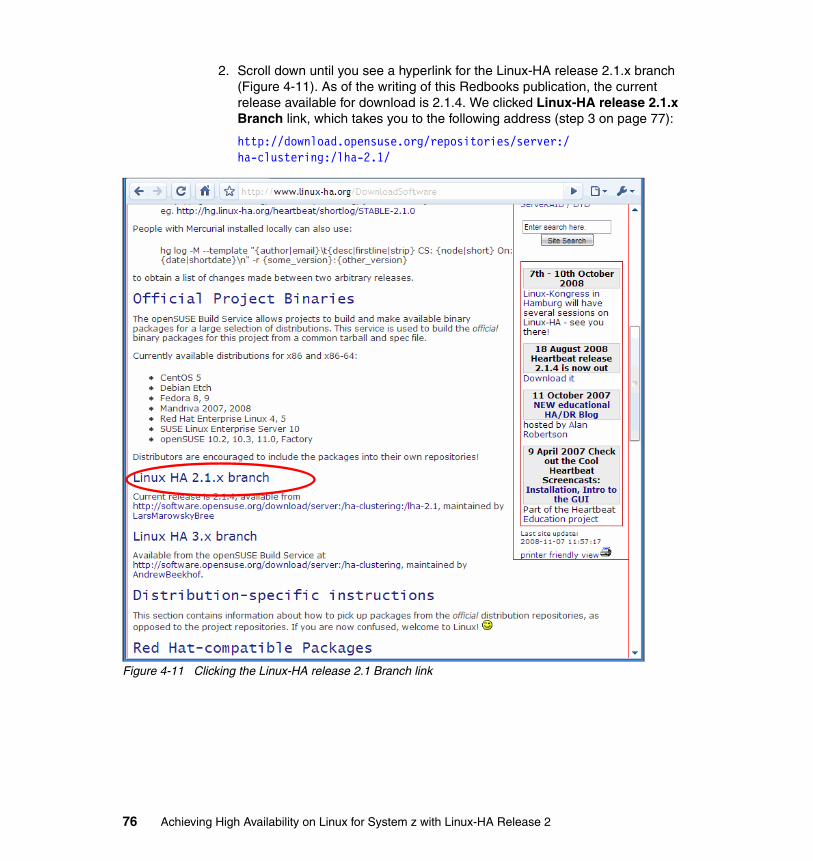
2. Scroll down until you see a hyperlink for the Linux-HA release 2.1.x branch (Figure 4-11). As of the writing of this Redbooks publication, the current release available for download is 2.1.4. We clicked Linux-HA release 2.1.x Branch link, which takes you to the following address (step 3 on page 77):
http://download.opensuse.org/repositories/server:/ha-clustering:/lha-2.1/
Figure 4-11 Clicking the Linux-HA release 2.1 Branch link
76 Achieving High Availability on Linux for System z with Linux-HA Release 2
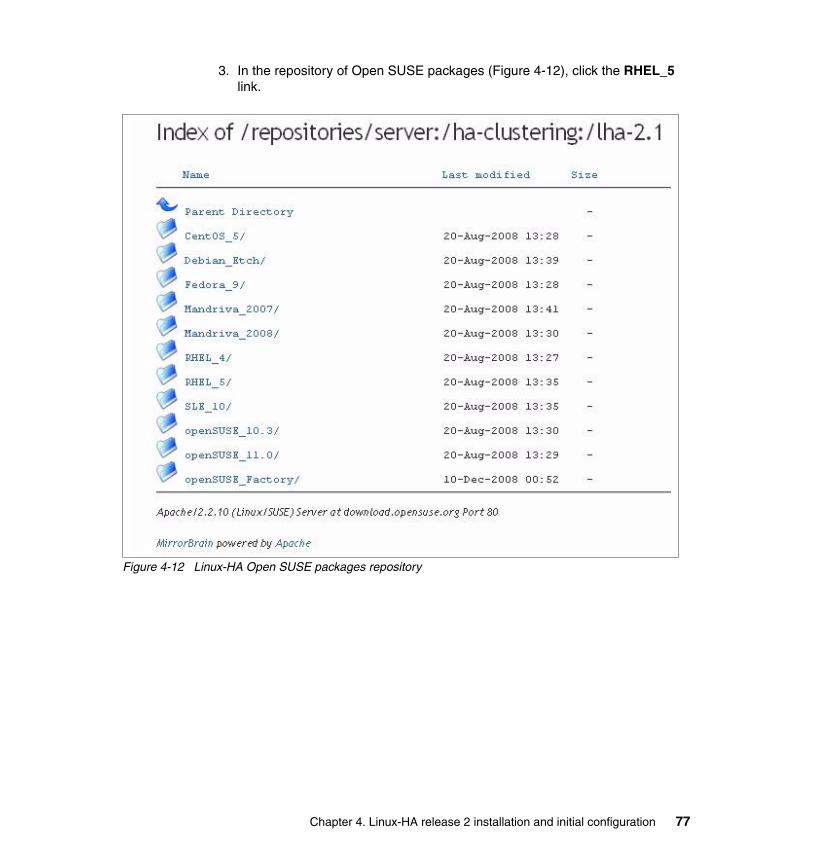
3. In the repository of Open SUSE packages (Figure 4-12), click the RHEL_5 link.
Figure 4-12 Linux-HA Open SUSE packages repository
Chapter 4. Linux-HA release 2 installation and initial configuration 77
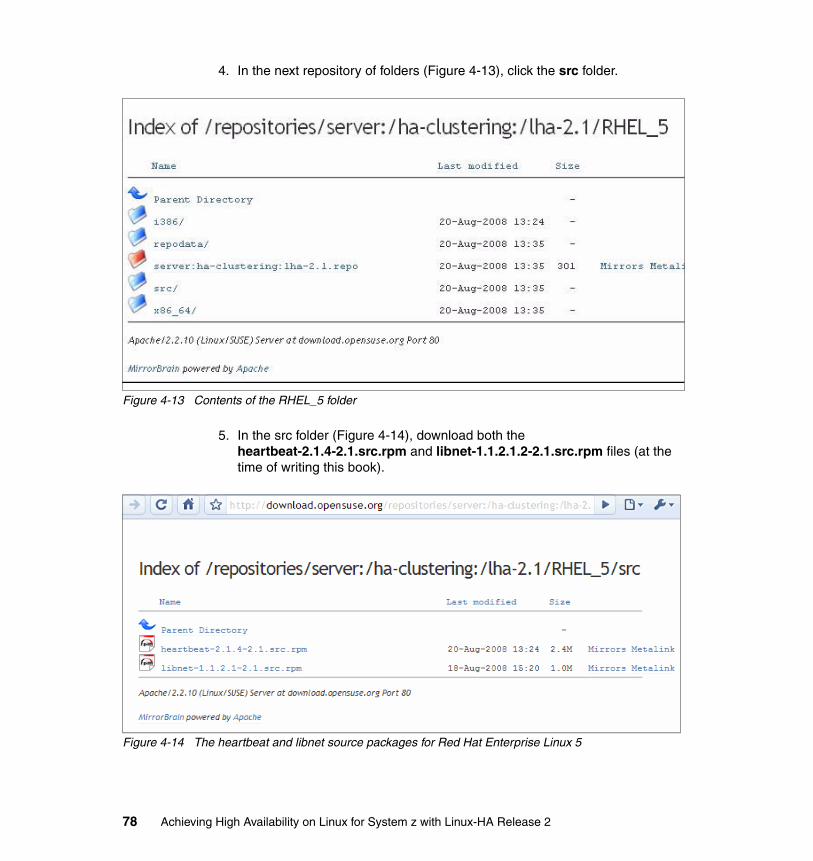
4. In the next repository of folders (Figure 4-13), click the src folder.
Figure 4-13 Contents of the RHEL_5 folder
5. In the src folder (Figure 4-14), download both the heartbeat-2.1.4-2.1.src.rpm and libnet-1.1.2.1.2-2.1.src.rpm files (at the time of writing this book).
Figure 4-14 The heartbeat and libnet source packages for Red Hat Enterprise Linux 5
78 Achieving High Availability on Linux for System z with Linux-HA Release 2

6. After you download all the files, transfer them to one of the Red Hat Enterprise Linux 5 z/VM guests. Choose one of the z/VM Red Hat Enterprise Linux 5 guests and send the files to the /usr/src/source-packages directory or any another directory where there is enough space on the chosen guest.
Next, you generate the RPM packages by using the RPM sources that you just downloaded.
Downloading the ipvsadm packagesThe source package for the ipvsadm tool is available for download on the Linux Virtual Server project home page (Figure 4-15). To download the packages:
1. Go to the Linux Virtual Server page at the following address:
http://www.linuxvirtualserver.org
On this page, click the Software tab.
Figure 4-15 Linux Virtual Server project home page
Chapter 4. Linux-HA release 2 installation and initial configuration 79

2. On the next page (Figure 4-16), which lists all ipvsadm branches that are available, click the branch for the Linux kernel 2.6 series.
Figure 4-16 ipvsadm available branches
80 Achieving High Availability on Linux for System z with Linux-HA Release 2
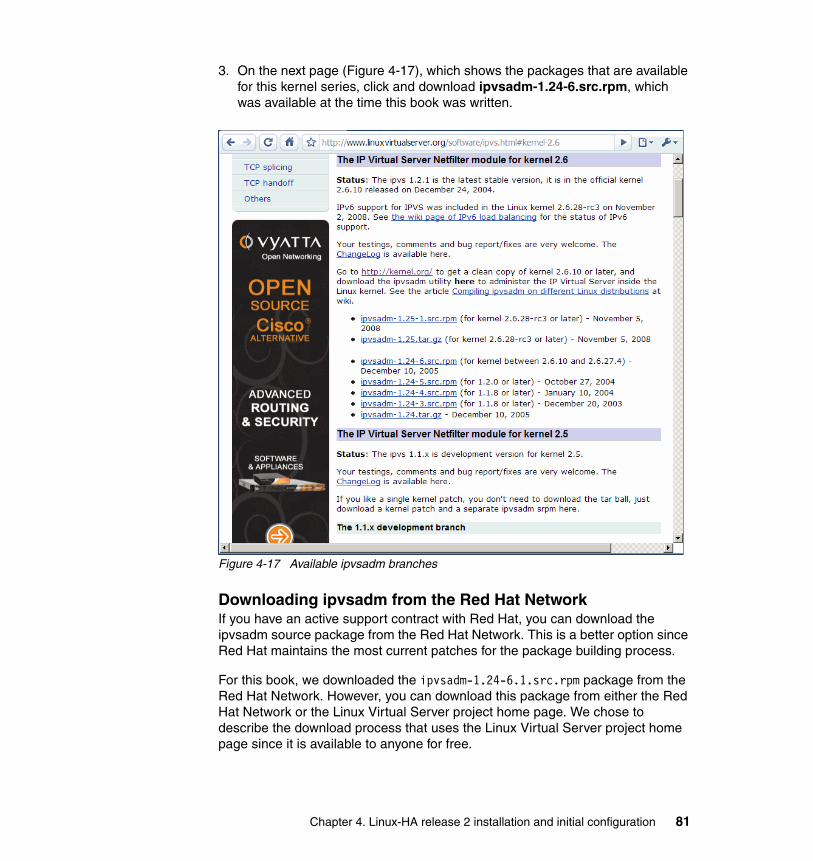
3. On the next page (Figure 4-17), which shows the packages that are available for this kernel series, click and download ipvsadm-1.24-6.src.rpm, which was available at the time this book was written.
Figure 4-17 Available ipvsadm branches
Downloading ipvsadm from the Red Hat NetworkIf you have an active support contract with Red Hat, you can download the ipvsadm source package from the Red Hat Network. This is a better option since Red Hat maintains the most current patches for the package building process.
For this book, we downloaded the ipvsadm-1.24-6.1.src.rpm package from the Red Hat Network. However, you can download this package from either the Red Hat Network or the Linux Virtual Server project home page. We chose to describe the download process that uses the Linux Virtual Server project home page since it is available to anyone for free.
Chapter 4. Linux-HA release 2 installation and initial configuration 81
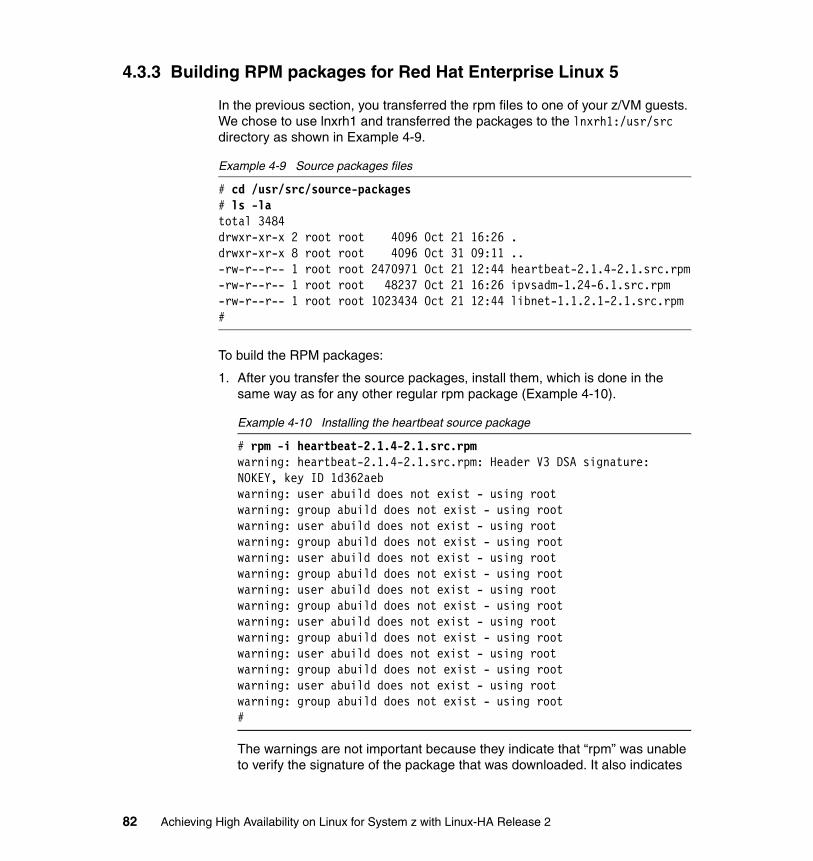
4.3.3 Building RPM packages for Red Hat Enterprise Linux 5
In the previous section, you transferred the rpm files to one of your z/VM guests. We chose to use lnxrh1 and transferred the packages to the lnxrh1:/usr/src directory as shown in Example 4-9.
Example 4-9 Source packages files
# cd /usr/src/source-packages# ls -latotal 3484drwxr-xr-x 2 root root 4096 Oct 21 16:26 .drwxr-xr-x 8 root root 4096 Oct 31 09:11 ..-rw-r--r-- 1 root root 2470971 Oct 21 12:44 heartbeat-2.1.4-2.1.src.rpm-rw-r--r-- 1 root root 48237 Oct 21 16:26 ipvsadm-1.24-6.1.src.rpm-rw-r--r-- 1 root root 1023434 Oct 21 12:44 libnet-1.1.2.1-2.1.src.rpm#
To build the RPM packages:
1. After you transfer the source packages, install them, which is done in the same way as for any other regular rpm package (Example 4-10).
Example 4-10 Installing the heartbeat source package
# rpm -i heartbeat-2.1.4-2.1.src.rpmwarning: heartbeat-2.1.4-2.1.src.rpm: Header V3 DSA signature: NOKEY, key ID 1d362aebwarning: user abuild does not exist - using rootwarning: group abuild does not exist - using rootwarning: user abuild does not exist - using rootwarning: group abuild does not exist - using rootwarning: user abuild does not exist - using rootwarning: group abuild does not exist - using rootwarning: user abuild does not exist - using rootwarning: group abuild does not exist - using rootwarning: user abuild does not exist - using rootwarning: group abuild does not exist - using rootwarning: user abuild does not exist - using rootwarning: group abuild does not exist - using rootwarning: user abuild does not exist - using rootwarning: group abuild does not exist - using root#
The warnings are not important because they indicate that “rpm” was unable to verify the signature of the package that was downloaded. It also indicates
82 Achieving High Availability on Linux for System z with Linux-HA Release 2
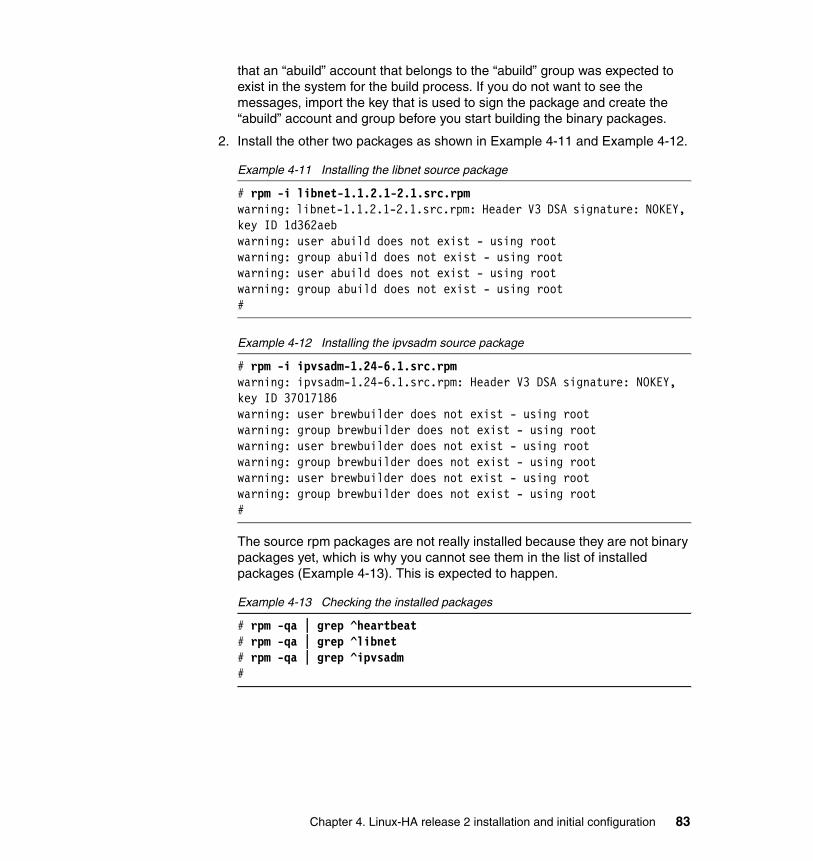
that an “abuild” account that belongs to the “abuild” group was expected to exist in the system for the build process. If you do not want to see the messages, import the key that is used to sign the package and create the “abuild” account and group before you start building the binary packages.
2. Install the other two packages as shown in Example 4-11 and Example 4-12.
Example 4-11 Installing the libnet source package
# rpm -i libnet-1.1.2.1-2.1.src.rpmwarning: libnet-1.1.2.1-2.1.src.rpm: Header V3 DSA signature: NOKEY, key ID 1d362aebwarning: user abuild does not exist - using rootwarning: group abuild does not exist - using rootwarning: user abuild does not exist - using rootwarning: group abuild does not exist - using root#
Example 4-12 Installing the ipvsadm source package
# rpm -i ipvsadm-1.24-6.1.src.rpmwarning: ipvsadm-1.24-6.1.src.rpm: Header V3 DSA signature: NOKEY, key ID 37017186warning: user brewbuilder does not exist - using rootwarning: group brewbuilder does not exist - using rootwarning: user brewbuilder does not exist - using rootwarning: group brewbuilder does not exist - using rootwarning: user brewbuilder does not exist - using rootwarning: group brewbuilder does not exist - using root#
The source rpm packages are not really installed because they are not binary packages yet, which is why you cannot see them in the list of installed packages (Example 4-13). This is expected to happen.
Example 4-13 Checking the installed packages
# rpm -qa | grep ^heartbeat# rpm -qa | grep ^libnet# rpm -qa | grep ^ipvsadm#
Chapter 4. Linux-HA release 2 installation and initial configuration 83

The source packages place files in the structure under the /usr/src/redhat directory (Example 4-14).
Example 4-14 The /usr/src/redhat structure
# cd /usr/src/redhat/# ls -latotal 56drwxr-xr-x 7 root root 4096 Oct 8 11:31 .drwxr-xr-x 8 root root 4096 Oct 31 09:11 ..drwxr-xr-x 2 root root 4096 Jan 15 2008 BUILDdrwxr-xr-x 4 root root 4096 Oct 8 11:31 RPMSdrwxr-xr-x 2 root root 4096 Oct 31 09:13 SOURCESdrwxr-xr-x 2 root root 4096 Oct 31 09:13 SPECSdrwxr-xr-x 2 root root 4096 Jan 15 2008 SRPMS#
The /usr/src/redhat directory has several files, but only those in the SPECS directory (Example 4-15) are of interest. They contain a type of script that is interpreted by rpmbuild, a binary program from the rpm package, to generate our Heartbeat binary packages, libnet and ipvsadm.
Example 4-15 The SPECS directory
# cd /usr/src/redhat/SPECS/# ls -latotal 100drwxr-xr-x 2 root root 4096 Oct 31 09:13 .drwxr-xr-x 7 root root 4096 Oct 8 11:31 ..-rw-r--r-- 1 root root 69488 Aug 20 07:20 heartbeat.spec-rw-r--r-- 1 root root 4888 Jul 12 2006 ipvsadm.spec-rw-r--r-- 1 root root 2507 Aug 18 09:22 libnet.spec#
3. Compile the first package. Start with the ipvsadm package since it has only a few dependencies and everything is in place to start compiling it on the Red Hat Enterprise Linux 5 installation. Run rpmbuild with the -bb flag (Example 4-16). The -bb flag indicates that rpmbuild must build a binary package. For more information about rpmbuild, enter man 8 rpmbuild.
Example 4-16 Building a package with rpmbuild
# rpmbuild -bb ipvsadm.spec
84 Achieving High Availability on Linux for System z with Linux-HA Release 2

After entering the rpmbuild command, a lot of information is displayed on the panel. If the rpmbuild command was able compile the package, we might see something similar to the output in Example 4-17 upon completion.
Example 4-17 Sample rpmbuild output
...
Wrote: /usr/src/redhat/RPMS/s390x/ipvsadm-1.24-8.1.s390x.rpmWrote: /usr/src/redhat/RPMS/s390x/ipvsadm-debuginfo-1.24-8.1.s390x.rpmExecuting(%clean): /bin/sh -e /var/tmp/rpm-tmp.39487+ umask 022+ cd /usr/src/redhat/BUILD+ cd ipvsadm-1.24+ rm -rf /usr/src/redhat/BUILD/ipvsadm+ rm -rf /var/tmp/ipvsadm-1.24-buildroot+ exit 0#
The last line must read “exit 0,” which signals that everything was compiled without any errors. You can also see some lines starting with the word “Wrote.” These lines indicate where rpmbuild placed the newly generated packages. In this case, we have the following two lines:
/usr/src/redhat/RPMS/s390x/ipvsadm-1.24-8.1.s390x.rpm /usr/src/redhat/RPMS/s390x/ipvsadm-debuginfo-1.24-8.1.s390x.rpm
4. Install the ipvsadm-1.24-8.1.s390x.rpm package (Example 4-18) since ipvsadm-debuginfo-1.24-8.1.s390x.rpm is used only when it is necessary to debug the generated binaries. This applies to all packages that have “debuginfo” in their names.
Example 4-18 Installing the ipvsadm package
# cd /usr/src/redhat/RPMS/s390x# rpm -ivh ipvsadm-1.24-8.1.s390x.rpmPreparing... ########################################### [100%] 1:ipvsadm ########################################### [100%]#
Chapter 4. Linux-HA release 2 installation and initial configuration 85

5. Build the libnet packages (Example 4-19).
Example 4-19 Building the libnet packages
# cd /usr/src/redhat/SPECS# rpmbuild -bb libnet.spec
Example 4-20 shows the libnet package as compiling without errors.
Example 4-20 The rpmbuild output of the libnet build process
...
Wrote: /usr/src/redhat/RPMS/s390x/libnet-1.1.2.1-2.1.s390x.rpmWrote: /usr/src/redhat/RPMS/s390x/libnet-debuginfo-1.1.2.1-2.1.s390x.rpmExecuting(%clean): /bin/sh -e /var/tmp/rpm-tmp.69916+ umask 022+ cd /usr/src/redhat/BUILD+ cd libnet+ /bin/rm -rf /var/tmp/libnet-1.1.2.1-2.1-root+ exit 0#
6. Install the libnet-1.1.2.1-2.1.s390x.rpm package as shown in Example 4-21.
Example 4-21 Installing the libnet package
# cd /usr/src/redhat/RPMS/s390x# rpm -ivh libnet-1.1.2.1-2.1.s390x.rpmPreparing... ########################################### [100%] 1:libnet ########################################### [100%]#
7. Build the heartbeat packages (Example 4-22).
Example 4-22 Building the heartbeat packages
# cd /usr/src/redhat/SPECS# rpmbuild -bb heartbeat.specerror: Failed build dependencies: lynx is needed by heartbeat-2.1.4-2.1.s390x net-snmp-devel is needed by heartbeat-2.1.4-2.1.s390x#
86 Achieving High Availability on Linux for System z with Linux-HA Release 2

As you can see in Example 4-22 on page 86, rpmbuild tried to compile heartbeat and noted that some dependencies were not met. This is not a big problem. We need to install lynx and net-snmp-devel packages before we can try to compile it again. Since these packages are in the list of dependencies discussed at the beginning of this chapter, we already transferred to our system, lnxrh1. These two packages are on the Red Hat Enterprise Linux 5 installation CD.
8. Install the lynx package as shown in Example 4-23.
Example 4-23 Resolving the heartbeat package dependencies
# rpm -ivh lynx-2.8.5-28.1.s390x.rpmwarning: lynx-2.8.5-28.1.s390x.rpm: Header V3 DSA signature: NOKEY, key ID 37017186Preparing... ########################################### [100%] 1:lynx ########################################### [100%]#
9. Install all dependencies of the net-snmp-devel package (Example 4-24) as shown in Example 4-25.
Example 4-24 net-snmp-devel package dependencies
# rpm -ivh net-snmp-devel-5.3.1-24.el5.s390x.rpmwarning: net-snmp-devel-5.3.1-24.el5.s390x.rpm: Header V3 DSA signature: NOKEY, key ID 37017186error: Failed dependencies: beecrypt-devel is needed by net-snmp-devel-5.3.1-24.el5.s390x elfutils-devel is needed by net-snmp-devel-5.3.1-24.el5.s390x net-snmp = 1:5.3.1 is needed by net-snmp-devel-5.3.1-24.el5.s390x#
Example 4-25 Resolving net-snmp-devel dependencies
# rpm -ivh net-snmp-devel-5.3.1-24.el5.s390x.rpm net-snmp-5.3.1-24.el5.s390x.rpm beecrypt-devel-4.1.2-10.1.1.s390x.rpm elfutils-devel-0.125-3.el5.s390x.rpm elfutils-devel-static-0.125-3.el5.s390x.rpmwarning: net-snmp-devel-5.3.1-24.el5.s390x.rpm: Header V3 DSA signature: NOKEY, key ID 37017186Preparing... ########################################### [100%] 1:net-snmp ########################################### [ 20%] 2:beecrypt-devel ########################################### [ 40%]
Chapter 4. Linux-HA release 2 installation and initial configuration 87

3:elfutils-devel ########################################### [ 60%] 4:net-snmp-devel ########################################### [ 80%] 5:elfutils-devel-static ########################################### [100%]#
All these packages are also on the Red Hat Enterprise Linux 5 installation CD.
10.Try to build the heartbeat package again (Example 4-26).
Example 4-26 Building the heartbeat packages after resolving the dependencies
# cd /usr/src/redhat/SPECS/# rpmbuild -bb heartbeat.spec...
Wrote: /usr/src/redhat/RPMS/s390x/heartbeat-2.1.4-2.1.s390x.rpmWrote: /usr/src/redhat/RPMS/s390x/heartbeat-ldirectord-2.1.4-2.1.s390x.rpmWrote: /usr/src/redhat/RPMS/s390x/heartbeat-stonith-2.1.4-2.1.s390x.rpmWrote: /usr/src/redhat/RPMS/s390x/heartbeat-pils-2.1.4-2.1.s390x.rpmWrote: /usr/src/redhat/RPMS/s390x/heartbeat-devel-2.1.4-2.1.s390x.rpmWrote: /usr/src/redhat/RPMS/s390x/heartbeat-debuginfo-2.1.4-2.1.s390x.rpmExecuting(%clean): /bin/sh -e /var/tmp/rpm-tmp.94984+ umask 022+ cd /usr/src/redhat/BUILD+ cd heartbeat-2.1.4+ '[' -n /var/tmp/heartbeat-2.1.4-build -a /var/tmp/heartbeat-2.1.4-build '!=' / ']'+ rm -rf /var/tmp/heartbeat-2.1.4-build+ rm -rf /usr/src/redhat/BUILD/heartbeat-2.1.4+ exit 0#
This time everything runs without any errors, and several packages are generated.
88 Achieving High Availability on Linux for System z with Linux-HA Release 2

11.Install the packages that were generated (Example 4-27).
Example 4-27 More dependencies to resolve
# cd /usr/src/redhat/RPMS/s390x# rpm -ivh s390x/heartbeat-ldirectord-2.1.4-2.1.s390x.rpmerror: Failed dependencies: perl(Mail::Send) is needed by heartbeat-ldirectord-2.1.4-2.1.s390x perl-Net-SSLeay is needed by heartbeat-ldirectord-2.1.4-2.1.s390x#
There are more dependencies to resolve. perl(Mail::Send) is needed only if you want ldirectord to send e-mail for you or any other administrator to let you know that something on the cluster has changed. If you do not want to use this feature, skip it and install heartbeat-ldirectord with the --nodeps flag. We do not need this feature here, so we install heartbeat-ldirectord by using that flag.
12.With all the dependencies satisfied, install heartbeat-ldirectord again as shown in Example 4-28, Example 4-29, and Example 4-30 on page 90.
Example 4-28 Installing heartbeat-ldirectord
# cd /usr/src/redhat/RPMS/s390x# rpm -ivh heartbeat-ldirectord-2.1.4-2.1.s390x.rpm --nodepsPreparing... ########################################### [100%]
Example 4-29 Installing more dependency packages
# rpm -ivh perl-Net-SSLeay perl-TimeDatewarning: perl-Net-SSLeay-1.30-4.fc6.s390x.rpm: Header V3 DSA signature: NOKEY, key ID 37017186Preparing... ########################################### [100%] 1:perl-Net-SSLeay ########################################### [ 50%] 2:perl-TimeDate ########################################### [100%]
Chapter 4. Linux-HA release 2 installation and initial configuration 89

Example 4-30 Installing heartbeat-ldirectord package
# cd /usr/src/redhat/RPMS/s390x# rpm -ivh --nodeps heartbeat-ldirectord-2.1.4-2.1.s390x.rpmPreparing... ########################################### [100%] 1:heartbeat-ldirectord ########################################### [100%]#
Now heartbeat and all necessary packages have been installed.
13.Install the heartbeat-devel package (Example 4-31), which is a requirement to correctly compile snIPL.
Example 4-31 Installing the heartbeat and heartbeat-devel packages
# cd /usr/src/redhat/RPMS/s390x# rpm -ihv heartbeat-2.1.4-2.1.s390x.rpm heartbeat-devel-2.1.4-2.1.s390x.rpm heartbeat-pils-2.1.4-2.1.s390x.rpm heartbeat-stonith-2.1.4-2.1.s390x.rpmPreparing... ########################################### [100%] 1:heartbeat-pils ########################################### [ 25%] 2:heartbeat-stonith ########################################### [ 50%] 3:heartbeat ########################################### [ 75%] 4:heartbeat-devel ########################################### [100%]# chkconfig --add heartbeat# chkconfig --list heartbeatheartbeat 0:off 1:off 2:off 3:off 4:off 5:off 6:off#
14.Verify the installed packages as shown in Example 4-32.
Example 4-32 Verifying the installed packages
# rpm -qa | egrep "^(heartbeat|ipvsadm|libnet)" | sortheartbeat-2.1.4-2.1heartbeat-ldirectord-2.1.4-2.1heartbeat-pils-2.1.4-2.1heartbeat-stonith-2.1.4-2.1
90 Achieving High Availability on Linux for System z with Linux-HA Release 2
ipvsadm-1.24-8.1libnet-1.1.2.1-2.1#
With all packages compiled, there is no need to go through the building process again for the other nodes. Simply copy all generated rpm files and install them. In addition, remember to install all dependencies.
4.3.4 Installing snIPL on Red Hat Enterprise Linux 5
snIPL for z/VM provides a way to remotely control z/VM system management functions. It can be used to reset, activate, or deactivate a z/VM Linux guest image for I/O fencing purposes. A pre-compiled package is available for SLES 10, but for Red Hat Enterprise Linux 5, it must be built from source.
snIPL uses the System Management API (SMAPI) of z/VM 4.4 or later. To communicate with the z/VM host, snIPL for z/VM establishes a network connection and uses the RPC protocol to send and retrieve data. To compile and run snIPL for z/VM, the RPC protocol specification DMSVSMA.X must be copied to the Linux system that is running snIPL (usually in the /usr/share/dmsvsma/ directory).
snIPL compilation depends on Heartbeat. Therefore, you must have the heartbeat and heartbeat-devel packages installed before any attempts to compile snIPL.
Another dependency is the hwmcaapi library. This library is maintained by the IBM HMC team and is available at the IBM Resource Link at the following address:
http://www.ibm.com/server/resourcelink
At the time this book was written, the hwmcaapi-2.10.0-73j.s390x.rpm and hwmcaapi-devel-2.10.0-73j.s390x.rpm packages were available for download from the IBM Resource Link.
1. Download and install the hwmcaapi-2.10.0-73j.s390x.rpm and hwmcaapi-devel-2.10.0-73j.s390x.rpm packages on the guests for a successful compilation.
More information: For instructions on how to obtain the DMSVSMA.X file, see 3.2.3, “Locating the dmsvsma.x file” on page 53.
Chapter 4. Linux-HA release 2 installation and initial configuration 91
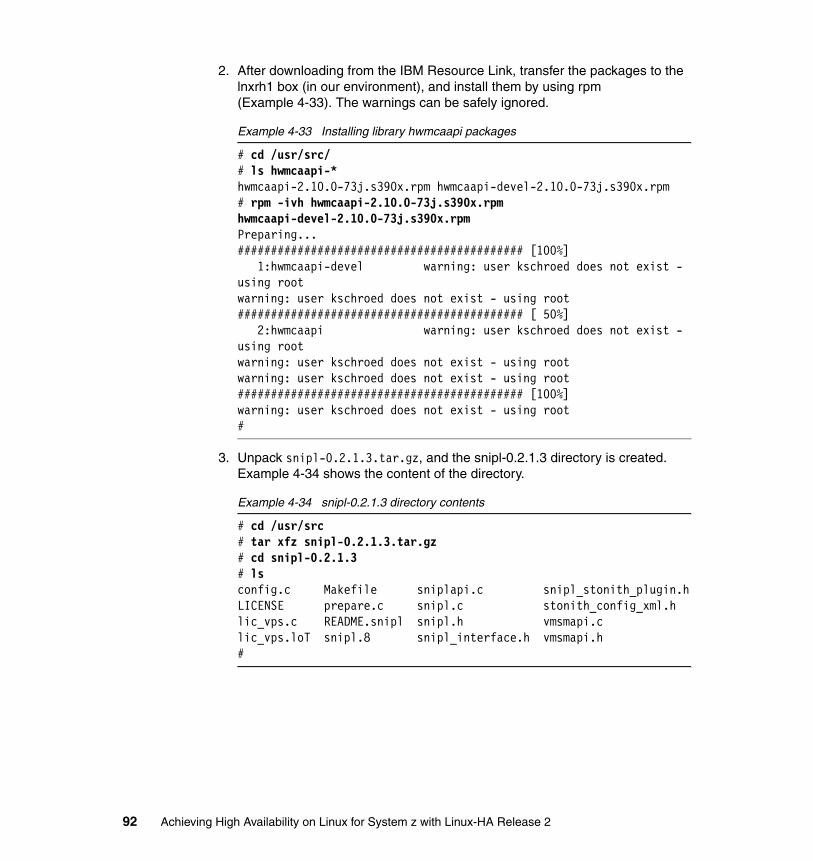
2. After downloading from the IBM Resource Link, transfer the packages to the lnxrh1 box (in our environment), and install them by using rpm (Example 4-33). The warnings can be safely ignored.
Example 4-33 Installing library hwmcaapi packages
# cd /usr/src/# ls hwmcaapi-*hwmcaapi-2.10.0-73j.s390x.rpm hwmcaapi-devel-2.10.0-73j.s390x.rpm# rpm -ivh hwmcaapi-2.10.0-73j.s390x.rpm hwmcaapi-devel-2.10.0-73j.s390x.rpmPreparing... ########################################### [100%] 1:hwmcaapi-devel warning: user kschroed does not exist - using rootwarning: user kschroed does not exist - using root########################################### [ 50%] 2:hwmcaapi warning: user kschroed does not exist - using rootwarning: user kschroed does not exist - using rootwarning: user kschroed does not exist - using root########################################### [100%]warning: user kschroed does not exist - using root#
3. Unpack snipl-0.2.1.3.tar.gz, and the snipl-0.2.1.3 directory is created. Example 4-34 shows the content of the directory.
Example 4-34 snipl-0.2.1.3 directory contents
# cd /usr/src# tar xfz snipl-0.2.1.3.tar.gz# cd snipl-0.2.1.3# lsconfig.c Makefile sniplapi.c snipl_stonith_plugin.hLICENSE prepare.c snipl.c stonith_config_xml.hlic_vps.c README.snipl snipl.h vmsmapi.clic_vps.loT snipl.8 snipl_interface.h vmsmapi.h#
92 Achieving High Availability on Linux for System z with Linux-HA Release 2

4. Compile snIPL. Go to the snipl-0.2.1.3 directory and enter a make command (Example 4-35).
Example 4-35 Running make inside snipl-0.2.1.3 directory
# cd /usr/src/snipl-0.2.1.3# make...
gcc -DUNIX=1 -DST_TEXTDOMAIN='"stonith"' -g -O2 -Wall -I. -I/usr/include -I/usr/include/stonith -o snipl -L. -L/usr/lib64 -lnsl -ldl -lvmsmapi -lsniplapi -lhwmcaapi -lconfig snipl.o prepare.o/bin/sh libtool --mode=compile gcc \ -DUNIX=1 -DST_TEXTDOMAIN='"stonith"' -g -O2 -Wall -I. -I/usr/include -I/usr/include/stonith -DLPAR_INCLUDED=1 -DVM_INCLUDED=1 `pkg-config --cflags glib-2.0` \-c lic_vps.c -o lic_vps.lo gcc -DUNIX=1 -DST_TEXTDOMAIN=\"stonith\" -g -O2 -Wall -I. -I/usr/include -I/usr/include/stonith -DLPAR_INCLUDED=1 -DVM_INCLUDED=1 -I/usr/include/glib-2.0 -I/usr/lib64/glib-2.0/include -c lic_vps.c -fPIC -DPIC -o .libs/lic_vps.oIn file included from /usr/include/stonith/stonith.h:47, from ./snipl_stonith_plugin.h:31, from lic_vps.c:17:/usr/include/pils/plugin.h:23:20: error: ltdl.h: No such file or directorymake: *** [lic_vps.lo] Error 1#
You see some text scrolling on your panel and probably an error message indicating that ltdl.h could not be found (highlighted in bold in Example 4-35). In fact ltdl.h is installed on the system and is available. We just have to tell the compiler how to find it.
5. Set the environment variable CFLAGS as shown in Example 4-36.
Example 4-36 Helping the compiler on how to find ltd.h
# CFLAGS="-I/usr/share/libtool/libltdl" make
You should now have a working snIPL binary.
6. Continue the installation as shown in Example 4-37.
Example 4-37 Installing snIPL binaries
# make installinstall -d -m755 /usr/lib64/stonith/plugins/stonith2install -d -m755 /usr/lib64 /usr/bin /usr/share/man/man8install -g root -o root -m755 libconfig.so /usr/lib64install -g root -o root -m755 libsniplapi.so /usr/lib64
Chapter 4. Linux-HA release 2 installation and initial configuration 93
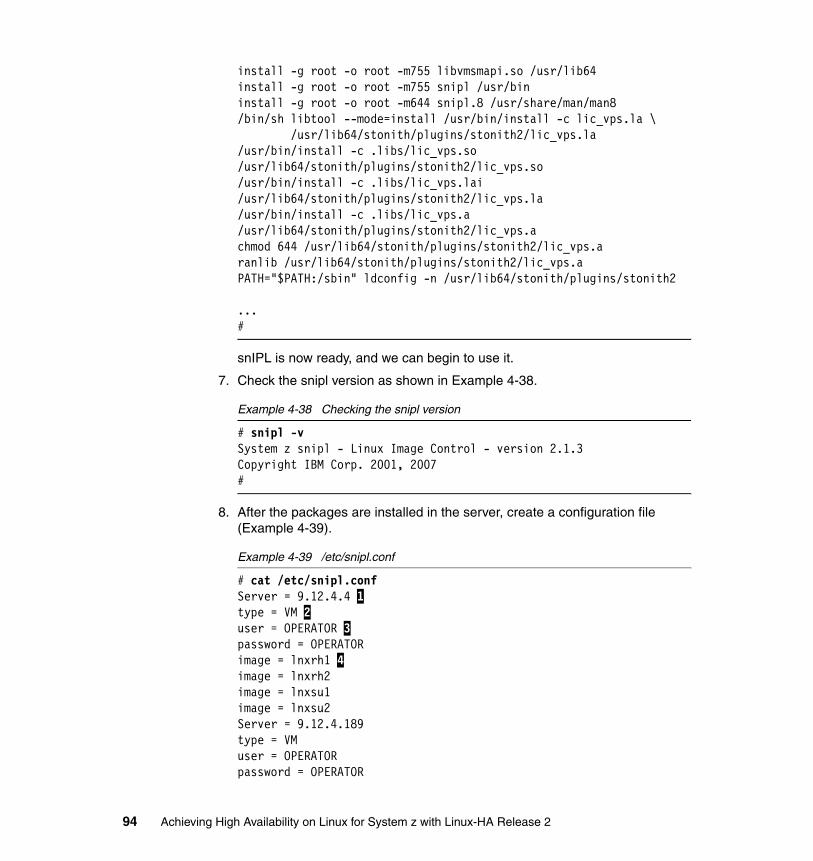
install -g root -o root -m755 libvmsmapi.so /usr/lib64install -g root -o root -m755 snipl /usr/bininstall -g root -o root -m644 snipl.8 /usr/share/man/man8/bin/sh libtool --mode=install /usr/bin/install -c lic_vps.la \ /usr/lib64/stonith/plugins/stonith2/lic_vps.la/usr/bin/install -c .libs/lic_vps.so /usr/lib64/stonith/plugins/stonith2/lic_vps.so/usr/bin/install -c .libs/lic_vps.lai /usr/lib64/stonith/plugins/stonith2/lic_vps.la/usr/bin/install -c .libs/lic_vps.a /usr/lib64/stonith/plugins/stonith2/lic_vps.achmod 644 /usr/lib64/stonith/plugins/stonith2/lic_vps.aranlib /usr/lib64/stonith/plugins/stonith2/lic_vps.aPATH="$PATH:/sbin" ldconfig -n /usr/lib64/stonith/plugins/stonith2
...#
snIPL is now ready, and we can begin to use it.
7. Check the snipl version as shown in Example 4-38.
Example 4-38 Checking the snipl version
# snipl -vSystem z snipl - Linux Image Control - version 2.1.3Copyright IBM Corp. 2001, 2007#
8. After the packages are installed in the server, create a configuration file (Example 4-39).
Example 4-39 /etc/snipl.conf
# cat /etc/snipl.confServer = 9.12.4.4 1type = VM 2user = OPERATOR 3password = OPERATORimage = lnxrh1 4image = lnxrh2image = lnxsu1image = lnxsu2Server = 9.12.4.189type = VMuser = OPERATORpassword = OPERATOR
94 Achieving High Availability on Linux for System z with Linux-HA Release 2

image = lnxrh3image = lnxrh4image = lnxsu3image = lnxsu4#
The following reverse numbers correspond to the reverse numbers in Example 4-39 on page 94 for further explanation:
1. We define the IP address of the z/VM system under which our Linux guests reside.
2. We identify the type as VM.
3. We specify the guest user and password for the guest that has snIPL access. In our environment, we give the guest user OPERATOR snIPL access to the guests defined in NAMELIST (see Example 3-8 on page 52).
4. We specify the Linux systems that must be loaded by snIPL.
The snIPL configuration also defines another z/VM LPAR, with IP 9.12.4.189. This is because we need to have snIPL access to Linux guests running in this z/VM LPAR as well. And we go through the OPERATOR guest ID to do so as well.
5. Now that snIPL is installed and configured, make a connection test (Example 4-40) and validate communication between snIPL and the z/VM host.
Example 4-40 Using snipl to list the z/VM images
# snipl -V 9.12.4.4 -x
available images for server 9.12.4.4 and userid OPERATOR :
lnxsu2 lnxrh2 lnxsu1 lnxrh1
#
The hostname command: For 4, in the image definitions, you must specify what the hostname command returns on your Linux systems. The image definition is case sensitive. That is, if the hostname command returns lnxsu1, you must enter lnxsu1 in lowercase.
Chapter 4. Linux-HA release 2 installation and initial configuration 95

4.4 Initial configuration of Linux-HA release 2
The initial configuration is in regards to a generic setup and works on both Red Hat and SUSE. The initial configuration entails the following steps:
1. Copy the configuration files and adjust their permissions.
Copy the configuration files that come with the package, and set up the correct permission as in Example 4-41.
Example 4-41 Copying the Linux-HA initial configuration files
# cp -pi /usr/share/doc/packages/heartbeat/*.cf /etc/ha.d# cp -pi /usr/share/doc/packages/heartbeat/authkeys /etc/ha.d# chmod 0600 /etc/ha.d/authkeys#
Pay attention to the chmod command. If you do not use the correct permissions on those files, Heartbeat is unable to start.
2. Set the basic configuration.
After the files are in place, make a basic configuration to start Heartbeat. The first file to change is the /etc/ha.d/ha.cf file. Example 4-42 shows the information that you must add to the /etc/ha.d/ha.cf file.
Example 4-42 /etc/ha.d/ha.cf
autojoin othernode lnxsu3 lnxsu4bcast hsi0crm on
Setting the autojoin variable to other facilitates adding a new node to the cluster. It allows nodes outside the cluster, which are not listed in the ha.cf file, to join automatically.
In Example 4-43 on page 97, we configure the authentication keys by using the /etc/ha.d/authkeys file, which holds the cryptographic key that is used among the nodes to communicate with each other.
Broadcast device: The broadcast device used in our scenario is hsi0. This device is attached to HiperSockets and is used for internal communication.
96 Achieving High Availability on Linux for System z with Linux-HA Release 2

Example 4-43 Setting the shared key for the cluster nodes
auth 11 sha1 ha2redbook
We set the key to ha2redbook. Consider the key as a passphrase that each node uses to authenticate itself and join the cluster. You can use anything you want in that field, but you must ensure that the same passphrase is being used in all nodes of the same cluster.
3. Copy the main configuration files to the other nodes.
After making the settings in the configuration files, propagate those files among the cluster nodes. Copy the set of files to each node. We copy the files from lnxsu3 to lnxsu4, as shown in Example 4-44.
Example 4-44 Copying files from lnxsu3 to lnxsu4
lnxsu3:~ # cd /etc/ha.dlnxsu3:/etc/ha.d # scp -p ha.cf lnxsu4:/etc/ha.d/ha.cf 100% 10KB 10.3KB/s 00:00 lnxsu3:/etc/ha.d # scp -p authkeys lnxsu4:/etc/ha.d/authkeys 100% 670 0.7KB/s 00:00 lnxsu3:/etc/ha.d #
4. Start the heartbeat startup daemons.
Start the heartbeat service on all member nodes of the cluster. Example 4-45 shows the start command for lnxsu3.
Example 4-45 Starting heartbeat in the first node
lnxsu3:~ # service heartbeat startStarting High-Availability servicesheartbeat[4250]: 2008/10/24_15:39:22 info: Version 2 support: onheartbeat[4250]: 2008/10/24_15:39:22 WARN: Core dumps could be lost if multiple dumps occur.heartbeat[4250]: 2008/10/24_15:39:22 WARN: Consider setting non-default value in /proc/sys/kernel/core_pattern (or equivalent) for maximum supportabilityheartbeat[4250]: 2008/10/24_15:39:22 WARN: Consider setting /proc/sys/kernel/core_uses_pid (or equivalent) to 1 for maximum supportabilityheartbeat[4250]: 2008/10/24_15:39:22 WARN: Logging daemon is disabled --enabling logging daemon is recommendedheartbeat[4250]: 2008/10/24_15:39:22 info: **************************
Chapter 4. Linux-HA release 2 installation and initial configuration 97
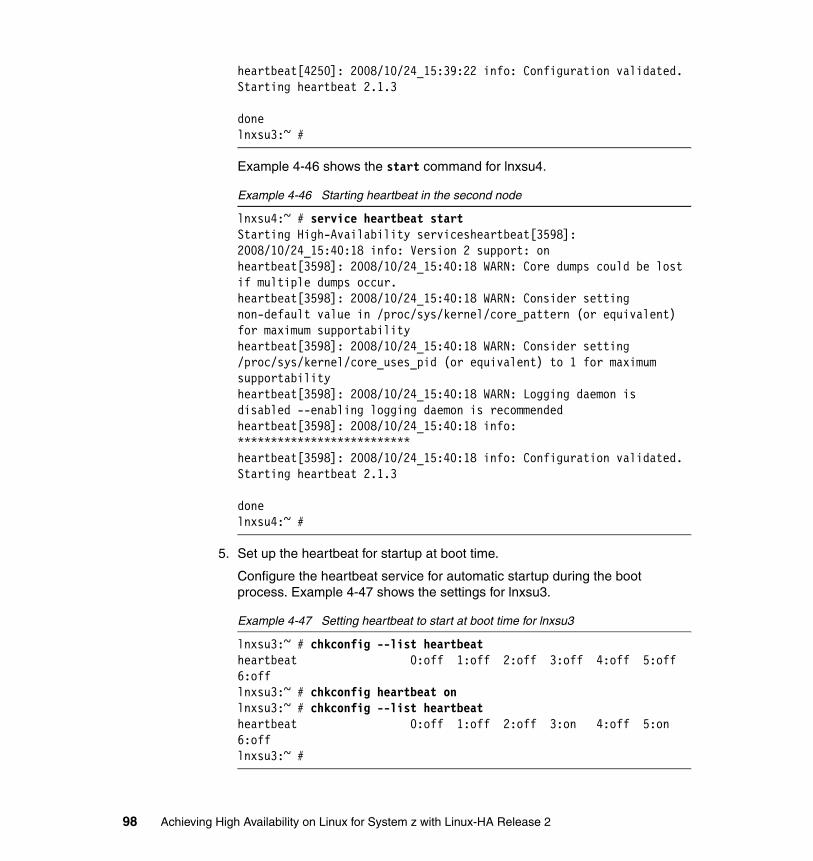
heartbeat[4250]: 2008/10/24_15:39:22 info: Configuration validated. Starting heartbeat 2.1.3 donelnxsu3:~ #
Example 4-46 shows the start command for lnxsu4.
Example 4-46 Starting heartbeat in the second node
lnxsu4:~ # service heartbeat startStarting High-Availability servicesheartbeat[3598]: 2008/10/24_15:40:18 info: Version 2 support: onheartbeat[3598]: 2008/10/24_15:40:18 WARN: Core dumps could be lost if multiple dumps occur.heartbeat[3598]: 2008/10/24_15:40:18 WARN: Consider setting non-default value in /proc/sys/kernel/core_pattern (or equivalent) for maximum supportabilityheartbeat[3598]: 2008/10/24_15:40:18 WARN: Consider setting /proc/sys/kernel/core_uses_pid (or equivalent) to 1 for maximum supportabilityheartbeat[3598]: 2008/10/24_15:40:18 WARN: Logging daemon is disabled --enabling logging daemon is recommendedheartbeat[3598]: 2008/10/24_15:40:18 info: **************************heartbeat[3598]: 2008/10/24_15:40:18 info: Configuration validated. Starting heartbeat 2.1.3 donelnxsu4:~ #
5. Set up the heartbeat for startup at boot time.
Configure the heartbeat service for automatic startup during the boot process. Example 4-47 shows the settings for lnxsu3.
Example 4-47 Setting heartbeat to start at boot time for lnxsu3
lnxsu3:~ # chkconfig --list heartbeatheartbeat 0:off 1:off 2:off 3:off 4:off 5:off 6:offlnxsu3:~ # chkconfig heartbeat onlnxsu3:~ # chkconfig --list heartbeatheartbeat 0:off 1:off 2:off 3:on 4:off 5:on 6:offlnxsu3:~ #
98 Achieving High Availability on Linux for System z with Linux-HA Release 2

Example 4-48 shows the settings for lnxsu4.
Example 4-48 Setting heartbeat to start at boot time for lnxsu4
lnxsu4:/ # chkconfig --list heartbeatheartbeat 0:off 1:off 2:off 3:off 4:off 5:off 6:offlnxsu4:/ # chkconfig heartbeat onlnxsu4:/ # chkconfig --list heartbeatheartbeat 0:off 1:off 2:off 3:on 4:off 5:on 6:offlnxsu4:/ #
6. Set the password.
To use the GUI for the Heartbeat configuration, set up a password for the haclient user. Example 4-49 shows how to set up the password for lnxsu3.
Example 4-49 Setting the hacluster account password on lnxsu3
lnxsu3:~ # passwd haclusterChanging password for hacluster.New Password:Bad password: it is based on a dictionary wordReenter New Password:Password changed.lnxsu3:~ #
Example 4-50 shows how to set up the password for lnxsu4.
Example 4-50 Setting the hacluster account password on lnxsu4
lnxsu4:~ # passwd haclusterChanging password for hacluster.New Password: Bad password: it is based on a dictionary wordReenter New Password: Password changed.lnxsu4:~ #
At this point, almost everything is in place to open the Linux-HA release 2 GUI and manage your cluster. You must use the Linux-HA release 2 GUI in a client running an X Server or VNC. For assistance in making VNC available, see “Starting the GUI” on page 68.
Chapter 4. Linux-HA release 2 installation and initial configuration 99

Use the hb_gui command to open the Linux-HA release 2. After starting the hb_gui command, click the Connection menu and then the Login option. In the Login window (Figure 4-18), which prompts you for the password of the hacluster user, type the password that you created.
Figure 4-18 Initial configuration
After you enter the correct password, the next window shows the nodes that are configured in the /etc/ha.d/ha.cf file and all available fields for the configuration and management.
7. Configure Heartbeat to avoid auto-failback.
The best practice on the most common high availability scenarios is to avoid auto-failback. It makes sense because in most of cases, users prefer to understand the root cause of the failover before allowing a failback.
To avoid auto-failback for all resource groups belonging to this cluster, select the cluster and click the Configurations tab in the right pane. Change Default Resource Stickness from 0 to a higher value or set it to INFINITY, meaning the highest value possible for that field (Figure 4-19 on page 101). Click the Apply button for the new configuration to take effect.
100 Achieving High Availability on Linux for System z with Linux-HA Release 2

Figure 4-19 Turning off auto-failback
4.5 Two-node active/passive scenario
In this section, we show a scenario that has two nodes and one resource group. The objective is to show how the service IP floats between the nodes.
We show how to create a resource by using the GUI. We use the hb_gui command to open the Heartbeat GUI management. You can use any node that is part of your cluster. You are required to perform the initial configuration as explained in 4.4, “Initial configuration of Linux-HA release 2” on page 96.
Chapter 4. Linux-HA release 2 installation and initial configuration 101
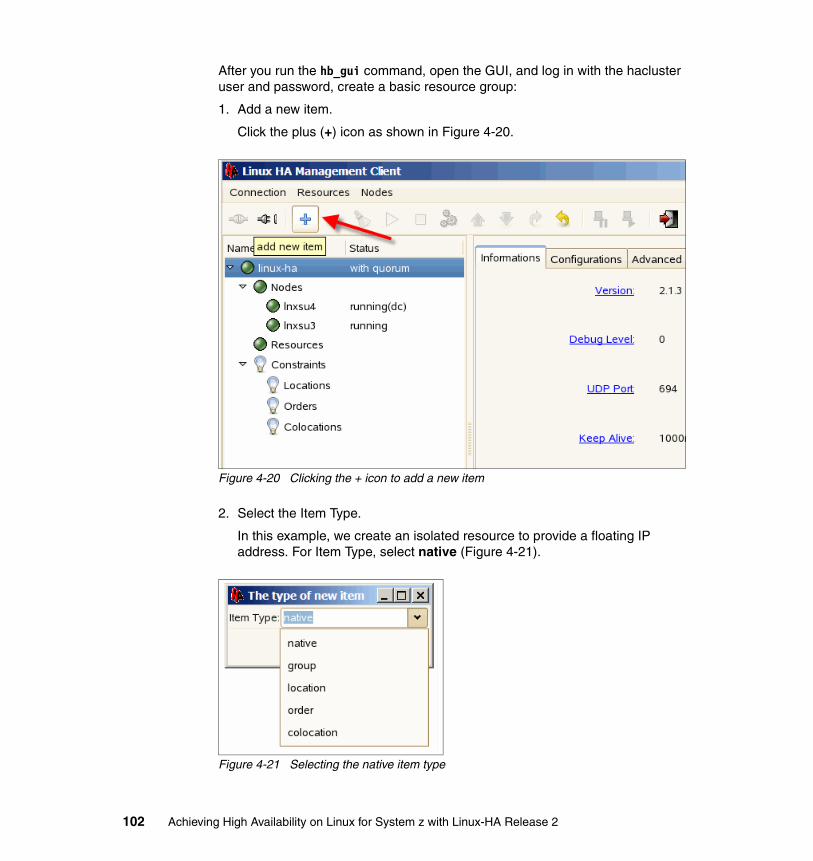
After you run the hb_gui command, open the GUI, and log in with the hacluster user and password, create a basic resource group:
1. Add a new item.
Click the plus (+) icon as shown in Figure 4-20.
Figure 4-20 Clicking the + icon to add a new item
2. Select the Item Type.
In this example, we create an isolated resource to provide a floating IP address. For Item Type, select native (Figure 4-21).
Figure 4-21 Selecting the native item type
102 Achieving High Availability on Linux for System z with Linux-HA Release 2
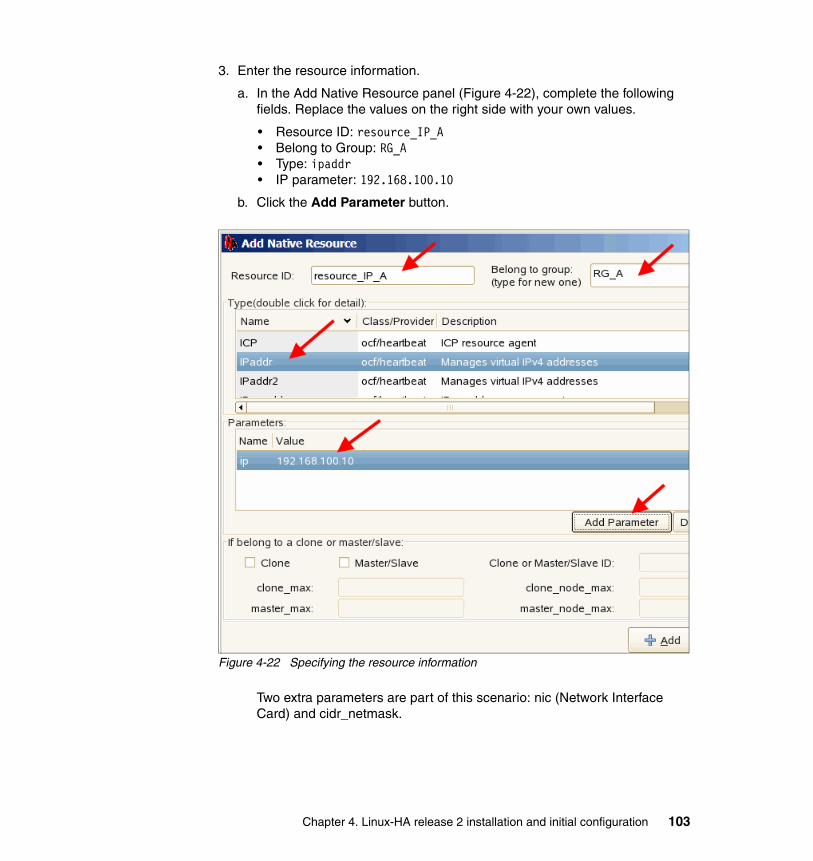
3. Enter the resource information.
a. In the Add Native Resource panel (Figure 4-22), complete the following fields. Replace the values on the right side with your own values.
• Resource ID: resource_IP_A• Belong to Group: RG_A• Type: ipaddr• IP parameter: 192.168.100.10
b. Click the Add Parameter button.
Figure 4-22 Specifying the resource information
Two extra parameters are part of this scenario: nic (Network Interface Card) and cidr_netmask.
Chapter 4. Linux-HA release 2 installation and initial configuration 103

c. In the Add Parameter window (Figure 4-23), window, for the Name field, select nic and for the Value field, select eth0.
The value eth0 in this scenario is the device that is connected to the Open Systems Adapter (OSA). In this case, it is the interface that is used for our production network.
Click OK. In the Add Native Resource window, you now see the nic information.
Figure 4-23 Specifying the nic parameter information in the Add Parameter window
104 Achieving High Availability on Linux for System z with Linux-HA Release 2
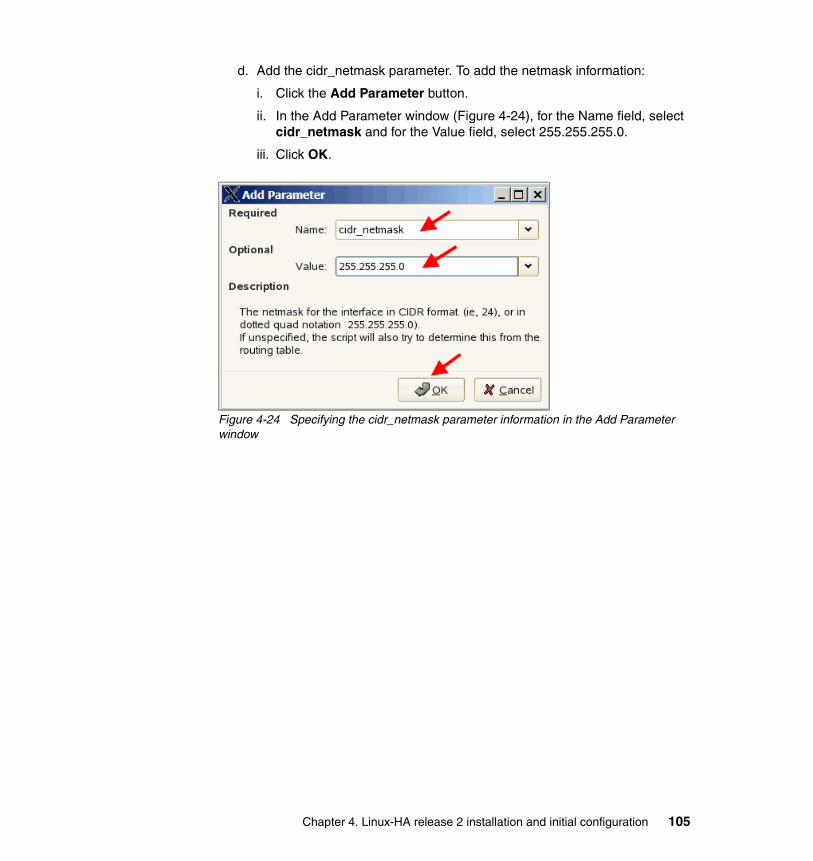
d. Add the cidr_netmask parameter. To add the netmask information:
i. Click the Add Parameter button.
ii. In the Add Parameter window (Figure 4-24), for the Name field, select cidr_netmask and for the Value field, select 255.255.255.0.
iii. Click OK.
Figure 4-24 Specifying the cidr_netmask parameter information in the Add Parameter window
Chapter 4. Linux-HA release 2 installation and initial configuration 105

e. In the Add Native Resource window (Figure 4-25), verify that all necessary information is complete prior to adding the resource in the cluster. Click Add button to see the new resource under the main Heartbeat panel.
Note that while the resource is already listed, it is still not activated.
Figure 4-25 Verifying the parameter information in the Add Native Resource window
106 Achieving High Availability on Linux for System z with Linux-HA Release 2

4. Start the resource group.
a. To start the resource group, in the Linux HA Management Client window (Figure 4-26), select RG_A and click the start resource button (triangle icon at the top of the window).
Figure 4-26 Starting the resource group
After starting the resource group, the IP address 192.168.100.10 is bound to the interface eth0 on node lnxsu4 (the active node).
b. Validate the IP address by entering the ifconfig command as shown in Example 4-51.
Example 4-51 IP validation
lnxsu4:/ # ifconfig eth0:0eth0:0 Link encap:Ethernet HWaddr 02:00:00:00:00:02 inet addr:192.168.100.10 Bcast:192.168.100.10 Mask:255.255.255.0 UP BROADCAST RUNNING MULTICAST MTU:1492 Metric:1
lnxsu4:/ #
Chapter 4. Linux-HA release 2 installation and initial configuration 107

The cluster is now configured and running. The next step for a simple validation test is to simulate a problem in the node that the resource group is running (for example, lnxsu4).
c. To simulate a problem, stop the heartbeat service as shown in Example 4-52.
Example 4-52 IP move
lnxsu4:/ # service heartbeat stopStopping High-Availability services donelogd[27066]: 2008/10/30_16:26:24 debug: Stopping ha_logd with pid 26829logd[27066]: 2008/10/30_16:26:24 info: Waiting for pid=26829 to exitlogd[27066]: 2008/10/30_16:26:25 info: Pid 26829 exitedlnxsu4:/ # ifconfig eth0:0eth0:0 Link encap:Ethernet HWaddr 02:00:00:00:00:02 UP BROADCAST RUNNING MULTICAST MTU:1492 Metric:1
lnxsu4:/ #
d. Verify that the IP address under the resource group will move from lnxsu4 to lnxsu3. Example 4-53 shows that the IP address is running in lnxsu3.
Example 4-53 IP address resource running on lnxsu3
lnxsu3:~ # ifconfig eth0:0eth0:0 Link encap:Ethernet HWaddr 02:00:00:00:00:04 inet addr:192.168.100.10 Bcast:192.168.100.10 Mask:255.255.255.0 UP BROADCAST RUNNING MULTICAST MTU:1492 Metric:1
lnxsu3:~ #
108 Achieving High Availability on Linux for System z with Linux-HA Release 2

Figure 4-27 shows our cluster situation just after the failover.
Figure 4-27 Cluster after failover
4.6 Two-node active/active scenario
The two nodes active/active scenario shows how to add one more resource group that runs in a similar configuration as applied in 4.5, “Two-node active/passive scenario” on page 101.
Example 4-54 shows a command to verify which resources are configured in the cluster.
Example 4-54 Verifying the Heartbeat resources
lnxsu3:~ # crm_resource --listResource Group: RG_A resource_IP_A (ocf::heartbeat:IPaddr)lnxsu3:~ #
Chapter 4. Linux-HA release 2 installation and initial configuration 109

At this point, you can open the GUI and make the new resource group configuration. For instructions on how to open the GUI, see “Starting the GUI” on page 68.
1. Create a new resource.
a. In the Linux HA Management Client window (Figure 4-28), click the + icon at the top of the window.
b. In The type of new item pop-up window, which prompts for the item type, click the OK button since the default option is good for this case.
Figure 4-28 Creating a new resource
110 Achieving High Availability on Linux for System z with Linux-HA Release 2

c. In the Add Native Resource window (Figure 4-29):
i. Complete the fields in the same way as in 4.5, “Two-node active/passive scenario” on page 101. However, here use a different resource name, resource ID, and IP address.
ii. Click Add Parameter to set up the resource to use the eth0 interface. In our scenario, it is connected to the OSA.
iii. Click the Add button to add the native resource.
Figure 4-29 Adding a native resource
Chapter 4. Linux-HA release 2 installation and initial configuration 111

2. List the resource.
At this point our cluster has two resource groups named RG_A and RG_B. To list the resources, use the crm_resource command (Example 4-55). You can enter this command in any node that belongs to the cluster. For this scenario, we use lnxsu3 or lnxsu4.
Example 4-55 Resource list
lnxsu3:~ # crm_resource --listResource Group: RG_A resource_IP_A (ocf::heartbeat:IPaddr)Resource Group: RG_B resource_IP_B (ocf::heartbeat:IPaddr)lnxsu3:~ #
3. Set up the resource constraints.
Configure the constraints to specify in which node each resource group should start when we do not put any specification in the command line. In this scenario, we add two constraints, one per resource group.
112 Achieving High Availability on Linux for System z with Linux-HA Release 2

a. In the Linux HA Management Console window (Figure 4-30), to add the first constraint, select Constraints, and click the + icon at the top of the window. In The Type of New Item pop-up window, for Item Type, select location, and click the OK button.
Figure 4-30 Adding the first constraint
b. In the Add Location Constraint window (Figure 4-31), which prompts you for the ID and the resource name, enter the resource ID location_RG_A and click OK.
Figure 4-31 Specifying the ID and resource of the constraint
Chapter 4. Linux-HA release 2 installation and initial configuration 113

c. The location constraint is now created, but you must still set up the necessary configuration:
i. In the left pane of the main window (Figure 4-32), under Locations, select location_RG_A.
Figure 4-32 Selecting location_RG_A
114 Achieving High Availability on Linux for System z with Linux-HA Release 2

ii. In the right pane (Figure 4-33), for Score, select 500, and for Resource, select RG_A. Click Add Expression.
In the Add Expression window, set the following values and click OK:
• Attribute: #uname• Operation: eq• Value: lnxsu3
iii. Click Apply.
Figure 4-33 Adding an expression
At this point, the cluster knows that the resources under RG_A are part of both participant nodes, but the startup policy uses lnxsu3 as a home node.
d. Make a new location constraint for RG_B, similar to how we did for RG_A.
For RG_B, we used a constraint ID called location_RG_B, and the name value in the attributes was lnxsu4. All other configurations were the same as the location that we previously created.
Chapter 4. Linux-HA release 2 installation and initial configuration 115
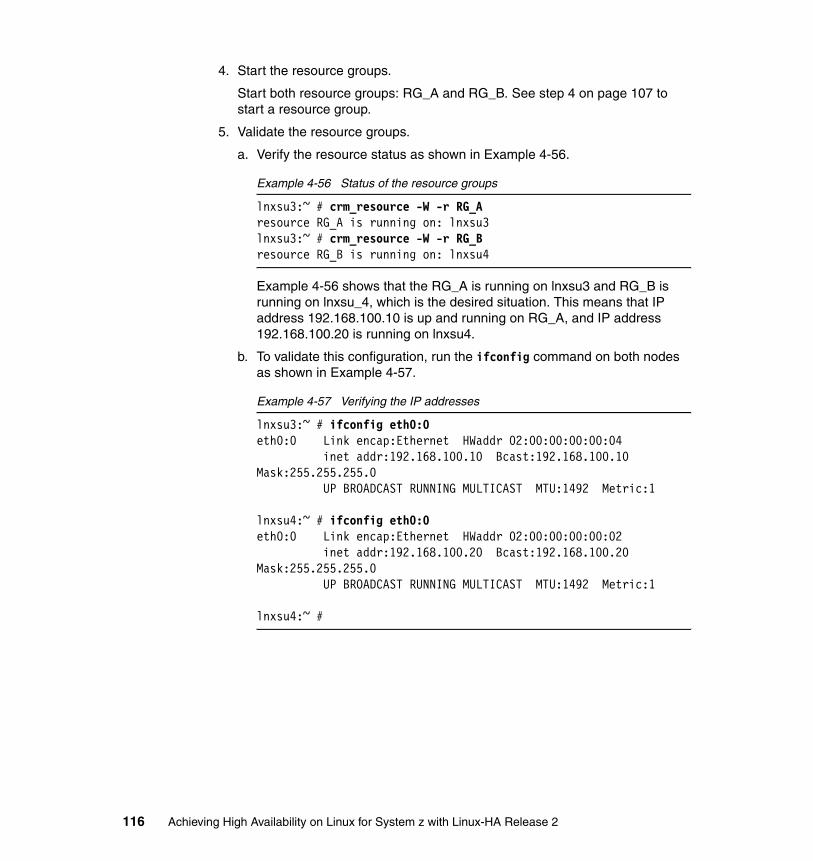
4. Start the resource groups.
Start both resource groups: RG_A and RG_B. See step 4 on page 107 to start a resource group.
5. Validate the resource groups.
a. Verify the resource status as shown in Example 4-56.
Example 4-56 Status of the resource groups
lnxsu3:~ # crm_resource -W -r RG_Aresource RG_A is running on: lnxsu3lnxsu3:~ # crm_resource -W -r RG_Bresource RG_B is running on: lnxsu4
Example 4-56 shows that the RG_A is running on lnxsu3 and RG_B is running on lnxsu_4, which is the desired situation. This means that IP address 192.168.100.10 is up and running on RG_A, and IP address 192.168.100.20 is running on lnxsu4.
b. To validate this configuration, run the ifconfig command on both nodes as shown in Example 4-57.
Example 4-57 Verifying the IP addresses
lnxsu3:~ # ifconfig eth0:0eth0:0 Link encap:Ethernet HWaddr 02:00:00:00:00:04 inet addr:192.168.100.10 Bcast:192.168.100.10 Mask:255.255.255.0 UP BROADCAST RUNNING MULTICAST MTU:1492 Metric:1
lnxsu4:~ # ifconfig eth0:0eth0:0 Link encap:Ethernet HWaddr 02:00:00:00:00:02 inet addr:192.168.100.20 Bcast:192.168.100.20 Mask:255.255.255.0 UP BROADCAST RUNNING MULTICAST MTU:1492 Metric:1
lnxsu4:~ #
116 Achieving High Availability on Linux for System z with Linux-HA Release 2

4.7 Three-node quorum scenario
In this scenario, the Linux-HA release 2 environment has one more node to avoid a split-brain condition. A split-brain condition results when each node believes that the other node is down and then proceeds to take over the resource groups as though the other node no longer owns any resources.
When a node is declared “dead,” by definition its status is unknown, meaning that perhaps it is down or perhaps it is incommunicado. Only the fact that its status is unknown is known.
In most cases, a good way to avoid a split-brain condition, without having to resort on fencing mechanisms, is to configure redundant and independent cluster communications paths. This way, loss of a single interface or path does not break communication between the nodes, and the communications should not have a single point of failure.
Another good practice to solve this situation is to have one more node on the cluster. This node represents one more quorum vote in the cluster.
4.7.1 Adding a new node in an existing cluster
The information about how to setup the two nodes is covered in 2.6, “Active/active configuration with Heartbeat” on page 38. We assume that you already have an active/active cluster up and running with two nodes.
To add one more node to your cluster environment:
1. Add the node name in the ha.cf file.
Edit the existing ha.cf file in one of nodes and insert the new node information. The node name in the ha.cf files must always match the Linux host name.
To verify the correct Linux host name, enter the uname -n command. Example 4-58 shows the new /etc/ha.d/ha.cf file.
Example 4-58 Three nodes file configuration - Option 1
lnxsu3:/ # cat /etc/ha.d/ha.cfautojoin othernode lnxsu3 lnxsu4 lnxrh1bcast hsi0crm onlnxsu3:/ #
Chapter 4. Linux-HA release 2 installation and initial configuration 117

There are two options for the node name information in the ha.cf file. We can put the node names in the same line as we did in Example 4-58 on page 117, or we can set up the node names in different lines as in Example 4-59.
Example 4-59 Three nodes file configuration - Option 2
lnxsu3:/ # cat /etc/ha.d/ha.cfautojoin othernode lnxsu3node lnxsu4node lnxrh1bcast hsi0crm onlnxsu3:/ #
2. Copy the files to the other cluster members.
After doing the proper configuration in one node, replicate the file to the other node members of the cluster. In this case, the new file is configured in lnxsu3. We send it to lnxsu4, which is already part of the cluster, and to the new node named lnxrh1, as shown in Example 4-60.
For the existing node, lnxsu4, send the new ha.cf file. For the new node, send the ha.cf and authkeys files.
Example 4-60 Replicating configuration files among the nodes
lnxsu3:/etc/ha.d # scp -p ha.cf lnxsu4:/etc/ha.d/ha.cf 100% 10KB 10.4KB/s 00:00
lnxsu3:/etc/ha.d # scp -p ha.cf lnxrh1:/etc/ha.d/100% 10KB 10.4KB/s 00:00
lnxsu3:/etc/ha.d # scp -p authkeys lnxrh1:/etc/ha.d/authkeys 100% 670 0.7KB/s 00:00
lnxsu3:/etc/ha.d # scp -p authkeys lnxsu4:/etc/ha.d/authkeys 100% 670 0.7KB/s 00:00 lnxsu3:/etc/ha.d #
118 Achieving High Availability on Linux for System z with Linux-HA Release 2

3. Start the heartbeat service in the third new node.
Example 4-61 shows how to start the service in the new node.
Example 4-61 Starting heartbeat service
[root@lnxrh1 etc]# service heartbeat startStarting High-Availability services: [ OK ][root@lnxrh1 etc]#
At this point, the new node is part of cluster, but no service is associated to it.
4. List the cluster nodes.
Since the last step completed successfully, we can see the three nodes in the GUI (Figure 4-34).
Figure 4-34 Linux-HA three nodes
We can also have the same information by entering the crmadmin command as shown in Example 4-62.
Example 4-62 Listing nodes by using the CLI
lnxsu3:/ # crmadmin --nodesnormal node: lnxsu4 (c94f84f8-4803-4c53-8709-f561e497e2a1)normal node: lnxsu3 (e6f0cc65-7443-4344-a44c-cd936fa101f4)normal node: lnxrh1 (a8f47d63-ac40-49f4-9226-9d3f49aaec6f)lnxsu3:/ #
Chapter 4. Linux-HA release 2 installation and initial configuration 119
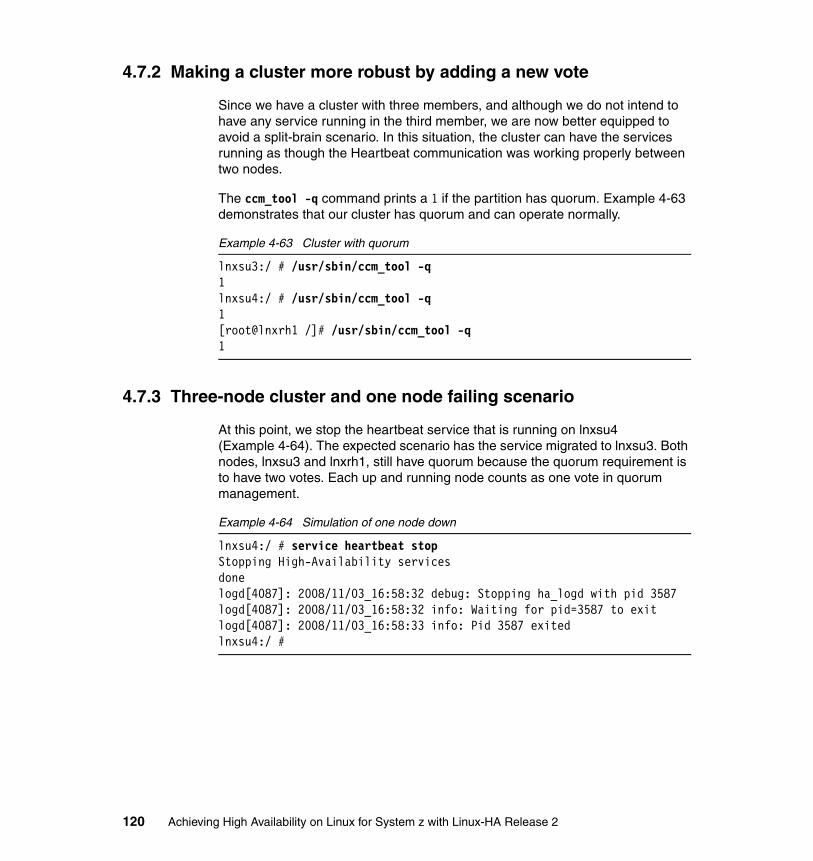
4.7.2 Making a cluster more robust by adding a new vote
Since we have a cluster with three members, and although we do not intend to have any service running in the third member, we are now better equipped to avoid a split-brain scenario. In this situation, the cluster can have the services running as though the Heartbeat communication was working properly between two nodes.
The ccm_tool -q command prints a 1 if the partition has quorum. Example 4-63 demonstrates that our cluster has quorum and can operate normally.
Example 4-63 Cluster with quorum
lnxsu3:/ # /usr/sbin/ccm_tool -q1lnxsu4:/ # /usr/sbin/ccm_tool -q1[root@lnxrh1 /]# /usr/sbin/ccm_tool -q1
4.7.3 Three-node cluster and one node failing scenario
At this point, we stop the heartbeat service that is running on lnxsu4 (Example 4-64). The expected scenario has the service migrated to lnxsu3. Both nodes, lnxsu3 and lnxrh1, still have quorum because the quorum requirement is to have two votes. Each up and running node counts as one vote in quorum management.
Example 4-64 Simulation of one node down
lnxsu4:/ # service heartbeat stopStopping High-Availability services donelogd[4087]: 2008/11/03_16:58:32 debug: Stopping ha_logd with pid 3587logd[4087]: 2008/11/03_16:58:32 info: Waiting for pid=3587 to exitlogd[4087]: 2008/11/03_16:58:33 info: Pid 3587 exitedlnxsu4:/ #
120 Achieving High Availability on Linux for System z with Linux-HA Release 2
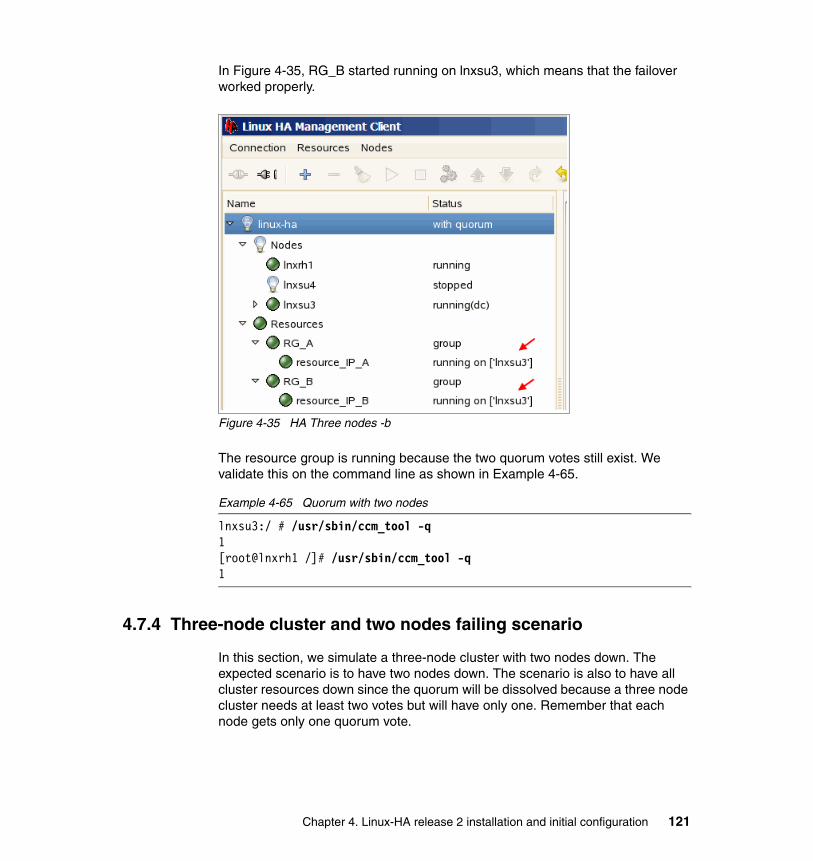
In Figure 4-35, RG_B started running on lnxsu3, which means that the failover worked properly.
Figure 4-35 HA Three nodes -b
The resource group is running because the two quorum votes still exist. We validate this on the command line as shown in Example 4-65.
Example 4-65 Quorum with two nodes
lnxsu3:/ # /usr/sbin/ccm_tool -q1[root@lnxrh1 /]# /usr/sbin/ccm_tool -q1
4.7.4 Three-node cluster and two nodes failing scenario
In this section, we simulate a three-node cluster with two nodes down. The expected scenario is to have two nodes down. The scenario is also to have all cluster resources down since the quorum will be dissolved because a three node cluster needs at least two votes but will have only one. Remember that each node gets only one quorum vote.
Chapter 4. Linux-HA release 2 installation and initial configuration 121
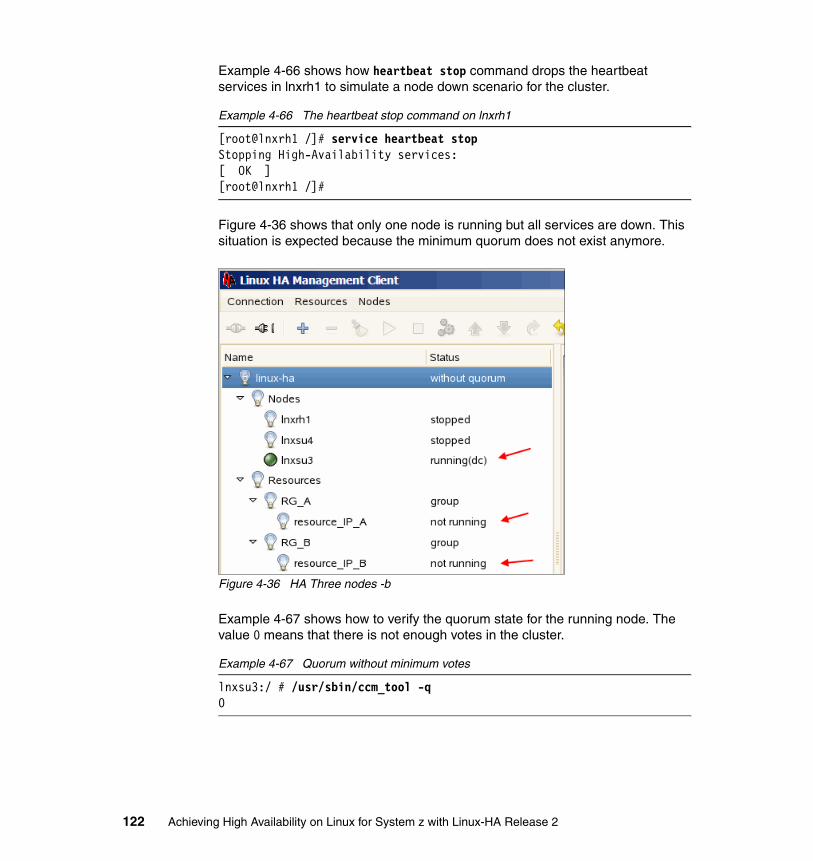
Example 4-66 shows how heartbeat stop command drops the heartbeat services in lnxrh1 to simulate a node down scenario for the cluster.
Example 4-66 The heartbeat stop command on lnxrh1
[root@lnxrh1 /]# service heartbeat stopStopping High-Availability services:[ OK ][root@lnxrh1 /]#
Figure 4-36 shows that only one node is running but all services are down. This situation is expected because the minimum quorum does not exist anymore.
Figure 4-36 HA Three nodes -b
Example 4-67 shows how to verify the quorum state for the running node. The value 0 means that there is not enough votes in the cluster.
Example 4-67 Quorum without minimum votes
lnxsu3:/ # /usr/sbin/ccm_tool -q0
122 Achieving High Availability on Linux for System z with Linux-HA Release 2

4.7.5 STONITH in action
In this section, we show how stonithd fences a node, imposing rules and broadcasting orders for its “snipers,” demanding them to “shoot a node in the head” in the event of bad behavior.
Adding a STONITH resource group to the clusterWe begin with the three-node cluster scenario that we deployed in 4.7.2, “Making a cluster more robust by adding a new vote” on page 120. Configure this cluster to use STONITH:
1. Using the GUI, select your cluster and click the Configurations tab.
2. On the Configurations tab (Figure 4-37), select the Stonith Enabled check box. For Stonith Action, select poweroff. Then click Apply.
Figure 4-37 Enabling stonithd
Chapter 4. Linux-HA release 2 installation and initial configuration 123
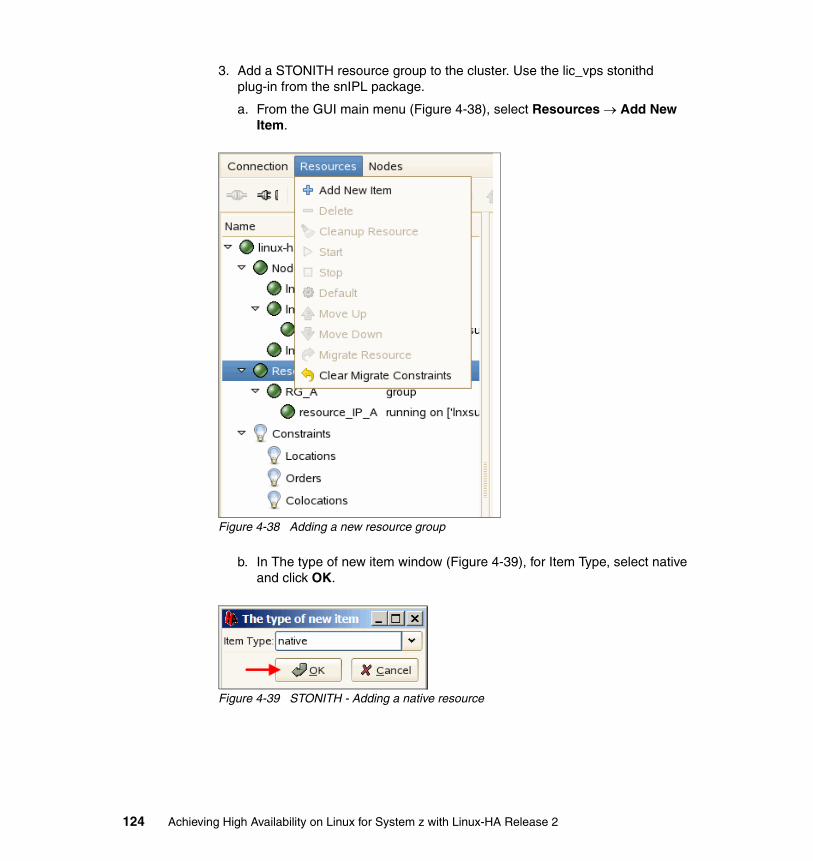
3. Add a STONITH resource group to the cluster. Use the lic_vps stonithd plug-in from the snIPL package.
a. From the GUI main menu (Figure 4-38), select Resources → Add New Item.
Figure 4-38 Adding a new resource group
b. In The type of new item window (Figure 4-39), for Item Type, select native and click OK.
Figure 4-39 STONITH - Adding a native resource
124 Achieving High Availability on Linux for System z with Linux-HA Release 2
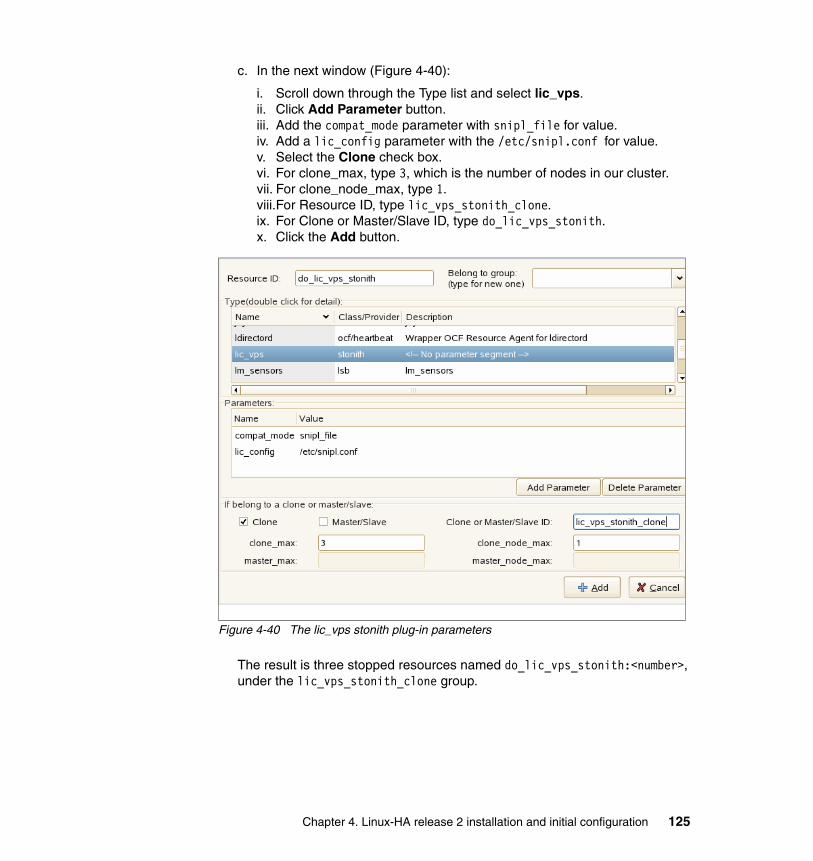
c. In the next window (Figure 4-40):
i. Scroll down through the Type list and select lic_vps. ii. Click Add Parameter button. iii. Add the compat_mode parameter with snipl_file for value. iv. Add a lic_config parameter with the /etc/snipl.conf for value. v. Select the Clone check box. vi. For clone_max, type 3, which is the number of nodes in our cluster.vii. For clone_node_max, type 1.viii.For Resource ID, type lic_vps_stonith_clone. ix. For Clone or Master/Slave ID, type do_lic_vps_stonith. x. Click the Add button.
Figure 4-40 The lic_vps stonith plug-in parameters
The result is three stopped resources named do_lic_vps_stonith:<number>, under the lic_vps_stonith_clone group.
Chapter 4. Linux-HA release 2 installation and initial configuration 125

4. Select any of the stopped resources and click the Start button. As shown in Figure 4-41, all three instances change to a running status, and there should be one for each node.
Figure 4-41 Three do_lic_vps_stonith instances running
Fencing a node that loses a Heartbeat connectionSince the cluster is now running with stonithd enabled and configured, we simulate a failure to see what happens. For this, we choose one node and bring down the heartbeat interfaces. The expected behavior is a shutdown of the “lost” node by using the lic_vps called by stonithd.
Figure 4-41 shows all the three nodes up and running. We bring down the heartbeat interface on node lnxsu3, as shown in Example 4-68.
Example 4-68 Bringing down the heartbeat interface on node lnxsu3
lnxsu3:~ # ip link list1: lo: <LOOPBACK,UP> mtu 16436 qdisc noqueue link/loopback 00:00:00:00:00:00 brd 00:00:00:00:00:002: sit0: <NOARP> mtu 1480 qdisc noop
126 Achieving High Availability on Linux for System z with Linux-HA Release 2
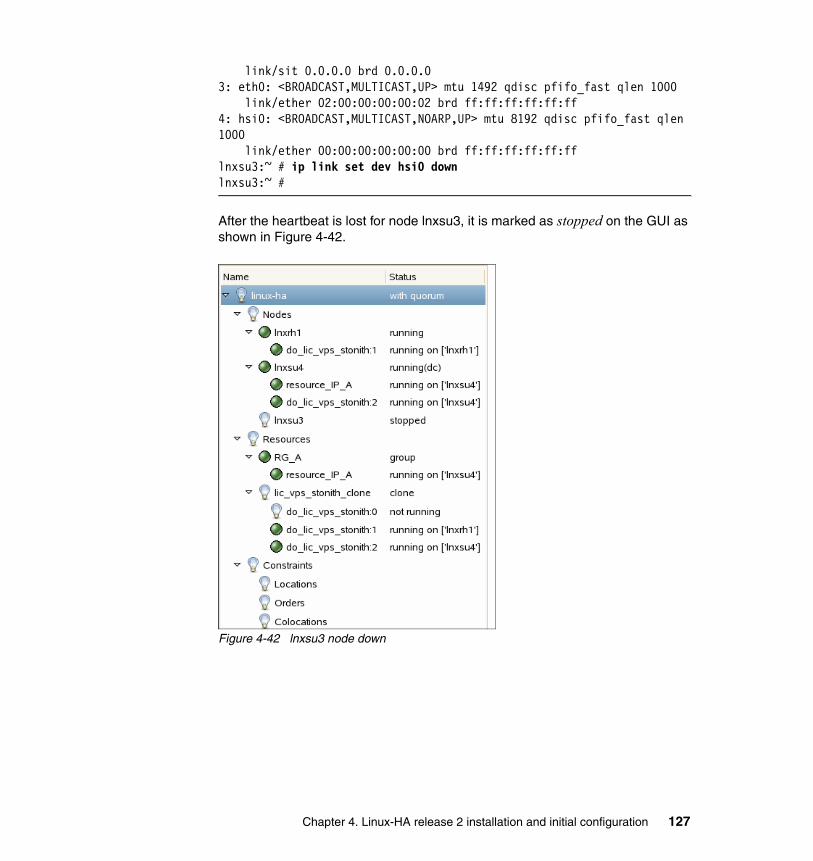
link/sit 0.0.0.0 brd 0.0.0.03: eth0: <BROADCAST,MULTICAST,UP> mtu 1492 qdisc pfifo_fast qlen 1000 link/ether 02:00:00:00:00:02 brd ff:ff:ff:ff:ff:ff4: hsi0: <BROADCAST,MULTICAST,NOARP,UP> mtu 8192 qdisc pfifo_fast qlen 1000 link/ether 00:00:00:00:00:00 brd ff:ff:ff:ff:ff:fflnxsu3:~ # ip link set dev hsi0 downlnxsu3:~ #
After the heartbeat is lost for node lnxsu3, it is marked as stopped on the GUI as shown in Figure 4-42.
Figure 4-42 lnxsu3 node down
Chapter 4. Linux-HA release 2 installation and initial configuration 127

In Example 4-69, a logging message on node lnxsu4 indicates that the lnxsu3 node was powered off by the lnxrh1 node as an action of the stonithd daemon.
Example 4-69 The stonithd action succeeded
lnxsu4:~ # grep Succeeded /var/log/messagesNov 11 09:40:59 lnxsu4 stonithd: [1852]: info: Succeeded to STONITH the node lnxsu3: optype=POWEROFF. whodoit: lnxrh1lnxsu4:~ #
An external stonithd plug-in using sniplHeartbeat uses a framework that makes it possible to implement plug-ins for a variety of functions. One of the plug-ins is for external stonithd mechanisms. In our environment, we implemented an external plug-in by using a shell script that calls the snipl command from the snIPL package. This script is simple and straightforward. It implements only the few functions that are necessary for stonithd to manage it. Example 4-70 shows its contents.
Example 4-70 /usr/lib64/stonith/plugins/external/snipl
#!/bin/shLANG=CPATH=/bin:/usr/bin:/sbin:/usr/sbin:/usr/local/bin:/usr/local/sbinexport LANG PATH
case $1 in gethosts) exit 0 ;; on) snipl -a "$2" 2>/dev/null 1>/dev/null exit 0 ;; off) snipl -d "$2" 2>/dev/null 1>/dev/null exit 0 ;; reset) snipl -r "$2" 2>/dev/null 1>/dev/null exit 0 ;; status) exit 0 ;; getconfignames)
128 Achieving High Availability on Linux for System z with Linux-HA Release 2

exit 0 ;; getinfo-devid) echo "snipl STONITH device" exit 0 ;; getinfo-devname) echo "snipl STONITH external device" exit 0 ;; getinfo-devdescr) echo "snipl z/VM guest reset" exit 0 ;; getinfo-devurl) echo "http://www.ibm.com" exit 0 ;; getinfo-xml) echo "<parameters></parameter>" exit 0 ;; *) exit 1 ;;esac
You can use any programming language you prefer. We chose a simple shell script for the sake of simplicity to show you what is possible.
Chapter 4. Linux-HA release 2 installation and initial configuration 129

130 Achieving High Availability on Linux for System z with Linux-HA Release 2
Chapter 5. Linux-HA usage scenarios
In this chapter, we explore five Linux-HA usage scenarios. We describe the architecture, implementation procedure, cluster configuration, and quality assurance for the following scenarios:
� Highly available Apache Web server using Heartbeat
� Clustered file system using Open Cluster File System 2 (OCFS2) and Heartbeat
� Highly available shared file system using Network File System (NFS), OCFS2, and Heartbeat
� Highly available data using data replication with Distributed Replicated Block Device (DRBD) and Heartbeat
� Highly available IBM DB2 Linux, UNIX, and Windows® using Logical Volume Manager (LVM) and Heartbeat
5
© Copyright IBM Corp. 2009. All rights reserved. 131
5.1 Highly available Apache Web server
With the ever-growing Internet, applications that provide content for the World Wide Web have played an increasing role and become an integral part of our society. One of the applications in this arena is the Apache Web server. In this chapter, we attempt to implement Linux-HA configurations for a simple Web service on Red Hat Enterprise Linux 5.2.
5.1.1 Architecture
For this implementation, we examined the following configurations:
� Active/passive two-node cluster� Active/active two-node cluster
To simplify the scenario, the Web service only provided static content, which entailed precreated documents that did not change with the users’ Web access. In all cases, the Web documents were replicated ahead of time across all nodes.
For the active/passive two-node cluster, one native IP address resource and a Web application resource were defined. In the event that the IP connection was lost or the Web application system became unavailable, both resources were transitioned to a working node (see Figure 2-4 on page 36).
In the case of our active/active cluster, each system was defined with its own active Web server resource and IP address resource (see Figure 2-6 on page 39). In the event of an IP connection loss or system loss, the resources on the broken system were transitioned to the working node and then experienced an auto-failback when the original system became available.
The basic setup consisted of two Red Hat Enterprise Linux 5.2 guests (lnxrh2 and lnxrh3), each on a separate z/VM system. The z/VM images ran on logical partitions (LPARs) on the same machine and shared the OSA devices that were used by the corresponding virtual switches (VSWITCHes).
132 Achieving High Availability on Linux for System z with Linux-HA Release 2

5.1.2 Implementing the architecture
Red Hat Enterprise Linux 5.2 ships with a version of the Apache httpd server. To begin the implementation:
1. Verify that the httpd package is already installed on the system (Example 5-1).
Example 5-1 Checking for the httpd package
[root@lnxrh3 ~]# rpm -q httpdhttpd-2.2.3-11.el5_1.3[root@lnxrh3 ~]#
If the software is not yet installed, access and install the package by using your installation media or download the package from an appropriate source and apply using the rpm command (Example 5-2).
Example 5-2 Installing the httpd package manually with the rpm command
[root@lnxrh1 ~]# rpm -Uvh httpd-2.2.3-11.el5_1.3.s390x.rpmwarning: httpd-2.2.3-11.el5_1.3.s390x.rpm: Header V3 DSA signature: NOKEY, key ID 37017186Preparing... ########################################### [100%] 1:httpd ########################################### [100%][root@lnxrh1 ~]#
It is assumed that the Linux-HA release 2 packages (heartbeat, heartbeat-stonith, heartbeat-pils, and dependencies) were already installed, and that the Simple Network IPL (snIPL) associated binaries were also compiled from source and installed.
2. For the Heartbeat link, set up a HiperSockets interface (hsi0) for each of the target nodes. If multiple heartbeat packages are desired on HiperSockets, make sure that each Heartbeat link is on a separate channel path. Otherwise the two links lose their independence from each other and a disruption of the channel path will affect both heartbeat packages.
3. For the service interface (eth0), set up one virtual network interface card (NIC) coupled to a VSWITCH with access to the 9.12.5.xxx subnet. We used this also as our primary interface to access and administer the system.
For testing purposes our configuration used a 192.168.70.xxx, which acted as a service IP. This is attached automatically by Linux-HA as an IP alias to eth0.
For further details about the software installation steps and network configuration, see Chapter 4, “Linux-HA release 2 installation and initial configuration” on page 57.
Chapter 5. Linux-HA usage scenarios 133

After the network infrastructure is in place and all the required software is installed, proceed with the Linux-HA configuration.
Apache active/passive configurationCreate the authkeys and ha.cf files in the /etc/ha.d directory. Alternatively, you can copy the samples from the /usr/share/doc/packages/heartbeat/ directory and modify them as necessary.
There are many configuration options for the ha.cf file and the hb_gui. You can find more information about the various options in the crm.dtd file that comes with your installed version of Heartbeat and that you can download at the following address:
http://www.linux-ha.org/ha.cf
If you want to view an online copy of the crm.dtd file, the latest version is available at the following Web address:
http://hg.clusterlabs.org/pacemaker/dev/file/tip/xml/crm-1.0.dtd
This Web site provides details about the parameters that work with CRM clusters and the setup to used in place of old settings.
For the Apache server, we based the ha.cf configuration on the setup in 4.5, “Two-node active/passive scenario” on page 101, with the following differences:
� We used full host names with the node entry to match the uname -n output on our prebuilt Red Hat Enterprise Linux 5.2 systems.
� We used unicast addresses for the heartbeat package (one entry per system in the cluster).
� We added ping nodes.
� We included a pingd directive.
In Heartbeat version 2, pingd replaced ipfail as the means by which IP connectivity is monitored. The ping nodes and pingd work in conjunction with a constraint rule to determine when and where resources should be moved when a possible IP connection loss occurs.
Tip: The ha.cf sample file that is provided with the heartbeat-2.1.4-2.1 package contains commented text with descriptions of the various accepted parameters, making for a quick guide to that information. Be aware that “auto_failback on” and “logfacility local0” are uncommented by default and are easy to miss because of all the commented text.
134 Achieving High Availability on Linux for System z with Linux-HA Release 2
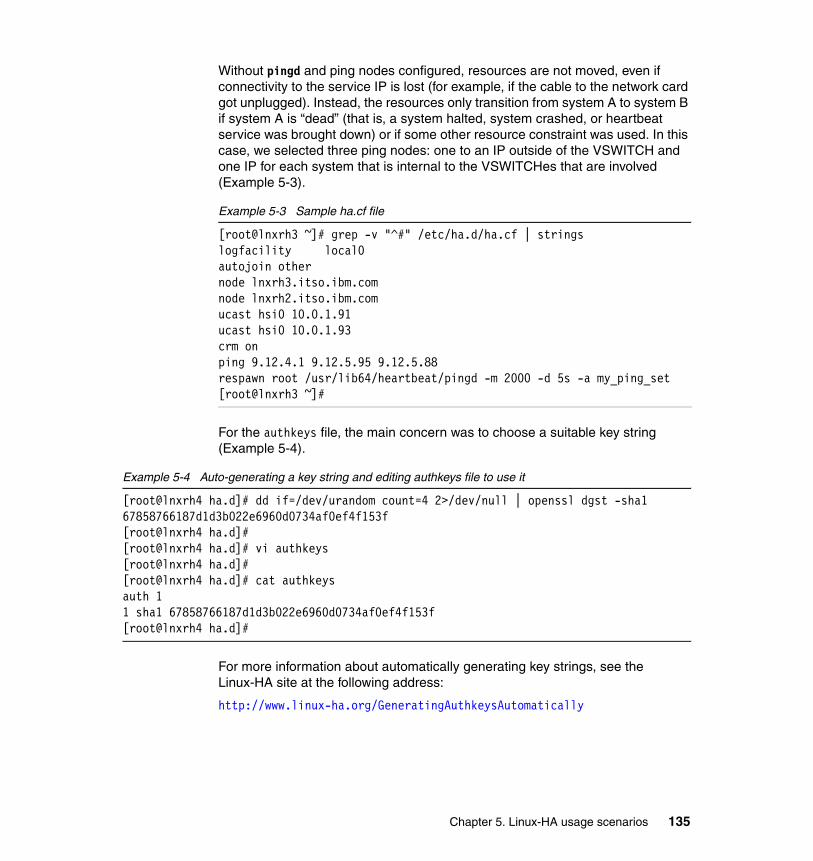
Without pingd and ping nodes configured, resources are not moved, even if connectivity to the service IP is lost (for example, if the cable to the network card got unplugged). Instead, the resources only transition from system A to system B if system A is “dead” (that is, a system halted, system crashed, or heartbeat service was brought down) or if some other resource constraint was used. In this case, we selected three ping nodes: one to an IP outside of the VSWITCH and one IP for each system that is internal to the VSWITCHes that are involved (Example 5-3).
Example 5-3 Sample ha.cf file
[root@lnxrh3 ~]# grep -v "^#" /etc/ha.d/ha.cf | stringslogfacility local0autojoin othernode lnxrh3.itso.ibm.comnode lnxrh2.itso.ibm.comucast hsi0 10.0.1.91ucast hsi0 10.0.1.93crm onping 9.12.4.1 9.12.5.95 9.12.5.88respawn root /usr/lib64/heartbeat/pingd -m 2000 -d 5s -a my_ping_set[root@lnxrh3 ~]#
For the authkeys file, the main concern was to choose a suitable key string (Example 5-4).
Example 5-4 Auto-generating a key string and editing authkeys file to use it
[root@lnxrh4 ha.d]# dd if=/dev/urandom count=4 2>/dev/null | openssl dgst -sha167858766187d1d3b022e6960d0734af0ef4f153f[root@lnxrh4 ha.d]#[root@lnxrh4 ha.d]# vi authkeys[root@lnxrh4 ha.d]#[root@lnxrh4 ha.d]# cat authkeysauth 11 sha1 67858766187d1d3b022e6960d0734af0ef4f153f[root@lnxrh4 ha.d]#
For more information about automatically generating key strings, see the Linux-HA site at the following address:
http://www.linux-ha.org/GeneratingAuthkeysAutomatically
Chapter 5. Linux-HA usage scenarios 135

In this configuration, we used the following steps:
1. Make sure that the authkeys file has permission 600. Otherwise, the Heartbeat service does not start correctly (Example 5-5).
Example 5-5 Setting the authkeys file with the needed permissions
[root@lnxrh4 ha.d]# chmod 600 authkeys[root@lnxrh4 ha.d]# ls -l authkeys-rw------- 1 root root 700 Nov 11 17:31 authkeys[root@lnxrh4 ha.d]#
2. Copy the authkeys and ha.cf files to all the other systems in the cluster.
3. Set the password (Example 5-6) for the hacluster user ID.
Example 5-6 Setting the hacluster password
[root@lnxrh3 ~]# passwd haclusterChanging password for user hacluster.New UNIX password:
Retype new UNIX password:
passwd: all authentication tokens updated successfully.[root@lnxrh3 ~]#
4. Start the heartbeat service on all the nodes. Verify that the heartbeat service is up and running and configure the service to come up on boot (Example 5-7).
Example 5-7 Starting heartbeat, verifying status, and configuring it to start on boot up
[root@lnxrh3 ~]# service heartbeat startStarting High-Availability services:[ OK ][root@lnxrh3 ~]#[root@lnxrh3 ~]# service heartbeat statusheartbeat OK [pid 1857 et al] is running on lnxrh3.itso.ibm.com [lnxrh3.itso.ibm.com]...[root@lnxrh3 ~]#[root@lnxrh3 ~]# chkconfig --list heartbeatservice heartbeat supports chkconfig, but is not referenced in any runlevel (run 'chkconfig --add heartbeat')
136 Achieving High Availability on Linux for System z with Linux-HA Release 2

[root@lnxrh3 ~]# chkconfig --add heartbeat[root@lnxrh3 ~]# chkconfig --list heartbeatheartbeat 0:off 1:off 2:on 3:on 4:on 5:on 6:off[root@lnxrh3 ~]#
5. With Heartbeat started on all nodes, open hb_gui and define the resources for the cluster:
a. To open hb_gui, connect to a node by using VNC or another session with the ability to display X Window System applications. Type hb_gui from the X Window System-enabled terminal and log in by using the hacluster id and password.
b. Click the Configurations tab. Set Default Resource Stickiness to a number, such as 777, and click Apply to enable the changes.
By modifying the Default Resource Stickiness parameter, you configure a relative preference that resources stay running on the system where they are already running. This weight is factored in when Heartbeat does a calculation to determine which node is best for running a particular resource.1
Because we only have two systems for this scenario and do not set any other weights, the stickiness value in this case has minimal effect. We prefer that a resource remain on the node on which it is already running. Therefore, we want a positive value for the resource stickiness. However, we want a value less than INFINITY since our pingd setup uses score adjustment to determine whether a resource should be moved.
Infinity +/- any value equals infinity. If we have set a value of INFINITY, the resource moves only in the case of a Heartbeat failure. That is, the node running the resource leaves the active cluster.
1 For more information about calculating scores, see http://www.linux-ha.org/ScoreCalculation
Resource stickiness: With Linux-HA release 2 type clusters, the auto_failback parameter is ignored. Instead use the Default Resource Stickiness attribute. Certain configuration settings for the resource stickiness mimic the previous auto_failback properties, but not exactly. For more information, consult the crm.dtd file that comes with your Heartbeat software.
Chapter 5. Linux-HA usage scenarios 137
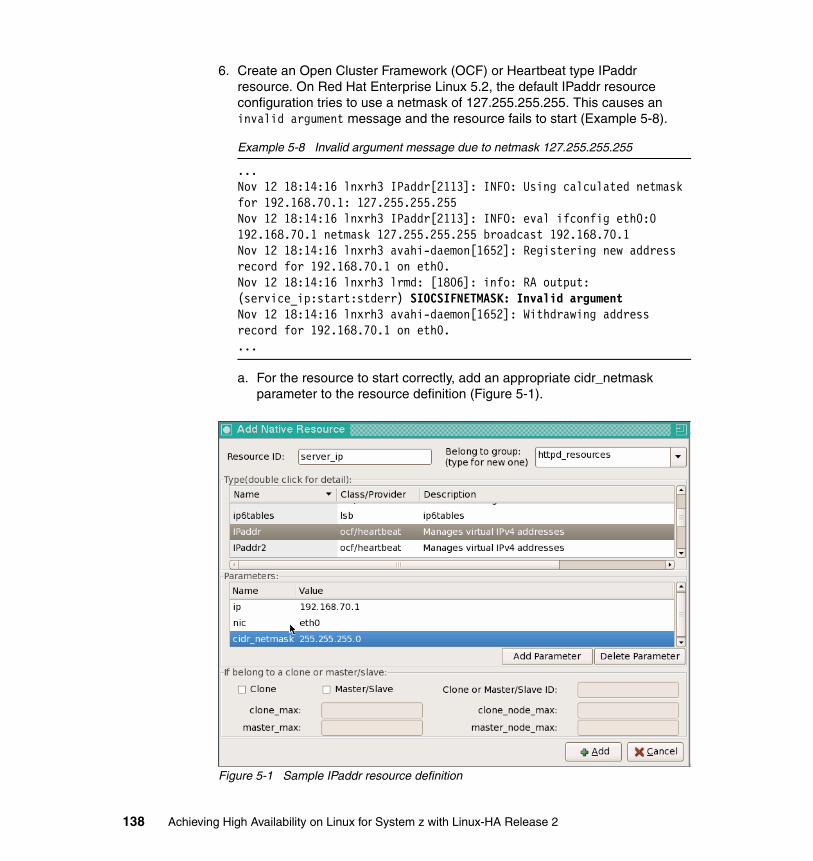
6. Create an Open Cluster Framework (OCF) or Heartbeat type IPaddr resource. On Red Hat Enterprise Linux 5.2, the default IPaddr resource configuration tries to use a netmask of 127.255.255.255. This causes an invalid argument message and the resource fails to start (Example 5-8).
Example 5-8 Invalid argument message due to netmask 127.255.255.255
...Nov 12 18:14:16 lnxrh3 IPaddr[2113]: INFO: Using calculated netmask for 192.168.70.1: 127.255.255.255Nov 12 18:14:16 lnxrh3 IPaddr[2113]: INFO: eval ifconfig eth0:0 192.168.70.1 netmask 127.255.255.255 broadcast 192.168.70.1Nov 12 18:14:16 lnxrh3 avahi-daemon[1652]: Registering new address record for 192.168.70.1 on eth0.Nov 12 18:14:16 lnxrh3 lrmd: [1806]: info: RA output: (service_ip:start:stderr) SIOCSIFNETMASK: Invalid argumentNov 12 18:14:16 lnxrh3 avahi-daemon[1652]: Withdrawing address record for 192.168.70.1 on eth0....
a. For the resource to start correctly, add an appropriate cidr_netmask parameter to the resource definition (Figure 5-1).
Figure 5-1 Sample IPaddr resource definition
138 Achieving High Availability on Linux for System z with Linux-HA Release 2

b. After you add the IPaddr resource, add a Web server resource. In this case, we used a simple Linux Standard Base (LSB) type httpd resource agent to start and stop the default init script that was installed by the httpd package (Figure 5-2).
For the Belong to group field, specify the same group name that was used for the IPaddr resource.
Figure 5-2 Sample HTTPD resource definition
Chapter 5. Linux-HA usage scenarios 139

Figure 5-3 shows how the hb_gui display looks after making these changes.
Figure 5-3 Working active/passive Apache setup
7. Configure a constraint to work with pingd to allow resources to be moved in case of a connectivity issue. The Linux-HA project site includes various examples that you can adopt for use in your environment.2 In this case, we wanted a constraint based on the number of reachable ping nodes (Example 5-9).
Example 5-9 Constraint used for pingd
[root@lnxrh3 ~]# cat pingd-constraint.xml<rsc_location id="pingd-constraint" rsc="httpd_resources"> <rule id="pingd-constraint-rule" score_attribute="my_ping_set" > <expression id="pingd-defined" attribute="my_ping_set" operation="defined"/> </rule></rsc_location>[root@lnxrh3 ~]# cibadmin -C -o constraints -x pingd-constraint.xml
2 See http://www.linux-ha.org/v2/faq/pingd
140 Achieving High Availability on Linux for System z with Linux-HA Release 2

As with most Linux-HA release 2 examples found online, the constraint is given in the form of a cib.xml snippet. With the hb_gui tool, you cannot always recreate such entries exactly. Depending on the release involved, the tool might not query for certain parameters. Alternatively, it might query for values that are not needed, but change the way the constraint works. Therefore, the easiest way to use the examples found online is to place them in a file, modify them as needed, and then use the cibadmin command line interface (CLI) to apply the changes (Example 5-9 on page 140).
With all resources running and the pingd constraint in place, the setup is ready for use. Figure 5-4 shows the configuration at this point.
Figure 5-4 Apache active/passive configuration with pingd constraint
Apache active/active configurationIn an active/active setup, we try to make more efficient use of machines by having multiple servers running resources so that a machine is just sitting idle. This setup is only used in case of a failure. Such a setup can help reduce startup time in case of failover as with a configuration that uses multiple instances of a service and IP spraying to different instances. This setup can also be used to maximize the use of existing servers by having two nodes up and providing
Chapter 5. Linux-HA usage scenarios 141

different needed services by default and moving resources to one node or another as backup for the duration of a failure.
In our configuration, we had the two nodes each serve a separate httpd resource, providing different content. When a system went down, the resources were moved to the second system (doubling the load on the second system but allowing both services to continue functioning).
We used the following steps:
1. Go to the /etc/httpd/conf/ directory and copy httpd.conf file to the apache1.conf and apache2.conf files.
2. Modify the configuration files to each handle a different DocumentRoot and IP as well as a different Pid file (Example 5-10). Copy the /var/www/html/ directory to an html1 and html2 directory to handle the corresponding services. This setup was executed on both nodes (because both nodes had to be able to handle both resources if needed).
Example 5-10 Changes needed for the Apache server instances
[root@lnxrh2 conf]# egrep -i "^DocumentRoot|^Listen|^Pid" apache1.confPidFile run/httpd_01.pidListen 192.168.70.201:80DocumentRoot "/var/www/html1"[root@lnxrh2 conf]# egrep -i "^DocumentRoot|^Listen|^Pid" apache2.confPidFile run/httpd_02.pidListen 192.168.70.202:80DocumentRoot "/var/www/html2"[root@lnxrh2 conf]#
3. Define two native IP resources (Figure 5-1 on page 138).
4. Define two Apache resources and place them in the same resource group as the IP resources to create two different resource groups that consist of an IP resource and an Apache resource each.
An Apache OCF resource agent must be used in this case for each httpd service that is provided (Figure 5-5 on page 143). This is in place of the LSB resource agent we used previously in the active/passive scenario. Calling the default httpd init script does not work in the case of two Apache instances.
142 Achieving High Availability on Linux for System z with Linux-HA Release 2

Figure 5-5 Configuring an Apache OCF resource on hb_gui
5. Give each resource group a constraint with a high stickiness weight to give it a preference for the node where the resource should run by default (Example 5-11).
Example 5-11 Constraint for the preferred node for apache_group_1
<rsc_location id="run_apache_group_1" rsc="apache_group_1"> <rule id="pref_run_apache_group_1" score="3500"> <expression attribute="#uname" operation="eq" value="lnxrh3.itso.ibm.com"/> </rule></rsc_location>
We used a couple of constraints based on the example on the Linux-HA Web site at the following address:
http://www.linux-ha.org/GettingStartedV2/TwoApaches
6. Apply the constraints by using the cibadmin command as in the following example:
cibadmin -C -o constraints -x preferred-node-constraint.xml
Chapter 5. Linux-HA usage scenarios 143
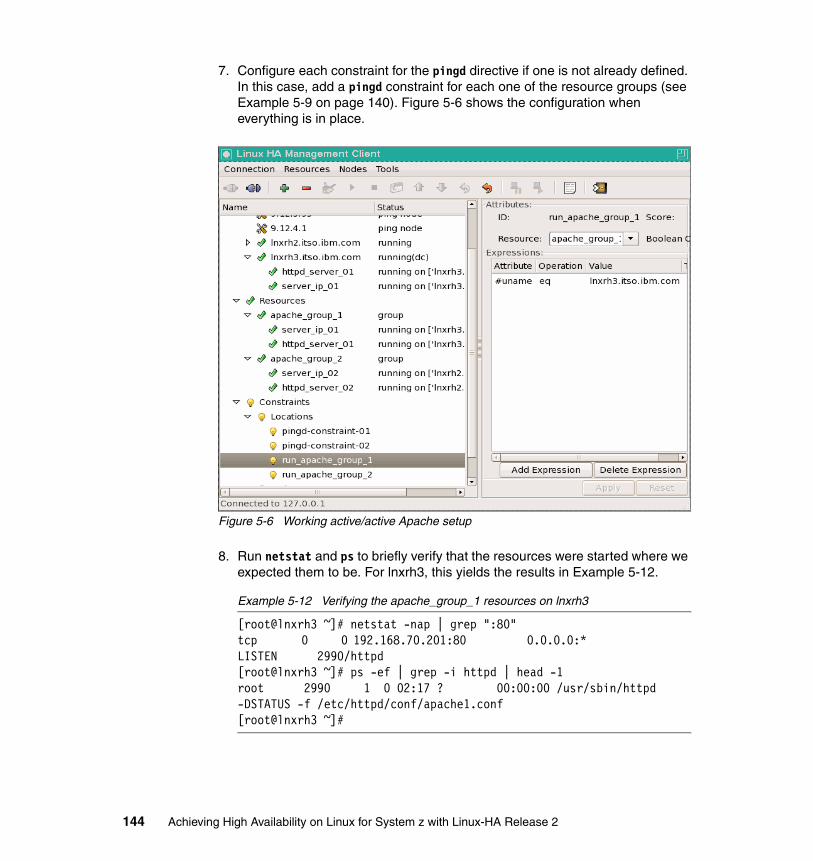
7. Configure each constraint for the pingd directive if one is not already defined. In this case, add a pingd constraint for each one of the resource groups (see Example 5-9 on page 140). Figure 5-6 shows the configuration when everything is in place.
Figure 5-6 Working active/active Apache setup
8. Run netstat and ps to briefly verify that the resources were started where we expected them to be. For lnxrh3, this yields the results in Example 5-12.
Example 5-12 Verifying the apache_group_1 resources on lnxrh3
[root@lnxrh3 ~]# netstat -nap | grep ":80"tcp 0 0 192.168.70.201:80 0.0.0.0:* LISTEN 2990/httpd[root@lnxrh3 ~]# ps -ef | grep -i httpd | head -1root 2990 1 0 02:17 ? 00:00:00 /usr/sbin/httpd -DSTATUS -f /etc/httpd/conf/apache1.conf[root@lnxrh3 ~]#
144 Achieving High Availability on Linux for System z with Linux-HA Release 2

Example 5-13 shows the results for lnxrh2.
Example 5-13 Verifying the apache_group_2 resources on lnxrh2
[root@lnxrh2 ~]# netstat -nap | grep ":80"tcp 0 0 192.168.70.202:80 0.0.0.0:* LISTEN 7437/httpd[root@lnxrh2 ~]# ps -ef | grep -i httpd | head -1root 7437 1 0 02:17 ? 00:00:00 /usr/sbin/httpd -DSTATUS -f /etc/httpd/conf/apache2.conf[root@lnxrh2 ~]#
A quick check from lnxrh4 shows that we can get the target contents from the two servers (Example 5-14).
Example 5-14 Verify server connectivity with download by using wget
[root@lnxrh4 ~]# wget http://192.168.70.201/--03:03:11-- http://192.168.70.201/Connecting to 192.168.70.201:80... connected.HTTP request sent, awaiting response... 200 OKLength: 227 [text/html]Saving to: `index.html'
100%[=======================================>] 227 --.-K/s in 0s
03:03:11 (19.7 MB/s) - `index.html' saved [227/227]
[root@lnxrh4 ~]# wget http://192.168.70.202/--03:05:43-- http://192.168.70.202/Connecting to 192.168.70.202:80... connected.HTTP request sent, awaiting response... 200 OKLength: 245 [text/html]Saving to: `index.html.1'
100%[=======================================>] 245 --.-K/s in 0s
03:05:43 (77.9 MB/s) - `index.html.1' saved [245/245]
[root@lnxrh4 ~]#
Chapter 5. Linux-HA usage scenarios 145

5.1.3 Testing the implementation
The following two methods simulate failures:
� Simulate a network failure by uncoupling the service interface from the VSWITCH:
#cp uncouple c200
� Simulate a system crash by forcing the Linux system down:
#cp i cms
To verify the results, a simple check from a Web browser using systems outside the cluster (in this case, lnxrh4 and lnxrh1) showed whether the example target site (URL httpd://192.168.70.1/) was still accessible after a failure was induced.
System crash in active/passive modeTo simulate a system crash in active/passive mode, we logged into the z/VM console for the guest that was running the resources and entered the #cp i cms command.
This command resulted in a hard stop for the running operating system and triggered Heartbeat to move the resources. Figure 5-7 on page 147 shows how a simulated system crash verified the basic Heartbeat configuration. When the system running the target resource left the cluster (in this case by going down), the resources were moved to the best location among the remaining nodes in the cluster.
146 Achieving High Availability on Linux for System z with Linux-HA Release 2

Figure 5-7 Result after entering the #cp i cms command from the LNXRH2 guest 3270 console
A quick check by using the wget command showed that the target was still reachable. The content of each target listed the server name (Welcome, this is <server_name> !!!) to make it easier for us to verify that the target matched the expected system as shown by our Linux-HA configuration (Example 5-15).
Example 5-15 Using wget to verify server connectivity
[root@lnxrh4 ~]# wget http://192.168.70.1/--21:57:36-- http://192.168.70.1/Connecting to 192.168.70.1:80... connected.HTTP request sent, awaiting response... 200 OKLength: 225 [text/html]Saving to: `index.html'
100%[=======================================>] 225 --.-K/s in 0s
21:57:36 (71.5 MB/s) - `index.html' saved [225/225][root@lnxrh4 ~]#
Chapter 5. Linux-HA usage scenarios 147

[root@lnxrh4 ~]# grep -i lnxrh index.html<h1>Welcome, this is LNXRH3 !!!</h1>[root@lnxrh4 ~]#
Network connectivity loss in active/passive modeAfter verifying that the resources moved in the case of a system crash, we checked that the pingd setup was working. We brought the system back to a state where both systems are in working order. Then we logged into the z/VM console for the guest with the target resources and disconnected the main interface from the LAN segment by using the uncouple command (Example 5-16).
Example 5-16 Simulating network connection loss with the uncouple command
[root@lnxrh3 ~]# 00: 00: CP 00: q v nic 00: Adapter C200.P00 Type: QDIO Name: UNASSIGNED Devices: 3 00: MAC: 02-00-00-00-00-03 VSWITCH: SYSTEM VSWITCH1 00: 00: cp uncouple c200 00: NIC C200 is disconnected from VSWITCH SYSTEM VSWITCH1 00: b qeth: Link failure on eth0 (CHPID 0x20) - there is a network problem or someonepulled the cable or disabled the port.
In our case, the network loss was detected and caused Heartbeat to adjust node scores based on the pingd constraint. Remember that we used score_attribute="my_ping_set" and removed all other score and value attributes in the constraint. The result was that each node’s score was weighted according to the number of ping nodes that were reachable from that system and the multiplier value (-m flag) given on the pingd directive in the ha.cf file.
To better understand the Heartbeat processing involved, it helped to have an idea of the score calculation performed. For information about score calculation, see the Linux-HA Web site at the following address:
http://www.linux-ha.org/ScoreCalculation
This Web site also provides scripts for checking node score values by parsing the output of the ptest command that comes with the heartbeat package. Unfortunately the output of ptest tends to change from release to release of the Heartbeat software. Therefore, the scripts might not work as is with what you have installed. However, you can usually parse the ptest output manually. With older releases, scores were reviewed by parsing ptest -LVVVVVVV output, and
148 Achieving High Availability on Linux for System z with Linux-HA Release 2

with newer systems, the scores can be seen directly with the ptest -LVs command (see Example 5-17). The scripts often do a better job of formatting the output. Therefore, if possible, modify the scripts to properly display the scores instead.
The main objective of score calculation is to compute the best location to run a resource according to weights introduced by the various factors involved (stickiness values, constraints, and so on). The node with the highest score gets to run the resource. Checking the scores in this fashion before and during failures gives you a better idea of how the different attribute values were used. It also shows some information about other automatic adjustments that Heartbeat was applying (such as constraints to colocate grouped resources that needed to be moved together). Overall, this helps you to determine more accurate values for stickiness settings and constraint values to get Heartbeat to perform in the desired manner.
In our case, before the interface was uncoupled, score calculation showed a status as shown in Example 5-17. The resource ran on the node with the highest overall score for the IPaddr resource (lnxrh3). Also the colocation rules were in effect so that the httpd server resource ran on the same system as the IPaddr resource.
Example 5-17 Score calculation before uncoupling the interface
[root@lnxrh3 ~]# 2>&1 ptest -LVs | sed 's/.*dump_node_scores://' | sed 's/allocation.*on//' | column -tgroup_color: httpd_resources lnxrh2.itso.ibm.com: 0group_color: httpd_resources lnxrh3.itso.ibm.com: 1554group_color: server_ip lnxrh2.itso.ibm.com: 6000group_color: server_ip lnxrh3.itso.ibm.com: 7554group_color: httpd_server lnxrh2.itso.ibm.com: 0group_color: httpd_server lnxrh3.itso.ibm.com: 1554native_color: server_ip lnxrh2.itso.ibm.com: 6000native_color: server_ip lnxrh3.itso.ibm.com: 9108native_color: httpd_server lnxrh2.itso.ibm.com: -1000000native_color: httpd_server lnxrh3.itso.ibm.com: 1554[root@lnxrh3 ~]#[root@lnxrh3 ~]# 2>&1 ptest -LVVVVVVV | grep "assign" | sed 's/.*debug://' native_assign_node: Assigning lnxrh3.itso.ibm.com to server_ip native_assign_node: Assigning lnxrh3.itso.ibm.com to httpd_server[root@lnxrh3 ~]#[root@lnxrh3 ~]# 2>&1 ptest -LVVVVVVV | grep "colocation"ptest[30511]: 2008/11/18_00:00:30 debug: debug2: native_color: httpd_server: Pre-Processing group:internal_colocation (server_ip)ptest[30511]: 2008/11/18_00:00:30 debug: debug2: native_rsc_colocation_lh: Processing colocation constraint between httpd_server and server_ip
Chapter 5. Linux-HA usage scenarios 149

ptest[30511]: 2008/11/18_00:00:30 debug: debug2: native_rsc_colocation_rh: Colocating httpd_server with server_ip (group:internal_colocation, weight=1000000)ptest[30511]: 2008/11/18_00:00:30 debug: debug2: colocation_match: group:internal_colocation: httpd_server.lnxrh2.itso.ibm.com = -INFINITY (failed)[root@lnxrh3 ~]#
After the interface was uncoupled, score calculation showed the situation in Example 5-18. The resources were moved so that the score for lnxrh3 lost the bonus from having the default resource stickiness (2 resources x 777 = 1554). In addition, having lost access to the whole 9.12.x.x LAN segment, lnxrh3 lost connection to all three ping nodes. This caused a loss of all 6000 points (2000 x 3 ping nodes) for the server_ip scores. Therefore, the node has zero values across the board except for the one position. This position is the httpd_server native resource where the colocation rules for the resource group forced it to have a value of -INFINITY (-1000000).
Example 5-18 Score calculation after uncoupling the interface
[root@lnxrh3 ~]# 2>&1 ptest -LVs | sed 's/.*dump_node_scores://' | sed 's/allocation.*on//' | column -tgroup_color: httpd_resources lnxrh2.itso.ibm.com: 1554group_color: httpd_resources lnxrh3.itso.ibm.com: 0group_color: server_ip lnxrh2.itso.ibm.com: 7554group_color: server_ip lnxrh3.itso.ibm.com: 0group_color: httpd_server lnxrh2.itso.ibm.com: 1554group_color: httpd_server lnxrh3.itso.ibm.com: 0native_color: server_ip lnxrh2.itso.ibm.com: 9108native_color: server_ip lnxrh3.itso.ibm.com: 0native_color: httpd_server lnxrh2.itso.ibm.com: 1554native_color: httpd_server lnxrh3.itso.ibm.com: -1000000[root@lnxrh3 ~]#[root@lnxrh3 ~]# 2>&1 ptest -LVVVVVVV | grep "assign" | sed 's/.*debug://' native_assign_node: Assigning lnxrh2.itso.ibm.com to server_ip native_assign_node: Assigning lnxrh2.itso.ibm.com to httpd_server[root@lnxrh3 ~]#[root@lnxrh3 ~]# 2>&1 ptest -LVVVVVVV | grep "colocation" ptest[1382]: 2008/11/18_00:14:31 debug: debug2: native_color: httpd_server: Pre-Processing group:internal_colocation (server_ip)ptest[1382]: 2008/11/18_00:14:31 debug: debug2: native_rsc_colocation_lh: Processing colocation constraint between httpd_server and server_ipptest[1382]: 2008/11/18_00:14:31 debug: debug2: native_rsc_colocation_rh: Colocating httpd_server with server_ip (group:internal_colocation, weight=1000000)
150 Achieving High Availability on Linux for System z with Linux-HA Release 2

ptest[1382]: 2008/11/18_00:14:31 debug: debug2: colocation_match: group:internal_colocation: httpd_server.lnxrh3.itso.ibm.com = -INFINITY (failed)[root@lnxrh3 ~]#
As with the system crash simulation, we verified httpd access by using the wget command while the network was uncoupled (Example 5-19).
Example 5-19 Verifying httpd access with wget in the uncoupled network scenario
[root@lnxrh4 ~]# rm index.htmlrm: remove regular file `index.html'? y[root@lnxrh4 ~]#[root@lnxrh4 ~]# wget -nv http://192.168.70.1/00:25:05 URL:http://192.168.70.1/ [225/225] -> "index.html" [1][root@lnxrh4 ~]#[root@lnxrh4 ~]# grep -i lnxrh index.html<h1>Welcome, this is LNXRH2 !!!</h1>[root@lnxrh4 ~]#
System crash in an active/active configurationOur active/active configuration had the following guests and resources:
� The lnxrh3 guest was running with the following resources:
– IP address 192.168.70.201
– httpd server based on the /etc/httpd/conf/apache1.conf file (which served a Web resource called “SG247711 - Linux-HA Redbook”)
� The lnxrh2 guest was running with the following resources:
– IP address 192.168.70.202
– httpd server based on the /etc/httpd/conf/apache2.conf file (which served a Web resource called “Just for fun”)
As with the active/passive configuration, we logged in to the z/VM console for one of the guests and enter the #cp i cms command. Since the active/active configuration had both guests running some resource, picking either guest worked for our purposes. In this case, we randomly chose lnxrh3 as the system to bring down.
The operation brought us to the situation in Figure 5-8 on page 152, where all the resources were running on lnxrh2. By checking the Web service from lnxrh4, we found that both Web documents were still reachable.
Chapter 5. Linux-HA usage scenarios 151
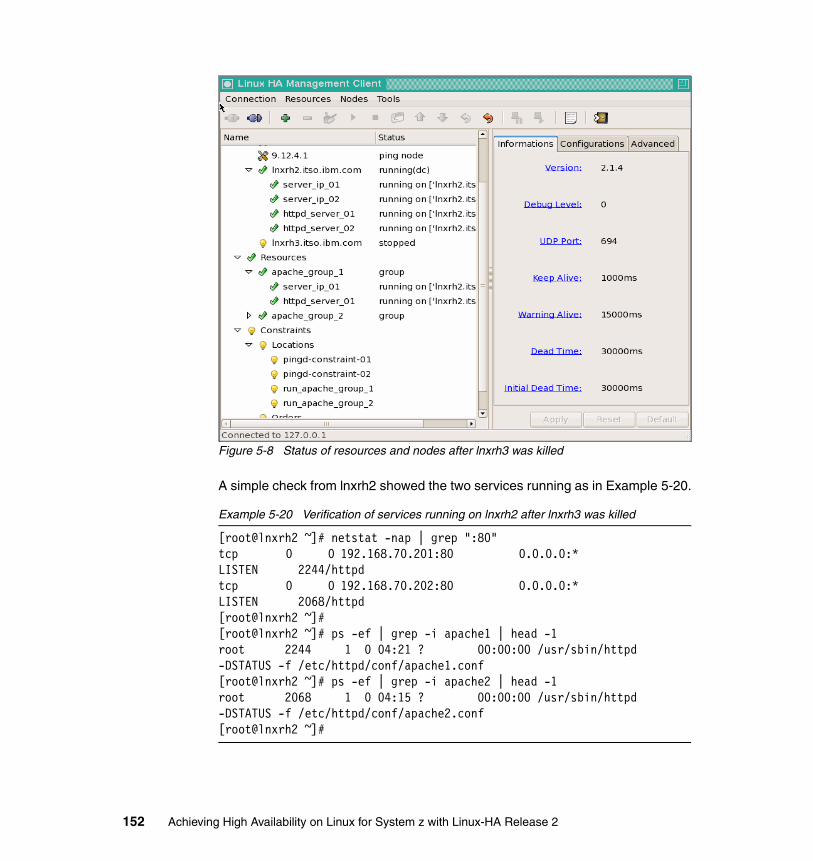
Figure 5-8 Status of resources and nodes after lnxrh3 was killed
A simple check from lnxrh2 showed the two services running as in Example 5-20.
Example 5-20 Verification of services running on lnxrh2 after lnxrh3 was killed
[root@lnxrh2 ~]# netstat -nap | grep ":80"tcp 0 0 192.168.70.201:80 0.0.0.0:* LISTEN 2244/httpdtcp 0 0 192.168.70.202:80 0.0.0.0:* LISTEN 2068/httpd[root@lnxrh2 ~]#[root@lnxrh2 ~]# ps -ef | grep -i apache1 | head -1root 2244 1 0 04:21 ? 00:00:00 /usr/sbin/httpd -DSTATUS -f /etc/httpd/conf/apache1.conf[root@lnxrh2 ~]# ps -ef | grep -i apache2 | head -1root 2068 1 0 04:15 ? 00:00:00 /usr/sbin/httpd -DSTATUS -f /etc/httpd/conf/apache2.conf[root@lnxrh2 ~]#
152 Achieving High Availability on Linux for System z with Linux-HA Release 2
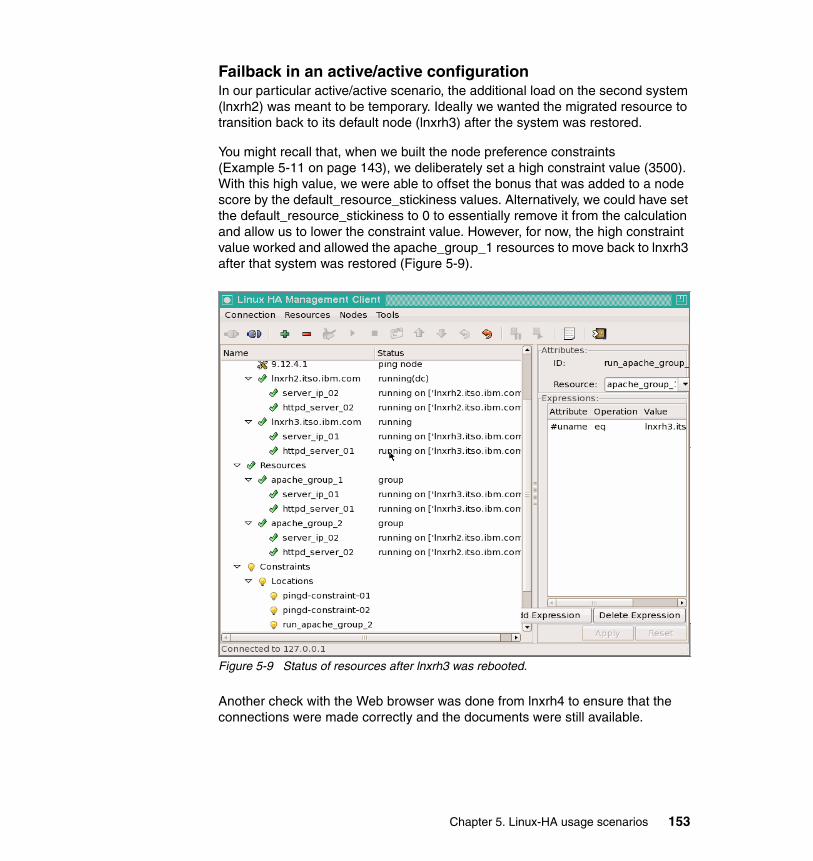
Failback in an active/active configurationIn our particular active/active scenario, the additional load on the second system (lnxrh2) was meant to be temporary. Ideally we wanted the migrated resource to transition back to its default node (lnxrh3) after the system was restored.
You might recall that, when we built the node preference constraints (Example 5-11 on page 143), we deliberately set a high constraint value (3500). With this high value, we were able to offset the bonus that was added to a node score by the default_resource_stickiness values. Alternatively, we could have set the default_resource_stickiness to 0 to essentially remove it from the calculation and allow us to lower the constraint value. However, for now, the high constraint value worked and allowed the apache_group_1 resources to move back to lnxrh3 after that system was restored (Figure 5-9).
Figure 5-9 Status of resources after lnxrh3 was rebooted.
Another check with the Web browser was done from lnxrh4 to ensure that the connections were made correctly and the documents were still available.
Chapter 5. Linux-HA usage scenarios 153
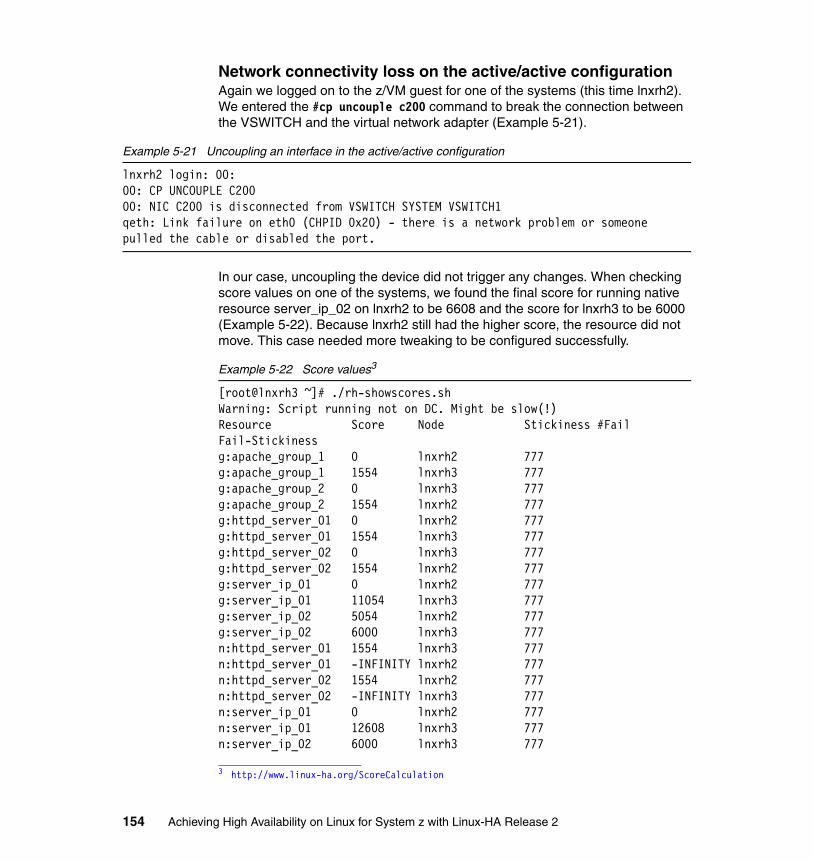
Network connectivity loss on the active/active configurationAgain we logged on to the z/VM guest for one of the systems (this time lnxrh2). We entered the #cp uncouple c200 command to break the connection between the VSWITCH and the virtual network adapter (Example 5-21).
Example 5-21 Uncoupling an interface in the active/active configuration
lnxrh2 login: 00: 00: CP UNCOUPLE C200 00: NIC C200 is disconnected from VSWITCH SYSTEM VSWITCH1 qeth: Link failure on eth0 (CHPID 0x20) - there is a network problem or someone pulled the cable or disabled the port.
In our case, uncoupling the device did not trigger any changes. When checking score values on one of the systems, we found the final score for running native resource server_ip_02 on lnxrh2 to be 6608 and the score for lnxrh3 to be 6000 (Example 5-22). Because lnxrh2 still had the higher score, the resource did not move. This case needed more tweaking to be configured successfully.
Example 5-22 Score values3
[root@lnxrh3 ~]# ./rh-showscores.shWarning: Script running not on DC. Might be slow(!)Resource Score Node Stickiness #Fail Fail-Stickinessg:apache_group_1 0 lnxrh2 777g:apache_group_1 1554 lnxrh3 777g:apache_group_2 0 lnxrh3 777g:apache_group_2 1554 lnxrh2 777g:httpd_server_01 0 lnxrh2 777g:httpd_server_01 1554 lnxrh3 777g:httpd_server_02 0 lnxrh3 777g:httpd_server_02 1554 lnxrh2 777g:server_ip_01 0 lnxrh2 777g:server_ip_01 11054 lnxrh3 777g:server_ip_02 5054 lnxrh2 777g:server_ip_02 6000 lnxrh3 777n:httpd_server_01 1554 lnxrh3 777n:httpd_server_01 -INFINITY lnxrh2 777n:httpd_server_02 1554 lnxrh2 777n:httpd_server_02 -INFINITY lnxrh3 777n:server_ip_01 0 lnxrh2 777n:server_ip_01 12608 lnxrh3 777n:server_ip_02 6000 lnxrh3 777
3 http://www.linux-ha.org/ScoreCalculation
154 Achieving High Availability on Linux for System z with Linux-HA Release 2

n:server_ip_02 6608 lnxrh2 777[root@lnxrh3 ~]#
To make the configuration work, we recoupled the virtual NIC to the VSWITCH (by using the #cp couple c200 to system vswitch1 command). We briefly did a check to make sure that the Web resources were still reachable by using a browser from lnxrh4. Next we set the default resource stickiness to 0 (Figure 5-10) and modified the preferred node constraints to a score value less than the pingd multiplier of 2000 set in the ha.cf file.
Figure 5-10 Resetting the default resource stickiness
Chapter 5. Linux-HA usage scenarios 155

For the preferred node constraint values, both run_apache_group_1 and run_apache_group_2 must be changed. In our case, we decided on a value of 1000 (Figure 5-11).
Figure 5-11 Modifying the preferred node constraints
156 Achieving High Availability on Linux for System z with Linux-HA Release 2

After we reconfigured the values, we tried the test again. The virtual NIC on lnxrh2 was uncoupled. Some time was given to let Heartbeat recognize that the link was down and update itself. This time it worked and resulted in the status shown in Figure 5-12, where lnxrh3 now has all the resources.
Figure 5-12 Status of resources and nodes after the lnxrh2 interface was uncoupled
The download from lnxrh4 was initiated a few times once more to verify that the Web content from both the IP and Web servers was still accessible. A check of the node scores showed the result in Example 5-23.
Example 5-23 Node scores after the lnxrh2 interface was uncoupled
[root@lnxrh3 ~]# ./rh-showscores.shWarning: Script running not on DC. Might be slow(!)Resource Score Node Stickiness #Fail Fail-Stickinessg:apache_group_1 0 lnxrh2 0g:apache_group_1 0 lnxrh3 0g:apache_group_2 0 lnxrh2 0g:apache_group_2 0 lnxrh3 0g:httpd_server_01 0 lnxrh2 0
Chapter 5. Linux-HA usage scenarios 157

g:httpd_server_01 0 lnxrh3 0g:httpd_server_02 0 lnxrh2 0g:httpd_server_02 0 lnxrh3 0g:server_ip_01 0 lnxrh2 0g:server_ip_01 7000 lnxrh3 0g:server_ip_02 1000 lnxrh2 0g:server_ip_02 6000 lnxrh3 0n:httpd_server_01 0 lnxrh3 0n:httpd_server_01 -INFINITY lnxrh2 0n:httpd_server_02 0 lnxrh3 0n:httpd_server_02 -INFINITY lnxrh2 0n:server_ip_01 0 lnxrh2 0n:server_ip_01 7000 lnxrh3 0n:server_ip_02 1000 lnxrh2 0n:server_ip_02 6000 lnxrh3 0[root@lnxrh3 ~]#
This time, the connectivity score of 6000 for lnxrh3 trumped the preferred node score of 1000 for lnxrh2, thus allowing server_ip_02 and related resources to move. Afterward, system lnxrh2’s network was recoupled, causing the apache_group_2 resources to fail back.
At this point, we initiated the system crash simulation (#cp i cms) and failback one more time to test that they still worked after the changes to default stickiness and the preferred node constraints.
Adding STONITH to the configurationDepending on the nature of an interface problem and the network configuration involved, it is possible that an IP resource might not be released cleanly from the owning node. This prevents the node that is taking over the resources from correctly registering the target IP. In this case, the user might want to execute automatic cleanup for the node that is releasing the resources.
One way to execute an automatic cleanup within the Linux-HA framework is to have it initiate a Shoot the Other Node in the Head (STONITH) procedure by using the lic_vps plug-in. This forces a reset for all hardware access including IP addresses for OSA devices. (On z/VM, this essentially logs off the guest).
In our case, the problem is that we wanted to trigger the STONITH operation in the case of a network connectivity or IP failure. Linux-HA does not normally trigger STONITH in these cases. The pingd mechanism that we used earlier does not register a resource failure. Therefore, it does not allow us to set up a monitor to start a STONITH operation. Using a pingd resource instead of pingd
158 Achieving High Availability on Linux for System z with Linux-HA Release 2

with the respawn mechanism has a similar result, meaning that it also does not work in this case.
One solution is to create your own OCF resource to trigger the desired status based on the conditions that you specify. This can be used with the constraint mechanisms to execute a complex set of instructions. In our case, we create a simple resource that pings an IP (similar to pingd), but that triggers a failure status when the IP is no longer reachable.
For the STONITH configuration, we set “stonith action” to poweroff because of the restrictions on the reset operation as described in 3.2.4, “Working with the stonith command on z/VM” on page 54. The snIPL configuration file was created as shown in Example 5-24.
Example 5-24 Configuration file for snIPL
[root@lnxrh2 ~]# cat /etc/snipl.conf# zVM 2Server = 9.12.4.4type = VMuser = OPERATORpassword = OPERATOR image = lnxrh2/lnxrh2.itso.ibm.com# zVM 9Server = 9.12.4.189type = VMuser = OPERATORpassword = OPERATOR image = lnxrh3/lnxrh3.itso.ibm.com# End of file[root@lnxrh2 ~]#
Notice the use of the syntax image = imagename/nodename, which allows snIPL to handle node names that differ from image name for the target system. Heartbeat passe the node name to the lic_vps plug-in. The systems management server checks the image name as an authorized target when validating a given snIPL request (that is, a guest name or LPAR name). Remember that Heartbeat matches the node name to the output of uname -n. (This is what is expected in the /etc/ha.d/ha.cf file). Furthermore, Heartbeat places the node name all in lowercase before passing it to the lic_vps plug-in. This is the expected form of the node name in the snipl.conf file.
Chapter 5. Linux-HA usage scenarios 159

We tested the snIPL configuration by using the following command:
stonith -t lic_vps compat_mode=snipl_file lic_config=/etc/snipl.conf -S
After configuring snIPL, we used the hb_gui to turn on STONITH and create the STONITH resources. See 4.7.5, “STONITH in action” on page 123.
To create our own OCF resource agent, we used the “Dummy” sample resource as a template, copied it to our provider directory, and modified it for our use. We tested the new resource agent by using the ocf-tester command and then propagated it to the other nodes. Example 5-25 shows the details of this procedure.
Example 5-25 Creating our own OCF resource agent
[root@lnxrh2 ~]# cd /usr/lib/ocf/resource.d[root@lnxrh2 resource.d]# mkdir test[root@lnxrh2 resource.d]# cp heartbeat/Dummy test/ConnectedToIP[root@lnxrh2 resource.d]# vi test/ConnectedToIP[root@lnxrh2 resource.d]# /usr/sbin/ocf-tester -n mytest -o targetIP="192.168.70.253" /usr/lib/ocf/resource.d/test/ConnectedToIPBeginning tests for /usr/lib/ocf/resource.d/test/ConnectedToIP...* Your agent does not support the notify action (optional)* Your agent does not support the demote action (optional)* Your agent does not support the promote action (optional)* Your agent does not support master/slave (optional)/usr/lib/ocf/resource.d/test/ConnectedToIP passed all testsroot@lnxrh2 resource.d]# scp -r test root@lnxrh3:/usr/lib/ocf/resource.d/ConnectedToIP 100% 5336 5.2KB/s 00:00[root@lnxrh2 resource.d]#
We made the following main modifications to the “Dummy” resource agent to create the “ConnectedToIP” resource agent:
� We added a parameter entry “targetIP,” which requires a string value.
� We modified the monitor function to do a ping operation and returned a value based on the ping results (Example 5-26 on page 161).
� We modified the validate function to return an error if the “targetIP” parameter was not defined.
160 Achieving High Availability on Linux for System z with Linux-HA Release 2

Example 5-26 Changes to the monitor function for ConnectedToIP OCF RA
c2IP_monitor() { # Monitor _MUST!_ differentiate correctly between running # (SUCCESS), failed (ERROR) or _cleanly_ stopped (NOT RUNNING). # That is THREE states, not just yes/no.
# if state is resource started, return based on access to target IP if [ -f ${OCF_RESKEY_state} ]; then # try a ping for target IP ocf_log info "${OCF_RESOURCE_INSTANCE} ping ${OCF_RESKEY_targetIP}." ping -c 2 ${OCF_RESKEY_targetIP} if [ $? = 0 ]; then ocf_log info "${OCF_RESOURCE_INSTANCE} ping succeeded." return $OCF_SUCCESS else ocf_log info "${OCF_RESOURCE_INSTANCE} ping failed." return $OCF_ERR_GENERIC fi fi if false ; then return $OCF_ERR_GENERIC fi return $OCF_NOT_RUNNING}
After the resource agent is created, we used the hb_gui tool to add an instance to the target resource group. You can either click Name to sort and locate by name (ConnectedToIP) or click Class/Provider to search by that category (ocf/test). You might have to exit and rerun hb_gui to list the new resource.
Chapter 5. Linux-HA usage scenarios 161

Figure 5-13 shows an example of creating the resource.
Figure 5-13 Creating the ConnectedToIP resource instance
Remember to specify the target group with which this resource should be associated. The main configuration needed for the resource is to choose a suitable IP to ping. Specify this IP as the value for the targetIP parameter. In this case, we chose another address that was reachable from our service IP. Click the Add button to add the resource.
162 Achieving High Availability on Linux for System z with Linux-HA Release 2

After the resource was created, we created a monitor for the resource to trigger the stonith operation by using the following steps:
1. In the Linux HA Management Client window (Figure 5-14), select the ConnectedToIP resource instance in the resource list. Click the Operations tab, and click the Add Operation button.
Figure 5-14 Adding the monitor operation for ConnectedToIP
Chapter 5. Linux-HA usage scenarios 163

2. In the Add Operation window (Figure 5-15):
a. Enter any suitable ID name and description.
b. For Name, select monitor.
c. Specify the Start Delay time. We specified 120 seconds to allow the IP service to come up a full before this monitor is started.
d. For On Fail, select fence as the action to take upon failure of this resource.
e. Click OK to accept the configuration.
Figure 5-15 Options for the monitor operation
3. Click the Apply button to activate the configuration.
164 Achieving High Availability on Linux for System z with Linux-HA Release 2

Example 5-27 shows a quick way to verify that the configuration propagated to a node.
Example 5-27 Verifying the configuration has been propagated across nodes
[root@lnxrh3 ~]# cibadmin -Q | grep -i conn_ | egrep "<primitive|<op id" <primitive id="conn_check_01" class="ocf" type="ConnectedToIP" provider="test"> <op id="conn_monitor_01" name="monitor" description="group1 stonith trigger" interval="10" timeout="20" start_delay="120s" on_fail="fence"/>[root@lnxrh3 ~]#
Finally, we performed a check to see that stonith is executed on the target node when the network connection is lost. In this case, we entered the following command from the guest where the ConnectedToIP resource is running:
#cp uncouple c200
After a short while, stonith triggered and the guest was logged off. All resources were moved to the remaining node (Figure 5-16). A quick test by using the wget command from another system verified that the target services was still reachable.
Figure 5-16 Status after the STONITH operation
Chapter 5. Linux-HA usage scenarios 165
5.2 Shared-disk clustered file system
In this section we discuss the architecture of the OCFS2 clustered file system and how it is used with Linux-HA Heartbeat to create a cluster of nodes that share the same physical disk.
5.2.1 OCFS2 overview
OCFS2 is a general purpose shared-disk clustered file system that is licensed under the General Public License (GPL).4 Because it provides local file system semantics, OCFS2 can be used by any application. Cluster-aware applications can use parallel I/O for higher performance. Other applications, if unable to benefit from parallel I/O, can use the file system to provide a failover setup to increase the availability of the application.
When using a clustered file system, keep in mind the following considerations:
� A clustered file system provides consolidation of storage for simpler management and lower cost.
� There is no need for data replication. Clustered nodes have access to the same files and the same data. Therefore, there is no need to worry about synchronizing or replicating information across multiple data stores.
� The physical disk becomes a single point of failure. In this case, consider using storage servers that offer redundancy at the disk level, such as Peer-to-Peer Remote Copy (PPRC) with the IBM DS8000® server family.
OCFS2 has the following common uses today:
� Highly available database servers (such as Oracle’s Real Application Cluster)� Highly available file servers� Application and Web servers� In-house custom applications
For more information about OCFS2, see OCFS2: A Cluster File System for Linux User's Guide for Release 1.4 at the following Web address:
http://oss.oracle.com/projects/ocfs2/dist/documentation/v1.4/ocfs2-1_4-usersguide.pdf
The OCFS2 kernel file system components are bundled with SUSE Linux Enterprise Server 10 (SLES 10) SP2 for System z. For Red Hat Enterprise Linux 5 Update 2 on the System z platform, kernel components are currently not bundled. Furthermore, for the Red Hat Enterprise Linux 5 Update 2 on the
4 See http://oss.oracle.com/projects/ocfs2/
166 Achieving High Availability on Linux for System z with Linux-HA Release 2

System z platform, the kernel is not built with the OCFS2 file system option. Therefore, to get OCFS2 on Red Hat Enterprise Linux 5 Update 2 for the System z platform, you must re-compile the kernel with the CONFIG_OCFS2_FS option, and then build the OCFS2 kernel components from source. This book does not describe the building process for Red Hat Enterprise Linux.
For more information about OCFS2, including the source downloads, see the following Web address:
http://oss.oracle.com/projects/ocfs2/
The OCFS2 kernel components include the clustering and heartbeat capabilities, as well as the Distributed Locking Manager.
OCFS2 has the following non-kernel packages:
� The ocfs2-tools package provides the command line tools that are used to configure OCFS2, as well as to format, tune, and mount an OCFS2 file system.
� The ocfs2console package provides a GUI to the OCFS2 command line tools.
5.2.2 Architectural overview of OCFS2 with Linux-HA Heartbeat
Two options are available for setting up an OCFS2 clustered file system:
� Use the OCFS2 provided kernel Heartbeat and clustering functionalities.
� Use the user-space Linux-HA Heartbeat to manage your clustered file systems.
Use of the user-space Heartbeat has the following benefits as opposed to use of the OCFS2 provided kernel heartbeat:
� If you plan to build applications or databases on top of the clustered file system, and plan on using Linux-HA Heartbeat to manage those resources, having OCFS2 as a Heartbeat resource provides a centralized management environment of all your cluster resources.
� Linux-HA Heartbeat provides a more sophisticated dependency model than the kernel-based heartbeat for OCFS2.
� Linux-HA Heartbeat provides fencing, and the kernel heartbeat does not.
Oracle Real Application Cluster or Clusterware: If you are building an OCFS2 clustered file system for use with Oracle Real Application Cluster or Clusterware, then there is no need to use Linux-HA Heartbeat.
Chapter 5. Linux-HA usage scenarios 167

You can set up OCFS2 to use either the kernel heartbeat or the user-space heartbeat. Be careful to not use both at the same time, which can cause confusion at the heartbeat level and can lead to data corruption.
Figure 5-17 illustrates the OCFS2 with Linux-HA Heartbeat architecture.
Figure 5-17 OCFS2 in user-space Heartbeat
OCFS2 is set up separately from Heartbeat, but it uses user-space Heartbeat. Heartbeat takes care of all the cluster membership monitoring and notifies the Filesystem resource agent about which nodes are still in the cluster and which are not. The local Filesystem resource agent then informs OCFS2 so that OCFS2 understands on which nodes to mount the file system. With this setup, OCFS2 by itself has no idea which nodes are active and which are not.
System AActive server
OCFS2
Linux Linux
System BActive server
Shared disk system
Heartbeat
OCFS2
Filesystem Filesystem
168 Achieving High Availability on Linux for System z with Linux-HA Release 2

The following two services must be running in this OCFS2 scenario, and they must run in the order shown:
1. The OCFS2 O2CB service loads all the necessary OCFS2 modules and puts the cluster online.
2. Linux-HA Heartbeat starts after O2CB. The Filesystem resource agent, part of Heartbeat, initiates the mount command to mount the OCFS2 device.
Both resources, the OCFS2 O2CB cluster service and the Heartbeat service, are configured to start on boot. Thankfully, in our SLES 10 SP2 environment, the system understands that is must start O2CB before Heartbeat, so that we do not have to worry about the order. For further discussion, see “Verifying the order of services up startup” on page 205.
STONITH is also implemented in this architecture (not shown in Figure 5-17 on page 168) because we do not want an errant node to write to the clustered file system and corrupt the data.
5.2.3 Implementing the architecture
Setting up OCFS2 integrated with Linux-HA Heartbeat entails the following steps:
1. Link the cluster desired disks in read/write mode for the involved Linux guests.2. Activate the disk on the Linux guests.3. Install the heartbeat packages.4. Configure Heartbeat and start it.5. Install the OCFS2 packages.6. Configure OCFS2 (cluster.conf, initial o2cb configuration, formatting disk).7. Configure the STONITH resource in Heartbeat.8. Configure the CRM options for Heartbeat.9. Configure and start the Filesystem resource in Heartbeat.10.Configure the location constraints in Heartbeat.11.Verify the order of the services on boot.
We explain these steps further in the sections that follow.
Linking the shared diskWe use Linux systems lnxsu1 and lnxsu2 to complete the OCFS2 scenario. They are two SLES 10 systems. To configure them to share a disk in read and write mode, we must edit their user directory definitions to add the new disk.
Chapter 5. Linux-HA usage scenarios 169

1. Make the disk available to lnxsu2. See the statement in line 25 in Example 5-28.
Example 5-28 The user directory definition of lnxsu2
00001 USER LNXSU2 LNXSU2 1G 2G G 00002 IPL CMS PARM AUTOCR 00003 MACHINE XA 2 00004 *** hipersockets 1*** 00005 DEDICATE 8000 F803 00006 DEDICATE 8001 F804 00007 DEDICATE 8002 F805 00008 *** hipersockets 2*** 00009 DEDICATE 9000 F903 00010 DEDICATE 9001 F904 00011 DEDICATE 9002 F905 00012 CONSOLE 0009 3215 00013 NICDEF C200 TYPE QDIO LAN SYSTEM VSWITCH1 00014 SPOOL 000C 3505 A 00015 SPOOL 000D 3525 A 00016 SPOOL 000E 1403 A 00017 LINK MAINT 0190 0190 RR 00018 LINK MAINT 019E 019E RR 00019 LINK MAINT 019F 019F RR 00020 LINK MAINT 019D 019D RR 00021 LINK TCPMAINT 0592 0592 RR 00022 MDISK 0191 3390 0201 40 LX2U1R MR 00023 MDISK 0201 3390 0001 1000 LXDE1D MR 00024 MDISK 0202 3390 1001 9016 LXDE1D MR 00025 MDISK 0203 3390 0001 3338 LXC937 MW
2. On lnxsu1, link to the 203 disk on lnxsu2 in RW mode. See the highlighted statement in line 22 of Example 5-29.
Example 5-29 The user directory definition of lnxsu1
00001 USER LNXSU1 LNXSU1 1G 2G G 00002 IPL CMS PARM AUTOCR 00003 MACHINE XA 2 00004 *** hipersockets 1 *** 00005 DEDICATE 8000 F800 00006 DEDICATE 8001 F801 00007 DEDICATE 8002 F802 00008 *** hipersockets 2 *** 00009 DEDICATE 9000 F900 00010 DEDICATE 9001 F901
170 Achieving High Availability on Linux for System z with Linux-HA Release 2

00011 DEDICATE 9002 F902 00012 CONSOLE 0009 3215 00013 NICDEF C200 TYPE QDIO LAN SYSTEM VSWITCH1 00014 SPOOL 000C 3505 A 00015 SPOOL 000D 3525 A 00016 SPOOL 000E 1403 A 00017 LINK MAINT 0190 0190 RR 00018 LINK MAINT 019E 019E RR 00019 * LINK MAINT 019F 019F RR 00020 LINK MAINT 019D 019D RR 00021 LINK TCPMAINT 0592 0592 RR 00022 LINK LNXSU2 0203 0203 MW 00023 MDISK 0191 3390 0121 40 LX2U1R MR 00024 MDISK 0201 3390 0001 1000 LXDE1B MR 00025 MDISK 0202 3390 1001 9016 LXDE1B MR
Make sure that the statements include the multiple write (MW) directive. With this directive on all the Linux guests, it does not matter which Linux guest are booted first. Each has equal read/write access to the shared disk.
3. Log out and log back into each of the Linux guests to pick up the changes.
4. IPL Linux on the guests.
Activating the disk in LinuxActivate the newly added disk on each of the Linux guests from Linux. It is best to do this through YaST because YaST performs all the necessary steps to activate the disk.
1. Using either the VNC or X Window System method, log into a lnxsu2 terminal session that is capable of displaying GUIs.
2. Enter the yast2 command on the terminal session to start YaST in the GUI form.
Chapter 5. Linux-HA usage scenarios 171
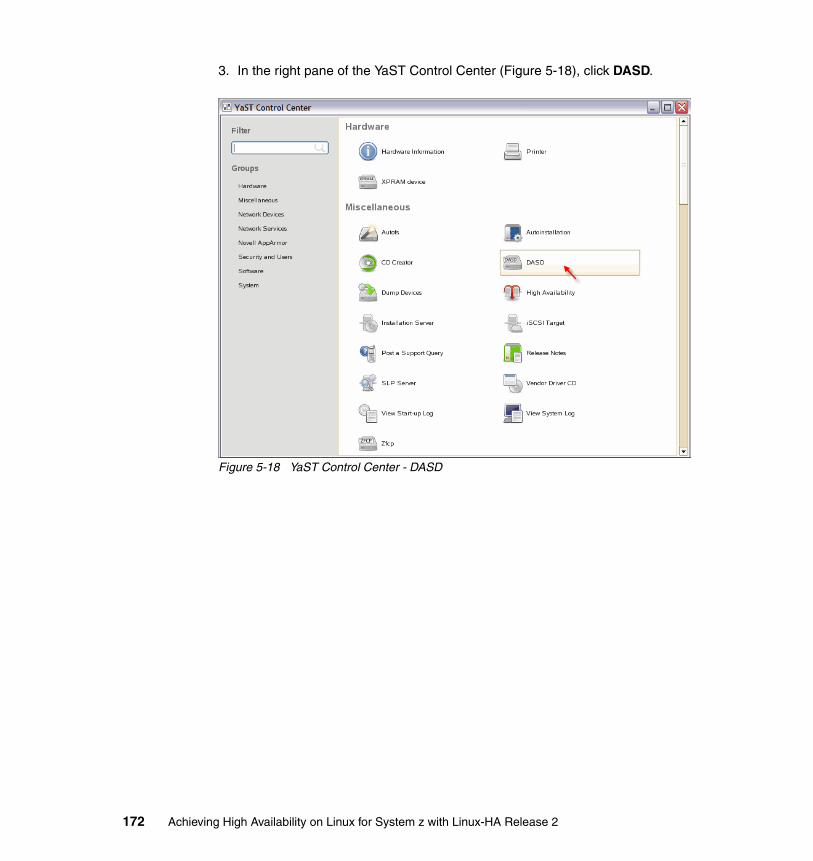
3. In the right pane of the YaST Control Center (Figure 5-18), click DASD.
Figure 5-18 YaST Control Center - DASD
172 Achieving High Availability on Linux for System z with Linux-HA Release 2

4. In the new DASD management window (Figure 5-19):
a. From the listing of all your disks, select the disk that is designated to become the OCFS2 disk. In our case, we highlight disk 203.
b. Click the Select or Deselect button to select it.
Figure 5-19 YaST DASD Disk Management window - Selecting the disk
Chapter 5. Linux-HA usage scenarios 173

c. In the same window, click the Perform Action button and select Activate (Figure 5-20).
Figure 5-20 YaST DASD Disk Management window - Activating the disk
d. Click Next.
YaST performs the action and exits to the main Control Center.
5. Exit the Control Center.
174 Achieving High Availability on Linux for System z with Linux-HA Release 2

6. Verify that the disk is activated by going to the /etc/sysconfig/hardware directory to see that a configurations file was generated for disk 203 as shown in Example 5-30.
Example 5-30 Hardware configuration file for activated disk
lnxsu2:/etc/sysconfig/hardware # lsconfig hwcfg-qeth-bus-ccw-0.0.9000hwcfg-dasd-bus-ccw-0.0.0201 hwcfg-qeth-bus-ccw-0.0.c200hwcfg-dasd-bus-ccw-0.0.0202 scriptshwcfg-dasd-bus-ccw-0.0.0203 skelhwcfg-qeth-bus-ccw-0.0.8000
7. Verify that the disk is activated by running the cat /proc/dasd/devices command as shown in Example 5-31.
Example 5-31 Viewing DASD devices
lnxsu2:/etc/sysconfig/hardware # cat /proc/dasd/devices0.0.0201(ECKD) at ( 94: 0) is dasda : active at blocksize: 4096, 180000 blocks, 703 MB0.0.0202(ECKD) at ( 94: 4) is dasdb : active at blocksize: 4096, 1622880 blocks, 6339 MB0.0.0203(ECKD) at ( 94: 8) is dasdc : active at blocksize: 4096, 600840 blocks, 2347 MB
After activating the disk on lnxsu2, we perform the same task on lnxsu1. Make sure you activate the disk on all your cluster members.
Installing the heartbeat packagesInstall the heartbeat packages on the lnxsu1 and lnxsu2 Linux systems in the cluster.
We need the following packages:
� heartbeat-2.1.3-0.9� heartbeat-stonith-2.1.3-0.9� heartbeat-pils-2.1.3-0.9
You might have a different release number for the heartbeat packages if you are on a different distribution or service pack level.
To install these packages, we use YaST. For details about installing the heartbeat packages on SLES 10, see 4.3.1, “Installing Heartbeat on SLES 10” on page 67.
Chapter 5. Linux-HA usage scenarios 175

Configuring HeartbeatNext configure Heartbeat on each Linux guest according to the steps in 4.4, “Initial configuration of Linux-HA release 2” on page 96.
Copy the configuration files and adjust their permissions according to step 1 on page 96. For step 2 on page 96, configure the ha.cf file as shown in Example 5-32.
Example 5-32 OCFS2 scenario - The ha.cf file
lnxsu1:/etc/ha.d # cat ha.cfcrm true 1auto_failback off 2logfacility daemon 3ucast hsi0 10.0.1.88 4ucast hsi0 10.0.1.92ucast hsi1 10.0.2.88ucast hsi1 10.0.2.92use_logd yes 5traditional_compression false 6node lnxsu1 7node lnxsu2deadtime 10 8debug 0 9keepalive 2 10
Note the following explanation:
1. crm true
This directive indicates that the cluster uses the style cluster management of Heartbeat version 2 that supports more than two nodes.
2. auto_failback off
This directive indicates that a resource will not automatically fail back to its “primary” node after that node is recovered.
3. logfacility daemon
This directive tells Heartbeat to use the syslog logging facility daemon for logging its messages.
4. ucast hsi0 10.0.1.88
This and the following three directives tell Heartbeat to use unicast to pass cluster- and node-related messages and to specifically address communications through these four IP addresses. hsi0 and hsi1 are HiperSockets interfaces defined to lnxsu1 and lnxsu2 for the purpose of transporting cluster messages. IP addresses 10.0.1.88 and 10.0.2.88 are
176 Achieving High Availability on Linux for System z with Linux-HA Release 2

interfaces that are defined to lnxsu1, and IP addresses 10.0.1.92 and 10.0.2.92 are interfaces defined to lnxsu2. The reason for two interfaces on each node is for availability. If one interface is down, then another one is available for Heartbeat messaging.
5. use_logd yes
This directive tells Heartbeat to log its messages through the logging daemon.
6. traditional_compression false
This directive avoids using compression. The Linux-HA project recommends setting this directive to false to avoid impacting the performance of Heartbeat.
7. node lnxsu1
This directive and the one that follows tell Heartbeat that lnxsu1 and lnxsu2 are part of the cluster. Be sure to use the host name of each Linux system.
8. deadtime 10
This directive tells Heartbeat to wait 10 seconds before declaring a node to be down or erroneous and take appropriate actions to take over its resources.
9. debug 0
This directive sets the debug level to off, which is the default value. It should be used in a production environment. The most useful values are between 0 (off) and 3. Setting the value higher means that you will get finer debugging messages.
10.keepalive 2
This directive tells Heartbeat to send “I’m alive” signals to other cluster members every 2 seconds.
Configure the authkeys file as shown in Example 5-33.
Example 5-33 OCFS2 scenario - The authkeys file
lnxsu1:/etc/ha.d # cat authkeysauth 11 sha1 ha2redbook
Set the password to the hacluster user, by using the steps in Example 4-47 on page 98.
Chapter 5. Linux-HA usage scenarios 177

Starting HeartbeatNow that Heartbeat is configured, start it by running the service heartbeat start command on all the nodes in the cluster. In our case, the nodes are lnxsu1 and lnxsu2. Example 5-34 shows how to start Heartbeat on lnxsu2.
Example 5-34 Starting Heartbeat on lnxsu2
lnxsu2:~ # service heartbeat startStarting High-Availability servicesheartbeat[9843]: 2008/11/13_13:50:31 info: Version 2 support: trueheartbeat[9843]: 2008/11/13_13:50:31 info: Enabling logging daemonheartbeat[9843]: 2008/11/13_13:50:31 info: logfile and debug file are those specified in logd config file (default /etc/logd.cf)heartbeat: baudrate setting must precede media statementsheartbeat[9843]: 2008/11/13_13:50:31 WARN: logd is enabled but logfile/debugfile/logfacility is still configured in ha.cfheartbeat[9843]: 2008/11/13_13:50:31 info: **************************heartbeat[9843]: 2008/11/13_13:50:31 info: Configuration validated. Starting heartbeat 2.1.3 done
Example 5-35 shows how to start Heartbeat on lnxsu1.
Example 5-35 Starting Heartbeat on lnxsu1
lnxsu1:/etc/ha.d # service heartbeat startStarting High-Availability servicesheartbeat[7989]: 2008/11/13_13:50:25 info: Version 2 support: trueheartbeat[7989]: 2008/11/13_13:50:25 info: Enabling logging daemonheartbeat[7989]: 2008/11/13_13:50:25 info: logfile and debug file are those specified in logd config file (default /etc/logd.cf)heartbeat: baudrate setting must precede media statementsheartbeat[7989]: 2008/11/13_13:50:25 WARN: logd is enabled but logfile/debugfile/logfacility is still configured in ha.cfheartbeat[7989]: 2008/11/13_13:50:25 info: **************************heartbeat[7989]: 2008/11/13_13:50:25 info: Configuration validated. Starting heartbeat 2.1.3done
To configure Heartbeat to start on boot, we enter the chkconfig heartbeat on command on both lnxsu1 and lnxsu2.
178 Achieving High Availability on Linux for System z with Linux-HA Release 2
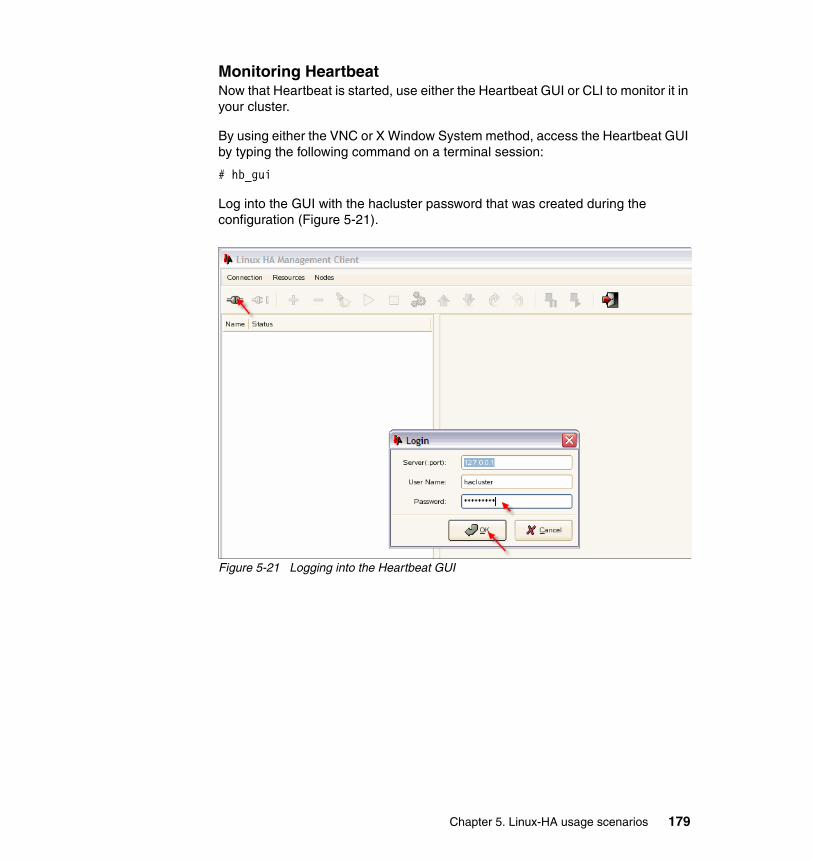
Monitoring HeartbeatNow that Heartbeat is started, use either the Heartbeat GUI or CLI to monitor it in your cluster.
By using either the VNC or X Window System method, access the Heartbeat GUI by typing the following command on a terminal session:
# hb_gui
Log into the GUI with the hacluster password that was created during the configuration (Figure 5-21).
Figure 5-21 Logging into the Heartbeat GUI
Chapter 5. Linux-HA usage scenarios 179

After you log in, you see the nodes in the cluster that you defined in the ha.cf file (Figure 5-22). In our case, we see that both lnxsu1 and lnxsu2 are running.
Figure 5-22 Heartbeat GUI - monitoring initial cluster configuration
You can also monitor the nodes by using the crm_mon CLI as shown in Example 5-36.
Example 5-36 Monitoring by using the crm_mon CLI
lnxsu2:/etc/ha.d # crm_mon -i 2
Refresh in 2s...
============Last updated: Thu Nov 13 15:18:54 2008Current DC: lnxsu2 (df0318c3-7e85-42e4-9e63-9b36244dd952)2 Nodes configured.0 Resources configured.============
Node: lnxsu1 (dad43330-d351-4b3f-9fa8-52f2c74bc484): onlineNode: lnxsu2 (df0318c3-7e85-42e4-9e63-9b36244dd952): online
By using the -i 2 option, the command refreshes the monitoring information every 2 seconds.
180 Achieving High Availability on Linux for System z with Linux-HA Release 2

Installing the OCFS2 packagesWe need the following two packages for OCFS2 in SLES 10:
� ocfs2-tools� ocfs2console
We have version 1.4.0-0.3, but the version might be different for your distribution.
The easiest way to install the OCFS2 packages is to use YaST, because YaST installs all the prerequisites for you.
1. By using either the VNC or X Window System method, open YaST by typing the yast2 command on a terminal session.
2. In the YaST Control Center (Figure 5-23), in the left pane, select Software, and in the right pane, select Software Management.
Figure 5-23 YaST Control Center - Installing new software
Chapter 5. Linux-HA usage scenarios 181

3. In the Software Management window (Figure 5-24):
a. In the Search field, type ocfs2 and click the Search button.
b. From the main panel, select the ocfs2-console and ocfs2-tools packages.
c. Click Accept to start the installation.
Figure 5-24 Installing OCFS2 packages from YaST
4. Exit YaST.
5. Verify that the packages are installed by entering the rpm command with the -qa option as shown in Example 5-37.
Example 5-37 Verifying the installation of the OCFS2 packages
lnxsu1:~ # rpm -qa | grep ocfs2ocfs2console-1.4.0-0.3ocfs2-tools-1.4.0-0.3
182 Achieving High Availability on Linux for System z with Linux-HA Release 2

Configuring OCFS2With the OCFS2 packages installed, configure OCFS2. The configuration is done on one system and then propagated to the rest of the systems.
1. On lnxsu2, enable o2cb, which loads all the necessary modules to configure OCFS2 (Example 5-38).
Example 5-38 Enabling o2cb
lnxsu2:/etc/init.d # /etc/init.d/o2cb enableWriting O2CB configuration: OKLoading module "configfs": OKMounting configfs filesystem at /sys/kernel/config: OKLoading module "ocfs2_nodemanager": OKLoading module "ocfs2_dlm": OKLoading module "ocfs2_dlmfs": OKCreating directory '/dlm': OKMounting ocfs2_dlmfs filesystem at /dlm: OKChecking O2CB cluster configuration : Failed
2. Configure the OCFS2 cluster by using either the VNC or X Window System method:
a. Run the ocfs2console program from a terminal session to start the GUI configuration tool:
# ocfs2console
b. In the OCFS2 console that opens, select Cluster → Configure Nodes from the menu bar on the top.
Note: It is to be expected that checking the O2CB cluster configuration fails because we have not yet completed the configuration step.
Chapter 5. Linux-HA usage scenarios 183

c. In the Node Configuration window, add the nodes in the cluster one at a time:
i. Add the lnxsu1 node. In the Add Node window (Figure 5-25), enter the name, IP address, and IP port to be used for cluster communications. The name must match an entry in the /etc/hosts file and match the output of the hostname command. The default IP port of 7777 is usually acceptable.
In our scenario, the IP address used for lnxsu1 is the HiperSockets interface that we defined to the system. It is the same interface over which the user-space heartbeat uses to communicate cluster messages.
Click OK.
Figure 5-25 Adding lnxsu1 to OCFS2 configuration
Now lnxsu1 is displayed in the node list.
ii. Add lnxsu2 by repeating the actions from step i.
Note: Even though we use Heartbeat to communicate cluster membership information for our OCFS2 cluster, OCFS2 still uses the IP address and port number defined in the ocfs2console command for Distributed Locking Manager (DLM) messages.
184 Achieving High Availability on Linux for System z with Linux-HA Release 2
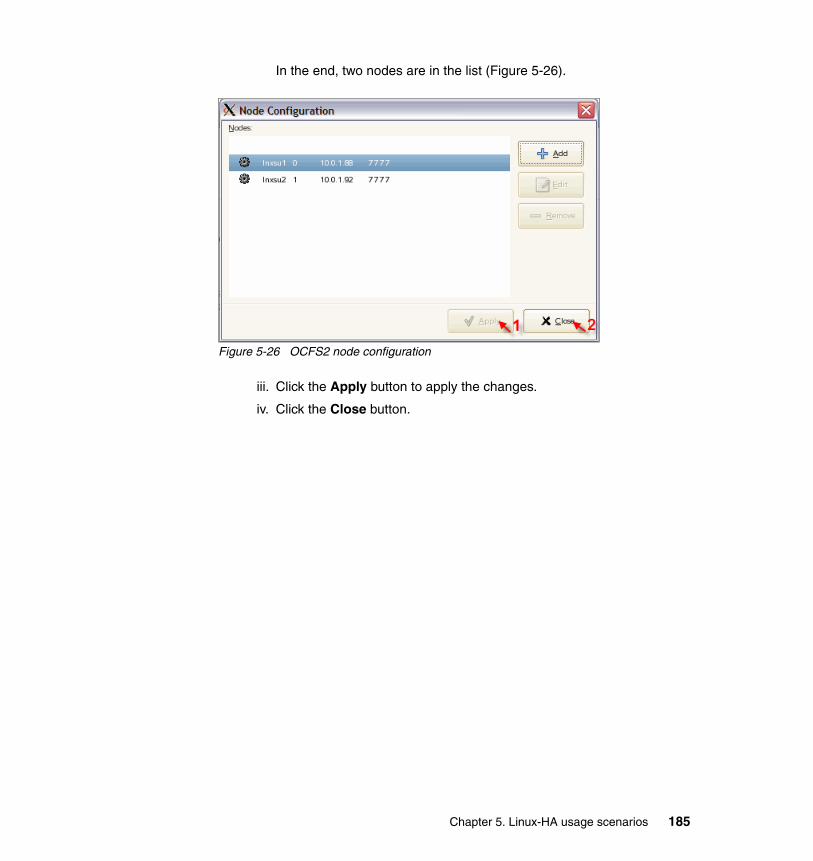
In the end, two nodes are in the list (Figure 5-26).
Figure 5-26 OCFS2 node configuration
iii. Click the Apply button to apply the changes.
iv. Click the Close button.
Chapter 5. Linux-HA usage scenarios 185

d. Propagate the configuration to all the nodes that you just defined:
i. Select Cluster → Propagate Configuration.
ii. In the Propagate Cluster Configuration window (Figure 5-27), when you see the “Finished!” message, click Close.
Figure 5-27 Propagating the OCFS2 cluster configuration
e. After the configuration is propagated, exit the OCFS2 console.
f. Verify the information by looking at the cluster.conf file (Example 5-39).
Example 5-39 OCFS2’s cluster.conf
lnxsu1:~ # cat /etc/ocfs2/cluster.confnode: ip_port = 7777 ip_address = 10.0.1.88
SSH keys: We configured SSH keys on our systems so that the OCFS2 console can use secure copy (scp) to copy the configuration file to all the cluster nodes without being prompted for the root password. If you do not have SSH keys configured on your systems, you are prompted for a password during the propagation process.
186 Achieving High Availability on Linux for System z with Linux-HA Release 2

number = 0 name = lnxsu1 cluster = ocfs2
node: ip_port = 7777 ip_address = 10.0.1.92 number = 1 name = lnxsu2 cluster = ocfs2
cluster: node_count = 2 name = ocfs2
3. Configure the O2CB driver on both nodes. We run the o2cb command with the configure option to start this process (Example 5-40).
Example 5-40 Configuring the O2CB driver
lnxsu2:/etc/init.d # /etc/init.d/o2cb configureConfiguring the O2CB driver.
This will configure the on-boot properties of the O2CB driver.The following questions will determine whether the driver is loaded onboot. The current values will be shown in brackets ('[]'). Hitting<ENTER> without typing an answer will keep that current value. Ctrl-Cwill abort.
Load O2CB driver on boot (y/n) [y]: Cluster to start on boot (Enter "none" to clear) [ocfs2]: Specify heartbeat dead threshold (>=7) [31]: Specify network idle timeout in ms (>=5000) [30000]: Specify network keepalive delay in ms (>=1000) [2000]: Specify network reconnect delay in ms (>=2000) [2000]: Use user-space driven heartbeat? (y/n) [n]: yWriting O2CB configuration: OKSwitching to user mode heartbeat : /etc/init.d/o2cb: line 761: echo: write error: Device or resource busyFAILEDO2CB cluster ocfs2 already online
Notice that we accept all the default options. However, for the question: Use user-space driven heartbeat?, we answer yes. This configuration also tells the O2CB driver to load on system reboot, which is what we want.
Chapter 5. Linux-HA usage scenarios 187

The error message is to be expected because the cluster is already running on lnxsu2.
4. Run the command shown in Example 5-41 to reload the configuration.
Example 5-41 Reloading the o2cb configuration
lnxsu2:~ # /etc/init.d/o2cb force-reloadStopping O2CB cluster ocfs2: OKUnmounting ocfs2_dlmfs filesystem: OKUnloading module "ocfs2_dlmfs": OKUnmounting configfs filesystem: OKMounting configfs filesystem at /sys/kernel/config: OKLoading module "ocfs2_dlm": OKLoading module "ocfs2_dlmfs": OKMounting ocfs2_dlmfs filesystem at /dlm: OKSwitching to user mode heartbeat : OKStarting O2CB cluster ocfs2: OK
5. Configure the O2CB driver on every node in your cluster. We repeat step 3 on page 187 to configure the O2CB driver on lnxsu1 as well.
6. Verify the configuration by looking at the /etc/sysconfig/o2cb file (Example 5-42).
Example 5-42 Examining the O2CB configuration file
lnxsu1:~ # cat /etc/sysconfig/o2cb## This is a configuration file for automatic startup of the O2CB# driver. It is generated by running /etc/init.d/o2cb configure.# On Debian based systems the preferred method is running# 'dpkg-reconfigure ocfs2-tools'.#
# O2CB_ENABLED: 'true' means to load the driver on boot.O2CB_ENABLED=true
# O2CB_BOOTCLUSTER: If not empty, the name of a cluster to start.O2CB_BOOTCLUSTER=ocfs2
# O2CB_HEARTBEAT_THRESHOLD: Iterations before a node is considered dead.O2CB_HEARTBEAT_THRESHOLD=
# O2CB_IDLE_TIMEOUT_MS: Time in ms before a network connection is considered dead.O2CB_IDLE_TIMEOUT_MS=
# O2CB_KEEPALIVE_DELAY_MS: Max time in ms before a keepalive packet is sent
188 Achieving High Availability on Linux for System z with Linux-HA Release 2

O2CB_KEEPALIVE_DELAY_MS=
# O2CB_RECONNECT_DELAY_MS: Min time in ms between connection attemptsO2CB_RECONNECT_DELAY_MS=
# O2CB_HEARTBEAT_MODE: Whether to use the native "kernel" or the "user"# driven heartbeat (for example, for integration with heartbeat 2.0.x)O2CB_HEARTBEAT_MODE="user"
7. Format the disk as shown in Example 5-43. You only have to format the shared disk once on one of the nodes.
Example 5-43 Formatting the shared disk device
lnxsu2:/etc/init.d # dasdfmt -b 4096 -p -f /dev/dasdcDrive Geometry: 3338 Cylinders * 15 Heads = 50070 Tracks
I am going to format the device /dev/dasdc in the following way: Device number of device : 0x203 Labelling device : yes Disk label : VOL1 Disk identifier : 0X0203 Extent start (trk no) : 0 Extent end (trk no) : 50069 Compatible Disk Layout : yes Blocksize : 4096
--->> ATTENTION! <<---All data of that device will be lost.Type "yes" to continue, no will leave the disk untouched: yesFormatting the device. This may take a while (get yourself a coffee).
cyl 71 of 3338 |#-------------------------------------------------| 2%
8. Partition the device as shown in Example 5-44. We only create one partition on the whole device.
Example 5-44 Creating one partition on the shared disk
lnxsu2:~ # fdasd -a /dev/dasdcauto-creating one partition for the whole disk...writing volume label...writing VTOC...
Chapter 5. Linux-HA usage scenarios 189

9. Verify that the partition has been created as shown in Example 5-45.
Example 5-45 Verifying the partition
lnxsu2:~ # fdasd -p /dev/dasdcreading volume label ..: VOL1reading vtoc ..........: ok'2' is not supported!
Disk /dev/dasdc: cylinders ............: 3338 tracks per cylinder ..: 15 blocks per track .....: 12 bytes per block ......: 4096 volume label .........: VOL1 volume serial ........: 0X0203 max partitions .......: 3
------------------------------- tracks ------------------------------- Device start end length Id System /dev/dasdc1 2 50069 50068 1 Linux nativeexiting...
10.Create the OCFS2 file system by using the mkfs.ocfs2 command line tool (Example 5-46) that came with the ocfs2-tools package. Similar to formatting the disk, you only have to do this on one of the nodes.
Example 5-46 Creating the OCFS2 file system
lnxsu2:/etc/init.d # mkfs.ocfs2 -b 4096 -N 2 /dev/dasdc1mkfs.ocfs2 1.4.0Filesystem label=Block size=4096 (bits=12)Cluster size=4096 (bits=12)Volume size=2460942336 (600816 clusters) (600816 blocks)19 cluster groups (tail covers 20208 clusters, rest cover 32256 clusters)Journal size=67108864Initial number of node slots: 2Creating bitmaps: doneInitializing superblock: doneWriting system files: doneWriting superblock: done
190 Achieving High Availability on Linux for System z with Linux-HA Release 2

Writing backup superblock: 1 block(s)Formatting Journals: doneWriting lost+found: donemkfs.ocfs2 successful
In the command in Example 5-46, the -b flag defines the block size. The -N flag tells the tool that there are 2 nodes in the cluster.
The O2CB drivers are now loaded, and O2CB is set to start on boot. The OCFS2 file system is not mounted and cannot be mounted manually because we gave this control to Heartbeat.
11.Check the O2CB status on both systems:
a. Check lnxsu1 (Example 5-47).
Example 5-47 Checking o2cb status on lnxsu1
lnxsu1:/etc/ha.d # service o2cb statusModule "configfs": LoadedFilesystem "configfs": MountedModule "ocfs2_nodemanager": LoadedModule "ocfs2_dlm": LoadedModule "ocfs2_dlmfs": LoadedFilesystem "ocfs2_dlmfs": MountedChecking O2CB cluster ocfs2: Online Network idle timeout: 30000 Network keepalive delay: 2000 Network reconnect delay: 2000Checking O2CB heartbeat: Not active
b. Run the same command on lnxsu2 to check that all the modules have been loaded and that the cluster is online (Example 5-48).
Example 5-48 Checking o2cb status on lnxsu2
lnxsu2:/etc/ha.d # service o2cb statusModule "configfs": LoadedFilesystem "configfs": MountedModule "ocfs2_nodemanager": LoadedModule "ocfs2_dlm": LoadedModule "ocfs2_dlmfs": LoadedFilesystem "ocfs2_dlmfs": MountedChecking O2CB cluster ocfs2: Online
Chapter 5. Linux-HA usage scenarios 191

Network idle timeout: 30000 Network keepalive delay: 2000 Network reconnect delay: 2000Checking O2CB heartbeat: Not active
Now that the O2CB configuration has been verified, you are done with the OCFS2 portion of the configuration. Next you must define a couple of resources to Heartbeat so that user-space Heartbeat can control and manage this resource.
Configuring STONITH in HeartbeatFor OCFS2, configure STONITH to ensure that Heartbeat notifies the Filesystem resource agent about the misbehaving node and the Filesystem resource agent, in turn, notifies OCFS2 about the change in cluster membership.
We choose lic_vps (snIPL) as our STONITH method. The lic_vps plug-in serves as an interface for the STONITH software to initiate snIPL operations. It allows Heartbeat to issue recycle, activate, and deactivate instructions for z/VM guest or System z LPAR control.
For more information about snIPL, see 3.1.1, “snIPL” on page 46. For more information about lic_vps, see 3.1.4, “Heartbeat STONITH mechanisms for the System z server” on page 49.
1. On lnxsu1 and lnxsu2, install the snipl package through YaST as shown in Figure 4-8 on page 72.
2. Verify the installation was successful (Example 5-49).
Example 5-49 Verifying that snipl was installed successfully
lnxsu1:/usr/src # rpm -qa | grep sniplsnipl-0.2.1.3-0.13
lnxsu2:/usr/src # rpm -qa | grep sniplsnipl-0.2.1.3-0.13
3. Make sure that our Linux systems, in our case lnxsu1 and lnxsu2, are authorized by VSMSERVE to reset each other. Make sure that the guest names, LNXSU1 and LNXSU2 in our case, are added to the NAMELIST definition on VSMSERVE’s 191 disk. See 3.2.2, “Setting up VSMSERVE for use with snIPL” on page 51, and Example 3-7 on page 52 for how to do this.
If you are just reading this chapter and not following the steps, know that the VSMSERVE service must also be enabled under z/VM. See 3.2.2, “Setting up VSMSERVE for use with snIPL” on page 51, for all the details.
192 Achieving High Availability on Linux for System z with Linux-HA Release 2

Example 5-50 shows the NAMELIST definition with our guests LNXSU1 and LNXSU2.
Example 5-50 Checking the NAMELIST definition
00000 * * * Top of File * * * 00001 :nick.LINUXHA 00002 :list. 00003 LNXRH1 00004 LNXRH2 00005 LNXSU1 00006 LNXSU2 00007 LNXSU5 00008 LNXRH5 00009 :nick.SERVER_FUNCTIONS 00010 :list. 00011 ....00028 ........
4. Configure the /etc/snipl.conf file on the Linux systems. The same file is created on both cluster members: lnxsu1 and lnxsu2. Example 5-51 shows the snipl.conf file for our two-node environment. There are two zVM sections, one for each Linux guest in our environment.
Example 5-51 /etc/snipl.conf on lnxsu1
lnxsu1:/usr/src # cat /etc/snipl.conf# zVMServer = 9.12.4.4 1type = VMuser = OPERATOR 2password = OPERATOR image = lnxsu1 3 image = lnxsu2 3# End of file
Same z/VM guest names as Linux host names: Keep in mind that, in our environment, the z/VM guest names are the same as the Linux host names. LNXSU1 is the z/VM guest that hosts the lnxsu1 Linux system. This is because at the time of this writing snIPL requires that they be the same. Check your version’s manuals to see if it requires the same name.
Chapter 5. Linux-HA usage scenarios 193

Here is a brief explanation for what a few of the fields mean:
1. We define the IP address of the z/VM system under which our Linux guests reside.
2. We specify the guest user and password for the guest that has snIPL access. In our environment, we give the guest user OPERATOR snIPL access to the guests defined in NAMELIST (see Example 5-50 on page 193).
3. We specify the Linux systems that must be loaded by snIPL.
On lnxsu2, define the same /etc/snipl.conf file as shown in Example 5-51 on page 193.
4. Verify that the snipl command is working with the configuration file on both systems (Example 5-52).
Example 5-52 Running the snipl command on both systems
lnxsu1:/etc # snipl -V 9.12.4.4 -x
available images for server 9.12.4.4 and userid OPERATOR :
lnxsu2 lnxsu1
lnxsu2:/etc # snipl -V 9.12.4.4 -x
available images for server 9.12.4.4 and userid OPERATOR :
lnxsu2 lnxsu1
5. To verify that snIPL and VSMSERVE are set up correctly, run the snipl command as shown in Example 5-53 to reset one of your Linux systems.
Example 5-53 Running snipl to verify settings
lnxsu2:~ # snipl -r lnxsu1Server 9.12.4.4 with userid OPERATOR from config file /etc/snipl.conf is used* ImageRecycle : Image lnxsu1 Image Already Active
lnxsu1:~ #
The hostname command: For 3, in the image definitions, you must specify what the hostname command returns on your Linux systems. The image definition is case sensitive. That is, if the hostname command returns lnxsu1, you must enter lnxsu1 in lowercase.
194 Achieving High Availability on Linux for System z with Linux-HA Release 2

Broadcast message from root (console) (Tue Nov 18 17:27:40 2008):
The system is going down for reboot NOW!
As you can see in Example 5-53, we issue the snipl command with the reset option -r to reset the system lnxsu1. And on lnxsu1 we see that the message “The system is going down for reboot NOW!” is displayed.
Make sure that the system (in our case, lnxsu1) is reset and that Heartbeat is started before moving to the next step.
6. Create a cloned STONITH resource of the lic_vps type in Heartbeat. Either follow the steps in 4.7.5, “STONITH in action” on page 123, or create a resource configuration XML file and use the cibadmin CLI to import it into your Cluster Information Base (CIB). Since we described the graphical way in 4.7.5, “STONITH in action” on page 123, we use the CLI to import a configuration into the CIB here.
Example 5-54 shows the configuration file that we create.
Example 5-54 stonith_snipl.xml used to create the STONITH resource in Heartbeat
lnxsu2:/etc/ha.d # cat stonith_snipl.xml<clone id="stonithcloneset"><meta_attributes id="stonith-options"><attributes><nvpair id="stonith-unique" name="globally_unique" value="false"/></attributes></meta_attributes><instance_attributes id="stonithcloneset"><attributes><nvpair id="stonithcloneset-01" name="clone_node_max" value="1"/></attributes></instance_attributes><primitive id="stonithclone" class="stonith" type="lic_vps" provider="heartbeat"><instance_attributes id="stonithclone"><attributes><nvpair id="stonithclone-01" name="compat_mode" value="snipl_file"/><nvpair id="stonithclone-02" name="lic_config" value="/etc/snipl.conf"/></attributes></instance_attributes></primitive></clone>
Chapter 5. Linux-HA usage scenarios 195

a. Import the configuration into the CIB with the command shown in Example 5-55.
Example 5-55 Importing STONITH configuration into CIB
lnxsu2:/etc/ha.d # cibadmin -C -o resources -x ./stonith_snipl.xml
b. Start the resource with the command shown in Example 5-56.
Example 5-56 Starting the STONITH resource
lnxsu2:/etc/ha.d # crm_resource -V -t clone -r stonithcloneset -p target_role -v started
c. Check that the STONITH resources have started (Example 5-57).
Example 5-57 Monitoring the cluster status
lnxsu2:/etc/ha.d # crm_mon -i 2Refresh in 1s...
============Last updated: Tue Nov 18 18:37:39 2008Current DC: lnxsu2 (df0318c3-7e85-42e4-9e63-9b36244dd952)2 Nodes configured.2 Resources configured.============
Node: lnxsu1 (dad43330-d351-4b3f-9fa8-52f2c74bc484): onlineNode: lnxsu2 (df0318c3-7e85-42e4-9e63-9b36244dd952): online
Clone Set: stonithcloneset stonithclone:0 (stonith:lic_vps): Started lnxsu1 stonithclone:1 (stonith:lic_vps): Started lnxsu2
You are now ready to move on with further Heartbeat configuration.
196 Achieving High Availability on Linux for System z with Linux-HA Release 2

Configuring the CRM options for HeartbeatConfigure the CRM options shown in Example 5-58 for Heartbeat. These options define the global behavior of a cluster.
Example 5-58 CRM options for Heartbeat
lnxsu2:/etc/ha.d # cat cluster_property.xml<cluster_property_set id="cibbootstrap"><attributes><nvpair id="cibbootstrap-01" name="cluster-delay" value="40"/><nvpair id="cibbootstrap-02" name="default-resource-stickiness" value="INFINITY"/><nvpair id="cibbootstrap-03" name="default-resource-failure-stickiness" value="-500"/><nvpair id="cibbootstrap-04" name="stonith-enabled" value="true"/><nvpair id="cibbootstrap-05" name="stonith-action" value="poweroff"/><nvpair id="cibbootstrap-06" name="symmetric-cluster" value="true"/><nvpair id="cibbootstrap-07" name="no-quorum-policy" value="stop"/></attributes></cluster_property_set>
Here is an explanation of each of the nvpairs:
� name="cluster-delay" value="40"
If there is a transition action in execution and nothing has been reported after 40 seconds, then the transition and subsequent actions are deemed failed.
� name="default-resource-stickiness" value="INFINITY"
Resources always remain in their current location unless forced to migrate (either due to a node failure, or administrative change). This is equivalent to setting auto_failback to off.
� default-resource-failure-stickiness" value="-500"
This defines the threshold at which resources should failover to another node. A value of -500 is indicating that the resources prefer not to failover to another node.
� name="stonith-enabled" value="true"
STONITH is enabled.
� name="stonith-action" value="poweroff"
The action taken by STONITH is to halt the misbehaving node. In our case, it logs off that Linux guest completely.
� name="symmetric-cluster" value="true"
Resources are permitted to run anywhere unless specified by resource constraints.
Chapter 5. Linux-HA usage scenarios 197

� name="no-quorum-policy" value="stop"
If there is no quorum policy detected, the action taken upon a resource failure is to stop that resource.
To configure the CRM options:
1. Create an XML file that contains the options that you want to change.
2. Use the cibadmin CLI to import this configuration into the CIB. 5
3. After the file is set up, import it into the Heartbeat CIB (Example 5-59).
Example 5-59 Importing a CRM configuration
lnxsu2:/etc/ha.d # cibadmin -C -o crm_config -x ./cluster_property.xml
You can also update these options on the Heartbeat GUI from the Configurations tab (Figure 5-28).
Figure 5-28 Using the Heartbeat GUI to update the CRM configuration for the cluster
5 See Exploring the High-Availability Storage Foundation guide from Novell at the following address: http://wiki.novell.com/images/3/37/Exploring_HASF.pdf
198 Achieving High Availability on Linux for System z with Linux-HA Release 2

Configuring the OCFS2 file system resource in HeartbeatNow create the OCFS2 file system resource in Heartbeat. Imagine this resource doing the actual mounting of the OCFS2 file system. The local Filesystem resource agent communicates to OCFS2 which nodes are part of the cluster and which are not. The file system is only mounted on the active nodes. See Figure 5-17 on page 168 for the architecture diagram.
We added the OCFS2 file system resource through importing a resource configuration XML file into the CIB by using cibadmin. The resource can also be added through the Heartbeat GUI, but we do not discuss the process here.
The OCFS2 file system resource must be created as a cloned resource because the same resource must exist and run on all cluster members. Because we configured O2CB on both lnxsu1 and lnxsu2, we must configure the OCFS2 file system resource on both systems. When the cluster is functioning properly and all node members are working correctly, the OCFS2 file system is mounted on all cluster members, which is the “clustered” part. The resource is of type Filesystem.
You create a resource configuration file as shown in Example 5-60.
Example 5-60 Filesystem resource configuration file
lnxsu2:/etc/ha.d # cat filesystem.xml<clone id="ocfs2cloneset"><meta_attributes id="ocfs2-options"><attributes><nvpair id="ocfs2-unique" name="globally_unique" value="false"/><nvpair id="ocfs2-notify" name="notify" value="true"/></attributes></meta_attributes><instance_attributes id="ocfs2cloneset"><attributes><nvpair id="ocfs2cloneset-01" name="clone_node_max" value="1"/><nvpair id="ocfs2cloneset-02" name="target_role" value="started"/></attributes></instance_attributes><primitive id="ocfs2clone" class="ocf" type="Filesystem" provider="heartbeat"><operations><op name="monitor" interval="5s" timeout="10s" prereq="nothing" id="ocfs2clone-op-01"/></operations><instance_attributes id="ocfs2clone"><attributes><nvpair id="ocfs2clone-01" name="device" value="/dev/dasdc1"/><nvpair id="ocfs2clone-02" name="directory" value="/ocfs2"/>
Chapter 5. Linux-HA usage scenarios 199
<nvpair id="ocfs2clone-03" name="fstype" value="ocfs2"/></attributes></instance_attributes></primitive></clone>
From this file, you see that the name of the clone set is ocfs2cloneset and it has two attributes: clone_node_max, and target_role.
clone_node_max This first attribute defines the maximum instance of this resource that can run in one node.
target_role This second attribute defines the desired status of all the cloned resources. In our case, that role is started. This means that, as soon as you import this resource into your CIB, it is started.
Two significant meta_attribute definitions are also attached to this clone set:
� notify="true": This definition allows the resource agent to be notified of the cluster membership status.
� globally_unique="false": By setting this attribute to false, we indicate that this clone set is an anonymous one. Anonymous clones behave completely identically on every node.
Diving deeper, each cloned resource has an ID defined by primitive id, which in our case is ocfs2clone, followed by a number attached by Heartbeat to make it unique. For example, since we have two nodes in our cluster, Heartbeat generates two cloned resources under this clone set, one with the ID ocfs2clone:0 and the other with the ID ocfs2clone:1. Within the cloned resources, there are three important attributes:
device This attribute defines the name of the OCFS2 device that we want to mount. In our case, that is /dev/dasdc1.
directory This attribute defines the name of the directory on which the OCFS2 devices is to be mounted. This directory must already exist. In our case, we want to mount our OCFS2 device in the /ocfs2 directory.
fstype This attribute defines the file system type that is to be mounted. It must be set to ocfs2.
Notice that the cloned resource also have an operation defined between the <operations> ... </operations> tags. The monitor operation is defined here. This operation tells the Filesystem resource agent to monitor the OCFS2 file system mounted on the /ocfs2 directory for errant behavior.
200 Achieving High Availability on Linux for System z with Linux-HA Release 2

Now that you have customized an XML configuration file, import it into the CIB as shown in Example 5-61.
Example 5-61 Importing the Filesystem resource configuration into CIB
lnxsu2:/etc/ha.d # cibadmin -C -o resources -x ./filesystem.xml
Heartbeat should automatically start this resource on your cluster nodes because target_role is defined as started. To verify that it has started successfully, you can run the crm_mon command or view the resource from the Heartbeat GUI (Example 5-62).
Example 5-62 Output of running crm_mon
lnxsu2:/etc/ha.d # crm_mon -i 2Refresh in 2s...
============Last updated: Wed Nov 19 12:15:32 2008Current DC: lnxsu2 (df0318c3-7e85-42e4-9e63-9b36244dd952)2 Nodes configured.2 Resources configured.============
Node: lnxsu1 (dad43330-d351-4b3f-9fa8-52f2c74bc484): onlineNode: lnxsu2 (df0318c3-7e85-42e4-9e63-9b36244dd952): online
Clone Set: ocfs2cloneset ocfs2clone:0 (ocf::heartbeat:Filesystem): Started lnxsu1 ocfs2clone:1 (ocf::heartbeat:Filesystem): Started lnxsu2Clone Set: stonithcloneset stonithclone:0 (stonith:lic_vps): Started lnxsu1 stonithclone:1 (stonith:lic_vps): Started lnxsu2
Another sure way of knowing that the resource has done its job is to verify that the OCFS2 file system has been mounted on all your cluster nodes (Example 5-63).
Example 5-63 Checking that the OCFS2 file system has been mounted
lnxsu1:~ # dfFilesystem 1K-blocks Used Available Use% Mounted on/dev/dasdb1 6389352 3344292 2720492 56% /udev 509328 104 509224 1% /dev/dev/dasdc1 2403264 141228 2262036 6% /ocfs2
Chapter 5. Linux-HA usage scenarios 201

lnxsu2:~ # dfFilesystem 1K-blocks Used Available Use% Mounted on/dev/dasdb1 6389352 2874812 3189972 48% /udev 509328 104 509224 1% /dev/dev/dasdc1 2403264 141228 2262036 6% /ocfs2
You can also verify that OCFS2 has been mounted by using the mount command (Example 5-64).
Example 5-64 Using the mount command to verify OCFS2 mount
lnxsu1:~ # mount/dev/dasdb1 on / type ext3 (rw,acl,user_xattr)proc on /proc type proc (rw)sysfs on /sys type sysfs (rw)debugfs on /sys/kernel/debug type debugfs (rw)udev on /dev type tmpfs (rw)devpts on /dev/pts type devpts (rw,mode=0620,gid=5)securityfs on /sys/kernel/security type securityfs (rw)configfs on /sys/kernel/config type configfs (rw)ocfs2_dlmfs on /dlm type ocfs2_dlmfs (rw)/dev/dasdc1 on /ocfs2 type ocfs2 (rw,_netdev,heartbeat=local)
lnxsu2:~ # mount/dev/dasdb1 on / type ext3 (rw,acl,user_xattr)proc on /proc type proc (rw)sysfs on /sys type sysfs (rw)debugfs on /sys/kernel/debug type debugfs (rw)udev on /dev type tmpfs (rw)devpts on /dev/pts type devpts (rw,mode=0620,gid=5)securityfs on /sys/kernel/security type securityfs (rw)configfs on /sys/kernel/config type configfs (rw)ocfs2_dlmfs on /dlm type ocfs2_dlmfs (rw)/dev/dasdc1 on /ocfs2 type ocfs2 (rw,_netdev,heartbeat=local)
In /var/log/messages, or wherever you log your Heartbeat messages, you should see messages similar to those in Example 5-65.
Example 5-65 Messages indicating that OCFS2 has been successfully started
Nov 17 19:07:50 lnxsu2 Filesystem[20235]: [20286]: INFO: 9770BD4F2AAE4B39BA62B4F7545866A9: Existing node list: Nov 17 19:07:50 lnxsu2 Filesystem[20235]: [20287]: INFO: 9770BD4F2AAE4B39BA62B4F7545866A9: Activating node: lnxsu1
202 Achieving High Availability on Linux for System z with Linux-HA Release 2

Nov 17 19:07:50 lnxsu2 Filesystem[20235]: [20289]: INFO: 9770BD4F2AAE4B39BA62B4F7545866A9: Activating node: lnxsu2Nov 17 19:07:50 lnxsu2 kernel: Node lnxsu1 is up in group 9770BD4F2AAE4B39BA62B4F7545866A9Nov 17 19:07:50 lnxsu2 kernel: Node lnxsu2 is up in group 9770BD4F2AAE4B39BA62B4F7545866A9
To stop the OCFS2 resource on all nodes in your cluster, run the command shown in Example 5-66.
Example 5-66 Stopping the OCFS2 resource on all nodes in the cluster
lnxsu2:/etc/ha.d # crm_resource -r ocfs2cloneset -p target_role -v stopped
When you stop the resource, you see messages similar to those in Example 5-67 in the /var/log/messages directory.
Example 5-67 Messages indicating that OCFS2 has been successfully stopped
Nov 18 17:01:23 lnxsu1 Filesystem[15807]: [15867]: INFO: /sys/kernel/config/cluster/ocfs2/heartbeat/9770BD4F2AAE4B39BA62B4F7545866A9: Removing membership directory.Nov 18 17:01:23 lnxsu1 kernel: Node lnxsu2 is down in group 9770BD4F2AAE4B39BA62B4F7545866A9Nov 18 17:01:23 lnxsu1 kernel: Node lnxsu1 is down in group 9770BD4F2AAE4B39BA62B4F7545866A9
You should also see that, when you run the df command, OCFS2 is no longer mounted (Example 5-68).
Example 5-68 Verifying that the OCFS2 device is no longer mounted
lnxsu1:/usr/src # dfFilesystem 1K-blocks Used Available Use% Mounted on/dev/dasdb1 6389352 3352468 2712316 56% /udev 509328 104 509224 1% /dev
If you had stopped the OCFS2 resource, restart it by using the command shown in Example 5-69.
Example 5-69 Starting the OCFS2 resource on all nodes in the cluster
lnxsu2:/etc/ha.d # crm_resource -r ocfs2cloneset -p target_role -v started
Chapter 5. Linux-HA usage scenarios 203

Configuring the location constraints in HeartbeatNow that the OCFS2 resource is defined in Heartbeat, define the location constraints so that Heartbeat knows where to run the cloned resources.
1. Create the constraints configuration file as shown in Example 5-70.
Example 5-70 Location constraints for the OCFS2 clone resources
lnxsu2:/etc/ha.d # cat ocfs2_constraints.xml<constraints> <rsc_location id="location_ocfs_lnxsu1" rsc="ocfs2clone:0"> <rule id="prefered_location_lnxsu1" score="INFINITY"> <expression attribute="#uname" id="location_ocfs_1" operation="eq" value="lnxsu1"/> </rule> </rsc_location> <rsc_location id="location_ocfs_lnxsu2" rsc="ocfs2clone:1"> <rule id="prefered_location_lnxsu2" score="INFINITY"> <expression attribute="#uname" id="location_ocfs_2" operation="eq" value="lnxsu2"/> </rule> </rsc_location></constraints>
This configuration indicates that the clone with the ID ocfs2clone:0 must run on lnxsu1 all the time (indicated by the INFINITY score). The clone with the ID ocfs2clone:1 must run on lnxsu2 all the time.
2. Import the constraints into the CIB by using the command in Example 5-71.
Example 5-71 Importing the constraints configuration into CIB
lnxsu2:/etc/ha.d # cibadmin -C -o constraints -x ./ocfs2_constraints.xml
204 Achieving High Availability on Linux for System z with Linux-HA Release 2

You can also add the location constraints through the Heartbeat GUI. Either way, the GUI should look as shown in Figure 5-29 after you are done.
Figure 5-29 Constraints displayed in the Heartbeat GUI
Verifying the order of services up startupAs mentioned in 5.2.2, “Architectural overview of OCFS2 with Linux-HA Heartbeat” on page 167, the order of services defined to begin at startup are extremely important. Remember that in “Starting Heartbeat” on page 178, we configured Heartbeat to start on boot, and in “Configuring OCFS2” on page 183, we configured O2CB to start on boot. The Heartbeat’s Filesystem resource requires that the OCFS2 modules are loaded and the cluster is online before it can mount the OCFS2 file system. Therefore, we must ensure that the O2CB service starts before the Heartbeat service does and that Heartbeat shuts down before O2CB does.
Chapter 5. Linux-HA usage scenarios 205

Verify the start order in the run times that you use. In our environment, we use runtime 3 the most. In the /etc/init.d/rc3.d directory, we look at the ordering of the start and stop scripts (Example 5-72).
Example 5-72 Verifying the order of services on boot
lnxsu1:/etc/init.d/rc3.d # lsK07heartbeat K10splash K16network S06slpd S11running-kernelK08cron K10sshd K19haldaemon S06syslog S11splashK08xinetd K13nfs K20dbus S07auditd S11sshdK09nscd K13nfsboot K20random S07portmap S12nscdK09o2cb K13smbfs K20resmgr S07splash_early S12o2cbK09postfix K14auditd S01dbus S08nfs S12postfixK09suseRegister K14portmap S01random S08nfsboot S12suseRegisterK10alsasound K14splash_early S01resmgr S08smbfs S13cronK10cups K15slpd S02haldaemon S11alsasound S13xinetdK10running-kernel K15syslog S05network S11cups S14heartbeat
The files in the /etc/init.d/rcx.d directories are symbolic links to the corresponding init scripts in the /etc/init.d directory. Therefore, S12o2cb is just a symbolic link to /etc/init.d/o2cb.
The links that start with S denote the ordering of the services that are set to start on boot. The services start in the order of S01 - S14. From the numbers, you can tell that o2cb is set to start before heartbeat, which is what we want.
The links starting with K denote the ordering of services to stop when the system is shutting down. Similar to the S links, the K links tell the system to shut down the services in the order of small to large. In our case, they go from K07 - K20. From the numbers, you can tell that heartbeat must be shut down before o2cb, which is what we want.
On your system, if the ordering is not what you want, you can change it by manipulating the symbolic links to reflect the desired ordering. To create a link, use the following command in the directory in which you want the symbolic link to be created:
lnxsu1:/etc/init.d/rc3.d # ln -s /etc/init.d/<service> <link-name>
If you want to remove a symbolic link, enter the following command:
lnxsu1:/etc/init.d/rc3.d # rm <link-name>
206 Achieving High Availability on Linux for System z with Linux-HA Release 2

Final verification before testingCheck the health of the entire cluster, including the CIB configuration and the status, before conducting testing. Run the cibadmin command to generate the cib.xml file of the current configuration and status. Then check the health of the cib.xml file with the ciblint command. As you can see from the ciblint output in Example 5-73, there are no error messages from the standpoint of the cluster configuration and the cluster status.
Example 5-73 Checking the health of cib.xml
lnxsu2:/etc/ha.d/cib1119 # cibadmin -Q > cib.xmllnxsu2:/etc/ha.d/cib1119 # ciblint -f cib.xmlINFO: CIB has non-default value for default-resource-failure-stickiness [-500]. Default value is [0]INFO: Explanation of default-resource-failure-stickiness option: default-resource-failure-stickinessINFO: CIB has non-default value for cluster-delay [40]. Default value is [60s]INFO: Explanation of cluster-delay option: Round trip delay over the network (excluding action execution)INFO: The "correct" value will depend on the speed and load of yourINFO: network and cluster nodes.INFO: CIB has non-default value for default-resource-stickiness [INFINITY]. Default value is [0]INFO: Explanation of default-resource-stickiness option: default-resource-stickinessINFO: Resource ocfs2clone:0 running on node lnxsu1INFO: Resource ocfs2clone:1 running on node lnxsu2INFO: Resource stonithclone:0 running on node lnxsu1INFO: Resource stonithclone:1 running on node lnxsu2
We also run the crm_verify command (Example 5-74) to check the running CIB. You do not need to generate the cib.xml file to run this command.
Example 5-74 Running the crm_verify command
lnxsu2:/etc/ha.d # crm_verify -VL
If this command does not produce any output, that is a good sign that everything is running as intended.
Chapter 5. Linux-HA usage scenarios 207

5.2.4 Testing the OCFS2 and Heartbeat implementations
Now that the resources are set up and running, you can test the configuration.
Testing automatic remountFirst conduct a test to see that user-space Heartbeat is in fact in control of the cluster membership. You can do this by manually by unmounting the OCFS2 device and then verifying that the device automatically gets mounted again (Example 5-75).
Example 5-75 Testing automatic mount
lnxsu2:/etc/ha.d # dfFilesystem 1K-blocks Used Available Use% Mounted on/dev/dasdb1 6389352 2894260 3170524 48% /udev 509328 104 509224 1% /dev/dev/dasdc1 2403264 141228 2262036 6% /ocfs2
lnxsu2:/etc/ha.d # umount /dev/dasdc1
lnxsu2:/etc/ha.d # dfFilesystem 1K-blocks Used Available Use% Mounted on/dev/dasdb1 6389352 2894276 3170508 48% /udev 509328 104 509224 1% /dev
<wait a few seconds...>
lnxsu2:/etc/ha.d # dfFilesystem 1K-blocks Used Available Use% Mounted on/dev/dasdb1 6389352 2894288 3170496 48% /udev 509328 104 509224 1% /dev/dev/dasdc1 2403264 141228 2262036 6% /ocfs2
In this transaction sequence, the first df command lists all the devices that are mounted currently. You can see that the /dev/dasdc1 OCFS2 device is mounted on /ocfs2. Then we manually unmount the OCFS2 device from the command line by using the umount command. At this point, the device is no longer mounted, but to Heartbeat lnxsu2 is still an active node in the cluster. Therefore, Heartbeat indicates to OCFS2 that lnxsu2 is still alive and that is must mount the device back on. The momentary delay experienced before the device is remounted is based on the timing configurations of the resource in Heartbeat.
208 Achieving High Availability on Linux for System z with Linux-HA Release 2

You see messages like those in Example 5-76 in the /var/log/messages directory, indicating that the device is to be remounted.
Example 5-76 Messages indicating automatic remount of OCFS2 device
Nov 21 17:20:59 lnxsu2 tengine: [12936]: info: send_rsc_command: Initiating action 12: ocfs2clone:1_start_0 on lnxsu2Nov 21 17:20:59 lnxsu2 crmd: [12931]: info: do_lrm_rsc_op: Performing op=ocfs2clone:1_start_0 key=12:20:9d5ca586-802b-4639-b218-c175cc2aefd4)Nov 21 17:20:59 lnxsu2 lrmd: [12928]: info: rsc:ocfs2clone:1: startNov 21 17:20:59 lnxsu2 Filesystem[14513]: [14543]: INFO: Running start for /dev/dasdc1 on /ocfs2
The same test should work on all cluster nodes.
Testing a node failureWe test the Heartbeat implementation by simulating a node failure by killing the heartbeat process on the “bad” node, which causes Heartbeat to shut down abruptly. Use care when simulating a failure, especially if you only have a two-node cluster as in our case. With a two-node cluster, you can easily cause a split-brain scenario if you take down the heartbeat interface. By killing the heartbeat process (Example 5-77), the surviving node realizes that it can still send “I’m alive” packets but not receive them. Therefore, the “bad” node is deemed “unclean” and will be fenced.
Example 5-77 Simulating a node crash
lnxsu1:~ # pkill heartbeat
We kill the heartbeat process, triggering lnxsu2 to STONITH lnxsu1. If you run the crm_mon command on lnxsu2, you see that lnxsu1 is OFFLINE (Example 5-78).
Example 5-78 Monitoring a cluster after a simulated node crash
lnxsu2:/etc/ha.d # crm_mon -i 2
Refresh in 2s...
============Last updated: Mon Nov 24 16:27:07 2008Current DC: lnxsu2 (df0318c3-7e85-42e4-9e63-9b36244dd952)2 Nodes configured.2 Resources configured.============
Chapter 5. Linux-HA usage scenarios 209

Node: lnxsu1 (dad43330-d351-4b3f-9fa8-52f2c74bc484): OFFLINENode: lnxsu2 (df0318c3-7e85-42e4-9e63-9b36244dd952): online
Clone Set: ocfs2cloneset ocfs2clone:0 (ocf::heartbeat:Filesystem): Stopped ocfs2clone:1 (ocf::heartbeat:Filesystem): Started lnxsu2Clone Set: stonithcloneset stonithclone:0 (stonith:lic_vps): Stopped stonithclone:1 (stonith:lic_vps): Started lnxsu2
On lnxsu2, in the /var/log/messages directory, you see messages similar to those in Example 5-79, indicating the process of determining which node was “unclean” and the action to STONITH that node.
Example 5-79 Messages indicating that lnxsu1 is dead and should be fenced.
Nov 24 16:27:00 lnxsu2 heartbeat: [1717]: WARN: node lnxsu1: is deadNov 24 16:27:00 lnxsu2 heartbeat: [1717]: info: Link lnxsu1:hsi0 dead.Nov 24 16:27:00 lnxsu2 crmd: [1810]: notice: crmd_ha_status_callback: Status update: Node lnxsu1 now has status [dead]........Nov 24 16:27:00 lnxsu2 pengine: [2661]: info: determine_online_status: Node lnxsu2 is onlineNov 24 16:27:00 lnxsu2 pengine: [2661]: WARN: determine_online_status_fencing: Node lnxsu1 (dad43330-d351-4b3f-9fa8-52f2c74bc484) is un-expectedly downNov 24 16:27:00 lnxsu2 pengine: [2661]: info: determine_online_status_fencing: ha_state=dead, ccm_state=false, crm_state=online, join_state=down, expected=memberNov 24 16:27:00 lnxsu2 pengine: [2661]: WARN: determine_online_status: Node lnxsu1 is unclean........Nov 24 16:27:00 lnxsu2 pengine: [2661]: WARN: native_color: Resource ocfs2clone:0 cannot run anywhereNov 24 16:27:00 lnxsu2 pengine: [2661]: WARN: native_color: Resource stonithclone:0 cannot run anywhereNov 24 16:27:00 lnxsu2 pengine: [2661]: WARN: custom_action: Action ocfs2clone:0_stop_0 on lnxsu1 is unrunnable (offline)Nov 24 16:27:00 lnxsu2 pengine: [2661]: WARN: custom_action: Marking node lnxsu1 uncleanNov 24 16:27:00 lnxsu2 pengine: [2661]: notice: NoRoleChange: Leave resource ocfs2clone:1 (lnxsu2)Nov 24 16:27:00 lnxsu2 pengine: [2661]: WARN: custom_action: Action stonithclone:0_stop_0 on lnxsu1 is unrunnable (offline)
210 Achieving High Availability on Linux for System z with Linux-HA Release 2

Nov 24 16:27:00 lnxsu2 pengine: [2661]: WARN: custom_action: Marking node lnxsu1 uncleanNov 24 16:27:00 lnxsu2 pengine: [2661]: notice: NoRoleChange: Leave resource stonithclone:1 (lnxsu2)Nov 24 16:27:00 lnxsu2 pengine: [2661]: WARN: stage6: Scheduling Node lnxsu1 for STONITH........Nov 24 16:27:00 lnxsu2 stonithd: Host lnxsu1 lic_vps-reset 3 request successfulNov 24 16:27:00 lnxsu2 stonithd: [1808]: info: Succeeded to STONITH the node lnxsu1: optype=POWEROFF. whodoit: lnxsu2
Meanwhile, the OCFS2 file system is still mounted and accessible on lnxsu2 (Example 5-80).
Example 5-80 OCFS2 device still mounted and accessible on the surviving node
lnxsu2:~ # dfFilesystem 1K-blocks Used Available Use% Mounted on/dev/dasdb1 6389352 2897032 3167752 48% /udev 509328 104 509224 1% /dev/dev/dasdc1 2403264 149416 2253848 7% /ocfs2lnxsu2:~ # ls /ocfs2foo.txt foo2.txt foo3.txt lost+found
After rebooting the lnxsu1 node, it automatically rejoins the cluster, and its resources are started automatically (Example 5-81).
Example 5-81 All nodes running resources
lnxsu2:/etc/ha.d # crm_mon -i 2
Refresh in 2s...
============Last updated: Mon Nov 24 16:34:15 2008Current DC: lnxsu2 (df0318c3-7e85-42e4-9e63-9b36244dd952)2 Nodes configured.2 Resources configured.============
Node: lnxsu1 (dad43330-d351-4b3f-9fa8-52f2c74bc484): onlineNode: lnxsu2 (df0318c3-7e85-42e4-9e63-9b36244dd952): online
Clone Set: ocfs2cloneset ocfs2clone:0 (ocf::heartbeat:Filesystem): Started lnxsu1
Chapter 5. Linux-HA usage scenarios 211

ocfs2clone:1 (ocf::heartbeat:Filesystem): Started lnxsu2Clone Set: stonithcloneset stonithclone:0 (stonith:lic_vps): Started lnxsu1 stonithclone:1 (stonith:lic_vps): Started lnxsu2
5.3 Implementing NFS over OCFS2 under Heartbeat
In this section we explore running NFS in a Linux-HA Heartbeat cluster. We build the NFS resource on top of our existing OCFS2 infrastructure. This is good for situations where you want to build a highly available networked clustered file system.
5.3.1 Architecture of NFS over OCFS2
We want to build on top of the OCFS2 infrastructure and create an NFS resource in Heartbeat. The point is to export the OCFS2 directory as an NFS mount.
Unlike the OCFS2 resource, the NFS resource only runs on one node. When that node fails, the NFS resource is automatically migrated to one of the remaining nodes. Realize that all nodes in this cluster are active, but only one is running the NFS resource. Figure 5-30 on page 213 shows the high level architecture.
We want to create the NFS server resource as a group resource that contains a floating IP address and the NFS resource. NFS clients use the floating IP address to connect to the networked file system.
When the node with the NFS resource fails, the cluster fences the errant node, and the NFS group resource is migrated to a clean node where the OCFS2 infrastructure is already running. With this architecture, we minimize the downtime of the NFS service and ensure that no data has been lost.
212 Achieving High Availability on Linux for System z with Linux-HA Release 2

Figure 5-30 Running NFS as a Heartbeat resource
5.3.2 Implementing the architecture
The concept of Implementing NFS over OCFS2 under Heartbeat might sound confusing. However, you already did the hard part by setting up the OCFS2 infrastructure with Linux-HA Heartbeat. At this point, you only need to complete the following steps, which are explained in the sections that follow:
1. Prepare the NFS /etc/exportfs file.2. Make sure that portmapper is started.3. Create a group resource with a floating IP address and an NFS resource.4. Create a location constraint for the group resource.5. Create an ordering constraint in Heartbeat.6. Restart Heartbeat.7. Test NFS from a client.
System AActive server
OCFS2
Linux Linux
System BActive server
Shared disk system
heartbeat
OCFS2
Filesystem Filesystem
NFS
Chapter 5. Linux-HA usage scenarios 213
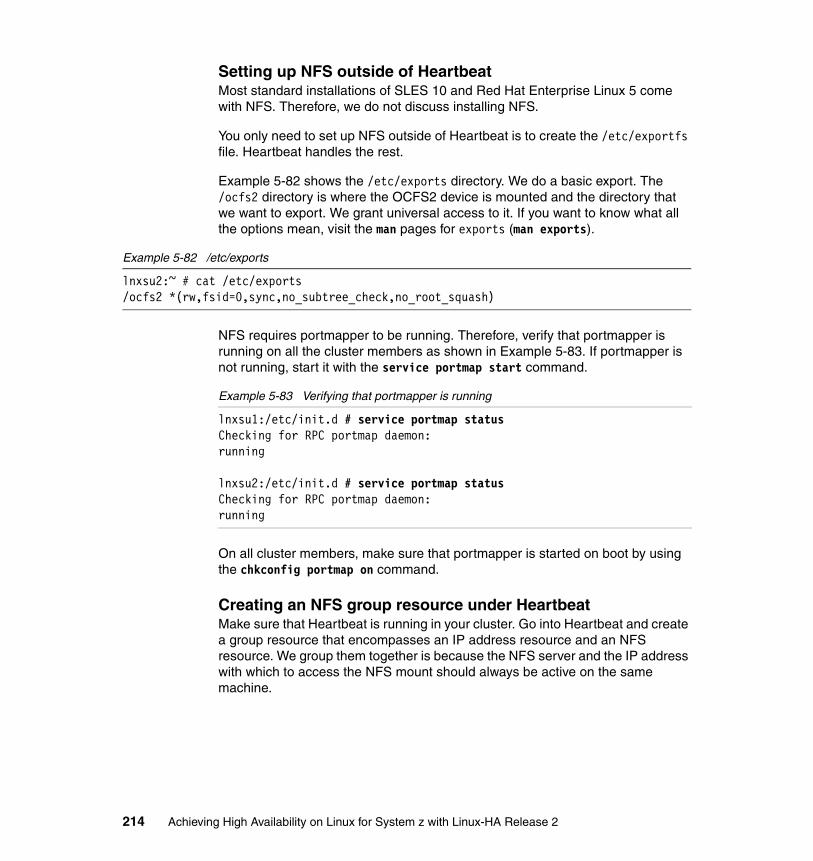
Setting up NFS outside of HeartbeatMost standard installations of SLES 10 and Red Hat Enterprise Linux 5 come with NFS. Therefore, we do not discuss installing NFS.
You only need to set up NFS outside of Heartbeat is to create the /etc/exportfs file. Heartbeat handles the rest.
Example 5-82 shows the /etc/exports directory. We do a basic export. The /ocfs2 directory is where the OCFS2 device is mounted and the directory that we want to export. We grant universal access to it. If you want to know what all the options mean, visit the man pages for exports (man exports).
Example 5-82 /etc/exports
lnxsu2:~ # cat /etc/exports/ocfs2 *(rw,fsid=0,sync,no_subtree_check,no_root_squash)
NFS requires portmapper to be running. Therefore, verify that portmapper is running on all the cluster members as shown in Example 5-83. If portmapper is not running, start it with the service portmap start command.
Example 5-83 Verifying that portmapper is running
lnxsu1:/etc/init.d # service portmap statusChecking for RPC portmap daemon: running
lnxsu2:/etc/init.d # service portmap statusChecking for RPC portmap daemon: running
On all cluster members, make sure that portmapper is started on boot by using the chkconfig portmap on command.
Creating an NFS group resource under HeartbeatMake sure that Heartbeat is running in your cluster. Go into Heartbeat and create a group resource that encompasses an IP address resource and an NFS resource. We group them together is because the NFS server and the IP address with which to access the NFS mount should always be active on the same machine.
214 Achieving High Availability on Linux for System z with Linux-HA Release 2

Create the XML configuration file shown in Example 5-84 for the group resource.
Example 5-84 Group resource including NFS and IP address
lnxsu2:/etc/ha.d # cat nfs_group.xml<group id="nfsgroup"> <meta_attributes id="nfsgroup-attributes"> <attributes> <nvpair id="nfsgroup-01" name="target_role" value="stopped"/> <nvpair id="nfsgroup-02" name="collocated" value="true"/> </attributes> </meta_attributes> <primitive id="nfsresource" class="lsb" type="nfsserver"> <operations> <op name="monitor" interval="5s" timeout="5s" prereq="nothing" onfail=”fence” id="nfs-resource-op-01"/> </operations> </primitive> <primitive id="ipresource" class="ocf" provider="heartbeat" type="IPaddr"> <operations> <op name="monitor" interval="5s" timeout="5s" prereq="nothing" onfail=”fence” id="ip-resource-op-01"/> </operations> <instance_attributes id="ia-ipaddr-01"> <attributes> <nvpair id="ipaddr-nv-01" name="ip" value="192.168.0.10"/> <nvpair id="ipaddr-nv-mask-01" name="cidr_netmask" value="255.255.255.0"/> </attributes> </instance_attributes> </primitive></group>
The collocated group attribute indicates that we want the resources that belong to this group to always run on the same node. You can see the two resources here: nfs_resource and ip_resource. Only the IP address parameter is mandatory parameter for ip_resource. Here we assign a test IP address of 192.168.0.10, which is be the IP address that we will use from the clients to connect to the NFS mount. We define a monitor operation for each resource. If the resource fails, we fence the whole node, which forces the group resource to migrate to the surviving node.
Chapter 5. Linux-HA usage scenarios 215

We use the cibadmin command to import it into our CIB (Example 5-85).
Example 5-85 Importing configuration into CIB
lnxsu2:/etc/ha.d # cibadmin -C -o resources -x ./nfs_group.xml
The group resource should not start automatically. You must create a couple of constraints before starting the resource.
Creating a location constraintCreate a location constraint for the group resource first, before creating the resource. After the resource is created, it looks for a location constraint on which to run. No harm is done in creating the constraint before the resource, except for a couple of warnings in crm_verify that you can ignore.
The location constraint for the NFS group resource is basic. As shown in Example 5-86, we tell it to always prefer to run on lnxsu2. This way, when lnxsu2 fails, it is migrated to lnxsu1.
Example 5-86 Location constraint for the NFS group resource
lnxsu2:/etc/ha.d # cat nfs_location_constraint.xml<constraints>
<rsc_location id="cli-prefer-nfsgroup" rsc="nfsgroup"><rule id="prefered_cli-prefer-nfsgroup" score="INFINITY"><expression attribute="#uname" id="nfsgroup-location-01" operation="eq"
value="lnxsu2"/></rule>
</rsc_location></constraints>
Import the XML configuration file into the CIB with the command shown in Example 5-87.
Example 5-87 Importing the location constraint into the CIB
lnxsu2:/etc/ha.d # cibadmin -C -o constraints -x ./nfs_location_constraint.xml
216 Achieving High Availability on Linux for System z with Linux-HA Release 2
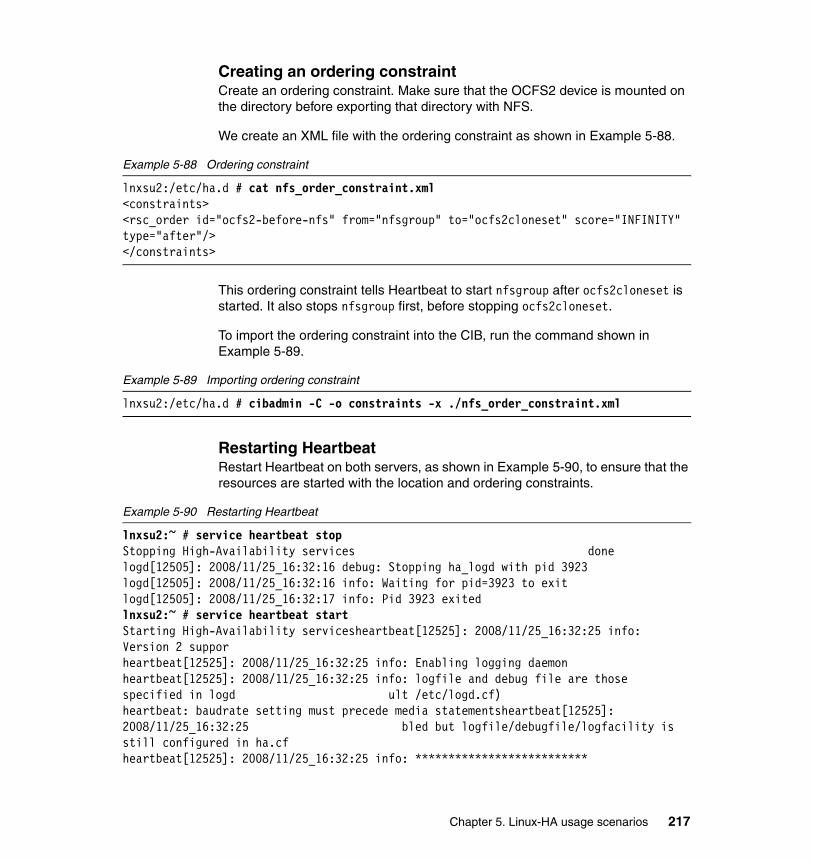
Creating an ordering constraintCreate an ordering constraint. Make sure that the OCFS2 device is mounted on the directory before exporting that directory with NFS.
We create an XML file with the ordering constraint as shown in Example 5-88.
Example 5-88 Ordering constraint
lnxsu2:/etc/ha.d # cat nfs_order_constraint.xml<constraints><rsc_order id="ocfs2-before-nfs" from="nfsgroup" to="ocfs2cloneset" score="INFINITY" type="after"/></constraints>
This ordering constraint tells Heartbeat to start nfsgroup after ocfs2cloneset is started. It also stops nfsgroup first, before stopping ocfs2cloneset.
To import the ordering constraint into the CIB, run the command shown in Example 5-89.
Example 5-89 Importing ordering constraint
lnxsu2:/etc/ha.d # cibadmin -C -o constraints -x ./nfs_order_constraint.xml
Restarting HeartbeatRestart Heartbeat on both servers, as shown in Example 5-90, to ensure that the resources are started with the location and ordering constraints.
Example 5-90 Restarting Heartbeat
lnxsu2:~ # service heartbeat stopStopping High-Availability services donelogd[12505]: 2008/11/25_16:32:16 debug: Stopping ha_logd with pid 3923logd[12505]: 2008/11/25_16:32:16 info: Waiting for pid=3923 to exitlogd[12505]: 2008/11/25_16:32:17 info: Pid 3923 exitedlnxsu2:~ # service heartbeat startStarting High-Availability servicesheartbeat[12525]: 2008/11/25_16:32:25 info: Version 2 supporheartbeat[12525]: 2008/11/25_16:32:25 info: Enabling logging daemonheartbeat[12525]: 2008/11/25_16:32:25 info: logfile and debug file are those specified in logd ult /etc/logd.cf)heartbeat: baudrate setting must precede media statementsheartbeat[12525]: 2008/11/25_16:32:25 bled but logfile/debugfile/logfacility is still configured in ha.cfheartbeat[12525]: 2008/11/25_16:32:25 info: **************************
Chapter 5. Linux-HA usage scenarios 217
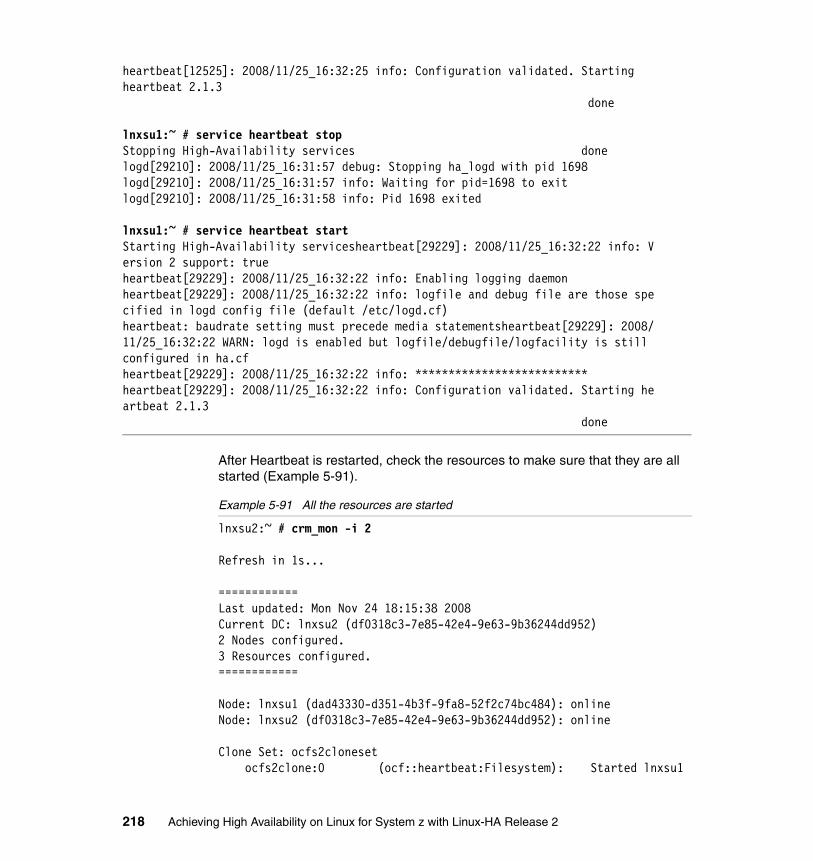
heartbeat[12525]: 2008/11/25_16:32:25 info: Configuration validated. Starting heartbeat 2.1.3 done
lnxsu1:~ # service heartbeat stopStopping High-Availability services donelogd[29210]: 2008/11/25_16:31:57 debug: Stopping ha_logd with pid 1698logd[29210]: 2008/11/25_16:31:57 info: Waiting for pid=1698 to exitlogd[29210]: 2008/11/25_16:31:58 info: Pid 1698 exited
lnxsu1:~ # service heartbeat startStarting High-Availability servicesheartbeat[29229]: 2008/11/25_16:32:22 info: V ersion 2 support: trueheartbeat[29229]: 2008/11/25_16:32:22 info: Enabling logging daemonheartbeat[29229]: 2008/11/25_16:32:22 info: logfile and debug file are those spe cified in logd config file (default /etc/logd.cf)heartbeat: baudrate setting must precede media statementsheartbeat[29229]: 2008/ 11/25_16:32:22 WARN: logd is enabled but logfile/debugfile/logfacility is still configured in ha.cfheartbeat[29229]: 2008/11/25_16:32:22 info: **************************heartbeat[29229]: 2008/11/25_16:32:22 info: Configuration validated. Starting he artbeat 2.1.3 done
After Heartbeat is restarted, check the resources to make sure that they are all started (Example 5-91).
Example 5-91 All the resources are started
lnxsu2:~ # crm_mon -i 2
Refresh in 1s...
============Last updated: Mon Nov 24 18:15:38 2008Current DC: lnxsu2 (df0318c3-7e85-42e4-9e63-9b36244dd952)2 Nodes configured.3 Resources configured.============
Node: lnxsu1 (dad43330-d351-4b3f-9fa8-52f2c74bc484): onlineNode: lnxsu2 (df0318c3-7e85-42e4-9e63-9b36244dd952): online
Clone Set: ocfs2cloneset ocfs2clone:0 (ocf::heartbeat:Filesystem): Started lnxsu1
218 Achieving High Availability on Linux for System z with Linux-HA Release 2

ocfs2clone:1 (ocf::heartbeat:Filesystem): Started lnxsu2Clone Set: stonithcloneset stonithclone:0 (stonith:lic_vps): Started lnxsu1 stonithclone:1 (stonith:lic_vps): Started lnxsu2Resource Group: nfs_group nfs_resource (lsb:nfsserver): Started lnxsu2 ip_resource (ocf::heartbeat:IPaddr): Started lnxsu2
Testing NFSAfter NFS is started, try to access the mount through another system, lnxrh1. The first ifconfig command in Example 5-92 configures an alias IP to the interface eth0 on lnxrh1. We do this so that we can access the test IP address, 192.168.0.10, that is associated with the NFS server.
Example 5-92 Accessing the NFS mount from another system
[root@lnxrh1 ~]# ifconfig eth0:0 192.168.0.5 up[root@lnxrh1 ~]# ifconfig eth0:0eth0:0 Link encap:Ethernet HWaddr 02:00:00:00:00:03 inet addr:192.168.0.5 Bcast:192.168.0.255 Mask:255.255.255.0 UP BROADCAST RUNNING NOARP MULTICAST MTU:1492 Metric:1
[root@lnxrh1 ~]# ping 192.168.0.10PING 192.168.0.10 (192.168.0.10) 56(84) bytes of data.64 bytes from 192.168.0.10: icmp_seq=1 ttl=64 time=0.152 ms64 bytes from 192.168.0.10: icmp_seq=2 ttl=64 time=0.165 ms
--- 192.168.0.10 ping statistics ---2 packets transmitted, 2 received, 0% packet loss, time 999msrtt min/avg/max/mdev = 0.152/0.158/0.165/0.014 ms[root@lnxrh1 ~]# mount 192.168.0.10:/ocfs2 /tmp[root@lnxrh1 ~]# ls /tmpfoo2.txt foo3.txt foo.txt lost+found[root@lnxrh1 ~]# umount /tmp[root@lnxrh1 ~]# ls /tmp[root@lnxrh1 ~]#
Chapter 5. Linux-HA usage scenarios 219

On lnxsu2, in the /var/log/messages directory, you see messages that indicate successful mounts and unmounts from the IP 192.168.0.5 (lnxrh1) as shown in Example 5-93.
Example 5-93 rpc.mountd messages in /var/log/messages
Nov 24 18:10:15 lnxsu2 rpc.mountd: authenticated mount request from 192.168.0.5:835 for /ocfs2 (/ocfs2)Nov 24 18:10:26 lnxsu2 rpc.mountd: authenticated unmount request from 192.168.0.5:855 for /ocfs2 (/ocfs2)
Testing NFS in HeartbeatAt this point, the environment is running as shown in Example 5-94.
Example 5-94 Monitoring the current Heartbeat environment on lnxsu2
lnxsu2:~ # crm_mon -i 2
Refresh in 1s...
============Last updated: Tue Nov 25 14:16:22 2008Current DC: lnxsu2 (df0318c3-7e85-42e4-9e63-9b36244dd952)2 Nodes configured.3 Resources configured.============
Node: lnxsu1 (dad43330-d351-4b3f-9fa8-52f2c74bc484): onlineNode: lnxsu2 (df0318c3-7e85-42e4-9e63-9b36244dd952): online
Clone Set: ocfs2cloneset ocfs2clone:0 (ocf::heartbeat:Filesystem): Started lnxsu1 ocfs2clone:1 (ocf::heartbeat:Filesystem): Started lnxsu2Clone Set: stonithcloneset stonithclone:0 (stonith:lic_vps): Started lnxsu1 stonithclone:1 (stonith:lic_vps): Started lnxsu2Resource Group: nfsgroup nfsresource (lsb:nfsserver): Started lnxsu2 ipresource (ocf::heartbeat:IPaddr): Started lnxsu2
Keep this monitor running, or start the Heartbeat GUI monitor. We want to see it transition when we simulate the failure.
220 Achieving High Availability on Linux for System z with Linux-HA Release 2

Now simulate a node failure by killing the heartbeat process. On lnxsu1, run the command shown in Example 5-95.
Example 5-95 Abruptly killing the heartbeat process on lnxsu1
lnxsu1:/etc/init.d # pkill heartbeat
The errant node is immediately halted. On the surviving node, lnxsu2, you can see that the resource group nfsgroup has migrated to run on lnxsu2 (Example 5-96).
Example 5-96 Post-node failure, resource migration
lnxsu2:~ # crm_mon -i 2
Refresh in 1s...
============Last updated: Tue Nov 25 14:10:02 2008Current DC: lnxsu2 (df0318c3-7e85-42e4-9e63-9b36244dd952)2 Nodes configured.3 Resources configured.============
Node: lnxsu1 (dad43330-d351-4b3f-9fa8-52f2c74bc484): OFFLINENode: lnxsu2 (df0318c3-7e85-42e4-9e63-9b36244dd952): online
Clone Set: ocfs2cloneset ocfs2clone:0 (ocf::heartbeat:Filesystem): Stopped ocfs2clone:1 (ocf::heartbeat:Filesystem): Started lnxsu2Clone Set: stonithcloneset stonithclone:0 (stonith:lic_vps): Stopped stonithclone:1 (stonith:lic_vps): Started lnxsu2Resource Group: nfsgroup nfsresource (lsb:nfsserver): Started lnxsu2 ipresource (ocf::heartbeat:IPaddr): Started lnxsu2
In the meantime, run the NFS test as explained in “Testing NFS” on page 219. The test is successful during the migration of the resource.
Obviously new clients connecting the NFS server will work, but what about clients that were already connected to the NFS server when the node failed? We tested this scenario by mounting the NFS directory on a client and then editing a file from the shared drive on the client machine. We then killed the node that was running the NFS resource in the middle of editing the file. We noticed a slight pause on the client before it resumed connection to the NFS server, now running
Chapter 5. Linux-HA usage scenarios 221

on another cluster member. The edits that we made to the file on the shared disk during the failover were not lost.
After the errant node is restarted (manually), the node automatically joins the cluster and starts its STONITH and OCFS2 resources. However, the nfsgroup resource stays on the surviving node because of our auto_failback off policy in Heartbeat. (See “Configuring the CRM options for Heartbeat” on page 197, for the CRM settings for the whole cluster).
5.4 Implementing DRBD under Heartbeat
Distributed Replicated Block Device (DRBD) technology allows the environment to have different disks mirrored in the block device layer via the TCP/IP network (Figure 5-31). With DRBD, we can have a RAID 1 implementation that mirrors each data block of the disk partition or logical volume.
Figure 5-31 DBRD
5.4.1 DRBD architecture
The solution can be configured by using either synchronous mode or asynchronous mode.
Synchronous mode means that the file system on the active node is notified that the writing of the block was finished when the block made it to both disks of the
Active ServersActive Servers
/appmounted
Data Center A
/appumounted
Data Center B
Data mirrored by using standard TCP/IP communication
222 Achieving High Availability on Linux for System z with Linux-HA Release 2

cluster. The system writes the next data block only after DRBD has the confirmation that the same data was written on the passive node. In this scenario, the system does not lose any transaction in case of a disaster.
Asynchronous mode means that the entity that issued the write request is informed about its completion as soon as the data is written to the local or active disk. Asynchronous mirroring is necessary to build mirrors over long distances, especially with high latency.
For the example used in this section, we used an environment where both Linux virtual servers reside on the same physical System z server, and they access disks on the same storage device. In a real-life scenario, it makes more sense to have a high availability implementation between different Systems z servers and different SANs.
5.4.2 Implementation under Heartbeat
Deploying a DRBD solution under Heartbeat involves several defined steps, which we explain in the following sections.
Preparing the environmentFor this scenario, we already have a two-node Heartbeat cluster up and running. See Chapter 4, “Linux-HA release 2 installation and initial configuration” on page 57, for instructions on how to configure a two-node Heartbeat cluster.
Four different disks, two per node, were assigned to our cluster. On both nodes, one of the disks was mapped by Linux as /dev/dasdd. The device name can vary and does not need to be exactly the same on both nodes.
Chapter 5. Linux-HA usage scenarios 223
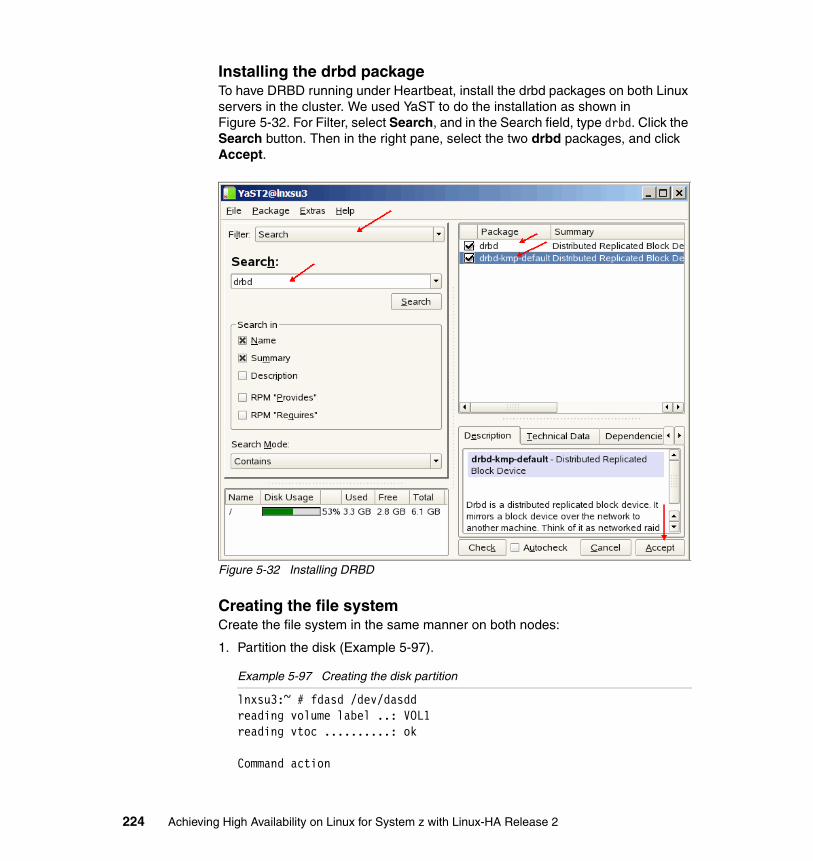
Installing the drbd packageTo have DRBD running under Heartbeat, install the drbd packages on both Linux servers in the cluster. We used YaST to do the installation as shown in Figure 5-32. For Filter, select Search, and in the Search field, type drbd. Click the Search button. Then in the right pane, select the two drbd packages, and click Accept.
Figure 5-32 Installing DRBD
Creating the file systemCreate the file system in the same manner on both nodes:
1. Partition the disk (Example 5-97).
Example 5-97 Creating the disk partition
lnxsu3:~ # fdasd /dev/dasddreading volume label ..: VOL1reading vtoc ..........: ok
Command action
224 Achieving High Availability on Linux for System z with Linux-HA Release 2

m print this menu p print the partition table n add a new partition d delete a partition v change volume serial t change partition type r re-create VTOC and delete all partitions u re-create VTOC re-using existing partition sizes s show mapping (partition number - data set name) q quit without saving changes w write table to disk and exit
Command (m for help): p
Disk /dev/dasdd: cylinders ............: 3339 tracks per cylinder ..: 15 blocks per track .....: 12 bytes per block ......: 4096 volume label .........: VOL1 volume serial ........: LXCF48 max partitions .......: 3
------------------------------- tracks ------------------------------- Device start end length Id System 2 50084 50083 unused
Command (m for help): nFirst track (1 track = 48 KByte) ([2]-50084): 2You have selected track 2Last track or +size[c|k|M] (2-[50084]): +1024MYou have selected track 21846
Command (m for help): p
Disk /dev/dasdd: cylinders ............: 3339 tracks per cylinder ..: 15 blocks per track .....: 12 bytes per block ......: 4096 volume label .........: VOL1 volume serial ........: LXCF48 max partitions .......: 3
Chapter 5. Linux-HA usage scenarios 225

------------------------------- tracks ------------------------------- Device start end length Id System /dev/dasdd1 2 21846 21845 1 Linux native 21847 50084 28238 unused
Command (m for help): wwriting VTOC...rereading partition table...lnxsu3:~ #
2. Set up the file systems under LVM management, so that you can see the flexibility of the solution (Example 5-98).
Example 5-98 Creating the LVM and file system
lnxsu3:~ # pvcreate /dev/dasdd1 Physical volume "/dev/dasdd1" successfully createdlnxsu3:~ # vgcreate app_vg /dev/dasdd1 Volume group "app_vg" successfully createdlnxsu3:~ # lvcreate -n app_lv -L 500M app_vg Logical volume "app_lv" created
lnxsu3:~ # mkfs.ext3 /dev/app_vg/app_lvmke2fs 1.38 (30-Jun-2005)Filesystem label=OS type: LinuxBlock size=4096 (log=2)Fragment size=4096 (log=2)128000 inodes, 128000 blocks6400 blocks (5.00%) reserved for the super userFirst data block=0Maximum filesystem blocks=1342177284 block groups32768 blocks per group, 32768 fragments per group32000 inodes per groupSuperblock backups stored on blocks: 32768, 98304
Writing inode tables: done Creating journal (4096 blocks): doneWriting superblocks and filesystem accounting information: done
226 Achieving High Availability on Linux for System z with Linux-HA Release 2

This filesystem will be automatically checked every 33 mounts or180 days, whichever comes first. Use tune2fs -c or -i to override.lnxsu3:~ #
Use the same procedure to create the logical volume in the other node.
Configuring the drbd packageTo configure the drbd package:
1. Create the configuration file in one of the nodes and then copy it to the other cluster node. There are many configuration options, of which all are described in the /usr/share/doc/packages/drbd/drbd.conf directory.
Our configuration uses the minimum setup (Example 5-99) to make it easier to understand the concepts.
Example 5-99 drbd.conf setup
resource app {
protocol C;incon-degr-cmd "echo '!DRBD! pri on incon-degr' | wall ; sleep 60 ; halt -f";
startup { degr-wfc-timeout 120; }
disk {on-io-error detach;
}
net {on-disconnect reconnect; }
syncer { rate 30M; group 1; al-extents 257; }
on lnxsu3 { device /dev/drbd0; disk /dev/app_vg/app_lv; address 10.0.1.90:7788;
Chapter 5. Linux-HA usage scenarios 227

meta-disk internal; } on lnxsu4 { device /dev/drbd0; disk /dev/app_vg/app_lv; address 10.0.1.94:7788; meta-disk internal; }}
2. After the configuration file is created, load the module and start the service, as shown in Example 5-100. Do this on both nodes.
Example 5-100 Loading drbd module and configuring for the next reboot
Loading the module:
lnxsu3:/etc # modprobe drbdlnxsu3:/etc # lsmod |grep drbddrbd 224504 0
Starting the service:
lnxsu3:/ # drbdadm up alllnxsu3:/
At this point, both servers start assuming that they are secondary DRBD nodes (Example 5-101).
Example 5-101 Both servers assuming secondary DRBD roles
lnxsu3:/ # cat /proc/drbdversion: 0.7.22 (api:79/proto:74)SVN Revision: 2572 build by lmb@dale, 2006-10-25 18:17:21 0: cs:Connected st:Secondary/Secondary ld:Inconsistent ns:0 nr:0 dw:0 dr:0 al:0 bm:48 lo:0 pe:0 ua:0 ap:0 1: cs:Unconfiguredlnxsu3:/ #
lnxsu4:/ # cat /proc/drbdversion: 0.7.22 (api:79/proto:74)SVN Revision: 2572 build by lmb@dale, 2006-10-25 18:17:21
228 Achieving High Availability on Linux for System z with Linux-HA Release 2

0: cs:Connected st:Secondary/Secondary ld:Inconsistent ns:0 nr:0 dw:0 dr:0 al:0 bm:48 lo:0 pe:0 ua:0 ap:0 1: cs:Unconfiguredlnxsu4:/ #
3. Tell DRBD which node will be the primary. On the first activation, force the primary node as shown in Example 5-102.
Example 5-102 Forcing the primary node in DRBD
lnxsu3:/ # drbdadm --do-what-I-say primary all lnxsu3:/ lnxsu3:/ # mount /dev/drbd0 /applnxsu3:/ # df -kFilesystem 1K-blocks Used Available Use% Mounted on/dev/dasdb1 6389352 3435144 2629640 57% /udev 509328 108 509220 1% /dev/dev/drbd0 495944 16804 453540 4% /app
In our scenario, lnxsu3 is now synchronizing the data to the lnxsu4 node (Example 5-103).
Example 5-103 Synchronization between cluster nodes
lnxsu3:/ # cat /proc/drbdversion: 0.7.22 (api:79/proto:74)SVN Revision: 2572 build by lmb@dale, 2006-10-25 18:17:21 0: cs:SyncSource st:Primary/Secondary ld:Consistent ns:20652 nr:0 dw:12 dr:20880 al:1 bm:49 lo:6 pe:0 ua:6 ap:0 [=>..................] sync'ed: 7.5% (360288/380928)K finish: 0:18:45 speed: 252 (240) K/sec 1: cs:Unconfiguredlnxsu3:/ # cat /proc/drbd
After the synchronization has completed, you see the new status of the device as shown in Example 5-104.
Example 5-104 Checking DRBD status
lnxsu3:/ # cat /proc/drbdversion: 0.7.22 (api:79/proto:74)SVN Revision: 2572 build by lmb@dale, 2006-10-25 18:17:21 0: cs:Connected st:Primary/Secondary ld:Consistent ns:12292 nr:64 dw:68 dr:12396 al:0 bm:5 lo:0 pe:0 ua:0 ap:0lnxsu3:/ #
Chapter 5. Linux-HA usage scenarios 229

Validating the drbd setupBefore you set up drbd under Heartbeat, conduct a manual test, as shown in Example 5-105, to verify if you can mount the file systems on both sides of the cluster.
Example 5-105 Verifying if the file systems can be mounted on both sides of the cluster
On primary server:
lnxsu3:/ # umount /applnxsu3:/ # drbdadm secondary alllnxsu3:/ #
On seocndary Server:lnxsu4:/ # drbdadm primary alllnxsu4:/ # mount /dev/drbd0 /applnxsu4:/ # df -k /appFilesystem 1K-blocks Used Available Use% Mounted on/dev/drbd0 495944 16808 453536 4% /applnxsu4:/ #
After the basic validation, set up the server to be started at boot time on both nodes (Example 5-106).
Example 5-106 Configuring drbd service to be started in the boot time
Setup to start the service on next reboot:
lnxsu3:/etc # chkconfig drbd onlnxsu3:/etc #
lnxsu3:/etc # chkconfig --list drbddrbd 0:off 1:off 2:off 3:on 4:off 5:on 6:off
5.4.3 Configuring DRBD under Heartbeat
In our scenario, Heartbeat is already working. The RG_A resource group has an associated IP address of 192.168.100.10. The plan is to set up the drbd resource under the same resource group. This means that the same resource group will be responsible for mounting the file system under drbd management and activate the IP address.
230 Achieving High Availability on Linux for System z with Linux-HA Release 2
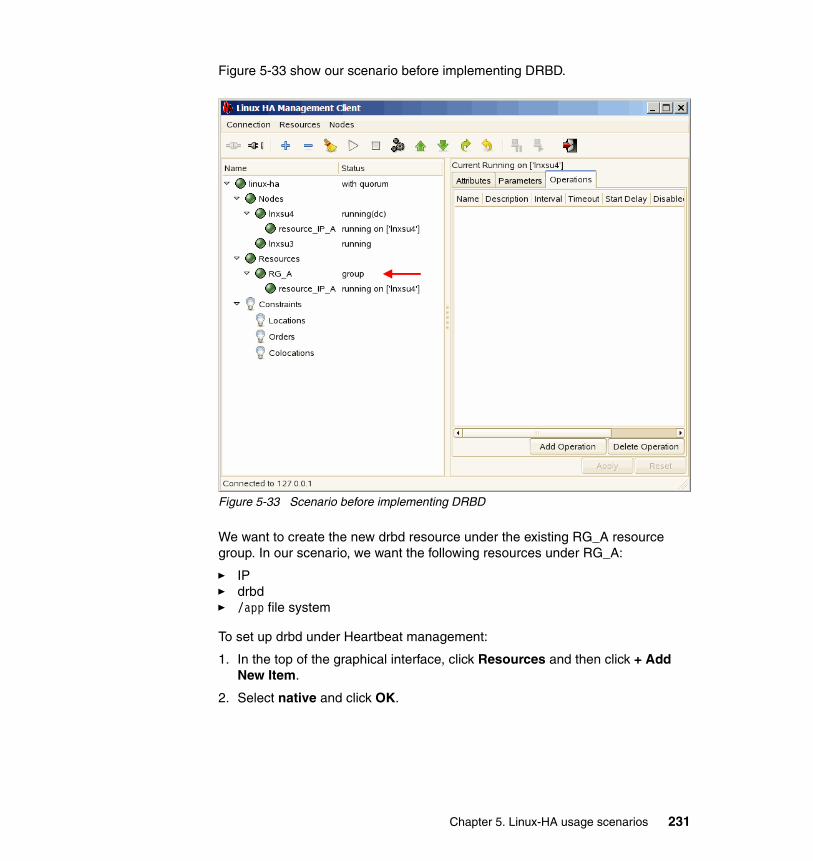
Figure 5-33 show our scenario before implementing DRBD.
Figure 5-33 Scenario before implementing DRBD
We want to create the new drbd resource under the existing RG_A resource group. In our scenario, we want the following resources under RG_A:
� IP� drbd� /app file system
To set up drbd under Heartbeat management:
1. In the top of the graphical interface, click Resources and then click + Add New Item.
2. Select native and click OK.
Chapter 5. Linux-HA usage scenarios 231

3. In the Add Native Resource window (Figure 5-34):
a. For Resource ID, type resource_DRBD_A.b. For Belong to Group, type RG_A.c. In the Name column under Type, select drbddisk.d. Click Add.
Figure 5-34 Setting up DRBD
232 Achieving High Availability on Linux for System z with Linux-HA Release 2

The new resource is automatically started in the node where RG_A is running (Figure 5-35). This means that the DRBD service is running on both nodes, but is primary on lnxsu4.
Figure 5-35 drbd running
The next step of this scenario is to add a file system under DRBD. The objective is to have the /app file system mounted always on the node where DRBD is primary. We previously created the file system as shown in Example 5-98 on page 226.
Go back to the GUI and add the file system:
1. At the top of the GUI, click Resources and then click + Add New Item.
2. Select native and click OK.
Chapter 5. Linux-HA usage scenarios 233

3. In the Add Native Resource window (Figure 5-36):
a. For Resource ID, type resource_FS_A.b. For Belong to group, type RG_A.c. In the Name column under Type, select Filesystem.d. Under Parameters:
i. For Device, select /dev/drbd0.ii. For directory, select /app (the mount point).iii. For fstype, select ext3.
e. Click Add.
Figure 5-36 DRBD - Adding the file system
At this point our scenario is ready, with a Resource Group with IP, drbd, and filesystem. Because the DRBD and file system are part of the same resource group, the file system is only mounted on the node, while DRBD is running as the primary.
234 Achieving High Availability on Linux for System z with Linux-HA Release 2

5.5 Implementing a DNS server under Heartbeat
In this section, we provide an example of a Domain Name System (DNS) implementation under the Heartbeat to show a different setup than the standard Berkeley Internet Name Domain (BIND) configuration, using the Heartbeat flexibility.
5.5.1 Architecture
Even with two DNS servers in the environment, and with all clients with both DNS servers configured, in a real scenario, if one DNS fails, usually a delay in the applications appears. Depending of the characteristics of the application, the delay can be big and make the environment unavailable.
This situation occurs because, if the client is running Linux or UNIX, the resolution order configured in the /etc/resolv.conf file is static. The client will always look up in the first DNS of this list, and the failover will happen for any connection with a lookup requirement.
You can resolve this situation by putting both “servers” under Heartbeat control. In this case, the IP addresses of both servers will be always be up and running even if one of them fails. The failover will happen in the server layer instead in the client, and the failover will happen one time instead in each TCP connection.
Similar to the flow chart in Figure 5-37 on page 236, the first change in the architecture is to change the failover layer from the client to the server. The second change in this implementation is in the BIND data management. The standard BIND implementation works with two different servers. The data is replicated by zone transferring, and the architecture BIND concept remains with primary and secondary DNS servers.
The new concept applied in this book means that we are using BIND with just one database accessed per two different servers in the same time by using a shared file system under OCFS2 control.
This solution has the following advantages:
� Centralized storage� Centralized management� Fast takeover and failback
We are not saying which is the best DNS solution to implement because many variables and products must be considered. Instead we are showing a possible solution that is different from the standard. In this case, users can still set up two
Chapter 5. Linux-HA usage scenarios 235
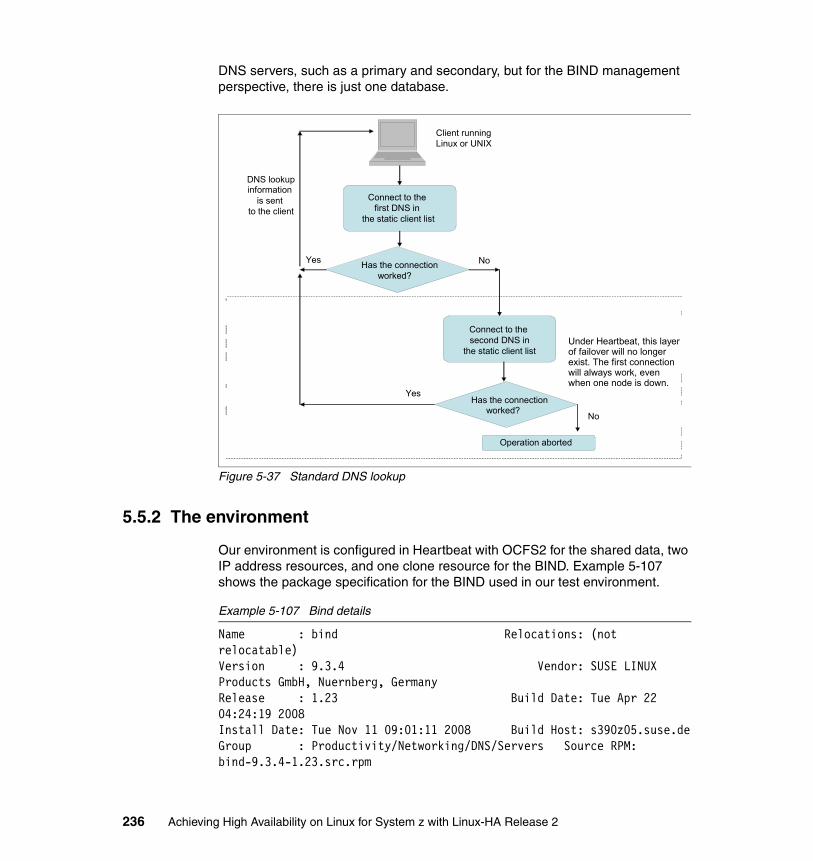
DNS servers, such as a primary and secondary, but for the BIND management perspective, there is just one database.
Figure 5-37 Standard DNS lookup
5.5.2 The environment
Our environment is configured in Heartbeat with OCFS2 for the shared data, two IP address resources, and one clone resource for the BIND. Example 5-107 shows the package specification for the BIND used in our test environment.
Example 5-107 Bind details
Name : bind Relocations: (not relocatable)Version : 9.3.4 Vendor: SUSE LINUX Products GmbH, Nuernberg, GermanyRelease : 1.23 Build Date: Tue Apr 22 04:24:19 2008Install Date: Tue Nov 11 09:01:11 2008 Build Host: s390z05.suse.deGroup : Productivity/Networking/DNS/Servers Source RPM: bind-9.3.4-1.23.src.rpm
Client runningLinux or UNIX
Connect to the first DNS in
the static client list
Has the connectionworked?
Yes
No
DNS lookupinformation
is sent to the client
Connect to the second DNS in
the static client list
Has the connectionworked? No
Operation aborted
Yes
Under Heartbeat, this layer of failover will no longer exist. The first connection will always work, even when one node is down.
236 Achieving High Availability on Linux for System z with Linux-HA Release 2
Size : 581287 License: X11/MITSignature : DSA/SHA1, Tue Apr 22 04:26:45 2008, Key ID a84edae89c800acaPackager : http://bugs.opensuse.orgURL : http://isc.org/sw/bind/Summary : Domain Name System (DNS) Server (named)Description :Berkeley Internet Name Domain (BIND) is an implementation of the DomainName System (DNS) protocols and provides an openly redistributablereference implementation of the major components of the Domain NameSystem. This package includes the components to operate a DNS server.
Authors:-------- ISC Software <[email protected]>Distribution: SUSE Linux Enterprise 10 (S/390X)
5.5.3 Implementing the DNS server
In this section, we explain how to implement the DNS server. Our scenario provides a solution with just one DNS database. In this case, the data must be shared between the two DNS servers. The solution used is OFCS2. For details about how to implement OCFS2, see 5.2.3, “Implementing the architecture” on page 169.
Chapter 5. Linux-HA usage scenarios 237
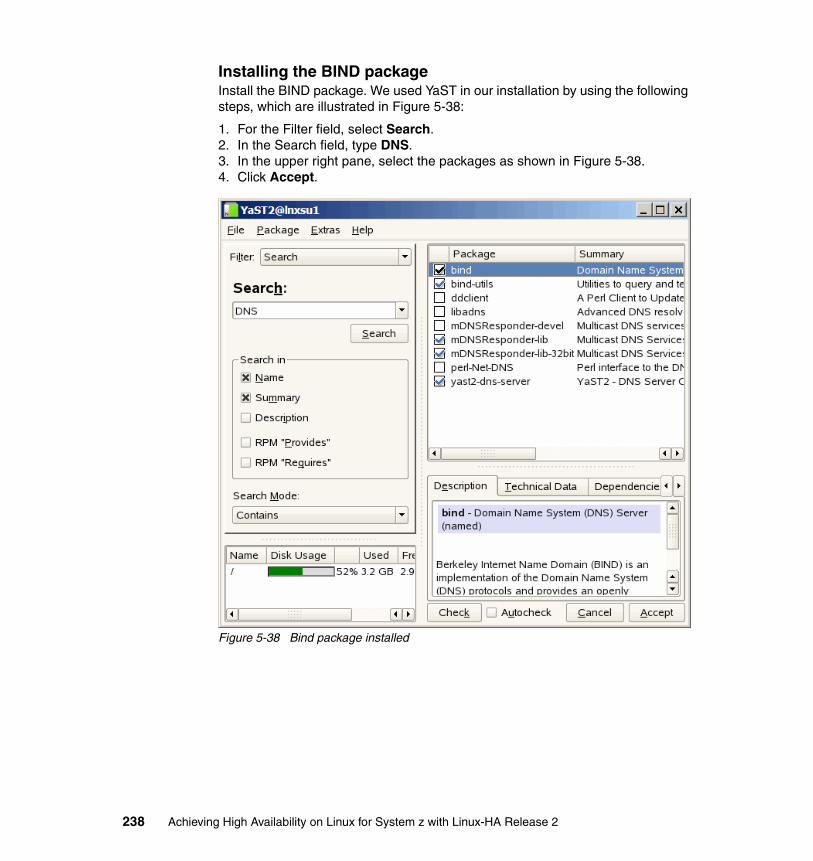
Installing the BIND packageInstall the BIND package. We used YaST in our installation by using the following steps, which are illustrated in Figure 5-38:
1. For the Filter field, select Search.2. In the Search field, type DNS.3. In the upper right pane, select the packages as shown in Figure 5-38.4. Click Accept.
Figure 5-38 Bind package installed
238 Achieving High Availability on Linux for System z with Linux-HA Release 2

Configuring the BIND (basic)To use the standard DNS files location, make a configuration in the /var/lib/named directory, which is also the mount point of OCFS2. Prior to mounting the OCFS2 in the new mount point, mount OCFS2 in any temporary directory and copy all contents from the /var/lib/named directory to the OCFS2 as shown in Example 5-108.
Example 5-108 Preparing the shared configuration
# mount -t ocfs2 /dev/dasdc2 /mnt# cp -pr /var/lib/named/* /mnt# umount /mnt# mv /var/lib/named /var/lib/named.ori# mkdir /var/lib/named# mount -t ocfs2 /dev/dasdc2 /var/lib/named
Because we have a shared file system, we do not need to make the same copy from the second node.
To avoid having two set of configuration files and the duplicated effort in maintaining those files, centralize the named.conf file in /var/lib/named directory of the OCFS2 shared file system. Make symlinks point /etc/named.conf to /var/lib/named/named.conf on both nodes. See Example 5-109.
Example 5-109 Centralizing the named.conf file and pointing symlinks to /etc/named.conf
# ln -s /var/lib/named/named.conf /etc/named.conf# ls -la /etc/named.conflrwxrwxrwx 1 root root 25 Nov 13 09:38 /etc/named.conf -> /var/lib/named/named.conf#
The rndc utility for name server controlTo make BIND administration easier, the package has a utility called rndc, which controls a named daemon locally and remotely. With rndc set up, administrators can manage the named daemon tasks on both servers from one centralized point.
Chapter 5. Linux-HA usage scenarios 239
To work, rndc demands additional configuration in the named.conf file as shown in Example 5-110.
Example 5-110 The rndc configuration
key "rndc-key" { algorithm hmac-md5; secret "f8WXBNRKQ/EmXhIPWu45Tw1RuQbbx/SzveqOqgEhPdnwg1ReSACe9Lfvm7Latd5D3sDJSYvqvts2MjaCWi+fXQ==";};
controls { inet * allow { 127.0.0.0/8; 192.168.1.0/24; } keys { rndc-key; };};
Heartbeat configurationsThe following Heartbeat configurations are essential to make this solution working properly:
� Daemon management
We want one and only one named daemon running on each node of our cluster, which is a feature granted by clone resources. Therefore, for our cluster, we create a clone resource to start the named daemon. If the named daemon is already running in one node, Heartbeat does not try to start a second instance in the event of a resource failover. Figure 5-39 on page 241 and Figure 5-40 on page 242 show how we set up this resource.
240 Achieving High Availability on Linux for System z with Linux-HA Release 2

Figure 5-39 shows the named clone resource (named_daemons-rg), as indicated by the word “clone” in the right Status column.
Figure 5-39 The named clone resource
Chapter 5. Linux-HA usage scenarios 241

Figure 5-40 shows our clone resource configuration for named_daemons-rg, which has a clone_max of 2 and a clone_node_max of 1. Across the top of the figure is the ID name of the resource, and closer to the right side is the resource.
Figure 5-40 Clone resource configuration
� IP address management of failover
To deploy this solution, we need two IP addresses, one for each instance of named running. With a cluster running in a normal situation, one IP address is bound to each node. In the event of a node failure, the IP address of the failing node fails over the other node.
For the DNS clients, the cluster appears as a standard primary and secondary DNS server configuration. For the cluster, two primary DNS servers share a common set of configuration and zone files.
242 Achieving High Availability on Linux for System z with Linux-HA Release 2

� Location constraints
To ensure that we always have the better scenario for the DNS servers, where each IP address and named daemon are running in their home nodes, we created a location constraint that enforces one IP address on each node in a sane cluster situation. That is, if our two nodes are up and running, each one will have one service IP address bound to them (Figure 5-41).
Figure 5-41 The location constraints for the IP addresses
Chapter 5. Linux-HA usage scenarios 243
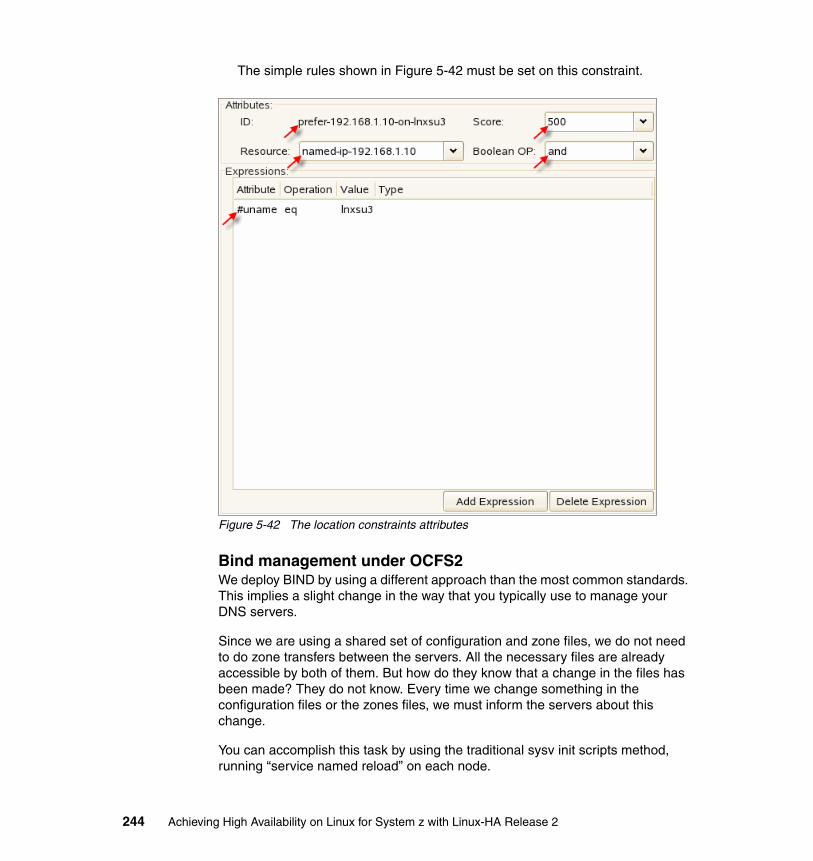
The simple rules shown in Figure 5-42 must be set on this constraint.
Figure 5-42 The location constraints attributes
Bind management under OCFS2We deploy BIND by using a different approach than the most common standards. This implies a slight change in the way that you typically use to manage your DNS servers.
Since we are using a shared set of configuration and zone files, we do not need to do zone transfers between the servers. All the necessary files are already accessible by both of them. But how do they know that a change in the files has been made? They do not know. Every time we change something in the configuration files or the zones files, we must inform the servers about this change.
You can accomplish this task by using the traditional sysv init scripts method, running “service named reload” on each node.
244 Achieving High Availability on Linux for System z with Linux-HA Release 2

Another option is to use the rndc utility, which is the remote name server control utility. With the rndc utility, you can tell both servers to reload their configuration and zone files without opening a shell session (Example 5-111). Everything is done by using a cryptographic messaging system between the servers.
Example 5-111 Reloading zone files using rndc
# rndc -s 192.168.1.20 reloadserver reload successful# rndc -s 192.168.1.10 reloadserver reload successful#
You must execute the rndc command for each node that is running BIND. If you have several servers, this can be a tedious and error prone task. You can easily automatize this task by using make and creating a makefile. In our laboratory, we created a makefile in the /var/lib/named/master directory (Example 5-112).
Example 5-112 A makefile to automatize the rndc task
# cd /var/lib/named/master# cat Makefiledefault: 5.12.9.in-addr.arpa itso.ibm.com @rndc -s 192.168.1.10 reload @rndc -s 192.168.1.20 reload#
After you create the directory, enter make inside that directory (Example 5-113). The make command reads the makefile and executes all actions that were defined there.
Example 5-113 Sending a reload to the servers using make
# makeserver reload successfulserver reload successful#
Chapter 5. Linux-HA usage scenarios 245

5.5.4 Validating the solution
After everything is set up, you can verify that each server will run one instance of “named”, the BIND daemon. One of the IP addresses of the BIND service will be assigned to the interface “eth0”, as shown in Example 5-114.
Example 5-114 IP address and named running on one node
# ps -ef | grep named | grep -v grepnamed 4401 1 0 11:29 ? 00:00:00 /usr/sbin/named -t /var/lib/named -u named
# ip addr list dev eth03: eth0: <BROADCAST,MULTICAST,UP> mtu 1492 qdisc pfifo_fast qlen 1000 link/ether 02:00:00:00:00:02 brd ff:ff:ff:ff:ff:ff inet 9.12.5.90/22 brd 9.12.7.255 scope global eth0 inet 192.168.1.10/24 brd 192.168.1.255 scope global eth0 inet6 fe80::200:0:200:2/64 scope link valid_lft forever preferred_lft forever#
Both DNS servers must respond to the queries as demonstrated in Example 5-115.
Example 5-115 Entering queries to the DNS servers
# host lnxsu4.itso.ibm.com 192.168.1.10Using domain server:Name: 192.168.1.10Address: 192.168.1.10#53Aliases:
lnxsu4.itso.ibm.com has address 9.12.5.94# host lnxsu4.itso.ibm.com 192.168.1.20Using domain server:Name: 192.168.1.20Address: 192.168.1.20#53Aliases:
lnxsu4.itso.ibm.com has address 9.12.5.94#
246 Achieving High Availability on Linux for System z with Linux-HA Release 2

If one of the nodes goes down, the only resource that should migrate is the BIND service IP address of that node as demonstrated in Example 5-116.
Example 5-116 All IP addresses running on one node
# ip address list dev eth03: eth0: <BROADCAST,MULTICAST,UP> mtu 1492 qdisc pfifo_fast qlen 1000 link/ether 02:00:00:00:00:02 brd ff:ff:ff:ff:ff:ff inet 9.12.5.90/22 brd 9.12.7.255 scope global eth0 inet 192.168.1.10/24 brd 192.168.1.255 scope global eth0 inet 192.168.1.20/24 brd 192.168.1.255 scope global secondary eth0 inet6 fe80::200:0:200:2/64 scope link valid_lft forever preferred_lft forever
# ps -ef | grep named | grep -v grepnamed 4401 1 0 11:29 ? 00:00:00 /usr/sbin/named -t /var/lib/named -u named
# host lnxsu4.itso.ibm.com 192.168.1.10Using domain server:Name: 192.168.1.10Address: 192.168.1.10#53Aliases:
lnxsu4.itso.ibm.com has address 9.12.5.94
# host lnxsu4.itso.ibm.com 192.168.1.20Using domain server:Name: 192.168.1.20Address: 192.168.1.20#53Aliases:
lnxsu4.itso.ibm.com has address 9.12.5.94#
5.6 Implementing DB2 under Heartbeat
In this section, we explain how to enable high availability on a DB2 database using Heartbeat. The intent of this section is not to go through the steps needed to install Linux, DB2, or Heartbeat, but to provide the configuration of a basic active/passive Heartbeat scenario for DB2. We assume that you have installed SLES 10 on z/VM and DB2 version 9.5 for Linux.
Chapter 5. Linux-HA usage scenarios 247

For details about how to install DB2, see Up and Running with DB2 on Linux, SG24-6899. For information about how install Heartbeat, see Chapter 4, “Linux-HA release 2 installation and initial configuration” on page 57.
5.6.1 Architecture of the active/passive Heartbeat scenario for DB2
Our cluster is composed of two SLES 10 SP2 servers that are running on z/VM 5.4. We installed a DB2 version 9.5 instance on an LVM /app shared directory. Other DB2 components, such as binaries, were installed on local directories. Figure 5-43 illustrates the architecture for this scenario.
Figure 5-43 Heartbeat architecture for DB2
5.6.2 Setting up the environment
For this high availability scenario, we configured the shared storage, LVM, and DB2.
Shared storageThe shared storage was configured on z/VM so that both nodes have read and write permission on the same disk.
Active - lnxsu5 Passive - lnxsu6
Syst
em z
10Heartbeat
Syst
em z
10
DB2
/app
248 Achieving High Availability on Linux for System z with Linux-HA Release 2
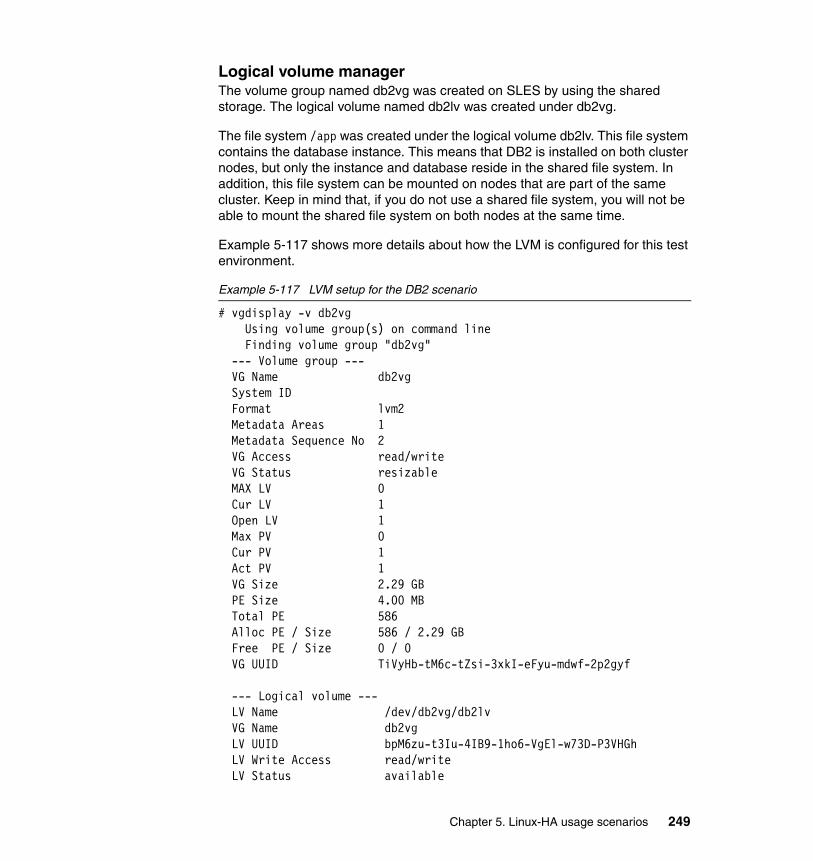
Logical volume managerThe volume group named db2vg was created on SLES by using the shared storage. The logical volume named db2lv was created under db2vg.
The file system /app was created under the logical volume db2lv. This file system contains the database instance. This means that DB2 is installed on both cluster nodes, but only the instance and database reside in the shared file system. In addition, this file system can be mounted on nodes that are part of the same cluster. Keep in mind that, if you do not use a shared file system, you will not be able to mount the shared file system on both nodes at the same time.
Example 5-117 shows more details about how the LVM is configured for this test environment.
Example 5-117 LVM setup for the DB2 scenario
# vgdisplay -v db2vg Using volume group(s) on command line Finding volume group "db2vg" --- Volume group --- VG Name db2vg System ID Format lvm2 Metadata Areas 1 Metadata Sequence No 2 VG Access read/write VG Status resizable MAX LV 0 Cur LV 1 Open LV 1 Max PV 0 Cur PV 1 Act PV 1 VG Size 2.29 GB PE Size 4.00 MB Total PE 586 Alloc PE / Size 586 / 2.29 GB Free PE / Size 0 / 0 VG UUID TiVyHb-tM6c-tZsi-3xkI-eFyu-mdwf-2p2gyf --- Logical volume --- LV Name /dev/db2vg/db2lv VG Name db2vg LV UUID bpM6zu-t3Iu-4IB9-1ho6-VgEl-w73D-P3VHGh LV Write Access read/write LV Status available
Chapter 5. Linux-HA usage scenarios 249

# open 1 LV Size 2.29 GB Current LE 586 Segments 1 Allocation inherit Read ahead sectors 0 Block device 253:0 --- Physical volumes --- PV Name /dev/dasdc1 PV UUID Zeve56-KEwx-VFVk-9jvI-jxR9-hIgx-ML1562 PV Status allocatable Total PE / Free PE 586 / 0 #
5.6.3 Configuring Heartbeat
In this active/passive scenario, we created the RG_DB2 resource group, which contains the following resources:
resource_ip This is the IP address to be enabled in the node when the database is up and running. In this case, we used the IP address of 192.168.30.10, which will be used to reach the database.
resource_vg This resource controls on which node the volume group should be activated. The configuration uses the OCF or Heartbeat provider. The only parameter to set up is the Volume Group name.
resource_fs This resource is responsible for mounting the file system. Remember that this is not a clone resource. Therefore, the file system will be mounted on the node when the resource is running.
resource_db2 This resource has the stop db2 and start db2 script.
In regard to the sequence, Heartbeat starts the resource group as follows:
1. Activates the IP address 192.168.30.10.2. Activates the volume group db2vg (vgchange -a -y).3. Mounts the /app file system under lvol db2lv.4. Runs the db2 script with the start option.
250 Achieving High Availability on Linux for System z with Linux-HA Release 2
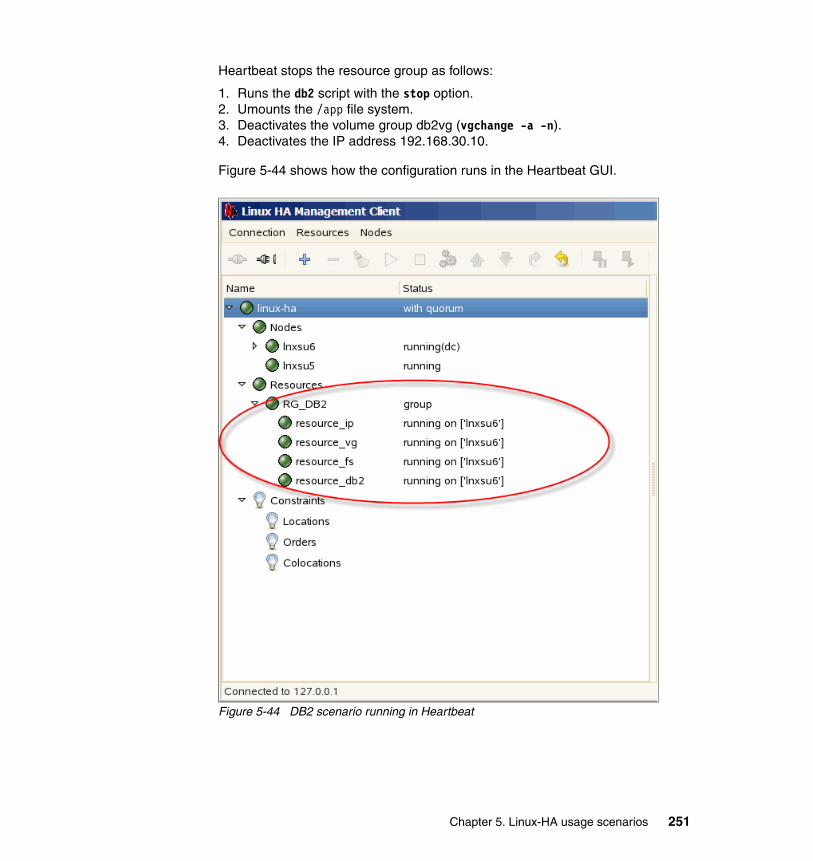
Heartbeat stops the resource group as follows:
1. Runs the db2 script with the stop option.2. Umounts the /app file system.3. Deactivates the volume group db2vg (vgchange -a -n).4. Deactivates the IP address 192.168.30.10.
Figure 5-44 shows how the configuration runs in the Heartbeat GUI.
Figure 5-44 DB2 scenario running in Heartbeat
Chapter 5. Linux-HA usage scenarios 251

5.6.4 Testing the failover
In a high availability implementation, the simulation of many issues can be done to test and validate the solution. For the purpose of this scenario, we show what happens in case of a server going down.
Figure 5-45 shows that the database is running on the lnxsu6 node. We perform a shutdown on the lnxsu6 node even with the database running. We expect to see the resource group activated in the lnxsu5 node. The figure shows what happens with the environment during the test. It also shows that the lnxsu6 node is down (disabled).
Figure 5-45 DB2 scenario - What happens when a node goes down
252 Achieving High Availability on Linux for System z with Linux-HA Release 2

Figure 5-45 on page 252 shows that the solution worked well. To double check, we connect to the database as shown in Example 5-118.
Example 5-118 DB2 connection
lnxsu5:/ # su - db2inst1db2inst1@lnxsu5:~> db2 connect to test
Database Connection Information
Database server = DB2/LINUXZ64 9.5.0 SQL authorization ID = DB2INST1 Local database alias = TEST
db2inst1@lnxsu5:~>
Chapter 5. Linux-HA usage scenarios 253

254 Achieving High Availability on Linux for System z with Linux-HA Release 2

Appendix A. Hints for troubleshooting Linux-HA
In this appendix, we provide useful troubleshooting hints to use in the Heartbeat implementation and management for Linux-HA. Specifically, this appendix includes the following topics:
� Validating the cib.xml file� Increasing the debug level� Monitoring the cluster status� Recovering from a failed takeover
A
© Copyright IBM Corp. 2009. All rights reserved. 255

Validating the cib.xml file
The cib.xml file is the main heartbeat configuration file. It is in the /var/lib/heartbeat/crm directory. Most of changes in the heartbeat configuration are made in this file, by using the GUI, the cidamin command, or an editor such as vi.
It is important to verify that, after configuration changes are made, the integrity of the cib.xml file remains unchanged. For complete verification of the cib.xml file, you can use two commands: crm_verify and ciblint.
We provide general information and examples about how these commands work. To verify all available options, you can print the help by using the --h command.
The crm_verify commandIf you intend to make a verification in a running cluster, you can use the -VL option as shown in Example A-1. -V means the verbose mode, and -L specifies the command to connect to the running cluster. The blank output means that there are no errors in the running cluster.
Example A-1 crm_verify with the running cluster
# crm_verify -VL#
If the cluster is not running and you try to use the same options (-VL), you see an error message similar to the one in Example A-2.
Example A-2 crm_verify error message
# crm_verify -VLLive CIB query failed: connection failed#
In this case with Heartbeat stopped, if you still intend to use crm_verify to validate the configuration prior the startup, you must specify the file location by using the -x option (Example A-3). The blank output means that no errors were detected in the file.
Example A-3 crm_verify command with the cluster not running
lnxsu3:/ # crm_verify -V -x /var/lib/heartbeat/crm/cib.xmllnxsu3:/ # #
256 Achieving High Availability on Linux for System z with Linux-HA Release 2

The ciblint commandThe ciblint program examines your cib.xml file in detail. Example A-4 shows how to verify the file with ciblint command:
Example A-4 Troubleshooting the cib.xml file
lnxsu4:/var/lib/heartbeat/crm # ciblint -f cib.xmlINFO: CIB has non-default value for stonith-action [poweroff]. Default value is [reboot]INFO: Explanation of stonith-action option: Action to send to STONITH deviceINFO: Action to send to STONITH device Allowed values: reboot,INFO: poweroffINFO: CIB has non-default value for default-resource-stickiness [INFINITY]. Default value is [0]INFO: Explanation of default-resource-stickiness option: default-resource-stickinessERROR: STONITH enabled, but No STONITH resources configured. STONITH is NOT available.INFO: See http://linux-ha.org/ciblint/stonith for more information about this topic.INFO: See http://linux-ha.org/ciblint/crm_config#stonith-enabled for more information about this topic.lnxsu4:/var/lib/heartbeat/crm #
The most important fields to verify in the output of the ciblint command are the “ERROR:” messages. Example A-4 shows an error message about Shoot The Other Node In The Head (STONITH). It does not make sense to have STONITH if no STONITH resources are configured.
After you make the necessary correction, run the ciblint command again to verify that there are no more error messages.
Increasing the debug level
If your cluster is not working properly and you are unable to identify the root cause, you can have more information by making changes in the debug configuration. By making such changes, you will have more information in the logs to help you understand what is happening.
Appendix A. Hints for troubleshooting Linux-HA 257
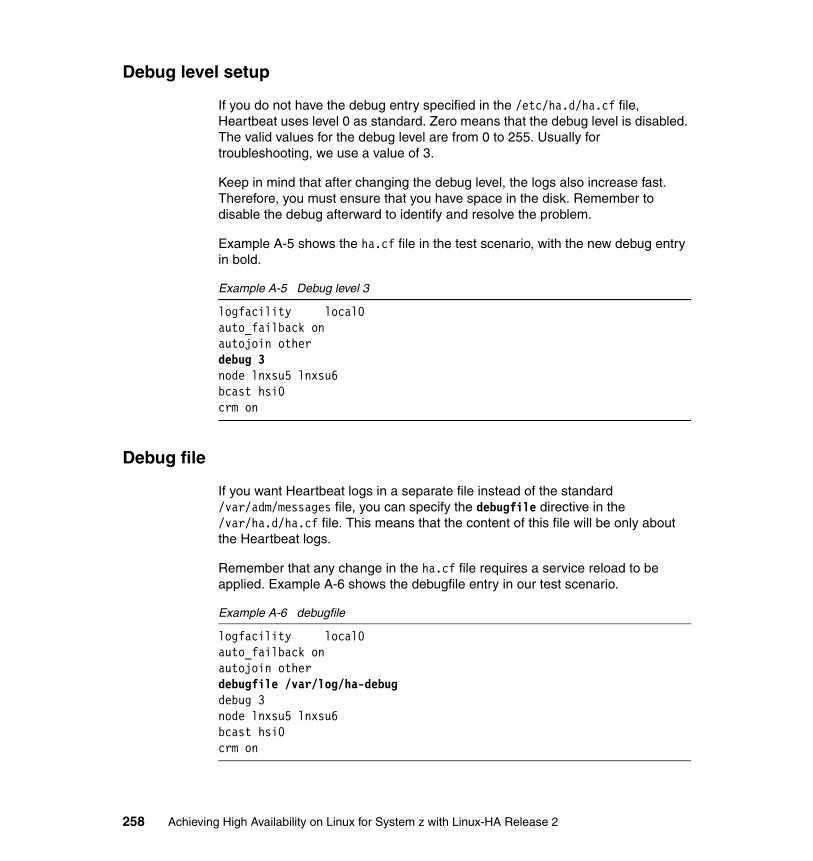
Debug level setup
If you do not have the debug entry specified in the /etc/ha.d/ha.cf file, Heartbeat uses level 0 as standard. Zero means that the debug level is disabled. The valid values for the debug level are from 0 to 255. Usually for troubleshooting, we use a value of 3.
Keep in mind that after changing the debug level, the logs also increase fast. Therefore, you must ensure that you have space in the disk. Remember to disable the debug afterward to identify and resolve the problem.
Example A-5 shows the ha.cf file in the test scenario, with the new debug entry in bold.
Example A-5 Debug level 3
logfacility local0auto_failback onautojoin otherdebug 3node lnxsu5 lnxsu6 bcast hsi0crm on
Debug file
If you want Heartbeat logs in a separate file instead of the standard /var/adm/messages file, you can specify the debugfile directive in the /var/ha.d/ha.cf file. This means that the content of this file will be only about the Heartbeat logs.
Remember that any change in the ha.cf file requires a service reload to be applied. Example A-6 shows the debugfile entry in our test scenario.
Example A-6 debugfile
logfacility local0auto_failback onautojoin otherdebugfile /var/log/ha-debugdebug 3node lnxsu5 lnxsu6 bcast hsi0crm on
258 Achieving High Availability on Linux for System z with Linux-HA Release 2
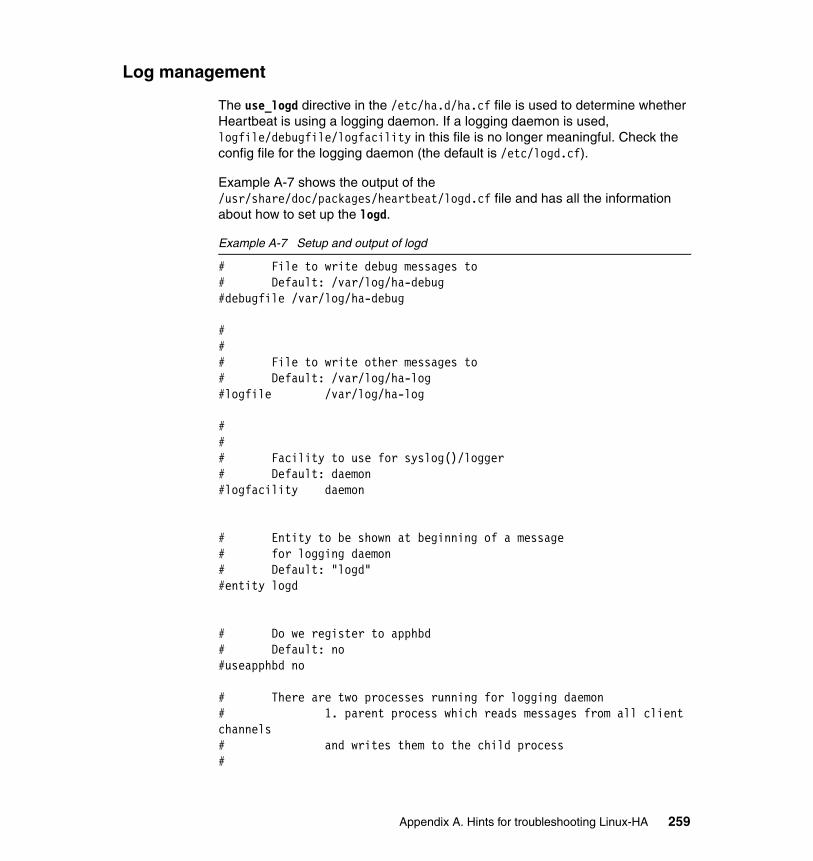
Log management
The use_logd directive in the /etc/ha.d/ha.cf file is used to determine whether Heartbeat is using a logging daemon. If a logging daemon is used, logfile/debugfile/logfacility in this file is no longer meaningful. Check the config file for the logging daemon (the default is /etc/logd.cf).
Example A-7 shows the output of the /usr/share/doc/packages/heartbeat/logd.cf file and has all the information about how to set up the logd.
Example A-7 Setup and output of logd
# File to write debug messages to# Default: /var/log/ha-debug#debugfile /var/log/ha-debug
### File to write other messages to# Default: /var/log/ha-log#logfile /var/log/ha-log
### Facility to use for syslog()/logger # Default: daemon#logfacility daemon
# Entity to be shown at beginning of a message# for logging daemon# Default: "logd"#entity logd
# Do we register to apphbd# Default: no#useapphbd no
# There are two processes running for logging daemon# 1. parent process which reads messages from all client channels # and writes them to the child process #
Appendix A. Hints for troubleshooting Linux-HA 259

# 2. the child process which reads messages from the parent process through IPC# and writes them to syslog/disk
# set the send queue length from the parent process to the child process##sendqlen 256
# set the recv queue length in child process##recvqlen 256
Monitoring the cluster status
By using the crm_mon command, you can monitor your cluster’s status and configuration. Its output includes the number of nodes, uname, uuid, status, the resources configured in your cluster, and the current status of each. The output of the crm_mon command can be displayed in the console or printed to an HTML file. When provided with a cluster configuration file without the status section, the crm_mon command creates an overview of nodes and resources as specified in the file.
Example A-8 shows a cluster without errors.
Example A-8 The crm_mon command
# crm_mon -V -1
============Last updated: Tue Nov 18 12:22:05 2008Current DC: NONE2 Nodes configured.0 Resources configured.============
Node: lnxsu3 (224d57db-692b-4922-8eaf-5e30a0b5ea0c): OFFLINENode: lnxsu4 (f3f83a97-8fec-4a89-8b65-350481669b44): OFFLINE
#
260 Achieving High Availability on Linux for System z with Linux-HA Release 2

To create similar output in HTML format, you can use the -h option as shown in Example A-9.
Example A-9 crm_mon - Creating status in HTML format
# crm_mon -1 -h /tmp/cluster_status.html#
Recovering from a failed takeover
Depending on the configuration applied in your cluster, you can have a situation where the cluster does not try to start the resource anymore, even if you try to start using the GUI or command line interface (CLI). This happens because of the number of incomplete failovers.
Example A-10 shows a resource that is not started because of a failcount issue.
Example A-10 The resource is not able to start due the failcount
# crm_resource -LResource Group: RG_A resource_IP_A (ocf::heartbeat:IPaddr)
# crm_resource -r resource_IP_A -p target_role -v started# crm_resource -W -r resource_IP_Aresource resource_IP_A is NOT running# # crm_mon -V -1crm_mon[9000]: 2008/12/04_20:53:32 ERROR: unpack_rsc_op: Remapping resource_IP_A_start_0 (rc=1) on lnxsu3 to an ERRORcrm_mon[9000]: 2008/12/04_20:53:32 ERROR: unpack_rsc_op: Remapping resource_IP_A_start_0 (rc=1) on lnxsu4 to an ERROR
============Last updated: Thu Dec 4 20:53:32 2008Current DC: lnxsu3 (224d57db-692b-4922-8eaf-5e30a0b5ea0c)2 Nodes configured.1 Resources configured.============
Node: lnxsu3 (224d57db-692b-4922-8eaf-5e30a0b5ea0c): onlineNode: lnxsu4 (f3f83a97-8fec-4a89-8b65-350481669b44): online
Failed actions:
Appendix A. Hints for troubleshooting Linux-HA 261

resource_IP_A_start_0 (node=lnxsu3, call=10, rc=1): complete resource_IP_A_start_0 (node=lnxsu4, call=7, rc=1): complete#
After you identify and resolve the root cause, you must clean up the failcount value and start the resource again:
1. Verify which resources have a failcount to be cleaned (Example A-11):
crm_failcount -U node_name -r resource_name -G
Example A-11 Verifying the failcount
# crm_failcount -U lnxsu3 -r resource_IP_A -G name=fail-count-resource_IP_A value=INFINITY
# crm_failcount -U lnxsu4 -r resource_IP_A -G name=fail-count-resource_IP_A value=INFINITY
2. Place the resource in the unmanaged mode so that Heartbeat does not manage the resource anymore:
crm_resource -r resource_name -p is_managed -v false
Example A-12 Disabling resource from heartbeat management
# crm_resource -r resource_IP_A -p is_managed -v false#
262 Achieving High Availability on Linux for System z with Linux-HA Release 2

In the list of resources (Figure A-1), you see an attention icon and a new resource status in the Heartbeat GUI.
Figure A-1 Resource in an unmanaged mode
3. Remove the failcount:
crm_failcount -U node_name -r resource_name -D
Example A-13 shows the command that we used in the test scenario to remove and validate the failcount. The expected result after removing the failcount is zero.
Example A-13 Removing the failcount
# crm_failcount -U lnxsu3 -r resource_IP_A -D# crm_failcount -U lnxsu3 -r resource_IP_A -G name=fail-count-resource_IP_A value=0# crm_failcount -U lnxsu4 -r resource_IP_A -D# crm_failcount -U lnxsu4 -r resource_IP_A -G name=fail-count-resource_IP_A value=0#
Appendix A. Hints for troubleshooting Linux-HA 263

4. Remove the error messages:
crm_resource -H node_name -r resource_name -C
At this point, you can see from using the crm_mon command that, even with the failcount at zero, the resource is still marked as failed (Example A-14).
Example A-14 crm_mon - Resource failed
# crm_mon -V -1crm_mon[9117]: 2008/12/04_21:29:05 ERROR: unpack_rsc_op: Remapping resource_IP_A_start_0 (rc=1) on lnxsu3 to an ERRORcrm_mon[9117]: 2008/12/04_21:29:05 ERROR: unpack_rsc_op: Remapping resource_IP_A_start_0 (rc=1) on lnxsu4 to an ERROR
============Last updated: Thu Dec 4 21:29:05 2008Current DC: lnxsu3 (224d57db-692b-4922-8eaf-5e30a0b5ea0c)2 Nodes configured.1 Resources configured.============
Node: lnxsu3 (224d57db-692b-4922-8eaf-5e30a0b5ea0c): onlineNode: lnxsu4 (f3f83a97-8fec-4a89-8b65-350481669b44): online
Failed actions: resource_IP_A_start_0 (node=lnxsu3, call=10, rc=1): complete resource_IP_A_start_0 (node=lnxsu4, call=7, rc=1): complete#
Example A-15 shows the commands that we used to clean up the error messages in the our test scenario.
Example A-15 Removing the error messages
# crm_resource -H lnxsu3 -r resource_IP_A -C# crm_resource -H lnxsu4 -r resource_IP_A -C
264 Achieving High Availability on Linux for System z with Linux-HA Release 2

After the cleanup, you no longer see errors in crm_mon (Example A-16).
Example A-16 crm_mon - No errors
# crm_mon -V -1
============Last updated: Thu Dec 4 21:38:19 2008Current DC: lnxsu3 (224d57db-692b-4922-8eaf-5e30a0b5ea0c)2 Nodes configured.1 Resources configured.============
Node: lnxsu3 (224d57db-692b-4922-8eaf-5e30a0b5ea0c): onlineNode: lnxsu4 (f3f83a97-8fec-4a89-8b65-350481669b44): online
#
5. Place the resource in managed mode so that Heartbeat can manage the resource again (Example A-17):
crm_resource -r resource_name -d is_managed
Example A-17 Changing the resource to managed mode
# crm_resource -r resource_IP_A -d is_managed#
Appendix A. Hints for troubleshooting Linux-HA 265
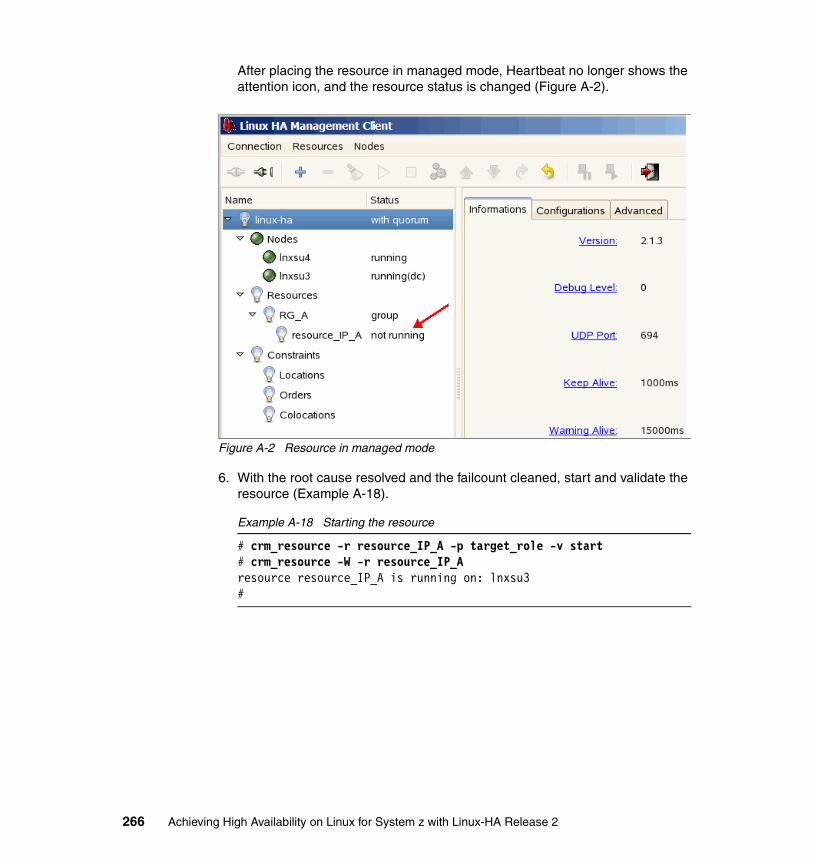
After placing the resource in managed mode, Heartbeat no longer shows the attention icon, and the resource status is changed (Figure A-2).
Figure A-2 Resource in managed mode
6. With the root cause resolved and the failcount cleaned, start and validate the resource (Example A-18).
Example A-18 Starting the resource
# crm_resource -r resource_IP_A -p target_role -v start# crm_resource -W -r resource_IP_Aresource resource_IP_A is running on: lnxsu3#
266 Achieving High Availability on Linux for System z with Linux-HA Release 2
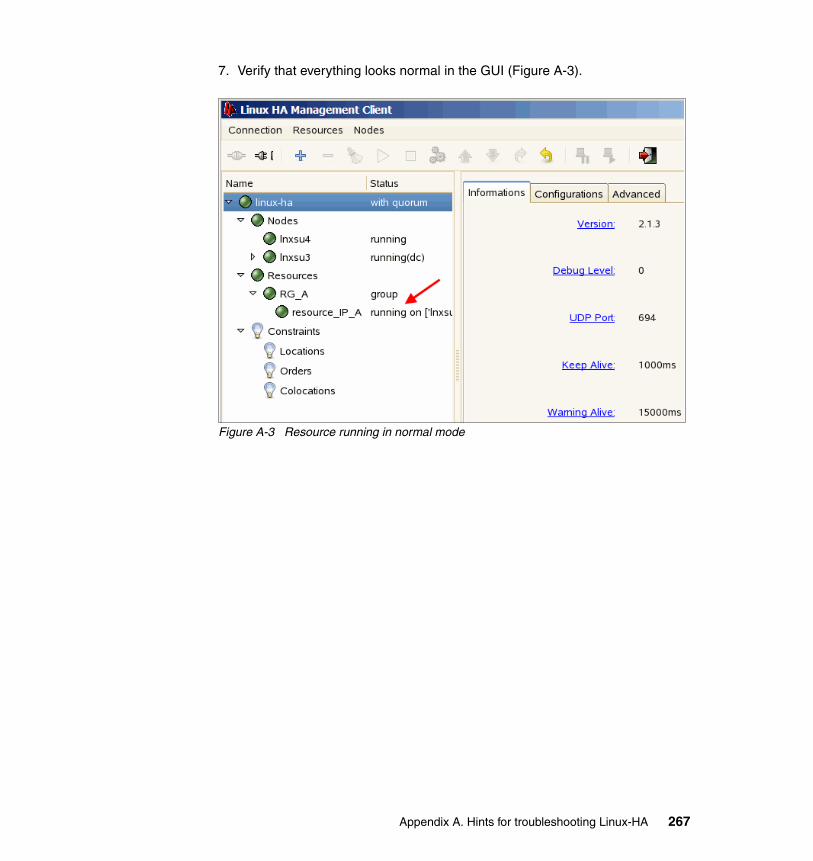
7. Verify that everything looks normal in the GUI (Figure A-3).
Figure A-3 Resource running in normal mode
Appendix A. Hints for troubleshooting Linux-HA 267

268 Achieving High Availability on Linux for System z with Linux-HA Release 2

Appendix B. Managing Heartbeat by using a command line interface
In this appendix, we summarize the commands to use in the Linux-HA implementation. Table B-1 shows the principle command line interface (CLI) commands and examples that are used for Heartbeat management. We do not include all options of all commands, but summarize the commands that are most. Read the man pages or help for complete information about a specific command.
Table B-1 Summary of commands
B
Command Objective Example
ccm_tool List the partition member or quorum status
# ccm_tool -q1(The output 1 means that the quorum exists for this partition.)
cibadmin Manipulate the heartbeat Cluster Information Base (CIB)
To remove one specific resource:cibadmin -D -o resources -X '<primitive id="test"/>'
© Copyright IBM Corp. 2009. All rights reserved. 269
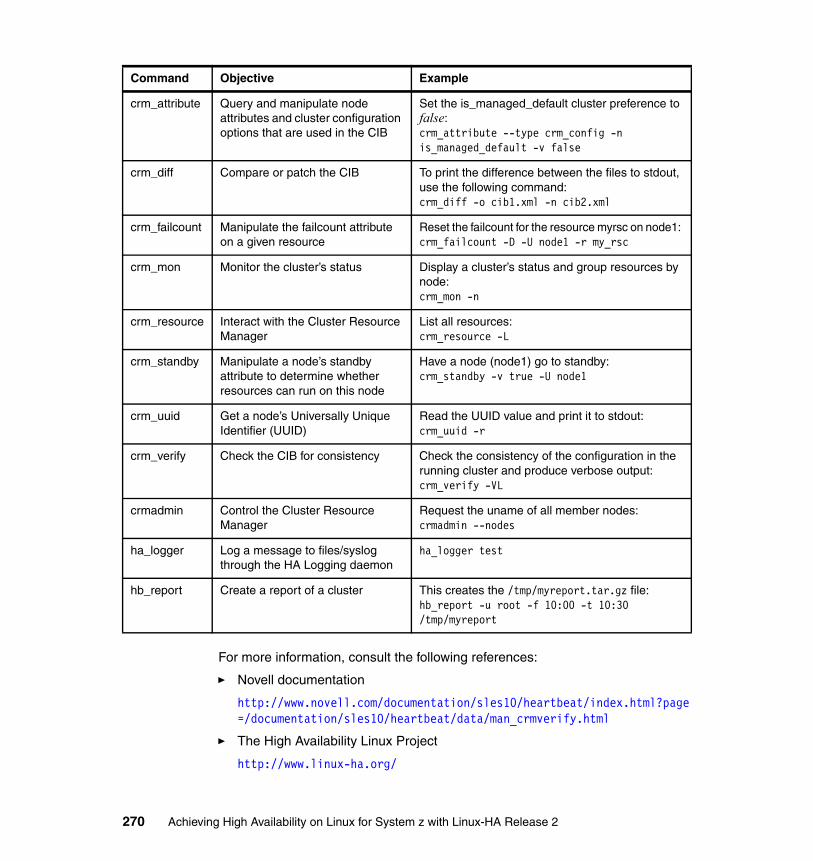
For more information, consult the following references:
� Novell documentation
http://www.novell.com/documentation/sles10/heartbeat/index.html?page=/documentation/sles10/heartbeat/data/man_crmverify.html
� The High Availability Linux Project
http://www.linux-ha.org/
crm_attribute Query and manipulate node attributes and cluster configuration options that are used in the CIB
Set the is_managed_default cluster preference to false:crm_attribute --type crm_config -n is_managed_default -v false
crm_diff Compare or patch the CIB To print the difference between the files to stdout, use the following command:crm_diff -o cib1.xml -n cib2.xml
crm_failcount Manipulate the failcount attribute on a given resource
Reset the failcount for the resource myrsc on node1: crm_failcount -D -U node1 -r my_rsc
crm_mon Monitor the cluster’s status Display a cluster’s status and group resources by node: crm_mon -n
crm_resource Interact with the Cluster Resource Manager
List all resources: crm_resource -L
crm_standby Manipulate a node’s standby attribute to determine whether resources can run on this node
Have a node (node1) go to standby: crm_standby -v true -U node1
crm_uuid Get a node’s Universally Unique Identifier (UUID)
Read the UUID value and print it to stdout:crm_uuid -r
crm_verify Check the CIB for consistency Check the consistency of the configuration in the running cluster and produce verbose output: crm_verify -VL
crmadmin Control the Cluster Resource Manager
Request the uname of all member nodes:crmadmin --nodes
ha_logger Log a message to files/syslog through the HA Logging daemon
ha_logger test
hb_report Create a report of a cluster This creates the /tmp/myreport.tar.gz file:hb_report -u root -f 10:00 -t 10:30 /tmp/myreport
Command Objective Example
270 Achieving High Availability on Linux for System z with Linux-HA Release 2

Appendix C. ConnectedToIP script
This appendix provides the following sample script, ConnectToIP OCF RA, that attempts to watch for an IP address and fails if the IP address is no longer reachable. This script is based on the script, Dummy OCR RA, by Lars Marowsky-Brée.
#!/bin/sh### ConnectedToIP OCF RA. Attempt to watch for an IP address.# Fails if the IP address is no longer reachable.# Based on Dummy OCR RA by Lars (see copyright)## Copyright (c) 2004 SUSE LINUX AG, Lars Marowsky-Brée# All Rights Reserved.## This program is free software; you can redistribute it and/or modify# it under the terms of version 2 of the GNU General Public License as# published by the Free Software Foundation.## This program is distributed in the hope that it would be useful, but# WITHOUT ANY WARRANTY; without even the implied warranty of# MERCHANTABILITY or FITNESS FOR A PARTICULAR PURPOSE.## Further, this software is distributed without any warranty that it is# free of the rightful claim of any third person regarding infringement
C
© Copyright IBM Corp. 2009. All rights reserved. 271

# or the like. Any license provided herein, whether implied or# otherwise, applies only to this software file. Patent licenses, if# any, provided herein do not apply to combinations of this program # with other software, or any other product whatsoever.## You should have received a copy of the GNU General Public License# along with this program; if not, write the Free Software Foundation,# Inc., 59 Temple Place - Suite 330, Boston MA 02111-1307, USA.#
######################################################################## Initialization:
. ${OCF_ROOT}/resource.d/heartbeat/.ocf-shellfuncs
#######################################################################
meta_data() {cat <<END
<?xml version="1.0"?><!DOCTYPE resource-agent SYSTEM "ra-api-1.dtd"><resource-agent name="ConnectedToIP" version="0.9"><version>1.0</version>
<longdesc lang="en">Checks connectivity to an IP. It fails if the target is not reachable.</longdesc><shortdesc lang="en">ConnectedToIP resource agent</shortdesc>
<parameters><parameter name="targetIP" unique="1" required="1"><longdesc lang="en">Target IP address </longdesc><shortdesc lang="en">Target IP address </shortdesc><content type="string" /></parameter>
<parameter name="state" unique="1"><longdesc lang="en">Location to store the resource state in.</longdesc><shortdesc lang="en">State file</shortdesc><content type="string" default="${HA_RSCTMP}/c2IP-${OCF_RESOURCE_INSTANCE}.state" /></parameter>
272 Achieving High Availability on Linux for System z with Linux-HA Release 2

</parameters>
<actions><action name="start" timeout="90" /><action name="stop" timeout="100" /><action name="monitor" timeout="20" interval="10" depth="0" start-delay="0" /><action name="reload" timeout="90" /><action name="migrate_to" timeout="100" /><action name="migrate_from" timeout="90" /><action name="meta-data" timeout="5" /><action name="validate-all" timeout="30" /></actions></resource-agent>END}
#######################################################################
# don't exit on TERM, to test that lrmd makes sure that we do exittrap sigterm_handler TERMsigterm_handler() {
ocf_log info "They use TERM to bring us down. No such luck."return
}
c2IP_usage() {cat <<END
usage: $0 {start|stop|monitor|migrate_to|migrate_from|validate-all|meta-data}
Expects to have a fully populated OCF RA-compliant environment set.END}
c2IP_start() { c2IP_monitor if [ $? = $OCF_SUCCESS ]; then
return $OCF_SUCCESS fi touch ${OCF_RESKEY_state}}
c2IP_stop() { c2IP_monitor
Appendix C. ConnectedToIP script 273

if [ $? = $OCF_SUCCESS ]; thenrm ${OCF_RESKEY_state}
fi return $OCF_SUCCESS}
c2IP_monitor() {# Monitor _MUST!_ differentiate correctly between running# (SUCCESS), failed (ERROR) or _cleanly_ stopped (NOT RUNNING).# That is THREE states, not just yes/no.
# if state is resource started, return based on access to target IP
if [ -f ${OCF_RESKEY_state} ]; then # try a ping for target IP ocf_log info "${OCF_RESOURCE_INSTANCE} ping ${OCF_RESKEY_targetIP}." ping -c 2 ${OCF_RESKEY_targetIP} if [ $? = 0 ]; then ocf_log info "${OCF_RESOURCE_INSTANCE} ping succeeded."
return $OCF_SUCCESS else ocf_log info "${OCF_RESOURCE_INSTANCE} ping failed."
return $OCF_ERR_GENERIC fi
fiif false ; then
return $OCF_ERR_GENERICfireturn $OCF_NOT_RUNNING
}
c2IP_validate() { if [ "$OCF_RESKEY_targetIP" = "" ]; then # this is bad, there is no targetIP set return $OCF_ERR_ARGS fi # Is the state directory writable? state_dir=`dirname "$OCF_RESKEY_state"` touch "$state_dir/$$" if [ $? != 0 ]; then
return $OCF_ERR_ARGS fi rm "$state_dir/$$"
274 Achieving High Availability on Linux for System z with Linux-HA Release 2

return $OCF_SUCCESS}
: ${OCF_RESKEY_state=${HA_RSCTMP}/c2IP-${OCF_RESOURCE_INSTANCE}.state}
case $__OCF_ACTION inmeta-data)meta_data
exit $OCF_SUCCESS;;
start)c2IP_start;;stop) c2IP_stop;;monitor)c2IP_monitor;;migrate_to)ocf_log info "Migrating ${OCF_RESOURCE_INSTANCE} to ${OCF_RESKEY_CRM_meta_migrate_to}."
c2IP_stop;;
migrate_from)ocf_log info "Migrating ${OCF_RESOURCE_INSTANCE} to ${OCF_RESKEY_CRM_meta_migrated_from}."
c2IP_start;;
reload)ocf_log err "Reloading..." c2IP_start
;;validate-all)c2IP_validate;;usage|help)c2IP_usage
exit $OCF_SUCCESS;;
*) c2IP_usageexit $OCF_ERR_UNIMPLEMENTED;;
esacrc=$?ocf_log debug "${OCF_RESOURCE_INSTANCE} $__OCF_ACTION : $rc"exit $rc
Appendix C. ConnectedToIP script 275

276 Achieving High Availability on Linux for System z with Linux-HA Release 2

Glossary
active server A a member of a cluster that owns the cluster resources and runs processes against those resources. After the server is compromised, the ownership of these resources stops and is handed to the standby server. Also known as a primary server.
active/active configuration A configuration in which all servers in the cluster can simultaneously run the same resources. These servers own the same resources and can access them independently of the other servers in the cluster. When a server in the cluster is no longer available, its resources are available on the other servers in the cluster.
active/passive configuration A configuration that consists of a server that owns the cluster resources and other servers capable of accessing the resources that are on standby until the cluster resource owner is no longer available.
availability The degree in which a service or application is ready for use or available (uptime).
cloned resource Has multiple instances (either identical or unique) that are intended to be deployed across multiple nodes in a cluster.
cluster A group of servers and resources that act as one entity to enable high availability or load balancing capabilities.
constraint In Linux-HA Heartbeat, specifications defined by the user to tell Heartbeat where and how to run cluster resources.
continuous availability A continuous, nondisruptive level of service that is provided to users. It provides the highest level of availability possibly achieved. Planned or unplanned outages of hardware or software cannot exist in environments that are designed to provide continuous availability.
© Copyright IBM Corp. 2009. All rights reserved.
continuous operation A continuous, nondisruptive level of operation where changes to hardware and software are transparent to users. Planned outages typically occur on environments that are designed to provide continuous operation. These types of environments are designed to avoid unplanned outages.
conventional Conventional availability requirements describe business functions that can be interrupted. Data integrity is unimportant in a conventional environment. The user’s work stops, uncontrolled shutdown occurs, and data can be lost or corrupted.
disaster tolerant An environment in which business functions must always be available and any systems failure must be invisible to the user. There can be no interruption of work, no transactions lost, and no performance degradation, with continuous operations and remote backup in the case of disasters such as power outage, flood, or earthquake.
downtime The length of time when services or applications are not available. Downtime is usually measured from the time that the outage takes place to the time when the services or applications are available.
failback The process in which one or more resources of a failed server are returned to its original owner after it becomes available.
failover The process in which one or more server resources are transferred to another server or servers in the same cluster because of failure or maintenance.
failover server See standby server.
277

fault resilient An environment in which business functions require uninterrupted computing services, either during essential time periods or during most hours of the day and most days of the week throughout the year. Users stay online, even though the current transaction might need restarting, and performance degradation can occur.
fault tolerant An environment in which business functions demand continuous computing and failures are invisible. This means no interruption of work, no transactions lost, no performance degradation, and continuous 24x7 operations.
fencing A mechanism that is used in high availability solutions to block an unstable cluster member from accessing shared resources and communicating with other members or systems. When fencing is applied, the unstable server cannot run any processes until its communication to the other servers in the cluster is resumed.
floating IP address In a cluster, an IP address that is attached to the active cluster node running some or all of the resources. Upon a failure in the active node, the floating IP address is migrated to another node in the cluster that can run the resources.
heartbeat Describes the communications exchanged between cluster members to let each other know about membership status. Do not confuse with Heartbeat.
Heartbeat A core component of the Linux-HA software. It provides the clustering capability that ensures high availability of critical resources such as data, applications, and services. It does this by providing monitoring, failover and failback capabilities to Heartbeat defined resources.
Heartbeat resource agent A program designed to start, monitor, and stop a particular resource. In Heartbeat, for every resource, there is a resource agent.
high availability The maximum system uptime. The terms stated in service level agreements (SLA) determine the degree of a system’s high availability.
highly reliable In a highly reliable environment, business functions can be interrupted, as long as data integrity is maintained. The user’s work stops, and an uncontrolled shutdown occurs.
Linux-HA The name of an open source project that maintains and develops the Linux-HA software. There are multiple components to the software that provide a high availability (clustering) solution for Linux.
master/slave resource See multi-state resource.
migration In a high availability environment, the process of moving a resource from one cluster node to another, either as a result of a node failure or manual move.
multi-state resource In Heartbeat, a clone resource, but the clones can run in one of three states: started, stopped, or promoted. All clone resources can be running, but a clone in promoted state (also known as the master state) always services requests before a clone in a started (otherwise known as the slave state) state. Upon a failure on the master clone, the slave clone is promoted to master and takes over servicing requests.
outage For the purpose of this book, the loss of services or applications for a specific period of time. An outage can be planned or unplanned.
passive server See standby server.
primary server See active server.
quorum A mechanism that is used to avoid split-brain situations by selecting a subset of a cluster to represent the whole cluster when forced to split into multiple subclusters because of communication issues. The selected cluster subset can run services, making the cluster available.
278 Achieving High Availability on Linux for System z with Linux-HA Release 2

resource In Linux-HA, a network service, application, or a piece of data that can be added to the Linux-HA environment to run on one or more cluster members. When added to a Linux-HA cluster, it can be managed by Linux-HA to ensure availability of the resource.
secondary server See standby server.
service level agreement (SLA) Determine the degree of responsibility to maintain services available to users, costs, resources, and the complexity of the services.
Shoot the Other Node in the Head (STONITH) See STONITH.
single point of failure (SPOF) In an Information Technology infrastructure, any software or hardware component that has only one instance of it installed and configured. The SPOF is vulnerable to long downtimes upon a failure because it has no standby or redundant instance configured to ensure any level of high availability.
SLA See service level agreement.
split-brain A scenario in which more than one server or application belonging to the same cluster can access the same resources which, in turn, can potentially cause harm to these resources. This scenario tends to happen when each server in the cluster believes that the other servers are down and start taking over resources.
SPOF See single point of failure.
standby server A member of a cluster that is capable of accessing resources and running processes but is in a state of hold until the primary server is compromised or must be stopped. At that point, all resources fail over the standby server, which becomes the active server. Also known as a secondary, passive, or failover server.
STONITH (Shoot the Other Node in the Head) A fencing mechanism employed by Heartbeat. It ensures the errant node is down by resetting the node.
uptime The length of time when services or applications are available.
Glossary 279

280 Achieving High Availability on Linux for System z with Linux-HA Release 2

Related publications
The publications listed in this section are considered particularly suitable for a more detailed discussion of the topics covered in this book.
IBM Redbooks
For information about ordering these publications, see “How to get Redbooks” on page 282. Note that some of the documents referenced here may be available in softcopy only.
� Linux on IBM zSeries and S/390: High Availability for z/VM and Linux, REDP-0220
� Systems Management APIs for z/VM, REDP-3882
� Up and Running with DB2 on Linux, SG24-6899
� z/VM and Linux on IBM System z The Virtualization Cookbook for SLES 10 SP2, SG24-7493
Other publications
These publications are also relevant as further information sources:
� z/VM V5R2.0 Systems Management Application Programming, SC24-6122-02
� z/VM 5.4 Directory Maintenance Facility Tailoring and Administration Guide, SC24-6135-04
Online resources
These Web sites are also relevant as further information sources:
� High Availability Linux project
http://www.linux-ha.org/
� Exploring the High-Availability Storage Foundation guide from Novell
http://wiki.novell.com/images/3/37/Exploring_HASF.pdf
© Copyright IBM Corp. 2009. All rights reserved. 281

� SUSE Linux Enterprise Server Heartbeat guide from Novell
http://www.novell.com/documentation/sles10/pdfdoc/heartbeat/heartbeat.pdf
� Linux-HA binaries
http://software.opensuse.org/download/server:/ha-clustering:/lha-2.1
� Open Cluster Framework Project
http://opencf.org/home.html
� Linux Standard Base Specification
http://refspecs.linux-foundation.org/LSB_3.2.0/LSB-Core-generic/LSB-Core-generic/iniscrptact.html
� Cluster Information Base DTD
http://hg.clusterlabs.org/pacemaker/dev/file/tip/xml/crm-1.0.dtd
� IBM System z10
http://www-03.ibm.com/systems/z/
� STONITH and snIPL source code
http://www-128.ibm.com/developerworks/linux/linux390/useful_add-ons_snipl.html
� Management library for the Heartbeat STONITH plug-in for snIPL
http://www.ibm.com/servers/resourcelink
How to get Redbooks
You can search for, view, or download Redbooks, Redpapers, Technotes, draft publications and Additional materials, as well as order hardcopy Redbooks, at this Web site:
ibm.com/redbooks
Help from IBM
IBM Support and downloads
ibm.com/support
IBM Global Services
ibm.com/services
282 Achieving High Availability on Linux for System z with Linux-HA Release 2

Index
Symbols#is_dc 32#uname 32
Numerics3004.P00 VDEV 61
Aabuild 82action 34active node 23, 107, 199, 208
file system 222incoming requests 38
active server 3active/active configuration 5–6, 37, 40, 151
Apache 141cloned resource 38failback 153Heartbeat 38load balancer 38network connectivity loss 154system crash 151
active/passive configuration 6, 35Apache 134Heartbeat 35
active/passive modenetwork connectivity loss 148system crash 146
alternative fencing mechanismscontrolled guest 50remote message to PROP 50REXEC server in z/VM 50
Apacheactive/active configuration 141active/passive configuration 134httpd server 133OCF resource agent 142resource 142
Apache Web server 132API Code Library by Platform 56application programming interface (API) 52architecture, clustered file system 166
© Copyright IBM Corp. 2009. All rights reserved.
associated Open Systems Adapter, special guest LAN 48authkeys file 31, 134–135
permissions 136AUTHLIST definition 53auto_failback on 134automatic remount 208availability 2
SLES 10 46SLES 9 46
available plug-ins 49
Bbaudrate setting 178bcast hsi0 96, 258Berkeley Internet Name Domain (BIND) 235BIND (Berkeley Internet Name Domain) 235
Cchannel-to-channel (CTC) device driver 47CIB (Cluster Information Base) 11, 13–14, 20, 141, 195
cluster configuration information 20cluster status information 21constraints section 23DTD 21DTD current version 21file generation 22high level structure 21master 13sections in cluster configuration 21structure 14, 20
cib.xml file 20, 207, 255–256cibadmin command 13, 23, 26, 141ciblint command 22, 257cidr_netmask 138classes of resource agents 15CLI (command line interface)
CIB 26CIB attributes 26cluster status 27configuration changes 27generating, retrieving node UUIDs 27
283

Heartbeat cluster management 26lists of 26node standby status 27resource configurations 27resource fail counts 27verifying a CIB 26
clone set 196cloned resources 200
clone_node_max 200cluster 3, 120
actions that trigger change 15feature 58planning worksheet 58status 260
Cluster Information Base (CIB) 11, 13–14, 20, 141, 195
cluster configuration information 20cluster status information 21constraints section 23DTD 21DTD current version 21file generation 22high level structure 21master 13sections in cluster configuration 21structure 14, 20
cluster management tools 26cluster member 12, 17, 118, 175, 177
service IP address 38cluster membership change 15
process flow 15cluster node 11, 41, 97, 186, 201
such section 22cluster planning worksheet 58cluster resource 3, 21, 27, 121, 167Cluster Resource Manager (CRM) 11, 14, 270
options for Heartbeat 197clustered file system using OCFS2 and Heartbeat 131Clusterware 167colocation constraint 31, 34
from 35rsc_colocation id 35score 35to 35
command line interface (CLI)CIB 26CIB attributes 26cluster status 27
configuration changes 27generating, retrieving node UUIDs 27Heartbeat cluster management 26lists of 26node standby status 27resource configurations 27resource fail counts 27verifying a CIB 26
configuration file 50, 94, 96, 142, 159configuration management GUI (Heartbeat GUI) 27ConnectedToIP resource
agent 272instance 162
ConnectedToIP script 271constraints 31
ordering 33types 31
continuous availability 3continuous operation 3controlled guest 50CRC method 16CRM (Cluster Resource Manager) 11, 14, 270
options for Heartbeat 197crm.dtd file 134crm_attribute command 26crm_mon command 27, 260crm_verify command 26, 256CTC (channel-to-channel) device driver 47customized resource agents 11CYL 61
DDASD device 51DB2 implementation 247db2 script 250DC (Designated Coordinator) 14debug file 258debug level 257
setup 258debugfile directive 258default node 153Default Resource Stickiness attribute 137default-resource-stickiness option 207, 257definition
availability 2cluster 3continuous availability 3continuous operation 3
284 Achieving High Availability on Linux for System z with Linux-HA Release 2

downtime 2failback 3failover 3fencing 4high availability 3outage 2primary (active) server 3quorum 4service level agreement 2single point of failure 3split-brain scenario 4standby (secondary, passive, or failover) server 4uptime 2
Designated Coordinator (DC) 14device attribute 200directory attribute 200DirMaint 51disk sharing between z/VM guests 51Distributed Replicated Block Device (DRBD) 131
architecture 222dmsvsma.x file 53DNS (Domain Name System) 237
server for node name resolution 65Document Type Definition (DTD) 21Domain Name System (DNS) 237
server for node name resolution 65downtime 2DRBD (Distributed Replicated Block Device) 131
architecture 222DTD (Document Type Definition) 21
Eenvironment setup 248error message 93, 188
ciblint command 257crm_verify command 256
etc/ha.d/ha.cf file 96, 159exit 0 85expression attribute 32
Ffailback 3
active/active configuration 153failcount 270
value 262failed takeover 261failover 3, 11, 100, 222, 252
server 4fencing 4, 19, 23
node that loses a Heartbeat connection 126self 23self-fencing 23STONITH 23when to use 25
file system 131Filesystem resource 17, 168, 205
configuration 201Free Software Foundation’s GNU General Public Li-cense (GPL) 10Free Software Foundation’s GNU Lesser General Public License (LGPL) 10from setting
colocation constraint 35ordering constraint 33
fstype attribute 200FTP server 63
YaST repository 64YUM repository 64
GGeneral Public License (GPL) 10, 166GPL (General Public License) 10, 166group_color 149GUI 10, 68, 171
HHA (high availability) 3, 46
configurations 5active/active 5active/passive 6
fundamental concepts 1ha.cf file 30, 117–118, 134, 148
node name 118hacluster user name 28
password 28hb_gui 137
command 27opening 137
Header V3 DSA signature 82, 133Heartbeat 9
connection 126considerations for Linux on an LPAR 55downloading the source packages 74installation of Red Hat Enterprise Linux 5 74layers and components 12
Index 285

management by command line 269monitoring 179resource agents 11, 19starting 178
Heartbeat configuration management GUIcopy of the current CIB XML file 28hb_gui 27standby mode 28XML file 27
Heartbeat GUI 13, 27, 179, 263Advanced tab 30copy of the current CIB XML file 28location constraints 205new resource status 263XML file 27
Heartbeat guide 13Heartbeat link 47, 133
connection options 47heartbeat loss 11heartbeat package 73, 148, 169
configuration 176different release number 175installation 175
heartbeat service 97–98, 135–136Heartbeat STONITH plug-ins 49–51, 55Heartbeat version 2 11
active/active configuration 38active/passive configuration 35architecture 11CIB 13cluster management tools 26configuration management GUI 27CRM 14environment 11links 45LRM 14membership layer 13messaging and infrastructure layer 12Policy Engine 14process flow 15quorum configuration 41resource agents 17resource allocation layer 13resource layer 14security considerations 16Transition Engine 14
heartbeat-stonith package 19high availability (HA) 3, 46
configurations 5
active/active 5active/passive 6
fundamental concepts 1highly available Apache Web server 132
implementing the architecture 133HiperSockets 48hostname command 95, 194httpd access 151httpd package 133hwmcaapi management library 55
II/O Definition File (IODF) 48image_recycle 54implementation testing 146in-flight transactions 40initial configuration 57invalid argument 138IODF (I/O Definition File) 48IP address 10
ConnectedToIP script 271management/failover 242resource 102, 132, 214
IP spraying 141IPaddr resource 21, 138
overall score 149ipvsadm package 79
downloading from Red Hat Network 81
Llaboratory environment 60Lesser General Public License (LGPL) 10LGPL (Lesser General Public License) 10lic_vps 50, 55, 93, 195
cloned STONITH resource 195licensing information 10Linux distributions 1, 46Linux guest 50, 52, 60, 169, 171
lnxrh4.itso.ibm.com 65next configure Heartbeat 176
Linux native 190Linux package selection for installation 66Linux Standard Base (LSB) 10, 139
NFS server resource 18resource agents 18
Linux system 60, 146, 177etc/snipl.conf file 193heartbeat packages 175
286 Achieving High Availability on Linux for System z with Linux-HA Release 2

on z/VM guests 46SNMP communication 56
Linux, UNIX, and Windows 131Linux-HA
project 10release 1 versus release 2 10troubleshooting 255
cib.xml file 256cluster status 260debug level 257failed takeover 261
usage scenarios 131Apache Web server 132DB2 under Heartbeat 247DNS server under Heartbeat 235DRBD under Heartbeat 222NFS over OCFS2 under Heartbeat 212shared-disk clustered file system 166
Linux-HA Heartbeat 166constraints 31fencing 23OCFS2 167OCFS2 infrastructure 213
Linux-HA on System z 45considerations 46Linux distributions 46Red Hat Enterprise Linux 4 and 5 47SLES 10 46SLES 9 46
Linux-HA release 2 9, 46, 58capabilities 10cluster planning 58component installation 67configuration 96environment 73, 117example 141fencing 23FTP server 63GUI 99installation 58installation and configuration 57laboratory 60network setup 60overview 1package 9, 74, 133package selection 66shared disk setup 61software package 10three-node quorum scenario 117
two-node active/active scenario 109two-node active/passive scenario 101type cluster 137z/VM hosts and guests 60
load balancer 38loaddev parameters 54Local Resource Manager (LRM) 14location constraint 31, 114–115, 204, 216
configuration in Heartbeat 204expression attribute 32operation 32rsc 32rsc_location id 31rule id 32score 32value 32
log management 259logfacility local0 134logical volume 222, 249
db2lv 249Logical Volume Manager (LVM) 248–249LPAR 45, 60
Heartbeat considerations for Linux 55system 55
LRM (Local Resource Manager) 14LSB (Linux Standard Base) 10, 139
NFS server resource 18resource agents 18
LVM (Logical Volume Manager) 248–249
Mmain objective 149Management API 55–56master CIB 13max partition 190MD5 hashing method 17membership layer 13multiple write (MW) 170MW (multiple write) 170
Nname 21NAMELIST definition 192native_color 149network communication authentication methods 16network connectivity loss 148
active/active configuration 154Network File System (NFS) 131
Index 287

implementation over OCFS2 212resource 212server resource 18, 212
network IPL 192NFS (Network File System) 131
implementation over OCFS2 212resource 212server resource 18, 212
nic information 104node
adding into an existing cluster 117failure 13, 49, 197, 209fencing one that loses a Heartbeat connection 126name resolution 65
node_state 22non-default value 207Novell Heartbeat guide 13nvpair id 22, 195nvpairs 21
OO2CB driver 187
on-boot properties 187obeyfile command 52OCF (Open Cluster Framework) 10
additional support 11resource agents 17
OCF/heartbeat typeIPaddr resource 138
ocf_log info 273OCFS2 (Open Cluster File System 2) 17, 131, 166
activating the disk in Linux 171configuration 183device 169
automatic remount 209file system resource configuration in Heartbeat 199infrastructure 213linking the shared disk 169Linux-HA Heartbeat 167overview 166package 167, 181package installation 181
ocfs2-tools package 167, 190op id 165Open Cluster File System 2 (OCFS2) 17, 131, 166
activating the disk in Linux 171
configuration 183device 169
automatic remount 209file system resource configuration in Heartbeat 199infrastructure 213linking the shared disk 169Linux-HA Heartbeat 167overview 166package 167, 181package installation 181
Open Cluster Framework (OCF) 10additional support 11resource agents 17
Open Systems Adapter (OSA) 48, 104device 132
IP address 158operation 32Oracle Real Application Cluster 167ordering constraints 31, 33
from 33rsc_order id 33to 33
OSA (Open Systems Adapter) 48, 104device 132
IP address 158outage 2
planned 2unplanned 2
Ppassive server 4PE (Policy Engine) 14pingd 134
constraint 141directive 144
planned outage 2planning worksheet for clustering 58plug-ins
available 49more information 25, 49
Policy Engine (PE) 14portmapper 213pre-compiled package 67primary (active) server 3primitive id 165, 269production network 58
9.12.5.0/24 61
288 Achieving High Availability on Linux for System z with Linux-HA Release 2

profile exec using the stonith command 54ptest 148
Qquorum 4
configuration with Heartbeat 41
RRA (resource agent) 9, 14, 17, 139, 160
classes 15Heartbeat 19LSB 18OCF 17STONITH 19
RCERR_IMAGEOP 54–55Red Hat Cluster Suite 47Red Hat Enterprise Linux
version 5 package repository 63versions 4 and 5 47
Red Hat Enterprise Linux 5Heartbeat installation 74installing snIPL 91package installation 66RPM package build 82
Red Hat Network, ipvsadm package 81Redbooks Web site 282
Contact us xiRedHat Package Manager (RPM) 64remote message to PROP 50remote procedure call (RPC) 52
portmap 214resource agent (RA) 9, 14, 17, 139, 160
classes 15Heartbeat 19LSB 18OCF 17STONITH 19
resource allocation layer 13components 13
resource group 58, 100, 142, 219colocation rules 150IP address 108
resource layer 14resource stickiness 137REXEC server in z/VM 50RG_A 103, 230root@lnxrh2 resource 160RPC (remote procedure call) 52
portmap 214RPM (RedHat Package Manager) 64rpm command 67, 133RPM package build, Red Hat Enterprise Linux 5 82rpm package installation 70rsc 32rsc_colocation id 35rsc_location id 31–32rsc_order id 33rule id 32
Sscore calculation objective 149score setting
colocation constraint 35location constraint 32
score_attribute 148SE (Support Element) 46, 56secondary server 4security considerations in Heartbeat version 2 16self-fencing resource 23serial link 47–48service heartbeat
start 178stop 108, 217
service IP 26, 101, 133service level agreement (SLA) 2–3, 37service xinetd 68SHA1 hashing method 17shared disk setup 61shared-disk clustered file system 166
OCFS2 166Shoot-The-Other-Node-In-The-Head (STONITH) 46, 67, 158, 165Simple Network IPL (snIPL) 46
installing on Red hat Enterprise Linux 5 91VSMSERVE setup 51
single point of failure (SPOF) 3SLA (service level agreement) 2–3, 37SLES 10 1, 166, 175
Heartbeat installation 67Linux-HA release 2 58Linux-HA release 2 installation 67package installation 66package repository 63–64pre-compiled package 91standard installations 214YaST repository 64
Index 289

snIPL (Simple Network IPL) 46installing on Red Hat Enterprise Linux 5 91VSMSERVE setup 51
split-brain situation 4, 10SPOF (single point of failure) 3SSH key 186standby server 4STONITH (Shoot-The-Other-Node-In-The-Head) 46, 67, 123, 158, 165
adding a resource group to the cluster 123adding to the Apache Web server configuration 158adding to the configuration 158configuration 192daemon 19fencing 23methods supported by Heartbeat 24node failure action 24plug-ins 19resource agent 19service 24
stonith command 49on z/VM 54profile exec 54
stonith reset command 54stonithd plug-in using the snipl command 128Support Element (SE) 46, 56SUSE Linux Enterprise Server
Heartbeat guide 13version 10 (SLES 10) 1
availability 46version 9 (SLES 9) 46
availability 46SVN revision 228symmetrical 34system crash
active/active configuration 151active/passive mode 146
System z platform 18, 166communication links 47
channel-to-channel (CTC) 47HiperSockets 48virtual switch 48
Heartbeat STONITH 49Red Hat Enterprise Linux 18Red Hat Enterprise Linux 5 Update 2 166SLES 10 installation 66snipl package 67
Ttarget IP 158, 272target_role 196, 200TCP PORTMAP 52TE (Transition Engine) 14testing the implementation 146testing the OCFS2 and Heartbeat implementations 208three-node cluster and one node failing scenario 120three-node cluster and two nodes failing scenario 121three-node quorum scenario 117to setting
colocation constraint 35ordering constraint 33
Transition Engine (TE) 14troubleshooting
cib.xml file 256cluster status 260debug level 257failed takeover 261Linux-HA 255
two-node active/active scenario 109two-node active/passive scenario 101type 34
Uunplanned outage 2uptime 2use_logd directive 259user
abuild 82brewbuilder 83kschroed 92
userid Operatorserver 9.12.4.4 194
Vvalue 21, 32virtual switch (VSWITCH) 48, 133VNC 137VSMSERVE
service 46, 192setup for use with snIPL 51
VSMSERVE AUTHLIST 52VSMSERVE NAMELIST 52VSWITCH (virtual switch) 48, 133
290 Achieving High Availability on Linux for System z with Linux-HA Release 2

Wwget command 147
XX Window System method 171XML
file 198, 207CIB 20Heartbeat GUI 28
format 33location constraint 33
YYaST repository 64Yellowdog Updater, Modified (YUM)
repository 64YUM (Yellowdog Updater, Modified)
repository 64
Zz/VM 132
considerations with Linux-HA 45guest 49, 60, 154, 192
deactivate instructions 49disk sharing 51Linux systems 46network setup 60
host 60same guest names and Linux host names 193
Index 291

292 Achieving High Availability on Linux for System z with Linux-HA Release 2

(0.5” spine)0.475”<
->0.875”
250 <->
459 pages
Achieving High Availability on Linux for System z w
ith Linux-HA Release 2


®
SG24-7711-00 ISBN 0738432598
INTERNATIONAL TECHNICALSUPPORTORGANIZATION
BUILDING TECHNICALINFORMATION BASED ONPRACTICAL EXPERIENCE
IBM Redbooks are developed by the IBM International Technical Support Organization. Experts from IBM, Customers and Partners from around the world create timely technical information based on realistic scenarios. Specific recommendations are provided to help you implement IT solutions more effectively in your environment.
For more information:ibm.com/redbooks
®
Achieving High Availability on Linux for System z with Linux-HA Release 2
Understand Linux-HA architecture, concepts, and terminology
Learn what is new in Linux-HA Release 2
Experience a Linux-HA implementation
As Linux on System z becomes more prevalent and mainstream in the industry, the need for it to deliver higher levels of availability is increasing. IBM supports the High Availability Linux (Linux-HA) project, which provides high availability functions to the open source community. One component of the Linux-HA project is the Heartbeat program, which runs on every known Linux platform. Heartbeat is part of the framework of the Linux-HA project.
This IBM Redbooks publication provides information to help you evaluate and implement Linux-HA release 2 by using Heartbeat 2.0 on the IBM System z platform with either SUSE Linux Enterprise Server version 10 or Red Hat Enterprise Linux 5. To begin, we review the fundamentals of high availability concepts and terminology. Then we discuss the Heartbeat 2.0 architecture and its components. We examine some of the special considerations when using Heartbeat 2.0 on Linux on System z, particularly Linux on z/VM, with logical partitions, interguest communication by using HiperSockets, and Shoot The Other Node In The Head (STONITH) by using VSMSERVE for Simple Network IPL (snIPL).
By reading this book, you can examine our environment as we outline our installation and setup processes and configuration. We demonstrate an active and passive single resource scenario and a quorum scenario by using a single resource with three guests in the cluster. Finally, we demonstrate and describe sample usage scenarios.
Back cover