
ACEWALL Installation Manual 100mm Rev1 installation manual 100mm rev1.1nf.pdf · Installation...
29
INSTALLATION MANUAL FOR ACEWALL PANELS For Both PARTITION AND EXTERNAL CLADDING
Transcript of ACEWALL Installation Manual 100mm Rev1 installation manual 100mm rev1.1nf.pdf · Installation...
INSTALLATION MANUAL
FOR ACEWALL PANELS
For Both
PARTITION AND EXTERNAL CLADDING
Installation Manual for Unfilled Ace‐Wall Partitions 100mm
2
Revision 1.1NF 25072011
For further information please contact,
Mr. Bill Wallace
Address: Ace‐Wall International Pty Ltd
503 Port Road
Croydon West South Australia 5008
Telephone: +61 0433 467 931
Fax: +61 8 8340 2456
Email: [email protected]
www: acewall.com.au
Disclaimer
This presentation and any accompanying appendices, has been prepared by Ace‐Wall International Pty Ltd. Copyright of all material contained in this document is vested In Ace‐Wall International Pty Ltd whose written permission for the reproduction of any information contained therein must be obtained.
Care has been exercised in the underlying research in this presentation but Ace‐Wall International Pty Ltd assumes no responsibility for the accuracy of the Information or the effectiveness of the recommendations contained therein.
Author Disclaimer
The authors of this document and accompanying appendices hereby give notice that the information contained within this presentation is of a confidential nature and may not be disclosed without the prior written permission of the authors.
No responsibility or liability is assumed by the authors with respect to the accuracy or projected outcomes of the information contained herein.
Installation Manual for Unfilled Ace‐Wall Partitions 100mm
3
Revision 1.1NF 25072011
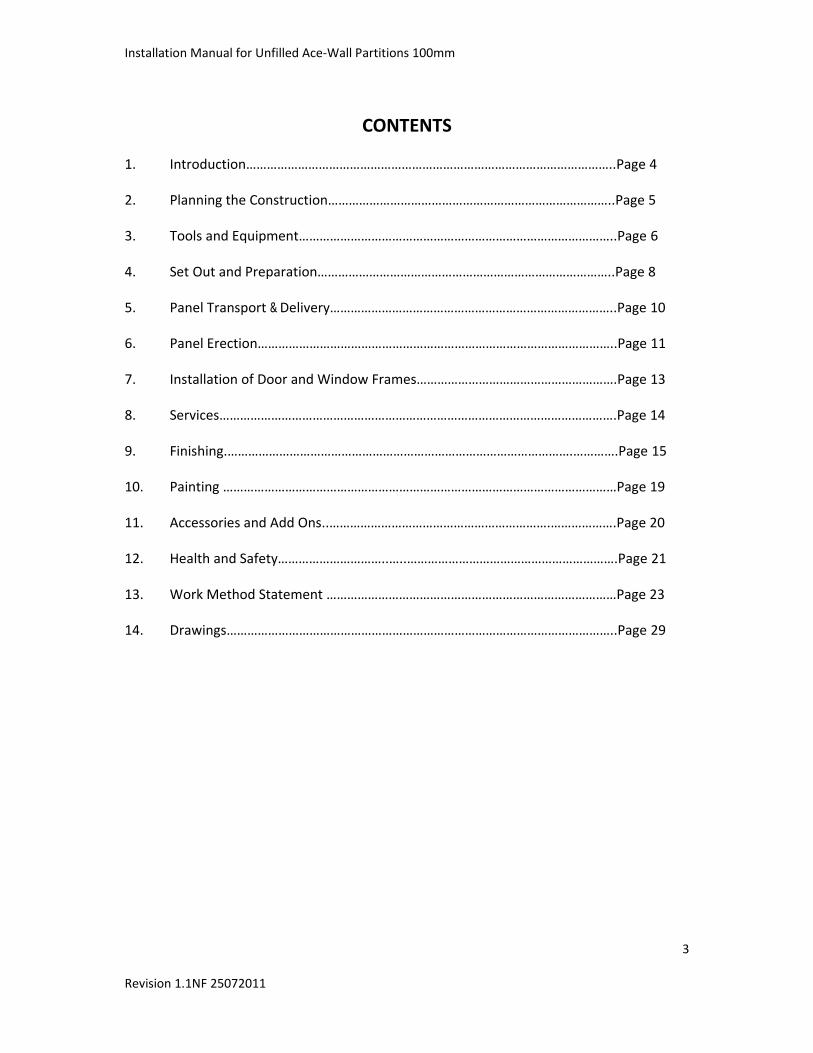
CONTENTS
1. Introduction……………………………………………………………………………………………..Page 4
2. Planning the Construction………………………………………………………………………..Page 5
3. Tools and Equipment………………………………………………………………………………..Page 6
4. Set Out and Preparation…………………………………………………………………………..Page 8
5. Panel Transport & Delivery………………………………………………………………………..Page 10
6. Panel Erection…………………………………………………………………………………………..Page 11
7. Installation of Door and Window Frames………………………………………………….Page 13
8. Services…………………………………………………………………………………………………….Page 14
9. Finishing.……………………………………………………………………………………….………….Page 15
10. Painting ……………………………………………………………………………………………………Page 19
11. Accessories and Add Ons..……………………………………………………….……………….Page 20
12. Health and Safety…………………………..…..…………………………………………………….Page 21
13. Work Method Statement …………………………………………………………………………Page 23
14. Drawings…………………………………………………………………………………………………..Page 29
Installation Manual for Unfilled Ace‐Wall Partitions 100mm
4
Revision 1.1NF 25072011
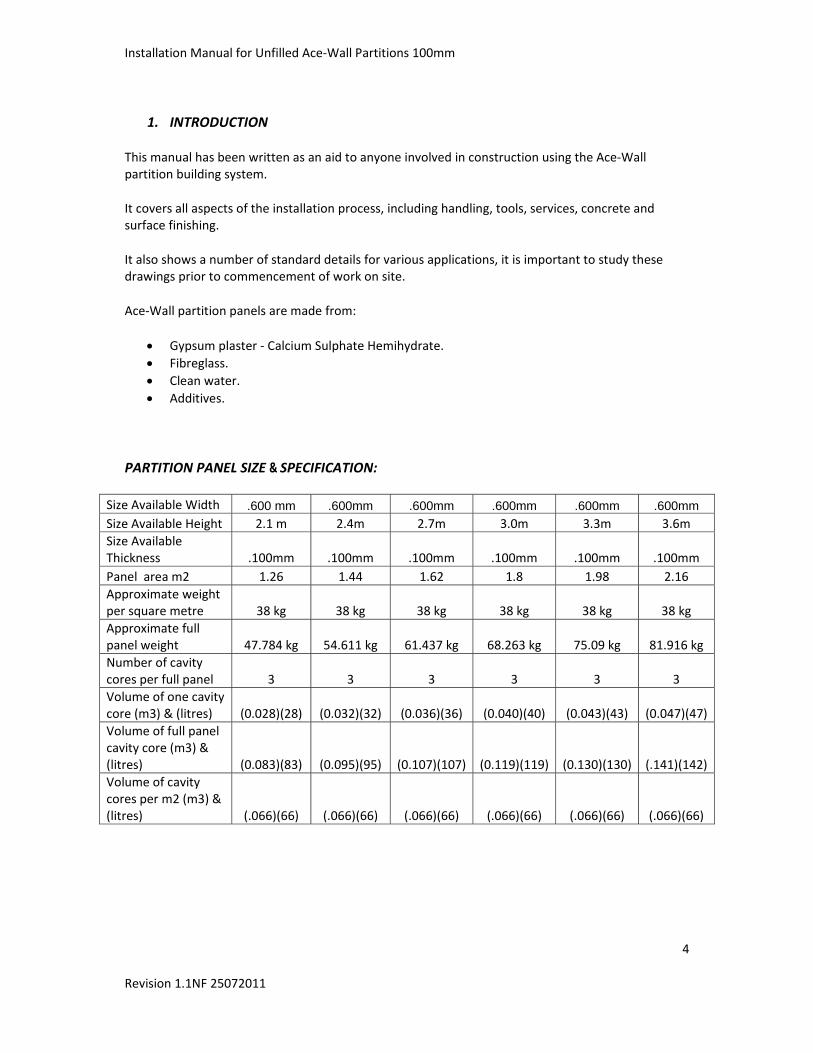
1. INTRODUCTION
This manual has been written as an aid to anyone involved in construction using the Ace‐Wall partition building system.
It covers all aspects of the installation process, including handling, tools, services, concrete and surface finishing.
It also shows a number of standard details for various applications, it is important to study these drawings prior to commencement of work on site.
Ace‐Wall partition panels are made from:
• Gypsum plaster ‐ Calcium Sulphate Hemihydrate. • Fibreglass. • Clean water. • Additives.
PARTITION PANEL SIZE & SPECIFICATION:
Size Available Width .600 mm .600mm .600mm .600mm .600mm .600mm Size Available Height 2.1 m 2.4m 2.7m 3.0m 3.3m 3.6m Size Available Thickness .100mm .100mm .100mm .100mm .100mm .100mm Panel area m2 1.26 1.44 1.62 1.8 1.98 2.16 Approximate weight per square metre 38 kg 38 kg 38 kg 38 kg 38 kg 38 kg Approximate full panel weight 47.784 kg 54.611 kg 61.437 kg 68.263 kg 75.09 kg 81.916 kg Number of cavity cores per full panel 3 3 3 3 3 3 Volume of one cavity core (m3) & (litres) (0.028)(28) (0.032)(32) (0.036)(36) (0.040)(40) (0.043)(43) (0.047)(47)Volume of full panel cavity core (m3) & (litres) (0.083)(83) (0.095)(95) (0.107)(107) (0.119)(119) (0.130)(130) (.141)(142)Volume of cavity cores per m2 (m3) & (litres) (.066)(66) (.066)(66) (.066)(66) (.066)(66) (.066)(66) (.066)(66)
Installation Manual for Unfilled Ace‐Wall Partitions 100mm
5
Revision 1.1NF 25072011
2. PLANNING THE CONSTRUCTION
Ace‐Wall partition panels can be utilised in numerous construction applications and provide outstanding solutions for project applications ranging from affordable housing, commercial/industrial buildings and multi storey apartments. Preliminary contact between the engineering and architectural consultants, client and the Ace‐Wall supplier will ensure the building system is designed to suit specific project requirements, in terms of structural adequacy, fire ratings, acoustic/thermal performance, costing and appearance. Efficiency in design, construction and cost savings are maximised by the early assessment and specifying of Ace‐Wall partition panels in the project planning stage.
Ace‐Wall can be fabricated to provide a fast and efficient on site construction system. Fabrication schedules are manually or computer generated to suite each project. Effective pre planning and fabrication at the factory can overcome expensive on site delays and provide fast track construction solutions. Should the need arise to cut and fabricate partition panels on site, this can be easily achieved using conventional hand and power tools.
Window and door openings are usually cut out on site during the installation of the partition panels.
It is important to emphasise to the people responsible for slab set out and construction that dimensional accuracy is very important to successfully installing the Ace‐Wall partition panels.
BEFORE DELIVERY, SITE ACCESS NEEDS TO BE ADDRESSED:
• Terrain conditions. • All weather access roads for delivery trucks and crane. • Overhead power cables and underground services. • Shrubs, trees and overhanging branch restrictions.
Installation Manual for Unfilled Ace‐Wall Partitions 100mm
6
Revision 1.1NF 25072011
3. TOOLS AND EQUIPMENT
CUTTING & FABRICATION
Ace‐Wall partition panels can be cut using conventional woodworking hand and power tools as appropriate. Gypsum being the base material, can be sawn, drilled, screwed and nailed. Cutting partition panels to size can be undertaken on site. Secondary fabrication, such as Gypsum, timber, UPVC or steel closure studs, fixing can be achieved using conventional tools and a range of fixing systems.
HAND TOOLS
Ace‐Wall partition panels can be cut and trimmed using any of the following hand tools ‐ timber or gyprock hand saw, keyhole saw, rasp trimming knife and hand sanding floats.
POWER TOOLS
Ace‐Wall partition panels can be cut and trimmed using conventional woodworking power tools circular saw, reciprocating saw, chainsaw, jigsaw, power sander and angle grinder.
PROPPING (if required)
The use of a simple propping system allows Ace‐Wall partition panels to be installed in an efficient and safe manner. The basic prop consists of a square hollow section tube with a pivoting top support bracket and bottom anchoring plate. The top support bracket is simply placed over the top of the panel at a rib location for maximum support, the panel alignment and plumb checked, then anchored to the floor through the bottom plate As the installation procedure progresses, cross and corner walls are secured to each other and the props can be gradually removed. Depending on wall lengths and heights, it is possible to completely remove all propping at the completion of the last wall panel. This reduces greatly the number of props required for a project and saves time in the recovery of the propping system at a later date.
• When erecting Ace‐Wall partition panels without top support, place props every 4 m. • Maximum un‐propped length of Ace‐Wall partition panel between cross walls and/or
corner connections is 4 m.
LIFTING CLAMPS
Purpose designed and made handheld lifting clamps enable quick and safe lifting of the partition panels into position. The lifting clamps can be positioned on the tongue and groove section of the Ace‐Wall partition panel. Once located in place, the clamps are tightened allowing safe pick up and placement. Ace‐Wall partition panels up to 3.6 meters high can be lifted using two clamps.
• Maximum panel height lifted with two handheld lifting clamps is 3.6 m.
Installation Manual for Unfilled Ace‐Wall Partitions 100mm
7
Revision 1.1NF 25072011
GENERAL INSTALLATION TOOLS
Once again a range of general woodworking tools as typically used by a carpenter will enable complete installation of the Ace‐Wall partition panels, in particular the following list would be required:
• Heavy duty drill (Electric and Cordless) • 2 tek screw guns • laser level • hammer • extension leads with earth leakage safety switches • 90° set out angle square • large spirit level • set out string lines, chalk lines and accessories • measuring tapes • marking pens • pitch bars • step ladders • saws (Electric and Hand held) • Safety equipment: boots, hard hat, dust masks, eye protection, ear protection and sun
protection.
For remote projects without electrical power, a small petrol generator will enable all power tools to operate.
Installation Manual for Unfilled Ace‐Wall Partitions 100mm
8
Revision 1.1NF 25072011
4. SET OUT AND PREPARATION
SETOUT
Initial floor slab checking for correctness of size, shape and level should precede wall panel installation. Should any major tolerance problems be evident, the builder will require notification to rectify. Wall locations are set out using chalk lines and marking pens to clearly indicate installation location. Also accurately and clearly mark the location of doors and windows to prevent the fixing of floor tracks at these positions.
FLOOR TRACK LOCATION SYSTEM
For Ace‐Wall partition panels, specially designed floor tracks are first secured to the slab using masonry anchors. Ace‐Wall partition panels are then installed, self locating over the floor tracks to achieve a neat appearance between the wall panel and floor slab.
TOP ANGLE
During the setting out process when the location of the bottom floor track is marked it is then by the use of a laser beam that the underside of the slab is also marked.
A 50mm x 50mm x from 0.75mm continuous angle is fitted to be able to receive the top of the Ace‐Wall partition panel for fixing. Once Ace‐Wall partition panel is in place a short piece of angle is then used at the joint location to lock panels in place.
Installation Manual for Unfilled Ace‐Wall Partitions 100mm
9
Revision 1.1NF 25072011
PRE PANEL ERECTION CHECKLIST
Before commencing erection of Ace‐Wall partition panels, check that all relevant items of the following checklist have been taken care of:
1. Set out completed. 2. All floor tracks in on site. 3. Water proofing foam (if applicable). 4. Crane and/or hand trolleys organised. 5. Accessibility of site checked. 6. No overhead power cables. 7. Tools on site. 8. Sufficient props on site. 9. Fixing consumables on site. 10. Top angle plate on site. 11. Power available. 12. Lifting clamps on site. 13. Slab accuracy checked. 14. Accurate architectural drawings available, including
o Panel layout o location of door and window openings o schedule of reveals etc o flashing details o location of services
15. Relevant engineering drawings available.
Installation Manual for Unfilled Ace‐Wall Partitions 100mm
10
Revision 1.1NF 25072011
5. PANEL TRANSPORT & DELIVERY
Ace‐Wall partition panels are horizontally loaded onto purposely formed pallets ready to be picked up by the appropriate transport vehicle. Up to 144 full size partition panels can be loaded onto a semi trailer providing 311m2 of panel area to be delivered at one time. The use of a truck crane for suitable projects can provide the delivery and on site unloading of the partition panels. Affordable delivery costs can be achieved to remote areas by bulk delivery of partition panels from the factory to site.
HANDLING
Lifting, loading and general handling of the Ace‐Wall partition panels can be achieved using conventional and affordable specialised systems. Lifting of pallets can be achieved using fork lifts, cranes and truck cranes. Ace‐Wall partition panels can be moved, unloaded and installed using all the above mentioned equipment. Being lightweight all partition panels can be installed manually or by using a number of specially built trolleys, hand trucks and hand frames.
A minimum of 9 people, not including the crane operator, should be involved in an Ace‐Wall partition panel erection team.
• 2 for the setout • 2 for the placement of bottom track and top plate • 2 for the placement of partition panel • 1 for cutting and cleaning • 2 for flushing
Installation Manual for Unfilled Ace‐Wall Partitions 100mm
11
Revision 1.1NF 25072011
6. PANEL ERECTION
POSITIONING PARTITION PANELS
Start with the set out, marking out locations for walls, doors and openings from the architects or engineers drawings is essentially one of the most important functions.
Once this is done the fixing of bottom tracks and top angles where required is carried out and when this procedure is complete, we are now ready to position and install the Ace‐wall partition panels.
It is also important that the positioning of full pallet loads of Ace‐wall partition panels are as close as possible to the working location.
• From the pallet 1 panel at a time is placed onto a hand trolley (if required) and moved to its correct location (if cutting is required it is carried out before moving from the pallet).
• Position the starting mould • At its correct location the Ace‐wall partition panels is lifted to its upright position, then
by the use of the lifting clamps it is placed onto the bottom track and against the top angle. Be sure not to slide the Ace‐wall partition panel against the starting mould until the adhesive has been applied.
• Apply the adhesive to either the starting mould joint or Ace‐wall partition panel joint then slide and lock them together, use tek screws through the top angle for extra locking if necessary.
• Further top angle pieces are placed at the opposite joints to further lock into place. • The above process is continued until work is complete. • If the cores are to be filled with perlite then no further work to the surface of the wall is
carried out until services and perlite filling has been completed. • If the cores are to be left empty then the taping and flushing of each vertical joint can
be carried out. This is sanded once dry and the wall is now ready for painting.
CARE OF THE WALL SURFACES BETWEEN THE FINISHING TO PAINTING NEEDS TO BE OBSERVED
PACKERS
Ace‐Wall partition panels may require packing, due to unevenness in the slab. Small strips of solid fibre cement or plastic sheet provide stable packers, enabling panel bottoms and wall intersections to be correctly plumbed and leveled prior to locking in.
Installation Manual for Unfilled Ace‐Wall Partitions 100mm
12
Revision 1.1NF 25072011
WALL & PANEL CONNECTIONS
During the site cutting process, timber, UPVC or steel closure studs are installed at the panel ends to duplicate a vertical rib to provide strength and a site fixing system. Timber, UPVC or steel closure studs can be installed on site and simply screw fixed through the panel into the stud.
Abutting, corner and cross walls are positioned, propped, aligned, leveled and then can be screw fixed using large 150mm long tek screws through the closure studs to produce a permanent strong connection. (These must be exterior grade treated screws) This connection procedure allows for rapid and immediate Installation of the partition panels to minimise on site construction time, manpower and propping costs. The use of closure studs and screw fixings can also provide strong connections.
Installation Manual for Unfilled Ace‐Wall Partitions 100mm
13
Revision 1.1NF 25072011
7. INSTALLATION OF DOOR AND WINDOW
Window and door frames of any size and type (steel, timber or aluminium frames) may be fitted within the system. The system also offers special details for interior and exterior reveals to enhance the building appearance.
Doors and window openings are generally left out on site during panel installation, to accurately profile the door or window frame the remaining head panel section will act as a lintel transferring any loads to the panel sides without loading up the door or window frame.
However in the case of large openings over 1.5m wide, it may be necessary to install a lintel beam and posts within the Ace‐Wall cavity cores, to carry the overhead load. In this case a panel off cut can be cut to fit around the lintel to form the head panel or base panel.
Timber, UPVC or steel closure studs, screw fixed within the cavity cores, provide the securing mechanism for fixing door and window frames. The installation of the closure studs takes place on site after the openings are left. Use exterior grade screws.
Timber and steel door frame styles are commonly specified, both simply installed by the installation or carpenter contractors. When ordering door frames care should be taken to specify the frames to suit the Ace‐Wall panel thickness of 100mm to ensure correct fitting over the panel.
Fire door applications can be achieved by using steel closure studs, steel door frames and fire resistant void filling grouts.
The use of standard 3 piece "knock down" steel door frames, allows for efficient installation, handling and transportation costs.
Window frames commonly specified are aluminium or timber styles, depending on the desired building look or construction type, both these frame methods can be installed into single leaf Ace‐Wall construction or veneer double leaf construction.
Location of the frame position within the Ace‐Wall panel can provide many combinations of exterior and interior reveal finishing off details. Attention to these details at the design stage will enhance the overall building appearance and costing. Conventional timber, fibre cement sheet or masonry materials can be utilised.
The use of external flange aluminium window extrusions, with the flange sealant fixed to the Ace‐Wall partition panels exterior face can provide a fast and cost effective solution, eliminating all exterior reveal moulds.
Installation Manual for Unfilled Ace‐Wall Partitions 100mm
14
Revision 1.1NF 25072011
8. SERVICES
The installation of plumbing, electrical and other cable services throughout the building is very similar to current building practice.
For single leaf Ace‐Wall construction all plumbing and electrical services are typically run horizontally along the top of wall or roof system members, then vertically down the panel cavities without any "nogging" restrictions.
Services are best installed once all Ace‐Wall partition panels are positioned and locked in and alterations can take place after these operations with minimal inconvenience.
Fixture, fittings and tap assemblies are easily cut and "chased" into the Ace‐Wall outer skin with standard woodworking tools and simply mounted onto a timber block screw fixed to the panel. To minimise horizontal cutting, chasing and associated repair work it is recommended that loop and branch lines not exceed approximately 1 m horizontally.
Repair work is undertaken after completion of all fixtures and fittings by "wadding" up the panel. "Wadding a stiff mixture of plaster and fibre glass rovings placed around the penetration, sets and bonds to all in contact, providing a permanent fixing ready for final flushing or tiling”.
Care should be taken to eliminate water pipe hammer as per normal procedure. Alternatively, the use of polybutylene plumbing systems will eliminate water hammer and it integrates well with the Ace‐Wall building system.
Plumbers, electricians and others will find many benefits in working with Ace‐Wall over other forms of solid construction resulting in labour savings to the builder I developer.
Important: Any pipework needing pressure testing must be carried out prior to filling the walls.
Installation Manual for Unfilled Ace‐Wall Partitions 100mm
15
Revision 1.1NF 25072011
9. FINISHING
Architectural specifications will list the following:
• Specify coating type and application method and colour. • Exterior waterproof finish. • Interior decorative finish. • Tile, slate or stone facing. • Architectural profile quoins and corner sections. • Location of expansion joints.
EXPANSION JOINTS
Ace‐Wall partition panels manufactured from Gypsum display only minimal coefficients of thermal expansion and contraction compared to heavy weight building materials such as masonry and concrete. It is still important to provide for expansion / movement joints to allow for overall structure movements and provide for articulated wall design.
Control joints should be as specified by the architect in consultation with the engineer to suit building appearance. Joint materials to be, closed cell polyethylene compressible filler strip or backing rod, sealed over with construction grade paintable polyurethane sealant.
The most efficient method for control joints to Ace‐Wall partitions is at the vertical joint.
Installation Manual for Unfilled Ace‐Wall Partitions 100mm
16
Revision 1.1NF 25072011
SETTING / STOPPING / FLUSHING
Ace‐Wall partition panels require minimal setting/stopping/and flush finishing when compared to masonry and plasterboard wall construction. Once partition panels are installed, services placed, door and window frames located and roof covered, finishing trades can commence.
Interior finishing:
The Ace‐Wall partition panels must be dry clean, sound, free of contaminants, splashes of plaster, mortar and sillcone compounds.
All interior corners, joints and wall Intersections to be flushed finished using the following components:
• Paper / fiberglass flushing tapes. • Metal / PVC corner angles and bead accessories. • Paintable acrylic sealants. • Approved flushing plasters and skim coats
Exterior finishing:
The Ace‐Wall partition panel must be dry clean, sound, free of contaminants, splashes of plaster, mortar and Silicone compounds.
All exterior corners, joints and wall Intersections to be flushed finished using the following recommended exterior grade components:
• Fibreglass flushing tapes. • Rigid PVC corner angles and bead accessories. • Exterior construction grade paintable polyurethane sealants. • Approved flushing plaster "setting" cements with water resistant acrylic bonding additive
(Do not use any other retarders or accelerators in the mixture).
For both exterior and interior filling and flushing, good quality plaster based setting cements should be used and not powder or pre‐mixed air dried compounds. The use of approved acrylic bonding additives in the liquid gauge plaster mixture at specified ratios will provide greater workability, water resistance, bonding and joint strength.
Installation Manual for Unfilled Ace‐Wall Partitions 100mm
17
Revision 1.1NF 25072011
CORNICE & SKIRTINGS
Cornices, if required, are fitted in the conventional manner using cornice adhesive. Consideration should be given to installing a larger 90mm cornice to enhance the 2.7m high walls. Standard 55mm cornice can be used also or replaced with a shadow line/flushed wall/ceiling detail to create a contemporary clean appearance.
Timber skirting can be secured by glue fixing with cornice cements or construction adhesives with tek screw nailing or PVC spaghetti nail fixing to provide initial support until curing of the glue. Vinyl skirting and seamless floor coverings can be contact glue adhered as per manufacturers recommendations.
FIXINGS AND FASTENERS
Fixing to the Ace‐Wall partition panels can be considered as similar to other types of cellular, drywall or plasterboard material. Many brands and fastener types can be used and manufacturer's recommendations should be followed for Installation and allowable loading capacities.
The unique Ace‐Wall panel with cavity construction and vertical ribs at 300mm centres does not allow for nail or screw fixings, without the use of void filling materials, such as timber, UPVC or steel closure studs, backing plates and solid concrete or grout filling.
By pre planning critical load fixtures at construction stage, void filling installation procedures will allow conventional fastener systems to be installed.
This is only necessary for heavy weight fixtures and loads exerted by cantilever hand basins, troughs, brackets, wall plates and industrial cabinets etc.
In general, light and medium weight fixtures can be attached with a variety of hollow cavity wall fasteners. Fixing through the ribs although acceptable is not generally done because fixture installations are restricted to rib locations. Chemical injection anchor systems can also be used to carry medium to heavy loads in situations where walling and building work has been completed.
Installation Manual for Unfilled Ace‐Wall Partitions 100mm
18
Revision 1.1NF 25072011
TILING
Tiles can be directly laid onto the panel face in the conventional manner. Proprietary pre‐mixed flexible tile adhesives perform best over traditional on site sand and cement mixed grouts.
WET AREAS
Wet area design and specifications must comply with the relevant government building standards.
As for conventional materials, design and construction details need to be observed for the critical shower alcove area. By using water resistant Gypsum panel constructions details are simpler than other lightweight plasterboard walling products.
Shower area floors need to be waterproofed by the installation of an accredited insitu shower tray membrane system or a proprietary shower base. The shower tray membrane must carry up the wall sides, and bonded to the Ace‐Wall face. The membrane should be carried up the full height of the tiling to provide extra shower wall protection.
All remaining wall surfaces in a wet area must be suitably paint finished to provide moisture protection and enhance appearance.
WALLPAPER
All walls should be sized prior to hanging wallpaper and normal decorating practice should be followed in conjunction with the manufacturer’s instructions.
Installation Manual for Unfilled Ace‐Wall Partitions 100mm
19
Revision 1.1NF 25072011
10. PAINTING
Ace‐Wall partition panels manufactured from water resistant Gypsum plaster provide the ideal substrate for both interior and exterior paint and texture coat finishes. Acrylic water based top coat systems applied over paint manufacturers' recommended primer/sealer coats produce excellent results General acrylic paint qualities such as bond strength elasticity, UV light resistance, weather resistance, fungus resistance and texture thickness are all important performance qualities of the coating system selected. The coatings must also have the ability to "breathe" and allow vapour permeability, while not allowing the ingress of water due to fair particularly important for exterior wall applications.
EXTERIOR COATINGS
Although Ace‐Wall partition panels are highly water resistant it is still mandatory to provide a suitable waterproof coating system to further reduce the long term weather abrasion effects.
Exterior finishes must have similar strength and elastic performance to that of the Ace‐Wall Gypsum material to ensure thermal movements are compatible and cracking and crazing will not occur. For this reason cement rich renders should not be used due to their high shrinkage when curing and rigid performance on setting.
Manufacturers have created a fashionable range of texture coatings, offering low and high profile "roll on", "trowel on", "spray stipple" or "stucco" applied coating systems.
A great benefit of specifying exterior Ace‐Wall partition panels is the superior surface flatness, requiring less demanding applied coating "hiding power".
Acrylic textures masonry and elastomeric paint systems can offer affordable coating solutions, while still providing weather resistance and enhanced appearance. A combination of the coating product selected, colour and method of application will enable the designer to vary the final appearance, function and costing of a project.
Ace‐Wall may need to be primed with an appropriate approved primer. Make sure that this primer is applied according to specifications and that particular care is taken along the edges of the panel sections.
A variety of approved paint finishes from Acrylic house paints to architectural texture coatings may be used on the panel. At all times, follow the manufacturer's specifications.
Installation Manual for Unfilled Ace‐Wall Partitions 100mm
20
Revision 1.1NF 25072011
11. ACCESSORIES & ADD ONS
The builder/developer/owner may wish to express individuality in the "dressing up" of the basic Ace‐Wall building system.
This can take the form of window and door reveals, quoins and plinths.
Exterior profiles, once installed require texture or paint finishing to further enhance the buildings appearance and provide increased weather durability.
Stone, slate, brick plinths and tile facings can also be installed to the wall panel along with roof tile, slate or iron roofing overlays to create the traditional look.
Verandahs, carports, garages, shade and porch hoods and pergolas become "add on" attachments, either as part of the original design or future planned extensions.

Installation Manual for Unfilled Ace‐Wall Partitions 100mm
21
Revision 1.1NF 25072011
12. HEALTH AND SAFETY
None of the three basic components of Ace‐Wall, plaster, fiberglass and water presents a health hazard. Plaster the basic ingredient of Ace‐Wall, has long been used as filler in medicines and is a major component of toothpaste.
The fiberglass component of Ace‐Wall is non respirable.
The chemicals used are used in small volumes and present no health hazard in the finished product.
SAFETY DATA
• IDENTIFICATION Plasterglass panel composed of a gypsum plaster, reinforced by filimatised fiberglass.
• USE Structural building panel for interior and exterior use
• INGREDIENT Gypsum 98.00% Fibreglass 1.0% Water Repellent 1.0%
CONTAINS NO ASBESTOS
• HEALTH EFFECTS
Swallowed No adverse effects known Eye Contact Minor Irritation Skin Contact Can Irritate (largely confined to cutting, trimming and grinding operations) Inhalation May cause minor irritation. Dust masks may be
beneficial in areas where high dust levels occur • FIRST AID
Swallowed Give plenty of water to drink
Eye Contact Wash with running water using eye bath or wash bottle, if irritation persists, seek medical attention
Skin Contact Wash with warm water and mild soap Inhalation Remove to fresh air. If any ill effect persists, seek
medical attention.
Installation Manual for Unfilled Ace‐Wall Partitions 100mm
22
Revision 1.1NF 25072011
• ADVICE TO DOCTORS
Treat symptomatically
• PRECAUTIONS FOR USE
No special precaution necessary
• PERSONAL PROTECTION
None required for normal use, but if cutting ACE‐WALL with an electric saw, a nuisance dust mask (eg. 3M brand mask 8500) is recommended and goggles advisable.
• SPILLS
No special precautions
• DISPOSAL
Dispose of as normal waste, subject to conforming to state
• PHYSICAL DESCRIPTION AND PROPERTIES
Gypsum plaster core reinforced by fibreqlass strands.
Specific gravity (H20=1.0) = 0.7
Solubility in water = 0.2%
Non flammable
Non hazardous
• FIRE
Ace‐Wall partition panel is non combustible. Extinguish local fires with water, C02, etc. No special fire fighting procedures required.
Installation Manual for Unfilled Ace‐Wall Partitions 100mm
23
Revision 1.1NF 25072011
13. Work Method Statements
ACE‐WALL INTERNATIONAL PTY LTD SAFETY PROCEDURES
FOR ERECTION OF ACE‐WALL PARTITION PANELS
1. Definitions
a) Ace‐Wall partition panels: any 100 mm thick section of fibre reinforced plaster wall b) Manufactured using Ace‐Wall Technology. c) Lifting clamps: lifting clamps used to lift Ace‐Wall partition panels. d) Hand‐trolley: steel frame on casters designed to move Ace‐Wall partition panels across firm level
surfaces. e) Tek screws: metal fasteners with thread used to join two sections of wall partition panels
together. f) Steel Prop: 50 x 50 section of steel with a specially designed steel hook on one end and flat steel
plate on the other end can be used to stabilise wall partition panels during erection stages. g) Ace‐Wall transport pallet: specially designed plastic transportation pallet.
2. Safety procedures
a) Ace‐Wall transport pallets must always be placed on level ground and where not possible, blocks must be placed to make sure the pallet (with partition panels) is totally level.
b) During erection of Ace‐Wall partition panels all work shall be carried out in a tradesman‐like manner with particular consideration for the safety of all personnel.
c) Where Ace‐Wall partition panels are moved with the use of a hand trolley, wind conditions must be taken into consideration. Partition panels must never be left unattended on a hand trolley.
d) All personnel are to avoid standing underneath a panel being lifted. e) If steel props are used they must always be connected to the panel by placing the clamp
over a rib and all steel props must be firmly secured to the floor. f) The supervisor shall ensure that all erected walls are safely braced or propped correctly
at completion of each work shift before leaving the site. g) When partition panels need to be cut on site, a dust mask needs to be worn of a
minimum P2 standard. h) When cutting or sanding partition panels on site with the use of power tools, a dust
mask needs to be worn of a minimum P2 standard, as well as suitable eye protection. i) A safety hard hat must be worn by all personnel on site during lifting and placing of Ace‐
Wall partition panels. j) Before the end of each work shift any off‐cuts of partition panels are to be placed in a
suitable container and all dust is to be wet swept or dry vacuumed and placed in a covered container.
k) Dust and off‐cuts are to be disposed of in accordance with the relevant local authority's waste disposal requirements and regulations.
Note: In the event of timber, UPVC or steel studs being inserted into the cavity of an Ace‐Wall Panel, under no circumstances shall lifting devices be attached to these studs for lifting purposes. All lifting devices shall be attached to solid ends of Ace‐Wall Partition panels.
Installation Manual for Unfilled Ace‐Wall Partitions 100mm
24
Revision 1.1NF 25072011
ACE‐WALL INTERNATIONAL PTY LTD WORK METHOD STATEMENT
FOR PLACEMENT OF ACE‐WALL PANEL SYSTEM
Preliminary Requirements
• Clear slab of ponding water if applicable. • Establish datum for floor and note floor level to be ± 5mm from specified reduced level. • Mark grid lines for set out from established survey grid provided by client. • Clear slab of debris and equipment (by others). • Position indicators at int. / ext. corners and reference location points. • Confirm method of placement of partition panels. • Confirm delivery date, time and panel schedules.
Stage One
1.01 Identify and mark panel numbers on floor set out 1.02 Measure and mark floor slab to accommodate services and transfer set out details from
Ace‐Wall Panel Schedule to accommodate same. 1.03 Provide continuous blocking to floor slab on one side of wall only if required 1.04 Set out and mark all door and window locations. 1.05 Complete set out to enable 100% of Ace‐Wall partition panels to be erected in any given
area. Stage Two
2.01 Drill holes in floor track at predetermined centres to accommodate services. 2.02 Remove dust residue 2.03 Place floor track and top angle. 2.04 Place yellow safety caps over services (not required if done simultaneously with panel
erection).
Stage Three
3.01 Determine method of lifting panel from pallet. 3.02 Ensure on a daily basis that the lifting clamps are in good working order prior to start of
day's lifting. 3.03 Reference to Ace‐Wall Cutting Schedules and pallet loading for order for placement of
partition panels. 3.04 Position brace for Ace‐Wall panel vertical and temporarily secure to floor slab via a
10mm dia x 40mm dyna bolt, ensuring true plumb and alignment if required. Ensure panel is level and shim where necessary to bring in to level plane.
3.05 Drill and place 150mm Hex Head 14 gauge screws at intersection of adjoining walls at 600mm centres if required.
3.06 On completion sweep and place all offcuts and debris in waste bins provided. 3.07 Stack pallets one upon another for craneage and removal to nominated storage area.
Installation Manual for Unfilled Ace‐Wall Partitions 100mm
25
Revision 1.1NF 25072011
Stage Four
4.01 Cut and place door and window heads and fit either steel or timber studs to underside. Stage Five
5.01 Fit temporary propping to all openings if required. Stage Six
6.01 On completion (i.e. floor by floor basis) check all partition panels located in correct position and they are both true and plumb and braced (check that installation of beams has not moved partition panels out of plumb).
6.02 Check all openings i.e. door, window is in correct location and where required, braced and supported to receive perlite.
Stage Seven (if required)
7.01 Perlite Filing. Brief pump operator as to the required specified slump and expected volume of perlite to be placed.
7.02 Do not commence filling if other than Light discontinuous rain is likely. 7.03 If rain occurs, then attempt to complete filling partition panels to full height if possible and
block panel openings to prevent ingress of moisture. 7.04 Wash down any perlite spillage before it hardens. Stage Eight
8.01 On completion of floors being constructed with Ace‐Wall partition panels, carry out the following. Remove temporary braces of walls, stack and relocate to the next level. Remove temporary supports from door and window openings after sufficient curing period where perlite filling has taken place. Remove all other temporary supports from walls and floor and leave area clear for follow on trades.
8.02 Note condition of walls, especially after perlite placement and notify relevant party to final sign off.
Stage Nine
9.01 Flushing of all joints using the recommended products. 9.02 Once all joints have received the required coats and are completely dry then they are
sanded to a smooth finish. 9.03 The wall system is now complete to receive final finished by others.
Stage Ten
10.01 SIGN OFF BY SUPERVISOR AND BUILDER IS NOW REQUIRED.
Installation Manual for Unfilled Ace‐Wall Partitions 100mm
26
Revision 1.1NF 25072011
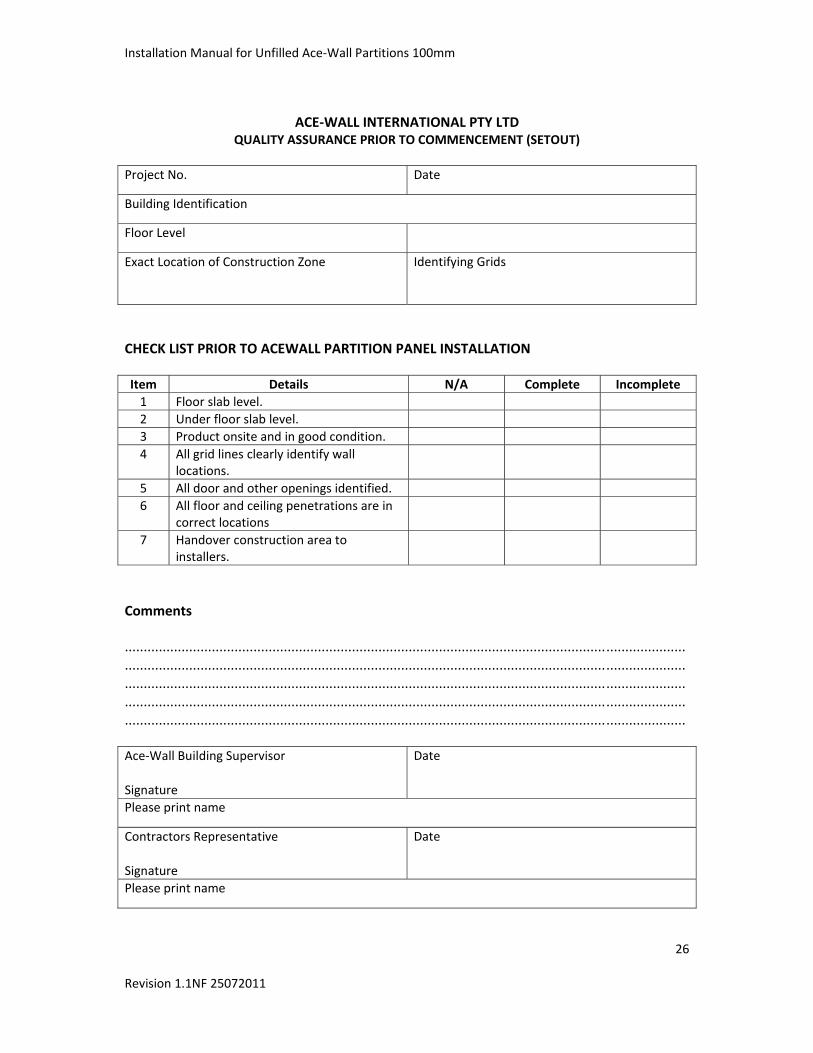
ACE‐WALL INTERNATIONAL PTY LTD QUALITY ASSURANCE PRIOR TO COMMENCEMENT (SETOUT)
Project No. Date
Building Identification
Floor Level
Exact Location of Construction Zone
Identifying Grids
CHECK LIST PRIOR TO ACEWALL PARTITION PANEL INSTALLATION
Item Details N/A Complete Incomplete 1 Floor slab level. 2 Under floor slab level. 3 Product onsite and in good condition. 4 All grid lines clearly identify wall
locations.
5 All door and other openings identified. 6 All floor and ceiling penetrations are in
correct locations
7 Handover construction area to installers.
Comments
....................................................................................................................................................
....................................................................................................................................................
....................................................................................................................................................
....................................................................................................................................................
....................................................................................................................................................
Ace‐Wall Building Supervisor
Signature
Date
Please print name
Contractors Representative
Signature
Date
Please print name
Installation Manual for Unfilled Ace‐Wall Partitions 100mm
27
Revision 1.1NF 25072011
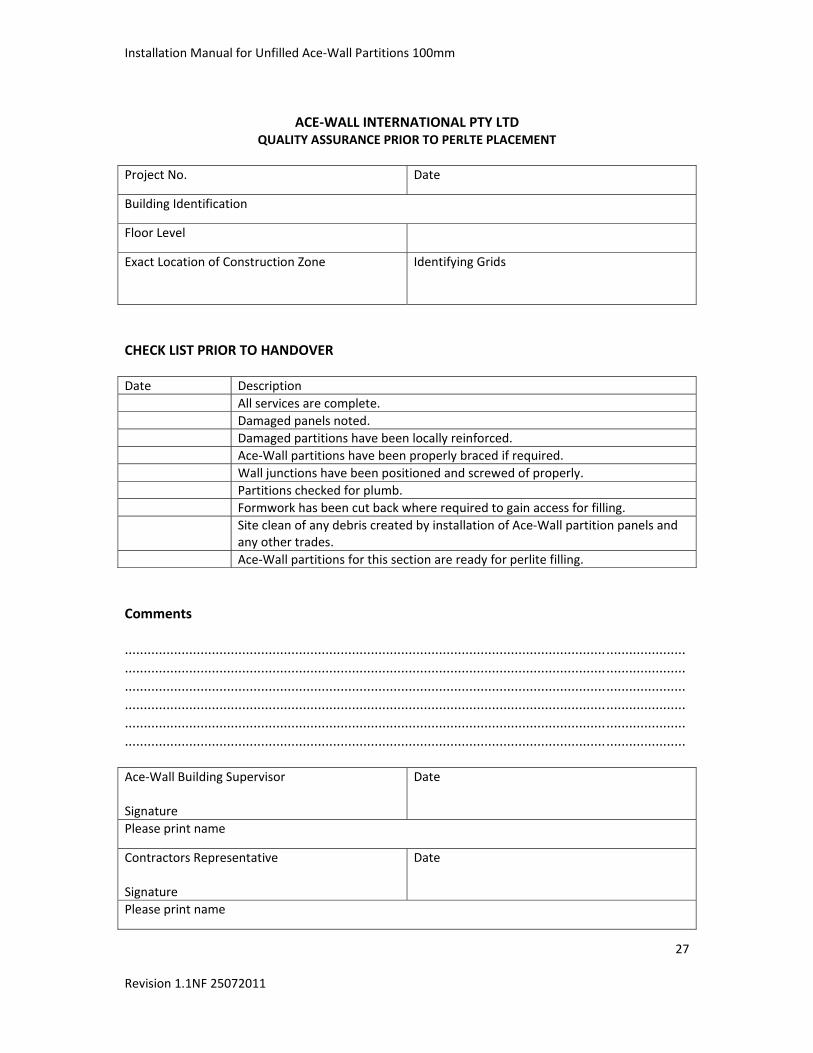
ACE‐WALL INTERNATIONAL PTY LTD QUALITY ASSURANCE PRIOR TO PERLTE PLACEMENT
Project No. Date
Building Identification
Floor Level
Exact Location of Construction Zone
Identifying Grids
CHECK LIST PRIOR TO HANDOVER
Date Description All services are complete. Damaged panels noted. Damaged partitions have been locally reinforced. Ace‐Wall partitions have been properly braced if required. Wall junctions have been positioned and screwed of properly. Partitions checked for plumb. Formwork has been cut back where required to gain access for filling. Site clean of any debris created by installation of Ace‐Wall partition panels and
any other trades. Ace‐Wall partitions for this section are ready for perlite filling.
Comments
....................................................................................................................................................
....................................................................................................................................................
....................................................................................................................................................
....................................................................................................................................................
....................................................................................................................................................
....................................................................................................................................................
Ace‐Wall Building Supervisor
Signature
Date
Please print name
Contractors Representative
Signature
Date
Please print name
Installation Manual for Unfilled Ace‐Wall Partitions 100mm
28
Revision 1.1NF 25072011
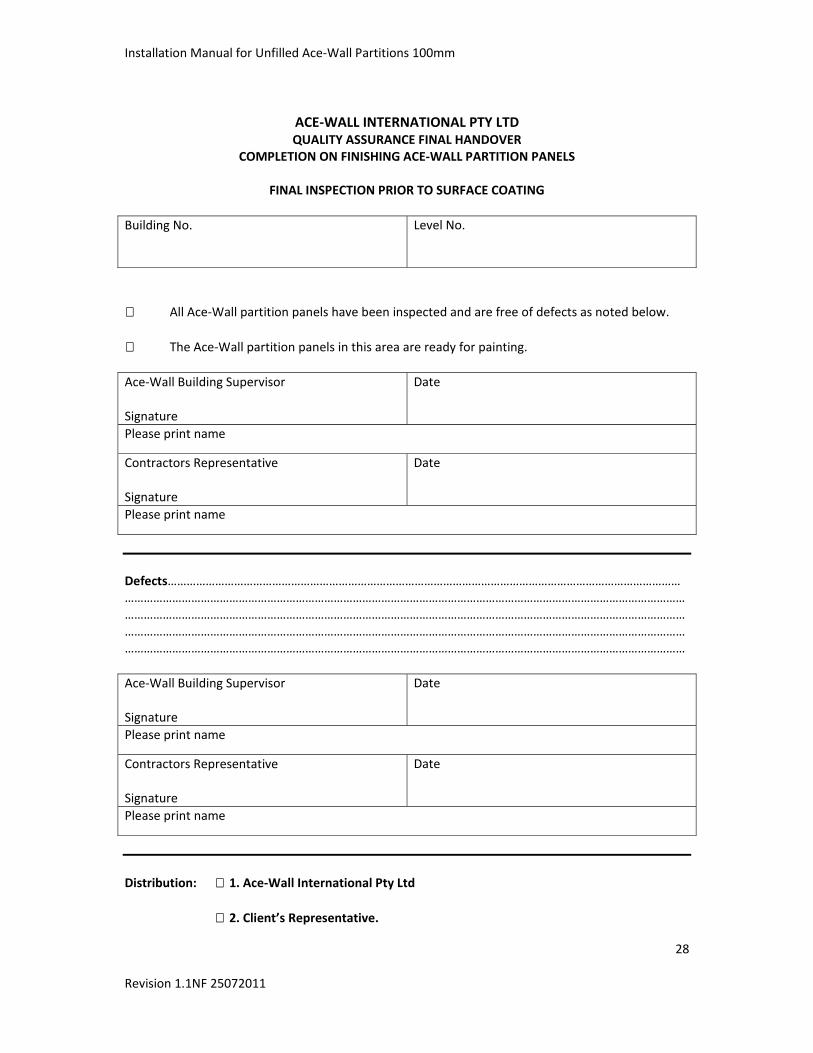
ACE‐WALL INTERNATIONAL PTY LTD QUALITY ASSURANCE FINAL HANDOVER
COMPLETION ON FINISHING ACE‐WALL PARTITION PANELS
FINAL INSPECTION PRIOR TO SURFACE COATING
Building No.
Level No.
All Ace‐Wall partition panels have been inspected and are free of defects as noted below.
The Ace‐Wall partition panels in this area are ready for painting.
Ace‐Wall Building Supervisor
Signature
Date
Please print name
Contractors Representative
Signature
Date
Please print name
Defects……………………………………………………………………………………………………………………………………………………………………………………………………………………………………………………………………………………………………………………………………………………………………………………………………………………………………………………………………………………………………………………………………………………………………………………………………………………………………………………………………………………………………………………………………………………………………………………………………
Ace‐Wall Building Supervisor
Signature
Date
Please print name
Contractors Representative
Signature
Date
Please print name
Distribution: 1. Ace‐Wall International Pty Ltd
2. Client’s Representative.
Installation Manual for Unfilled Ace‐Wall Partitions 100mm
29
Revision 1.1NF 25072011
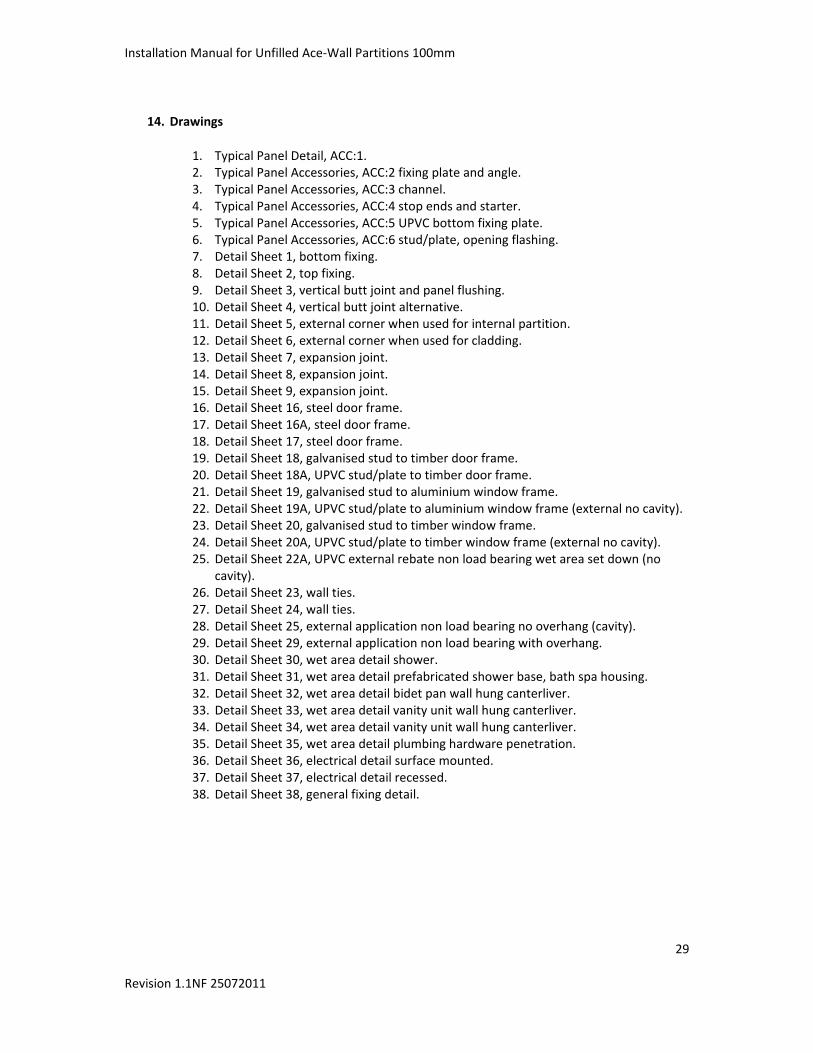
14. Drawings
1. Typical Panel Detail, ACC:1. 2. Typical Panel Accessories, ACC:2 fixing plate and angle. 3. Typical Panel Accessories, ACC:3 channel. 4. Typical Panel Accessories, ACC:4 stop ends and starter. 5. Typical Panel Accessories, ACC:5 UPVC bottom fixing plate. 6. Typical Panel Accessories, ACC:6 stud/plate, opening flashing. 7. Detail Sheet 1, bottom fixing. 8. Detail Sheet 2, top fixing. 9. Detail Sheet 3, vertical butt joint and panel flushing. 10. Detail Sheet 4, vertical butt joint alternative. 11. Detail Sheet 5, external corner when used for internal partition. 12. Detail Sheet 6, external corner when used for cladding. 13. Detail Sheet 7, expansion joint. 14. Detail Sheet 8, expansion joint. 15. Detail Sheet 9, expansion joint. 16. Detail Sheet 16, steel door frame. 17. Detail Sheet 16A, steel door frame. 18. Detail Sheet 17, steel door frame. 19. Detail Sheet 18, galvanised stud to timber door frame. 20. Detail Sheet 18A, UPVC stud/plate to timber door frame. 21. Detail Sheet 19, galvanised stud to aluminium window frame. 22. Detail Sheet 19A, UPVC stud/plate to aluminium window frame (external no cavity). 23. Detail Sheet 20, galvanised stud to timber window frame. 24. Detail Sheet 20A, UPVC stud/plate to timber window frame (external no cavity). 25. Detail Sheet 22A, UPVC external rebate non load bearing wet area set down (no
cavity). 26. Detail Sheet 23, wall ties. 27. Detail Sheet 24, wall ties. 28. Detail Sheet 25, external application non load bearing no overhang (cavity). 29. Detail Sheet 29, external application non load bearing with overhang. 30. Detail Sheet 30, wet area detail shower. 31. Detail Sheet 31, wet area detail prefabricated shower base, bath spa housing. 32. Detail Sheet 32, wet area detail bidet pan wall hung canterliver. 33. Detail Sheet 33, wet area detail vanity unit wall hung canterliver. 34. Detail Sheet 34, wet area detail vanity unit wall hung canterliver. 35. Detail Sheet 35, wet area detail plumbing hardware penetration. 36. Detail Sheet 36, electrical detail surface mounted. 37. Detail Sheet 37, electrical detail recessed. 38. Detail Sheet 38, general fixing detail.