ACD Manual - rocom-nimanssupport.co.uk · ACD System Supervisor ... What is ACD? Automatic Call...
40
ACD Manual Version 3.1 for SV8100 R8 September 2012
Transcript of ACD Manual - rocom-nimanssupport.co.uk · ACD System Supervisor ... What is ACD? Automatic Call...

ACD Manual
Version 3.1 for SV8100 R8
September 2012

Contents
What is ACD? ....................................................................................................................................... 4
Setting up ACD for the First Time ...................................................................................................... 5
Using PC Pro Wizards ....................................................................................................... 5
Determining When Calls can be delivered to ACD Groups ................................................ 7
ACD Time Patterns. ..................................................................................................................... 7
ACD Extension Work Schedule. ................................................................................................ 8
ACD Trunk Work Schedule ......................................................................................................... 8
Setting Up Agents ............................................................................................................. 9
Standard Login ............................................................................................................................. 9
AIC login ...................................................................................................................................... 10
Agent Login Codes ..................................................................................................................... 11
ACD Programmable Function Keys ........................................................................................ 11
Setting up ACD Groups ................................................................................................... 12
Agent Options ............................................................................................................................. 12
ACD Skill Based Routing ................................................................................................. 14
Caller ID Marking ............................................................................................................. 15
Logging Agents In .............................................................................................................................. 16
Delivering Calls to ACD Groups ....................................................................................................... 17
Using a Pilot Number ....................................................................................................... 17
Assigning an ACD Group to a Ring Group ....................................................................... 18
ACD Overflow and Announcements ................................................................................ 20
ACD Overflow ............................................................................................................................. 20
Setting up Announcements ....................................................................................................... 22
Contents continued
ACD Supervisor Options ................................................................................................. 29
ACD System Supervisor .................................................................................................. 29
Setting up the ACD System Supervisor. ................................................................................. 29
Using the ACD System Supervisor Functions. ...................................................................... 31
ACD Group Supervisor .................................................................................................... 31
Setting up an ACD Group Supervisor ..................................................................................... 32
Using the ACD Group Supervisor Functions. ........................................................................ 34
ACD Service Codes ......................................................................................................... 35
ACD Queue Alarms ......................................................................................................... 36
ACD Queue Display COS Option ............................................................................................ 36
ACD Queue Alarm Setup .......................................................................................................... 36
ACD Queue Display Setup .............................................................................................. 37
Enhanced DSS Operation ............................................................................................... 38
ACD DSS Lamp Table ..................................................................................................... 38
Document History ............................................................................................................ 39
What is ACD?
Automatic Call Distribution uniformly distributes calls among agents who are members of ACD groups. When calls arrive at an ACD group, the longest waiting call is routed to the Agent who has been idle the longest. By using this method to distribute calls, service levels can be maintained efficiently and calls are distributed fairly.
ACD call routing can be enhanced by the use of Skill Based Routing. Skill based routing allows agents to be given different priorities in the ACD groups that they login to. If two agents are logged into the same ACD group with the same priority a queued call will be delivered the agent who has been idle for the longest.
When an agent is ready to take calls, they login to ACD. There are two modes of login, Standard and AIC. Standard login will allow an agent to login to a single predefined ACD group. AIC login (Agent Identity Code) will allow an agent to enter a code that logs them into multiple ACD groups. Many different AIC codes can be created giving agents flexibility to login to different groups as required. The login mode is set on a per extension basis and therefore a combination of both standard login and AIC login can be used.
When an agent completes a call they can automatically be put into a wrap-up state for a set amount of time. This is intended to give an agent time to finish what they are doing before they are presented with another ACD call. Agents also have the ability to make themselves unavailable, when an agent leaves their desk or do not want to be presented calls, then they can press their unavailable key.
There are also a number of supervisor functions that can be carried out by elected extensions so that they can monitor and manage agents.
All of the ACD activity can be output by the SV8100 via the MIS output port. An MIS application such as MyCalls can be used to monitor ACD activity of the SV8100. Further information is available in the MyCalls Installation Manual.
There are many other features that accompany ACD are available on the SV8100 including:
ACD Queue Announcements, including position in queue.
ACD Call Queuing
Flexible Overflow Options
Agent Login / Logout / Unavailable / Wrap-up States
Call Monitoring
ACD Supervisor Functions
Enhanced DSS Operations
Management Information System output
Flexible Work Schedules
Caller ID Marking
ACD supports a maximum of 256 Agent and 64 ACD Groups. The SV8100 requires ACD Agent licenses for each concurrent ACD Agent that will logon – BE107581.
Skill Based Routing requires minimum R5 system software and the ACD Advance License – BE110869.
Caller ID Marking requires the ACD Advance License and the R8 enhanced feature license – BE112138.
Setting up ACD for the First Time
When setting up ACD for the first time, the following should be considered:
What times will calls be delivered to the ACD Groups
Will Agents use AIC or Standard login
Which Options should be configured for each ACD Group
What are the requirements in terms of overflow
Where calls will go out of hours
Which DDI numbers should be pointed to ACD Groups
What Programmable Keys / Service codes need setting up
The above topics are discussed in the following section of the manual in detail. Additional programming items are available later in the Advanced Features section.
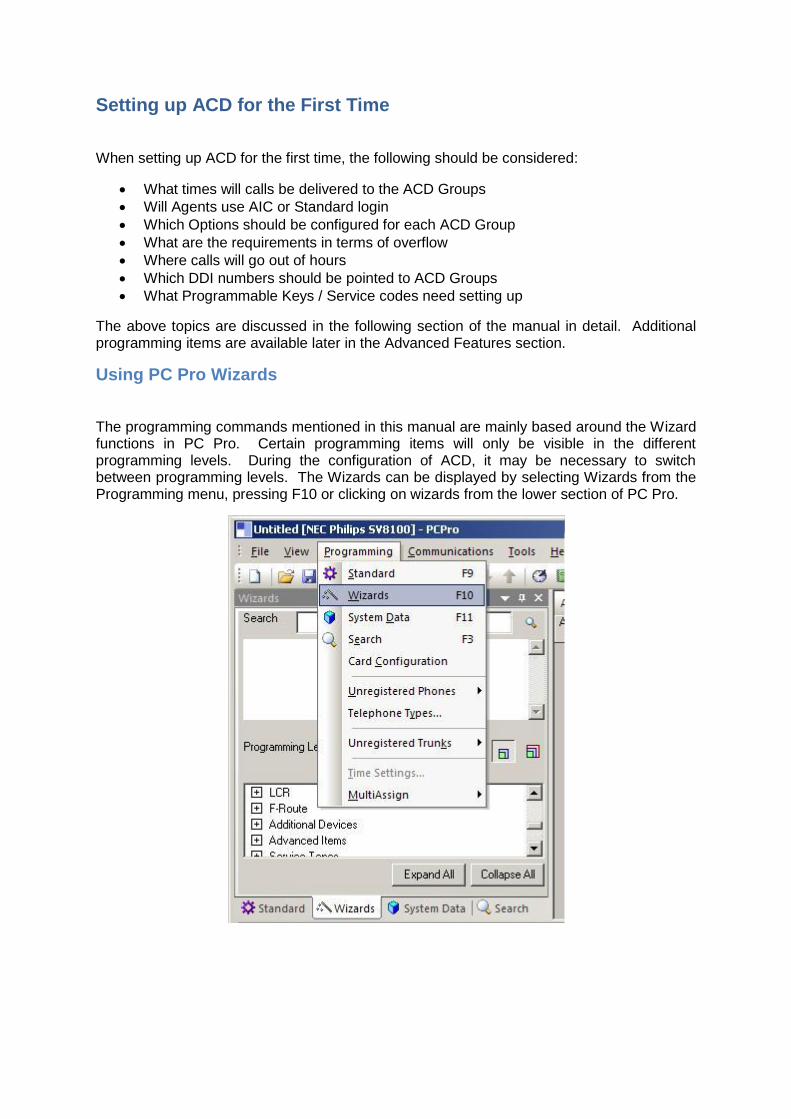
Using PC Pro Wizards
The programming commands mentioned in this manual are mainly based around the Wizard functions in PC Pro. Certain programming items will only be visible in the different programming levels. During the configuration of ACD, it may be necessary to switch between programming levels. The Wizards can be displayed by selecting Wizards from the Programming menu, pressing F10 or clicking on wizards from the lower section of PC Pro.
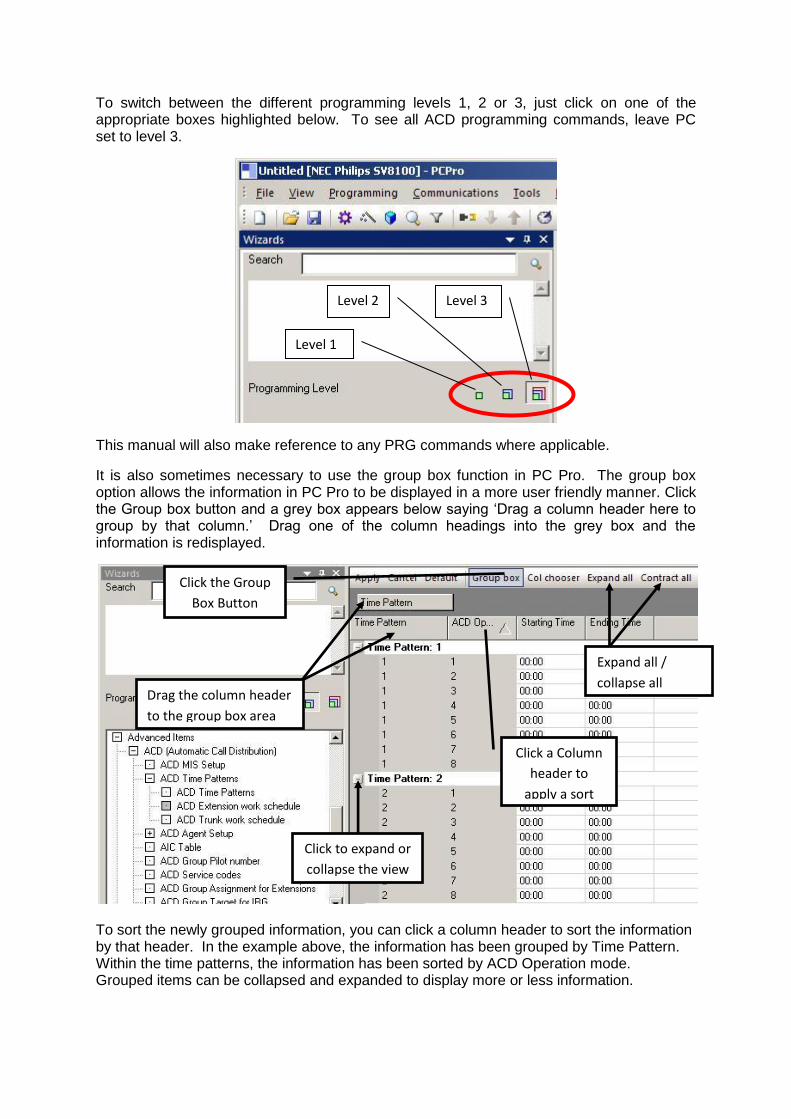
To switch between the different programming levels 1, 2 or 3, just click on one of the appropriate boxes highlighted below. To see all ACD programming commands, leave PC set to level 3.
This manual will also make reference to any PRG commands where applicable.
It is also sometimes necessary to use the group box function in PC Pro. The group box option allows the information in PC Pro to be displayed in a more user friendly manner. Click the Group box button and a grey box appears below saying ‘Drag a column header here to group by that column.’ Drag one of the column headings into the grey box and the information is redisplayed.
To sort the newly grouped information, you can click a column header to sort the information by that header. In the example above, the information has been grouped by Time Pattern. Within the time patterns, the information has been sorted by ACD Operation mode. Grouped items can be collapsed and expanded to display more or less information.
Level 1
Level 2 Level 3
Click the Group
Box Button
Drag the column header
to the group box area
Click a Column
header to
apply a sort
Click to expand or
collapse the view
Expand all /
collapse all
Determining When Calls can be delivered to ACD Groups
There are 3 programmable items that all relate to when calls can be delivered to ACD Groups, Time Patterns, ACD Extension Work Schedule and ACD Trunk work schedule. These items define when calls can be delivered to different ACD groups. Up to 4 time patterns can be assigned to different days of the week. Time patterns can used to change the SV8100 into different ACD modes during the day. Up to 8 different ACD modes can be used and agent’s can belong to different ACD groups during different ACD modes. When configured, the mode changes will take place at the specified time and the agents will be moved from their current ACD group to the ACD group related to the next mode change.
As an example;
On Monday the SV8100 should be in ACD mode 1 between 08:00 and 11:59. Between 12:00 and 13:59 ACD Mode 2 and 14:00 – 17:00 ACD Mode 3. Time pattern 1 could be assigned to Monday and configured to reflect this configuration.
On Sunday the SV8100 should be in ACD Mode 1 all day. Time pattern 2 could be assigned to Sunday and configured accordingly.
Using different ACD modes and time patterns allows great flexibility to mange ACD systems during busy periods.
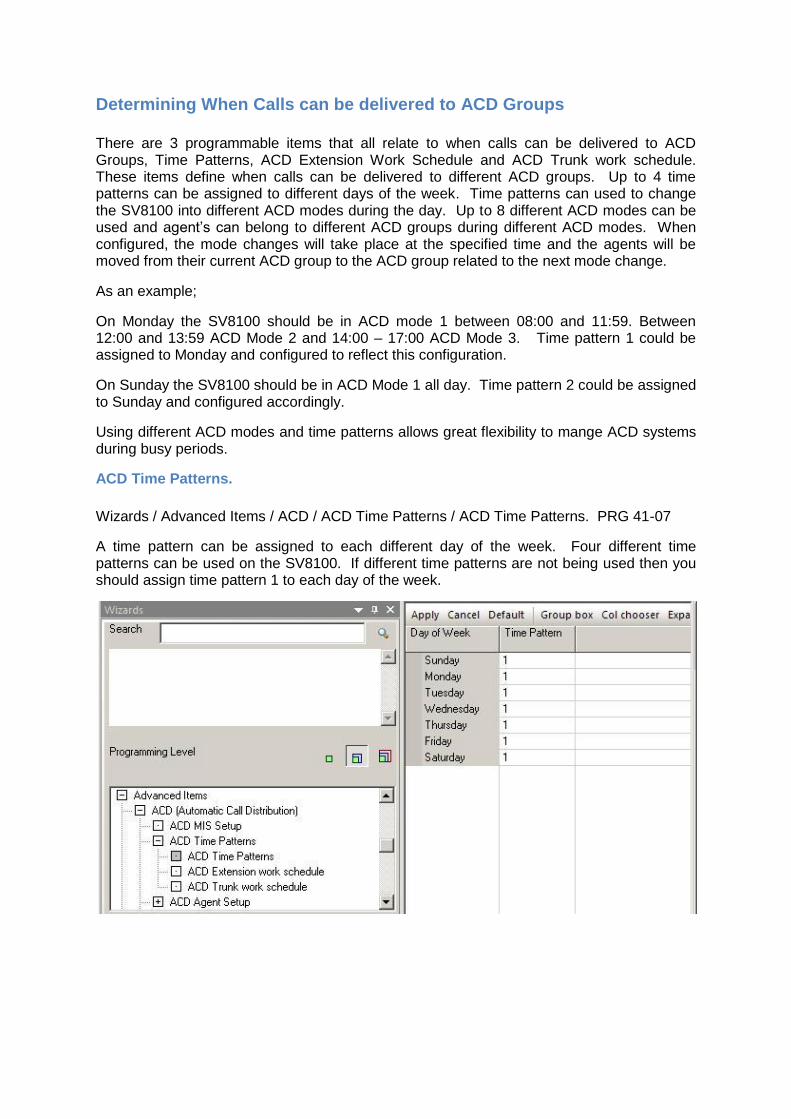
ACD Time Patterns.
Wizards / Advanced Items / ACD / ACD Time Patterns / ACD Time Patterns. PRG 41-07
A time pattern can be assigned to each different day of the week. Four different time patterns can be used on the SV8100. If different time patterns are not being used then you should assign time pattern 1 to each day of the week.
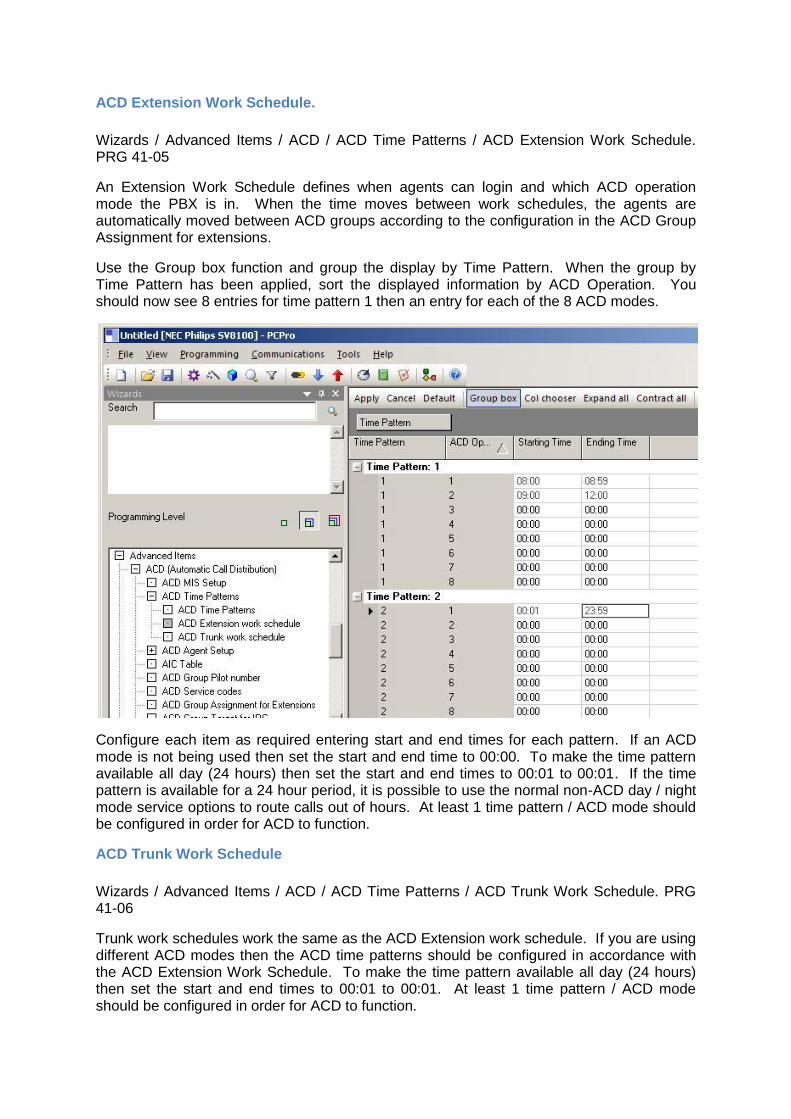
ACD Extension Work Schedule.
Wizards / Advanced Items / ACD / ACD Time Patterns / ACD Extension Work Schedule. PRG 41-05
An Extension Work Schedule defines when agents can login and which ACD operation mode the PBX is in. When the time moves between work schedules, the agents are automatically moved between ACD groups according to the configuration in the ACD Group Assignment for extensions.
Use the Group box function and group the display by Time Pattern. When the group by Time Pattern has been applied, sort the displayed information by ACD Operation. You should now see 8 entries for time pattern 1 then an entry for each of the 8 ACD modes.
Configure each item as required entering start and end times for each pattern. If an ACD mode is not being used then set the start and end time to 00:00. To make the time pattern available all day (24 hours) then set the start and end times to 00:01 to 00:01. If the time pattern is available for a 24 hour period, it is possible to use the normal non-ACD day / night mode service options to route calls out of hours. At least 1 time pattern / ACD mode should be configured in order for ACD to function.
ACD Trunk Work Schedule
Wizards / Advanced Items / ACD / ACD Time Patterns / ACD Trunk Work Schedule. PRG 41-06
Trunk work schedules work the same as the ACD Extension work schedule. If you are using different ACD modes then the ACD time patterns should be configured in accordance with the ACD Extension Work Schedule. To make the time pattern available all day (24 hours) then set the start and end times to 00:01 to 00:01. At least 1 time pattern / ACD mode should be configured in order for ACD to function.
Setting Up Agents There are two methods in which Agents can login to ACD, standard login or AIC. A mixture of both login modes can be used on a configuration.
Wizards / Advanced Items / ACD / ACD Agent Setup / ACD Agent Login Mode. PRG 41-17
Assign the login type to each extension as required.
Standard Login
Standard Login allows an Agent to login to a single ACD Group for each ACD mode. The ACD group that the agent logs into is defined in Wizards / Advanced Items / ACD / ACD Group Assignment for extensions. Agents can be configured so that they login to different ACD groups during the different ACD modes. When the ACD mode change takes place, the agent logs out their current group and into the group related to the next mode.
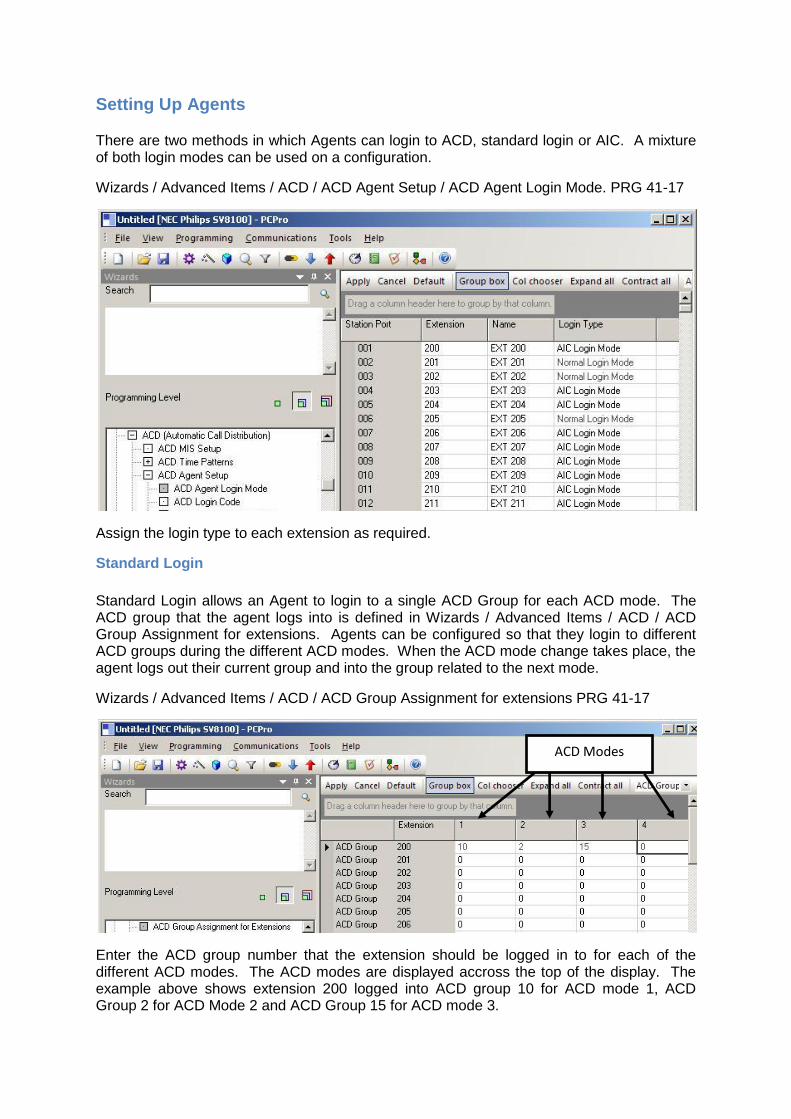
Wizards / Advanced Items / ACD / ACD Group Assignment for extensions PRG 41-17
Enter the ACD group number that the extension should be logged in to for each of the different ACD modes. The ACD modes are displayed accross the top of the display. The example above shows extension 200 logged into ACD group 10 for ACD mode 1, ACD Group 2 for ACD Mode 2 and ACD Group 15 for ACD mode 3.
ACD Modes

AIC login
AIC login allows an Agent to login to multiple ACD groups. When the agent logs on to ACD, they are prompted to enter their login ID, then an AIC code. Many AIC codes can be created on the SV8100 so that the same agent can enter different AIC codes as required. The main advantage with AIC login is that agents can move ACD groups easily without any system programming on the SV8100. For example an AIC code could be created that logs into ACD groups 1,2, and 3. A different AIC code could be created that logs into ACD Groups 1,2,3,4,5 and 6, another that logs into 1,2,3,4,5,6,7,8 and 9. AIC codes can also login to different ACD groups working with the ACD mode changes.
AIC codes are configured in Wizards / Advanced Items / ACD / AIC Table (PRG 41-18.) The first column in the AIC table is the row number and a maximum of 512 rows can be used in total. To setup an AIC code you have to enter an AIC code, a default ACD Group and at least an ACD group for Mode 1 of the ACD modes. The AIC code will be the code that the agent will dial when they are asked to INPUT AIC. The default ACD Group is the ACD group that the AIC code will take its default settings from. The default settings are set in ACD / ACD Agent Setup /ACD Group agent options and contain items such as Wrap up and auto off duty timers.
Wizards / Advanced Items / ACD / AIC Table. PRG 41-18
The following table goes on to show examples of how codes 100, 110 and 120 can be used to login to different ranges of ACD groups.
When an agent is logged in using AIC, they can login to an additional AIC login without logging out. By pressing the login button, then 0 to not logout another AIC code can be entered. This can allow an agent to quickly login to more ACD groups. When and agent logs out, they logout of all ACD groups.
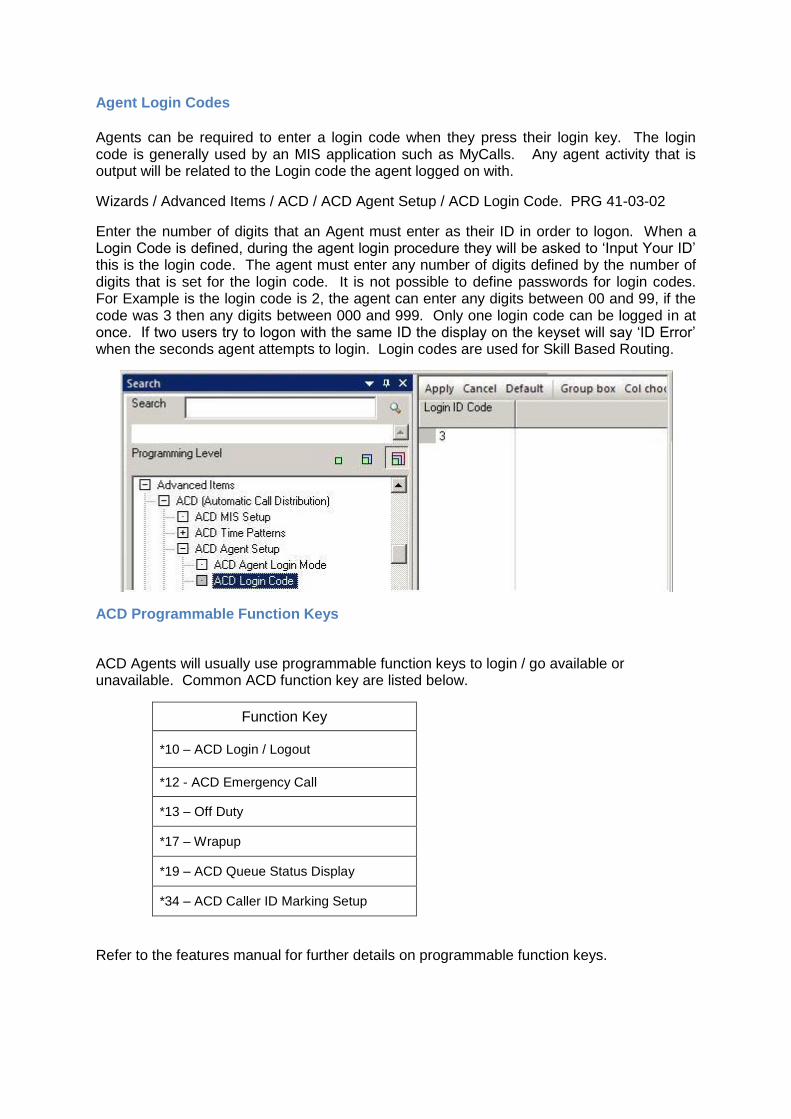
Agent Login Codes Agents can be required to enter a login code when they press their login key. The login code is generally used by an MIS application such as MyCalls. Any agent activity that is output will be related to the Login code the agent logged on with.
Wizards / Advanced Items / ACD / ACD Agent Setup / ACD Login Code. PRG 41-03-02
Enter the number of digits that an Agent must enter as their ID in order to logon. When a Login Code is defined, during the agent login procedure they will be asked to ‘Input Your ID’ this is the login code. The agent must enter any number of digits defined by the number of digits that is set for the login code. It is not possible to define passwords for login codes. For Example is the login code is 2, the agent can enter any digits between 00 and 99, if the code was 3 then any digits between 000 and 999. Only one login code can be logged in at once. If two users try to logon with the same ID the display on the keyset will say ‘ID Error’ when the seconds agent attempts to login. Login codes are used for Skill Based Routing.
ACD Programmable Function Keys
ACD Agents will usually use programmable function keys to login / go available or unavailable. Common ACD function key are listed below.
Function Key
*10 – ACD Login / Logout
*12 - ACD Emergency Call
*13 – Off Duty
*17 – Wrapup
*19 – ACD Queue Status Display
*34 – ACD Caller ID Marking Setup
Refer to the features manual for further details on programmable function keys.
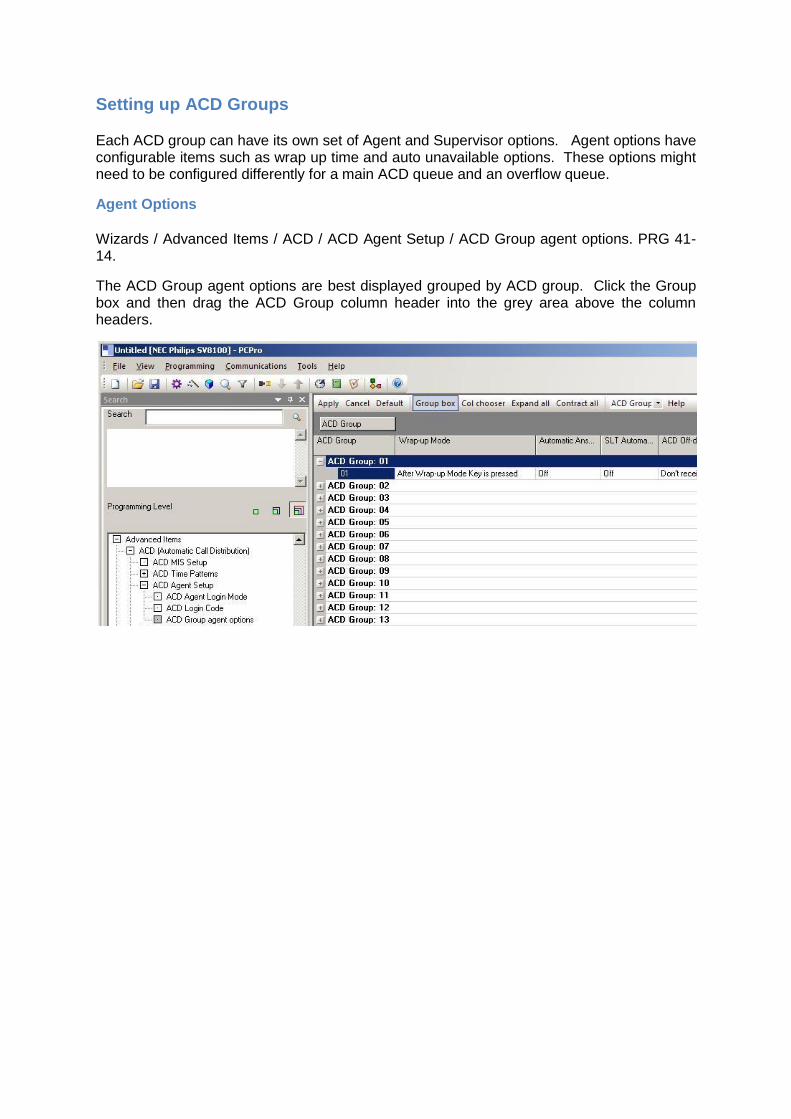
Setting up ACD Groups Each ACD group can have its own set of Agent and Supervisor options. Agent options have configurable items such as wrap up time and auto unavailable options. These options might need to be configured differently for a main ACD queue and an overflow queue.
Agent Options Wizards / Advanced Items / ACD / ACD Agent Setup / ACD Group agent options. PRG 41-14.
The ACD Group agent options are best displayed grouped by ACD group. Click the Group box and then drag the ACD Group column header into the grey area above the column headers.
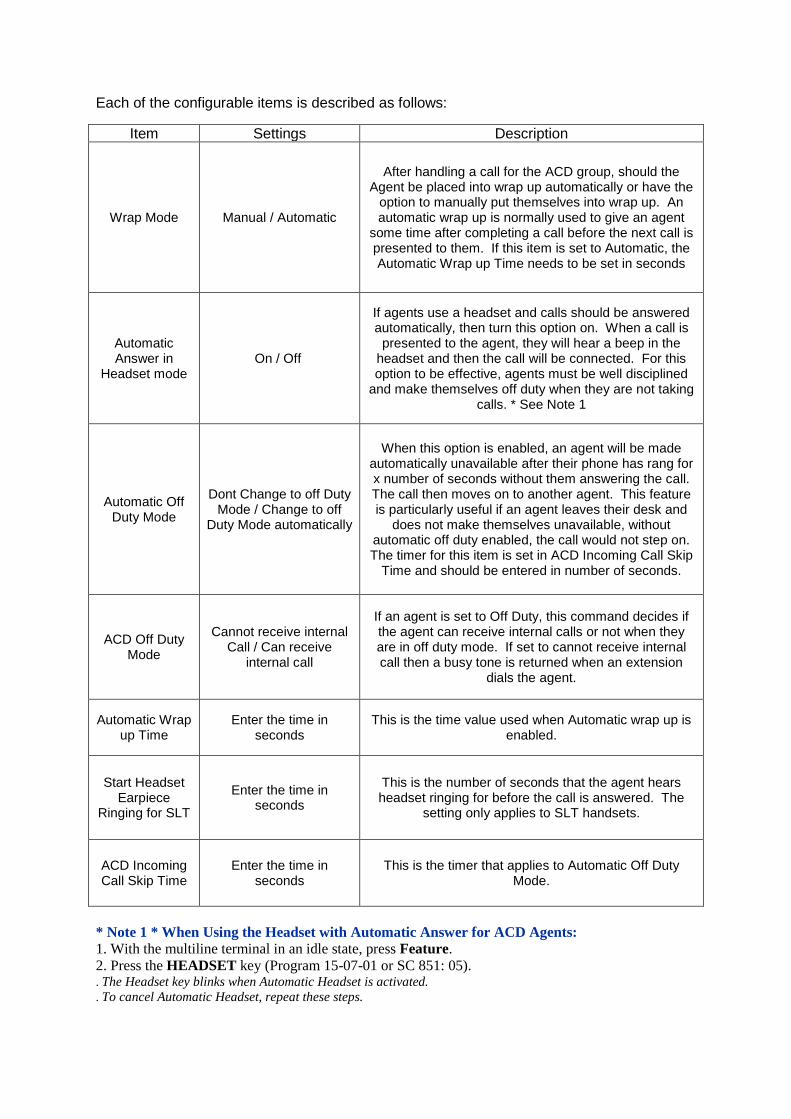
Each of the configurable items is described as follows:
Item Settings Description
Wrap Mode Manual / Automatic
After handling a call for the ACD group, should the Agent be placed into wrap up automatically or have the
option to manually put themselves into wrap up. An automatic wrap up is normally used to give an agent
some time after completing a call before the next call is presented to them. If this item is set to Automatic, the Automatic Wrap up Time needs to be set in seconds
Automatic Answer in
Headset mode On / Off
If agents use a headset and calls should be answered automatically, then turn this option on. When a call is
presented to the agent, they will hear a beep in the headset and then the call will be connected. For this option to be effective, agents must be well disciplined
and make themselves off duty when they are not taking calls. * See Note 1
Automatic Off Duty Mode
Dont Change to off Duty Mode / Change to off
Duty Mode automatically
When this option is enabled, an agent will be made automatically unavailable after their phone has rang for x number of seconds without them answering the call. The call then moves on to another agent. This feature is particularly useful if an agent leaves their desk and
does not make themselves unavailable, without automatic off duty enabled, the call would not step on. The timer for this item is set in ACD Incoming Call Skip
Time and should be entered in number of seconds.
ACD Off Duty Mode
Cannot receive internal Call / Can receive
internal call
If an agent is set to Off Duty, this command decides if the agent can receive internal calls or not when they are in off duty mode. If set to cannot receive internal call then a busy tone is returned when an extension
dials the agent.
Automatic Wrap up Time
Enter the time in seconds
This is the time value used when Automatic wrap up is enabled.
Start Headset Earpiece
Ringing for SLT
Enter the time in seconds
This is the number of seconds that the agent hears headset ringing for before the call is answered. The
setting only applies to SLT handsets.
ACD Incoming Call Skip Time
Enter the time in seconds
This is the timer that applies to Automatic Off Duty Mode.
* Note 1 * When Using the Headset with Automatic Answer for ACD Agents:
1. With the multiline terminal in an idle state, press Feature.
2. Press the HEADSET key (Program 15-07-01 or SC 851: 05). . The Headset key blinks when Automatic Headset is activated.
. To cancel Automatic Headset, repeat these steps.
ACD Skill Based Routing
Skill based routing will work with both Normal Login Mode and AIC login. Without skill based
routing, calls would be delivered to the agent who had been idle for the longest in an ACD
group.
Prior to enabling skill based routing ACD should be setup so that agents can logon to the
ACD groups as required. Once logged in to these groups then the following system
programming will define the priority for the ACD groups that the agent is logged into.
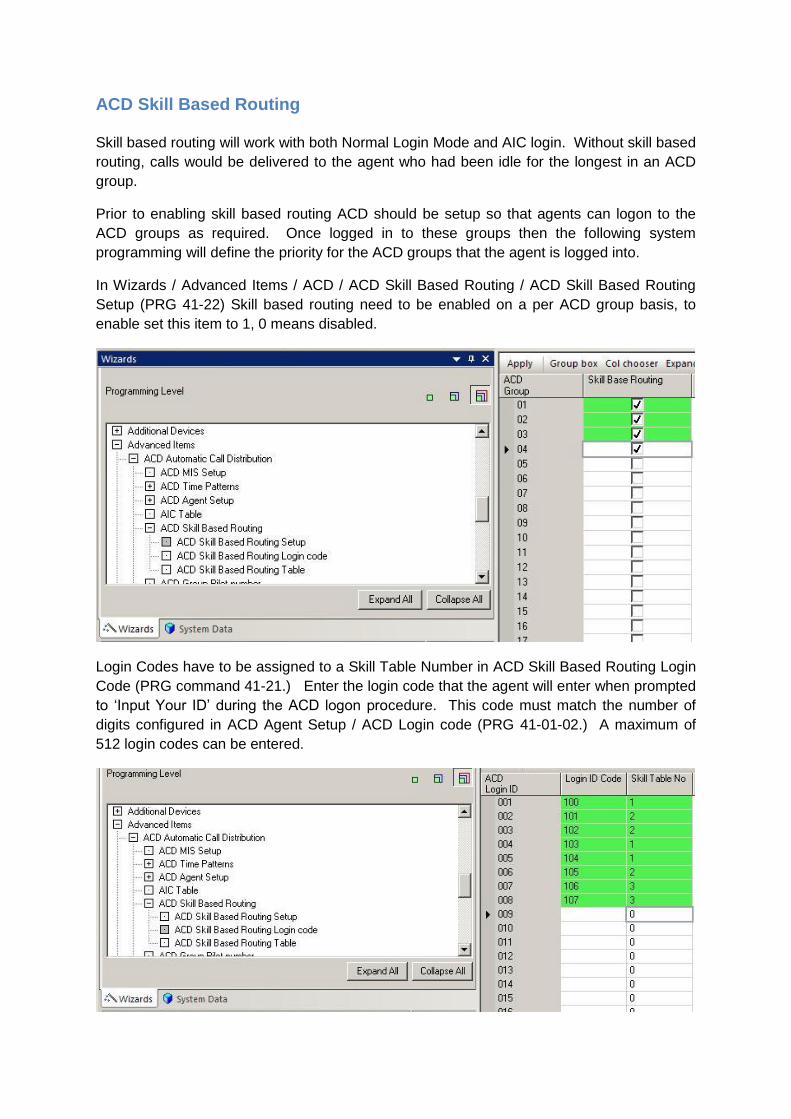
In Wizards / Advanced Items / ACD / ACD Skill Based Routing / ACD Skill Based Routing
Setup (PRG 41-22) Skill based routing need to be enabled on a per ACD group basis, to
enable set this item to 1, 0 means disabled.
Login Codes have to be assigned to a Skill Table Number in ACD Skill Based Routing Login
Code (PRG command 41-21.) Enter the login code that the agent will enter when prompted
to ‘Input Your ID’ during the ACD logon procedure. This code must match the number of
digits configured in ACD Agent Setup / ACD Login code (PRG 41-01-02.) A maximum of
512 login codes can be entered.
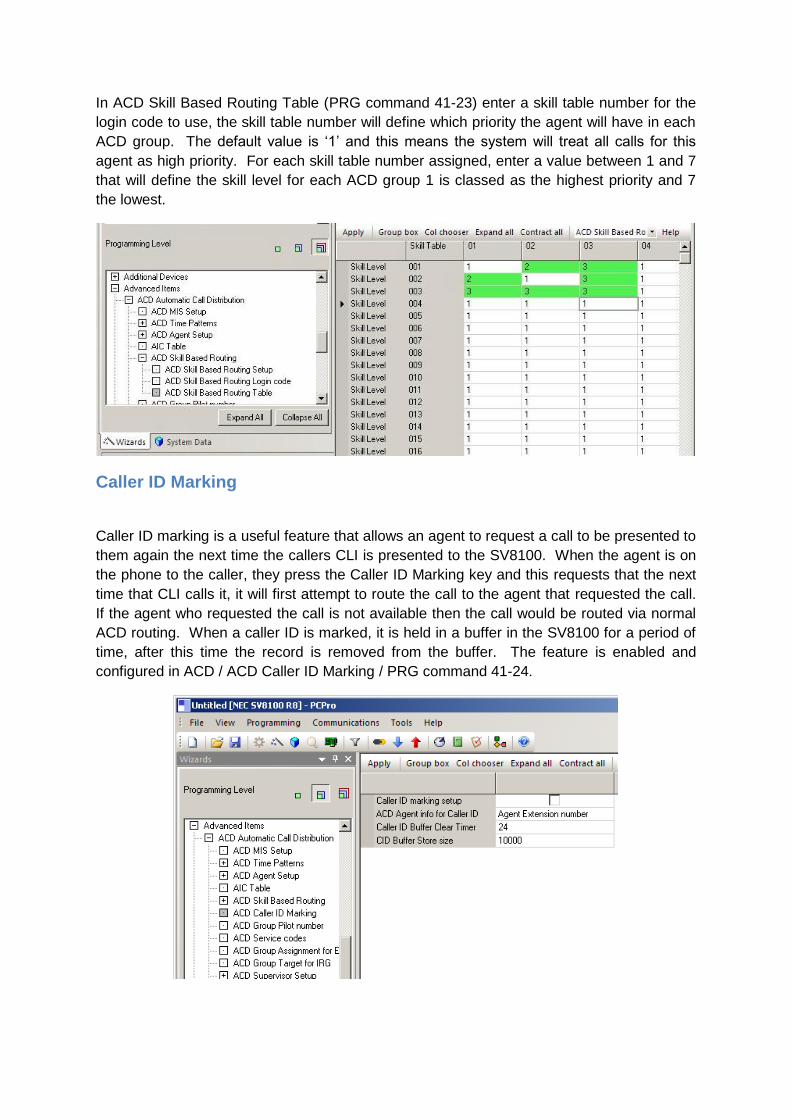
In ACD Skill Based Routing Table (PRG command 41-23) enter a skill table number for the
login code to use, the skill table number will define which priority the agent will have in each
ACD group. The default value is ‘1’ and this means the system will treat all calls for this
agent as high priority. For each skill table number assigned, enter a value between 1 and 7
that will define the skill level for each ACD group 1 is classed as the highest priority and 7
the lowest.
Caller ID Marking
Caller ID marking is a useful feature that allows an agent to request a call to be presented to
them again the next time the callers CLI is presented to the SV8100. When the agent is on
the phone to the caller, they press the Caller ID Marking key and this requests that the next
time that CLI calls it, it will first attempt to route the call to the agent that requested the call.
If the agent who requested the call is not available then the call would be routed via normal
ACD routing. When a caller ID is marked, it is held in a buffer in the SV8100 for a period of
time, after this time the record is removed from the buffer. The feature is enabled and
configured in ACD / ACD Caller ID Marking / PRG command 41-24.
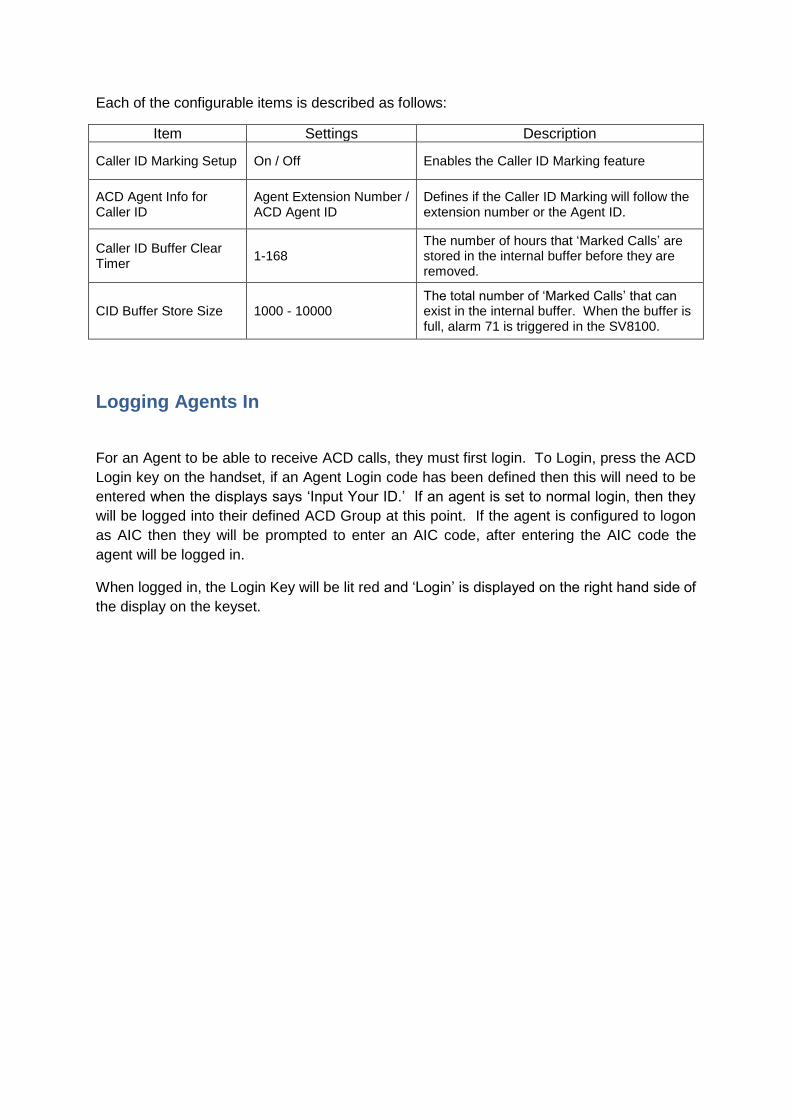
Each of the configurable items is described as follows:
Item Settings Description
Caller ID Marking Setup On / Off Enables the Caller ID Marking feature
ACD Agent Info for Caller ID
Agent Extension Number / ACD Agent ID
Defines if the Caller ID Marking will follow the extension number or the Agent ID.
Caller ID Buffer Clear Timer
1-168 The number of hours that ‘Marked Calls’ are stored in the internal buffer before they are removed.
CID Buffer Store Size 1000 - 10000 The total number of ‘Marked Calls’ that can exist in the internal buffer. When the buffer is full, alarm 71 is triggered in the SV8100.
Logging Agents In
For an Agent to be able to receive ACD calls, they must first login. To Login, press the ACD
Login key on the handset, if an Agent Login code has been defined then this will need to be
entered when the displays says ‘Input Your ID.’ If an agent is set to normal login, then they
will be logged into their defined ACD Group at this point. If the agent is configured to logon
as AIC then they will be prompted to enter an AIC code, after entering the AIC code the
agent will be logged in.
When logged in, the Login Key will be lit red and ‘Login’ is displayed on the right hand side of
the display on the keyset.
Delivering Calls to ACD Groups
There are two ways you can point a DDI to an ACD group. The first way is to assign a pilot number to an ACD group and point DDI’s to those pilot numbers. It is also possible to assign a ring group to an ACD group and then route the DDI to the ring group.
Using a Pilot Number
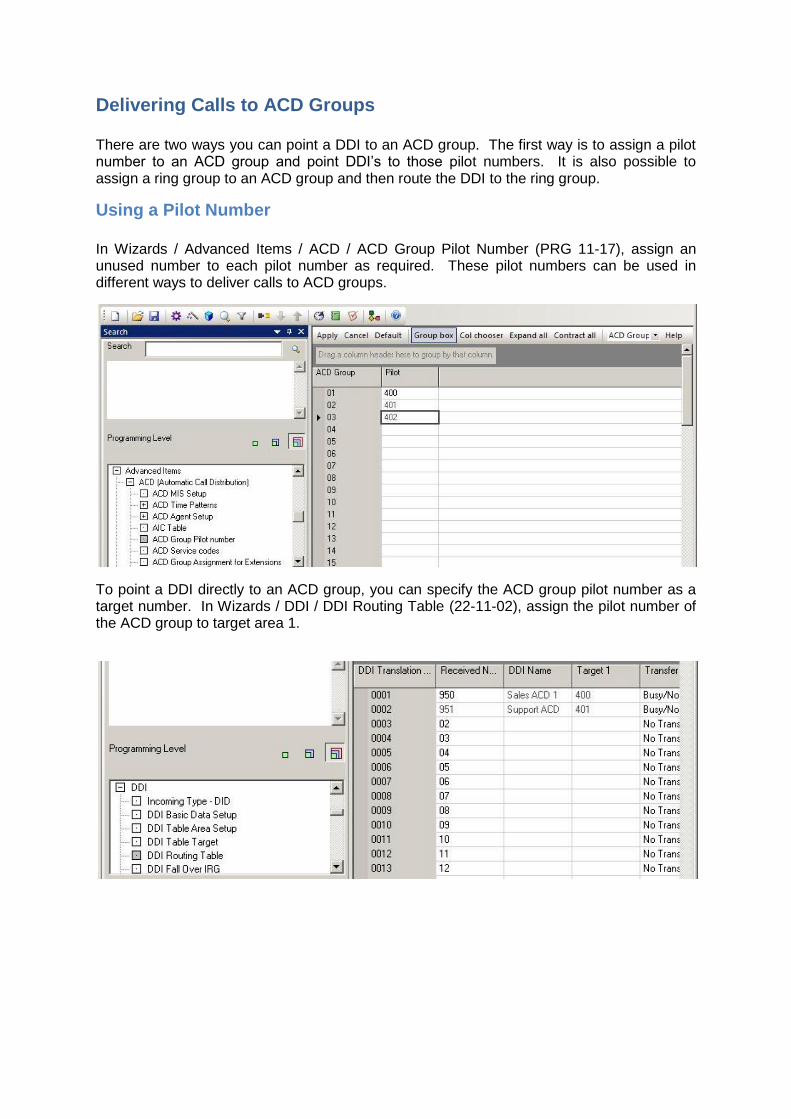
In Wizards / Advanced Items / ACD / ACD Group Pilot Number (PRG 11-17), assign an unused number to each pilot number as required. These pilot numbers can be used in different ways to deliver calls to ACD groups.
To point a DDI directly to an ACD group, you can specify the ACD group pilot number as a target number. In Wizards / DDI / DDI Routing Table (22-11-02), assign the pilot number of the ACD group to target area 1.
When configuring Auto Attendants single digit options can be pointed to the ACD group pilot number.
An extension can carry out a blind transfer to a pilot number for an ACD group.
Assigning an ACD Group to a Ring Group
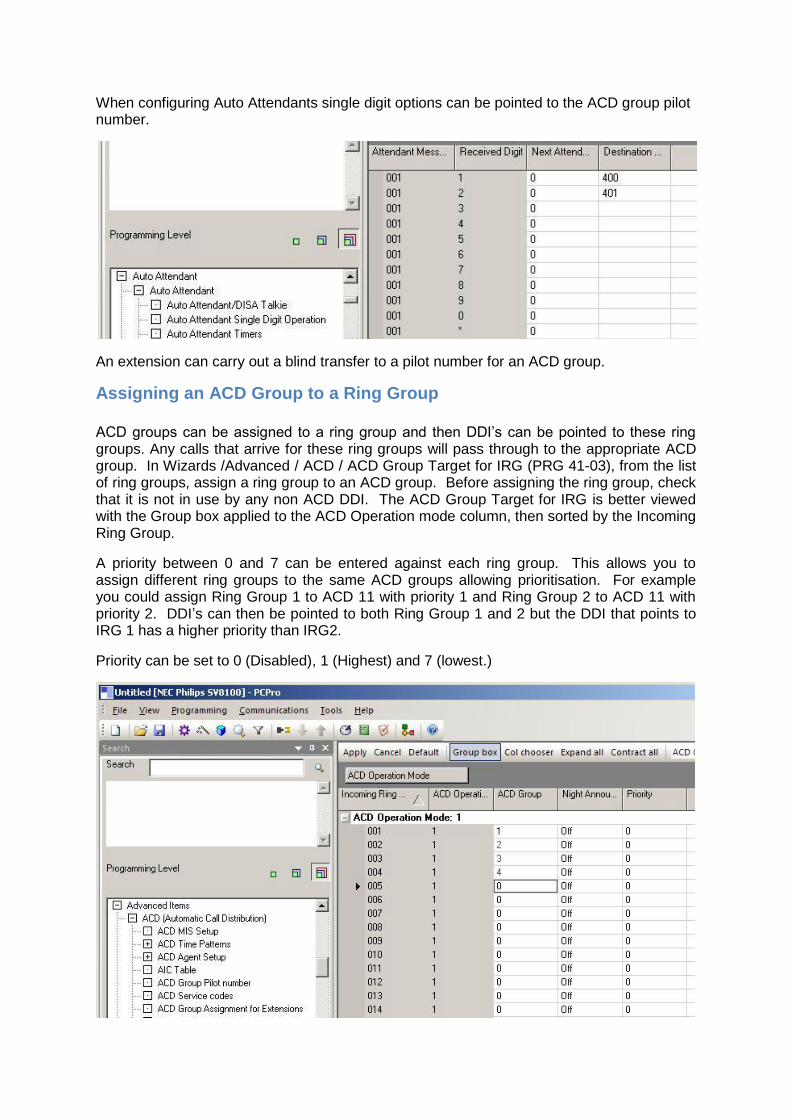
ACD groups can be assigned to a ring group and then DDI’s can be pointed to these ring groups. Any calls that arrive for these ring groups will pass through to the appropriate ACD group. In Wizards /Advanced / ACD / ACD Group Target for IRG (PRG 41-03), from the list of ring groups, assign a ring group to an ACD group. Before assigning the ring group, check that it is not in use by any non ACD DDI. The ACD Group Target for IRG is better viewed with the Group box applied to the ACD Operation mode column, then sorted by the Incoming Ring Group.
A priority between 0 and 7 can be entered against each ring group. This allows you to assign different ring groups to the same ACD groups allowing prioritisation. For example you could assign Ring Group 1 to ACD 11 with priority 1 and Ring Group 2 to ACD 11 with priority 2. DDI’s can then be pointed to both Ring Group 1 and 2 but the DDI that points to IRG 1 has a higher priority than IRG2.
Priority can be set to 0 (Disabled), 1 (Highest) and 7 (lowest.)
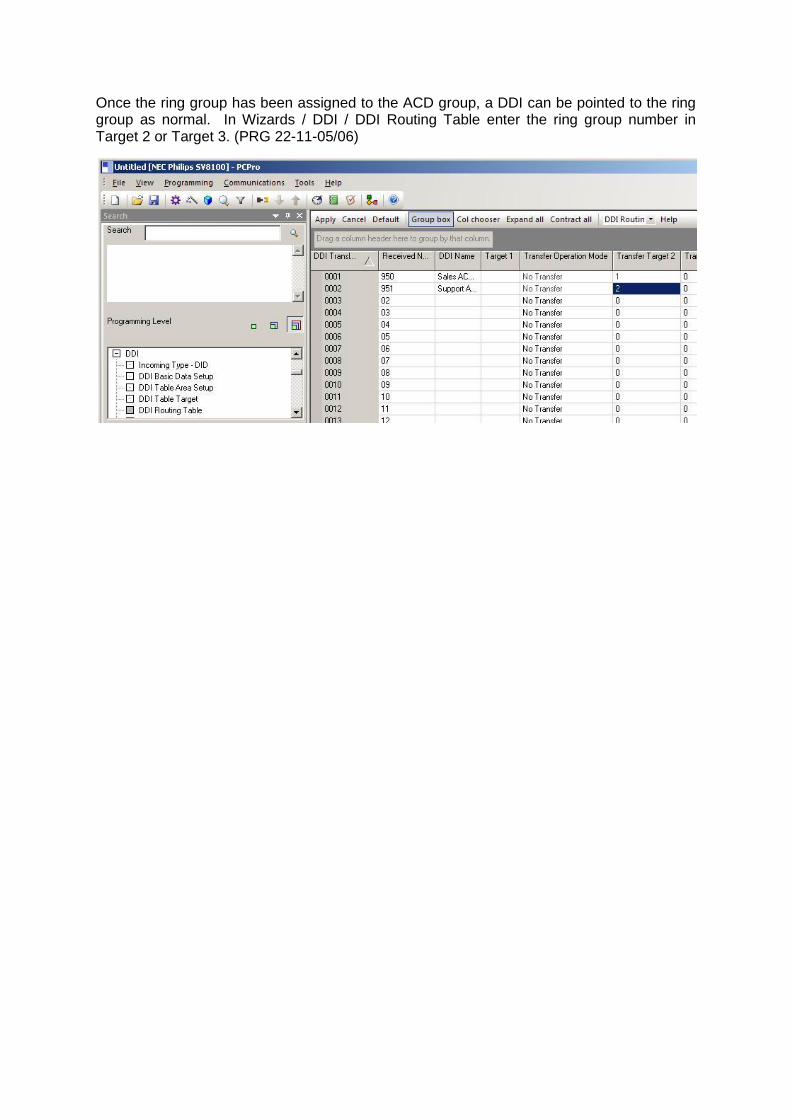
Once the ring group has been assigned to the ACD group, a DDI can be pointed to the ring group as normal. In Wizards / DDI / DDI Routing Table enter the ring group number in Target 2 or Target 3. (PRG 22-11-05/06)
ACD Overflow and Announcements
ACD on the SV8100 has a very comprehensive and flexible overflow method. Calls that arrive in an ACD group can over flow to:
Other ACD Groups
Voicemail
A Single digit option
A Ring Group
An Extension
A Speed dial location (Including External numbers) ACD queue announcements can be played to callers on a per ACD queue basis. Up to 2 announcements can applied to each ACD group. Announcements can be played using 3 different device types they are:
The DSPDB (VRS) – Messages can be recorded by dialling a service code and assigned as announcements. The DSPDB is also used for playing position in queue announcements.
ACI – Messages can be played from the PGDAD unit from either of the two ACI channels.
InMail – Mailboxes can be created to play announcements as queue messages.
ACD Overflow
Calls can be configured to overflow after a set amount of time. There are various overflow destinations that can be configured including other ACD groups, voicemail, ring groups or speed dials. Overflows are configured on a per ACD groups basis. To setup over flows, go to Wizards / Advanced Items / ACD / ACD Overflow and Announcements / ACD Overflow and Announcements (PRG 41-08.)
Overflow Operation Mode
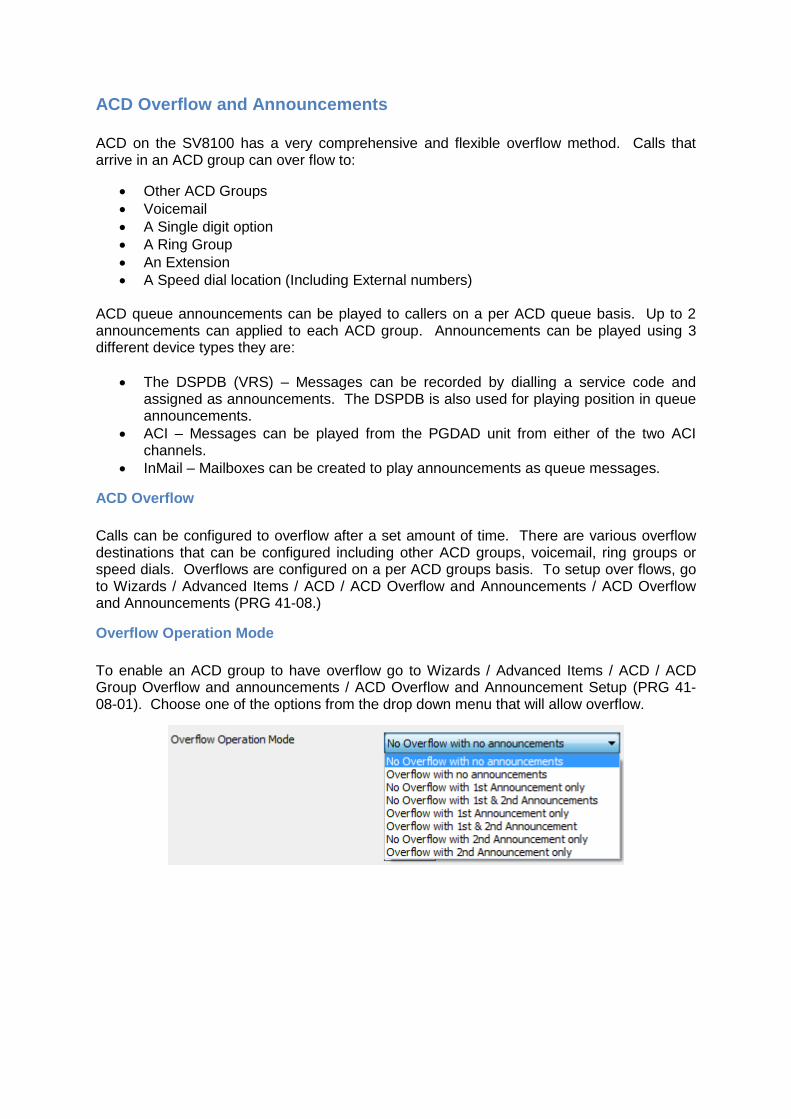
To enable an ACD group to have overflow go to Wizards / Advanced Items / ACD / ACD Group Overflow and announcements / ACD Overflow and Announcement Setup (PRG 41-08-01). Choose one of the options from the drop down menu that will allow overflow.
Overflow Transfer Destination
Wizards / Advanced Items / ACD / ACD Overflow and Announcements / ACD Overflow and Announcements / Overflow Transferred Destination (PRG 41-08-02)
Working through the ACD Overflow and announcements wizard, the next programmable item is overflow transferred destination. This is where you can specify where the calls for the ACD group overflow. The following table shows the different values that can be entered and where they overflow to.
Setting Overflow Destination Description
0 No Overflow Do not overflow any calls.
1-64 Overflow to an ACD Group Number
Enter the ACD Group number that the call will overflow to. As part of the overflow to an ACD Group, the call can only overflow to one group. The call will not overflow if there are no agents are available in the
destination ACD group.
65 Overflow to the ACD Overflow Table
By entering 65, the call will be routed to the ACD Overflow table. The ACD Overflow table can be
configured to allow calls to overflow up to seven ACD groups. The ACD Overflow table is configured in
Wizards / Advanced Items / ACD / ACD Group Overflow and Announcements / ACD Overflow Tables.
66 Overflow to InMail voicemail
Enter 66 to overflow to voicemail. When using overflow to voicemail, the call will overflow to the
mailbox that is associated with the ACD Pilot Number. For example, if an ACD queue is set to overflow to
voicemail and the pilot number for the ACD queue is 400, when the caller is transferred to voicemail, they will be connected to mailbox 400. Pilot numbers can be assigned to ACD groups in Wizards / Advanced
Items / ACD / ACD Group Pilot Numbers.
67 Overflow to an Speed dial
Enter 67 to overflow to a speed dial. Specify the speed dial location number that the call should over to. A speed dial can be used to overflow a call to an
external number.
68 Overflow to IRG Enter 68 to overflow a call to a ring group. When the call overflows it will be presented to the specified ring
group.
Specify the overflow transferred destination as required.
The ACD Overflow Transfer Time
Enter the amount of time in seconds that the system will wait before the queued call over flows.
Speed Dial Location When Overflow
When the calls are set to overflow to a speed dial location, enter the location number of the speed dial that the call should overflow to.
Incoming Ring Group When Overflow
When calls are set to overflow to a ring group, enter the ring group number that the calls should overflow to.
Setting up Announcements
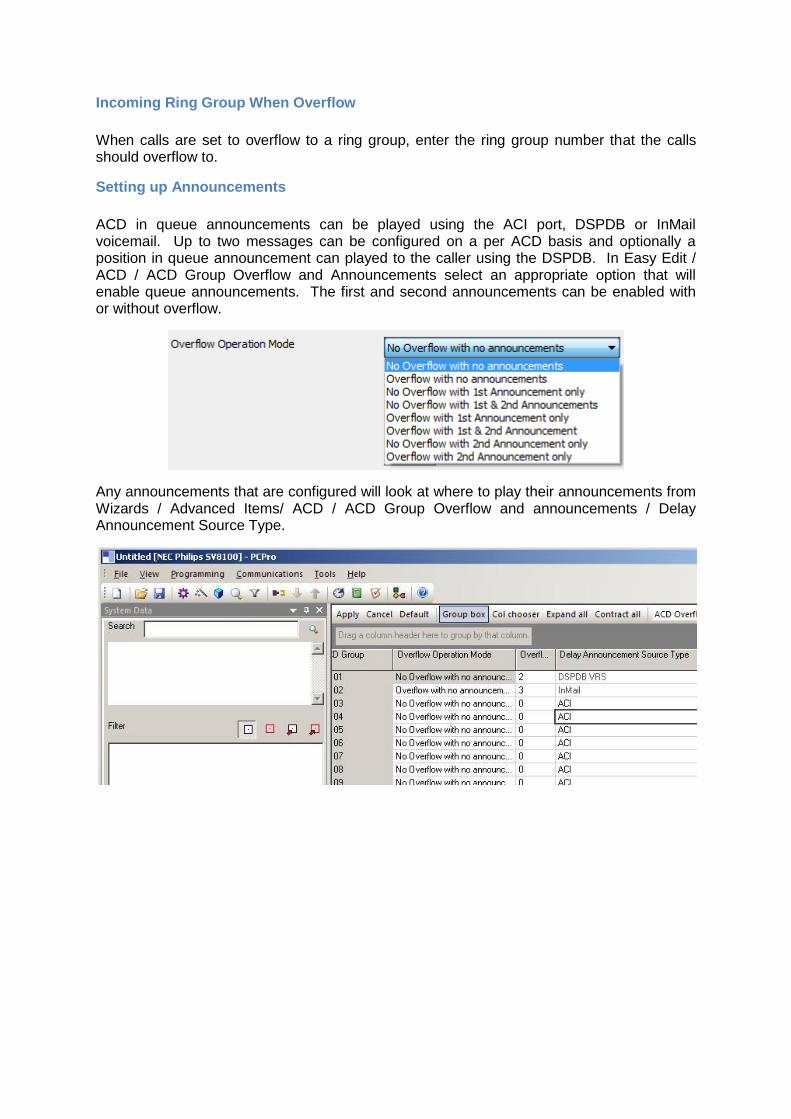
ACD in queue announcements can be played using the ACI port, DSPDB or InMail voicemail. Up to two messages can be configured on a per ACD basis and optionally a position in queue announcement can played to the caller using the DSPDB. In Easy Edit / ACD / ACD Group Overflow and Announcements select an appropriate option that will enable queue announcements. The first and second announcements can be enabled with or without overflow.
Any announcements that are configured will look at where to play their announcements from Wizards / Advanced Items/ ACD / ACD Group Overflow and announcements / Delay Announcement Source Type.
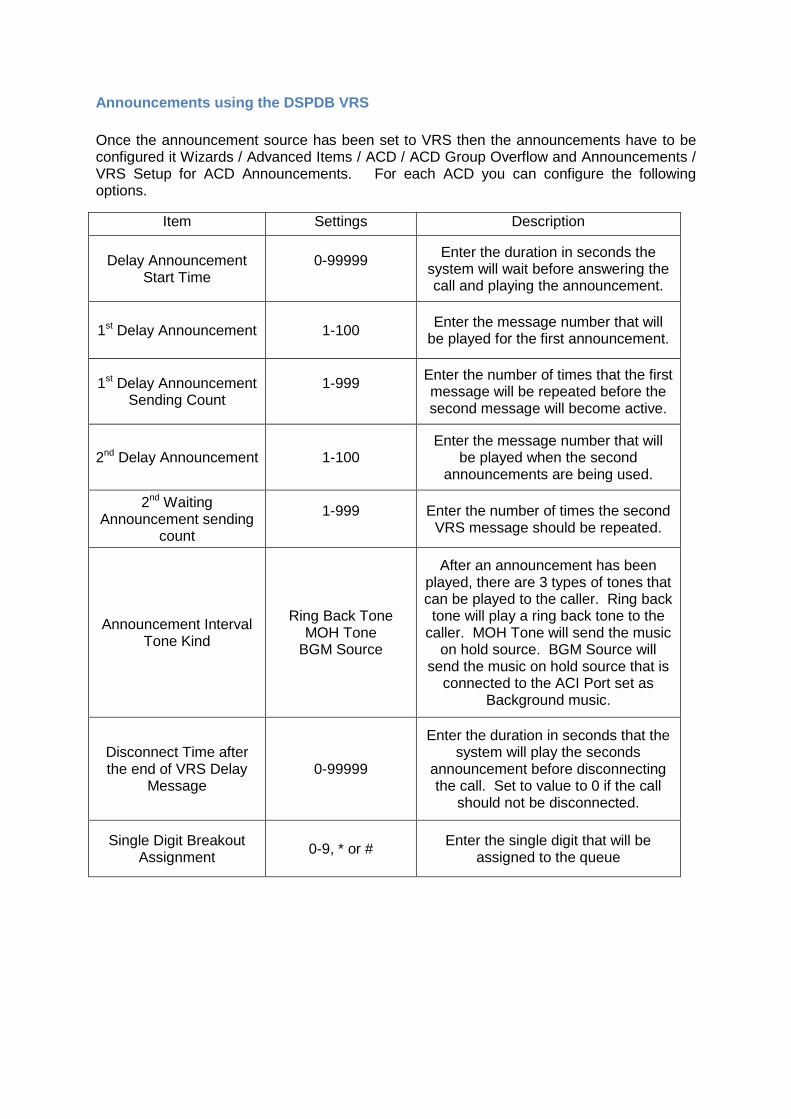
Announcements using the DSPDB VRS
Once the announcement source has been set to VRS then the announcements have to be configured it Wizards / Advanced Items / ACD / ACD Group Overflow and Announcements / VRS Setup for ACD Announcements. For each ACD you can configure the following options.
Item Settings Description
Delay Announcement Start Time
0-99999
Enter the duration in seconds the system will wait before answering the call and playing the announcement.
1st Delay Announcement 1-100 Enter the message number that will
be played for the first announcement.
1st Delay Announcement Sending Count
1-999
Enter the number of times that the first message will be repeated before the second message will become active.
2nd Delay Announcement 1-100 Enter the message number that will
be played when the second announcements are being used.
2nd Waiting Announcement sending
count
1-999
Enter the number of times the second VRS message should be repeated.
Announcement Interval Tone Kind
Ring Back Tone MOH Tone
BGM Source
After an announcement has been played, there are 3 types of tones that can be played to the caller. Ring back tone will play a ring back tone to the
caller. MOH Tone will send the music on hold source. BGM Source will
send the music on hold source that is connected to the ACI Port set as
Background music.
Disconnect Time after the end of VRS Delay
Message 0-99999
Enter the duration in seconds that the system will play the seconds
announcement before disconnecting the call. Set to value to 0 if the call
should not be disconnected.
Single Digit Breakout Assignment
0-9, * or # Enter the single digit that will be
assigned to the queue
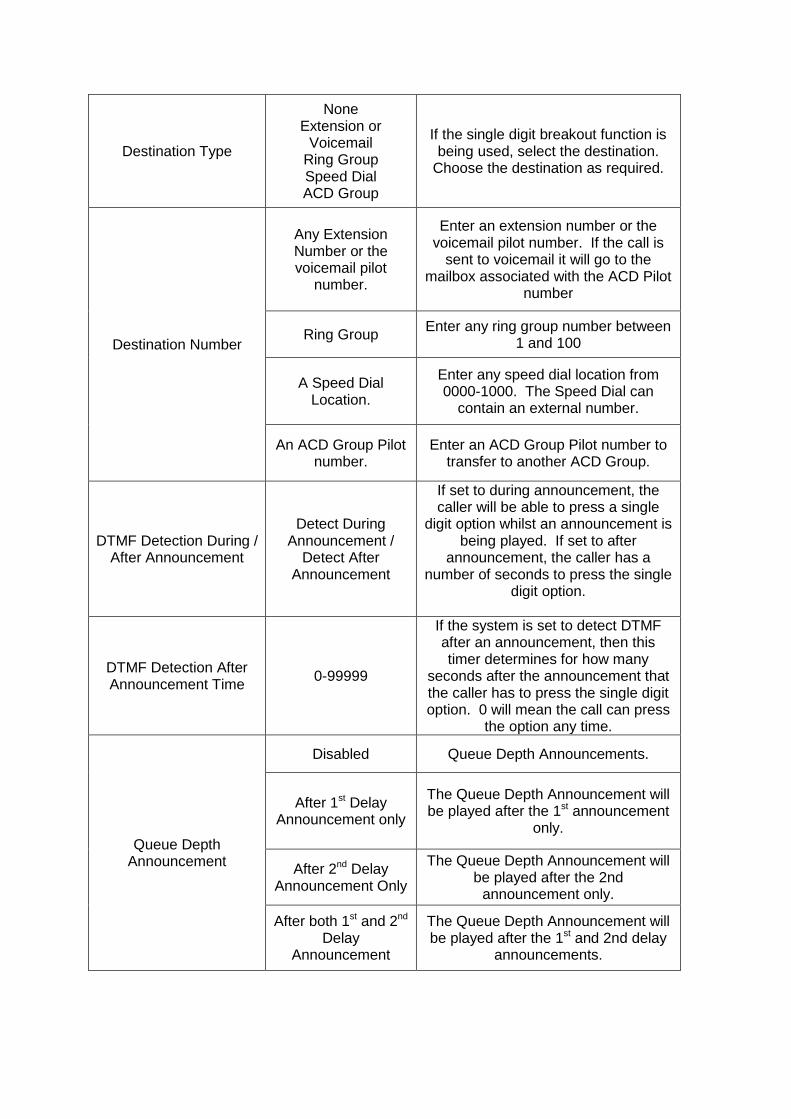
Destination Type
None Extension or
Voicemail Ring Group Speed Dial ACD Group
If the single digit breakout function is being used, select the destination.
Choose the destination as required.
Destination Number
Any Extension Number or the voicemail pilot
number.
Enter an extension number or the voicemail pilot number. If the call is
sent to voicemail it will go to the mailbox associated with the ACD Pilot
number
Ring Group Enter any ring group number between
1 and 100
A Speed Dial Location.
Enter any speed dial location from 0000-1000. The Speed Dial can
contain an external number.
An ACD Group Pilot number.
Enter an ACD Group Pilot number to transfer to another ACD Group.
DTMF Detection During / After Announcement
Detect During Announcement /
Detect After Announcement
If set to during announcement, the caller will be able to press a single
digit option whilst an announcement is being played. If set to after
announcement, the caller has a number of seconds to press the single
digit option.
DTMF Detection After Announcement Time
0-99999
If the system is set to detect DTMF after an announcement, then this timer determines for how many
seconds after the announcement that the caller has to press the single digit option. 0 will mean the call can press
the option any time.
Queue Depth Announcement
Disabled Queue Depth Announcements.
After 1st Delay Announcement only
The Queue Depth Announcement will be played after the 1st announcement
only.
After 2nd Delay Announcement Only
The Queue Depth Announcement will be played after the 2nd
announcement only.
After both 1st and 2nd Delay
Announcement
The Queue Depth Announcement will be played after the 1st and 2nd delay
announcements.

Recording VRS Messages
The VRS Messages can be recorded and played back from a keyset. An extension needs to be in an appropriate class of service. It is possible to record a maximum of 100 VRS messages. Wizards / COS / COS Prt1 / Playback / Record / Erase VRS Message (PRG 20-07-13) if set to ‘on’ enables Playback, Record, Erase from an extension. Wizards / COS / COS Prt1 / Playback VRS General Message (PRG 20-07-14) if set to ‘on’ enables Playback only. Wizards / COS / COS Prt1 / Record / Erase (PRG 20-07-15) if set to ‘on’ enables Record and Erase. Wizards / System Numbering Plan / Service Codes / 3 Digit Codes / PRT 1 (PRG 11-10-20) is where the service code to access the VRS is, by default the setting is 716. To record a greeting dial the SVR service code and you arrive at the VRS Message Control Menu, dial 7 to record. The prompt on the keyset will change to ‘Record VRS MSG Message No.’ Dial the message number that you want to record, for message number 1, dial 001, message 2, dial 002, message 10, dial 010. You will be asked to record a message after the tone and press the ‘#’ key when you have finished. Record the message and press #. Once the message has been recorded it is played back straight away after the message has been played back, you return to the VRS Message Control menu. Note: It is not possible to change to recordings for the Queue Depth Announcements.

Announcements Using ACI
When the queue announcements are configured to be played using the ACI the announcements can be configured in Wizards / Advanced Items / ACD / ACD Group Overflow and Announcements / ACI Setup for ACD Announcements.
Item Settings Description
1st Delay Announcement ACI
Port
0 -96
Set the port number for the ACI port that will be used for playing the first announcement.
2nd Delay Announcement ACI
Port 0 -96
Set the port number for the ACI port that will be used for playing the second announcement.
1st Delay Announcement
Connection Time
0 -64800
Enter the duration (Seconds) the system will wait before answering the queued call to begin
playing the announcement. The system will keep the connection to the ACI until the call is answered by an ACD agent or the 2nd Delay
Announcement starts.
2nd Delay Announcement
Connection Time 0 – 64800
Enter the duration (Seconds) the system will wait before playing the 2nd announcement. The system will keep the connection to the ACI until
the call is answered by an ACD agent or the Delay Announcement Sending Duration
expires.
Delay Announcement Sending Duration
0 -64800
Enter the duration (Seconds) the system will play the 2nd announcement until the call is
disconnected. Set to 0 to prevent the call being disconnected.
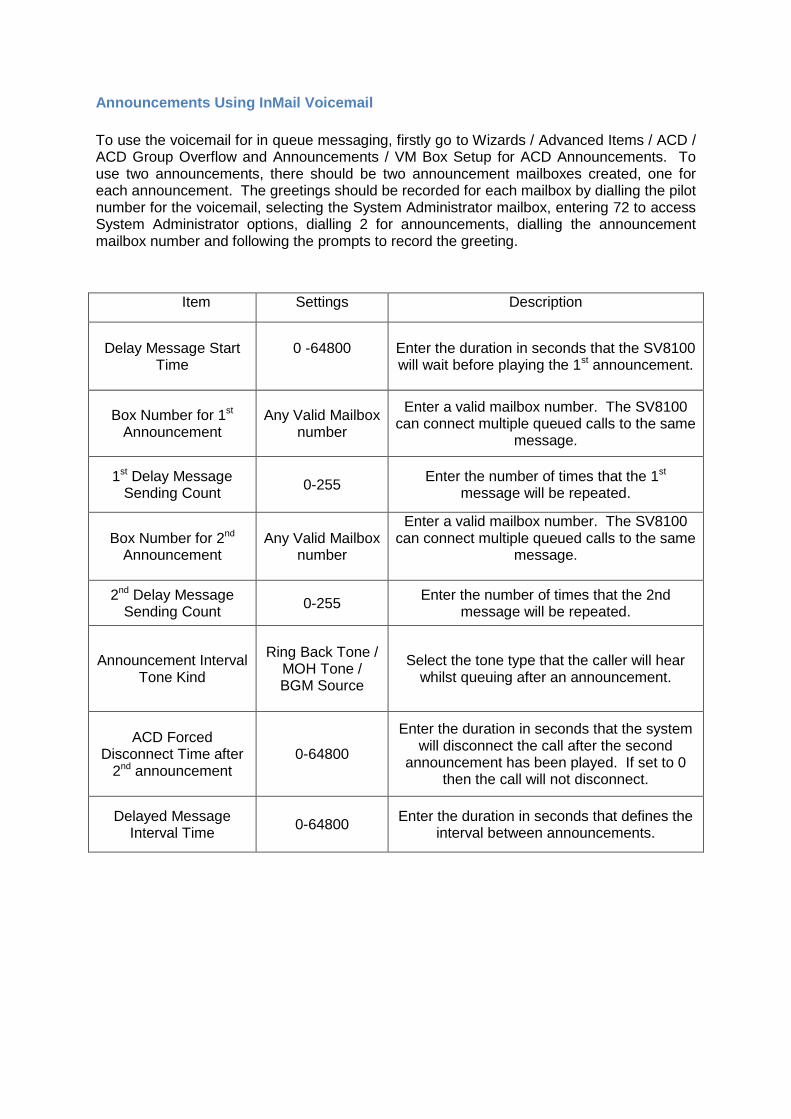
Announcements Using InMail Voicemail
To use the voicemail for in queue messaging, firstly go to Wizards / Advanced Items / ACD / ACD Group Overflow and Announcements / VM Box Setup for ACD Announcements. To use two announcements, there should be two announcement mailboxes created, one for each announcement. The greetings should be recorded for each mailbox by dialling the pilot number for the voicemail, selecting the System Administrator mailbox, entering 72 to access System Administrator options, dialling 2 for announcements, dialling the announcement mailbox number and following the prompts to record the greeting.
Item Settings Description
Delay Message Start Time
0 -64800
Enter the duration in seconds that the SV8100 will wait before playing the 1st announcement.
Box Number for 1st Announcement
Any Valid Mailbox number
Enter a valid mailbox number. The SV8100 can connect multiple queued calls to the same
message.
1st Delay Message Sending Count
0-255 Enter the number of times that the 1st
message will be repeated.
Box Number for 2nd Announcement
Any Valid Mailbox number
Enter a valid mailbox number. The SV8100 can connect multiple queued calls to the same
message.
2nd Delay Message Sending Count
0-255 Enter the number of times that the 2nd
message will be repeated.
Announcement Interval Tone Kind
Ring Back Tone / MOH Tone / BGM Source
Select the tone type that the caller will hear whilst queuing after an announcement.
ACD Forced Disconnect Time after
2nd announcement 0-64800
Enter the duration in seconds that the system will disconnect the call after the second
announcement has been played. If set to 0 then the call will not disconnect.
Delayed Message Interval Time
0-64800 Enter the duration in seconds that defines the
interval between announcements.
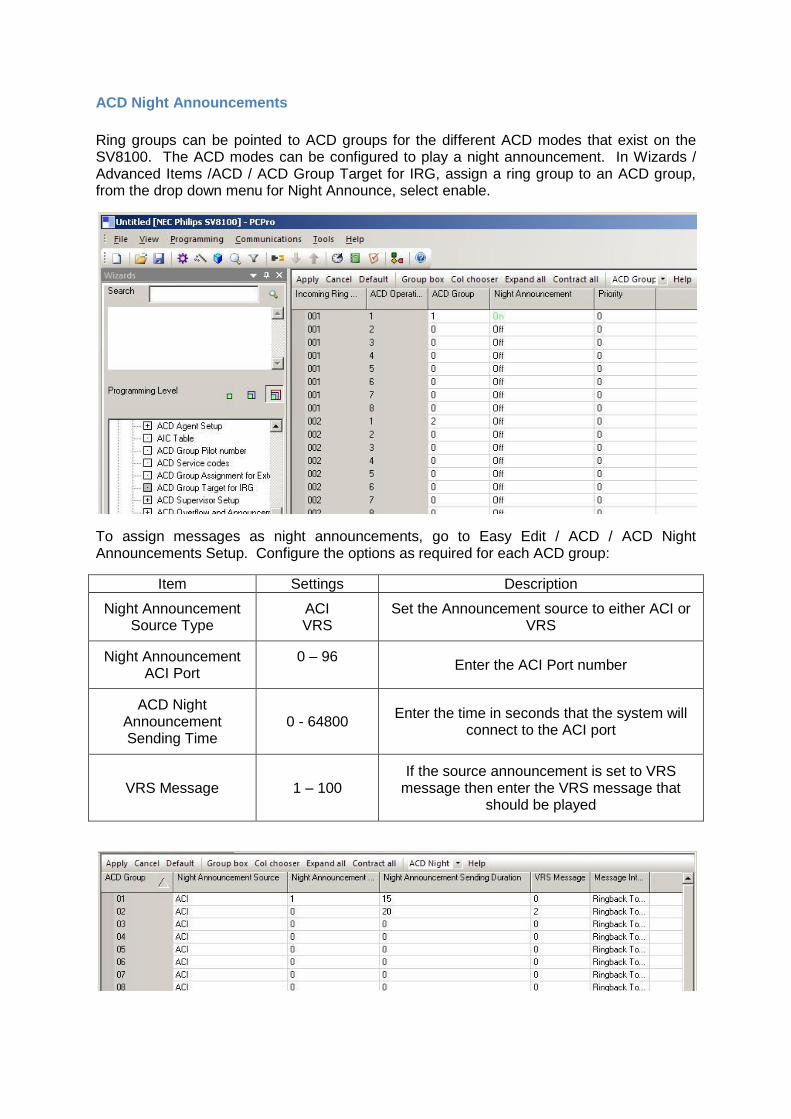
ACD Night Announcements
Ring groups can be pointed to ACD groups for the different ACD modes that exist on the SV8100. The ACD modes can be configured to play a night announcement. In Wizards / Advanced Items /ACD / ACD Group Target for IRG, assign a ring group to an ACD group, from the drop down menu for Night Announce, select enable.
To assign messages as night announcements, go to Easy Edit / ACD / ACD Night Announcements Setup. Configure the options as required for each ACD group:
Item Settings Description
Night Announcement Source Type
ACI VRS
Set the Announcement source to either ACI or VRS
Night Announcement ACI Port
0 – 96
Enter the ACI Port number
ACD Night Announcement Sending Time
0 - 64800 Enter the time in seconds that the system will
connect to the ACI port
VRS Message 1 – 100 If the source announcement is set to VRS
message then enter the VRS message that should be played
ACD Supervisor Options
Extensions can be elected as ACD supervisors to be given more features and visibility of ACD activity. There is also an ACD System Supervisor which will give one extension extra functionality. ACD Supervisors can only use standard login and not AIC login and can only carry out login / logout functions on extensions that are standard login.
ACD System Supervisor
You can designate an extension as an ACD System Supervisor. The system can have only one ACD System Supervisor and once an extension is a system supervisor it can’t be a supervisor for a specific group. Once a user is assigned as an ACD System Supervisor, they can perform the following tasks:
Log an agent into or out of an ACD Group.
Reassign an agent to a different ACD Group.
Take all the system's ACD Groups out of service simultaneously. Outside callers will hear ringback tone or an ACI recording.
Restore all the ACD Groups to service simultaneously.
Receive an emergency call from an Agent.
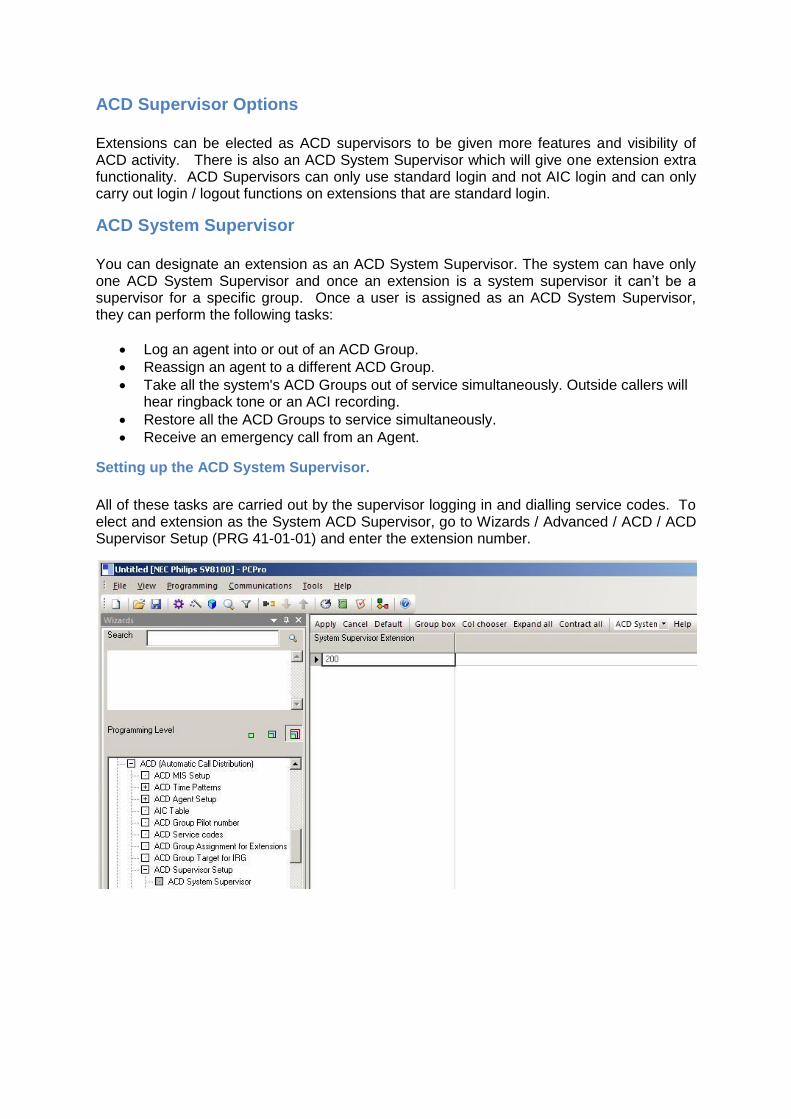
Setting up the ACD System Supervisor.
All of these tasks are carried out by the supervisor logging in and dialling service codes. To elect and extension as the System ACD Supervisor, go to Wizards / Advanced / ACD / ACD Supervisor Setup (PRG 41-01-01) and enter the extension number.

The ACD system supervisor function needs to be allowed in class of service. To enable ACD Supervisor Position Enhancement, go to Advanced Items / ACD / ACD Supervisor Setup / ACD Supervisor COS options (PRG 20-13-33) and set the class of service to ‘on’ for the Supervisors class of service.
There are also some configurable service codes for the supervisor position.
Wizards / Advanced Items / ACD / ACD Supervisor Setup / ACD Supervisor Service Codes / ACD Agent login for Supervisor (PRG 11-13-10.) This is the service code that a supervisor dials to login an agent. The default setting is 767.
Wizards / Advanced Items / ACD / ACD Supervisor Setup / ACD Supervisor Service Codes / ACD logout by Supervisor (PRG 768.) This is the service code that a supervisor dials to log and agent out. The default setting is 768.
Wizards / Advanced Items / ACD / ACD Supervisor Setup / ACD Supervisor Service Codes / ACD Group Change by Supervisor (PRG 11-13-12.) This service code can be used by the supervisor to change which ACD group the agent will login to. This function can only be used when agent is not logged in. The default value is 769.
For An ACD System Supervisor to take all of the ACD queues out of service, they must have an ‘ACD Force Work End’ key on their extension. The function key can be programmed using 852*14 or set through PC Programming.

Using the ACD System Supervisor Functions.
Login an Agent
For the system supervisor to login an agent they should dial the service code enabled in Wizards / Advanced Items / ACD / ACD Supervisor Setup / ACD Supervisor Service Codes / ACD Agent login for Supervisor (PRG 11-13-10.) Once the service code has been dialled the display will show ‘ACD Agent Login Dial Agent’ at this point enter the extension number that should be logged in. After the extension number has been entered you are prompted to enter the agent ID, enter the agent id and the prompt will change to login ok. An agent can only be logged in when their extension is idle and if they are logged out.
Logout an Agent
Similar to the login an agent function, the ACD system supervisor can dial the service code configured in Wizards / Advanced items / ACD / ACD Supervisor Setup / ACD Supervisor Service Codes / ACD logout by Supervisor (PRG 11-13-11.) When they enter the service code you are prompted to enter the extension you wish to logout, enter the extension number and they agent is logged out. If the agent is busy in any way then the agent can’t be logged out.
Change ACD Group Membership
To change which ACD group an Agent belongs to, dial the service code entered in Wizards / Advanced Items / ACD / ACD Supervisor Setup / ACD Supervisor Service Codes / ACD Group Change by Supervisor (PRG 11-13-12.) After dialling the service code enter the extension number you will be shown which ACD group the extension is currently assigned to. Enter the new ACD group that the extension should be assigned. Again the extension has to be logged out and idle to use this function.
ACD Group Supervisor
The ACD Group supervisor is similar to the ACD System supervisor but can carry out more specific functions for a single ACD group. There can only be one ACD supervisor per group. Once enabled, the ACD Group supervisor can:
Take an ACD Group out of service.
Restore the ACD Group to service.
Receive ACD Emergency Calls from Agent within the group.
Log agents in and out.
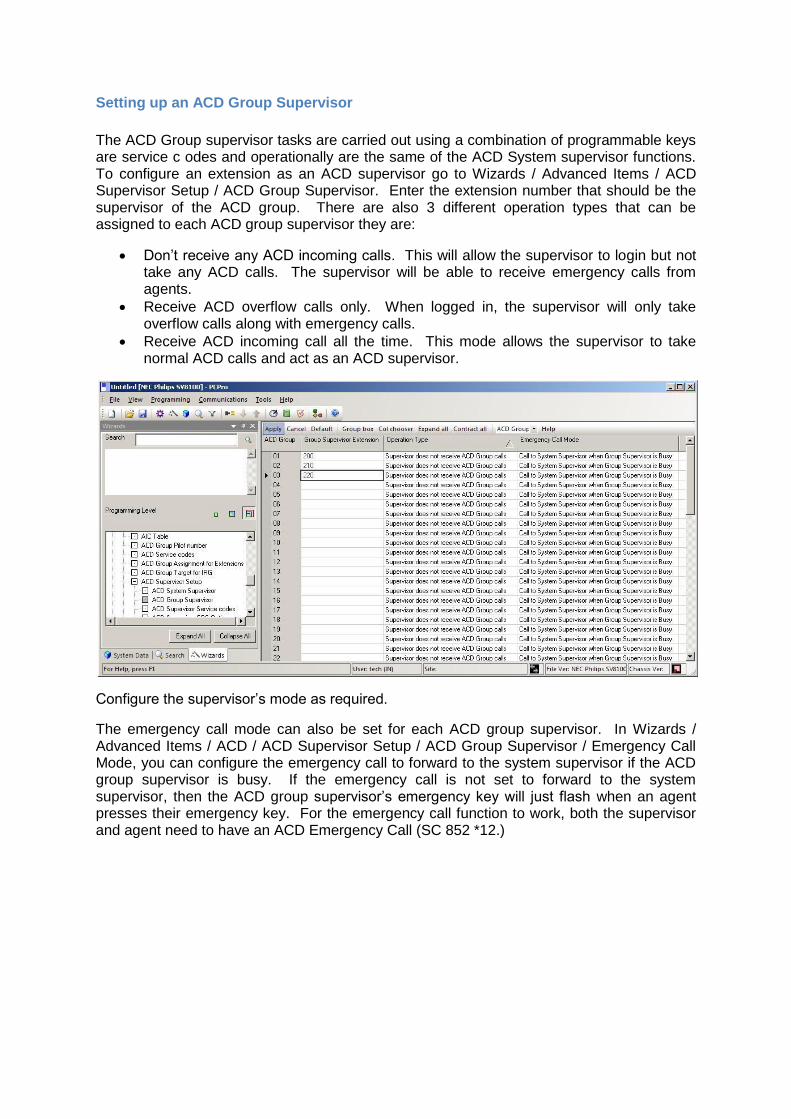
Setting up an ACD Group Supervisor
The ACD Group supervisor tasks are carried out using a combination of programmable keys are service c odes and operationally are the same of the ACD System supervisor functions. To configure an extension as an ACD supervisor go to Wizards / Advanced Items / ACD Supervisor Setup / ACD Group Supervisor. Enter the extension number that should be the supervisor of the ACD group. There are also 3 different operation types that can be assigned to each ACD group supervisor they are:
Don’t receive any ACD incoming calls. This will allow the supervisor to login but not take any ACD calls. The supervisor will be able to receive emergency calls from agents.
Receive ACD overflow calls only. When logged in, the supervisor will only take overflow calls along with emergency calls.
Receive ACD incoming call all the time. This mode allows the supervisor to take normal ACD calls and act as an ACD supervisor.
Configure the supervisor’s mode as required.
The emergency call mode can also be set for each ACD group supervisor. In Wizards / Advanced Items / ACD / ACD Supervisor Setup / ACD Group Supervisor / Emergency Call Mode, you can configure the emergency call to forward to the system supervisor if the ACD group supervisor is busy. If the emergency call is not set to forward to the system supervisor, then the ACD group supervisor’s emergency key will just flash when an agent presses their emergency key. For the emergency call function to work, both the supervisor and agent need to have an ACD Emergency Call (SC 852 *12.)

The ACD group supervisor function needs to be allowed in class of service. To enable ACD Supervisor Position Enhancement, go to Wizards / Advanced Items / ACD / ACD Supervisor Setup / ACD Supervisor COS options and set the class of service to ‘on’.
There are also some configurable service codes for the ACD Group supervisor position, these codes are the same as the ACD System supervisor service codes.
Wizards / Advanced Items / ACD / ACD Supervisor Setup / ACD Supervisor Service Codes / ACD Agent login for Supervisor (PRG 11-13-10.) This is the service code that a supervisor dials to login an agent. The default setting is 767.
Wizards / Advanced Items / ACD / ACD Supervisor Setup / ACD Supervisor Service Codes / ACD logout by Supervisor (PRG 768.) This is the service code that a supervisor dials to log and agent out. The default setting is 768.
Wizards / Advanced Items / ACD / ACD Supervisor Setup / ACD Supervisor Service Codes / ACD Group Change by Supervisor (PRG 11-13-12.) This service code can be used by the supervisor to change which ACD group the agent will login to. This function can only be used when agent is not logged in. The default value is 769.
For An ACD Group Supervisor to take their assigned ACD queue out of service, they must have an ‘ACD Force Work End’ key on their extension. The function key can be programmed using SC 852 *14 or set through PC Programming.
Using the ACD Group Supervisor Functions.
The ACD Group supervisor functions work the same of the ACD System supervisor functions but can only carry out functions for the ACD group that they are assigned to.
Login an Agent
For the group supervisor to login an agent they should dial the service code enabled in Wizards / Advanced Items / ACD / ACD Supervisor Setup / ACD Supervisor Service Codes / ACD Agent login for Supervisor (PRG 11-13-10.) Once the service code has been dialled the display will show ‘ACD Agent Login Dial Agent’ at this point enter the extension number that should be logged in. After the extension number has been entered you are prompted to enter the agent ID, enter the agent id and the prompt will change to login ok. An agent can only be logged in when their extension is idle and if they are logged out. Group ACD supervisors can login ACD agents for any ACD queue.
Logout an Agent
Similar to the login an agent function, the ACD group supervisor can dial the service code configured in Wizards / Advanced items / ACD / ACD Supervisor Setup / ACD Supervisor Service Codes / ACD logout by Supervisor (PRG 11-13-11.) When they enter the service code you are prompted to enter the extension you wish to logout, enter the extension number and they agent is logged out. If the agent is busy in any way then the agent can’t be logged out. The ACD group supervisor can logout agents for any group.
Change ACD Group Membership
To change which ACD group an Agent belongs to, dial the service code entered in Wizards / Advanced Items / ACD / ACD Supervisor Setup / ACD Supervisor Service Codes / ACD Group Change by Supervisor (PRG 11-13-12.) After dialling the service code enter the extension number you will be shown which ACD group the extension is currently assigned to. Enter the new ACD group that the extension should be assigned. Again the extension has to be logged out and idle to use this function. The ACD group supervisor can change the group membership of any extension.
Emergency Call
Agents can have an emergency key on their extension. If the agent is receiving a call that they would like the ACD supervisor to either listen in to or to join the conversation, they can press the emergency key. When an agent presses the emergency key, an emergency call is made to the supervisor, the supervisor can see that there is an emergency call being made from the agents extension number. The supervisor can answer the call by pressing their emergency key. Once the emergency key has been pressed, the supervisor is listening in to the conversation in ‘monitor’ mode. For the supervisor to join in the conversation, they pressing their emergency call key again. At that point the call become like a conference call. If the agent drops out of the conversation then the caller and the supervisor call is still connected.
ACD Group Call Coverage Key
A call coverage key can be assigned to an ACD group, when a call a queuing the key will flash. When a call is ringing in the ACD group, any one regardless of if they are logged into ACD or not can answer the call pressing the call coverage key. This function can be particularly useful for supervisors who do not take want to take ACD all the time. The call coverage key can be programmed using PRG 852: *03 ACD Pilot Number.
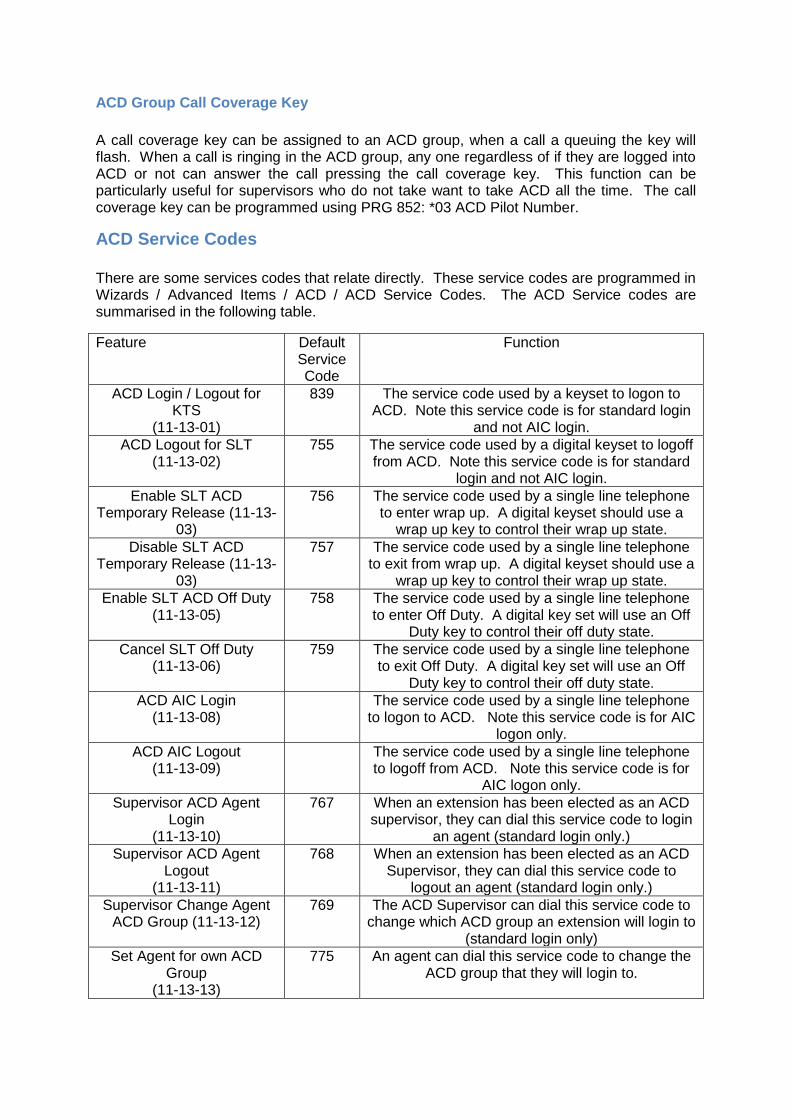
ACD Service Codes
There are some services codes that relate directly. These service codes are programmed in Wizards / Advanced Items / ACD / ACD Service Codes. The ACD Service codes are summarised in the following table.
Feature Default Service Code
Function
ACD Login / Logout for KTS
(11-13-01)
839 The service code used by a keyset to logon to ACD. Note this service code is for standard login
and not AIC login.
ACD Logout for SLT (11-13-02)
755 The service code used by a digital keyset to logoff from ACD. Note this service code is for standard
login and not AIC login.
Enable SLT ACD Temporary Release (11-13-
03)
756 The service code used by a single line telephone to enter wrap up. A digital keyset should use a
wrap up key to control their wrap up state.
Disable SLT ACD Temporary Release (11-13-
03)
757 The service code used by a single line telephone to exit from wrap up. A digital keyset should use a
wrap up key to control their wrap up state.
Enable SLT ACD Off Duty (11-13-05)
758 The service code used by a single line telephone to enter Off Duty. A digital key set will use an Off
Duty key to control their off duty state.
Cancel SLT Off Duty (11-13-06)
759 The service code used by a single line telephone to exit Off Duty. A digital key set will use an Off
Duty key to control their off duty state.
ACD AIC Login (11-13-08)
The service code used by a single line telephone to logon to ACD. Note this service code is for AIC
logon only.
ACD AIC Logout (11-13-09)
The service code used by a single line telephone to logoff from ACD. Note this service code is for
AIC logon only.
Supervisor ACD Agent Login
(11-13-10)
767 When an extension has been elected as an ACD supervisor, they can dial this service code to login
an agent (standard login only.)
Supervisor ACD Agent Logout
(11-13-11)
768 When an extension has been elected as an ACD Supervisor, they can dial this service code to
logout an agent (standard login only.)
Supervisor Change Agent ACD Group (11-13-12)
769 The ACD Supervisor can dial this service code to change which ACD group an extension will login to
(standard login only)
Set Agent for own ACD Group
(11-13-13)
775 An agent can dial this service code to change the ACD group that they will login to.
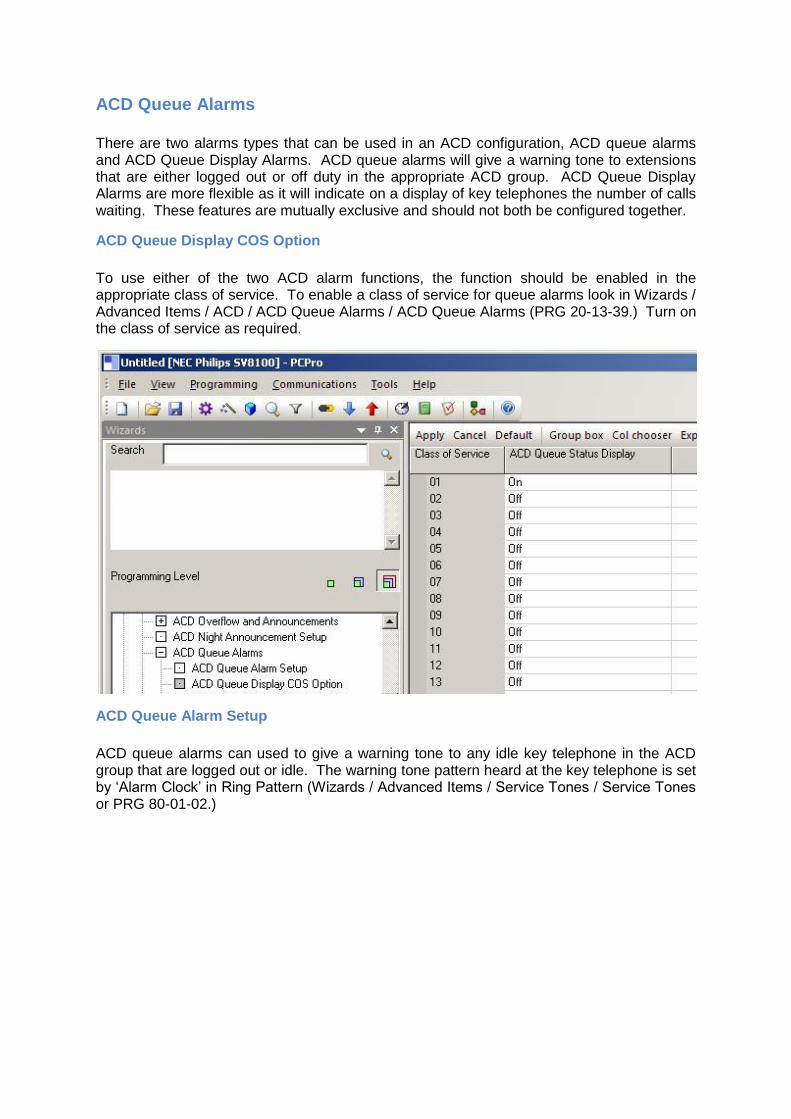
ACD Queue Alarms
There are two alarms types that can be used in an ACD configuration, ACD queue alarms and ACD Queue Display Alarms. ACD queue alarms will give a warning tone to extensions that are either logged out or off duty in the appropriate ACD group. ACD Queue Display Alarms are more flexible as it will indicate on a display of key telephones the number of calls waiting. These features are mutually exclusive and should not both be configured together.
ACD Queue Display COS Option
To use either of the two ACD alarm functions, the function should be enabled in the appropriate class of service. To enable a class of service for queue alarms look in Wizards / Advanced Items / ACD / ACD Queue Alarms / ACD Queue Alarms (PRG 20-13-39.) Turn on the class of service as required.
ACD Queue Alarm Setup
ACD queue alarms can used to give a warning tone to any idle key telephone in the ACD group that are logged out or idle. The warning tone pattern heard at the key telephone is set by ‘Alarm Clock’ in Ring Pattern (Wizards / Advanced Items / Service Tones / Service Tones or PRG 80-01-02.)

In Wizards / Advanced Items / ACD Queue Alarms / ACD Queue Alarms Setup (PRG 41-15) enter the number of calls in the ACD queue required to trigger the alarm. You can also enter the Alarm Information interval time. This is the time that the programmed alarm will alert extensions for. The extensions will be alerted for the programmed number of seconds and then the alerting will be silenced for the same number of seconds.
ACD Queue Display Setup
Wizards / Advanced Items / ACD / ACD Queue Alarm / ACD Queue Display Setup (PRG 41-20)
ACD Queue display setup can be used to display the number of calls in queue and the longest wait time on a keyset that is logged out. The ACD queue activity can be displayed on the keyset and optionally a warning tone can be played on the keyset. The following table describes each of the configurable items.
Number of call in ACD Queue to activate Display Information.
Enter the number of calls in queue to trigger the alarm.
Queue Status Display Hold Time Enter the number of seconds that the key telephone will display the queue status display information for.
Queue Status Display Interval Time
Enter the interval in seconds between the key telephone display showing the Queue Status Display and Alarm
Tone. This time also sets when the display and alarms will start after the queue limit is reached.
ACD Call Waiting Alarm Turn this option on the enable the alarm tone to be sent to a keyset receiving the alarm
ACD Call Waiting Alarm Send Duration
Enter the duration in seconds that the alarm tone will be on. The warning tone pattern heard at the key
telephone is set by ‘Alarm Clock’ in Ring Pattern (Wizards / Advanced Items / Service Tones / Service
Tones or PRG 80-01-02.)
The information displayed in the ACD Queue Display Setup can be displayed by programming an ‘ACD Queue Status Display’ key on a keyset. The service code for an ACD Queue Status Display SC 852:*19.
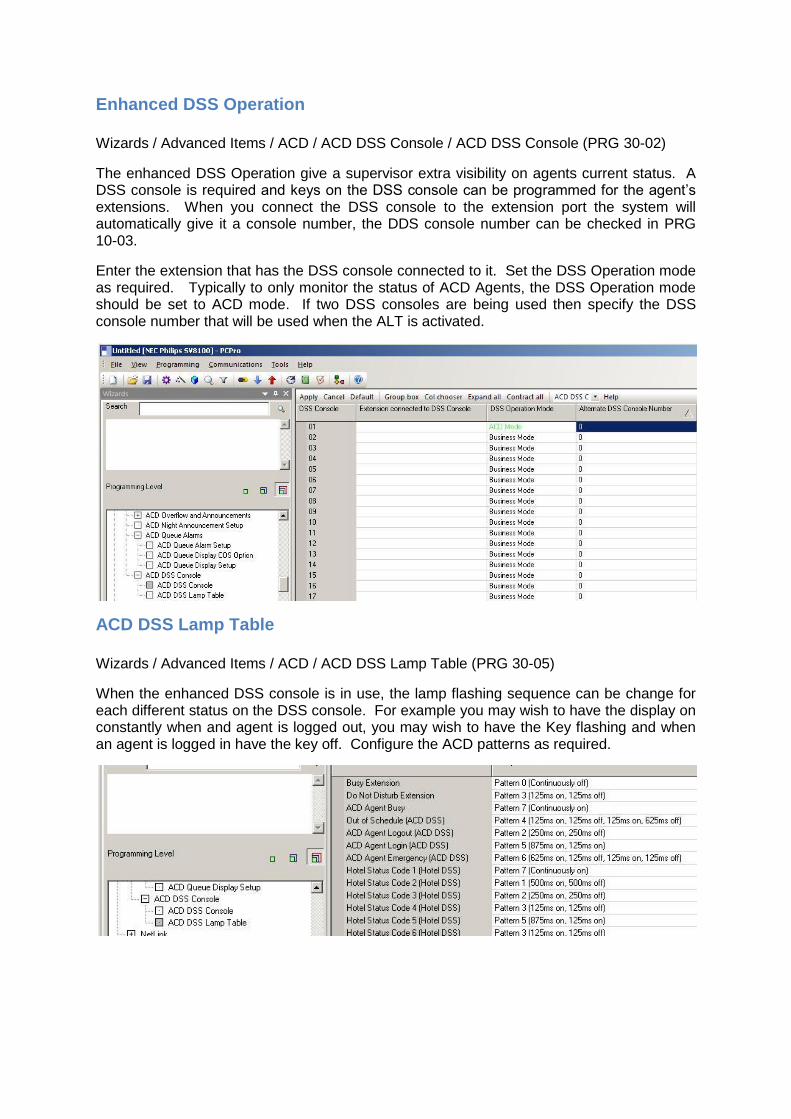
Enhanced DSS Operation
Wizards / Advanced Items / ACD / ACD DSS Console / ACD DSS Console (PRG 30-02)
The enhanced DSS Operation give a supervisor extra visibility on agents current status. A DSS console is required and keys on the DSS console can be programmed for the agent’s extensions. When you connect the DSS console to the extension port the system will automatically give it a console number, the DDS console number can be checked in PRG 10-03.
Enter the extension that has the DSS console connected to it. Set the DSS Operation mode as required. Typically to only monitor the status of ACD Agents, the DSS Operation mode should be set to ACD mode. If two DSS consoles are being used then specify the DSS console number that will be used when the ALT is activated.
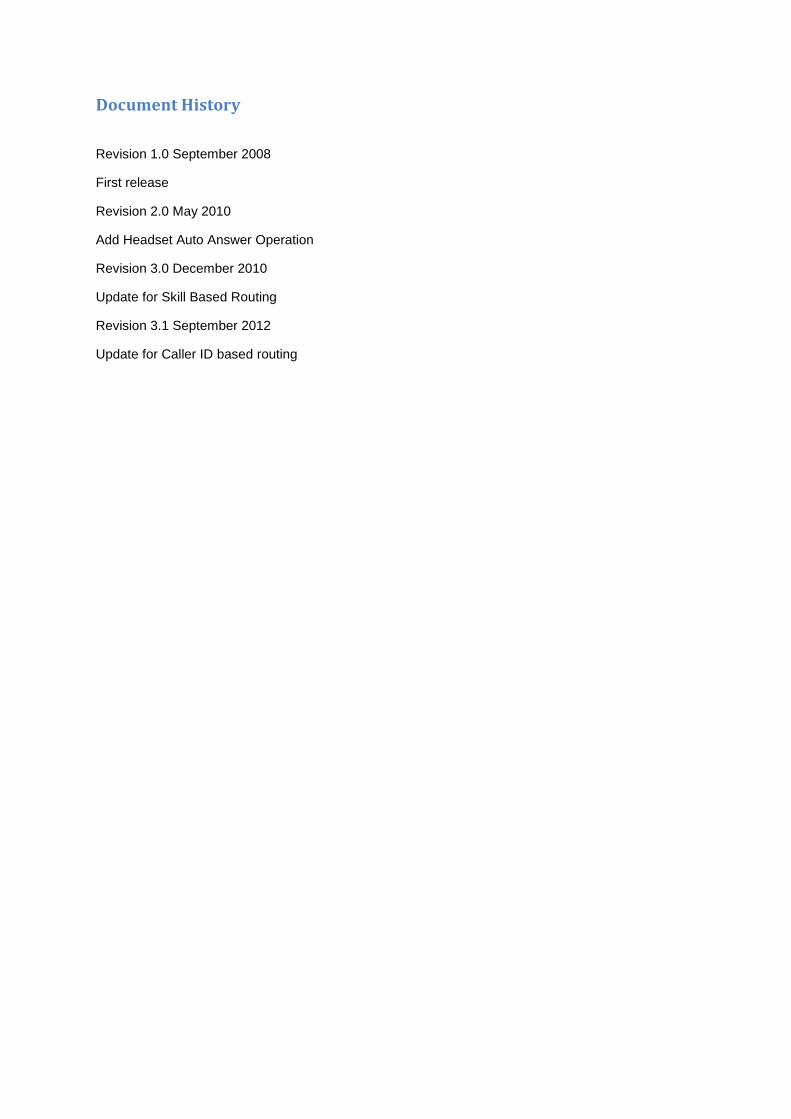
ACD DSS Lamp Table
Wizards / Advanced Items / ACD / ACD DSS Lamp Table (PRG 30-05)
When the enhanced DSS console is in use, the lamp flashing sequence can be change for each different status on the DSS console. For example you may wish to have the display on constantly when and agent is logged out, you may wish to have the Key flashing and when an agent is logged in have the key off. Configure the ACD patterns as required.
Document History
Revision 1.0 September 2008
First release
Revision 2.0 May 2010
Add Headset Auto Answer Operation
Revision 3.0 December 2010
Update for Skill Based Routing
Revision 3.1 September 2012
Update for Caller ID based routing
LIABILITY DISCLAIMER
NEC Unified Solutions reserves the right to change the specifications, functions, or features, at any time, without notice.
NEC Unified Solutions has prepared this document for use by its employees and customers. The information contained herein is the property of NEC Unified Solutions and shall not be reproduced
without prior written approval from NEC Unified Solutions. All brand names and product names on this document are trademarks or registered trademarks of their respective companies.
Copyright 2010
NEC Unified Solutions
NEC Unified Solutions
P.O. Box 32
1200 JD Hilversum
The Netherlands