Accounts Payable Users Manual - livgov.com
19
MUNIS version 11.1
Transcript of Accounts Payable Users Manual - livgov.com

MUNIS version 11.1
Page 1 of 17
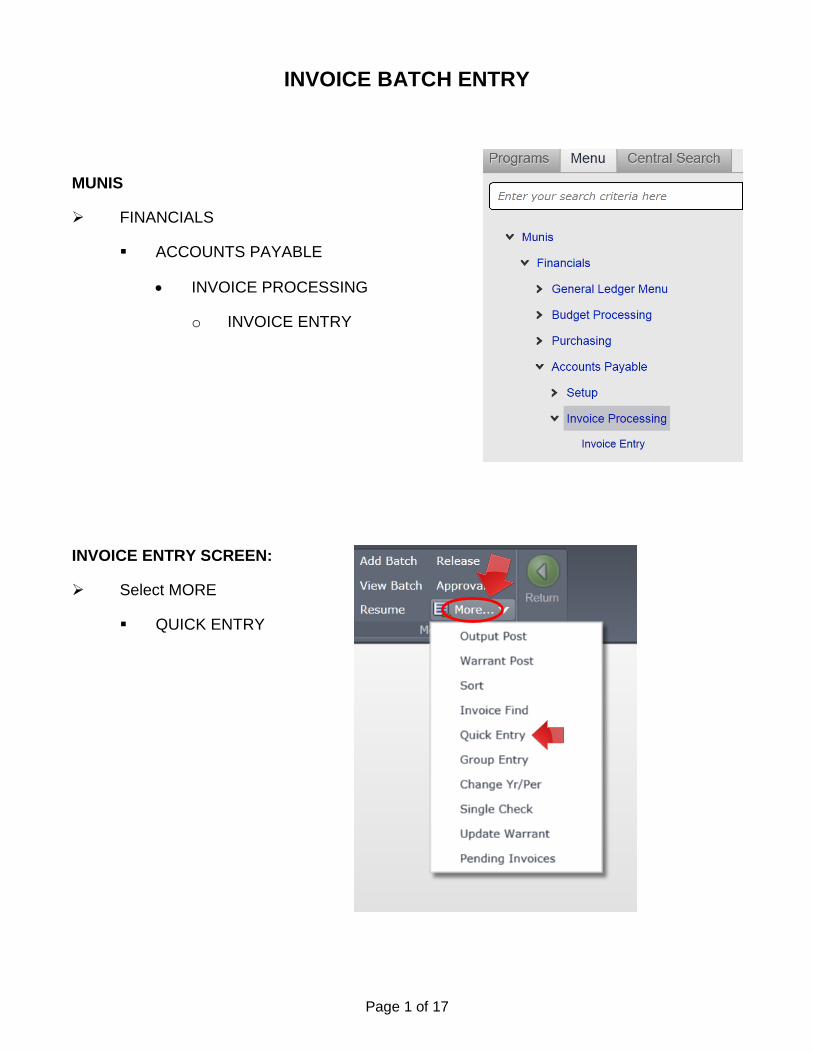
INVOICE BATCH ENTRY
MUNIS
FINANCIALS
ACCOUNTS PAYABLE
INVOICE PROCESSING
o INVOICE ENTRY
INVOICE ENTRY SCREEN:
Select MORE
QUICK ENTRY

Page 2 of 17
BATCH HEADER:
CLICK ADD BATCH
TAB through fund and cash account, these self-populate
***Effective date and Warrant dates MUST match***
EFFECTIVE DATE:
This will self-populate with the day you are doing your entry MAKE SURE TO CHANGE!
Provided by Finance.
Claims: .................. Dates of the finance meeting (always a Wednesday)
Preauthorized: ....... Thursdays
WARRANT FIELD:
PA + DATE - if submitting Preauthorized invoices
CL + DATE - for claims
(Example: .............. PA021314 for a payable check on Feb. 13, 2014
CL022614 for 2/26/14 finance board meeting )
DUE DATE: REFER TO DATE CALENDAR SENT OUT BY AP
Provided by AP once the current year calendar is set by the board
Claims: .................. Dates of the finance meeting (always a Wednesday)
Preauthorized: ........ Thursdays
ACCEPT

Page 3 of 17
IF YOU NEED TO CHANGE EITHER THE EFFECTIVE DATE OR WARRANT #
This is done from the Batch header screen under “MORE” in the upper right ribbon
Under more to change the EFFECTIVE DATE you select ‘Change Yr/Per’ this
will take you to the Effective Date Field, you can either click on calendar or type
in date.
After you change date you MUST hit accept, your date will be changed.
To change the warrant # click on ‘UPDATE
WARRANT’ when you do the above ‘Update
Criteria’ box will appear, enter new warrant hit
accept this will change the warrant on ALL
invoices in the batch.
!! IMPORTANT NOTES/ TIPS FOR INVOICE ENTRY !!
When entering an invoice that has a PO or a Contract you MUST enter
this upon initial entry MUNIS WILL NOT ALLOW YOU TO CORRECT THIS
if you forget!

Page 4 of 17
Munis also will not allow you to change a VENDOR after the invoice
screen is left make sure your vendor is correct!
You make corrections to the UPPER PORTION of the invoice by using
“Update” the lower portion(line detail) by using “change lines”
If you attach the wrong document in TCM although you cannot delete
you can OVERWRITE, what you would do is when attaching correct docs
DO NOT hit “NEW” just hit “IMPORT” and you will see a message
warning you that this will replace the existing docs which is what you
want.
If you need documentation to go with the check make sure to check
“include documentation” it is also a good idea to either send me an
email or at lease add a comment.

Page 5 of 17
INVOICE ENTRY
DIRECT INVOICE ENTRY:
ADD or TAB to PO field for first invoice
PO: Purchases $500 & under = no PO required
(Office Depot always requires a PO)
CONTRACT: Make sure to enter your Contract Number if you have
one … MUNIS WILL NOT LET YOU ADD LATER …You will have to re-enter
invoice!
VENDOR: Type number if known or search
REMIT: Choose appropriate payment address, if available
INVOICE: Type number from vendor’s invoice
GROSS AMOUNT: $ amount from vendor’s invoice
DESCRIPTION: Required, please make sure it reflects the invoice
PAYMENT METHOD: Normal
WARRANT: Will populate from Batch Header
INVOICE DATE: From vendor’s invoice

Page 6 of 17
DUE DATE: Will populate from Batch Header
INCLUDE DOCUMENTATION: If need to send remittance with check
SEPERATE CHECK: If you need a stand alone check if not Munis will group all
like vendors
PA APPLIED: Make sure this is checked if you need to use a project string,
otherwise make sure it is unchecked
ACCEPT or TAB through past PA applied
ENTER ORG & OBJ or CHOOSE PROJECT STRING: Enter numbers or search
ACCEPT
TCM: ADD DOCS: Select AP Invoices under document mappings
OK
ACCEPT
NEW
IMPORT find file, select open
SAVE
CLOSE viewer
ADD (if have more invoices)
RETURN TO BATCH HEADER (to send invoices for approval)
SELECT RELEASE
SELECT APPROVALS
YES
THIS WILL RELEASE INVOICES INTO WORKFLOW

Page 7 of 17
PO INVOICE ENTRY:
[ WHEN A PURCHASE ORDER IS BEING USED ]
When using a PO during invoice entry when you tab past your final field (PA APPLIED,
may be different if you are using Quick Entry) You will be taken to the PO LIQUIDATION
SCREEN
You will have the choice to either FULL LIQUIDATE or
MODIFY
You will FULLY LIQUIDATE when you have only one
invoice assigned to that PO or on the LAST invoice of a multiple invoice PO (Multiple
invoices on one PO you must use MODIFY until you are on your last one). Each invoice
must be entered seperately, you CANNOT combine.
TIP: If you have multiple invoices on one PO save the invoice with the most items for
last so you can just FULL LIQUIDATE that one.
FULL LIQUIDATE to pay full open amount of PO.
You will get a message asking if you are sure you want to liquidate.
SELECT Yes to close PO. You will be taken back to the invoice, ORG & OBJ
populate, verify to make sure correct.
ATTACH your docs.

Page 8 of 17
MODIFY to Partially Liquidate
ENTER quantity received.
ENTER Liq amount. Complete all lines. DO NOT TAB PAST THE LAST FIELD
(INV AMOUNT) OR YOU WILL HAVE TO BEGIN AGAIN!
CONTINUE
ACCEPT
ADD to enter more invoices or to Batch Header

Page 9 of 17
GROUP INVOICE ENTRY WITH PO
INVOICE ENTRY or BATCH HEADER SCREEN:
Select MORE
GROUP ENTRY
PO: Type # or search
ACCEPT
INVOICE: # from vendor’s invoice
GROSS AMOUNT: $ amount from vendor’s invoice
WARRANT: will populate from Batch Header
DATE: from vendor’s invoice
DESCRIPTION: populates from PO. Add more information if needed.
TAB opens another line
When complete with last description, select Return to Top
ENTER the Gross amount from bottom of screen into
the Liquidation Amount on the top of the screen
ACCEPT
GEN INVOICES

Page 10 of 17
NEW VENDORS
**IF YOUR VENDOR IS NOT IN THE SYSTEM OR DOES NOT HAVE W9 INFO
IN THE SYSTEM YOU ARE REQUIRED TO SEND AND FORWARD A
VENDOR PACKET, WHICH YOU CAN REQUEST FROM AP**
AP CREATES ALL NEW VENDORS
REGULAR VENDORS
Companies or individuals that provide goods and/or services
Restitution victims that are receiving more than one payment
Employees
Request a W9 from your vendor.
Email it to AP, a new number will be issued.
ONETIME VENDORS
Restitution victims being fully paid in one
payment
Jurors or Witnesses
Refunds
Use 100000 in the Vendor field on the Invoice
Entry Screen
Enter information in ALL CAPS and WITHOUT punctuation
ACCEPT

Page 11 of 17
TO SEARCH A VENDOR
Vendor search can take place in two (2) places: from your MUNIS HOMEPAGE,
via TYLER MENU, or under the VENDOR CENTRAL program
VIA HOMEPAGE MENU
Homepage
Tyler Menu
Munis
Departmental Functions
o Vendor Inquiry

Page 12 of 17
TO LOOK UP AN OLD INVOICE OR CHECK:
To search a past invoice:
VENDOR INQUIRY
INVOICE INQUIRY
INVOICE CRITERIA
o Fill correct search year
Status-blank- VERY IMPORTANT
o ENTER / Accept
To search an old check:
VENDOR INQUIRY
CHECK INQUIRY
CHECK CRITERIA
o Enter check number only
o ENTER / Accept

Page 13 of 17
TO SEARCH VIA VENDOR CENTRAL:
Homepage
Central Search
Search
Type in Vendor Name or Number#
Centrals will list number of vendors, if any
Click on arrow, Vendor will show
Click on Vendor below screen will appear
This page you need to set up as to what
you want to show

Page 14 of 17
P-CARDS
MUNIS
FINANCIALS
ACCOUNTS PAYABLE
INVOICE PROCESSING
o PURCHASE CARDS STATEMENTS
SEARCH
CARD: Enter 16 digit card number
STATEMENT DETAILS: Status: new
ACCEPT
TRANSACTIONS
UPDATE
ALLOCATE- make sure to allocate purchase charge to proper accounts, they will be imported in with a generic account #.
CHARGE DESCRIPTION: Required. Enter description of purchase, must update
OBJ: change to appropriate account
RETURN

Page 15 of 17
TCM Attach docs…MUST be done under “TRANSACTIONS” not statements
ACCEPT
o NEW
o IMPORT find file, select open
o SAVE
o CLOSE viewer
ARROW over to next record. When finished with all transactions. Select Mass Release
from ribbon.

Page 16 of 17
HOW TO FIX A REJECTED INVOICE
Occasionally you may receive an email that an invoice you had entered has been
rejected
This is NOT a big deal, it happens for a variety of reasons, your account you
chose may not be the best choice and needs
to be changed, you may be missing
documentation, etc.
One thing you will notice when you look at the
invoice is the Status it will have an “R” for
Rejected. This will need to be updated once
your fix is complete.
To fix a description or amount you will need to use “UPDATE”
To fix an Org or Object or account # you will need to use “CHANGE LINES”
Make your needed changes and hit ACCEPT
Now the most important aspect of a fix is when you are done making whatever
changes you need to make you MUST do 2 things:
FIRST you must change the STATUS of the
invoice from “R” for rejected to “H” for Held!
Hit ACCEPT
Hit RETURN

Page 17 of 17
You will then be taken to your Batch
Header Screen, verify that
“RELEASED” is still checked, if not
hit release.
Then this is the important part….YOU MUST HIT APPROVALS again, if you do
not the invoice will not go back into the workflow and will never get paid
Your invoice is now fixed, back in the workflow and ready for approvals.
PLEASE MAKE SURE TO NOTIFY YOUR DEPARTMENT HEAD THAT THEY
HAVE AN APPROVAL THAT NEEDS TO BE DONE!!
HOW TO ENTER A CREDIT INVOICE Enter just as you would do a regular invoice except use a negative in
the amount field.

Page 18 of 17
When you do this and hit “tab” the following box will appear, the only
thing you need to enter is the old Invoice # from the invoice that is
giving the credit. Hit accept and it will take you back to the invoice
entry screen.
***some things to know***
You can ONLY enter a credit invoice for an invoice that has already
been processed, otherwise Munis will not find the invoice and credit
cannot be processed.
Sometimes Munis will pre-populate the amount on invoice entry for
the TOTAL amount of the invoice, if this happens use “change lines”
and change the detail to match the amount of the credit.
INVOICE HISTORY REPORT
FINANCIALS
ACCOUNTS PAYABLE
INVOICE INQUIRY AND REPORTS
INVOICE HISTORY BY GL ACCOUNT
CHOOSE to run report by Fund, Org, or Object
Make selections, then ACCEPT
EXCEL allows you to choose column wanted
ACCEPT