Accessory Application Publication No. INSTALLATION...
2
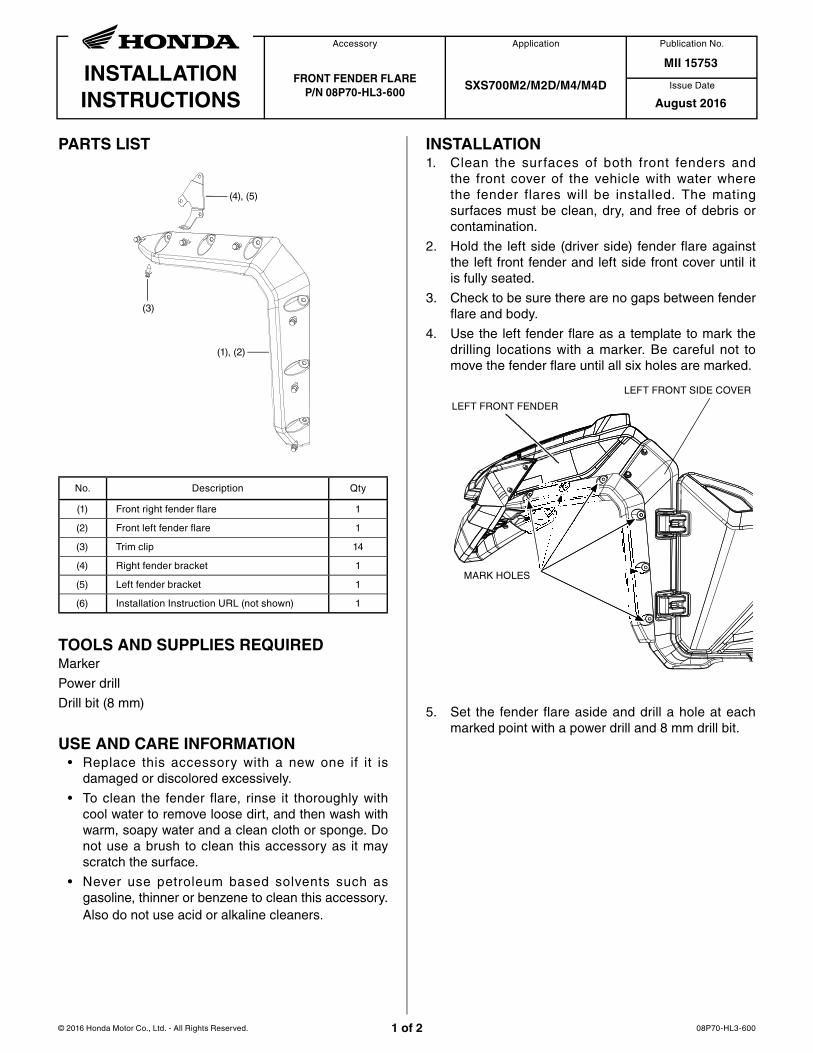
Issue Date INSTALLATION INSTRUCTIONS Accessory Application Publication No. © 2016 Honda Motor Co., Ltd. - All Rights Reserved. PARTS LIST 08P70-HL3-600 1 of 2 FRONT FENDER FLARE P/N 08P70-HL3-600 SXS700M2/M2D/M4/M4D MII 15753 August 2016 (1), (2) (4), (5) (3) No. Description Qty (1) Front right fender flare 1 (2) Front left fender flare 1 (3) Trim clip 14 (4) Right fender bracket 1 (5) Left fender bracket 1 (6) Installation Instruction URL (not shown) 1 TOOLS AND SUPPLIES REQUIRED Marker Power drill Drill bit (8 mm) USE AND CARE INFORMATION • Replace this accessory with a new one if it is damaged or discolored excessively. • To clean the fender flare, rinse it thoroughly with cool water to remove loose dirt, and then wash with warm, soapy water and a clean cloth or sponge. Do not use a brush to clean this accessory as it may scratch the surface. • Never use petroleum based solvents such as gasoline, thinner or benzene to clean this accessory. Also do not use acid or alkaline cleaners. INSTALLATION 1. Clean the surfaces of both front fenders and the front cover of the vehicle with water where the fender flares will be installed. The mating surfaces must be clean, dry, and free of debris or contamination. 2. Hold the left side (driver side) fender flare against the left front fender and left side front cover until it is fully seated. 3. Check to be sure there are no gaps between fender flare and body. 4. Use the left fender flare as a template to mark the drilling locations with a marker. Be careful not to move the fender flare until all six holes are marked. LEFT FRONT FENDER LEFT FRONT SIDE COVER MARK HOLES S 5. Set the fender flare aside and drill a hole at each marked point with a power drill and 8 mm drill bit.
Transcript of Accessory Application Publication No. INSTALLATION...
Issue DateINSTALLATIONINSTRUCTIONS
Accessory Application Publication No.
© 2016 Honda Motor Co., Ltd. - All Rights Reserved.
PARTS LIST
08P70-HL3-6001 of 2
FRONT FENDER FLAREP/N 08P70-HL3-600
SXS700M2/M2D/M4/M4D
MII 15753
August 2016
(1), (2)
(4), (5)
(3)
No. Description Qty
(1) Front right fender flare 1
(2) Front left fender flare 1
(3) Trim clip 14
(4) Right fender bracket 1
(5) Left fender bracket 1
(6) Installation Instruction URL (not shown) 1
TOOLS AND SUPPLIES REQUIREDMarker
Power drill
Drill bit (8 mm)
USE AND CARE INFORMATION• Replace this accessory with a new one if it is
damaged or discolored excessively.
• To clean the fender flare, rinse it thoroughly with cool water to remove loose dirt, and then wash with warm, soapy water and a clean cloth or sponge. Do not use a brush to clean this accessory as it may scratch the surface.
• Never use petroleum based solvents such as gasoline, thinner or benzene to clean this accessory. Also do not use acid or alkaline cleaners.
INSTALLATION1. Clean the surfaces of both front fenders and
the front cover of the vehicle with water where the fender flares will be installed. The mating surfaces must be clean, dry, and free of debris or contamination.
2. Hold the left side (driver side) fender flare against the left front fender and left side front cover until it is fully seated.
3. Check to be sure there are no gaps between fender flare and body.
4. Use the left fender flare as a template to mark the drilling locations with a marker. Be careful not to move the fender flare until all six holes are marked.
LEFT FRONT FENDER
LEFT FRONT SIDE COVER
MARK HOLESS
5. Set the fender flare aside and drill a hole at each marked point with a power drill and 8 mm drill bit.

2 of 2
6. Remove the two front grill trim clips from the position shown. Install the left fender bracket behind the front grill at the position shown with the removed trim clips.
FRONT GRILL TRIM CLIPS
LEFT FENDER BRACKET
FRONT GRILL TRIM CLIPS
LEFT FENDER BRACKET(Install behind the front grill)g )
7. Install left fender flare using the seven supplied trim clips as shown.
TRIM CLIPS
8. Repeat Steps 2 thru 6 for the right side (passenger side) fender flare.