Accessing PACS Images from PowerChart - Excela...
38
© 2011 Cerner Corporation. All rights reserved. This document contains Cerner confidential and/or proprietary information which may not be reproduced or transmitted without the express written consent of Cerner. 1 Accessing PACS Images from PowerChart
Transcript of Accessing PACS Images from PowerChart - Excela...

© 2011 Cerner Corporation. All rights reserved. This document contains Cerner confidential and/or proprietary information which may not be reproduced or transmitted without the express written consent of Cerner. 1
Accessing PACS Images from PowerChart

© 2011 Cerner Corporation. All rights reserved. This document contains Cerner confidential and/or proprietary information which may not be reproduced or transmitted without the express written consent of Cerner. 2
At the end of the session, the participant will be able to:
• Explain how PACS will fit into the physician process.
• Demonstrate use of the application to:
Access an Image
Search for relevant priors
Manipulate the image
• Identify key policy and procedure changes with these application functions.
PACS Image Viewing
Objectives

© 2011 Cerner Corporation. All rights reserved. This document contains Cerner confidential and/or proprietary information which may not be reproduced or transmitted without the express written consent of Cerner. 3
How to view images from Orders
Trainer Notes:
To view the images from the Orders section in Powerchart:
1. Select Order from the Powerchart menu bar
2. Select the Radiology exam you wish to view.
3. Click on the Results tab on to view the orders activity flowsheet
4. Double-click on the exam for the report you wish to view
5. To view an image on the radiology report click on the view image icon located at the top
of the report
– If the exam includes an image, at the bottom of the report will be the statement “
This document has an image.”

© 2011 Cerner Corporation. All rights reserved. This document contains Cerner confidential and/or proprietary information which may not be reproduced or transmitted without the express written consent of Cerner. 4
How to view images from Orders
1
2 3
5
1. Click on Orders
2. Select the Radiology exam to view
3. Click on the Results tab
4. Double-click on the exam in the
Date/Time column
5. Click on Image Icon to view image
4

© 2011 Cerner Corporation. All rights reserved. This document contains Cerner confidential and/or proprietary information which may not be reproduced or transmitted without the express written consent of Cerner. 5
How to view images from the Results Review
Trainer Notes:
Key Points:
1. From the Powerchart menu screen select the Results Review.
2. Then from the Clinical Data screen select the Radiology tab.
• This will show all of the radiology exams in the flowsheet format.
3. Next select the radiology exam to display the radiology report.
4. Last if there is an image available for the report you will select the un-dithered Image
icon on in the lower right of the report.
© 2011 Cerner Corporation. All rights reserved. This document contains Cerner confidential and/or proprietary information which may not be reproduced or transmitted without the express written consent of Cerner. 6
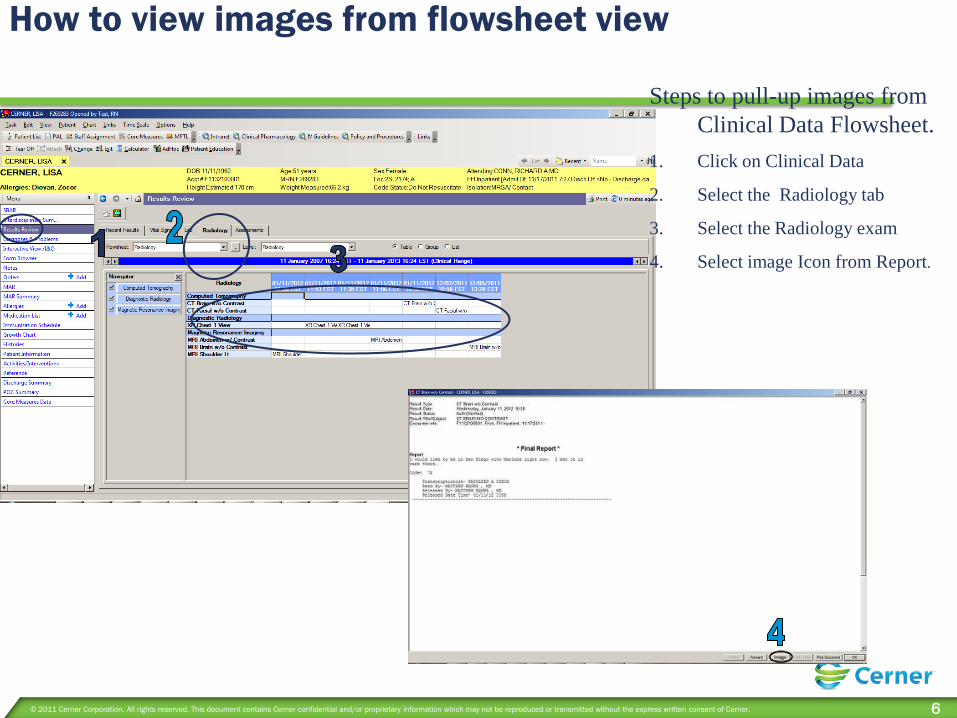
Steps to pull-up images from
Clinical Data Flowsheet.
1. Click on Clinical Data
2. Select the Radiology tab
3. Select the Radiology exam
4. Select image Icon from Report.
How to view images from flowsheet view

© 2011 Cerner Corporation. All rights reserved. This document contains Cerner confidential and/or proprietary information which may not be reproduced or transmitted without the express written consent of Cerner. 7
Trainer Notes:
In order for PowerChart to have the ability to pull images, it
must load two different applications. The first is a java
applet that will run Cerner’s ProVision web viewer. The next
job is that it must load all of the image(s) in the the
ProVision view. Time may vary depending on the size of the
image study.
Load time for Java applet
• The first time you use PowerChart to view images there is an extended
Java load time (1-5 minutes). This will happen the first time you load an
image for each new Citrix session (each time you log into PowerChart).
Load time for Cerner ProVision Web
• There is a load time for images to the Cerner ProVision Web application.
• Load time will vary depending on the size and/or amount of images in the
series.
Load time expectations

© 2011 Cerner Corporation. All rights reserved. This document contains Cerner confidential and/or proprietary information which may not be reproduced or transmitted without the express written consent of Cerner. 8
Load time expectations
This is the load screen that displays when
you launch ProVision.
Image loading
screens
Blue progress
bar shows
images being
loaded

© 2011 Cerner Corporation. All rights reserved. This document contains Cerner confidential and/or proprietary information which may not be reproduced or transmitted without the express written consent of Cerner. 9
Trainer Notes:
The Cerner ProVision Web screen is made up of a number of
sections. These sections are the Menu Bar, thumbnails of
the image series, the View Port and Tiles (where the image
displays), the Navigation Bar and the Tool Bar.
Patient and exam information is displayed using DICOM
tags in white text at the corners of the images.
Overview of screen

© 2011 Cerner Corporation. All rights reserved. This document contains Cerner confidential and/or proprietary information which may not be reproduced or transmitted without the express written consent of Cerner. 10
Overview of screen
Menu bar
Slide View
View Ports / Tile – Image Window
Tool Bar

© 2011 Cerner Corporation. All rights reserved. This document contains Cerner confidential and/or proprietary information which may not be reproduced or transmitted without the express written consent of Cerner. 11
• Tool Bar
– View ports / Tiles
– Window Leveling
• Contrast
• Brightness
– Pan
– Zoom
– Magnifying glass
– Invert Contrast / Brightness
– Image orientation
– Measurement tools
Measurements made using the PowerChart
view are not saved to the image.
– Move forward one image & Back one
image
Trainer Notes:
Menu Bar
Search (Used to query images and related data)
• Patient Folder (F4)
• Patient Query Search (CTRL + F)
Action
• Such as print exporting and viewing DICOM information
View (used to hide different parts of the application)
• Hide toolbar
• Hide thumbnail
• Hide Menu
• Hide Image Text
• Hide DICOM overlays
Preferences - Please note that preferences are not saved from session to
Menu/toolbar

© 2011 Cerner Corporation. All rights reserved. This document contains Cerner confidential and/or proprietary information which may not be reproduced or transmitted without the express written consent of Cerner. 12
Menu/toolbar
Menu Bar Tool Bar
Series Selection and View ports

© 2011 Cerner Corporation. All rights reserved. This document contains Cerner confidential and/or proprietary information which may not be reproduced or transmitted without the express written consent of Cerner. 13
Trainer Notes:
Below is an example of a 1 view study. X-rays will display
in this manner.
If there are multiple x-ray images, the first image will
automatically load. To load other images, click on the
desired image thumbnail.
Scanned documents (from the DICOM scanners) will also
display as images associated with the study.
Pressing the “Esc” key will expand viewport to Full Screen
and toggle Back again.
Example of simple (chest 1 view)

© 2011 Cerner Corporation. All rights reserved. This document contains Cerner confidential and/or proprietary information which may not be reproduced or transmitted without the express written consent of Cerner. 14
Example of simple (chest 1 view)
1.
2.
3.
4.
Map of screen lay out
1. Menu bar
2. Series Selection
3. View port
4. Tool bar

© 2011 Cerner Corporation. All rights reserved. This document contains Cerner confidential and/or proprietary information which may not be reproduced or transmitted without the express written consent of Cerner. 15
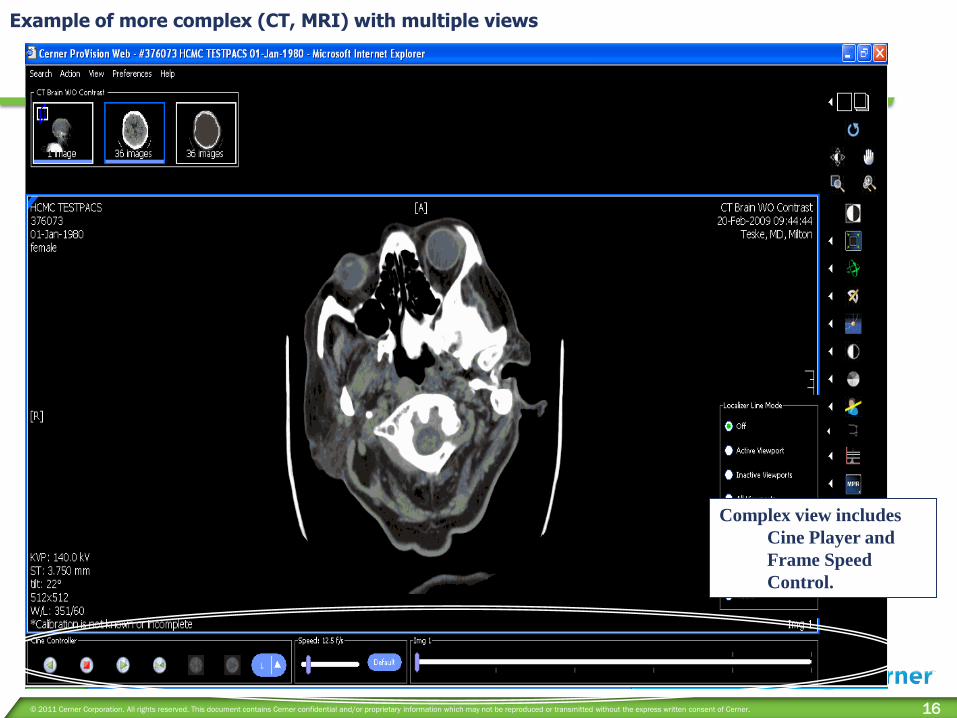
Example of more complex (CT, MRI) with multiple views
Trainer Notes:
• Complex studies (CT, MRI) include the same sections with the addition of the Cine player and frame speed
control.
• The Cine player and Frame speed add additional functionality to play multiple images in a continues series
in the view port(s).
• First Image in the Series of Study is preloaded.
• CT and MRI defaults to a 4 tile view.
© 2011 Cerner Corporation. All rights reserved. This document contains Cerner confidential and/or proprietary information which may not be reproduced or transmitted without the express written consent of Cerner. 16
Example of more complex (CT, MRI) with multiple views
Complex view includes
Cine Player and
Frame Speed
Control.

© 2011 Cerner Corporation. All rights reserved. This document contains Cerner confidential and/or proprietary information which may not be reproduced or transmitted without the express written consent of Cerner. 17
Trainer Notes:
Pan – Click and hold down on the mouse wheel
Able to move image in view port
For mice that do not use the scroll wheel, you can use the Pan icon on
the Toolbar
Zoom – Right click and hold down on the mouse
Move mouse up to zoom out
Move mouse down to zoom in
Window Leveling
Move the mouse left to right to control the contrast
Move the mouse down or up to control the brightness
Mouse control

© 2011 Cerner Corporation. All rights reserved. This document contains Cerner confidential and/or proprietary information which may not be reproduced or transmitted without the express written consent of Cerner. 18
Mouse control
Pan – Click and
hold down on the
mouse wheel
Zoom – Right
click and hold
down on the
mouse
Window Leveling –
Left click and hold
down on the mouse
© 2011 Cerner Corporation. All rights reserved. This document contains Cerner confidential and/or proprietary information which may not be reproduced or transmitted without the express written consent of Cerner. 19
Pan
Trainer Notes:
• Panning
– Click and hold down on the mouse wheel and you will be able to move the image in the view port
– Or, Click on the Panning Icon (hand) in the Toolbar

© 2011 Cerner Corporation. All rights reserved. This document contains Cerner confidential and/or proprietary information which may not be reproduced or transmitted without the express written consent of Cerner. 20
Pan
Pan – Click and
hold down on the
mouse wheel

© 2011 Cerner Corporation. All rights reserved. This document contains Cerner confidential and/or proprietary information which may not be reproduced or transmitted without the express written consent of Cerner. 21
Zoom
Trainer Notes:
• Zoom
– Right click and hold down on the mouse
• Move mouse up to zoom out
• Move mouse down to zoom in
– Or, You can click on the Zoom icon on the toolbar

© 2011 Cerner Corporation. All rights reserved. This document contains Cerner confidential and/or proprietary information which may not be reproduced or transmitted without the express written consent of Cerner. 22
Zoom
Zoom – Right
click and hold
down on the
mouse
Zoo
m
Out
Zoo
m
In

© 2011 Cerner Corporation. All rights reserved. This document contains Cerner confidential and/or proprietary information which may not be reproduced or transmitted without the express written consent of Cerner. 23
Window leveling (brightness, contrast)
Trainer Notes:
• Window / Leveling – Window = Contrast, and Level or Leveling = Brightness
– Left click and hold down on the mouse
• Move mouse Left Decrease Window
• Move mouse Right to Increase Window
– Left click and hold down on the mouse
• Move mouse up to Decrease Level
• Move mouse down to Increase Level
– Or, You can click on the Window Leveling icon on the toolbar

© 2011 Cerner Corporation. All rights reserved. This document contains Cerner confidential and/or proprietary information which may not be reproduced or transmitted without the express written consent of Cerner. 24
Window leveling (brightness, contrast)
3
Window Leveling
– Left click and
hold down on the
mouse
Rt. / Increase
Window
Lt. / Decrease
Window
up to
Decrease
Level
Down
Increase
Level

© 2011 Cerner Corporation. All rights reserved. This document contains Cerner confidential and/or proprietary information which may not be reproduced or transmitted without the express written consent of Cerner. 25
Navigation bar image control (Cine Control Bar)
Trainer Notes:
• The image Navigation bar is broken down into three parts
1. The Cine controller is used to play the images in a continuous frame by frame view.
• The Cine controller allows you to play the images in a forward loop, reverse loop or as a Yo-Yo
effect.
2. The Frame speed control allows you to control the rate of speed at which the images are played
(Frames per Second).
• You can also restore back to the Default speed of 12.5 f/s by selecting the default icon.
3. The image frame bar allows you to see which image is currently loaded in the image viewer.

© 2011 Cerner Corporation. All rights reserved. This document contains Cerner confidential and/or proprietary information which may not be reproduced or transmitted without the express written consent of Cerner. 26
Navigation bar image control
Cine Controller / Frame Speed / Image Series

© 2011 Cerner Corporation. All rights reserved. This document contains Cerner confidential and/or proprietary information which may not be reproduced or transmitted without the express written consent of Cerner. 27
Trainer Notes:
• Play Cine Counter Counterclockwise (reverse)
– Plays the image series in reverse order from last image to first image (loops)
– Click once to start cine player / click again to pause
• Stop
– By Clicking on stop you will stop the series of images from playing and reset the series back to the first
image.
• Play Cine Clockwise (Forward)
– Plays the image series in order from first to last image (loops)
– Click once to start cine player / click again to pause
Play Reverse / Stop / Play Forward

© 2011 Cerner Corporation. All rights reserved. This document contains Cerner confidential and/or proprietary information which may not be reproduced or transmitted without the express written consent of Cerner. 28
Play Reverse / Stop / Play Forward
Play Counterclockwise / Pause
Play Clockwise / Pause
Stop / Reset
© 2011 Cerner Corporation. All rights reserved. This document contains Cerner confidential and/or proprietary information which may not be reproduced or transmitted without the express written consent of Cerner. 29
Yo-yo
Trainer Notes:
• You can play the Cine player with a yo-yo effect by clicking on the cine yo-yo icon.
– The yo-yo effect plays the image series forward from the first to the last image and then reverses and
plays the last image to the first image.

© 2011 Cerner Corporation. All rights reserved. This document contains Cerner confidential and/or proprietary information which may not be reproduced or transmitted without the express written consent of Cerner. 30
Yo-yo
Yo-Yo Icon

© 2011 Cerner Corporation. All rights reserved. This document contains Cerner confidential and/or proprietary information which may not be reproduced or transmitted without the express written consent of Cerner. 31
Frame speed
Trainer Notes:
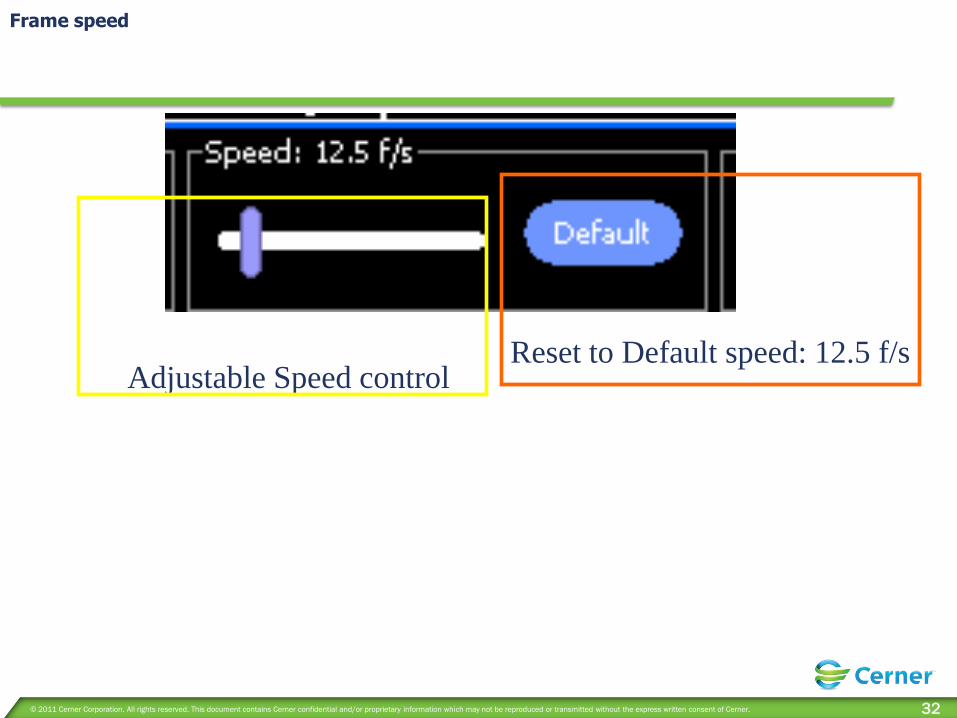
• There are two selectable functions on the Frame speed toolbar
– The first is an adjustable speed controller (measured in Frames per second).
• By clicking on the slide bar and moving the bar to the right, the frame speed will increase.
• Or move the slide bar left to decrease frame speed.
– Second, you can click on the “Default” icon to reset the speed back to 12.5 F/s (frames per second).
© 2011 Cerner Corporation. All rights reserved. This document contains Cerner confidential and/or proprietary information which may not be reproduced or transmitted without the express written consent of Cerner. 32
Frame speed
Adjustable Speed control Reset to Default speed: 12.5 f/s

© 2011 Cerner Corporation. All rights reserved. This document contains Cerner confidential and/or proprietary information which may not be reproduced or transmitted without the express written consent of Cerner. 33
Using multiple view ports and tiles
Trainer Notes:
1. You are able to adjust the image viewer by selecting the View ports and Tile Icon located at the right of the
Tool bar.
2. You can customize your view ports by selecting the View port Icon. This will allow you to put multiple
studies or image series into different view ports that you have created.
3. You can also customize the amount of tiles you would like to view at the same time. The Tile feature allows
you to view multiple images of a study in a ordered sequence.
– Example: If you are viewing a study that has a large amount of images you can increase the amount of
tiles to view more images at the same time. (If you are selecting a CT with 40 images and you want to
view 10 images of that study at once, you can increase the amount of tiles to 10 and they will display
with one image in each tile.
4. The View port and Tile feature can be used concurrently, allowing for a very customizable user interface.
– But remember, as the number of view ports and tiles increase your viewable screen will be smaller for
each image.

© 2011 Cerner Corporation. All rights reserved. This document contains Cerner confidential and/or proprietary information which may not be reproduced or transmitted without the express written consent of Cerner. 34
Using multiple view ports and tiles
Example of a study that has multiple view port (2) with different studies in each. One
of the view ports is set up with multiple tiles (4) that display the images in sequence.
View port 1 View port 2
Tiles 4 Tiles 1
© 2011 Cerner Corporation. All rights reserved. This document contains Cerner confidential and/or proprietary information which may not be reproduced or transmitted without the express written consent of Cerner. 35
Searching for Relevant Priors
Trainer Notes:
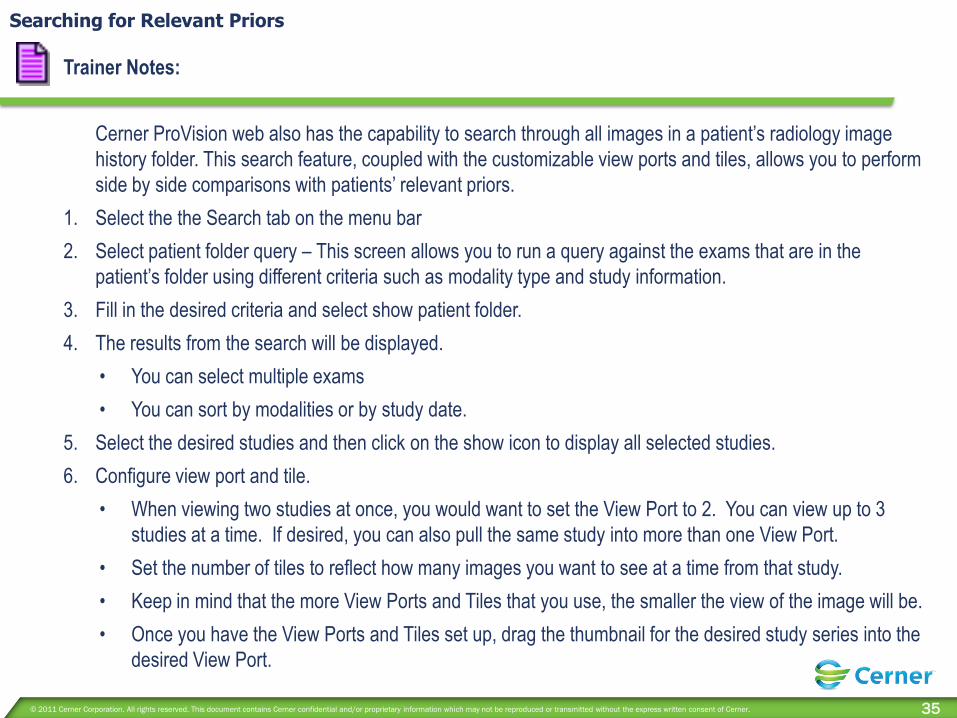
Cerner ProVision web also has the capability to search through all images in a patient’s radiology image
history folder. This search feature, coupled with the customizable view ports and tiles, allows you to perform
side by side comparisons with patients’ relevant priors.
1. Select the the Search tab on the menu bar
2. Select patient folder query – This screen allows you to run a query against the exams that are in the
patient’s folder using different criteria such as modality type and study information.
3. Fill in the desired criteria and select show patient folder.
4. The results from the search will be displayed.
• You can select multiple exams
• You can sort by modalities or by study date.
5. Select the desired studies and then click on the show icon to display all selected studies.
6. Configure view port and tile.
• When viewing two studies at once, you would want to set the View Port to 2. You can view up to 3
studies at a time. If desired, you can also pull the same study into more than one View Port.
• Set the number of tiles to reflect how many images you want to see at a time from that study.
• Keep in mind that the more View Ports and Tiles that you use, the smaller the view of the image will be.
• Once you have the View Ports and Tiles set up, drag the thumbnail for the desired study series into the
desired View Port.
© 2011 Cerner Corporation. All rights reserved. This document contains Cerner confidential and/or proprietary information which may not be reproduced or transmitted without the express written consent of Cerner. 36
Searching for Relevant Priors
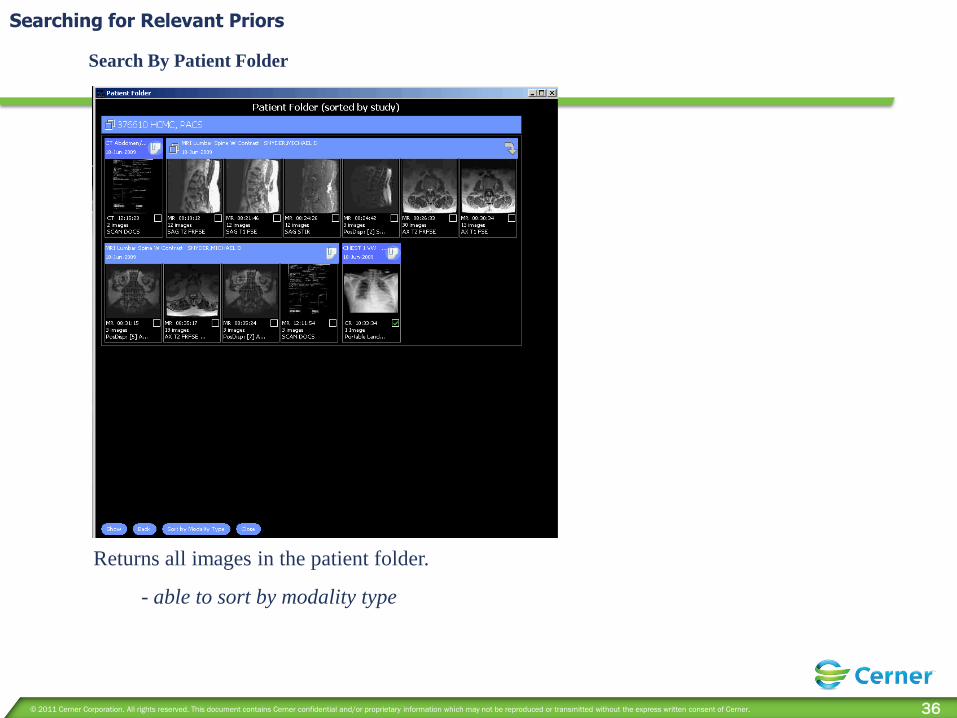
Returns all images in the patient folder.
- able to sort by modality type
Search By Patient Folder

© 2011 Cerner Corporation. All rights reserved. This document contains Cerner confidential and/or proprietary information which may not be reproduced or transmitted without the express written consent of Cerner. 37
Searching for Relevant Priors
Able to query by Date /
Time or Modality Type
Study 1: Original Study
Check marks are dithered
Study 2: New Comparison Study
Check mark to view side by side (Green check marks)
Search By Patient folder query

© 2011 Cerner Corporation. All rights reserved. This document contains Cerner confidential and/or proprietary information which may not be reproduced or transmitted without the express written consent of Cerner. 38
Searching for Relevant Priors
Example of a comparison study: Study 1 is loaded in view port (1) with four tiles.
Study 2 is in a single tile set up. With the View Port on the right selected, you can see
in the Toolbar the selected View Port/Tile setup. On the left the two boxes represent
the two View Ports. On the right, the single box depicts the single Tile setup.
Study 1 Study 2