Accessing EPM Data Warehouse via VMware Desktop...Accessing EPM Data Warehouse via VMware Desktop 2...
26
August 1, 2014 Accessing EPM Data Warehouse via VMware Desktop
Transcript of Accessing EPM Data Warehouse via VMware Desktop...Accessing EPM Data Warehouse via VMware Desktop 2...
August 1, 2014
Accessing EPM Data Warehouse via VMware Desktop


Accessing EPM Data Warehouse via VMware Desktop
i
Table of Contents Installation of VMware Horizon View Client ................................................................................................. 1
Using the VMware Horizon View Client Software ........................................................................................ 9
Using SQL Developer to Access the EPM Database .................................................................................... 10
Changing your EPM password .................................................................................................................... 12
Access View Machine content .................................................................................................................... 18
Connecting to View machine via RDP ......................................................................................................... 20

ii
Accessing EPM Data Warehouse via VMware Desktop
1
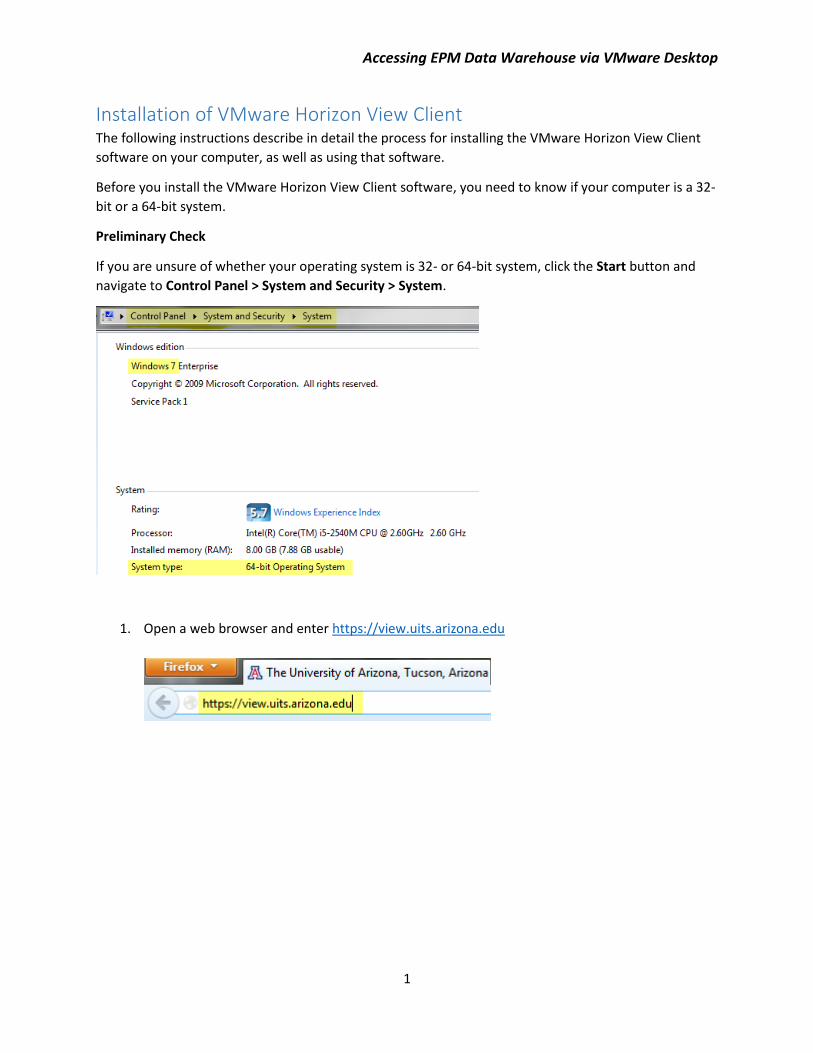
Installation of VMware Horizon View Client The following instructions describe in detail the process for installing the VMware Horizon View Client
software on your computer, as well as using that software.
Before you install the VMware Horizon View Client software, you need to know if your computer is a 32-
bit or a 64-bit system.
Preliminary Check
If you are unsure of whether your operating system is 32- or 64-bit system, click the Start button and
navigate to Control Panel > System and Security > System.
1. Open a web browser and enter https://view.uits.arizona.edu
Accessing EPM Data Warehouse via VMware Desktop
2
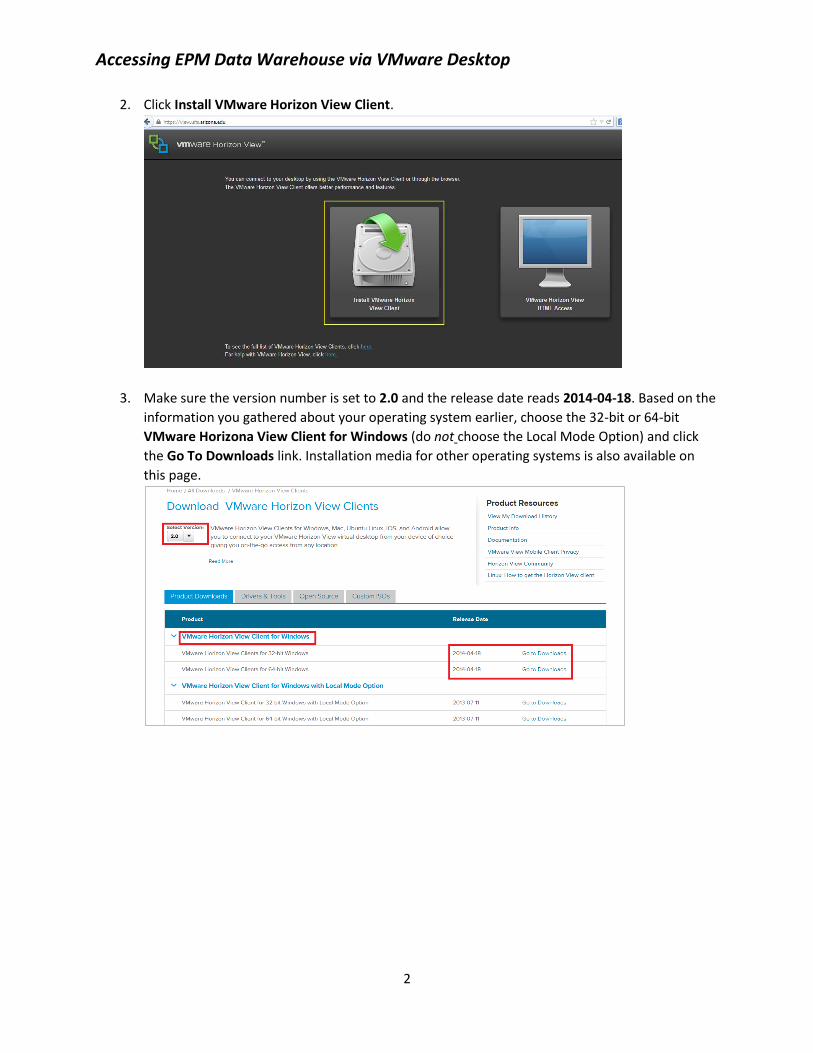
2. Click Install VMware Horizon View Client.
3. Make sure the version number is set to 2.0 and the release date reads 2014-04-18. Based on the
information you gathered about your operating system earlier, choose the 32-bit or 64-bit
VMware Horizona View Client for Windows (do not choose the Local Mode Option) and click
the Go To Downloads link. Installation media for other operating systems is also available on
this page.
Accessing EPM Data Warehouse via VMware Desktop
3
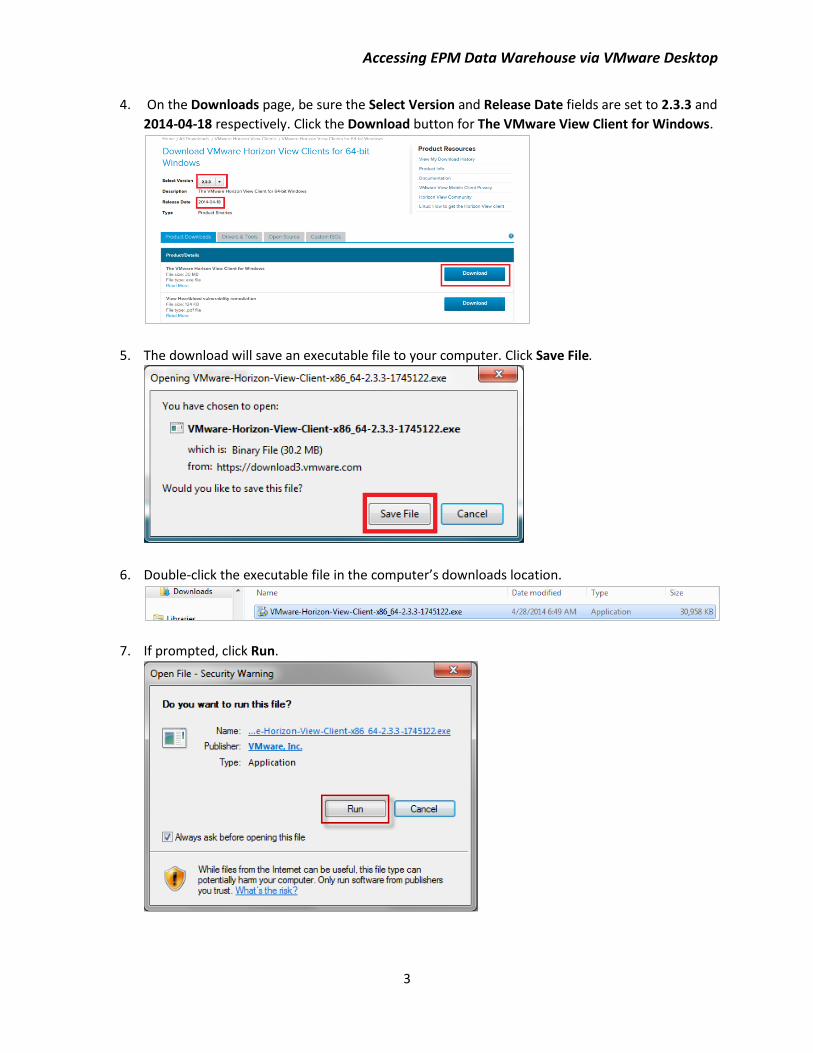
4. On the Downloads page, be sure the Select Version and Release Date fields are set to 2.3.3 and
2014-04-18 respectively. Click the Download button for The VMware View Client for Windows.
5. The download will save an executable file to your computer. Click Save File.
6. Double-click the executable file in the computer’s downloads location.
7. If prompted, click Run.
Accessing EPM Data Warehouse via VMware Desktop
4
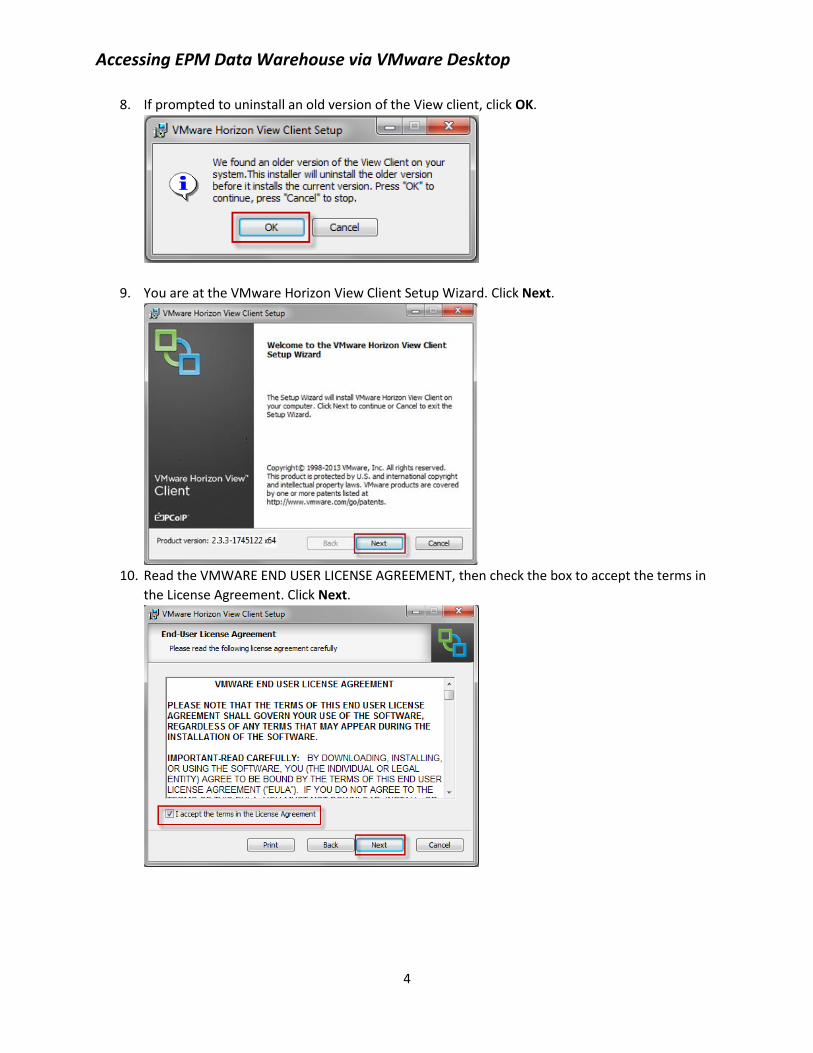
8. If prompted to uninstall an old version of the View client, click OK.
9. You are at the VMware Horizon View Client Setup Wizard. Click Next.
10. Read the VMWARE END USER LICENSE AGREEMENT, then check the box to accept the terms in
the License Agreement. Click Next.

Accessing EPM Data Warehouse via VMware Desktop
5
11. Click Next.
12. The default view connection server should read view.uits.arizona.edu. Click Next.
Accessing EPM Data Warehouse via VMware Desktop
6
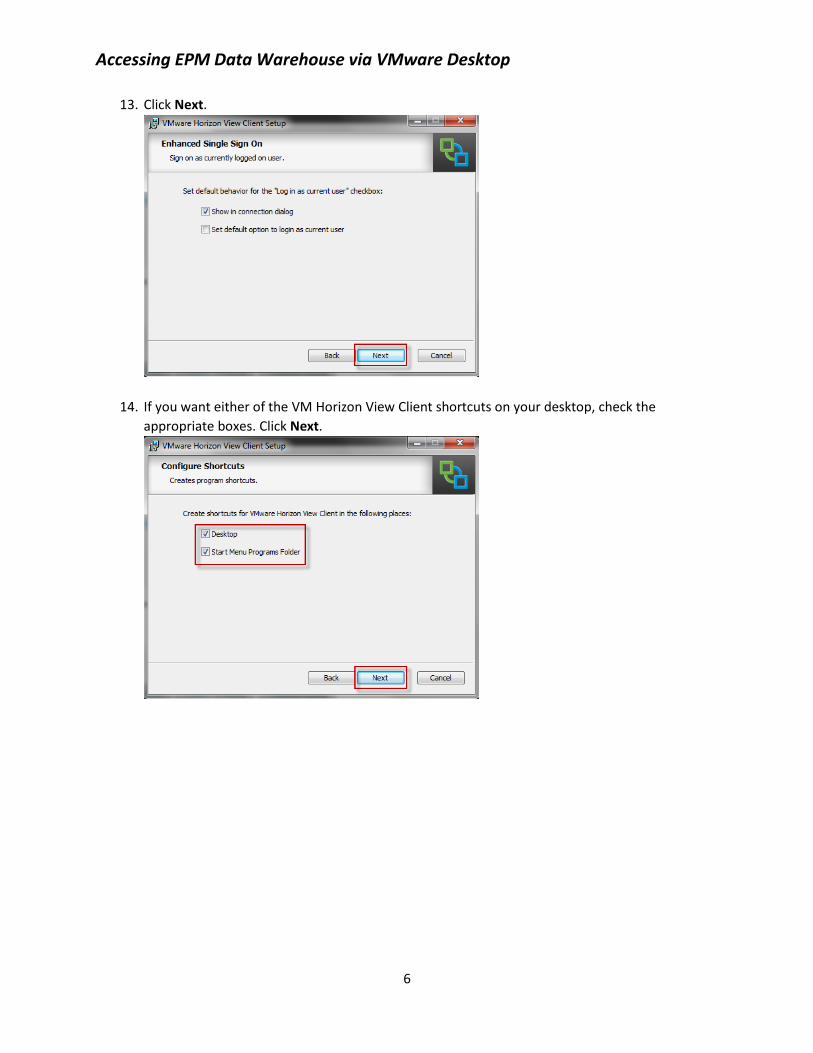
13. Click Next.
14. If you want either of the VM Horizon View Client shortcuts on your desktop, check the
appropriate boxes. Click Next.

Accessing EPM Data Warehouse via VMware Desktop
7
15. Click Install.
16. Click Finish.
17. If prompted to restart your computer, click Yes.
Accessing EPM Data Warehouse via VMware Desktop
8
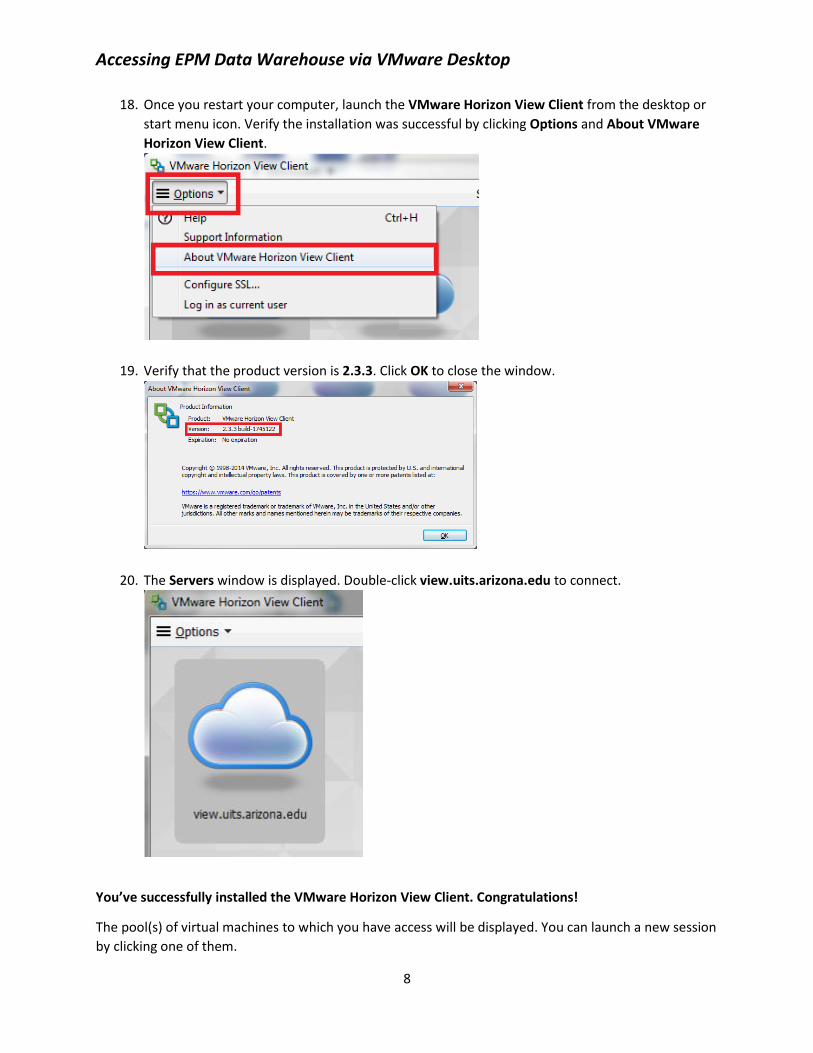
18. Once you restart your computer, launch the VMware Horizon View Client from the desktop or
start menu icon. Verify the installation was successful by clicking Options and About VMware
Horizon View Client.
19. Verify that the product version is 2.3.3. Click OK to close the window.
20. The Servers window is displayed. Double-click view.uits.arizona.edu to connect.
You’ve successfully installed the VMware Horizon View Client. Congratulations!
The pool(s) of virtual machines to which you have access will be displayed. You can launch a new session
by clicking one of them.
Accessing EPM Data Warehouse via VMware Desktop
9
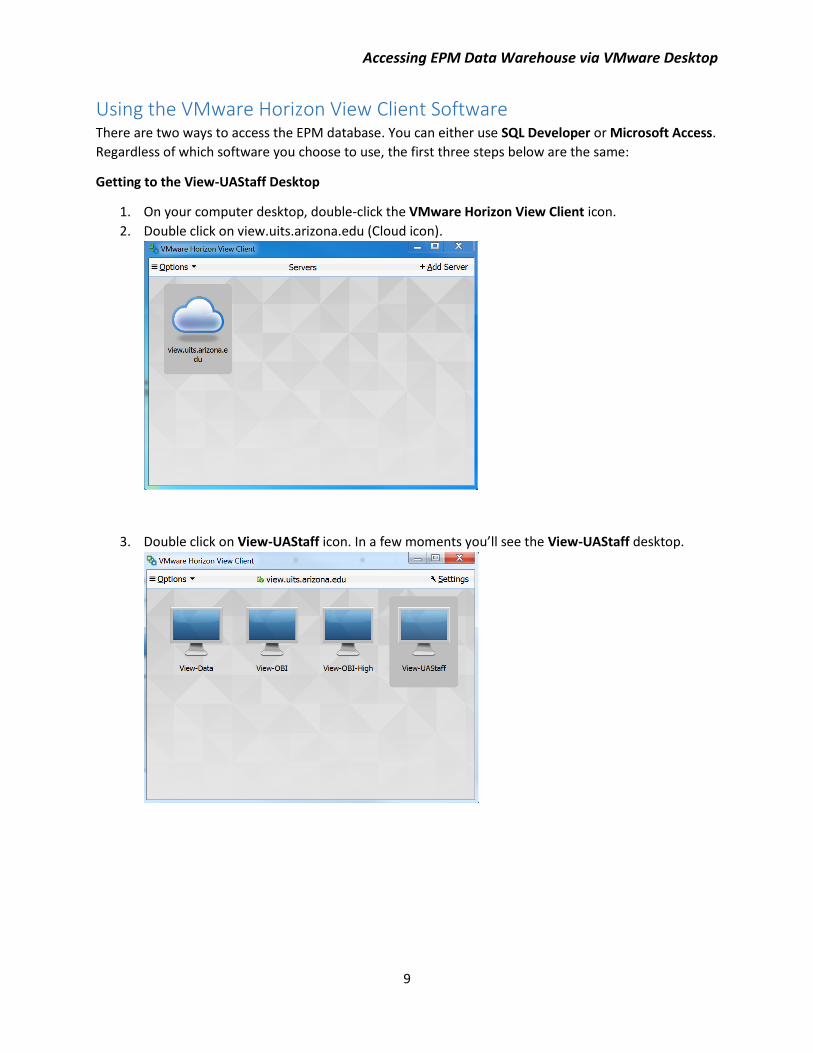
Using the VMware Horizon View Client Software There are two ways to access the EPM database. You can either use SQL Developer or Microsoft Access.
Regardless of which software you choose to use, the first three steps below are the same:
Getting to the View-UAStaff Desktop
1. On your computer desktop, double-click the VMware Horizon View Client icon.
2. Double click on view.uits.arizona.edu (Cloud icon).
3. Double click on View-UAStaff icon. In a few moments you’ll see the View-UAStaff desktop.

Accessing EPM Data Warehouse via VMware Desktop
10
Using SQL Developer to Access the EPM Database
1. On the View-UAStaff desktop, double-click the SQL Developer 4 icon.
2. Once SQL Developer has started, locate the Connections tab on the left. Just below the tab
name, double-click the green “+” icon to make a new connection.
Accessing EPM Data Warehouse via VMware Desktop
11
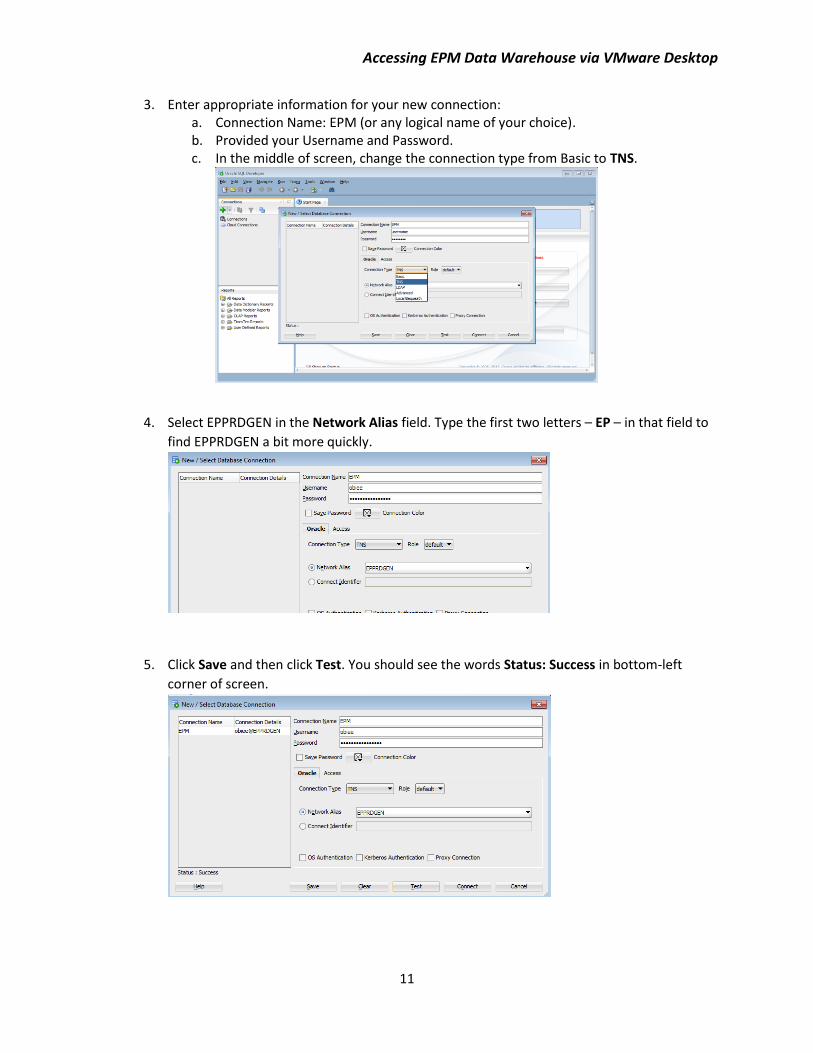
3. Enter appropriate information for your new connection: a. Connection Name: EPM (or any logical name of your choice). b. Provided your Username and Password. c. In the middle of screen, change the connection type from Basic to TNS.
4. Select EPPRDGEN in the Network Alias field. Type the first two letters – EP – in that field to
find EPPRDGEN a bit more quickly.
5. Click Save and then click Test. You should see the words Status: Success in bottom-left
corner of screen.
Accessing EPM Data Warehouse via VMware Desktop
12
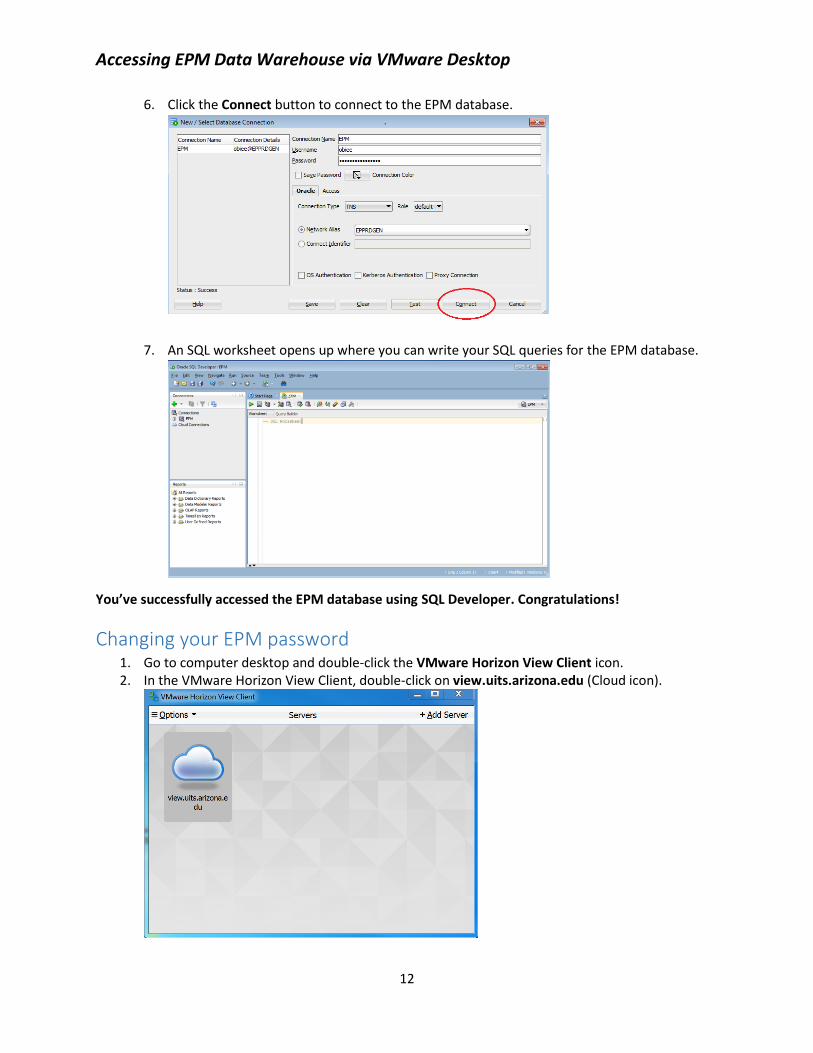
6. Click the Connect button to connect to the EPM database.
7. An SQL worksheet opens up where you can write your SQL queries for the EPM database.
You’ve successfully accessed the EPM database using SQL Developer. Congratulations!
Changing your EPM password 1. Go to computer desktop and double-click the VMware Horizon View Client icon. 2. In the VMware Horizon View Client, double-click on view.uits.arizona.edu (Cloud icon).
Accessing EPM Data Warehouse via VMware Desktop
13
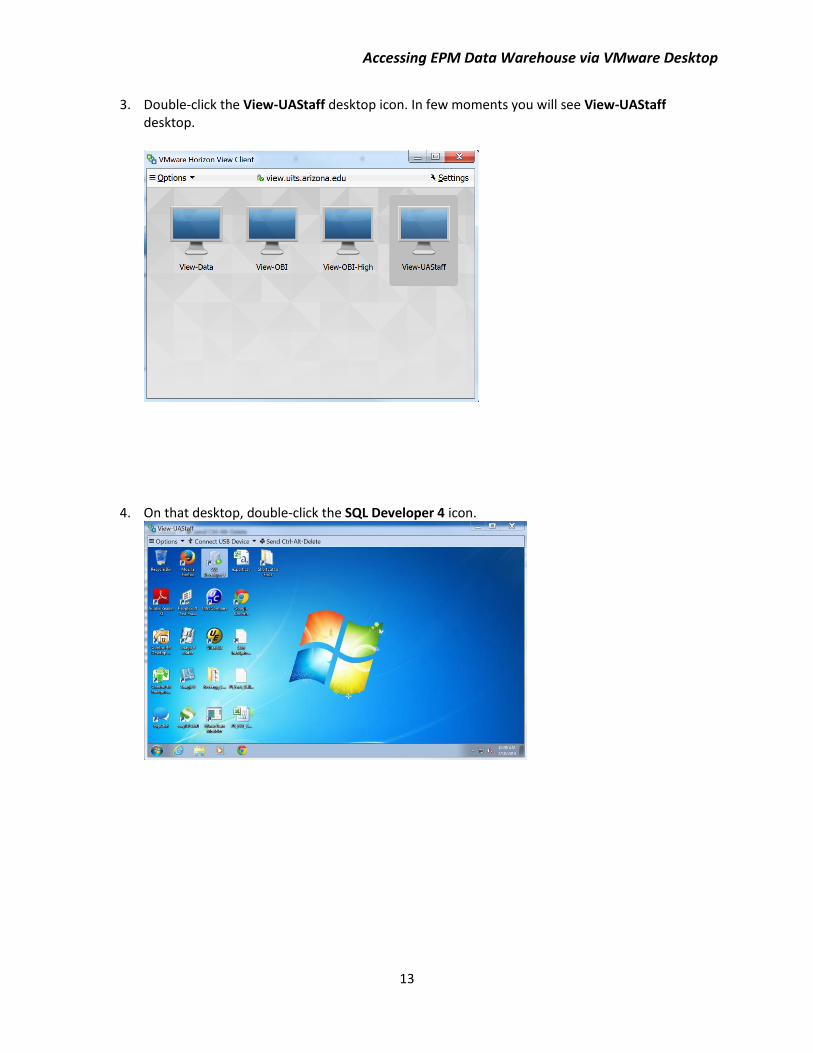
3. Double-click the View-UAStaff desktop icon. In few moments you will see View-UAStaff desktop.
4. On that desktop, double-click the SQL Developer 4 icon.
Accessing EPM Data Warehouse via VMware Desktop
14
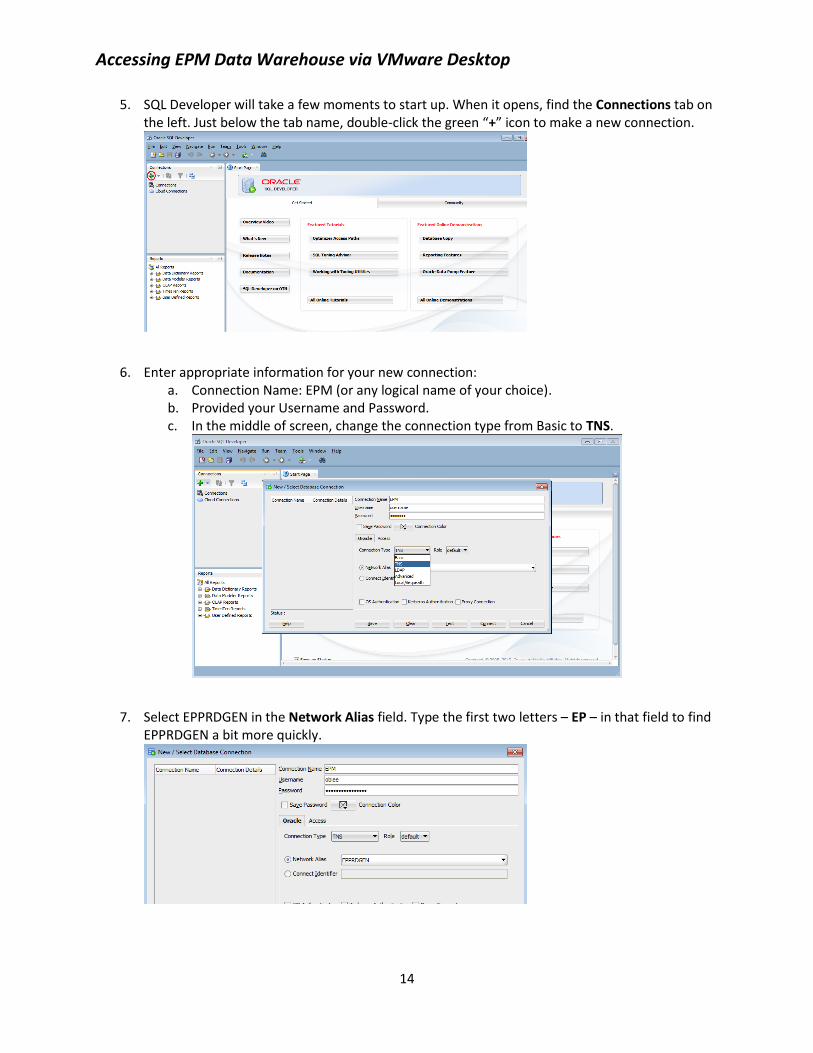
5. SQL Developer will take a few moments to start up. When it opens, find the Connections tab on the left. Just below the tab name, double-click the green “+” icon to make a new connection.
6. Enter appropriate information for your new connection: a. Connection Name: EPM (or any logical name of your choice). b. Provided your Username and Password. c. In the middle of screen, change the connection type from Basic to TNS.
7. Select EPPRDGEN in the Network Alias field. Type the first two letters – EP – in that field to find EPPRDGEN a bit more quickly.

Accessing EPM Data Warehouse via VMware Desktop
15
8. Click Save and then click Test. You should see the words Status: Success in bottom left corner of the screen.
9. Click the Connect button to connect to the EPM database.
10. An SQL worksheet opens up where you can write your SQL queries for the EPM database.
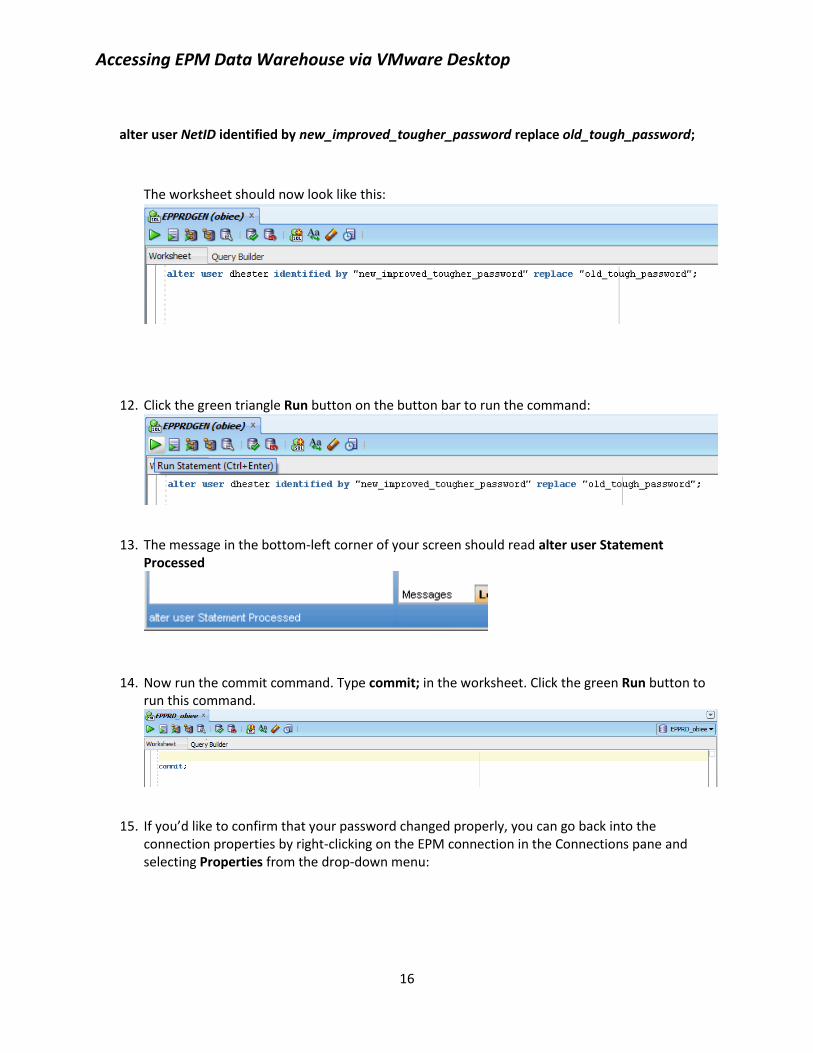
11. Enter the SQL command to change your password in the blank worksheet. The command is:
Accessing EPM Data Warehouse via VMware Desktop
16
alter user NetID identified by new_improved_tougher_password replace old_tough_password;
The worksheet should now look like this:
12. Click the green triangle Run button on the button bar to run the command:
13. The message in the bottom-left corner of your screen should read alter user Statement Processed
14. Now run the commit command. Type commit; in the worksheet. Click the green Run button to run this command.
15. If you’d like to confirm that your password changed properly, you can go back into the connection properties by right-clicking on the EPM connection in the Connections pane and selecting Properties from the drop-down menu:

Accessing EPM Data Warehouse via VMware Desktop
17
16. Change the password in the properties window and click Test again. If you get the same Success message you got when you connected before, you’re all set.
Accessing EPM Data Warehouse via VMware Desktop
18
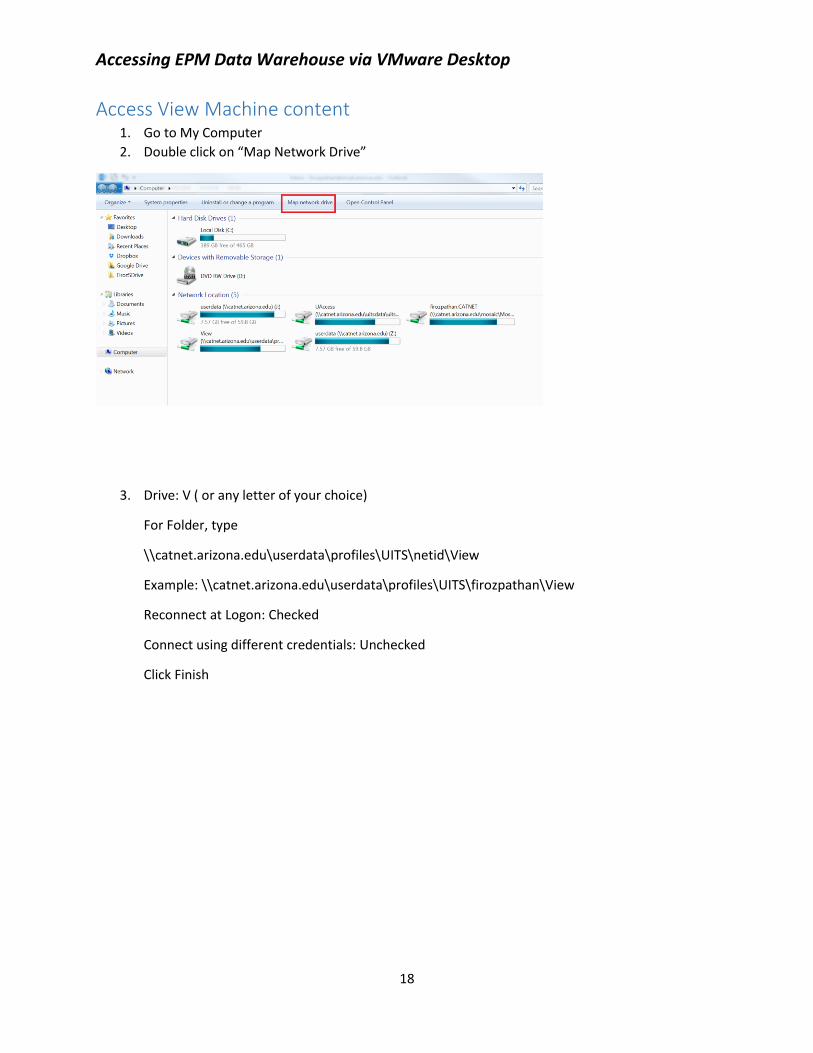
Access View Machine content 1. Go to My Computer
2. Double click on “Map Network Drive”
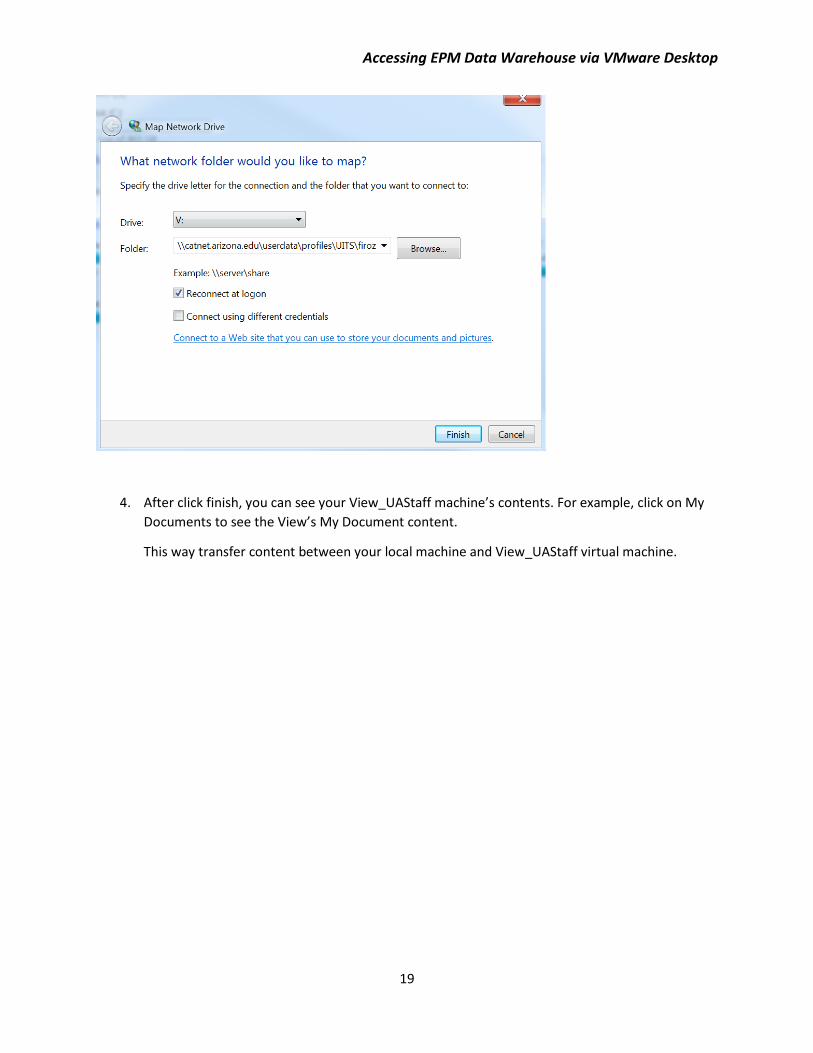
3. Drive: V ( or any letter of your choice)
For Folder, type
\\catnet.arizona.edu\userdata\profiles\UITS\netid\View
Example: \\catnet.arizona.edu\userdata\profiles\UITS\firozpathan\View
Reconnect at Logon: Checked
Connect using different credentials: Unchecked
Click Finish
Accessing EPM Data Warehouse via VMware Desktop
19
4. After click finish, you can see your View_UAStaff machine’s contents. For example, click on My
Documents to see the View’s My Document content.
This way transfer content between your local machine and View_UAStaff virtual machine.
Accessing EPM Data Warehouse via VMware Desktop
20
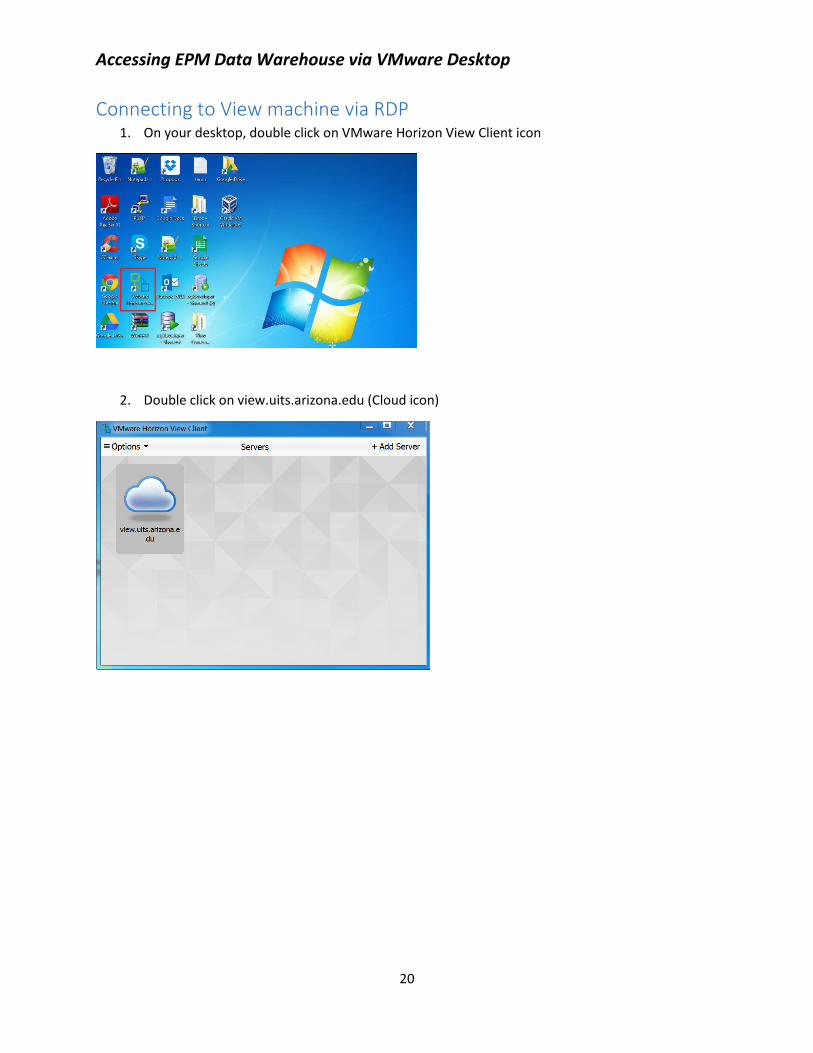
Connecting to View machine via RDP 1. On your desktop, double click on VMware Horizon View Client icon
2. Double click on view.uits.arizona.edu (Cloud icon)
Accessing EPM Data Warehouse via VMware Desktop
21
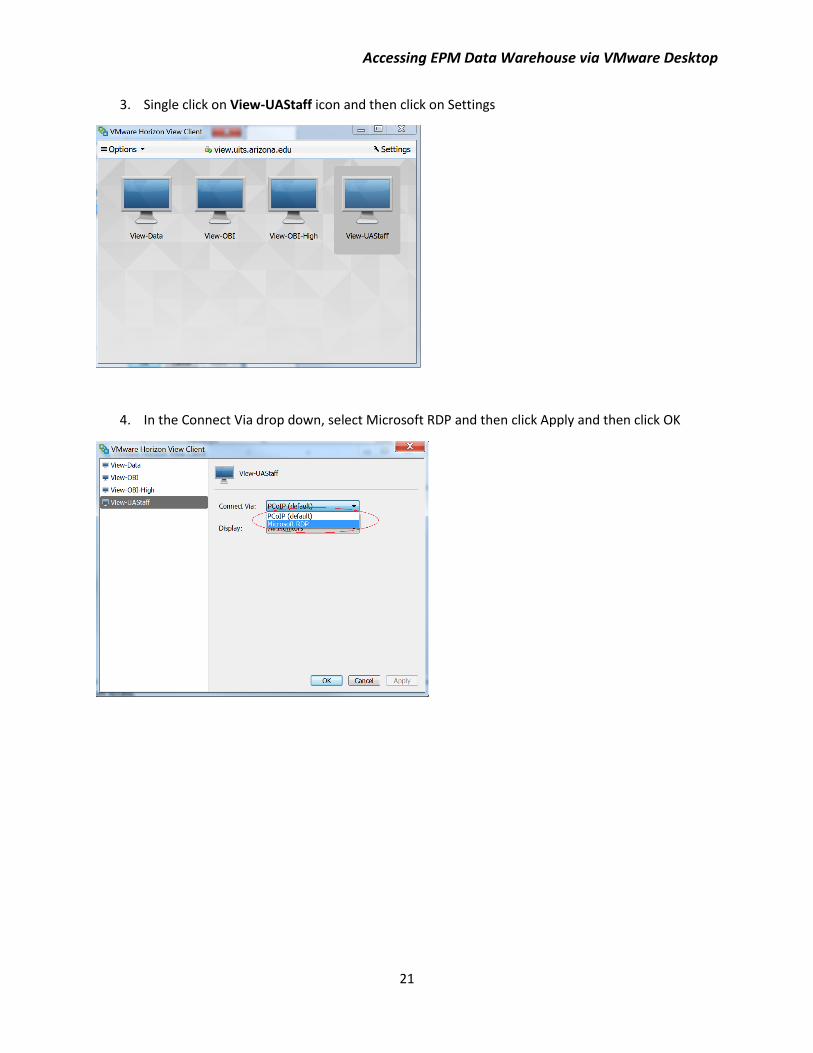
3. Single click on View-UAStaff icon and then click on Settings
4. In the Connect Via drop down, select Microsoft RDP and then click Apply and then click OK
Accessing EPM Data Warehouse via VMware Desktop
22
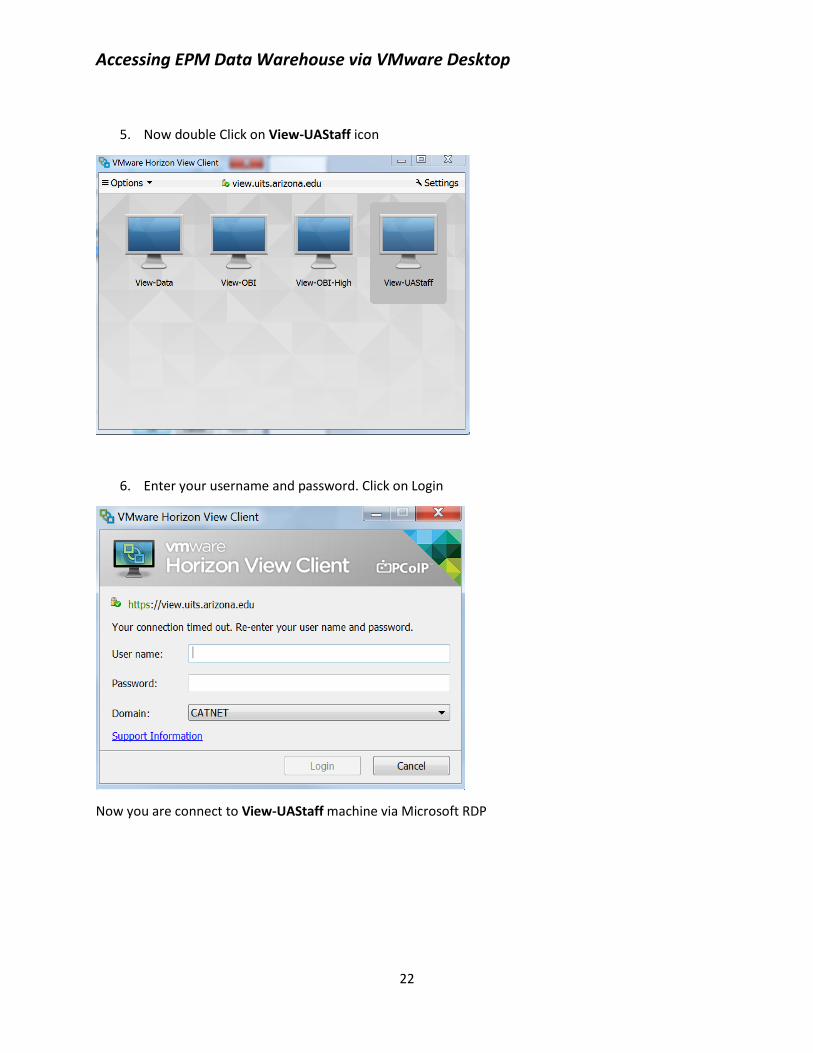
5. Now double Click on View-UAStaff icon
6. Enter your username and password. Click on Login
Now you are connect to View-UAStaff machine via Microsoft RDP