Absence Roll Collection User Guide - · PDF fileLetter not Received ... ••• 9...
19
© PCSchool – Version 2011.2 Absence Roll Collection User Guide Commercial in Confidence 1/19 Absence Roll Collection User Guide
-
Upload
hoangkhanh -
Category
Documents
-
view
214 -
download
1
Transcript of Absence Roll Collection User Guide - · PDF fileLetter not Received ... ••• 9...

© PCSchool – Version 2011.2 Absence Roll Collection User Guide
Commercial in Confidence 1/19
Absence Roll Collection User Guide

© PCSchool – Version 2011.2 Absence Roll Collection User Guide
Commercial in Confidence 2/19
Table of Contents
Absence Roll Collection ...................................................................................................... 3 Attendance Settings ......................................................................................................... 3
Trigger Codes ............................................................................................................................5 Absent Roll - Data ............................................................................................................. 6
Create the Roll ...........................................................................................................................7 Contact Details ........................................................................................................................8
Change the Default Order for Contacts ................................................................................8 Roll Reports...............................................................................................................................9
Absent Codes ........................................................................................................................10 Early Notification - Settings ........................................................................................... 11 Early Notification - Data.................................................................................................. 12 SMS Engine Recipients .................................................................................................. 16
Submit the Message................................................................................................................17 Submit at a Later Time...........................................................................................................18
View details in The SMS Engine .................................................................................... 19

© PCSchool – Version 2011.2 Absence Roll Collection User Guide
Commercial in Confidence 3/19
Absence Roll Collection Absence Roll Collection allows for;
• The selection and entry of Attendance Settings that are defaults for the Absent Module
• Entry of early notification settings
• Early Notification of student absences to parents
• Information on the Status of marked and unmarked Rolls
• Details on Student attendance Status based on marked rolls You can view the Data in two modes;
•••• Absent Roll: Shows the roll information for all of the students at your school. The data displayed is essentially the same as the Absent Roll Marking and can be edited and modified in exactly the same way.
•••• Early Notification: Shows all of the absent students and their current Early Notification Status. This view also allows you to send the students Absence to SMS messaging or your early notification system.
This section covers;
Attendance Settings Absent Roll - Data Early Notification
Settings Early Notification - Data
Attendance Settings Path: Administration → Absence Roll Collection → Attendance Settings Attendance settings are optional but if you have individuals looking after the various reporting aspects of Absences their emails and other information can be entered to allow for automated emails to be sent out.
Continued

© PCSchool – Version 2011.2 Absence Roll Collection User Guide
Commercial in Confidence 4/19
1. Go to the Attendance Settings tab.
2.
Enter 0 to disable, or select the number of days to wait before Converting an Unexplained Absence to a Truancy;
•••• This is the number of days since an ‘unexplained absence’ has been recorded and no notification has been received as to why the student was absent.
3.
The Default Roll Status can be changed for Roll Marking select;
•••• NM – Not Marked to have all the students default to not being marked
•••• P – Present to have all the students default to being marked as present
•••• All students are classified as present unless marked absent.
4.
Enter the EMail Address for responsible person, this email is Triggered by the settings in Timetable periods;
• Unexplained Absences can have a trigger set for emailing to the address entered
• Unmarked Rolls = UN in Timetable Period Descriptions
• Consecutive Absences = CA in Timetable Period Descriptions 5. Enter the codes you wish to use as Unexplained absences, the defaults are ? and T.
6.
Tick Store Late as an Absence to have a Late that is marked in the Roll show in the Absence tab;
• If Full Day marking is done this will show as a late for the marked period only other periods will be unmarked
• If this option is not selected the late will not be recorded in the Absence view
• Students can be late to class for multiple periods but must be marked for each period
7.
If you want Lates marked in Roll Marking to show in the Late tab of Absence Lates and Behaviour select a period in Store Roll Late as Late for PD;
• Select a period for transferring a late marked in the Roll to the Late tab
• The Late tab is for Students late to School they can only be late for school once
• This feature will update the Late in Student view and allow for Late Reports to be run
8.
Enter an amount of Consecutive Unjustified half days absences to trigger an alert;
• Three levels of escalation are available
• Tick to Notify the Dean or Home Teacher as entered in Student View under the Scholastic tab.
9.
Once the Trigger periods are created use Microsoft Scheduler to activate the emails;
• Do not use this feature to activate the Trigger
• Go to the server and use Microsoft Scheduler
10.
Tick radio boxes for defaults as required;
• To have Saturday default as a School Day
• Turn off the Late question in the lates tab
• Remove Form Class from roll marking
• Remove the default tick from Build from T/T in roll marking where the Timetable is not used
• If Identify Non Roll Periods is ticked Students who have no Subject for a period or Students who have a Subject with Non Roll period ticked will automatically be marked with an asterisk
• If Ignore Double Periods is ticked both periods will have to be marked in roll marking

© PCSchool – Version 2011.2 Absence Roll Collection User Guide
Commercial in Confidence 5/19
Trigger Codes Path: Timetable → Timetable Period Description Emails via Triggers can be set for;
• Unexplained Absences
• Consecutive Absences
• Unmarked Rolls Trigger Codes of CA and UN need to be created if you are using the feature to send emails out to the relevant persons for Unmarked Rolls and Consecutive Absences. A time Interval Needs to be entered for Unexplained Absences.
1.
On the next Free line enter the code of CA or UN;
• UN = Unmarked Rolls
• CA = Consecutive Absences
2. Enter the appropriate Description. 3. Select he Type of R.
4. Leave the Roll unticked.
5. Enter a Start time;
•••• This is the Time that the Trigger interval will use in Attendance Settings.
6. For Unexplained Absences enter a Trigger Interval this will be the amount of minutes after the start of this period for the email to be sent.

© PCSchool – Version 2011.2 Absence Roll Collection User Guide
Commercial in Confidence 6/19
Absent Roll - Data Path: Administration → Absence Roll Collection → Absent Roll The Overview Type of Absent Roll in the Data tab gives an overview of the Roll Marking that has been completed for a selected date, you can also select to view and print lists on the status of Rolls.
1. Overview Type; select Absent Roll to view information on absences or Roll Marking.
2. You must select the Class Period that you wish to view.
3.
Select the Roll Status from the drop down list the Reporting is based on;
• Absence Status of the Students
• Status of the Rolls
4. The default is EN Status;
• Contact Details can be selected to view the carers details.
5. Year will default to *C, a single Year Level can be selected;
• Batch is only active with Early Notification 6. Tick to use only Numeric Periods; this will remove AM and PM periods from the reports.
7. Tick the Boxes to activate and select data from the drop down lists to further filter the Roll report.
8. Date will default to today’s date;
• Overdue Rolls will go back one Timetable Cycle. 9. Click Generate Roll when your selections are made.

© PCSchool – Version 2011.2 Absence Roll Collection User Guide
Commercial in Confidence 7/19
Create the Roll Absent Roll allows you to create Rolls base upon individual Absence Statuses you can also create Rolls based upon;
• Status of the Rolls if selecting Roll Statuses it will generate the information at this point and no further input is required.
• .All Anomalies; will list all recorded Absences.
• All; will list All Students both Absent and Present.
• Consecutive Unexplained Absences. Select the Filters for viewing the Rolls then click Create Roll.
1. Select Filters for Viewing the Roll. 2. Click Generate Roll to Create the Roll.
3. Click I, the Information Icon to open the selected Students details. 4. View the Students Name.
5.
The Status can be changed;
•••• Individually by selecting a new Status from the drop down list or
•••• Globally using the Status option on the bottom taskbar.
6.
If changing a Status the Comment;
• NZ; A comment is compulsory.
• Aus; The compulsory comment, Absent Reason, can be turned off in the .ws file
7. The Time is normally for Students who are flagged as Late and a time has been entered in Roll marking.
8. EN Status displays the code of the Early Notification Status.
9. Click Submit to save the details.
© PCSchool – Version 2011.2 Absence Roll Collection User Guide
Commercial in Confidence 8/19
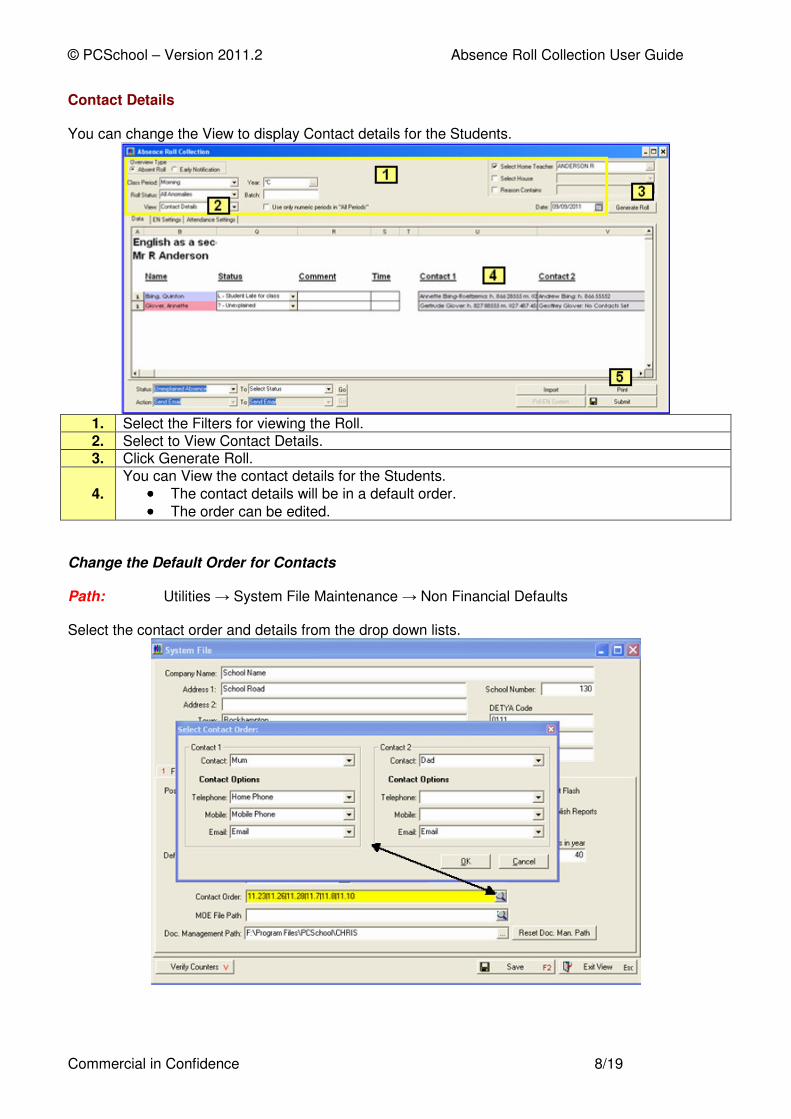
Contact Details You can change the View to display Contact details for the Students.
1. Select the Filters for viewing the Roll. 2. Select to View Contact Details. 3. Click Generate Roll.
4.
You can View the contact details for the Students.
•••• The contact details will be in a default order.
•••• The order can be edited. Change the Default Order for Contacts Path: Utilities → System File Maintenance → Non Financial Defaults Select the contact order and details from the drop down lists.

© PCSchool – Version 2011.2 Absence Roll Collection User Guide
Commercial in Confidence 9/19
Roll Reports Path: Administration → Absent Roll Collection Roll reports can be created and printed based upon;
•••• Unmarked Rolls
•••• All Rolls
•••• Overdue Rolls Select the Filters for creating the Report.
1.
Select the filters for creating a Roll report;
•••• Absent Roll must be selected
•••• In Roll Status select the report
•••• Ticking Use only numeric periods in All periods will stop the AM and PM rolls from generating
•••• Select the Date for the report 2. Click to Generate Roll to create the Roll. 3. An Action can be selected manually from the drop down list.
4. Click to Print the Roll. 5. Click to submit the Actions and send out any emails.
You will receive a message saying the Process is complete and the emails have been sent, the emails have a standard message.

© PCSchool – Version 2011.2 Absence Roll Collection User Guide
Commercial in Confidence 10/19
Absent Codes Absent Codes are stored in XML format under PCSchool Documents. The codes used give varying results. If you wish to change these settings please phone PCSchool Help Desk for a Tech Tip. Codes that can’t be changed are high Codes will calculate as Present = P – Absent but Justified = J – Absent and Unjustified = A.
•••• ? Letter not Received
•••• B Family Bereavement/Circumstances
•••• C Attending a School Camp
•••• D Doctor/Dentist Appointment
•••• E Absence Explained but Unjustified
•••• F Attending an Offsite Course
•••• G Group Suspended
•••• H Attending a Health Camp/Regional Health School/Residential School
•••• I* Internal School Appointment
•••• J Attending Justice Court Proceedings
•••• K Attending Alternative Education
•••• L Student Late for Class
•••• M Short Term Illness/Medical Reasons
•••• N School based Activity
•••• O Student on Overseas Holiday
•••• P Present
•••• Q Attending School Trip
•••• R Removed Temporarily from Class
•••• S Sickbay
•••• T Unexplained Truant
•••• U Temporarily Withdrawn/Stood Down
•••• V Study Period
•••• W Work Experience
•••• X On Exam Leave
•••• Y Attending an Activity Centre
•••• 9 Student Not a Member of this Class

© PCSchool – Version 2011.2 Absence Roll Collection User Guide
Commercial in Confidence 11/19
Early Notification - Settings Path: Administration → Absence Roll Collection Prerequisites need to be completed before absence Roll marking can be used for SMS messaging.
• Roll Marking must have been completed.
• EN Type must be selected
• If using The SMS Engine Settings must be completed via Utilities/SMS Messaging
• EN Settings need to be selected The Overview Type, Early Notification displays only absent students and allows you to submit them to ‘The SMS Engine’. You can track the progress of the submissions via the SMS Engine Website and if necessary modify or cancel them. If using The SMS Engine Select the EN Type of Tagged Set.
1. If you are saving an Early Notification Type of CSV select the path.
2.
Select the default EN Type, this can be changed when creating EN files;
•••• CSV; Create a CSV file of the EN Data
•••• Do Not Notify
•••• eMerge; If selected will take you to an Email where a message can be sent
•••• NZ EN; New Zealand Schools will give the EN Action of Notify
•••• Tagged Set; Used to create a Tag Set that can be sent to The SMS Engine 3. New Zealand Schools can choose to retain the NZ EN XML created. 4. Click Save when finished.
5.
The whole database of Parents and their Mobile numbers can be exported to The SMS Engine;
• Select the destination of the file
• You can chose to export and Ignore any Privacy Request
• Click Export to CSV to create the file
6. Schools can charge parents for the SMS testing, if this is selected no SMS will be sent to parents without a Deposit; this needs checking further email sent to Brendan 12/10/2011

© PCSchool – Version 2011.2 Absence Roll Collection User Guide
Commercial in Confidence 12/19
Early Notification - Data Path: Administration → Absence Roll Collection Absences must be entered through Absence Roll Marking to use the Early Notification feature of PCSchool. Early Notification is used when the Career is Unaware of a Students absence, notifications can be sent our through various methods.
1. Select the Overview Type of Early Notification.
2. Class Period will default to All Periods a single period can be selected.
3. Year will default to *C, optional year levels can be selected.
4.
Roll Status will default to Carer Unaware and Awaiting Reply;
•••• This is the Roll Status used for SMS Messaging
•••• Other Statuses can be selected 5. In View the default of En Status is selected.
6. Tick if you do not wish to use the AM or PM periods in this report;
• AM and PM are used for Form Class absences 7. Date will default to today’s date an alternative date can be selected. 8. Click Generate Roll to propagate the data.

© PCSchool – Version 2011.2 Absence Roll Collection User Guide
Commercial in Confidence 13/19
The EN Action can be edited; the default of Tagged Set comes from the EN Settings previously entered and is used by The SMS Engine for sending Text messages.
1. Click the Information icon to view the selected Students details. 2. View the Students Studkey and Name.
3. Yr shows the current Year Level of the Student.
4. H.Tch lists the Home Teacher. 5. Reason shows the Reason if the Absence has been explained.
6. EN Status shows the Early Notification Status;
• Select Carer Unaware and Awaiting Reply to send the Students information to Early Notification.
7.
EN Action this will default to the default EN Setting, other EN Actions can be selected from the drop down list;
•••• Send to Tagged Set is the Default for SMS Messaging.
•••• Notify – This setting is used for New Zealand
•••• Do Not Notify
•••• Send to eMerge 8. EN Comment will display if there are not contact options for the EN Type.
9. The EN Status and Action can be changed globally for groups of EN Status;
•••• Select the Status or Action to change to and click Go. 10. Click Submit to start the process.

© PCSchool – Version 2011.2 Absence Roll Collection User Guide
Commercial in Confidence 14/19
If using a Tag Set this will create a file with the extension .fls, this is a Student Tag Set and will be available anywhere a Student Tag Set is available.
1. PCSchool will Name the file and make it unique with the date;
•••• If running several files for the same date you may wish to edit this by adding the time to make it unique and avoid it being overwritten.
2. The File is saved in the default path, PCSchool/Documents/SMS on the server.
3. Click OK to create the Tag Set. You will then be given the following message, Click OK to continue.

© PCSchool – Version 2011.2 Absence Roll Collection User Guide
Commercial in Confidence 15/19
The Tag Set will be saved and you will be taken to SMS Messaging where the Tag Set can be processed and sent to The SMS Engine now recalled and sent at a or at a later time.
The Roll will now be flagged as Message Sent Awaiting reply.
© PCSchool – Version 2011.2 Absence Roll Collection User Guide
Commercial in Confidence 16/19
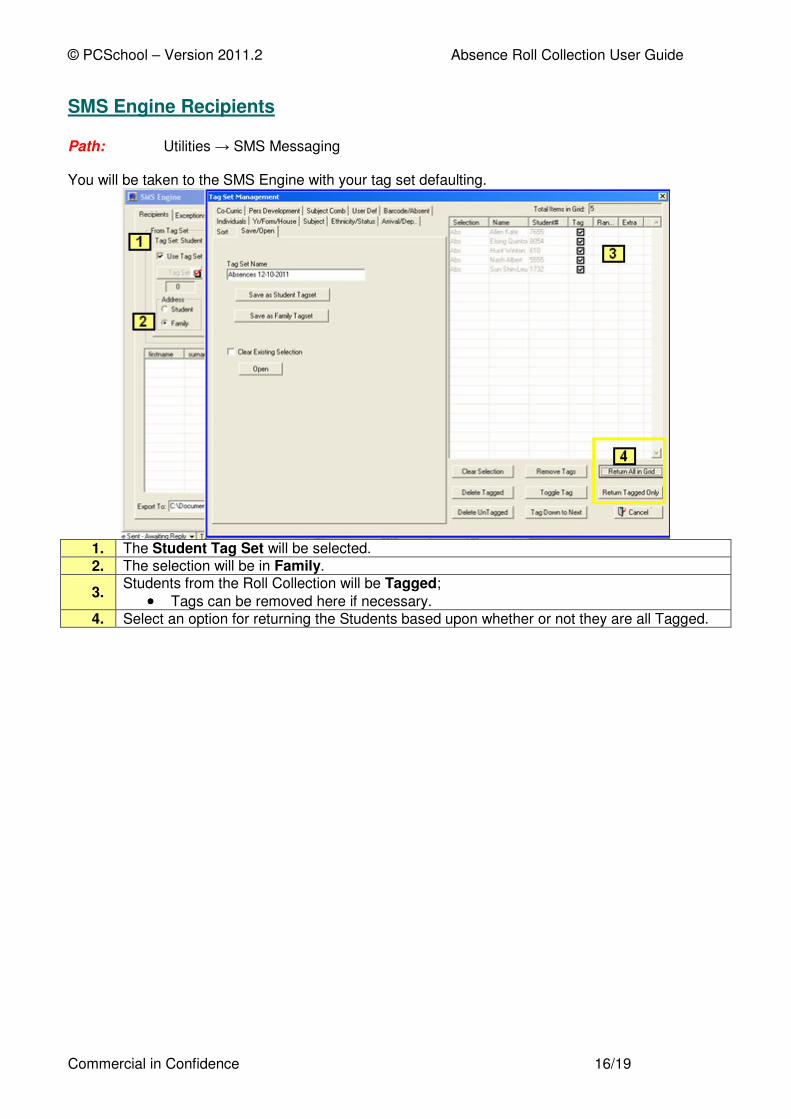
SMS Engine Recipients Path: Utilities → SMS Messaging You will be taken to the SMS Engine with your tag set defaulting.
1. The Student Tag Set will be selected.
2. The selection will be in Family.
3. Students from the Roll Collection will be Tagged;
•••• Tags can be removed here if necessary. 4. Select an option for returning the Students based upon whether or not they are all Tagged.

© PCSchool – Version 2011.2 Absence Roll Collection User Guide
Commercial in Confidence 17/19
Submit the Message You will need to create a new message or open a pre created message for Texting.
1. The amount of Text Messages to be sent will be displayed. 2. Options for selection. 3. Click Add. 4. The List of recipients will display. 5. Messages can be saved and reselected to save time. 6. Enter the message.
7.
Select data information to add to Text Message;
•••• Available Data fields are available for selection in the drop down list
•••• Select the data field to add
•••• Click Insert. 8. Click Send Message to SMS Engine to finish the process. 9. The tag set can be saved as a CSV for manually uploading to The SMS Engine web site.

© PCSchool – Version 2011.2 Absence Roll Collection User Guide
Commercial in Confidence 18/19
Submit at a Later Time Path: Utilities → SMS Messaging If you do not want to send the Text Message straight away it can be sent at a later time.
1. Tick the Student Tag Set. 2. Go to the Save/Open tab. 3. Click Open. 4. Find the path to the saved FLS file. 5. Highlight the correct file. 6. Click Open. 7. Return the Students by clicking the appropriate button.
8. It is important to select Family as it is the Family mobile phone number you wish to use for Texting.
9. Click Add. 10. The contact person’s details can be viewed. 11. Click Send Message to SMS Engine to complete the process.

© PCSchool – Version 2011.2 Absence Roll Collection User Guide
Commercial in Confidence 19/19
View details in The SMS Engine Details can be checked at your account with The SMS Engine. Open your SMS account and go to the SMS Inbox to view the details