Above Ground Skimmer
2
2200 East Sturgis Road, Oxnard, CA 93030 • Ph. (805) 981-0262 • Fax (805) 981-9403 www.waterwayplastics.com • waterway@waterwayplastics .com 810-0111.0908 © Copyright 2008 Waterway Plastics FLO-PRO II ABOVE GROUND SKIMMERS INST ALLA TION INS TRUC TIONS SAVE THESE INSTRUCTIONS • Read all instructions prior to assembly IMPORTANT: Average wa ter level should be approximat ely at middle of faceplate. Install accordingly . INSTALLATION FOR ABOVE GROUND METAL POOLS WITH FACTORY PRE-CUT: 1. Install vinyl liner in assembled pool. 2. Position Gasket (#5, 711-0060) through square hole in P ool W all. 3. Position Moun ting Plate (#3, 519-3180). Weir Door Pivot Pins should be positioned on bottom as illustrated. Pool wall should be secured between gaskets. Using two (2) screws (#4, 819-0006) one in each top corner of mounting Plate, line up through liner, gasket, and wall, then attach to body on outside of pool. Leave screws loose until all screws have been aligned and fastened to body, then secure snugly. DO NOT OVER-TIGHTEN. Cut out vinyl liner along inside edges of Mounting Plate opening. 4. To insert or remove basket, turn basket until basket lip clearance aligns with mounting tabs. Basket can either be accessed through the top lid or via front opening. 5. To ax hose to body , wrap Hose Adapter , #10, with 4 to 6 turns of Teon tape (HINT: Apply tape in a clockwise rotation or the opposite direction that the threads run). Screw into threads on bot tom of Skimmer body (Teon tape not included). 6. To use Vacuum Plate (#9, 519-3150), remove lid and place vacuum plate directly on top of basket. System suction will hold in place. FOR FLO-PRO WIDE MOUTH: 7. Pool Wall and Liner should be secured between Gaskets (#12, 711- 0070). 8. Substitute Wide Mouth Mounting Plate (#13, 519-4110) for Mounting Plate (#3, 519-3180) when securing to skimmer body. INSTALLATION FOR DELUXE WALL RETURN WITH EYEBALL: (ONLY FOR MODELS 560-CXCXXX, 560-DXCXXX) 1. Slide the rubber gasket (#2, 711- 4350) onto t he threads of the walltting (215-9170). The rubber gasket must be placed between the walltting ange and liner. 2. Pierce a hole in the liner large enough to slide the wall tting through the liner. Push the walltting (215-9170) through the liner. Slide the paper gasket (806-1050) onto the threads of the walltting between the liner and the pool wall (you will need to slightly bend the paper gasket to t between the pool wall and gasket). 3. Slide wall tting complete thr ough the hole and put on second paper gasket, #3, then thread on nut (#4, 718-3150) until snug. DO NOT OVER-TIGHTEN. 4. To install return Hos e to Hose A dapter (#5, 417-6140) follow t he directions in #5 under the skimmer installation section and then thread the adapter into the back of the Walltting as shown in the detail below. WINTERIZING: For Winterizing , use optional Winterizing Kit, P/N 500-3020. Item Part No. Description 1 215-9170 Walltting - 1" FPT Thru x 2" NPSM 2 711-4350 Gasket - Rubber 3 806-1050 Gasket - Paper 4 718-3150 Nut - Suction Strip Skimmer Vent - White 5 417-6140 1" MPT x 1" Hose - Male Smooth Adapter 6 400-1410E Eyeball Fitting - 1" Eyeball - 1" MPT Assembly 6 5 3 4 2 1 Liner Pool Wall 3
-
Upload
donaldfahey -
Category
Documents
-
view
235 -
download
0
Transcript of Above Ground Skimmer
8/16/2019 Above Ground Skimmer
http://slidepdf.com/reader/full/above-ground-skimmer 1/2
2200 East Sturgis Road, Oxnard, CA 93030 • Ph. (805) 981-0262 • Fax (805) 981-9403
www.waterwayplastics.com • [email protected] 810-0111.0908© Copyright 2008 Waterway Plastics
FLO-PRO II ABOVE GROUND SKIMMERS
INSTALLATION INSTRUCTIONS
SAVE THESE INSTRUCTIONS • Read all instructions prior to assembly
IMPORTANT: Average water level should be approximately at middle
of faceplate. Install accordingly.
INSTALLATION FOR ABOVE GROUND METAL
POOLS WITH FACTORY PRE-CUT:1. Install vinyl liner in assembled pool.
2. Position Gasket (#5, 711-0060) through square hole in Pool Wall.
3. Position Mounting Plate (#3, 519-3180). Weir Door Pivot Pins should
be positioned on bottom as illustrated. Pool wall should be secured
between gaskets. Using two (2) screws (#4, 819-0006) one in each
top corner of mounting Plate, line up through liner, gasket, and wall,
then attach to body on outside of pool. Leave screws loose until all
screws have been aligned and fastened to body, then secure snugly.
DO NOT OVER-TIGHTEN. Cut out vinyl liner along inside edges of
Mounting Plate opening.
4. To insert or remove basket, turn basket until basket lip clearance
aligns with mounting tabs. Basket can either be accessed through
the top lid or via front opening.
5. To ax hose to body, wrap Hose Adapter, #10, with 4 to 6 turns of
Teon tape (HINT: Apply tape in a clockwise rotation or the opposite
direction that the threads run). Screw into threads on bottom of
Skimmer body (Teon tape not included).
6. To use Vacuum Plate (#9, 519-3150), remove lid and place vacuumplate directly on top of basket. System suction will hold in place.
FOR FLO-PRO WIDE MOUTH:7. Pool Wall and Liner should be secured between Gaskets (#12, 711-
0070).
8. Substitute Wide Mouth Mounting Plate (#13, 519-4110) for
Mounting Plate (#3, 519-3180) when securing to skimmer body.
INSTALLATION FOR DELUXE WALL RETURN
WITH EYEBALL: (ONLY FOR MODELS 560-CXCXXX, 560-DXCXXX)
1. Slide the rubber gasket (#2, 711-4350) onto the threads of the
walltting (215-9170). The rubber gasket must be placed between
the walltting ange and liner.
2. Pierce a hole in the liner large enough to slide the walltting
through the liner. Push the walltting (215-9170) through the
liner. Slide the paper gasket (806-1050) onto the threads of the
walltting between the liner and the pool wall (you will need to
slightly bend the paper gasket to t between the pool wall and
gasket).
3. Slide wall tting complete through the hole and put on second
paper gasket, #3, then thread on nut (#4, 718-3150) until snug.
DO NOT OVER-TIGHTEN.
4. To install return Hose to Hose Adapter (#5, 417-6140) follow the
directions in #5 under the skimmer installation section and then
thread the adapter into the back of the Walltting as shown inthe detail below.
WINTERIZING: For Winterizing, use optional Winterizing Kit, P/N 500-3020.
Item Part No. Description
1 215-9170 Walltting - 1" FPT Thru x 2" NPSM
2 711-4350 Gasket - Rubber
3 806-1050 Gasket - Paper
4718-3150
Nut - Suction Strip Skimmer Vent - White5 417-6140 1" MPT x 1" Hose - Male Smooth Adapter
6 400-1410E Eyeball Fitting - 1" Eyeball - 1" MPT Assembly
6 5
3 4
2
1
Liner
Pool Wall
3
8/16/2019 Above Ground Skimmer
http://slidepdf.com/reader/full/above-ground-skimmer 2/2
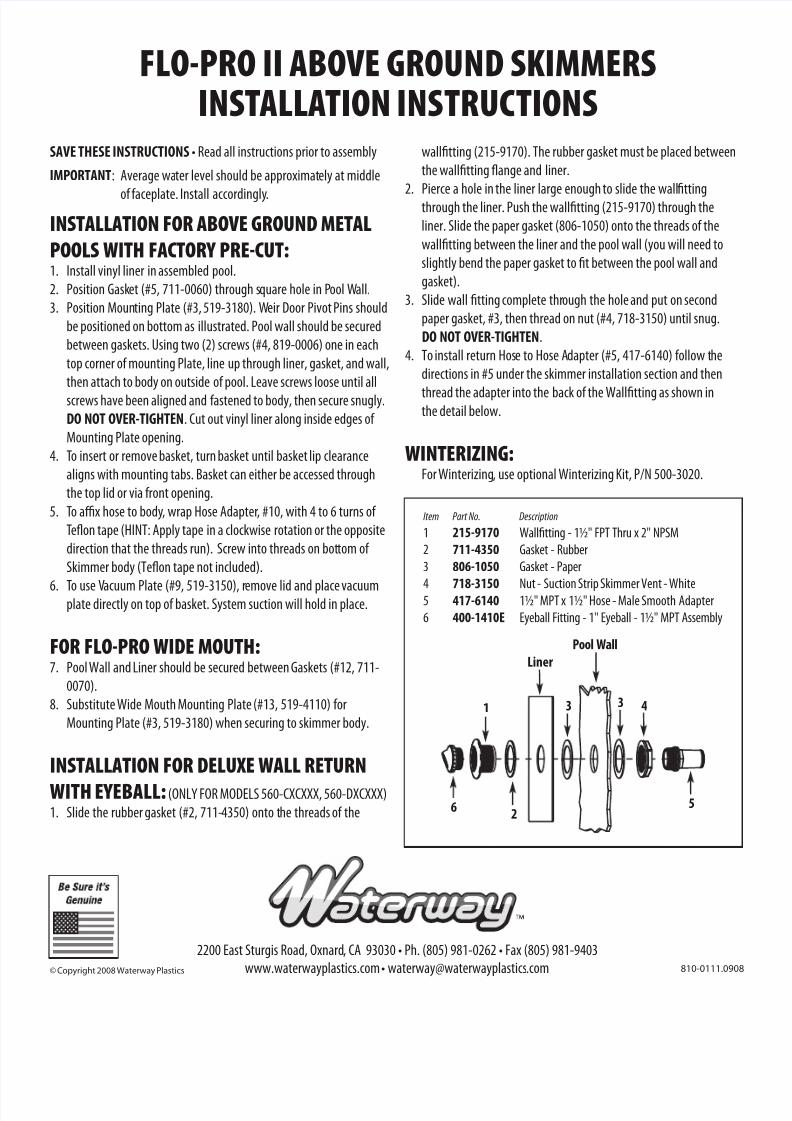
FLO-PRO II ABOVE GROUND SKIMMER REPLACEMENT PARTS
Item Part No. Description1 542-3060 Weir Door with Foam - White
542-3067 Weir Door with Foam - Gray
2 519-3090 Trim Plate - ABS - White (optional)
519-3097 Trim Plate - ABS - Gray (optional)
3 519-3180 Mounting Plate - Front Access -White
519-3187 Mounting Plate - Front Access - Gray
4 819-0006 Screw - #12 x 1" PFH 18-8 Sms
(10 for Standard • 18 for Wide Mouth)
5 711-0060 Wall Protection Gasket - Weir Body
6 N/A Body
7 550-1030 Basket - Assembly
8 519-3030 Lid - Front Access - White
9 519-3150 Vacuum Plate - Front Access with 90° Elbow10 417-6140 Hose Adapter - 1 " MPT x 1 " Hose
11 N/A Body - Wide Mouth - White
N/A Body - Wide Mouth - Gray
12 711-0070 Wall Protection Gasket - Wide Mouth
13 519-4110 Mounting Plate - Wide Mouth - White
519 -4117 Mounting Plate - Wide Mouth - Gray
14 400-1410E Eyeball Fitting - 1" Eye - White
400-1417E Eyeball Fitting - 1" Eye - Gray
15 400-9170 Wall Fitting with Locknut and Gaskets - White
500-3020 Winterizing Kit (optional)
810-0111 Instruction Sheet
9
8
7
6
10
1514
5
3
4
21
13
12
11
4
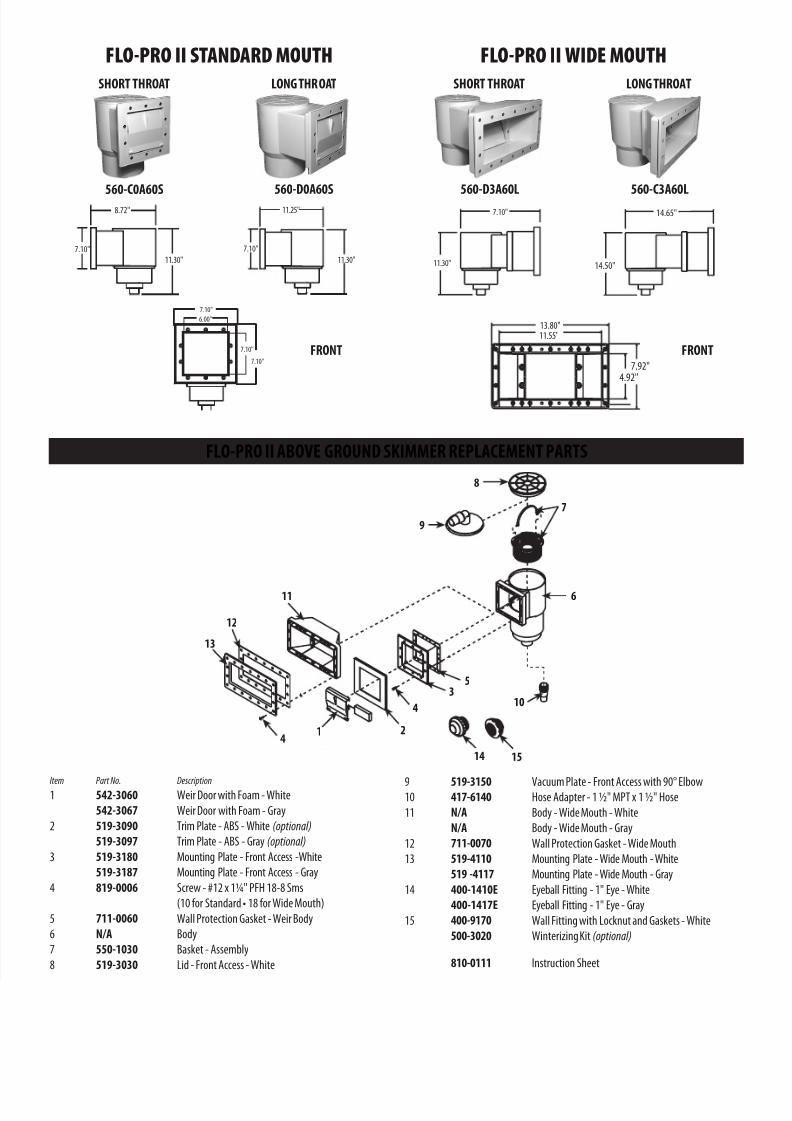
FLO-PRO II STANDARD MOUTH FLO-PRO II WIDE MOUTH
560-C0A60S
SHORT THROAT SHORT THROATLONG THROAT
FRONT FRONT
LONG THROAT
560-D0A60S 560-D3A60L 560-C3A60L
8.72"
7.10"
11.30"
11.25"
11.30"
7.10"
7.10"
7.10"
7.10"
6.00"
7.10"
11.30"
14.65"
14.50"
13.80"
4.92"
7.92"
11.55"