About the Author - fmicassets.com is a powerful instrument in a supportive role. ... slap lick ideas...
102
Transcript of About the Author - fmicassets.com is a powerful instrument in a supportive role. ... slap lick ideas...


About the Author
Jay Piccirillo is the marketing manager for Fender® Bass Amplification and a lifelong bass player. He holds a degree in music performance with an emphasis in business from the University of Massachusetts, Lowell. In addition to various musicproduct-related industry positions, he has also lived the life of a full-time road and studio musician. His self-proclaimedmission in life is to help people understand just how cool and powerful being a bass player can be.
“Bass should be an instrument of choice; not the default position for the worst guitar player in the band. To understand the power of the bass is to realize that, when done properly, the bass line in any song is all one big solo.” – Jay Piccirillo
Acknowledgements
The author would like to thank the following people (in alphabetical order) for their selfless and tireless contributions to making the B-DEC 30 and the accompanying method book possible:
Chuck Adams, Mike Anderson, Kregg Barentine, Rose Bishop, Scott Bringe, Keith Chapman, Dale Curtis, Brian Dinkel, Christi Farris, James Gifford, Reggie Hamilton, Rick Heins, Bill Hughes, Brian Kennedy, Dave Lewis, Mike Lewis, Clay Lyons, Richard McDonald, Shane Nicholas, Robyn Orsini, Jeff Owens, Sunir Patel, Billy Pirie, Ken Porter, Brian Ramey, Brad Scaife, Kimbo Tippett, John Willis and Bob Willocks.
METHOD BOOKBy Jay Piccirillo
© 2006 Fender Musical Instruments Corporation. All rights reserved.

Congratulations on your purchase of the B-DEC 30. This revolutionary product has been designed to help you become agreat bass player. No matter what level you play at today, you will quickly find yourself heading in new musical directions and generally having a great time while you improve your internal metronome and develop new musical instincts.
The “job” of a bass player is to be the glue that holds a band together. As the link between rhythm and harmony, the bass guitar is a powerful instrument in a supportive role. Unfortunately, developing the skill and instinct needed to be a great bass player usually only happens while supporting a band. The B-DEC 30 gives you the opportunity to rehearse with a full band any time in any key at any tempo for as long as you want. The ability to record and listen back to your performance lets you hear your mistakes as well as your progress. Remember, being the bass player in a band is NOT being the worst guitar player!
The B-DEC 30 Has Two Kinds of Loops:
Performance Loops: These are song examples that outline various styles. Each loop has an “A” section and a “B” section. The idea is to refine your instincts not only of what notes to play, but how to feel or anticipate the change from one section to the next. This is one of the most important attributes of a great bass player. These loops also provide a tone that should inspire you in the direction of the music style being played.
Teacher Loops: These are virtual lessons utilizing a bass track and a drum track to illustrate things like warm up exercises, scales, arpeggios, slap lick ideas and rhythmic drills.
Follow Along With Your Lesson Book!
The B-DEC 30 comes with a book of lead sheets covering every loop. These musical charts indicate the chords being played along with notation and tablature of the pre-recorded bass line. One approach is to learn the existing bass line note for note. This will help you develop ideas you may not have considered.
What About the Bass Track?
Each loop offers individual control over the bass, drums and other instruments. Push the “DRUM” button to bring up the drum menu. The first item in the menu is “Bass Track On/Off.” Turning the large data wheel will toggle the bass track on and off. With the bass track off (muted), you can fill out the space with your own bass lines.
The bass track also has three different modes, indicated as the next item in the “drum” menu. The factory default plays the bass track for the first pass through the loop, then it automatically mutes the bass track so you can jump right in after hearing the general idea for a potential bass line. The bass track can also be set to play continuously or alternate every other pass through the loop. This bass track mode is stored within the preset.
B-DEC™
30 Method Book

Since you can turn any of the tracks on or off, another great practice tool is to mute everything except the drums. This will give you a “drummer” complete with a changing feel (“A” section to “B” section) and fills to play off of.
You can also develop bass solos while the B-DEC™ 30 covers the written bass parts. As bass players, we don’t get many solos, but a good one goes a long way …
What Else Does It Do?
Bass Amp Types: Sometimes the right tone makes all the difference. With the B-DEC 30, you get several amp models that represent many popular bass sounds. Effects: Used sometimes for taste and sometimes just for fun, there are plenty of cool and inspiring onboard effects that really add to your sound, including overdrive, distortion, fuzz, compression, flanging, phasing, envelope filter, chorus, reverb and delay. Auto-Key: So that there’s no place on your bass’s neck that you’re unfamiliar with, this feature automatically transposes a loop by a chosen interval, letting you play the exercise in multiple keys without stopping.
Tempo-Creep: Automatically increases the tempo at a selectable rate from 1 to 10 bpm, letting you take musicalexercises from slower tempos to faster ones without stopping. Song Mode: A virtual hard drive onto which you can save your favorite MIDI files, so they’re available to jam along with at any time and any place. Phrase Sampler: Lets you record what you’re playing so you can listen to your performance with a critical ear. A great way to quickly improve your playing.

TempoTry playing this preset at varying tempos. For the “Performance” loops, try playing at one tempo for a while, then stop the loop, change the tempo and play some more. For “Teacher” loops, try using the “Tempo-Creep” feature, which speeds up the loop after each pass, allowing you to gradually increase the speed of the “Teacher” exercises without stopping.
KeyTry playing this preset in different keys. For the “Performance” loops, try playing in one key for a while, then stop the loop, change to a different key and play some more. For “Teacher” loops, try using the “Auto-Key” feature, which transposes the loop after each pass, allowing you to play the “Teacher”exercises in all 12 keys without stopping.
Try Using a PickTry playing this preset using a pick. Whether you play using finger-style, a pick or slap-and-pop, it’simportant to have control over your technique. Work on playing all down-strokes for a hard rock style.Alternating between up-strokes and down-strokes and making them sound even is another goal whenplaying with a pick.
Finger-StyleTry playing this preset using the finger-style technique. Whether you play using finger-style, a pick or slap-and-pop, it’s important to have control over your technique. Different musical styles call for different playing techniques, and it’s important to be able to change your technique to best suit the song.
Slap-and-Pop TechniqueTry playing this preset using the “slap-and-pop” technique. Check the “Teacher” loops for specific slap-and-pop technique lessons. Being able to play a finger-style bass line as written using your thumb is a fun exercise in developing your technique.
Tab Legend
How to Use This Guide Icon Legend
StyleA description of the musical style demonstrated in the preset.
MeterA description of the meter used in the preset. “Meter” is described using a time signature in the form of a fraction. The numerator indicates the number of beats per measure; the denominator indicates the note value (i.e., quarter note, eighth note, etc.) being counted. A time signature for 6/8 meter, for example,indicates that you would count six (6) eighth notes (8) per measure.
KeyA description of the key the preset is played in. This should help give you a sense of where the “tonal center” is.
DifficultyA description of how difficult the preset is to accurately perform. This can be based on factors including technique, chord complexity, tempo and time signature.
RockStyle
6/8Meter
F# minorKey
MediumDifficulty

Performance Loops
P00 - Double Bass 5
P01 - Midnite Heat 7
P02 - Disco Octave 8
P03 - Rusty Gate 9
P04 - Synth Time 10
P05 - Soulful Sky 11
P06 - Jamboree UP 12
P07 - Big Rocks On 13
P08 - Classy Pop 14
P09 - SKA 8Board 15
P10 - Funk 5 Fever 16
P11 - Pick Rocker 17
P12 - Groove Gravy 18
P13 - Chicago Blue 19
P14 - Slow 6 Swing 20
P15 - Soft Ballad 21
P16 - Reggae Time 22
P17 - Blue Shuffle 23
P18 - Riff-O-Matic 24
P19 - Island Rays 26
P20 - Sharp 7 Sham 27
P21 - 4 On The Flo 28
P22 - Groove Juice 29
P23 - Looking Away 30
P24 - Big Hit Walk 31
P25 - Prog Rocker 32
P26 - Last Goodbye 33
P27 - Puzzle Piece 34
P28 - Steel Drum 35
P29 - Punch Thru 36
P30 - Spacey Kaos 37
P31 - ComeN Get It 39
P32 - Popping In 7 40
P33 - Giddey Up 41
P34 - Feeling Sad 42
P35 - Root Peddler 43
P36 - Pop Synth 7 44
P37 - Garage Jam 45
Teacher Loops
P38 - Teach Warm 1 46
P39 - Teach Warm 2 47
P40 - Teach Warm 3 48
P41 - Major Scale1 49
P42 - Major Scale2 50
P43 - Major Arp1 51
P44 - Major Arp2 52
P45 - Major Pedal1 53
P46 - Major Pedal2 54
P47 - Major 4ths 55
P48 - Major Pedal3 56
P49 - Major Pedal4 57
P50 - Major Add3rd 58
P51 - Major Arp3 59
P52 - Major Arp4 60
P53 - Minor Scale1 61
P54 - Minor Scale2 62
P55 - Minor Arp1 63
P56 - Minor Arp2 64
P57 - Minor Pedal1 65
P58 - Minor Pedal2 66
P59 - Minor 4ths 67
P60 - Minor Pedal3 68
P61 - Minor Pedal4 69
P62 - Minor Add3rd 70
P63 - Min Penta 1 71
P64 - Min Penta 2 72
P65 - Tch Tritone 73
P66 - Teach Octave 74
P67 - Teach Rhy1 75
P68 - Teach Rhy2 76
P69 - Teach Rhy3 77
P70 - Teach Slap 1 79
P71 - Teach Slap 2 80
P72 - Teach Slap 3 81
P73 - Teach Slap 4 82
P74 - Teach Slap 5 84
P75 - Teach Slap 6 87
Songs
Pop Song 88
Rock Song 95
Table Of Contents

P00 Double BassA fast paced rock tune requiring a simple yet solid bass line.
Technique Tips: Right hand movement doesn’t let up, so try using a pick, but make sure the up and down pick strokes come off as even as possible. Try slowing it down and playing it finger-style.
Theory Thoughts: The first section moves through E minor with brief periods on Bb (which is an interval of a tri-tone away from E). The interval of a tri-tone causes the musical tension you hear.
Main Objectives: Keeping up the intensity of the rhythm is most important. Right-hand power and precision makes all the difference. The chord changes come quickly, so make sure the left hand is anticipating the movement to the next chord.
Style Meter Key Difficultyrock 4/4 E minor medium
5

P00 Double Bass (continued)A fast paced rock tune requiring a simple yet solid bass line.
Style Meter Key Difficultyrock 4/4 E minor medium
6

P01 Midnite HeatThis dark-sounding rock tune has a bass line that uses a repeating rhythmic pattern over different chords as it moves through each section.
Technique Tips: Open strings can be tempting, so try learning this one in different keys to eliminate the option of playing any open strings. Work on your left-hand muting technique. Notice how cutting off the notes at the end of each phrase changes the feel of the bass line.
Theory Thoughts: Notice how the bass starts the riff in F# minor by first picking an E, then goes up to the F#. This same pattern is repeated in the second section as the bass starts the riff in B minor by first picking an A, then going up to the B minor. This approach on bass creates a sense of motion.
Main Objectives: Finding the pocket of this tune is the most important element. Try not to play it lazy or hurried, but right in the middle. The tempo may be quick, but the bass is playing in the middle of the beat. Learning “where” to place each note relative to the beat, regardless of the tempo, is important for developing your internal clock.
Style Meter Key Difficultyrock 4/4 F# minor medium
7

P02 Disco OctaveThis fun, upbeat tune has a bass line playing octaves while walking over two chords.
Technique Tips: The bass pattern starts on the root of the chord being played, jumps down 4 frets then walks chromatically (1 fret at a time) back up to the root. Try playing this with either the finger-style approach or using the slap-and-pop technique. Keep your focus on emphasizing the downbeat.
Theory Thoughts: This tune uses “dominant seven” chords. This means the 7th scale degree is flat (lowered a half-step). So, the E7 (meaning dominant seven) has a D natural as the seventh scale degree (instead of D#). This causes the distance or interval of a tri-tone between the 3rd and 7th scale degrees (in E, these scale degrees would be G# and D) which adds musical tension to the sound of the chords.
Main Objectives: Creating a solid “in the pocket” feel, locked in with the drummer, is most important. Developing a left hand technique that becomes second nature is necessary to play this for an extended period of time. Notice how you can cut each note off early (also called staccato) to create more of a “punchy” feeling.
Style Meter Key Difficultydisco/funk 4/4 E major medium
8

P03 Rusty GateA traditional blues pattern becomes jazz with a few additional chords anda walking bass line.
Technique Tips: Right-hand attack needs to be consistent and delivered with a sense of purpose. Left-hand positioning will need to be flexible as you venture into your own walking patterns.
Theory Thoughts: Walking a bass line over chords like these can be done in an infinite number of ways. You can play chord tones (1st, 3rd, 5th and 7th scale degrees of each chord) to emphasize the chord being played. You can also use passing tones (notes that aren’t part of the chord) to create tension, and then cause release by playing a chord tone.
Main Objectives: To deliver a consistent rhythm the band can feed off of while supporting the chords with good note choices. Maintaining the “swing feel” of the walking bass line is the main role of the bass in this musical environment.
Style Meter Key Difficultyjazz/blues 4/4 G major hard
9

P04 Synth TimeA pop progression that relies on the bass to define the chords.
Technique Tips: Make sure the single hits on each downbeat of the second section are played exactly on the downbeat. Long rests in between notes can challenge your internal clock.
Theory Thoughts: The first half of this song has chords that are only defined when the bass is playing. This is a great example of the power of bass.
Main Objectives: This song is an open framework that allows you to try playing different notes in the open spaces. Change up the bass line and try some different note choices. Make sure you emphasize the downbeat to maintain intensity.
Style Meter Key Difficultypop/funk 4/4 E minor easy
10

P05 Soulful SkyThis pop song changes from major to minor from one section to the next.
Technique Tips: The bass sometimes plays (with the chord) on the anticipation of the downbeat. Try and feel when thishappens by listening to the rhythm of the chords. Notice in the second section that there is a space left each time by the basson beat 3. This technique leaves a nice hole and increases the “bouncy” feel.
Theory Thoughts: In the first section, the bass is playing G while the chords start on C. Because the bass stays on G, the chord sounds like a variation of a G chord rather than a C chord (in this case the result is called a Gsus4). The bass has the power to define a chord just by the choice of notes played over it.
Main Objectives: Use your ear to hear the sound of the band change based on your note choices. Focus on when not to play to create a certain feeling of space.
Style Meter Key Difficultypop 4/4 G major medium
11

P06 JamboreeA country song where playing a simple and traditional bass line is the key to making the song work.
Technique Tips: Sometimes the hardest thing to do is to not overplay. Maintain an even attack with your fingers and let the notes ring out (also called legato). Avoid slapping the strings on beats 2 and 4 (a common mistake when trying to focus on beats 1 and 3).
Theory Thoughts: This song structure is focused on being sparse. There are a few walking bass fills placed to specifically set up the changing of a chord (also called leading tones).
Main Objectives: Executing the simple bass part properly so that it sounds natural and authentic. It may seem easy, but it takes time to learn to play it correctly and consistently.
Style Meter Key Difficultycountry 4/4 G major easy
12

P07 Big Rocks OnThis straight-ahead rock tune requires solid playing but also has room for some tasty fills.
Rock 4/4 E Major Easy
Technique Tips: Listen to the kick drum and decide when it is best to play the same rhythmic pattern with your right hand.If you vary your approach by section, you can create a stronger feeling of change.
Theory Thoughts: When you decide to play a bass fill, good note choices and solid rhythm make all the difference. Notice how many of these bass fills set up the next downbeat. Remember that regardless of what you choose to play, being in sync with the drummer on the next downbeat is your fundamental job.
Main Objectives: To learn and understand how to play both with and between the rhythm of the kick drum. Knowing howto play bass fills that include chord tones and set up the next downbeat.
Style Meter Key Difficultyrock 4/4 E minor easy
13

Style Meter Key Difficulty
P08 Classy PopThis pop tune uses some extended chord voicings and interesting rhythm hits.
Technique Tips: The key to making this sound effective is to play fewer notes, but to put them in the right place at the right time. By making use of the space, the bass can “push” or “pull” the feeling of the pulse.
Theory Thoughts: Notice the bass fills in measures 2 and 6. Each fill uses the same notes but with different rhythmic place-ment. Remember, there are only 12 notes; it’s where you place with them that makes all the difference!
Main Objectives: Placement of notes in a song that lacks an obvious steady pulse. Placing fills without disturbing the unique feel of the pulse.
sophisticated pop 4/4 E major medium
14

Style Meter Key Difficulty
P09 SKA 8BoardA fast-paced, bouncy tune with emphasis on the upbeats that requires quick hands.
Technique Tips: The rhythmic placement of notes is the key. Being able to hear the downbeat and keep time while playing on the upbeat takes practice. Slow this one down at first. The pattern of notes comes right out of the chord (1st, 3rd and 5th scale degrees). Understanding the note pattern will make playing the rhythm pattern easier. A good left-hand alternative is to avoid open strings, playing the riff in A on the 5th fret and the riff in B on the 7th fret (of the E string).
Theory Thoughts: This song does not have an equal amount of measures. Although the “A section” is a familiar 8 bars, the “B section” is only 6 bars. Hearing the upward movement of the chords to cue the change might take some practice.
Main Objectives: To learn a unique rhythmic feel played at faster tempos, and to anticipate the changes during uncommon section lengths.
ska 4/4 E major hard
15

Style Meter Key Difficulty
P10 Funk 5 FeverFrom sparse to busy, this pop tune in 5/4 presents a rhythmic challenge.
Technique Tips: The most important element to playing this properly is to internalize what 5/4 feels like. Try counting itdifferent ways to see what feels more natural. Instead of counting to 5 over the pulse of quarter notes, try counting 1 and 2 over two half notes followed by “and” on the last (5th) quarter note. This will help emphasize and single out the fifth quarter note from the other beats.
Theory Thoughts: Notice how the note played on the downbeat is the most important one. The notes in between are being played to help set up each downbeat. Try playing only the downbeat note to really help solidify your feeling of playing in 5/4.
Main Objectives: To master the art of counting and feeling an odd meter. Beyond the counting, knowing how to set up the downbeat with the bass line is also very important.
pop/funk 5/4 G minor hard
16

Style Meter Key Difficulty
P11 Pick RockerA floating bass line keeps this rock tune moving forward and feeling good.
Technique Tips: Even right-hand technique and proper note placement is what makes this feel song feel bouncy. The bass is playing “inside” all of the time (meaning there aren’t really any fills, just a focus on conveying the groove).
Theory Thoughts: Notice how the bass goes through a rhythmic pattern every 2 bars. The first bar has emphasis on the downbeat. The second bar has a rest on the downbeat. This creates a push/pull feeling and illustrates the point of playing the same notes in a different manner to make the bass line more effective.
Main Objectives: To understand and execute subtle rhythmic changes designed to create an interesting feel.
rock 4/4 E minor easy
17

P12 Groove GravyA groove-focused pop tune with some interesting and contrasting bass lines.
Rock 4/4 E Major Easy
Technique Tips: Locking in with the drummer in the “A section” creates the feeling of groove. If you feel your toe tapping or your head bobbing up and down, you’re playing it correctly. Notice how the bass supports the drum fills at the end of bars 2, 4, 6 and 8 by playing some additional notes in a similar rhythm.
Theory Thoughts: The “B section” is composed of only a few notes, which are placed in such a way that they sound almost like small steps up a ladder. This approach on bass gives lots of space to breathe and sets up the return to the groove of the“A section”.
Main Objectives: To move between playing a strong groove and leaving a lot of space to create contrast.
Style Meter Key Difficultypop 4/4 G minor medium
18

Style Meter Key Difficulty
P13 Chicago BluesA classic blues progression with a swing feel.
Technique Tips: Right-hand consistency across all strings is very important. Feeling the swing aspect is made easier by focusing on the ride cymbal.
Theory Thoughts: Playing this walking bass line is somewhere in between a simple pattern and a full-on improvised jazz approach. Study the written part to see where the bass notes are taken right from the chord vs. passing tones (not from the chord) that create tension until they resolve to the next chord.
Main Objectives: To hear the chord progression naturally and be able to create your own walking bass part to support what is being played. This is also a good one to practice taking a solo over.
blues 4/4 E major medium
19

P14 Slow 6 SwingThis ballad uses 6/8 meter to create a swing feel.
Rock 4/4 E Major Easy
Technique Tips: Understanding the fundamental rhythm of this tune is important. You can count 6/8 as 3/4 (3 quarter notes instead of 6 eighth notes) if it makes things easier for you. Work on the pulse first, and then bring in the fills.
Theory Thoughts: In the “A section” the chords go back and forth between C Major and A minor. Notice how similar these two chords sound. This is because the notes of a C Major scale are the same as the notes in an A (natural) minor scale, they are just presented in a different order. The basic C Major chord is spelled out C, E, G. The basic A minor chord is spelled out A, C, E. There is only 1 note different in these two basic chord forms.
Main Objectives: To understand and be able to play a 6/8 swing feel with conviction and be able to insert your own fills.
Style Meter Key Difficultyswing ballad 6/8 C major medium
20

Style Meter Key Difficulty
P15 Soft BalladA slow ballad in which the bass uses leading tones to set up each chord change.
Technique Tips: Get the foundation down before trying to play all of the fills. Once you can understand and feel the framework of the progression, plugging in the fills will be much easier.
Theory Thoughts: Notice how the bass uses a lot of motion to set up each chord. Sometimes the setup is done with notes from the scale. Other times, the bass plays chromatic (1/2 step) phrases to create brief moments of tension, which are then resolved at the next chord.
Main Objectives: To help set up chords by playing different bass notes in between each downbeat.
pop ballad 4/4 E major medium
21

P16 Reggae TimeA slow reggae tune with plenty of space.
Rock 4/4 E Major Easy
Technique Tips: One of the toughest challenges of playing this tune is not overplaying. The point of this approach is to make a gesture on the bass, and then to leave some space. Because you do not play on the downbeat, a common mistake is to come in late while you are focusing on leaving so much space. Try to be deliberate about where you put your notes. Notice the rhythmic strength is on beats 2 and 4 as opposed to most pop or rock tunes, which tend to emphasize beats 1 and 3.
Theory Thoughts: Although the rhythm of the bass can seem a little fragmented, all of the bass notes are taken directly from the chord being played. When done properly, playing bass in this style can almost be like playing one big solo! Just remember it is a solo that challenges you to leave some space in exchange for each note you play.
Main Objectives: To become familiar with the unique role of the bass in the style of reggae.
Style Meter Key Difficultyreggae 4/4 B minor medium
22

Style Meter Key Difficulty
P17 Blue ShuffleA slow tempo, shuffling blues progression with the bass steadily pumping eighth notes.
Technique Tips: In this tune, the bass and drums feel as though they are sitting near the back of the beat. It is tough to play at the back of the beat without simply being late. Try to play this one at varying tempos to improve this technique.
Theory Thoughts: This 12-bar blues in A is based around three chords: A7, D7 and E7. If you assign a number to each chord as it falls alphabetically (starting with the key you are in), you could also recognize these chords as I, IV and V. The Nashville number system is based on assigning numbers to chords because it allows you to transpose a song to different keys for different singers. It also helps signal a chord change with your fingers to another musician.
Main Objectives: This chord progression is the foundation for so much in music. Know how to hear each chord and anticipate the change from one chord to the next.
blues 4/4 A major medium
23

P18 Riff-O-MaticA tune combining a rock style riff and a pop style progression.
Rock
Technique Tips: This is a song in which the bass doubles the big guitar riff for strength and thickness. Try slowing the riff way down until you can play it comfortably. Don’t just focus on the notes; make sure you hear rhythmic placement andaggressive attitude being used for effect.
Theory Thoughts: The second half of this progression is completely different, focusing on a simple ascending bass line that softly takes you to the top (where the main riff is waiting to play again). Notice how the bass is going up a whole step each time. At one point the bass plays a C# over the A Major chord. This is done to continue the feeling of upward momentum and it works because C# is the 3rd scale degree of an A Major chord. This is a good example of the bass choosing to play a note other than the root for a desired effect.
Main Objectives: To learn to play with dynamics as you shift between aggressive and soft parts while maintaining thedesired feel of each.
Style Meter Key Difficultyrock 4/4 E minor hard
24

P18 Riff-O-Matic (continued)A tune combining a rock style riff and a pop style progression.
RockStyle Meter Key Difficultyrock 4/4 E minor hard
25

Style Meter Key Difficulty
P19 Island RaysA Latin bass pattern played over an island type of feel with steel drums playing the melody.
Technique Tips: The rhythmic feel being played over each chord is the same. The key is to emphasize the downbeat notes (usually the second note of the group). Once you understand and can play the root/fifth pattern, you should be able to handle this song. There are plenty of more complicated Latin rhythms, but this one is an essential building block. A more complex rhythm variation is to play the bass line double time against the normal tempo (play each measure twice at double the speed).
Theory Thoughts: Notice how the chords are the same in each section, but in a different order. The “B section” starts on a C chord instead of a D chord. This is done to challenge your memory as two very similar yet different parts can sometimes get confused inside your head. Playing music can be a mental exercise as much as a physical one.
Main Objectives: To become comfortable with the root/fifth pattern and retain the memory of two similar yet differentsections of music.
latin/island 4/4 D major medium
26

P20 Sharp 7 ShamA rock tune in odd meter with some dissonant chords and polyrhythms.
Rock 4/4 E Major Easy
Technique Tips: The first thing to notice with this tune is the odd meter. You might be tempted to count this as quarter notes (1, 2, 3, 4, 5, 6, 7, over and over again). An easier approach is to count 1, 2, 3, and where the numbers fall on quarter notes and the and falls on the 7th eighth note. This way, the numbers are on the beat as in 4/4 counting; then you use the word and to signify the final (7th) eighth note.
Theory Thoughts: This musical example uses the tri-tone and a chromatic approach to deliberately cause musical tension. Playing the Bb after the E establishes the tri-tone (a tri-tone is always 1 string and 1 fret above where you start), which is used (in combination with the odd meter) to create tension. Tension is also created when the E is followed by the F, a ½ step away. Instead of a tri-tone, you get a minor second (1 note away). The chromatic tension caused by the F acts as a “call and response” to the tri-tone.
Main Objectives: To become comfortable playing in 7/4 and to introduce the ear to tri-tone and minor second intervals as ways to create tension.
Style Meter Key Difficultyrock 7/4 E minor hard
27

Style Meter Key Difficulty
P21 4 On The FloA straight ahead pop tune including a simple bass line you can have fun with.
Technique Tips: Try to play this one without using any open strings (as written). Even though it may seem easy to play with open strings, you should learn it without using them. Transpose this to different keys for the mental exercise of re-positioning your hands. Also, try playing it by ear in a different key.
Theory Thoughts: The key to this tune is the contrast between the two sections. Playing simple whole notes over the first section leaves a lot of space. Notice how the “B section” moves the tonal center from A minor up to B minor. This creates a tonal change. It is at this point that the bass takes on a more rhythmic approach. This is important for creating a sense ofmovement and change.
Main Objectives: To exercise restraint, by playing only what is written (even when it is very simple). To be aware of musical changes and how simply altering the rhythm can enhance those changes.
pop/rock 4/4 A minor easy
28

P22 Groove JuiceA rock tune using octaves and walking bass lines to create emphasis.
Rock 4/4 E Major Easy
Technique Tips: During the “B section” there is a chromatic walking pattern (1/2-step increments). It is easy to play if you remember to keep your left hand in position. Play the root of the G7 chord (G) with your second finger. This frees up your first finger to grab the B and begin the walk up. If you keep your left hand in position over the whole chord, you will be able to play these kinds of lines with ease.
Theory Thoughts: Since the keyboard is playing a rather involved melody in the “A section”, the bass uses octaves to create motion without muddying up the sound with too many notes. The walking bass in the “B section” adds chromatic notes, which create tension and release along with the motion of the chords. This approach contrasts the first section and creates movement and change between the sections.
Main Objectives: To shift back and forth between two different concepts on bass (octaves and walking) without losing the momentum of the song.
Style Meter Key Difficultyrock 4/4 E major medium
29
Style Meter Key Difficulty
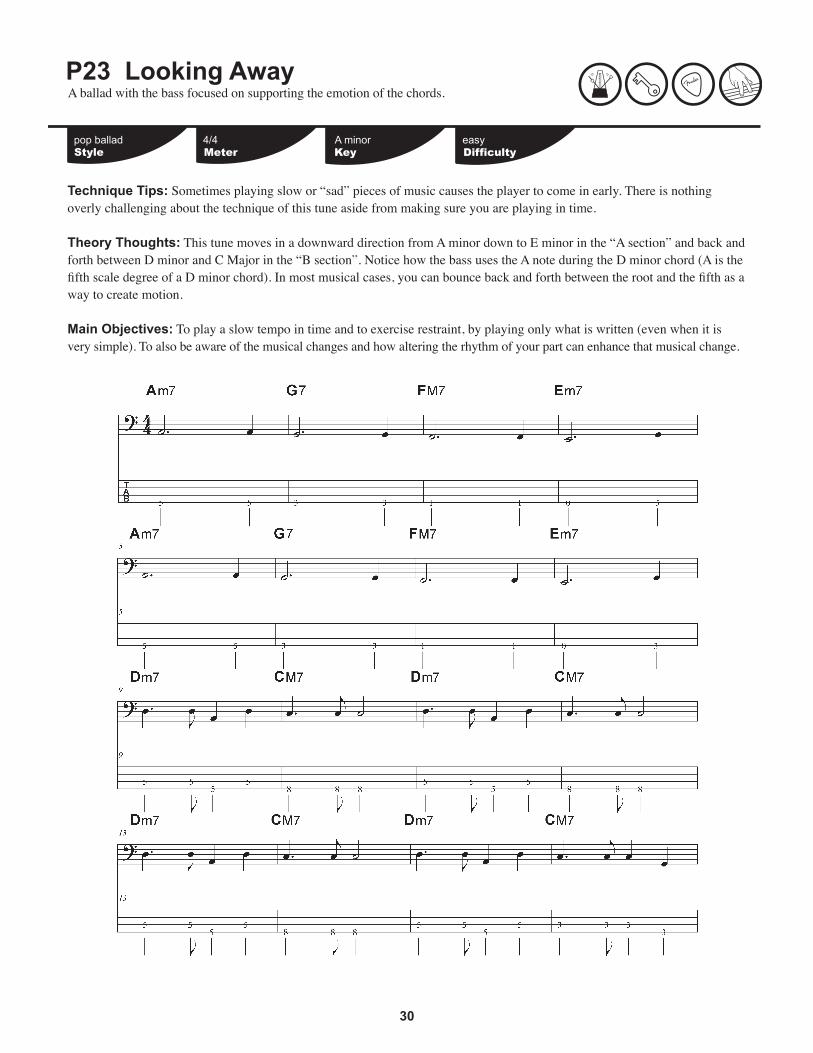
P23 Looking AwayA ballad with the bass focused on supporting the emotion of the chords.
Technique Tips: Sometimes playing slow or “sad” pieces of music causes the player to come in early. There is nothing overly challenging about the technique of this tune aside from making sure you are playing in time.
Theory Thoughts: This tune moves in a downward direction from A minor down to E minor in the “A section” and back and forth between D minor and C Major in the “B section”. Notice how the bass uses the A note during the D minor chord (A is the fifth scale degree of a D minor chord). In most musical cases, you can bounce back and forth between the root and the fifth as a way to create motion.
Main Objectives: To play a slow tempo in time and to exercise restraint, by playing only what is written (even when it is very simple). To also be aware of the musical changes and how altering the rhythm of your part can enhance that musical change.
pop ballad 4/4 A minor easy
30

P24 Big Hit WalkA good combination of rhythmic hits and walking bass lines.
Rock 4/4 E Major Easy
Technique Tips: This tune is a great example of how learning to play with the proper left hand position makes playing the parts much easier. By playing the main riff on the A string, your left hand is already set up for the transition into the “B section”. Play the first E note of the “B section” with your left pinky and keep your hand spaced one finger per fret; you can walk up each note of the phrase with the finger assigned to that fret.
Theory Thoughts: The big riff in the “A section” is all about rhythmic intensity (which is why the drums hit the tom-toms without any accompanying hi-hat or ride cymbal). The contrast to this intensity is to play a wide selection of notes. The walking bass pattern in the “B section” is chromatic (1/2-step increments), which creates tension and release as it climbs up the fingerboard.
Main Objectives: To go back and forth between abrupt rhythmic hits and a smooth walking pattern without losing the intensity or timing of the song.
Style Meter Key Difficultyrock 4/4 E major medium
31

Style Meter Key Difficulty
P25 Prog RockerA galloping rock tune with an aggressive bass part.
Technique Tips: The intensity of the right hand is the most important element in this tune. You can try using fingers or a pick (a good idea would be to learn both techniques) to match the double bass drum pattern.
Theory Thoughts: In the key of F# minor, the ability to use the open E string creates a nice sense of motion. The bass follows the drums by playing sixteenth notes at the beginning of the phrase along with the bass drum. This rhythmic approach is also used in the “B section” while the drums are playing the ride cymbal and the bass is playing C# minor down to A Major.
Main Objectives: To play the relentless rhythm and keep your left hand ahead of the game so it can keep up with the galloping motion of your right hand. Stay on top of the beat and don’t lose the groove.
rock 4/4 F# minor medium
32

Style Meter Key Difficulty
P26 Last GoodbyeA soft ballad with some pretty chords and a couple of bass note substitutions.
Technique Tips: The idea with this tune is to get big, warm notes out of the bass and use the movement of the rhythm to propel the chords forward. To get a warmer tone, try moving your right hand closer to the neck so you are striking closer to the middle of the string.
Theory Thoughts: Notice the bass plays a D over the G chord in measure 10. In a G Major chord, the notes are G (root),B (third) and D (fifth). By playing the D (fifth of the chord) you create an interesting sound without upsetting the tonality ofthe chord. Try this in different musical applications to add flavor!
Main Objectives: To support the chords and move them forward with a soft, warm tone. Also, understand the idea of playing the fifth of the chord instead of the root.
pop ballad 4/4 D minor medium
33

P27 Puzzle PieceVery complicated rhythms that call for the bass to play something solid and simple.
Rock 4/4 E Major Easy
Technique Tips: If you listen only to the bass line, this tune is relatively simple to play. The tough part is keeping your bass line together while all of the chords start playing seemingly random rhythmic hits. Try using your foot to tap quarter notes(1, 2, 3, 4) to further develop your internal clock.
Theory Thoughts: Listen to the “B section” for a rhythmic phrasing called 3 against 4. This is a way of describing the sound of triplets against quarter notes. Use your left hand to tap out the quarter notes and your right hand to tap the triplets. You should be able to see and hear one hand tapping 3 (right) while the other is tapping 4 (left).
Main Objectives: To perform a straight bass line against difficult rhythms and to understand the sound and feel of 3 against 4.
Style Meter Key Difficultyprog rock 4/4 E major medium
34

Style Meter Key Difficulty
P28 Steel DrumThis upbeat tune has an island vibe provided by steel drums and a bouncy bass line.
Technique Tips: The challenge with this bass line is to internalize the upbeat hits that provide the “bouncy” feeling. Try counting out the measures you find difficult to hear the upbeats being emphasized. Internalizing unfamiliar rhythmic patterns takes time and practice, but it will eventually become natural for you.
Theory Thoughts: Notice that the “B section” of this tune has the bass simply outlining the notes of the chords being played. In the case of measure 9, the bass is playing F, A, C, F. This selection of notes outlines the F Major chord (1, 3, 5,octave). This pattern repeats throughout the remaining measures. Try to see this pattern and remember it, because knowingthe 1st, 3rd and 5th degrees of any given chord allows you to make good note choices and create better bass lines.
Main Objectives: To feel and internalize this unique rhythm pattern and to understand the power of knowing and playing arpeggios over any given chord.
latin/island 4/4 C major medium
35

P29 Punch ThruA pop tune that gets its drive from the bass being locked into the bass drum.
Rock 4/4 E Major Easy
Technique Tips: Remember that music is not just about playing the notes. In the “A section” of this tune the downbeats give the attitude while the upbeats provide the flavor and motion. Try to distinguish between them and play each with the proper technique. The downbeats should feel heavy and deliberate while the upbeats should allow you to create a lighter sense of motion.
Theory Thoughts: The chord progression is fairly simple, as it is derived from the blues progression. Notice how it uses the same three chords as the blues (I, IV and V), but is a 16-bar progression with a different “feeling” than the blues. It is very common that the chord you will use to get back to the beginning is the V chord (in the key of E, that chord is B, or B7 in this case).
Main Objectives: Combine the unique rhythmic approach of upbeats and downbeats to create a solid bass line. Understand the familiarity of the blues in other styles of music and learn to hear more common chord progressions like I, IV, V without seeing written music as a guide.
Style Meter Key Difficultypop rock 4/4 E major medium
36

Style Meter Key Difficulty
P30 Spacey KaosAn extreme study of going between complete simplicity and total rhythmic complexity.
Technique Tips: Mental alertness when transitioning between these sections is the key to playing this tune. Counting using eighth notes is recommended. Play this one at a tempo comfortable to your right hand during the “B section.” The quick string jumps in the “B section” should be worked up slowly.
Theory Thoughts: Going from playing hardly anything in the “A section” to the full-on rhythmic assault of the “B section” takes some getting used to. Notice that the “B section” is outlining the notes of the E7 chord. When the bass is playing the D on the open D string, you are playing the “flatted 7th” of an E7 (E= root, G#=3rd, B=5th, D=b7 th).
Main Objectives: To transition between simple and complex rhythms and to understand how the bass can help outline the notes of a dominant 7th chord (commonly written as E7).
prog rock 4/4 A major medium
37

Style Meter Key Difficulty
P30 Spacey Kaos (continued)An extreme study of going between complete simplicity and total rhythmic complexity.
prog rock 4/4 A major medium
38

P31 ComeN Get ItA simple country song with the basic building-block bass line.
Rock 4/4 E Major Easy
Technique Tips: Playing the notes evenly and with the correct duration is one of the skills that separates a good country bass player from a great one. Pay attention to your right hand so you do not slap the strings on beats 2 and 4 as you are keeping time. Try altering the note duration to change the feel of the song. Notice how long notes (sustained until the next note plays) feel very different than short notes (silenced before the next note is played). Country may seem simple, but good quality playing is all in the details.
Theory Thoughts: Musically, the bass alternates between the root and the fifth of the chord being played. The position of the root often determines where you will play the fifth. Knowing where the octave above or below the note you are playing is located, can give you more note choices.
Main Objectives: To understand what truly makes a country bass line work, by sensing the difference between playing “long” and “short” quarter notes and to figure out where the octaves are to help expand your note choices.
Style Meter Key Difficultycountry 4/4 E major easy
39

Style Meter Key Difficulty
P32 Popping In 7A pop tune in 7/8 focused on trying to make an odd meter sound more even.
Technique Tips: Counting to seven over and over is not the best solution to truly “feeling” 7/8. Using quarter notes helps create a count that is easy to remember and lets you concentrate more on playing. In the case of 7/8, you have (7) eighth notes. If you treat 6 of them like (3) quarter notes then use the word “and” to signify the remaining eighth note, you get a count thatis 1, 2, 3, and, 1, 2, 3, and …
Theory Thoughts: The “B section” uses a common and valuable chord progression known as the ii, V, which moves the song back to the root (C) at the beginning. D minor is the ii chord (C=1, D=2) in the key of C followed by G7, which is theV chord (G7 is simply the dominant 7 chord version of G).
Main Objectives: To understand and execute music played in 7/8 and to realize how the notes the bass plays on the weaker beats helps the odd meter feel more even. To understand the ii V chord progression and how it sets up the return to the root (I) chord (in this case C).
pop 7/8 C major hard
40

P33 Giddey UpA train beat and some well-placed walking bass lines propel this up-tempo country song.
Rock 4/4 E Major Easy
Technique Tips: Beyond having an even attack with your right hand, knowing when the walking lines are coming and what variations are possible makes playing this song a lot easier. Try to internalize the feel of the train beat. It has a tendency to feel fast, so being comfortable with it will help if you are making mistakes or dropping beats along the way. Notice how the walk-ing lines help identify when the chord is about to change. Constructing a bass line that is able to telegraph information about an upcoming chord change is an important aspect of playing with a group.
Theory Thoughts: This is another example of music based on a blues progression that helps convey a feeling of familiarity. Notice how some of the walking lines use notes taken right from the scale of the chord being played (see measure 4), while others are chromatic runs that create tension and release (see measure 11).
Main Objectives: To play comfortably with an up-tempo train beat. To understand where to place a walking line and what af-fect the note choices will have on the sound of that walking line.
Style Meter Key Difficultycountry 4/4 E major medium
41

Style Meter Key Difficulty
P34 Feeling SadA steady bass part plays off of the drums and creates a nice background for this popular chord progression.
Technique Tips: Notice how the bass is not playing the same rhythm accents as the kick drum. This is an example of how drums and bass can work off of each other instead of playing the same rhythm. Focus your ears on the kick drum and thebass guitar to hear this clearly. When done properly, this approach can create a wider-sounding rhythm section and a more interesting groove.
Theory Thoughts: The “A section” has a chord progression of I, iii, IV, V, in which the bass is playing the root of each chord. This progression has a feeling of climbing upward. The “B section” uses almost the same chord progression, substituting ii for I (ii, iii, IV, V). Notice how starting on the ii chord (which is minor) drastically alters the sound of the progression.
Main Objectives: To focus on the relationship between the kick drum and the bass guitar and to see how they can play against each other to achieve a more complex sound.
pop ballad 4/4 E major medium
42

P35 Root PeddlerThis pop tune shows how the choice of bass notes changes the overall feel of the song.
Rock 4/4 E Major Easy
Technique Tips: Keep your focus on playing in sync with the drums during the “A section.” The downbeat is mostly left open (nothing played). The chords moving over the top are anchored by the anticipation of the C, which is played on the last eighth note of each preceding measure (see the last note played in measures 1, 2 and 3).
Theory Thoughts: In the “A section,” the bass continues to play C (pedals) while the chords move through C, F and G.This is an example of how the bass creates the feeling of an anchor around the note C, which makes the chords all sound like variations of C. Once the “B section” begins, the bass moves away from C, down the scale, which creates momentum and opens up the song; a nice contrast to the “A section.”
Main Objectives: To understand how keeping the bass rooted on the same note (pedaling) has an interesting effect on the chords moving around it. To be able to stay with the drums and play anticipated upbeat notes.
Style Meter Key Difficultypop 4/4 C major medium
43

Style Meter Key Difficulty
P36 Pop Synth 7A tricky odd meter combined with a happy chord progression makes for an interestingexercise.
Technique Tips: Counting to seven over and over is not the best solution to truly “feeling” 7/8. Using quarter notes helps create a count that is easy to remember and lets you concentrate more on playing. In the case of 7/8, you have (7) eighth notes. If you treat 6 of them like quarter notes, then add the word “and” for the remaining (7th) eighth note, you get a count that is1, 2, 3, and, 1, 2, 3, and …
Theory Thoughts: The bass uses notes on the weaker beats to help set up the downbeat more easily while playing in 7/8. Notice how the “B section” has the bass playing along with the snare drum instead of the bass drum. This is done to createmotion and change to the feeling while the drummer is playing on the ride cymbal.
Main Objectives: To focus on being musical while playing in 7/8 as this song goes through many chords. Understanding alternate relationships between bass and drums and help create different rhythm patterns and “feels.”
pop 7/8 G major hard
44

P37 Garage JamA basic rock tune that uses the bass to create a simple, straight-ahead pulse.
Rock 4/4 E Major Easy
Technique Tips: This song relies on the bass to pump eighth notes with attitude during the “A section.” Being able to do this consistently is one of the more basic jobs of playing bass. Listen to the hi-hat and make sure you are not too far ahead of or behind the beat.
Theory Thoughts: The “B section” uses the ii, V progression to bring the listener back to the beginning. Notice how the bass pattern changes and outlines this progression in a much softer manner. This helps the listener feel the strong emotion of the“A section” more by smoothing things out in the “B section.”
Main Objectives: To focus on delivering consistent eighth notes and then transitioning into a different, softer rhythm smoothly. To hear the impact of the ii, V chord progression, as it is very common and should be recognized by ear.
Style Meter Key Difficultyrock 4/4 E major easy
45

Style Meter Key Difficulty
P38 Teach Warm 1A 1-position, 4-string finger exercise designed to increase strength and dexterity inboth hands.
Technique Tips: 1. Play every note with the same attack and for the same duration. 2. Right hand alternates between the first and second fingers. 3. Left-hand positioning is very important (thumb behind neck, positioned in between the fingers). 4. Use one finger per fret and avoid shifting or compensating for weaker fingers. 5. Play each note with your fingertips just behind the fret; focus on getting an even sound. 6. Alter either the tempo or key, but not both at the same time.
Main Objectives: To warm up both hands evenly while increasing strength and dexterity.
warm up 4/4 none easy
46

P39 Teach Warm 2A multi-position exercise on 1 string moving up the neck, designed to increase strength and dexterity in both hands..
Rock 4/4 E Major Easy
Technique Tips: 1. Play every note with the same attack and for the same duration. 2. Right hand alternates between the first and second fingers. 3. Left-hand positioning is very important (thumb behind neck, positioned in between the fingers). 4. Use one finger per fret and avoid shifting or compensating for weaker fingers. 5. Keep the left hand steady during position shifts. 6. Play each note with your fingertips just behind the fret; focus on getting an even sound.
Main Objectives: To warm up both hands evenly while increasing strength and dexterity.
Style Meter Key Difficultywarm up 4/4 none easy
47

Style Meter Key Difficulty
P40 Teach Warm 3A multi-position exercise on 1 string moving down the neck, designed to increase strength and dexterity in both hands.
Technique Tips: 1. Play every note with the same attack and for the same duration. 2. Right hand alternates between the first and second fingers. 3. Left-hand positioning is very important (thumb behind neck, positioned in between the fingers). 4. Use one finger per fret and avoid shifting or compensating for weaker fingers. 5. Keep the left hand steady during position shifts. 6. Play each note with your fingertips just behind the fret; focus on getting an even sound.
Main Objectives: To warm up both hands evenly while increasing strength and dexterity.
warm up 4/4 none easy
48

P41 Major Scale1A 1-octave Major scale in the key of G.
Rock 4/4 E Major Easy
Technique Tips: The root note of the scale (in this case G) should be played with the middle finger of your left hand. Assigning one finger per fret, you should be able to play this scale without shifting your left-hand position. Think of your left hand fingers as being numbered: 1(pointer) 2 (middle) 3 (ring) and 4 (pinky). Based on those numbers, the scale would be fingered: 2, 4, (shift string) 1, 2, 4, (shift string) 1, 3, 4. Because the bass neck is a grid, simply shifting your left-hand position allows you to play any major scale.
An alternate pattern for playing this same scale can also be used. Place your first finger on the root note G and play G, A and B all on the E string (3rd, 5th and 7th frets). Repeat this spacing on the A string to play C, D and E (where C is being played with your first finger). The final two notes (F# and G) would be played on the D string (frets 4 and 5) with your first and second fingers. The fingerings would be 1, 3, 5 (string shift) 1, 3, 5 (string shift) 1, 2. This approach has a wider left-hand stretch, but it allows for a different jumping-off point beyond the first octave.
Theory Thoughts: Music notes have a whole step between them with two exceptions which occur from B to C and again from E to F. The notes in ascending order would be: C, C#, D, D#, E, F, F#, G, G#, A, A#, B, C. The notes in descending order would be: C, B, Bb, A, Ab, G, Gb, F, E, Eb, D, Db, C. As you can see in both cases, there is no sharp or flat from B to C or from E to F. The notes C# and Db are the same pitch but have different names dependant on how they are being used.
Main Objectives: To become comfortable playing and hearing the sound of a major scale.
Style Meter Key Difficultyscales 4/4 G major easy
49

Style Meter Key Difficulty
P42 Major Scale2A 1-octave major scale playing the root and octave of each note in the key of G Major.
Technique Tips: This major scale makes use of octaves (the same note at a higher pitch). This example shows the string skipping from E to A in measure 2 and staying there all the way to the top of the scale. When you play this scale in different keys, you will have to decide the best time to switch from the E string to the A string. This exercise should help you visualize more of the fretboard. Remember, an octave is always two frets up the neck and two strings higher in pitch (a visual shape resembling the number 7). Try this one using the 1st and 3rd fingers of your left hand, then switch it up and use the 2nd and4th fingers. This will increase your finger strength evenly.
Theory Thoughts: The formula to create a major scale starts from the root note (in this case G) and is measured in terms of whole steps and half-steps. The formula is: W, W, H, W, W, W, H (W=whole and H=half). A whole step = two half-steps. From G to G# = half-step. From G to A = whole step. You can select any note as the root and follow this pattern of whole and half-steps to arrive at the notes of that major scale.
Main Objectives: To become comfortable playing and hearing the sound of a major scale and be able to find the octave for each note within that scale.
scales 4/4 G major easy
50

P43 Major Arp1A 1-octave G major arpeggio played in one position (no left hand shift).
Rock 4/4 E Major Easy
Technique Tips: Start with the middle finger on the root; use the index finger to play the B, the ring to play the D and pinky to play the octave G. The same fingerings work for descending.
Theory Thoughts: A chord is a group of notes taken from a scale. When these notes are played together, they outline the tonality (or sound) of that scale. A chord and an arpeggio are very similar. A chord is the selected notes of a scale playedsimultaneously. An arpeggio is the notes of the chord played one note at a time. The G Major scale is made up of these notes: G, A, B, C, D, E, F#, G. The G Major chord is made up of these notes: G, B, D, G (1, 3, 5, octave), Strum them together and you are playing a chord. Play them ascending or descending one at a time and you are playing an arpeggio.
Main Objectives: To become comfortable playing and hearing the sound of a major arpeggio.
Style Meter Key Difficultyarpeggios 4/4 G major easy
51

Style Meter Key Difficulty
P44 Major Arp2A 2-octave G major arpeggio requiring multiple left-hand position shifts.
Technique Tips: This is a 2-octave G Major arpeggio. Notice the change in hand position and where the stretches are for the left hand. Start with the first finger on the root; use the index finger to play the B, and the pinky to play the D and the octave G. The same fingerings work for descending. This approach is different from the one demonstrated in the 1-octave major arpeggio because the 2-octave arpeggio requires a couple of position shifts to reach all of the notes. Notice that the last note of measure 1 and the first note of measure 2 are the same. The fingering changes to accommodate movement up the neck. You could play either fingering for either note. This is a stylistic choice (notice that it happens again on the way down).
Theory Thoughts: A basic arpeggio is defined as the root, 3rd, 5th and octave of a scale. There are many places on your bass where you can find these notes (in different octaves). If you are playing a G Major arpeggio: G, B, D, G (1, 3, 5, octave) try to find every G, B and D on the neck. You will see patterns develop on the fretboard that can help you when walking the bass or playing a solo.
Main Objectives: To become comfortable playing and hearing the sound of a 2-octave major arpeggio.
arpeggios 4/4 G major medium
52

P45 Major Pedal1An ascending major scale pedaling back and forth between the root and the scale tones to help demonstrate different interval (distance) relationships within the major scale.
Rock 4/4 E Major Easy
Technique Tips: This exercise uses a G Major scale to help you hear and recognize the intervals between the root note and each scale degree. By placing a root note G in between each scale step, you will begin to recognize the intervals (distance between the notes) that are being played. The better you get at recognizing these intervals, the easier it will be for you to learn musical passages by ear.
Theory Thoughts: The intervals in this ascending G Major scale are as follows: G to A (Major 2nd), G to B (Major 3rd), G to C (Perfect 4th), G to D (Perfect 5th), G to E (Major 6th), G to F# (Major 7th).
Main Objectives: To become comfortable playing and hearing the sound of all the different intervals in a major scale inrelation to the root or key of the scale.
Style Meter Key Difficultyscales 4/4 G major medium
53

Style Meter Key Difficulty
P46 Major Pedal2A descending major scale pedaling back and forth between the octave root and the scale tonesto help demonstrate different interval (distance) relationships within the major scale.
Technique Tips: This exercise uses a G Major scale to help you hear and recognize the intervals between the root note and each scale degree. By placing a root note G in between each scale step, you will begin to recognize the intervals (distance between the notes) that are being played. The better you get at recognizing these intervals, the easier it will be for you to learn musical passages by ear.
Theory Thoughts: The intervals in this descending G Major scale are as follows: G to F# (minor 2nd), G to E (minor 3rd),G to D (Perfect 4th), G to C (Perfect 5th), G to B (minor 6th), G to A (minor 7th).
Main Objectives: To become comfortable playing and hearing the sound of all the different intervals in a major scale inrelation to the root or key of the scale.
scales 4/4 G major medium
54

P47 Major 4thsWalking quarter notes up and down a G Major scale 4 notes at a time.
Rock 4/4 E Major Easy
Technique Tips: The idea is to play 4 notes up the scale and then start again from the second note you played the time before. G, A, B, C, then A, B, C, D, then B, C, D, E, all the way up to the octave G. Once you reach the octave G, the pattern turns around and comes back to the original G you started on. G, F#, E, D, then F#, E, D, C, then E, D, C, B, all the way down to the G the exercise began on.
Theory Thoughts: This type of exercise helps you understand how to combine a sense of rhythm with a sense of playing in a key. Once you work an exercise like this up to a medium tempo, you can use this pattern (and many other variations on it) to create licks for solos or help you transition from one chord to the next with an interesting bass line. Think about some different ways you can combine rhythm and notes.
Main Objectives: To become comfortable playing and hearing the sound of a major scale while developing a 4-note repeating rhythm pattern.
Style Meter Key Difficultyscales 4/4 G major medium
55

Style Meter Key Difficulty
P48 Major Pedal3An ascending major scale (similar to Major_Pedal1) using eight notes pedaling back and forth between the root and the scale tones to help demonstrate different interval (distance) relationships within the major scale.
Technique Tips: This exercise uses a G Major scale to help you hear and recognize the intervals between the root note and each scale degree. By placing a root note G in between each scale step, you will begin to recognize the intervals that are being played. The better you get at recognizing these intervals, the easier it will be for you to learn musical passages by ear. Playing eighth notes creates an additional challenge.
Theory Thoughts: The intervals in this ascending G Major scale are as follows: G to A (Major 2nd), G to B (Major 3rd),G to C (Perfect 4th), G to D (Perfect 5th), G to E (Major 6th), G to F# (Major 7th).
Main Objectives: To become comfortable playing and hearing the sound of all the different intervals in a major scale inrelation to the root or key of the scale.
scales 4/4 G major medium
56

P49 Major Pedal4A descending major scale (similar to Major_Pedal2) using eight notes pedaling back and forth between the root and the scale tones to help demonstrate different interval (distance) relationships within the Major scale.
Rock 4/4 E Major Easy
Technique Tips: This exercise uses a G Major scale to help you hear and recognize the intervals between the root note and each scale degree. By placing a root note G in between each scale step, you will begin to recognize the intervals that are being played. The better you get at recognizing these intervals, the easier it will be for you to learn musical passages by ear. Playing eighth notes creates an additional challenge.
Theory Thoughts: The intervals in this descending G Major scale are as follows: G to F# (minor 2nd), G to E (minor 3rd),G to D (Perfect 4th), G to C (Perfect 5th), G to B (minor 6th), G to A (minor 7th).
Main Objectives: To become comfortable playing and hearing the sound of all the different intervals in a major scale inrelation to the root or key of the scale.
Style Meter Key Difficultyscales 4/4 G major medium
57

Style Meter Key Difficulty
P50 Major Add3rdAn exercise using a G Major scale and adding a 3rd (1 octave above).
Technique Tips: The notes on the bass are too low in pitch to allow for a chord to be created only on the low strings (without sounding muddy). To create a more pleasing sounding chord, add a 3rd scale degree up one octave (also called the 10th). This creates more distance between the notes, resulting in a more pleasing sounding chord. In the same way that the 1st and 8th scale degrees are the same notes (1 octave apart); the 3rd and 10th scale degrees are also the same.
Theory Thoughts: Chords on bass are not as common as playing single notes, but, done properly, they can be very effective. In this example, you are playing the root note on the E string and the 3rd of the chord on the G string. Some chords are major and some are minor. Since you are only playing the root and the 3rd, the only note that will change is the 3rd. To make a G Major chord into a G minor chord, simply lower the 3rd a half-step (in this case from B to Bb). If you study this example, you will realize which chords are major and which ones are minor in the key of G Major. Note: the minor chord based on F# (7th scale degree in the key of G) is actually a ½ diminished chord (because it also has a flatted 5th). Since this example does not playthe 5th scale degree, it appears to be minor.
Main Objectives: To become comfortable playing and hearing the sound of each scale degree with the 3rd added whichcreate the major and minor chords that naturally come out of a major scale.
scales 4/4 G major medium
58

P51 Major Arp3This exercise plays through the arpeggios of a G Major scale up a full octave.
Rock
Technique Tips: Notice that the time signature is 6/4 and that the pattern is a half note followed by eighth notes for the arpeggio and a quarter note for the finishing note. Once you hear it a few times it will make sense. There is a basic fingering pattern for a major, 1-octave arpeggio, which starts with the second finger (middle) on the root note G. With your left hand in1 position, use your first finger (index) to play the B and your fourth finger (pinky) to play the remaining notes. As you shift up to the second arpeggio (A minor), you will need to change your fingering. There is a basic fingering pattern for a minor,1-octave arpeggio, which starts with the first finger (index) on the root note A. With your left hand in 1 position, use your fourth finger (pinky) to play the C and your third finger (ring) to play the remaining notes. Changing back and forth between these forms takes some practice.
Theory Thoughts: Measure 7 is different from the others because the arpeggio is neither major nor minor; it is called “half diminished” because the fifth scale degree (C) is lowered a ½ step. A half diminished chord is similar to a minor chord having a flatted third, but it also has a flatted fifth. Knowing how to quickly voice any given arpeggio can prove very useful when looking for notes to create a bass line with, to play an improvised line between chords or to increase your technique during soloing.
Main Objectives: To become comfortable playing and hearing the sound of the different arpeggios located within a major scale while ascending the scale.
Style Meter Key Difficultyarpeggios 6/4 G major medium
59

Style Meter Key Difficulty
P52 Major Arp4This exercise plays through the arpeggios of a G Major scale starting up a full octave and working down the scale.
Technique Tips: Notice that the time signature is 6/4 and that the pattern is a half note followed by eighth notes for thearpeggio and a quarter note for the finishing note. Once you hear it a few times it will make sense. There is a basic left hand form for a major 1-octave arpeggio, which starts with the second finger (middle) on the root note G. With your left hand in1 position, use your first finger (index) to play the B and your fourth finger (pinky) to play the remaining notes. To play the basic left-hand form for a minor 1-octave arpeggio, start with the first finger (index) on the root note then use your fourthfinger (pinky) and your third finger (ring) to play the remaining notes. Changing back and forth between these forms takes some practice.
Theory Thoughts: Measure 2 is different from the others because the arpeggio is not major or minor; it is called “half diminished” because the fifth scale degree (C) is lowered a ½ step. A half diminished chord is similar to a minor chord having a flatted third, but it also has a flatted fifth. Knowing how to quickly voice any given arpeggio can prove very useful when looking for notes to create a bass line with, to play an improvised line between chords or to increase your technique during soloing.
Main Objectives: To become comfortable playing and hearing the sound of the different arpeggios located within a major scale while descending the scale.
arpeggios 6/4 G major medium
60

P53 Minor Scale1A 1-octave minor scale in the key of G minor.
Rock 4/4 E Major Easy
Technique Tips: The key is to start this minor scale with the first finger (index) on the root note (whereas major typically starts with the index finger). The difference between major and natural minor scales is only 3 notes (which are flatted from the major to create the minor scale). The notes that are flatted (lowered 1 fret) are the 3rd, 6th and 7th scale degrees. G Major: G, A, B, C, D, E, F#, G. G minor: G, A, Bb, C, D, Eb, F, G. The minor scale has a “sad” sound in comparison to the “happy” sound of the major scale. Assigning one finger per fret, you should be able to play this scale without shifting your left-hand position. Think of your left-hand fingers as being numbered: 1 (pointer) 2 (middle) 3 (ring) and 4 (pinky). Based on thosenumbers, the scale would be fingered: 1, 3, 4, (shift string) 1, 3, 4, (shift string) 1, 3. Because the bass neck is a grid, simply shifting your left-hand position allows you to play any minor scale.
Theory Thoughts: The formula to create a natural minor scale starts from the root note (in this case G) and is measured in terms of whole steps and half-steps. The formula is: W, H, W, W, H, W, W (W=whole and H=half). A whole step = two half-steps. From G to A = whole step. From A to Bb = whole step. You can select any note as the root and follow this pattern of whole and half-steps to arrive at the notes of that minor scale.
Main Objectives: To become comfortable playing and hearing the sound of a minor scale.
Style Meter Key Difficultyscales 4/4 G minor easy
61

Style Meter Key Difficulty
P54 Minor Scale2A 1-octave natural minor scale playing octaves in the key of G minor.
Technique Tips: This natural minor scale makes use of octaves (the same note at a higher pitch). In this example the left hand shifts from the E string to the A string halfway through measure 2 and stays there all the way to the top of the scale.When you play this scale in different keys, you will have to decide the best time to switch from the E string to the A string. This exercise should help you visualize more of the fretboard. Remember, an octave is always two frets up the neck and two strings higher in pitch (a visual shape resembling the number 7). Try this one using the 1st and 3rd fingers of your left hand, then switch it up and use the 2nd and 4th fingers. This will increase your finger strength evenly.
Theory Thoughts: For every major scale there is something called a “relative minor” scale. This means that although each scale starts on a different note, they both contain all of the same notes. In the case of C Major (all of the white keys on a piano), the relative minor scale is A minor (also uses all the white keys of a piano). The distance from a major scale to its relative minor scale is three ½ steps down from major to minor or (3) steps up from minor to major. Based on this formula, the relative major scale to G minor would be Bb major.
Main Objectives: To become comfortable playing and hearing the sound of a minor scale and be able to find the octave for each note within that scale.
scales 4/4 G minor easy
62

P55 Minor Arp1A 1-octave G minor arpeggio played in one position (no left-hand shift).
Rock 4/4 E Major Easy
Technique Tips: Start with the first finger on the root; use the pinky finger to play the Bb, and the middle finger to play theD and the ring finger to play the octave G. The same fingerings work for descending.
Theory Thoughts: A chord is a group of notes taken from a scale. When these notes are played together, they outline the tonality (or sound) of that scale. A chord and an arpeggio are very similar. A chord is the selected notes of a scale playedsimultaneously. An arpeggio is the notes of the chord played one note at a time. The G natural minor scale is made up of these notes: G, A, Bb, C, D, Eb, F, G. The G minor arpeggio is made up of these notes: G, Bb, D, G (1, 3, 5, octave) which is the same as a G minor chord. Strum them together and you are playing a chord. Play them one at a time and you are playing an arpeggio.
Main Objectives: To become comfortable playing and hearing the sound of a minor arpeggio.
Style Meter Key Difficultyarpeggios 4/4 G minor easy
63

Style Meter Key Difficulty
P56 Minor Arp2A 2-octave G minor arpeggio requiring multiple left-hand position shifts.
Technique Tips: Notice the change in hand position and where the stretches are for the left hand. This approach is different from the one demonstrated in the 1-octave minor arpeggio. The 1-octave can remain in a single playing position, but a 2-octave arpeggio requires a couple of position shifts to reach all of the notes. Notice that the last note of the first measure and the first note of the second measure are the same. The fingering changes to accommodate movement up the neck. You could play either fingering for either note. This is a stylistic choice (notice that it happens again on the way down).
Theory Thoughts: A basic arpeggio is defined as the root, 3rd, 5th and octave of a scale. There are many places on your bass where you can find these notes (in different octaves). If you are playing a G minor arpeggio: G, Bb, D, G (1, 3, 5, octave) try to find every G, Bb and D on the neck. You will see patterns develop on the fretboard that can help you when walking the bass or taking a solo.
Main Objectives: To become comfortable playing and hearing the sound of a 2-octave minor arpeggio.
arpeggios 4/4 G minor medium
64

P57 Minor Pedal1An ascending minor scale pedaling back and forth between the root and the scale tones to help demonstrate different interval (distance) relationships within the minor scale.
Rock 4/4 E Major Easy
Technique Tips: This exercise uses a G minor scale to help you hear and recognize the intervals between the root note and each scale degree. By placing a root note G in between each scale step, you will begin to recognize the intervals that are being played. The better you get at recognizing these intervals, the easier it will be for you to learn musical passages by ear.
Theory Thoughts: The intervals in this ascending G natural minor scale are as follows: G to A (Major 2nd), G to Bb (minor 3rd), G to C (Perfect 4th), G to D (Perfect 5th), G to Eb (minor 6th), G to F (minor 7th).
Main Objectives: To become comfortable playing and hearing the sound of all the different intervals in a minor scale inrelation to the root or key of the scale.
Style Meter Key Difficultyscales 4/4 G minor medium
65

Style Meter Key Difficulty
P58 Minor Pedal2A descending minor scale pedaling back and forth between the octave root and the scaletones to help demonstrate different interval (distance) relationships within the minor scale.
Technique Tips: This exercise uses a G minor scale to help you hear and recognize the intervals between the root note and each scale degree. By placing a root note G in between each scale step, you will begin to recognize the intervals that are being played. The better you get at recognizing these intervals, the easier it will be for you to learn musical passages by ear.
Theory Thoughts: The intervals in this descending G natural minor scale are as follows: G to F (Major second), G to Eb (Major 3rd), G to D (Perfect 5th), G to C (Perfect 4th), G to Bb (Major 6th), G to A (Minor 7th).
Main Objectives: To become comfortable playing and hearing the sound of all the different intervals in a minor scale inrelation to the root or key of the scale.
scales 4/4 G minor medium
66

P59 Minor 4thsWalking quarter notes up and down a G minor scale 4 notes at a time.
Rock 4/4 E Major Easy
Technique Tips: The idea is to play 4 notes up the scale and then start again from the second note you played the time before. The pattern goes like this: G, A, Bb, C, then A, Bb, C, D, then Bb, C, D, Eb, all the way up to the octave G. Once you reach the octave G, the pattern turns around and comes back to the original G you started on. G, F, Eb, D, then F, Eb, D, C, then Eb, D, C, Bb, all the way down to the G the exercise began on.
Theory Thoughts: This type of exercise helps you combine a sense of rhythm with a sense of being in a key. Once you work an exercise like this up to a medium tempo, you can use this pattern (and many other variations on it) to create licks for solos or, help you transition from one chord to the next with an interesting bass line. Think about some different ways you can combine rhythm and notes.
Main Objectives: To become comfortable playing and hearing the sound of a minor scale while developing a 4-note repeating rhythm pattern.
Style Meter Key Difficultyscales 4/4 G minor medium
67

Style Meter Key Difficulty
P60 Minor Pedal3An ascending minor scale (similar to Minor_Pedal1) using eighth notes pedaling back and forth between the root and the scale tones to help demonstrate different interval (distance) relationships within the minor scale.
Technique Tips: This exercise uses a G minor scale to help you hear and recognize the intervals between the root note and each scale degree. Playing eighth notes builds new technical skills that will be used to your benefit in future playing situations. By placing a root note G in between each scale step, you will begin to recognize the intervals that are being played. The better you get at recognizing these intervals, the easier it will be for you to learn musical passages by ear.
Theory Thoughts: The intervals in this ascending G Major scale are as follows: G to A (Major 2nd), G to Bb (minor 3rd),G to C (Perfect 4th), G to D (Perfect 5th), G to Eb (minor 6th), G to F (minor 7th).
Main Objectives: To become comfortable playing and hearing the sound of all the different intervals in a minor scale inrelation to the root or key of the scale.
scales 4/4 G minor medium
68

P61 Minor Pedal4A descending minor scale (similar to Minor _Pedal2) using eighth notes pedaling back and forth between the root and the scale tones to help demonstrate different interval (distance) relationships within the major scale.
Rock 4/4 E Major Easy
Technique Tips: This exercise uses a G minor scale to help you hear and recognize the intervals between the root note and each scale degree. Playing eighth notes builds new technical skills that will be used to your benefit in future playing situations. By placing a root note G in between each scale step, you will begin to recognize the intervals that are being played. The better you get at recognizing these intervals, the easier it will be for you to learn musical passages by ear.
Theory Thoughts: The intervals in this descending G natural minor scale are as follows: G to F (Major 2nd), G to Eb(Major 3rd), G to D (Perfect 5th), G to C (Perfect 4th), G to Bb (Major 6th), G to A (Minor 7th).
Main Objectives: To become comfortable playing and hearing the sound of all the different intervals in a minor scale inrelation to the root or key of the scale.
Style Meter Key Difficultyscales 4/4 G minor medium
69

Style Meter Key Difficulty
P62 Minor Add3rdAn exercise using a G minor scale adding a 3rd an octave above (also known as #9).
Technique Tips: The notes on the bass are too low in pitch to allow for a chord to be created only on the low strings (without sounding muddy). To create a more pleasing sounding chord, add the minor 3rd scale degree up one octave (also called a #9). This creates more distance between the notes, resulting in a more pleasing sounding chord. In the same way that the 1st and8th scale degrees are the same notes (1 octave apart); the minor 3rd and #9 scale degrees are also the same.
Theory Thoughts: Chords on bass are not as common as playing single notes but done properly, they can be very effective. In this example, you are playing the root note on the E string and the 3rd of the chord on the G string. Some chords are major and some are minor. Since you are only playing the root and the 3rd, the only note that will change is the 3rd. If you study this example, you will realize which chords are minor and which ones are Major in the key of G minor. Note: the minor chord based on 2nd scale degree in the key of G minor (A minor) is actually a diminished chord (because it also has a flatted 5th). Since this example does not play the 5th scale degree, it appears to be minor.
Main Objectives: To become comfortable playing and hearing the sound of each scale degree with the 3rd added whichcreate the major and minor chords that naturally come out of a minor scale.
scales 4/4 G minor medium
70

P63 Min Penta 1A 1-octave G minor pentatonic scale.
Rock 4/4 E Major Easy
Technique Tips: This scale uses 2 notes per string, which requires more left-hand movement and less time spent per string than most of the scales demonstrated so far. The fingering of this scale begins with your index finger on the root (G), then up to your pinky finger to play the Bb. The rest of the scale is back and forth between your index and ring fingers. Always keep in mind that playing “in position” (assigning 1 finger per fret on your left hand) gives you economy of motion. The more you work on creating even strength across the fingers of your left hand, the more even your playing will sound. This is also true of your right hand. Whether you are playing finger-style, with a pick or using the slap-and-pop technique, you will benefit from slowing everything down and focusing on creating a consistent, even attack.
Theory Thoughts: Playing the pentatonic minor scale opens up ideas that are less “scale sounding” by omitting some of the normal notes found in a minor scale. Penta = 5, so this scale is based on 5 notes from the natural minor scale: Root, 3rd, 4th, 5th, 7th (and the octave of the root). The 2nd and 6th scale degrees are omitted. This scale is very commonly used in every-thing from heavy rock riffs to legendary guitar solos and all kinds of different vocal performances.
Main Objectives: To become comfortable playing and hearing the sound of a pentatonic minor scale.
Style Meter Key Difficultyscales 4/4 G minor easy
71

Style Meter Key Difficulty
P64 Min Penta 2A 1-octave G minor pentatonic scale with an added tri-tone (#4/b5) note.
Technique Tips: This scale is based on the G minor pentatonic scale we looked at in Min_Penta_1, with an additional note added. This scale is also referred to as the blues scale. The note we are adding is (in the case of G minor) C#/Db (two ways of describing the same note). This note is a tri-tone away from the root note (G). A tri-tone is a dissonant interval which is why there is a sense of tension when it is played. This scale is spelled out: G, Bb, C, (C#/Db), D, F, G.
Theory Thoughts: Playing the pentatonic minor scale opens up ideas that are less “scale sounding” by omitting some of the normal notes found in a minor scale. In this case we have not only removed the 2nd and 6th scales degrees from a natural minor scale, but we have also added a note that is not part of a natural minor scale. Because the new note is a tri-tone away, playing this scale gives you a note that creates tension. This allows you to move in and out of that tension as you desire.
Main Objectives: To become comfortable playing and hearing the sound of a pentatonic minor scale with a tri-tone added to create tension (sometimes referred to as a “blue” note as it is the defining note of a blues scale).
scales 4/4 G minor easy
72

P65 Tch TritoneA look at the tri-tone as it can be applied over the course of a 3-chord blues progression.
Rock 4/4 E Major Easy
Technique Tips: This exercise requires playing a root note (typically located in the lower range of the bass), then sliding way up the neck to find the tri-tone that works with the root note you just played. A tri-tone is made up of two notes where the second note is (visually) 1 fret and 1 string up from the first note. It is important to understand which notes you are playing and where you can quickly locate them when you need them. Playing parts that have such wide jumps takes time. Play these slowly and work on learning what you are playing. Given time, this approach will become second nature, allowing you to play a tri-tone chord whenever you like.
Theory Thoughts: If you study the music below, you can see that the tri-tone shape is always the same (in terms of your left hand). If you look at the notes being played, you will see they are either a Major 3rd or a flatted 7th from the root of their respective chord. In the case of measure 1, the low E is then followed by a tri-tone made up of the notes D (flatted 7th) andG# (Major 3rd). In measure 2, sliding that tri-tone up 6 frets gives you the same two notes, except they are now inverted, with G# (now found on the D string) and D (now found on the G string). The same happens when you move from E to A in measure 5. The tri-tone gives you C# (Major 3rd) and G (flatted 7th). In measure 6 we again slide the tri-tone up 6 frets (inverting the notes), with G (now on the D string) and C# (now on the G string). Look for dominant seven chords to play these tri-tones over. Any chord that is written with a “7” after the letter is a dominant seven chord. This means the chord is based on a major scale, but has a flattened 7th. Examples would be E7, A7, B7, etc.
Main Objectives: To become comfortable playing and hearing the sound of a tri-tone and to understand how to use it to create some interesting chords on bass when playing over dominant seven chords.
Style Meter Key Difficultytri-tone 4/4 E major medium
73

Style Meter Key Difficulty
P66 Teach OctaveAn exercise playing 16th notes through the cycle of fourths.
Technique Tips: From a technical standpoint, this exercise is great for working on string skipping. When playing bass finger-style, moving quickly up the strings (from lower- to higher-pitched strings) is one of the toughest things to do. This example alternates strings every quarter-note beat to cover both the starting note and the octave. In addition, playing on different strings throughout the exercise is great practice for improving your right-hand technique. The way to get the most from this exercise is to start slow and develop the technique.
Theory Thoughts: This exercise is designed to take you through the cycle of fourths while playing octaves. Playing through the cycle of fourths is an important musical exercise because it helps you understand how chords resolve. In this example, we begin with the open E string followed by its octave (2nd fret of the D string). By continually moving up a fourth, you eventually play every note and resolve back to E. The cycle goes like this: E, A, D, G, C, F, Bb, Eb, Ab, Db, (Gb/F#), B, E. Notice the Gb/F#. The term “cycle of fourths” implies each letter name will go up 4 steps. Although Gb and F# are the same note (also called “enharmonic equivalents”) Db must go 4 letter names up (to Gb). Since Gb to B is only 3 letter names apart, it is more appropriate for Gb to be called F#. Think of each note in this cycle of fourths naturally resolving to the next one.
Main Objectives: To become comfortable playing and hearing the cycle of fourths and understanding how using this cycle helps chord progressions resolve or take you to a new key within the same piece of music.
intervals 4/4 none medium
74

P67 Teach Rhy1A sixteenth-note rhythmic study systematically removing notes to increase rhythmic awareness.
Rock 4/4 E Major Easy
Technique Tips: This exercise begins with a basic pattern of playing straight sixteenth notes. Since 4 sixteenth notes = 1 quarter note, you will notice 4 groups of sixteenth notes per measure (equaling 16 notes). The first eight measures focus on removing 1 note at a time from the end of each 4-note grouping. The second eight measures focus on removing 1 note at a time from the beginning of each 4-note grouping. The idea here is to force you to think and feel each group of notes as a 4-note group, with rests placed in interesting places.
Theory Thoughts: Although we are playing only a single note for the point of this exercise, the lesson to be learned is about when instead of what. Knowing the notes you can play over any given chord is part of the learning process, but remember: “People do not dance to notes, they dance to rhythms.” Having total rhythmic control is essential to being a great bass player. Once you understand the concept of breaking rhythms down, you will naturally begin applying them to all of the notes you play.
Main Objectives: To become comfortable playing and hearing different patterns of sixteenth notes and be able to play them with confidence in any musical situation. Understanding the importance of rhythm in music is one of the most importantelements of being a great bass player.
Style Meter Key Difficultyrhythm 4/4 none medium
75

Style Meter Key Difficulty
P68 Teach Rhy2A series of rhythm patterns demonstrating the difference between eighth and sixteenth notes vs. eighth- and sixteenth-note triplets.
Technique Tips: This exercise gives you increased rhythmic intensity from one measure to the next. The first two measures (notice they repeat 3 times for a total of 8 bars) goes back and forth between playing eighth notes and sixteenth notes. The idea is to be comfortable playing and transitioning from one to the other. The second two measures (also repeat 3 times for a total of 8 bars) go back and forth between eighth-note triplets and sixteenth-note triplets. A triplet is a group of three notes performed in the time of two notes of the same value. Being able to seamlessly shift between any of these rhythmic feels is crucial to developing your overall sense of rhythm, and will allow you to play the same notes you already know in all kinds of effective and exciting rhythms.
Theory Thoughts: Although we are playing only a single note for the point of this exercise, the lesson to be learned is about when instead of what. Knowing the notes you can play over any given chord is part of the learning process, but remember: “People do not dance to notes, they dance to rhythms.” Having total rhythmic control is essential to being a great bass player. Once you understand the concept of breaking rhythms down, you will naturally begin applying them to all the notes you play.
Main Objectives: To become comfortable playing and hearing different patterns of eighth and sixteenth notes (straight and triplet versions) and be able to play them with confidence in any musical situation. Understanding the importance of rhythm in music is one of the most important elements of being a great bass player.
rhythm 4/4 none medium
76

P69 Teach Rhy3A series of rhythm patterns taking you systematically from a whole note all the way up to a sixteenth-note triplet, increasing the subdivision one degree at a time.
Rock 4/4 E Major Easy
Technique Tips: This exercise gives you increased rhythmic intensity from one measure to the next. The focus is on the transition from one subdivision to the next. Focus on hearing the next subdivision in your head before that measure actually begins. It is important to apply the same focus on playing good, solid notes with the same level of intensity from measure to measure. Being able to play any subdivision at any level of intensity and transition to other subdivisions cleanly is a huge step in becoming a great bass player. Try putting your bass down and tapping the rhythms with your fingers (or humming them). Knowing them in your mind and vocalizing them makes playing them on your bass much easier.
Theory Thoughts: Total rhythmic control is essential to being a great bass player. Once you understand the concept of breaking rhythms down, you will naturally begin applying them to any notes you might be playing.
Main Objectives: To become comfortable playing and hearing all of the typical rhythmic subdivisions and to be able to play them with confidence in any musical situation. Understanding the importance of rhythm in music is one of the most important elements of being a great bass player.
Style Meter Key Difficultyrhythm 4/4 none medium
77

P69 Teach Rhy3 (continued)
A series of rhythm patterns taking you systematically from a whole note all the way up to a sixteenth-note triplet, increasing the subdivision one degree at a time.
Rock 4/4 E Major EasyStyle Meter Key Difficultyrhythm 4/4 none medium
78

Style Meter Key Difficulty
P70 Teach Slap 1An exercise focused on developing hand coordination and building muscle memory to assist with the playing of octaves up and down the neck of the bass.
Technique Tips: To use the slap-and-pop technique, the low notes should be played with the ball of your thumb (look for a sweet spot just after the end of the fretboard). The high notes should be plucked with either your index or middle finger(whichever feels more comfortable for you). Focus on the quality of the notes you are playing. The thumb attack is like a stick hitting a drum that moves quickly out of the way. The same holds true when popping the octave note. The focus is on a strong attack followed by quick muting. Your left hand should lift off the note being played just enough to mute without losing contact with the string or the neck. This style of muting helps add a percussive feel to your slap-and-pop technique.
Theory Thoughts: The concept behind the slap-and-pop technique is to emulate the percussive qualities of a drum set.
Main Objectives: To introduce your hands to the slap-and-pop technique using simple octaves up and down the neck, and to add the rhythm of this exercise into your bag of tricks so that playing a riff based on this rhythm becomes second nature.
slap-and-pop 4/4 none medium
79

P71 Teach Slap 2An exercise focused on applying the slap-and-pop technique to a major scale.
Rock 4/4 E Major Easy
Technique Tips: In this exercise, we are playing an eighth-note pattern back and forth between the root and octave of all the notes in a G Major scale. Start slow and develop the technique properly before trying to play at faster tempos. Notice how abrupt each note sounds. The thumb attack is similar to a hammer striking a piano string. A quick attack, then the thumb lifts out of the way. The same holds true when popping the octave note. The focus is on a strong attack followed by quick muting.A very important part of this exercise involves left-hand muting. Your left hand should lift off the note being played just enough to mute without leaving the string or the neck. This style of muting helps add a percussive feel to your slap-and-pop technique.
Theory Thoughts: The concept behind the slap-and-pop technique is really the emulation of a drum set. The thumb provides the low, punchy kick drum sound and the popping of the higher strings provides the snare drum sound. Any drumbeat you hear can be applied to the slap-and-pop technique. By moving up and down the neck, your hands get used to the way the string tension changes in different playing positions.
Main Objectives: To introduce your hands to the slap-and-pop technique while playing a G Major scale.
Style Meter Key Difficultyslap-and-pop 4/4 G major medium
80

Style Meter Key Difficulty
P72 Teach Slap 3An exercise focused on applying the slap-and-pop technique to a minor scale.
Technique Tips: In this exercise, we are playing an eighth-note pattern back and forth between the root and octave of all the notes in a G minor scale. Start slow and develop the technique properly before trying to play at faster tempos. Notice how abrupt each note sounds. The thumb attack is like a hammer striking a piano string. A quick attack, then the thumb lifts out of the way. The same holds true when popping the octave note. The focus is on a strong attack followed by quick muting. A very important part of this exercise involves left-hand muting. Your left hand should lift off the note being played just enough to mute without leaving the string or the neck. This style of muting helps add a percussive feel to your slap-and-pop technique.
Theory Thoughts: A good goal to strive for is to be playing finger-style, change technique to play a slap-and-pop riff, and then go back to playing finger-style without dropping the beat or making any undesired sounds. The slap-and-pop technique is simply a technique; how you apply it makes all the difference.
Main Objectives: To introduce your hands to the slap-and-pop technique while playing a G minor scale.
slap-and-pop 4/4 G minor medium
81

P73 Teach Slap 4An exercise focused on using the slap-and-pop technique to play over a blues progression.
Rock 4/4 E Major Easy
Technique Tips: In this exercise, we combine the slap-and-pop technique playing octaves with a 3-chord blues progression to introduce changing chords into playing with the slap-and-pop technique. The bass line repeats over each chord. This gives you the opportunity to see the riff on the fingerboard and discover how to transpose it to different strings or playing positionsto suit the chord being played.
Theory Thoughts: Measures 1-4 are all being played against an E7 chord. Notice how the bass creates a feeling of movement without a chord change. One of the most powerful intervals (distance between two notes) to play is called a tri-tone, because it creates tension. When the bass plays the Bb over an E7 chord, there is tension, which is then released as the bass moves up to play B.
Main Objectives: To combine the slap-and-pop technique with a blues-based chord progression. This exercise forces the player to consider how a riff played in E7 can be moved or transposed to fit the chord change to A7 or B7.
Style Meter Key Difficultyslap-and-pop 4/4 E major medium
82

P73 Teach Slap 4 (continued)An exercise focused on using the slap-and-pop technique to play over a blues progression.
Rock 4/4 E Major EasyStyle Meter Key Difficultyslap-and-pop 4/4 E major medium
83

Technique Tips: The ability to take this pattern back and forth between strings presents a challenge. Managing your hands from string to string without missing notes is important. The popping of strings is much easier to do on the G string than on the D string because there is wide-open space underneath the G string (whereas the D string pop has to navigate between the D and G strings to be played). Focus on the quality of the notes and achieving very tight muting (no sloppiness; tight note length).
Theory Thoughts: A good slap-and-pop technique comes from effective muting. Moving back and forth between different strings, you will notice that things get sloppy sounding. Slow things down if needed. Playing this exercise evenly up and down the neck may take some time, as your hands get used to the different string tension from one position to the next.
Main Objectives: To introduce your hands to a more advanced slap-and-pop technique using simple octaves up and down the neck, and to add the pattern of this exercise into your bag of tricks so that playing a riff based on this rhythm is second nature.
P74 Teach Slap 5A more intense slap and pop exercise which incorporates left and right hand movement back and forth between the E and A strings. The intense rhythm for the right hand now must allow for string changing while playing octaves up and down the neck of the bass.
Rock 4/4 E Major EasyStyle Meter Key Difficultyslap-and-pop 4/4 none hard
84

P74 Teach Slap 5 (continued)A more intense slap and pop exercise which incorporates left and right hand movement back and forth between the E and A strings. The intense rhythm for the right hand now must allow for string changing while playing octaves up and down the neck of the bass.
Rock 4/4 E Major EasyStyle Meter Key Difficultyslap-and-pop 4/4 none hard
85

P74 Teach Slap 5 (continued)A more intense slap and pop exercise which incorporates left and right hand movement back and forth between the E and A strings. The intense rhythm for the right hand now must allow for string changing while playing octaves up and down the neck of the bass.
Rock 4/4 E Major EasyStyle Meter Key Difficultyslap-and-pop 4/4 none hard
86

Style Meter Key Difficulty
P75 Teach Slap 6An exercise focused on applying the slap-and-pop technique to a minor scale with the placementof the root note (G) in between each scale tone to emphasize the intervals of the minor scale.
Technique Tips: In this exercise, we are playing an eighth-note octave pattern while also placing the root note in between each scale degree. The idea here is to combine your slap-and-pop technique with your ear’s memory of the different degrees of a minor scale. The end result should help you play slap-and-pop riffs beyond simply climbing up and down a scale. You should be able to hear an interval (distance between two notes) that you want to play and your hands should automatically shift to the correct note you want to play.
Theory Thoughts: Great players can hear something they want to express inside their head before they ever play a note. Establishing a connection between your technique and your ear is important. This exercise throws you back and forth between G and the different notes in a G minor scale. Being able to hear the distance between G and Bb (an interval of a minor 3rd) is the first goal. Being able to play a Bb (using your slap-and-pop technique) is the second goal.
Main Objectives: To connect your ears and your technique so you can hear the intervals found within the G minor scale and to be able to play those intervals using the slap-and-pop technique.
slap-and-pop 4/4 G minor medium
87

Style Meter Key Difficulty
Pop SongA complete pop song utilizing different rhythmic and musical approaches on bass designedto support the song.
Technique Tips: Listening along to this song, some things will jump out as familiar to you while other parts may seem very unfamiliar. Try putting the bass down and following along with the written music using a pencil to mark the measures that interest you. Then go back and study those specific measures with your bass and add something new to your playing.
Theory Thoughts: How does the bass move the song forward? When the bass plays notes outside of the normal pattern, which scale degrees (of the chord) are being played and what is the result of those note choices? Discovering the tonality ofthe notes in the context of the chord being played will give you the knowledge to create powerful and effective bass lines.
Main Objectives: To hear a complete piece of music and pull out the specific parts you enjoy for the purpose of analyzing and emulating them. To learn how to play the written bass part, then create your own bass line for this song.
pop 4/4 G major medium
88

Style Meter Key Difficulty
Pop Song (continued)A complete pop song utilizing different rhythmic and musical approaches on bass designedto support the song.
pop 4/4 G major medium
89

Style Meter Key Difficulty
Pop Song (continued)A complete pop song utilizing different rhythmic and musical approaches on bass designedto support the song.
pop 4/4 G major medium
90

Style Meter Key Difficulty
Pop Song (continued)A complete pop song utilizing different rhythmic and musical approaches on bass designedto support the song.
pop 4/4 G major medium
91

Style Meter Key Difficulty
Pop Song (continued)A complete pop song utilizing different rhythmic and musical approaches on bass designedto support the song.
pop 4/4 G major medium
92

Style Meter Key Difficulty
Pop Song (continued)A complete pop song utilizing different rhythmic and musical approaches on bass designedto support the song.
pop 4/4 G major medium
93

Style Meter Key Difficulty
Pop Song (continued)A complete pop song utilizing different rhythmic and musical approaches on bass designedto support the song.
pop 4/4 G major medium
94

95
Rock SongA complete rock song utilizing different rhythmic and musical approaches on bassdesigned to support the song.
Rock Easy
Technique Tips: Listening along to this song, some things will jump out as familiar to you while other parts may seem very unfamiliar. Try putting the bass down and following along with the written music using a pencil to mark the measures that interest you. Then go back and study those specific measures with your bass and add something new to your playing.
Theory Thoughts: How does the bass move the song forward? When the bass plays notes outside of the normal pattern, which scale degrees (of the chord) are being played and what is the result of those note choices? Discovering the tonality ofthe notes in the context of the chord being played will give you the knowledge to create powerful and effective bass lines.
Main Objectives: To hear a complete piece of music and pull out the specific parts you enjoy for the purpose of analyzingand emulating them. To learn how to play the written bass part, then create your own bass line for this song.
Style Meter Key Difficultyrock 4/4 E minor medium

Rock Song (continued)A complete rock song utilizing different rhythmic and musical approaches on bassdesigned to support the song.
Rock EasyStyle Meter Key Difficultyrock 4/4 E minor medium
96

Rock Song (continued)A complete rock song utilizing different rhythmic and musical approaches on bassdesigned to support the song.
Rock EasyStyle Meter Key Difficultyrock 4/4 E minor medium
97

Rock Song (continued)A complete rock song utilizing different rhythmic and musical approaches on bassdesigned to support the song.
Rock EasyStyle Meter Key Difficultyrock 4/4 E minor medium
98

Rock Song (continued)A complete rock song utilizing different rhythmic and musical approaches on bassdesigned to support the song.
Rock EasyStyle Meter Key Difficultyrock 4/4 E minor medium
99