A07763 OU 206 206X Churchill KK R9 - Akkar
12
Models 206-206X
Transcript of A07763 OU 206 206X Churchill KK R9 - Akkar

Models 206-206X
FIREARMS SAFETY
READ THE INSTRUCTIONS AND WARNINGS INTHIS MANUAL CAREFULLY BEFORE USING THISFIREARM
CAUTIONFIREARMS SAFETY DEPENDS ON YOU!
THIS MANUAL CONTAINS DISCLAIMER OF LIABILITY
WARNING - LEAD EXPOSURE
WARNING
FIREARMS SAFETY IS YOUR RESPONSIBILITY.
1
We bel�eve that safe f�rearms handl�ng �s the most�mportant cons�derat�on for anyone who uses f�rearmsand ammun�t�on. Please take a few m�nutes to throughlyread and understand th�s �nstruct�on manual �ncludedw�th th�s shotgun.
Don't rely on your gun's safety. Treat every gun as �fwere loaded and ready to f�re.
Never cross a fence, cl�mb a tree or jump a d�tch w�th aloaded gun.
Never load or carry a loaded gun unt�l you �ntend to use�t. Watch your muzzle so the other fellow doesn't have to.
Keep guns and ammun�t�on separately and �n lockedstorage.
Don't shoot unless absolutely sure of your target andwhat �s beyond �t.
Know the range of your gun.
Always wear eye and ear protect�on when shoot�ng.
Always be sure the barrel �s free of obstruct�ons, andonly carry ammun�t�on spec�f�cally �ntended for the gunyou are us�ng.
Do not alter or mod�fy your gun. Have your gunregularly checked by a gunsm�th.
1. Important warn�ngs that should be read and understoodbefore us�ng th�s f�rearm.
2. D�rect�ons and procedures for handl�ng, load�ng, f�r�ngand unload�ng.
3. Instruct�ons for care, clean�ng, repa�r, and serv�ce ofth�s shotgun.
Th�s �nstruct�on and safety manual �s des�gned to helpyou �n learn�ng how to properly use and care for yourshotgun. Only when you are certa�n you have fullyfam�l�ar�zed yourself w�th the funct�on of your f�rearmshould you pract�ce load�ng, unload�ng and f�r�ng w�thl�ve rounds of ammun�t�on.Th�s �nstruct�on manual should always accompanyth�s f�rearm and be transferred w�th �t upon change ofownersh�p. Should you ever need to replace �t, th�smanual �s ava�lable FREE upon request.
We shall not be respons�ble for product malfunct�on�ngor for phys�cal �njury, death or damage to propertyresult�ng from e�ther �ntent�onal or acc�dental d�schargeof th�s f�rearm, �ts cr�m�nal or negl�gent use, �mproper orcareless handl�ng, unauthor�zed mod�f�cat�ons oralterat�on, use of defect�ve or �mproper or hand-loadedor (replaced) ammun�t�on, or from �ts use for purposesor subject�on to treatment for wh�ch �t was not des�gned.For your safety, use only or�g�nal h�gh qual�tycommerc�ally manufactured ammun�t�on �n goodcond�t�on that �s appropr�ate to the cal�ber / gauge ofyour gun. We shall not be respons�ble for products orresults from use of defect�ve, �mproper or reloadedammun�t�on.
D�scharg�ng f�rearms �n poorly vent�lated areas, clean�ngf�rearms, or handl�ng ammun�t�on may result �nexposure to lead and other substances that may causeb�rth defects, reproduct�ve harms, and other ser�ousphys�cal �njur�es. Have adequate vent�lat�on at all t�mes.Wash your hands throughly after exposure. Shoot�ng orclean�ng guns may expose you to lead.
Pr�or to remov�ng th�s gun from �ts packag�ng and pr�or toload�ng and f�r�ng, carefully and throughly read the ent�re�nstruct�on manual wh�ch g�ves adv�ce on the gun'sproper handl�ng and funct�on�ng. Your safety and that ofothers (�nclud�ng your fam�ly) depends on yourrespons�ble compl�ance w�th that adv�ce. If unfam�l�arw�th f�rearms, seek superv�sed �nstruct�on.
SAFE GUN HANDLING IS YOUR PERSONAL RESPONSIBILITYAT ALL TIMES. D�sregard�ng warn�ngs �n th�s manual mayresult �n �njury or death to you and others and damage toproperty.
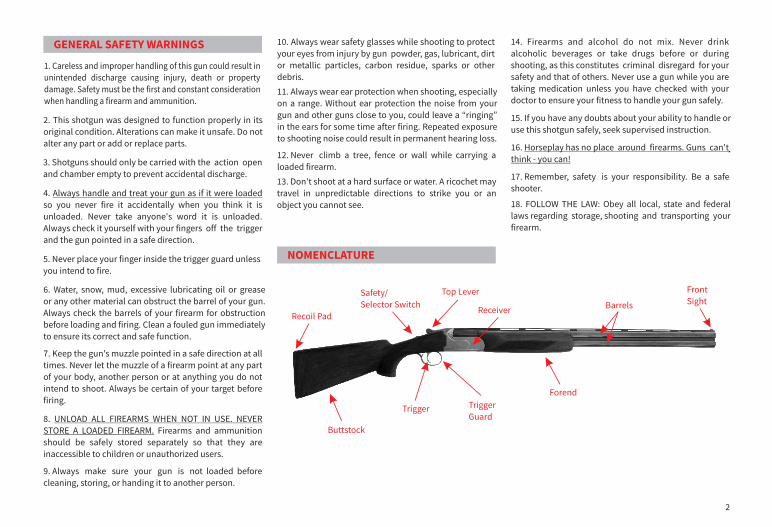
Safety/Selector Sw�tch
Top LeverBarrels
Tr�gger Tr�ggerGuard
Buttstock
Forend
Rece�ver
FrontS�ght
2
2. Th�s shotgun was des�gned to funct�on properly �n �tsor�g�nal cond�t�on. Alterat�ons can make �t unsafe. Do notalter any part or add or replace parts.
3. Shotguns should only be carr�ed w�th the act�on openand chamber empty to prevent acc�dental d�scharge.
4. Always handle and treat your gun as �f �t were loadedso you never f�re �t acc�dentally when you th�nk �t �sunloaded. Never take anyone's word �t �s unloaded.Always check �t yourself w�th your f�ngers off the tr�ggerand the gun po�nted �n a safe d�rect�on.
5. Never place your f�nger �ns�de the tr�gger guard unlessyou �ntend to f�re.
6. Water, snow, mud, excess�ve lubr�cat�ng o�l or greaseor any other mater�al can obstruct the barrel of your gun.Always check the barrels of your f�rearm for obstruct�onbefore load�ng and f�r�ng. Clean a fouled gun �mmed�atelyto ensure �ts correct and safe funct�on.
7. Keep the gun's muzzle po�nted �n a safe d�rect�on at allt�mes. Never let the muzzle of a f�rearm po�nt at any partof your body, another person or at anyth�ng you do not�ntend to shoot. Always be certa�n of your target beforef�r�ng.
8. UNLOAD ALL FIREARMS WHEN NOT IN USE. NEVERSTORE A LOADED FIREARM. F�rearms and ammun�t�onshould be safely stored separately so that they are�naccess�ble to ch�ldren or unauthor�zed users.
9. Always make sure your gun �s not loaded beforeclean�ng, stor�ng, or hand�ng �t to another person.
GENERAL SAFETY WARNINGS
1. Careless and �mproper handl�ng of th�s gun could result �nun�ntended d�scharge caus�ng �njury, death or propertydamage. Safety must be the f�rst and constant cons�derat�onwhen handl�ng a f�rearm and ammun�t�on.
10. Always wear safety glasses wh�le shoot�ng to protectyour eyes from �njury by gun powder, gas, lubr�cant, d�rtor metall�c part�cles, carbon res�due, sparks or otherdebr�s.11. Always wear ear protect�on when shoot�ng, espec�allyon a range. W�thout ear protect�on the no�se from yourgun and other guns close to you, could leave a “r�ng�ng”�n the ears for some t�me after f�r�ng. Repeated exposureto shoot�ng no�se could result �n permanent hear�ng loss.
12. Never cl�mb a tree, fence or wall wh�le carry�ng aloaded f�rearm.
13. Don't shoot at a hard surface or water. A r�cochet maytravel �n unpred�ctable d�rect�ons to str�ke you or anobject you cannot see.
14. F�rearms and alcohol do not m�x. Never dr�nkalcohol�c beverages or take drugs before or dur�ngshoot�ng, as th�s const�tutes cr�m�nal d�sregard for yoursafety and that of others. Never use a gun wh�le you aretak�ng med�cat�on unless you have checked w�th yourdoctor to ensure your f�tness to handle your gun safely.
15. If you have any doubts about your ab�l�ty to handle oruse th�s shotgun safely, seek superv�sed �nstruct�on.
16. Horseplay has no place around f�rearms. Guns can'tth�nk - you can!
17. Remember, safety �s your respons�b�l�ty. Be a safeshooter.
18. FOLLOW THE LAW: Obey all local, state and federallaws regard�ng storage, shoot�ng and transport�ng yourf�rearm.
Reco�l Pad
NOMENCLATURE
F�g.1 F�g.2
F�g.3
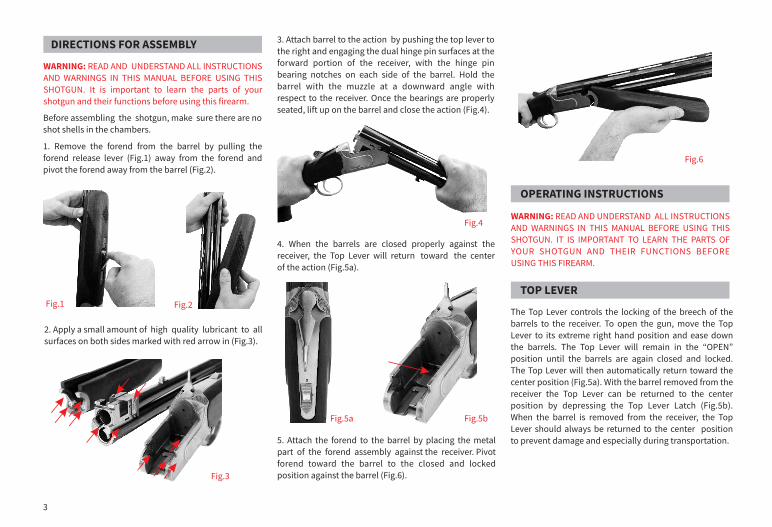
F�g.4
F�g.5a F�g.5b
F�g.6
DIRECTIONS FOR ASSEMBLY
OPERATING INSTRUCTIONS
TOP LEVER
3
WARNING: READ AND UNDERSTAND ALL INSTRUCTIONSAND WARNINGS IN THIS MANUAL BEFORE USING THISSHOTGUN. It �s �mportant to learn the parts of yourshotgun and the�r funct�ons before us�ng th�s f�rearm.
Before assembl�ng the shotgun, make sure there are noshot shells �n the chambers.
1. Remove the forend from the barrel by pull�ng theforend release lever (F�g.1) away from the forend andp�vot the forend away from the barrel (F�g.2).
2. Apply a small amount of h�gh qual�ty lubr�cant to allsurfaces on both s�des marked w�th red arrow �n (F�g.3).
4. When the barrels are closed properly aga�nst therece�ver, the Top Lever w�ll return toward the centerof the act�on (F�g.5a).
5. Attach the forend to the barrel by plac�ng the metalpart of the forend assembly aga�nst the rece�ver. P�votforend toward the barrel to the closed and lockedpos�t�on aga�nst the barrel (F�g.6).
WARNING: READ AND UNDERSTAND ALL INSTRUCTIONSAND WARNINGS IN THIS MANUAL BEFORE USING THISSHOTGUN. IT IS IMPORTANT TO LEARN THE PARTS OFYOUR SHOTGUN AND THEIR FUNCTIONS BEFOREUSING THIS FIREARM.
The Top Lever controls the locking of the breech of thebarrels to the receiver. To open the gun, move the TopLever to its extreme right hand position and ease downthe barrels. The Top Lever will remain in the “OPEN”position until the barrels are again closed and locked.The Top Lever will then automatically return toward thecenter position (Fig.5a). With the barrel removed from thereceiver the Top Lever can be returned to the centerposition by depressing the Top Lever Latch (Fig.5b).When the barrel �s removed from the receiver, the TopLever should always be returned to the center positionto prevent damage and especially during transportation.
3. Attach barrel to the act�on by push�ng the top lever tothe r�ght and engag�ng the dual h�nge p�n surfaces at theforward port�on of the rece�ver, w�th the h�nge p�nbear�ng notches on each s�de of the barrel. Hold thebarrel w�th the muzzle at a downward angle w�threspect to the rece�ver. Once the bear�ngs are properlyseated, l�ft up on the barrel and close the act�on (F�g.4).
F�g.7a F�g.7b
F�g.9
F�g.8
F�g.10
SAFETY / BARREL SELECTOR
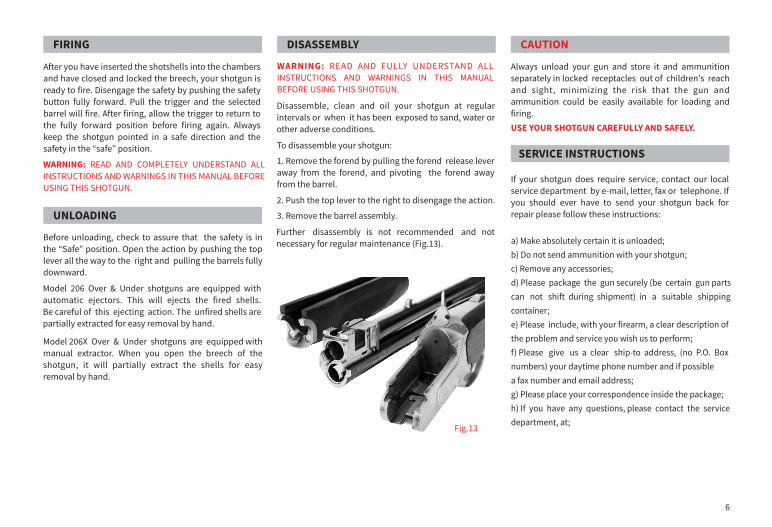
SELECTIVE AUTOMATIC EJECTORS
Model 206 Over & Under shotguns are equipped withautomatic ejectors. When you open the breech of the shotgun,they will automatically eject a fired case and partially extractany unfired shell for easy removal by hand (Fig.8).
EXTRACTOR
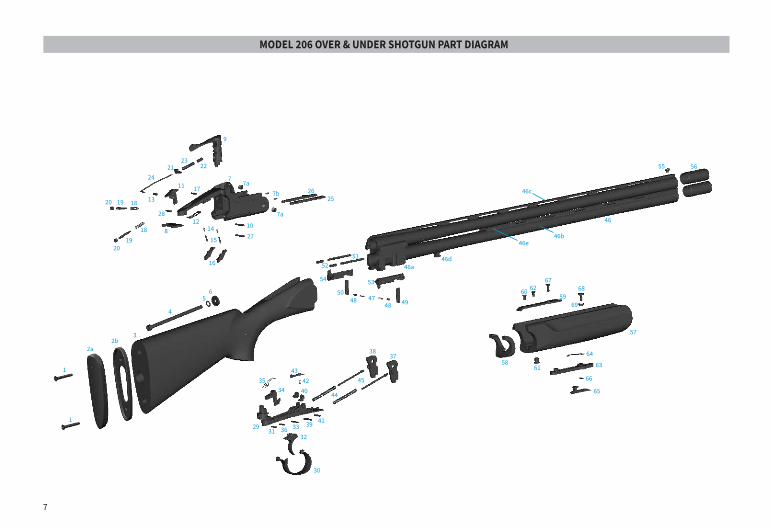
MULTI CHOKE TUBES
Model 206X Over & Under shotguns are equipped withmanual extractor. When you open the breech of the shotgun,�t will partially extract the shells for easy removal byhand (Fig.9).
Constr�ct�onName Mark�ngsNotchesInch mm
Cyl�nder
Skeet
Mod�f�ed
Improved Cyl�nder
Improved Mod�f�ed
Full
I I I I I II I I I II I I II I II II
CSICMIMF
.005” 0.13
.010” 0.25
.020” 0.51
.025” 0.64
.035” 0.89
.000” 0.00
4
Safety is first and foremost when handling any firearm.To engage the safety, slide the Safety Button fullyrearward. There is a visible “S” to help guide you. Todisengage the safety in order to fire the shotgun, slidethe Safety Button fully forward. Always keep the safetyin the “Safe” position until you are ready to fire theshotgun.
Hunt�ng models are equipped with an automatic safety.When the top lever is moved to the extreme right handposition, the Safety Button will automatically be movedto the rear position or “Safe” position. The Sporting andTrap models are equipped with only a manual safetywhich requires the Safety Button to be manually movedrearward to the “Safe” position to engage the safety fromthe fire position.
WARNING: SPORTING AND TRAP MODELS ARE EQUIPPEDWITH A MANUAL SAFETY ONLY!
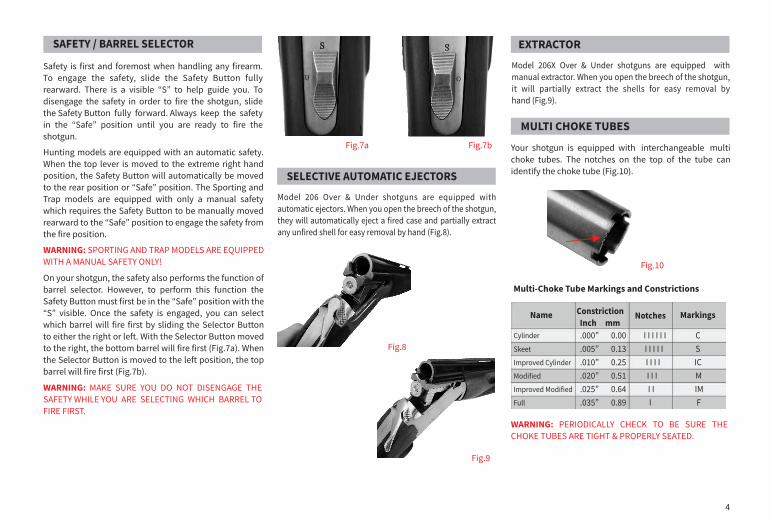
On your shotgun, the safety also performs the function ofbarrel selector. However, to perform this function theSafety Button must first be in the “Safe” position with the“S” visible. Once the safety is engaged, you can selectwhich barrel will fire first by sliding the Selector Buttonto either the right or left. With the Selector Button movedto the right, the bottom barrel will fire first (Fig.7a). Whenthe Selector Button is moved to the left position, the topbarrel will fire first (Fig.7b).
WARNING: MAKE SURE YOU DO NOT DISENGAGE THESAFETY WHILE YOU ARE SELECTING WHICH BARREL TOFIRE FIRST.
Your shotgun �s equ�pped w�th �nterchangeable mult�choke tubes. The notches on the top of the tube can�dent�fy the choke tube (F�g.10).
WARNING: PERIODICALLY CHECK TO BE SURE THECHOKE TUBES ARE TIGHT & PROPERLY SEATED.
Mult�-Choke Tube Mark�ngs and Constr�ct�ons

F�g.12
F�g.11
LOADING
5
Gauge & Chamber Shells can be used
12/76 12Ga 3”
12/89 12Ga 3 ½”
20/76 20Ga 3”
12/89 12Ga 3 ½”12/70 12Ga 2 ¾” 12/76 12Ga 3”
20/70 20Ga 2 ¾” 20/76 20Ga 3”
410/76 410cal 3”
12/70 12Ga 2 ¾” 12/76 12Ga 3”
28/70 28Ga 2 ¾”
410/76 410cal 3”
28/70 28Ga 2 ¾”
410/70 410cal 2 ¾”
AMMUNITION
WARNING: STEEL SHOT USAGE
Before chang�ng a choke tube, always make sure thatyour shotgun �s unloaded and the safety �s �n the“Safe” pos�t�on. To change the choke tubes, use thechoke tube wrench. The wrench and add�t�onal chokesare suppl�ed �n the shotgun box. Insert the wrench �ntothe recessed space of the tube and unscrewcounterclockw�se. Insert the des�red choke tube and seatw�th the wrench �n the clockw�se d�rect�on (F�g.11).
WARNING: NEVER FIRE YOUR SHOTGUN WITHOUTA CHOKE TUBE INSTALLED. This could damage the choketube threads on the inside of the barrels.
Use only h�gh qual�ty factory ammun�t�on spec�f�callydes�gned for your gauge of shotgun. The gauge andchamber are marked on barrel. The shells that can beused for each gauge are l �sted at below table. We do notrecommend us�ng slugs w�th choke tubes t�ghter than�mproved cyl�nder.
Your shotgun w�ll accommodate steel shot. Howeversteel shot (up to and �nclud�ng shot s�ze #2) should notbe f�red through your shotgun w�th a choke t�ghter thanmod�f�ed. If shot larger than #2 �s used, the t�ghtestchoke used should be an �mproved cyl�nder. Do not usesteel shot w�th �mproved mod�f�ed, full or extra full choketubes (flush mount or external).
WARNING: ACCIDENTAL LOADING AND DISCHARGE OFSHELLS OF THE WRONG GAUGE IN YOUR GUN CANRESULT IN DAMAGE TO YOUR GUN AND INJURY TO THESHOOTER OR OTHERS.
Only carry the proper ammun�t�on w�th you when shoot�ng.
Do not use a cartr�dge that �s longer than the max�mum cartr�dge length that �s stamped on the barrel.
WARNING: READ AND UNDERSTAND ALL INSTRUCTIONSAND WARNINGS IN THIS MANUAL BEFORE USING THISSHOTGUN.
It �s �mportant to learn the parts of your shotgun andthe�r funct�ons before us�ng th�s f�rearm. Be sure of yourtarget and what’s beyond before f�r�ng.
To load your shotgun, be sure the safety �s �n the “Safe”pos�t�on, open the act�on by mov�ng the top lever to ther�ght. Th�s w�ll cause the lock to d�sengage and allowthe barrels to p�vot downward expos�ng the chambers.Insert shotshells of the appropr�ate gauge and s�ze �ntothe chambers (F�g.12). When you are f�n�shed load�ng thechambers, close the breech by p�vot�ng the barrelsaga�nst the act�on. The top lever w�ll return toward thecenter pos�t�on when the breech �s closed and locked.
F�g.13
CAUTION
a) Make absolutely certa�n �t �s unloaded;b) Do not send ammun�t�on w�th your shotgun;c) Remove any accessor�es;d) Please package the gun securely (be certa�n gun partscan not sh�ft dur�ng sh�pment) �n a su�table sh�pp�ngconta�ner;e) Please �nclude, w�th your f�rearm, a clear descr�pt�on ofthe problem and serv�ce you w�sh us to perform;f) Please g�ve us a clear sh�p-to address, (no P.O. Boxnumbers) your dayt�me phone number and �f poss�blea fax number and ema�l address;g) Please place your correspondence �ns�de the package;h) If you have any quest�ons, please contact the serv�cedepartment, at;
SERVICE INSTRUCTIONS
6
DISASSEMBLYFIRING
UNLOADING
After you have �nserted the shotshells �nto the chambersand have closed and locked the breech, your shotgun �sready to f�re. D�sengage the safety by push�ng the safetybutton fully forward. Pull the tr�gger and the selectedbarrel w�ll f�re. After f�r�ng, allow the tr�gger to return tothe fully forward pos�t�on before f�r�ng aga�n. Alwayskeep the shotgun po�nted �n a safe d�rect�on and thesafety �n the “safe” pos�t�on.
WARNING: READ AND COMPLETELY UNDERSTAND ALLINSTRUCTIONS AND WARNINGS IN THIS MANUAL BEFOREUSING THIS SHOTGUN.
Before unload�ng, check to assure that the safety �s �nthe “Safe” pos�t�on. Open the act�on by push�ng the toplever all the way to the r�ght and pull�ng the barrels fullydownward.
Model 206 Over & Under shotguns are equ�pped w�thautomat�c ejectors. Th�s w�ll ejects the f�red shells.Be careful of th�s eject�ng act�on. The unf�red shells arepart�ally extracted for easy removal by hand.
Model 206X Over & Under shotguns are equipped withmanual extractor. When you open the breech of theshotgun, �t will partially extract the shells for easyremoval by hand.
WARNING: READ AND FULLY UNDERSTAND ALLINSTRUCTIONS AND WARNINGS IN THIS MANUALBEFORE USING THIS SHOTGUN.
D�sassemble, clean and o�l your shotgun at regular�ntervals or when �t has been exposed to sand, water orother adverse cond�t�ons.
To disassemble your shotgun:
1. Remove the forend by pull�ng the forend release leveraway from the forend, and p�vot�ng the forend awayfrom the barrel.
2. Push the top lever to the r�ght to d�sengage the act�on.
3. Remove the barrel assembly.
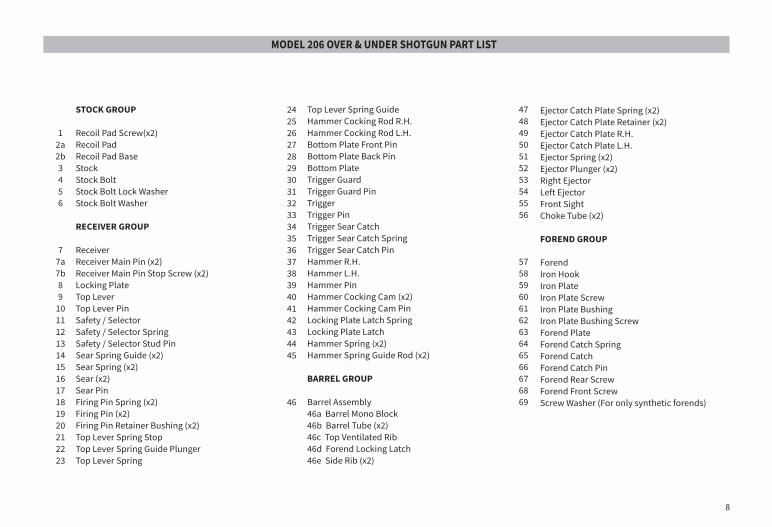
Further d�sassembly �s not recommended and notnecessary for regular ma�ntenance (F�g.13).
Always unload your gun and store �t and ammun�t�onseparately �n locked receptacles out of ch�ldren's reachand s�ght, m�n�m�z�ng the r�sk that the gun andammun�t�on could be eas�ly ava�lable for load�ng andf�r�ng.USE YOUR SHOTGUN CAREFULLY AND SAFELY.
If your shotgun does requ�re serv�ce, contact our localserv�ce department by e-ma�l, letter, fax or telephone. Ifyou should ever have to send your shotgun back forrepa�r please follow these �nstruct�ons:
7
MODEL 206 OVER & UNDER SHOTGUN PART DIAGRAM
1
2a2b
3
4
56
1
7
8
7a
7a
9
7b
10
11
12
13
14
15
16
17
181920
1819
20
21 2223
24
2526
27
28
29
30
3132
33
3435
36
3738
39
40
41
4243
44
45
46
46a
46b
46c
46d
46e
474848 49
50
5152
54 53
55 56
57
58
5960
61
62
63
64
65
66
6768
69
8
MODEL 206 OVER & UNDER SHOTGUN PART LIST
12a2b3456
77a7b89
1011121314151617181920212223
47484950515253545556
57585960616263646566676869
24252627282930313233343536373839404142434445
46
Top Lever Spr�ng Gu�deHammer Cock�ng Rod R.H.Hammer Cock�ng Rod L.H.Bottom Plate Front P�nBottom Plate Back P�nBottom PlateTr�gger GuardTr�gger Guard P�nTr�ggerTr�gger P�nTrigger Sear CatchTrigger Sear Catch SpringTrigger Sear Catch PinHammer R.H.Hammer L.H.Hammer P�nHammer Cock�ng Cam (x2)Hammer Cock�ng Cam P�nLock�ng Plate Latch Spr�ngLock�ng Plate LatchHammer Spr�ng (x2)Hammer Spr�ng Gu�de Rod (x2)
BARREL GROUP
Barrel Assembly46a Barrel Mono Block46b Barrel Tube (x2)46c Top Vent�lated R�b46d Forend Lock�ng Latch46e S�de R�b (x2)
STOCK GROUP
Reco�l Pad Screw(x2)Reco�l PadReco�l Pad BaseStockStock BoltStock Bolt Lock WasherStock Bolt Washer
RECEIVER GROUP
Rece�verRece�ver Ma�n P�n (x2)Rece�ver Ma�n P�n Stop Screw (x2)Lock�ng PlateTop LeverTop Lever P�nSafety / SelectorSafety / Selector Spr�ngSafety / Selector Stud P�nSear Spr�ng Gu�de (x2)Sear Spr�ng (x2)Sear (x2)Sear P�nF�r�ng P�n Spr�ng (x2)F�r�ng P�n (x2)F�r�ng P�n Reta�ner Bush�ng (x2)Top Lever Spr�ng StopTop Lever Spr�ng Gu�de PlungerTop Lever Spr�ng
Ejector Catch Plate Spr�ng (x2)Ejector Catch Plate Reta�ner (x2)Ejector Catch Plate R.H.Ejector Catch Plate L.H.Ejector Spr�ng (x2)Ejector Plunger (x2)R�ght EjectorLeft EjectorFront S�ghtChoke Tube (x2)
FOREND GROUP
ForendIron HookIron PlateIron Plate ScrewIron Plate Bush�ngIron Plate Bush�ng ScrewForend PlateForend Catch Spr�ngForend CatchForend Catch P�nForend Rear ScrewForend Front ScrewScrew Washer (For only synthet�c forends)
9
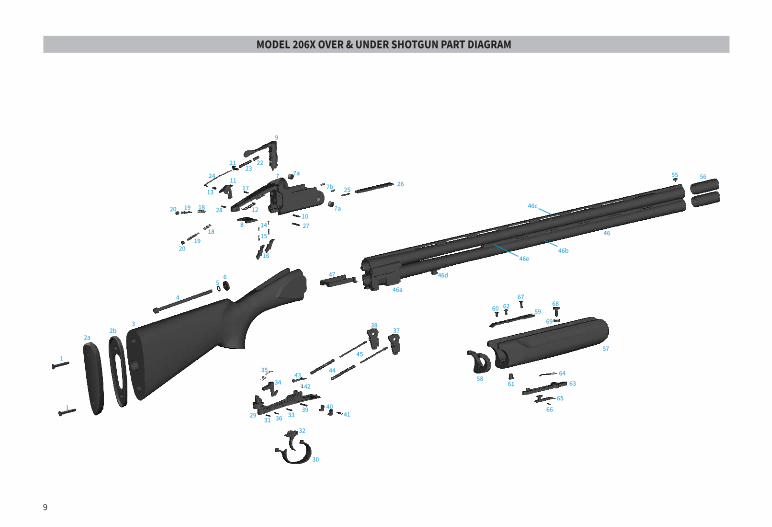
MODEL 206X OVER & UNDER SHOTGUN PART DIAGRAM
1
2a2b
3
4
56
1
7
8
7a
7a
9
7b
10
11
12
13
14
15
16
17
181920
1819
20
21 2223
24
2526
27
28
29
30
3132
33
34
35
36
3738
39 4041
42
4344
45
46
46a
46b
46c
46d
46e
47
55 56
57
58
5960
61
62
6364
65
66
6768
69
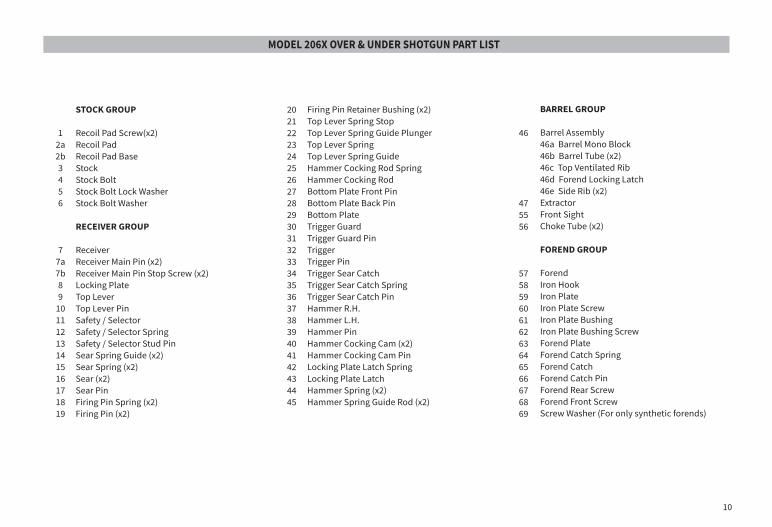
MODEL 206X OVER & UNDER SHOTGUN PART LIST
10
12a2b3456
77a7b89
10111213141516171819
46
475556
57585960616263646566676869
2021222324252627282930313233343536373839404142434445
F�r�ng P�n Reta�ner Bush�ng (x2)Top Lever Spr�ng StopTop Lever Spr�ng Gu�de PlungerTop Lever Spr�ngTop Lever Spr�ng Gu�deHammer Cock�ng Rod Spr�ngHammer Cock�ng RodBottom Plate Front P�nBottom Plate Back P�nBottom PlateTr�gger GuardTr�gger Guard P�nTr�ggerTr�gger P�nTrigger Sear CatchTrigger Sear Catch SpringTrigger Sear Catch PinHammer R.H.Hammer L.H.Hammer P�nHammer Cock�ng Cam (x2)Hammer Cock�ng Cam P�nLock�ng Plate Latch Spr�ngLock�ng Plate LatchHammer Spr�ng (x2)Hammer Spr�ng Gu�de Rod (x2)
STOCK GROUP
Reco�l Pad Screw(x2)Reco�l PadReco�l Pad BaseStockStock BoltStock Bolt Lock WasherStock Bolt Washer
RECEIVER GROUP
Rece�verRece�ver Ma�n P�n (x2)Rece�ver Ma�n P�n Stop Screw (x2)Lock�ng PlateTop LeverTop Lever P�nSafety / SelectorSafety / Selector Spr�ngSafety / Selector Stud P�nSear Spr�ng Gu�de (x2)Sear Spr�ng (x2)Sear (x2)Sear P�nF�r�ng P�n Spr�ng (x2)F�r�ng P�n (x2)
BARREL GROUP
Barrel Assembly46a Barrel Mono Block46b Barrel Tube (x2)46c Top Vent�lated R�b46d Forend Lock�ng Latch46e S�de R�b (x2)ExtractorFront S�ghtChoke Tube (x2)
FOREND GROUP
ForendIron HookIron PlateIron Plate ScrewIron Plate Bush�ngIron Plate Bush�ng ScrewForend PlateForend Catch Spr�ngForend CatchForend Catch P�nForend Rear ScrewForend Front ScrewScrew Washer (For only synthet�c forends)

A077
63-1
2061
9R9