A South Carolina Bicycle Safety Curricula for all ... · A South Carolina Bicycle Safety Curricula...
16
1 A South Carolina Bicycle Safety Curricula for all audiences, in a classroom setting
Transcript of A South Carolina Bicycle Safety Curricula for all ... · A South Carolina Bicycle Safety Curricula...

1
A South Carolina
Bicycle Safety Curricula
for all audiences, in a classroom setting

2
About the Safe Streets Save Lives (SSSL) campaign
The Palmetto Cycling Coalition, in collaboration with Bikelaw and the South Carolina Department of
Public Safety (SCDPS), are pleased to present Safe Streets Save Lives, a long-term, strategic bicycle-
safety campaign in South Carolina to bring public awareness to the need for safer roadways for
bicyclists. The campaign began in 2011 with the production of four videos to educate the general
public on bike laws and safe riding practices. Each video is 1 minute long and addresses bike law and
safety education for both bicyclists and drivers: 1) Bicycle riding in traffic, 2) Signals and safety, 3)
Sharing the Road (for motorists), and 4) the new SC Anti-harassment law. Phase 2 of the campaign
began in 2012 and launched the videos into various media throughout the state. You can request a
hard copy of the videos sent to you by emailing [email protected].
Two types of curricula were developed to compliment the videos with more direct instruction. What
you’re reading now is meant for a classroom setting, but it can be taught by anyone, including
schoolteachers, community & church leaders, and others. It is also available on the website
www.safestreetssavelives.com and on the SCDPS website www.scdps.gov. The second type is a
Powerpoint presentation, complete with 44 slides, in circulation with trained Safe Streets Ambassadors
for the campaign. For more information on finding an Ambassador near you, please inquire to
[email protected]. One near you may be able to present to your class (geared to Grades 6 and above).
Basic Bicycle Safety Facts for South Carolina
Facts
87 million Americans ride bicycles, 27.8 million in the South.
The U.S. could save 262 million of gallons of gasoline a year by increasing bicycling from 1%
to 1.5% of all trips.
One in 12 U.S. households does not own an automobile.
In one generation, the percentage of U.S. children who walk or bike to school has dropped
by 70%. Childhood obesity has tripled.
South Carolina has some of the most progressive laws concerning bicycle safety, yet according to the Alliance for Biking & Walking 2014 Benchmarking Report, our state
reports the 6th highest # of bike fatalities per 10,000 bicycling commuters, in the nation.
Bike safety Education, combined with improved Engineering and Enforcement, leads to
more bike friendly communities.
Riding a bicycle, for any pursuit, is a whole lot of fun.
Rights and rules for bicyclists sharing the road:
Bicyclists must always ride in the same direction as traffic.
Generally, a bike is to be driven like a car, in the right-most lane, and as far to the right in
that lane as is practical.
If a road has a bicycle lane with markings for the exclusive use of bicyclists, these lanes must be used by bicyclists, unless passing another bicyclist or obstruction, or if the intended
direction of travel lies outside of that lane.
A bicyclist must obey all traffic signs and traffic lights and use hand signals.
South Carolina law dictates that bicyclists can ride no more than two side-by-side.
When riding at night, bicyclists must have a white light on the front of their bikes that can
be seen from a distance of at least 500 feet and a read red reflector must be visible from at
least 50 feet, but a rear red blinking light is safest.

3
Rights and rules for motorists sharing the road:
Drivers of motor vehicles must maintain a safe operating distance between the motor
vehicle and the bike. Pass with caution, slow down and give at least three feet.
It is unlawful to harass, taunt or maliciously throw an object at or in the direction of anyone riding a bike.
Understand and pay attention to bicyclists’ hand signals.
Use caution when driving through intersections. Most car-bicycle collisions occur at intersections where bicyclists are often difficult to see or their actions are hard to predict.

4
Table of Contents
Duration Age Range Content Page
1 ½ hour Grades 5-8 Measuring Bicycle Ridership 5
1 hour All Ages Bicycle Road Rules 6 45 minutes All Ages Right-of-Way Rules 8
30 minutes Grades 3-12 Bike Laws 10
30 minutes All Ages Bike Law Pantomime 11
30 minutes All Ages Road Hazards for Bicyclists 12
15 minutes All Ages My Get-Around-Plan 15

5
Measuring bicycle ridership
1½ hour, (Grades 5-8)
Getting Started.
Do our schoolmates ride bikes to school? Do you think it’s easy to bike to school or is there too
much traffic?
Teach.
We will go and measure the daily bicycle ridership to school. We are going to launch an investigation
to study our school’s travel and bicycle behavior. Kids are grouped into sets of 3, with 2 extrovert
survey takers and 1 note taker. One must be a leader and responsible. The group will walk around to
other classrooms on their hall and conduct a 3 minute survey. Class develops survey questions that will
generate both numeric and categorical responses for all types of graphs.
Sample survey questions: How many ride a bike to school? How many ride the bus? How many are
dropped off in a car? Is it easy to bike to school or is there too much traffic? What do we need to ride
a bike more often?
Before sending them into the halls, make sure they know the type of graph that matches each survey
question.
Demonstrate/Explore.
Analyze Data: Upon return, combine all note takers to add up all data. The survey takers can simultaneously begin drawing their graphs on large paper. Note takers join in.
(Optional: Explain that we will try to implement some of these solutions during our Bike-to-School Day
promotion and by talking with the principal about the need for such changes.)
Summarize.
Verbally quiz kids, through question and answer, on the various things they learned, including summary
stats or trends from the graphs generated.
(Optional: Kids present their graphs to class.)
Materials needed.
Large paper with markers for making graphs.

6
Bicycle Road Rules
1 hour (All Ages)
Getting Started.
Get to know the audience.
Are you a bicyclist? What kind of bike do you ride? Where do you ride?
Watch the four Safe Streets Save Lives videos for bicyclists and motorists. If not available, request a
DVD by emailing [email protected].
Teach/Demonstrate/Explore.
In all states, bikes generally have to follow the same rules of the road as cars. While a bike doesn’t
have a steering wheel, how would you “drive” it like a car?
Teach basic bike laws.
Law 1) Ride as a vehicle, ride with traffic, and obey all traffic signs.
Have students come to the board and draw all traffic signs they know. Inquire about why bicyclists
should follow the same traffic laws as motorists.
Law 2) Stay in the bike lane unless your destination lies in a different direction. For instance, if you
need to pass another bicyclist, turn left, or a roadway obstruction exists, you would move outside of
the bike lane. Law 3) Ride as far to the right as practicable.
Ask a student to define practicable.
Law 4) Signal when turning (Signal right, with your right arm extended out straight. Signal left, by
either a) extending your left arm out straight, or b) by extending your left arm straight up in the air, or
c) by extending your left arm out in an “L” shape.)

7
Ask students: What do you do if you need to turn left? Have a student come to the front of the class and
demonstrate the 3 options. Then ask another student to demonstrate the sign for turning right.
Law 5) Don’t ride more than two abreast, or two side-by-side; Law 6) The motorist must maintain a
safe passing distance from a bicyclist.
Ask students: What does a safe passing distance mean, and why is it mostly the responsibility of the motorist?
Law 7) Don’t ride with someone on your handlebars or the rear of a BMX bike.
Ask students: As much fun as this is, if you have one bike seat, that’s the same number of people that should
be on your bike.
Law 8) It’s unlawful for a motorist to harass you on a bicycle, and it’s unlawful for them to throw
anything at you maliciously.
Ask students: But what if they just yell at me? What else can they do that breaks the law? How do I turn
them into the police?
Law 9) Always wear a front head lamp and rear reflector (though it’s best to have a rear light).
Recommended Practice, not a law, and Number 10) It’s always a good idea to wear a helmet.
Summarize.
Have students individually write a personal analysis of any of these questions:
o Why do I need to wear a helmet when I bike?
o What reasons are there for bikes having to follow the same traffic laws as cars?
o Why is it up to the motorist to have the most responsibility for maintaining the “safe passing
distance” when passing a bicyclist?
o If it’s only a law to have a front head lamp, why is it suggested I should also have one in the
rear?
o If a lot more bicyclists ride in the roadway than cars, would we ever need a different type of
sign? Draw some examples, and explain where they would be of benefit.
o If you can think of ways to improve on your current bike design to make it better for riding
long distances, explain what and how you would make those improvements.
Materials needed.
Draw-erase whiteboard or chalkboard, with either markers or chalk.
8
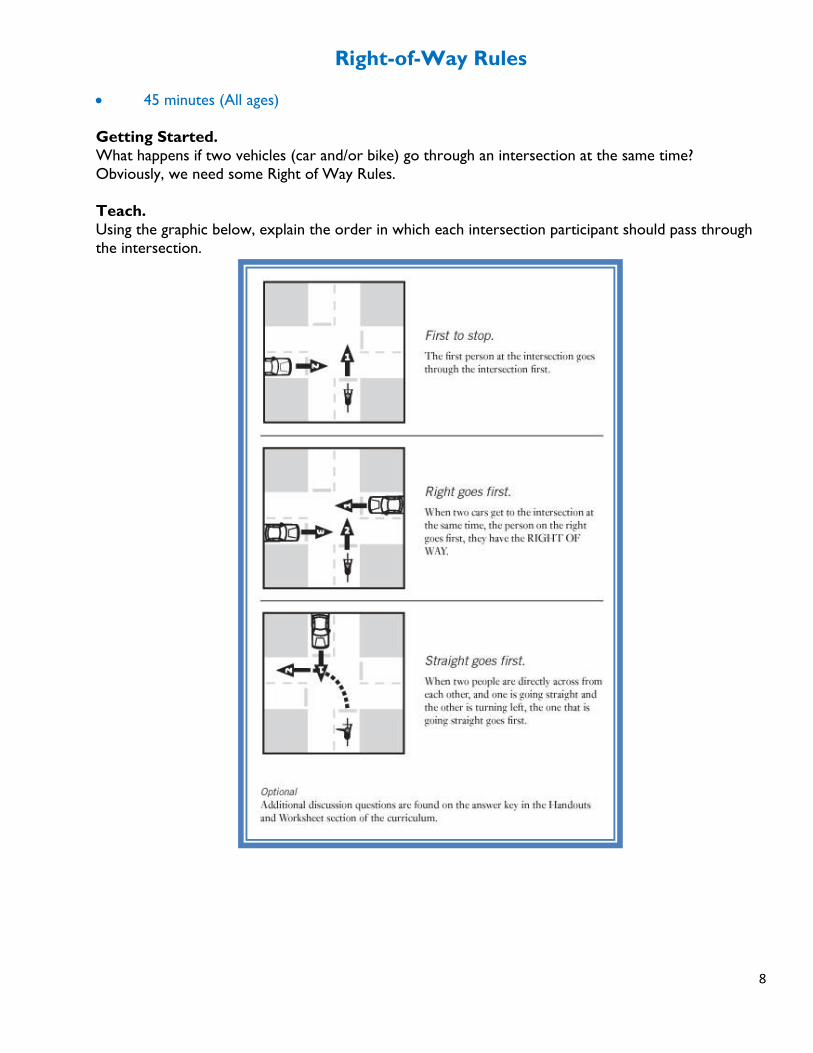
Right-of-Way Rules
45 minutes (All ages)
Getting Started.
What happens if two vehicles (car and/or bike) go through an intersection at the same time?
Obviously, we need some Right of Way Rules.
Teach.
Using the graphic below, explain the order in which each intersection participant should pass through
the intersection.

9
Demonstrate/Explore.
Then put people into groups, and have each group look at graphics of hypothetical intersections. They
discuss which intersection participant should pass through first, in each graphic. Walk around and
guide each group towards the right conclusion. Make sure groups know it well enough to act out a
chosen intersection situation to the full class.
Summarize.
Have each group act out each intersection activity with their bodies, pantomiming which type of
vehicle they are by using their hands – either with a steering wheel or handle bars. Teacher instructs
the class after each demonstration, to guess which vehicle should move first. The actors make the
right decisions, and the audience verifies which answers are right.
Materials needed.
Print out one set of Rules and Question sheets for each group.

10
Bike Laws
30 minutes (Grades 3-12)
Getting Started.
How is a bike different from a motor vehicle? How is a bike the same as a motor vehicle?
Lead to: “A bike is a vehicle.”
Teach.
The first bicycle law in SC is that “a bike is a vehicle”, and more exactly that “A person riding a bicycle
upon a roadway must be granted all of the rights and is subject to all of the duties applicable to the
driver of a vehicle.” What are examples of laws for a vehicle?
Demonstrate/Explore.
Students come to the board and draw images of traffic signs in roadways that tell us the rules. Make
sure to discuss: stop signs, yield signs, one way signs, traffic lights, speed limit signs, school crossing
signs, no right/left turn signs, and signs indicating that multiple lanes must turn a specific direction.
Some of these are pictured below.
Another set of students write the rule below each image. After a couple of minutes, have them sit
down and discuss each sign.
Ask: What are other road rules, not seen in traffic signs, that all vehicles must follow?
Summarize.
Reiterate this basic concept: “A bicycle is a vehicle.”
Materials needed.
Draw-erase whiteboard or chalkboard, with either markers or chalk.

11
Bike Law Pantomime
30 minutes (All ages)
Group pantomime (or chirades) of the various bike laws. First refer to 1 hour “Bicycle Road Rules”
exercise (p.6) for the 10 basic bike laws of South Carolina. Review them with the group. Write each
of these on a separate sheet of paper, and turn papers upside down in a stack. Shuffle stack randomly,
though keep paper pieces face down so you cannot see hand writing.
Divide stack evenly into two (2) groups of five (5). Each group should then act out, or pantomime, the
various bike laws in their stack. Each group will assign a different person in their group each time to
pantomime the bike law from the paper. The person performing the pantomime will pick up the bike
law card on the top of the upside-down stack and not show it to the rest of his/her group. If the
person performing the pantomime successfully convinces their group of the correct bike law within
one full minute (no more than 60 seconds), then the group earns one point. As both groups work
through their stack of five (5) bike laws each, the winning group is the one that earns the most points.
Materials needed.
1-2 pieces of blank paper cut into 10 pieces
Timer or watch

12
Road Hazards for bicyclists
30 minutes (All ages)
Getting Started.
Ask how they think most crashes occur.
Teach.
Discuss how crashes occur. Many are crashes with cars, but most are just falls. Explain the problems
and threats that these hazards pose.
Demonstrate/Explore.
Place people into no more than 5 groups. Distribute the hazards handout sheets (titled “Where are
the road hazards?”). Have the group work to circle the hazards and list them on the side of the sheet.
Groups compete to name the most # of hazards within the hazards sheet. The group with the most #
of correct hazards wins.
Optional: Make a prize available for the winning group.
Guide them to the final conclusion: Generally, riding like a car (i.e. following the rules of the
road) will make you safer, because everyone following the known road rules adds to predictability in
traffic flow, regardless of the presence of many different road users.
Summary.
Determine a winning group. Review answers in the process. Discuss avoidance of all of the hazards with the class, from those in the Answer Key.
Brainstorm other ideas about why bikes crash, and why bikes crash into cars:
o failure to yield when changing lanes, or swerving into traffic.
o not paying attention
o bicyclists ride the wrong way on a street and crash with a car
o when a motorist turns left
o sidewalk cycling
o when motorists turn right
o when motorists restart from stop sign
o others?...
Materials needed.
Print out a set of both sheets for each group: “Where are the road hazards?”, and “Answer Key”.

13
Where are the road hazards?

14
Answer Key.

15
My get-around plan
15 minutes (All ages)
Inquiry.
How do you get around town? If you could bike more, which way would you go? Could you ride your
bike to school? To work? Your friend’s house? To the park? Could you ride your bike to the bus, then
take the bus, and then bike again? Which way do you like best? Why? Why are some ways not
preferable?
Teach. Explain basic bike laws: 1) ride as a vehicle and obey all traffic signs, 2) stay in the bike lane unless you
need to pass another bicyclist or a roadway obstruction exists, 3) ride as far to the right as practicable
(or safe), 4) signal when turning, 5) don’t ride more than 2 abreast, 6) the motorist must maintain a
safe passing distance from a bicyclists, 7) don’t ride with someone on your handlebars or the rear of a
BMX bike, 8) it’s unlawful for a motorist to harass you on a bicycle, and, 9) always wear a front head
lamp and rear reflector (though it’s best to have a rear light), and it’s a great idea to wear a helmet.
Explore.
Using one sheet of blank paper, each person should draw a map from home to school, or work, or the
grocery store. On that paper, draw out those roads you would take to bike. If you cannot bike the
entire way, leave some sections out. If you can take the bus, assuming it has a bike rack attached you
can use while not on your bike, then note those street sections separately. Also note those areas
more suitable for walking than biking, where you would walk your bike. For those areas that are
neither bikeable, walkable, or accessible via transit, note those as areas for future Complete Streets
treatment.
Note: A Complete Streets treatment is an area in need of improvement, so the single
occupancy automobile is not the only transportation option.
Materials needed.
One piece of blank paper and pencil/pen for each student.

16
Content created by: Palmetto Cycling Coalition
Using this Reference: Bicycle Transportation Alliance (Oregon’s) Safe Routes for Kids Bicycle Safety Curriculum
2008 SC Bike Law updates advocated by: BikeLaw.com
Palmetto Cycling Coalition