Aussie Floor Kings-Sanding and Polishing Timber Floors Newcastle

Sanding of wooden floors
USEFUL TIPS FROM START TO FINISH
A GUIDE IN THE CORRECT USE OF FLOOR SANDING MACHINES

2
SANDING WOODEN FLOORS
1
The following manual shows the most common methods. For special appliances use these methods as a base and adjust.
The writer can not be held responsi-ble for any accidents or damages re-sulting from the use of this manual.
Wooden floors are on the rise. The beauty of nature gives comfort and prestige. They can be used any-where in the house and are easy to
How to use this manual
Sanding wooden floors
be maintained. Most important for the looks of the wooden floors is the sanding job. The LÄGLER com-pany wants to give the professional
as well as the D.I.Y.-guy a few tips with this manual in order to ensure the best results on the floor.
1. Preparing the floor for sanding ...................................................................................................................................32. How to choose grits properly ......................................................................................................................................43. Important items while working with HUMMEL ..........................................................................................................64. Floor sanding with a belt sanding machine HUMMEL ..............................................................................................85. Fine sanding with HUMMEL or TRIO ........................................................................................................................126. Edging with edge sanding machine UNICO .............................................................................................................147. Working with other machines ...................................................................................................................................168. Removal of cracks and joints ...................................................................................................................................199. Last cut ........................................................................................................................................................................1910. Varnishing of wooden floors .....................................................................................................................................1911. Intermediate sanding with TRIO ...............................................................................................................................2012. Final coat .....................................................................................................................................................................2113. Maintenance of coated wooden floors ....................................................................................................................2114. Special tips and safety ..............................................................................................................................................21 Safety precautions .....................................................................................................................................................23

3
Fig. 1 How to level old plank floors.
PREPARING THE FLOOR FOR SANDING
1
Preparing the floor for sanding
For best results and a safe work-ing environment the floor has to be cleaned before sanding! Loose
Check for nailheads on old floors. Use a punch to sink them into the wood. Sanding over them may dam-age your sanding belt or sanding drum and leave marks on the floor later on!
NEW FLOOR
OLD FLOOR
CHECK THE KIND OF FLOORING
Joints that are wider than 1/24“ (1 mm) have to be closed with pieces of wood. Wide joints cannot be closed durably with a filler. Skirts have to be removed for proper edging.
Mosaic parquetry: All the cuts have to be done in a 45° angle in order to avoid different abrasion on soft and hard grain.
Strip flooring and planks: All the rough cutting has to be done in a 7° - 15° angle. The fine cuts are done in direction of the wood.
Exception: Old planks with big dif-ferences in height. First cut with the plank to level the high points. Then proceede as with regular strip flooring.
Old worn out planks first cut along the plank ...
... then rough sanding under a 7° - 15° angle to level the floor.
To remove old paint try to do your sanding only backwards.
pieces of your floor have to be fas-tened.

4
How to choose grits properly
HOW TO CHOOSE GRITS
2 2
The natural beauty of a wooden floor only shows after proper sanding.
The choice of grits and the amount of cuts on a new floor depend on overwood and underwood, soiling and uneveness. Figures 2 to 6 show the importance of the sequence of grits. The rough grit is used to remove overwood and underwood
Fine sanding belts are cheaper than rough ones!
Fig. 2 That´s your normal range of grids.
COMMON SEQUENCE OF GRIT!
G 1 6 G 2 4 G 3 0 G 3 6 G 4 0 G 5 0 G 6 0 G 8 0 G 1 0 0 G 1 2 0 G 1 5 0
and soiling. After the rough cut the floor has to be leveled. The fine grits are only used to remove the sanding marks of the rough grits.
Never jump more than one grit. Otherwise you will have a hard time to remove the marks of the one before.
Start with as fine a grit as possible. Quality of work, speed and expenses are a direct result of your choice of grits.
THE GRITThe grit of a sandpaper tells you the size of one grain. To separate the different grain a riddle is used. The number of the grit gives you the amount of meshes of a riddle per square inch.

5
2
HOW TO CHOOSE GRITS
2
Fig. 6Using finer grit on the first cut you need less time and waste less wood.
Fig. 3Sequence of grit for floor sanding. The proper se-quence is most important for your succes.
Fig.4If you jump too far from one grit to the next it is im-possible to remove sand-ing marks.
Fig. 5Time and amount removed 3 cuts G 40 - G 60 - G 80
6
WORKING WITH HUMMEL
3 3
Important items while working with HUMMEL
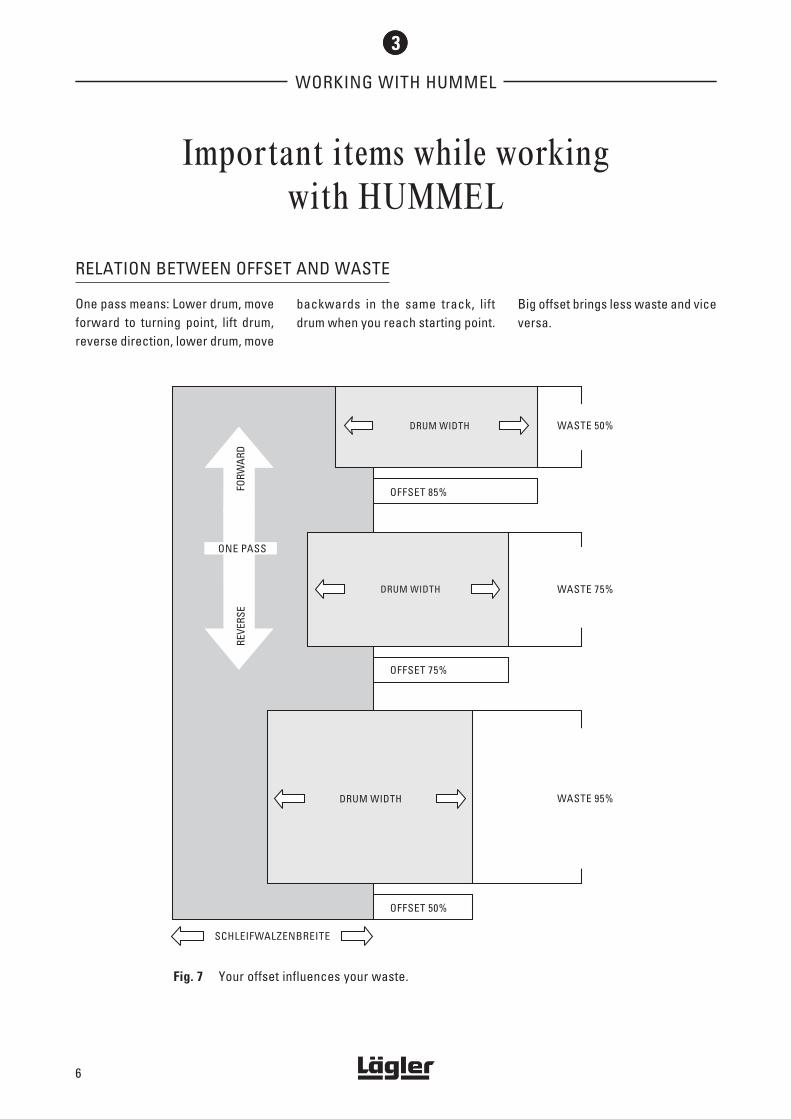
One pass means: Lower drum, move forward to turning point, lift drum, reverse direction, lower drum, move
RELATION BETWEEN OFFSET AND WASTE
backwards in the same track, lift drum when you reach starting point.
Fig. 7 Your offset influences your waste.
Big offset brings less waste and vice versa.

7
3 3
WORKING WITH HUMMEL
PRESSURE SETTING IN RELATION TO THE SEQUENCE OF GRIT
Your HUMMEL has three pressure settings, that are related to the grits.
WALKING SPEED IN RELATION TO SEQUENCE OF GRIT
Fast walking => less waste!
GROB (rough), MITT (medium), FEIN (fine).
Your walking speed has to be even and not too slow. You have to walk
much faster with a belt sander than with a drum sander.
Fig.8Adjust drumpressure according to grit you use. Fine grit means low drumpressure.
Fig 9Adjust your walking speed to the grit you use. Fast walking means fine grit.

8
4
FLOOR SANDING WITH HUMMEL
4
In order to avoid deep sanding marks it is better to start with a fine grit. Do your first pass with grit 50 or 60.
If you are satisfied start working. If you are not either go down one step
or consider to do two fast cuts with your fine grit.
Fig. 10 Working plan for the HUMMEL
Floor sanding with a belt sandingmachine HUMMEL
TEST CUTTING

9
4 4
FLOOR SANDING WITH HUMMEL
STARTING
As you see in figure 11 always start on the left and offset to your right. If you do it the other way your left hand side wheel will always run on the uneven floor and transfers all the waves directly to the drum. You will not get an even floor!
One pass means forward and back-ward in the same track (see fig. 7). Never offset more than 85% of your drum.
Try to have your starting and turning points in areas with less light. Start-
ing and turning points of your second cut should be in another area than the ones of your first cut. Never stop with a lowered drum.
Fig. 11 Always offset to the right so your left hand side wheelrruns already sanded part all time.

10
4
FLOOR SANDING WITH HUMMEL
Each square in figure 12 symbolizes one cut. In every symbol you have
SANDING ACCORDING TO SEQUENCE OF GRIT
HOW TO WORK THE DIAGRAM
• Check your kind of floor (strip, mosaic or else).
• Do a test sanding with grit 50/60 and then decide which way to go.
• Your advancement in the diagram depends on the looks of the floor after the cut.
two choices of grit, left hand and right hand bottom side. If you opted
• If you are not satisfied with the result of one cut it´s possible to repeat it.
• We recommend the use of the three-disc sanding machine TRIO for the fine sanding. That is the only machine that guarantees an even floor without sanding marks.
Stick to your sequence of grit and don´t jump more than one.
To ensure good quality sanding you have to clean your floor after each cut.
Check your wheels and drums for residues before you start on a new job and after the first cuts on old floors.
ATTENTION
• If you use a HUMMEL for fine sand-ing you have to consider the main direction of the wood.
for the right one in the first square, stick to it in the second square.

11
4
FLOOR SANDING WITH HUMMEL
Fig. 12 Diagramm for use of HUMMEL

12
5
FINE SANDING WITH TRIO OR HUMMEL
Fine sanding with TRIO or HUMMEL
FINE SANDING WITH TRIO
TRIO starts with grit 60 on wood. Either use paper or mesh and go up in grit depending on the kind of finish you want.
Remember the system of TRIO gives you a very fine, dust free sanding job.
In most cases you could get around with 60 paper or mesh. The direction of sanding doesn´t matter with TRIO but it is advis-able to move forward all the time.
If you are redoing laminated floors and don´t succeed with 60 grit it is possible to go down to 40 grit.
Fig. 13 Diagramm for use of TRIO
Any direction possible with TRIO!

13
5
FINE SANDING WITH TRIO OR HUMMEL
FINE SANDING WITH HUMMEL
Fine sanding with HUMMEL is similar to rough sanding.
Check the direction of your san-ding.
Don´t walk too slow with your fine paper to avoid waves.
Check your sequence of grit.
Set your pressure according to grit. Use less pressure, finer paper and walk faster on soft wood.
Fig. 14 Diagramm for use of HUMMEL

14
6
EDGE SANDING WITH UNICO
Edge sanding with UNICO
Check your sequence of grit while sanding with UNICO.
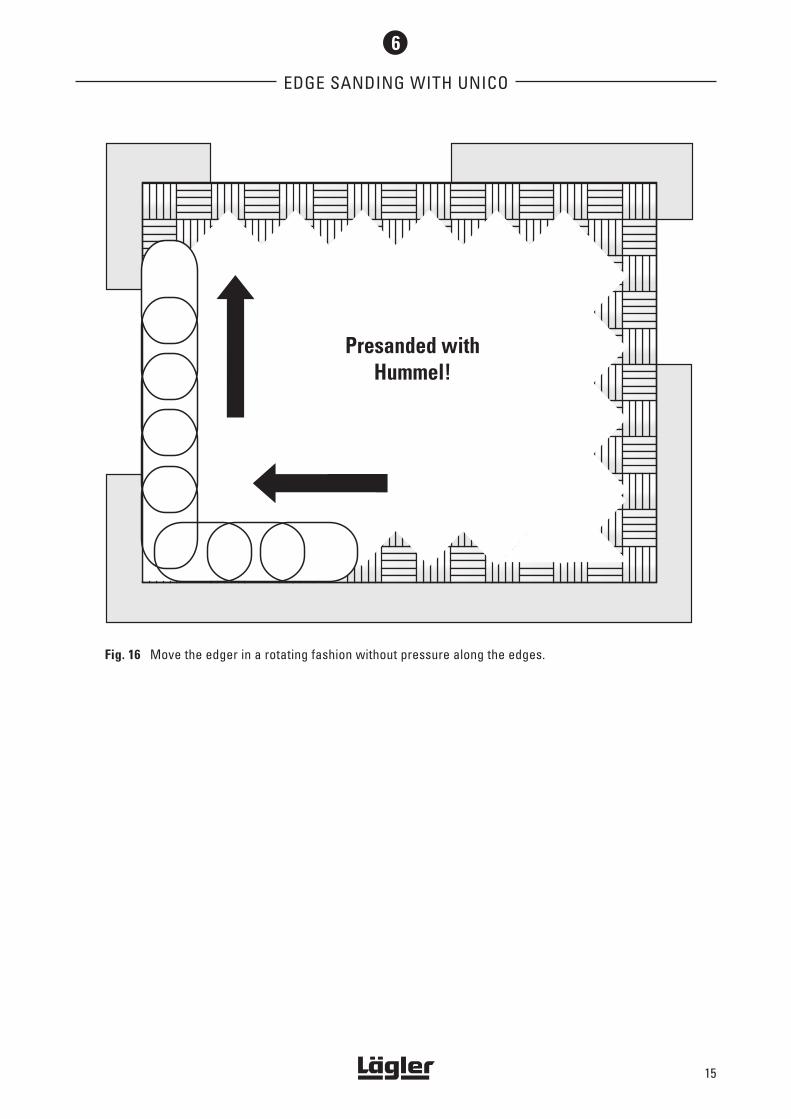
Guide your machine in a rotating movement along the edges.
Don´t exert additional pressure. For
HUMMEL/TRIO paper => UNICO paper
TRIO mesh => UNICO mesh
Fig. 15 Diagramm for use of UNICO
more aggressiveness adjust the angle of the sanding disc.
Always keep moving to avoid sanding faults. Always use the same sanding material to avoid differences on the floor.
15
6
EDGE SANDING WITH UNICO
Fig. 16 Move the edger in a rotating fashion without pressure along the edges.

16
FLIP Fig. 18 shows you a diagram for the use of the stair and edge sanding machine FLIP. Keep in mind that the rpm on the
disc are higher than on UNICO so you have to move a little bit faster with this one!
Fig. 18Diagram for use of FLIP
7
WORKING WITH OTHER MACHINES
Working with other machines
PROFIT Fig. 17 shows you a diagram for the use of the DIY machine PROFIT.
Basically the same rules apply as for HUMMEL.
Fig. 17Diagram for use of PROFIT

17
7
WORKING WITH OTHER MACHINES
7
ELAN Fig. 19 shows you a diagram for the use of the stair and edge sanding machine ELAN. Keep in mind that the rpm on the
disc are higher than on UNICO so you have to move a little bit faster with this one!
Fig. 19 Diagram for use of ELAN
7
ELF200250300
Fig. 20 Diagram for use of ELF
Fig. 20 shows you a diagram for the use of the drum sanding machine ELF.
Basically the same rules apply as for HUMMEL.

18
7
SUPER-HUMMEL
Fig. 21 shows you a diagram for the use of the SUPERHUMMEL.
Fig. 21Diagram for use of SUPER-HUMMEL
WORKING WITH OTHER MACHINES
Fig. 22 shows you a diagram for the use of the FIN in fine sanding of wooden
Fig. 22Diagram for use of FIN
floors and cork floors.FIN
19
Removal of cracks and joints
REMOVAL OF CRACKS AND JOINTS
11
10
9
Some cracks and interstices show after sanding a floor so check for them before your last cut.
Last cut
Proceed as in section 5.
Choose your grit according to your sequence.
It is advisable to use same grit as
before if you have applied too much filler.
Some fillers are very hard on your sand paper and can cause burns especially while edging.
Varnishing of wooden floors
Before you start use a good vacuum cleaner to tidy the floor up.
Start varnishing in the light and move to the shade in order to detect
failures and correct them on the spot. For information about quantity, ways to apply and drying time please refer to the manuals of your varnish supplier. Protect your work from
Use filler and flat steel spatula to spread it over the whole floor. Make sure the filler sinks in properly.
If you have joints wider than 1/24“ (1 mm) use wooden splinters to fill them.
In order to get a good quality surface stick to the rules in section 5.
Make sure you use the same sand-ing material on the edges as on the floor.
10
dust and direct sunlight when you are done.
7 8

20
12
INTERMEDIATE SANDING WITH TRIO
Intermediate sanding with TRIO
Intermediate sanding is mainly used after the first coat of waterbased varnish. The wooden surface reacts to the varnish by becoming rough. For the good looks of the finished floor it has to be smoothed out before applying the final coat.
Preferably use mesh 120. It is also possible to use paper 120 but the mesh with its pad as a back up is much softer to the surface. Don´t use much pressure and move fast.
Remember to use the same sanding material on the edges as on the floor.
Fig. 23 Diagramm for use of TRIO
11
Any direction possible with TRIO!

21
12
FINAL COAT
Before you start with the final coat tidy up your floor.
Make sure you have no airbourne dust particles because they will settle down on your fresh coat af-terwards.
Maintenance of coated wooden floor
13
To keep your floor in good shape use polish once in a while.
CLIMATEFor the well being of you and your floor the average temperature should be between 68° - 73° F (20° - 23° C) and 55 - 65% humidity.
Heavy use => every 3 weekseasy use => every 2-3 months
If you wish to imporve protection of your floor further, put on another coat.
Special tips and safety
Make sure to empty your dustbag as soon as it´s one third full. Over-stepping that limit means your dust pickup is getting worse.
When you are finished with the machine empty the dustbag into a
proper container and store it out-doors to avoid fire risk.
One sign for the quality of sanding is the level of the floor. By observing the lever to lower or lift the drum on the HUMMEL your are able to judge
the level of the floor. Unlevel floor means lot of movements. As you pro-ceed from rough to fine sanding the movement of the lever has to cease as a sign of a level floor.
14
Final coat

22
Attention
HUMMEL and UNICO are both build according to CE machine safety rules. Both machines are proven to emit less than 2 mg/m³ dust.
The TRIO is also build according to the CE rules. The TRIO is the only floor sanding machine in the world
that is approved by the german professional association as being dust-free!
For your own safety don´t use ma-chinery that does not respond to the latest safety rules.
Before you start working with your machinery make sure you have read and understood your manual.
14

23
SAFETY PRECAUTIONS
16
Keep your workplace environment tidy and orderlyDisorder at the workplace increases the risk of accidents.
Always be aware of environmental effectsNever expose an electric tool or ma-chine to precipitation. Do not work with electric tools or machines in a damp or wet environment. Make sure your working area is brightly lit. Do not use electric tools or machines in close proximity to inflammable liquids or gases.
Protect yourself from electric shockWhile working with electric tools or machines avoid physical contact with grounded metal appliances like pipes, radiators, kitchen ranges, refrigerators etc..
Keep children awayDo not permit children or any other persons to touch the machine or the power cable. Keep them remote from your working area.
Store your electric tools and machines safelyWhile not in use your tools and ma-chines ought to be stowed away in dry, locked spaces, out of reach for children and unauthorized persons.
Do not overcharge or overburden your electric tools and machinesIt is better and safer to work within the machines’ prescribed capacity ranges.
Always use the most adequate electric tool or machineDo not use lowcapacity machines, tools or attachment parts for heavy-duty tasks. Never use a tool or ma-chine for a purpose for which it has not been designed.
14
Safety precautionsAlways wear adequate work attireDo not wear loose clothing; do not wear bracelets, necklaces and similar loose decorations that might become entangled.
Use protective devicesWhen doing dust-generating work always use a breathing mask of the filter class P3.
Never use power cable for improper purposesDo not lift or carry your tool or ma-chine by the power cable, do not pull cable in order to disconnect plug from socket. Protect cable from heat, oil and sharp edges.
Do not work in stooped postureAvoid unnatural or strenuous bodily postures. Make sure to always stand on solid ground and in balanced posture.
Keep your tool or machine in good shapeKeep your tool or machine clean for better and safer performance. Ad-here to the maintenance instructions and change defective or wornout parts when necessary or in recom-mended intervals. Check the power cables regularly and, if you detect any defects, have the defective elements replaced by a certified specialist. Also check the extension cable regularly and replace it in case of damage. Keep the handles dry and free of oil and grease.
Disconnect power plugWhile machine is not in use, unplug power cable. Also do so, under any circumstances, prior to any main-tenance work or gear change.
No loose tools and attachments on machineBefore switching machine on, make sure that all and any wrenches or setting fixtures are removed from machine.
Avoid inadvertent machine startWhile machine is power connected never carry it with your finger close to the switch button. Before plugg-ing in make sure that machine is switched off.
Always try to be concentratedWhile working always watch what you do and what happens around you. Go about your job in a sys-tematic and reasonable way. If you feel unable to concentrate refrain from using your machine.
Check your machine for visible and hidden defectsBefore starting a job check your machine carefully; in particular, check its protective devices and its wearing components and make sure they are in perfect working order. Check moving components to make sure that their mobility is not impaired, that no parts are broken or fissured, that all parts are in their proper place and securely fastened; in short, make sure that all require-ments for a proper functioning of the machine are fulfilled. Defective parts must be repaired or replaced by an authorized service shop, unless oth-erwise recommended in this manual. Defective switches must be replaced by authorized service personnel. Never use your machine while its power switch button or any other electrical components are defective or ineffective.

Eugen Lägler GmbH Maschinenbau · Industriegebiet Kappelrain · D-74363 Güglingen-FrauenzimmernTelefon +49 - 71 35 - 98 90-0 · Telefax +49 - 7135 - 98 90-98 · e-mail: [email protected] · Internet: www.laegler.com Co
pyrig
ht ©
200
1 Eu
gen
Lägl
er G
mbH
- A
ll rig
hts
rese
rved
N
o w
arra
nty
for c
onte
nts
of th
is m
anua
l. N
o lia
bilit
y fo
r any
kin
d of
dam
ages
, los
ses
or in
jurie
s re
sulti
ng fr
om th
e us
e of
this
boo
klet
. Sub
ject
to c
hang
e w
ithou
t prio
r not
e.
USANZIRLGBCANAUS