A Case/or - Rockler Woodworking and Hardwarego.rockler.com/celebrate60/MedalCase.pdf · A Case/or...
6
A Case/or By John Kelliher 36
-
Upload
hoangthuan -
Category
Documents
-
view
216 -
download
2
Transcript of A Case/or - Rockler Woodworking and Hardwarego.rockler.com/celebrate60/MedalCase.pdf · A Case/or...

A Case/or
By John Kelliher 36

ommendations Cherry inlaid with brass and quartersawn oak I'd saved for a special project now frame an important family heirloom.
'What Medals? ... " Ie-mailed back to my sister Mary. Soon, I was on the phone with my folks: Mom on one line, Dad on the other. I knew Dad was in World War II and that he was a radioman (he's still liable to use Morse code on the arm of his chair during a close football game) . But he hardly ever talked about the war ... "I just wanted to get on with my life," he explained recently. After all these years, he decided it was time to find a more suitable place for a number of medals, photos and other memorabilia from his war days. I immediately volunteered to create this "more suitable place."
The design process started with my parents. First, they decided that a wall-hung cabinet with a glass cloor would be the perfect container for the items uncler consideration. My mom had just the spot for such a cabinet (which helped dictate the final size) and an idea of which species she'd like: "Cherry .. . that's kind of reddish, right? That would be nice."
Sorting through all of the stuff my dad sent took the designing process to the next level - deciding how to layout the inside of the box. The commendations seemed like such
humble documents - no foil stampings, no script, just a blue ribbon in an old manual typewriter, probably banged out somewhere on a beach. I was happy to see that some photos were included. While the medals were the reason for the case, my Dad's face in all of those situations made the medals and commendations seem more personal.
Detail Design A few issues back, master woodworker Ian Kirby wrote about the design process (Designing with Full-size Mock-ups, October, 2000). There are, he pointed out, four important aspects to this process: functional design, spatial design, structural design and detail design. The first three aspects were pretty well covered already, but the "details" still eluded me. Kirby recommended creating full-size mock-ups at this stage, and I realized that, with a little help from my trusty computer, I could do the same thing. I used my flatbed scanner to scan all the items for
True to form, art director John Kelliher used a computer to assist in his case design. ~ After emilloying a flatbed scanner to capture each medal and photo, he turned to familiar Ilublishing software (Quark XPress0) to Ilosition the scans and dividers until he was happy with the layout. He then created a full-size pattern with our Illotter (check with your local print shop) and had a few extra COllies made - future gifts for his siblings.
Woodworller's journal April 2001
possible inclusion, created a document with a border (representing the back of the cabinet), imported the scans and slowly started moving them around until a design revealed itself. A commendation referring to "D" Day, July 10, 1943 took center stage, and the medals and photos found their spots from there. With a full-size pattern in hand and the approval of all, I was headed to the shop to start making sawdust.
Building the Case I made the case from beautiful straight grained cherry. Before I made any cuts, I selected the nicest looking wood for the most visible parts. The case sides, top and bottom (pieces 1 and 2), were
\

38
Hanger Strip (Section view)
Material List
1 Case Sides (2)
2 Case Top and Bottom (2)
3 Back (1)
4 Hanger Strip (1)
5 Door Sides (2)
6 Door Top and Bottom (2)
7 Brass Inlay Strip (1)
8 Plywood Mounting Blocks (3)
9 Binning Strips
16· on center-----------..j~ I
Hanger Strip (Back view; keyhole locations)
TxWx L 1/2" x 1'/2" x 24"
1/2" x 1'/2' x 18"
1/4" x 21 %" x 17'/2'
3/4" x 2" x 17'/2'
1/2" x 2" x 24'/. "
1/2" x 2" x 18'/a"
1/16" x 90"
3/8", Cut to fit
1 /2", Cut to fit
Exploded View
10 Foam Core Backing (1)
11 Photo Matting (1)
12 Small Frame Molding (1)
13 Wedges (3)
14 Hinges (2)
15 Door Catch (1)
16 Brass Retainer Buttons (8)
17 Glass Door Panel (1)
18 RubberBumpeffi~)
Catch Location (Front view)
9
10 11
TxW x L 1/4", Cut to fit
1/8", Cut to fit
1/2", Cut to fit
1/2", Cut to fit
Brass
Brass
Brass
1 /8", Cut to fit
3/8" Diameter

40
@
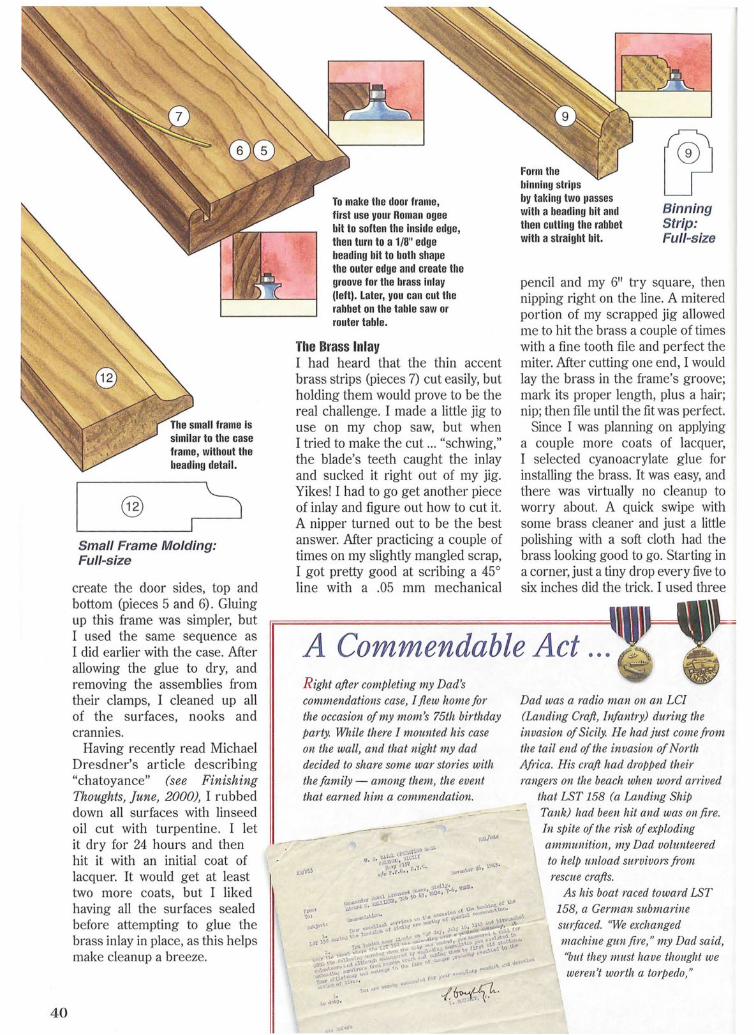
similar to the case frame, without the beading detail.
Small Frame Molding: Full-size
create the door sides, top and bottom (pieces 5 and 6). Gluing up this frame was simpler, but I used the same sequence as I did earlier with the case. After allowing the glue to dry, and removing the assemblies from their clamps, I cleaned up all of the surfaces, nooks and crannies.
Having recently read Michael Dresdner's article describing "chatoyance" (see Finishing Thoughts, June, 2000), I rubbed down all surfaces with linseed oil cut with turpentine. I let it dry for 24 hours and then hit it with an initial coat of lacquer. It would get at least two more coats, but I liked having all the surfaces sealed before attempting to glue the brass inlay in place, as this helps make cleanup a breeze.
To make the door frame, first use your Roman ogee bit to soften the inside edge, then turn to a 1/8" edge beading bit to both shape the outer edge and create the groove for the brass inlay (left). Later, you can cut the rabbet on the table saw or router table.
The Brass Inlay I had heard that the thin accent brass strips (pieces 7) cut easily, but holding them would prove to be the real challenge. I made a little jig to use on my chop saw, but when I tried to make the cut ... "schwing," the blade's teeth caught the inlay and sucked it right out of my jig. Yikes! I had to go get another piece of inlay and figure out how to cut it. A nipper turned out to be the best answer. After practicing a couple of times on my slightly mangled scrap, I got pretty good at scribing a 45° line with a .05 mm mechanical
Form the binning strips by taking two passes with a beading bit and then cutting the rabbet with a straight bit.
Binning Strip: Full-size
pencil and my 6" try square, then nipping right on the line. A mitered portion of my scrapped jig allowed me to hit the brass a couple of times with a fine tooth file and perfect the miter. After cutting one end, I would lay the brass in the frame's groove; mark its proper length, plus a hair; nip; then file until the fit was perfect.
Since I was planning on applying a couple more coats of lacquer, I selected cyanoacrylate glue for installing the brass. It was easy, and there was virtually no cleanup to worry about. A quick swipe with some brass cleaner and just a little polishing with a soft cloth had the brass looking good to go. Starting in a corner, just a tiny drop every five to six inches did the trick. I used three
A Commendable Act R ight alter completing my Dad's commendatio?ls case, I/lew horne for the occasion of my mom's 75th birthday pa1'ty. While the1'e I mounted his case on the wall, and that night my dad decided to sha1'e some Wa1' sto1'ies with the family - among them, the event that eamed him a commendation.
Dad was a mdio man on an LCI (Landing Cmlt, Infantl'Y) during the invasion of Sicily. He had just come from the tail end of the invasion of North Africa. His cmlt had dropped theil' mngers on the beach when word arrived
that LST 158 (a Lauding Ship Tanll) had been hit and was on fire. In spite of the risk of exploding ammunition, my Dad volunteered to help unload survivors from rescue cmf/s.
As his boat raced toward LST 158, a German submarine sUlfaced. "We exchanged machine gun fire," my Dad said, "but they must have thought we weren't worth a torpedo,"

drops along the top, pressed in that section of inlay, and went with four drops along each side - holding the last drop back from the corner because the next piece starts there.
A Customized Interior The intelior of my father's case is designed specifically to fit the collection of memorabilia he brought home from WWII. It is not likely to be exactly what you might want to build, but the approach I used may be useful as you design your own case. I used two sizes of mounting blocks (pieces 8) for medals, binning ships (pieces 9) to create clear divisions and free floating foam core (piece 10) and photo matting (piece 11) to best show the old photos. I also milled and glued up a small frame
because after the machine gun excha1lge th ey submerged and tooll off The seas were rough, and although some lives were saved, many others were lost.
"It was "D" day," my Dad said, "so the Commander of Naval Advanced Bases was there. He sent his lieutenant down to get my name. "
There was one othel' commendation that my dad had - 1m' the invasion of AlIzio. It was a lot more ainllled up and didn't really fit this case - so I left it in a plastic bag behind the medal mount panel. I have a leeli1lg there are a lot 01 c011lmendable acts that don 't get Iramed appropl'iately. I'm glad I had the opP01'tunity to frame my dad's.
- Jolm Kelliher
Marking out and chopping the hinge mortises was
a hand-powered operation. The author's wheeled
scriber and a sharp chisel made short work of the
three-step process.
(piece 12) of golden hued white oak with a unique curly quartersawn grain to hold one of my dad's commendations. The wild grain made routing the molding's shape a little tricky, but it was well worth it for the look it created.
The entire contents of the case are held in place with a couple of different sizes of wedges (pieces 13) that run across the top of the case. This was a key design feature, since tightly holding the contents in place by friction allowed me to ship the case empty and put it all together at my parent's house. It also helped me create separate areas with the red, white and blue fields complementing the medals.
I folded red and blue velvet around the three medal mounting blocks and
pinned it, and then my wife, Liz, sewed it up in the back. It was nice the way the smoothly finished wooden pieces and the velvet covered blocks fit together - but it took me a couple of attempts cutting the plywood, wrapping and pinning the velvet on it, and fitting the frame with the two medal mounts, before it was perfect.
Last Details When I went to form the mortises (see Drawings) for the hinges (pieces 14) and catch (piece 15), I ran into my first small challenge (every project has at least one). I had to cut some of the hinge screws down in length, as they were lining up right behind the groove with the brass strip.
I used brass retainers (pieces
16) to hold the panel in place, which meant I could ship the case without glass (piece 17). The final coats of lacquer were applied, and I was ready to send it home.
Two weeks later, when I arrived home for my mom's 75th birthday party, it was easy to have the glass cut locally and equally easy to install it. I hung the case in its predesignated spot and settled in to hear the stories behind some of those medals and pictures. /'~
John Kelliher is the art director lor Woodworker's Journal. This is his first article, but you've been enjoying his drawings lor many years.
41