A b s tr a c t - DigitalCommons@CalPoly | California ...
44
Tiny Disco: A Cost-Effective, High-Fidelity Wireless Audio System A Senior Project Report presented to the Faculty of California Polytechnic State University San Luis Obispo In Partial Fulfillment of the Requirements for the Degree Bachelor of Science in Computer Engineering By Luke Liberatore February 2020 Date of Submission: February 25, 2020 Senior Project Advisor: Hugh Smith
Transcript of A b s tr a c t - DigitalCommons@CalPoly | California ...

Tiny Disco: A Cost-Effective, High-Fidelity
Wireless Audio System
A Senior Project Report
presented to
the Faculty of California Polytechnic State University
San Luis Obispo
In Partial Fulfillment
of the Requirements for the Degree
Bachelor of Science in Computer Engineering
By
Luke Liberatore
February 2020
Date of Submission: February 25, 2020
Senior Project Advisor: Hugh Smith

Abstract
The Tiny Disco is a WiFi based concert system, featuring improvements on popular “Silent
Disco” concerts. Rather than being tied to compression and bandwidth restrictions present in
traditional silent disco systems, the Tiny Disco system can deliver 320kbps+ audio quality, and
allows listeners to bring their own headphones, further lending to the high quality audio
experience.
Tiny Disco uses a Raspberry Pi as the audio server, and Espressif ESP32 microcontrollers as
audio receivers/clients. The Tiny Disco is primarily geared toward smaller concerts and niche
events where audio quality is valued, though due to its WiFi-based architecture, it can be
expanded to events of a few hundred people fairly easily.
The Tiny Disco system was developed and tested, and performed successfully using a test
setup. Only one client was tested due to cost constraints, but load testing was performed
against the Raspberry Pi server, as well as bandwidth/audio quality analysis.
2

Table of Contents
Abstract 2
Table of Contents 3
Introduction 5
Stakeholders 7
Project Goals and Objectives 7
Project Deliverables 8
Project Outcomes 8
Background 9 Experimentation to help develop engineering specifications 9
Formal Project Definition 10 Customer Requirements 10 Engineering Requirements 10 Customer/End-User Personas 11 User Stories 12
Discussion of Applicable Codes and Standards 13
Legal and Ethical Concerns 13
Existing Products that Solve Similar Problems 14
Design 14 System Diagram 15 PCM5102A Schematic (from Texas Instruments) 15 Client (ESP32 w/ PCM5102A DAC) Schematic 16 Design Considerations 16 Risk Area Analysis 18 Implementation - Server 19 Implementation - Client 22
3

Design Considerations for Future Projects 23
System Testing/Analysis 24 Server Load Testing 24
Test #1: 100 Users 24 Test #2: 300 Users 25 2000 User Test 27
Load Test Analysis 28 Audio Quality Test 28
Vice - Droptek 32 Walkers - Stephen Walking 34
Conclusions + Future Work 35
Works Cited 36
Appendix 37 ESP32 WiFi Connection & I2S Code 37 Raspberry Pi Code 38 icecast.xml 39 Audio Quality Test #3: Thundergun by 1uP 39
4

Introduction
Over the last decade, there has been a massive societal shift in the way people discover and
listen to new music. With the rise of streaming services like Spotify, Apple Music, and others,
listeners now receive tailored recommendations for new music, and it’s all available wherever
and wherever we want to listen. However, while personal listening has benefitted from these
advancements, listening to live music has remained largely the same over the past few
decades. Concerts still use large, powered speaker systems, though there have been some
advancements for smaller-scale concerts and events.
As technology has progressed, “silent disco” concerts have become possible: each concertgoer
is given a pair of headphones to listen to music, rather than relying on a single conventional
speaker system. These silent disco systems typically transmit audio using radio transmitters and
receivers, and they are usually very efficient for transmitting to a large group of people
seamlessly.
I have been a DJ for the past 8 years, and have DJed at and attended a handful of silent disco
concerts. I think that silent discos are a fun, new way to experience live music, and there’s
something special about dancing with your friends, taking your headphones off and not hearing
any outside music. However, silent disco-style concerts have their drawbacks. Namely, most
silent disco systems feature headsets with built-in radio receivers, so listeners are restricted to
the supplied headphones, which are usually purchased and made cheaply (and without regard
for audio quality). Taking all of these factors into account, I want my Senior Project to improve
5

on current silent disco systems, namely allowing listeners to use their own headphones, and
aim for high quality (320kbps+ data transfer) between transmitter and receiver).
To accomplish these goals, I’ll implement my own silent disco system using the Espressif
ESP32 (a microcontroller, similar to the Arduino, that has Wi-Fi and Bluetooth built in) and
transmit audio over wifi instead of radio. Additionally, my system will allow users to plug in their
own headphones (using a standard 3.5mm audio jack), and possibly, to connect Bluetooth
headphones to the ESP32.
Stakeholders
While there are no formal customers for this Senior Project, there is still a large market for silent
disco concerts and live music in general. Notably, event companies and other organizations
6
would likely have interest in this project’s success, and would be interested in the improvements
that this project offers over current silent disco systems. My silent disco system could also be
used by independent artists (such as DJs and bands) that may want to have smaller listening
and album release parties without worrying about high overhead costs of renting silent disco
headphones that feature lackluster sound quality. These artists could hold smaller-scale
listening events that still value listening to music in the quality and the way that they want to
portray to their friends and fans.
Project Goals and Objectives
The objectives of this Senior Project are to investigate and create a functional silent disco
system, complete with a transmitter and receiver. Audio for the system will be delivered over
Wi-Fi, rather than traditional systems that use radio frequencies to transmit audio. This system
should allow listeners to use their own wired headphones, and should handle at least 50 clients.
The Wi-Fi system should allow clients to be at least 50 feet away. Additionally, the client should
be able to receive and transcode high-quality audio, with a bandwidth of at least 320kbps.
Project Deliverables
Some deliverables for this project include a working transmitter and receiver system (including a
Wi-Fi access point for clients to connect to) that can transmit audio. The receiver should have a
3.5mm Auxiliary port for wired headphones. Additionally, benchmarks will be conducted for
power draw of the receiver (to measure maximum theoretical runtime/battery life, with multiple
battery sizes), theoretical Wi-Fi bandwidth limit (to measure the maximum number of clients that
7
could connect and stream at once), and range tests using different Access Points to measure
how far clients can be from the transmitter.
This document will also act as a deliverable, and will include goals for this project, full
implementation details, implementation tradeoffs, a history of silent disco systems (and
upcoming technologies/advancements in the field) and a breakdown of each benchmark and its
results.
Project Outcomes
The outcomes of this project would be highly beneficial to live music companies, specifically
silent disco companies, as well as musicians that want to hold concerts and events for their fans
to listen to music in high quality. The silent disco market has not experienced much innovation
since its creation, but this project could enable new avenues for more niche events, and enable
innovation to replace current systems.
Background
Silent disco-format concerts have existed since the early 1990s, when eco-activists used
headphones at outdoor parties to minimize noise pollution and disturbance to the local wildlife.
Between the mid-1990s and the early 2000s, event companies such as Glastonbury Music
Festival and BBC began to utilize silent disco technology for some of their events.
The term “silent disco” was added to the Oxford Dictionary in 2011 (they were referred to as
“silent gigs” and “silent dance parties” before the phrase was coined). However, while the silent
disco format has been used since the 1990s, technology has not advanced past all-in-one radio
8

receiver and headphone systems. A similar type of silent party, called “mobile clubbing”, has
had some notable events in 2003 and 2007, however mobile clubbing events usually involve
participants listening to their own MP3 players or other portable devices, and listeners aren’t
listening to the same music.
At the time of writing, I cannot find any literature or products that use WiFi for silent disco
systems, and cannot find any that let listeners bring their own headphones. All of the systems
perform largely the same, using radio transmitters (the Talent TX-50RF and TX-60RF models
are popular) that transmit FM radio at 920MHz frequency. I believe my system is a major
advancement for silent disco systems, and can rival (and replace) currently available systems
for the same price, or cheaper.
Experimentation to help develop engineering specifications
I have been a DJ for 7 years, and have participated in many silent disco events- both as a DJ
and a listener. However, I couldn’t stand the sub-par music quality that silent disco systems
produced. I wanted to create a way to give listeners a better experience by allowing them to use
their own headphones, and to ensure that the music quality they were hearing was miles ahead
of current systems that use radio to send and receive audio. However, these systems still had to
compete with current systems, so they needed a long battery life that would enable listeners to
have fun for hours on end. Finally, I wanted this system to be cheaper to design and produce
than current systems, so I decided to use the ESP32 and Raspberry Pi. Aside from the WiFi
system needed for this project, the ESP32 and I2S DAC was <$20 for one unit, and the
Raspberry Pi was $35. While this wasn’t necessarily experimentation to develop the engineering
9

specifications, my experiences with silent disco concerts really helped to form my expectations
for how my ideal silent disco system would perform.
Formal Project Definition
Customer Requirements
• Support 50+ ESP32 clients
• Support 320kbps+ audio quality
• 4+ hour runtime (enough battery life to last for a concert or event)
• Easy access to the audio stream (allow listeners to use their personal devices to access the
stream, instead of locking them to using the ESP32)
Engineering Requirements
Tiny Disco Engineering Requirements
Specification Number
Parameter Description
Requirement/Target
Tolerance Risk Compliance
Performance
1 Bit Rate 320 kbps Min H A, T, S
2 Concurrent Users
50 Min M T
3 Audio Channels
Stereo N/A M A, T
Energy
4 Energy Usage 1 W Max M A, S
5 Battery Life 4 hours Min M A
Usability/Ergonomics
6 Easy Stream Access
Listeners can use personal devices, not just ESP32
7 Listening Range
100 ft Min H A, T, S
10

Operation/Maintenance
8 Battery Charging Time
1 hr to 80% Max M A, S
Customer/End-User Personas
There are a few main customers and end users that will deploy a system like this:
A new event company wants to expand into organizing silent disco concerts, but wants to do so
more cheaply than traditional silent disco systems. They also want to spend money on a system
that will last them a few years, and will be somewhat future-proofed out of the box. They want to
organize smaller, more intimate events for fans that value audio quality, so they choose the Tiny
Disco system to achieve these goals.
A band has just released their first album, and wants to throw an album listening party.
Releasing this album was a huge deal for them, and they want to share their work with their
friends, family, and fans. Because the release is so special, they want their fans to experience
their album at the best quality possible. They decide to use the Tiny Disco system, and let their
fans use their own headphones (or personal devices, like phones) to connect and listen at the
release party.
An event company in SLO rents 200 silent disco receivers and one hub for an upcoming event.
They ask people to bring their own headphones (no matter what kind), and have a few
headphones supplied to cover those that didn’t bring any. Their event avoids noise complaints
since there aren’t any powered speakers.
11

A local music festival wants to host a silent disco stage, but wants attendees to not have to
worry about bringing their own headphones, or worrying about carrying the receivers around
during the festival. They rent a hub for the event, and provide headphones for attendees. Using
their cell phones, attendees can access the Wi-Fi audio stream and enjoy the music without
needing an extra receiver.
User Stories
● As a DJ, I want to avoid noise complaints and tickets, so I can keep my business
running.
● As an event company owner, I want to expand my offerings to attract new customers.
● As a musician, I want to share my music with others in the highest quality possible.
● As an event company owner, I want to throw events for many people, to increase my
profits and produce more memorable events.
● As a serious music listener, I want to experience new and cutting-edge concerts and
events to deepen my love for music and have fun.
Discussion of Applicable Codes and Standards
Applicable Codes and Standards for this project are the 802.11 WiFi standards and FCC
standards for WiFi transmission and WiFi power. WiFi transmit power has limits to minimize
2.4GHz and 5GHz radiation, so it’s important to keep these limits in mind when working with
WiFi devices. Thankfully, since my silent disco system utilizes consumer-grade Access Points,
these devices are audited and are within the FCC limits for transmit power (the Google WiFi
12

mesh system used for testing uses 656mW at 2.4GHz and 535mW at 5GHz, which are lower
than the FCC limit (1W) for 2.4GHz and 5GHz.
There are no standards needed for the Raspberry Pi or the ESP32, as these simply depend on
the Google WiFi system.
Legal and Ethical Concerns
There aren’t many legal or ethical concerns for this product, though due to the wireless nature of
this system, care should be taken to avoid use in illegal or unauthorized concerts and events
(“renegade” concerts are popular for silent disco systems, in which small-scale concerts occur
on unauthorized land, such as private property and parks/nature preserves that aren’t fit for
concerts, and without securing permits for these events).
Existing Products that Solve Similar Problems
As this report has mentioned multiple times, this product is a successor to popular silent disco
products that are widely available today. These silent disco products feature radio transmitters
and receivers, and radio receivers are typically low-cost and low-quality all-in-one receiver and
headphone solutions. My silent disco product would aim to improve over these existing systems
by using WiFi for audio transmission, allowing listeners to use their own headphones, and
aiming for high quality (320kbps+) audio.
13

Design
This system is best described as a client-server design, in which the server (the Raspberry Pi)
sends audio to the client (Espressif ESP32) over WiFi.
System Diagram
14

PCM5102A Schematic (from Texas Instruments)
Client (ESP32 w/ PCM5102A DAC) Schematic
Design Considerations
To complete this system, my priorities were cost, reliability/robustness, ease of
implementation/use, and size. I primarily have experience with networking and cybersecurity, so
I had some idea about what hardware to use to accomplish my goals.
15

For the server hardware, I wanted to use a small, low cost hardware system to serve audio over
a network, that could handle ~50 concurrent clients. This led me to decide on a Raspberry Pi
microcomputer, since I have experience using them for side projects and they’re capable
enough to do basic audio transcoding, or support a small media server (such as Network
Attached Storage). I used a Raspberry Pi 3 Model B+, as it was the most current Raspberry Pi
at the time of choosing parts (the Raspberry Pi 4 has been released since writing).
For client/receiver hardware, I still wanted to choose an option that was cheap and has a small
form factor, since (for a final product) this would be contained in a small case with a battery, and
held during a silent disco concert. I ended up choosing the ESP32-WROOM-32 module, from
HiLetGo on Amazon. The ESP32 is the successor to the popular ESP8266, and has a number
of improvements over the ESP8266. Like the ESP8266, the ESP32 uses the Arduino IDE for
development; both boards are like high-end versions of the popular Arduino Uno boards.
However, the ESP32 features built-in WiFi and Bluetooth, and a dual core CPU (the ESP8266
does not have Bluetooth onboard, and only has a single core CPU). The ESP32 has a deep
sleep power state which uses 7uA of power, and 80-180mA while using the WiFi module. These
power numbers are perfect for a small device using a Lithium Ion battery for small electronics.
Using a AA-sized 1500mAh battery yields an impressive 8 hour runtime of constant listening,
found using an IoT battery life calculator.
16

ESP8266 vs. ESP32
CPU Wi-Fi Bluetooth Frequency SPI/I2C/I2S/UART
ADC
ESP-WROOM-32 32-bit Dual Core
40MHz 802.11b/g/n
Included (with BLE)
160MHz 4/2/2/2 12 bit
ESP 8266 32-bit Single Core
20MHz 802.11b/g/n
N/A 80MHz 2/1/2/2 10 bit
The Access Points still should not be forgotten, and for this project/proof of concept I decided to
use what’s at my home: a Google mesh WiFi system with 3 access points. While I could’ve likely
used any 802.11N compatible AP, the mesh system could greatly increase range for a finished
product, allowing listeners to be 2-300ft+ away from the transmitter. However, the specific
model that I have may not be suitable for this, as they rely on an internet connection to function
properly, and no configuration can be done locally. For a use case that’s away from a readily
available internet connection, another mesh networking kit may work better.
Risk Area Analysis
Perhaps the biggest risk area in this system is handling audio on the client (ESP32) side. This
includes transcoding the WiFi audio stream, volume controls on the ESP32, and
Bluetooth/3.5mm audio output to a listener’s headphones.
Transcoding can be done using the ESP32 hardware, using the ESP32’s I2S audio libraries.
The ESP32 is a dual-core system; one core controls WiFi/Bluetooth connectivity, and the other
core can be used for all other functions (so we will have one dedicated core for audio
transcoding/manipulation).
17

After the audio is transcoded to I2S, it will be either be transmitted over Bluetooth to a listener’s
headphones, or sent to an external DAC for 3.5mm headphone support. The code for Bluetooth
functionality will be tested and upgraded to work with most modern headphones.
There are many external DAC options for the ESP32, including the STA3333IS. This chip
performs digital audio processing, simply needing an I2S input. The chip has 2 out channels for
stereo audio, as well as support for software volume control. Volume control will likely be
up/down/mute buttons or a potentiometer, and this input can be fed into the STA3333IS for
processing.
Another option for the DAC is the Infineon MA12040P. This chip is more powerful than the STA
(possibly too powerful for this application, as it’s more suited for soundbars and ‘permanent’
sound systems), but still features software volume control and limiting.
Testing will be done with the ESP32’s internal DAC and external DACs before settling on a
solution (to see if the internal DAC is powerful enough to produce high quality sound and to
drive speakers connected to the ESP32). However, there are a multitude of external I2S DACs
available, so even if the two listed in this document aren’t suitable, it shouldn’t be hard to find
one that will suit this project’s needs.
Implementation - Server
Server implementation is built using the popular audio streaming software Icecast. Icecast is a
streaming media server which is usually used for Internet radio stations. While Icecast streams
are typically broadcast on the Internet, Icecast can also be used on a local network, and they’re
18

functionally similar. To achieve a media server for this project, I decided to install Icecast on the
Raspberry Pi, and serve content over a LAN.
Unfortunately, Icecast does not support capturing external audio, so I used a program called
DarkIce to accomplish this. I used a USB sound card to connect external audio (for example, a
DJ controller), which is then encoded and sent to Icecast, which serves the audio.
First, I installed DarkIce and Icecast on my Raspberry Pi using
sudo apt-get install darkice icecast2
This installs both DarkIce and Icecast to the Raspberry Pi, and after downloading and installing
is complete, the Icecast2 install wizard is launched which asks for the address to stream on (I
used localhost, though a URL can be used for web streaming), and passwords for the admin
section of Icecast.
Next, we start the Icecast process by running
sudo su
/etc/init.d/icecast2 start
(the above command must be run using root).
19

I used my upstream router for DHCP, and once I navigated to the Raspberry Pi’s URL I was
greeted with this page:
Clicking the yellow M3U link in the top right corner opens a .m3u file (used to share playlist
information for songs) and the streamed music can be heard.
To further configure Icecast for this project, I modified the config file that DarkIce uses, and set
up the audio configuration to match the USB sound card setup in the Raspberry Pi, as well as
setting a 320kbps stream. The full config file can be found in the appendix, under
darkice.cfg.
The [general] section of the config file sets the duration of the stream (24 hours, far longer than
should be needed), as well as a buffer for audio and the option to reconnect if the stream URL is
disconnected (it never should, since we’re using LAN).
20

The [input] section selects the USB sound card (it’s in USB slot 1,0), and sets the audio sample
rate and bits per sample. 44.1kHz sample rate is typical for CDs (high-quality), and to hear
differences between the left and right headphones, we’re using stereo for this project, versus
converting both left and right streams to just one (mono).
The [icecast2-0] section shows configuration for the Icecast server. To complete one of my
objectives, I selected an audio format of constant bitrate (CBR) 320kbps. The lowpass/highpass
section is important, since these are both disabled (using the -1 value). This was turned on
when I first started using DarkIce, but resulted in poor audio quality since the highs and bass
were cut.
Now that DarkIce and Icecast are working properly (and we can hear audio that’s being played),
we just need to enable DarkIce and Icecast when the Raspberry Pi boots. To do this, we’ll use
the following script:
#!/bin/bash
sudo /etc/init.d/icecast2 start
sudo /usr/bin/darkice -c /home/pi/DARKICE/darkice.cfg
We can use Cron to run this script when the Raspberry Pi boots, by running
sudo su
crontab -e
and adding “@reboot /home/pi/DARKICE/darkice.sh” to the end of the file (this is the
location of the script).
21

Now that the Raspberry Pi functions properly and doesn’t need any more input after booting,
we can focus on connecting the ESP32 client and streaming audio.
Implementation - Client
Client implementation was completed using the Espressif ESP32 microcontroller, and a
PCM5102A I2S stereo DAC. The ESP32 has I2S built in, and the PCM5102A supports high
quality audio (up to 32 bits per sample, though I’m only using 16), and up to 384kHz sample rate
(I’m using 44100kHz).
Thankfully, the ESP32 includes WiFi and Bluetooth on-board, which greatly simplifies the design
of this system. Additionally, the ESP32 can use the Arduino IDE for development, which allows
for the use of built in libraries and leveraging existing projects.
I came across a Github project for “ESP8266Audio”, which was created to play audio files (MP3,
WAV, etc.) on I2S DACs on ESP8266 and ESP32 microcontrollers. This project has been in
development for over 3 years, and continual support and updates are still being added. This
package included support for playing a MP3 stream over HTTP, and playing that MP3 to a I2S
DAC. There is also a double-buffer system for HTTP streams which I used, which supports
having 1-2 packets in memory to avoid stuttering.
To wire the PCM5102A to the ESP32, I used a breadboard and standard male to male jumper
wires. The ESP8266Audio description includes some help for wiring:
22

• 3.3V from ESP8266 -> VCC, 33V, XMT
• GND from ESP8266 -> GND, FLT, DMP, FMT, SCL
• (Standard I2S interface) BCLK->BCK, I2SO->DIN, and LRCLK(WS)->LCK
However, to wire the BCK, DIN and LCK pins, I did a bit more research and discovered another
Github repo, with wiring suggestions for an I2S DAC:
ESP pin - I2S signal
----------------------
GPIO25/DAC1 - LRCK
GPIO26/DAC2 - BCLK
GPIO22 - DATA
I wrote a program using examples from the ESP8266Audio package to support an MP3 stream
from LAN, which is double-buffered before sent to the PCM5102A (the full code text is available
in the Appendix). The audio served from the Raspberry Pi can successfully be heard through
the ESP32!
Design Considerations for Future Projects
For future projects like this (or to expand on this project) I would recommend not using the
ESP-WROOM-32 as I did. While the WROOM-32 model is great, and worked reliably in this
application, there are other ESP32 models available now that are more suited for audio
applications (specifically, the ESP32-LyraT), which includes a builtin DAC, play/pause and
volume controls while retaining builtin WiFi and Bluetooth.
23

Additionally, for a more permanent system, a battery is needed to power the ESP32 clients. As
discussed in the Implementation - Client section, the ESP32 uses ~80-180mA at 3.3V with
WiFi enabled, and the PCM5102A uses 10uA at 3.3V (Section 8.5 of the TI datasheet).
Combined, the system would use ~0.462033W (0.462W from ESP32 at 140mA, and
0.000033W from the PCM5102A). Using the 1500mAh battery listed in the Implementation
section for the ESP32, this gives an 8 hour runtime at 140.01mAh power consumption.
Assuming the battery starts fully charged, this gives more than enough runtime for most events,
and standby batteries can allow events to run far past the 8 hour limit.
System Testing/Analysis
Testing this system was performed in two ways: load tests for the Raspberry Pi server, and
audio quality tests from the Raspberry Pi and the ESP32 client.
Server Load Testing
To perform load tests on the Raspberry Pi with DarkIce and Icecast, I found a Github repository
by user ‘aerth’ that contains a Golang program for load testing Icecast servers. I started DarkIce
and Icecast, and began load testing.
To log CPU usage over time (to notice impact of the load tests on the Raspberry Pi) I SSH’ed
into the Raspberry Pi and ran
while true; do uptime >> uptime.log; sleep 1; done
24

while the load tests were completed. This gave me an output that contained the current time (to
graph this information) as well as load averages of the CPU every second.
Test #1: 100 Users
The arguments for the stress testing script are host IP address and port, the Icecast stream
mount point, the number of connections to test and an optional interval for starting new streams.
To test 100 users against the stream, I ran
go run main.go 192.168.86.243:8000 test.mp3 100
and used the above uptime command to log CPU usage. The test was run for 5 minutes to get a
better idea of how the load would stabilize on the system. The following graph is the time versus
the 1 minute, 5 minute and 15 minute load averages for 100 connected users:
25

Test #2: 300 Users
Similar to the first load test, another load test was performed over 5 minutes for 300 connected
users. However, I had to modify a value in the Icecast config file to allow >100 users connected
at once (there is a limit hardcoded in the config file, possibly to deter DDoS attacks for public
web streams).
Unlike the 100 user test, I began to get errors when running the load testing script:
dial tcp 192.168.86.24:8000: socket: too many open files
Followed by
Reading connection 227 failed: EOF
However, some debugging showed that I had 256 available file descriptors for my terminal on
my laptop, running ulimit -S -n 2048 fixed this problem and I was able to successfully test 300
users without any errors.
1, 5, 15 minute Load Averages/Time - 300 Users
26
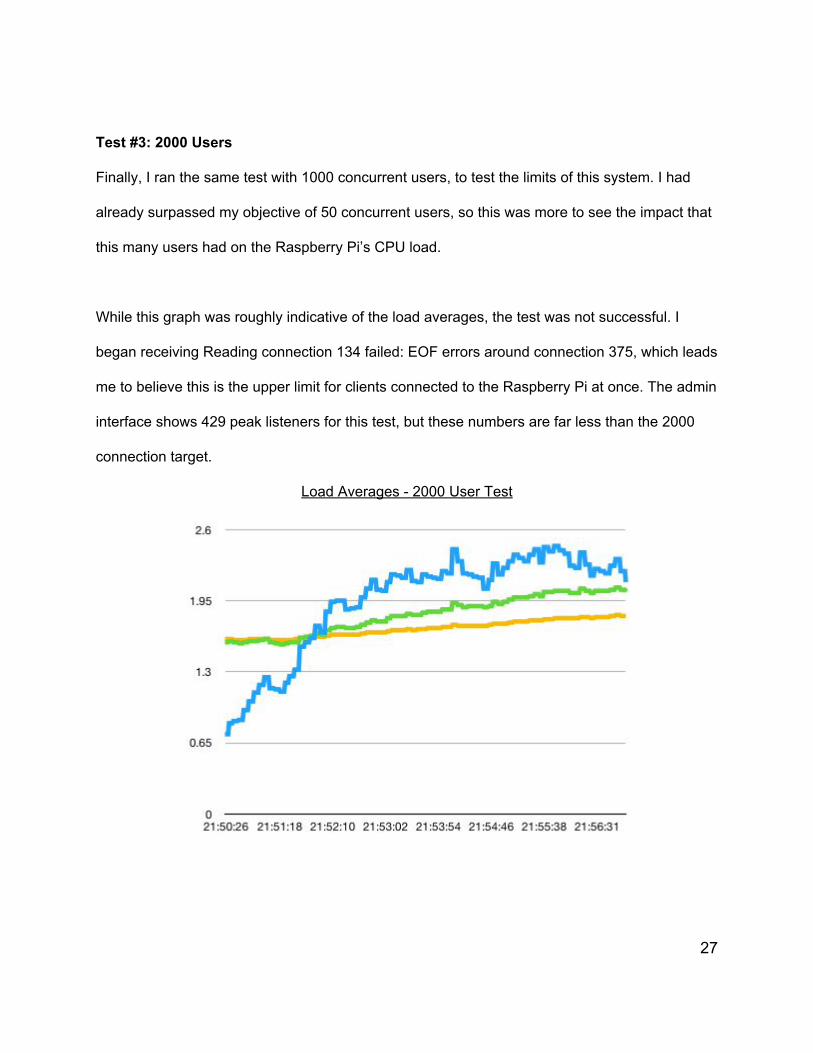
Test #3: 2000 Users
Finally, I ran the same test with 1000 concurrent users, to test the limits of this system. I had
already surpassed my objective of 50 concurrent users, so this was more to see the impact that
this many users had on the Raspberry Pi’s CPU load.
While this graph was roughly indicative of the load averages, the test was not successful. I
began receiving Reading connection 134 failed: EOF errors around connection 375, which leads
me to believe this is the upper limit for clients connected to the Raspberry Pi at once. The admin
interface shows 429 peak listeners for this test, but these numbers are far less than the 2000
connection target.
Load Averages - 2000 User Test
27

Load Test Analysis
After completing these tests, I averaged the values for the 1 minute, 5 minute, and 15 minute
loads and collected them:
Load Avg [1 min] Load Avg [5 min] Load Avg [15 min]
100 Users 1.412 1.051 0.693
300 Users 1.922 1.341 0.678
375 Users 1.950 1.821 1.694
As we can see, the load roughly doubled between 100 users and 350 users connected (using
the 5 minute averages). The load averages are a measure of how many processes are waiting
to execute, and with the quad core processor on the Raspberry Pi, a load average of <2 is
acceptable. However, for a production-level system, the client limits and EOF errors should
certainly be investigated, as this doesn’t seem like a limitation of the Raspberry Pi’s CPU.
Audio Quality Test
To test audio quality, I captured output of the stream from the Raspberry Pi, and the ESP32 (to
compare audio degradation over the network, and degradation as a result of the
ESP32/PCM5102A DAC).
I tested using FLAC files from my iTunes library to start with the most clean audio quality I could
find. The bitrate of the files I tested with is >2,000 kbps, which is transcoded by the Raspberry Pi
to 320kbps before being streamed.
28

Audio clips from the Raspberry Pi were recorded using
curl --output streamoutput.mp3 --max-time 10
http://192.168.86.243:8000/test.mp3
This allowed me to record snippets of the stream, and compare them to audio files present on
my computer. I recorded samples of 2 different songs, and each recording was 10 seconds
long. I recorded the same 10 second sample of each song from the Raspberry Pi and the
ESP32 to further identify differences between the source material, the Raspberry Pi’s encoding,
and the ESP32’s DAC.
To clean my recordings, I used Audacity to “stack” each recording on top of one another,
ensuring that the same ~10 seconds were being compared between each song. This is the
stacking process for Vice by Droptek, and each file was saved from Audacity in wav format to
prevent another transcode (that could degrade audio quality).
29
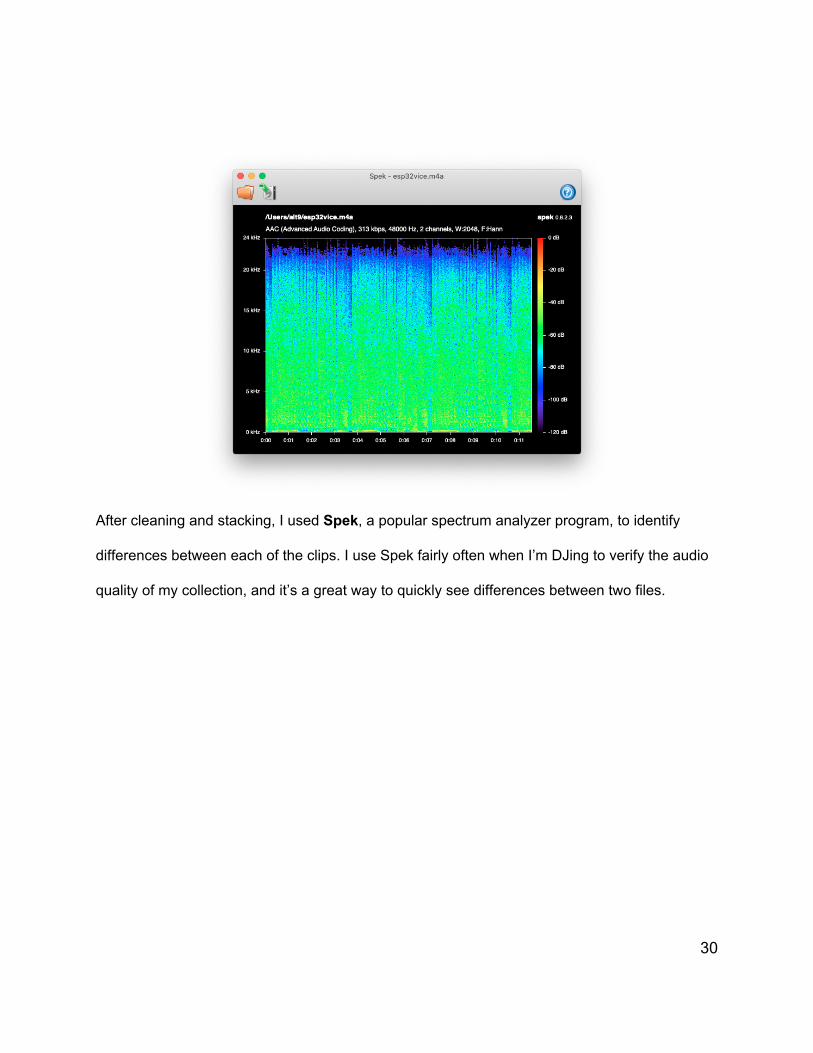
After cleaning and stacking, I used Spek, a popular spectrum analyzer program, to identify
differences between each of the clips. I use Spek fairly often when I’m DJing to verify the audio
quality of my collection, and it’s a great way to quickly see differences between two files.
30
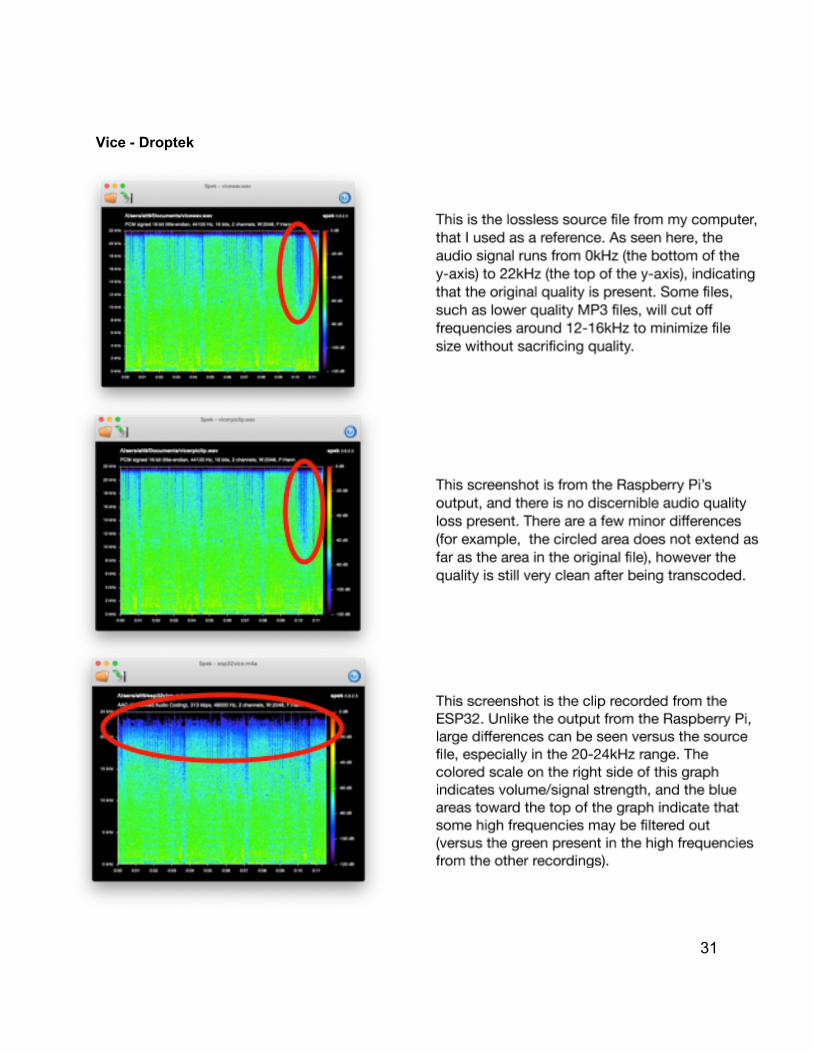
Vice - Droptek
31

Walkers - Stephen Walking
32

Conclusions + Future Work
Overall, this system performed very well, and presents a large upgrade over current silent disco
systems. The load test showed that 375 users could be connected at once (almost 8x the
engineering requirement for connected users), and while the audio analysis showed some
degradation at the ESP32 client, the quality was still far over 320kbps+, which was one of the
engineering requirements. Additionally, audio quality could likely be improved by letting listeners
use their personal devices, such as cell phones, to connect manually to the stream and listen.
The processors and DACs available in most modern phones would be far more capable than
the ESP32, and could allow listeners to use Bluetooth headphones as well.
Future work for this project could include testing different ESP32-compatible DACs and
measuring their audio quality, or changing/upgrading the server hardware to broadcast in better
quality (even up to lossless quality) and support for more concurrent listeners. Bluetooth support
on ESP32 devices would also be a plug, and would allow more listeners to use the ESP32 since
Bluetooth headphones are becoming more and more popular.
More experimentation could also be done for the WiFi network, including range testing, and
comparing WiFi systems to raise the number of connected clients. Mesh networks are also
possible with the ESP32, which could replace the need for WiFi entirely, though using a mesh
network may cause bandwidth and reliability issues.
33

Works Cited
“Battery-Powered ESP32.” RadioShuttle Network Protocol, www.radioshuttle.de/en/media-en/tech-infos-en/battery-powered-esp32/.
“DarkIce.” DarkIce Live Audio Streamer, www.darkice.org/.
Earle F. Philhower, III, ESP8266Audio, (2017), GitHub Repository, https://github.com/earlephilhower/ESP8266Audio.
“ESP32-LyraT Overview: Espressif Systems.” ESP32-LyraT Overview | Espressif Systems, Espressif Systems, www.espressif.com/en/products/hardware/esp32-lyrat.
“ESP32 Series Datasheet.” esp32_datasheet_en, Espressif Systems, 2020, www.espressif.com/sites/default/files/documentation/esp32_datasheet_en.pdf.
“FCC ID A4RNLS-1304-25.” Google LLC Dual Band WiFi Router NLS-1304-25, Google LLC, 2016, fccid.io/A4RNLS-1304-25.
“FCC Rules and Regulations.” AIR802, 2006, www.air802.com/fcc-rules-and-regulations.html.
“Icecast Is Free Server Software for Streaming Multimedia.” Icecast, Xiph.org, 2004, icecast.org/.
MrBuddyCasino, ESP32 Web Radio, (2019), GitHub Repository, https://github.com/MrBuddyCasino/ESP32_MP3_Decoder/blob/master/README.md.
Neutert, Simon. “Simple Calculator for Estimating a (LiPo) Battery's Life.” IOT Battery Life Calculator, www.of-things.de/battery-life-calculator.php.
“PCM5102A Functional Block Diagram.” Functional Block Diagram for PCM5102A, Texas Instruments, www.ti.com/data-sheets/diagram.tsp?genericPartNumber=PCM5102A&diagramId=SLAS859C.
“PCM510xA Datasheet.” PCM510xA Datasheet, Texas Instruments, May 2012, www.ti.com/lit/ds/symlink/pcm5100a.pdf.
“Safety & Regulatory Guide | Wifi.” Google Wifi Help, Google, support.google.com/wifi/answer/7450618?hl=en.
Zulueta, Dean. “Silent Discos: How to DJ in Silence.” DJ TechTools, DJTechTools, 5 Oct. 2017, djtechtools.com/2017/08/29/silent-discos-dj-silence/.
34

Appendix
ESP32 WiFi Connection & I2S Code
#include <Arduino.h> #include "AudioGeneratorMP3.h" #include "AudioOutputI2S.h" #include "AudioFileSourceHTTPStream.h" #include "AudioFileSourceBuffer.h" #include <WiFi.h> // Define our WiFi SSID and Password const char* ssid = "xxxxxxx"; const char* password = "xxxxxxx"; // Declare our MP3 audio generator, MP3 file, the HTTP buffer, and the I2S audio sink AudioGeneratorMP3 *mp3; AudioFileSourceHTTPStream *file; AudioFileSourceBuffer *buff; AudioOutputI2S *out; void setup() { Serial.begin(115200); delay(1000); Serial.print("Connecting to "); Serial.println(ssid); // Attempt to connect to WiFi WiFi.begin(ssid, password); // Print “..........” until connected while (WiFi.status() != WL_CONNECTED) { delay(500); Serial.print("."); } // Once connected, initialize our Audio stream (the below IP address
is my Raspberry Pi with IceCast) file = new AudioFileSourceHTTPStream("http://192.168.86.243:8000/test.mp3"); buff = new AudioFileSourceBuffer(file, 2048); out = new AudioOutputI2S();
35

mp3 = new AudioGeneratorMP3(); // Pass the buffer as the MP3, not the http stream to enable buffering mp3->begin(buff, out); } void loop() { // While the server is still running, handle it and print MP3 bugging if (mp3->isRunning()) { Serial.printf("MP3 Running\n"); Serial.printf(mp3); if (!mp3->loop()) mp3->stop(); } else { // If the stream is over, wait until it starts again Serial.printf("MP3 done\n"); delay(1000); } } Raspberry Pi Code
darkice.cfg [general] duration = 86400 # duration in s, 0 forever bufferSecs = 1 # buffer, in seconds reconnect = yes # reconnect if disconnected [input] device = plughw:1,0 # Soundcard device for the audio input sampleRate = 44100 # sample rate 11025, 22050 or 44100 bitsPerSample = 16 # bits channel = 2 # 2 = stereo [icecast2-0] format = mp3 bitrateMode = cbr bitrate = 320 quality = 1.0 server = localhost port = 8000 password = hackme
36

mountPoint = test.mp3 lowpass = -1 # disable low pass filter highpass = -1 # disable high pass filter icecast.xml
<icecast> <limits>
<clients>300</clients> <!-- Change this value for testing --> <sources>2</sources> <threadpool>5</threadpool> <queue-size>524288</queue-size> <client-timeout>30</client-timeout> <header-timeout>15</header-timeout> <source-timeout>10</source-timeout> <!-- same as burst-on-connect, but this allows for being more specific on how much to burst. Most people won't need to change from the default 64k. Applies to all mountpoints --> <burst-size>65535</burst-size>
</limits>
<authentication> <!-- Sources log in with username 'source' --> <source-password>hackme</source-password> <!-- Relays log in username 'relay' --> <relay-password>hackme</relay-password> <!-- Admin logs in with the username given below --> <admin-user>admin</admin-user> <admin-password>hackme</admin-password>
</authentication>
<!-- Uncomment this if you want directory listings --> <!-- <directory>
<yp-url-timeout>15</yp-url-timeout> <yp-url>http://dir.xiph.org/cgi-bin/yp-cgi</yp-url>
</directory> <directory>
<yp-url-timeout>15</yp-url-timeout> <yp-url>http://www.oddsock.org/cgi-bin/yp-cgi</yp-url>
</directory> -->
37

<!-- This is the hostname other people will use to connect to your server.
It affects mainly the urls generated by Icecast for playlists and yp
listings. --> <hostname>localhost</hostname>
<!-- You can use these two if you only want a single listener --> <!--<port>8000</port> --> <!--<bind-address>127.0.0.1</bind-address>-->
<!-- You may have multiple <listener> elements --> <listen-socket>
<port>8000</port> <!-- <bind-address>127.0.0.1</bind-address> -->
</listen-socket> <!-- <listen-socket>
<port>8001</port> </listen-socket> →
(The rest of the file is unchanged from the default version)
Audio Quality Test #3: Thundergun by 1uP
The above screenshots are the lossless file of Thundergun by 1uP in Spek, and the recording
from the Raspberry Pi.
38

This screenshot is the recording from the ESP32, the shelf is clearly visible near the top of the
spectrograph.
Bill of Materials
Supplier Name Item #/Part Name
Quantity Price Each (+ Link to Purchase)
Use in Project
Adafruit Raspberry Pi 3 - Model B+
1 $35.00 Server hardware
Amazon HiLetGo Espressif ESP-WROOM-32
1 $10.99 Client Hardware
Amazon DIYMore PCM5102A DAC (2-pack)
1 $12.99 Client Audio Hardware
Amazon Sabrent USB Stereo Audio Adapter
1 $7.99 Server Audio Input
Micro Center QVS 3.5mm to ¼” Stereo Audio Adapter
1 $3.99 Recording audio clips for testing
39
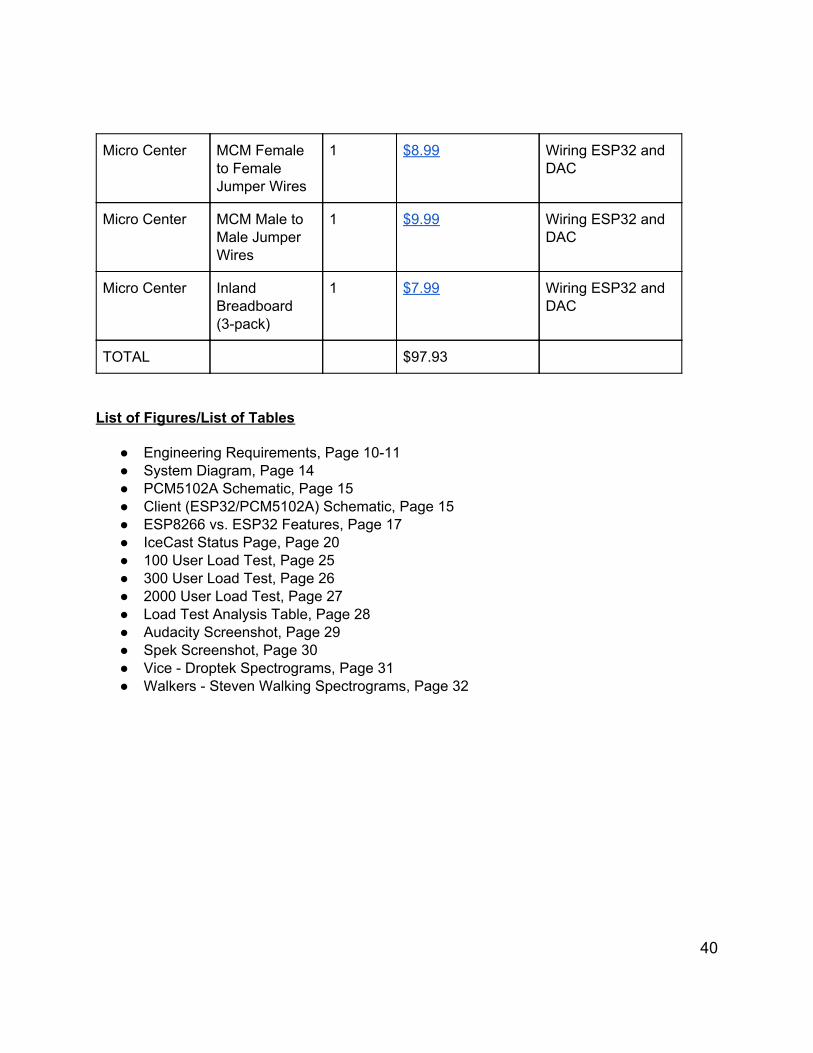
Micro Center MCM Female to Female Jumper Wires
1 $8.99 Wiring ESP32 and DAC
Micro Center MCM Male to Male Jumper Wires
1 $9.99 Wiring ESP32 and DAC
Micro Center Inland Breadboard (3-pack)
1 $7.99 Wiring ESP32 and DAC
TOTAL $97.93
List of Figures/List of Tables
● Engineering Requirements, Page 10-11 ● System Diagram, Page 14 ● PCM5102A Schematic, Page 15 ● Client (ESP32/PCM5102A) Schematic, Page 15 ● ESP8266 vs. ESP32 Features, Page 17 ● IceCast Status Page, Page 20 ● 100 User Load Test, Page 25 ● 300 User Load Test, Page 26 ● 2000 User Load Test, Page 27 ● Load Test Analysis Table, Page 28 ● Audacity Screenshot, Page 29 ● Spek Screenshot, Page 30 ● Vice - Droptek Spectrograms, Page 31 ● Walkers - Steven Walking Spectrograms, Page 32
40

Analysis of Senior Project Design
Please provide the following information regarding your Senior Project and submit to your advisor along with your final report. Attach additional sheets for your responses to the questions below. Project Title: Tiny Disco: A Cost-Effective, High-Fidelity Wireless Audio System Quarter / Year Submitted: Winter 2020 Student: (Print Name) ______________________ (Sign) ___________________________ Advisor: (Print Name) ______________________ (Initial) _________ Date: __________ Summary of Functional Requirements
- Describe the overall capabilities of functions of your project or design. Describe what your project does. (Do not describe how you designed it.)
- The Tiny Disco is capable of transmitting high quality, 320kbps+ audio over WiFi to >300 clients. The Tiny Disco uses a Raspberry Pi as a server, which captures and transcodes audio before serving it over a Local Area Network. The clients are Espressif ESP32 microcontrollers, which stream the audio from the server and send it to Texas Instruments PCM5102A for listening. Additionally, listeners can use their personal devices (namely, cell phones) to connect to the network and listen to the stream.
Primary Constraints
- Describe significant challenges or difficulties associated with your project or implementation. For example, what were limiting factors or other issues that impacted your approach? What made your project difficult? What parameters or specifications limited your options or directed your approach?
41

- Some of the largest challenges associated with my project were learning to work with the ESP32, and learning its limitations. While the ESP32 has WiFi and Bluetooth built in, it does not support audio streaming out of the box and doesn’t decode audio extremely well (there are better versions of the ESP32 for audio projects, I discussed one version in the Design section of this report)
Economic
- Original estimated cost of component parts (as of the start of your project)
- $65 - Actual final cost of component parts (at the end of your project)
- $97 - Attach a final bill of materials for all components
- Attached in the Appendix - Additional equipment costs (any equipment needed for
development?) - Jumper wires and breadboards were needed for wiring the
ESP32. - Original estimated development time (as of the start of your project)
- 3 months - Actual development time (at the end of your project)
- 2 months If manufactured on a commercial basis:
- Estimated number of devices to be sold per year - ~50 servers, ~5,000 clients (100 clients/server)
- Estimated manufacturing cost for each device - $40 (server), $25 (client + battery + DAC)
- Estimated purchase price for each device - Devices would be rented for events, not purchased - Purchase price = $50 (server) $30 (client)
- Estimated profit per year - $25,500
- 50 servers x $50 - (50 servers x $40) 42

- + 5000 clients x $30 - (5000 clients x $25) - Estimated cost for user to operate device, per unit time (specify time
interval) - Only cost is recharging battery (~3 hours) and powering WiFi
network (length of event) Environmental
- Describe any environmental impact associated with manufacturing or use.
- Batteries needed for extended use, created from rare earth materials
Manufacturability
- Describe any issues or challenges associated with manufacturing. -
Sustainability
- Describe any issues or challenges associated with maintaining the completed device or system.
- The system is relatively simple, but more complex networks could lead to far more complex issues.
- Additionally, the Raspberry Pi server could be replaced to support more clients, and this would likely require further testing and implementation to work properly.
- Describe how the project impacts the sustainable use of resources. - This project does not impact sustainable use of resources, in
fact, it promotes listeners to use their own devices rather than using an ESP32 client device.
- Describe any upgrades that would improve the design of the project. - Upgrading the ESP32/PCM5102A may improve audio quality
on the client side (see the report for more info, “Conclusions and Future Work”)
- Upgrading the Raspberry Pi (or adding a second Raspberry Pi) could support many more clients on one LAN
- Describe any issues or challenges associated with upgrading the design.
43

- Upgrading any of the server/client will require updating code to support these devices, and possibly will require updating code on every client device (for example, if changing the IP address of the server).
Ethical
- Describe ethical implications relating to the design, manufacture, use or misuse of the project.
- There are no real ethical implications relating to this project.
Health and Safety
- Describe any health and safety concerns associated with design, manufacture or use.
- Hearing loss is a potential health issue caused with listening to loud music over an extended period of time.
Social and Political
- Describe any social and political concerns associated with design, manufacture or use.
- As noted in the report (“Legal and Ethical Concerns”), this system could be used for unauthorized/illegal events and parties, including outdoor renegades.
Development
- Describe any new tools or techniques used for either development or analysis that you learned independently during the course of your project.
- I learned how to use some of the analysis tools for this project, such as learning Audacity and using curl to download streaming audio.
44