98100014.12 Power Vision Getting Started Guide
16
1 POWER VISION UNIT 1 DIAGNOSTIC CABLE 1 USB CABLE 4 CABLE TIES 1 MOUNTING KIT 1 QUICK START GUIDE PARTS LIST PLEASE READ ALL DIRECTIONS BEFORE STARTING INSTALLATION 98100014.12 POWER VISION Quick Start Guide
Transcript of 98100014.12 Power Vision Getting Started Guide

1 POWER VISION UNIT
1 DIAGNOSTIC CABLE
1 USB CABLE
4 CABLE TIES
1 MOUNTING KIT
1 QUICK START GUIDE
PARTS LIST
PLEASE READ ALL DIRECTIONS BEFORE STARTING INSTALLATION
98100014.12
POWER VISIONQuick Start Guide

2 POWER VISION QUICK START GUIDE2 POWER VISION QUICK START GUIDE
!!!---WARNING---!!!FOR RACING VEHICLE USE ONLY
Note: This product is not for use on roads or vehicles subject to emission control requirements and is not legal for use or installation on motor vehicles operated on public highways in the State of California or other States where similar emission and decibel regulation laws may apply. The user shall determine
suitability of the product for his or her use. The user shall assume all risk and liability in violation of regulations and any incurred financial obligations due to vehicle inspections or emissions tests.
BEFORE INSTALLING SOFTWAREDetermine Your Operating System
You must determine which version of the Windows (32-bit vs. 64-bit) operating system you are running before installing the Power Vision Software.
To open the System Window on ALL VERSIONS of the Windows operating system, on your keyboard press the WIN key and Pause/Break key
together to open System Window.
WINDOWS XPFor a 32-bit operating system:
Windows XP Professional Version<Year> appears under System.
For a 64-bit version operating system:
Windows XP Professional x64 Version<Year> appears under System.
WINDOWS VISTA, 7, 8, 8.1 AND 10Under the System heading verify if System Type is a 32-bit or 64-bit operating system .
NOTICE!

98100014.1298100014.12
CONTENTS1 Power Vision Unit1 Diagnostic Cable1 USB Cable4 6” Cable ties1 Mounting kit (4 x M4 x .7 x 8mm bolts and washers)
1 Quick Start Guide
USB MINI-B PORT
DYNOJET CAN-LINK
EXPANSION PORT
MOLEX 8 PIN VEHICLE INTERFACE CONNECTION
VEHICLE DIAGNOSTIC INTERFACE CABLE
INTEGRATED AMPS 4 HOLE THREADED INSERTS FOR MOUNTING
(MOUNTING SCREWS INCLUDED)

4 POWER VISION QUICK START GUIDE
INSTALLATION FROM DOWNLOAD
WINPV SOFTWARE INSTALLATION
• To Download the latest WinPV software visit www.dynojet.com.
• From the top navigation menu, select SUPPORT then select DOWNLOADS from the fly-out menu.
• On the download page select POWER VISION FOR HARLEY-DAVIDSON.
• Select the download link on the right and be sure to download the proper installer for your operating system.
Note: The Zip File Compressed option is just a compressed version for faster downloading. This file will
need to first be extracted with the appropriate software before installation.
• Save the downloaded file in a convenient location such as your desktop.
• Once downloaded, double click on the file to begin installation of the WinPV software.

98100014.12
Next you are given the option to modify what applications and features the installer will install.
Note: Dynojet recommends that you do not change
any of the default options or default locations.
• Read the summary of your settings and click Next to continue.
WINPV SOFTWARE INSTALLATION
• Read the Welcome window and click Next to continue.
• Carefully read the WinPV license agreement, check the accept box, and click Next to continue.
Note: To install WinPV, you must accept this
agreement. If you do not, Setup will close.
• Click Finish to complete the installation.
Continue with the Power Vision Driver Installation.
Windows Vista and later
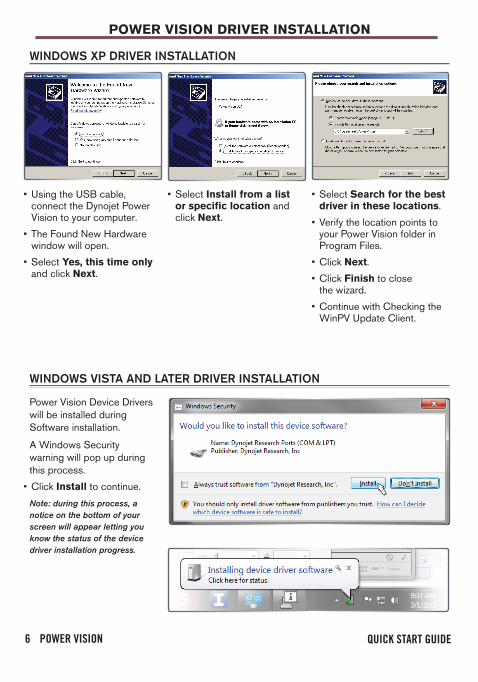
A Windows Security warning will pop up during the installation process. This is normal and will install the Power Vision Device Drivers.
• Click Install to continue.
6 POWER VISION QUICK START GUIDE
• Using the USB cable, connect the Dynojet Power Vision to your computer.
• The Found New Hardware window will open.
• Select Yes, this time only and click Next.
Power Vision Device Drivers will be installed during Software installation.
A Windows Security warning will pop up during this process.
• Click Install to continue.
Note: during this process, a notice on the bottom of your screen will appear letting you know the status of the device driver installation progress.
POWER VISION DRIVER INSTALLATION
• Select Install from a list or specific location and click Next.
• Select Search for the best driver in these locations.
• Verify the location points to your Power Vision folder in Program Files.
• Click Next.
• Click Finish to close the wizard.
• Continue with Checking the WinPV Update Client.
WINDOWS XP DRIVER INSTALLATION
WINDOWS VISTA AND LATER DRIVER INSTALLATION
98100014.12
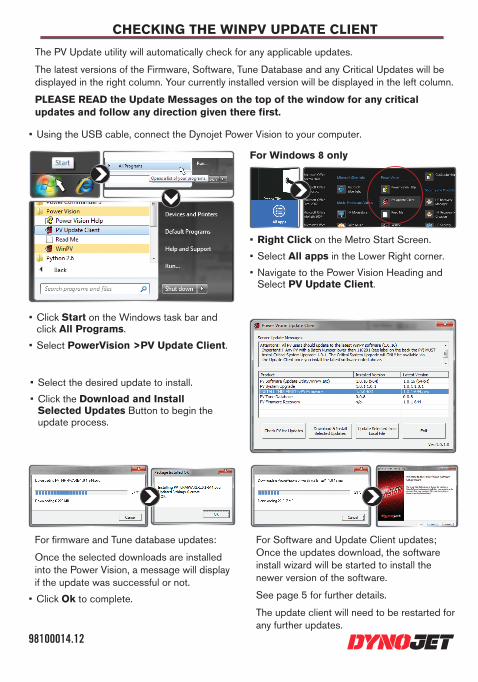
CHECKING THE WINPV UPDATE CLIENT
• Using the USB cable, connect the Dynojet Power Vision to your computer.
• Click Start on the Windows task bar and click All Programs.
• Select PowerVision >PV Update Client.
• Right Click on the Metro Start Screen.
• Select All apps in the Lower Right corner.
• Navigate to the Power Vision Heading and Select PV Update Client.
For Windows 8 only
• Select the desired update to install.
• Click the Download and Install Selected Updates Button to begin the update process.
For firmware and Tune database updates:
Once the selected downloads are installed into the Power Vision, a message will display if the update was successful or not.
• Click Ok to complete.
For Software and Update Client updates; Once the updates download, the software install wizard will be started to install the newer version of the software.
See page 5 for further details.
The update client will need to be restarted for any further updates.
The PV Update utility will automatically check for any applicable updates.
The latest versions of the Firmware, Software, Tune Database and any Critical Updates will be displayed in the right column. Your currently installed version will be displayed in the left column.
PLEASE READ the Update Messages on the top of the window for any critical updates and follow any direction given there first.

8 POWER VISION QUICK START GUIDE
INSTALLING THE POWER VISION
• Route the Power Vision cable away from any moving or hot parts.
Dynojet recommends using zip ties to secure the cable to existing non-moving components.
• The Power Vision module may be mounted to the bike’s handlebars using mounting hardware.
The Power Vision does not need to remain on the bike.
This installation was done on a 2009 Harley-Davidson Night Rod. Your bike and set-up may vary.
• Connect the Power Vision to the ECM’s diagnostic port.
Note: The Power Vision may be damaged if installed improperly.
The location of the diagnostic port varies depend-ing on model, so please refer to a service manual or contact Dynojet for the exact location.
Use caution, many models use the same style connector for accessories, your Power Vision MUST be connected to the diagnostic port.
2004-2017 Dyna ModelsDiagnostic connector is located behind the Left hand side cover. Connector is Light Grey in color with black rubber plug installed. Note: 2001-2011 models are J1850 using the PV-1.Note: 2012-2017 models are CAN, using the PV-2.
2007-2020 Sportster Models (including XR Models)
Diagnostic connector is located behind the Left hand side cover. Connector is Light Grey in color with black rubber plug installed.
FIG. A FIG. B
DIAGNOSTIC CONNECTOR LOCATIONS

98100014.12
2002-2007 Touring ModelsDiagnostic connector is located behind the right hand side cover. Connector is Light Grey in color with black rubber plug installed.Note: Requires removing the Right side saddle bag.
2008-2020 Touring ModelsDiagnostic connector is located behind the left hand side cover. Connector is Light Grey in color with a black rubber plug installed. Note: Requires removing the Left side saddle bag.
2001-2020 Softail ModelsDiagnostic connector is located under the seat, attached to the frame by the rear fender. Connector is Light Grey in color, with black rubber plug installed. Note: Requires removing the seat. Note: 2001-2010 models are J1850 using the PV-1.Note: 2011-2017 models are CAN using the PV-2.
2015-2017 Street 500 and 750 ModelsDiagnostic connector is located behind right hand side cover. Connector is Light Grey in color with black rubber plug installed.
2002-2017 V-Rod Models- Shown on Page 8
Diagnostic connector is located behind the Right Front frame cover. Connector is Light Grey in color with black rubber plug installed. Note: Tools required to access.

10 POWER VISION QUICK START GUIDE
FLASHING A DYNOJET PRE-CONFIGURED TUNE FILE
The Power Vision is loaded with Pre-Configured Tunes developed by Dynojet when it leaves our facility. Dynojet makes every effort to have a tune file available for your specific combination when you receive your Power Vision (pre-loaded in the device), but in some cases you’ll need to use the Update Client to ensure you have the latest tunes available from Dynojet.
You can also visit http://www.dynojet.com to search our tune database and download a tune for your combination.
POWER VISION TUNE FILE MANAGEMENT
There are three types of tunes that can be flashed to your ECM with the Power Vision:
Flashing your ECM with any one of these types of tunes will automatically save a backup of your Original Tune, and will permanently lock the Power Vision to your bike’s ECM.
You can flash your ECM with tunes as many times as you like, but the Power Vision will only be permitted to flash tunes to the ECM it’s locked to for life. The Power Vision’s other features, like datalogging / monitoring, diagnostics, clearing adaptive values, etc. will still be available to be used on any bike it was designed for, as well as the bike it’s locked to.
1. Dynojet Pre-Configured Tunes
2. Custom Tunes 3. Load Copy
Any combination of the three types of tune files can be placed in the Tune Manager. There are 8 “slots” in the Tune Manager, and you can occupy a single slot or all eight if you choose.
For example, you could have a Dynojet Pre-Configured Tune in Slot 1, a Custom Tune in Slot 2, and a Copy of Original Tune in Slot 3. You can think of the Tune Manager as an area that “holds” the tunes, or “stages them” prior to the Power Vision flashing them to your ECM. You can overwrite the tunes that occupy the various slots at any time, or manage your tune files in the Tune Manager by using the WinPV software.
IMPORTANT:
NOTE:

98100014.12
FLASHING A DYNOJET PRE-CONFIGURED TUNE FILE
• Select Program Vehicle. • Select Dynojet Pre-Configured Tunes.
The Power Vision will automati-cally search for compatible tunes.
• Select a Dynojet Pre-Configured Tune File to flash.
• Touch Select.
• Verify the tune information. If the tune information is correct, touch Continue.
• Select a slot to save the selected tune file.
Note: If there is any data in the selected slot, it will be overwritten.
• Touch Select.
The tune is now ready.
• Select Flash to flash this tune to the ECM.
Note: During the flash process, do not turn off the bike. Once complete, you will be prompted to turn the bike off for 10 seconds.
• Select Edit to edit this tune.
• Select Exit to exit the screen without any changes.
• Select Load Tune.
Note: You can edit any tune that’s loaded in the Tune Manager prior to flashing your ECM. The Power Vi-
sion allows you to make basic adjustments to your tunes directly on the device without using a computer.
In order to gain full access to your tune files, you’ll need to download them from the Power Vision to WinPV,
our custom tuning software.
Use the following steps to flash a Dynojet Pre-Configured Tune to the ECM:

12 POWER VISION QUICK START GUIDE
• Select Program Vehicle. • Select Custom Tunes.• Select Load Tune.
The Tune is now ready.
• Select Flash to flash this tune to the ECM.
Note: During the flash process, do not turn off the bike. Once complete, you will be prompted to turn the bike off for 10 seconds.
• Select Edit to edit this tune.
• Select Exit to exit the screen without any changes.
Note: You can edit any tune that’s loaded in the Tune Manager
prior to flashing your ECM. The Power Vision allows you to make
basic adjustments to your tunes directly on the device without
using a computer. In order to gain full access to your tune files,
you’ll need to download them from the Power Vision to WinPV,
our custom tuning software.
• Select a Custom Tune File to flash.
• Touch Select.
• Verify the tune information. If the tune information is correct, touch Continue.
FLASHING A CUSTOM TUNE FILECustom Tunes may or may not be pre-loaded from a reseller that specializes in custom tuning. Dynojet does NOT load custom tunes in the Power Vision when it leaves our facility (we load Dynojet Pre-Configured Tunes). You may also receive Custom Tunes via email that can be uploaded to the Power Vision using WinPV, our custom tuning software.
Use the following steps to flash a Custom Tune file to the ECM:

98100014.12
The Tune is now ready.
• Select Flash to flash this tune to the ECM.
Note: During the flash process, do not turn off the bike. Once complete, you will be prompted to turn the bike off for 10 seconds.
• Select Edit to edit this tune.
• Select Exit to exit the screen without any changes.
LOADING A COPY OF THE ORIGINAL TUNE FILE, OR A COPY OF THE CURRENT TUNE FILE
• Select Program Vehicle.
The Power Vision will allow you to use either a COPY OF ORIGINAL tune or a COPY OF CURRENT tune files.
The COPY OF ORIGINAL tune file is a copy of the tune that was present in your ECM when the Power Vision first locked to your ECM. In other words, it is a copy of the backup file that was created and stored in the Power Vision. This is a great way for those who are happy with the way their bike runs, but want access to their existing tune in order to make a few adjustments.
The COPY OF CURRENT tune file is a copy of the CURRENT tune that has been flashed to your ECM.
Use the following steps to load and flash either a Copy of Original tune or a Copy of Current tune file to the ECM:
• Select Load Copy.
• Select a slot to save the Copy of Original tune file.
Note: If there is any data in the selected slot, it will be overwritten.
• Touch Select to continue.
• Select the type of tune you want to copy.
You may either select to Load a Copy of the Current Tune or a Copy of the Original Tune into the tune manager.
• Select Load Tune.
Note: You can edit any tune that’s loaded in the Tune Manager prior
to flashing your ECM. The Power Vision allows you to make basic
adjustments to your tunes directly on the device without using a
computer. In order to gain full access to your tune files, you’ll need
to download them from the Power Vision to WinPV, our custom
tuning software.

14 POWER VISION QUICK START GUIDE14 POWER VISION QUICK START GUIDE
AVAILABLE POWER VISION ACCESSORIES
AUTOTUNE BASIC
SENSOR TYPE Factory Narrow Band
H-D MODELS 2007 and Newer
DESCRIPTION
Included FREE with each Power Vision. Uses the Autotune function with the stock narrow band O2 sensors. Good for minor adjustments within range of stock O2 sensors.
AUTOTUNE PRO
SENSOR TYPE Dynojet Wide Band
H-D MODELS2001-2006 (EFI Models)
DESCRIPTION
Additional accessory includes Control Module and two Wideband O2 sensors. Use Autotune to make tune adjustments on the Power Vision and re-flash the ECM with the edited tune version.
TARGET TUNE
SENSOR TYPE Dynojet Wide Band
H-D MODELS 2007 and Newer
DESCRIPTION
Additional accessory includes Control Module and two Wideband O2 sensors. Includes all functions of Autotune Pro with the addition of FULL TIME CLOSED LOOP control!
TARGET TUNEDynojet’s new Target Tune is an exciting new product that can add a new dimension to your Harley-Davidson’s® ECM. When paired with a Target Tune specific calibration flashed by a Power Vision, your ECM will run closed loop fuel control based on wideband O2 sensors.
The Power Vision delivered calibration changes the coding in the ECM to “understand” the wideband signal (from Target Tune) and allows the ECM to accurately achieve the target AFR.
THERE ARE THREE VERSIONS OF THE AUTOTUNE PROCESS FOR THE POWER VISION.

98100014.1298100014.12
POWER VISION VISOR AND QUICK CLIP SYSTEM This optional accessory will result in better screen visibility and a provision to quickly detach the Power Vision from your bike. Made from high quality, tough ABS plastic with a chrome or flat black finish on the visor, this optional accessory is a functional enhancement that looks great as well. The embedded “NutSerts” allow you to securely attach the Visor / Quick Clip accessory to a mounting system with an AMPS 4-hole pattern.
VIDEO TUTORIALS
WWW.DYNOJET.COM
Visit dynojet.com for the latest video tutorials on the Power Vision and accessories.

© 2017-2020 DYNOJET RESEARCH ALL RIGHTS RESERVED2191 MENDENHALL DRIVE, NORTH LAS VEGAS, NV 89081 - 800-992-4993 - DYNOJET.COM