
88-00060-1 SmartHub Modem Installation...
30
Telecoms Power Solutions PowerOasis Limited . Shrivenham Hundred Business Park Telephone: +44 (0)1793 784 242 Email: [email protected] . www.poweroasis.com SmartHub Modem Installation Guide 88-00060-1 November 9, 2012
Transcript of 88-00060-1 SmartHub Modem Installation...

Telecoms Power Solutions
PowerOasis Limited . Shrivenham Hundred Business Park Telephone: +44 (0)1793 784 242
Email: [email protected] . www.poweroasis.com
SmartHub Modem Installation Guide
88-00060-1
November 9, 2012

Telecoms Power Solutions
FatBox Modem 2 © PowerOasis 2012 SmartHub Installation Guide
88-00060-1
November 9, 2012
Version History
Issue Date Author/Editor Comments/Description of Change
0.1 9-11-12 Simon Oxlade First Draft
0.2 21-1-13 Simon Oxlade Updated with Y-cable instructions
© PowerOasis 2013
All rights reserved. The contents of this document are copyright and may not be reproduced or transmitted in any form or by any means without the written permission of PowerOasis Ltd.
The PowerOasis products described in this document may include copyrighted PowerOasis computer programs stored in semiconductor memories or other media. Any copyright PowerOasis computer programs contained in the PowerOasis products described in this document may not be copied or reproduced in any manner without the express written permission of PowerOasis. Furthermore, the purchase of PowerOasis products shall not be deemed to grant either directly or by implication, estoppels or otherwise, any license under the copy-rights, patents or patent applications of PowerOasis, except for the rights that arise by operation of law in the sale of a product.
The software described in this document is the property of PowerOasis. It is furnished under a license agreement and may be used and/or disclosed only in accordance with the terms of the agreement. Software and documentation are copyright materials. Making unauthorised copies is prohibited by law. No part of the software or documentation may be reproduced, transmitted, transcribed, stored in a retrieval system, or translated into any language or computer language, in any form or by any means, without prior written permission of PowerOasis.
PowerOasis and the PowerOasis logo are the registered trademarks of PowerOasis Ltd.
Telecoms Power Solutions
FatBox Modem 3 © PowerOasis 2012 SmartHub Installation Guide
88-00060-1
November 9, 2012
CONTENTS 1 Introduction .................................................................................................................... 5 1.1 Scope of the Document .............................................................................................. 5 1.2 Fatbox GPRSV2 Cellular Router ................................................................................ 5 1.3 Fatbox B.A.S.E HSUPA Router .................................................................................. 6 2 Connecting the Fatbox Modem ...................................................................................... 7 2.1 GPRSV2 Modem Connections ................................................................................... 7 2.1.1 Fitting SIMs ............................................................................................................... 7 2.2 B.A.S.E Router Connections ....................................................................................... 8 2.2.1 Fitting SIMs ............................................................................................................... 8 2.3 Fitting Antenna ............................................................................................................ 9 2.4 Power Connection ..................................................................................................... 10 2.4.1 Use included Power Supply .................................................................................... 10 2.4.2 Use SmartHub RJ45 Analog Port ........................................................................... 10 2.5 Data Connections ..................................................................................................... 11 2.5.1 LAN for GPRS Access ............................................................................................ 11 2.5.2 Serial Connection for SMS Access ......................................................................... 11 3 Pre-Requisites ............................................................................................................. 12 3.1 Equipment ................................................................................................................. 12 3.2 GPRS connection information ................................................................................... 12 3.3 Technician’s Laptop IP address ................................................................................ 12 3.4 Modem Configuration ................................................................................................ 13 3.4.1 Check Modem Network settings ............................................................................. 13 4 Configuring the FATBOX as a GPRS Modem for Smarthub ....................................... 16 4.1 Log on to Fatbox ....................................................................................................... 16 4.2 To configure the GPRSV2 Modem ........................................................................... 17 4.2.1 To configure the GPRS connection ........................................................................ 17 4.2.2 To configure the Modem’s Application Mode ......................................................... 17 4.3 To configure the B.A.S.E. Modem ............................................................................ 18 4.3.1 To configure the Modem’s application mode .......................................................... 19 4.4 Auto Ping Configuration ............................................................................................ 20 4.5 Saving the Modem Configuration .............................................................................. 21 4.6 Validating GPRS connection ..................................................................................... 22 4.6.1 Web Browser .......................................................................................................... 22 4.6.2 DOS Window .......................................................................................................... 22 4.7 Connecting Modem to SmartHub .............................................................................. 23 4.7.1 Change Technician’s Laptop IP address ................................................................ 23 4.7.2 Logon to SmartHub ................................................................................................ 23 4.7.3 Set SmartHub settings ............................................................................................ 23 5 Configuring the FATBOX as a SMS Modem for SmartHub ......................................... 25 5.1 Log on to Fatbox ....................................................................................................... 25 5.2 Application Specific Configuration ............................................................................ 25 5.3 Saving the Modem Configuration .............................................................................. 27
Telecoms Power Solutions
FatBox Modem 4 © PowerOasis 2012 SmartHub Installation Guide
88-00060-1
November 9, 2012
5.4 Validating Serial Modem connection ......................................................................... 28 5.5 Configuration Connection Step ................................................................................. 29 5.5.1 Change Technician’s Laptop IP address ................................................................ 29 5.5.2 Logon to SmartHub ................................................................................................ 29 5.5.3 Set SmartHub settings ............................................................................................ 30

Telecoms Power Solutions
FatBox Modem 5 © PowerOasis 2012 SmartHub Installation Guide
88-00060-1
November 9, 2012
1 INTRODUCTION 1.1 Scope of the Document
This document details the setup of either the FATBOX GPRSV2 or the FATBOX BASE (HSUPA) Modems for use with the SmartHub.
Both models of FATBOX Modem can be configured for use as either a GPRS Modem or as an SMS Modem.
1.2 Fatbox GPRSV2 Cellular Router Connect mobile or remote Ethernet devices to the internet via stable GPRS (and EDGE) data networks. FATBOX GPRSV2 router allows simultaneous serial port transparent connection to a remote server and Ethernet port TCP/IP operations or operate as a serial modem. For out of band management of equipment in data-centers. FATBOX GPRSV2 router supports two data SIM cards to provide redundant GPRS connection for critical mobile or remote applications.
• EDGE Class 10 with RS-485 port version • -48VDC version for telecoms data center and exchanges • Global GPRS Class 10 850,900,1800,1900 • Global EDGE Class 10 850,900,1800,1900 (EDGE version) • Dual SIM support for redundancy • Router mode Ethernet LAN port • Modem and DTU modem Serial port • Wake-On-LAN/RING/Serial Data • DMZ, Port Forwarding, Static Route • PPTP, L2TP and IPSEC VPN client • AToverETH to send AT commands (e.g. to SMS) for EDGE version • EGDE version - SMS to reboot router function • EDGE version - SSH (version 2) for secure configuration • Browser or TELNET configurationn • -10C~60C operating temperature • Wide 9~30VDC power supply input • Integrates Motorola GPRS/EDGE G24 module • CE and FCC tested and certified

Telecoms Power Solutions
FatBox Modem 6 © PowerOasis 2012 SmartHub Installation Guide
88-00060-1
November 9, 2012
1.3 Fatbox B.A.S.E HSUPA Router The FATBOX B.A.S.E. HSUPA router is designed for networking projects requiring higher speed downloads and uploads (up to 7.2Mbps down and 2Mbps up) in demanding applications like security IP cameras, outdoor digital signages, kiosks, WAN back-up, remote office VPN back-up and critical M2M telemetry projects - in remote or mobile environments.
• HSUPA 850/900/1900/2100 supports global WCDMA and UMTS cellular networks • Supports GPRS & EDGE 850/900/1800/1900 • 7.2Mbps Download & 2Mbps Upload • Robust Router with 2 X LAN ports • Serial modem (max 230400bps) mode • No software required - Browser or Telnet • VPN over PPTP, L2TP or IPSEC (PSK) • DDNS, NAT, Static Route, VLAN & VRRP • IP Table In/Out and Scripting support • With SNMP and SSH for remote management • Dual Ethernet ports with WAN backup over HSUPA using VRRP or AUTOPING • AT over LAN for SMS and router monitoring • Sleep and Wake on LAN/serial data and Call • SMS to remote reboot router function • Rugged and compact metal enclosure • 9~30VDC power supply requirement • -20C~65C operating temp • US Lab tested and certified for CE and FCC Part 15

Telecoms Power Solutions
FatBox Modem 7 © PowerOasis 2012 SmartHub Installation Guide
88-00060-1
November 9, 2012
2 CONNECTING THE FATBOX MODEM This document details the setup procedure required for the installation of the FATBOX GPRSV2 and BASE (HSUPA) Cellular Routers as either a GPRS Modem or as a SMS Modem.
2.1 GPRSV2 Modem Connections A front view of the FATBOX GPRSV2 modem is shown below:
2.1.1 Fitting SIMs The Fatbox modem requires at least one data-enabled SIM card to be installed.
1. Open the SIM 1 slot 2. Insert a GPRS-enabled SIM Card 3. Close the SIM 1 slot
Optionally a second GPRS-equipped SIM can be installed to ensure connection to a secondary network for redundancy purposes:
1. Open the SIM 2 slot 2. Insert a second GPRS-enabled SIM Card 3. Close the SIM 2 slot
Telecoms Power Solutions
FatBox Modem 8 © PowerOasis 2012 SmartHub Installation Guide
88-00060-1
November 9, 2012
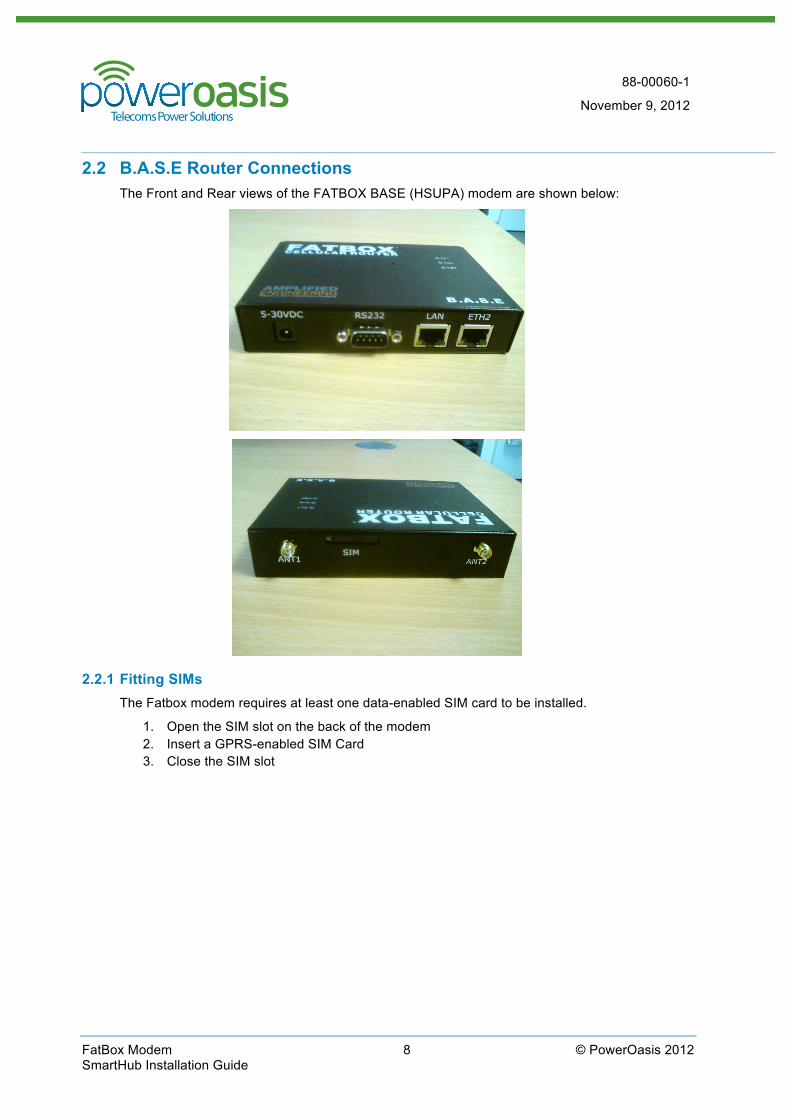
2.2 B.A.S.E Router Connections The Front and Rear views of the FATBOX BASE (HSUPA) modem are shown below:
2.2.1 Fitting SIMs The Fatbox modem requires at least one data-enabled SIM card to be installed.
1. Open the SIM slot on the back of the modem 2. Insert a GPRS-enabled SIM Card 3. Close the SIM slot
Telecoms Power Solutions
FatBox Modem 9 © PowerOasis 2012 SmartHub Installation Guide
88-00060-1
November 9, 2012
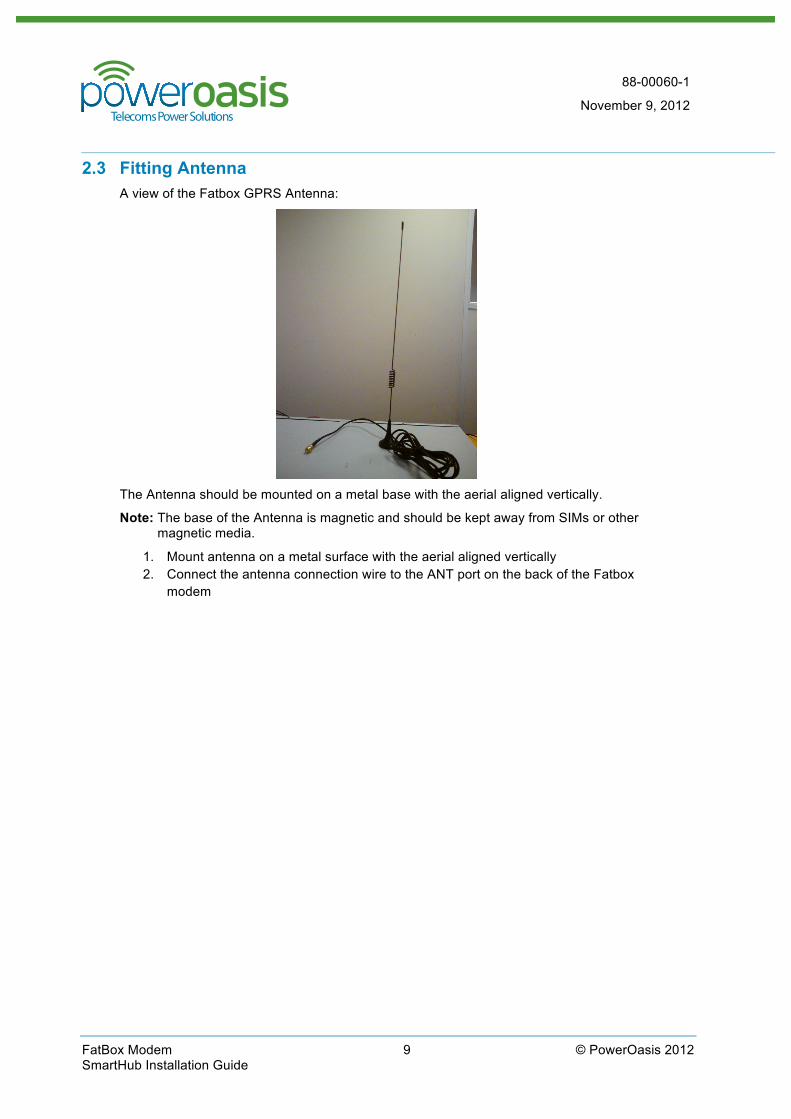
2.3 Fitting Antenna A view of the Fatbox GPRS Antenna:
The Antenna should be mounted on a metal base with the aerial aligned vertically.
Note: The base of the Antenna is magnetic and should be kept away from SIMs or other magnetic media.
1. Mount antenna on a metal surface with the aerial aligned vertically 2. Connect the antenna connection wire to the ANT port on the back of the Fatbox
modem

Telecoms Power Solutions
FatBox Modem 10 © PowerOasis 2012 SmartHub Installation Guide
88-00060-1
November 9, 2012
2.4 Power Connection The Fatbox modem can be powered in two ways:
• Using included Power Supply (if supplied) • Using a spare SmartHub RJ45 Analog port
2.4.1 Use included Power Supply 1. Fit AC Mains power supply into a mains power socket
2. Connect power plug into the DC port on the front of the Modem
2.4.2 Use SmartHub RJ45 Analog Port Using the supplied ‘Y’ cable:
1. Connect the RJ45 connector labelled “Rear Port 1” into Port 1 of the SmartHub Rear ports
2. Connect the Power Connection into the Fatbox. 3. Connect the RJ45 connector labelled “Front Port 16” into SmartHub Blue Port 16.

Telecoms Power Solutions
FatBox Modem 11 © PowerOasis 2012 SmartHub Installation Guide
88-00060-1
November 9, 2012
2.5 Data Connections The Fatbox modem offers two different ways to connect:
• LAN for GPRS Access • Serial for SMS Access
2.5.1 LAN for GPRS Access For GPRS data connection, the Fatbox will be connected to one of the Green Ethernet ports on the front of the SmartHub.
1. Connect a CAT5 cable into Green Port D on the front of the SmartHub 2. Connect the other end of the CAT5 cable into the LAN port on the Fatbox
Note: See Section 4 for instructions on installing and configuring the Fatbox modem as a GPRS connection
2.5.2 Serial Connection for SMS Access For SMS data connection, the Fatbox will be connected to the RS-232 port on the front of the SmartHub.
1. Connect a female-to-female RS-232 Serial Cable into the RS-232 port on the front of the SmartHub
2. Connect the other end of the Serial Cable into the RS-232 port on the Fatbox
Telecoms Power Solutions
FatBox Modem 12 © PowerOasis 2012 SmartHub Installation Guide
88-00060-1
November 9, 2012
3 PRE-REQUISITES For configuration purposes, there are a number of pre-requisites that must be in place before installation can begin:
3.1 Equipment User must have :
• A Laptop computer with Ethernet port • Ethernet (Cat 5) cable)
Note: If the User is installing the Fatbox modem as part of a SmartHub installation, the installation should take place after the SmartHub has been installed and configured, but before the “Test Communications to Manager” step.
3.2 GPRS connection information The User needs to have the following values in order to configure the Modem correctly:
Access Point Name (APN)
e.g. mobile.o2.co.uk
SIM 1 Service Name
e.g. *99#
SIM 1 User Name
e.g. web
SIM 1 User Password
e.g. password
For the GPRSV2 Modem, which has two SIM slots, a second SIM and associated APN, Service Name, User Name and Password will be required.
Note: It is recommended that SIM 2 is from a different GSM service provider than SIM 1. The details for SIM 2 will differ to those for SIM 1.
3.3 Technician’s Laptop IP address The Technician’s Laptop needs to have its IP Address set to one of the following settings:
Automatic
OR IP Address: 192.168.1.13
Subnet Mask: 255.255.255.0
DNS Gateway: 192.168.1.1
If the User is installing the Fatbox as part of a SmartHub installation, the Technician’s PC should have already been set to the Manual IP address settings listed above. If not, it is recommended that the PC is set to the manual settings shown above:
1. Click Start Button > Control Panel 2. Network and Sharing Center > LAN Configure > TCP/IP (IPv4). 3. Click Properties

Telecoms Power Solutions
FatBox Modem 13 © PowerOasis 2012 SmartHub Installation Guide
88-00060-1
November 9, 2012
4. Check “Use the Following IP Address” 5. Enter the settings shown above. 6. Click OK button 7. Click OK button
3.4 Modem Configuration By default the Modem is largely configured correctly and only requires network –specific settings to be applied. However if a modem has be re-purposed from another site, it may have the wrong settings installed. It is recommended that all installers reset the Fatbox to the factory default settings before configuring.
3.4.1 Check Modem Network settings Note: Before beginning, disable any WiFi or other Network communication antennae on the
Technician’s computer.
1. Click Start Button > Run
The following popup will appear:
2. Type the following in the Open text box:
cmd
3. Click OK
A Command Prompt window will appear:
4. Type the following at the Command Prompt, then press Return:
Telecoms Power Solutions
FatBox Modem 14 © PowerOasis 2012 SmartHub Installation Guide
88-00060-1
November 9, 2012
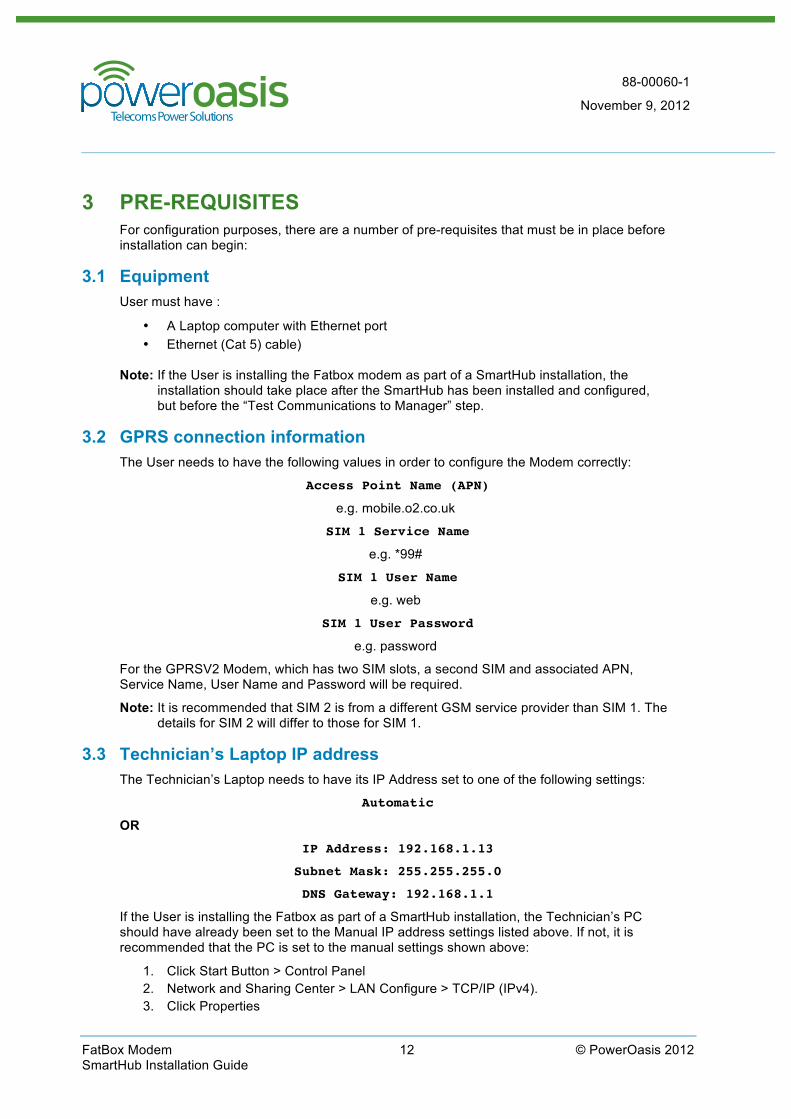
ipconfig
A screen similar to the following will appear:
Check that the following settings match the values listed below:
IPv4 Address: 192.168.1.2
Subnet Mask: 255.255.255.0
Default Gateway: 192.168.1.1
If these values are correct then the Modem is already set to the factory defaults and the User should move on to Section 4.
OR
If these values are different, the modem must be reset back to the factory defaults, see Section 3.4.1.1.
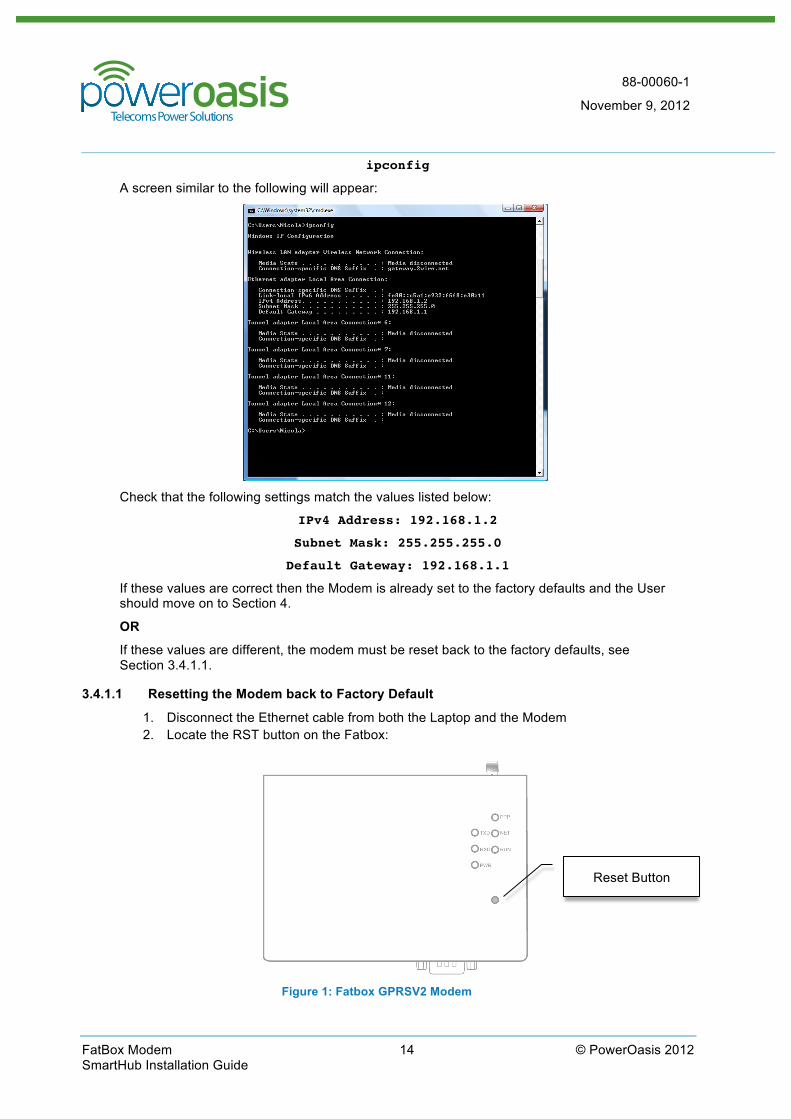
3.4.1.1 Resetting the Modem back to Factory Default
1. Disconnect the Ethernet cable from both the Laptop and the Modem 2. Locate the RST button on the Fatbox:
Figure 1: Fatbox GPRSV2 Modem
Reset Button
Telecoms Power Solutions
FatBox Modem 15 © PowerOasis 2012 SmartHub Installation Guide
88-00060-1
November 9, 2012
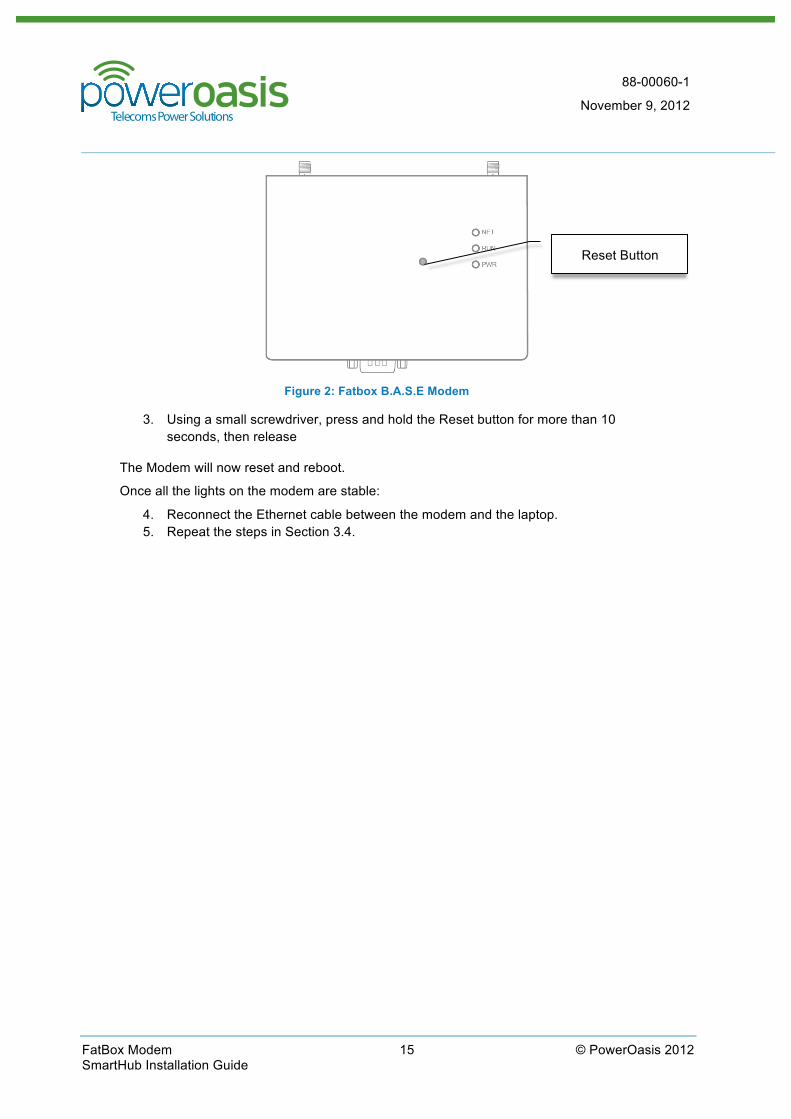
Figure 2: Fatbox B.A.S.E Modem
3. Using a small screwdriver, press and hold the Reset button for more than 10 seconds, then release
The Modem will now reset and reboot.
Once all the lights on the modem are stable:
4. Reconnect the Ethernet cable between the modem and the laptop. 5. Repeat the steps in Section 3.4.
Reset Button
Telecoms Power Solutions
FatBox Modem 16 © PowerOasis 2012 SmartHub Installation Guide
88-00060-1
November 9, 2012
4 CONFIGURING THE FATBOX AS A GPRS MODEM FOR SMARTHUB
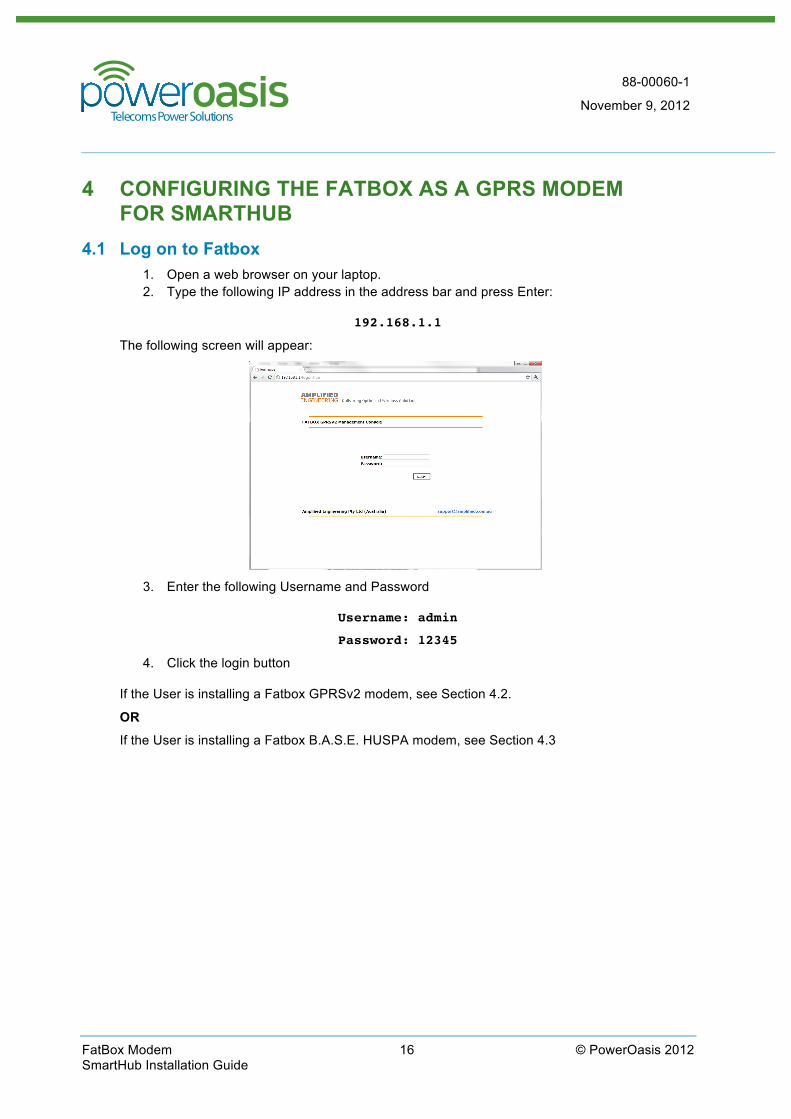
4.1 Log on to Fatbox 1. Open a web browser on your laptop. 2. Type the following IP address in the address bar and press Enter:
192.168.1.1
The following screen will appear:
3. Enter the following Username and Password
Username: admin
Password: 12345
4. Click the login button
If the User is installing a Fatbox GPRSv2 modem, see Section 4.2.
OR
If the User is installing a Fatbox B.A.S.E. HUSPA modem, see Section 4.3

Telecoms Power Solutions
FatBox Modem 17 © PowerOasis 2012 SmartHub Installation Guide
88-00060-1
November 9, 2012
4.2 To configure the GPRSV2 Modem After logging in successfully, the following window will appear:
4.2.1 To configure the GPRS connection
1. Enter the SIM 1 Access Point Name (APN) into the SIM 1 Access Point Name textbox 2. Enter the SIM 1 Service number in the SIM 1 Service Number textbox 3. Enter the SIM 1 User Name in the SIM 1 User Name textbox 4. Enter the SIM 1 Password in the SIM 1 Password textbox
Add optional additional SIM
5. Enter the SIM 2 Access Point Name (APN) into the SIM 2 Access Point Name textbox 6. Enter the SIM 2 Service number in the SIM 2 Service Number textbox 7. Enter the SIM 2 User Name in the SIM 2 User Name textbox 8. Enter the SIM 2 Password in the SIM2 Password textbox
Note: It is recommended that SIM 2 is from a different GSM service provider than SIM 1. The details for SIM 2 will differ to those for SIM 1.
9. Click the Set button
4.2.2 To configure the Modem’s Application Mode 1. Click System Parameter in the left hand menu 2. Click Application Configure
The following screen will appear:

Telecoms Power Solutions
FatBox Modem 18 © PowerOasis 2012 SmartHub Installation Guide
88-00060-1
November 9, 2012
3. In the Application Mode drop down, select “Point to Multipoint” 4. Click the Set button
4.3 To configure the B.A.S.E. Modem After logging in to the modem, the User must access the Services Configure settings:
1. Click on “Services Configure” under the “System Parameter” of the Console Menu.
The following screen will appear:
2. Configure “Register Network Type” as ‘Auto’. 3. Check all the Checkboxes in the Radio Band Set panel. 4. Set the APN Appointed Mode to ‘Appointed’ 5. Enter the SIM 1 Access Point Name (APN) into the SIM 1 Access Point Name textbox 6. Enter the SIM 1 Service number in the SIM 1 Service Number textbox 7. Ensure the User Name and Password blank Checkbox is Unchecked 8. Enter the SIM 1 User Name in the SIM 1 User Name textbox 9. Enter the SIM 1 Password in the SIM 1 Password textbox 10. Click the Set button

Telecoms Power Solutions
FatBox Modem 19 © PowerOasis 2012 SmartHub Installation Guide
88-00060-1
November 9, 2012
4.3.1 To configure the Modem’s application mode 1. Click System Parameter in the left hand menu 2. Click Application Configure
The following screen will appear:
3. In the “Application Mode” drop-down, select ‘Router’ 4. Click on ‘Save’ Button
Telecoms Power Solutions
FatBox Modem 20 © PowerOasis 2012 SmartHub Installation Guide
88-00060-1
November 9, 2012
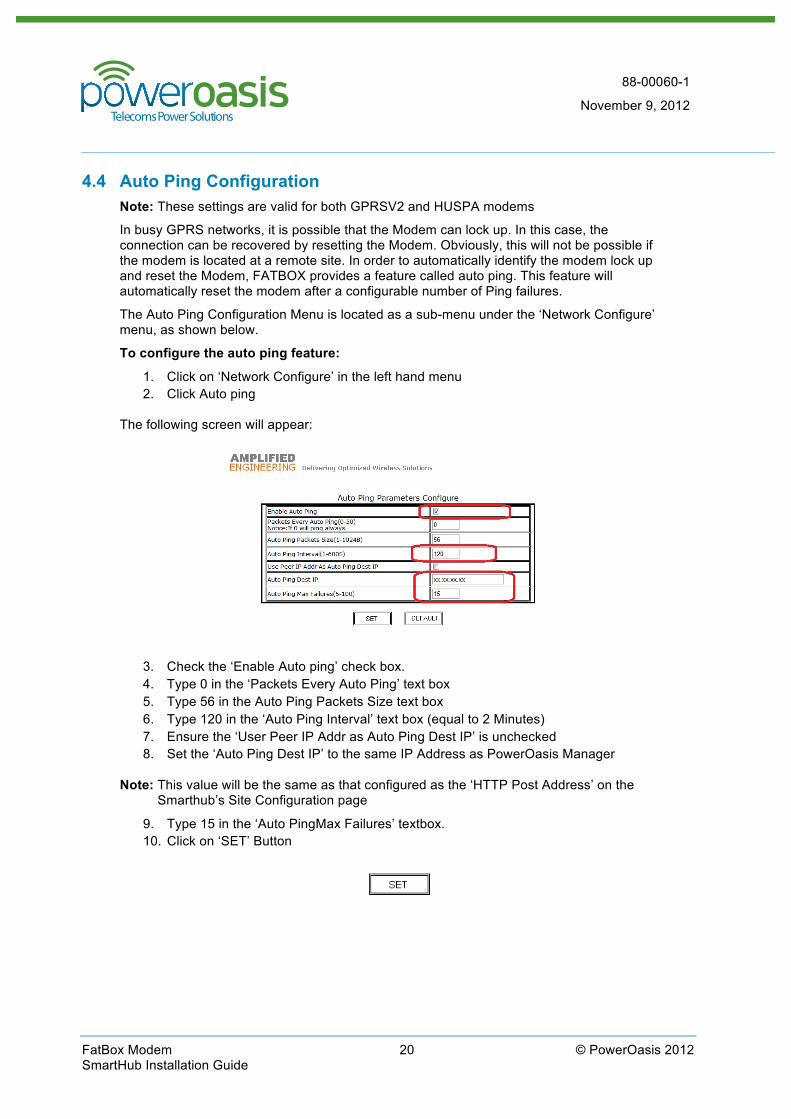
4.4 Auto Ping Configuration Note: These settings are valid for both GPRSV2 and HUSPA modems
In busy GPRS networks, it is possible that the Modem can lock up. In this case, the connection can be recovered by resetting the Modem. Obviously, this will not be possible if the modem is located at a remote site. In order to automatically identify the modem lock up and reset the Modem, FATBOX provides a feature called auto ping. This feature will automatically reset the modem after a configurable number of Ping failures.
The Auto Ping Configuration Menu is located as a sub-menu under the ‘Network Configure’ menu, as shown below.
To configure the auto ping feature:
1. Click on ‘Network Configure’ in the left hand menu 2. Click Auto ping
The following screen will appear:
3. Check the ‘Enable Auto ping’ check box. 4. Type 0 in the ‘Packets Every Auto Ping’ text box 5. Type 56 in the Auto Ping Packets Size text box 6. Type 120 in the ‘Auto Ping Interval’ text box (equal to 2 Minutes) 7. Ensure the ‘User Peer IP Addr as Auto Ping Dest IP’ is unchecked 8. Set the ‘Auto Ping Dest IP’ to the same IP Address as PowerOasis Manager
Note: This value will be the same as that configured as the ‘HTTP Post Address’ on the Smarthub’s Site Configuration page
9. Type 15 in the ‘Auto PingMax Failures’ textbox. 10. Click on ‘SET’ Button

Telecoms Power Solutions
FatBox Modem 21 © PowerOasis 2012 SmartHub Installation Guide
88-00060-1
November 9, 2012
4.5 Saving the Modem Configuration In order to remember the changed information in consecutive web logouts, save the present configuration to flash.
To save the Modem Configuration:
1. Click on ‘System Manage’ in the left hand menu 2. Click System Tools
The following screen will appear:
3. Check the ‘Save Parameter to Flash’ Radio button 4. Click on SET button.
When the configuration is saved successfully, ‘Parameter Save Success!‘ will be displayed:

Telecoms Power Solutions
FatBox Modem 22 © PowerOasis 2012 SmartHub Installation Guide
88-00060-1
November 9, 2012
4.6 Validating GPRS connection It is important to check that the GPRS connection is active. This can be done in one of two ways:
• Via a web browser
OR
• Via a DOS window
4.6.1 Web Browser On the technician’s PC:
1. Open a web browser 2. Enter a stable website address in the address bar
The web page should now load.
Note: A stable website address is one that is always available, such as www.google.com or news.bbc.co.uk.
Check the webpage loads correctly and that the performance is acceptable. If not, troubleshoot the connections and try again.
4.6.2 DOS Window On the technician’s PC:
1. Click on Start Button > Run 2. Type the following in the Open: textbox
cmd
A Command Prompt window will appear:
3. Type the following in the command prompt:
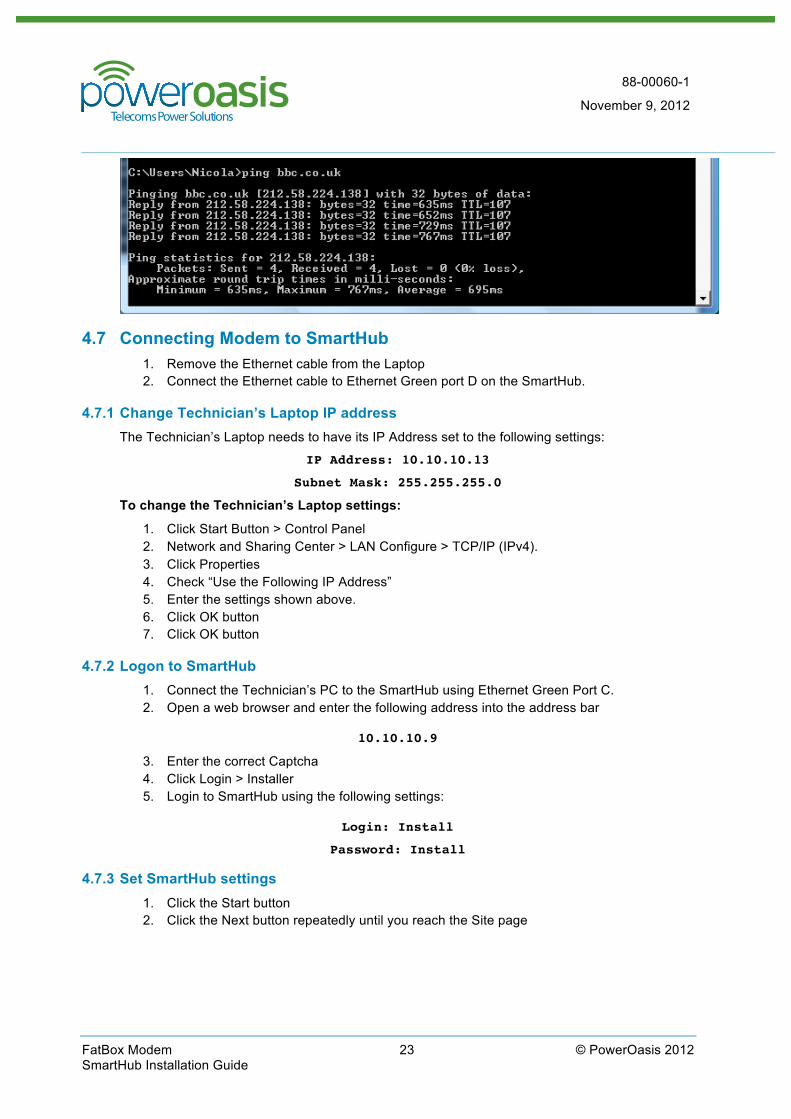
ping bbc.co.uk
If the Ping is successful four replies should be reported, followed by some Ping Statistics. If not, troubleshoot the connections and try again.
Telecoms Power Solutions
FatBox Modem 23 © PowerOasis 2012 SmartHub Installation Guide
88-00060-1
November 9, 2012
4.7 Connecting Modem to SmartHub 1. Remove the Ethernet cable from the Laptop 2. Connect the Ethernet cable to Ethernet Green port D on the SmartHub.
4.7.1 Change Technician’s Laptop IP address The Technician’s Laptop needs to have its IP Address set to the following settings:
IP Address: 10.10.10.13
Subnet Mask: 255.255.255.0
To change the Technician’s Laptop settings:
1. Click Start Button > Control Panel 2. Network and Sharing Center > LAN Configure > TCP/IP (IPv4). 3. Click Properties 4. Check “Use the Following IP Address” 5. Enter the settings shown above. 6. Click OK button 7. Click OK button
4.7.2 Logon to SmartHub 1. Connect the Technician’s PC to the SmartHub using Ethernet Green Port C. 2. Open a web browser and enter the following address into the address bar
10.10.10.9
3. Enter the correct Captcha 4. Click Login > Installer 5. Login to SmartHub using the following settings:
Login: Install
Password: Install
4.7.3 Set SmartHub settings 1. Click the Start button 2. Click the Next button repeatedly until you reach the Site page

Telecoms Power Solutions
FatBox Modem 24 © PowerOasis 2012 SmartHub Installation Guide
88-00060-1
November 9, 2012
3. IP Address parameters should then be changed to the following values:-
IP Address: 192.168.1.50
Subnet Mask: 255.255.255.0
Gateway Address: 192.168.1.1
DNS 1: 192.168.1.1
DNS 2: 192.168.1.1
Secondary IP: 10.10.10.9
Secondary Subnet Mask: 255.255.255.248
HTTP Post Address: <PowerOasis Manager IP>

Telecoms Power Solutions
FatBox Modem 25 © PowerOasis 2012 SmartHub Installation Guide
88-00060-1
November 9, 2012
5 CONFIGURING THE FATBOX AS A SMS MODEM FOR SMARTHUB
5.1 Log on to Fatbox 1. Open a web browser on your laptop. 2. Type the following IP address in the address bar and press Enter:
192.168.1.1
The following screen will appear:
3. Enter the following Username and Password
Username: admin
Password: 12345
4. Click the login button
5.2 Application Specific Configuration After logging in to the modem, the User must access the Services Configure settings:
1. Click on “Application Configure” under the “System Parameter” of the Console Menu.
The following screen will appear:

Telecoms Power Solutions
FatBox Modem 26 © PowerOasis 2012 SmartHub Installation Guide
88-00060-1
November 9, 2012
2. Select Modem in the Application Mode drop-down box 3. Click Advanced Parameter from the left hand menu
4. Ensure the ‘Output Debug Info to Serial Port’ check box is unchecked 5. Click Serial Configure from the left hand menu

Telecoms Power Solutions
FatBox Modem 27 © PowerOasis 2012 SmartHub Installation Guide
88-00060-1
November 9, 2012
6. Ensure the following settings are in place:
Baud Rate: 115200
Data Bits: 8
Stop Bits: 1
Parity Check: None
Flow Control: None
Max Packet Size (1-30000): 1024
Max Data Send Interval(1-60000): 10
Max Data Wait Time(20-6000000): 100
5.3 Saving the Modem Configuration In order to remember the changed information in consecutive web logouts, save the present configuration to flash.
To save the Modem Configuration:
1. Click on ‘System Manage’ in the left hand menu 2. Click System Tools
The following screen will appear:

Telecoms Power Solutions
FatBox Modem 28 © PowerOasis 2012 SmartHub Installation Guide
88-00060-1
November 9, 2012
3. Check the ‘Save Parameter to Flash’ Radio button 4. Click on SET button.
When the configuration is saved successfully, ‘Parameter Save Success!‘ will be displayed:
5.4 Validating Serial Modem connection 1. Connect a Serial cable from the serial port on the Technician’s PC to the Serial port
on the Fatbox modem. 2. Open a Hyper-Terminal session for the Serial port you have defined
The baud rate session should be reported as 115200.
3. Type AT/r
If the session is correctly configured, OK will be displayed.
Telecoms Power Solutions
FatBox Modem 29 © PowerOasis 2012 SmartHub Installation Guide
88-00060-1
November 9, 2012
5.5 Configuration Connection Step 1. Disconnect the Serial Cable from the Technician’s Laptop 2. Connect the serial cable to RS-232 Port B on the front of the SmartHub.
The SmartHub is now connected to the Modem.
5.5.1 Change Technician’s Laptop IP address The Technician’s Laptop needs to have its IP Address set to the following settings:
IP Address: 10.10.10.13
Subnet Mask: 255.255.255.0
To change the Technician’s Laptop settings:
1. Click Start Button > Control Panel 2. Network and Sharing Center > LAN Configure > TCP/IP (IPv4). 3. Click Properties 4. Check “Use the Following IP Address” 5. Enter the settings shown above. 6. Click OK button 7. Click OK button
5.5.2 Logon to SmartHub 1. Connect the Technician’s PC to the SmartHub using Ethernet Green Port C. 2. Open a web browser and enter the following address into the address bar
10.10.10.9
3. Enter the correct Captcha 4. Click Login > Installer 5. Login to SmartHub using the following settings:
Login: Install
Password: Install
Telecoms Power Solutions
FatBox Modem 30 © PowerOasis 2012 SmartHub Installation Guide
88-00060-1
November 9, 2012
5.5.3 Set SmartHub settings 1. Click the Start button 2. Click the Next button repeatedly until you reach the Update Configuration page 3. Click the Select file button and select an appropriate Configuration File.
The Configuration File will configure the following settings:
Modem Connection Type: Serial
Modem Type: SMS
SMS Phone Number: <valid phone number>
4. Click Update button