85 CLASS ELECTRIC LOCOMOTIVES INTERIM ...PUBLIC TRANSPORT COMMISSION OF NEW SOUTH WALES LOCOMOTIVE...
72
PUBLIC TRANSPORT COMMISSION OF NEW SOUTH WALES LOCOMOTIVE OPERATIONS BRANCH 85 CLASS ELECTRIC LOCOMOTIVES INTERIM OPERATING INSTRUCTIONS F. A. GODFREY, OPERATIONS MANAGER, LOCOMOTIVE 1979
Transcript of 85 CLASS ELECTRIC LOCOMOTIVES INTERIM ...PUBLIC TRANSPORT COMMISSION OF NEW SOUTH WALES LOCOMOTIVE...
PUBLIC TRANSPORT COMMISSION OF NEW SOUTH WALES
LOCOMOTIVE OPERATIONS BRANCH
85 CLASS ELECTRIC LOCOMOTIVES
INTERIMOPERATING INSTRUCTIONS
F. A. GODFREY,OPERATIONS MANAGER, LOCOMOTIVE
1979

Reprinted March 2003
HB 85OPER79.DOC

PUBLIC TRANSPORT COMMISSION OF NEW SOUTH WALES
LOCOMOTIVE OPERATIONS BRANCH
85 CLASS
ELECTRIC LOCOMOTIVES
INTERIM
OPERATING INSTRUCTIONS
F. A. GODFREY,OPERATIONS MANAGER, LOCOMOTIVE
1979
PTC.79-25

GENERAL DESCRIPTION
The 85 class electric locomotive is employed in thehaulage of freight and passenger trains over the various lineswithin the electrified area. General particulars are as follows:-
Voltage 1500 D.C.Wheel arrangement CO - COMass 120 tonnesAxle load 20 tonnesWheel diameter 1250 mmBogie wheel base 4000 mmTotal wheel base 14400 mmLength over buffers 19000 mmOverall width 2883 mmHeight from rail level to pantograph lowered 4330 mmHorse power 2700 kWMaximum speed 115 km/hLow tension supply 120 D.C.Dead hauling mass 125 tonnes
Cab
The locomotive has a driving position at each end withsuitable accommodation for the enginemen.
Housed within the locomotive is the control equipment,traction motor blowers, starting resistances, blower fans, andmotor alternator set.
Two electrically driven compressors are mounted on theunderframe, also the battery charger and batteries.
Traction Motors
There are six (6) traction motors, three on each bogiegiving traction on all wheels. Each traction motor is supportedby axle suspension bearings. A lateral hydraulic snubber isprovided on the bogie located adjacent to the inner axle. Theintroduction of this type of snubber should improve ridingcharacteristics. In addition, two traction snubbers are usedto control swivelling of the bogie.
Shrunk onto the motor armature shaft is a pinion thatmeshes with a drive gear pressed onto the driving axle. Thegear ratio between the pinion and the drive gear is expressedby two figures, such as 79/20 for the 130 km/h gearing usedon this locomotive. The first number indicates the number of

- 2 -
teeth on the drive gear and the second the number of teeth onthe pinion.
Armature bearings are of the roller type and axlesuspension bearings are also roller bearing type.
Control Equipment
The control equipment is arranged for the motors to beconnected either six in series, two parallelled circuits eachof 3 motors in series, or three parallel circuits each oftwo motors in series. Four weak field positions are providedin each combination. Contactors are of the electro-pneumatictype.
Resistances are of strip metal type. They are providedwith blowers which come into operation when the resistances arein circuit for over a prescribed time.
Provision is made for regenerative braking in seriesand series-parallel.
The control voltage is 120 D.C.
Batteries
The batteries consist of 54 cells of the lead acid typewith a capacity of 55 amps hours.
The battery switch being a double pole knife type locatedon the upper portion of the circuit breaker panel.
Motor Alternator (MA) Set
The motor alternator (MA) set produces three phase 415volts of current for the operation of the traction motor blowers,starting resistance fan motors, hot plates, cab heaters, airconditioning and alternating current (AC) control apparatus.Portion of this current is rectified to 120 volts DC for operationof the control circuit and battery charging.
A separate three phase supply is provided by the motoralternator for regenerative braking.
The control circuit of the motor alternator (MA) set isprotected by the motor alternator control circuit breaker (M.A.C.B)located on the circuit breaker panel and it is essential that itbe "on" to permit continuous operation of the motor alternatorwhile ever the locomotive is in service.

- 3 -
High tension current from the overhead drives the machineand protection is provided by the Differential Current Detectorand overcurrent relay (M.A.O.C.R.) through the operation of theHigh Speed Circuit Breaker.
The three phase 415 volt output has an overvoltageprotector and in addition is protected by the alternatorcurrent (AC) circuit breaker located on the wall adjacent tothe alternator.
Regenerative brake excitation supply is protected bythree large fuses bolted to the wall adjacent to the motoralternator and are not to be renewed by engineman.
Should a defect develop on the motor side Of the alternator,the motor alternator overcurrent relay (M.A.O.C.R.) will operateand trip the High Speed Circuit Breaker, isolating the 1500 voltoverhead supply to the motor alternator. Similarly, an overvoltagerelay (OVD) protects the output side of the motor alternator andshould a defect develop, OVD energises the motor alternatorovervoltage relay (M.A.O.V.R.) which de-energises the motoralternator contactor (MAC). This interrupts high tension currentsupply to the motor alternator and upon it being stopped, thealarm circuit is energised.
Operation of the motor alternator overcurrent relay(M.A.O.C.R.) will cause both the blue and red lights to shineand the alarm bell to sound.
The tripping of the overvoltage relay (M.A.O.V.R.) willcause the motor alternator output to be interrupted, the bluelight will shine and alarm bell will sound.
The motor alternator overcurrent relay M.A.O.C.R. andM.A.O.V.R. are reset and the warning lights and bell cancelledby operating the fault reset button on the driver's stand.
Supply Isolate Switch (SIS)
This switch is located on the circuit breaker panel andis normally on. Should a defect develop or it becomes necessaryto isolate the motor alternator for any reason, the switch is tobe turned "Off". This action also isolates the blue light and bell.
Supply Indicating Relay (SIR)
This relay is located on the 120 volt side of the batterycharger and operates the blue light and alarm to indicate that theoutput from the alternator is lost, due to the motor alternator(AC) control circuit breaker, battery charger circuit breaker(BACB) or supply indicator circuit breaker (SIRB) tripping out.
- 4 -
Under normal circumstances, the blue light and bell willbe cancelled when the circuit breaker is reset.
Remote Supply Circuit Breaker
If the batteries are discharged to the point where theauxiliary machines cannot be started, provision is made in thejumpers to obtain a 120 V remote supply from a battery chargeron another 85 class locomotive. This is connected when jumpercouplings are inserted and Remote Supply circuit breaker (RSB)seal is broken and switched "ON" on both locomotives. Theoperation of the circuit breakers will cancel the "FailedAlternator" indication and alarm by energising the "SupplyIndicating relay" (S.I.R.).
Once the auxiliary machines are started the "Remote SupplyCircuit breakers" on both locomotives must be opened and thedefect recorded in the log book.
Note: In the event of the motor alternator failing on alocomotive in a multiple consist, control circuit current(120 volt) can be obtained by adopting this procedure but in allcases the control circuit cut out switch (CCOS) must be locatedin the "off" position on the locomotive with the failed motoralternator, in addition lower pantographs and turn off supplyisolating switch (SIS).
External Alternating Current (AC) Power Supply
An external alternating current (A.C.) Power supply socketand switch are mounted on the underframe at No. 1 end of thelocomotive. This is used by the maintenance staff to test thelocomotive without having the 1500 V supply.
This switch should be carried in the "Normal" position.
NOTE: The sequence test switch controlling supply is next to thecontrol circuit cutout switch (CCOS) in the electrical cabinet.
COMPRESSORS
There are two air compressors each having a displacementof 2 cubic metres per minute and is driven by a 1500 volt motor.
BRAKE EQUIPMENT
Locomotive class 85 (8501 - 8510) will be equipped withautomatic 26L self lapping, brake pipe pressure maintaining, typeof brake equipment. This system functions by employing the same4 pipe arrangement as applies for the A7-B7EL type, i.e. thelocomotive pipes are designated Brake Pipe, Main Reservoir,

- 5 -
Control and Independent Release. Thus it functions in conjunctionwith, and under control of, other locomotives fitted with A7-B7ELsystems both in the automatic and independent aspects. Followingis a description of the arrangement and use of the 26L equipmentfor the guidance of Enginemen.
The Basic components of the system are:-
Automatic Brake Valve
This valve is designed to provide self lapping, brake pipepressure maintaining conditions, which means that for any brakevalve handle position in the "service" range a given brake pipereduction applies, pressure, at the reduced level, being maintainedagainst reasonable leakage. Under such a condition, once a certainlevel of braking has been set by a given reduction in brake pipepressure this degree of braking remains constant and does notincrease as applies with earlier equipment under normal conditionsof brake pipe leakage.
No rotary valve is incorporated in this item, thedistribution of air for the various functions of the brake valvebeing controlled by cam operated spool valves and flexiblediaphragms.
Regulating Valve
Mounted in the upper left hand part of the Automatic BrakeValve assembly. This valve serves a similar purpose to the feedvalve on earlier equipment and provides a means of manualadjustment to brake pipe pressure. The control spindle isrotated clockwise (screwed in) to increase pressure and anti-clockwise to decrease pressure.
Brake Valve Cut Off Valve
Mounted in the upper front area of the Automatic Brake Valveassembly and serves a similar purpose to the driver's brake valveisolating cock in earlier equipment. The valve control knob canbe located in two positions.
IN when the associated brake valve controls the train (point horizontal).
OUT when the associated brake valve is isolated (point vertical). (i.e. is rendered incapable of charging the train).
- 6 -
Automatic Brake Valve Operation
The automatic brake valve has 6 handle positions i.e.Release, Minimum Reduction, Full Service, Suppression, HandleOff and Emergency.
Release position charges the brake pipe and is the normal position during running without a brake application. THERE IS NO FULL RELEASE function - all brake pipe charging occurring per medium of the regulating and relay valves. The Regulating Valve is set at normal pipe pressure requirements.
Minimum Reduction position provides and maintains a 45 - 55 kPa reduction in brake pipe pressure.
Service range covers the zone from minimum reduction to full service. In this zone a given brake pipe pressure reduction exists, and is maintained, for any brake valve handle position - only as the handle is moved to the right, i.e., as the degree of reduction is increased. In the full service position the brake pipe pressure is reduced by 175 kPa. When the handle is moved to the left no increase in brake pipe pressure occurs until the "release" location is arrived at.
Suppression position is not used with our locomotives and can be considered as a "Full Service" position. Main reservoir pressure is directed to the vigilance control equipment for suppression.
Handle Off position renders the normal functions of a brake valve inoperative whilst the brakes are being controlled from another brake valve on the same or an attached locomotive. In this position the equalising reservoir is vented to atmosphere.
The "handle off" position functions in conjunction with the "brake valve cut off valve" when the latter should be set in the "out" position.
The "handle off" position may be used on a leading locomotive with brakes cut in so as to apply the brakes to a degree exceeding a service condition. In such a case the brake pipe is reduced at a "service" rate to approximately 70 kPa.
Main reservoir pressure is directed to the vigilance control equipment for suppression.

- 7 -
Emergency position vents the brake pipe to zero at a fast rate and provides maximum brake cylinder pressure rapidly throughout the train.
Main reservoir pressure is directed to the vigilance control equipment for suppression.
Independent Brake Valve
This valve is cam operated and Self lapping and like the auto - brake valve does not incorporate a rotary valve. Similar facilities are provided to those available with the use of existing equipment, i.e.
(a) the locomotive brakes can be applied and released independently of the automatic system.
(b) the locomotive brakes can be released whilst an automatic brake application is in operation on the locomotive and train.
Two operating positions apply for the handle:-
"Release" at the extreme left and,
"Full Application" at the extreme right.
Between these positions is the application zone in which for any given handle position a particular brake cylinder pressure applies. This condition exists both when the handle is being moved to the right (increasing pressure) or left (decreasing pressure). Maximum setting is 325 kPa.
Depression of the handle whilst it is in the "application zone" provides a quick release feature for an "automatic" application the brake cylinder pressure however, only being reduced to that which corresponds to the independent handle position. Thus for a complete "quick release" of an automatic application the independent handle must be depressed in the "release" position. The independent brake valve handle is removable in the "Release" position and all pedestals, except that from which the locomotive is being controlled should have their independent brake valve set in the "Release" position.

- 8 -
Control Valve
Performs a similar function to the distributingvalve of the A7-B7EL equipment.
Under the effect of pressures dictated by thevarious brake valve (both automatic and independent)functions, this valve controls the degree of brakecylinder pressure development per medium of a RelayValve.
MU 2A Valve is mounted on the lower L.H. front face of the brake pedestal and is provided ONLY FOR THE PURPOSE OF "CUTTING IN" OR "ISOLATING" THE INDEPENDENT BRAKE VALVE ON THE SAME PEDESTAL.
When "CUT IN" (Lead or Dead) the pointer is vertically upwards. When "ISOLATED" (Trail) the pointer is horizontal.
Regardless of the number of MU valves on a locomotive or group of locomotives working multiple all other than the MU valve at the controlling pedestal should be set at "Trail".
In order to determine the required setting for each valve the following rules should be observed:-
(1) LEADING LOCOMOTIVES
Where a locomotive leads and/or controls a train the MU valve, at the pedestal from which it is being driven, must be set at "Lead or Dead".
(2) PUSHER OR BANK ENGINES
With this working when locomotives are situated remotely from the leading locomotive the conditions in (1) also apply.
(3) TRAILING LOCOMOTIVES (working multiple)
Where this condition applies the setting of the MU valve depends entirely on whether the No. 3 independent hose of a trailing locomotive is coupled to and being fed from the corresponding hose on the leading locomotive.
When the No. 3 hoses are coupled the setting is "Trail" When the No. 3 hoses cannot be coupled the setting is "Lead or Dead".

- 9 -
Flow Meter
This section of the equipment is the same and provides similar operating facilities as available with A7-B7EL systems.
Dead Engine Device
Consists of a cock, which is normally closed, and a spring loaded check valve. When the cock is open Brake Pipe Air is fed to charge the No.2 Main Reservoir of a "dead" locomotive. The check valve only allows No. 2 Main Reservoir to reach a pressure of 150 kPa below the brake pipe pressure involved. This device is cut in under similar conditions to those which apply for the use of A7-B7EL equipment on existing locomotives.
Regenerative Interlock
This function occurs by means of a magnet valve which is energised whilst regeneration brake procedures are being observed. When it is in use the automatic brake is not available on the locomotive but the independent system can be used, care being observed to limit brake cylinder pressure so as to avoid wheel skidding.
When the brake pipe pressure is reduced below 250 kPa the regenerative brake is rendered inoperative by a pneumatic control switch in a similar manner as applies with A7-B7EL systems.
Emergency Cock
This is located to the right of the pedestal near floorlevel. The handle of this cock points upwards when closed andmovement of it to the horizontal position will vent the brake pipedirectly to the atmosphere. Under this condition the cut off valveshould be set in the "OUT" position.
Main Reservoir Drain Valves
A new type of automatic drain valve is fitted to the mainreservoir and under normal conditions will drain all water from themain reservoirs. However, should the air valve not seateffectively air will escape from the opening in the base.
If loss of main reservoir pressure in service occurs and itis found to be due to this cause, the body of the valve may belightly tapped to reseat the valve.

- 10 -
MOTOR COMBINATIONS
Each locomotive is equipped with six traction motors whichare axle mounted. Motors Nos. 1, 2 and 3 are on one bogie andmotors Nos. 4, 5 and 6 on the other bogie.
Powering circuit
(a) Series connection
The six traction motors and two groups of starting resistancesare connected in series.
The starting resistance is cut out step by step by theresistance camshaft under current limit control.
(b) Series-Parallel connection
The traction motors are connected into two parallel groupseach group with three traction motors in series. The tworesistance groups are connected in parallel.
(c) Parallel connection
The traction motors are connected in three parallel groupswith two traction motors in series.
The two resistance groups are connected in parallel.
(d) Field weakening
Can occur in each motor grouping. There are four stepsof weak field. All motors are connected for maximum weak fieldat starting.
Line Volt Meter
A line volt meter is located at roof level in the leftcorner of the driving cab and indicates the overhead linevoltage.
Control Circuit Cut Out Switch (CCOS)
The control circuit cut out switch is located in theElectrical Cupboard and is labelled "ON" and "OFF".
In the "ON" position normal operation is available butin "OFF" position the power circuit for traction motor operation isisolated, together with the red fault light and alarm bell.

- 11 -
However, the placing of the control circuit cut outSwitch (CCOS) does not prevent the control circuit from beingoperated by the accelerating handle, regenerative handle andreverser on the isolated locomotive, which permits power to beapplied on trailing locomotives from the leading locomotive when itis "dead".
Supply Isolate Switch (SIS)
This switch is located on the circuit breaker panel andis labelled "ON" and "OFF".
When moved to the "OFF" position it isolates the motoralternator and also the alarm circuit; blue light and bell.
LOAD METER (AMMETER)
The load meter is of the centre zero type, clockwisemotoring, and anti-clockwise regen brake with a continuousrating zone extending up to 690 amps and an overload zonecoloured red for both motoring and when operating in regenerativebrake. One hour rating under full power is 725 amps.
CONTROL CIRCUIT
The control circuit consists of battery charging, controland small motor circuits, contactor and relay coils, lightingcircuits and air conditioning.
The control circuits are protected from overload by numerousmagnetic circuit breakers and fuses.
A magnetic circuit breaker protects the circuit from anoverload of current in a similar manner to a thermal type.It has a magnetic coil and spring loaded armature plateincorporated in the switch.
When the amperage exceeds the value of the circuitbreaker, the magnetic coil overcomes the tension of the springand moves the armature plate sufficiently, to permit the switchto trip off and open the circuit. The toggle portion of theseswitches displays a white band which provides a positiveindication of whether the circuit breaker is switched 'on' or'off'.

- 12 -
Three (3) battery fuses are provided and groupedtogether in the cabinet adjacent to battery box and protectthe following:-
From left to right:-
F.1 - Battery supply - Positive F.2 - Battery supply - Negative F.3 - Spare
The fuses in each of these circuits are 60 amp fuses.
During preparation, the spare 60 amp fuses are to betested in the following manner:-
1. Operate light switch to ensure light bulb functions.
2. Turn off light switch.
3. Lay fuse to be tested across the test block.
If the fuse is good the light should shine.
Fuse Tester
Three (3) auxiliary fuses - Positive, negative and spareare provided adjacent to the battery fuses and protect fusetest panels in the battery box and high tension compartment.
In the event of the fuse test light not functioning,check the globe is not defective and renew the defective fusewith the spare provided.
DRIVER'S DESK
It is located directly in front of the driver and isequipped with the following:-
1. Two air brake pressure gauges.2. Flowmeter3. Loadmeter (Ammeter)4. Pan up buttons front and rear.5. Pan down buttons front and rear.6. Headlight switch (3 position).7. Wheelslip/slide alarm - White light.8. Brake cylinder pressure - Blue light.9. Reset button.10. Resistance fan failure - Amber light.11. Resistance notch - Amber light.

- 13 -
Control Panel
1. Timetable light. 2. Blower motor switch. 3. Cab light.4. Vigilance control button. 5. Demister. 6. Cab heater 1.7. Cab heater 2
Observer's Panel
1. Power Fault light Red light.2. Alternator failure Blue light.3. Step light toggle switch.4. Marker light.5. Marker light.6. Cab light.7. Panel light.8. Cab heater 1.9. Cab heater 2.
In addition, windscreen washers and wiper controls areprovided for both the driver's and observer's position.
Alarms and Safeguards
The locomotive is equipped with the following alarms andsafeguards.
1. An alarm bell and buzzer are provided to warn the driver that one of the safeguards has operated.
2. Coloured lights indicating the various troubles that can occur in conjunction with the ringing of the alarm bell located at each driving position and are as follows:-
Power Fault Indicating Light (PFIL)
Red light and bell operates if any of the following occurs.
(a) Fault in traction circuit.(b) Overcurrent in traction motors (straight overload operation 1400 amperes).(c) Overcurrent on motor side of motor alternator (high tension).(d) Opening of the control governor.(e) Overvoltage relay tripped out (2050 volts).(f) Failure in camshaft control to respond correctly.
Faults a, b, c, d cause the high speed breaker to openand this opens the line switches, which will also cause the bluelight to shine. Faults e, f, only cause line switches to open.

- 14 -
When the (PFIL) Red power fault indicator light operatesunder power return the accelerating handle or regeneratinghandle to the "OFF" position and press the fault reset button.
In the event of the motor alternator stopping the BlueFailed Alternator light (FAL) will also shine.NOTE: There is a time delay of up to fifteen (15) seconds fromthe time the reset button is pressed until alarm ceases.
FAILED MOTOR ALTERNATOR (MA) SET
The blue light will shine and alarm bell will sound inthe event of output from the motor alternator being lost. In addition the blue light will shine and alarm bellsound in accordance with the following:-
(i) Motor alternator (AC) control circuit breaker tripped.(ii) Battery charger circuit breaker (BACB) tripped.(iii) Supply indicator circuit breaker (SIRB) tripped.(iv) Main alternator supply breaker (ACB) tripped.
Under normal circumstances, the blue light and bellwill be cancelled when output supply is restored by the resettingof the circuit breaker.
Motor Alternator (MA) Set Fails with both the Blue and RedLights Shining and Alarm Bell Sounding
This indicates a fault on the high tension side of themotor alternator and the probable cause is the motor alternatorovercurrent relay (MAOCR) has operated and tripped the highspeed circuit breaker causing the line switches to open andisolating the 1500 volt overhead supply, which will stop themotor alternator.
To reset the motor alternator overcurrent relay (MAOCR)operate the fault reset button on the driver's control stand.This will cancel the red light and bell and immediately themotor alternator commences to produce current the blue lightwill be extinguished. A time delay of approximately fifteen (15)seconds applies.
Wheel Slip/Slide Indicator Light - White light and buzzeroperates if either of the above occur. When powering the armature current is reduced to theaffected wheel and automatic notching stops until wheel slipis corrected. The tractive effort should be reduced by easingthe accelerating handle toward minimum position in notch 4 aswell as operating the sander button if continual slipping isexperienced.

- 15 -
When operating in regeneration, the braking effort willbe reduced to approximately 60% of the total value in accordancewith the position of the regeneration handle on the unit affecteduntil wheel slide is corrected.
When the wheel slip/slide occurs during pneumatic brakingno automatic correction is effected and braking effort should bereduced in conjunction with sanding.
If continual wheel slip/slide is indicated a check mustbe made to ensure all wheels are capable of rotating freely.If not the unit must be isolated and considered a failure.
Brake Cylinder Pressure - Blue Light
The brake cylinder pressure blue light is provided towarn the Driver should the brakes inadvertently apply on thelocomotive or on any trailing locomotive fitted with this switchin a multiple unit consist. The light is normally extinguishedwhile ever the brakes are released.
When pressure in the brake cylinder rises to 30 kPa, theswitch closes and the blue light shines. Upon the pressure,falling to 10 kPa, the switch opens, the blue light is extinguished.
The brake cylinder pressure blue light is train linedthrough the jumper coupling and will shine on all locomotives,when the brakes are applied on one or more of the locomotivesin a multiple unit consist.
Should it be necessary to isolate the air brake on theNo. 1 bogie for any reason, the brake cylinder pressure warninglight becomes inoperative.
Brake Cylinder Pressure Blue Light Shines
The blue warning light will shine whenever the brakes areapplied and pressure in the brake cylinders exceeds 30 kPa.
Should the blue warning light shine when the locomotive(s)are being operated with the brakes released, immediate action isto be taken to release the brakes in accordance with currentinstructions. NOTE: This particularly applies in a multiple unit consist as severe damage can be caused to a trailing locomotive due to the brakes failing to release from a slight overcharge of the brake pipe.

- 16 -
Failed Resistance Blower Fan Alarm Amber light and bell.
Power circuit is interrupted automatically. The failedresistor blower light operates in the event of a failure of afan or if any overheating of the starting resistances isdetected by a thermal overheat device. Similarly, this also appliesin the event of a traction motor blower failing.
Resistance notch indication Amber light.
This light shines on all units when the acceleratinghandle is opened and will continue to shine until all resistanceis notched out of circuit by the automatic action of the camshaft.i.e. the light shines to indicate to the driver that resistanceis in circuit and continuous operation of this light beyond areasonable time period will require attention to determine thecause.
It is important to note that forward transition cannotbe achieved while the amber light is shining with resistanceremaining in circuit.
Thermal overheat device is a protective device andoperates it any excessive overheating occurs within the startingresistances. The amber light shines, alarm bell sounds andpower is interrupted.
MASTER CONTROLLER
The Reverse lever, Accelerating handle and Regenerativebraking handle are assembled in the master controller.
1. Reverse Lever
The Reverse lever has four positions:- Forward, Off, Reverse and Isolate.
Direction in which the locomotive moves is controlled byplacing this lever in the desired position.
The Reverse lever should be moved ONLY when the locomotiveis standing still.
The Reverse lever can only be inserted and removed fromthe master controller horizontally in the "Isolate" position.
The Reverse handle can be moved only when the acceleratinghandle and the Regenerative brake handle are placed in the"OFF" positions.

- 17 -
Removal of the Reverse lever locks the operating controlsof the master controller.
When operating the locomotives in multiple unit, theReverse lever should be removed from the master controller inall the cabs except the driving location.
The Reverse lever is also used for operating the inter-lock mechanism of the entrance door of the high tensioncompartment.
2. Accelerating Handle
The accelerating handle has six positions:-
OFF POSITION NO. 1 (NOTCH DOWN) POSITION NO. 2 (HOLD) POSITION NO. 3 (NOTCH UP) POSITION NO. 4 (RUN UP) POSITION NO. 5 (TRANSITION)
The position of the accelerating handle is indicated bythe illuminated indicating plate visible from the upper sideof the master controller.
The powering motor current and the motor connection inpowering is controlled by the operation of this handle.
The accelerating handle can be operated only when theReverse lever is in Forward or Reverse position and theRegenerative braking handle in the "OFF" position.
Positions 1, 2, 3 are used for low speed operationsand permit resistance to be inserted or deleted in "series" toachieve desired speed as follows:-
Position 1 (Notch down) When the accelerating handle is locatedin this position and returned to position 2 a bank of resistanceis inserted in circuit.
Position 2 (Hold) This position is used when desired speed isachieved and during notching operation.
Position 3 (Notch Up) This position is used to achieve anincrease in speed. By alternating the accelerating handlebetween position 3 and 2 positions the desired locomotive speedis attained. Each time the handle is placed in position 3(notch up) and returned to position 2 (Hold) a bank ofresistance is deleted. In this position when all resistance

- 18 -
is out of circuit and amber notching light is extinguished theweak field notches will be automatically inserted under thecontrol Of the accelerating relay. A series of ten (10) startingresistances are provided therefore ten (10) separate notchingmovements can be made in the low speed notches.
Position 4 (Run Up) This is the normal operating position andgives the operator flexible control in each combination.
Position 5 (Transition) This position is used to achieveforward transition only when the notching light (amber) isextinguished and the accelerating handle is momentarily placedin this position transition is effected. The acceleratinghandle should then be placed in position 4 to give flexibilityof control.
3. Regenerative Brake Handle
The Regenerative braking handle has two positions"OFF" and "REGENERATIVE BRAKE"
The Regenerative braking handle can be operated onlywhen the Reverse lever is in the forward position and theaccelerating handle is in the " OFF" position. There is a humpguide between the "Off" and the Regenerative brake positions.
The Regenerative braking effort is controlled accordingto the angle position of the regenerative braking handle.
The detailed function of the Regenerative brake is describedunder "Operating procedure".
Regeneration Brake Control
Regenerative braking can only be used if the reverserhandle is in the forward position.
The braking range is set to provide maximum to minimumbraking provided the current and weak field ratio limits arenot exceeded to cause unstable traction motor operation.
The maximum armature current limit of 900 amperes inbraking is gradually decreased to 690 amperes automaticallyduring a time interval of ten (10) minutes to prevent over-heating of the traction motors. From the above it will benoted that the braking effort will be gradually reduced afterthe initial application even though the regenerative brakinghandle is in a fixed position.

- 19 -
The current limit is reset to 900 amperes by moving theregenerative handle to "OFF" position and back to regenerationzone.
Regenerative braking speeds are:- Series - below 70 km/h. Series-parallel - above 70 km/h.
Selection of either series or series-parallel underregenerative braking is automatically controlled and dependenton speed; up to 70 km/h series and above this speed seriesparallel combination. When speed falls below 70 km/h andregeneration was initiated in the series-parallel combinationand braking is to continue, then series combination is to beselected. This is achieved by shutting off regenerative brakingand then re-applying whilst travelling at the slower speed.
A voltage polarity detector (VPD) is provided to detectthat the voltage of the armature circuit is higher than theoverhead supply voltage before closing the line switches tocommence braking.
MAIN ISOLATING SWITCH
It is necessary for this switch to be closed for any ofthe 1500 volt equipment to operate. The switch is interlockedwith the doors of the high tension compartment so that theswitch cannot be closed unless the doors are closed, and thedoors cannot be opened unless the switch is open, and theequipment earthed.
The switch is unlocked by inserting the reverser handlein the "Power On" position.
Move reverser handle to "handwheel unlocked" position.
Turn handwheel through full movement in direction ofarrows.
Move reverser key to "door unlocked" position and remove.
To lock door reverse above procedure.
Manual pantograph isolating switches are located insidethe high tension compartment and enable individual pantographsto be isolated by the rotation of the spider wheel by openinga pantograph knife switch, isolating the pantograph from therest of the locomotive.

- 20 -
JUMPER COUPLING
The locomotive is equipped with a permanently attached42 pin jumper coupling and receptacle.
The 42 pin jumper coupling is removed from its dummyreceptacle by turning a small wheel anti-clockwise to withdrawa threaded screw, thus releasing a locking clamp and freeingthe jumper head.
When placing the jumper coupling in position its facemust be located with the matching lugs in the receptacle. Thelocking clamp is then lifted upwards and secured in positionwith the small hand wheel being turned clockwise moving thethreaded screw in to secure it.
These jumper couplings must be secured to the dummyreceptacles and not left hanging loose as they are dangerousin this condition and can cause serious injury to personnel aswell as damage to the equipment.
When removing and inserting jumper couplings Reversehandle should be located in "Isolate" position to reducepossibility of injury and burning of contact points.
The receptacle is fitted with a shear pin designed topermit the jumper coupling to be released and avoiding damageto equipment in the event of train being parted. Particularattention should be paid to the shear pin during preparationand if defective should be rectified prior to departing fromthe depot.
Jumper Wiring_______________________________________________________________Pin No. Wire No. Function_______________________________________________________________ 1 1 Forward 2 2 Reverse 3 3 Powering 4 4 Run UP 5 5 Regenerative Series-Parallel 6 6 " Brake 7 7 Transition 8 8 Fault 9 Spare 10 10 Overload, overcurrent and HB reset 11 11 Pan Up No. 2 end 12 12 Pan clown No. 2 end 13 13 Brake cylinder pressure indicator 14 CP Control positive

- 21 -
_______________________________________________________________Pin No. Wire No. Function_______________________________________________________________ 15 15 Pan Up No. 1 end 16 16 Pan Down No. 1 end 17 BN Battery negative 18 Spare 19 CP Control positive 20 20 Sanding control 21 20 " " 22 22 Compressor synchronising 23 CP Control positive 24 Spare 25 CN Control negative 26 CN Control negative 27 27 Wheel slip 28 28 Remote supply 29 28 " " 30 RT/1 Regenerative brake pattern voltage 31 RN/1 Regenerative brake negative 32 CN Control negative 33 VPN Current pattern negative 34 BN Battery negative 35 BN " " 36 A Notch advance 37 H Notch hold 38 B Notch back 39 Spare 40 40 Resistance notch indicator 41 VP1 Powering current demand 42 VP2 Regenerative brake demand_______________________________________________________________Note: No. 1 and 2 wires are crossed between junction boxes.
OVERLOAD RELAYS, DIFFERENTIAL CURRENT DETECTOR, HIGH SPEED BREAKER
High Speed Circuit Breaker is provided to interrupt overload andfault currents and will break the fault current very rapidlyand greatly reduce the resultant arcing damage.
The High Speed Circuit Breaker is set to open when afault or overload occurs in the circuit.

- 22 -
Overload Relays and Differential Current Detector
Differential Current Detector in case of a fault on the 1500 Vequipment the locomotive is provided with overload anddifferential current relays which will trip the high speedbreaker and open the line switches.
Overload Relays
The overload relays trip if the current flow to thetraction motors exceeds 1400 amps.
The Differential Current Detector trips if the amount of currentflowing into the circuit is different from the amount flowingout. This indicates an earth fault in the equipment.
Overload relays are reset by first returning theaccelerating handle to the "off" position and then by pressingthe fault "Reset" button on the driver's stand.
They should not be reset more than twice in quicksuccession. Repeated settings will damage the equipment andmay result in a fire.
When the accelerating handle is in the open positionthe tripping of the overload relays and differential currentdetector is indicated by the presence of the Red Power Faultindicator light on the affected unit and the alarm bell on allunits in multiple.
Overvoltage Relay
This relay is energised during regeneration and opensthe line switches if the voltage which is being generated exceeds2050 volts. It is reset by returning the regenerative handle tothe "OFF" position.Indication Red "Power Fault indicator" light on affected locomotive.Alarm bell on all units in multiple.
AUXILIARY RELAYS, AR 1 AND 2
Two auxiliary relays are mounted at each end of thelocomotive adjacent to the respective "Pan up" and "Pan down"magnet valves.
An auxiliary relay (AR) must be energised before theno volt auxiliary relay (NVAR) will operate and energise themotor alternator contactor (MAC) and Compressor Contactor (CC)permitting these auxiliary machines to operate. At the same

- 23 -
time the fault alarm circuits also become operative when the"Pan up" button is pressed and Auxiliary relays (AR) energised.
When the "Pan down" button is pressed, the Auxiliaryrelays (AR) are de-energised, opening the motor alternatorcontactor (MAC) and Compressor Contactor (CC) before thePantographs leave the overhead wire.
This ensures that current is not flowing from theoverhead wire to the pantograph and prevents any arcing thatmay damage the pantograph strips or contact wire due to theauxiliary machines operating.NOTE: When stabling both "Pan down" buttons must be pressed.
AIR COMPRESSORS
The air compressors are driven by 1500 Volt electricmotors and are controlled in output by an electro pneumaticgovernor.
Air Compressor Control
For the air compressors to be running it is necessaryfor the compressor contactor circuit breaker on the circuitbreaker panel and the compressor control switches in theelectrical cabinet to be turned "ON" and high tension currentavailable. Also the train control circuit breaker must be "ON"
The compressor control circuit is fed through thecompressor motor circuit breaker and a compressor governorsynchronising circuit breaker is also provided on the circuitbreaker panel.
The compressors are under the direct control of thegovernor, which is of the square "D" type, located on thebulkhead of the machine compartment. Each compressor maybe stopped and started through individual compressor switchesin the low tension compartment behind the right hand door ofthe electrical cabinet. The compressor motors are protectedindividually by a high tension 20 amps fuse mounted on thepanel in the high tension compartment.
One (1) spare compressor 20 amp fuse is provided forreplacement Purposes.

- 24 -
PANTOGRAPH CONTROL
The pantographs are raised by main reservoir air pressurewhen available. If air pressure is not available a footpump issupplied at each end of the locomotive and after pressing"Pan up" button, or manually operating the "pan up" and AR setplungers of the respective magnet valve, the footpump should beoperated until the pantograph makes contact with the overhead wire,the compressors commence to run and sufficient air is available tomaintain contact between pantograph and contact wire.
In the air supply pipe line to the pantograph cylindersthere is an isolating cock which is connected to the interlockingmechanism for the door of the high tension compartment. Thiscock is enclosed in the High Tension (H.T.) door interlock andprevents the pantographs being raised until the door is closedand locked.
A two position vented isolating cock is located at eachend of the locomotive adjacent to the pantograph magnet valveswhich isolates the air supply to the respective pantographroof cylinder when the handle is placed horizontally and isused to ensure the pantographs cannot be raised accidentallywhen running under dead sections of wiring.
TRACTION MOTOR BLOWERS
Two traction motor blowers are provided, one at eachend of the machine compartment and are driven by 415 volt3 phase power from the motor alternator (MA) set.
A toggle switch is provided in each cab on the driver'scontrol stand to switch the traction motor blowers "on" and"off" These switches are connected in parallel and if oneis left "on" in the trailing cab the traction motor blowerscannot be turned "OFF" at the driving location.
When operating in multiple unit consists a tractionblower switch on each trailing unit must be left "ON" as thereis no control through the jumper couplings.
Protection is incorporated in the traction motor andresistor blower fan motor circuits against overheating. Ifthe fan motor contactors are not closed within sixty (60)seconds this is detected by interlocks on the contactors, thefailed resistor blower fan amber light and alarm bell operatesand power is automatically interrupted for a period of threeminutes.
- 25 -
STARTING AND VERNIER RESISTANCES
A series of ten starting resistances are provided withsuitable blower fans for cooling purposes. A thermal overheatdevice is provided in the resistance compartments to detectany excessive heating and operates in conjunction with a failedblower fan condition to cause an amber light to shine and alarmbell to sound.
In addition, under normal operation, the amber lightwill shine until the starting resistances are notched out ofcircuit. In multiple operation the amber light remains on inall units when any of the locomotives are powering withresistances in circuit.
Prevention of damage to the resistances by excessiveheat is effected by the provision that if the resistance blowerfan motors fail to start up within sixty (60) seconds, then thealarm circuit, amber light and bell is energised and powercircuit interrupted for a period of three minutes.
Similarly, should the thermal overheat heat deviceoperate, then the alarm circuit, amber light and bell, isenergised and power circuit interrupted.
Under these circumstances it is necessary to wait untilthe resistances cool down and alarm ceases to function, whichmay take up to fifteen (15) minutes.
Control of Resistance Cooling Fan Motors
Resistance cooling fan motors cool the starting andvernier resistances. Thirty (30) seconds after power is appliedNos 1 and 2 cooling fans start. After a further five (5) secondsNos 3 and 4 cooling fans start. If all resistances are cut outwithin thirty (30) seconds the fans do not start.
The cooling fans stop three minutes after power is removedfrom the starting and vernier resistances.
If any cooling fan contactors fail to close or resistorblower circuit breaker trips, the line switches are openedautomatically within sixty (60) seconds and reapplication ofpower is stopped for three (3) minutes. The failed resistanceblower fan amber light will shine and alarm bell will sound.

- 26 -
FAILURE OF TRACTION MOTOR BLOWERS OR RESISTANCE BLOWER FANS
In the event of the failure of a traction motor blowersor resistance blower fans the locomotive can only be operatedas a light engine using the low speed notches (1 to 3) and fullseries only is available. Notching through resistances must becompleted within sixty seconds with a maximum of 400 amperesper motor during notching.
When operating under above conditions the followingmotor currents should be observed.
150 amperes per motor continuous 230 amperes per motor for 25 minutes 270 amperes per motor for 15 minutes
If operation cannot be achieved without exceeding aboveamperages a relief locomotive must be obtained.
Regenerative braking is not available under theseconditions.
WHEEL SLIP AND SLIDE CORRECTION
This function is entirely automatic. Wheel slip andslide is detected by generators provided on each axle. Thesespeed and acceleration differences will be detected by thecontrol system and correction will be made by reduction ofcurrent to the traction motor of the slipping wheel set only.
If the driver receives continued wheel slip indicationshe should reduce the current to a level where only occasionalwheel slip conditions occur.
If wheel slip exists for more than two (2) seconds whileoperating in resistance notches the main resistance camshaftwill automatically move backwards one notch.
Wheel Slide Protection in Regenerative Brake
If a wheel slide occurs in regenerative braking thebraking current is reduced to approximately sixty percent ofthat value set by the position of the regenerative brakinghandle. After wheel slide is corrected the braking currentis restored to the value at which the regenerative handle isset.

- 27 -
Demisters
Electric demisters are provided in each cab and suppliedwith 120 volt DC power through a Demister circuit breaker on thecircuit breaker panel and controlled by a toggle switch on thedriver's panel in each cab.
Hotplate
A hotplate is provided in each cab supplied with 240 voltAC power and each controlled by a three position rotary switch.Each hotplate is fed through separate circuit breakers on thecircuit breaker panel.
Headlights
Twin sealed beam headlights are Provided at each end andfed from 240 volt AC power Supply via headlight circuit breakerslocated on circuit breaker panel. Each pair of headlights iscontrolled by a three position switch located on the driver'sconsole in each cab. Circuit breakers are also provided for thehigh and low beam circuits, located below circuit breaker panel.
Cab Refrigerator
Each cab is fitted with a refrigerator which is of simpledesign and uses air at high pressure for cooling under thermostaticcontrol.
The cabinet is a top loading type and has a capacity ofholding a water bottle and a supply of foodstuffs which mayrequire to be kept cool.
It is the utmost importance that enginemen keep therefrigerator in a clean and hygienic condition at all times anddo not place items of an odorous nature in them.
The air supply to the refrigerator passes through a twoposition isolating cock, which is open in the vertical positionand closed in the horizontal position. The cock is located onthe rear panel of the cabinet.
The air demands for the operation of the refrigeratorsis high and to ensure sufficient air supply is available forother essential equipment on the locomotive, it is essentialthat before vacating the cab, Enginemen close off the air supplyto the refrigerator by placing the two position isolating cockin the horizontal position and ensure that only one refrigeratoris in use at any time.

- 28 -
AIR CONDITIONING
Air conditioning is provided in both locomotive cabs with415 V AC power supplied from the motor alternator (MA) set.
To avoid wear, the air conditioning unit in unoccupiedcabs should be switched off.
Each air conditioning system consists of two separateunits, the compressor condenser unit and evaporator unit. Thecompressor condenser units are mounted on the right hand wallof the locomotive at both ends and contain the circuit breakersfor each unit. The evaporative unit contains the air circulatingfan, cooling coil, heaters, thermostats and selector switch.A main air conditioning circuit breaker is located below thecircuit breaker panel.
A test key switch is provided for maintenance purposes.
The selector switch is located above the Driver's seat justbelow roof level and is labelled:-
Heat High, Heat Low, Off, Auto, Cool, Vent.
Should the MA set fail the air conditioning will beinoperative.
Air nozzles are located below roof level towards thefront of the cab and can be used to direct the flow of air byboth the Driver and observer.
Cab heating is best achieved by using the individualcab heaters in front of the Driver and Observer in conjunctionwith the heaters in the air conditioning unit.
The heaters in each cab are supplied with 240 volt A.C.power through cab heater circuit breakers located on circuitbreaker panel. Each heater is controlled through a High - Lowswitch on the respective consoles.
VIGILANCE CONTROL EQUIPMENT
The vigilance control equipment fitted is the E.H. typewith a solid state timing unit controlling a penalty applicationmagnet valve which upon being de-energised will exhaust brakepipe pressure to atmosphere, i.e., the system is fail safe.
All current instructions applicable to both normal andemergency working procedures for the E.H. type vigilance controlwill apply.

- 29 -
Battery Switch
Before opening, close both Driver's brake valve isolatingcocks. Vigilance control penalty valve when de-energised willdump brake pipe pressure.
This action is necessary to ensure the vigilance controlis isolated by closure of the isolating cocks before theelectrical circuit to the penalty magnet valve is interruptedby opening the battery switch.
ISOLATING COCKS
Below the Footplates
1. Two main reservoir pipe cocks at each end of the locomotive.
2. One brake pipe cock at each end of the locomotive.
3. Two sets of independent application and release cocks at each end of the locomotive.
4. Two brake cylinder isolating cocks, left side.
5. Main reservoir isolating cock, left side.
In the Cab
1. Brake valve cut off valves, one on each brake pedestal.
2. Brake pipe emergency cock adjacent to the brake pedestal.
3. M.U. valves for isolating independent brake, one on each brake pedestal.
4. Refrigerator isolating cock, on side panel of refrigerator in each cab.
5. A small compartment is provided adjacent to the hotplate in which the following are located:-
(i) Horn (ii) Windscreen wipers and washers (iii) No. 2 end. An additional isolating cock is provided for the above equipment.

- 30 -
In the Engine Room
Bulkhead behind No. 1 Cab.
1. Pantograph isolating cock No. 1 end.
2. Horn change-over cock.
3. High Tension door interlock.
4. Vigilance control emergency application valve.
5. Control air reservoir.
6. Compressor governor.
7. Control valve on brake equipment stand isolates locomotive automatic brake.
8. Dead locomotive device on brake equipment stand.
9. Two sanding magnet valves, right side engine room wall.
10. Pantograph isolating cock, No. 2 end.
NOTE: The control valve isolating cock is located on the brake pipe and when closed, only isolates the automatic portion of the brake, i.e., the independent brake is operative with the isolating cock closed.
CIRCUIT BREAKERS AND SWITCHES
The following circuit breakers are provided on the circuitbreaker panel and protect the various circuits on the locomotivein accordance with the following:-
1. Battery Charger (BACB) - Battery charger, supply indicator circuit breaker (SIRB) and supply Indicating relay.
2. Motor alternator control (MACB) - Motor alternator control circuits.
3. Motor alternator output (ACB) - Motor alternator output.
4. Traction motor blower (MBB1) - Traction motor blower (MBB2) circuits.
- 31 -5. Resistor Blower motor (RBB11) - Resistance blower (RBB12) fan motor circuits. (RBB21) (RBB22)6. Pilot Motor Control (PMB) - Main supply to the master controllers and camshaft pilot motors.7. Blower motor control (BMCB) - Traction motor and resistance fan blowers control circuit.8. Train control (TCB) - Motor alternator contactor for supply to motor alternator (MA) set, Compressor Control Circuit and control positive through the reverser contacts.9. Pantograph Control (PCB) - Pan up, Pan down and auxiliary relays set and trip coils. Motor alternator and compressor operation.10. Control circuit (main) (CCB) - Traction control circuits.11. Control positive (CPB) - Master Controller supply through the control governor and regenerative brake control. Sanding magnet and reset buttons through reverser contacts.12. Regenerative brake control (RBC) - Regenerative brake control circuits.13. Vigilance Control (VCB) - Vigilance control circuits.14. Headlight (HLB) - Headlight Circuit (HLBB) - Hdlight bright)below circuit (HLBD) - Hdlight dim )breaker panel15. Heater (CHB1) - Cab heater No.1 end. (CHB2) - Cab heater No.2 end.16. Demister (DB) - Demister circuit.17. Hotplate (HPB1) - Hotplate No.1 end. (HPB2) - Hotplate No-2 end.18. Compressor Control (CMCB) - Compressor control circuits, both compressors.19. Compressor Synchronise (CSB) - Compressor synchronising circuit.

- 32 -20. Fault Breaker (FB) - Fault, lights, bell and buzzer.21. Lighting Control 1 ) (LCB) - No.1 end lights - cab, timetable, coupler, steps, number, marker and panel.22. Lighting Control 2 ) (LCB) - No.2 end lights - cab, timetable, coupler, steps, number, marker, panel and toilet.23. -24. -25. Machine room lights (MRLB) - Machine room lights and high tension compartment lights.26. Supply Indicator Relay (SIRB) - Operates blue light and bell to indicate loss of motor alternator (AC) supply. Alarm also operates in the event of this circuit breaker tripping27. Remote supply (RSB) - Completes circuit from the (sealed open) source of supply on another locomotive in the case of flat batteries.28. Main air conditioning supply - Supply to both air conditioning units - below circuit breaker panel
Electrical Cupboard Machine compartment FunctionCompressor control switch (CMS1) No. 1 Compressor control.Compressor control switch (CMS2) No. 2 Compressor control.Control circuit cut out switch (CCOS) Power control circuits.Sequence test switch (SQ TEST SWITCH) Testing control circuits.
PREPARATION
1. In the event of any equipment being found "cut out" unless labelled "Not to be used", or in the absence of a relevant entry in the Log Book, such equipment must be "Cut In".
2. If any authorised employee be at work on an electric locomotive at the time when the driver arrives to commence testing operations, and if such work is likely to affect the electrical or air equipment, the driver must not proceed with the testing operations on the locomotive concerned, or cause the locomotive to be moved, until the work has been

- 33 -
completed and all danger discs removed from the departure end of the locomotives.
3. When an electric locomotive is stabled at a depot, the procedure outlined for stabling must be carried out by the stabling driver, unless instructed not to do so by the Shed Chargeman.
Preparation
Obtain Driver's Daily Report Sheet and Reverser handle.On arrival at locomotive peruse Log Book and commence preparationat No. 1 end.
No. 1 Cab
The following items are to be checked:-
1. Hand brake is applied.
2. Check the accelerating handle, regenerative handle are in "off", Reverse lever in "Isolate", and removed.
3. Driver's brake valve cut off in "OUT" MU2A valve in "Dead" position.
4. All switches on driver's and observer's consoles not required are up and off.
Proceed to machine compartment Check
(a) Circuit breaker panel left wall.
(b) Check ammeter for accuracy of zero reading.
(c) Close battery switch.
(d) Supply Indicating switch (S.I.S.) "ON".
(e) All circuit breakers up and on except remote supply (RSB) which is sealed in the open position.
(f) Check spare globes supply in adjacent rack.
Check air cocks on bulkhead behind No. 1 cab. Vigilance control sealed and all air cocks properly positioned. Check fire extinguishers in machine compartment during preparation for charge and check seal Sander magnet valve isolating cocks (R wall).

- 34 -
Check electrical cupboard (through small door):-
(a) Control cut out switch (CCOS) is in "ON" position.
(b) sequence test switch is in 'normal'.
(c) Compressor motor rotary switches (CM 1 and 2) are in "ON" position.
Warning. Enginemen are warned against opening the electricalcupboard as 240 volt electrical current is present. On noaccount are the doors to be opened while the pantograph is inthe raised position or motor alternator operating.
Check sanding magnet valve isolating cocks open (R wall). Check brake control valve and dead engine cocks correctly positioned, located under traction motor blower No. 1 end. Operate reverser handle in high tension door interlock. Check high tension fuses are in position and spare fuses:- 1 x 20 ampere H.T. fuse (compressor). 1 x 10 ampere (no volt relay, polarity detector). Check manual pantograph isolating switches are correctly located. Ensure high tension door interlock properly locked. Check motor alternator circuit breaker (ACB) is in "ON" position on right wall adjacent to traction motor blower No. 2 end.
No. 2 end
(a) Driver's brake valve cut out valve in "OUT". MU2A valve in "dead".
(b) All switches on driver's and observer's consoles not required are turned "off".
(c) Insert reverser handle in "Isolate" position and move to "Off" position (centre).
(d) Press pantograph raise button. If no main reservoir pressure is available the pantograph is raised by using a footpump (one each end of the locomotive). In case of insufficient main reservoir air pressure the alarm bell will sound and the Red Power fault light (PFL) will shine because the high speed breaker will not close until 485 kPa pressure is attained. The Blue Failed Alternator light (FAL) will also shine.
(e) Check line voltage is normal (1100-1500 V DC) Note: If the line voltage is less than 110OV the high tension machines will not operate.

- 35 -
When 485 kPa Control air pressure is available returnreverser handle to "OFF". Press Overload reset button (ORB)which should cause high speed breaker to close, Red PowerFault light and Blue Failed Alternator light to be extinguished,also alarm bell to cease sounding.
When the motor alternator commences to run 415V 50HZthree phase power will be fed to the control and auxiliarycircuits.
With main reservoir fully charged to 700-800 kPa openbrake valve cut off cock and MU2A valve and test brake asfollows:-
1. The independent brake valve is to be in the 'application' position and the automatic brake valve in the 'release' position. The brake valve cut off valve set at 'IN' and MU valve in the 'lead or dead' position on the brake pedestal being tested.
2. Check the main reservoir, brake pipe and equalising reservoir pressures. The brake pipe and equalising reservoir pressure should be 500 kPa. The main reservoir pressure 700 to 800 kPa.
3. Place the independent brake valve in the 'release' position and depress the vigilance control acknowledgment button. The flashing light is to be acknowledged, whilst the brake test is being carried out.
4. Place the automatic brake valve in the minimum reduction position and note that a minimum reduction of 50 kPa takes place in the equalising reservoir and brake pipe pressures. The brake cylinder pressure should rise to between 70 and 105 kPa.
5. Release the engine brakes with the independent brake by depressing the handle in the 'release' position until a full release of brake cylinder pressure is obtained.
6. Place the auto brake valve in the 'service application' zone and reduce the equalising reservoir and brake pipe pressure by 70 kPa. Note that the regulating and relay valves function and the brake cylinder pressure increases.
7. Conduct a power and sand test. Place brake valve cut off valve in the 'out' position, check the brake piston travel is within required limits and sands are working correctly. Note that the brake pipe pressure has not seriously reduced or increased with the brake valve cut off valve set in the 'out' position.

- 36 -
8. Regenerative Brake Test. Place the reverser in the 'forward' position, and set brake valve cut off valve in the 'in' position. Move the regenerative handle to the braking position. Note that minimum brake cylinder pressure releases. When the brake cylinder pressure has released, reduce the brake pipe pressure to below 250 kPa. Note that the locomotive brakes re-apply. Move the regenerative handle to the 'off' position.
9. Place the automatic brake valve handle in the 'release' position. Note the brake pipe and equalising reservoir pressure is restored and the locomotive brakes release.
10. Move the accelerating handle to position 3 and back to position 2. Note the load meter (ammeter) reading indicating that the pneumatic control switch has closed. Fully apply the independent brake and check the brake cylinder pressure rises to 325 kPa. Move the accelerating handle to the 'off' position.
11. Place the automatic brake valve in the emergency application position. Note that a heavy reduction occurs in the brake pipe and equalising reservoir pressure.
12. Move the automatic brake valve handle to the 'release' position and note that the flow meter functions correctly.
13. Place the independent brake valve handle in the 'release' position without depressing handle and note that the brake cylinder pressure releases.
14. Open emergency cock at base of pedestal and check that brake pipe is quickly and considerably reduced in pressure.
15. Maintaining feature check
Close emergency cock and fully recharge brake pipe.
Place auto brake valve handle in service zone and reduce brake pipe pressure by 70 kPa. Leave handle in this position.
Open emergency cock slightly to vent brake pipe and note that brake pipe pressure remains constant at the reduced level.
16. While the brake test is being conducted, the cutting in and out point of the governor is to be checked.

- 37 -
Raise and lower pantographs to ensure correct operation. Set switches as required. Isolate brake equipment. Place reverser handle in "Isolate" and remove.
Alight from locomotive cab on driver's side. - Examine front of locomotive, checking all air cocks are closed and air hoses properly secured to dummy couplers. Check automatic coupling in good condition and operates correctly also jumper coupling in good condition and properly secured.
- Pass down the side of the locomotive, examine brake shoes and rigging, springs etc. Check that brake cylinder isolating cocks are open, sands flow adequate and sandpipes set to rail, main reservoir isolating cock open, compressor oil level checked by lifting filler cap, main reservoirs are fitted with self draining valves. - Enter cab at No. 1 end, carry out instructions as previously detailed in No. 2 cab, lower and raise pantographs to ensure correct operation. Lower leading pantograph if it is not required. - Set required tail and number lights.
Alight from locomotive on driver's side. - Pass along locomotive checking as previously and including battery box and condition of spare fuses. - Check red flags, detonator headlights, windscreen washers, wipers, marker gauge and interior lights. - At departure end, set up for operation and release hand brakes.
OPERATION PROCEDURE
Acceleration in Series
When starting from rest the "Accelerating Handle" ismoved from "OFF" and should be operated between "Notch 3" and"Notch 2" (Hold) which advances the "Resistance Cam Switch"one step at a time until drawgear slack is taken up. In theManual Advance (Notch 3) maximum current of 1100 amperes(for 10 seconds) is available if required providing adhesionwill permit. The "Accelerating Handle" can be located inNotch 4 in the lowest position when the locomotive willautomatically notch through to the Full Series Weak Field.By advancing the "Accelerating Handle" in Notch 4 zone(towards Notch 5) acceleration can be increased within theadhesion limits up to the maximum of 900 amperes acceleratingcurrent for 5 minutes.

- 38 -
While operating in Notch 4 if a reduction in speed isrequired, the "Accelerating Handle" is returned to minimum whichwill reduce the current to the traction motors. If a furtherreduction in speed is required, the "Accelerating Handle" ismoved back to Notch 1 (Notch down) and returned to Notch 2(Hold). Adopting this method manually notching backward onestep at a time controlling current to the traction motors canbe achieved.
Transition from Series to Series-Parallel
If a further increase in speed is required providing theresistance notch light is not illuminated the "AcceleratingHandle" is momentarily placed in Notch 5 (Transition) andreturned to Notch 4 causing the transition to Series-Parallelcombination, automatic notching occurs through to SeriesParallel Weak Field. Using the "Accelerating Handle" in thiszone, accelerating current can be varied from 340 amperes to900 amperes thus enabling the driver to control his acceleratingrate. While operating in Notch 4 if a reduction in speed isrequired the "Accelerating Handle" can be moved back, therebyreducing the current to the traction motors.
Transition from Series-Parallel to Parallel
If a further increase in speed is required whilst operatingin Series-Parallel the "Accelerating Handle" is momentarily placedin Notch 5 (Transition) and returned to Notch 4 causing transitionto the Parallel combination (providing resistance notch light isextinguished). Once again automatic notching will occur throughto Weak Field and by varying the "Accelerating Handle" position,acceleration current can be controlled between 340 amperes to900 amperes.
While operating in Notch 4 if a reduction in speed isrequired, the "Accelerating Handle" can be moved back therebyreducing the current to the traction motors.
Speed Reduction
If a speed reduction is required, return acceleratinghandle to the "OFF" position until desired reduction in speedis achieved then return the accelerating handle to the appropriateposition e.g.,
Note. There is no backward transition as on a 46 class locomotive.
If a speed reduction is required from series-parallel orparallel combinations the accelerating handle is returned to "OFF"

- 39 -
position and then placed in Position 4 where the locomotivewill keep notching automatically to maximum series weak fieldposition. If the obtainable speed in this combination is notsufficient, series-parallel combination is selected by movingthe accelerating handle to Position 5 momentarily from "OFF"position (providing the Resistance Notch light is extinguished)the control circuit will be established and transition effected.This manoeuvre is repeated if a higher combination to Parallel isrequired.
Shunting and Low Speed Control in Series Combination
From the "OFF" position advance the accelerating handleto Notch 3 which moves the resistance camshaft one step forward.The handle is operated between Notch 2 (Hold) and Notch 3(Notch up) until the desired speed is obtained when the handleis maintained in Notch 2 (Hold).
If a reduction in speed is required the acceleratinghandle is returned to Notch 1 (Notch down) and back to Notch 2(Hold) which moves the resistance camshaft one step backward.
This is repeated until the desired reduction in speedis achieved.
Operating through Water
Under no circumstances should the locomotive be operatedthrough water that is deeper than 100 millimetres above raillevel and speed must not exceed 3 kilometres per hour.
Operation over points and crossovers
When operating the locomotive at speeds in excess of40 km/h reduce the motoring current by returning the acceleratinghandle to the minimum current position in Notch 4 seven secondsbefore the locomotive reaches a railroad crossing or points.
When operating in regenerative braking reduce theregenerative handle to minimum position as above.
This action is required to minimise brush bounce andthereby reduces fusion damage between the carbon brushes andcommutators of the traction motors.

- 40 -
REGENERATIVE BRAKE CIRCUIT
There are two stages of regenerative braking. The six (6)traction motor armatures are either connected in series or inSeries-parallel with 3 motors in series in each group. The sixtraction motor fields are separated from the high tension circuitand connected in series in both stages. The fields are suppliedby means of an exciter rectifier and step down transformer fromthe 415 V auxiliary supply from the motor alternator (MA) set.
The amount of regenerative braking is controlled byvariation of the traction motor field current.
Regeneration Brake Control
Regenerative braking can only be obtained if the reverserhandle is in the forward position.
The braking range is set to provide maximum to minimumbraking provided the current and weak field ratio limits are notexceeded to cause unstable traction motor operation.
The maximum armature current limit of 900 amperes inbraking is gradually decreased to 690 amperes automaticallyduring a time interval of ten (10) minutes to prevent overheatingof the traction motors. From the above it will be noted that thebraking effort may be gradually reduced after the initialapplication even though the regenerative braking handle is in afixed position.
The current limit is reset to 900 amperes by moving thebraking handle to "OFF" position and then returning it to thebraking zone.
When the speed is more than 70 km/h braking occurs withinthe series-parallel combination automatically. When the speed ismore than 30 km/h and between 70 km/h series combination isselected automatically. In the event of the braking combinationneeding to be changed the regenerative braking handle is to bereturned to the OFF position and braking will then be establishedupon the opening of the regenerative braking handle in the correctcombination.
A voltage polarity detector (VPD) is provided to detectthat the voltage of the armature circuit is slightly higher thanthe overhead supply voltage before closing the line switches tocommence braking.

- 41 -
LOSS OF OVERHEAD POWER
Loss of overhead power to a locomotive can arise fromtwo possible causes, namely:-
(i) A fault within the electrical equipment of the electric rolling stock.
(ii) Loss of supply to the overhead wiring caused by an overhead wiring fault or by loss of supply to a sub-station.
Electric Locomotives - Single Units
(i) As soon as possible after the initial loss of power, return the accelerating handle to the "off" position and if using regenerative brake, the regenerative handle to the "off" position. Avoid stopping with any portion of the train on a bridge, viaduct, catch-points, crossing or in a tunnel, under an air gap, or any position likely to obstruct trains on another line.
(ii) If supply is not available two minutes after the initial loss of power, the driver should switch off motor generators and compressors, lower pantographs, observe that they are lowered and charge storage reservoir.
(iii) Four minutes after the initial loss of power the driver should raise one pantograph and arrange to have it carefully observed when it makes contact with the overhead wire.
(iv) If a flash occurs and power goes off immediately, as indicated by the line voltmeter in the driver's cabin. It is probable that there is a fault on the locomotive. If such is the case, the pantograph should be lowered and arrangements made for a relief locomotive to be obtained.
(v) If power is restored and remains restored, proceed.
(vi) If there is no flash at the pantograph and power is not restored the pantograph should be lowered.

- 42 -
(vii) The pantograph should be raised after a further period of two minutes for a similar test. If there is no indication of return of power it should be lowered again. The observer should then be sent to communicate with the nearest signal-box.
(viii) The driver should act on instructions received from the Signalman and, unless he has definite knowledge that his locomotive is defective, he should raise a pantograph every five minutes to test for the return of power and lower it if power has not been restored.
(ix) He should make arrangements for the securing and protection of the train as required in accordance with the regulations.
Electric Locomotives - Multiple Unit
In the case of electric locomotives in multiple unitconsists, the driver should carry out the instructions detailedabove for single unit electric locomotives except that operation(iii) should be applied to one pantograph of the leadinglocomotive, and operation (vii) to one pantograph of the trailinglocomotive.
Protection of Train
The train crew must make arrangements for protectionof the train where required in accordance with the provisionsof Rule No.243, 244 or 245 where applicable.
Loss of Overhead Power on Heavy Gradients
If overhead power is lost when a train is ascendingor descending a heavy gradient an immediate application ofthe automatic air brake is to be made to stop the trainwhich is then to be secured by the application of sufficienthand brakes to hold it stationary on the grade and theautomatic brake released. This instruction must be observedat all times, as it is essential that the train be broughtto a stand before main reservoir pressure has been depleted.When power is restored, full main reservoir pressure must beobtained before the hand brakes are released.

- 43 -
PANTOGRAPHS
Most wear on the overhead wire is caused by passage ofcurrent to the pantograph strips rather than by frictionbetween wire and strips. It is therefore desirable at alltimes when hauling a train to operate with both pantographsraised. The current density at the pantograph strips isthereby kept as low as possible and the rate of wear on theoverhead wire kept as low as possible.
The number of pantographs to be raised is summarisedbelow:-
Number of pantographs to be raised oneach locomotive
LocationBetween placesstated
Metropol-itan Areagenerally
Rhodes andGosfordLiverpoolandGlenlee
NepeanRiverBridge andKatoomba
KatoombaandLithgow
Light Enginesone, two or threelocomotives (d)
1 1 1 1
Hauling Trainssingle locomotives
any speedTwo units coupled below 90 km/h above 90 km/hThree units coupled any speed (c)
2
11
1
2
21
1
2
2(a)
2
2
2(a)
1(b)
NOTES: The rear pantograph should normally be raised where only one is permitted.
(a) Speed not to exceed 90 km/h on this section.
(b) Two pantographs should be raised on each locomotive between Lithgow and Bell only in the up direction.
(c) Locomotives must not be operated in parallel.
(d) Light locomotives may run at normal track speed.

- 44 -
(e) To comply with these instructions, it will be necessary for drivers of coupled electric locomotives to raise and lower the pantographs, if necessary, when passing the following points:-
West: Penrith - Katoomba - Bell (up only)
North: Rhodes
South: Liverpool
North Shore: Hornsby
(f) Pantographs may be raised or lowered with the locomotive(s) in motion, providing the accelerating handle is first moved to the off position. It is important to ensure at all times that pantographs are in the fully raised or lowered position, to avoid damage to overhead equipment.
MULTIPLE UNIT OPERATION
These locomotives can only operate with other 85 classlocomotives in a multiple unit consist. At all other times,should it be necessary to operate with locomotives of differenttypes then both units must be manned.
When operating with multiple units, the normal practiceis for all locomotives to have the jumper couplings insertedbetween them, thus providing for control of all locomotivesfrom the leading driver's cabin.
The locomotives are to be prepared as described inpreparation duties.
Each locomotive is equipped with a 42 pin jumpercoupling at each end and suitable air hose couplings. Whenthe locomotives are coupled for multiple unit operation, onejumper coupling is to be connected between the locomotives.The brake pipe and main reservoir, No. 3 control and No. 4independent release air hoses are to be coupled and allrelative air hose cocks opened.
Control and Brake Valve Handles
When operating with units in multiple unit consists,reverser handle, automatic brake valve handle, and theindependent brake valve handle should be in position on theappropriate equipment in the leading driver's cabin.

- 45 -
In all other cabs in the locomotive consist the reversermust be removed from the control stands in "Isolate" position.Brake equipment cut out in accordance with instructions andmotor alternator switch left "ON".
CHANGING OPERATING STATIONS
The following procedure is to be adopted when changingoperating stations.
1. Fully apply the independent brake and place M.U. valve in the trail position. Move the independent brake valve handle to the release position, without depressing it and remove the handle.
2. Reduce the brake pipe pressure by making a 150 kPa brake pipe reduction with the automatic brake valve and place the brake valve cut off valve in the "out" position. Move the automatic brake valve handle to the "handle out" position.
3. The accelerating and regenerative brake handles are to be in the "off" position and the reverser handle placed in the isolate position and removed. The motor alternator will stop when the reverser handle is moved to the "Isolate" position.
4. The traction motor blower switch is to be turned "off".
5. The driver is to remain at the control stand being vacated with the automatic brake valve in the "handle out" position.
6. The observer is to proceed to the stand being cut in, fully apply the hand brake, insert the independent brake valve handle, place the M.U. valve in the "lead or dead" position, release and fully apply the brakes.
7. The driver is to observe that the brakes have released and applied and not less than 285 kPa is indicated on the brake cylinder gauge, and remove the automatic brake valve handle.
8. Proceed to the control stand being cut in with the automatic brake valve and reverser handle, insert the reverser handle and place the brake valve cut off valve at the "in" position.
9. The brakes are to be tested in the normal manner and the observer is to release the hand brake under the driver's supervision.

- 46 -
10. Move the reverser handle from the isolate position, turn on the traction motor blower switch and press the fault reset button to restart the motor alternator. The failed alternator blue light and bell will operate for approximately thirty (30) seconds due to it being necessary for the alternator output to exceed a predetermined voltage before the alarm ceases.
Note: When the reverser handle is moved to the isolate position, the high speed circuit breaker trips and opens the line switches, which stops the alternator.
AMALGAMATION AND DIVISION OF UNITS
Multiple Unit Operation
Instructions and Amalgamation
85 class electric locomotives may be operated in multipleunit consists of two, three and four with their own type.When operating in combination with other units all locomotivetypes must be manned.
Coupling of Units for Multiple Unit Operation
1. When the unit is prepared, place in position and secure with the independent brake in the application position, hand brake to be applied.
2. (a) Note the brake pipe and brake cylinder pressure.
(b) Accelerating and Regenerative brake handles to be in the 'off' position.
(c) Move the reverser handle to the 'isolate' position.
3. On trailing unit:-
(a) Move the trailing unit onto the leading unit and engage the automatic couplings. Test pull to ensure that they are properly coupled. Secure the automatic coupling locking catch in position.
(b) Reduce the brake pipe pressure to 350 kPa and place brake valve cut off valve in the 'out' position.
(c) Reduce the brake cylinder pressure to 150 kPa.
(d) Remove the automatic brake valve handle in the 'Handle out' position. Place the M.U. valve in the 'trail' position and remove the independent brake valve handle in the release position.

- 47 -
(e) (i) Accelerating and Regenerative brake handles to be in the 'off' position.
(ii) Place the reverser handle in the 'isolate' position and remove.
4. Couple the brake pipe, main reservoir, No. 3 control and No. 4 Independent release air hoses and open the associated cocks.
5. Note that the brake pipe and brake cylinder pressures build up on the air gauges to the same setting as on the leading unit.
6. Supervise the insertion of the jumper coupling.
7. The reverser and brake valve handles are to be suitably located in the No. 1 end driver's cab.
8. On leading unit:-
(a) Test the operation of the pantographs.
(b) A check is to be made between the units to ensure that there is no leakage on the air hose connections.
(c) Release the hand brake.
(d) Move the reverser handle from the isolate position, with the traction motor blower switch on, press the fault reset button to restart the motor alternator.
(e) Proceed with normal operation.
Coupling for Multiple Unit Working - Observer's Duties
1. Upon preparing to couple the units, open and centre the automatic couplers to ensure they engage when brought together.
2. When the automatic couplers are brought together, wait until the driver test pulls the couplings to make sure that they are properly engaged. Then secure the automatic coupling locking latch in position.
3. Couple up the brake pipe, main reservoir and one set of independent brake air hoses.
4. When driver signals, open the air hose cocks between the units.
- 48 -
5. Ensure the jumper head is inserted correctly. When inserting the jumper coupling, make sure of a firm footing. Also examine the jumper coupling pins to ensure they are not bent or damaged.
NOTE: In all cases where time is allowed for the turning of units and piloting locomotives to whistling out point, such duties must be performed by the observer.
MULTIPLE UNIT OPERATION - DIVISION OF UNITS
When units are being divided in multiple unit workingeither in depots or at stations enroute to suit trafficrequirements, the following procedure is to be adopted:-
1. When the locomotives have been brought to a stand, they are to be secured with a full application of the independent brake and hand brakes are to be applied.
2. The observer is to remove the jumper coupling and secure it in the dummy receptacle. Close the brake pipe, main reservoir and independent brake pipe air hose cocks and uncouple the air hoses.
3. On the Trailing Unit:- Place the automatic and independent brake valve handles in position. Move the M.U. valve to the 'lead or dead' position and fully apply the independent brake. Place the brake valve cut off valve at the "in" position and move the automatic brake valve handle to the release position.
4. The observer will then ease the Driver up, disengage the automatic couplers and attach air hoses to the dummy couplers.
5. Two wooden chocks are to be located on each side of the No. 2 wheel of the stationary locomotive.
6. On leading locomotive, proceed with normal operation.
STABLING
When the locomotive has been brought to a stand at thepoint of stabling the following duties should be carried out.
1. Fully apply the independent brake and place M.U. valve in the trail position. Move the independent brake valve handle to the release position, without depressing it, and remove the handle.

- 49 -
2. Reduce the brake pipe pressure by making a 150 kPa brake pipe reduction with the automatic brake valve and place the brake valve cut off valve in the 'out' position. Move the automatic brake valve handle to the "Handle out" position.
3. The accelerating handle is to be in the 'off' position, the Regenerative handle in the 'off' position, the reverser handle placed in the 'Isolate" position and removed.
4. Press Pan down buttons to lower pantographs.
5. When leaving locomotive, open battery switch, close all windows and doors.
6. Remove the reverser handle in isolate position. Enter all defects in the log book.
7. Chocks to be placed each side of No. 2 wheels.
POSITIONING OF CONTROLS FOR HAULAGE OF DEAD LOCOMOTIVES
Should a locomotive fail and be left at a station, thequalified Driver, prior to leaving the unit must secure thelocomotive by means of the hand brake and carry out normalstabling duties and leave the unit in order vide instructionsrelating to the haulage of the unit.
An electric locomotive of any type when required to behauled dead must not be attached to a train unless a qualifiedMechanical and Electrical Equipment Branch Technical Officer orTechnician has certified to its fitness to be hauled. Wherepossible a Driver required to haul a 'dead' locomotive, shouldcontact the District Manager, Locomotives and Rolling Stockor other Technical Officer nominated, for clearance to do so.
The following procedure is to be adopted on the 'dead'locomotive:-
1. Under normal operating conditions when the No. 3 control and No. 4 independent release air hoses can be satisfactorily coupled for multiple unit air brake operation.
(a) Air brake equipment is to be set up for normal multiple unit operation.
(b) Accelerating Handle in the 'off' position, reverser handle removed and regenerative handle in the 'off' position, where provided.

- 50 -
(c) All switches and circuit breakers on the control stand and control panel to be placed in the 'off' position. Battery switch open.
(d) Reverser switch, where provided, to be located in the "isolate" position.
(e) Main reservoir, brake pipe, No. 3 control and No. 4 independent release air hoses are to be coupled between the locomotives and associated air cocks opened.
(f) The brakes must be operative on the dead locomotive.
2. When the No. 3 control and No. 4 independent release air hoses cannot be coupled between locomotives fitted with 26L brake equipment.
A competent employee, qualified for 26L brake operations must travel on the 'dead' locomotive for the purpose of releasing the locomotive brakes, by depressing the independent brake valve handle when the brake pipe pressure is restored upon each release of the automatic brake from the leading locomotive.
(a) Driver's brake valve cut off valves are to be in the 'out' position.
(b) Automatic brake valve handle is to be placed in the 'handle out' position and removed.
(c) At the brake pedestal being operated on the 'dead' locomotive, the independent brake valve handle is to be carried in the release position and the MU valve placed in the 'lead or dead' position.
(d) Accelerating handle in off position, reverser handle removed in isolate and regenerative handle in the 'off' position.
(e) Main reservoir and brake pipe air hoses are to be coupled between the locomotives and associated air cocks opened.
(f) Brakes are to be applied and released from the leading locomotive and their correct operation checked on the 'dead' locomotive before departure.

- 51 -
NOTE: When a main reservoir air supply is not available from the assisting locomotive the dead locomotive device is to be placed in the open position to charge the main reservoir on the 'dead' locomotive.
Enginemen are reminded that due to their restrictedlength, Nos.3 and 4 air hoses will not remain coupled betweena 46 class and 85 class locomotive and failure to carryout the foregoing instructions will result in brakes failingto release on a trailing 85 class locomotive after anautomatic brake application.
Hauling of Dead Locomotives from a Depot
When a locomotive is being hauled 'dead' from a depotit will be the responsibility of Depot officers making thesearrangements to ensure that the 'dead' locomotive is correctlyset up, the air brake equipment is properly positioned andconnected for dead haulage and that the brakes apply andrelease satisfactorily when remotely controlled from thehauling locomotive.
It is not necessary for the Driver of the train bywhich the dead locomotive is hauled between depots to bequalified for it, but, if he is qualified for the type ofbrake equipment with which it is fitted, he will be expectedto effectively deal with any brake troubles occurring enroute.
FUSES
The following fuses are provided in the high tensioncompartment:-
(a) A group of three 10 amp fuses which are:- (i) Polarity detector positive and negative fuses. These fuses protect the polarity detector circuits which ensure a slightly higher voltage is present in the traction motor armature than in the overhead before the line switches close and regenerative brake becomes effective. Should a fuse fail, regenerative brake becomes inoperative and if the regenerative handle is open, the red fault light will shine and alarm bell sound. To correct the fault, press the reset button and if this fails to have the desired effect, test and renew the 10 amp fuse.
- 52 - (ii) No volt relay fuse. This fuse protects the no volt relay circuit and in the event of it failing, overhead supply is lost and the line switches will open, causing the red fault light to shine and alarm bell to sound. Close the accelerating or regenerative brake handles and press the fault reset button. Should this action fail to correct the defect, test and if necessary renew the 10 amp fuse.
(b) Two compressor 20 amp fuses, one for each compressor. Should either of these fuses fail, the compressor will stop and it will be necessary to test and renew the defective fuse.
(c) A group of three (3) regenerative brake fuses. These fuses are bolted on the wall adjacent to the motor alternator (MA) set and must not be renewed by enginemen.
(d) One spare 20 amp and one spare 10 amp fuse are located in the high tension compartment.
DRIVER'S, SPARE AND EMERGENCY EQUIPMENT
The following equipment shall be carried on 85 classelectric locomotives:-
Driver's Equipment
1 tail disc. 2 cases of 12 detonators. One in each cabin. 2 red flags (in flag cases). One in each cabin.
Tools
1 spanner, hose M.R. and B.P. 1 " " Bogie M.R. 1 " " " B.Cyl. 1 " " " Sand 1 pin punch 1 chisel 1 hammer

- 53 -
Spare and Emergency Equipment
1 screw wrench 1 brake pipe hose - 25 millimetres 1 brake pipe hose - 32 millimetres 1 rope - 1220 millimetres. Spare fuses - Compressor 20 ampere - no volt relay 10 ampere 1 hook stick 3 fire extinguishers.
FAULTS, FAILURES AND THEIR REMEDY
The following is a complete coverage of the defects thatmay manifest themselves due to the malfunction or completebreakdown of equipment and the appropriate action required ofthe driver.
In the event of a defect developing, before attemptingto rectify the fault, ensure all circuit breakers are on andcheck which fault light is shining.
1. Discharged Battery
In this case the auxiliary machines cannot be startedwhen battery voltage is less than 70 volts DC until coupledto another 85 class locomotive.
Remedy
(a) Couple another locomotive to the unit with flat batteries.
(b) Connect the jumper coupling between the units.
(c) Check that motor alternator is operating on normal locomotive.
(d) Break seals and place "Remote supply" circuit breakers (RSB) on both locomotives in "ON" position.
(e) Raise pantographs on disabled unit and start the motor alternator and compressors.
(f) Place the remote supply breakers (RSB) in the "OFF" position on both locomotives once motor alternator commences operation.
(g) Enter defect in log book.
- 54 -
Caution
Be sure remote supply breakers (RSB) are turned "Off" before coupling or uncoupling locomotives otherwise severe burning of the jumper pins will occur.
2. Lights will not go on when motor alternator is not running
The following items are to be checked:- (a) Battery isolating switch is closed. (b) All miniature circuit breakers (MCB) are "ON". (c) Renew battery positive or negative fuses if required located in fuse box adjacent to storage batteries.
3. Pantograph will not go up
The following items are to be checked:- (a) Reverser handle is not in "Isolate". (b) High tension compartment door is closed and correctly locked. (c) Pantograph control circuit breaker is "ON" (d) Air supply isolating cocks on bulkhead in machine compartment correctly positioned.
4. Line Voltmeters do not register
The following items are to be checked:- (a) Pantograph is up. (b) Pantograph isolating switches in high tension compartment correctly located. (c) If the line voltmeter is not registering a reading and power is available (indicated by motor ammeter registering a reading) the locomotive may be operated normally. A suitable entry is to be recorded in the log book.
5. Both compressors fail or will not start
The train is to be brought to a stand immediately andsecured by the application of sufficient hand brakes to holdit stationary and protected in accordance with regulations. The following items are to be checked:- (a) Line voltmeter is registering overhead supply is available. (b) Compressor control circuit breaker. (c) Compressor governor synchronising circuit breaker (CMGB).

- 55 -
(d) Train control circuit breaker (TCB). (e) Compressor governor isolating cock open and contact points closed. (f) Compressor switches CMS1, CMS2 correctly positioned. (g) Test and renew compressor fuses if required. Note: When operating in multiple unit consists the governor synchronising circuit breaker (GSCB) should also be checked.
6. One Compressor only fails or will not start
Continue with normal operation if sufficient air pressureavailable and at earliest convenient opportunity:-
(a) Check compressor motor switches (CMS1, CMS2) are turned "ON" in electrical cabinet. (b) Renew 20 ampere compressor fuse.
7. Failure of motor alternator
The following items are lost:-
(a) One source of supply for low tension circuit. (b) Battery charging. (c) Traction motor blowing and pressurisation of high tension compartment. (d) Resistance fans. (e) Regenerative brake. (f) Air conditioning. (g) Automatic notching and transition change. (h) Cab heaters, hotplates, demisters.
Effect The alarm circuit will be energised causing the blue light to shine and alarm bell to sound. The battery ammeter will also register a discharge. Should the defect be on the motor side of the alternator the red fault light (FIL) will also shine.
- 56 -
Remedy Return accelerating or regenerating handle to "OFF" position. Press reset button to reset high speed breaker.
The following items are to be checked:- (a) Line voltmeter indicates overhead supply. (b) Press "Pan up" button to reset auxiliary relay (AR) (c) Press reset button to reset high speed breaker (HSB) (d) Supply indicator switch (SIS) (e) Train control breaker (TCB) (f) Motor alternator control breakers (MACB) (g) Supply isolating breaker (SIB) (h) Alternator circuit breaker (No. 2 end R wall).
If the alarm still operates, manually operate both auxiliary relay reset buttons.
When the defect cannot be rectified to silence the alarmand extinguish the blue light, turn off the supply isolate switchon the circuit breaker panel.
Under these circumstances, the motor alternator is afailure, the traction motor blowers and resistor blower fanswill not operate.
Notching is only possible in positions 1 to 3 of theaccelerating handle and the locomotive can only be operatedup to full series.
The ammeter readings are to be controlled during notchingin resistance up to a maximum of 400 amps which restrictsoperation to light locomotive running only.
The notching of starting resistances out of circuitmust be completed within sixty (60) seconds to preventoverheating of the resistances without the blower fans.
Should this period be exceeded, then power to thetraction motors is interrupted and cannot be re-applied for aperiod of three minutes. The amber light for failed resistor blowerwill shine and alarm bell will sound.
When operating under these conditions, the followingammeter readings must not be exceeded. 150 amps continuous 230 amps for twenty five (25) minutes 270 amps for fifteen (15) minutesRegenerative brake is inoperative.

- 57 -
POWER FAULT INDICATOR RED LIGHT SHINES
Whenever the line switches open on fault with theaccelerating or regenerative handles in the open position andthe control circuit is complete, the red light will shine andalarm bell will sound.
In addition, upon the line switches opening the motoralternator (MA) set will also stop and therefore the blue lightwill also shine.
The energising of the alarm circuit will cause thelight(s) to shine on the affected unit and the alarm bell tosound on all units due to the following:-
1. Fault in traction circuit. One of the following circuit breakers may be tripped. Train Control, control positive or pilot motor.
2. Overcurrent to traction motors (overload relays tripped 1400 amps).
3. Fault on motor alternator (stopped).
4. Overvoltage relay tripped (2050 volts) applies in either motoring or regeneration.
5. Failure in camshaft control (Pilot motor circuit breaker tripped).
6. High speed circuit breaker tripped.
7. Opening of control governor (Pneumatic control switch).
8. Loss of overhead supply (check line voltmeter. No volt relay may have operated).
9. Resistance overheat detector operated (amber light and bell functions).
10. Polarity detector 10 amp fuse blown when operating in Regenerative braking.
To assist in rectifying the defect, press the fault resetbutton with the accelerating or regenerative brake handle in the"off" position. Should this action fail to correct the fault,the following items of equipment are to be checked:-
(a) Train control, control positive or pilot motor circuit breakers are not tripped.

- 58 -
(b) Brake pipe pressure exceeds 350 kPa to close control governor (Pneumatic control switch).
(c) Resistance overheat device has not functioned which is indicated by the presence of the amber light and bell.
(d) Test and if necessary, renew any one of the three (3) ten amp fuses in the high tension compartment viz:- positive and negative polarity detector and no volt relay fuses.
When the indicator light shines when powering, returnthe accelerating handle to the 'off' position and press thereset button. The indication will be extinguished and bellceases to sound after the motor alternator restarts.
Note: The reset button is not effective when the reverser handle is in 'isolate' or the train control circuit breaker (TCB) or control positive circuit breaker (CPB) is in the 'off' position.
If the alarm bell and indicator light operate againbefore operating the accelerating handle or regenerative handleof the master controller, this indicates a failure of the motoralternator. Isolate the motor alternator.
When a defect is not evident, check line voltmeter isregistering and if so, check the ten (10) amp no volt relayfuse in the high tension compartment and renew if necessary.
If the alarm bell and the indicator light operate againwhen the accelerating handle is open, the unit should be isolated.
Do not reset repeatedly because it may seriously damagethe electrical equipment.
When the alarm operates in regenerative braking returnthe regenerative handle to the 'off' position; if the alarmceases to operate it would indicate the overvoltage relayhad operated.
If the alarm operates repeatedly do not continue to useregenerative braking. Turn off regenerative brake controlbreaker (RCB).
In the event of the indicator light not being extinguishedby returning the regenerative handle to the 'off' positionpress the reset button. If the alarm operates when regenerativebrake is reapplied after resetting do not use regenerative braking.

- 59 -
FAILURE OF ALTERNATING CURRENT (AC) SUPPLY FROM THE MOTORALTERNATOR OR BATTERY CHARGER INOPERATIVE
The alarm circuit will be energised causing the bluelight to shine and alarm bell to sound should the failureoccur on the motor side of the alternator, then the red faultlight will also shine with the accelerating and/or regenerativebrake handle in the 'off' position.
The following items are to be checked:-
1. Line voltage is more than 1100 volts. Note: If the line voltage is less than 1100 volts then the no volt relay will function.
2. Accelerating and regenerative brake handles are in the 'off' position.
3. Press the fault reset button if the red indicator light is shining.
4. Motor alternator (AC) supply circuit breaker is not tripped.
5. Battery charger circuit breaker is not tripped.
6. Supply indicator circuit breaker is not tripped.
When the defect cannot be rectified to silence the alarmand extinguish the blue light, isolate the motor alternator byturning off the supply isolate switch.
Under these conditions, the motor alternator is afailure, the traction motor blowers and starting resistorblower fans will not operate. Notching is only possible inpositions 1 to 3 of the accelerating handle and the locomotivecan only be operated up to full series.
The ammeter readings should be controlled during notchingin resistance to a maximum of 400 amps which will restrictoperation to light locomotive running only.
The notching of starting resistances out of circuit mustbe completed within sixty (60) seconds to prevent overheatingof the resistances without the blower fans.
Should this period be exceeded, then power to the tractionmotors is interrupted and cannot be re-applied for a period ofthree (3) minutes.

- 60 -
In addition, the failed resistor blower fan amber lightwill shine and alarm bell will sound. When operating under theseconditions, the following ammeter readings must not be exceeded.
150 amps continuous 230 amps for twenty five (25) minutes 270 amps for fifteen (15) minutes
Regenerative brake is not available.
FAILED RESISTANCE FAN, TRACTION MOTOR BLOWERS OR RESISTANCETHERMAL DETECTOR OPERATION
The alarm circuit will be energised causing the amberlight to shine and alarm bell to sound.
The following items of equipment are to be checked:-
Ascertain whether traction motor blower or resistanceblower fan is defective.
(a) Check blower control switch on driver's control stand is "ON".
(b) If thermal overheat detector operates. The red light will shine and it will be necessary to press the fault reset button.
(c) Check blower motor control circuit breaker (BMCB) is "ON"
(d) Check traction motor blower circuit breakers are "ON".
(e) Check resistance blower circuit breaker (RBB) are "ON".
NOTE: There is a time delay in blower fans starting up when accelerating handle is opened as previously described.
When the defect cannot be rectified, the locomotive isonly to be operated light in accordance with the following:-
If the resistance fans or traction motor blowers failfor any reason or if the thermal overheat device in the mainresistance boxes operate this alarm will be energised.
A check should be made of the circuit breakers andswitches.
It will be necessary to wait fifteen (15) minutes forthe resistances to cool and for the alarm to be de-energisedshould the alarm operate more than twice in quick succession

- 61 -
and train working conditions are not such as to permit a coolingdown of resistances the unit should be considered a failure andisolated. If train working conditions would permit a coolingdown of resistances e.g. reaching the top of a grade with adownhill or lighter grade continue with operation.
Failure of resistance cooling and/or traction motorblowers the following amperages must not be exceeded. 270 amps - 15 minutes 230 amps - 25 minutes 150 amps - continuous.
WHEEL SLIP/SLIDE LIGHT AND BUZZER FAIL TO OPERATE
Remedy
(a) Check wheel slip circuit breaker on circuit breaker panel is not tripped.
Sanders will not operate
Remedy
(a) Reverser handle correctly positioned for direction.
(b) Control positive (CPB) circuit breaker is not tripped.
(c) Check sander magnet valve isolating cocks on right wall in machine compartment.
Horns will not operate
If main reservoir pressure is available check isolatingcocks for respective cab control.
No. 1 end cab
(a) Isolating cock on bulkhead in machine compartment.
(b) Isolating cock in small compartment adjacent to hotplate.
NOTE: Isolating cock on bulkhead isolates air supply for high tension door interlock, sands No. 1 end, windscreen washer, wipers, refrigerator.
No. 2 end cab
(a) In small compartment adjacent to hotplate check lower
(b) and horn isolating cocks in open position,
NOTE: Lower isolating cock isolates air supply to horns, windscreen washers, windscreen wipers, refrigerator on No. 2 end.

- 62 -
Cab Amenities
Respective circuit breaker turned "ON" on circuitB panel.
PROCEDURE WHEN LOCOMOTIVE WILL NOT MOVE OR LOSES POWER WHENMOTORING OR REGENERATING
If on a steep falling grade bring the train to a standapplying the automatic brakes.
Return the accelerating handle or regenerating handleto the "OFF" position.Check - Overhead current available.(a) Train control circuit breaker is not tripped.(b) Main control circuit breaker is not tripped.(c) Control circuit breaker is not tripped.(d) Pilot motor (CB) is not tripped.(e) Control positive circuit breaker is not tripped.(f) Regenerative control breaker is not tripped.(g) Low control air pressure.(h) Low brake pipe air (control governor (CG)) will open and this in turn will trip the high speed circuit breaker and open the line switches.
If the motor ammeter does not read:-
Check Supply is proved if:- Action if no supply1. Overhead supply
2. Battery supply
3. Control circuit supply
Line voltmeter reads ormotor alternator operatesor compressors operate
Motor alternator operatesor compressors operate orany loco lights operate
Motor alternator operatesor line switches close orindicator lamps light
Ensure pantograph incontact with wire andpantograph isolatingswitches closed. Hightension door interlockis properly locked.
Check battery isolatingswitch is closed andbattery fuses are notdefective.
Check Pilot motor control(PMB) Control circuit (CCB)Control Positive (CPB)Regenerative brake controlRCB1, RCB2.

- 63 -
Amber Resistance Notch Indicating Light
This light is illuminated when any of the locomotivesin multiple are operating with resistances in circuit duringacceleration.
BRAKE CYLINDER PRESSURE BLUE LIGHT
The brake cylinder pressure blue light is provided towarn the Driver should the brakes inadvertently apply on thelocomotive or on any trailing locomotive fitted with thisswitch in a multiple unit consist. The light is normallyextinguished while ever the brakes are released.
When pressure in the brake cylinder rises to 30 kPa,the switch closes and the blue light shines. Upon thepressure falling to 10 kPa, the switch opens, the blue lightis extinguished.
The brake cylinder pressure blue light is train linedthrough the jumper coupling and will shine on all locomotives,when the brakes are applied on one or more of the locomotivesin a multiple unit consist.
Should it be necessary to isolate the air brake onthe No.1 bogie for any reason, the brake cylinder pressurewarning light becomes inoperative.
Brake Cylinder Pressure Blue Light Shines
The blue warning light will shine whenever the brakesare applied and pressure in the brake cylinders exceeds 30 kPa.
Should the blue warning light shine when the locomotive(s)are being operated with the brakes released, immediate actionis to be taken to release the brakes in accordance with currentinstructions.
NOTE: This particularly applies in a multiple unit consist as severe damage can be caused to a trailing locomotive due to the brakes failing to release from a slight overcharge of the brake pipe.
The opening of the following miniature circuit breakersmay cause operating difficulties with no alarms:-
1. Train control circuit breaker (TCB)2. Control circuit breaker (CCB)3. Control positive circuit breaker (CPB)
- 64 -
4. Fault circuit breaker (FB)5. Pilot motor circuit breaker (PMB)6. Regenerative brake circuit control (RCB)7. Wheel slip/slide circuit breaker (WSB)
Control Governor (CG) (Pneumatic Control Switch)
The pneumatic control switch is operated by brake pipepressure opening if brake pipe pressure falls below 250 kPaand closing when pressure is restored to not less than 350 kPa.
When brake pipe pressure falls and the pneumatic controlswitch opens, it in turn trips the high speed circuit breakerand opens the line switches, causing the red fault light toshine and alarm bell to sound.
This condition will continue until the brake pipepressure is restored and control governor closes, with theaccelerating or regenerative handle in the "off" position andthe fault reset button pressed.
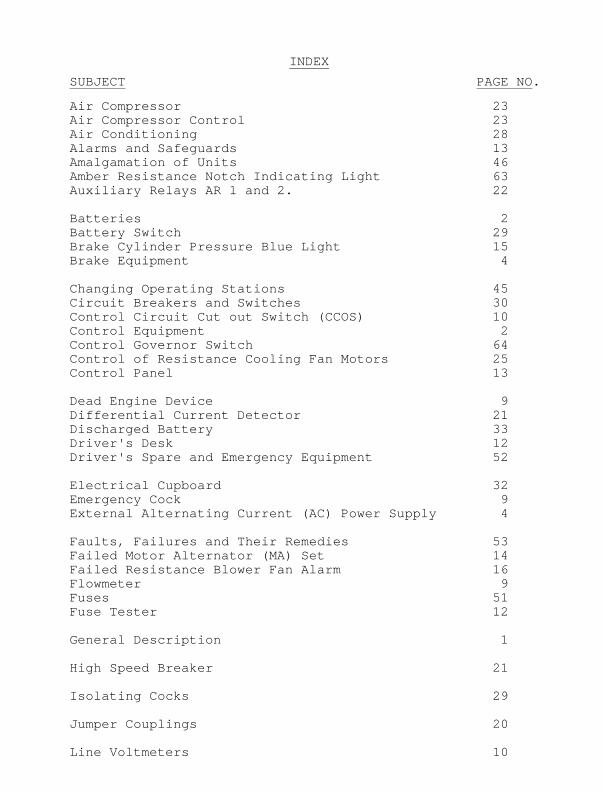
INDEX SUBJECT PAGE NO.
Air Compressor 23 Air Compressor Control 23 Air Conditioning 28 Alarms and Safeguards 13 Amalgamation of Units 46 Amber Resistance Notch Indicating Light 63 Auxiliary Relays AR 1 and 2. 22
Batteries 2 Battery Switch 29 Brake Cylinder Pressure Blue Light 15 Brake Equipment 4
Changing Operating Stations 45 Circuit Breakers and Switches 30 Control Circuit Cut out Switch (CCOS) 10 Control Equipment 2 Control Governor Switch 64 Control of Resistance Cooling Fan Motors 25 Control Panel 13
Dead Engine Device 9 Differential Current Detector 21 Discharged Battery 33 Driver's Desk 12 Driver's Spare and Emergency Equipment 52
Electrical Cupboard 32 Emergency Cock 9 External Alternating Current (AC) Power Supply 4
Faults, Failures and Their Remedies 53 Failed Motor Alternator (MA) Set 14 Failed Resistance Blower Fan Alarm 16 Flowmeter 9 Fuses 51 Fuse Tester 12
General Description 1
High Speed Breaker 21
Isolating Cocks 29
Jumper Couplings 20
Line Voltmeters 10
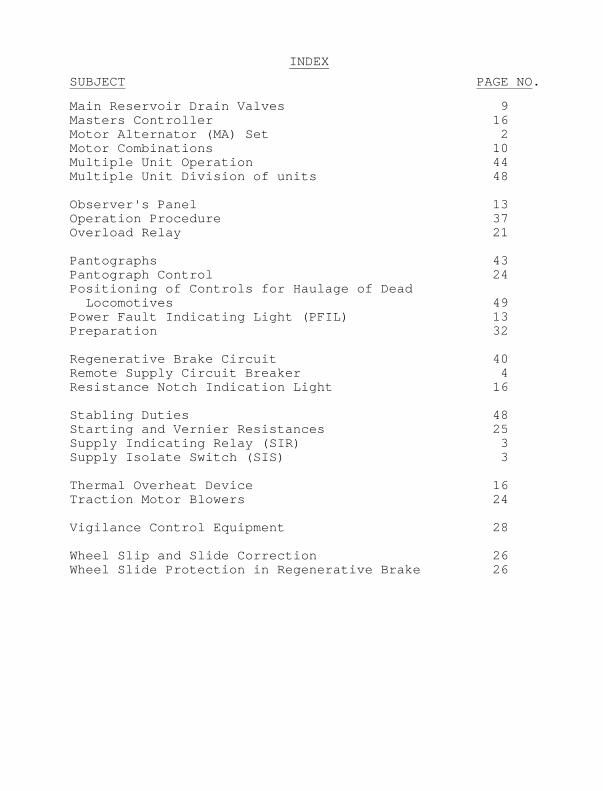
INDEX SUBJECT PAGE NO.
Main Reservoir Drain Valves 9 Masters Controller 16 Motor Alternator (MA) Set 2 Motor Combinations 10 Multiple Unit Operation 44 Multiple Unit Division of units 48
Observer's Panel 13 Operation Procedure 37 Overload Relay 21
Pantographs 43 Pantograph Control 24 Positioning of Controls for Haulage of Dead Locomotives 49 Power Fault Indicating Light (PFIL) 13 Preparation 32
Regenerative Brake Circuit 40 Remote Supply Circuit Breaker 4 Resistance Notch Indication Light 16
Stabling Duties 48 Starting and Vernier Resistances 25 Supply Indicating Relay (SIR) 3 Supply Isolate Switch (SIS) 3
Thermal Overheat Device 16 Traction Motor Blowers 24
Vigilance Control Equipment 28
Wheel Slip and Slide Correction 26 Wheel Slide Protection in Regenerative Brake 26

DEFECTS AND THEIR REMEDIES PAGE NO.
Battery Charger Inoperative 59 Both Compressors Fail or will not Start 63 Brake Cylinder Pressure Blue Light Shines 63
Cab Amenities 62 Cab Refrigerator 27
Demisters 27 Discharged Battery Condition 53
Failed Motor Alternator (MA) Set 55 Failed Resistance Fan, Traction Motor Blowers or Resistance Thermal Operation 60
Horns Will Not Operate 61
Lights Will Not Go On When MA Set Is Not Running 54 Line Voltmeters Do Not Register 54 Locomotive Will Not Move Or Loses Power 54 Loss of Overhead Power 41
Motor Combinations 10
One Compressor Only Fails Or Will Not Start 55
Pantograph Will Not Go Up 54 Power Fault Indicator Red Light Shines 57
Sanders Will Not Operate 61
Wheel Slip/Slide Light and Buzzer Fail to Operate 61