7000 Series
10
7000 Series Sewing & Fashion Section II
Transcript of 7000 Series

7000 Series Sewing & Fashion Section II

Sewing & Fashion
Line Dancing Placemat............................................ I-3Knitwear by Dean Cheek ......................................... I-5Orlando Dugi ........................................................... I-6Monista Arts ............................................................. I-7Yes, You Can Quilt! .................................................. II-8Unlined Jacket Tips ................................................. II-9Seam Pressing Template ......................................... II-10Sheer Jean-eous ..................................................... II-12Destinista Fashions ................................................. II-13Sewing with a Zipper Foot & Double Cording Foot . II-14Guests ..................................................................... II-15
Due to the size of this section, it has been separated into two sections in order for it to be downloaded more quickly. For instance, “Line Dancing Placemat” is in Section I on page 3, whereas “Yes, You Can Quilt!” is in Section II on page 8.
Table of Contents

Each classic design is made without the traditional set-in seams (a.k.a. Y-seams). So the sewing is easy
as shown here.
Strips are cut and sewn together into strip-sets. Shapes are cut from the strip-sets.
The pieces are then arranged and sewn together into the fin-ished quilt
You will learn how to select fabrics to get surprising 3-D designs. Pressing instructions make joining the points easy. Quilting designs are offered for that additional dimension which only quilting can do. All of this provides a successful 3-D quilt project that you can enjoy and be proud of, sharing the results with your family, friends, and fellow quilters.
Choosing Fabric for a 3-D QuiltValue Not Color
The most important quality of fabric when designing for the illusion of depth is value. This term describes the darkness or lightness of a color. Seeing color as value is a skill that can be learned.
There are many methods for analyzing the value of a piece of fabric. Looking through a piece of colored plastic is one technique. But if the plastic is red, it doesn't work well on warm colors, and if the plas-
My favorite words to hear from my students and customers are "I've always wanted to make a tumbling blocks quilt. Now I can!" If you have thought the first, you can say the second. The methods shown throughout this book make 3-D designs as easy as ABC and the step by step instructions give you the ABC's of the process, hence the title of the book. With updated and new combinations of Sara Nephew's Big Book of Building Block Quilts and my Not Your Grandmother's Tumbling Blocks, there is something for everyone.
Yes, You Can Quilt!
tic is green, it doesn't work well on cold colors. You would need to work back and forth with both. Another approach sometimes mentioned is viewing a design through the wrong end of a pair of binoculars. This will reduce the design, which is a helpful technique, sort of like stepping back from a picture. Or some quilters get extra use from their glasses by removing them. But these approaches don't specifically deal with value.
My favorite way to determine value is to squint. This limits the amount of light entering the eye, and then all colors are somewhat reduced to shades of gray. Narrowing the eyes so less light comes in reduces the element of color and increases perception of value. Squinting also allows the comparison of the lightness or darkness of busy or larger prints. The eye mixes the light and dark parts of these prints when we see them from a distance, or in a reduced light. This allows us to compare them, and to judge.
Judging FabricsBegin to compare fabrics by laying one over the other. Choose a fabric you can be sure of, perhaps a definite light. Lay it out flat. Then lay another fabric flat over the first fabric. Unfold it enough to eliminate most thickness, as this can cast a shadow. Also avoid a selvage or a torn edge, as it can be lighter than the rest of the fabric. Are both fabrics light? Is one lighter than the other? When you have as many light fabrics as needed, begin to choose definite dark fabrics. Last
8

of all, choose mediums. Lay a medium fabric across the light fabric and then across the dark fabric. Try to find a medium that is exactly in between the light and the dark value for the strongest 3-D effects.
Special care must be taken with the inherent intensity or warmth of certain colors. Warm colors like yellow, red, some purples, etc., move forward to the eye, and cold colors recede. This affects the 3-D illusion. Con-sider all fabrics as they relate to the other fabrics you are combining them with. A medium blue may look dark next to a medium yellow, and a medium blue may look light next to a medium black print. So don't sort by color AND value (for ex-ample: light, medium, and dark blue, light, medium, and dark yellow, etc.) and then expect to be able to choose ANY light and ANY dark. Would the light green be light next to the medium yellow. You can sort by color and value if you can piece the same way, if you can piece one whole block from light, medium, and dark blue and the next block from light, medium, and dark yellow, etc. [This is used throughout the book for most tumbling blocks designs.]
Fabrics to UseOne hundred percent cotton blouse-weight fab-rics are the best choices for 3-D quilts, as for most quilts that are going to be actually used on a bed, or washed to clean them. Prints can be wonderfully ef-fective in a 3-D pattern, adding texture to the illusion. Almost anything goes.
Small prints and solids are the easiest to work with. Large prints sometimes are more difficult to assign a value to, since cutting may break the pattern into sections that are different values. The safety choice for a large print is a fabric where the foreground of the print is almost the same value as the background (a low-contrast print.) Limiting use of a large print to one value of the design may be wise.
COURTESY.: Marci BakerQuilt with Marci Baker
www.quiltwithMarciBaker.com
Unlined jackets have a soft, easy look but then need careful attention to wear well through the years.
• Provide support where needed. Interface the jacket facings, collars and the jacket front opening areas extending the support and the facings into the shoulders in both the front and the back.• Interface the hems of the jacket body and sleeves as well. Finish the seams neatly in order to take your jacket from functional to fabulous.• French seam - Begin by making a small 1/4” seam on the outside with wrong sides together and press open. Trim the seam to 1/8” then encase the outside seam into an inside seam 3/8” wide. Press to the back.• Hong Kong finished seam - Sew your seam as directed, at least a 5/8” seam. Press the seam open. Pin, then sew a bias strip of lightweight cotton, lining or silk print to the right side seam edge 1/8” from the raw edge. Press the bias seam toward the seam edge, then wrap it to the underside of the seam. After pressingthebindingflatandpinningtheturnededgein place, stitch in the ditch on the outside of the seam catching the raw edge of the bias strip into the stitching.• Rolled edge seam - If you have a serger, and your fabric is medium to lightweight, consider an ex-posed rolled edge seam. Sew your seam on the out-side of the garment with wrong sides together. Press theseamopenfirstandthentoone side. Trim the seam down and then use the rolled edge setting onthe serger to encase the seam in thread. This is a greatseamfinishforfairlystraightseams.Itisveryhard to control on curvy seams. Make sure you make some samples of this seam before using it on a jacket.
COURTESY: Rae CumbieAssn. of Sewing & Design Professionals
www.raecumbie.com
Unlined Jacket Tips
9

The Cathedral Window Block has been around for MANY years and it happens to be one of my favorite blocks. I love everything about it. When I learned how to make this block, our instructor gave us a "pa-per template" which was fine for the first 3 blocks. Then the corners started to wrinkle and I was unable to get nice crisp corners and edges. At this point I became frustrated because this part is the most important part in making this block, and it started to slow me down. It took me 4 hours to make 9 blocks! The wheels in my mind began to spin on how to make this more effective. I needed 'crisp' edges and in a timely manner. I found my solution!! As of 5/16/2012, I have made approximately 360 blocks with one of my templates. I hope you find less frus-tration in using my template over a "paper" template.
PLEASE READ THE FOLLOWING:
1.) The template is a type of plastic product. It is meant for "Seam Pressing ONLY". Do not leave iron setting on the template for long periods of time.2.) Use the "Dry" setting on your iron. (No Steam)3.) After so much use the template will begin to warp. This is normal - it is still going to outlast the paper template that we are all used to using. Give the template a minute to cool down. This will allow the template to flatten itself back out. (I like to make 4 or 5 blocks at a time)4. ) Before using the backside of the template, I would like for you to make sure the ink will not come off once you flip the template over. The ink does not come off on my iron (which happens to be a very inexpensive iron - so I am sure that yours will be fine). Before ironing on the 'back' side of the tem-
Seam Pressing Template
plate, please test on an old scrap of fabric.... Just to be safe.5.) If you are like me... (no patience at all), and decide you want to seam press a lot of blocks in a row before moving to the next step, please know the template will get hot. So, be careful handling the tem-plate when turning it. ALSO, the corners will start to turn up. This is when you can turn the template over and use the other side to help flatten the corners out again. Again, please make sure you test the ink on the back with a piece of scrap fabric to make sure the ink will not come off. It should be just fine.6.) I am constantly holding the template down in place with one hand while I iron. Until you can grasp the technique, the template may slide on you - it would help you if you put masking tape on it or some other type of grip so it will not slide.
Cathedral Throw Quilt Instructions
Fabric needed:(88) - 10" squares of Mixed Dark Fabric(157) - 2 3/4" squares of Mixed Cream Fabric1/4" yard of Dark Fabric for Binding
How to make the Cathedral Window Block:
Take the (88) - 10" x 10" squares of Mixed Dark Fabric, one by one, to create a block. Place the 9" squared template centered on the wrong side of the fabric. Use a dry iron to create a 1/2" crease around the square, starting with the corners. (Corners will be mitred.)
Fold each corner (what I call "dog ear") over the corner of the template and iron the angled crease. Fold the edges over the template and iron, this should create mitred corners. When all four edges are creased, remove the template - switch the iron to steam and press the edges down one more time to get a nice crisp edge.
Take the fabric square and fold in half— lengthwise, press flat. Fold in half again to create a block that is quartered off by creases, press. Your block should now be 1/4 of the size you started with. Unfold the square. Your 9" square should be divided into quarters by the creases you made. Bring one cor-ner to the center of the block. Press the edge of the fold you just made. Repeat with all corners. (Make
10

sure your corners are neat - this will help the overall look of your quilt when completed.) All four corner tips should meet up in the middle of the block. Make your block even smaller yet by taking each corner and folding it to the center again, press. Repeat until all 88 blocks are complete.
Once all of your blocks are complete (you should have (88) 4 1/2" x 4 1/2" window pieces), it is time to start sewing them together.
Lay all of your blocks out on the floor to arrange the color flow of the quilt you would like to have. You will have 8 blocks going across, 11 blocks going down.Take two of the blocks. From each of the two blocks, open up one "triangle end." Align the two triangle ends together (backside of the blocks will be togeth-er) in the crease at the sides - match up the corners as well as you can. Pin in place. Make sure to keep everything as flat as you can. Sew corner to corner. (The points at the top of the triangle, DO NOT need to match up.) Repeat this step until you have all 8 blocks per row completed.
Once you have the rows completed, lay the rows back down. Make sure the triangles are lying back down in place. Start sewing the rows together by sewing the "triangle ends" together the way you sewed the blocks together. I split the rows in half— so I sewed 5 rows together and then did the same for the remaining 6 rows. It helped to keep the bulk of the quilt until the very end.
Once you have the 5 rows completed you will be-gin to connect all four corners down on the inside of each block (all four 'corner tips' should be barely touching each other) by sewing little crosses, at least two stitches in each of the four corners in the middle of the block.
***Do not do this step to the 'End Row.' Keep those blocks open. (You will complete this step when you are ready to attach the top section to the bottom section). Repeat until you have both of the Top and Bottom Rows complete.
Adding the Mixed Cream Centers:Place a Cream Fabric 2 3/4" square on top of a dia-mond shaped window section of your quilt block. Pin in place. (I pin about 4 or 5 at a time. You don't want to pin all of them down or you will get poked a lot when trying to sew them on.) Finger press the edges of the Dark Fabric over the 2 3/4" Cream square to
create a 'curved' look. (You are working with the bias edge, so it will curve easily). Pin each side down as you go. This will "frame" the window.
Stitch the curved frame down very close to the edge, stitch around the complete frame of the window (all 4 sides). When you get to the end of one curve, keep your needle down to turn the fabric around so you can continue to the next curve. At this point, you may use a seam ripper to help tuck the 'cream fabric' in place, so it will not poke out of the corners (This willmake sense when you are actually doing this step). After you have done a couple, you will get the hang of it and probably get to a point where you do not need to use pins for each curve. You will also "curve" all edge blocks that do not have the diamond star within it.
Continue until all of the diamonds are sewn down.Attach the two rows you left open that would be the middle of the quilt, complete all the sewing until you have the quilt complete.
**At this point, I pinned one full row with the cream fabric in place. I sewed only two sides of the window, going all the way down, across the row. When that side of the row was complete, I turned the guilt around to finish the opposite side of the row. It went MUCH faster than trying to sew one diamond in place at a time. This way may go easier for you as well.
Since you are making the back of the quilt as you are working on the top of the quilt, there will be no quilt-ing needed.
Use your Dark Fabric for binding around the edges of the quilt to clean up the edges and complete the quilt.
If you like my designs, I have more on my website www.unseenhands.net
COURTESY: Erica PlankUnseen Hands
www.unseenhands.net
11

For many women the search for that perfect pair of jeans is the Holy Grail of fashion. I can’t share “The Perfect Jean” - because it isn’t the
same for every woman. But I CAN share some con-cepts that can guide each woman to her ideal choice. We’ll look at color, fabric, leg cut and style details.
Color - or “wash” as it’s called when you’re talking about jeans - influences how casual or dressy a pair is, and also how slimming.
The most relaxed look is a slightly faded out and purposely distressed color. The sit-down lines - called whiskering - and the look of wear on the thigh are created by hand-sanding the finished jeans to make them look well-loved.
The darker color of this pair makes it a bit dressier, while
the contrasting topstitching keeps it sportier. The darker wash is also a bit more slim-ming, and see how the hand sanding focuses attention at the center of the leg, while the darker color camou-flages the actual thigh width — sneaky, huh?
This very dark wash is the most slimming, and also on the dressier end of jean styling - sort of a balance be-tween traditional jeans and sporty trousers. Matching navy topstitching - rather than the traditional bronze color - avoids calling at-
Sheer Jean-eoustention to horizontal design details like back yokes and patch pockets. If you like this dark, dark look, plan on washing these jeans inside-out in cool water to minimize fading.
Jeans in colors other than navy are also popular now. If you decide to jump on that trend, choose carefully. Look for slightly muted colors rather than extremely bright ones. And balance that attention-grabbing bot-tom color with a riveting accessory high on your body — a great scarf or necklace, for instance.
Fabric makes a big difference in jeans too. Look for a mix of cotton with about 5% Spandex. That gives the fabric a bit of stretch, so you can wear a youth-ful, body-skimming fit without feeling un-comfortably squeezed into the pants. But don’t imagine that if a little Spandex is good, a lot must be even better. Too much stretch fiber can leave you with pants that grow as you wear them and end up look-ing baggy.
The shape of the leg is also important to jean flattery. Unlike dressier pants that are designed to skim over the body, jeans are designed to fit snug through the thighs and actually hug the back of the leg below the fanny.
From the knee down, jeans can either get narrower or wider. Skinny jeans can be surprisingly flattering. I’ve seen lots of my clients insist they can’t wear skinny jeans ... then do a complete turn-around when they actually try on a pair. And because skinny jeans have to end at the ankle rather than coming down over the foot, you can wear the same pair with both flats and taller heels.
12
Boot-cut jeans - with a flare at the bottom - are widely touted as being the most flat-tering - supposedly because they balance out hip fullness. But take that advice with a grain of salt. If the hem gets very wide it quickly makes legs look shorter, and makes your lower body look 10# heavier in the process..oops! Look for jeans with just the slightest bit of flare so you get the balance without the shortening effect.
One little-discussed but critical design detail can re-ally ramp up the flattery of jeans - the waist cut. The most savvy designer jeans are cut higher in the back and lower in the front. A waistband that hits low in back instantly makes hips look broad. So look for a high cut in back, but a lower cut in front so your torso looks longer. The easiest place for a woman to look taller and trimmer is the space between the bottom of her bra and the top of her waistband.
And having that waistband run diagonally across your body makes the fit a lot easier too. Curvy gals usually have a problem - when the hips fit, the waistband is too big, and gap at the back. And straighter figures have the opposite problem - when the hips fit, the waistband’s too tight. A diagonal band completely avoids the hip:waist ratio problems.
So decide which color, fabric, leg shape and waist-line suit your figure, add a belt with a fun, focal-point buckle to visually whittle your waist ... and wear your jeans with STYLE, regardless of your age or pant size.
COURTESY: Nancy Nix-RiceAuthor & Wardrobe Consultant
www.nancynixrice.com
13
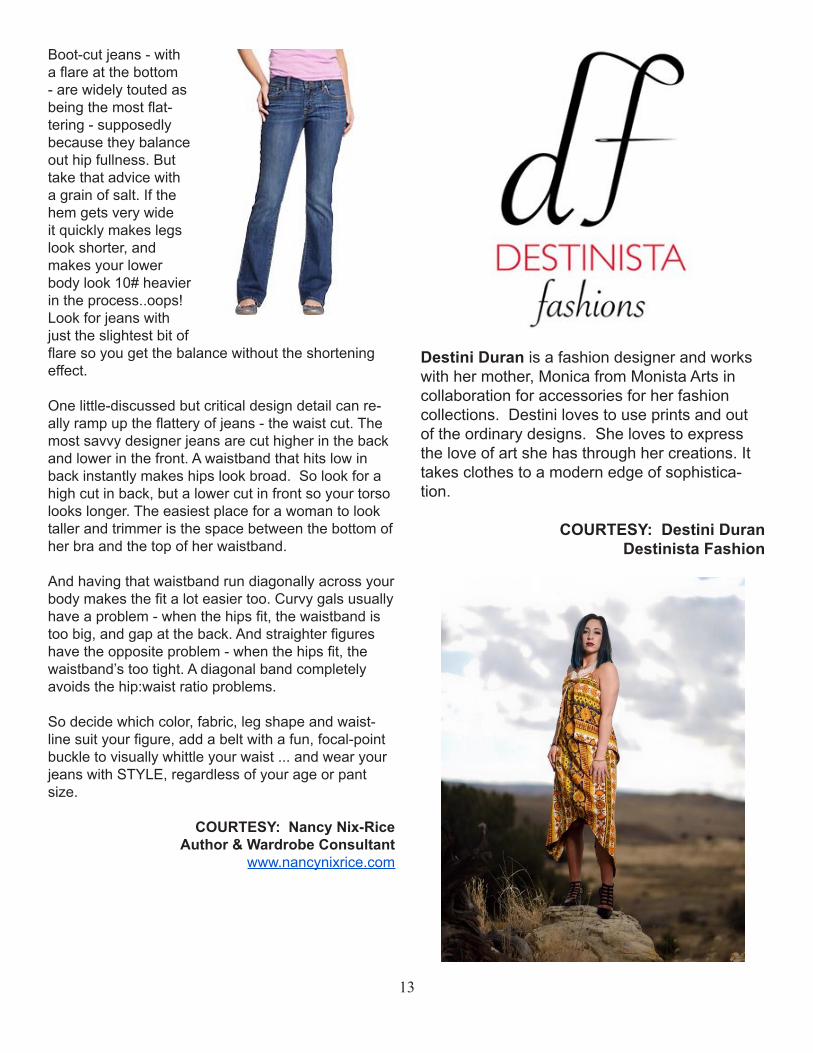
Destini Duran is a fashion designer and works with her mother, Monica from Monista Arts in collaboration for accessories for her fashion collections. Destini loves to use prints and out of the ordinary designs. She loves to express the love of art she has through her creations. It takes clothes to a modern edge of sophistica-tion.
COURTESY: Destini DuranDestinista Fashion

To start, here’s a look at the whole pillow, plus a detail shot showing the trims and stitching. I used the Double Cording Foot #59 or #60 and Zipper Foot with Guide #14.
You might have noticed the shiny “mini-piping” next to some of the trims. For this I used heavy upholstery zip-pers and stitched them in place with the Zipper Foot with Guide #14. See how nicely the guide holds the zipper teeth in place, mak-ing it easy to stitch a straight line?
I used the Zipper Foot with Guide #14 once again for stitching the heavy braided trim over the zipper tape. This time place the foot so that the needle will land between the braided edge and the
X design in the center. Then I aligned the guide with the “ditch” between the two cords along the edge of the trim. The result – nearly invisible stitching. Next – two strands of cord held in place by Double Cord Foot #60, stitched togeth-er and to the base at the same time with a zigzag stitch.
I like to add cording to my pillow edges. Not only does it create a nicely-finished edge, but it makes it easier to turn the pillow right side out neatly. Mak-
14
ing covered cord is easy – just wrap filler cord in a strip of bias-cut fabric, place it under one side of Double Cording Foot #60, and stitch – the needle stitches right at the base of the cord. (Using giant cord? Leather Roller Foot #55 is super for over-size piping.)
Tip: When stitch-ing around corners, round them slightly and clip the flange/tape to allow it to bend around the curve.
Nearly finished! With the front and buttoned-together backs right sides togeth-er, with the wrong side of the pillow front showing on top, I stitched right over the previous stitch-ing using Zipper Foot #4 with the needle position moved all the way to the left. (With lighter-weight fabrics and trims I could have used Double Cording Foot #60 again, but these layers were just too bulky for that.) Before cutting away the excess fabric, I zigzagged around all four side of the pillow. I could have done this afterward, but it’s easier to manage all those un-even layers before they’re trimmed.
COURTESY: Jo Leichte& Kerri Forrest
Bernina Sewing Co.www.bernina.com
Sewing with a Zipper Foot and Double-Cording Foot

Sewing & Fashion GuestsMarci BakerAlicia’s Attic, Inc.204 N. Link Ln. #7Fort Collins, CO [email protected]
Dean CheekD C Knits2837 Hwy. 14Madrid, NM [email protected]
Rae CumbieAssn. of Sewing & Design Prof.507 Anneslie Rd.Baltimore MD [email protected]
Orlando DugiDesigner3600 Cerrillos Road, Unit 401-ASanta Fe, NM [email protected]
Patty DunnAll Dunn Designs4910 Oakmont Dr.Corpus Christi, TX [email protected]
Destini DuranDestinista FashionP O Box 307Espanola, NM [email protected]
15
Monica DuranMonista Arts & DesignsP O Box 307Espanola, NM 87532505-927-6229/[email protected]
Kerri ForrestThe Sewing Basket (Bernina)1605 N. Prince St.Clovis, NM [email protected]://www.thesewingbasket.comwww.bernina.com
Nancy Nix-RiceWardrobe Consultant & Author#10 BirnawoodsSt. Louis, MO 63132314-803-4445 (cell)[email protected]
Erica PlankUnseen HandsP O Box 732028Puyallup, WA [email protected]
Clare RowleyCreative Feet LLCP O Box 26282Prescott Valley, AZ 86312928-775-3484 or [email protected]