65-0156 - C7024E,F 24 Vdc Solid State Purple Peper ...
16
PRODUCT DATA 65-0156-3 fi U.S. Registered Trademark Copyright ' 2004 Honeywell International Inc. All Rights Reserved C7024E,F 24 Vdc Solid State Purple Peeperfi Ultraviolet Flame Detectors APPLICATION The C7204E,F 24 Vdc Flame Detectors are solid-state electronic devices for sensing the ultraviolet radiation emitted by the combustion of most carbon containing fuels such as natural gas, LP gases, and oil. FEATURES C7024E,F: Solid-state electronic circuitry provides low power consumption and high reliability. Detectors can be mounted horizontally, vertically or at any angle in between. The self-checking models require faceplate alignment and have integral locating reference points to assure proper operation of the shutter mechanism. Ultraviolet radiation sensing tube and quartz viewing window are field replaceable. Threaded conduit fitting and color-coded lead-wires allow rapid electrical installation. Two flame detectors can be wired in parallel to reduce nuisance shutdowns in difficult flame sighting applications. A swivel mount is available to facilitate flame sighting. -40 F (-40 C) rating. Incorporates UV sensor tube checking feature used with Honeywell dynamic self-check R7824C Flame Signal Amplifiers. Oscillating shutter interrupts ultraviolet radiation reaching UV sensor 12 times per minute to provide the UV sensor checking function. Amplifier circuitry components are checked from the microprocessor in the RM7824. C7024E: Housing meets NEMA 4 enclosure standards (indoor, outdoor protection: rain-tight, dust-tight, hose directed water). Protective heat block built into the mounting flange. High pressure (50 psi [345 kPa]) quartz viewing window, focusing lens and antivibration mounting accessories available. C7024F: Housing designed to be explosion-proof and Underwriters Laboratories Inc. Component Recognized for use in hazardous locations: Class 1, groups C and D, and Class 2, groups E, F and G. Viewing window rated for 100 psi (690 kPa). C7024E C7024F Contents Application ........................................................................ 1 Features ........................................................................... 1 Specifications ................................................................... 2 Ordering Information ........................................................ 2 Installation ........................................................................ 3 Wiring ............................................................................... 8 Adjustments and Checkout .............................................. 8 Troubleshooting ................................................................ 10 Service ............................................................................. 11
Transcript of 65-0156 - C7024E,F 24 Vdc Solid State Purple Peper ...

PRODUCT DATA
65-0156-3
® U.S. Registered TrademarkCopyright © 2004 Honeywell International Inc. All Rights Reserved
C7024E,F 24 VdcSolid State Purple Peeper®Ultraviolet Flame Detectors
APPLICATION The C7204E,F 24 Vdc Flame Detectors are solid-state electronic devices for sensing the ultraviolet radiation emitted by the combustion of most carbon containing fuels such as natural gas, LP gases, and oil.
FEATURESC7024E,F:
� Solid-state electronic circuitry provides low power consumption and high reliability.
� Detectors can be mounted horizontally, vertically or at any angle in between. The self-checking models require faceplate alignment and have integral locating reference points to assure proper operation of the shutter mechanism.
� Ultraviolet radiation sensing tube and quartz viewing window are field replaceable.
� Threaded conduit fitting and color-coded lead-wires allow rapid electrical installation.
� Two flame detectors can be wired in parallel to reduce nuisance shutdowns in difficult flame sighting applications.
� A swivel mount is available to facilitate flame sighting.� -40° F (-40° C) rating.� Incorporates UV sensor tube checking feature used
with Honeywell dynamic self-check R7824C Flame Signal Amplifiers.
� Oscillating shutter interrupts ultraviolet radiation reaching UV sensor 12 times per minute to provide the UV sensor checking function. Amplifier circuitry components are checked from the microprocessor in the RM7824.
C7024E:
� Housing meets NEMA 4 enclosure standards (indoor, outdoor protection: rain-tight, dust-tight, hose directed water).
� Protective heat block built into the mounting flange.� High pressure (50 psi [345 kPa]) quartz viewing
window, focusing lens and antivibration mounting accessories available.
C7024F:
� Housing designed to be explosion-proof and Underwriters Laboratories Inc. Component Recognized for use in hazardous locations: Class 1, groups C and D, and Class 2, groups E, F and G.
� Viewing window rated for 100 psi (690 kPa).
C7024E
C7024F
ContentsApplication ........................................................................ 1Features ........................................................................... 1Specifications ................................................................... 2Ordering Information ........................................................ 2Installation ........................................................................ 3Wiring ............................................................................... 8Adjustments and Checkout .............................................. 8Troubleshooting ................................................................ 10Service ............................................................................. 11

C7024E,F 24 VDC SOLID STATE PURPLE PEEPER® ULTRAVIOLET FLAME DETECTORS
65-0156�3 2
ORDERING INFORMATIONWhen purchasing replacement and modernization products from your TRADELINE® wholesaler or distributor, refer to the TRADELINE® Catalog or price sheets for complete ordering number.
If you have additional questions, need further information, or would like to comment on our products or services, please write or phone:
1. Your local Honeywell Automation and Control Products Sales Office (check white pages of your phone directory).2. Honeywell Customer Care
1885 Douglas Drive NorthMinneapolis, Minnesota 55422-4386
In Canada�Honeywell Limited/Honeywell Limitée, 35 Dynamic Drive, Scarborough, Ontario M1V 4Z9.International Sales and Service Offices in all principal cities of the world. Manufacturing in Australia, Canada, Finland, France, Germany, Japan, Mexico, Netherlands, Spain, Taiwan, United Kingdom, U.S.A.
SPECIFICATIONSIMPORTANT:
The specifications in this publication do not include normal manufacturing tolerances. Therefore, this unit may not exactly match the listed specifications. This product is tested and calibrated under closely controlled conditions, and minor differences in performance can be expected if these conditions are changed.
Models:C7024E Self-Checking Solid State Purple Peeper Ultraviolet
Flame Detector: For use with R7824C Dynamic Self-Check Amplifiers.
C7024F Self-Checking Solid State Purple Peeper Ultraviolet Flame Detector: Same as C7024E except with explosion-proof housing for use in hazardous locations.
Electrical Ratings:Voltage: 24 Vdc.Power Consumption: 7.8 watts maximum.
Ambient Temperature Ratings (outside the case): C7024E,F: -20° F to +175° F (-29° C to +79° C).
Storage Temperature Ratings: -60° F to +175° F (-51° C to +79° C).
Housing:C7024E: Violet, cast aluminum cover; mounting flange with
heat block and faceplate are separate to provide heat insulation and sealoff. Meets NEMA 4 enclosure requirements (indoor, outdoor protection; rain-tight, dust-tight, hose-directed water). Optional water jacket available for the C7024E.
C7024F: Explosion-proof, two-piece, violet, cast aluminum.
Pressure Rating of Quartz Viewing Window:C7024E: 20 psi ([138 kPa). Focusing lens (20 psi [138 kPa]
rating) or high pressure viewing window (50 psi [345 kPa] rating) available; see Accessories.
C7024F: 100 psi (690 Kpa).
Mounting: C7024E: Mounting flange with 3/4 inch NPT internal threads for attachment to sight pipe.
Wiring Connections: NEC Class 1 color-coded lead-wires, 8 feet (2.4 meters) long.
Number of Leadwires: Six.Threaded Leadwire Opening in Faceplate:
C7024E: 1/2-14 NPSM or 7/8-20 UNSM internal threads for attaching conduit.
C7024F: 1/2-14 NPT internal threads for attaching pipe.
Dimensions: See Figs. 1 and 2.
Weight:C7024E: Approximately 4.25 pounds (1.9 kg).C7024F: Approximately 14.5 pounds (6.6 kg).
Serviceability C7024E and F: Field replaceable viewing windows and ultraviolet sensing tube, self-checking coil and shutter assembly.
Approvals:Underwriters Laboratories Inc. Component Recognized:C7024E: File no. MP268. C7024F: For use in hazardous locations; Class 1, Groups C
and D; Class 2, Groups E, F and G; File no. E34649.Canadian Standards Association Certified: File no.
LR95329-3.
Replacement Parts:C7024E,F:
191286 Ultraviolet Sensing Tube for -40° F (-40° C) operation.
190971G Coil and Shutter Assembly, 24 Vdc.C7024E:
114372 Quartz Viewing Window; rated for 20 psi (138 kPa).114465 Gasket, silicone rubber; for installing viewing
window (three required).120739 Gasket, fiber-neoprene; heat insulation and sealoff
for mounting flange.C7024F:
122037 Quartz Viewing Window, rated for 100 psi (690 kPa).
Accessories:C7024E,F:
W136A Test Meter (includes 196146 Meter Connector Plug).
118367A Swivel Mount.C7024E:
122748 Quartz Viewing Window, rated for 50 psi (345 kPa).

C7024E,F 24 VDC SOLID STATE PURPLE PEEPER® ULTRAVIOLET FLAME DETECTORS
3 65-0156�3
124204 Quartz Focusing Lens, rated for 20 psi (138 kPa); for increasing the ultraviolet radiation sensed by the detector.
120934 Mounting Flange, aluminum, with 3/4 inch NPT internal threads for attaching to sight pipe.
123539 Antivibration Mount.190105 Water Jacket.
C7024F: 118369 Bushing: Galvanized iron, with 3/4 inch NPT
internal threads on one end and 1 inch NPT external threads on the other end. For adapting a detector with 1 inch NPT internal threads (for mounting) to a 3/4 inch sight pipe, or to the pipe nipple and tee for connecting an air supply.
Fig. 1. Dimensions of C7024E in in. (mm).
Fig. 2. Dimensions of C7024F in in. [mm).
INSTALLATION
When Installing This Product�1. Read these instructions carefully. Failure to follow them
could damage the product or cause a hazardous condition.
2. Check the ratings given in the instructions and on the product to make sure the product is suitable for your application.
3. Installer must be a trained, experienced flame safeguard service technician.
4. After installation is complete, check out product operation as provided in these instructions.
CAUTIONEquipment Damage Hazard.Failure of sensing tube can cause improper operation.Ultraviolet sensing tubes have a life expectancy of 40,000 hours of continuous use within ambient temperature and voltage ratings. Worn-out ultraviolet sensing tubes result in failure of the sensing tube to properly discriminate between flame conditions.
Appliances with burners that remain on continuously for 24 hours or longer should use the C7024E,F Flame Detectors and the R7824C Amplifier with their associated controls.
WARNINGElectrical Shock Hazard.Can cause severe injury, death or property damage.1. Disconnect power supply before beginning
installation to prevent electrical shock and equipment damage. More than one disconnect may be involved.
2. Do not connect detectors to non-Honeywell manufactured controls (primaries, programmers, multiburner systems, and burner management systems). Unsafe conditions could result.
3. All wiring must be NEC Class 1 (Line Voltage).4. Assure voltage of the power supply connected to
this detector agrees with the values marked on the detector.
5. Sight the detector so it will not respond to the ignition spark.
6. On multiburner installations, assure each detector responds only to the flame produced by the burner it is supervising.
IMPORTANT: Do not connect more than two C7024 Flame Detectors in parallel.
Proper flame detector installation is the basis of a safe and reliable flame safeguard installation. Refer to the burner manufacturer instructions and to those included here. Carefully follow instructions to make the best possible flame detection application.
Basic RequirementsThe combustion flames of most carbon-based fuels emit sufficient ultraviolet radiation to enable the C7024 Solid State Purple Peeper Ultraviolet Flame Detector to prove flame presence in a combustion chamber. The detector is mounted outside the combustion chamber. Its mounting flange or union is threaded to one end of a sight pipe inserted through the wall of the combustion chamber. The ultraviolet sensing tube in the flame detector sights the flame through the pipe.
When a flame is present, the UV tube in the C7024 senses the ultraviolet radiation emitted. The C7024 produces a signal that is sent to the amplifier in the flame safeguard control. The amplified signal pulls in the flame relay in the control to allow proper operation of the system.
MOUNTING FLANGE
1/2- 14 NPSM
LEADWIRESFACEPLATE
3/4-14 NPT
M1962C
3-3/4
(95)
7-7/32
(183)
5-1/8 (130)
3-7/16
(87)
5-1/4 (133)
C7012A,C,E,F
M 1 9 6 3
FACEPLATE
PIPE
UNION
8
(203)
DIA.
1/2-14 NPT
LEADWIRES
9 (229)
2
(51)
5
(127)
1-11 1/2 NPT
2-1/16
(52)
1-
1/2
(38)
5/16-18 UNC-2B BY
7/16 (11) DEEP
MOUNTING HOLES (2)
2 (51)
1 (25)
3 (76)

C7024E,F 24 VDC SOLID STATE PURPLE PEEPER® ULTRAVIOLET FLAME DETECTORS
65-0156�3 4
Because it is necessary for the UV sensing tube to actually see the flame, it is best to locate the detector as close to the flame as physical arrangement, temperature, and other restrictions permit. These restrictions are described in detail in the following paragraphs.
Determine the LocationBefore beginning the actual installation, determine the best location for mounting the detector. Carefully consider the factors discussed in this section before deciding on the location.
TemperatureInstall the C7024 where the ambient temperature (outside the case) will stay within the ambient operating temperature ratings.
To keep the C7024 below its maximum rating, it may be necessary to add additional insulation between the wall of the combustion chamber and the flame detector. A shield or screen can be added to reflect radiated heat away from the detector. If the detector continues to get too hot, cooling is necessary. Refer to the Sight Pipe Ventilation section. Part number 190105 Water Jacket is also available for cooling the C7024E Flame Detector.
VibrationIf the C7024 is subject to excessive vibration, a special antivibration mount, part number 123539, can be used for the C7024E. If you use this mount, install it before positioning and sighting the detector.
ClearanceMake sure there is enough room to easily mount the sight pipe, detector, and all the required fittings, and to remove the detector for troubleshooting and service.
Radiation Sources (Other Than Flame)Examples of radiation sources (other than flame) that could actuate the detection system:
1. Ultraviolet sources: a. Hot refractory above 2300° F (1260° C).b. Spark:
(1) Ignition transformers.(2) Welding arcs.(3) Lightning.
c. Welding flames.d. Bright incandescent or fluorescent artificial light.e. Solar radiation.f. Gas lasers.g. Sun lamps.h. Germicidal lamps.i. Bright flashlight held close to the sensing tube.
2. Gamma ray and X-ray sources:a. Diffraction analyzers.b. Electron microscopes.c. Radiographic X-ray machines.d. High voltage vacuum switches.e. High voltage condensers.f. High voltage coronas.
g. Radioisotopes.Except under unusual circumstances, none of these sources (except hot refractory and ignition spark) would be present in or near the combustion chamber.
The detector may respond to hot refractory above 2300° F (1260° C) if the refractory surface represents a significant percentage of the detector field of view. If the temperature of the hot refractory causes the flame relay (in the flame safeguard control) to pull in, re-aim the sight pipe so the detector views a cooler area of the refractory.
Ignition spark is an intense source of ultraviolet radiation. When installing the detector, make sure it does not respond to ignition spark.
Single Burner RequirementsThe detector must have an unobstructed view of a steady part of the flame it is supervising. This requires a proper sighting angle and minimized ultraviolet radiation attenuation effects. When supervising only one burner, sighting requirements are simplified.
Sighting Angle (See Fig. 3)The first 30 percent of a flame nearest the burner nozzle (flame root) emits the most ultraviolet energy. Also, if the detector sights the flame at an angle instead of perpendicularly, it views more flame depth. Therefore, the best sighting angle is nearly parallel to the axis of the flame, permitting the detector to view a large portion of the first 30 percent of the flame nearest to the burner nozzle, as illustrated in Fig. 3.
Fig. 3. Detector sighting angle.
Low angle sighting permits the detector to view a greater depth of flame, thus reducing the effects of instabilities in the flame pattern. Also, the environment near the burner nozzle is usually cleaner than at any other part of the combustion chamber. This provides a clearer line of sight and may keep the viewing window cleaner, reducing the maintenance required.
NOTE: When possible, it is desirable to tilt downward the detector and sighting pipe to prevent buildup of soot in the pipe or on the viewing window.
DETECTOR IN GOOD
SIGHTING POSITION
(LOW ANGLE SIGHTING) FLAME DEPTH-
ANGLE VIEW
BURNER
NOZZLE
DETECTOR IN POOR
SIGHTING POSITION
FLAME DEPTH-
PERPENDICULAR VIEW
UNBURNED FUEL
M1956

C7024E,F 24 VDC SOLID STATE PURPLE PEEPER® ULTRAVIOLET FLAME DETECTORS
5 65-0156�3
In most installations, the detector will need to respond to pilot flame alone, then the pilot and main burner flame together, and finally the main burner flame alone. The detector must meet all sighting requirements that apply:
Pilot flame alone�the smallest pilot flame that can be detected must be capable of reliably igniting the main burner.
Pilot and main burner flame together�the detector must sight the junction of both flames.
Main burner flame alone�the detector must sight the most stable part of the flame for all firing rates.
Parallel Flame DetectorsShifting flame patterns, commonly encountered on burners with high turndown ratios, may require two parallel detectors to prove the flame at the highest and lowest firing rates and for the modulation in between. In this case, one detector supervises the pilot (interrupted) and both detectors supervise the main burner flame. During the main burner run period, either detector is capable of maintaining system operation. A maximum of two C7024 Detectors can be connected in parallel.
In addition to assuring more reliable flame detection, parallel detectors facilitate maintenance during burner operation. Each detector can be removed, in turn, without shutting down the supervised burner. However, a flame simulating failure occurring in the flame signal amplifier or in either detector will cause a shutdown.
Screening EffectsSmoke, oil, mist, dirt and dust are masking agents that attenuate the ultraviolet radiation emitted by the flame. If they absorb too much radiation, the amount of ultraviolet radiation reaching the detector is reduced. The flame signal then can become too low to hold in the flame relay, resulting in burner shutdown.
The problem can be eliminated by diluting the contaminants. A strong flow of air through the sight pipe will clear a viewing path through the attenuating material. Refer to Sight Pipe Ventilation section.
It is also desirable to sight the detector at an area containing fewer masking agents such as near the burner nozzle or near the entrance of the combustion air. Increasing the viewing area of the detector by shortening the sight pipe or by increasing the diameter of the sight pipe also reduces the attenuating effects of masking agents.
Multiburner Requirements (Flame Discrimination)In addition to meeting the requirements for a single burner, a multiburner installation requires discrimination between flames. Flame discrimination can be defined as locating all flame detectors so that each detector responds only to the flame produced by the burner it is supervising.
In multiple burner systems, not every detector can be positioned so its line-of-sight does not intercept flames from other burners. For example, this situation occurs in front-fired boiler-furnaces having more than one row of burners, or in multilevel opposed-fired furnaces where the burners face each other.
When planning such an installation, locate each flame detector so that it has the best possible view of the first 30 percent nearest the burner nozzle (flame root) it is supervising, and the worst possible view of all other flames.
Fig. 4 illustrates a critical detector application problem that requires flame discrimination. Flame discrimination is accomplished for Detector A by repositioning it until the flame relay (in the flame safeguard control) does not respond to Flame B. Note that Detector A is aimed at the first 30 percent of Flame A where the ultraviolet radiation is most intense. It sights the tip of Flame B, but is not aimed at the first 30 percent of Flame B where UV is intense. Detector A is repositioned to assure maximum response to Flame A while rejecting Flame B. Similarly, Detector B is positioned to assure maximum response to Flame B while rejecting Flame A.
If you reposition a detector and still cannot achieve flame discrimination, try reducing the viewing area by increasing the length or decreasing the diameter of the sight pipe, or adding an orifice plate.
Fig. 4. Example of flame discrimination problem (opposed burners).
Install the Sight Pipe (See Fig. 5)After you have determined the location and sighting angle, select the sight pipe. A black iron pipe with a minimum diameter of 1-1/2 in. [38.1 mm] is recommended. Do not use stainless steel or galvanized pipe because they reflect ultraviolet radiation internally and complicate aiming the pipe.
DETECTOR A FLAME A FLAME B DETECTOR B
M1957

C7024E,F 24 VDC SOLID STATE PURPLE PEEPER® ULTRAVIOLET FLAME DETECTORS
65-0156�3 6
Fig. 5. Typical mounting of C7024.
Sight pipes with diameters 2 to 3 in.(51 to 76 mm) produce better results for horizontal rotary burners, which require wide viewing angles. A wide viewing angle can also be obtained by using a short sight pipe.
Prepare Hole in Wall of Combustion ChamberAt the selected location, cut or drill a hole the proper diameter for the sight pipe into the wall of the combustion chamber. Flare the hole to leave room for small adjustments of the sighting angle. The taper of the hole should be about 1 in. for every 3 in. (25 mm for every 76 mm) of wall thickness.
Mount Sighting PipeThread one end of the pipe to fit the mounting flange, union, or required coupling. Cut the pipe to the desired length (as short as practicable) and at an angle so it fits flush with the wall of the combustion chamber. Tack weld the pipe to the wall in a trial position. Do not weld the sighting pipe permanently in place until after completing the Adjustments and Checkout section.
NOTE: If you use part no. 118367A Swivel Mount and you are positive about the location and sighting angle, permanently weld the pipe.
Install FittingsIn some cases, the sight pipe will not directly fit the C7024 Mounting Flange or union. Also, it may be desirable or necessary to vent the sight pipe. You may also want to use a swivel mount or an antivibration mount. Each of these cases may require additional fittings.
ReducerFor sight pipes of larger diameter than the mounting flange connector or union, install a reducer as illustrated in Fig. 5. The reducer will require a close nipple with these external threads:
C7024E: 3/4 in. NPT.
C7024F: 1 in. NPT.
Sight Pipe VentilationIt may be necessary to ventilate the sight pipe to cool the detector or to clear a viewing path through UV radiation attenuating material.
For a negative pressure combustion chamber, drilling a few holes in the section of the sight pipe outside the combustion chamber will allow air at atmospheric pressure to flow through the sight pipe into the chamber. A perforated pipe nipple between the sight pipe and the detector can also be used.
For a positive pressure combustion chamber, connect a supply of pressurized air from the burner blower to flow supply through the sight pipe into the chamber. The air pressure must be greater than the chamber pressure.
Swivel MountTo facilitate proper flame sighting, part no. 118367A Swivel Mount is available. The swivel mount will require a reducer of the proper size to mount it onto the sight pipe. It will also require a one-inch close nipple for mounting to a C7024 with a one-inch connector. For mounting details for the 118367A Swivel Mount, refer to form 60-0361.
Antivibration Mount (C7024E)The detector will withstand normal burner vibration. If the vibration is excessive, part no. 123539 Antivibration Mount is available for the C7024E. (For mounting details, see form 60-0361.) If you use this mount, install it before positioning and sighting the detector.
Mount the DetectorMount the detector on the sight pipe, reducer, or other fitting (see Figs. 6 to 9).
The C7024E,F Self-Checking Flame Detectors incorporate an oscillating shutter mechanism and therefore require special consideration for mounting positions other than vertically sighting downward or upward as illustrated in Fig. 6.
Fig. 6. Vertical Mounting of C7024E,F Detectors.
1
CLOSE NIPPLE
(3/4 in. FOR
A C7024E; 1 in.
FOR A C7024F.
TEMPORARY
TACK WELD
COMBUSTION
CHAMBER WALL
REDUCER
BLACK IRON SIGHT
PIPE (1-1/2 TO 3 in.
[38 TO 76 mm] DIA.)
REFRACTORY
FLARED
HOLE
1 IF VENTILATION OF THE SIGHTING PIPE IS REQUIRED, ADD PIPE
TEE, PERFORATED NIPPLE, OR OTHER SUITABLE DEVICE
FOR VENTILATION. M1958A
COMBUSTION
CHAMBER WALL
M1964A
BURNER
C7024E, F SIGHTING
VERTICALLY DOWNWARD
C7024E, F SIGHTING
VERTICALLY UPWARD

C7024E,F 24 VDC SOLID STATE PURPLE PEEPER® ULTRAVIOLET FLAME DETECTORS
7 65-0156�3
The C7024E has notch and arrow indicators (see Fig. 7) on the faceplate to facilitate mounting in positions other than those shown in Fig. 6. The notch and arrow must be vertically aligned with the notch in the up position and the arrow pointing downward. The C7024F must be mounted with the conduit opening located approximately 45 degrees below the horizontal (see Fig. 7).
IMPORTANT: The notch and arrow on the C7024E faceplate must be aligned in a vertical plane with the notch up and the arrow pointing downward.
The C7024F housing must be mounted with the conduit opening approximately 45° below horizontal (see Fig. 7).
Fig. 7. C7024E,F mounting positions.
To mount a C7024E (see Fig. 8):
1. The mounting flange is in two pieces. Loosen, but do not remove, the three screws holding the flange together.
2. Slightly rotate the detector so the slots in the back section of the mounting flange clear the screws in the front section, then separate the two sections.
3. Screw the front section of the mounting flange onto the sight pipe, reducer, or other fitting.
Fig. 8. Mounting C7024E Detector.
4. Fit the slots in the back section of the mounting flange (with the detector) over the three screws in the front section, and rotate the detector so that the screws hold the flange together.
5. Securely tighten the screws.To mount a C7024F with explosion-proof housing (see Fig. 9):
1. Unscrew the collar on the pipe union and remove the coupling section. The collar and coupling are in two pieces; do not separate them.
2. Screw the coupling onto the sight pipe, reducer, or other fitting.
3. Mount the rest of the pipe union (with the detector) on the coupling and securely tighten the collar.
Fig. 9. Mounting C7024F Detector.
M1965A
C7024E, F MAY BE MOUNTEDHORIZONTAL, VERTICAL, ORAT ANY ANGLE IN BETWEEN
HORIZONTZALPLANE
VERTICALPLANE
90
90
1
1
1
NOTCH IN FACEPLATEMUST BE UP
HORIZONTZALPLANE
NOTCH AND ARROWMUST ALWAYS BEALIGNED IN AVERTICAL PLANE
C7024E OR FMUST NOT BE ROTATEDAROUND ITS AXIS
ARROW ON FACEPLATEMUST BE POINTING DOWNWARD
45
C7024F CONDUITOPENING POSITION
ADE IN U.S.A.
MOUNT WITHARROW DOWN
1 NOTE DOWNWARD POSITIONING OF CONDUIT OPENING.
COVER
M1959A
ROTATE DETECTOR THIS
WAY WHEN MOUNTING
ROTATE
DETECTOR
THIS WAY TO
SEPARATE
MOUNTING
FLANGE
CAPTIVE COVER
SCREW (4)
FACEPLATE
BACK SECTION OF
MOUNTING FLANGE
NOTCH IN FACEPLATE
(C7024E ONLY)
120934 (3/4 INCH NPT)
FRONT SECTION OF
MOUNTING FLANGE
SCREW ONTO
SIGHT
PIPE
SLOT (3)
FLANGE
SCREWS (3)
SCREW COUPLING
ONTO SIGHT PIPE
PIPE
UNION
COLLAR
HOLE
KEYED
TO PIN
ON BODY
FLANGE
BODY FLANGE
HEX-HEAD
COVER BOLT (6)
COVER
M1955

C7024E,F 24 VDC SOLID STATE PURPLE PEEPER® ULTRAVIOLET FLAME DETECTORS
65-0156�3 8
WIRING
CAUTIONEquipment Damage Hazard.Improper wiring can permanently damage the Flame Amplifier.When using a C7024E or F with a R7824C Dynamic Self-Check Amplifier, be careful not to short the white shutter leadwires together (by wiring incorrectly, leaving an incorrect jumper wire, or stripping the insulation so far that the bare leadwires can touch). If the shutter leadwires are shorted during the operation, the amplifier will be permanently damaged and be nonoperative.
1. All wiring must comply with applicable local electrical codes, ordinances and regulations. Use NEC Class 1 wiring.
2. Keep the flame signal leadwires as short as possible from the flame detector to the terminal strip or wiring subbase. Capacitance increases with leadwire length, reducing the signal strength. The maximum permissible leadwire length depends on the type of leadwire and conduit type and diameter. The ultimate limiting factor in flame signal leadwire length is the signal current. Refer to Table 1.
3. The detector has color-coded plastic-insulated no. 18 leadwires, 8 ft [2.4m] long, rated for 221° F [105° C]. Run these wires in a conduit.
4. If the leadwires are not long enough to reach the terminal strip or wiring subbase, make the required splices in a junction box.
5. If splicing is necessary, use moisture-resistant no. 14 wire suitable for at least 167° F [75° C] if the detector is used with a flame safeguard primary control, or at least 194° F [90° C] if used with a flame safeguard programming control.
6. For high temperature installations, use Honeywell specification no. R1298020 or equivalent for the �F� leadwire, which is rated up to 400° F [204° C] for continuous duty and tested for operation up to 600 volts and for breakdown up to 7500 volts. For the other leadwire, use moisture-resistant no. 14 wire selected for a temperature rating above the maximum operating temperature.
7. Refer to Fig. 10 for wiring connections.
Fig. 10. Wiring diagram for C7024E,F Detectors with RM7824 Flame Safeguard controls with shutter drive
circuitry.
IMPORTANT: Do not run the flame detector wiring in the same conduit with high voltage ignition transformer wires.
Connecting the Detectors in ParallelFor a flame that is difficult to sight, using two parallel C7024 Flame Detectors reduces nuisance shutdowns. If only one of the parallel detectors loses the flame signal, the other will indicate the presence of the flame and will keep the burner running. If two parallel C7024E or F Detectors (with self-checking shutters) are used, a flame-simulating failure in either detector will cause the burner to shut down. Two C7024E or F Detectors may be connected in parallel to the same terminal on 24 Vdc flame safeguard controls. To avoid exceeding the rating of the solid-state shutter switch in the R7824C Flame Signal Amplifier, do not connect more than two C7024E or F Detectors in parallel.
IMPORTANTVoltage rating of the C7024 must match the power supply of the flame safeguard control.
ADJUSTMENTS AND CHECKOUT
UV Sensor Tube TestFor initial burner lightoff, consult the burner manufacturer instructions or the instructions for the flame safeguard control.
WHITE
YELLOW
WHITE
M9370
F
G
22
L2
3
L2
4
5
C7024E, F
3
FLAME SAFEGUARDCONTROLTERMINAL STRIP
1 A R7824C DYNAMIC SELF-CHECK AMPLIFIER MUST BE USED WITH A RM7824 FLAME SAFEGUARD CONTROL INCORPORATING THE SHUTTER DRIVE CIRCUIT.
VOLTAGE AND FREQUENCY RATING OF THE C7024E, F MUST MATCH THE POWER SUPPLY OF THE FLAME SAFEGUARD CONTROL.
TWO C7024E, F DETECTORS MAY BE CONNECTED IN PARALLEL TO THE SAME TERMINALS ON 24 Vdc CONTROLS ONLY.
THE ADDITIONAL YELLOW/GREEN LEADWIRE IS ONLY ON CERTAIN C7024E MODELS THAT MEET BGC OR DIN REQUIREMENTS; CONNECT YELLOW/GREEN WIRE TO SEPARATE GROUND TERMINAL ON THE WIRING SUBBASE.
( ) IDENTIFICATION LABEL ON LEADWIRE.
2
3
4
5
1
2
BLUE
RED
BLACK
(S)
(L2)
(+)
(-)
YELLOW/GREEN

C7024E,F 24 VDC SOLID STATE PURPLE PEEPER® ULTRAVIOLET FLAME DETECTORS
9 65-0156�3
If the system does not start during the initial burner lightoff, check the UV sensor tube in the flame detector. If a reddish glow appears when there is no flame present, replace the UV sensing tube. When performing this test, make sure there are no extraneous sources of ultraviolet radiation in the test area. See Radiation Sources section.
Adjust Detector SightingWith the flame detector installed and the burner running, adjust the detector sighting position for optimum flame signal.
Most existing Honeywell Flame Safeguard Controls incorporate a flame current jack on the control flame amplifier or on the control itself. Measure the flame signal with an volt/ohm meter (see Fig. 11) such as the Honeywell W136A Volt meter.
The R7824C Amplifier used with the RM7824 Flame Safeguard Control has a dc voltage flame signal output. For the R7824C Amplifier, an ohm/volt meter with a minimum sensitivity of 20,000 ohms per volt with a zero to five or ten Vdc scale is recommended. Measure the flame signal as illustrated in Fig. 11. Be careful to make the proper connections of the positive (red) meter lead to positive (+) control jack and negative (black) meter lead to negative (-) or common (COM) jack with the R7824C Amplifier. If the RM7824 Control has the Keyboard Display Module (KDM), a zero to five Vdc voltage will be displayed on the module.
Fig. 11. Measuring voltage flame signal with 7800 SERIES controls.
NOTES:
1. For a C7024E or F, the shutter operation causes fluctuations in the current reading. Read the average stable current, disregarding the peaks.
2. The flame signal must be steady (or stable as described in note 1).
Move the detector and sight pipe around to sight the flame from various positions and angles. Try to get a maximum steady (or stable) reading on the meter. The signal must be above the minimum acceptable current listed in Table 1.
Measure the flame signal for the pilot alone, the main burner flame alone, and both together unless monitoring only the pilot flame when using an intermittent pilot, or only the main burner flame when using direct spark ignition. With the detector in its final position, all required flame signals must be steady (or stable) and as specified in Table 1. If you cannot obtain the proper signal, refer to the Troubleshooting section.
Pilot Turndown TestIf the detector is used to prove a pilot flame before the main fuel valve(s) can be opened, perform a Pilot Turndown Test before welding the sight pipe into position. Follow the procedures in the Flame Safeguard Control instructions and in the burner manufacturer instructions.
Ultraviolet Response TestIgnition Spark Response TestTest to make certain the ignition spark is not actuating the flame relay in the flame safeguard control:
1. Close the pilot and main burner manual shutoff valves.2. Start the burner and run through the ignition period.
Ignition spark should occur, but flame relay must not pull in. The flame signal should not be greater than 0.25 Vdc for RM7824 control.
3. If the flame relay does pull in, reposition the detector farther from the spark, or relocate/resight the detector to eliminate/reduce the detector response to reflected UV radiation. It may be necessary to construct a barrier to block the ignition spark from the detector view. Continue adjustments until the flame signal due to ignition spark is less than the flame signal value indicated in step 2 above.
NEGATIVE (-)
METER LEAD
POSITIVE (+)
METER LEAD ONE MEGOHM/VOLT
MINIMUM INPUT
IMPEDANCE
METER
M6818

C7024E,F 24 VDC SOLID STATE PURPLE PEEPER® ULTRAVIOLET FLAME DETECTORS
65-0156�3 10
Table 1. Flame Signal.
a Shutter operation of the C7024E,F causes fluctuations in the readings. Read the average stable current or voltage disregarding the peaks.
b This minimum or greater signal should be obtained if the detector is correctly installed and positioned to properly sense flame. This current or voltage must be obtained before completing the checkout.
Response to Other Ultraviolet Radiation SourcesSome sources of artificial light produce small amounts of ultraviolet radiation. Under certain conditions, an ultraviolet detector will respond to them as if it is sensing a flame. Do not use an artificial light source to check the response of an ultraviolet flame detector. To check for proper detector operation, conduct Flame Failure Response Tests under all operating conditions.
Weld the Sight PipeWhen all adjustments have been made and the flame signal is acceptable, remove the detector and weld the sight pipe in its final position. (If you are using a swivel mount, the pipe may already be welded.) Then reinstall the detector.
Final CheckoutBefore putting the burner into service, check out the installation using the checkout procedures for the appropriate Flame Safeguard control. After completing the checkout, run the burner through at least one complete cycle to verify correct operation.
IMPORTANTDo not put the system into operation until all checkout tests in the instructions for the appropriate flame safeguard control, and any others specified in the burner installation instructions, are completed satisfactorily.
TROUBLESHOOTING
WARNINGElectrical Shock Hazard.Can cause severe injury, death or property damage.1. Be extremely careful when troubleshooting the
detector; voltages are preset on some of the terminals when power is on.
2. Open the master switch to disconnect power before removing or installing the detector or its cover. More than one disconnect may be involved.
Equipment RequiredFor 7800 SERIES Controls, an ohm/volt meter with a minimum sensitivity of 20,000 ohms/volt and a zero to five or ten Vdc scale is suggested. When the Keyboard Display Module is included with the control, flame signal will be displayed on the module.
For replacement parts, see the Specifications section.
UV Sensor Tube TestSee Adjustments and Checkout section.
Unsatisfactory Flame SignalIf a satisfactory flame signal (see Table 1) cannot be obtained while adjusting the sighting position of the detector, follow these procedures. If you encounter other problems in the system, refer to the Troubleshooting section in the instructions for the appropriate flame safeguard control.
NOTE: For instructions for replacing the viewing window, sensing tube, and coil and shutter assembly, see the Service section.
Troubleshooting ProceduresFirst perform the Preliminary Inspection, then follow the applicable procedures for either a low reading or a zero reading on the meter. After reinstalling the detector or replacing its cover, recheck the meter reading. Adjust the position of the detector to try to obtain the proper flame signal. If you complete all of the procedures and still can-not obtain a proper flame signal, replace the detector.
Preliminary Inspection1. Check for 24 Vdc input voltage. Make sure the master
switch is closed, connections are correct and power supply voltage is correct.
2. Check the detector wiring for defects:a. Incorrect connections.b. Wrong type or size of wire.c. Deteriorated wire.d. Open circuits.e. Short circuits.
3. With the burner running, check the temperature at the detector. If it exceeds 175° F (79° C):a. Add additional insulation between the wall of the
combustion chamber and the detector.b. Add a shield or screen to reflect radiated heat away
from the detector, orc. Add cooling (refer to Sight Pipe Ventilation and
Accessories sections).
Flame DetectorPlug-in Flame Signal
AmplifierFlame Safeguard
ControlMiminuma Acceptable Steadyn Voltage (Vdc)
Maximum Expected Voltage (Vdc)
C7024E,Fa R7824C Dynamic Self-Check
RM7824 1.25b 5.0
C7024E,F 24 VDC SOLID STATE PURPLE PEEPER® ULTRAVIOLET FLAME DETECTORS
11 65-0156�3
Removing the Detector from the Sight PipeC7024E (see Fig. 8): Loosen the three screws holding the mounting flange together; slightly rotate the detector so that the screws clear the slots in the back section of the flange; separate the flange; and pull off the back section (with the UV sensor).
C7024F (see Fig. 9): Unscrew the collar from the pipe union and remove the detector.
NOTE: The detector will be free as soon as the collar is unscrewed�do not drop it.
Procedure for a Zero Meter Reading:1. Replace the plug-in amplifier. Then recheck the flame
signal.2. Replace the ultraviolet sensing tube (see Service
section). Then recheck the flame signal.3. For a C7024E or F, replace the coil and shutter
assembly (see Service section). Then recheck the flame signal.
4. If you still cannot obtain a meter reading, replace the detector.
IMPORTANT At the completion of troubleshooting, be sure to perform the procedures in the Adjustments and Checkout section.
SERVICE
WARNINGElectrical Shock Hazard.Can cause severe injury, death or property damage.Open the master switch to disconnect power before removing or installing the detector or its cover. More than one disconnect may be involved.
Periodic Maintenance1. Clear the viewing window (or focusing lens) when nec-
essary. Remove the detector (see Troubleshooting sec-tion) and use a clean cloth placed over the eraser end of a pencil. You do not have to remove the window (or lens) to clean it. If it is broken or damaged, or if it is coated with a substance that cannot be cleaned, replace it (see Fig. 14).
2. Keep the flame detection system adjusted for the smoothest, most reliable operation recommended by the burner manufacturer.
3. Replace the sensing tube, coil and shutter assembly, or viewing window only when necessary to obtain proper operation.
Removing the Detector Cover
WARNINGElectrical Shock Hazard.Can cause severe injury, death or property damage.Open the master switch to disconnect power before removing or installing the detector or its cover. More than one disconnect may be involved.
C7024E: Unscrew the four captive cover screws (see Fig. 8) and carefully slide off the cover.
C7024F: Unscrew the six hex-head cover bolts (see Fig. 9) and carefully pull off the cover.
NOTE: These bolts are removable. Put them in a safe place to avoid losing them.
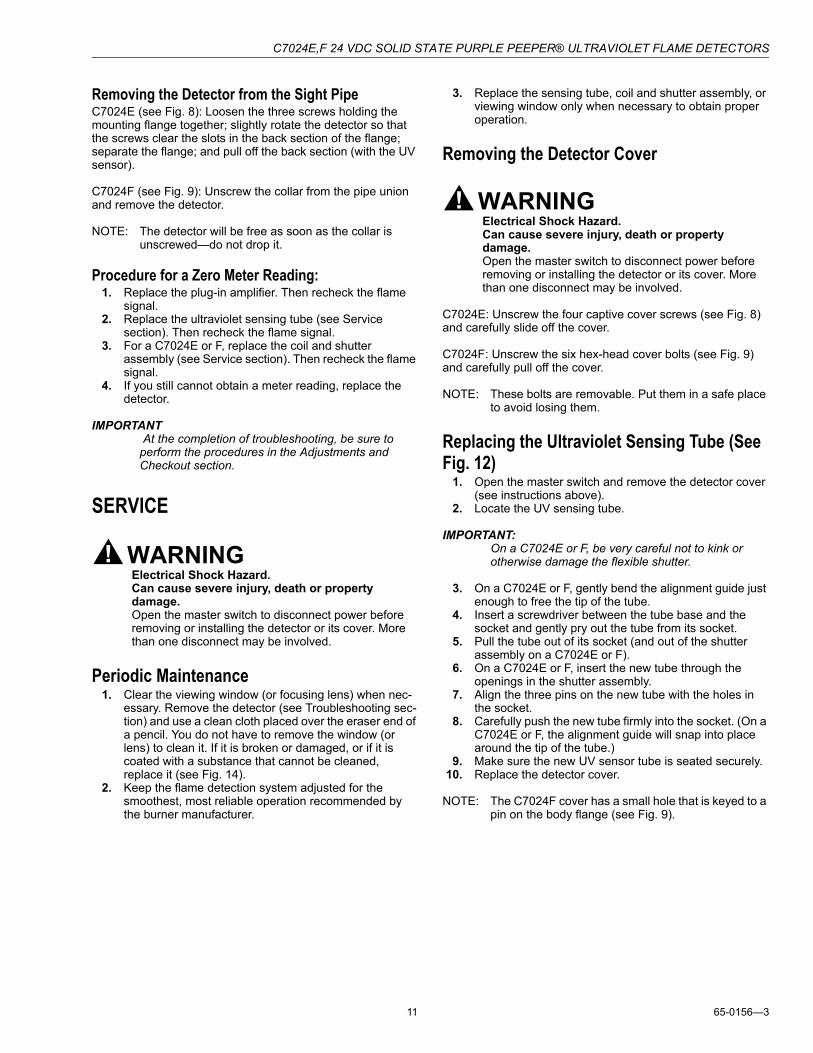
Replacing the Ultraviolet Sensing Tube (See Fig. 12)
1. Open the master switch and remove the detector cover (see instructions above).
2. Locate the UV sensing tube.
IMPORTANT: On a C7024E or F, be very careful not to kink or otherwise damage the flexible shutter.
3. On a C7024E or F, gently bend the alignment guide just enough to free the tip of the tube.
4. Insert a screwdriver between the tube base and the socket and gently pry out the tube from its socket.
5. Pull the tube out of its socket (and out of the shutter assembly on a C7024E or F).
6. On a C7024E or F, insert the new tube through the openings in the shutter assembly.
7. Align the three pins on the new tube with the holes in the socket.
8. Carefully push the new tube firmly into the socket. (On a C7024E or F, the alignment guide will snap into place around the tip of the tube.)
9. Make sure the new UV sensor tube is seated securely.10. Replace the detector cover.
NOTE: The C7024F cover has a small hole that is keyed to a pin on the body flange (see Fig. 9).
C7024E,F 24 VDC SOLID STATE PURPLE PEEPER® ULTRAVIOLET FLAME DETECTORS
65-0156�3 12
Fig. 12. Replacing ultraviolet radiation sensing tube.
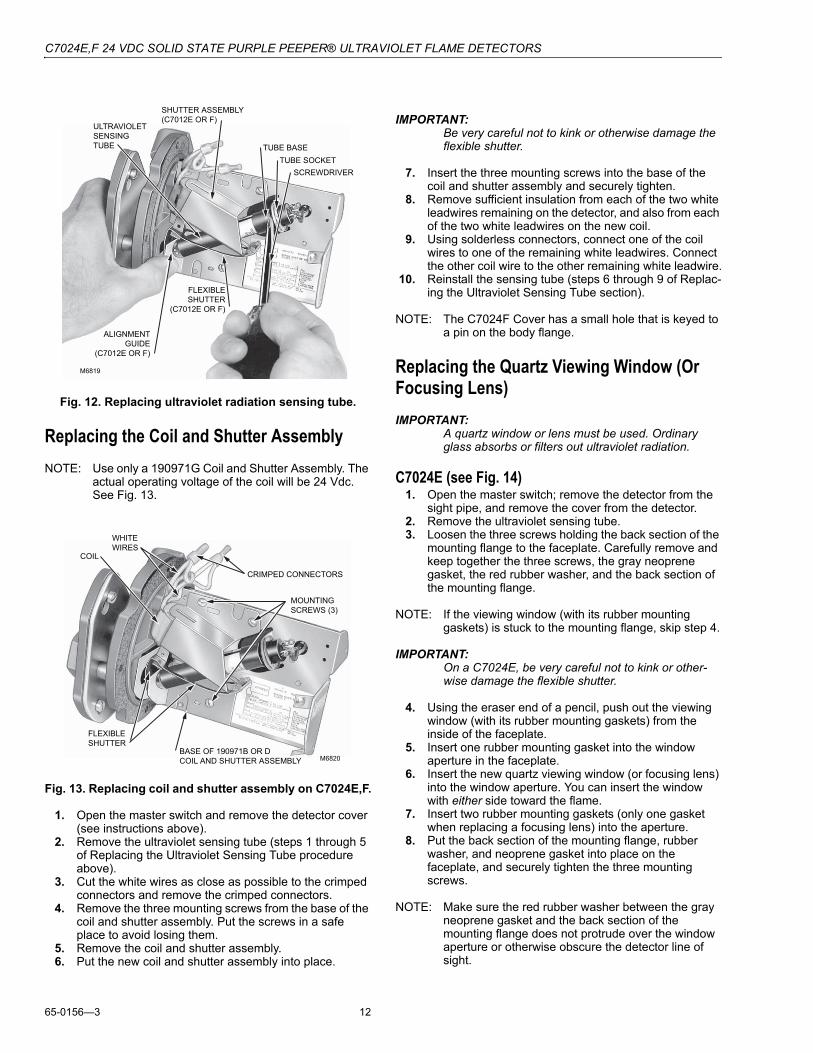
Replacing the Coil and Shutter AssemblyNOTE: Use only a 190971G Coil and Shutter Assembly. The
actual operating voltage of the coil will be 24 Vdc. See Fig. 13.
Fig. 13. Replacing coil and shutter assembly on C7024E,F.
1. Open the master switch and remove the detector cover (see instructions above).
2. Remove the ultraviolet sensing tube (steps 1 through 5 of Replacing the Ultraviolet Sensing Tube procedure above).
3. Cut the white wires as close as possible to the crimped connectors and remove the crimped connectors.
4. Remove the three mounting screws from the base of the coil and shutter assembly. Put the screws in a safe place to avoid losing them.
5. Remove the coil and shutter assembly.6. Put the new coil and shutter assembly into place.
IMPORTANT: Be very careful not to kink or otherwise damage the flexible shutter.
7. Insert the three mounting screws into the base of the coil and shutter assembly and securely tighten.
8. Remove sufficient insulation from each of the two white leadwires remaining on the detector, and also from each of the two white leadwires on the new coil.
9. Using solderless connectors, connect one of the coil wires to one of the remaining white leadwires. Connect the other coil wire to the other remaining white leadwire.
10. Reinstall the sensing tube (steps 6 through 9 of Replac-ing the Ultraviolet Sensing Tube section).
NOTE: The C7024F Cover has a small hole that is keyed to a pin on the body flange.
Replacing the Quartz Viewing Window (Or Focusing Lens)IMPORTANT:
A quartz window or lens must be used. Ordinary glass absorbs or filters out ultraviolet radiation.
C7024E (see Fig. 14)1. Open the master switch; remove the detector from the
sight pipe, and remove the cover from the detector.2. Remove the ultraviolet sensing tube.3. Loosen the three screws holding the back section of the
mounting flange to the faceplate. Carefully remove and keep together the three screws, the gray neoprene gasket, the red rubber washer, and the back section of the mounting flange.
NOTE: If the viewing window (with its rubber mounting gaskets) is stuck to the mounting flange, skip step 4.
IMPORTANT: On a C7024E, be very careful not to kink or other-wise damage the flexible shutter.
4. Using the eraser end of a pencil, push out the viewing window (with its rubber mounting gaskets) from the inside of the faceplate.
5. Insert one rubber mounting gasket into the window aperture in the faceplate.
6. Insert the new quartz viewing window (or focusing lens) into the window aperture. You can insert the window with either side toward the flame.
7. Insert two rubber mounting gaskets (only one gasket when replacing a focusing lens) into the aperture.
8. Put the back section of the mounting flange, rubber washer, and neoprene gasket into place on the faceplate, and securely tighten the three mounting screws.
NOTE: Make sure the red rubber washer between the gray neoprene gasket and the back section of the mounting flange does not protrude over the window aperture or otherwise obscure the detector line of sight.
ULTRAVIOLET
SENSING
TUBE
SHUTTER ASSEMBLY
(C7012E OR F)
TUBE BASE
TUBE SOCKET
SCREWDRIVER
ALIGNMENT
GUIDE
(C7012E OR F)
FLEXIBLE
SHUTTER
(C7012E OR F)
M6819
COIL
WHITE
WIRES
CRIMPED CONNECTORS
MOUNTING
SCREWS (3)
FLEXIBLE
SHUTTERBASE OF 190971B OR D
COIL AND SHUTTER ASSEMBLY M6820

C7024E,F 24 VDC SOLID STATE PURPLE PEEPER® ULTRAVIOLET FLAME DETECTORS
13 65-0156�3
9. Clean both sides of the viewing window (or focusing lens) with a clean cloth placed over the eraser end of a pencil.
10. Reinstall the sensing tube.11. Replace the detector cover and reinstall the detector on
the sight pipe.
Fig. 14. Replacing quarts viewing window or focusing lens on C7024E.
C7024F (See Fig. 15)1. 1. Open the master switch and remove the detector
from the sight pipe.2. 2. Unscrew the four hex-head bolts holding the seal-off
flange to the faceplate and remove the flange. To avoid losing the bolts, put them in a safe place.
3. 3. Unscrew the retaining ring (with its rubber O-ring seal) from the seal-off flange.
4. 4. Tip the flange and let the viewing window fall out into your hand.
5. 5. Insert either side of the new 122037 Quartz Viewing Window into the window aperture.
6. 6. Screw the retaining ring (with its O-ring seal) into the seal-off flange and securely tighten.
7. 8. Put the seal-off flange back into place on the faceplate and securely tighten the four hex-head bolts. 7. Clean both sides of the viewing window with a clean cloth placed over the eraser end of a pencil.
8. 9. Reinstall the detector on the sight pipe.
Fig. 15. Replacing quartz viewing window on C7024F.
PENCIL
1 VIEWING WINDOW CAN BE REPLACED WITH EITHER SIDE TOWARD
THE FLAME.
ONLY ONE GASKET ON EACH SIDE OF THE FOCUSING LENS.
ON A C7024, REMOVE THE THREE MOUNTING SCREWS AND MOVE THE
COIL AND SHUTTER ASSEMBLY OUT OF THE WAY TO PUSH OUT THE
VIEWING WINDOW.
3
114372 (20 PSI) OR 122748 (50 PSI)
QUARTZ VIEWING WINDOW (OR 124204
QUARTZ FOCUSING LENS, 20 PSI)
FACEPLATE
1
2
RED RUBBER WASHER
(BETWEEN
GASKET AND
FLANGE)
114465 RUBBER
MOUNTING
GASKETS (3)
WINDOW
APERTURE
BACK SECTION OF
MOUNTING FLANGE
120739 FIBER-NEOPRENE GASKETMOUNTING
SCREWS (3)
2
3
M1961A
HEX-HEAD BOLT (4)
SEAL-OFF FLANGE
FACEPLATE
WINDOW
APERTURE
122037 QUARTZ
VIEWING WINDOW (100 PSI)
RETAINING RING
SEAL (RUBBER O-RING)
RETAINING RING
BODYM1960

65-0156�3

15 65-0156�3

65-0156�3 G.R. Rev. 02-04 www.honeywell.com
Automation and Control SolutionsHoneywell International Inc. Honeywell Limited-Honeywell Limitée1985 Douglas Drive North 35 Dynamic DriveGolden Valley, MN 55422 Scarborough, Ontario
M1V 4Z9