6406453 - Atlas Resell Management T2 and T3 Own… · Operating Instructions / XY turbine / 01 for...
62
qN L qO L qP ÜáÖÜëéÉÉÇ Ü~åÇéáÉÅÉ båÖäáëÜ léÉê~íáåÖ fåëíêìÅíáçåë Ñçê páêçå~I h~sçI tCeI kph j~ÅÜiáíÉ ~åÇ kph naJg ÅçååÉÅíáçå pk [ SMM MMM Operating Instructions / XY turbine / 01 for Sirona, KaVo, W&H, Bien-Air, NSK MachLite, and NSK QD-J connection / 14 for Sirona and KaVo connection / 16 for Sirona, KaVo, W&H, and NSK MachLite connection 6406453.book Seite 1 Freitag, 1. März 2013 11:53 11
Transcript of 6406453 - Atlas Resell Management T2 and T3 Own… · Operating Instructions / XY turbine / 01 for...

qN=L=qO=L=qP=ÜáÖÜëéÉÉÇ=Ü~åÇéáÉÅÉ
båÖäáëÜ
léÉê~íáåÖ=fåëíêìÅíáçåë
Ñçê=páêçå~I=h~sçI=tCeI=kph=j~ÅÜiáíÉ=~åÇ=kph=naJg=ÅçååÉÅíáçå
pk=[=SMM=MMM
Operating Instructions / XY turbine / 01 for Sirona, KaVo, W&H, Bien-Air, NSK MachLite, and NSK QD-J connection / 14 for Sirona and KaVo connection / 16 for Sirona, KaVo, W&H, and NSK MachLite connection
6406453.book Seite 1 Freitag, 1. März 2013 11:53 11

6406453.book Seite 2 Freitag, 1. März 2013 11:53 11

Operating Instructions T1 / T2 / T3 highspeed handpiece
64 06 453 D3596.201.01.01.02 3
Table of Contents1 Before you begin … ........................................................................................ 6
1.1 Structure of the document ............................................................................................. 71.2 Service life of Sirona instruments.................................................................................. 10
2 Safety information........................................................................................... 113 Technical description ...................................................................................... 14
3.1 Task............................................................................................................................... 143.2 Structure of T1 turbine................................................................................................... 153.3 Structure of T2 / T3 turbines.......................................................................................... 163.4 Technical data ............................................................................................................... 173.5 Turbine connection types available ............................................................................... 21
4 Preparation ..................................................................................................... 234.1 Initial start-up and longer breaks in use ........................................................................ 23
6406453.book Seite 3 Freitag, 1. März 2013 11:53 11

Operating Instructions T1 / T2 / T3 highspeed handpiece
4 64 06 453 D3596.201.01.01.02
4.2 Prior to starting the work day......................................................................................... 234.3 Before each patient ....................................................................................................... 24
5 Operation ........................................................................................................ 255.1 Connecting the Sirona quick coupling to the supply hose............................................. 265.2 Replacing the turbine .................................................................................................... 275.3 Inserting and removing burr instruments....................................................................... 305.4 Adjusting the cooling spray ........................................................................................... 31
6 Follow-up ........................................................................................................ 336.1 After each treatment session......................................................................................... 336.2 At the end of the work day............................................................................................. 33
7 Care and maintenance ................................................................................... 347.1 Spraying the mechanical parts ...................................................................................... 347.2 Care of the push button chuck ...................................................................................... 367.3 Cleaning the light guide surface .................................................................................... 38
6406453.book Seite 4 Freitag, 1. März 2013 11:53 11

Operating Instructions T1 / T2 / T3 highspeed handpiece
64 06 453 D3596.201.01.01.02 5
7.4 Manually cleaning and disinfecting the surface............................................................. 387.5 Manually cleaning and disinfecting the spray channels ................................................ 407.6 Automated cleaning and disinfecting ............................................................................ 417.7 Sterilization instructions................................................................................................. 437.8 Cleaning the cooling spray nozzles............................................................................... 457.9 Testing the FG clamping system................................................................................... 457.10 Servicing Sirona quick coupling .................................................................................... 477.11 Replacing the halogen lamp in the handpiece .............................................................. 52
8 Spare parts and consumables ........................................................................ 569 Storage and transport conditions.................................................................... 6010 Disposal .......................................................................................................... 61
6406453.book Seite 5 Freitag, 1. März 2013 11:53 11

1 Before you begin … Operating Instructions T1 / T2 / T3 highspeed handpiece
6 64 06 453 D3596.201.01.01.02
1 Before you begin …Before you begin …Intended use TurbineThe T1 / T2 / T3 turbine is used to treat dental disease and injuries. Rotating_without bonesThe treatment involves the rotary processing of hard and soft tooth substance and dental prostheses (crowns, fillings, bridges, etc.).Complies with state-of-the-art technology + current standards for turbinesThe T1 / T2 / T3 turbine corresponds with the provisions of state-of-the-art technology. TheT1 / T2 / T3 turbine complies with the ISO 14457 and ISO 9168 standards.Read/note _ turbine1. Read the operating instructions before using the T1 / T2 / T3 turbine.2. Use the T1 / T2 / T3 turbine only for the purposes described in the
operating instructions.3. Follow the hygiene regulations, work safety regulations, and
accident prevention measures that apply to the T1 / T2 / T3 turbine.Target group Trained dental personnelThis product is intended for use only by trained dental personnel in
dental practices and laboratories.
6406453.book Seite 6 Freitag, 1. März 2013 11:53 11

Operating Instructions T1 / T2 / T3 highspeed handpiece 1 Before you begin …
64 06 453 D3596.201.01.01.02 7
Scope of validityScope of validity of operating instructions TurbineThese operating instructions are applicable for the following turbines:SN 600 000 and higher● T1 / T2 / T3 Serial number 600 000 and higher
1.1 Structure of the documentStructure of the document
1.1.1 Labeling of informationLabeling of information
Warnings ➢ To prevent any personal injury, please observe all warnings.Warnings are labeled as follows:
DANGER! indicates a hazard that will lead to death or serious injury if not avoided.
WARNING! indicates a hazard that can lead to death or serious injury if not avoided.
CAUTION! indicates a hazard that can lead to injury if not avoided.Instructions for use ➢ To prevent material damage and additional expenses, please
observe all instructions for use.
6406453.book Seite 7 Freitag, 1. März 2013 11:53 11

1 Before you begin … Operating Instructions T1 / T2 / T3 highspeed handpiece
8 64 06 453 D3596.201.01.01.02
Instructions for use can be identified as follows:NOTICE! indicates measures for preventing material damage. IMPORTANT: indicates important information and information on avoiding additional expenses.Tip: indicates information on facilitating work.
6406453.book Seite 8 Freitag, 1. März 2013 11:53 11

Operating Instructions T1 / T2 / T3 highspeed handpiece 1 Before you begin …
64 06 453 D3596.201.01.01.02 9
1.1.2 Formats and symbolsFormats and symbols
The formats and symbols used in this document have the following meaning:
✔ Prerequisite1. First action step2. Second action stepor
➢ Alternative action Result
Requests you to do something.
Use of formats and symbols [ → 9].
Identifies a reference to another text passage and indicates the relevant page number.
● List Identifies a list.
6406453.book Seite 9 Freitag, 1. März 2013 11:53 11

1 Before you begin … Operating Instructions T1 / T2 / T3 highspeed handpiece
10 64 06 453 D3596.201.01.01.02
1.2 Service life of Sirona instrumentsService life of Sirona instrumentsService life 5 + 3 years /3 + 1 1/2 yearsWhen used as intended:Standard_Sirona● Non-moving parts of Sirona instruments have a typical service life of
approx. 5 years● Moving parts of Sirona instruments have a typical service life of
approx. 3 yearsNo warranty claim can be inferred here, as wear may occur earlier or later than indicated above depending on use, frequency of sterilization, and frequency of maintenance.
6406453.book Seite 10 Freitag, 1. März 2013 11:53 11

Operating Instructions T1 / T2 / T3 highspeed handpiece 2 Safety information
64 06 453 D3596.201.01.01.02 11
2 Safety informationSafety informationObligations of the user ➢ Use only fault-free materials that do not deviate from the specified
data [ → 17].➢ Protect yourself, patients, and others against hazards. To do this,
follow the safety instructions.➢ Use the equipment as intended.➢ You should always keep these operating instructions within reach for
further reference.Cross contamination and spreading of infectionPrevention of the spread of infection and cross
contaminationPrevent the spread of infections and cross contamination among patients, users, and others; sterilize after every patient.Take the appropriate hygiene measures, e.g. wear protective gloves.Eye damagePrevention of eye damage The LED is in risk class 2 according to the IEC 62471:2006 standard. The LED emits optical radiation that is potentially hazardous and may be harmful to the eyes! Potential damage to the retina from the blue light
6406453.book Seite 11 Freitag, 1. März 2013 11:53 11

2 Safety information Operating Instructions T1 / T2 / T3 highspeed handpiece
12 64 06 453 D3596.201.01.01.02
emission. Do not stare at the LED for longer periods of time while in operation.Malfunction / Damage _ TurbineMalfunction or damage Immediately discontinue use in the case of malfunction or damage. Damaged turbines may cause injury. Notify the dental depot or the manufacturer.Potential explosion hazardPotential explosion hazard Do not use this product in areas subject to explosion hazards.Repair _ TurbineRepair Do not attempt to repair the turbine yourself. Repair _ Replacement of BearingsThe replacement of bearings can lead to sudden failures and injuries to patients due to the different levels of wear of the newer and older components. Safe operation is not guaranteed when repairs are performed incorrectly. For repairs, contact the dental depot or the manufacturer.Accessory partsSpare and accessory parts Use only Sirona original or approved parts. Safe operation is not guaranteed for parts that have not been approved by Sirona.
6406453.book Seite 12 Freitag, 1. März 2013 11:53 11

Operating Instructions T1 / T2 / T3 highspeed handpiece 2 Safety information
64 06 453 D3596.201.01.01.02 13
If you have any questions, please contact your dental depot or the manufacturer.
6406453.book Seite 13 Freitag, 1. März 2013 11:53 11

3 Technical description Operating Instructions T1 / T2 / T3 highspeed handpiece
14 64 06 453 D3596.201.01.01.02
3 Technical descriptionTechnical description
3.1 TaskTaskTurbineThe T1 / T2 / T3 turbine is used to power dental instruments with an FG shank.Quick couplingThe quick coupling is used for media supply and connection to the supply hose and features convenient turnability.
6406453.book Seite 14 Freitag, 1. März 2013 11:53 11

Operating Instructions T1 / T2 / T3 highspeed handpiece 3 Technical description
64 06 453 D3596.201.01.01.02 15
3.2 Structure of T1 turbineStructure of T1 turbine
EDC
BA A Turbine head (here: Boost)B Push buttonC Cooling spray outletD Opening of chuck systemE Light aperture
6406453.book Seite 15 Freitag, 1. März 2013 11:53 11

3 Technical description Operating Instructions T1 / T2 / T3 highspeed handpiece
16 64 06 453 D3596.201.01.01.02
3.3 Structure of T2 / T3 turbines Structure of T2 / T3 turbines
FEDC
BA A Turbine head (here: Boost)B Push buttonC Cooling spray outletD Opening of chuck systemE Light aperture (only for T2 turbine)F Handpiece sleeve
6406453.book Seite 16 Freitag, 1. März 2013 11:53 11

Operating Instructions T1 / T2 / T3 highspeed handpiece 3 Technical description
64 06 453 D3596.201.01.01.02 17
3.4 Technical dataTechnical dataT1 / T2 / T3 turbinesTurbine T1 / T2 / T3T1 / T2 / T3_new
T1 turbine T2 turbine T3 turbineAvailable head sizes:
CONTROL x x -Boost x x xmini x x x
Light function x x -Back-suction stop in the head housing x x xBack suction stop in the spray water area x x xPushbutton cover clamping system FG FG FG
6406453.book Seite 17 Freitag, 1. März 2013 11:53 11

3 Technical description Operating Instructions T1 / T2 / T3 highspeed handpiece
18 64 06 453 D3596.201.01.01.02
T head for CONTROL, Boost, and miniTurbine head
Friction grip burr instrument
CONTROL Boost mini
Idling speed in min-1 250,000 + 30% 370,000 ± 10% 400,000 ± 10%
Maximum torque in Nmm ~ 1.8 ~ 2.0 ~ 1.6
CONTROL Boost miniShank standard ISO 1797-1 ISO 1797-1 ISO 1797-1Shank diameter in mm 1.59 - 1.60 1.59 - 1.60 1.59 - 1.60Maximum total length in mm 25 25 21Maximum working diameter in mm (ISO 2157) 2.1 2.1 2.1
6406453.book Seite 18 Freitag, 1. März 2013 11:53 11

Operating Instructions T1 / T2 / T3 highspeed handpiece 3 Technical description
64 06 453 D3596.201.01.01.02 19
Treatment Center _ Turbine 2012Treatment center
T1 / T2 / T3Driving air pressure in bar(flowing, dry, and clean)
2.7 - 3.0
Driving air consumption in Nl/min 48 ± 5Return air pressure in bar < 0.3Spray air pressure in bar ~ 2.7Spray air flow in Nl/min > 2.5Spray water pressure in bar ~ 2.0Water content in spray > 50 ml/min
6406453.book Seite 19 Freitag, 1. März 2013 11:53 11

3 Technical description Operating Instructions T1 / T2 / T3 highspeed handpiece
20 64 06 453 D3596.201.01.01.02
For Filtering_Quick Coupling B, R, FQuick couplings B, R, and FQuick couplings (Sirona)
Quick coupling R Quick coupling F Quick coupling BConnection 6-hole 6-hole 4-holeStandard ISO 9168 ISO 9168 ISO 9168Driving air return with return airflow without return airflow without return airflowSpray water control at the coupling at the coupling -Back suction stop in the spray water area in the spray water area in the spray water areaLight function x x -Lamp voltage (lamp with dark brown socket)
3.6 V 3.6 V -
Lamp voltage (LED) 3.6 V 3.6 V -
6406453.book Seite 20 Freitag, 1. März 2013 11:53 11

Operating Instructions T1 / T2 / T3 highspeed handpiece 3 Technical description
64 06 453 D3596.201.01.01.02 21
3.5 Turbine connection types availableTurbine connection types available
Connection type available for T1 turbine T2 turbine T3 turbineR/F quick coupling (Sirona) x x -
Quick coupling B - - x
Multiflex LUX (KaVo) quick coupling x x -
ROTO QUICK (W&H) quick coupling x x x
6406453.book Seite 21 Freitag, 1. März 2013 11:53 11

3 Technical description Operating Instructions T1 / T2 / T3 highspeed handpiece
22 64 06 453 D3596.201.01.01.02
MachLite/Phatelus (NSK) quick coupling - x x
QD-J (NSK) quick coupling - - x
Connection type available for T1 turbine T2 turbine T3 turbine
6406453.book Seite 22 Freitag, 1. März 2013 11:53 11

Operating Instructions T1 / T2 / T3 highspeed handpiece 4 Preparation
64 06 453 D3596.201.01.01.02 23
4 PreparationPreparation
4.1 Initial start-up and longer breaks in useInitial start-up and longer breaks in useTurbine➢ Sterilize the turbine and accessory parts prior to startup.➢ Clean and maintain the turbine after longer breaks in use.
4.2 Prior to starting the work dayPrior to starting the work day➢ Purge the water and air channels for 20 - 30 seconds.
6406453.book Seite 23 Freitag, 1. März 2013 11:53 11

4 Preparation Operating Instructions T1 / T2 / T3 highspeed handpiece
24 64 06 453 D3596.201.01.01.02
4.3 Before each patientBefore each patientPreparation _ Turbine1. Purge the water and air channels for 20 - 30 seconds.2. Attach the turbine [ → 27].3. Insert the burr instrument [ → 30].4. Use a sufficient amount of cooling water (> 50 ml/min) [ → 31].5. Use filtered water only (< 50µm). 6. Check the nozzles for blockages and lime deposits, for example, and
clean the nozzles if necessary [ → 45].Overheating at the preparation site
CAUTION! Insufficient cooling leads to overheating of the preparation site and damage to the tooth substance. Ensure that the water content is > 50ml/min.
6406453.book Seite 24 Freitag, 1. März 2013 11:53 11

Operating Instructions T1 / T2 / T3 highspeed handpiece 5 Operation
64 06 453 D3596.201.01.01.02 25
5 OperationOperationUse only undamaged burrsNOTICE! Use only burrs and diamond polishers that are sharp and undamaged. Use clean burrs and diamond polishers to avoid dirt in the clamping system.Drill Fixation _ Turbine
CAUTION! A loose or partially removed burr instrument can detach itself from the head or break off. This may cause injury. Therefore, use the turbine only if the burr instrument is inserted at least 10 mm and is clamped securely in place. Overheating at the preparation site
CAUTION! Insufficient cooling leads to overheating of the preparation site and damage to the tooth substance. Ensure that the water content is > 50ml/min.Pulling back the patient's cheek _ Turbine
CAUTION! Do not pull the patient's cheek back with the handpiece while the turbine is rotating. This would actuate the push button, thus creating a risk of burning the patient's oral mucosa.
6406453.book Seite 25 Freitag, 1. März 2013 11:53 11

5 Operation Operating Instructions T1 / T2 / T3 highspeed handpiece
26 64 06 453 D3596.201.01.01.02
Harmful to eyes
CAUTION! Potentially hazardous optical radiation may cause harm to the eyes. Do not stare at the LED for extended periods during operation.
5.1 Connecting the Sirona quick coupling to the supply hoseConnecting the Sirona quick coupling to the supply hose1. Attach the quick coupling (B) to the supply hose, noting the various
tube diameters.2. Screw the cap nut (C) tight. Secure the quick coupling using the key
(A).
A B C
6406453.book Seite 26 Freitag, 1. März 2013 11:53 11

Operating Instructions T1 / T2 / T3 highspeed handpiece 5 Operation
64 06 453 D3596.201.01.01.02 27
5.2 Replacing the turbineReplacing the turbineTurbine must be at a standstill
CAUTION! Do not remove the handpiece while the turbine is running.
5.2.1 Turbine with Sirona or KaVo connectionTurbine with Sirona or KaVo connectionAttaching the turbine➢ Insert the turbine until it audibly clicks into place.Removing the turbine✔ The turbine is at a standstill.➢ Hold the quick coupling and the hose nut firmly and pull the turbine
while turning it slightly. Do not pull on or hold the supply hose.
6406453.book Seite 27 Freitag, 1. März 2013 11:53 11

5 Operation Operating Instructions T1 / T2 / T3 highspeed handpiece
28 64 06 453 D3596.201.01.01.02
5.2.2 Turbine with W&H connectionTurbine with W&H connectionAttaching the turbine➢ Insert the turbine until it audibly clicks into place.Removing the turbine✔ The turbine is at a standstill.➢ Press the markings (A) on the W&H quick coupling and pull the
turbine while turning it slightly. Do not pull on or hold the supply hose.
A
6406453.book Seite 28 Freitag, 1. März 2013 11:53 11

Operating Instructions T1 / T2 / T3 highspeed handpiece 5 Operation
64 06 453 D3596.201.01.01.02 29
5.2.3 Turbine with NSK MachLite connectionTurbine with NSK MachLite connectionAttaching the turbine➢ Insert the turbine until it audibly clicks into place.Removing the turbine✔ The turbine is at a standstill.➢ Slide back the sleeve (A) on the quick coupling toward the supply
hose and pull the turbine while turning it slightly. Do not pull on or hold the supply hose.
A
6406453.book Seite 29 Freitag, 1. März 2013 11:53 11

5 Operation Operating Instructions T1 / T2 / T3 highspeed handpiece
30 64 06 453 D3596.201.01.01.02
5.2.4 Turbine with NSK QD-J connectionTurbine with NSK QD-J connectionAttaching the turbine➢ Slide back sleeve (A) on the quick coupling toward the supply hose
and insert the turbine.Removing the turbine✔ The turbine is at a standstill.➢ Slide back the sleeve on the quick coupling toward the supply hose
and detach the turbine while turning it slightly. Do not pull on or hold the supply hose.
5.3 Inserting and removing burr instrumentsInserting and removing burr instrumentsFree movement of the push buttonIMPORTANT: Check the push button to make sure it moves freely!Use only undamaged burrsNOTICE! Use only burrs and diamond polishers that are sharp and undamaged. Use clean burrs and diamond polishers to avoid dirt in the clamping system.
A
6406453.book Seite 30 Freitag, 1. März 2013 11:53 11

Operating Instructions T1 / T2 / T3 highspeed handpiece 5 Operation
64 06 453 D3596.201.01.01.02 31
Drill Fixation _ Turbine
CAUTION! A loose or partially removed burr instrument can detach itself from the head or break off. This may cause injury. Therefore, use the turbine only if the burr instrument is inserted at least 10 mm and is clamped securely in place. Attach and Remove FG _TurbineInserting the friction grip burr instrument✔ The turbine is at a standstill.1. Press the button and slide the burr instrument in until it reaches the
stop.2. Pull on the burr instrument to check that it is firmly attached.Removing the friction grip burr instrument✔ The burr instrument must not be moving.➢ Press the button and remove the burr instrument.
5.4 Adjusting the cooling sprayAdjusting the cooling sprayAdjust Cooling Spray _ Quick Coupling B➢ Adjust the cooling spray for quick coupling B at the treatment center.
6406453.book Seite 31 Freitag, 1. März 2013 11:53 11

5 Operation Operating Instructions T1 / T2 / T3 highspeed handpiece
32 64 06 453 D3596.201.01.01.02
Adjust Cooling Spray _ NSK QD-J➢ Adjust the cooling spray for QD-J quick coupling (NSK) at the treatment center.
General adjustment> 50 ml/min➢ Adjust the flow rate of the cooling water using the control ring (A) (> 50 ml/min).
Tip: You can measure the amount of cooling water with a measuring cup and watch.Max. water flowWater flowR/F quick couplingR/F (Sirona) quick coupling: The maximum water flow is set when the control ring clicks into place.KaVo quick couplingKaVo quick coupling: The maximum water flow is set when the two markings face each other.W&H quick couplingW&H quick coupling: The minimum water flow is set when the red line and the red dot are facing each other.Turn the control ring to the left or right for the maximum water flow.NSK MachLite quick couplingMachLite quick coupling (NSK): The maximum water flow is set when the control ring clicks audibly into place.
A
6406453.book Seite 32 Freitag, 1. März 2013 11:53 11

Operating Instructions T1 / T2 / T3 highspeed handpiece 6 Follow-up
64 06 453 D3596.201.01.01.02 33
6 Follow-upFollow-up
6.1 After each treatment sessionAfter each treatment sessionTurbine1. Clean and disinfect the turbine and accessories.2. Spray the turbine [ → 34].3. Sterilize the turbine and the accessories [ → 43].
6.2 At the end of the work dayAt the end of e work dayTurbine➢ Spray the turbine [ → 34].
6406453.book Seite 33 Freitag, 1. März 2013 11:53 11

7 Care and maintenance Operating Instructions T1 / T2 / T3 highspeed handpiece
34 64 06 453 D3596.201.01.01.02
7 Care and maintenanceCare and maintenanceReplacing elastomersElastomers, e.g. O-rings, must be replaced depending on their degree of wear.
7.1 Spraying the mechanical partsSpraying the mechanical partsUsing the T1 sprayIntervalsDaily at noon and in the evening● At least every noon and evening● Prior to each sterilization● After each thermodisinfection
Longer preparations● During a longer preparation (> 10 minutes)Required accessoriesRequired accessoriesNOTICE! Using sprays from other manufacturers can reduce the product's service life. Use only Sirona T1 spray.
A
FE
D
C
B
6406453.book Seite 34 Freitag, 1. März 2013 11:53 11

Operating Instructions T1 / T2 / T3 highspeed handpiece 7 Care and maintenance
64 06 453 D3596.201.01.01.02 35
ProcedureCleaning (remove burr instrument) _Turbine✔ The turbine is at a standstill.✔ The O-rings on the spray adapter are intact.1. Remove the burr instrument.2. Detach the turbine from the quick coupling [ → 27].3. Attach the spray adapter onto the nozzle of the spray can as shown.4. Insert the turbine as far as it will go and hold it in place.5. Spray into the turbine for 1-2 seconds.
IMPORTANT: Hold the spray can upright.CheckCheckTurbine1. Check whether the fluid coming out of the turbine head is clean.2. If the fluid is dirty, repeat the process.
6406453.book Seite 35 Freitag, 1. März 2013 11:53 11

7 Care and maintenance Operating Instructions T1 / T2 / T3 highspeed handpiece
36 64 06 453 D3596.201.01.01.02
Is the fluid still not clean?1. Connect the turbine to the quick coupling and allow the turbine to run
briefly. In this way, the spray can be distributed more effectively.2. CAUTION! Wait until the turbine comes to a standstill.
Wipe off any leaking oil with a dry cloth.3. Repeat the spraying procedure.
7.2 Care of the push button chuckCare of the push button chuckSironaNewUse T1 spray on the push button chuck to remove deposits and ensure proper functioning of the clamping system.IntervalIntervalCarry out maintenance work on the push button chuck at least once a week.Required accessoriesT1 sprayT1 spray
6406453.book Seite 36 Freitag, 1. März 2013 11:53 11

Operating Instructions T1 / T2 / T3 highspeed handpiece 7 Care and maintenance
64 06 453 D3596.201.01.01.02 37
ProcedureProcedure _ Turbine1. Press the turbine head with the chuck firmly against the spray can
nozzle.2. Spray the chuck for 1 - 2 seconds.
IMPORTANT: Hold the spray can upright.3. Wipe off any leaking protective oil with a lint-free cloth.
6406453.book Seite 37 Freitag, 1. März 2013 11:53 11

7 Care and maintenance Operating Instructions T1 / T2 / T3 highspeed handpiece
38 64 06 453 D3596.201.01.01.02
7.3 Cleaning the light guide surfaceCleaning the light guide surfaceLight guide surfaces1. In order to avoid scratching the surfaces (A), blow off any dirt
particles with air using a dry syringe.2. Wipe the surfaces with a Q-tip or a soft cloth and alcohol.
7.4 Manually cleaning and disinfecting the surfaceManually cleaning and disinfecting the surfaceRemove the burr instrument✔ Wear appropriate protective clothing.1. Remove the burr instrument [ → 30].
A
6406453.book Seite 38 Freitag, 1. März 2013 11:53 11

Operating Instructions T1 / T2 / T3 highspeed handpiece 7 Care and maintenance
64 06 453 D3596.201.01.01.02 39
2. Use automated processing when possible.IMPORTANT: Manual cleaning must always be combined with disinfection.
7.4.1 Cleaning the outer surfaceCleaning the outer surfaceNo ultrasonic bathNOTICE! Never clean in an ultrasonic bath!Procedure _ Turbine1. Clean the turbine by brushing it off under running water (< 38°C, <
100°F, at least drinking water quality).2. Blow the turbine out with max. 3 bar.
7.4.2 Disinfecting the surfaceDisinfecting the surfaceImmersion in disinfectantsNOTICE! Never immerse in disinfectants!
6406453.book Seite 39 Freitag, 1. März 2013 11:53 11

7 Care and maintenance Operating Instructions T1 / T2 / T3 highspeed handpiece
40 64 06 453 D3596.201.01.01.02
Spray and wipe disinfection✔ The disinfectants must be approved in your country and have proven bactericidal, fungicidal and virucidal properties.
1. Spray the surface with disinfectant.2. Wipe the disinfectant off with a cloth.Disinfectants to be used In the USA and CanadaIn the USA and Canada, for example, you can use:● CAVICIDE®
● CAVIWIPES ™
Please observe the manufacturer's instructions for using instrument disinfectants.
7.5 Manually cleaning and disinfecting the spray channelsManually cleaning and disinfecting the spray channels➢ Clean and disinfect the spray channels using suitable equipment
and the corresponding adapters in accordance with the manufacturer specifications.
6406453.book Seite 40 Freitag, 1. März 2013 11:53 11

Operating Instructions T1 / T2 / T3 highspeed handpiece 7 Care and maintenance
64 06 453 D3596.201.01.01.02 41
7.6 Automated cleaning and disinfecting ...Automated cleaning and disinfecting ...Quick couplings excludedNOTICE! Do not carry out automated cleaning of the quick couplings.
7.6.1 ... with a DAC UNIVERSAL... with a DAC UNIVERSALSirona DAC UniversalWe recommend using Sirona DAC UNIVERSAL for automated cleaning, disinfection, and care.For further details, refer to the operating instructions supplied with the unit.➢ Manual care of the push button chuck [ → 36].
DAC Universal
DAC Universal
6406453.book Seite 41 Freitag, 1. März 2013 11:53 11

7 Care and maintenance Operating Instructions T1 / T2 / T3 highspeed handpiece
42 64 06 453 D3596.201.01.01.02
7.6.2 ... with cleaning and disinfection equipment... with cleaning and disinfection equipmentSirona _ -TurbineThe turbine can also be cleaned and disinfected in suitable cleaning and disinfection equipment.The cleaning and disinfection equipment used must be approved by its manufacturer for the cleaning and disinfection of dental instruments and comply with EN ISO 15883-1 (e.g. 95°C/203°F and 10 min. holding time).For further details, refer to the operating instructions supplied with the unit.Checking _ Turbine1. Check whether the turbine is clean after processing.2. If it is still dirty, repeat the process. For further processing, the turbine should be dry and free of
residue.3. Blow the turbine out with max. 3 bar.
95°C
203°F
6406453.book Seite 42 Freitag, 1. März 2013 11:53 11

Operating Instructions T1 / T2 / T3 highspeed handpiece 7 Care and maintenance
64 06 453 D3596.201.01.01.02 43
4. Manual care of mechanical parts [ → 34].5. Manual care of the push button chuck [ → 36].
7.7 Sterilization instructionsSterilization instructionsSteps _ Turbine 1. Clean and disinfect the turbine. [ → 38]2. Spray the turbine [ → 34].3. Sterilize the turbine in the steam sterilizer with saturated water
vapor.
134°C 274°F
Saturated water vapor: Temperature: 134°C (274°F)Overpressure: 2.04 bar (29.59 psi)
Holding time: 3 min
6406453.book Seite 43 Freitag, 1. März 2013 11:53 11

7 Care and maintenance Operating Instructions T1 / T2 / T3 highspeed handpiece
44 64 06 453 D3596.201.01.01.02
DAC PROFESSIONAL _ TurbineSteam sterilizers that comply with the requirements of either EN 13060, class B (for example, DAC PROFESSIONAL) or EN 13060, class S and are also suitable for the sterilization of turbines are approved.NOTICE! Do not exceed 140°C (284°F), even during the drying phase.In-packaging sterilizationTurbineThe turbine can be sterilized in packaging which is suitable for sterilization and storage, e.g. paper/plastic composite packaging.After sterilizing - headingAfter sterilizingFollow-up _ Turbine1. Remove the turbine from the steam sterilizer immediately.
CAUTION! The turbine will be hot. This may cause burns!NOTICE! Do not immerse the turbine in cold water to speed up the cooling process. This will damage your turbine!
2. Store all turbines so that they are protected from contamination.3. Sterilize again once the storage period has elapsed.
The Hygiene Division of SironaThe Hygiene Division of Sirona
ProfessionalDAC
P
6406453.book Seite 44 Freitag, 1. März 2013 11:53 11

Operating Instructions T1 / T2 / T3 highspeed handpiece 7 Care and maintenance
64 06 453 D3596.201.01.01.02 45
7.8 Cleaning the cooling spray nozzlesCleaning the cooling spray nozzlesHard tap waterIf your tap water is very hard, lime deposits may constrict or completely block the cooling spray nozzles.Cleaning the nozzles _ Turbine1. Carefully clean the nozzle openings by running a cleaning wire
through them at regular intervals.2. Let the turbine run briefly with cooling spray.
7.9 Testing the FG clamping systemTesting the FG clamping systemIntervalTest the FG clamping system at least once a month.
6406453.book Seite 45 Freitag, 1. März 2013 11:53 11
7 Care and maintenance Operating Instructions T1 / T2 / T3 highspeed handpiece
46 64 06 453 D3596.201.01.01.02
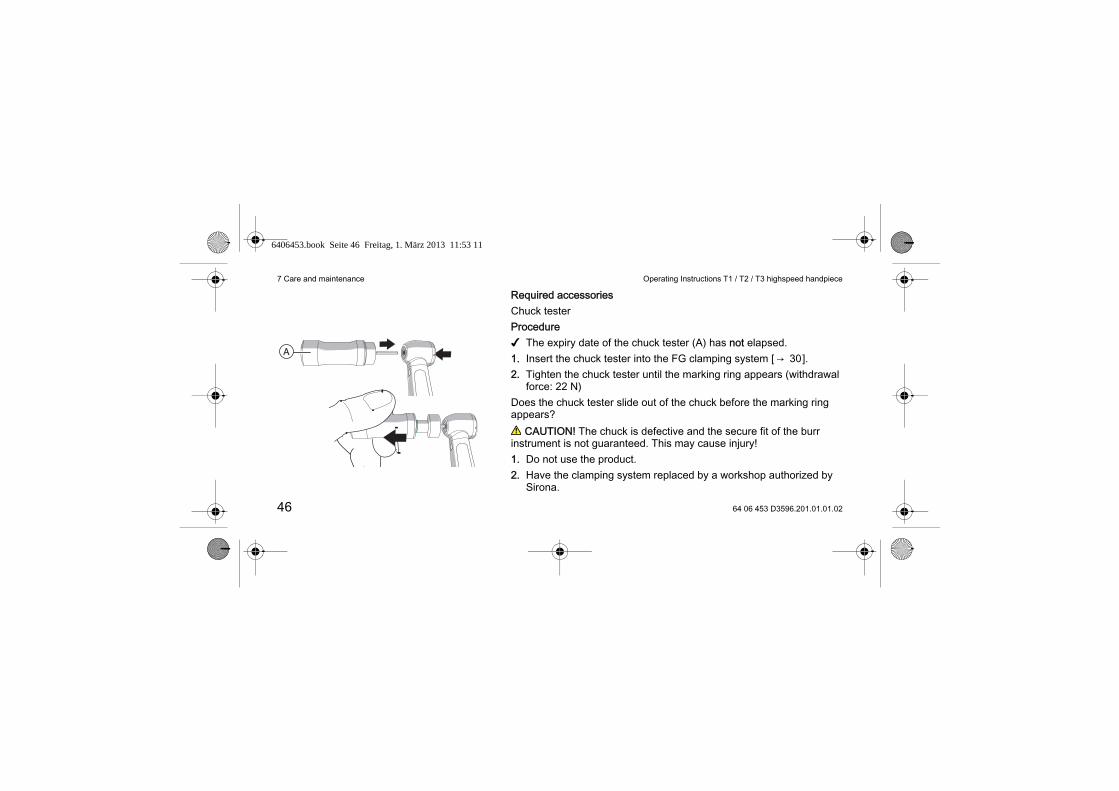
Required accessoriesChuck testerProcedure✔ The expiry date of the chuck tester (A) has not elapsed.1. Insert the chuck tester into the FG clamping system [ → 30].2. Tighten the chuck tester until the marking ring appears (withdrawal
force: 22 N)Does the chuck tester slide out of the chuck before the marking ring appears?
CAUTION! The chuck is defective and the secure fit of the burr instrument is not guaranteed. This may cause injury!1. Do not use the product. 2. Have the clamping system replaced by a workshop authorized by
Sirona.
A
6406453.book Seite 46 Freitag, 1. März 2013 11:53 11

Operating Instructions T1 / T2 / T3 highspeed handpiece 7 Care and maintenance
64 06 453 D3596.201.01.01.02 47
Tip: Record the time and result of the check for your own information.
7.10 Servicing Sirona quick couplingServicing Sirona quick coupling
7.10.1 Replacing O-ringsReplacing O-ringsUsing T1 Spray1. Remove the defective O-ring.2. Slide the tool (A), with the new O-ring attached, to just in front of the
corresponding groove (B).3. Insert the O-ring. Do not use any sharp objects for this.4. Lightly oil the O-ring with T1 spray.
NOTICE! Do not use Vaseline or silicone grease on the O-rings.
B
A
6406453.book Seite 47 Freitag, 1. März 2013 11:53 11

7 Care and maintenance Operating Instructions T1 / T2 / T3 highspeed handpiece
48 64 06 453 D3596.201.01.01.02
7.10.2 Replacing the compression ringReplacing the compression ringIn order to guarantee proper functioning of the “back suction stop in the spray water duct”, we recommend replacing the compression ring (C) every six months.1. Purge the spray water duct at the maximum water flow.2. Slide the tool, with the new compression ring attached, to just in front
of the corresponding groove (C).3. Insert the compression ring. Do not use any sharp objects.4. Check that the ring fits snugly all the way around and is not twisted.
C
6406453.book Seite 48 Freitag, 1. März 2013 11:53 11

Operating Instructions T1 / T2 / T3 highspeed handpiece 7 Care and maintenance
64 06 453 D3596.201.01.01.02 49
7.10.3 Replacing the halogen lamp/LEDReplacing the halogen lamp/LEDBurn hazard from halogen lamp
CAUTION! The halogen lamp/LED can be hot. There is a risk of burns! Allow the halogen lamp/LED to cool down.Turbine1. Remove the turbine.2. Unscrew the cap (B).3. Remove the defective halogen lamp/LED (A).4. Insert the new halogen lamp/LED. Ensure the proper position of the
contact surfaces.NOTICE! Pressing on the lens can destroy the LED. Therefore, please use the installation tool (C) provided to insert the LED.
5. Wipe the bulb of the halogen lamp with a clean cloth.6. Unscrew the cap from the quick coupling. 7. Check the light function of the quick coupling.
BA
C
6406453.book Seite 49 Freitag, 1. März 2013 11:53 11

7 Care and maintenance Operating Instructions T1 / T2 / T3 highspeed handpiece
50 64 06 453 D3596.201.01.01.02
Does the LED not light up?➢ Remove the LED and re-insert it after rotating it 180° around its own
axis.
7.10.4 Replacing the spray water cartridgeReplacing the spray water cartridgeRequired accessories● Spray water cartridge
T1 spray● T1 sprayIf the spray water cartridge leaks or is clogged.Quick coupling1. Remove the quick coupling from the supply hose.2. Remove the sealing washer (B).3. Click the control ring into the maximum water flow. The spray water
cartridge (A) can be replaced only in this position.4. Remove the spray water cartridge.
C
BA
6406453.book Seite 50 Freitag, 1. März 2013 11:53 11

Operating Instructions T1 / T2 / T3 highspeed handpiece 7 Care and maintenance
64 06 453 D3596.201.01.01.02 51
5. Spray oil lightly onto the new spray water cartridge.6. Insert the new spray water cartridge.7. Note the position of the bulging side (C) when fitting the sealing
washer.
7.10.5 Replacing the felt strip (quick coupling F)Replacing the felt strip (quick coupling F)Replace the felt strip if the oil-laden return air that escapes is soiled. We recommend replacing the felt strip at least every three months. 1. Click the control ring into the maximum water flow.2. Place the coupling upright on a firm, flat surface supported by the
screw-on cap and firmly push the control ring (C) downward until it disengages.NOTICE! Note that the balls (A) and springs (B) may drop out.
3. Replace the soiled felt strip (D).D
CBA
6406453.book Seite 51 Freitag, 1. März 2013 11:53 11

7 Care and maintenance Operating Instructions T1 / T2 / T3 highspeed handpiece
52 64 06 453 D3596.201.01.01.02
4. Click the control ring back into position, taking care to keep the balls and springs in place.
7.11 Replacing the halogen lamp in the handpieceReplacing the halogen lamp in the handpieceAttachment _ only W&HIn the T1 / T2 / T3 with W&H connection, the halogen lamp is located in the turbine handpiece.W&H turbine T1T1 turbineT1 turbine with W&H connection:
CAUTION! The halogen lamp may be hot. This may cause burns! Allow the halogen lamp to cool down.1. Detach the turbine from the quick coupling.2. Unscrew end sleeve (B) with the tool (C) supplied and detach it.3. Detach the coupling fitting (A).
CBA
6406453.book Seite 52 Freitag, 1. März 2013 11:53 11

Operating Instructions T1 / T2 / T3 highspeed handpiece 7 Care and maintenance
64 06 453 D3596.201.01.01.02 53
4. Remove the lamp holder (G) from the coupling fitting. To do so, lift the lamp holder at the head end (F).
5. Tap the defective halogen lamp (E) out of its base.6. Insert the new halogen lamp. Ensure the correct position of the
contact surface.7. Wipe the bulb with a clean cloth.8. Insert the lamp holder.
When using a new lamp holder, remove the small bar (D) before insertion.
FED G
6406453.book Seite 53 Freitag, 1. März 2013 11:53 11

7 Care and maintenance Operating Instructions T1 / T2 / T3 highspeed handpiece
54 64 06 453 D3596.201.01.01.02
9. Carefully push the coupling fitting in up to marking line (H). The arrow on the coupling fitting and the dot on the handpiece
must face each other (I).10.Refit end sleeve and screw it down with tool.T2 turbineT2 turbine with W&H connection:W&H turbine T2
CAUTION! The halogen lamp may be hot. This may cause burns! Allow the halogen lamp to cool down.1. Detach the turbine from the quick coupling.2. Unscrew the back (B) of the handpiece sleeve and remove it.3. Check the O-ring (A) for damage and replace it if necessary.
H
I
BA
6406453.book Seite 54 Freitag, 1. März 2013 11:53 11

Operating Instructions T1 / T2 / T3 highspeed handpiece 7 Care and maintenance
64 06 453 D3596.201.01.01.02 55
4. Lift the lamp holder (F) at the head end (E) and remove it.5. Tap the defective halogen lamp (D) out of its base.6. Insert the new halogen lamp. Ensure the correct position of the
contact surface.7. Wipe the bulb with a clean cloth.8. Insert the lamp holder.
When using a new lamp holder, remove the small bar (C) before insertion.
9. Screw the handpiece sleeve back on.
FEDC
6406453.book Seite 55 Freitag, 1. März 2013 11:53 11

8 Spare parts and consumables Operating Instructions T1 / T2 / T3 highspeed handpiece
56 64 06 453 D3596.201.01.01.02
8 Spare parts and consumablesSpare parts and consumablesAccessories + approved accessoriesUse only Sirona original or approved parts.T1/T2/T3
Order ID: Order ID:T1 spray (6 x 250 ml cans) 59 01 665 Halogen lamp (dark brown base) 59 40 291Chuck tester 33 27 793 Cleaning wire for spray nozzles 24 00 232
6406453.book Seite 56 Freitag, 1. März 2013 11:53 11

Operating Instructions T1 / T2 / T3 highspeed handpiece 8 Spare parts and consumables
64 06 453 D3596.201.01.01.02 57
Turbine with Sirona connection
Order ID: Order ID:Spray adapter 59 41 802 O-ring for spray adapter 18 91 840Replacement kit for quick coupling:● 10 O-rings ● 2 compressed rings ● 1 tool for O-rings and compressed rings
41 75 803 Tool for O-rings and compressed rings 41 74 343Screw-on cap for R/F coupling 89 16 645Wrench for quick coupling 59 41 794LED for R/F coupling 63 14 558
Spring coupling F 89 17 262 Control ring coupling F 41 76 6032.5 mm Ø ball for coupling F 34 20 742 Felt strip coupling F 41 76 389Sealing washer for R/F quick coupling 89 16 629 Spray water cartridge for R/F coupling 77 43 444
6406453.book Seite 57 Freitag, 1. März 2013 11:53 11

8 Spare parts and consumables Operating Instructions T1 / T2 / T3 highspeed handpiece
58 64 06 453 D3596.201.01.01.02
KAVo connectionTurbine with KaVo connection
W&H connectionTurbine with W&H connectionincluding lamp holder+tool
Order ID: Order ID:Spray adapter 54 56 954 O-rings (small) for spray adapter 18 90 842O-ring (large) for spray adapter 18 91 444
Order ID: Order ID:Spray adapter 54 56 970 O-ring (small) for spray adapter 41 83 849O-ring (large) for spray adapter 70 23 542 Tool for replacing lamps 54 57 515Lamp holder 54 56 871
6406453.book Seite 58 Freitag, 1. März 2013 11:53 11

Operating Instructions T1 / T2 / T3 highspeed handpiece 8 Spare parts and consumables
64 06 453 D3596.201.01.01.02 59
NSK-Anschluss _ T1/T2/T3Turbine with NSK connection
Order ID: Order ID:Spray adapter (QD-J) 58 62 243 Spray adapter (NSK ML) 58 67 911O-ring (large) for spray adapter (QD-J) 41 83 856 O-ring set (NSK ML) 58 74 958O-rings (small) for spray adapter (QD-J) 70 41 734
6406453.book Seite 59 Freitag, 1. März 2013 11:53 11

9 Storage and transport conditions Operating Instructions T1 / T2 / T3 highspeed handpiece
60 64 06 453 D3596.201.01.01.02
9 Storage and transport conditionsStorage and transport conditions
Protect against moisture
Sensitive contents
Relative humidity
Air pressure
Temperature After a severe change in temperature, allow sufficient time for acclimatization.
kPa
6406453.book Seite 60 Freitag, 1. März 2013 11:53 11

Operating Instructions T1 / T2 / T3 highspeed handpiece 10 Disposal
64 06 453 D3596.201.01.01.02 61
10 DisposalDisposal● To the best of our current knowledge, the product does not contain
any substances which are hazardous to the environment.Disinfected● Disinfect the product prior to disposal.● Observe the applicable disposal regulations for your area.
6406453.book Seite 61 Freitag, 1. März 2013 11:53 11

0123
tÉ=êÉëÉêîÉ=íÜÉ=êáÖÜí=íç=ã~âÉ=~åó=~äíÉê~íáçåë=ïÜáÅÜ=ã~ó=ÄÉ=êÉèìáêÉÇ=ÇìÉ=íç=íÉÅÜåáÅ~ä=áãéêçîÉãÉåíëK
aPRVSKOMNKMNKMNKMO MOKOMNP ûKJkêKW=MMM=MMM
páêçå~=aÉåí~ä=póëíÉãë=dãÄe in USA: páêçå~=aÉåí~ä=póëíÉãëI=ii`c~Äêáâëíê~≈É=PN QUPR=páêçå~=aêáîÉI=pìáíÉ=NMMaJSQSOR=_ÉåëÜÉáã `Ü~êäçííÉI=k`=OUOTPdÉêã~åó ïïïKëáêçå~KÅçã rp^ ïïïKëáêçå~KÅçã
SQ=MS=QRP=aPRVS=
6406453.book Seite 62 Freitag, 1. März 2013 11:53 11