6 Payroll Training Guide 4 - exponenthr.com · ExponentHR Payroll Training Guide 1 Table of...
52
Payroll Approval HR Administrator Training Guide for ExponentHR This guide provides detailed information on the ExponentHR Time Clock and Payroll Batch Approval tools. The tools described in this manual allow employees with Payroll Approval Rights to complete the final review and approval of pay, after managers have approved their employees’ time. Exponent Technologies 4970 Landmark Place Dallas, TX 75254 (214) 987-4567
Transcript of 6 Payroll Training Guide 4 - exponenthr.com · ExponentHR Payroll Training Guide 1 Table of...

Payroll Approval
HR Administrator Training Guide for ExponentHR This guide provides detailed information on the ExponentHR Time Clock and Payroll Batch Approval tools. The tools described in this manual allow employees with Payroll Approval Rights to complete the final review and approval of pay, after managers have approved their employees’ time.
Exponent Technologies 4970 Landmark Place Dallas, TX 75254 (214) 987-4567

ExponentHR Payroll Training Guide 1
Table of Contents Table of Contents .......................................................................................................................... 1
Time Keeping Activities ................................................................................................................. 3 Introduction ................................................................................................................................................ 3 Non-Exempt Employees Reporting Time ................................................................................................ 3 To Report Time ............................................................................................................................................ 3
To Report Time worked for the current Pay Period.......................................................................... 3 To Report Hours Only ................................................................................................................................. 4
To Report Hours Worked in the Current Pay Period ......................................................................... 4 To Show Notes ............................................................................................................................................ 5
To Show Notes Box ................................................................................................................................ 5 Requesting Time Off .................................................................................................................................. 7 Request Future Paid Time Off (Vacation) .............................................................................................. 7 Report Paid Time Off Already Taken (Sick Days) .................................................................................. 7
To Request/Report Leave .................................................................................................................... 8 Report Multi-Day Leave ............................................................................................................................ 9
To Report Multi-Day Leave .................................................................................................................. 9 Estimating Leave Balances .................................................................................................................... 10
To Estimate Paid Leave Accrual Balances (Personal View) ........................................................ 10 Viewing Other Employee Leave Requests (Optional Feature) ........................................................ 10
To View Other Employee Leave Requests ...................................................................................... 11 Reporting Time/Leave to Payroll ........................................................................................................... 12
To Report Time/Leave at the Conclusion of the Pay Period ....................................................... 13
Paid Leave Approval .................................................................................................................. 14 Introduction .............................................................................................................................................. 14 Benefits ...................................................................................................................................................... 14 Process ....................................................................................................................................................... 15
To Approve or Reject Paid Leave .................................................................................................... 15 Paid Leave Approval Status ............................................................................................................. 16
Viewing Peer Group Leave Request (Optional Feature) .................................................................. 16 To View Peer Groups for Employee Leave Request ..................................................................... 16
Time Clock Review and Approval ............................................................................................ 18 Introduction .............................................................................................................................................. 18 Setting Time Clock Options for Viewing the Page .............................................................................. 20 Viewing Employee Time .......................................................................................................................... 21 Time Clock Adjustments .......................................................................................................................... 22 Adjusting Employee Time........................................................................................................................ 22
To Edit an Existing Punch ................................................................................................................... 22 Excluding an Employee from a Payroll ................................................................................................. 23
To Suppress Employee Pay ................................................................................................................ 23 Miscellaneous Adjustments .................................................................................................................... 23
To Insert a Miscellaneous Adjustment/Deduction ......................................................................... 24 Payroll Adjustments .................................................................................................................................. 26
To Process Supplemental Pay for Multiple Employees ................................................................. 27 Payroll Adjustment Import Format ......................................................................................................... 29 Bulk Import ................................................................................................................................................. 29 Earnings/Deductions Adjustments ........................................................................................................ 30
To Add Recurring Earnings for an Employee .................................................................................. 30 To Add Recurring Deductions for an Employee ............................................................................ 31
Editing Existing Recurring Items .............................................................................................................. 32 To Override a Recurring Earning/Deduction .................................................................................. 33 To Record Outside (Non-System) Transactions .............................................................................. 33
Time Clock Approval ............................................................................................................................... 34 To Approve Employee Time .............................................................................................................. 34
Time Clock Batch Submittal ................................................................................................................... 34 To Approve Employee Time .............................................................................................................. 35
Payroll Processing ........................................................................................................................ 36 Payroll Batch Review and Approval ..................................................................................................... 36

2 ExponentHR Payroll Training Guide
To Review Batch Detail for a Pending Payroll ................................................................................ 36 Reviewing Batch Detail ........................................................................................................................... 37 Diagnostics ................................................................................................................................................ 37 Payroll Batch Approval ........................................................................................................................... 39
To Approve a Payroll Batch for Processing .................................................................................... 39 Payroll Batch Rejection ........................................................................................................................... 39
To Reject a Batch ............................................................................................................................... 39
Off-Cycle Batch Processing ....................................................................................................... 40 Introduction .............................................................................................................................................. 40 Creating an Off-Cycle Payroll Batch .................................................................................................... 40
To create an off-cycle batch ........................................................................................................... 41
Additional Payroll Tools & Utilities .............................................................................................. 43 Time Clock Kiosk Setup ............................................................................................................................ 43
To Activate a New Kiosk .................................................................................................................... 43 To Edit an Existing Kiosk ...................................................................................................................... 43
Edit Meal Schedules ................................................................................................................................ 44 To add an Automatic Deduction for a Meal ................................................................................. 44
Retroactive Pay ........................................................................................................................................ 45 To Calculate Retroactive Pay for an Employee ............................................................................ 45
Arrearage Management ........................................................................................................................ 47 To View Arrearage Payments and Balances ................................................................................. 47 To Create an Arrearage Payment ................................................................................................... 48 To Override an Arrearage Payment or Adjust a Balance ............................................................ 48
Paid Leave Accrual Management ....................................................................................................... 49 To Edit an Employee’s Paid Leave Accrual ................................................................................... 49 To Override Settings or Change Eligibility in a Paid Leave Plan .................................................. 50

ExponentHR Payroll Training Guide 3
Time Keeping Activities
Introduction
ExponentHR allows employees to report their time throughout the pay period and submit a final report of their hours at the end of the pay period. The steps of how each employee will report their time depends on their FSLA status. Non-Exempt employees will report time on a daily basis in addition to requesting leave, while Exempt employees will only report any leave they would like to request.
Non-Exempt Employees Reporting Time
Hourly Non-Exempt employees will be responsible for reporting their time on a daily basis. Your company will decide if they would like to have their employees Report Time (start and end) or Report Hours Only.
To Report Time
To Report Time worked for the current Pay Period
Step Action 1 On the Navigation bar from the Personal View, click Compensation> Time
Reporting> Time Clock Reporting.
2 On the Time Tracking/Leave Reporting page, select Report Time from the drop down list.
3 If you want to… Then…
Clock In Click Clock In
Clock Out Click Clock Out
4
Select the Date from the drop down list for which you wan to report time.
Note: The date will default to the current date, but can be changed if you are making a past or future time punch.

4 ExponentHR Payroll Training Guide
5
Select the Time from the drop down that most closely matches the time for your time punch.
Note: The time will default according to the company setup for time punches. Other times can be selected but the deviation will be captured in the Time Clock Audit Report.
6 If necessary, enter notes.
Note: If the notes field is not visible, see page 11 for information about selecting this option.
7 Click
To Report Hours Only
To Report Hours Worked in the Current Pay Period
Step Action 1 On the Navigation bar from the Personal View, click Compensation> Time
Reporting> Time Clock Reporting.
2 On the Time Tracking/Leave Reporting page, select Report Hours Only from the drop down list.
3
Select the Date from the drop down list that you would like to use as a time punch.
Note: The date will default to the current date, but can be changed if you are making a past or future time punch
4 Report the amount of hours you would like to report for the day you selected.
5 If necessary, enter notes.
Note: If the notes field is not visible, see page 11 for information about selecting this option.
6 Click
ExponentHR Payroll Training Guide 5
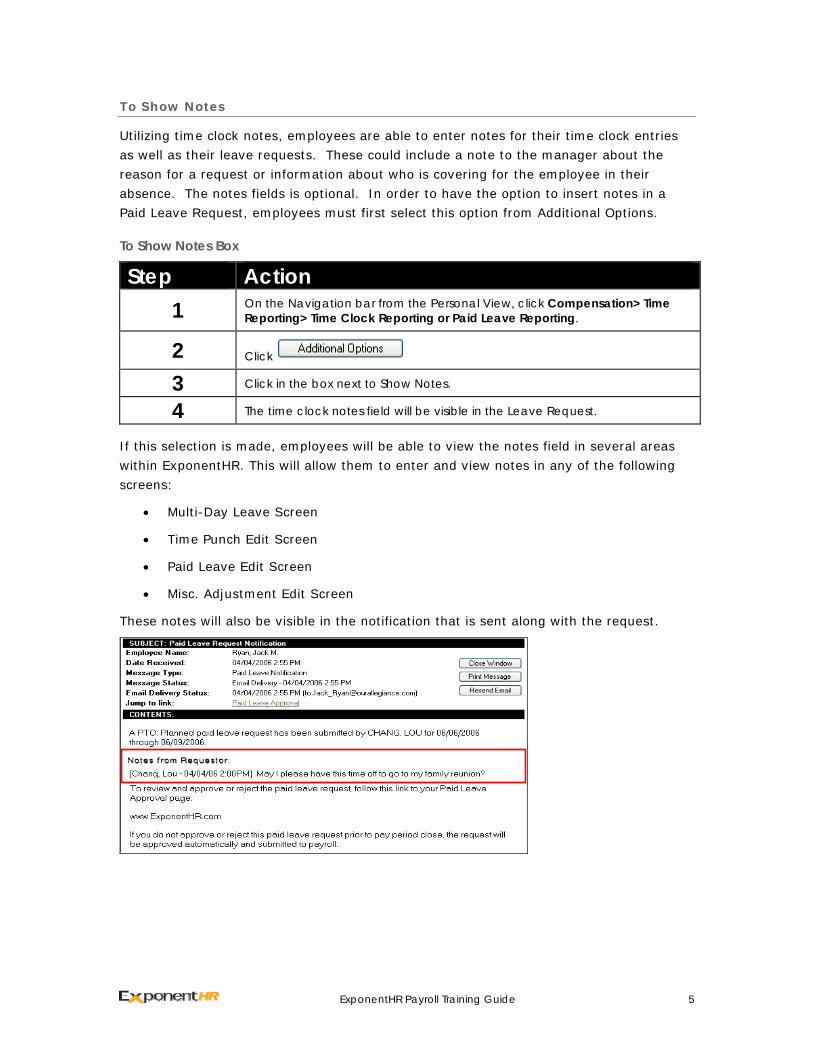
To Show Notes
Utilizing time clock notes, employees are able to enter notes for their time clock entries as well as their leave requests. These could include a note to the manager about the reason for a request or information about who is covering for the employee in their absence. The notes fields is optional. In order to have the option to insert notes in a Paid Leave Request, employees must first select this option from Additional Options.
To Show Notes Box
Step Action 1 On the Navigation bar from the Personal View, click Compensation> Time
Reporting> Time Clock Reporting or Paid Leave Reporting.
2 Click
3 Click in the box next to Show Notes.
4 The time clock notes field will be visible in the Leave Request.
If this selection is made, employees will be able to view the notes field in several areas within ExponentHR. This will allow them to enter and view notes in any of the following screens:
• Multi-Day Leave Screen
• Time Punch Edit Screen
• Paid Leave Edit Screen
• Misc. Adjustment Edit Screen
These notes will also be visible in the notification that is sent along with the request.
6 ExponentHR Payroll Training Guide
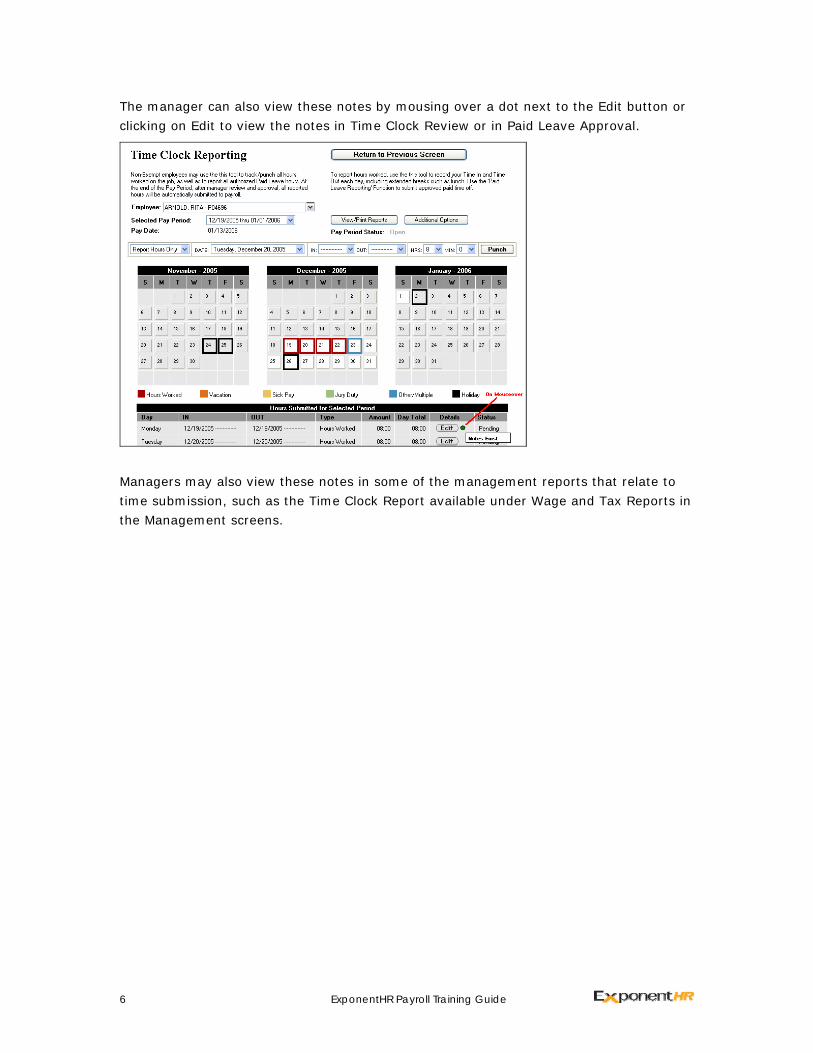
The manager can also view these notes by mousing over a dot next to the Edit button or clicking on Edit to view the notes in Time Clock Review or in Paid Leave Approval.
Managers may also view these notes in some of the management reports that relate to time submission, such as the Time Clock Report available under Wage and Tax Reports in the Management screens.

ExponentHR Payroll Training Guide 7
Requesting Time Off
Exempt and non-exempt employees can use the Paid Leave Approval process within ExponentHR. Exempt employees will not be responsible for reporting the hours they work, but will have the ability to request the hours they would like to take off. Exempt employees are responsible for reporting their hours at the conclusion of each pay period.
Request Future Paid Time Off (Vacation)
Employees may submit paid leave requests for a future date. ExponentHR will automatically notify their manager of the requested leave through an e-mail and Message Center notification. Once the manager approves or rejects the request, an e-mail or Message Center notification will be sent to the employee. If the paid leave request is approved, ExponentHR will automatically transmit the requested hours to the payroll system when the applicable payroll period is reached.
If the manager does not act on your paid leave request by the end of the pay period in which the requested date(s) of paid leave occur, ExponentHR automatically approves the time off and transmits it to the payroll system.
Report Paid Time Off Already Taken (Sick Days)
If an employee experiences an unscheduled day of absence, they must report the unscheduled day off using the Paid Leave Request and Reporting process upon their return to work. ExponentHR’s process is not an approval mechanism in these situations – it is only a reporting tool.
ExponentHR will assign the special status “Late Entry” to any paid leave reported for past dates (including the current day). ExponentHR will notify the supervisor of the late entry.

8 ExponentHR Payroll Training Guide
To Request/Report Leave
Step Action 1 On the Navigation bar from the Personal View, click Compensation> Time
Reporting> Paid Leave Reporting or Time Clock Reporting.
2 If necessary, select Report Leave from the first drop down option – This option will already default and will not be able to be changed if you are an exempt employee.
2 In the Type list, select the leave type that you would like to use.
3
If you want to… Then…
Request a day off during the current Pay Period
Select the Date from the drop down list that you would like to use as the leave request. The date will default to the current date, but can be changed if you are making a past or future time leave request.
Request a day off outside of the current Pay Period
In the Selected Pay Period Drop Down, select the pay period that the date you would like to request is a part of.
Note: If you are making a past request, the status will be entered as Late Entry and will not go through the management approval process.
4
In the Hours list, select the amount of hours that you would like to request.
Note: The hours will default to 8, but the drop down list will display the hours that are acceptable to request off according to the company setup
5 If necessary, enter notes to include in your leave request.
Note: If the notes field is not visible, see page 11 for information about selecting this option.
6 Click

ExponentHR Payroll Training Guide 9
Report Multi-Day Leave
There may be times that you would like to request more than one day off a time. In that case, you can use the Report Multi-Day Leave Option through the Time Clock Reporting area.
To Report Multi-Day Leave
Step Action 1 On the Navigation bar from the Personal View, click Compensation> Time
Reporting> Time Clock Reporting or Paid Leave Reporting.
2 Click
3 Click Report Multi-Day Leave.
4 Click on the days that you would like to request in the calendar. The days will display in the Days Selected column. If you would like to remove a day within this column, double click and it will be removed.
5 In the Leave Type drop down, select the type of leave you would like to use.
6 In the Hours Per Day drop down, select the amount of hours you would like to request for each day of the days that appear in the Days Selected area.
7 Click

10 ExponentHR Payroll Training Guide
Estimating Leave Balances
Employees and managers are able to forecast the balance of paid leave hours for a selected plan through a utility on the Personal and Management view. Based on a date in the future, the Employee Leave Estimator utility can calculate how much paid leave will have accumulated by then. The estimate can also take into account any requested or approved leave between now and the selected date.
To Estimate Paid Leave Accrual Balances (Personal View)
Step Action 1 On the Navigation bar from the Personal View, click Compensation> Time
Reporting> Paid Leave Reporting or Time Clock Reporting.
2 Click on
3 Click on Employee Leave Estimator. The Employee Leave Estimator page displays.
4 Select the paid leave plan from the Plan drop-down list.
5
Select the date through which you want to estimate your paid leave accrual.
Note: To include hours accrued through the pay date following the selected date, select the check box.
6 Click on Calculate.
The summary takes the current balance, subtracts any future hours scheduled to be taken, and adds the accrued hours.
Viewing Other Employee Leave Requests (Optional Feature)
There is an option within Time Clock Reporting and Paid Leave Reporting that will allow an employee to view the requested and approved leave of other employees before the employee requests time off from work. This feature will not be visible in ExponentHR unless the functionality has been activated for your company.
The ability for each employee to view the time off requests by others in the company can be limited to custom peer groups defined in your company. The setup options for viewing an employee peer group are as follows:
• All Active Employees — Allows an employee to view approved and requested leave for all employees in the company
• OSM Time Clock Levels — Allows an employee to view approved and requested leave for all employees reporting to the same Time Clock Supervisor, including the option to view subordinate employees in the same OSM tree

ExponentHR Payroll Training Guide 11
• OSM Direct Report Levels — Allows an employee to view approved and requested leave for all employees reporting to the same Direct Report Supervisor, including the option to view subordinate employees in the same OSM tree
• Employee Classifications Filters — Allows you to designate the appropriate group that the employee can see based on common employee classifications (for example, if an employee is classified with a department code of Customer Service, then they will be able to see all approved and requested leave for other members of the Customer Service department). If multiple classifications are applied, ExponentHR will combine the layers (for example, using department and location will allow Customer Service employees to see ALL Customer Service employees at their LOCATION only).
If your company chooses to have this new feature activated, you will also have the option to disable this feature on an employee-by-employee basis. The New Hire EAN, Re-Hire EAN, and Employment EAN will contain a field labeled “Disable View of other Employee Leave.” (You will only see this field if this feature has been activated.) The default for this field will be “No;” however, if you choose to suppress the view of other employee’s leave, change the field to “Yes” so that their view of this feature will be disabled.
To View Other Employee Leave Requests
Step Action 1 On the Navigation bar from the Personal View, click Compensation> Time
Reporting> Paid Leave Reporting or Time Clock Reporting.
2 Click on
3 Click on View Other Employee Leave.
In a pop-up window, the screen below the step table will be displayed.

12 ExponentHR Payroll Training Guide
From this screen the employee will be able to view:
• Any requested days (appear in red) or approved days (appear in yellow) that the employee’s defined work group has requested off
• A summary of the particular day in question showing the percentage of the work group members that have requested or approved leave for that day
• To view a different date, simply adjust the date in the top left corner of the screen
Reporting Time/Leave to Payroll
At the conclusion of each pay period, each exempt employee will receive a notification alerting them it is time to report their hours or their leave submissions to Payroll. This will ensure that the hours each employee worked, or requested off, will be accounted for properly. The notification typically goes out on the last working day of the pay period. An example of the notification for exempt employees is below:
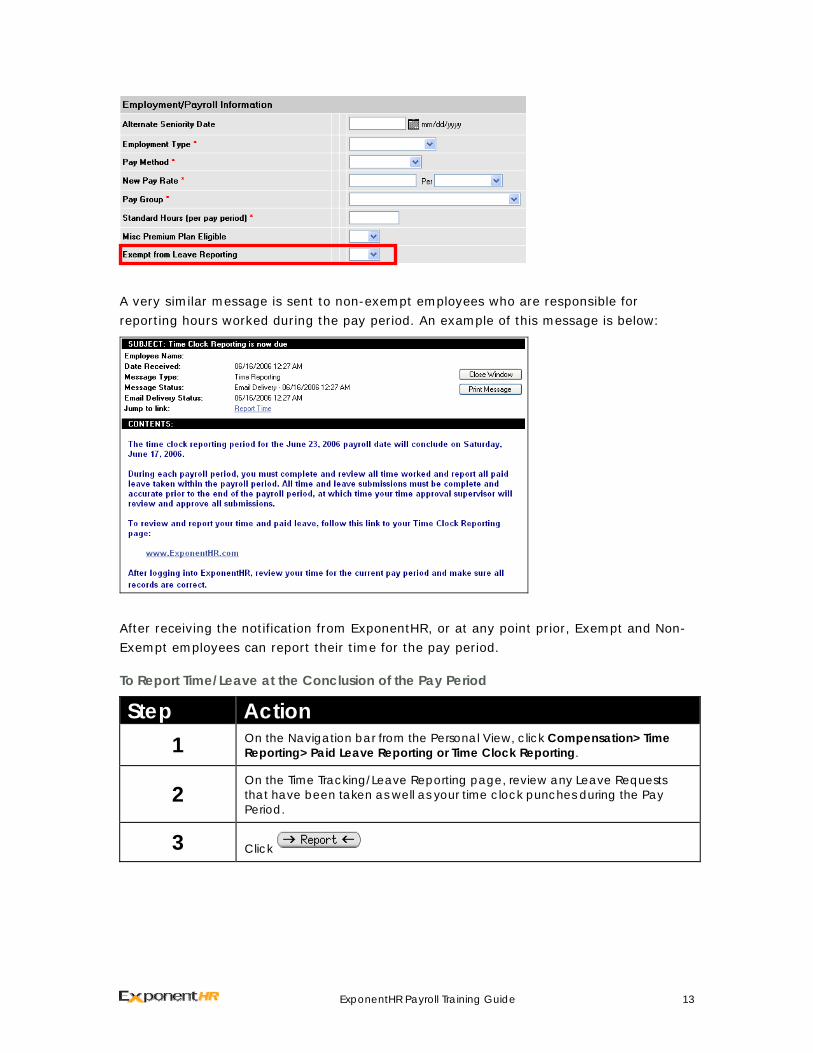
Note: If you have individuals in your company, such as the CEO, who you would prefer did not receive the Time Reporting Notification, you may “exempt” those employees from receiving the notification. They will still be able to report time, if they wish, but they will not be alerted by the notification from ExponentHR to do so. The New Hire, Re-Hire, and Employment EANs contain a field “Exempt from Leave Reporting.” If you select Yes, the employee will not receive the e-mail requiring them to report paid leave.
ExponentHR Payroll Training Guide 13
A very similar message is sent to non-exempt employees who are responsible for reporting hours worked during the pay period. An example of this message is below:
After receiving the notification from ExponentHR, or at any point prior, Exempt and Non-Exempt employees can report their time for the pay period.
To Report Time/Leave at the Conclusion of the Pay Period
Step Action 1 On the Navigation bar from the Personal View, click Compensation> Time
Reporting> Paid Leave Reporting or Time Clock Reporting.
2 On the Time Tracking/Leave Reporting page, review any Leave Requests that have been taken as well as your time clock punches during the Pay Period.
3 Click

14 ExponentHR Payroll Training Guide
Paid Leave Approval
Introduction
The Paid Leave Approval system in ExponentHR provides a communications mechanism for employees to request future time off through their manager. The approval system also provides managers with the ability to easily assess the impact of an employee’s time off request by comparing the request to the scheduled time off for other supervised employees. The system also creates a permanent record of requests and approvals and provides automated notifications via e-mail and/or ExponentHR’s Message Center. These features ensure clear communication between employees and their managers.
Benefits
The Paid Leave Approval system offers the following features for managers:
• Managers receive automated e-mails notifying them when employees submit paid leave requests.
• Managers have the option to approve or reject requests in the Time Clock Review Utility or by using the Paid Leave Approval system.
• Managers may choose to receive automatic e-mail reminders two days before an employee’s scheduled paid leave.
• Managers may report paid leave on behalf of an employee and bypass the normal approval process.
• Managers may print consolidated paid leave reports.
• Manager access to Paid Leave Approval is directly tied to Time Clock Review rights, making it easy to control who has access to view, approve, and reject paid leave.
ExponentHR Payroll Training Guide 15
Process
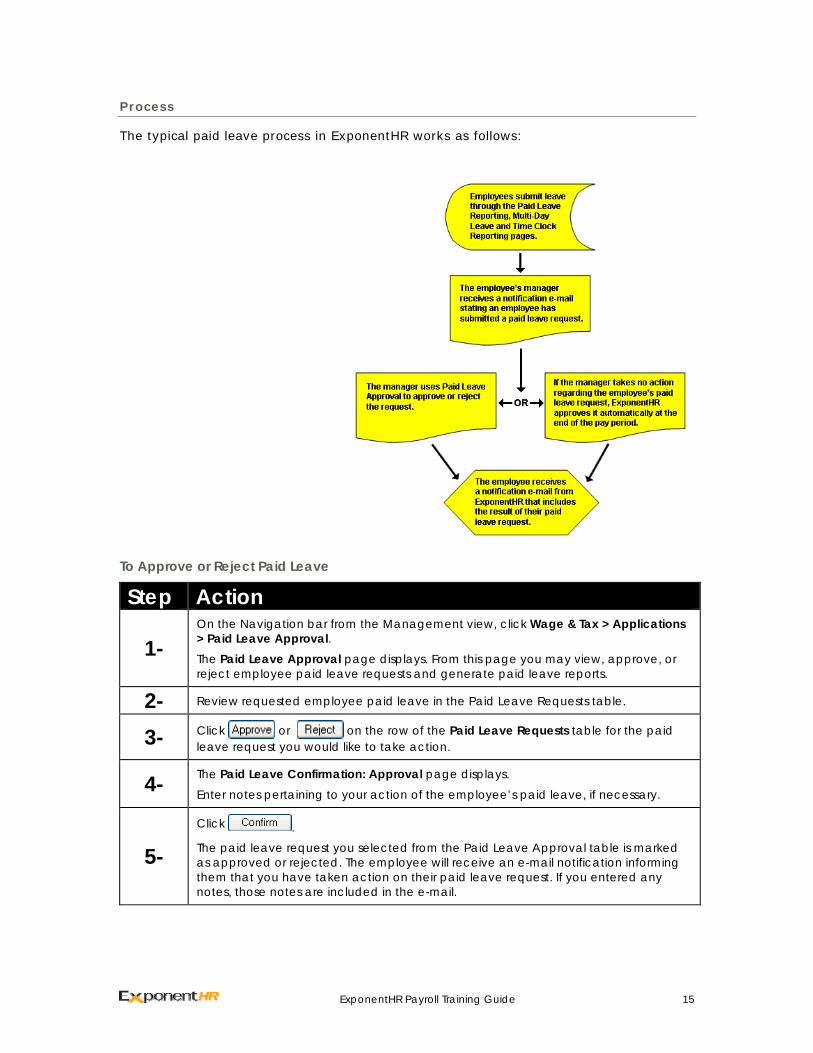
The typical paid leave process in ExponentHR works as follows:
To Approve or Reject Paid Leave
Step Action
1- On the Navigation bar from the Management view, click Wage & Tax > Applications > Paid Leave Approval. The Paid Leave Approval page displays. From this page you may view, approve, or reject employee paid leave requests and generate paid leave reports.
2- Review requested employee paid leave in the Paid Leave Requests table.
3- Click or on the row of the Paid Leave Requests table for the paid leave request you would like to take action.
4- The Paid Leave Confirmation: Approval page displays.
Enter notes pertaining to your action of the employee’s paid leave, if necessary.
5- Click . The paid leave request you selected from the Paid Leave Approval table is marked as approved or rejected. The employee will receive an e-mail notification informing them that you have taken action on their paid leave request. If you entered any notes, those notes are included in the e-mail.

16 ExponentHR Payroll Training Guide
Paid Leave Approval Status
Status Description
Requested: The employee has requested leave in ExponentHR. Management review and approval is pending.
Approved: Management has reviewed and approved the employee’s request. No further action is needed.
Rejected: Management has reviewed and rejected the employee’s request. Accompanying notes will detail why the manager rejected it. The employee may delete the request after it is rejected. If it is not deleted, ExponentHR deletes it automatically at the end of the applicable payroll period.
Mgmt Entry: Management has reported leave on the employee’s behalf in ExponentHR. This bypasses the approval process. No further action is needed.
Late Entry: The employee reported leave for a past date in ExponentHR. This bypasses the paid leave approval process. Management will review the leave through Time Clock Review at the end of the current pay period.
Auto-approved: Management did not act on the leave request by the end of the applicable pay period (it was not Approved or Rejected). As a result, the ExponentHR system changed the leave status from Requested to Auto-Approved and exported the time to payroll.
Viewing Peer Group Leave Request (Optional Feature)
If you have activated the ability for employees to view the requested and approved leave requests of other employees (see Page 7-9 of this guide for more information), you will also have the ability for managers to view the peer group of the employee that has requested a day off. This tool is helpful when only a particular percentage of the Peer Group members are allowed to be out of the workplace in a single day.
To View Peer Groups for Employee Leave Request
Step Action 1- On the Navigation bar from the Management view, click Wage & Tax > Applications
> Paid Leave Approval.
2- Click on the Employee’s Name that you wish to review.
3- Click
4- In addition to viewing the leave requests from others you supervise, you will now be able to view a summary of the total request and percentages for the days in question. (See the table below the step table for more information.)

ExponentHR Payroll Training Guide 17
5- Click after reviewing the Peer Group.
6- Continue to Reject or Approve the leave request.
Note When Managers view the peer group, they will see the same screen that the selected
employee has access to on the Personal View. The Manager will NOT be
prevented from seeing employees that they do not have access to through Grant
Access.
18 ExponentHR Payroll Training Guide
Time Clock Review and Approval
Introduction
The Time Clock Review serves two key management level users in ExponentHR. The first, management personnel, uses Time Clock Review to review, edit, print, and approve an employee’s worked hours, while the Payroll Manager uses Time Clock Review to perform the final review and submit the Time Clock batch to ExponentHR for processing.
Common uses for the Time Clock Review page:
• Review and submittal of current hours
• Remove current punches/hours
• Insert missing punches/hours
• Report any type of paid leave
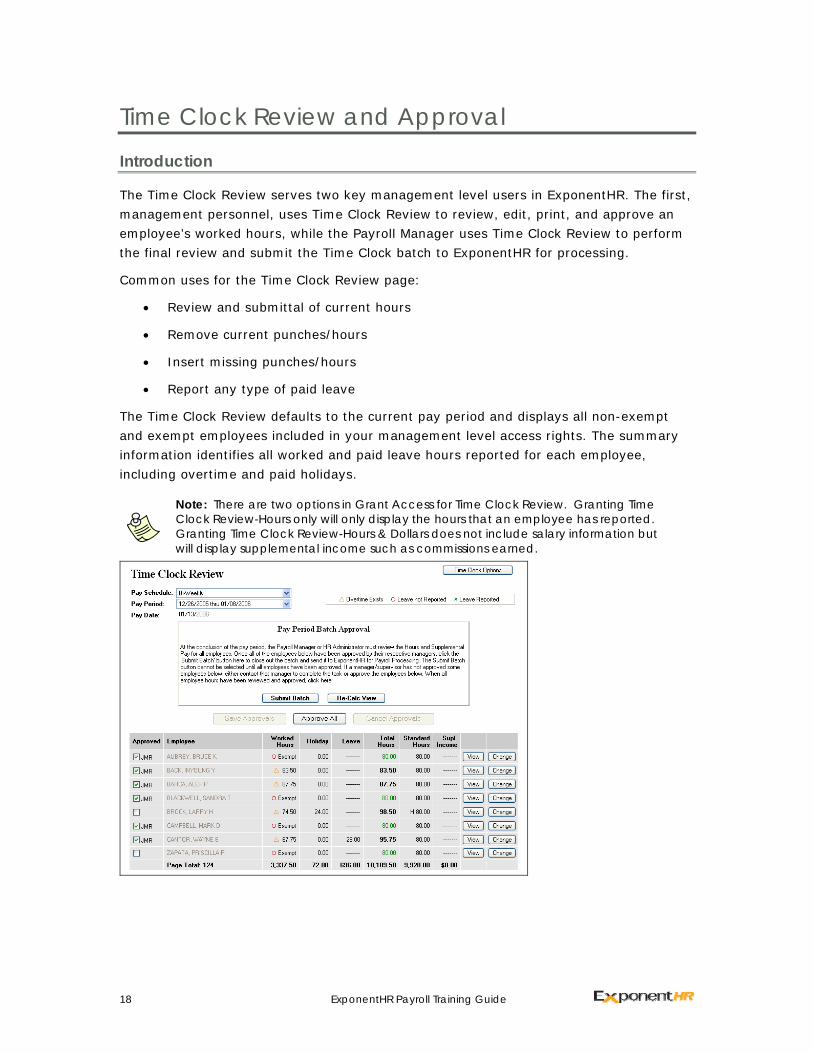
The Time Clock Review defaults to the current pay period and displays all non-exempt and exempt employees included in your management level access rights. The summary information identifies all worked and paid leave hours reported for each employee, including overtime and paid holidays.
Note: There are two options in Grant Access for Time Clock Review. Granting Time Clock Review-Hours only will only display the hours that an employee has reported. Granting Time Clock Review-Hours & Dollars does not include salary information but will display supplemental income such as commissions earned.

ExponentHR Payroll Training Guide 19
The image on the previous page displays a sample Time Clock Review page to a user with Payroll Rights. Use the table below to distinguish each component of the Time Clock Review page.
Item Description A delta ( ) icon will be displayed in the Worked Hours column if
overtime exists for the displayed pay period.
A circle (O) icon will be displayed in the Worked Hours column if an exempt employee has not reported any leave during the displayed pay period.
An (X) icon will be displayed in the Worked Hours column for an exempt employee if any reported leave exists during the displayed pay period.
The employee’s time for the displayed pay period has not been approved. Click this icon to view the Time Clock Review – Approval History page.
Identifies the employee has an insufficient amount of accrued paid leave hours to cover the employee’s reported leave. Click this icon to view the detailed hours requested and accrued.
A green dot will be displayed when the employee has a deduction amount in arrears.
A triangle with an exclamation point will be displayed when there is a warning or error associated with an imported time clock record.
Approved
Checkbox allows approving manager to select and approve recorded hours. Once approved this field is disabled and displays the initials of the approving manager.
Worked Hours Total hours worked recorded in the current pay period.
Holiday Total holiday hours recorded in the current pay period.
Leave Total leave hours recorded in the current pay period.
Total Hours Total hours + overtime recorded in the current pay period.
Standard Hours Total anticipated work hours per pay period. An (H) displayed next to the hours indicates this is an hourly employee.
Supl. Income Additional income recorded to be applied during the displayed pay period.
Note: A dynamic status bar appears at the top of the Time Clock Review page when the page first loads showing you the percentage to completion for the loading of this page.
20 ExponentHR Payroll Training Guide
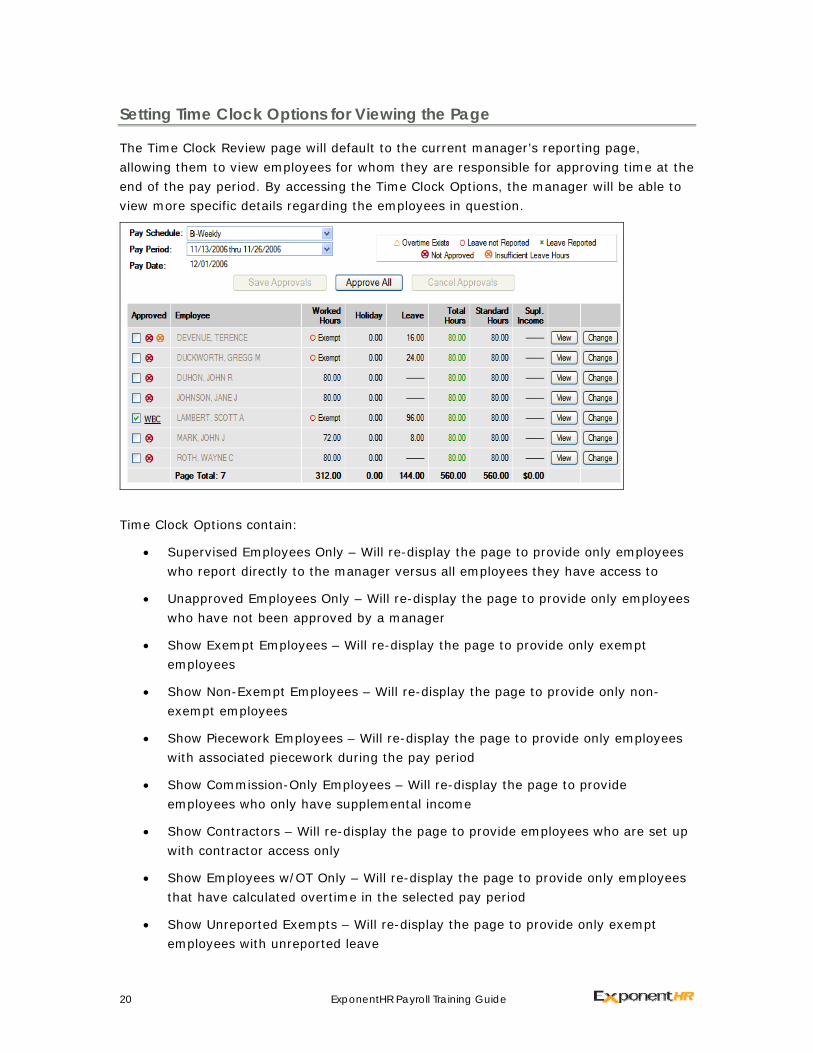
Setting Time Clock Options for Viewing the Page
The Time Clock Review page will default to the current manager’s reporting page, allowing them to view employees for whom they are responsible for approving time at the end of the pay period. By accessing the Time Clock Options, the manager will be able to view more specific details regarding the employees in question.
Time Clock Options contain:
• Supervised Employees Only – Will re-display the page to provide only employees who report directly to the manager versus all employees they have access to
• Unapproved Employees Only – Will re-display the page to provide only employees who have not been approved by a manager
• Show Exempt Employees – Will re-display the page to provide only exempt employees
• Show Non-Exempt Employees – Will re-display the page to provide only non-exempt employees
• Show Piecework Employees – Will re-display the page to provide only employees with associated piecework during the pay period
• Show Commission-Only Employees – Will re-display the page to provide employees who only have supplemental income
• Show Contractors – Will re-display the page to provide employees who are set up with contractor access only
• Show Employees w/OT Only – Will re-display the page to provide only employees that have calculated overtime in the selected pay period
• Show Unreported Exempts – Will re-display the page to provide only exempt employees with unreported leave

ExponentHR Payroll Training Guide 21
• Show Actual Worked Hours – Selecting this option will display the regular, overtime and double time worked hours that any salary non-exempt employee has actually punched. Without this option selected, ExponentHR will display the standard hours base amount
• Print Reports for all Employees – Will allow you to print the detailed Time Clock Reporting Page for each employee in the list
• Re-Send Management Emails – Will allow you to send the managers a follow-up email asking them to approve their employees’ time
• Suppress Employee Pay – Will allow you to suppress pay for a particular employee for this pay period
• Batch Settings – Will allow you to change the settings of the batch, such as the distribution method and supplemental tax rate overrides
To select any of these options, click the Time Clock Options button and place a check mark next to the desired option. The page will re-display with the desired option. If you would like to select multiple options, you will need to select each one and allow a moment for the page to refresh before selecting the next option.
Viewing Employee Time
You can see the details of an employee’s time clock entries by clicking View on the Time Clock Review page. The Time Clock report shows the employee’s time clock punches for each day in the pay period (for non-exempt employees), as well as any variable pay or allocation details.

22 ExponentHR Payroll Training Guide
Time Clock Adjustments
Adjusting Employee Time
If a time punch was erroneously recorded, you can use the Time Clock Review function to adjust or delete that punch. The image and table below describe this feature.
To Edit an Existing Punch
Step Action 1- On the Time Clock Review page, click the button on the employee’s
corresponding row.
2- In the Hours Submitted for Selected Period table, click the Edit button on the row corresponding to the punch needing correction.
The Time Punch Edit window appears.
3-
Do the following:
If you want to… Then…
Delete the punch Click the Delete button.
Edit the punch Using the lists, adjust the clock in, clock out, and/or end date.
4- Click Save.
ExponentHR will store records of the corrected entry including information of when edits and deletions took place. It will also take note of who made the correction.
Note: To go back to the previous page, click the Return to Previous Screen button. Clicking the ‘Back’ button on your browser controls will not update the page correctly.
Scenario: In reviewing time for one of your Non-Exempt employees, you see that an employee clocked out for lunch and did not clock back in after lunch. Therefore, their hours were shorted by 4 hours. After talking with them about it, you need to add a time punch for the 4 hours that were missed last Monday. Following the Edit Existing Punch instructions, adjust the time punch so that the hours are reported correctly.

ExponentHR Payroll Training Guide 23
Excluding an Employee from a Payroll
This process allows a management level user with Time Clock Review access rights to suppress payroll for a specific employee without removing that employee’s hours, supplemental pay, and recurring earnings. This process will suppress the pay for the employee in the selected pay period only.
When activated the employee is very clearly marked with a Don’t Pay designation on the Time Clock Review. Any manager with rights to the employee can restore pay to the user by clicking the Don’t Pay link on the screen or by using the Suppress Employee Pay function in the Time Clock Options menu.
To Suppress Employee Pay
Step Action 1- On the Navigation bar from the Management view, click Wage & Tax > Applications
> Time Clock Review.
2- Select the Pay Schedule from the drop down list.
3- On the Time Clock Review page, click
4 Select Supress Employee Pay.
The Suppress Employee Pay page appears.
5- In the Employee drop down list, select the employee for which you wish to suppress pay.
The employee and all hours detail appear in the table.
6- Click .
The Payroll status changes to Payroll Suppressed.
7- Click .
Note: Benefit Deductions will be ignored for the suppressed pay period. ExponentHR will place benefit deduction amounts in arrears and apply them to those amounts in a subsequent paycheck.
Miscellaneous Adjustments
When approving and providing final review of time clock hours, it may be necessary to insert supplemental pay for employees such as:
• Bonus
• Commission
• Advance / Reimbursement
• Hourly adjustments to regular, holiday, vacation, and overtime pay

24 ExponentHR Payroll Training Guide
Follow these steps to insert a miscellaneous adjustment to add or delete any hours that occurred in a prior pay period, or to report other pay earned such as bonuses or commissions. Miscellaneous deductions, such as a lost uniform repayment, are handled in the same way through Time Clock Review.
To Insert a Miscellaneous Adjustment/Deduction
Step Action 1- On the Time Clock Review page, click the button on the employee’s
corresponding row.
2- In the first drop down list, select Misc. Adjustments or Misc. Deduction.
3- In the Type list, select the type of adjustment you are adding.
4- In the Description box, type a short description of the misc. adjustment (if necessary).
This field is limited to 50 characters.
5- Select Hide to suppress the Misc Adjustment from employee view until pay day.
6-
Enter the Hours or Amt. $ and click Submit. The following popup message displays:
7- Click OK.

ExponentHR Payroll Training Guide 25
Scenario: One of your employees has been doing an outstanding job in the last few months. At the latest management meeting, a decision was made to provide a spot bonus to this employee in the amount of $1000. Use the Misc. Adjustments utility to issue this employee a bonus of $1000.
26 ExponentHR Payroll Training Guide
Payroll Adjustments
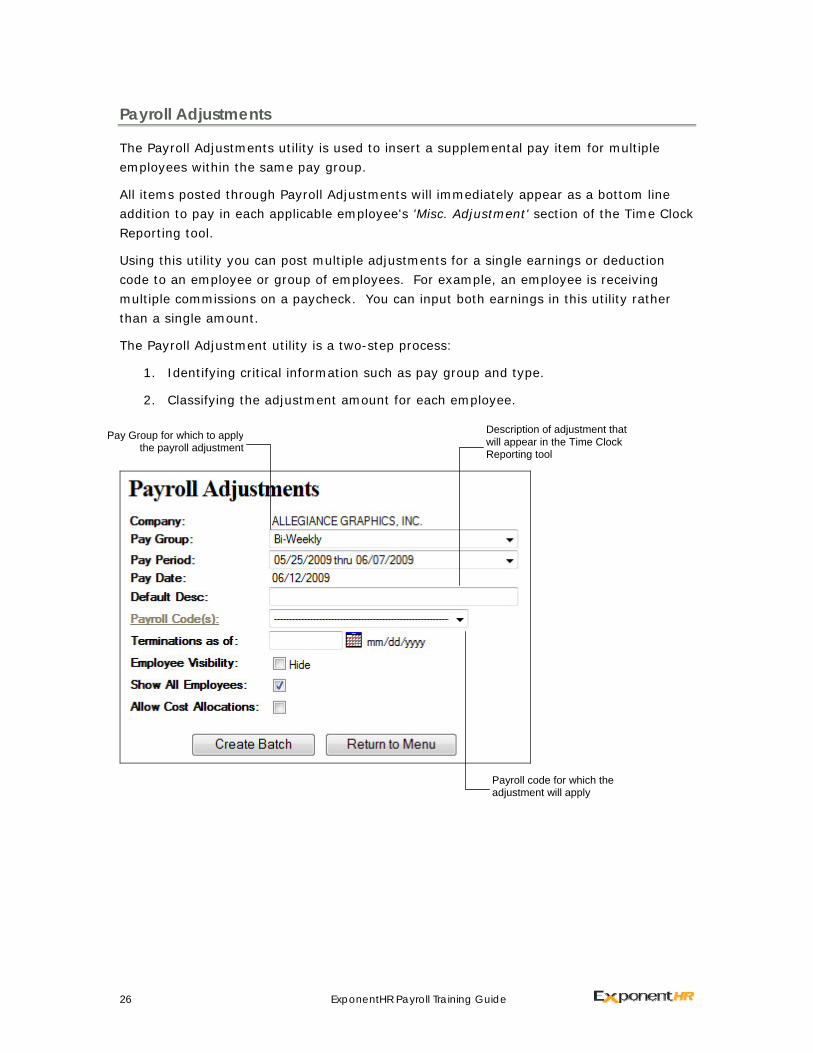
The Payroll Adjustments utility is used to insert a supplemental pay item for multiple employees within the same pay group.
All items posted through Payroll Adjustments will immediately appear as a bottom line addition to pay in each applicable employee's 'Misc. Adjustment' section of the Time Clock Reporting tool.
Using this utility you can post multiple adjustments for a single earnings or deduction code to an employee or group of employees. For example, an employee is receiving multiple commissions on a paycheck. You can input both earnings in this utility rather than a single amount.
The Payroll Adjustment utility is a two-step process:
1. Identifying critical information such as pay group and type.
2. Classifying the adjustment amount for each employee.
Payroll code for which the adjustment will apply
Pay Group for which to applythe payroll adjustment
Description of adjustment that will appear in the Time Clock Reporting tool

ExponentHR Payroll Training Guide 27
To Process Supplemental Pay for Multiple Employees
Step Action 1- From the Navigation bar, select Home > Wage & Tax > Payroll Management >
Payroll Adjustments
2- In the Pay Group list, select the pay group to apply the payroll adjustment.
Note: You may only post to the currently active pay period.
3- In the Default Desc. box, type a description for the adjustment.
Note: The description will appear in the Misc Adjustment section of the Time
Clock Reporting tool.
4- In the Payroll Code(s) list, select the pay code for the payroll adjustment.
5- In the Terminations As Of box, type the date to include employees that have been terminated. (For example, 4/1/09 would include any employee terminated since that date.)
Total Payroll Adjustment Amount
Adjustment Summary

28 ExponentHR Payroll Training Guide
Step Action
6-
Select the check boxes for other options as desired:
• Employee Visibility – Allows employees to see the adjustment prior to pay day
• Show All Employees – Includes all employees in the pay group in the following employee-selection screen
• Allow Cost Allocations – Allows you to perform cost allocation overrides in the batch
7- For a dollars-based pay type, if you want the adjustment to apply to overtime worked, select the Date Range radio button and enter the applicable date range.
8- Click the Create Batch button.
The Payroll Adjustments Detail page appears.
9- In the Amount (or Hours) box, type an amount for the adjustment.
10- In the Alternate Description box, typing a description will override the Default Description entered on the previous page.
11- If you want to add another adjustment for the same employee, click the icon.
If you want to add an adjustment for another Employee, click Add Employee.
12- Click the Post Adjustments button.
The Payroll Adjustments Confirmation page appears.
13- Click Confirm Post.
Scenario: You have been given the approval from management to award each of your employees with a $250 bonus. Using the payroll adjustment tool, make a one-time non-recurring payment for all employees that were employed as of the beginning of this month.
ExponentHR Payroll Training Guide 29
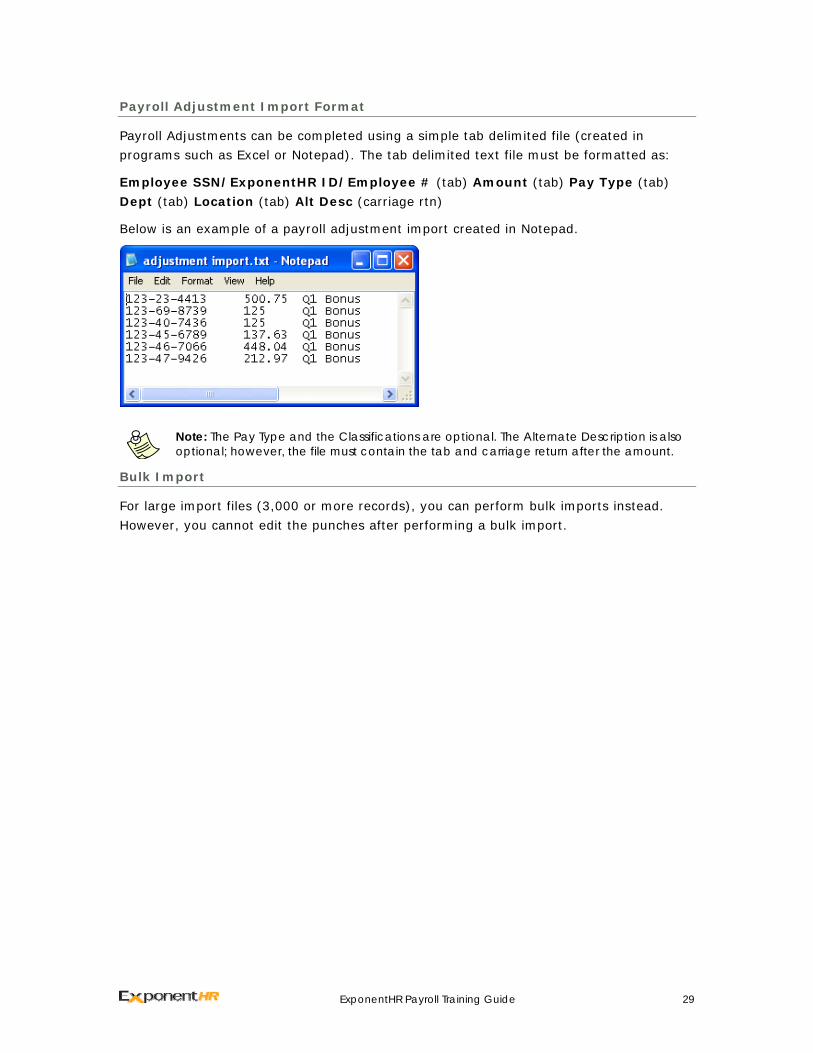
Payroll Adjustment Import Format
Payroll Adjustments can be completed using a simple tab delimited file (created in programs such as Excel or Notepad). The tab delimited text file must be formatted as:
Employee SSN/ExponentHR ID/Employee # (tab) Amount (tab) Pay Type (tab) Dept (tab) Location (tab) Alt Desc (carriage rtn)
Below is an example of a payroll adjustment import created in Notepad.
Note: The Pay Type and the Classifications are optional. The Alternate Description is also
optional; however, the file must contain the tab and carriage return after the amount.
Bulk Import
For large import files (3,000 or more records), you can perform bulk imports instead. However, you cannot edit the punches after performing a bulk import.

30 ExponentHR Payroll Training Guide
Earnings/Deductions Adjustments
Use the Recurring Items utility to set up recurring earnings and deductions. This utility can also be used to modify employee per-period benefit deductions.
Common examples for use of this utility are as follows:
• Create a deduction adjustment
• 401k loan repayment
• Employee cash advance
• Advance repayment
• Bonus/award
• Commission draw
• Tuition Reimbursement
You can also set up overrides to the ongoing adjustment such that the adjustment amount is reduced (or even dropped to zero) for a selected period of time.
To Add Recurring Earnings for an Employee
Step Action 1- From the Navigation bar, select Home > Wage & Tax > Payroll Management >
Recurring Items
2- Click .
3- In the Employee list, select the employee for which you are adding a recurring earning.
4- In the Earnings Code list, select the earnings code in which to apply the earnings.
5- If necessary, in the Reference ID box, type any TPA identification number used to track the account.
6- In the Status box, make sure it is set to Active if you want the adjustment effective immediately.
7- In the Start Date box, type the pay date for the earnings to begin.
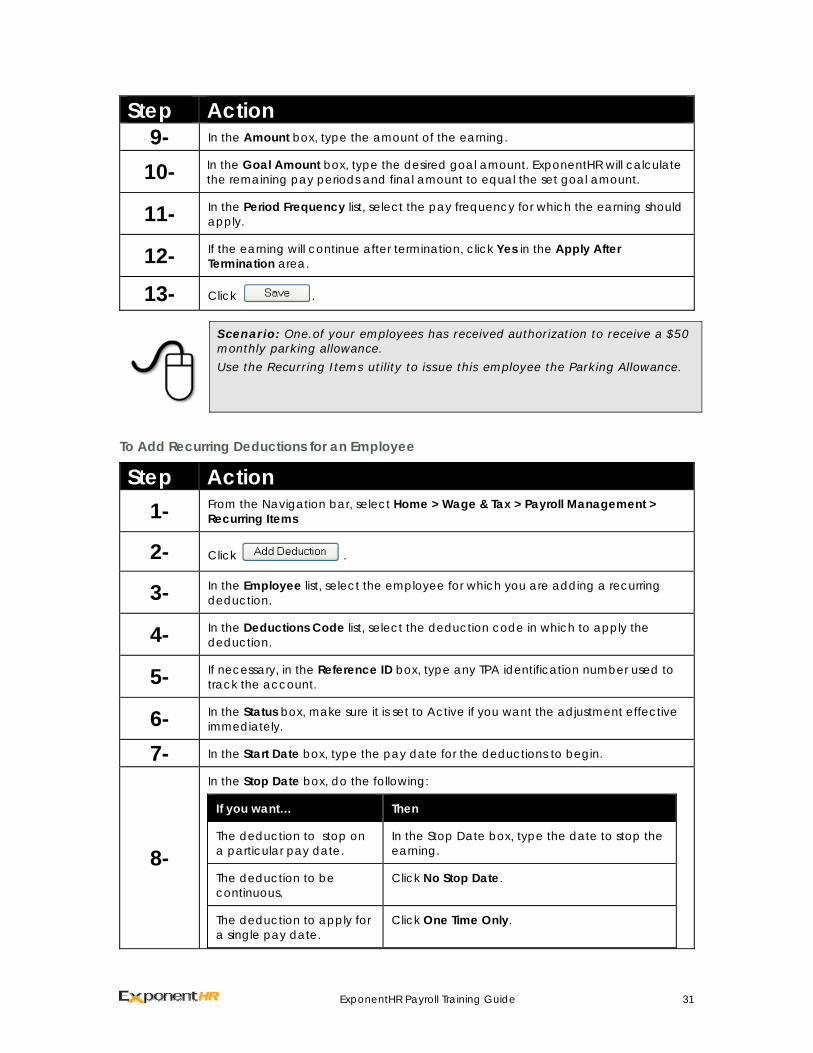
8-
In the Stop Date box, do the following:
If you want… Then
The earnings to stop on a particular pay date.
In the Stop Date box, type the date to stop the earning.
The earnings to be continuous.
Click No Stop Date.
The earnings to apply for a single pay date.
Click One Time Only.
ExponentHR Payroll Training Guide 31
Step Action 9- In the Amount box, type the amount of the earning.
10- In the Goal Amount box, type the desired goal amount. ExponentHR will calculate the remaining pay periods and final amount to equal the set goal amount.
11- In the Period Frequency list, select the pay frequency for which the earning should apply.
12- If the earning will continue after termination, click Yes in the Apply After Termination area.
13- Click .
Scenario: One.of your employees has received authorization to receive a $50 monthly parking allowance. Use the Recurring Items utility to issue this employee the Parking Allowance.
To Add Recurring Deductions for an Employee
Step Action 1- From the Navigation bar, select Home > Wage & Tax > Payroll Management >
Recurring Items
2- Click .
3- In the Employee list, select the employee for which you are adding a recurring deduction.
4- In the Deductions Code list, select the deduction code in which to apply the deduction.
5- If necessary, in the Reference ID box, type any TPA identification number used to track the account.
6- In the Status box, make sure it is set to Active if you want the adjustment effective immediately.
7- In the Start Date box, type the pay date for the deductions to begin.
8-
In the Stop Date box, do the following:
If you want… Then
The deduction to stop on a particular pay date.
In the Stop Date box, type the date to stop the earning.
The deduction to be continuous.
Click No Stop Date.
The deduction to apply for a single pay date.
Click One Time Only.
32 ExponentHR Payroll Training Guide
Step Action 9- In the Amount box, type the amount of the deduction.
10- In the Goal Amount box, type the desired goal amount if this is a recurring deduction. ExponentHR will calculate the remaining pay periods and final amount to equal the set goal amount.
11- In the Orig. Loan Amount box, record the original loan amount for reference (if applicable).
12- In the Period Frequency list, select the pay frequency for which the deduction should apply.
13- If the deduction will continue after termination, click Yes in the Apply After Termination area.
14- If you want the deduction to go into arrears, select Yes in the Maintain Arrearage area.
15- Click .
You can set up more than one recurring item using the same earnings or deduction code. If this happens, a Record Number is automatically assigned to the adjustment so you can track them separately.
Scenario: Your company recently went through a United Way contribution campaign. Several of your employees have requested to take ongoing deductions from their checks. Use the Recurring Items utility to set up a $10 a check deduction for one of your employees.
Editing Existing Recurring Items
You can re-open a recurring earning or deduction to make changes to the way it is set up. You can temporarily override the recurring item, if you need to modify the amount for a certain duration or put it on hold temporarily. If the record has a goal amount, you can also enter transactions made by the employee outside of ExponentHR that affect the recurring earning or deduction, such as an employee paying down a loan amount by personal check.

ExponentHR Payroll Training Guide 33
To Override a Recurring Earning/Deduction
Step Action 1- From the Navigation bar, select Home > Wage & Tax > Payroll Management >
Recurring Items
2- Click Edit next to the earning or deduction you want to override.
3- In the Overrides area, click Add.
4- Type the new temporary amount in the Amount Per Period box.
Note: If you want to put the recurring item on hold, leave 0.00 in the box.
5- In the Override Start Date box, enter the date when you want the new amount effective.
6- In the Override End Date box, enter the date when you want to return to the original amount.
7- Click .
To Record Outside (Non-System) Transactions
Step Action 1- From the Navigation bar, select Home > Wage & Tax > Payroll Management >
Recurring Items
2- Click Edit next to the earning or deduction for which you want to record an outside transaction.
3- In the Goal Details area, click Edit next to Non-System Transactions.
4- Click Add.
5- Type any notes and the amount.
6- Click .
7- Click .

34 ExponentHR Payroll Training Guide
Time Clock Approval
At the conclusion of the pay period, all managers responsible for approving time will receive an email prompting them to approve time for employees. Below is a sample notification:
To Approve Employee Time
Step Action 1- From the Navigation bar, select Home > Wage & Tax > Applications > Time Clock
Review
2- If necessary, select the Pay Schedule from the drop down list
3- Select the box in the Approved column next to each employee for which you want to approve time.
4- Click Save Approvals. ExponentHR records the date, time and approver’s initials.
Note: An employee’s time cannot be approved if any open time clock punches exist.
Time Clock Batch Submittal
At the conclusion of the pay period, once all of the employees on the Time Clock Review page have been approved by their respective managers, the Payroll Manager must review the Hours and Supplemental Pay for all employees.

ExponentHR Payroll Training Guide 35
To Approve Employee Time
Step Action 1- From the Navigation bar, select Home > Wage & Tax > Applications > Time Clock
Review
2- Select the Pay Schedule from the drop down list.
3- Click Submit Batch.
If a manager/supervisor has not approved some employees on the Time Clock Review page, either contact that manager to complete the task or approve the employees yourself. The Submit Batch button cannot be selected until all employees have been approved.

36 ExponentHR Payroll Training Guide
Payroll Processing
Payroll Batch Review and Approval
Use the Batch Management utility to analyze the current pending payroll batch and approve or reject it. From the Batch Management page, you can access payroll funding requirements and review batch detail by clicking on the associated batch number.
Below is an example of the Batch Management page.
The Batch Management page displays the gross-to-net detail of each pending payroll batch.
To Review Batch Detail for a Pending Payroll
Step Action 1- From the Navigation bar, select Home > Wage & Tax > Applications > Batch
Management.
2- Select the check box next to the batch containing the pay group you want.
To see the batches for all pay groups, select the check box in the upper left corner.
3- Click Batch Detail. The Batch Detail page appears.

ExponentHR Payroll Training Guide 37
Reviewing Batch Detail
Use this Batch Detail page to review specific information of the selected payroll batch. After reviewing the batch detail, select the appropriate button to approve or reject the payroll batch.
The initial sort for the page is by variance, displaying the greatest net variance from the prior check at the top. Variances greater than +/- 10% will appear in bold. The variance allows you to quickly discover employees whose pay is significantly different from the prior check. Specific employee batch detail can be evaluated through the employee pay register by clicking on the employee name.
Diagnostics
Upon calculation of your payroll batch, ExponentHR performs a diagnostic check to inform you of critical and warning (non-critical) events that you should review prior to performing final approval of the batch. Access the Batch Diagnostics report by either clicking the Critical/Warnings link on Batch Detail or by selecting Batch Diagnostics from the menu on the Options button. The Batch Diagnostics report provides all Warnings & Errors contained at both the batch and employee level.

38 ExponentHR Payroll Training Guide
Payroll Funding Requirements The Payroll Funding Requirements Summary page allows you to view the specific totals for payroll, tax payments, 401(k)/FSA funding, etc. As a Payroll Manager you can access the funding requirements from the Quick Reference Links on the Management Home page or via the Batch Management page.
As you can see in the image below, five columns identify the specific amounts for the following:
• Gross
• EE Deductions
• ER Taxes
• 401(k)/FSA Funding
• Total Funding Requirement
To view the specific funding detail by employee, click the Batch No. link for the associated batch. This report will list each employee and their gross wages, deductions, ER FICA liability FUTA/SUTA, and 401(k) match.

ExponentHR Payroll Training Guide 39
Payroll Batch Approval
After you have completed all final review of the payroll batch, it is time to submit it to ExponentHR no later than the deadline. Once you have approved the batch, ExponentHR will accept the final batch, process payroll, and post the funding requirement.
To Approve a Payroll Batch for Processing
Step Action 1- From the Navigation bar, select Wage & Tax > Applications > Batch Management.
2- Select the check box next to the batch containing the pay group you want.
To see the batches for all pay groups, select the check box in the upper left corner.
3- Click Batch Detail. The Batch Detail page appears.
4- Click Approve.
Refer to the Payroll Processing Flow Chart for specific timeline and processing details for your company.
Payroll Batch Rejection
You also have the option to reject the batch and immediately open Time Clock (and recurring items) for edit prior to final batch approval.
To Reject a Batch
Step Action 1- From the Navigation bar, select Wage & Tax > Applications > Batch Management.
2- Select the check box next to the batch containing the pay group you want.
To see the batches for all pay groups, select the check box in the upper left corner.
3- Click Batch Detail. The Batch Detail page appears.
4- Click Reject.
5- Click Reject Batch and Re-Open Time Clock for Additional Edits (or click Reject Batch to ExponentHR Only if you simply need to process an EAN or Life Event).
6- Click Reject again.
Note: Include notes to the ExponentHR Payroll Processor with a summary of the changes you are making. (For example, if you want an EAN to be processed before re-calculating the batch, include the EAN number.)
40 ExponentHR Payroll Training Guide
Off-Cycle Batch Processing
Introduction
You can process payroll checks outside of the normal payroll schedule using the Off-Cycle Payroll Batch utility. You can specify different types of earnings (hours-based pay and flat amount pay) and deductions for a single employee or for groups of employees. In addition, you can import all of the recurring earnings or deductions that would appear in the next paycheck.
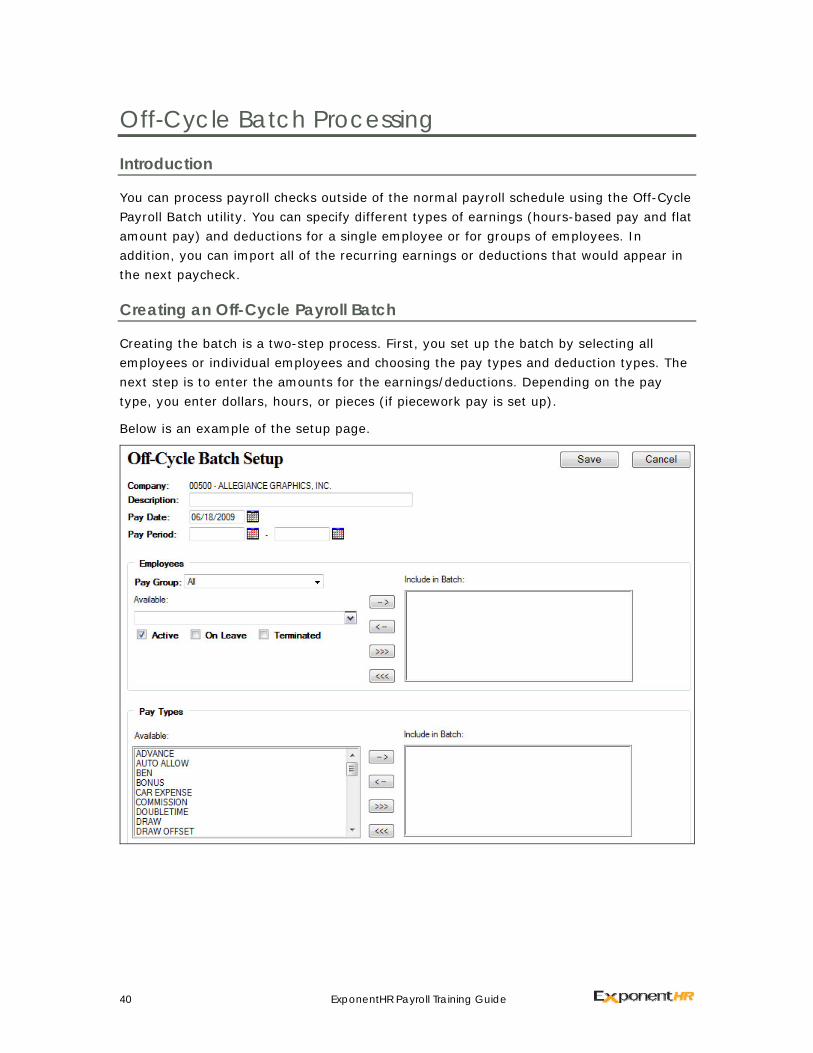
Creating an Off-Cycle Payroll Batch
Creating the batch is a two-step process. First, you set up the batch by selecting all employees or individual employees and choosing the pay types and deduction types. The next step is to enter the amounts for the earnings/deductions. Depending on the pay type, you enter dollars, hours, or pieces (if piecework pay is set up).
Below is an example of the setup page.
ExponentHR Payroll Training Guide 41
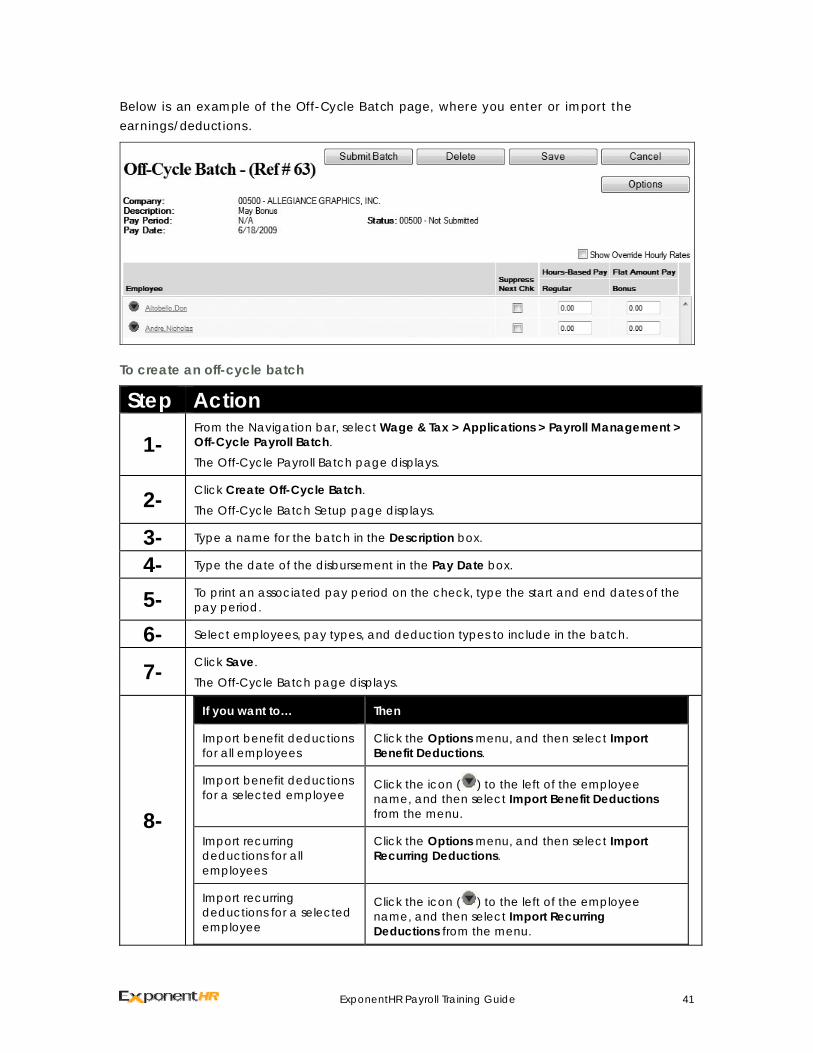
Below is an example of the Off-Cycle Batch page, where you enter or import the earnings/deductions.
To create an off-cycle batch
Step Action
1- From the Navigation bar, select Wage & Tax > Applications > Payroll Management > Off-Cycle Payroll Batch.
The Off-Cycle Payroll Batch page displays.
2- Click Create Off-Cycle Batch.
The Off-Cycle Batch Setup page displays.
3- Type a name for the batch in the Description box.
4- Type the date of the disbursement in the Pay Date box.
5- To print an associated pay period on the check, type the start and end dates of the pay period.
6- Select employees, pay types, and deduction types to include in the batch.
7- Click Save.
The Off-Cycle Batch page displays.
8-
If you want to… Then
Import benefit deductions for all employees
Click the Options menu, and then select Import Benefit Deductions.
Import benefit deductions for a selected employee
Click the icon ( ) to the left of the employee name, and then select Import Benefit Deductions from the menu.
Import recurring deductions for all employees
Click the Options menu, and then select Import Recurring Deductions.
Import recurring deductions for a selected employee
Click the icon ( ) to the left of the employee name, and then select Import Recurring Deductions from the menu.
42 ExponentHR Payroll Training Guide
Step Action Import recurring earnings for all employees
Click the Options menu, and then select Import Recurring Earnings.
Import recurring earnings for a selected employee
Click the icon ( ) to the left of the employee name, and then select Import Recurring Earnings from the menu.
Import all deductions/ earnings for all employees
Click the Options menu, and then select Import All (Benefit and Recurring Items).
Import all deductions/ earnings for a selected employee
Click the icon ( ) to the left of the employee name, and then select Import All (Benefits and Recurring Items) from the menu.
Import pay/deductions from a file
Click the Options menu, and then select Data File Import.
9- Type the number of hours, dollars, or pieces for each employee in the batch. (If you imported amounts, you can type over them to make edits.)
10- Click Submit Batch, and then click Confirm.

ExponentHR Payroll Training Guide 43
Additional Payroll Tools & Utilities
Time Clock Kiosk Setup
You have the ability to designate the computer you are using as a Time Clock Kiosk. This way, non-exempt employees only need access to one computer to clock in/out. To activate a new computer terminal, or reset a terminal for Kiosk use, you must first be connected to the desired computer terminal.
Recommended Access: Employees with HR Administrative responsibilities and Managers in locations where an HR Administrator cannot be present to set up the computer.
To Activate a New Kiosk
Step Action 1- From the Navigation bar, select Wage & Tax > Applications > Payroll Management
> Time Clock Kiosk Setup
2-
In the Activate this System as a New Kiosk table, do the following:
In this field Do the following…
Computer Name Type a description of the system and location of this kiosk.
Disable ExponentHR Login
Check the box if you want to disable ExponentHR login capabilities from this kiosk.
Activate Spanish Check the box if you want all text in the kiosk to appear in English and Spanish.
Time Zone Choose the time zone of where the kiosk is located from the list.
3- Click .
To Edit an Existing Kiosk
Step Action 1- From the Navigation bar, select Wage & Tax > Applications > Payroll Management
> Time Clock Kiosk Setup
2-
In the Edit Active Kiosk Systems table, make the necessary adjustments to the kiosk.
Click Delete to remove a kiosk. Click Reset to update the computer ID on a nonfunctioning kiosk. Note: this step must be performed on the actual system in question.
3- Click .
44 ExponentHR Payroll Training Guide
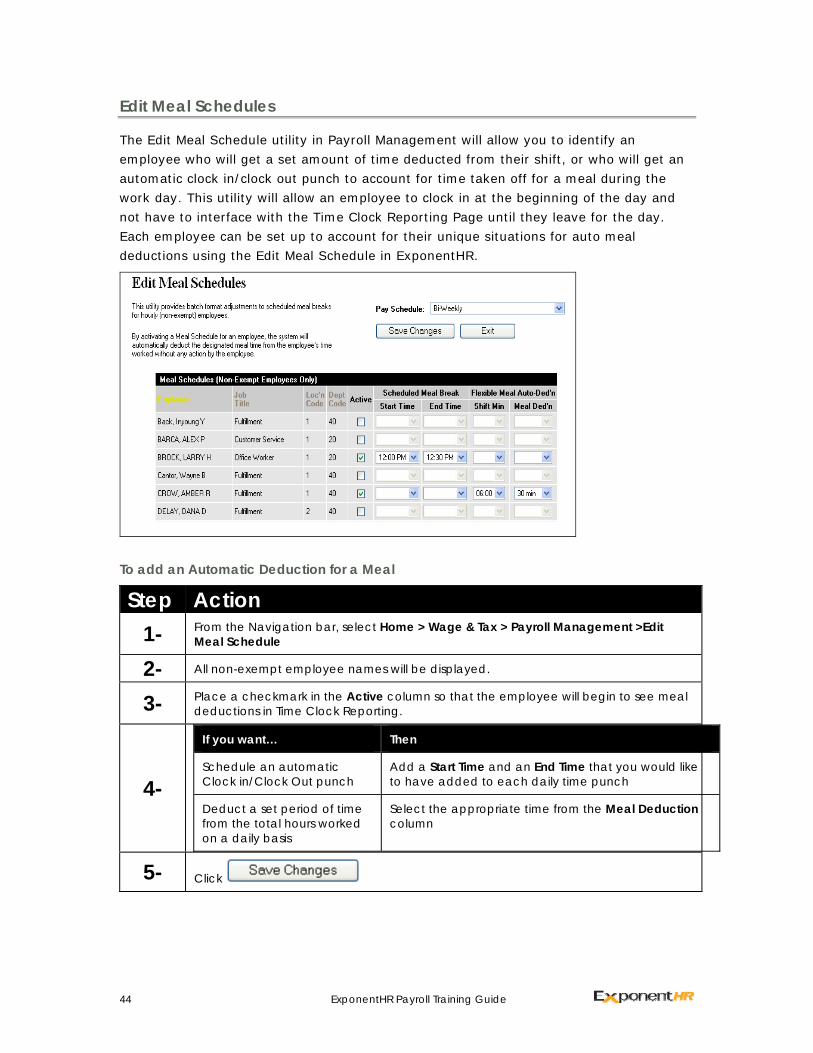
Edit Meal Schedules
The Edit Meal Schedule utility in Payroll Management will allow you to identify an employee who will get a set amount of time deducted from their shift, or who will get an automatic clock in/clock out punch to account for time taken off for a meal during the work day. This utility will allow an employee to clock in at the beginning of the day and not have to interface with the Time Clock Reporting Page until they leave for the day. Each employee can be set up to account for their unique situations for auto meal deductions using the Edit Meal Schedule in ExponentHR.
To add an Automatic Deduction for a Meal
Step Action 1- From the Navigation bar, select Home > Wage & Tax > Payroll Management >Edit
Meal Schedule
2- All non-exempt employee names will be displayed.
3- Place a checkmark in the Active column so that the employee will begin to see meal deductions in Time Clock Reporting.
4-
If you want… Then
Schedule an automatic Clock in/Clock Out punch
Add a Start Time and an End Time that you would like to have added to each daily time punch
Deduct a set period of time from the total hours worked on a daily basis
Select the appropriate time from the Meal Deduction column
5- Click

ExponentHR Payroll Training Guide 45
Retroactive Pay
The Retroactive Pay Calculator will determine the total amount of pay differential between an employee's old and new pay rate and apply that rate to all hours previously paid within a defined date range.
To use the Retroactive Pay Calculator, you must know the following:
• Employee Name
• Retroactive Effective Date
• Old Pay Rate
• New Pay Rate
This report tool should be used to calculate a lump sum pay adjustment for an employee when the employee's pay raise is implemented after the desired effective date has already passed. After the retroactive amount has been determined, use the Payroll Adjustments utility to post the retro pay for the employee.
Note: Before submitting a Retroactive Pay Adjustment, you should submit an EAN request reflecting the new pay rate change to be used for all future payroll periods, including the current pay period.
To Calculate Retroactive Pay for an Employee
Step Action 1- From the Navigation bar, select Wage & Tax > Applications > Payroll
Management.
2- In the list of available utilities, click Retroactive Pay Calculator.
3- In the Employee list, select the employee for whom you wish to calculate retroactive pay.
4- In the Retroactive Effective Date box, type the date for the pay increase.
5- In the Calculate Period End Date list, select the end date of the final pay period prior to the actual implementation of the employee’s pay raise.
Employee Calculation Variables
46 ExponentHR Payroll Training Guide
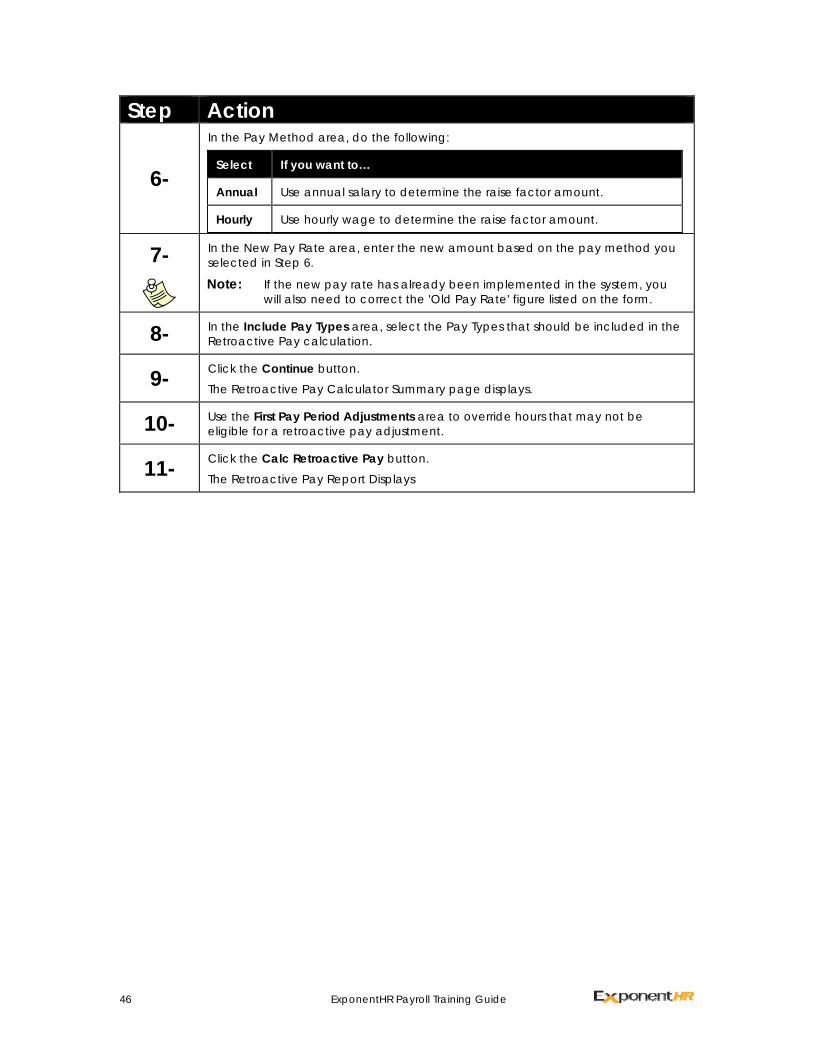
Step Action
6-
In the Pay Method area, do the following:
Select If you want to…
Annual Use annual salary to determine the raise factor amount.
Hourly Use hourly wage to determine the raise factor amount.
7- In the New Pay Rate area, enter the new amount based on the pay method you selected in Step 6.
Note: If the new pay rate has already been implemented in the system, you
will also need to correct the 'Old Pay Rate' figure listed on the form.
8- In the Include Pay Types area, select the Pay Types that should be included in the Retroactive Pay calculation.
9- Click the Continue button.
The Retroactive Pay Calculator Summary page displays.
10- Use the First Pay Period Adjustments area to override hours that may not be eligible for a retroactive pay adjustment.
11- Click the Calc Retroactive Pay button.
The Retroactive Pay Report Displays

ExponentHR Payroll Training Guide 47
Arrearage Management
An arrearage occurs when an employee's scheduled deduction is not taken because they did not have enough earnings to cover the deduction or because a paycheck was not issued to the employee in the scheduled payroll. This often affects on-leave employees or those who do not regularly receive a paycheck, such as commission-only employees.
ExponentHR automatically processes deductions that have gone into arrears by setting up a repayment schedule and will continue to withdraw the same payment in each paycheck until the arrearage balance is zero.
The Arrearage Management tool allows you to create new earnings or deduction arrearage payments for an employee without a current arrearage balance, as well as override any per-check arrearage payment amounts and adjust balances.
To View Arrearage Payments and Balances
Step Action 1- From the Navigation bar, select Wage & Tax > Applications > Payroll
Management.
2- In the list of available utilities, click Arrearage Management. The Arrearage Management page displays. Note: A green dot next to an employee's name means they have Time Clock activity in the current pay period, either hours worked or an adjustment.
3- To see the Current Arrearage Detail Report, click an employee’s name.
4- To see other reports (such as the Balance Due Adjustments report), click Options and select the report.
48 ExponentHR Payroll Training Guide
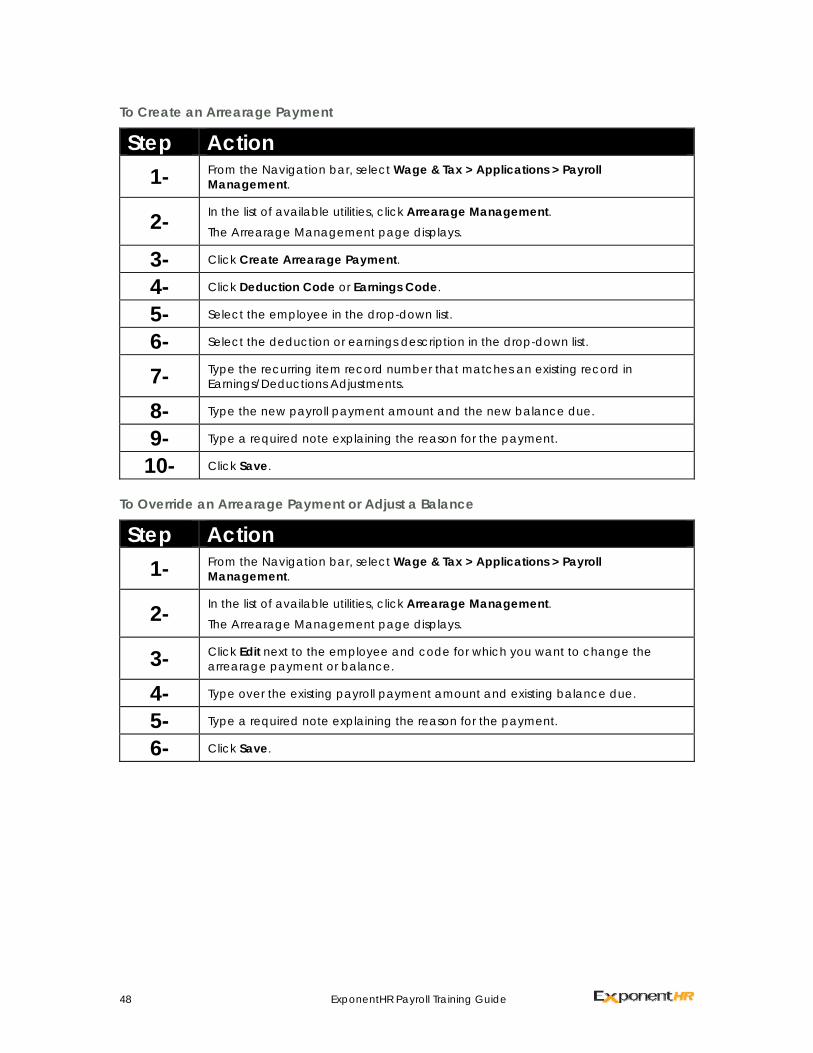
To Create an Arrearage Payment
Step Action 1- From the Navigation bar, select Wage & Tax > Applications > Payroll
Management.
2- In the list of available utilities, click Arrearage Management. The Arrearage Management page displays.
3- Click Create Arrearage Payment.
4- Click Deduction Code or Earnings Code.
5- Select the employee in the drop-down list.
6- Select the deduction or earnings description in the drop-down list.
7- Type the recurring item record number that matches an existing record in Earnings/Deductions Adjustments.
8- Type the new payroll payment amount and the new balance due.
9- Type a required note explaining the reason for the payment.
10- Click Save.
To Override an Arrearage Payment or Adjust a Balance
Step Action 1- From the Navigation bar, select Wage & Tax > Applications > Payroll
Management.
2- In the list of available utilities, click Arrearage Management. The Arrearage Management page displays.
3- Click Edit next to the employee and code for which you want to change the arrearage payment or balance.
4- Type over the existing payroll payment amount and existing balance due.
5- Type a required note explaining the reason for the payment.
6- Click Save.
ExponentHR Payroll Training Guide 49
Paid Leave Accrual Management
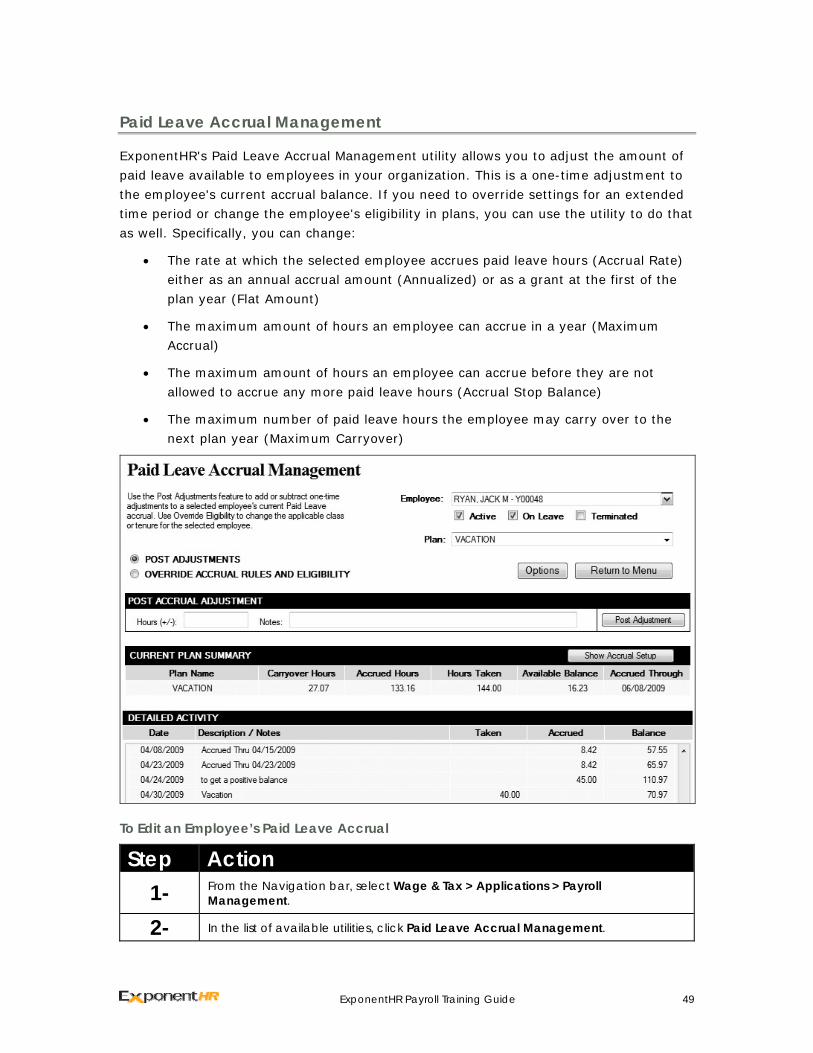
ExponentHR's Paid Leave Accrual Management utility allows you to adjust the amount of paid leave available to employees in your organization. This is a one-time adjustment to the employee's current accrual balance. If you need to override settings for an extended time period or change the employee's eligibility in plans, you can use the utility to do that as well. Specifically, you can change:
• The rate at which the selected employee accrues paid leave hours (Accrual Rate) either as an annual accrual amount (Annualized) or as a grant at the first of the plan year (Flat Amount)
• The maximum amount of hours an employee can accrue in a year (Maximum Accrual)
• The maximum amount of hours an employee can accrue before they are not allowed to accrue any more paid leave hours (Accrual Stop Balance)
• The maximum number of paid leave hours the employee may carry over to the next plan year (Maximum Carryover)
To Edit an Employee’s Paid Leave Accrual
Step Action 1- From the Navigation bar, select Wage & Tax > Applications > Payroll
Management.
2- In the list of available utilities, click Paid Leave Accrual Management.
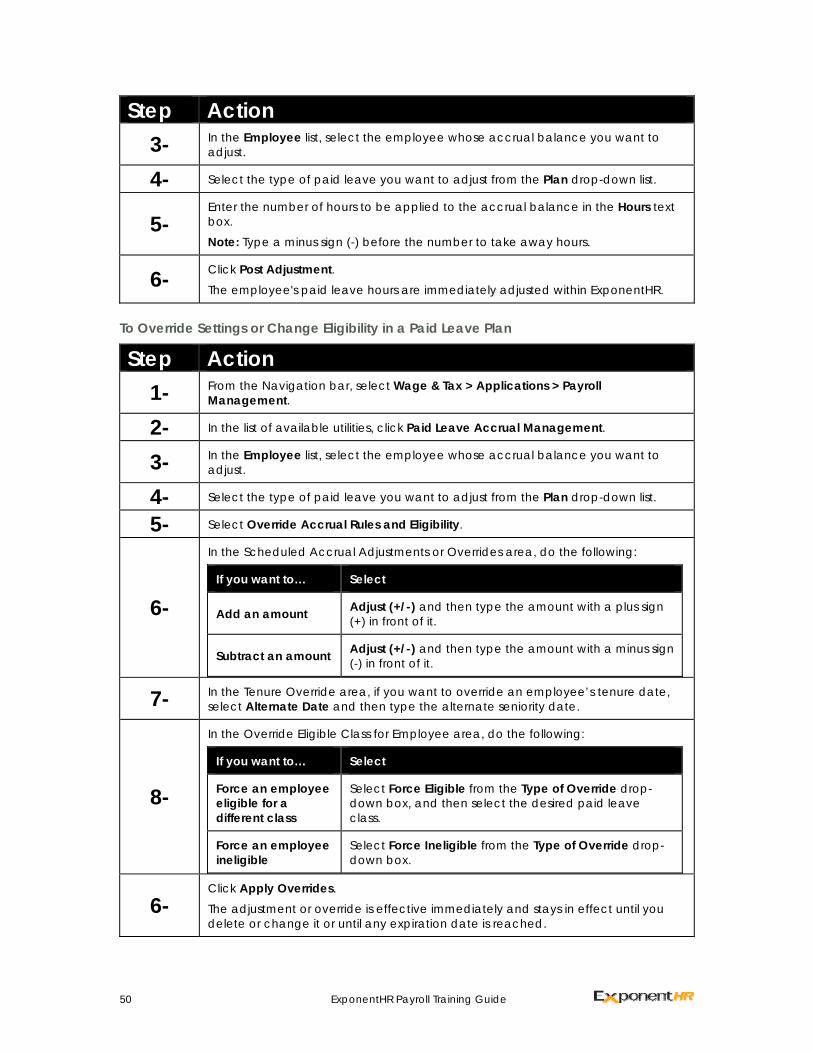
50 ExponentHR Payroll Training Guide
Step Action 3- In the Employee list, select the employee whose accrual balance you want to
adjust.
4- Select the type of paid leave you want to adjust from the Plan drop-down list.
5- Enter the number of hours to be applied to the accrual balance in the Hours text box.
Note: Type a minus sign (-) before the number to take away hours.
6- Click Post Adjustment. The employee's paid leave hours are immediately adjusted within ExponentHR.
To Override Settings or Change Eligibility in a Paid Leave Plan
Step Action 1- From the Navigation bar, select Wage & Tax > Applications > Payroll
Management.
2- In the list of available utilities, click Paid Leave Accrual Management.
3- In the Employee list, select the employee whose accrual balance you want to adjust.
4- Select the type of paid leave you want to adjust from the Plan drop-down list.
5- Select Override Accrual Rules and Eligibility.
6-
In the Scheduled Accrual Adjustments or Overrides area, do the following:
If you want to… Select
Add an amount Adjust (+/-) and then type the amount with a plus sign (+) in front of it.
Subtract an amount Adjust (+/-) and then type the amount with a minus sign (-) in front of it.
7- In the Tenure Override area, if you want to override an employee’s tenure date, select Alternate Date and then type the alternate seniority date.
8-
In the Override Eligible Class for Employee area, do the following:
If you want to… Select
Force an employee eligible for a different class
Select Force Eligible from the Type of Override drop-down box, and then select the desired paid leave class.
Force an employee ineligible
Select Force Ineligible from the Type of Override drop-down box.
6- Click Apply Overrides.
The adjustment or override is effective immediately and stays in effect until you delete or change it or until any expiration date is reached.