
5000 series strike - Access...
14
22630 North 17th Avenue Phoenix, Arizona 85027 Technical Support: 800.626.7590 [email protected] www.hesinnovations.com 5000 series strike Installation Instructions 4019006.001 rev G ©HES 2005 ASSA ABLOY, the global leader in door opening solutions
Transcript of 5000 series strike - Access...
22630 North 17th AvenuePhoenix, Arizona 85027
Technical Support: [email protected]
www.hesinnovations.com
������� ����� ���������� ���
5000 series strikeInstallation Instructions
4019006.001 rev G©HES 2005
ASSA ABLOY, the global leaderin door opening solutions

!
1
What do I have?
What do I need?
quantity description item
What tools would you recommend I use?
quantity description item
You will need 1 faceplate option kit (not included, see page 3) which contains:
*
*tool may differ for different applications
1
2
3
4
5
6
2
1
2
3
4
5
6
CautionBefore connecting electric strike at the installation site verify input voltage using a multimeter. Any input voltage exceeding 10% of thesolenoid rating may cause severe damage to the unit.
What item are you looking for?5000 series strike body
Faceplate option kit
Trim enhancer
Mounting screws
Faceplate screws
Trim enhancer screws
1
2
3
4
5
6(sold separately)
(sold with faceplate option kit)
(sold with faceplate option kit)
1 5000 series strike body
1 Trim enhancer
5-11 Blue wire connector
5 Pig tail connector
1 5000 series faceplate
2Mounting screws
#12-24 x 1/2
3Faceplate screws
#8-32 x 5/8
2 Trim enhancer screws#4-40 x 1/8
3
What faceplate will you be using?
501
501A
503
502
504
501B
503B
metal
metal
flat aluminum
flat aluminum/wood
wood
aluminum door
aluminum door
501501A
503502
504
501B
503B
option door/frame
pg 24pg 24
pg 18
pg 26
pg 21
pg 16 pg 14
Step 2
Refer to pages 13-26 for faceplate dimensions.
Recommended “For Indoor Use Only.” 4
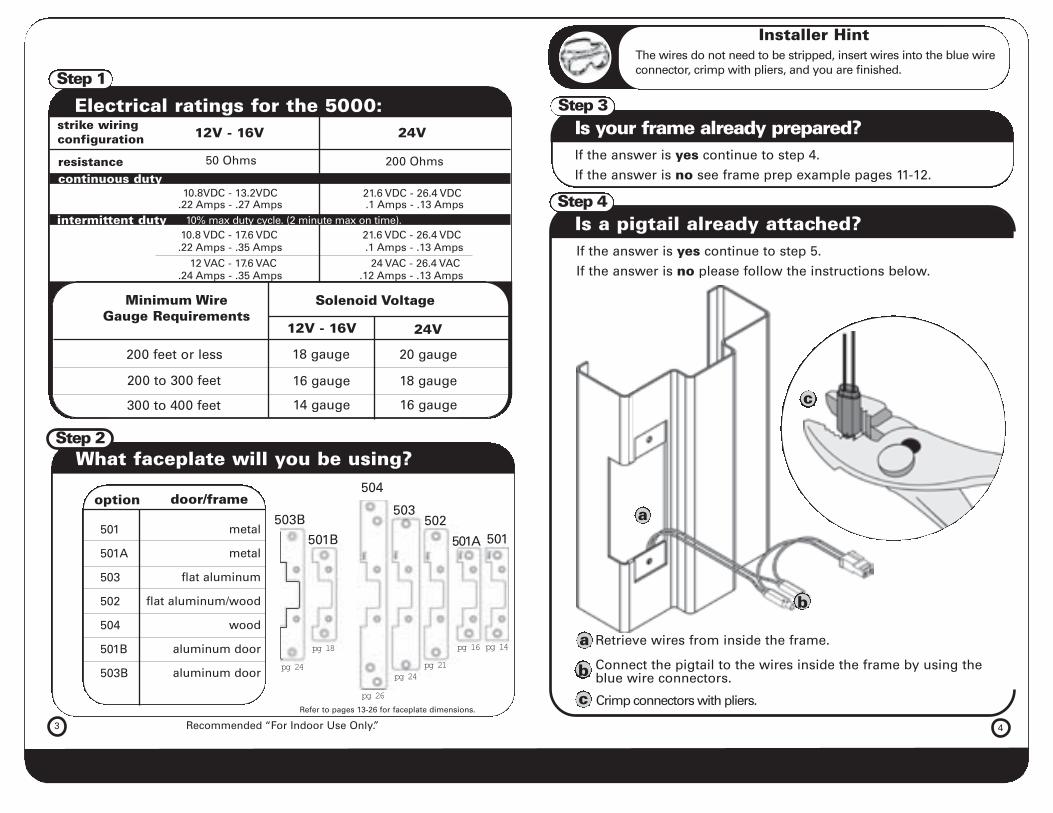
Installer HintThe wires do not need to be stripped, insert wires into the blue wireconnector, crimp with pliers, and you are finished.
Is your frame already prepared?If the answer is yes continue to step 4.
If the answer is no see frame prep example pages 11-12.
Is a pigtail already attached?
Step 3
Step 4
If the answer is yes continue to step 5.
If the answer is no please follow the instructions below.
Retrieve wires from inside the frame.aConnect the pigtail to the wires inside the frame by using the blue wire connectors.b
Crimp connectors with pliers.c
a
b
c
Electrical ratings for the 5000:Step 1
Minimum WireGauge Requirements
Solenoid Voltage
12V - 16V 24V
200 feet or less 18 gauge 20 gauge
200 to 300 feet 16 gauge 18 gauge
300 to 400 feet 14 gauge 16 gauge
strike wiring configuration
continuous duty
intermittent duty
12V - 16V 24V
resistance 50 Ohms 200 Ohms
10.8 VDC - 17.6 VDC
12 VAC - 17.6 VAC
10% max duty cycle. (2 minute max on time).
10.8VDC - 13.2VDC.22 Amps - .27 Amps
.22 Amps - .35 Amps24 VAC - 26.4 VAC
.12 Amps - .13 Amps
21.6 VDC - 26.4 VDC.1 Amps - .13 Amps
21.6 VDC - 26.4 VDC.1 Amps - .13 Amps
.24 Amps - .35 Amps

6
Installer HintWhen adjusting the screws for field selectability, veteraninstallers suggest adding a drop of Loctite to the screws beforetightening them into their final position for added durability.
Do you use Standard or LBM?If the answer is standard continue to step 7.
If the answer is LBM follow the instructions below.
What is LBM?
Step 6
Step 6a
LBM stands for Latch Bolt Monitoring. The LBM option detects that
the Latch is captured in the Strike.
white
orange
green
common
normally open
normally closed
wiring diagram
LBM
®
If the answer is 12-16* Volt continue to step 6.If the answer its 24 volt please follow the instructions below.
What does the strike wiring configuration need to be?
*For 16 Volt AC/DC operationsMaintain the solenoid wiring configured for 12 - 16 V. Be advisedthat with a 16 Volt source, the Model5000 is capable of a 10% IntermittentDuty Cycle (e.g. “On” for 2 secondsfollowed by “Off” for 20 secondswith an “On” time not to exceed2 minutes continuous.
16 Volt AC/DC Capable(10% Intermittent Duty Cycle)

7
Do you need fail secure or fail safe?If the answer is fail secure follow the instructions under step 7a.
If the answer is fail safe follow the instructions under step 7b.
What is fail safe?
Step 7
Step 7b
Fail safe means if the strike loses power it remains unlocked.
If you need to convert the strike to fail safe
What is fail secure?Step 7a
a
Move screws into fail safepositionas shown.
b
Tighten screws.c
a
Move screws into fail secureposition as shown.b
Tighten screws.c
Fail secure means if the strike loses power it remains locked.
All HES strikes come standard as fail secure.
If you need to convert the strike to fail secure
Loosen screws, but do not remove them. b
Loosen screws, but do not remove them. b
a
a
Installer HintWhen using the trim enhancer you will need to make the cutoutslightly larger than the actual dimensions given for the strike. Thiswill allow space for the trim enhancer.
8
Do you wno
If the answer is yes .
Place trim enhancer on
electric strike body. a
b
ver up a rough or
a
b
How do I attach the faceplate?Step 8
Place faceplate on electric strike body. a
Attach the faceplate to electricstrike body using the faceplatescrews provided with the faceplate option kit.
Attach the trim enhancer to electricstrike body using the provided trim enhancer screws .
b
a
b
Step 9ant to use a trim enhancer?
If the answer is continue to step 10.
please follow the instructions below
The trim enhancer allows the installer to coincorrect sized frame cut.
9
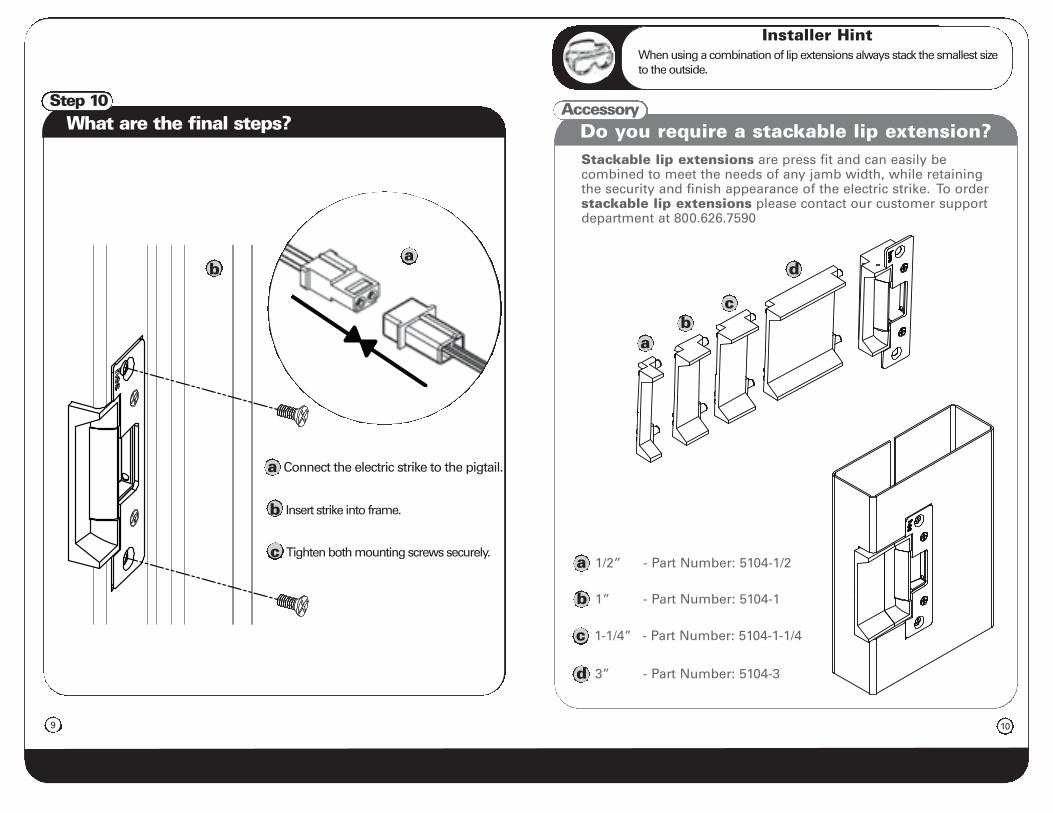
What are the final steps?Step 10
ba
Connect the electric strike to the pigtail.a
Insert strike into frame.b
Tighten both mounting screws securely.c
10
Installer HintWhen using a combination of lip extensions always stack the smallest sizeto the outside.
Do you require a stackable lip extension?Accessory
Stackable lip extensions are press fit and can easily be combined to meet the needs of any jamb width, while retainingthe security and finish appearance of the electric strike. To orderstackable lip extensions please contact our customer supportdepartment at 800.626.7590
1/2” - Part Number: 5104-1/2a
ab
c
d
1” - Part Number: 5104-1b
1-1/4” - Part Number: 5104-1-1/4c
3” - Part Number: 5104-3d

11
Frame preparation example*
Want to simplify the process?
c
b Mask off the section of the frameto be cut by using masking tape.
Find the cutout dimensions on pages 13-26. Draw your guidelines on the masking tape toshow where you will make theneeded cuts.
a
c
b
Remove the exisiting strike plate fromthe frame by removing the screws.
a
*Note: Frame example with ANSI 4 7/8” x 1 1/4” strike preparation
HES offers a universal Metal Template Kit to simplifythe installation procedure. Order the model 154-MTKby calling customer support at 800.626.7590.
12
Installer HintALWAYS use eye and ear protection.
Veteran Installers recommend cutting inside the lines and finishing the cutout with a metal file.
e File the frame to remove rough edgesand ensure the strike fits properly.
d
e
Using your guide lines cut the frame tothe dimensions you have measured.
d
Frame preparation example*
*Note: Frame example with ANSI 4 7/8” x 1 1/4” strike preparation
return to page 4 and
continue with Step 4

13 14
Installer HintTo obtain the best results, always cut well inside the lines and
use a metal file to finish off the cutout.
3 3/8"85.7
1 1/4"31.8
4 7/8"124
11/16"17.5
[2.3]3/32"
What should the cutout be?
Cut frame according to the dimensions in the drawing.a
a
501 faceplate option
What are the faceplate dimensions?501 faceplate option
[mm]inches
[mm]inches

15
1 1/4"31.8
4 7/8"124
3 3/8"85.7
3/32"
[2.3]
11/16"17.5
What should the cutout be?
a
Cut frame according to the dimensions in the drawing.aInstall the mounting tabs to the frame, but do not fully tighten mounting tab screws.*b
After you install the strike, securely tighten the mounting tab screws.c
b
501A faceplate option
c
*Note: To make it easier to mark the locations for themounting tabs, attach the mounting tabs to the faceplate,turn the faceplate backwards and insert it into the cutout. Mark the hole locations using the template. Remove theassembly and drill holes.
16
Installer HintIt is often beneficial to first put masking tape on the door frame whereyou will be installing the electric strike. The masking tape protects theframe surface from being scratched during the installation process.
What are the faceplate dimensions?501A faceplate option
[mm]inches
[mm]inches

17
3 3/8"85.7
4 7/8"124
1 1/4"31.8
11/16"17.5
c
a
b
c
501B faceplate option
18
Installer HintVeteran installers suggest removing all dust and debris before final installation of the electric strike.
What are the faceplate dimensions?501B faceplate option
[mm]inches
[mm]inches

19
What should the cutout be?
Cut frame according to the dimensions in the drawing.aInstall the mounting tabs to the frame, but do not fully tighten mounting tab screws.*b
After you install the strike, securely tighten the mounting tab screws.c
a
b
c
502 faceplate option
*Note: To make it easier to mark thelocations for the mounting tabs,attach the mounting tabs to the faceplate, turn the faceplate back-wards and insert it into the cutout. Mark the hole locations using thetemplate. Remove the assembly anddrill holes.
20
Installer HintTo obtain the best results when preparing a wood frame for an electric strike installation; cut a 1/4" area around the inside of the templatedimensions first with a wood chisel or router for a clean finished edge.
What should the cutout be?
Cut frame according to the dimensions in the drawing.aChisel out the recess dimensions within the frame.b
a
b
502 faceplate option
For wood applications pre-drill pilot hole for mounting pointswith a #30 drill bit.
c
[mm]inches
[mm]inches

21
What are the faceplate dimensions?502 faceplate option
22
Installer HintCutting an aluminum frame with a router or a jigsaw can be very messyand noisy. Spread out a drop cloth in front of your work area to capture the aluminum chips and bring a vacuum to clean up after your installation.
What should the cutout be?
Cut frame according to the dimensions in the drawing.aInstall the mounting tabs to the frame, but do not fully tighten mounting tab screws.*b
After you install the strike, securely tighten the mounting tab screws.c
a
b
c
503 faceplate option
*Note: To make it easier to mark thelocations for the mounting tabs, attachthe mounting tabs to the faceplate, turnthe faceplate backwards and insert it intothe cutout. Mark the hole locations usingthe template. Remove the assembly anddrill holes.
[mm]inches
[mm]inches

23
What should the cutout be?
Cut frame according to the dimensions in the drawing.aInstall the mounting tabs to the frame, but do not fully tighten mounting tab screws.*b
After you install the strike, securely tighten the mounting tab screws.c
a
b
c
503B faceplate option
*Note: To make it easier to mark thelocations for the mounting tabs,attach the mounting tabs to the face-plate, turn the faceplate backwardsand insert it into the cutout. Mark thehole locations using the template.Remove the assembly and drill holes.
beveled aluminum door
24
Installer HintVeteran installers suggest masking the frame off with tape. This allowsyou to mark your guides on the tape instead of the frame. Then afteryou cut the frame you simply need to remove the tape for a clean finish.
What are the faceplate dimensions?503/503B* faceplate option
* 503B bevel face R 1/8”
���
503B[mm]inches
[mm]inches

25
What should the cutout be?
Cut frame according to the dimensions in the drawing.aChisel out the recess dimensions within the frame.b
a
b
504 faceplate option
For wood applications pre-drill pilot hole for mounting pointswith a #30 drill bit.
c
26
Installer HintTo obtain the best results when preparing a wood frame for an electric strikeinstallation; cut a 1/4" area around the inside of the template dimensions firstwith a wood chisel or router for a clean finished edge.
What are the faceplate dimensions?504 faceplate option
[mm]inches
[mm]inches
[34.9]1-3/8”