4.8 V Cordless Screwdriver - Power Tools Plus 54-2823 English Rev 1.5... · Owner’s Manual 4.8 V...
17
Owner’s Manual 4.8 V Cordless Screwdriver 054-2823-2 CAUTION: Before using this cordless screwdriver or any of its accessories, read this manual and follow all Safety Rules and Operating Instructions. General Safety Rules Specific Safety Rules and Symbols Functional Description Assembly Operation Maintenance Accessories Imported by Mastercraft Canada Toronto, Canada M4S 2B8 Rev 1.5 15/01/2010
Transcript of 4.8 V Cordless Screwdriver - Power Tools Plus 54-2823 English Rev 1.5... · Owner’s Manual 4.8 V...

Owner’s Manual
4.8 V Cordless Screwdriver 054-2823-2
CAUTION: Before using this cordless screwdriver or any of its accessories, read this manual and follow all Safety Rules and Operating Instructions.
General Safety Rules Specific Safety Rules
and Symbols Functional Description Assembly Operation Maintenance Accessories
Imported by Mastercraft Canada Toronto, Canada M4S 2B8 Rev 1.5 15/01/2010

2
SECTION PAGE SECTION PAGE Warranty ….………………………. 2 Know your cordless
screwdriver ……………………. 9 Product specifications ………….. 3 Battery operated power tool safety ……………………………… 4–5
Accessories …………………… 10 Carton contents……..………... 10–11
Cordless screwdriver safety ...….. 6 Assembly & operation ..……… 12–14 Battery & charger safety ………. 6–7 Maintenance …….…………….. 15 Symbols ………………………….. 8 Parts & service ..……..……….. 16–17
WARNING: Some dust created by power sanding, sawing, grinding, drilling
and other construction activities contains chemicals known to cause cancer, birth defects or other reproductive harm. Some examples of these chemicals are:
Lead from lead-based paints
Crystalline silica from bricks, cement and other masonry products
Arsenic and chromium from chemically-treated lumber Your risk from these exposures varies, depending on how often you do this type of work. To reduce your exposure to these chemicals, work in a well-ventilated area and work with approved safety equipment such as dust masks that are specially designed to filter out microscopic particles.
WARRANTY
TABLE OF CONTENTS
Limited 3-year Replacement Warranty This Mastercraft product carries a three (3) year replacement warranty against
defects in workmanship and materials. Mastercraft Canada agrees to replace the defective product free of charge with the same model or one of equal value or specification, within the stated warranty period, when returned by the original purchaser with proof of purchase. Cordless tool battery or batteries and charger and/or case carry a two (2) year replacement warranty against defects in
workmanship and materials. This product is not guaranteed against wear or breakage due to misuse and/or abuse.
This product is not guaranteed if used for industrial or commercial purposes. Mastercraft is a superior line of products selected for their workmanship and materials. These products are designed to meet rigorous quality and performance standards, and are approved by our Quality Assurance laboratory.
TOLL FREE HELPLINE: 1-800-689-9928
TABLE OF CONTENTS
!

3
SCREWDRIVER Spindle speed …………….. 220 RPM (no load) Battery ……………………... 4.8 V Weight ……………………... 1 lb 2 oz (0.47 kg)
BATTERY & CHARGER Battery Voltage …………… 4.8 V Charger ……………………. 3–5 Hour, Class 2 Charger Input ……………... 120 V AC, 60 Hz Charger Output …………… 6 V DC, 400 mA
WARNING: To avoid electrical hazards, fire hazards or damage to the battery charger, use proper circuit protection. The battery charger is wired at the factory for 120 V operation. It must be connected to a 120 V, 15 A time delayed fuse or circuit breaker. To avoid shock or fire, replace power cord immediately if it is worn, cut or damaged in any way.
SPECIFICATIONS
!

4
GENERAL SAFETY RULES
WARNING: Read and understand
all instructions. Failure to follow all
instructions listed below may result in electric shock, fire and/or serious personal injury. WORK AREA Keep your work area clean and well-lit.
Cluttered benches and dark areas invite accidents. Do not operate power tools in explosive environments, such as in the presence of flammable liquids, gas or dust. Power
tools create sparks which may ignite the dust or fumes. Keep bystanders, children and visitors away while operating the tool.
Distractions can cause you to lose control. ELECTRICAL SAFETY
Double insulated battery chargers are equipped with a polarized plug (one blade is wider than the other). This plug will fit in a polarized outlet only one way. If the plug does not fit fully in the outlet, reverse the plug. If it still does not fit, contact a qualified electrician to install a polarized outlet. Do not alter the plug in any way. Double insulation eliminates the
need for the three wire grounded power cord and grounded power supply system. Use only the battery charger specified for recharging the battery. This applies to both battery-operated tools with internal batteries and those with a removable battery pack. A charger that
may be suitable for one type of battery may create a risk of fire when used with another battery.
Only use battery-operated tools with their specifically designed battery pack.
Use of other batteries may create a risk of fire. Only use the charger in a standard 120 V, 60 Hz electrical outlet only. Avoid body contact with grounded surfaces such as pipes, radiators, ranges and refrigerators. There is
increased risk of electric shock if your body is grounded. Don’t expose charger to rain or wet conditions. Water entering the charger will
increase the risk of electric shock. Do not abuse the cord. Never use the
cord to carry the charger or pull the plug from an outlet. Keep cord away from heat, oil, sharp edges and moving parts. Replace damaged cords immediately. Damaged cords increase the risk of electric shock.
When operating the charger outside, use an outdoor extension cord marked “W-A” or “W”. These cords are rated for
outdoor use and reduce the risk of electric shock.
PERSONAL SAFETY
Stay alert, watch what you are doing and use common sense when operating a power tool. Do not use the tool while tired or under the influence of drugs, alcohol or medication. A moment of
inattention while operating power tools may result in serious personal injury.
Use safety equipment. Always wear eye protection. Dust mask, non-skid safety
shoes, hard hat or hearing protection must be used for appropriate conditions.
BATTERY OPERATED POWER TOOL SAFETY
SAVE THESE INSTRUCTIONS FOR REFERENCE
!

5
PERSONAL SAFETY – cont’d Dress appropriately. Do not wear loose clothing or jewellery. Contain long hair. Keep hair, clothing and gloves away from moving parts.
Loose clothing, jewellery or long hair can be caught in moving parts.
Avoid accidental starting. Be sure the power switch is OFF before inserting battery pack. Inserting the battery pack
with the switch ON or carrying tools with your finger on the switch invites accidents.
Remove adjusting keys or wrenches before turning the tool ON. A wrench or
key that is left attached to a rotating part of the tool may result in personal injury.
Do not overreach. Keep proper footing and balance at all times. Proper footing
and balance enables better control of the tool in unexpected situations. TOOL USE AND CARE
Use clamps or another practical method to secure and support the workpiece on a stable platform. Holding the work by
hand or against your body is unsafe and may lead to loss of control. Do not force the tool. Use the correct tool for your application. The correct tool
will do the job better and safer at the rate for which it is designed. Do not use the tool if the power switch does not turn it ON or OFF. Any tool that
cannot be controlled with the switch is dangerous and must be repaired.
Remove the battery and turn the switch OFF before making any adjustments, changing accessories or storing the tool. Such preventive safety measures
reduce the risk of the tool starting accidentally. Store idle tools out of reach of children and other untrained persons. Tools are
dangerous in the hands of untrained users. Maintain tools with care. Keep cutting tools sharp and clean. Properly
maintained cutting tools with sharp cutting edges are less likely to bind and are easier to control. Check for misalignment or binding of moving parts, breakage of parts and any other condition that may affect the tool’s operation. If damaged, have the tool serviced before using. Many accidents
are caused by poorly maintained tools. Use only accessories that are recommended by the manufacturer for your model. Accessories that are suitable
for one tool may become hazardous when used on another tool. SERVICE
Tool service must be performed only by qualified personnel. Service or
maintenance performed by unqualified personnel could result in risk of injury. When servicing a tool, use only identical replacement parts. Follow instructions in the Maintenance section of this manual. Use of unauthorized parts or
failure to follow Maintenance instructions may create a risk of electric shock or injury.
BATTERY OPERATED POWER TOOL SAFETY
6
WARNING: For your safety, do not
plug in your charger, charge the battery or operate the tool until you have read and understood this Owner’s Manual. Always use safety goggles or other suitable eye protection. Hold the tool by its insulated gripping surfaces when driving screws in areas where the screws may contact hidden wiring. Contact with a “live” wire will make
exposed metal parts of the tool “live” and shock the operator. Do not drive screws or break into existing walls or other blind areas where electrical wiring may exist. If this situation is unavoidable, remove all fuses or disconnect all breakers feeding the work area. Secure the workpiece in a vice or with clamps. Never hold it in your hand or across your legs. The rotating action of
the screwdriver may cause the bit to come loose from the screw and cause injury. Never carry the cordless screwdriver with your finger on the ON/OFF switch.
The tool is always in an “ON” condition when the battery is charged. Never hold the body of the cordless screwdriver near the ON/OFF switch while changing screwdriver bits.
Accidentally touching the ON/OFF switch may start the tool and possibly cause an injury. Always use the correct shape of screwdriver bit that matches the head of the screw.
Always use the largest size screwdriver bit that will properly fit into the head of the screw.
Do not use worn or damaged screwdriver bits. Worn or damaged
screwdriver bits will not drive the screw properly and may jump out of the screw head, causing possible injury. Always install the screwdriver bit or magnetic bit holder fully into the collet.
If not fully inserted, the bit or magnetic bit holder may jump out of the collet and cause damage to the workpiece or possible injury.
Never attempt to open the battery for any reason. If the housing of the battery
breaks or cracks and allows leakage through the handle, immediately discontinue use and do not recharge the cordless screwdriver. Do not charge the battery if the tool is wet or shows any evidence of battery leakage.
Minor leakage from the battery may occur under extreme use, charging or temperature conditions. This does not indicate a failure. If however, the outer seal is broken and this leakage gets on your skin, follow these steps:
1. Wash immediately with soap and water.
2. Neutralize with a mild acid such as lemon juice or vinegar.
3. If liquid gets into your eyes, flush immediately with clean water for a minimum of 10 minutes and seek medical attention. NOTE: The battery liquid is
20–35% solution of potassium hydroxide.
!
BATTERY & CHARGER SAFETY
CORDLESS SCREWDRIVER SAFETY

7
WARNING: The Ni-Cad battery pack
is an integral part of the tool. If it will no longer charge properly or is damaged, the tool and battery must not be discarded as household trash, burned or thrown into water. The tool and battery must be disposed of as hazardous waste in accordance with all municipal requirements. Do not incinerate a discarded battery. It
can explode in a fire. Do not use an extension cord. Plug the charger cord directly into an electrical outlet. Charge the battery only with the charger supplied with the cordless screwdriver. Do not use the charger in wet or damp conditions. It is intended for indoor use only. Do not use the charger near sinks or bathtubs. Do not immerse the charger in water. Do not allow the cord to hang over the edge of a table or counter or touch hot surfaces. The charger should be placed away from sinks and hot surfaces. Do not use charger to charge any batteries other than the cordless screwdriver battery. Other batteries may explode. Do not operate charger if cord or plug is damaged. Replace damaged cord and plug immediately. Do not operate charger if it has received a sharp impact, been dropped or otherwise damaged in any way. Have a qualified technician examine the charger and repair it if necessary. Do not disassemble the charger.
For best results, charge the battery when the temperature range of the battery and in the work area is 10–40°C (50–104°F). Unplug the charger when not in use and before cleaning or maintenance. Do not abuse the cord. To reduce the risk of damage to the electric cord or plug, never carry the charger by the cord or yank the cord to pull the plug. Always grasp the plug and pull to disconnect. Always keep the cord away from heat, oil and sharp edges.
BATTERY & CHARGER SAFETY
!

8
V volts
A amperes
Hz hertz
W watt
kW kilowatts
microfarads
L litres
kg kilograms
H hours
N/cm2 newtons per square centimetre
Pa pascals
Min minutes
S seconds
alternating current
three-phase alternating current
three-phase alternating current with neutral
direct current
no load speed
alternating or direct current
class II construction
splash proof construction
watertight construction
protective earthing at earthing terminal, Class I tools
revolutions or reciprocations per minute
diameter
off position
arrow
warning symbol
WARNING: Some of the following symbols may be used on your
tool. Please study them and learn their meaning. Proper interpretation
of these symbols will allow you to operate the tool better and safer.
!
SYMBOLS
This symbol designates that
this tool is listed with both
Canadian and U.S.
requirements by Underwriters
Laboratories.
61TN
E213739 JD5002

9
KNOW YOUR CORDLESS SCREWDRIVER
Collet
Charging indicator light
Charger receptacle
Battery charger
Forward/Reverse switch
Pivoting handle
Charger plug

10
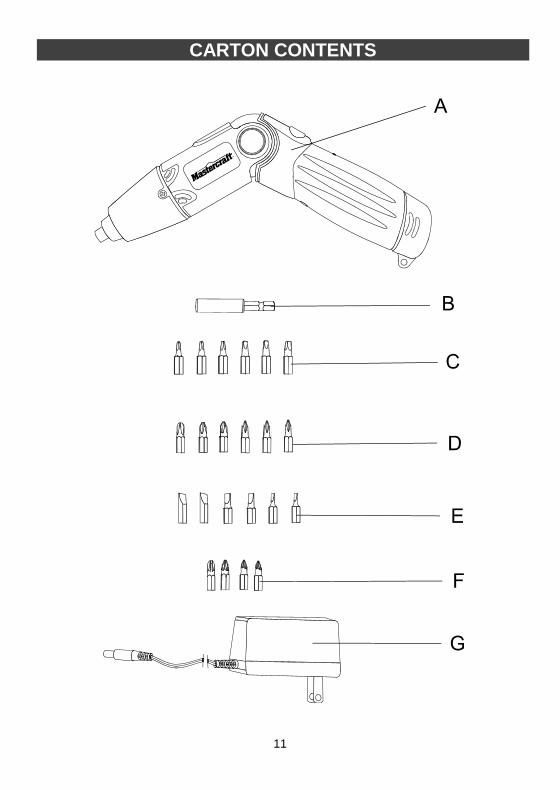
ACCESSORIES & CARTON CONTENTS
CARTON CONTENTS
AVAILABLE ACCESSORIES WARNING: Use only accessories recommended for this cordless screwdriver. Follow all instructions that accompany this tool. Use of improper accessories may cause injury to the operator or damage to the tool. Do not use any accessory unless you have completely read the instructions and/or Owner’s Manual for that accessory. Screwdriver bits
WARNING: If any part is missing
or damaged, do not plug the charger into the power source until the missing or damaged part is replaced.
Carefully unpack the cordless screwdriver. Compare against the “Cordless Screwdriver Components” chart at right. NOTE: See illustration of components on
Page 11. WARNING: To avoid fire or toxic reaction, never use gasoline, naphtha, acetone, lacquer thinner or similar highly volatile solvents to clean the tool.
!
!
!
CORDLESS SCREWDRIVER COMPONENTS
KEY DESCRIPTION QTY
A Cordless screwdriver 1
B Magnetic hex bit extension
1
C
Screwdriver bits #0 #1 (x2) #2 (x2) #3
6
D
Screwdriver bits #0 #1 (x2) #2 (x2) #3
6
E
Screwdriver bits 3 mm 4 mm 4.5 mm 5 mm 6 mm 7 mm
6
F
Screwdriver bits #0 #1 #2 #3
4
G Battery charger 1
Owner’s manual 1
11
CARTON CONTENTS

12
CHARGING THE BATTERY
1. Place the cordless screwdriver near a 120 V, 60 Hz electrical outlet.
2. Insert the battery charger plug (1) into the charger receptacle (2) in the handle of the cordless screwdriver (3) (Fig. 1).
3. Plug the battery charger (4) into a 120 V 60 Hz wall receptacle.
NOTES:
a) The red indicator light (5) in the handle will turn ON, indicating a positive connection with the charger. b) The red indicator light will remain ON until the charger is disconnected. c) A new battery or one that is completely run down should be charged for 5 hours. After normal use, a battery should be fully charged in about 3 hours or more. d) If the battery does not charge properly, check to make sure the electrical outlet is “live” and that the temperature range in the work area is between 10–40°C (50–104°F).
INSTALLING SCREWDRIVER BITS
WARNING: Never hold the body of
the cordless screwdriver near the switch while changing screwdriver bits. Accidentally touching the switch may start the tool and possibly cause an injury. 1. Select an appropriate screwdriver bit
that fits the head of the screw being driven. NOTES: a) Use the largest size screwdriver bit that will properly fit the screw head. b) Make sure the screwdriver bit is in good condition and is neither damaged nor worn.
2. Insert the screwdriver bit (1) fully into
the screwdriver collet (2) (Fig. 2). NOTES:
a) Make sure the screwdriver bit is fully inserted into the collet. b) If required, insert the magnetic hex bit extension (3) into the collet first and then insert the screwdriver bit fully into the magnetic hex bit extension.
!
ASSEMBLY & OPERATION
Fig. 1
Fig. 2

13
FORWARD/REVERSE SWITCH
The cordless screwdriver is equipped with a convenient switch that functions as both an ON/OFF switch and FORWARD/REVERSE switch. 1. To drive screws, press the right hand
side of the switch (1) (Fig. 3). To turn the switch OFF, release the switch.
2. To remove screws, press the left hand side of the switch (2).
PIVOTING HANDLE
The handle of the cordless screwdriver is designed to pivot to various angles. This feature allows you to configure the tool for easier access in hard to reach locations. It also makes it easier to apply extra torque in manual mode. To pivot the handle, simply “bend” the tool in the middle to the appropriate angle (1) (Fig. 4)
PREPARING SCREW HOLES
It is important to prepare screw holes before attempting to fasten two pieces of wood together. Proper preparation will make screws drive easier and prevent misaligned components, stripped screw heads, splitting and separating of wood components. 1. Clamp components that are to be
screwed together in their desired position (Fig. 5).
2. Drill a pilot hole (1) through the outer piece (2) and into the inner piece (3). Drill hole 2/3 the diameter of the smooth portion of the screw shank. NOTE: If the wood is soft, drill the hole
2/3 the length of the screw. If the wood is hard, drill the hole the full length of the screw.
3. Remove the clamp from the two pieces to be screwed together.
4. Enlarge the hole (1) in the outer piece (2) so that it is the same size as the smooth portion of the screw shank (Fig. 6).
5. If using a flat head screw, counter-sink the hole (4) so the head of the screw will be flush with the surface when fully driven into place.
ASSEMBLY & OPERATION
Fig. 3
Fig. 4 Fig. 5
Fig. 6
14
DRIVING SCREWS
When driving screws, care must be taken to use the bit that correctly fits the head of the screw being driven. Make sure you use the largest bit size that will properly fit into the head of the screw. The bits must also be in good condition and not worn so they will drive screws without slipping out of the screw head. 1. Select the correct screwdriver bit for
the screw being driven. NOTE: Use the magnetic hex bit
extension if longer reach is required.
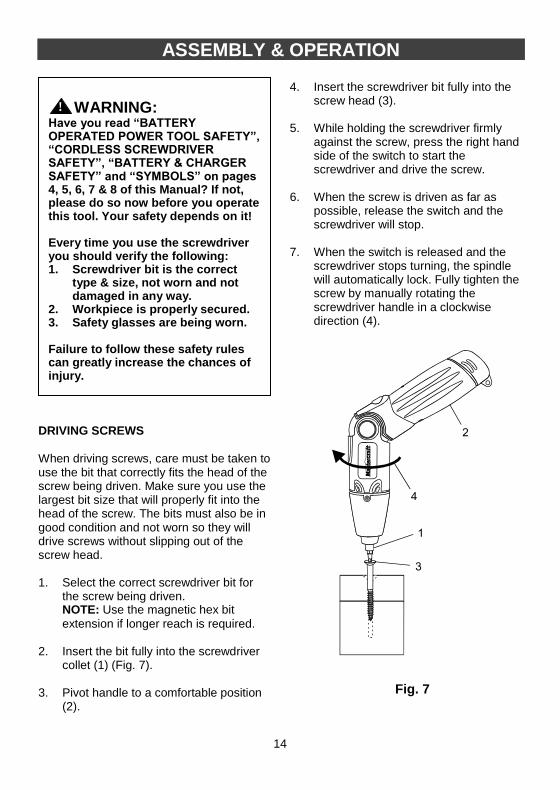
2. Insert the bit fully into the screwdriver collet (1) (Fig. 7).
3. Pivot handle to a comfortable position (2).
4. Insert the screwdriver bit fully into the
screw head (3).
5. While holding the screwdriver firmly against the screw, press the right hand side of the switch to start the screwdriver and drive the screw.
6. When the screw is driven as far as possible, release the switch and the screwdriver will stop.
7. When the switch is released and the screwdriver stops turning, the spindle will automatically lock. Fully tighten the screw by manually rotating the screwdriver handle in a clockwise direction (4).
ASSEMBLY & OPERATION
WARNING: Have you read “BATTERY OPERATED POWER TOOL SAFETY”, “CORDLESS SCREWDRIVER SAFETY”, “BATTERY & CHARGER SAFETY” and “SYMBOLS” on pages 4, 5, 6, 7 & 8 of this Manual? If not, please do so now before you operate this tool. Your safety depends on it! Every time you use the screwdriver you should verify the following: 1. Screwdriver bit is the correct
type & size, not worn and not damaged in any way.
2. Workpiece is properly secured. 3. Safety glasses are being worn. Failure to follow these safety rules can greatly increase the chances of injury.
!
Fig. 7

15
GENERAL
WARNING: When servicing, use
only identical replacement parts. Use of any other part may create a hazard or cause product damage.
DO NOT use solvents when cleaning plastic parts. Most plastics are susceptible to damage from various types of commercial solvents and may be damaged by their use. Use a clean cloth to remove dirt, dust, oil, grease etc.
WARNING: Do not at any time
allow brake fluids, gasoline, petroleum-based products, penetrating oils, etc. to come in contact with plastic parts. They contain chemicals that can damage, weaken or destroy plastic.
DO NOT abuse power tools. Abusive practices can damage the tool as well as the workpiece.
WARNING: DO NOT attempt to
modify tools or create accessories not recommended by the manufacturer. Any such alteration or modification is misuse and could result in a hazardous condition leading to possible serious injury. It will also void the warranty.
LUBRICATION
All of the bearings in this tool are lubricated with a sufficient amount of high-grade lubricant for the life of the unit under normal conditions. Therefore, no further lubrication is required.
!
!
!
MAINTENANCE
16
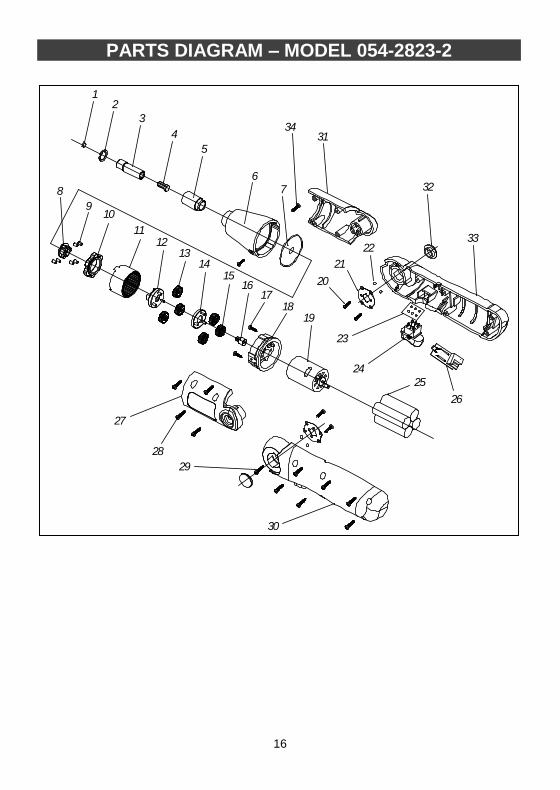
PARTS DIAGRAM – MODEL 054-2823-2
34
33
14
12
2
3
4
5
67 32
22
21
20
26
25
24
23
1918
1716
15
13
11
109
8
27
28
29
30
31
1
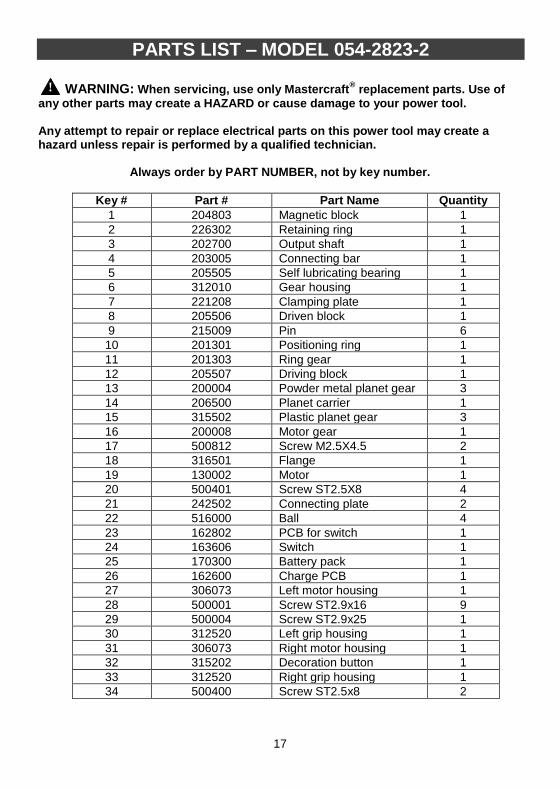
17
WARNING: When servicing, use only Mastercraft® replacement parts. Use of
any other parts may create a HAZARD or cause damage to your power tool. Any attempt to repair or replace electrical parts on this power tool may create a hazard unless repair is performed by a qualified technician.
Always order by PART NUMBER, not by key number.
Key # Part # Part Name Quantity
1 204803 Magnetic block 1
2 226302 Retaining ring 1
3 202700 Output shaft 1
4 203005 Connecting bar 1
5 205505 Self lubricating bearing 1
6 312010 Gear housing 1
7 221208 Clamping plate 1
8 205506 Driven block 1
9 215009 Pin 6
10 201301 Positioning ring 1
11 201303 Ring gear 1
12 205507 Driving block 1
13 200004 Powder metal planet gear 3
14 206500 Planet carrier 1
15 315502 Plastic planet gear 3
16 200008 Motor gear 1
17 500812 Screw M2.5X4.5 2
18 316501 Flange 1
19 130002 Motor 1
20 500401 Screw ST2.5X8 4
21 242502 Connecting plate 2
22 516000 Ball 4
23 162802 PCB for switch 1
24 163606 Switch 1
25 170300 Battery pack 1
26 162600 Charge PCB 1
27 306073 Left motor housing 1
28 500001 Screw ST2.9x16 9
29 500004 Screw ST2.9x25 1
30 312520 Left grip housing 1
31 306073 Right motor housing 1
32 315202 Decoration button 1
33 312520 Right grip housing 1
34 500400 Screw ST2.5x8 2
!
PARTS LIST – MODEL 054-2823-2