4.3 Multiview Setup - Ezwatch - Security Cameras · GeoVision Technical Handbook 46 4.3 Multiview...
10
GeoVision Technical Handbook 46 4.3 Multiview Setup Configure this section on remote PC. 4.3.1 Install Multiview Multiview can be obtained from one of the following locations: Download from GV-DVR system remotely via Internet Explorer. Install from GeoVision installation disk. Download from http://www.usavisionsys.com/download . Download from GV-DVR System 1. Under Internet Explorer, type in DVR’s IP address as found in section 4.2.2. (If connecting within the same network, use LAN IP address as found in 4.2.1.) 2. Type in ID and Password of the DVR system 3. Click “Login”. 4. Install all ActiveX Control as prompted. (ActiveX Control options will appear as an orange bar on top) 5. Click on orange bar as shown below, then select “Install” or “Run Add-on”. 6. Refresh webpage. (Login may be required). 7. Select “Run” if prompted by Internet Explorer security warning.
-
Upload
truongcong -
Category
Documents
-
view
238 -
download
2
Transcript of 4.3 Multiview Setup - Ezwatch - Security Cameras · GeoVision Technical Handbook 46 4.3 Multiview...

GeoVision Technical Handbook 46
4.3 Multiview Setup
Configure this section on remote PC.
4.3.1 Install Multiview
Multiview can be obtained from one of the following locations:
Download from GV-DVR system remotely via Internet Explorer.
Install from GeoVision installation disk.
Download from http://www.usavisionsys.com/download.
Download from GV-DVR System 1. Under Internet Explorer, type in DVR’s IP address
as found in section 4.2.2. (If connecting within the
same network, use LAN IP address as found in
4.2.1.)
2. Type in ID and Password of the DVR system
3. Click “Login”.
4. Install all ActiveX Control as prompted. (ActiveX
Control options will appear as an orange bar on
top)
5. Click on orange bar as shown below, then select
“Install” or “Run Add-on”.
6. Refresh webpage. (Login may be required).
7. Select “Run” if prompted by Internet Explorer security warning.
GeoVision Technical Handbook 47
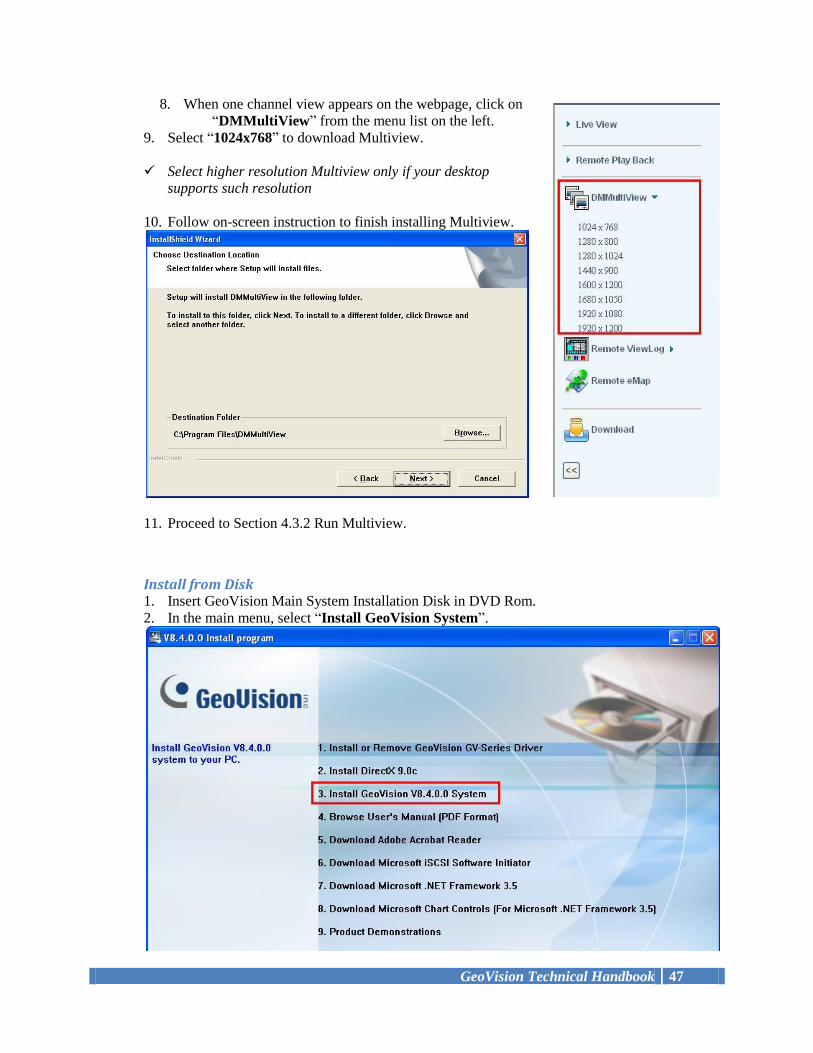
8. When one channel view appears on the webpage, click on
“DMMultiView” from the menu list on the left.
9. Select “1024x768” to download Multiview.
Select higher resolution Multiview only if your desktop
supports such resolution
10. Follow on-screen instruction to finish installing Multiview.
11. Proceed to Section 4.3.2 Run Multiview.
Install from Disk 1. Insert GeoVision Main System Installation Disk in DVD Rom.
2. In the main menu, select “Install GeoVision System”.
GeoVision Technical Handbook 48
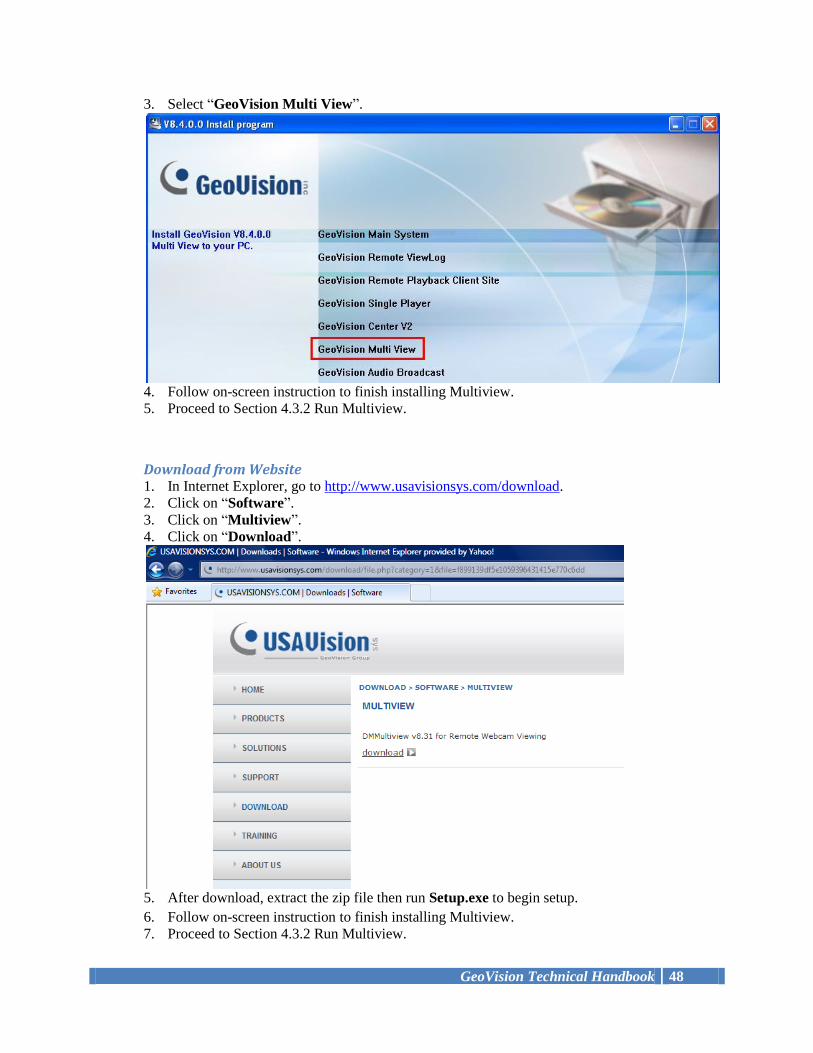
3. Select “GeoVision Multi View”.
4. Follow on-screen instruction to finish installing Multiview.
5. Proceed to Section 4.3.2 Run Multiview.
Download from Website 1. In Internet Explorer, go to http://www.usavisionsys.com/download.
2. Click on “Software”.
3. Click on “Multiview”.
4. Click on “Download”.
5. After download, extract the zip file then run Setup.exe to begin setup.
6. Follow on-screen instruction to finish installing Multiview.
7. Proceed to Section 4.3.2 Run Multiview.
GeoVision Technical Handbook 49
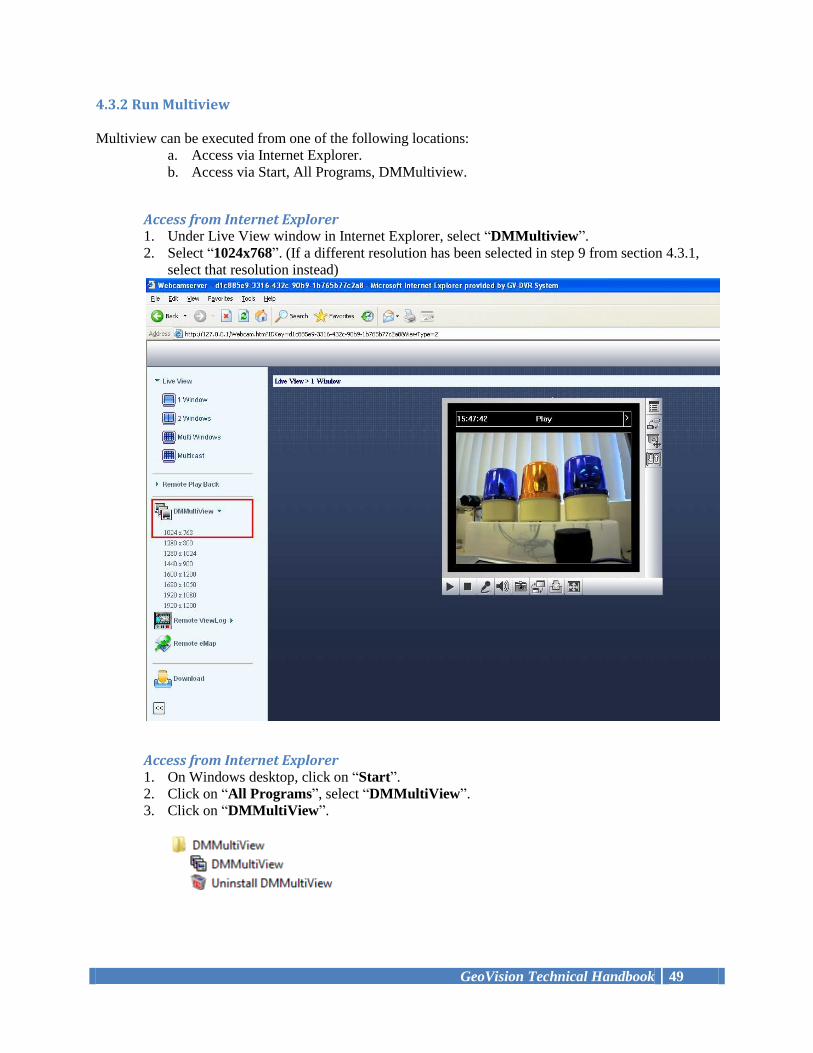
4.3.2 Run Multiview
Multiview can be executed from one of the following locations:
a. Access via Internet Explorer.
b. Access via Start, All Programs, DMMultiview.
Access from Internet Explorer 1. Under Live View window in Internet Explorer, select “DMMultiview”.
2. Select “1024x768”. (If a different resolution has been selected in step 9 from section 4.3.1,
select that resolution instead)
Access from Internet Explorer 1. On Windows desktop, click on “Start”.
2. Click on “All Programs”, select “DMMultiView”.
3. Click on “DMMultiView”.
GeoVision Technical Handbook 50
4.4 Multiview
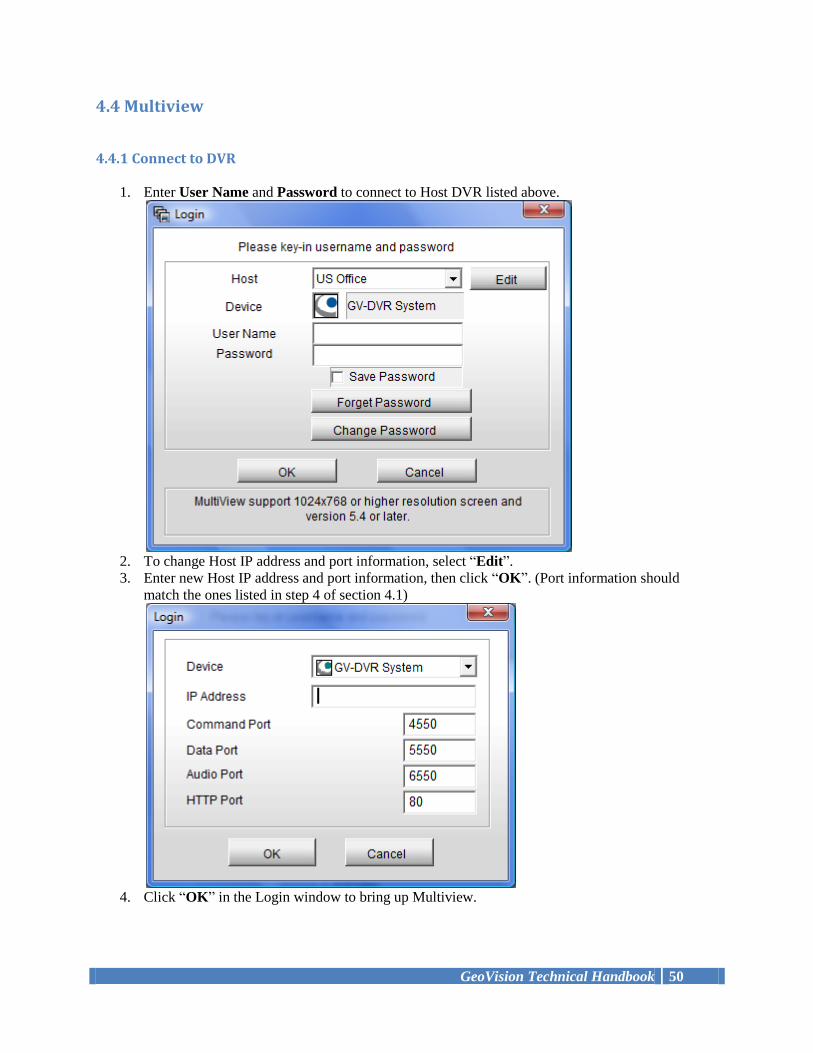
4.4.1 Connect to DVR
1. Enter User Name and Password to connect to Host DVR listed above.
2. To change Host IP address and port information, select “Edit”.
3. Enter new Host IP address and port information, then click “OK”. (Port information should
match the ones listed in step 4 of section 4.1)
4. Click “OK” in the Login window to bring up Multiview.
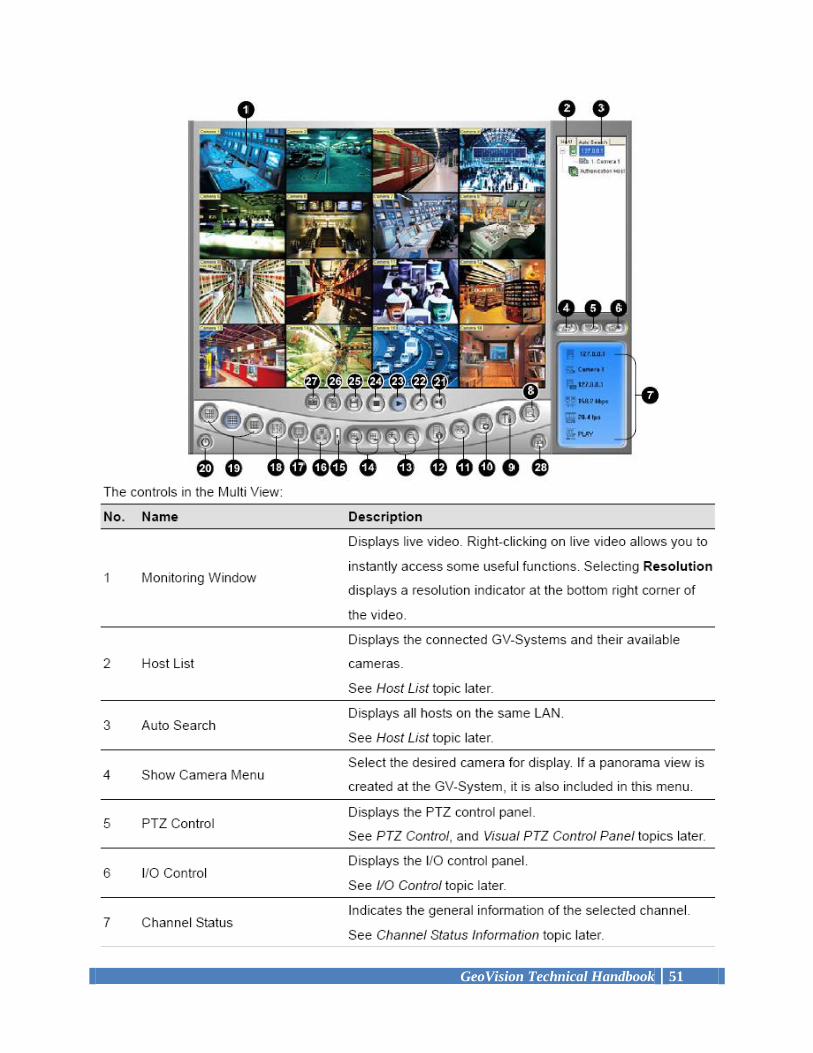
GeoVision Technical Handbook 51
GeoVision Technical Handbook 52
GeoVision Technical Handbook 53
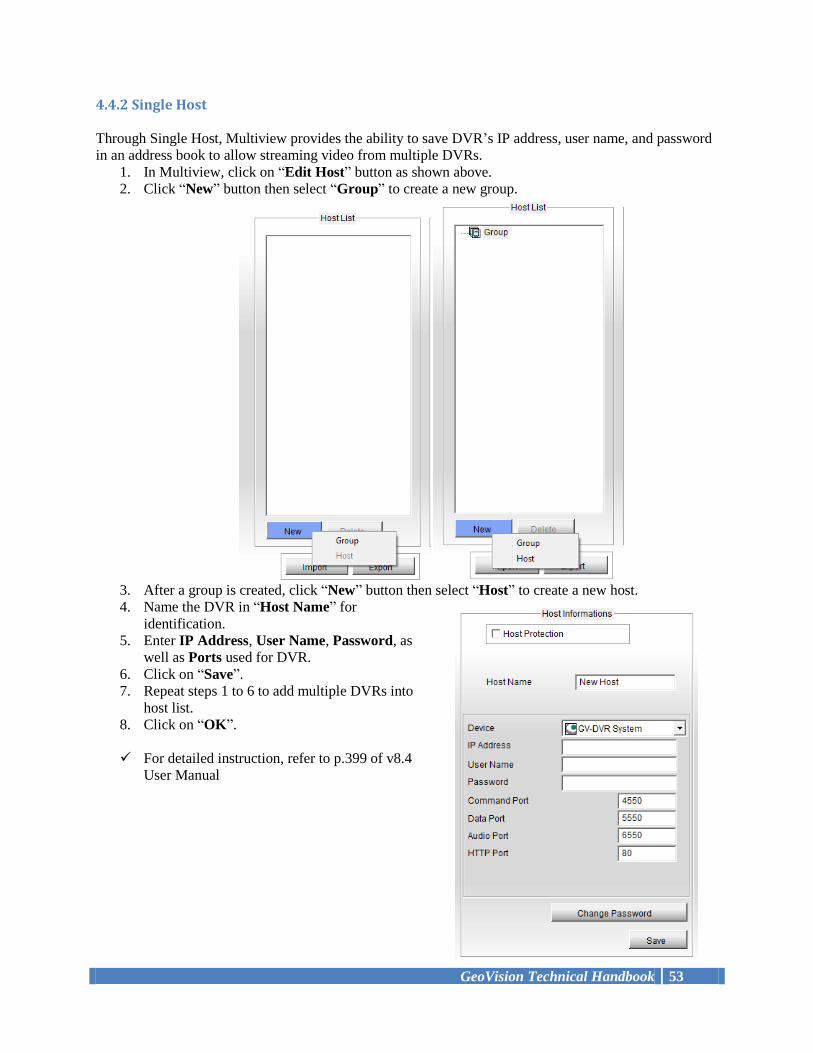
4.4.2 Single Host
Through Single Host, Multiview provides the ability to save DVR’s IP address, user name, and password
in an address book to allow streaming video from multiple DVRs.
1. In Multiview, click on “Edit Host” button as shown above.
2. Click “New” button then select “Group” to create a new group.
3. After a group is created, click “New” button then select “Host” to create a new host.
4. Name the DVR in “Host Name” for
identification.
5. Enter IP Address, User Name, Password, as
well as Ports used for DVR.
6. Click on “Save”.
7. Repeat steps 1 to 6 to add multiple DVRs into
host list.
8. Click on “OK”.
For detailed instruction, refer to p.399 of v8.4
User Manual
GeoVision Technical Handbook 54
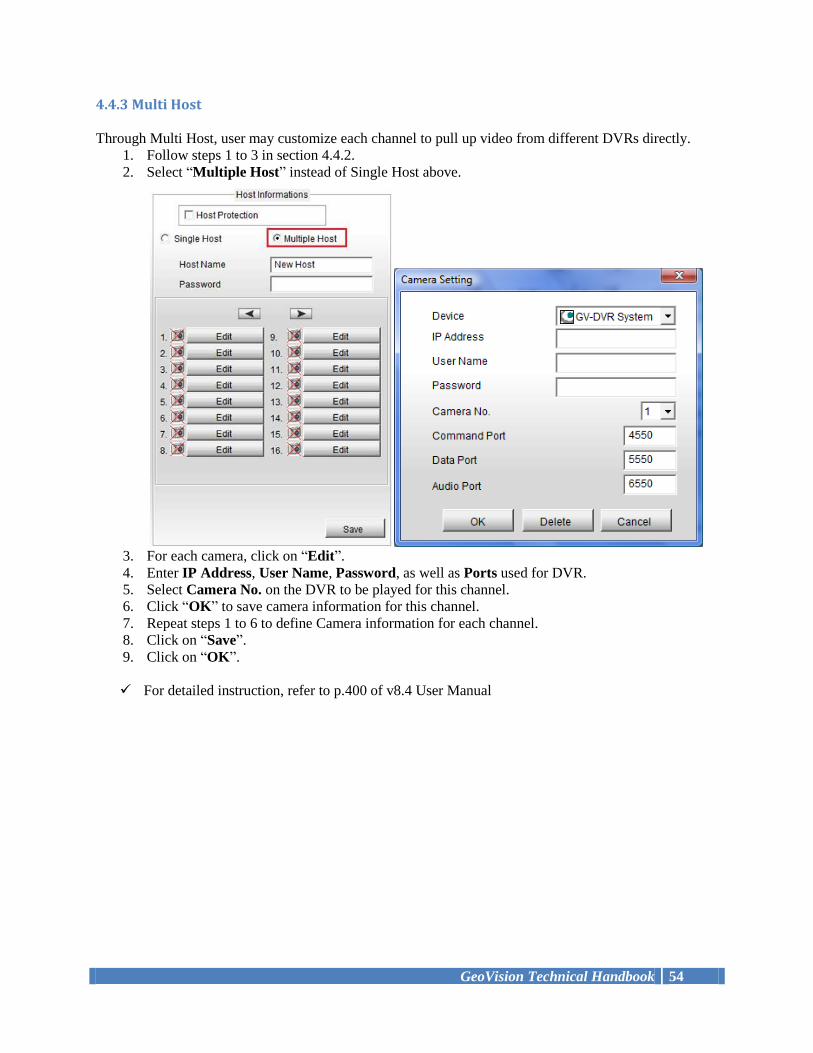
4.4.3 Multi Host
Through Multi Host, user may customize each channel to pull up video from different DVRs directly.
1. Follow steps 1 to 3 in section 4.4.2.
2. Select “Multiple Host” instead of Single Host above.
3. For each camera, click on “Edit”.
4. Enter IP Address, User Name, Password, as well as Ports used for DVR.
5. Select Camera No. on the DVR to be played for this channel.
6. Click “OK” to save camera information for this channel.
7. Repeat steps 1 to 6 to define Camera information for each channel.
8. Click on “Save”.
9. Click on “OK”.
For detailed instruction, refer to p.400 of v8.4 User Manual
GeoVision Technical Handbook 55
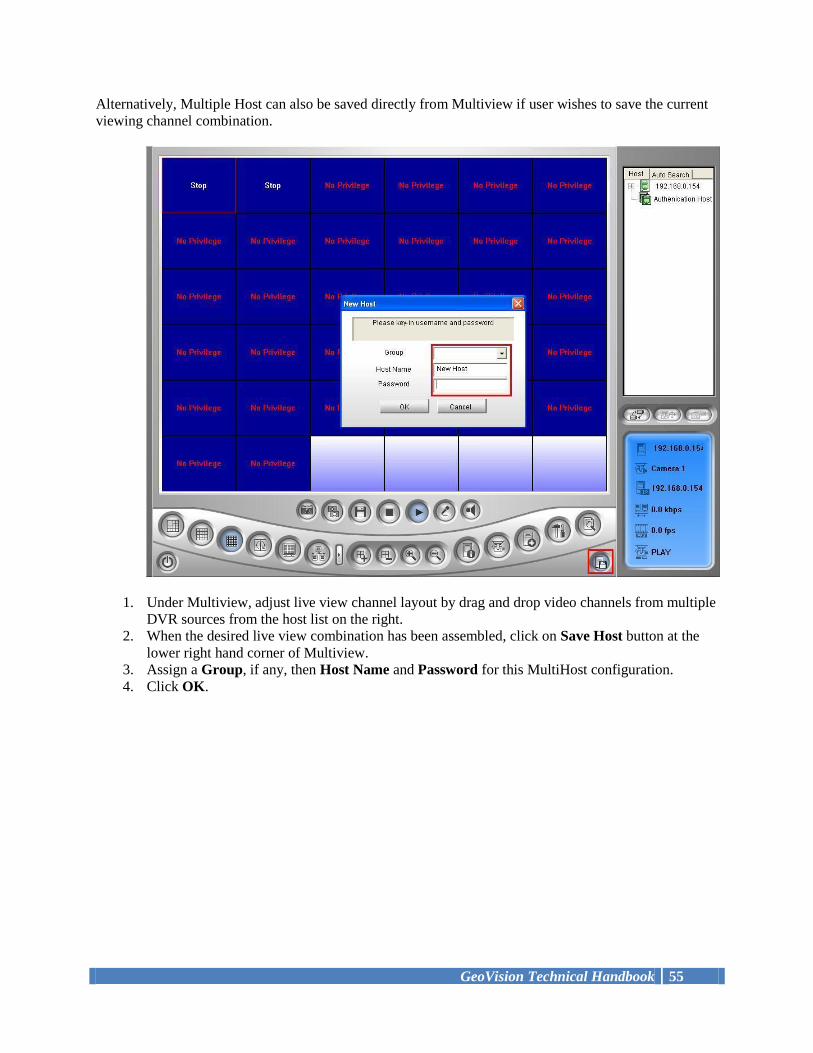
Alternatively, Multiple Host can also be saved directly from Multiview if user wishes to save the current
viewing channel combination.
1. Under Multiview, adjust live view channel layout by drag and drop video channels from multiple
DVR sources from the host list on the right.
2. When the desired live view combination has been assembled, click on Save Host button at the
lower right hand corner of Multiview.
3. Assign a Group, if any, then Host Name and Password for this MultiHost configuration.
4. Click OK.