4 Week Online Photography Course Adobe Lightroom for ... · PDF fileLightroom catalog. I ......
18
Adobe Lightroom for Photographers with George Cairns An online course with 1-2-1 tuition & Weekly Assessments 4 Week Online Photography Course Lesson 1 Course Notes
Transcript of 4 Week Online Photography Course Adobe Lightroom for ... · PDF fileLightroom catalog. I ......

Adobe Lightroom for Photographers
with George Cairns
An online course with 1-2-1 tuition & Weekly Assessments
4 Week Online Photography Course
Lesson 1Course Notes

PAGE 2
IntroductionWelcome to Lesson One. Like most photographers, it’s likely you will have thousands of images scattered over multiple drives making it a challenge to find specific photos. In this lesson I will demonstrate how to setup Lightroom’s library module to gather files from various sources, such as hard drives and memory cards and bring them all together into an easy to manage Lightroom catalogue.
I’ll also explain how to add useful information such as copyright details to batches of shots as they’re imported to help you protect your work and save you time. We’ll then look at ways to separate the wheat from the chaff, by adding ratings, keywords and creating collections to help you keep things organised.
You can also use filters to find your favourite files faster, and even tag shots to according to where they were captured. So by the end of the lesson you will learn how to keep everything under one roof even if your photos are scattered over multiple drives.
So thanks to the library module’s tools you will feel in control of your photographs so let’s get started by firing up Lightroom, and I’ll show you how to add photos from a variety of sources and then get them organised.
George Cairns

PAGE 3
Course CurriculmWeek 1: Import and Organize
It’s likely that most photographers will have thousands of shots scattered over multiple drives, making it hard to find specific images. In this lesson I’ll demonstrate how to use Lightroom’s Library module to gather files from various sources (such as hard drives and memory cards) into an easy to manage Lightroom catalog. I’ll explain how to add useful info such as copyright details to batches of shots as they’re imported,
to help protect your work. We’ll then look at ways to separate the wheat from the chaff by adding ratings, keywords and creating collections.
Week 2: Introducing the Digital DarkroomAfter learning how to manage our shots in lesson one, you’ll need to tackle prob-lems with colour and tone. In this lesson I’ll take you into the Develop module – your digital darkroom – where you can process your Raw files to perfection. I’ll use the Basic panel’s sliders and the ed-itable Histogram window to tackle prob-lems with exposure and restore missing detail in shadows and highlights. You’ll also discover ways to improve colour
by removing colour casts and selectively boosting weaker colours without over-saturating strong ones. You’ll learn how to make selective adjustments using the Graduated and Radial tools, to claw back detail in over-exposed skies for example.
Week 3: Digging deeper into the Develop module I’ll demonstrate how to use the Lens Cor-rections panel to counteract lens related problems such as converging verticals, vignetted edges and chromatic aberra-tion. We’ll also demonstrate how the De-tail tab helps us sharpen our shots and re-move nasty noise. We’ll use the B&W panel to lighten or darken particular parts of a monochrome conversion and use the Ef-fects panel to add character building arte-facts such as vignettes and grain. I’ll also
show how to split-tone a mono conversion to change atmosphere. We will then use the HSL panel to creatively target and tweak colours to produce a more filmic retro look.
Week 4: Printing, Publishing and Sharing Your Images After fixing your shots (or creatively pro-cessing them), you’ll want to share them. In this lesson I’ll demonstrate how to send edited shots from Lightroom to social net-working sites such as Facebook, or email them to clients. You’ll discover how to use the Print module’s presets to create a con-tact sheet to share with clients. We’ll look at how soft proofing helps you produce a shot with printable colours. I’ll demon-strate how to share your shots as a slide-
show and create the layout for a web gallery (and all the components) using the Web Module. I’ll also demonstrate how the Book module enables you to design and order attractive photo books.

PAGE 4
Lightrrom for Photographers: Import & Organize
So here’s the Lightroom workspace and I’m just going to give you a brief overview to get you familiar with the various panels and modules we’ll
be working with in the next four video lessons.
Let’s kick off in the library module, here’s where all your imported photographs will appear and this is where you’re going to organise them. These are some photos I’ve taken on an iphone and they’ve been synced using Lightroom mobile so they automatically come into Lightroom every time I take a picture on my iphone. I’ll show you how to do that later on. The panels in Lightroom can be collapsed. So if you click in here you can see it’s closed there,
I can collapse the one on the right and you can see various things such as histograms and that gives a cleaner looking workspace.
If you move over the panel it will pop up. In fact I’m going to turn them back on so that we can see those as you will be seeing them at home. There’s also panels you can close at the top and the filmstrip at the bottom. You can click here to select various pictures. And we’re looking at the grid view at the moment but you can go to a full frame view if you want to cycle through your pictures to get a better look. You can also press F for fullscreen too if you want to get a much better clean look at your photos.
So we will take a look at the library module in much more detail in due course, I’m just going to briefly show you what these other modules are: Develop is
on digital darkroom, this is where you can tweak colours, tones, sharpness and composition as well – there’s so much we can do here to get our pictures looking their best. You can also go to the map module – that’s particularly useful if you’re using iphone photos.
If I click on a picture here – you can see it’s being selected in the filmstrip view; if I move onto a photo in filmstrip view (see it’s jumping up and down there) you can see it knows where the photograph was taken and is showing us on a map there.

PAGE 5
That’s because we were using an iphone and you can see when we click on a photo we get is coordinates appearing here thanks to GPS. We’re going to come back and look at this in due course. The book module lets me
just select all my photographs in the film strip. If we go there you can see it’s automatically popping them into pages of a photo book. And we can change the template and contents of each page and we will look at that in a future lesson.
You might want to share your photographs as a slide show and you can do this in this module here and we can also print things in a variety of different layouts using different templates such as cells, greetings cards and other options from this section. Again we will look at this in a future lesson.And finally you can design a webpage and it will lay out the pictures for you and
you can create html files and everything you need to create a website without any coding knowledge. We will come back to that in due course.
I’m just going to pop back to the library module and give you one last tip. You can see here there’s lots of little triangles where we can toggle open various panels such as metadata – that’s giving us information about each individual photograph that I click and select on.
The thing about panels is that they take up a lot of space so what you can do when you’ve got multiple panels open, you can right click and choose solo mode. And that means when you click on a panel it closes all the other panels and that means that only one panel is only ever open at a time in each section. So solo mode is a very useful way of saving space.
PAGE 6
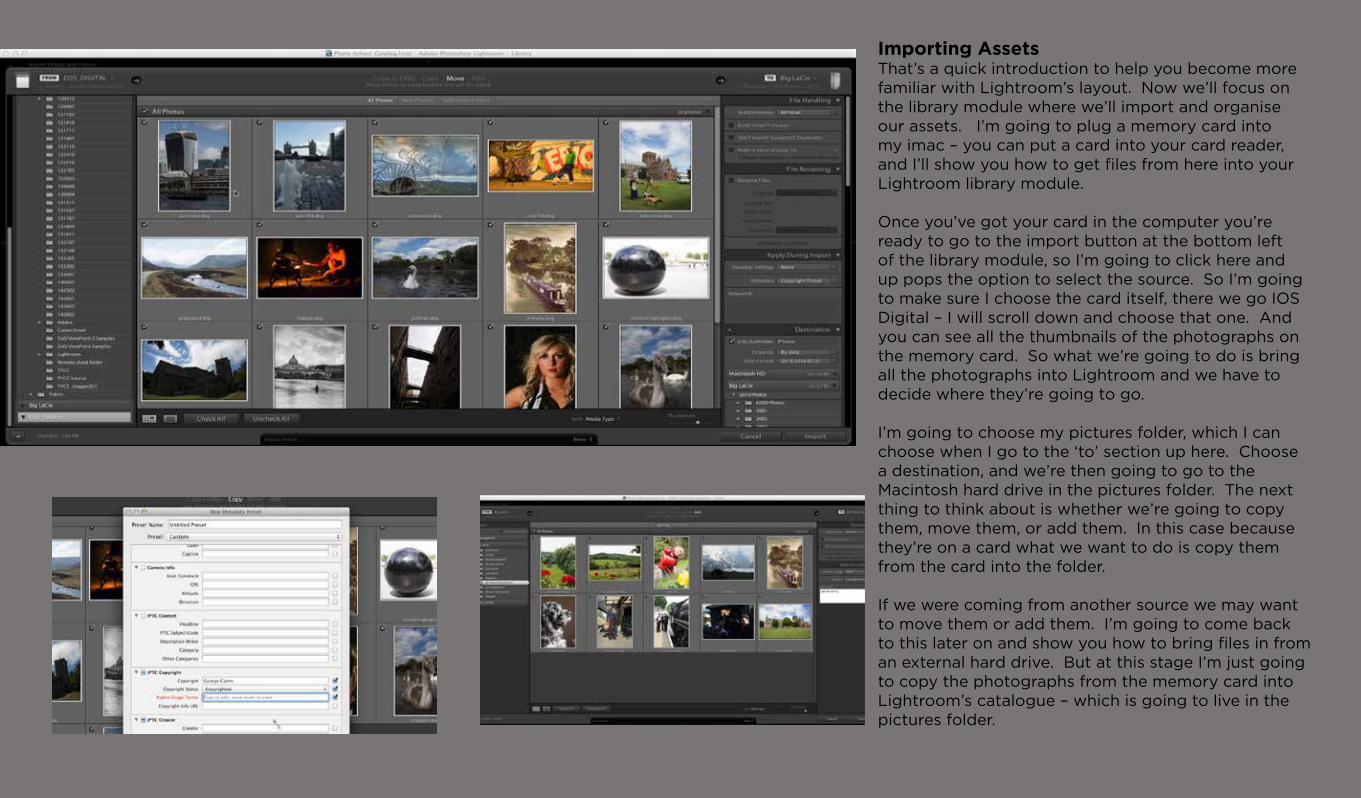
Importing AssetsThat’s a quick introduction to help you become more familiar with Lightroom’s layout. Now we’ll focus on the library module where we’ll import and organise our assets. I’m going to plug a memory card into my imac – you can put a card into your card reader, and I’ll show you how to get files from here into your Lightroom library module.
Once you’ve got your card in the computer you’re ready to go to the import button at the bottom left of the library module, so I’m going to click here and up pops the option to select the source. So I’m going to make sure I choose the card itself, there we go IOS Digital – I will scroll down and choose that one. And you can see all the thumbnails of the photographs on the memory card. So what we’re going to do is bring all the photographs into Lightroom and we have to decide where they’re going to go.
I’m going to choose my pictures folder, which I can choose when I go to the ‘to’ section up here. Choose a destination, and we’re then going to go to the Macintosh hard drive in the pictures folder. The next thing to think about is whether we’re going to copy them, move them, or add them. In this case because they’re on a card what we want to do is copy them from the card into the folder.
If we were coming from another source we may want to move them or add them. I’m going to come back to this later on and show you how to bring files in from an external hard drive. But at this stage I’m just going to copy the photographs from the memory card into Lightroom’s catalogue – which is going to live in the pictures folder.
PAGE 7
Ok I’m going to bring in all the files here and there’s other things I can do as well to save time such as adding various things like adding copyright details for example. If we go down to ‘apply during import’ I’m applying a copyright preset. That’s going to add my name to each photo so when they go onto the internet they won’t get stolen or not know the image source. If you don’t have a copyright preset you can create new and you can type in information such as your name in this window here.
And you can put in things like your website, and copyright status, like royalty free, rights manage issues and IPTC information. I do this to all my photos so at least when they’re out of my control people know who the photos belong to. And that is copyright preset.
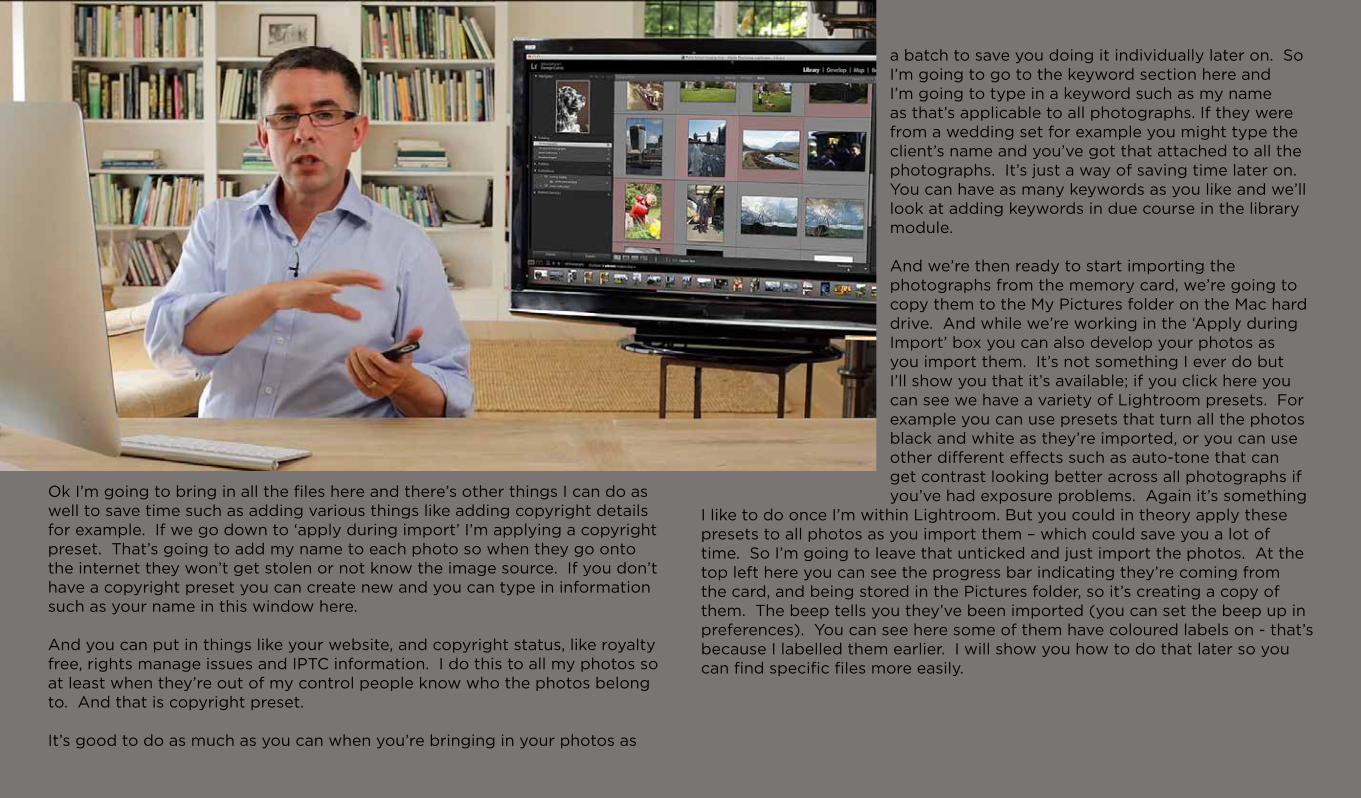
It’s good to do as much as you can when you’re bringing in your photos as
a batch to save you doing it individually later on. So I’m going to go to the keyword section here and I’m going to type in a keyword such as my name as that’s applicable to all photographs. If they were from a wedding set for example you might type the client’s name and you’ve got that attached to all the photographs. It’s just a way of saving time later on. You can have as many keywords as you like and we’ll look at adding keywords in due course in the library module.
And we’re then ready to start importing the photographs from the memory card, we’re going to copy them to the My Pictures folder on the Mac hard drive. And while we’re working in the ‘Apply during Import’ box you can also develop your photos as you import them. It’s not something I ever do but I’ll show you that it’s available; if you click here you can see we have a variety of Lightroom presets. For example you can use presets that turn all the photos black and white as they’re imported, or you can use other different effects such as auto-tone that can get contrast looking better across all photographs if you’ve had exposure problems. Again it’s something
I like to do once I’m within Lightroom. But you could in theory apply these presets to all photos as you import them – which could save you a lot of time. So I’m going to leave that unticked and just import the photos. At the top left here you can see the progress bar indicating they’re coming from the card, and being stored in the Pictures folder, so it’s creating a copy of them. The beep tells you they’ve been imported (you can set the beep up in preferences). You can see here some of them have coloured labels on - that’s because I labelled them earlier. I will show you how to do that later so you can find specific files more easily.
PAGE 8
So those photos were brought in from a memory card and copied into the My Pictures folder. But you might have an external drive where you have 1000s of photos, and you might want to keep your files on there and work on them in Lightroom, without clogging up your computer. So I’m going back to import and choosing a new source, and choosing the lacy hard drive which I’ve got attached. I’m going to go to this folder MyPhotoSchool Lesson 3 and this time they’re coming from a hard drive into Lightroom’s catalogue.
I don’t want to actually move them or copy them, I just want to add them to the catalogue. So you can see at the top here I’m just going to add them without moving them. I can also add copyright presets and keywords such as my name – they’re for lesson three too so I’ll add them in for this purpose.
Then again I can click import and this is bringing them to my catalogue – it’s going to gather them in to the Lightroom catalogue. It will add them to the ones we did earlier.
There we go. So now I have the catalogue option, I can go to the previous import, which is these 10 photos from the hard drive, I can go to all the photographs which includes the ones which came from the memory card, plus the ones that came from my iphone thanks to Lightroom mobile synching up to the catalogue. So three different sources there, all in one catalogue, all under one roof.
Another thing I’d like to show you is how to bring things in from Lightroom mobile. Because that’s designed to enable you to edit your photos on the phone, and then it automatically syncs them with Lightroom when you have wifi enabled. So what I’ll do is take a picture of the crew and then hopefully it will synch up to our Lightroom catalogue. So I’ll fire up my camera here and take a very snappy shot here - and you can see it automatically goes to the phone and if I fire up Lightroom on the phone, it’s a free app and syncs with the phone. After it says one photo successfully imported – you can see it
automatically begins to sync it up with Lightroom’s catalogue.
You see the newest files appear at the top as we’re viewing things by capture time - you can change it from old to new if you want to. Once the files are in the catalogue via wireless you can even go and tweak it by going to quick develop by going to auto-tone as it’s a little under exposed and it has brightened things up to show more detail in the background. So we’re looking at the full view there, and I’m going back to the grid view to look at my thumbnails – and we’ll talk a little bit more about metadata. Metadata
PAGE 9
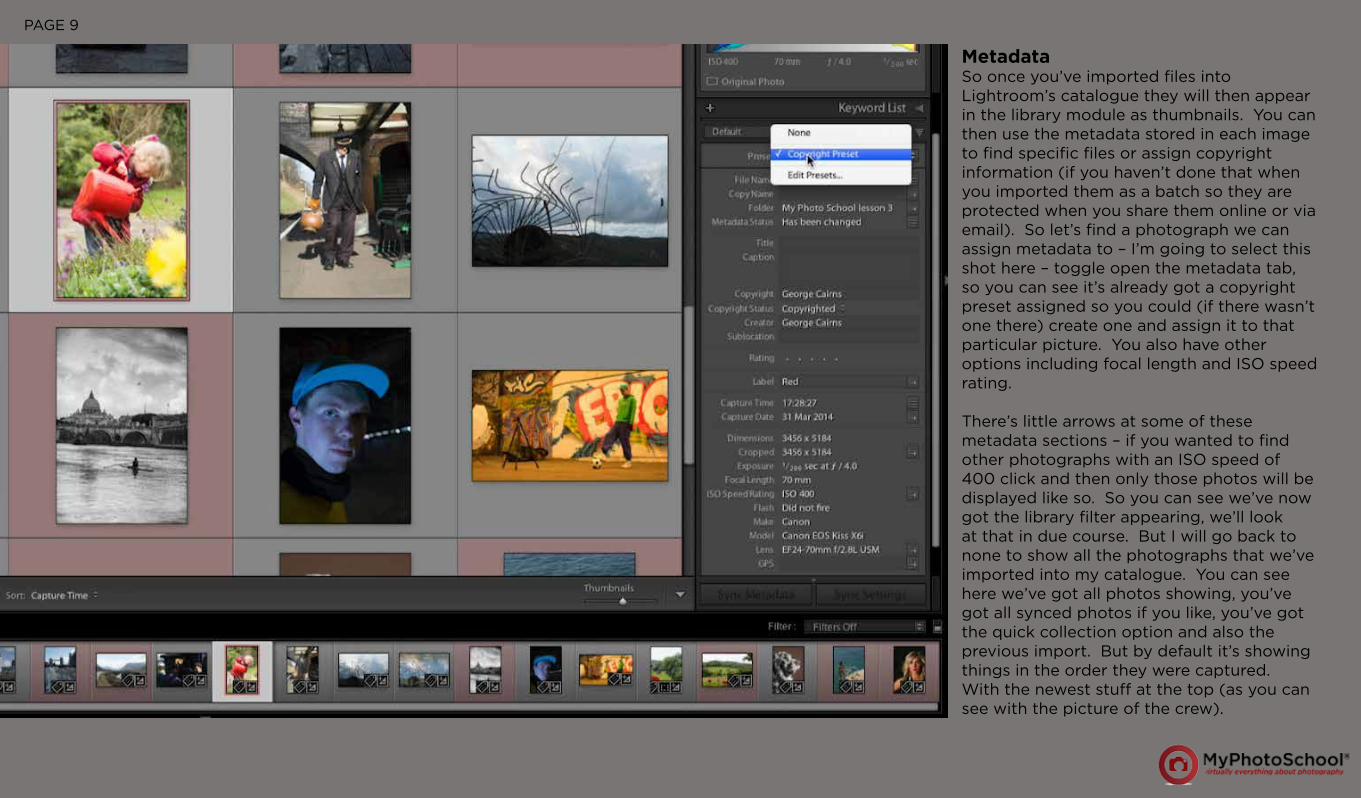
MetadataSo once you’ve imported files into Lightroom’s catalogue they will then appear in the library module as thumbnails. You can then use the metadata stored in each image to find specific files or assign copyright information (if you haven’t done that when you imported them as a batch so they are protected when you share them online or via email). So let’s find a photograph we can assign metadata to – I’m going to select this shot here – toggle open the metadata tab, so you can see it’s already got a copyright preset assigned so you could (if there wasn’t one there) create one and assign it to that particular picture. You also have other options including focal length and ISO speed rating.
There’s little arrows at some of these metadata sections – if you wanted to find other photographs with an ISO speed of 400 click and then only those photos will be displayed like so. So you can see we’ve now got the library filter appearing, we’ll look at that in due course. But I will go back to none to show all the photographs that we’ve imported into my catalogue. You can see here we’ve got all photos showing, you’ve got all synced photos if you like, you’ve got the quick collection option and also the previous import. But by default it’s showing things in the order they were captured. With the newest stuff at the top (as you can see with the picture of the crew).

PAGE 10
Create CollectionsOnce you’ve imported files and assigned copyright details to them, you’re ready to start organising them so you can find your favourites more easily. A quick and easy way to do this is by creating collections. That saves you the hassle of scrolling through hundreds of files in chronological order. You go to the collections panel here and click this little icon and click create collection. Then it’s a good idea to label it something like landscapes. And you can create smaller subsets if you like – so Scottish landscapes, English Landscapes etc. But I’m just going to create a general landscapes collection. Then we can find a landscape and drag the picture to the landscapes collection and you can see the pictures appearing in the collection. And when you click on it you can see any photos hiding in our folder.
I’m just going to go back to all photos and show you a quicker way to add photos to collections. If you go to ‘landscapes collection’ here and right click – you can set it as a target collection. You can see there’s a plus icon now so that’s the target collection and I’m going to go back to all photos and scroll down to find another landscape here and if I press ‘B’ it adds it to the target
collection. It means you don’t have to drag and drop. A really good tip for speeding up your workflow. You can select multiple files as well and add them to your collections.
There’s lots of different ways to do the same thing in Lightroom. Let me just show you this little painter tool here. If you click on that you can train it to do different things. Such as label something for example – you can choose the yellow label, click to label things yellow, or you can choose select a target collection which is what I’ll do now. So if I go and find another landscape, click and spray, it adds it to the target collection. Just click with the painter to perform a variety of different tasks. So here we have a collection full of landscapes. If you decide something’s not really a landscape you can click B to remove it from the target collection.
Another thing you can do is create smart collections. So you can gather files together according to specific criteria for example the particular camera model. To do that let’s go to the collections panel and let’s have a look at smart collections. Now there aren’t any at the moment so I’m going to create one clicking here and choose create ‘smart collection’. Then we open up in the smart collection window. Then there is a range of criteria we can choose to create our smart collection. We can choose things such as rating, but we’ve not added any ratings to photographs yet. Or you can go to camera info and choose a particular camera or you can go to metadata and choose the name of the creator of the file for example.
PAGE 11
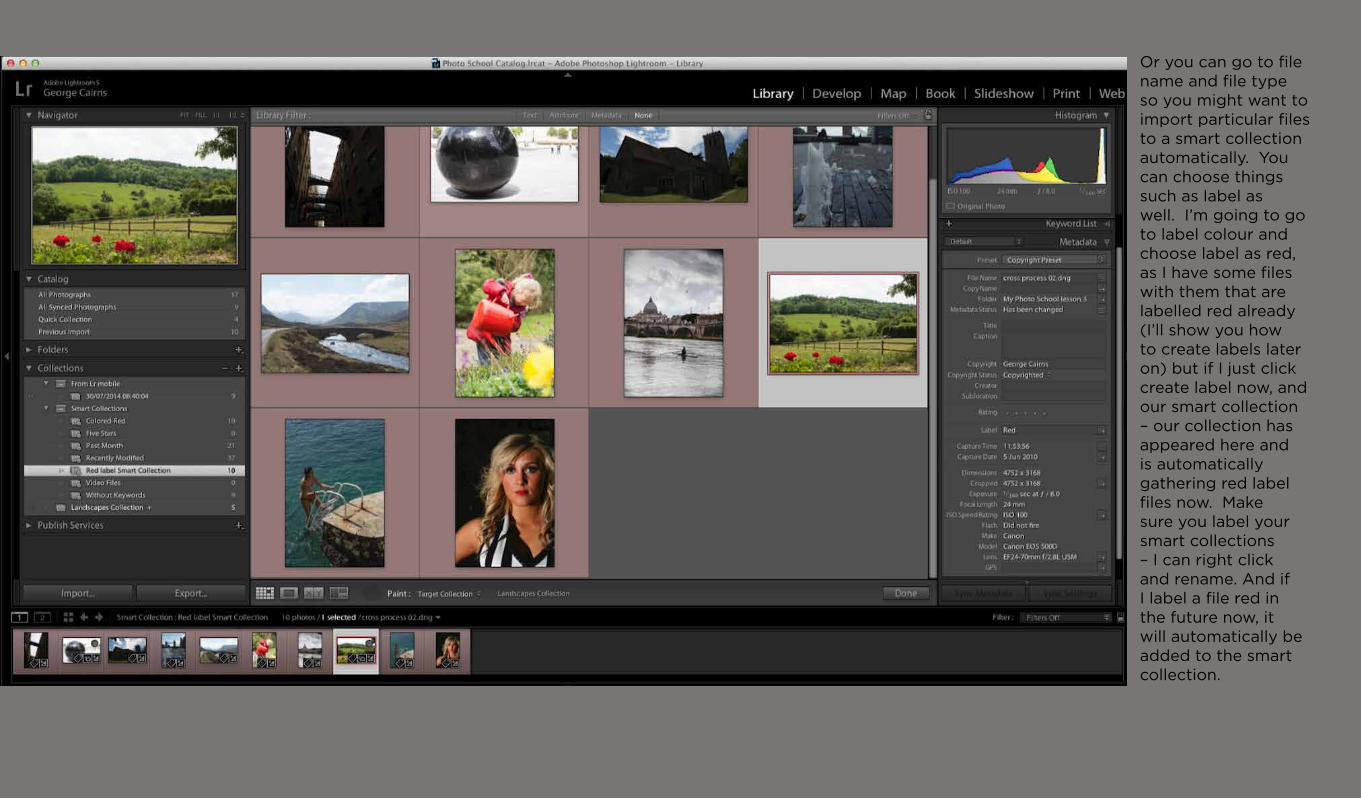
Or you can go to file name and file type so you might want to import particular files to a smart collection automatically. You can choose things such as label as well. I’m going to go to label colour and choose label as red, as I have some files with them that are labelled red already (I’ll show you how to create labels later on) but if I just click create label now, and our smart collection – our collection has appeared here and is automatically gathering red label files now. Make sure you label your smart collections – I can right click and rename. And if I label a file red in the future now, it will automatically be added to the smart collection.

PAGE 12
Keywords and RatingsSo collections and smart collections provide a general way to start getting organised. But there’s plenty you can do to make specific images easier to find in the future. In this section I’ll teach you how to sort your shots by adding star ratings, colour labels and key words. Now while we’ve got the paint tool selected here I’m going to set this to a label, I’m also going to go back to all photographs so I can see everything, not just that particular collection, and we can choose a paint to add to the pictures, let’s say we want green to then say these are photographs we want to develop or share, I can just click to then add a colour label.
You can also dock your painter pot back in, and if you right click on an image you can add labels here too so I can choose green from the set colour label option. You can also press P as well – if you want to flag it as a pic, if you like a shot, just press P and it will add a little flag to the picture. You can filter things by flag and label later on. It starts to just sort the wheat from the chaff.
Another thing you can do with your photographs is to rate them with a rating of 1 to 5 stars. Simply just click on a photograph and press 5 to add a rating of 5 - or if it’s a shot that’s looking a bit dodgy you can press 1 to add a rating of 1. And again you can rate photographs and then later on you can filter them to find files with specific ratings, and create smart collections to gather files with specific ratings automatically into those smart collections. So there’s labels, there’s flags, there’s ratings – and these are good ways to quickly start sorting out the files and making some more prominent than others.
Another useful way of adding ratings is to double click to zoom in and you can see down here you have the option to add ratings here you can also flag it by clicking on the icon, or you can also reject it too by clicking on the icon here. Let’s go back to the grid view and I’ll show you how to filter the files now we’ve add labels and ratings to. If you pop up to filters here – at the moment it’s off – you can go up and filter things by whether they are rated. And now we can choose a rating of greater or equal to one, or we can go for some higher ratings ones we can click here so now only files with a rating of 3 or over will show and then click here 4stars or higher, and this one will only show our 5 star shots.

PAGE 13
So that’s another way of quickly finding things in the catalogue by using filters. You might also want to combine that with things that have got a star rating and a flag which is only file in this case – so you can actually bolt different criteria together to find files quickly and easily. I’m just going to turn that off and take that down and choose coloured labels as well, green ones and red ones which have star ratings. In fact the green ones have no star ratings which is why they’re not showing up. So if we click and drag down to turn that off, we can see red and green together. So that’s another way of finding files fast by using filters to look for ratings, flags etc.
Now it’s interesting to note that when you look at a file you can see in its metadata whether it’s got ratings added as well and you can see the labels appearing. You can also add ratings directly into the meta data. So that’s another way to add ratings to your photos. We’re also going to look at ways of getting specific files more specifically found in the future by adding keywords to them. So I’m going ot go to the keywording panel. And bear in mind that because I’ve right clicked and chosen solo mode, it’s only showing the panel I’m clicking on so we’re not getting cluttered up with other open panels. It’s automatically closed the metadata panel now thanks to solo mode.
Now you’ll have noticed two keyword tags already in here – because we assigned them when we brought them in with the camera import. I also assigned them using the meta data tab down here so what we can do is add more keywords to our photographs. Let me just go back to no filtering so we can see all the files, and then I’m going to add a keyword to this one here and there’s keyword suggestions from things I’ve added earlier, you’ve also got keyword sets such as outdoor photography. So if you click there you can see things such as landscape so if I click here and click to keyword that with landscape it might also be in the summer, with this nice cygnet growing up there and it might also be wildlife. So that’s a quick way to add extra keyword to a photograph by using keyword sets. But you can also create custom keywords as well on the selected
PAGE 14
photograph by clicking here typing in a comma and just typing in something such as cygnet for example. It’s remembering other keywords we’ve added and suggesting them automatically. So the more keywords you add it will remember them and it will be easier and quicker to add automatically. Let’s just add another keyword to this shot here. This isn’t wildlife it’s people who have broken down in their train and they’re mobiling for help. So what I’ll do is add a new keyword here called train. Technically it’s an engine but I’m not going to geekout too much about the difference!
Ok so there’s trains and people and the more keywords you can add to a photograph the easier it’s going to be in the future thanks to filters. So once you’ve spent time adding keywords to your photographs you can filter them more easily in the future. Let’s say we wanted a photograph of a train for example: let’s pop down to keyword list, that automatically closes the other panels, and you can see here we have a variety of photographs with various keywords - you’ve got 27 pictures with my name added, you’ve got two pictures with people added, and what we’re going to do is find trains. So if you click by trains by the little arrow – it just displays pictures of photographs with that particular keyword. You might just want shots of people – these shots have been key worded with people. And when
you’ve finished searching for files via keywords, you can just pop up here and choose none again just to see all of the photographs in Lightroom’s catalogue.
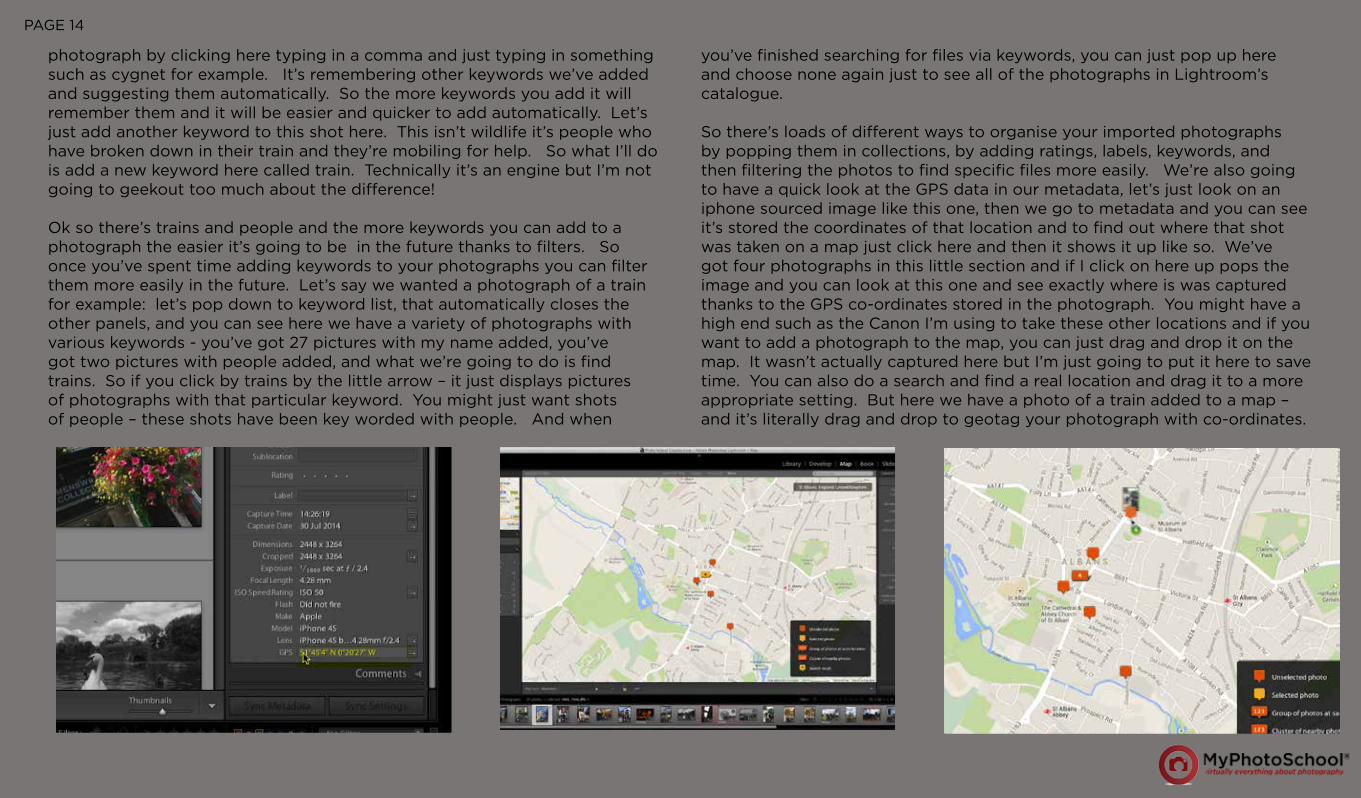
So there’s loads of different ways to organise your imported photographs by popping them in collections, by adding ratings, labels, keywords, and then filtering the photos to find specific files more easily. We’re also going to have a quick look at the GPS data in our metadata, let’s just look on an iphone sourced image like this one, then we go to metadata and you can see it’s stored the coordinates of that location and to find out where that shot was taken on a map just click here and then it shows it up like so. We’ve got four photographs in this little section and if I click on here up pops the image and you can look at this one and see exactly where is was captured thanks to the GPS co-ordinates stored in the photograph. You might have a high end such as the Canon I’m using to take these other locations and if you want to add a photograph to the map, you can just drag and drop it on the map. It wasn’t actually captured here but I’m just going to put it here to save time. You can also do a search and find a real location and drag it to a more appropriate setting. But here we have a photo of a train added to a map – and it’s literally drag and drop to geotag your photograph with co-ordinates.
PAGE 15
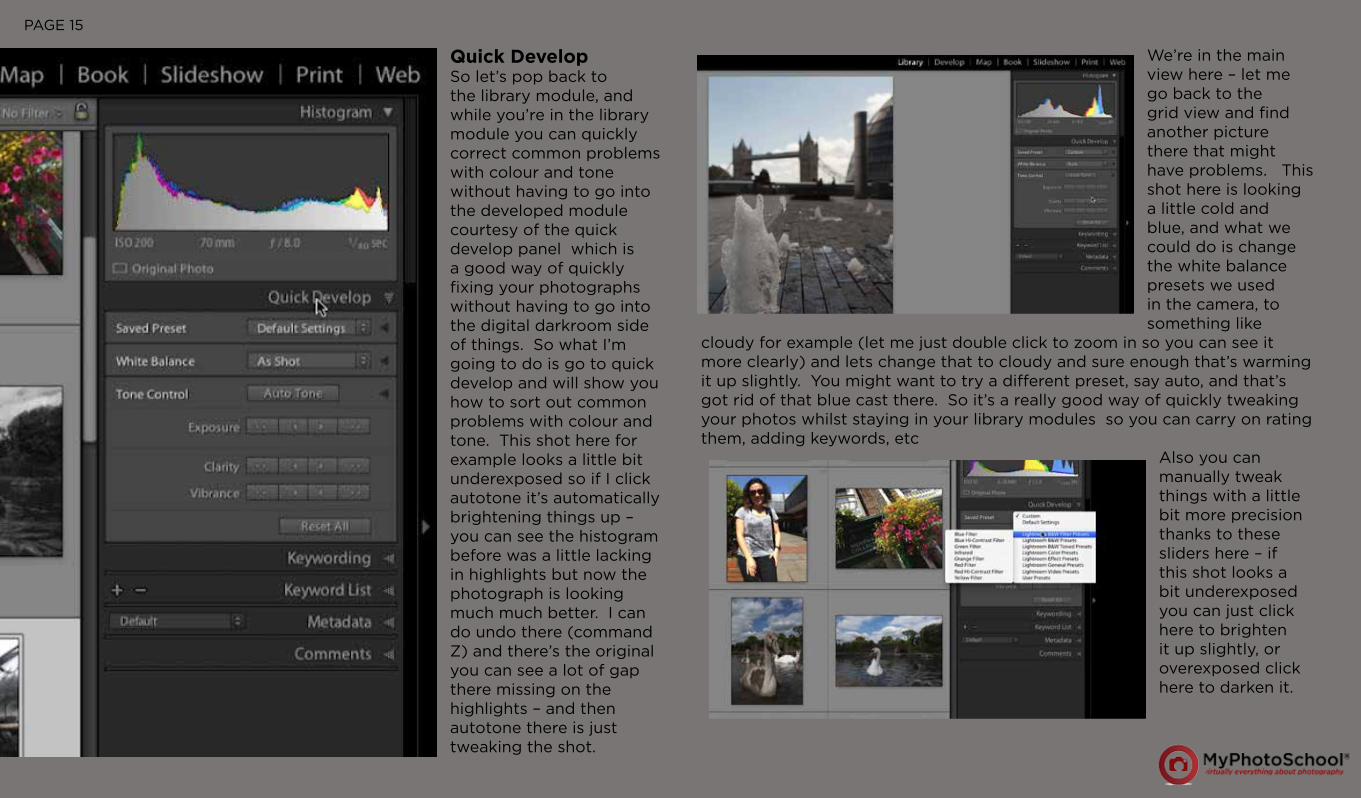
Quick DevelopSo let’s pop back to the library module, and while you’re in the library module you can quickly correct common problems with colour and tone without having to go into the developed module courtesy of the quick develop panel which is a good way of quickly fixing your photographs without having to go into the digital darkroom side of things. So what I’m going to do is go to quick develop and will show you how to sort out common problems with colour and tone. This shot here for example looks a little bit underexposed so if I click autotone it’s automatically brightening things up – you can see the histogram before was a little lacking in highlights but now the photograph is looking much much better. I can do undo there (command Z) and there’s the original you can see a lot of gap there missing on the highlights – and then autotone there is just tweaking the shot.
We’re in the main view here – let me go back to the grid view and find another picture there that might have problems. This shot here is looking a little cold and blue, and what we could do is change the white balance presets we used in the camera, to something like
cloudy for example (let me just double click to zoom in so you can see it more clearly) and lets change that to cloudy and sure enough that’s warming it up slightly. You might want to try a different preset, say auto, and that’s got rid of that blue cast there. So it’s a really good way of quickly tweaking your photos whilst staying in your library modules so you can carry on rating them, adding keywords, etc
Also you can manually tweak things with a little bit more precision thanks to these sliders here – if this shot looks a bit underexposed you can just click here to brighten it up slightly, or overexposed click here to darken it.
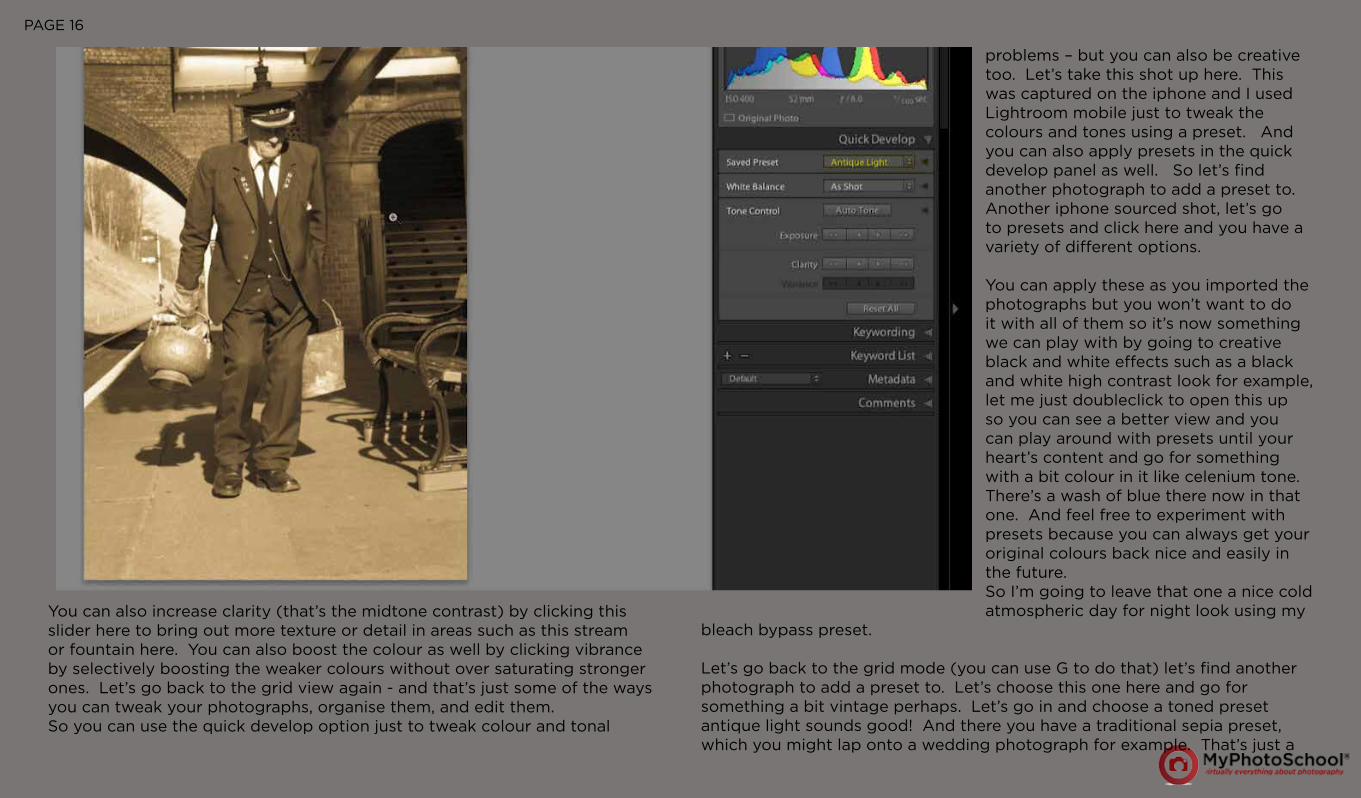
PAGE 16
You can also increase clarity (that’s the midtone contrast) by clicking this slider here to bring out more texture or detail in areas such as this stream or fountain here. You can also boost the colour as well by clicking vibrance by selectively boosting the weaker colours without over saturating stronger ones. Let’s go back to the grid view again - and that’s just some of the ways you can tweak your photographs, organise them, and edit them. So you can use the quick develop option just to tweak colour and tonal
problems – but you can also be creative too. Let’s take this shot up here. This was captured on the iphone and I used Lightroom mobile just to tweak the colours and tones using a preset. And you can also apply presets in the quick develop panel as well. So let’s find another photograph to add a preset to. Another iphone sourced shot, let’s go to presets and click here and you have a variety of different options.
You can apply these as you imported the photographs but you won’t want to do it with all of them so it’s now something we can play with by going to creative black and white effects such as a black and white high contrast look for example, let me just doubleclick to open this up so you can see a better view and you can play around with presets until your heart’s content and go for something with a bit colour in it like celenium tone. There’s a wash of blue there now in that one. And feel free to experiment with presets because you can always get your original colours back nice and easily in the future. So I’m going to leave that one a nice cold atmospheric day for night look using my
bleach bypass preset.
Let’s go back to the grid mode (you can use G to do that) let’s find another photograph to add a preset to. Let’s choose this one here and go for something a bit vintage perhaps. Let’s go in and choose a toned preset antique light sounds good! And there you have a traditional sepia preset, which you might lap onto a wedding photograph for example. That’s just a

PAGE 17
good way of experimenting with different looks. I tend not to use presets much – I tend to go into the develop module to tweak things with more control but these are quick ways to experiment with different looks and colours.
Once you’ve tweaked the tones of a photo using quick develop, and once you’ve changed it using a preset such as antique light – then you’ll need to
share it. Especially for the homework section where we’d like to have a look at some of your photographs, and to share a photo you’ve edited from Lightroom you need to export it. So let me choose file, go to export, then here you have the option to export as a full size jpeg. So that’s nice and compressed so that will fit into an email to upload. And make sure you export it to a suitable place such as the hard drive and you can choose a folder by clicking choose - I’m going to go to the desktop, click choose, I could put it in a subfolder but I’m just going to let it sit on the desktop so I’m going to untick that option and going to click export.
And it’s now saving this edited RAW file onto the desktop. As you can see if I just scroll through to my other screen – there it is sitting there as a compressed jpeg I can email to friends, family, or course tutors.

PAGE 18
First Published in 2014 by MyPhotoSchool Ltdwww.my-Photo-school.com
Copyright © 2014 MyPhotoSchool Ltd. (All rights reserved)Text by George Cairns
Photographs by MyPhotoSchool


![ForeScout CounterACT Supplemental Administrative … Secure Acceptance, Installation, and Configuration ... CounterACT® Installation Guide Version 7.0.0 [2] CounterACT® Console User](https://static.fdocuments.in/doc/165x107/5b0d73937f8b9a685a8e27f5/forescout-counteract-supplemental-administrative-secure-acceptance-installation.jpg)