4 freestyle mixed-media stitch projects make fabric art ... · 4 freestyle mixed-media stitch...
21
4 freestyle mixed-media stitch projects make fabric art with appliqué, heat transfer, fabric collage, and more 1 true confessions of a rebellious quilter DEBBI CRANE 2 get a grid DEBBI CRANE 3 spontaneous combustion: using prompts to spark design ROBIN OLSEN 4 stuffed horse ornaments SAMANTHA JENKINS presented by cloth paper scissors ® 1 2 3 4
Transcript of 4 freestyle mixed-media stitch projects make fabric art ... · 4 freestyle mixed-media stitch...

4 freestyle mixed-media stitch projects make fabric art with appliqué, heat transfer, fabric collage, and more
1 true confessions of a rebellious quilter Debbi Crane
2 get a grid Debbi Crane
3 spontaneous combustion: using prompts to spark design robin olsen
4 stuffed horse ornaments samantha Jenkins
presented by cloth paper scissors®
1 2
3
4

i love to use fabric and stitch in my mixed-media art, but I don’t have the time (or desire) to create big
quilts or complicated clothing. Easy sewing projects that include elements like raw-edge appliqué, painted surface design, heat transfer images, some hand stitchery, found objects—and not a lot of rules—are more my style. And I think a lot of mixed-media artists agree.
So I’m pleased to present fabric art inspiration and instruction from some of my favorite artists in this free, downloadable eBook, 4 Freestyle Mixed-Media Stitch Projects: Make Textile Art with Appliqué, Heat Transfer, Fabric Collage, and More.
Mixed-media artist Debbi Crane combines her love of textile art such as quilting with her need for speed in two projects. In “True Confessions of a Rebellious Quilter,” Debbi creates appliqué blocks with torn edges and a single image she has converted to fabric using an inkjet or heat transfer. Then she uses hand and machine stitchery to attach the appliqué designs and add detail and found objects to each one.
In “Get a Grid!” Debbi once again turns the traditional quilt on its head, this time using 12 pre-stretched canvases as the blocks. Each square combines
4 Freestyle Mixed-Media Stitch Projects:
Make Fabric Art with Appliqué, Heat Transfer, Fabric Collage, and More
presented by Cloth Paper Scissors®
online editor Cate Prato
creative services division art director Larissa Davis
PhotograPhers Larry Stein Korday Studio
Projects and information are for inspiration and personal use only. interweave Press llc is not responsible for any liability arising from errors, omissions, or mistakes contained in this eBook, and readers should proceed cautiously, especially with respect to technical information.
interweave Press llc grants permission to photocopy any patterns published in this issue for personal use only.
paper and fabric collage with surface design techniques like painting and faux appliqué, achieved with decorative papers and glue. Found objects, photos, and mini pieces of fiber art act as focal points.
Robin Olsen takes an even more freewheeling approach to fabric art in “Spontaneous Combustion: Using Prompts to Spark Design.” Inspired by the handmade arts and crafts of ethnic cultures that use raw-edge appliqué and a seemingly random approach to stitch in their fiber art, Robin gathers her fabric scraps, hand-stitching materials, and a list of simple prompts. Then spontaneous, and innovative, fabric collage ensues.
Finally, Samantha Jenkins offers her tutorial on how to make whimsical “Stuffed Horse Ornaments” using paint, fabric, and stitch. Following her easy sewing instructions, construct and stuff the horse. Then paint with gesso and acrylics and hand stitch a mane, saddle, embellishments, and ribbon for hanging. Alternatively, you could use fabric paper to make these winning whinniers.
It’s so much fun to work on fiber art projects like these that you can adapt to fit your time and skills. With 4 Freestyle Mixed-Media Stitch Projects: Make Fabric Art with Appliqué, Heat Transfer, Fabric Collage, and More, you’ll learn to combine mixed-media and fiber arts techniques. Plus, they make beautiful gifts and home décor for anyone who appreciates handmade arts.
Warmly,
Cate Prato Online Editor, Cloth Paper Scissors Today
clothpaperscissors.com
Where mixed media artists come to play
4 Freestyle Mixed-media Stitch Projects presented by2
clothpaperscissors.com©interweave Press llc

true confessionsof a rebellious quilter
by debbi crane
w hen I was 12 or
so, my great aunt
Ethel decided I was ready
to make a quilt. She chose
the schoolhouse block,
bought all the fabric, cut out
the templates, and got me
started on my first block.
I wish I could show you a
picture of the quilt I made
when I was 12, but I cannot.
I could, however, get a
box off a high shelf in the
garage and show you the
quilt I could not finish when
I was 12. I have moved
that box, that monument to
biting off more than I could
chew, six times; I expect I’ll
never get rid of it. The block
was too big, there were too
many pieces, and all those
little seams had to match up
perfectly. It was too much for
me as a 12-year-old, and, I
realize now, even too much
for me as an adult.
adapted from Cloth PaPer SCiSSorS®
september/october 2007
“To A.W., with Love” • 27" × 32" • “This was the first quilt in my series. I used the same portrait transfer on every block for a couple of reasons. First, I love that little face. Those eyes are telling me a story. Second, from a design standpoint, the common element of the face unites the entire quilt, even though all the blocks are different. Artists through history have used repeated imagery, perhaps none as well-known as Andy Warhol and his repeated soup cans and Marilyns. He is the A.W. in the title of the quilt.”
4 Freestyle Mixed-media Stitch Projects presented by3
clothpaperscissors.com©interweave Press llc

So here I am, a lover of fabric, color, and pattern, a lifelong art maker, the great-granddaughter of a true quilter. (My great aunt Ethel’s mother, Grammy Rose, was a seamstress, a crafter, and a “true quilter.”) I have a short attention span and an intolerance of rules, and I have a dilemma:
I want to make quilts, but, in the interest of sparing my sanity, I cannot use traditional methods. Grammy Rose is probably rolling over in her grave.
I set out to make a quilt that would allow me to use a wide variety of fabrics in small, easy-to-handle blocks. I wanted a quilt that I could finish in a month, or less, and have it hanging on the dining room wall to prove to myself I could make a whole quilt. I accomplished my goal and at the same time developed a method that served as the starting point for a five-piece series of related quilts. In each one, I explored the process further.
The quilt I call “To A.W., with Love” was the first in the series. To prepare, I made a very flat “pillow” with coordinating fabrics and low-loft batting. Then I made quilt blocks that I could arrange on the top surface of my pillow, rather than creating a traditional pieced quilt top. The blocks are 4" squares that are torn, not cut; I prefer the raw, raveled edge. The 4" block size was small enough to make one a day, without feeling overtaxed and overtaken by the quilt.
When I had 30 blocks done, I planned out the placement on the flat pillow, glued them sparingly, then heavily pinned them in preparation for stitching. The stitching that attaches the blocks to the pillow serves a dual purpose: it also functions as the quilting. When I finished sewing the 30th block onto the
pillow, the quilt was done, pieced and quilted. No need to bind it because the edges were finished from the start (when I made the pillow and turned it right-side out). I like the colors and fabrics in “To A.W. with Love;” I am happy with the overall look of the piece, but the thing I love most about it is that it is done!
directionsThis is the process I used for all the quilts. Change the measurements to suit the finished size you desire.
To make the very flat pillow, which encompasses the background fabric, the batting, and the backing, we need to do a little math. For “Grammy Rose” I had 3 rows of two 4" blocks, with 11⁄2" between each row for the sashing. The measurement across is 11⁄2" + 4" + 11⁄2" + 4" + 11⁄2", to equal 121⁄2". I added a 1⁄4" seam allowance on each side, making the total width 13". For the length, add 11⁄2" + 4" + 11⁄2" + 4" + 11⁄2" + 4" + 11⁄2", with a 1⁄4" seam allowance on both sides, for a total of 181⁄2".
1. Cut the background, the batting, and the backing all to 13" × 181⁄2". Lay the 2 fabrics down, right-sides together, and lay the batting on top. Pin all the edges together and sew with a 1⁄4" seam allowance, by hand or machine,
m at e r i a l sFor “Grammy Rose” quilt
• 1⁄2 yard each of 2 fabrics for background and backing (Anna Maria Horner’s fabrics are my favorite.)
• 1⁄2 yard low-loft batting or fleece for quilting (I prefer fleece because I find it is easier to sew on the machine and easier to quilt through.)
• Six 4" blocks with torn edges
• Scraps for circles or other shapes
• Photograph, scanned and transferred to muslin
• Twelve 11⁄2" torn squares for sashing
• Embroidery floss and needle
• Three-dimensional embellishments for blocks, such as the velvet scrap and pin
• Sewing machine or needle and thread
• 11⁄2" × 12" strips of scrap cardstock
• White glue
• Pins
4 Freestyle Mixed-media Stitch Projects presented by4
clothpaperscissors.com©interweave Press llc

“Grammy Rose” 121⁄2" × 18" “This was the fifth and final quilt in my series. The lady on the blocks is my great-grandmother, in the days before she lost her eyesight. The red circle is a reference to her pincushions. The position of the red circle is slightly offset from block to block to create rhythm and interest. The finishing touch on each block is a scrap of the velvet she used to make her pincushions.”
4 Freestyle Mixed-media Stitch Projects presented by5
clothpaperscissors.com©interweave Press llc

leaving a 5" opening so you can turn it right-side out. This is your pillow. Once it is turned, sew the opening closed.
tip: To make turning easier, clip off the excess fabric at the corners, carefully avoiding the stitching, before turning.
2. Make your blocks. For “Grammy Rose,” I machine stitched the red circles to the lime green blocks with black thread. (Figure 1) For the transfers, I scanned the photo of Grammy Rose and edited it slightly, cropping out most of the extraneous background. Then I printed the image multiple times onto the same iron-on, t-shirt transfer paper. I cut out the part of each image I wanted to transfer (Figure 2) and ironed it onto bleached muslin. Then I cut out the figures, leaving a narrow border of plain muslin around each for stitching. Grammy Rose was sewn to the blocks using red thread for contrast.
3. Using the cardstock strips as visual aides to keep the spacing even between the blocks, apply the tiniest bit of glue and lots of pins to plan the placement of the finished blocks.
4. Using 6 strands of embroidery floss, attach the blocks to the pillow with a running stitch, whipstitch, buttonhole stitch, or any stitch you like. Be sure to go through all the layers, because this stitching is also the quilting.
note: The small block size makes the quilting stitches an appropriate distance apart, but more stitching could be added in the spaces between the blocks, if desired, to add interest to the quilt.
5. Place the 11⁄2" squares at the corners of the blocks and stitch them into place.
6. Add embellishments, as desired, to finish the quilt.
Learn more about Debbi and her art at paperdollpost.blogspot.com.
Figure 1
Figure 2
4 Freestyle Mixed-media Stitch Projects presented by6
clothpaperscissors.com©interweave Press llc

a c e
b d f
a c
b
g
blanket stitch1. To begin the blanket stitch, find
your baseline. In the illustration, the baseline is the dashed line at the bottom of the stitches.
2. Come up at A.
3. Insert the needle into the fabric at B, and bring it back out at C. Your working thread must be under the needle, so that it catches. The resulting stitch should resemble a backward L.
If you are left-handed the resulting stitch will look like a standard L. Generally, right-handed stitching begins on the left end of a seam, and left-handed stitching begins on the right end of a seam.
“Girls Can’t Do Random” • 13" × 29" “Quilt blocks don’t have to be square. In this quilt the blocks are circles and rectangles. I began by making seven paper dolls, using an old photo in which the girl’s legs cannot be seen because her black tights and shoes blend into the black background. I gave her patterned tights and cowboy boots and a wardrobe of new dresses. I used my scanner and printer to make transfers of the paper dolls that I then ironed onto muslin. The dolls were machine stitched to rectangles of patterned fabric. The pillow for this quilt is a long rectangle to which I appliquéd circles in a random fashion. I added the rectangular paper-doll blocks to the pillow, finishing with rickrack, buttons, and charms.”
4 Freestyle Mixed-media Stitch Projects presented by7
clothpaperscissors.com©interweave Press llc

“get a grid!” canvas wall art for collectors of odds & ends
by debbi crane
adapted from Cloth PaPer SCiSSorS® January/February 2010
4 Freestyle Mixed-media Stitch Projects presented by8
clothpaperscissors.com©interweave Press llc

This piece was conceived as a display idea for my Good Girls art dolls, which appeared in the September/October 2009 issue of Cloth PaPer sCissors. The dolls are fine by themselves, but really too small to make much of a decorating impact on an entire room. I placed a doll inside the niche on the back of a canvas and found that it created instant substance. I decided that if a plain canvas looked good, a painted and collaged one would be heavenly. Further, if one 12" canvas looked that good on the wall, how about a series of nine?
inspiration I have been lucky enough to study with many outstanding artists/teachers since I began my mixed-media journey in 2002. Without a doubt, Keith LoBue, the king of found objects, has been one of the most influential people in my artistic life. He introduced me to the idea of not using glue to attach things. No glue? I practically have Aleene’s® Tacky Glue® running through my veins! In his workshop, Keith forced us to explore the myriad other ways things can be attached to each other, and this one small notion revolutionized my work. In creating these canvases, I asked myself what would be the most secure way to attach all the disparate elements to the canvases. I am indebted to Keith for making me think.
directionsgetting startedChallenge yourself to create this project without purchasing anything but the canvases. I suspect that I am not alone in my semi-hoarding of interesting odds and ends that I plan to use later, when the right project comes along. Maybe later is now. This wall grid is a great way to display collections of small things and use up those scraps. And by using non-glue attachments, the canvases can be disassembled and the elements used elsewhere if you change your mind.
if you were accused of being an
artist, would there be enough
evidence in your living room to
convict you? For many years,
my answer would have been a
resounding, “No!” There was an
obvious disconnect between what I
loved to do and how I lived.
m at e r i a l s• Nine 12"-square pre-stretched
canvases, at least 1" deep
• Assorted odds and ends: flotsam and jetsam, a variety of interesting bits you’ve saved along the way
• Acrylic paint (5–6 colors)
• Plain white printer paper
• Printed paper and fabrics in colors related to your acrylics
• Paintbrushes
• Scissors
• White craft glue or gel medium
• Waxed linen thread
• Awl
• Sawtooth picture hangers and tacks (9)
• Hammer
Above: Detail of Mini Quilt Square.
Previous page:
Top row, from left: Mini Quilt—a 6" quilt is stitched in place. Spools—rectangular scraps of paper and fabric are the base for the spools, which are tied in place with waxed linen thread. Twigs—bundles of twigs are layered on coordinating printed fabric and tied in place.
Middle row, from left: Stuffed Heart—a sewn and stuffed heart is framed with paper and fabric and held in place with ribbon. Ohio Star—a nine-patch quilt block is stitched in place and embellished with found objects. Good Girl Art Doll—a doll is set in an environment with a woodland theme.
Bottom row, from left: Paper and Fabric Stacks—stacks of patterned papers and fabrics are held in place with a button in the center. Glass Bottles—layered scraps of paper and fabric give a presence to small bottles filled with buttons, beads, pins, glitter, and milagros. Branch and Bird—paper leaves and branches are enhanced with some machine stitching.
4 Freestyle Mixed-media Stitch Projects presented by9
clothpaperscissors.com©interweave Press llc

paint the canvasesI viewed this entire piece of art as an enlarged nine-patch quilt block. As you may know, traditional quilters have historically used a red center square in a pieced block to represent hearth and home, so I painted the center canvas deep red. The surrounding eight canvases were painted brown and a latte shade, with the brown canvases placed in the corners to visually anchor the entire piece. Do not paint the fronts of the canvases. Instead, turn them over so you have a framed niche or shadow box. I call this little maneuver the Prater Flip for my friend and co-author Cheryl Prater who was the first person I ever saw use a canvas this way.
decorate the framesThe stretcher bars create a nice wide frame around the niches, giving lots of opportunity to play with shapes and colors. Painting large shapes on this surface can be tricky, however, because of the staples and raw canvas edge. To solve the problem of painting over the uneven edges, I borrowed an idea from artist Henri Matisse who cut large sheets of boldly painted papers into a variety of shapes to create large collages.
1. Paint 2–3 sheets of plain white printer paper with each of your acrylic paint colors. Allow to dry.
note: Do not use watercolor paper or cardstock; the light weight of the printer paper makes it preferable as it will almost melt into the background.
2. When the painted papers are dry, cut out simple shapes in lots of sizes—circles, squares, triangles, curvy lines. Cut some shapes out of your patterned papers, too.
3. Coat one side of each frame with a mixture of 2 parts white craft glue and 1 part water; or use gel medium.
4. Adhere the cutouts and then add a coat of the glue mixture on top. Repeat on all sides, using as many layers as you like.
5. When the glue is dry, use a very fine paintbrush to add some hand-painted lines, dots, and other marks to break up all the perfect straight edges of your cut shapes.
design the nichesEach niche is a work of art in itself. Once you have determined a theme and/or color scheme, get started, keeping in mind that though each niche is designed independently, you want to create a unified whole.
niche ideas
• Special photos
• An environment for a doll
• Nature finds
• Patterns/grids of small jars, spools, buttons, etc.
• Quilt squares, collages, small paintings, other small art pieces
• 3-D elements or stuffed items (like the heart)
• Stacks: paper, fabric, buttons, or other
• Bundles (I used sticks, but use your imagination.)
background ideas
• A torn scrap of grocery sack
• A printed background: fabric or paper
• Painted printer paper
• Quilt block: fabric or paper
• Collage
• Machine stitching for texture
tips• Repeating a grid form within the
larger grid is one way to create a unified whole.
• In the interest of keeping your niches cohesive, I think it is important to use at least a smidgen of all the acrylic colors you are working with on each canvas.
• Repeating elements from canvas to canvas makes the individual pieces relate to each other. The viewer’s eye can easily travel from canvas to canvas, resting on familiar colors and/or textures.
4 Freestyle Mixed-media Stitch Projects presented by10
clothpaperscissors.com©interweave Press llc

attachment methods
• Small nails
• Waxed linen thread
• Glue
• Eyelets
• String
finishingCenter a sawtooth picture hanger on the back of each canvas and attach the hangers close to the edge with nails.
Learn more about Debbi and her art at paperdollpost.blogspot.com.
variations• Create a canvas for each member
of your family using photos and memorabilia.
• Use more canvases to fill a bigger wall or fewer in a small space.
• Hang the canvases in a linear arrangement or display them across a mantle.
• Create a grid for each season
4 Freestyle Mixed-media Stitch Projects presented by11
clothpaperscissors.com©interweave Press llc

As much as I appreciate the spontaneous approach, I had a hard time achieving it in my fiber work. I didn’t have any trouble working without a plan and plunging in intuitively when it came to painting or mixed-media journaling. After all, anything that doesn’t work can easily be covered with a few brush strokes or a piece of collaged paper. When it came to stitching, however, I held back. Because I like a lot of
maybe it’s a reaction to my
early training in traditional
quilt making with all those perfect
points, or maybe I just have a natural
affinity for chaos, but whatever the
case, I am always looking to mess
things up a bit. I’m drawn to quilts that
have a little wildness to them, frayed
edges, unexpected patches, or color
combinations that won’t be found in a
color theory book. I love the seemingly
random stitches often found in ethnic
art. The quilts of Gee’s Bend thrill
me with their scrap bag approach
and shocking patches of color. The
spontaneity always seems to give these
types of pieces a little added spark
and energy.
spontaneous combustion using prompts to spark design
“Poppies” • 15" × 10½"
by robin olsen
adapted from Cloth PaPer SCiSSorS® september/october 2009
4 Freestyle Mixed-media Stitch Projects presented by12
clothpaperscissors.com©interweave Press llc

“Doodles” • 13" × 11"
4 Freestyle Mixed-media Stitch Projects presented by13
clothpaperscissors.com©interweave Press llc

handwork in a piece, the thought of pulling out stitches hours later forced me into more forethought. When a friend suggested I try using the same sort of prompts in my fiber work that I designed for my mixed-media journals, a fresh new world of playfulness opened to me.
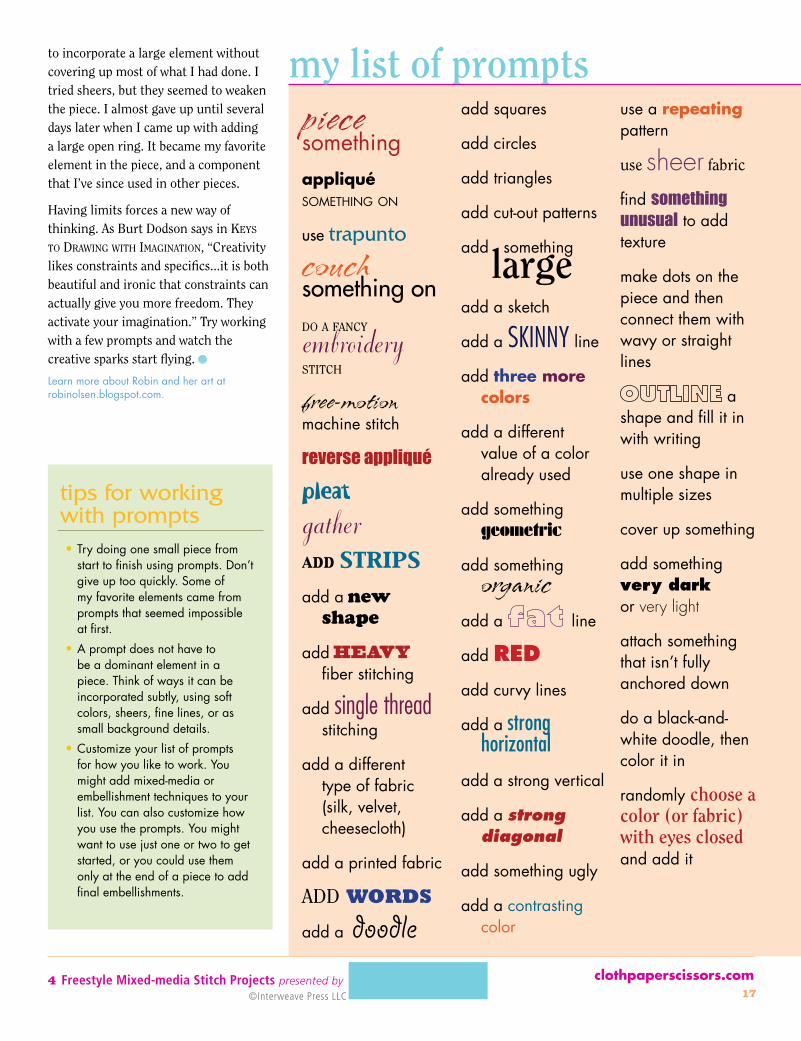
how does it work?I brainstormed and came up with a list of prompts that focus on using stitching and fabric. Some are technique-based, such as “Appliqué something on” or “Couch something.” Others are design-centered, such as “Add triangles”
or “Add something very light or very dark.” I printed the prompts on small pieces of paper, folded them, and threw them in a basket.
In its purest form, I draw a prompt, decide how to incorporate it into the piece, and then work on that until I feel
“Sky Garden” • 11" × 11"
4 Freestyle Mixed-media Stitch Projects presented by14
clothpaperscissors.com©interweave Press llc
satisfied that I’m done with it. Then I draw another prompt and proceed like this until the entire piece feels complete. It might take three prompts or 10.
prompts in actionThe first piece I made using prompts, “Sky Garden,” follows this approach very
closely. I didn’t have any plan ahead of time, except to create a piece that felt spontaneous and used my hand-dyed fabric. I decided on a brown cotton background and drew the prompt “Add rectangles.” I grabbed some pieces of fabric that jumped out at me and tore or cut them into a bunch of rectangles. I put them in a pile and pulled one after
another, without looking at them, and stitched them to form a background layer. At this point the background looked pretty dreary to me.
Next, I drew the prompt “Find something unusual to add texture.” I wanted to limit this piece to fabric and thread, rather than jump over to mixed
“Eth
nic
Gra
ffiti”
• 1
1" ×
11"
4 Freestyle Mixed-media Stitch Projects presented by15
clothpaperscissors.com©interweave Press llc

media, so I was limited as to what I could use that would be unusual. I found a linen selvedge that I dyed and some pieces of embroidered gauze that I used wrong-side out. The brighter colors of the gauze helped perk up the piece, and the flowers on the wrong side of the embroidery made a nice focal point, but it still felt unfocused.
My next prompt was “Add line.” The embroidered flowers seemed to be floating in space, so I added a ladder going up to them. I decided the flowers
needed to pop more, so I outline stitched them.
I drew the prompt “Add dots.” The piece was a little dark, so I decided on white dots for a bit of brightening. I stitched them down with black crosses to tie in with the ladder. I felt like the piece was pretty much done at this point, but I did add some black straight stitches to the background to integrate it. I had my doubts along the way, but I tried to remain open to letting the piece develop
and allowing it to determine how to best incorporate each prompt.
breaking the rulesThe whole point of using the prompts is to stretch my creativity and find fresh approaches to my work, so I don’t always adhere to the rules that closely. Sometimes I start with a direction or a pre-planned background. In “Autumn Flowers,” for example, I had a crazy-patched background that I wanted to do a fall piece on, so that formed the theme and direction for the work. I also find ways of interpreting the prompts to make them work for me.
In “Poppies,” the first prompt I drew was “Do black and white doodles, then fill in with color.” When I had written that prompt, I was envisioning some fun little final stage embellishments. What could I do with that as the starting point for a piece? I settled on a black and white fabric that looked like doodles and then, after other elements were added, I filled in the doodles with colored stitches and bits of colored fabric as final touches.
I’m thrilled with the way the prompts have pushed me beyond the predictable in my work. I find them to be a fabulous way to take the angst out of starting a new piece. Rather than contemplate what the final product is going to look like, I just draw a prompt and do what it says. Granted, there are points along the way when I think some pre-planning would have been nice instead of trying to tuck one piece under the other, but the trade-off in spontaneity seems worth it to me.
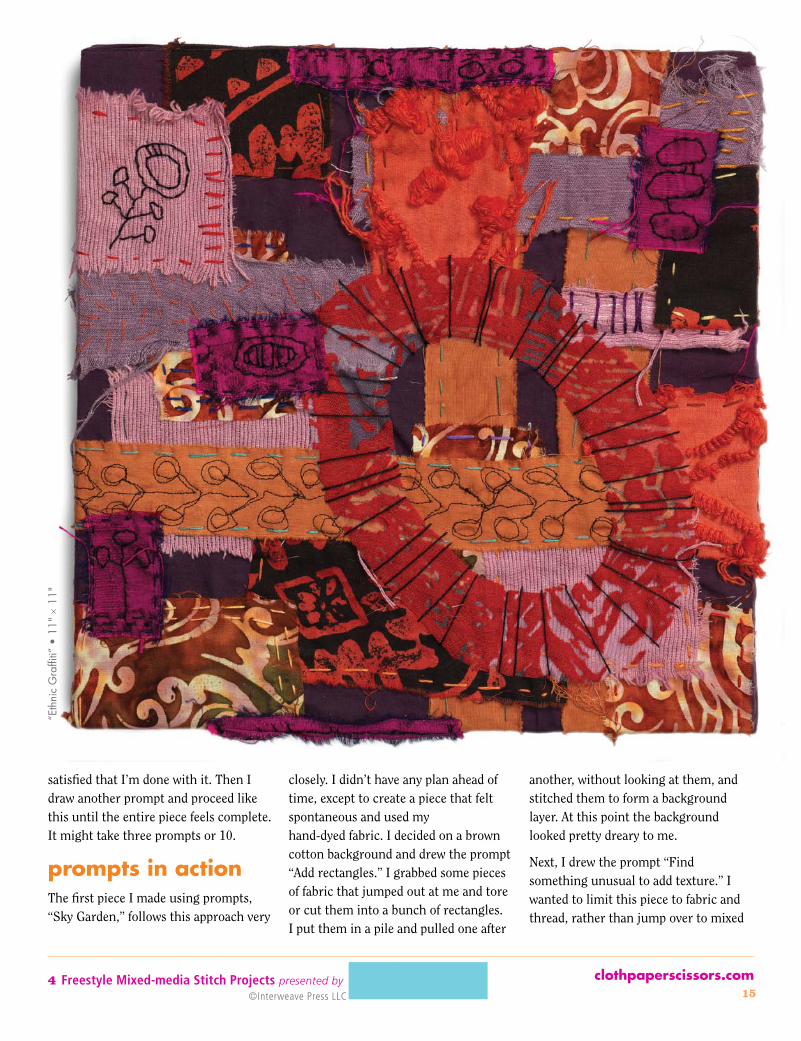
Using prompts has stretched my creativity in ways I did not expect. In “Ethnic Graffiti,” I was close to finishing the piece when I drew the prompt “Add something large.” I was stuck for quite a while on that one, having no idea how
“Autumn Flowers” • 8" × 6" • Autumn quote by Albert Camus.
4 Freestyle Mixed-media Stitch Projects presented by16
clothpaperscissors.com©interweave Press llc
to incorporate a large element without covering up most of what I had done. I tried sheers, but they seemed to weaken the piece. I almost gave up until several days later when I came up with adding a large open ring. It became my favorite element in the piece, and a component that I’ve since used in other pieces.
Having limits forces a new way of thinking. As Burt Dodson says in Keys to Drawing with imagination, “Creativity likes constraints and specifics...it is both beautiful and ironic that constraints can actually give you more freedom. They activate your imagination.” Try working with a few prompts and watch the creative sparks start flying.
Learn more about Robin and her art at robinolsen.blogspot.com.
piece somethingappliqué something on
use trapunto
couch something onDo a fanCy embroidery stitCh
free-motion machine stitch
reverse appliquépleatgatheradd stripsadd a new
shape
add heavy fiber stitching
add single thread stitching
add a different type of fabric (silk, velvet, cheesecloth)
add a printed fabric
aDD words
add a doodle
add squares
add circles
add triangles
add cut-out patterns
add something large
add a sketch
add a skinny line
add three more colors
add a different value of a color already used
add something geometric
add something organic
add a line
add red
add curvy lines
add a strong horizontal
add a strong vertical
add a strong diagonal
add something ugly
add a contrasting color
use a repeating pattern
use sheer fabric
find something unusual to add texture
make dots on the piece and then connect them with wavy or straight lines
a shape and fill it in with writing
use one shape in multiple sizes
cover up something
add something very dark or very light
attach something that isn’t fully anchored down
do a black-and-white doodle, then color it in
randomly choose a color (or fabric) with eyes closed and add it
tips for working with prompts• Try doing one small piece from
start to finish using prompts. Don’t give up too quickly. Some of my favorite elements came from prompts that seemed impossible at first.
• A prompt does not have to be a dominant element in a piece. Think of ways it can be incorporated subtly, using soft colors, sheers, fine lines, or as small background details.
• Customize your list of prompts for how you like to work. You might add mixed-media or embellishment techniques to your list. You can also customize how you use the prompts. You might want to use just one or two to get started, or you could use them only at the end of a piece to add final embellishments.
my list of prompts
4 Freestyle Mixed-media Stitch Projects presented by17
clothpaperscissors.com©interweave Press llc

I have designed this project to accommodate both machine and hand sewing, so if you have skills in only one area that is fine. If you have skills in both, then choose or combine to suit your mood. Hand sewing will give a lovely shabby edge to your horse (see “Giddy Up”) and offers flexibility in terms of when and where you do this project. Machine sewing gives a lovely finished edge to your horse (see “Petal” and “Diego”). So, if you have developed some basic sewing skills and love experimenting with mixed media why not jump on, hold tight, and enjoy the ride. Yee haw!
cut & sew1. Make your own paper template using
the pattern provided and cut it out.
2. Fold the muslin in half crosswise and pin the horse template in place.
3. Draw around the pattern using a pencil or pen.
4. Without moving the fabric, remove the horse template and pin the fabric together, placing the pins inside the horse shape. This keeps the fabric from moving, allowing you to cut out both sides of your horse at once.
Alternatively, draw around the template on 2 single pieces of muslin
and cut out separately.
5. Decide if you will be sewing your horse by hand or
machine. For hand stitching, cut out the
pattern along the original pencil line. If machine stitching, use the original pencil line as a guide and draw a second line 1⁄4" beyond the original line all the way around the pattern. This second line is your cutting line.
tip: Draw one line in the center of the two sets of legs, leaving a ¼" gap at the top.
stuffed horse ornamentsfoal around with paint, fabric, and stitch
ilove mixed-media art because it offers endless opportunities for play. I can
select what media I want to use based on my creative and emotional mood.
Sometimes I enjoy using paint and focusing on imagery; sometimes textiles,
embellishments, and texture; and sometimes collage materials and color. Then
there are those times when I want to use it all in one project, like in my
mixed-media horses. The great thing about these horses is that they offer
endless design potential and make
an interesting change from
working on paper, canvas,
and board.
“Petal” • 11" × 8" Muslin fabric; cotton thread, gesso, acrylic paints, gel pens, ribbon; machine stitched.
by samantha Jenkins
4 Freestyle Mixed-media Stitch Projects presented by18
clothpaperscissors.com©interweave Press llc

6. With pins in place, hand or machine sew on the original pattern line, leaving an opening to allow for later stuffing (use the template guide if desired).
note: Take your time stitching as this ultimately affects the final horse shape. However, do not worry about odd imperfections as these add to the handmade appearance.
7. Once the horse is stitched, remove all the pins. Hand-sewn horses are now ready for stuffing, and machine-sewn horses are now ready for turning.
turn1. Use your turning tool to turn the tail
and legs. Once all the legs and the tail have been turned, the body will automatically turn into the correct position.
2. Press your horse shape flat.
3. Place the flat end of your turning tool inside the body via the gap left for stuffing and press along the stitched edge to press the seams out evenly.
stuffStuffing can be time-consuming, and so it can be tempting to use large pieces of fill for speed. However, small pieces work best, especially for the tail and legs, to avoid gaps and blockages and to help create a relatively firm and smooth end product.
1. Stuff the tail, and then each leg. Use small pieces of stuffing (about the size of a fingertip) and poke them into the bottom of the tail/legs using your stuffing implement (this can be the same as your turning tool).
2. Gradually push more and more stuffing into position, while frequently pressing and squeezing
m at e r i a l s• Horse pattern (page 67)
• Paper (8½" × 11" or larger)
• Pencil/marker (I use a 2B pencil.)
• Muslin, 19" × 12"
• Pins
• Scissors
• 100-percent cotton thread (This is eventually painted, so I use a dark thread for ease of visibility when stitching.)
• Sharp sewing needle
• Turning tool (for machine-stitched horses)
• Polyester fiberfill
• Stuffing tool (e.g. a slim paintbrush end or chopstick)
• Gesso (I use white but any color will suffice.)
• Paintbrushes
• Jar of water
• Acrylic paint (I use 2–3 different colors for the body and additional colors for hooves/text/patterns, as desired.)
• Rag or cloth
optional • Sewing machine
• Scrapbook paper
• Matte medium
• Gel pens
• Spray varnish (I use plasti-kote® Krystal Clear, 549 Flat.)
• Colored wool or other fibers
• Embroidery floss
• Buttons, bells, ribbon, beads, sequins, and other embellishments
“Diego” • 11" × 8" Muslin fabric; cotton thread, gesso, acrylic paint, scrapbook paper, matte medium, buttons, wool fibers, beads, felt, embroidery floss, ribbon, metal brad; machine stitched.
sewing tips• For machine sewing, use a
relatively short stitch length to make the seam more stable.
• Take time to stitch along the line as best you can.
• Double stitch the bottoms of the hooves, bottom of the tail, and all around the ears to increase seam stability when turning and stuffing.
• For hand sewing, use a blanket stitch and cotton thread. Make relatively small stitches for increased seam stability.
• Try not to fray the outside edges too much. A little fraying is fine, though, as the threads will eventually be secured using gesso, and it adds a nice shabby look to your piece.
4 Freestyle Mixed-media Stitch Projects presented by19
clothpaperscissors.com©interweave Press llc

the stuffed areas to feel for gaps and to reduce lumps by evening out the filling.
note: The stuffed legs and tail may have a few creases in them, but this will not look unsightly in your finished product.
3. Stuff the head. I mainly use my fingers and am more generous with the size of the stuffing pieces. I stuff the nose, the ears, and then the eye area.
4. For the body, fill the neck first, all along the top of the legs and tail, and then the middle and top of the horse.
5. Gently massage all over the horse to help even out any lumps and to find any gaps. Add more stuffing as needed.
6. Once you are happy with the form of your horse, fold in the raw edges of the opening and pin them in place.
Hand stitch the opening with a relatively small blanket stitch. Don’t worry if it’s a little uneven, you can always hide it with a saddle later.
gesso and paint1. Paint your horse with undiluted
gesso. Take care to fully cover all surfaces, and press the gesso into the stitches. This helps strengthen both the fabric and the seams and prepares your horse for painting. Allow it to dry completely.
note: If you plan to add hand-sewn embellishments, do not make this layer too thick as it can cause sewing difficulties later.
tip: Hand-sewn horses may benefit from a little trimming of excess threads or fibers.
2. Thoroughly paint your horse and all seams in your chosen base color. I use only a tiny amount of water,
as needed. Allow the paint to dry completely.
3. With a second color of acrylic paint and a little water, paint over your horse more randomly. While the paint is still damp, smudge and lift the paint using a rag. You may want the rag to be slightly damp.
4. Assess your horse and leave as is or repeat step 3 in a third color if desired.
5. Using acrylic paint colors of your choice, paint on the hooves and nose. Remember to do both sides of the horse (use the template guide if desired). Let dry.
6. Add acrylic paint decoration such as patterns, written text, collars. Embellishment is not necessary and is entirely up to you. “Petal” is made quite simply, using only acrylic paints, a gel pen, and a tied piece of ribbon, and she is a lovely looking girl!
note: Varnish is optional. It will help to protect your project but is not essential. If you add a saddle, varnish after the saddle is in place. If adding ribbons and embellishment, I would spray and let dry before you attach these.
embellisheyes
Mark the desired eye position using a pencil or pen (use the template as a guide if desired). Using a needle and either cotton thread or embroidery floss, sew on the eyes, using buttons, small beads, or sequins.
“Giddy Up” • 11" × 8" Muslin fabric; cotton thread, gesso, acrylic paint, text stencil, scrapbook paper, matte medium, textile fibers, wool fibers, textile flower, beads, embroidery floss; hand stitched.
4 Freestyle Mixed-media Stitch Projects presented by20
clothpaperscissors.com©interweave Press llc

note: The fabric will be little stiff now with gesso and paint, so it may be difficult to find spots that easily accommodate your needle. You could also paint on the eyes.
saddle
Cut a piece of scrapbook paper to the preferred size of your saddle. Wet the back of the cut paper very slightly and rub it very gently. This helps remove some of the backing paper, helping the saddle to mold around and integrate with the horse more easily. Use matte medium to glue the saddle in place, then coat the surface of the saddle with matte medium to ensure a smooth edge. Gently press out any bubbles and creases in your saddle with your fingers while the medium is still wet.
tail
Cut a single length of your chosen wool/fiber and fold it in half. Hold it against the tail to determine the approximate length of your tail end. It is better to have this a little too long as you can easily trim excess length later. Once you’ve determined the length, use this thread as a guide to cut numerous threads of the same length—how many you cut depends on how bushy you want your tail end to
be. Gather the threads together and tie a knot in the center. Hand stitch through the knot to attach it to the horse’s tail. Trim any excess length.
mane
Cut a single length of wool/fiber. Lay it between the ears, from the front of the head to the back, to determine the length. Once determined, use this thread as a guide and cut numerous threads of the same length—how many you cut depends on how bushy you want your mane to be. Tie a knot in the
wool/fiber lengths at roughly the point that will sit between the ears and hand stitch through the knot to attach the mane to your horse’s head. Trim any excess length. Once secure, use your fingers to rub a small amount of matte medium along the length of your wool/ fibers. While wet, position your fibers as desired. Once dry, the matte medium will keep your fibers firm and in place.
decoration and hanging
Embellish as desired. Hand sew decorative stitches; add buttons, beads, bells, sequins; use more scrapbook paper; add glitter; and so on. If you wish to hang your horse, either hand stitch a ribbon/tie in place or secure it using a metal brad. Think about the tilt that will be created on your horse by the position of your ribbon/tie before attaching.
Learn more about Samantha and her art at samanthajenkins.blogspot.com.
Leave Open
Enlarge to desired size.Interweave Press LLC grants permission
to photocopy this pattern for personal use.
ideas for your painting palette• For machine sewing, use a relatively short stitch length to make the seam more
stable.
• Take time to stitch along the line as best you can.
• Double stitch the bottoms of the hooves, bottom of the tail, and all around the ears to increase seam stability when turning and stuffing.
• For hand sewing, use a blanket stitch and cotton thread. Make relatively small stitches for increased seam stability.
• Try not to fray the outside edges too much. A little fraying is fine, though, as the threads will eventually be secured using gesso, and it adds a nice shabby look to your piece.
4 Freestyle Mixed-media Stitch Projects presented by21
clothpaperscissors.com©interweave Press llc