4-CHANNEL H.264 DVR - Security-Warehouse · 4CH Stand alone digital video recorder User’s Manual...
55
XJ8104 4-CHANNEL H.264 DVR www.best-china-security-supplies.com Page 1 of 55 DVR 4CH Stand alone digital video recorder User’s Manual 4-CHANNEL H.264 DVR
Transcript of 4-CHANNEL H.264 DVR - Security-Warehouse · 4CH Stand alone digital video recorder User’s Manual...

XJ8104 4-CHANNEL H.264 DVR www.best-china-security-supplies.com
Page 1 of 55
DVR 4CH Stand alone digital video recorder User’s Manual
4-CHANNEL H.264 DVR

XJ8104 4-CHANNEL H.264 DVR www.best-china-security-supplies.com
Page 2 of 55
Warnings
Safety: ● This device is an INDOOR equipment and NOT water resistant. In order to avoid dangers of short circuit or electric shock, do NOT expose it in rainy or moist environment. ● In case of any solid or liquid matter get into the device case, turn off the power immediately, and ask for qualified technicians to check it before restart. ● This device is a precise equipment, ask qualified technicians or distributors for help if any malfunction. Do NOT attempt to repair any unit of it by yourself.
Power Supply: The digital video recorder applies DC12V,4A power adaptor. The voltage of the power must
be verified before use. When this machine is not be used for a long time, pull plug of power adaptor.
Using Place ● Do NOT put this device near by a radiator or heat ventilator. Do not expose to sunlight or dust. Keep away from magnetic force or vibration. Avoid humidity or water. ● Most important, connect this device to the ground to avoid electric shock.
Notice ●Any re-construction or change maybe leads to destroy of this machine, which
brings many inconveniences to user. Therefore, do not disassemble or modify this unit. Otherwise, the dealer will not be responsible for it.
● The damages caused by following incorrect operation are not belong the range of the warranty even if it is within the warranty period: ◇Using incorrect power adaptor ◇The damages are caused by natural disasters (such as fire, flood, tide and lightning etc) ◇Changing HDD.

XJ8104 4-CHANNEL H.264 DVR www.best-china-security-supplies.com
Page 3 of 55
Feature Non-pc stand-alone security digital video recorder with embedded operation system H.264 compression format Safe and friendly power-on / power-off function Chinese/English/Korea/Japanese languages supported Audio and video real time recording and playback function Support NTSC/PAL video system 4CH video inputs, 1CH monitor output 1CH VGA output(optional) 4CH audio inputs, 1CH audio output High quality image, sharpness, sharpness and color adjustable for each channel Support multiple zoom by mouse Support auto switch for each full screen display Display modes: PIP, full screen, 2 images, 3 images, 4 images Recording modes: manual recoding, scheduled recording, alarm recording and motion
detection recording Image quality: highest, high, normal, low Detailed event log support Searching modes: time & data searching, event recording searching, recording group
searching Support fast forward and fast rewind: ×2, ×4, ×6 Backup modes: network backup, USB 2.0 backup, CD-ROM backup(optional) Support RS-485 PTZ control(speed dome camera), and preset positions operation Support USB mouse and infrared remote controller operation Support 1 SATA port HDD, more HDD support(optional) 4 CH alarm inputs, 1 CH alarm control output Multiplex operation: live & record & playback & network can be operated at the same
time Support network function: remote monitor, remote playback, remote record and so on Live display: 480fps(NTSC), 100fps(PAL) CIF resolution record: 120fps(NTSC), 100fps(PAL)

XJ8104 4-CHANNEL H.264 DVR www.best-china-security-supplies.com
Page 4 of 55
Content
Ⅰ System Installation 1.1 Accessories 1.2 Introduction of the front panel 1.3 Introduction of the rear panel 1.4 Connection of the rear panel 1.5 Introduction of the infrared remote controller
ⅡOperation Guideline 2.1 Turn on the DVR 2.2 Turn off the DVR 2.3 Viewing Operation 2.4 Manual record operation 2.5 Alarm record operation 2.6 Schedule record operation 2.7 Playback operation 2.8 Record time searching 2.9 Record group searching 2.10 Event group searching 2.11 USB backup 2.12 CD-ROM backup(Optional) 2.13 Checking system information 2.14 PTZ control 2.15 Password input
Ⅲ System Menu Setup 3.1 Main menu 1. Front panel 2. Mouse 3.2 CAMERA
1. CHANNEL 2. COLOR 3. TITLE 4. PTZ PROTOCOL 5. PTZ ADDRESS 6. EVENT POPUP 7. MAIN ROT. TIME
3.3 RECORD 1. CHANNEL 2. RESOLUTION 3. PRE RECORD

XJ8104 4-CHANNEL H.264 DVR www.best-china-security-supplies.com
Page 5 of 55
4. FPS 5. QUALITY 6. RECORD MODE 7. AUDIO 8. SCHEDULE 3.4 MOTION 1. CAMERA CHANNEL 2. MOTION ENABLE 3. SENSITIVITY 4. MOTION AREA 5. POST RECORD TIME 6. BUZZER TIME 7. ALARM TIME 8. MOTION TRACE 3.5 SENSOR 1. SENSOR CHANNEL 2. SENSOR TYPE 3. POST RECORD TIME 4. BUZZER TIME 5. ALARM TIME 3.6 SCHEDULE 3.7 NETWORK 1. IP MODE 2. PORT 3. IP 4. NETMASK 5. GATEWAY 6. NAME SERVER 7. DDNS
3.8 BACKUP 3.9 SYSTEM 1. TIME SETUP 2. SYSTEM PASSWORD 3. SYSTEM INFO 4. VIDEO FORMAT 5. LOG VIEW 6. LOG SET 7. DISK FORMAT 8. FIRMWARE UPGRADE 9. FACTORY RESET 10. LANGUAGE
Ⅳ Default Setup

XJ8104 4-CHANNEL H.264 DVR www.best-china-security-supplies.com
Page 6 of 55
Ⅴ PC Viewer Operation
Ⅵ Parameters Table

XJ8104 4-CHANNEL H.264 DVR www.best-china-security-supplies.com
Page 7 of 55
Ⅰ System Installation 1.1 Accessories
Open package, the accessories should include:
1. User’s manual 1pcs 2. DC12V/4A power adaptor 1pcs 3. Screws 1 set 4. CD with PC software 1pcs 5. Infrared remote controller 1pcs 6. USB port mouse 1pcs
1.2 Introduction of the front panel Function of the front panel
1. “↑”/”UP” button In QUAD display mode, press “↑”/”UP” button to display CH1. Under menu operation, it is “UP” key. 2. “→”/”RIGHT” button In QUAD display mode, press “→”/”RIGHT” button to display CH2. Under menu operation, it is “RIGHT” key. In PTZ operation mode, press” ↑ ”/”RIGHT” button to control the “Rightward” rotation of PTZ. 3. “↓”/”DOWN” button In QUAD display mode, press “↓”/”DOWN” button to display CH3. Under menu operation, it is “Downward” key. In PTZ operation mode, press” ↓ ”/”DOWN” button to control the “Downward” rotation of PTZ. 4. “←”/”LEFT” button In QUAD display mode, press “ ←”/”LEFT” button to display CH4. Under menu operation, it is “Leftward” key. In PTZ operation mode, press “←”/”LEFT” button to control the “Leftward” rotation of PTZ. 5. “ENTER” button In display mode, press this button to enter popup menu, press “UP” or “DOWN” button to move the cursor. Re-press “ENTER” button to enter sub-menu. Press “CANCEL” button to quit menu. When playback, “ENTER” button is a pause button. In PTZ operation mode, press “ENTER” button to enter pre-set position function. 6. “MODE” button Repeat pressing this button to display image in different modes (PIP1, PIP2, PIP3, two pictures, three pictures, four pictures). In PTZ operation mode, press “MODE” button to enter focus control, then adjusted by “←”button and “→”button. Press it again to quit focus control.
XJ8104 4-CHANNEL H.264 DVR www.best-china-security-supplies.com
Page 8 of 55
7. “MENU” button Press this button to enter main menu, press “CANCEL” button to quit menu. After setting parameters in menu, press “MENU” button to save and quit menu. 8. “CANCEL” button In menu or PTZ operation mode, press this button to quit menu or PTZ operation mode. In playback mode, press this button to stop playback. 9. “PTZ” button
In display mode, press this button to enter “PTZ” operation of single channel, press “CANCEL” button to quit from “PTZ” operation.
10. “MUTE” button In display mode, press “MUTE” button to turn on and turn off the audio. In PTZ operation mode, press “MUTE” button to enter iris control, then adjusted by “←”button and “→”button. Press it again to quit iris control.
11. “AUTO” button In display mode, press this button to enter “auto switch” for single channel.
The user can set the switching time. The DVR can display each channel in turn for this time. Press again to quit from “auto switch”
In PTZ operation mode, press “AUTO” to control the PTZ auto rotation, press again to stop auto rotation of PTZ.
12. “BACKUP” button In display mode, if there is USB (CD burner) to connect the DVR, press the
button to backup the information. Choose the start time and the end time of the backup and press “ENTER” button to backup. When backup is completed, the system automatically quit from the menu. If there isn’t backup device to connect to the DVR, the DVR reminds “can’t find the backup device”, and press “CANCEL” button to quit from the menu In playback mode, repeat pressing the button to start playback one frame by one frame, then press “ENTER” button to return normal playback.
In PTZ operation mode, press “BACKUP” button to enter zoom control, then adjusted by “←”button and “→”button. Press it again to quit zoom control.
13. “POWER” button In display mode, long press the button for more than 2 seconds and DVR will
display power on/off dialog box, press “CANCEL” button to give up turning off DVR and return back to display mode. Press “ENTER” button to turn off DVR. If DVR turned off by “POWER” button, can press “POWER” button again to turn on DVR.
14. “REC” button When setting DVR record mode to OFF, press the button to start emergency
record (manual record), the color of REC icon on the bottom status bar becomes blue. Press “REC” button again to stop emergency record (manual record)
Note: When DVR set to schedule record mode or always record mode, the emergency record mode can’t be started.

XJ8104 4-CHANNEL H.264 DVR www.best-china-security-supplies.com
Page 9 of 55
15. “PLAY” button In display mode or record modes, press “PLAY” button to enter record events menu. Press “LEFT” or “RIGHT” button to choose the playback modes (time & date searching mode or events searching mode). Then press “ENTER” button to play back recorded information, press “CANCEL” button to stop playback.
16. “<<”/”REWIND” button During playback, repeat pressing the button to rewind play and the speed can
be selected to X2, X4 or X6. 17. “>>”/”FAST FORWARD” button During playback, repeat pressing the button to fast forward play and the
speed can be selected to X2, X4 or X6. 18、USB port Connection with USB disk for updating firmware and backup files. Can not
use USB mouse to this port. 19、Mouse port Connection with USB mouse. 20. Power indicator light After DVR turned on, the light is on. When pressing “POWER” button to turn off
the DVR, the light is flickering. 21. Network connecting indicator light When DVR connected to network , the light is on. Otherwise the light is off. 22. Recording indicator light When DVR is recording, the light is on. Otherwise the light is off. 23. Playback indicator light During DVR playback, the light is on, Otherwise the light is off. 24. Receiver of remote controller.
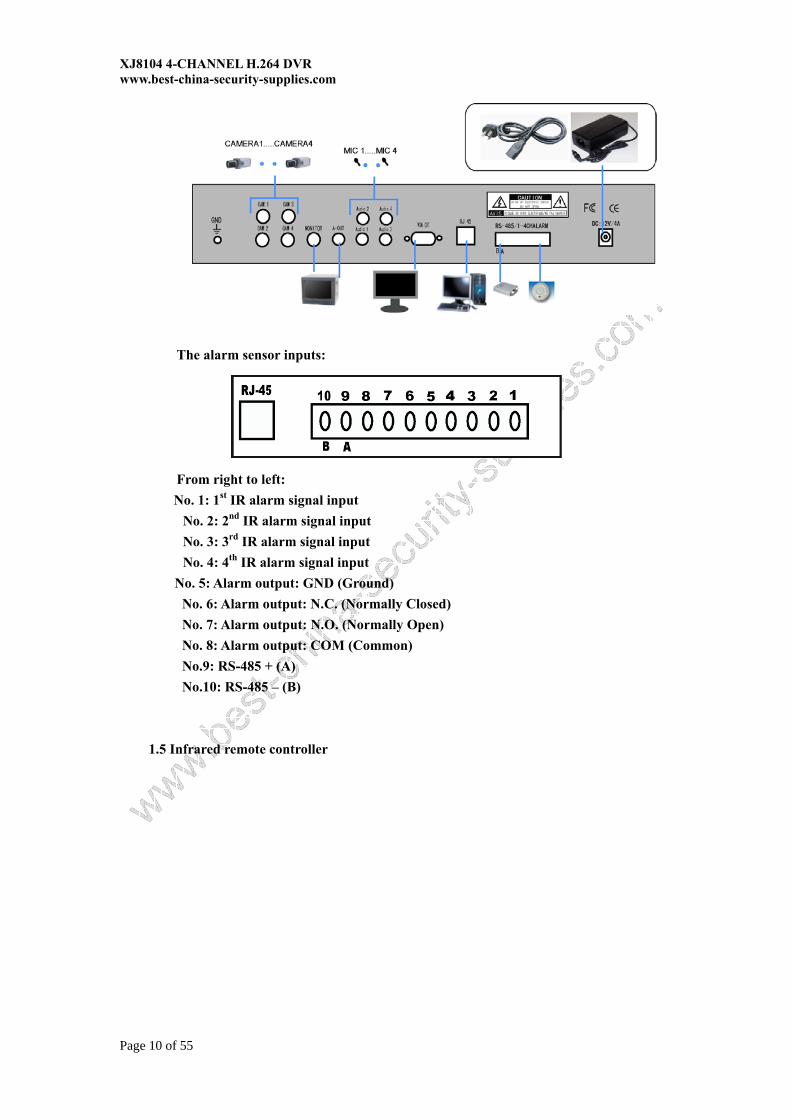
1.3 The rear panel
1. Video inputs(CH1~CH4 2. Video output 3. Audio output 4. Audio inputs(CH1~CH4) 5. VGA output (optional) 6. RJ-485 Ethernet 7. RS-485 PTZ 8. The alarm sensor inputs 9. DV12V/4A power input 10. Grond 1.4 The connection of rear panel
XJ8104 4-CHANNEL H.264 DVR www.best-china-security-supplies.com
Page 10 of 55
The alarm sensor inputs:
From right to left: No. 1: 1st IR alarm signal input
No. 2: 2nd IR alarm signal input No. 3: 3rd IR alarm signal input No. 4: 4th IR alarm signal input
No. 5: Alarm output: GND (Ground) No. 6: Alarm output: N.C. (Normally Closed) No. 7: Alarm output: N.O. (Normally Open) No. 8: Alarm output: COM (Common) No.9: RS-485 + (A) No.10: RS-485 – (B)
1.5 Infrared remote controller

XJ8104 4-CHANNEL H.264 DVR www.best-china-security-supplies.com
Page 11 of 55
1.POWER: Turn on/off the DVR 2. MENU:DVR menu 3.CANCEL:Quit from the menu 4. BACKUP:Backup the information 5.PTZ: PTZ control 6. REC: Record 7.PLAY: Playback 8. <<:Rewind 9. >>:Fast forward 10. ↑:CH1/UP 11、→ :CH2/RIGHT 12、↓ :CH3/DOWN 13、← : CH4/LEFT 14、ENTER: Enter control 15、MUTE :Audio on/off 16、AUTO :Automatically switch channel 17、MODE :Display mode 18、 :QUAD 19、 : Horizontal two pictures display 20、 : Vertical two pictures
display. 21、 :)Three pictures (1) 22、 : Three pictures(2)
XJ8104 4-CHANNEL H.264 DVR www.best-china-security-supplies.com
Page 12 of 55
Ⅱ Operation Guideline Before using the DVR, please set up system according to user guide. Keep the machine work in the right way.
When installing new hard disk, it must be formatted by DVR system menu. 2.1 Turn on the DVR
1. Before power on, please make sure all the items in the “Security Notice” at the beginning of this manual are fulfilled. 2. Before power on, please check the system connection, keep inputs and outputs in correct connections. 3. Open the cover of the DVR and install the hard disk with the screws and connect the cables. 4. After checking all connections without any problems, connect the power adaptor and plug in, DVR will be automatically turned on. 5. If DVR turned off by “Power” button, it can be turned on by “POWER” button again.
2.2 Turn off the DVR 1. Normally do not turn off the machine during recording, playing or system setting
up , Long time press “POWER” button about 2 seconds to turn off the DVR. 2. The DVR will display power off dialog box, press “ENTER” to turn off, and
press “CANCEL” to keep power on. Note: If turn off the DVR during recording, the DVR will check the last working
condition when turn on again. It will take a longer time to start up. 2.3 Display mode 1. Press the “MODE” button to choose the display modes, and press channel button
to display single channel image. ● Mouse Left click the “MENU” on the left of the bottom status bar, choose “LIVE” to
enter display modes, click to choose different display mode. 2. Auto switch and display each channel in turn, first set the switch time in the menu,
then press “AUTO” button on the front panel to start the auto switch function. ● Mouse
Left click the “MENU” on the left of the bottom status bar, choose “ROTATION” to start auto switch function.
3. Zoom of the images, only for mouse operation ● Mouse
Left click the “MENU” on the left of the bottom status bar, choose “ZOOM” to enable Zoom function, keep the left click of the mouse and drag it to select zoom erea. If selecting full screen, it will return back the normal size. Right click the mouse to quit from “Zoom” function.

XJ8104 4-CHANNEL H.264 DVR www.best-china-security-supplies.com
Page 13 of 55
2.4 Manual record 1. Connect video inputs.
2. Choose the record modes: always record, emergency record (manual record), schedule record. (The factory default is always record)
3. Press “REC” button to manual record 4 channels’ video. 4. Press “REC” button to stop manual record. 5. During recording, if the hard disk is full, and the system set to automatically
overwrite, then the recording will not be interrupted and it begins to overwrite the earliest recorded area. if the system set to disable overwrite, it will stop recording when the hard disk is full.
Note: Manual recording can only be operated by front panel or remote controller, the mouse can’t operate manual record.
2.5 Alarm record 1. Alarm record cannot be started by REC button.
2. Alarm record can be activated by alarm input signal or motion alarm, so need to check alarm inputs first and make sure the inputs are stable and reliable. (Referring to sensor setup and motion detection setup)
3. Setting the record mode before recording. 4. As long as the alarm input signal is effective, the alarm keeps recording. When no
alarm input signals, alarm recording will keep recording for the time set in menu and then stop recording automatically.
5. Entering menu to change recording mode if no need alarm recording (if there is a password for setup, input correct password)
2.6 Schedule Record

XJ8104 4-CHANNEL H.264 DVR www.best-china-security-supplies.com
Page 14 of 55
1. Schedule record starts or stops recording automatically according to the pre-set
time. It set in a pre-set timetable, for example to set a periodical recording. 2. There are 5 schedule record lists for your choice, choose the suitable schedule
accord to the requirement. 3. Before using this function, make sure the time setting correctly. 4. Only in the menu can change and quit schedule recording. Note: Different color symbols indicate the different record modes, the detailed
information as following: Normal mode: The green symbol in the middle of the screen. Always mode: The blue symbol in the middle of the screen Motion detection alarm mode: The red symbol in the middle of the screen Sensor alarm mode: The orange symbol in the middle of the screen Schedule mode: The purple symbol in the middle of the screen 2.7 Playback ● Front panel
1. Press “PLAY” button, DVR will display playback “SEARCH MENU”, the user can choose “TIME SEARCH” or “EVENT SEARCH” mode then press “ENTER” to play back.

XJ8104 4-CHANNEL H.264 DVR www.best-china-security-supplies.com
Page 15 of 55
1. during playback, press “ENTER” button to pause, and press “ENTER” again to continue. 2. During playback, press “REWIND” or “FORWARD” button to check the recorded information by the speed of X2 or X4 or X6.
3. Press “CANCEL” to stop playing.
● Mouse

XJ8104 4-CHANNEL H.264 DVR www.best-china-security-supplies.com
Page 16 of 55
Click the “MENU” on the left of the bottom status bar, and choose “SEARCH” to enter playback “SEARCH MENU”, and the user can double click to choose playback mode to play back.
2.8 Record Time Search
● Front panel
1. Press “PLAY” button to enter playback “SEARCH MENU”. 2. Press “LEFT” or “RIGHT” button to choose “TIME SEARCH”
mode. 3. Press “LEFT” or “RIGHT” button to choose date and time, and press
“UP” or “DOWN” button to change the date and time, press “ENTER” button to play back.
4. Press “CANCEL” button to quit from “TIME SEARCH MENU” ● Mouse 1) Click the “MENU” on the left of the bottom status bar, and then choose
“SEARCH” to enter playback “ SEARCH MENU”, then double click to choose “TIME SEARCH” mode to play back.
2) When choosing “TIME SEARCH” to playback, the middle button of mouse can be used to change time.
3) Click the “STOP” icon on the bottom playback status bar to stop playback.

XJ8104 4-CHANNEL H.264 DVR www.best-china-security-supplies.com
Page 17 of 55
2.9 Record Event Group Search ● Front panel
1. Press “PLAY” button to enter playback “SEARCH MENU”. 2. Press “LEFT” or “RIGHT” button to choose “EVENT SEARCH” mode.
3. Press “UP” or “DOWN” button to choose date and time, and then press “ENTER” button to play back.
4. Press “CANCEL” button to quit the menu ● Mouse 1. Click the “MENU” on the left of the bottom status bar, choose “SEARCH” again to enter playback ”SEARCH MENU”, then double click to choose “EVENT SEARCH” mode to play back. 2. Click the “STOP” button on the bottom playback status bar to stop playback.
2.10 Emergency Search ● Front panel

XJ8104 4-CHANNEL H.264 DVR www.best-china-security-supplies.com
Page 18 of 55
1. Press “PLAY” button on the front panel to enter playback “SEARCH MENU”.
2. Press “LEFT” or “RIGHT” button to choose “EMERGENCY SEARCH” mode. 3. Press “UP” or “DOWN” button to choose date and time, and then press “ENTER” button to play back 4. Press “CANCEL” button to quit from “EMERGENCY MENU” . ● Mouse
1. Click “MENU” on the left of the bottom status bar, choose “SEARCH” to enter playback “SEARCH MENU”, then double click to choose “EMERGENCY SEARCH” mode to play back.
2. Click the “STOP” on the bottom playback status bar to stop playback.
2.10 USB Backup ● Front panel
1. Insert the USB device to DVR USB port, after 10 seconds press “BACKUP” button to enter “BACKUP MENU”. 2. Press “LEFT” or “RIGHT” button to move the cursor, and press “UP” or “DOWN” to set up the start time of backup and the end time of backup. 3. Choose the backup format to AVI format(DVR default format), press “ENTER” button to start backup. 4. Press “CANCEL” button to quit from ”BACKUP MENU”. Note: The USB device must be removed after backup finished. ● Mouse 1. Click the “MENU” on the left of the bottom status bar, then click “SYSTEM SETUP” to enter the “SYSTEM MENU”. 2. Choose “BACKUP” to enter “BACKUP MENU”, click the “SETUP” to set up
XJ8104 4-CHANNEL H.264 DVR www.best-china-security-supplies.com
Page 19 of 55
the parameters. 3. Click the small circle symbol on the top right to enter backup condition.
2.12 CD-ROM Backup(Optional function) 1. Before using the CD-ROM to backup, please install the CD-ROM burners. 2. Put in the blank CD to CD-ROM, and press “BACHUP” button to
enter ”BACKUP MENU” 3. Press “LEFT” or “RIGHT” to move the cursor, press “UP” or “DOWN” button
to set the start time of backup and the end time of backup. 4. Choose the backup format to AVI format(DVR default format), press “ENTER” button to start backup. Note: CD-ROM backup is the optional function, this type of DVR can’t support CD-ROM function.
2.13 Checking System Information
1. Press “MENU” to enter DVR system menu. 2. Choose “SYSTEM” menu, move the cursor to “SYSTEM INFORMATION”
menu then press “MENU” button to enter DVR system menu.

XJ8104 4-CHANNEL H.264 DVR www.best-china-security-supplies.com
Page 20 of 55
It displays the software version of DVR, the master hard disk information and the slave hard disk information HDD OVERWRITE: the system will automatically overwrite if it set to ON. The DVR will stop recording when hard disk is full if “HDD OVERWRITE” set to OFF.
3. Press “CANCEL” button to quit from system menu.
2.14 PTZ Control

XJ8104 4-CHANNEL H.264 DVR www.best-china-security-supplies.com
Page 21 of 55
● front panel
1. In the full channel mode, press “PTZ” button on front panel or remote controller to enter PTZ function.
2. Press “UP”, “DOWN”, “LEFT” or “RIGHT” button to control the rotation of PTZ, then press “ENTER” to enter the pre-set menu. Note: Only keep pressing “UP”, “DOWN”, “LEFT” or “RIGHT” button to control the rotation of PTZ, when button released, the PTZ will stop rotation.
3. Press “MUTE” button to enable “IRIS” function. Then keep pressing “LEFT” or “RIGHT” button to adjust the iris of camera, button released to stop adjusting the iris.
4. Press “AUTO” button to enable “AUTO” function, the PTZ will automatic rotate, press again to stop.
5. Press “BACKUP” button to enable “ZOOM” function of camera, press “LEFT” or “RIGHT” button to adjust the zoom of camera, button released to stop “ZOOM” function.
6. Press “MODE” button to enable “FOCUS” function of camera, press “LEFT” or “RIGHT” button to adjust the focus of camera, button released to stop “FOCUS” function.
7. Press “CANCEL” button to quit from PTZ function. Pre-set Position Function
1. After entering PTZ control mode, press “ENTER” button to enter the setting menu of pre-set position.

XJ8104 4-CHANNEL H.264 DVR www.best-china-security-supplies.com
Page 22 of 55
2. Press “UP” or “DOWN” button to move cursor, and press “LEFT” or “RIGHT” button to select setting number, then press “ENTER” button to confirm. 3. PRESET
a) After entering the SET PRESET menu, set the PRESET to “1” and select SAVE then press “ENTER” button to save current PTZ position to “1”.
b)Quit from SET PRESET menu and back to PTZ mode, press “LEFT” or “RIGHT” button to move the speed dome camera to next pre-set point, enable “ZOOM” , “IRIS” or “FOCUS” function then press “LEFT” or “RIGHT” button to adjust a position of PTZ. Press “ENTER” button to enter SET PRESET menu, set the PRESET to “2” and select SAVE then press “ENTER” button.
Using the same way to set other pre-set position. The DVR support 255 pre-set positions.
In SET PRESET menu, set the PRESET to one number, then select LOAD icon and press “ENTER” button to move PTZ to reach its pre-set position. 4. The setting of the pre-set positions refers to the user manual of speed dome.
● Mouse 1. Left click “MENU” on the left of the bottom status bar, choose “PTZ” to enter PTZ control mode. 2. Left click “UP”, “DOWN”, “LEFT” or “RIGHT” icons to control the
rotation of the PTZ. 3. Left click “Z”, “F”, “I” to enable “ZOOM”, “FOCUS” and “IRIS”
function respectively, then left click the “LEFT” or “RIGHT” to adjust.

XJ8104 4-CHANNEL H.264 DVR www.best-china-security-supplies.com
Page 23 of 55
4. Left click “P” to enter SET PRESET menu. 5. Set the PRESET and SAVE refers to the user manual of speed dome. Note: Before operating PTZ function, it is necessary to check the connections of PTZ. The pre-set position is used for speed dome that can support pre-set function. 2.15 Password Input If the password protection is enabled, it needs to input the correct password when entering the DVR menu. 1. Press “MENU” button and display password dialog box. 2. Press “MENU” button again to display the keyboard box, and press “UP”, “DOWN”, “LEFT” or “RIGHT” button to move cursor, then press “ENTER” button to input password and select “←”on the keyboard box to clear. Input the correct password and move the cursor to “ENTER”, press “ENTER” button to confirm the correct password.
3. After quit from the keyboard box, press “MENU” button to enter the system menu.

XJ8104 4-CHANNEL H.264 DVR www.best-china-security-supplies.com
Page 24 of 55
Ⅲ System Menu Setup 3.1 Main menu ● Front Panel
Press “Menu” button on the front panel to enter system menu, press “UP”, “DOWN” button to move the cursor, press “ENTER” button to enter the sub-menu. Press “LEFT”, “RIGHT” button to select item and press “MENU” button to save and quit. Or press “CANCEL” button to quit from the menu without save.
The system menu display as following:
● Mouse
1) Left click “Menu” to display the DVR function menu, and select “SETUP” to enter DVR system setup menu.
XJ8104 4-CHANNEL H.264 DVR www.best-china-security-supplies.com
Page 25 of 55
LIVE:Choose the display image mode SETUP: Enter the system setup menu SEARCH:Enter the information playback menu MOTION:Open or close the motion alarm function. ZOOM:In the full channel mode, select the ZOOM function. Only using
mouse to operate the ZOOM function for the image. PTZ: In the full channel mode, select PTZ to control PTZ function ROTATION: Select the auto switch function for each channel. AUDIO:Turn on/off audio. QUIT:Turn off the DVR.
2) I n the sub-menu, left click a small circle symbol on the top right to save and quit menu.
3) Left click the icon in the menu to enter sub-menu, use the middle wheel of mouse to change parameters, and then left click “SAVE” to save the parameters and quit the sub-menu. Click the “CANCEL” to quit the menu without save parameters.
4) Go Back to the main menu, right click the mouse to quit the system setup menu.
3.2 CAMERA Move the cursor to “CAMERA” icon and press “ENTER” to enter the CAMERA
sub-menu:

XJ8104 4-CHANNEL H.264 DVR www.best-china-security-supplies.com
Page 26 of 55
1. CHANNEL Press “LEFT”, “RIGHT” button to choose the channel, “ALL” is to choose all channels 2. COLOR Move the cursor to “COLOR”, press “ENTER” button to enter the COLOR
sub-menu, press “LEFT” or “RIGHT” button to set the parameters.

XJ8104 4-CHANNEL H.264 DVR www.best-china-security-supplies.com
Page 27 of 55
1) Contrast: to adjust contrast of the channel image
2) Brightness: to adjust brightness of the channel image 3) Hue: to adjust hue of the channel image
4) Saturation: to adjust saturation of the channel image 5) Sharpness: to open or close the image sharpness of the channel image
3. TITLE
● Front panel 1) Press “UP”, “DOWN”, “LEFT”, “RIGHT” button to select
the letters of keyboard box and change the channel’s title. Press “ENTER” button to input the letters. Move the cursor to the symbol “←” of keyboard box and press “ENTER” button to delete the chosen letters.
2) Move the cursor to “ENTER” of keyboard box and press “ENTER” button to quit from the menu.
3) Press “MENU” button to save and quit from menu. 4) Press “CANCEL” button to quit from menu without save.
● Mouse 1) Enter the CAMERA sub-menu, move the cursor to “Title” and left click
the “SET” to enter keyboard box. 2) Click the letters by using mouse to set title, click “ENTER” to quit from
“SET” menu or right click the mouse to quit from the menu. 3) Press “SAVE” to save and quit from the menu. 4) Press “EXIT’ to quit from the menu without save.

XJ8104 4-CHANNEL H.264 DVR www.best-china-security-supplies.com
Page 28 of 55
4. PTZ PROTOCOL 1) The DVR can support PELCO-D and PELCO-P. When setting it to “OFF” in the menu, can close PTZ function. 2) The default baud rate: 2400bps for PELCO-D, 9600bps for PELCO-P. 5. PTZ ADDRESS
The default address for PTZ control as following: Channel Address Channel 1 1 Channel 2 2 Channel 3 3 Channel 4 4
6. EVENT POPUP
Turn on or turn off event record. The DVR can record the event time, and the event can be recorded and saved in the event list.
7. MAIN ROT. TIME Setting the switch time for displaying each channel in turn.
3.3 RECORD Move the cursor to “RECORD” icon and press “ENTER” to enter the
RECORD sub-menu:
If enter RECORD sub-menu during recording, the DVR will stop recording automatically.

XJ8104 4-CHANNEL H.264 DVR www.best-china-security-supplies.com
Page 29 of 55
1. CHANNEL Choose the channel for recording; “All” is to choose all channels. 2. RESOLUTION The DVR supports D1, 1/2D1, CIF recording: D1: 6.25f/s for each channel 1/2D1: 12.5f/s for each channel CIF: 25f/s for each channel (real time) Different resolution has different image quality, D1 is the best.
3. PRE RECORD When PRE RECORD is on and the recording mode is alarm record(motion detection mode, sensor mode), the DVR can record ahead 2 seconds before the alarm happened. This ensures the alarm event is complete.
4. FPS
The DVR can set frame rate for each channel and set to real time recording. PAL: 25fps NTSC: 30fps Note: Under CIF resolution, the frame rate is maxmum (real time).
5. QUALITY The image quality can be set: HIGHEST, HIGH, STANDARD, LOW
6. RECORD MODE 1) The record mode can be set: ALWAYS, MOTION, SENSOR, SCHEDULE, OFF. 2) When setting “OFF”, the DVR can start emergency record(manual record).
7. AUDIO 1) Turn on or turn off audio record. It can record 4 channels audio. 2) The DVR can record the 4 channels audio when selecting ALL. If record only one
channel’s audio, don’t choose ALL.
XJ8104 4-CHANNEL H.264 DVR www.best-china-security-supplies.com
Page 30 of 55
8. SCHEDULE Choose the DVR schedule list if the record mode is schedule record. The default is SCHEDULE 1.
3.4 MOTION Move the cursor to “MOTION” icon and press “ENTER” button to enter the MOTION sub-menu:
If enter MOTION sub-menu during recording, the DVR will stop recording automatically.
1. CAMERA CHANNEL press “LEFT” or “RIGHT” button to choose the channels for motion detection. 2. MOTION ENABLE
Turn on or turn off motion detection. 3. SENSITIVITY
Setting the sensitivity for motion detection as following:

XJ8104 4-CHANNEL H.264 DVR www.best-china-security-supplies.com
Page 31 of 55
1).SENSITIVITY
Setting Sensitivity 2).SPATIAL
Setting the area for motion detection 3).BLACK LEVEL Black level sensitivity 4).WHITE LEVEL White level sensitivity
If turn off the sensitivity or setting low sensitivity can affect motion detection function. Setting sensitivity according to your requirement.
4. MOTION AREA Setting the detection area for the channel as following:

XJ8104 4-CHANNEL H.264 DVR www.best-china-security-supplies.com
Page 32 of 55
● Front panel 1) Detection area cover with small green grids. 2) Press “MENU” button to display the setup items: SELECT, CLEAR, EXIT. 3) Choose SELECT to set up detection area, press “UP”, “DOWN”, “LEFT”
and “RIGHT” buttons to move the cursor and set up the area, press the “ENTER” button to confirm the area, then press “UP”, “DOWN”, “LEFT” and “RIGHT” buttons to move cursor to a new grid, press “ENTER” button to set up the new area. The detection area display in different color. Press “MENU” button and select EXIT to quit.
4) Choose CLEAR to clear the detection area, operation is same with 3. 5) Press “MENU” button and select EXIT to quit.
● Mouse 1) Left click the “SET” on the right of MOTION AREA to detection area. 2)Right click the mouse and display: SELECT, CLEAR and EXIT. 3)Choose SELECT to set up detection area, keep left click and drag to choose the detection area, The detection area display in different color. Right click the mouse and choose “EXIT” to quit. 4)Choose CLEAR to clear the detection area, operation is same with 3.
5. POST RECORD TIME 1) Set up the time after the alarm happened, the maximum time is 60
seconds. The default time is 5 seconds. 2) Can only used in MOTION record mode.
6. BUZZER TIME The buzzer ring when detecting the motion, the maximum ring time is 60 seconds.
7. ALARM TIME Control the time of outside alarm devices when detecting the motion, the

XJ8104 4-CHANNEL H.264 DVR www.best-china-security-supplies.com
Page 33 of 55
maximum time is 60 seconds. 8. MOTION TRACE
When the MOTION TRACE is on, the area color around the moving object is red during motion alarm.
3.5 SENSOR
Move the cursor to “SENSOR” icon and press “ENTER” button to enter the SENSOR sub-menu:
1. SENSOR CHANNEL
Press “LEFT” or “RIGHT” button to choose the sensor channel . “ALL” is to choose all channels.
2. SENSOR TYPE NORMAL OPEN: Open the sensor. NORMAL CLOSE:Close the sensor.
3. POST RECORD TIME 1) Set up the time after the sensor alarm happened, the maximum time is 60
seconds. The default time is 5 seconds. 2) Can only used in SENSOR record mode.
4. BUZZER TIME The buzzer ring when detecting the sensor alarm, the maximum ring time is 60 seconds.
5. ALARM TIME Control the time of outside alarm devices when detecting the motion, the maximum time is 60 seconds.

XJ8104 4-CHANNEL H.264 DVR www.best-china-security-supplies.com
Page 34 of 55
3.6 SCHEDULE Move the cursor to “SCHEDULE” icon and press “ENTER” button to enter the
SCHEDULE sub-menu:
If enter MOTION sub-menu during recording, the DVR will stop recording
automatically. ● Front panel
1. Press “MUTE” button to choose ALWAYS record mode. Press “AUTO” button to choose MOTION record mode. Press “BACKUP” button to choose SENSOR record mode. Press “MODE” button to close schedule record mode.
2. Press “ UP”, “DOWN”, “LEFT” and “RIGHT” buttons to move the cursor. Press “MENU” button to set schedule include time (24 hours) and day (one week). There are 5 groups of schedule time can be set.
3. Press “ENTER” button to quit. ● Mouse
1. Left click to choose SCHEDULE mode. 2. Keep left click and drag to set schedule time. 3. Left click the small circle on the top right to save and quit the menu. Left click
CANCEL icon to quit the menu without save. 3.7 NETWORK
Move the cursor to “NETWORK” icon and press “ENTER” button to enter the NETWORK sub-menu:
XJ8104 4-CHANNEL H.264 DVR www.best-china-security-supplies.com
Page 35 of 55
1. IP MODE
Choose the LAN IP mode include static IP and dynamic IP. Press “LEFT” and “RIGHT” button to choose IP mode. The default mode is static IP.
2. PORT
Set the server port of network. Press “LEFT” and “RIGHT” button to set the port. The default is 3100
3. IP:
Set the LAN IP address of the DVR. Press “ENTER” button to enter the IP setup keyboard box.

XJ8104 4-CHANNEL H.264 DVR www.best-china-security-supplies.com
Page 36 of 55
● Front panel 1). Press “UP”, “DOWN”, “LEFT”, “RIGHT” button to select the letters of
keyboard box. Press “ENTER” button to input the letters. Move the cursor to the symbol “←” of keyboard box and press “ENTER” button to delete the chosen letters.
2). Move the cursor to “ENTER” of keyboard box and press “ENTER” button to save and quit menu.
3). Press “CANCEL” button to quit from menu without save. ● Mouse
1). Move the cursor to IP MODE in NETWORK sub-menu. Left click the “SET” icon on the right to enter IP mode keyboard box.
2). Click the letters and click “ENTER” to save and quit. Right click to quit the menu without save.
4. NETMASK The setting method is same with IP setting.
5. GATEWAY The setting method is same with IP setting. 6. NAME SERVER The setting method is same with IP setting. 7. DDNS: Press “ENTER” button to enter DDNS setting menu.
1). SERVER
Open or close the DDNS server.

XJ8104 4-CHANNEL H.264 DVR www.best-china-security-supplies.com
Page 37 of 55
2). HOST NAME Input the DDNS domain name.
3). USER NAME Input the DDNS user name.
4). PASSWORD Input the DDNS domain user password
5). xDSL ROUTER The default is OFF.
3.8 BACKUP 1. When the DVR connect the backup device (CD-ROM or USB) for about ten seconds, move the cursor to “BACKUP” icon and press “ENTER” button to enter the BACKUP sub-menu:

XJ8104 4-CHANNEL H.264 DVR www.best-china-security-supplies.com
Page 38 of 55
1). DISK Choose hard disk for backup(when more than one hard disks used).
2). DEVICE Backup device.
3). CHANNEL The channel to backup. “ALL” is to choose all the channels.
4). START The start time to backup.
5). END The end time to backup.
6). TOTAL The size of the backup data.
7). AVI The AVI format for backup data.
2. Press “ENTER” button to start backup.

XJ8104 4-CHANNEL H.264 DVR www.best-china-security-supplies.com
Page 39 of 55
3. When backup is completed, the DVR will display the following box:
4. Press “ENTER” button to finish backup. After the DVR displays BACKUP sub-menu again, can remove the backup device. 5. When using mouse, left click the small circle on top right of BACKUP sub-menu to start

XJ8104 4-CHANNEL H.264 DVR www.best-china-security-supplies.com
Page 40 of 55
to backup the information. Note: If no backup device, the DVR will display warning box when backup.
3.9 SYSTEM
Move the cursor to “SYSTEM” icon and press “ENTER” button to enter the SYSTEM sub-menu:

XJ8104 4-CHANNEL H.264 DVR www.best-china-security-supplies.com
Page 41 of 55
1. TIME SETUP Press “ENTER” button to set up the time as following:
TIME
Setting the DVR system date and time

XJ8104 4-CHANNEL H.264 DVR www.best-china-security-supplies.com
Page 42 of 55
FORMAT The date and time display types: ASIA, EURO and US
● Front panel 1) Press “LEFT” or “RIGHT” button to move the cursor. Press “UP” or “DOWN” button to set up the date and time. 2) Press “ENTER” button to save and quit. 3) Press “CANCEL” button to quit the menu without save.
● Mouse 1) Choose TIME SETUP in the SYSTEM sub-menu and left click the “SET” on the right to enter TIME SET sub-menu. 2) Move the cursor to choose items and move the middle wheel of the mouse to set up the date and time. 3) Press the circle on the top right to save and quit. 1) Press the CANCEL icon to quit the menu without save.
2. SYSTEM PASSWORD Move the cursor to choose the SYSTEM PASSWORD and press “ENTER” button to
enter SYSTEM PASSWORD sub-menu as following:
PASSWORD
The menu password CONFIRM
Repeat and confirm the menu password ● Front panel 1) Choose PASSWORD, Press “ENTER” button to input password. 2). Press “UP”, “DOWN”, “LEFT”, “RIGHT” button to select the characters of

XJ8104 4-CHANNEL H.264 DVR www.best-china-security-supplies.com
Page 43 of 55
keyboard box. Press “ENTER” button to input the characters. Move the cursor to the symbol “←” of keyboard box and press “ENTER” button to delete the chosen letters. 3). Move the cursor to “ENTER” of keyboard box and press “ENTER” button to quit from the menu. 4). Press “MENU” button to save and quit from menu. 5). Press “CANCEL” button to quit from menu without save.
● Mouse 1). Move the cursor to PASSWORD and CONFIRM in the SYSTEM PASSWORD sub-menu. Left click the “SET” to enter keyboard box. 2). Left Click the characters and click “ENTER” to save and quit. Right click the mouse to quit the menu without save. Note: The default is no password. The user can set the password if need. The DVR general password is 666666
3. SYSTEM INFO Move the cursor to choose the SYSTEM INFO and press “ENTER” button to enter
SYSTEM INFO sub-menu as following:
The SYSTEM INFO sub-menu displays the following information: 1). FIRMWARE VER Display the DVR firmware version. 2). PRI. MASTER The size and capacity of the first master hard disk. 3). PRI. SLAVE

XJ8104 4-CHANNEL H.264 DVR www.best-china-security-supplies.com
Page 44 of 55
The size and capacity of the first slave hare disk. 4). SEC. MASTER
The size and capacity of the second master hard disk. 5). SEC. SLAVE The size and capacity of the second salve hard disk. Note: This type of DVR only support one hard disk. 6). HDD OVERWRITE
a) When setting to ON, the DVR system will automatically delete and cover the first group information of hard disk and no stop recording if the hard disk full recorded.
b) When setting to OFF, the DVR system will stop recording if the hard disk full recorded.
4. VIDEO FORMAT The DVR can set to PAL or NTSC system.
5. LOG VIEW The DVR can record the time of event if log is enabled.
6. LOG SET Move cursor to LOG SET in SYSTEM sub-menu and press “ENTER” button to enter LOG SET sub-menu as following:
MOTION Setting to ON to save motion alarm event in the log.
SENSOR Setting to ON to save sensor alarm event in the log.
MANUAL
XJ8104 4-CHANNEL H.264 DVR www.best-china-security-supplies.com
Page 45 of 55
Setting to ON to save manual recording event in the log. BOOTING
Setting to ON to save DVR switch-on and switch-off event in the log.
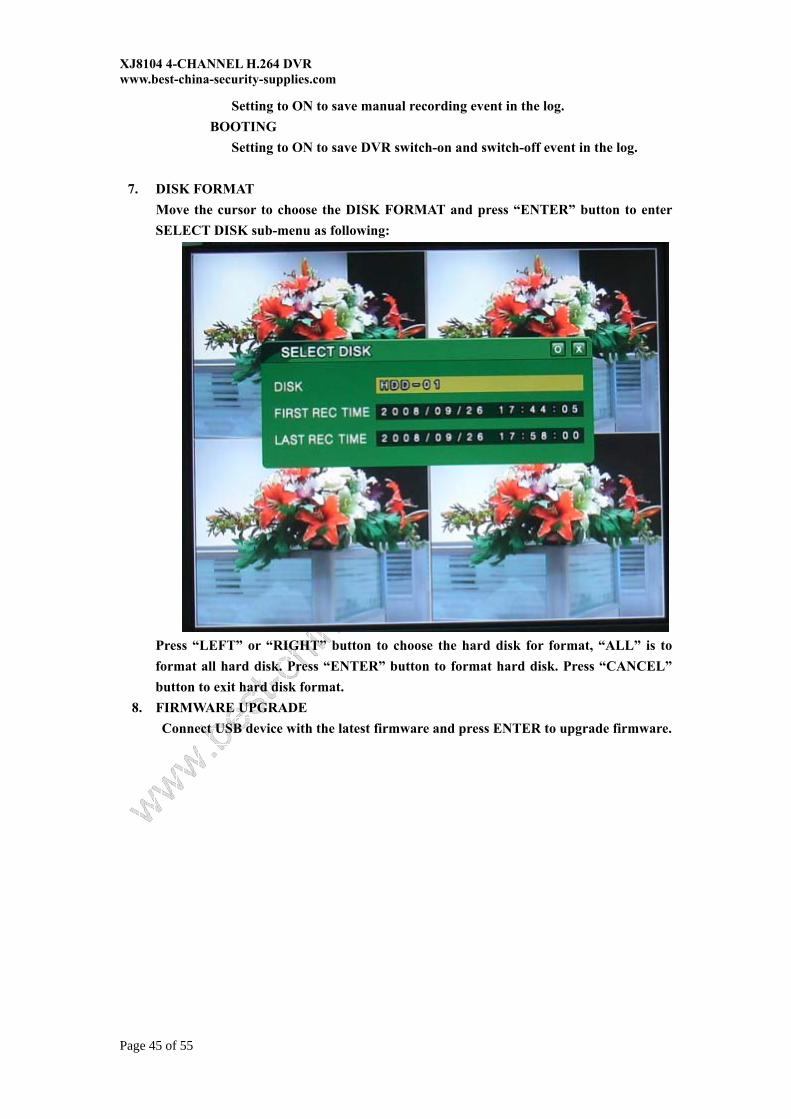
7. DISK FORMAT Move the cursor to choose the DISK FORMAT and press “ENTER” button to enter
SELECT DISK sub-menu as following:
Press “LEFT” or “RIGHT” button to choose the hard disk for format, “ALL” is to format all hard disk. Press “ENTER” button to format hard disk. Press “CANCEL” button to exit hard disk format.
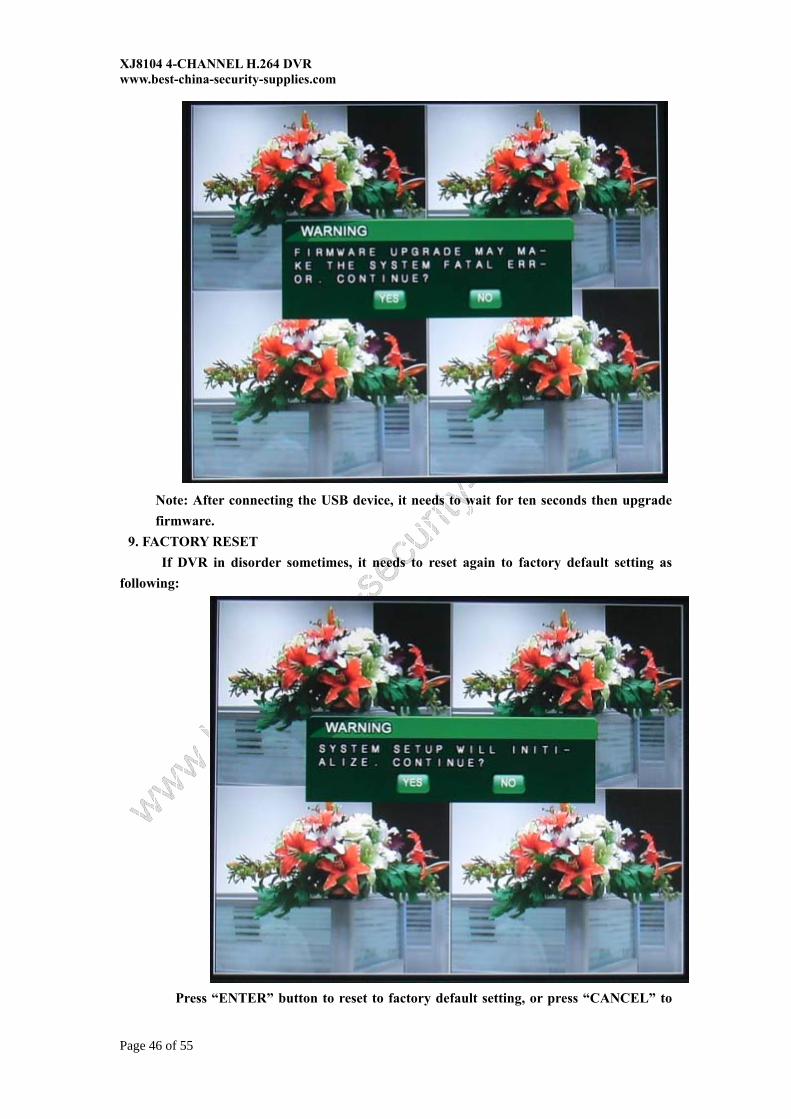
8. FIRMWARE UPGRADE Connect USB device with the latest firmware and press ENTER to upgrade firmware.
XJ8104 4-CHANNEL H.264 DVR www.best-china-security-supplies.com
Page 46 of 55
Note: After connecting the USB device, it needs to wait for ten seconds then upgrade firmware.
9. FACTORY RESET If DVR in disorder sometimes, it needs to reset again to factory default setting as
following:
Press “ENTER” button to reset to factory default setting, or press “CANCEL” to

XJ8104 4-CHANNEL H.264 DVR www.best-china-security-supplies.com
Page 47 of 55
quit. 10. LANGUAGE:
Press “LEFT” or “RIGHT” button to select menu language include Chinese, English, Korean and Japanese. Other languages can be built in if need.

XJ8104 4-CHANNEL H.264 DVR www.best-china-security-supplies.com
Page 48 of 55
Ⅳ Default Setting The Default setting for the DVR by the manufacturer is as following. User can change the setting according to the requirements. When recovering to default
setting, you can choose “FACTORY RESET” in “SYSTEM SET” sub-menu, and reset all setting to default factory setting.
Items Default Setting
Optional Setting
Password NO Setting by keyboard box Sequence Time 4 seconds 0~10 seconds Buzzer ON ON/OFF System Log ON ON/OFF Video System NTSC NTSC/PAL Video Color 50 1~100 adjustable
General Setup
Audio 1 2 3 4 1 2 3 4 /OFF Overwrite Open Open/Close
Record Speed 120f/s(NTSC) 100f/s(PAL)
NO
Record Resolution
CIF CIF 、1/2D1 、 D1
Playback Speed 120f/s(NTSC) 100f/s(PAL)
NO
Audio Selectable ON CH1/CH2/CH3/CH4/OFFAlarm Rec Time 5 seconds 5~60 seconds Pre-record ON ON/OFF
Schedule Setting Always Always, Motion Alarm, Sensor Alarm, OFF
Record Parameter
Record Mode Manual Motion Detection, Sensor, Schedule, Always, Emergency (Manual)
PTZ Protocol PELCO-D PELCO-D PELCO-P PTZ Address 1 2 3 4 0~255 Optional P T Z Pre-set Position Support 255pcs position Sub-netmask 255.255.255.0 Optional Gateway 192.168.1.1 Optional IP Addrss 192.168.1.152 Optional
Network Setup
Port 2200 Optional Motion Detection ON ON/OFF Motion Area NO Selectable Sensitivity LEVEL 4 LEVEL 1~ LEVEL 8 Buzzer Time 5 seconds 5~60 seconds
SYSTEM
SETUP
Alarm Setup
Schedule Setup Always Always, Motion Alarm, Sensor Alarm, OFF

XJ8104 4-CHANNEL H.264 DVR www.best-china-security-supplies.com
Page 49 of 55
Ⅴ PC Viewer Operation 5.1 Steps of operation: 1. Install the PC viewer software from CD to your PC. As following:
(P1)
⒉ Double click and display as following:
(P2)
⒊ Click the “SETTING” button marked with red color, display as following.

XJ8104 4-CHANNEL H.264 DVR www.best-china-security-supplies.com
Page 50 of 55
(P3)
Input IP Add in the , and click the to exit the menu.
⒋ Click the icon and display as following:
(P4)
The DVR IP address in the , Input password in
the box. Click to exit, click to enter remote viewer. Note: No need password for DVR default setting, only input IP address and click

XJ8104 4-CHANNEL H.264 DVR www.best-china-security-supplies.com
Page 51 of 55
.
After open of the remote viewer, click display mode icons on the bottom right to change the display mode as following:
(P5)
(P6)
5. Double click the one channel picture to display the full channel picture, double click again to go back to quad display.
(P7)
1). Save CamNo 01 Image… Save the channel 1 image as “JPG” format. Right click one channel picture such as “CamNo 04” to save the Channel 4.
2). Save Image All…

XJ8104 4-CHANNEL H.264 DVR www.best-china-security-supplies.com
Page 52 of 55
Save all images as “JPG” format. 3). Print “CamNo 01”Channel
Print the channel 1 image. Right click one channel image such as “CamNo 03” to print the Channel 3.
4). Reset “CamNo 01” Channel Reset the Channel 1 image.
5). Reset Channel All Reset all channels images.
6. Click to stop the remote viewer, click again to input the password and click “OK” to enter the remote viewer.
7.Recording to AVI format
Click and will change to blue color to start recording. Click
again to stop recording. The AVI file can be played by WINDOWS player. Note: When recording to AVI file, the live channel images are not smooth.
8.Recording to DVR format
Click and will change to green color to start recording.
Click again to stop recording. The file can only be played by DVR.
Note: Setting the save path in the before recording. The
remote recording and local recording can be operated simultaneously.
5.2 Menu 1. Live
Control the PTZ operation of DVR. When controlling PTZ operation, first select one channel display then can control “PTZ”. Press UP, DOWN, LEFT and RIGHT icons to control the PTZ operation for cameras.
ZOOM: Press to zoom in, and press to zoom out, release the button to
stop the zoom.
FOCUS: Press to adjust focus far from object, press to adjust focus near
from object, release the button to stop adjusting focus.
IRIS: Press to adjust iris open, press to adjust iris close, release the
button to stop adjusting iris.

XJ8104 4-CHANNEL H.264 DVR www.best-china-security-supplies.com
Page 53 of 55
AUTO: Left click the button to start the auto rotation, press again to stop the auto rotation.
⒉ Playback Click the button to play HDD data of DVR on your PC.
(P8)
1) Move the cursor to the date box to choose the date of the recorded data. 2) Move the cursor to the time box to choose the time of the recorded data.
3)Click to play record. Click to play forward one frame by one frame. Click
to play rewind one frame by one frame. Click to stop playing.
Note: Before playback, need to log in by password first. When playback finished, need to log in by password again.
2. FilePlay Open and play backup files from viewer or from DVR copies.
(P12)
Click to open backup file, then click the “PLAY” button to play it.
3. Click to start DVR recording, click to stop DVR recording.

XJ8104 4-CHANNEL H.264 DVR www.best-china-security-supplies.com
Page 54 of 55
During recording, will change to red color. If click , the recorded files will be saved in DVR’s HDD not in PC’s HDD. Note: Setting the record mode to Manual Record before using this operation.

XJ8104 4-CHANNEL H.264 DVR www.best-china-security-supplies.com
Page 55 of 55
Ⅵ Parameters Table
Item Specification
Compression
Format
H.264
Video System NTSC/PAL
Video Input Video: 1.0Vp-p/75Ω,BNC×4
Video Output 1CH Compound Video Output: 1.0Vp-p/75Ω,BNC×1S video
1CH VGA Output(Frequency: 60 Hz,Resolution:1024 x 768) Resolution Display: NTSC(720x480) PAL(720×576)
Audio Input -8Db22kΩ,RCA connector×4
Audio Output -8Db3kΩ,RCA connector×1
Alarm Input 4
Alarm Output 1
Frame and
Resolution
CIF:NTSC 120fps /352x240 PAL 100fps /352x288
1/2D1:NTSC 60fps /720x240 PAL 50fps /720x240
D1 :NTSC 30fps /720x480 PAL 25fps /720x576
Occupation
Space
All 4channels record at high quality mode:600M/H
HDD Port SATA hard disk
Network Port 10M/100M Ethernet port
Confidential Function
Password Protection
Power Supply DC:12V/4A
Power Consumption(No HDD)
20W
Environment Work Temp:+5℃ ~ +50℃;
Storage Temp:-20℃ ~ +70℃;
Dimension 430×390×120mm / 430×390×70mm
Weight 3kg (No HDD)
Note: Specifications and appearance are subject to change without notice.